

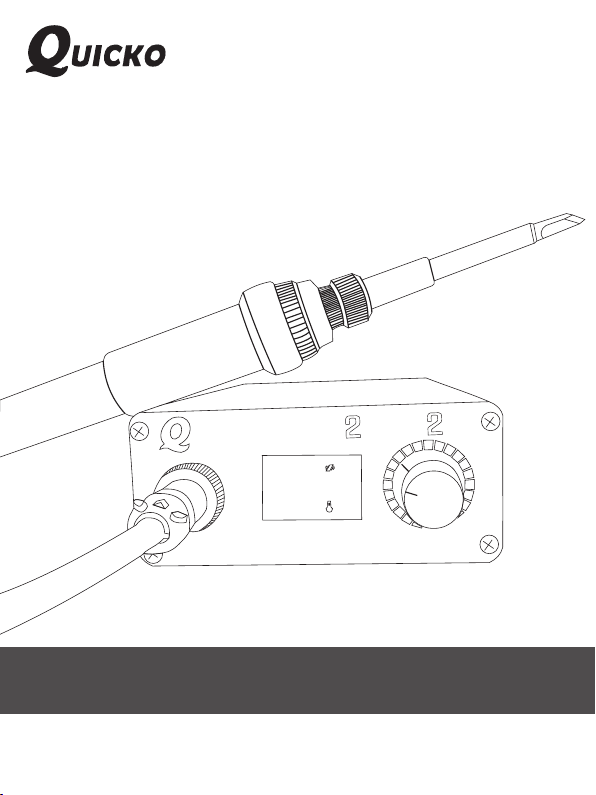
T12 S TC- O LED DIGITAL SOLDERI N G STATI O N
USERMANUAL
VE R:1. 4@ 20 17618
5
℃
1
5
2
%
3
℃
9
ERI NG STAT
ION
1 -
O
K
C
I
U
O
L
ED T
1
2 Q
T
0℃
0
3
:
SET
0
0
3
V
4
2
U
C
I
K
O HE
A
TING SO LD
QUICKO ELECTRONIC.,LT D
http:// www.quick ochin a.com
Conventional safety
Please use only the power adapter that is dedicated to the
product and is certified by the country / area.
Do not operate in a wet environment.
Do not operate in a flammable and explosive environment.
Please keep the surface of the product clean and dry.
To protect your family and friends for the safety, please power
off after use or leave, beware of fire.
When the host is starting up, the temperature of iron tip will
be reached 100℃ to 480 ℃, beware of scalds.
Do not be soaked in water or with wet hands to use the
soldering station, prevent leakage.
Operating environment
Operating environment
temperature
humidness
Requirements
Working condition:+0 to +50℃ ℃
Off working state:-20 to +60℃ ℃
Working condition:high temperature 40 -60 , 0%-60%RH℃ ℃
Working condition:low temperature 0 -40 , 10%-90%RH℃ ℃
Off working state:high temperature 40 -60 , 5%-60%RH℃ ℃
Off working state:low temperature 0 -40 , 5%-90%RH℃ ℃
Matters needing attention
When using the T12 iron tip please tighten the nut for soldering
head to avoid falling and damaging the iron tip.
The temperature will be reached above 350℃ of soldering
station is used for 40 minutes, and the temperature of the front
end of the handle will be reached 50℃ -60℃.
When the new T12 soldering iron tip is used for the first
time,Host will appear temperature jump and display ERROR,it
will become a normal phenomenon due to the heating of the
inner galvanic couple part of the iron tip. After repeated use
several times, the temperature will be stabled.
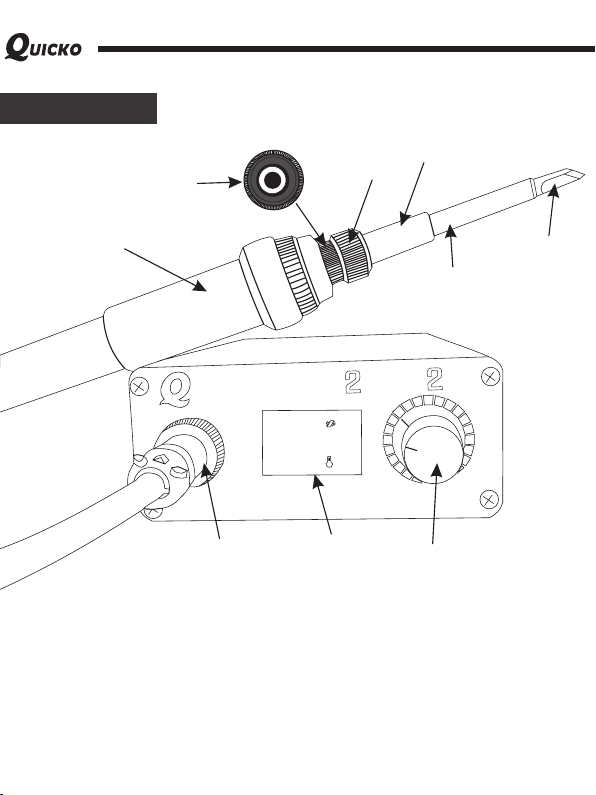
Parts list
②
④
③
①
1 -
S
IC
ET: 3
24V
30 0
KO H
T
℃
%
00
13
℃
25℃
EA
T
IN
G S
O
L
DE
⑦
O
CK
I
U
OLE
D T1
2 QU
⑥
1、T12- 9 0 7 H a n dle
2、So cket of iron ti p
3、Lo cking nut for i ro n tip
4、Lo ck tube for iro n ti p
5、He ad of iron tip
6、Avia ti on Plug of ha nd le
7、 O L ED te mperatu re d isplay
8、En coder
9、No zzle tip
95
RI
N
G ST
A
⑧
⑨
⑤
TI
O
N
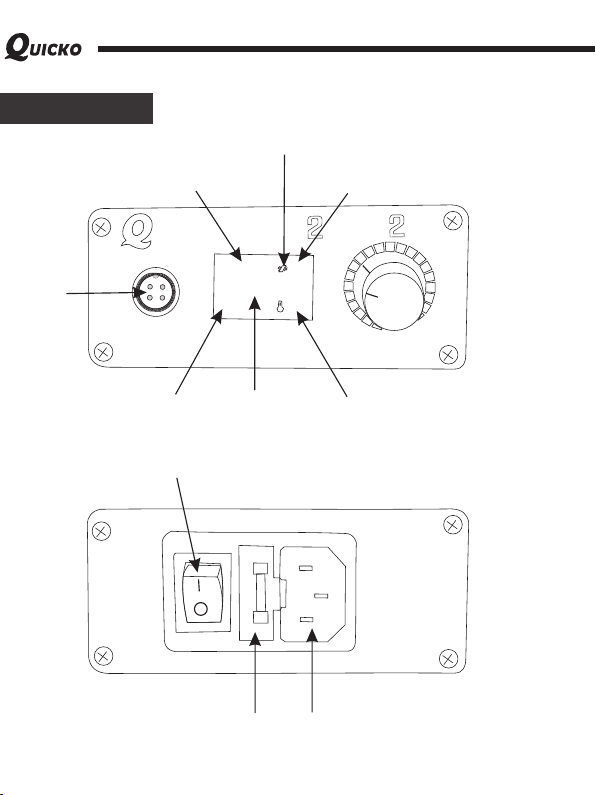
Parts list
The current set temperature
②
Vibration prompt
⑩
③
STC usage
Handle
interf ac e
①
Current voltage
O
K
C
I
U
OL
ED T1
2 Q
④
Current working
Switc h
⑦
Fuse
1 -
T
S
E
T
:3
00℃
1
3
00℃
2
4
V
2
UIC K
O HEAT
ING S
⑤
temperature
⑧
95
3%
5
℃
OL
D
E
R
I
N
G ST
AT
ION
⑥
Inside temperature of
Power c ord connector
⑨
Front
the machine
Back
Product parameter
Model number
Display
Handle interf ac e
Product weigh t
Dimension of ho st
Wire length of ha nd le
Application i ro n ti p
Tim e of m el t tin
Max power
Range tempera tu re
Voltage of power
Input voltage
T12 STC -9 52
OL E D
GX 12-4pi ns
Standard 510g
120*88*38mm
1.1m
T12 series
Work ing p arameter
<8S
108W
200-480℃
24V 4.5A
AC 100-240V
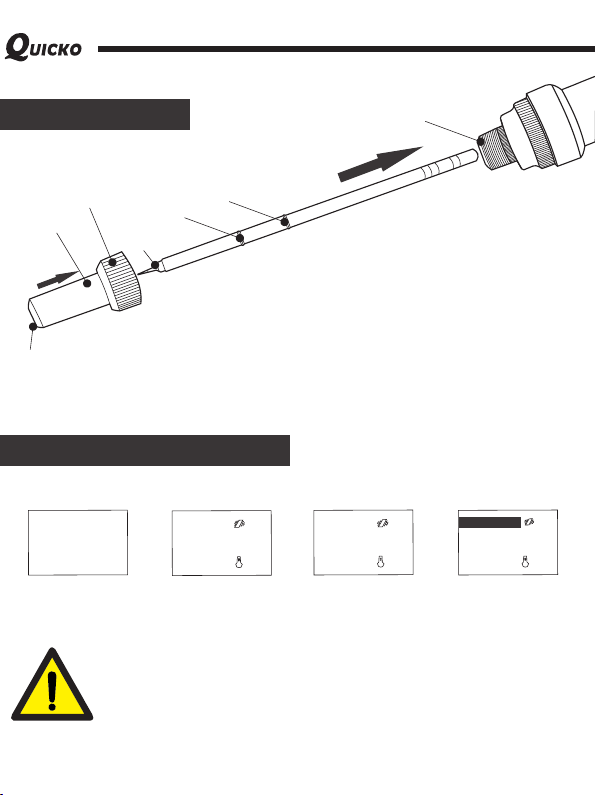
install iron tip
Socket of i ron tip
Locking nut
Tighten
sleeve
Head of nut
Note: Turn on the bu tt on , th e di sp la y sc reen shows E R ROR , in di ca ti ng t ha t th e iron
tip may not be well i ns ta ll ed , pl ea se t ry to install the iro n ti p ag ai n.
The first screens
Tsui tip
The second step: Put the tube to the locking nut, let the nut and the tube
from the iron head nozzle tip into the iron tip, the nut head and the iron tip is
flat with first clamping, then tighten the nut, the installation is complete!
The second scre en s
The first step: remove the handle locking nut, insert the
iron tip to iron head socket, let the second clamping
and handle iron head socket is flat!
Description for display
1
℃
0
5
T:3
S
T12 S OLD ERI NG
IR ON STA TIO N
Initial state of
power off
Note: after confirming the installation of the components is right,
the new iron tip is inserted into the handle and the display screen will
be a flash or ERROR, and the host buzz is wrong. It’s normal. After
heating 5-20 minutes, it will return to normal gradually. Temperature
control range of mamin engine: 200 -480 .The common welding ℃ ℃
temperature is 300 -380 . In order to protect the working life of ℃ ℃
the soldering iron tip, it is recommended that the temperature do not
more than 380 !℃
℃
0
:30
T
SE
O
ERR
24V
Non plugged
iron tip
℃
00
℃
%
3
1
℃
25
3
0%
R
5℃
2
SET :
24
30 0
V
Normal
working state
BOO
30 0℃
25
V
24
One press
strong temperature
%
3
℃

Menu use
5
1 -9
D T12 Q
KO
C
ED T12 Q
S
ET
:30
0
℃
3
0
0℃
24
V
U
I
C
KO HE
MEN U
1.CAL IBRATI ON
2.AUT OSLEEP
3.AUT OPOWERO FF
UI
CKO HE
T
13%
25
ATI
NG S
1 -
T
A
T
I
N
G S
UICKO
MEN U
1.CAL IBRATI ON
2.AUT OSLEEP
OL
U
O
E
D T12 Q
C
I
L
ED T12 Q
KO
3.AUT OPOWERO FF
U
I
CKO H
E
MEN U
1.CAL IBRATI ON
2.AUT OSLEEP
3.AUT OPOWERO FF
UI
CKO HE
℃
OL
DE
R
IN
G ST
AT
I
ON
5
9
OLD
ERIN G S
T
A
TION
UICKO
O
LE
I
U
O
L
Enter the menu setting interface: under the normal working temperature interface, long
press the encoder button (about 3s). Enter the host setup mode! Exit menu settings
interface: at the menu setting interface, long press the encoder button (about 3s), exit the
host setup mode!
Setting menu:
Enter the function item: rotate the encoder to the corresponding function, and short press
the button to enter the function item.
Exit setting function item: after setting the corresponding parameters with the encoder rotary
knob, short press the button to confirm exit the function item.
1 -9
T
A
T
I
N
G SO
LDER I
1 -
T
A
T
I
N
G S
OLD
9
ERIN G S
NG ST
5
A
TI
ON
5
T
A
TION
Temperature calibration
UICKO
O
L
E
D T12 Q
MEN U
1.CAL IBRATI ON
2.AUT OSLEEP
3.AUT OPOWERO FF
UI
CKO H
E
1 -9
T
A
T
I
N
G S
OLD
ERIN G S
5
T
A
TI
ON
UICKO
O
L
E
D T12 Q
CURRE NT350℃
RATIO [100%]
UI
CKO H
E
A
1 -9
T
T
I
N
G S
OLD
ERIN G S
5
T
A
TI
ON
After selecting the temperature calibration function, short press the encoder to enter the
temperature calibration setting, the adjustable temperature ratio: 70%-130%, if there is no
professional measurement instrument, please set the ratio value to 100%.

Sleeping time
5
1 -9
D T12 Q
MEN U
1.CAL IBRATI ON
2.AUT OSLEEP
3.AUT OPOWERO FF
U
I
CKO H
E
T
A
T
I
N
G S
OLDE RI
N
G ST
A
TI
ON
UICKO
OL
E
D T12 Q
U
I
CKO H
AUTOSL EEP
[01mi n]
E
A
UICKO
OL
E
Choosing sleeping time feature, short press encoder, into the sleeping time setting, the
time setting range: 0-99 minutes, if you don't need the sleeping time function, the dormancy
feature can be set to OFF.
Default sleeping time for 1 minute, means after 1 minute the host and handle is stand still,
the soldering station will entry to dormant state, the temperature of soldering iron tip will drop
to 150℃, at this time when move handle or rotary encoder, the soldering station will rapidly
heat up the working temperature before Sleeping.
You can set the sleeping time according as the usage scenario and working habit, it can
be extended the working life of the iron tip and protect your family and friends safe!
1 -9
T
T
I
N
G S
OLDE RI
5
NG S
T
A
TI
ON
Power off time
5
1 -9
D T12 Q
MEN U
1.CAL IBRATI ON
2.AUT OSLEEP
3.AUT OPOWERO FF
U
I
CKO H
E
T
A
T
I
N
G S
O
LDER I
NG S
T
A
TI
ON
1 -
T
O
K
C
I
U
AUTOPO WEROFF
[OFF]
O
L
ED T12 Q
UIC
KO HEATI
NG S
UICKO
AUTOPO WEROFF
[01mi n]
OL
E
D T12 Q
U
I
CKO H
E
A
95
OL
D
E
RIN
G S
TA
T
IO
N
UICKO
OL
E
Choosing power off time feature, short press encoder, into the power off time setting, the
time setting range: 0-99 minutes, if you don't need the power off time function, the power off
function can be set to OFF.
Default power off time for 1 minute, means after 1 minute the host and handle is stand
still, the soldering station will entry to power off time state, the temperature of soldering iron
tip will drop to indoor temperature (note: The temperature control range of the host is 200-
480℃, it will appear larger deviation when the temperature less than 100℃. Please
ignore it.). At this time when move handle or rotary encoder, the soldering station will
rapidly heat up the working temperature before power off.
You can set the power off time according as the usage scenario and working habit, it can
be extended the working life of the soldering iron tip!
1 -9
T
T
I
N
G S
O
LDER I
5
NG S
T
A
TI
ON

Strengthening time
5
1 -9
D T
1
2 QU
T
MEN U
4.BOO STDURAT ION
5.BOO STDEGRE E
6.WAK EUPMETH OD
I
C
KO H
E
AT
I
N
UICKO
BOOSTD URATIO N
[30S]
OL
E
D T
1
2 QU
I
C
KO H
E
G SO
LDE
R
I
NG STA
TI
O
N
AT
UICKO
OL
E
After choosing strengthen the time function, short press the encoder and enter the time
setting. The time setting range: 0-99 minutes.
The default time is 30 seconds, it can be set according as the actual needs, after setting,
short press the encoder to confirm and exit. When working normally, it takes a short time to
increase temperature welding the larger welding spot, it can be heated to the set
temperature rapidly after pressing the encoder. After 30 seconds, the host will
automatically return to original temperature. This can avoid soldering iron tip oxidation
when with high temperature to use!
1 -9
T
I
N
G SO
LDE
R
I
NG STA
5
TI
O
N
Strengthening temperature
95
1 -
T
O
K
C
I
U
MEN U
4.BOO STDURAT ION
5.BOO STDEGRE E
6.WAK EUPMETH OD
O
L
ED T12 Q
UICKO H EA
TI
NG S
OL
D
ERIN
G S
TA
T
IO
N
1 -
T
O
K
C
I
U
BOOSTD EGREE
[80℃]
O
L
ED T12 Q
UIC
KO HEATI
NG S
OL
D
E
RIN
After choosing strengthen the function of temperature, short press the encoder, enter
strengthening temperature setting, the temperature setting range: 10-80 ℃.
The default strengthen temperature is 30 ℃, it can be set according as actual needs,
after setting, short press the encoder to confirm and exit. When working normally, it takes a
short time to increase temperature welding the larger soldering spot, it can be heated to the
set temperature rapidly after pressing the encoder. After 30 seconds, the host will
automatically return to original temperature. This can avoid soldering iron tip oxidation
when with high temperature to use!
95
G S
O
K
C
I
U
BOOSTD EGREE
O
L
ED T12 Q
UICKO H EA
TA
T
IO
N
1 -
T
[50℃]
TI
95
NG S
OL
D
ERIN
G S
TA
T
IO
N

Wake-Up type
5
1 -9
D T
1
2 QU
T
MEN U
4.BOO STDURAT ION
5.BOO STDEGRE E
6.WAK EUPMETH OD
I
C
KO H
E
AT
I
N
UICKO
POWER OFFWAKE UP
ENCOD ER&HAN DLE
OL
E
D T
1
2 QU
I
C
KO H
E
G SO
LDE
R
I
NG STA
TI
O
N
95
1 -
T
O
K
C
I
U
POWER OFFWAKE UP
[ENCO DERONLY ]
O
L
ED T
1
2 QUIC
KO HEATI
NG SO
L
D
E
R
IN
G STA
T
IO
AT
N
UICKO
OL
E
After selecting the wake-up function, short press the encoder, enter setting of wake-up
type, the system provides two kinds of wake-up type: encoder together with handle or just
encoder. When choosing encoder + handle, the soldering station is automatic power off,
shaking handle or short press or rotary encoder, all can wake-up the host!
When choosing the encoder, the automatic shutdown state, short press or rotary encoder
can wake-up the host, but shaking handle cannot wake-up the host!
The default setting is: encoder + handle, which can be set according to actual needs.
1 -9
T
I
N
G SO
LDE
R
I
NG STA
5
TI
O
N
Buzzer switch
5
1 -9
T
O
UICK
MEN U
7.BUZ ZERSWIT CH
8.BAT TERYGUA RD
9.FIR MWARE
OL
E
D T
1
2 QU
I
C
KO H
EATI
NG SO
L
DE
R
I
NG STA
T
I
O
N
This version OLED controller integrates with a buzzer, and the sound prompts the host
state. The buzzer will beep when the host encounters an error or sets the appropriate
function.
UICK
OL
E
D T
1
O
2 QU
BUZZE RSWITCH
[ON]
I
C
KO H
EATI
1 -9
T
NG SO
L
DE
5
R
I
NG S
T
A
T
I
O
N

Battery guard
95
1 -
T
O
K
C
I
U
MEN U
7.BUZ ZERSWIT CH
8.BAT TERYGUA RD
9.FIR MWARE
OL
ED T
1
2 QU
IC
KO H
EATI
NG SO
L
DE
R
I
N
G STA
T
IO
N
According to the voltage environment of the host, built-in battery guard function of this
soldering station, and the default voltage is 12V. When the voltage is not stable, the power
supply will be supercharged according to the setting. Usually don't need to set it. The
setting range is 12V-24V.
O
K
C
I
U
BATTE RYPROTE CT
OL
ED T
1
2 QU
IC
KO H
AT[12 .0V]
EATI
1 -
T
NG SO
95
L
DE
R
I
N
G STA
T
IO
N
Version information
5
1 -9
D T
1
2 QU
T
MEN U
7.BUZ ZERSWIT CH
8.BAT TERYGUA RD
9.FIR MWARE
I
CKO H
E
A
T
I
N
G SO
LDER
I
NG ST
A
TI
ON
UICKO
OL
E
It shows the info rm at io n of t hi s ve rsion controller.
UICKO
OL
E
D T
1
2 QU
I
FIRMW ARE
[V1.4 @20170 618]
CKO H
E
A
1 -9
T
T
I
N
G SO
LDER
I
NG ST
5
A
TI
ON
Restore default
UICKO
OL
E
D T12 Q
MEN U
8.BAT TERYGUA RD
9.FIR MWARE
A.FAC TORYRES ET
U
I
CKO H
E
1 -9
T
A
T
I
N
G S
OLDE RI
5
NG S
T
A
TI
ON
UICKO
OL
E
D T12 Q
RESTO RESETTI NG
U
I
CKO H
[NO]
E
A
1 -9
T
T
I
N
G S
OLDE RI
5
NG S
T
A
TI
ON
Restore the parameters of the soldering station to the factory default. Note: please back-up
your usual important parameters before you restore factory Settings to prevent data loss.
For example: temperature calibration value, strengthening time and temperature, etc.

How to choose the iron tip
Note: Choosin g th e ri gh t ir on t ip c an m ake the work more effic ie nt .

Iron tips maintenance
1.Please put appropriate tin on the adhering head of iron tip Before powering off , and
please clean it before welding.
2.Do not allow the iron tip to stay at high temperature for a long time to avoid dry burning.
3.In welding, do not rub the soldering tip with too much pressure to friction the solder, which
will damage the iron head.
4.Never clean iron head with a rough material or file.
5.If the surface oxide and no absorb tin, as needed you can use 600 to 800 of emery cloth
friction it carefully and use isopropyl alcohol or equivalent solution to clean, heated to
200 immediately adhering tin to prevent sticking tin and then oxidation.℃
6.Do not use chlorine or high acid soldering flux. Only use of synthetic resin or activated
resin flux.
7.The working temperature of the soldering iron tip is about 300 to 380 , and the ℃ ℃
working temperature should not exceed 450 in a short time. Otherwise it will affect the ℃
working life of the soldering iron tip!
8.Different welding scenes should be selected with different soldering iron tip. Large
welding spot or aluminum base plates will need to be touched to large soldering iron tip
(such as C4). Small welding spot can be usedC1, JL02, ILS, etc.
9.The new soldering iron tip is used for the first time, the heat up may be slightly slower, and
it can melt tin 7 seconds after the normal use of 1-3 hours.
10.7 seconds of tin, only for solder wire with the high purity and low melting point, the higher
the lead tolerance, the speed of melt tin is slower, the higher the temperature will be
required. So we suggest to choose the high purity & low melting point solder wire from my
store.
保修服务
After-s ales se rvice
T12 soldering station host in non-human damage to provide 1 year free warranty
service. Warranty service, please contact the seller to buy! Iron head is a consumables, its
life and maintenance of the tip, the use of the number of the first use can not be returned or
replacement.
About Dis cardi ng
Do not discard in f am il y ga rb ag e!
Handling an d re cy cl in g: you ha ve to d ea l with the ir on corr ec tl y
according to lo ca l la ws a nd r eg ul at ions.

FA Q
FAQ:
1. Why the temperature of the new T12 solder tip is jump?
Because the inside heating core of the new T12 solder tip did not go through the high
temperature, so the first time to use will be a bit of temperature, generally without special
treatment, the normal use of 1-2 days after the basic will not bounce. Such as the need to
immediately effective, the general proposal to adjust the temperature to 380 -400 , side ℃ ℃
of the solder tip to the tip of tin, burning 5-10 minutes after the shutdown, until the solder tip of
the cooling and then re-boot! ( if 1 times no effect, then can be repeated 2-3 times). T12 is
pulsating temperature warming, even if the display temperature is flashing, the tip of the real
temperature is completely stable.
T12 jump temperature also are connected with the temperature control board of
procedures, power of electrostatic and if it connect the ground.
2. What the problem of attention when we use the T12 first time?
T12 tip heating speed is very fast, when the new solder tip connect the electricity, it must
be tinput immediately to the solder tip, for protection, due to heating up fast, just need 6-10
seconds, no have more time to you for preparetion.
so the important is prepare the items which will be welded, and finally boot power, and
each welding gap or the end, should be more on the tin to protect and then shutdown, so it
can avoid to tin the new sold tip is difficult, especially the T12 tip type of iron, such as T12-I /
T12-IL / T12-BL / T12-ILS and so on!
3.What are the precautions for using the T12 tip?
a. If can use low temperature, then do not high temperature: T12 is constant temperature
control, the general recommended working temperature control between 300 ~ 380 , ℃ ℃
higher than 380 damage the coating of solder tip and cut down the PTC life!℃
b. Do not dry: the first time to use solder tip, should be wrapped while heating a layer of
tin. If it's without work, at once shutdown!
c. Diligent to clean: before shutting down, use a wet sponge or detin the ball to remove the
tip of the oxidation of debris, on the tin after the shutdown power off!
d. Standard operation: Do not violent collision the solder tip, do not stamp the top of the
hard objects, but can not be used to hot plastic and other materials, specifically reminded
that friends like tin should avoid the iron and other hard metal knock tin, the heating core of
T12 is in the head of the solder tip, often percussion is a fatal damage to T12!
e. Less use of scaling powder: scaling powder can not be used, can be used as less as
possible! When scaling powder help make beautiful and reliable welding at the same time,
but also greatly speed up the consumption the coating of the solder tip, T12 heating core
high temperature position is very near of the Nozzle tip of the solder tip,Scaling powder in the
fear of threat to T12 head pressing parts.
4.How to do when T12 tip does not absorb tin?
T12 iron head does not absorb tin, generally there are two reasons:
A. The head of solder tip is severe oxidation can not absorb tin.
B. Temperature can not rise up then can not tin.
C. The head is oxidized and can not the tin, you can use the soldering iron to clean the ball
gently, then use the wet sponge rub and then heat the tin.
More FAQ please follow this link:http://www.quickochina.com/FAQ/

Your feedback will make us better!
Chinese websi te
Taobao
Aliexpress
Made in China
Quicko electronic co.,ltd TEL:08615992468682
 Loading...