


The Labels You Want When You Need Them.
®
USER
GUIDE
• Fast print speed,
up to 305 mm/s
• Excellent print
quality up to 1600 dpi
• High-yield, vivid inks
• Complete with color
labeling software
QuickLabel.com
Part Number: 22834649-EN-E


QL-800 User Guide
Part Number 22834649-EN-E
Revision 1.2
11/2015
QuickLabel Systems, An AstroNova™ Division
World Headquarters
600 East Greenwich Ave., West Warwick, RI 02893
Tel: +1 (401) 828-4000 Fax: +1 (401) 822-2430
E-mail: info@QuickLabel.com
www.QuickLabel.com
Technical Support
Tel: +1 (401) 828-4000
E-mail: support@QuickLabel.com
www.QuickLabel.com/support/

© 2015 Astro-Med, Inc. All Rights Reserved
This manual is copyrighted with all rights reserved. No part of this manual may be
reproduced, transmitted, transcribe d, stored in a retrieval system, or translated into any
language in any form by any means without written permission of QuickLabel Systems.
Trademarks
QL-800® and Custom QuickLabel Omni® are registered trademarks of Astr o-Med, Inc.
Adobe®, Photoshop®, and Illustrator® are registered trademarks of Adobe Systems,
Inc.
Corel® is a registered trademark of Corel Corporation.
Microsoft® Windows® XP, Windows® Vista®, Windows® 7, and Windows® 8 are
registered trademarks of Microsoft Corporation.
QL-800 Limited Warranty
QuickLabel Systems, An AstroNova Division, warrants all components of this pro duct,
except wear parts and consumables, against defects in materials or workmanship for
a period of one (1) year from the date of original purchase. Wear parts include the
transport unit, maintenance roller, maintenance cartridge, cutter blades and the like.
Consumables include ink cartridges and labels, which are covered under a separate
warranty. If the customer discovers a defect, this defect must be reported promptly to
QuickLabel Systems or an authorized QuickLabel dealer. QuickLabe l Systems will, at
its option, repair the printer or repair or replace its defective component(s) at no
additional charge. Repair parts and replacement parts will be furnished on an
exchange basis and will be either reconditioned or new. The customer is responsible
for freight to return the printer or component to our factory or authorized service center.
We will ship the repaired or replaced printer or component back to you via standard
ground freight service. All replaced parts become the property of QuickLabel System s.
Travel, freight and other expenses related to warranty repairs are not covered.
In the first year of product ownership, you may be covered by a separate Customer
Support Agreement purchased from or issued by QuickLabel or an authorized
QuickLabel dealer. In such a case, you would be entitled to an on-site installation
and/or training visit. Otherwise, Customer Support Agreements and renewals are
available for purchase and provide on-site support.
This warranty is void if the product has been damaged by accident, abuse, neglect or
misapplication or by the use of incompatible consumables or parts, or if the product has
been improperly installed, or if the product has been modified without the express
written permission of QuickLabel Systems. QuickLabel is not responsib le for products
lost or damaged in transit.
QuickLabel makes no warranty, either express or implied, with respect to this product's
merchantability or fitness for a particular purpose. In no event shall QuickLabel be held
liable for any direct, indirect, special, incidental, or consequential damages, whether
based on a contract, tort, or any other legal theory and whether advised of the
possibility of such damages.

Ink Limited Warranty
This warranty covers QuickLabel QL-800 ink cartridge sold by QuickLabel Systems.
Each QL-800 ink cartridge is warranted to be free from defects in materials and
workmanship for up to 12 months from the date of manufacture if in original u nopened
packaging, or up to 3 months after installation, wh ic he ve r oc cu rs first. This warranty
applies only to the ink cartridges as used in the QuickLabel QL-800 printing system.
If the customer suspects a defect in a QL-800 ink cartridge, the customer must notify
QuickLabel or an authorized QuickLabel dealer within the warranty period. Upon return
of the ink cartridge and QuickLabel's verification of the defect, QuickLabel will, at its
option, either:
1. Replace the defective ink cartridge; or,
2. If the customer has used the ink, pro-rate the price of a new ink based upon the
estimated life remaining for the ink, as reported by the QL-800 system. The QL-800
provides the estimated life remaining, and QuickLabel may obtain this information from
the system remotely or request the customer to furnish this information.
This warranty does not cover QL-800 ink cartridges that have been emptied, refilled,
remanufactured, modified, refurbished, misused, or tampered with, or that have
expired, or when used to print on label or tag media that is not compatible with the
QL-800.
This warranty is void if the QL-800 ink cartridge has been damaged by accident, abuse,
neglect or misapplication, if the product has been improperly installed or maintained, if
the product has been used outside of its environmental specifications, or if the product
has been modified without the express written permission of QuickLabel.
QuickLabel makes no warranty, either express or implied, with respect to this product's
merchantability or fitness for a particular purpose. In no event shall QuickLabel be held
liable for any direct, indirect, special, incidental, or consequential damages, whether
based on a contract, tort, or any other legal theory and whether advised of the
possibility of such damages.
Printhead Limited Warranty
QuickLabel Systems warrants the printhead from the date of purchase for a period of
90 days or for 250,000 inches of printing, whichever comes first, contingent upon the
use of QuickLabel ink and labels. The QL-800 printhead is calibrated for use with
QuickLabel ink and labels and performs optimally only when used with these materials.
This specific printhead warranty does not apply to printheads damaged by accident,
abuse, neglect, misapplication or the like. This warranty is void if the product has b een
damaged by accident, abuse, neglect or misapplication, or if the product has been
improperly installed, or if the product has been modified without th e express written
permission of QuickLabel Systems.
ICC Profile
ICC Profile Powered by X-Rite Incorporated

Obtaining Service
To obtain warranted service, please contac t QuickLabel Technical Support through
one of the Factory Sales and Service Centers.
Contact Information for Factory Sales and Service
QuickLabel USA and World Headquarters
600 East Greenwich Avenue
West Warwick, RI 02893 USA
Tel: +1 (401) 828-4000
Fax: +1 (401) 822-2430
Web Site: www.QuickLabel.com
Sales E-mail: info@QuickLabel.com
Technical Support E-mail: support@QuickLabel.com
QuickLabel Deutschland
Astro-Med GmbH, Senefelderstraße 1/ T6 D-63110 Rodgau
Tel. +49 (0) 6106-28368-20
Fax: +49 (0) 6106-771121
Web Site: www.QuickLabel.de
Sales E-mail: info@QuickLabel.de
Technical Support E-mail: support@QuickLabel.de
Ownership Information
Congratulations and thank you for your business. Your purchase of a QuickLabel digital
label printer is an investment in production flexibility and packaging efficiency. Please
record the model number and serial number of your product.

Contents
Chapter: 1 Getting Started . . . . . . . . . . . . . . . . . . . . . . . . . . . . . 1
About the QL-800 . . . . . . . . . . . . . . . . . . . . . . . . . . . . . . . . . . . . 1
Installation and Setup Overview . . . . . . . . . . . . . . . . . . . . . . . . . . . . . 2
Unpacking the Printer . . . . . . . . . . . . . . . . . . . . . . . . . . . . . . . . . . 3
Checking the Included Parts . . . . . . . . . . . . . . . . . . . . . . . . . . 6
Before Installing the Printer . . . . . . . . . . . . . . . . . . . . . . . . . . . . . . . 6
Choosing an Installation Location . . . . . . . . . . . . . . . . . . . . . . . . 6
Installation Precautions . . . . . . . . . . . . . . . . . . . . . . . . . . . . . 7
System Requirements . . . . . . . . . . . . . . . . . . . . . . . . . . . . . . 8
Connecting the Power Cable . . . . . . . . . . . . . . . . . . . . . . . . . . . . . . 8
Switching the Printer On and Off . . . . . . . . . . . . . . . . . . . . . . . . 9
Installing the Printer Driver . . . . . . . . . . . . . . . . . . . . . . . . . . . . . . . . 9
Installing the Printer Driver (USB) . . . . . . . . . . . . . . . . . . . . . . . . 9
Resolving Windows 7 and Windows 8 USB Installation Issues . . . . . . . . . 11
Installing the Printer Driver (Network) . . . . . . . . . . . . . . . . . . . . . . 12
Using the After Shipping Wizard . . . . . . . . . . . . . . . . . . . . . . . . . . . . . 14
Readying the Maintenance Roller . . . . . . . . . . . . . . . . . . . . . . . . 14
Installing Ink Cartridges . . . . . . . . . . . . . . . . . . . . . . . . . . . . . 15
Installing the Printhead . . . . . . . . . . . . . . . . . . . . . . . . . . . . . 16
Loading and Unloading Media . . . . . . . . . . . . . . . . . . . . . . . . . . . . . . 21
Loading Media . . . . . . . . . . . . . . . . . . . . . . . . . . . . . . . . . . 21
Unloading Media . . . . . . . . . . . . . . . . . . . . . . . . . . . . . . . . 23
QuickLabel Services . . . . . . . . . . . . . . . . . . . . . . . . . . . . . . . . . . . 24
QL-800 Label Materials . . . . . . . . . . . . . . . . . . . . . . . . . . . . . 24
QuickLabel BPO Blanket Purchase Order Program . . . . . . . . . . . . . . 24
Media Specialists . . . . . . . . . . . . . . . . . . . . . . . . . . . . . . . . 24
Chapter: 2 QL-800 Overview . . . . . . . . . . . . . . . . . . . . . . . . . . . .25
Printer Part Names and Functions . . . . . . . . . . . . . . . . . . . . . . . . . . . . 25
Front View . . . . . . . . . . . . . . . . . . . . . . . . . . . . . . . . . . . . 25
Back View . . . . . . . . . . . . . . . . . . . . . . . . . . . . . . . . . . . . 26
Operation Panel . . . . . . . . . . . . . . . . . . . . . . . . . . . . . . . . . . . . . 27
LED Indicators . . . . . . . . . . . . . . . . . . . . . . . . . . . . . . . . . . . . . .28
Color Basics . . . . . . . . . . . . . . . . . . . . . . . . . . . . . . . . . . . . . . .29
Color and Computers . . . . . . . . . . . . . . . . . . . . . . . . . . . . . . 29
Color Profiling . . . . . . . . . . . . . . . . . . . . . . . . . . . . . . . . . . 30
Display Profiling . . . . . . . . . . . . . . . . . . . . . . . . . . . . . . . . . 30
QuickLabel QL-800 Color Profiles . . . . . . . . . . . . . . . . . . . . . . . . 30
A Profile for Each Device . . . . . . . . . . . . . . . . . . . . . . . . . . . . 30
Chapter: 3 Designing and Printing Labels . . . . . . . . . . . . . . . . . . . . .31
Designing Labels . . . . . . . . . . . . . . . . . . . . . . . . . . . . . . . . . . . . . 31
Choosing Design Software . . . . . . . . . . . . . . . . . . . . . . . . . . . 31
Disabling Anti-aliasing . . . . . . . . . . . . . . . . . . . . . . . . . . . . . . 31
Planning Full-Bleed and Non-Bleed Labels . . . . . . . . . . . . . . . . . . . 31
Setting up the Label Design Software . . . . . . . . . . . . . . . . . . . . . . . . . . 32
Setting up Labels in Custom QuickLabel Omni . . . . . . . . . . . . . . . . . 32
QL-800 User Guide i

Contents
Setting up Labels in Third-Party Design Applications . . . . . . . . . . . . . . 32
Setting up the Printer Driver . . . . . . . . . . . . . . . . . . . . . . . . . . . . . . . 33
Setting up General Options . . . . . . . . . . . . . . . . . . . . . . . . . . . 33
Setting up a Custom Label Size . . . . . . . . . . . . . . . . . . . . . . . . . 35
Setting up Media Options . . . . . . . . . . . . . . . . . . . . . . . . . . . . 37
Using Service Options . . . . . . . . . . . . . . . . . . . . . . . . . . . . . . 39
Saving and Recalling Driver Settings . . . . . . . . . . . . . . . . . . . . . . 40
Printing Labels . . . . . . . . . . . . . . . . . . . . . . . . . . . . . . . . . . . . . .41
Using the Status Monitor . . . . . . . . . . . . . . . . . . . . . . . . . . . . . . . . . 43
Viewing the Printer Status . . . . . . . . . . . . . . . . . . . . . . . . . . . . 43
Viewing the Job Status and Cancelling Jobs . . . . . . . . . . . . . . . . . . 44
Viewing Ink and Consumable Levels . . . . . . . . . . . . . . . . . . . . . . 44
Chapter: 4 QL-800 Maintenance Utility . . . . . . . . . . . . . . . . . . . . . . .47
About the Maintenance Utility . . . . . . . . . . . . . . . . . . . . . . . . . . . . . . 47
Printer Information Tab . . . . . . . . . . . . . . . . . . . . . . . . . . . . . . . . . 47
Viewing Printer Information . . . . . . . . . . . . . . . . . . . . . . . . . . . 47
Upgrading the Printer and Print Module Firmware . . . . . . . . . . . . . . . 48
Setting the Clock . . . . . . . . . . . . . . . . . . . . . . . . . . . . . . . . 49
Print Settings Tab . . . . . . . . . . . . . . . . . . . . . . . . . . . . . . . . . . . . 49
Setting the Vertical Baseline . . . . . . . . . . . . . . . . . . . . . . . . . . 50
Setting the Horizontal Baseline . . . . . . . . . . . . . . . . . . . . . . . . . 50
Setting the Cut/Stop Position . . . . . . . . . . . . . . . . . . . . . . . . . . 51
Cleaning Tab . . . . . . . . . . . . . . . . . . . . . . . . . . . . . . . . . . . . . . .52
Setting up Auto-Maintenance . . . . . . . . . . . . . . . . . . . . . . . . . . 52
Cleaning Printheads . . . . . . . . . . . . . . . . . . . . . . . . . . . . . . . 53
Preparing for Moving . . . . . . . . . . . . . . . . . . . . . . . . . . . . . . 54
Preparing for Shipping . . . . . . . . . . . . . . . . . . . . . . . . . . . . . 54
System Logs Tab . . . . . . . . . . . . . . . . . . . . . . . . . . . . . . . . . . . . 55
Viewing the Error History . . . . . . . . . . . . . . . . . . . . . . . . . . . . 55
Saving Log Files . . . . . . . . . . . . . . . . . . . . . . . . . . . . . . . . . 56
Parts Replacement Tab . . . . . . . . . . . . . . . . . . . . . . . . . . . . . . . . . 56
Replacing the Printhead Assembly . . . . . . . . . . . . . . . . . . . . . . . 57
Replacing the Cutter . . . . . . . . . . . . . . . . . . . . . . . . . . . . . . 57
Replacing the Aerosol Filter . . . . . . . . . . . . . . . . . . . . . . . . . . . 57
Replacing the Maintenance Cartridge . . . . . . . . . . . . . . . . . . . . . . 58
Replacing the Maintenance Roller . . . . . . . . . . . . . . . . . . . . . . . 59
Advanced Tab . . . . . . . . . . . . . . . . . . . . . . . . . . . . . . . . . . . . . . 59
Chapter: 5 Printer Maintenance . . . . . . . . . . . . . . . . . . . . . . . . . . .61
Replacing Ink Cartridges . . . . . . . . . . . . . . . . . . . . . . . . . . . . . . . . . 61
Cleaning . . . . . . . . . . . . . . . . . . . . . . . . . . . . . . . . . . . . . . . . . 63
Cleaning the Printer Exterior . . . . . . . . . . . . . . . . . . . . . . . . . . 63
Cleaning the Input Pinch Rollers . . . . . . . . . . . . . . . . . . . . . . . . 63
Cleaning the Maintenance Tray Area . . . . . . . . . . . . . . . . . . . . . . 64
Cleaning the Transport Belts . . . . . . . . . . . . . . . . . . . . . . . . . . 65
Chapter: 6 Troubleshooting . . . . . . . . . . . . . . . . . . . . . . . . . . . . .69
Error Messages . . . . . . . . . . . . . . . . . . . . . . . . . . . . . . . . . . . . . 69
Removing a Media Jam . . . . . . . . . . . . . . . . . . . . . . . . . . . . . . . . . 76
ii QL-800 User Guide

Contents
Chapter: 7 Safety Warnings and Precautions . . . . . . . . . . . . . . . . . . .79
Location . . . . . . . . . . . . . . . . . . . . . . . . . . . . . . . . . . . . . . . . . 79
Power Supply and Power Cord . . . . . . . . . . . . . . . . . . . . . . . . . . . . . 80
General Safety . . . . . . . . . . . . . . . . . . . . . . . . . . . . . . . . . . . . . . 80
Moving the Printer . . . . . . . . . . . . . . . . . . . . . . . . . . . . . . . . . . . . 81
Ink Cartridge and the Maintenance Cartridge . . . . . . . . . . . . . . . . . . . . . . 82
Chapter: 8 Specifications . . . . . . . . . . . . . . . . . . . . . . . . . . . . . .85
Printer Specifications . . . . . . . . . . . . . . . . . . . . . . . . . . . . . . . . . . 85
Label Specifications . . . . . . . . . . . . . . . . . . . . . . . . . . . . . . . . . . . 88
QL-800 User Guide iii

Contents
iv QL-800 User Guide

1
About the QL-800
When you start printing your own labels in your office or factory with the QL-800 from
QuickLabel Systems, you'll stop production delays and reduce excess inventory. You
will achieve flexibility and cost-savings because you are digitally printing the right label
for the right customer in the right quantity, just-in-time.
Getting Started
As a true digital printer, the QL-800 easily prints labels with any text, barcode, or
graphics in affordable small batches, perfect for labeling multiple different products or
labeling for different wholesale customers. The QL-800 is the best too l for customizing
your product labels in affordable small quantities.
• Fast print speed, up to 305 mm/s
• Excellent print quality up to 1600 dpi
• High-yield, vivid inks
• Complete with color labeling software
QL-800 User Guide 1

Getting Started
The QL-800 is designed with all the power of a high-end digital label printing press, but
it's sold at just a fraction of the price and fits on your desk or table top. The QL-800 is a
versatile, in-house digital color label printer that prints both labels in a range of widths
at high speeds, and in high-quality.
The QL-800 makes great-looking labels that perform well even in challenging
conditions. Your products will look appealing and professional, with bright, vivid inks
that reproduce a wide gamut of colors. Genuine QL-800 inks are available in large
capacity, high-yield separate cyan, magenta, yellow, and black (CMYK) cartridges.
Installation and Setup Overview
Refer to the installation and setup summary for an outline of the required steps.
1 Unpack the printer. See “Unpacking the Printer” on page 3.
2 Ensure all parts are included. See “Checking the Included Parts” on page 6.
3 Before installing the printer, select an appropriate location and ensure system
requirements are met.
• See “Choosing an Installation Location” on page 6.
• See “Installation Precautions” on page 7.
• See “System Requirements” on page 8.
4 Connect the power cable to the printer. See “Connecting the Power Cable” on page
8.
5 Switch the printer power on. See “Switching the Printer On and Off” on page 9.
6 Install the printer driver.
• See “Installing the Printer Driver (USB)” on page 9.
• See “Installing the Printer Driver (Network)” on page 12.
7 Use the After Shipping wizard in the QL-800 Maintenance Utility. See “Using the
After Shipping Wizard” on page 14. This wizard will guide you through the following
actions.
• Foam support block removal - See “Readying the Maintenance Roller” on page
14.
• Ink cartridge installation - See “Installing Ink Cartridges” on page 15.
• Printhead installation - See “Installing the Printhead” on page 16.
8 Load media. See “Loading Media” on page 21.
2 QL-800 User Guide

Unpacking the Printer
The printer is secured using packing tape and cushioning materials to protect it against
vibrations and shock during transportation. Use the following pro cedure to unpack the
printer. Keep the packing materials for future transportation.
1 Remove the accessory box and packing materials from the shipping carton.
Getting Started
QL-800 User Guide 3

Getting Started
2 Lift the printer out of the shipping carton.
The printer weighs about 70 pounds (31.75 kilograms). Two persons standing at
the front and back of the printer respectively must lift the printer by the indicated lift
points.
Lift the front of the printer by the recessed handle. Lift th e rear of the printer by th e
flat area of the purple frame above the mandrel.
Caution: Do not lift the printer by the mandrel.
3 Place the printer on a horizontal table.
4 QL-800 User Guide

Getting Started
4 Remove all pieces of packing tape. This clear filament tape is used to secure the
doors and covers in place.
There is also tape holding the maintenance cartridge in place. Open the main si de
door and lower side door to access and remove this tape.
5 With the main side door open, remove the yellow transport unit shipping lock by
rotating it counterclockwise and then pulling it straight out.
Note: The printer will function with the transport shipping lock installed. However,
the transport unit cannot be removed while the lock is installed.
QL-800 User Guide 5

Getting Started
6 Close all covers and doors.
Checking the Included Parts
Check to make sure the following items are included with the printer.
• Power cable
• USB cable
• Printhead
• Four ink cartridges (one for each color)
• Installation CD
Before Installing the Printer
Choosing an Installation Location
The installation environment must be as described in this section.
• The printer power cord must be able to connect to an outlet (100V - 240V AC). This
outlet must be easily accessible.
• Avoid installing the printer near a faucet, water heater, humidifier, or refrigerator.
• Ensure the environment temperature is within 41 to 95 degrees Fahrenheit (5 to 35
degrees Celsius). For optimal print quality, an environment temperatu re of
approximately 73 degrees Fahrenheit (23 degrees Celsius) is recommended.
• Ensure the environment humidity is withi n 20% to 80% (non-condensing) relative
humidity. For optimal print quality, a relative humidity of approximately 60% is
recommended.
• Avoid placing the printer in areas exposed to high temperature and humidity,
extremely low temperature, severe temperature changes, or direct sunlight.
Especially, avoid placing the printer near fire, outdoors, in distribution warehouses,
or in refrigerated areas.
• Avoid installing the printer in areas subject to dust.
• The room must be properly ventilated.
• No printer feet should float. The printer must be held level constantly.
• When placing the printer on a desk, table, or other similar surface, it must be sturdy
and stable enough to support the weight of the printer. The table must be rated for
a minimum of 100 pounds.
6 QL-800 User Guide

Getting Started
8 inches
203 mm
15 inches
381 mm
17.75 inches
451 mm
8 inches
203 mm
• The minimum space required for installation and maintenance is shown below.
Installation Precautions
When installing the printer, observe the following precautions.
• Imaging faults can result from dew condensation that occurs when the printer is
moved from a cold place to a warm place. Leave the unpacked printer as is for at
least two hours before installing it.
• The printer weighs about 70 pounds (31.75 kilograms). Two persons standing at
the front and back of the printer respectively must lift the printer by the indicated lift
points.
Lift the front of the printer by the recessed handle. Lift th e rear of the printer by th e
flat area of the purple frame above the mandrel.
Caution: Do not lift the printer by the mandrel.
QL-800 User Guide 7

Getting Started
1
2
System Requirements
• 32-bit or 64-bit Microsoft® Windows® XP, Windows Vista®, Windows 7, or
Windows 8
• Microsoft .NET Framework 3.5 SP1
• 350 MB free hard drive space
• CD/DVD drive
• One available USB 2.0 port for USB installation or network connectivity for network
installation
Connecting the Power Cable
1 Connect the power cable to the printer power inlet (1).
2 Connect the power cable to the outlet.
3 Move the power inlet switch (2) to the on position.
Related Topics:
- Switching the Printer On and Off on page 9
8 QL-800 User Guide

Getting Started
Switching the Printer On and Off
After you have connected the power cable and plugged it into an outlet, use the
following instructions to turn the printer power on/off.
Note: The power cable connects to a power inlet on the rear of the printer. This inlet
has a power switch. Ensure the power inlet switch is switched to the on position.
1 If the printer power is off, press and release the power key to turn the power on.
The printer will begin the power-up process, and the green LED will flash
momentarily. When the green LED stops flashing and remains on, the printer will
be ready to use.
2 If the printer power is on, press and hold the power key to turn the powe r off.
Related Topics:
- Connecting the Power Cable on page 8
Installing the Printer Driver
Installing the Printer Driver (USB)
Use the following instructions to install the printer via USB 2.0 on Windows XP,
Windows Vista, Windows 7, or Windows 8.
Note: When the Windows logo testing, publisher verification, or digital signing warning
messages appear, choose to continue the installation. These messages indicate that
the driver has not been “logo tested” by Microsoft. However, it has been tested
thoroughly by QuickLabel Systems, and will not cause any of the problems listed in
these messages.
1 Ensure the QL-800 is powered on but not connected to your computer via the USB
cable.
2 Power on your computer and insert the QL-800 Installer CD in the CD drive. The
Installer CD wizard will open. Choose Next.
Note: If the autorun program does not start automatically, use Windows Explorer
to launch the “Setup.exe” file located in the root level of the CD.
QL-800 User Guide 9

Getting Started
3 Use the driver installation wizard to install the driver. Refer to the following
information during this process.
• Choose the USB connection method when prompted.
• Select an installation location for the QL-800 Maintenance Utility when
prompted.
Choose Finish in the installation wizard after successfully installing the QL-800
Maintenance Utility and driver.
4 When prompted, connect the smaller end of the USB cable to the QL-800 USB type
B port.
Connect the larger end of the USB cable to an available USB 2.0 port on your
computer.
5 Once the USB connection is made, the Windows Found New Hardware Wizard will
start. This wizard will guide you through rest of the installation process. Refer to the
following general guidelines when using this wizard.
• If you are prompted to connect to Windows Update to search for software,
choose no.
• Choose to install the software automatically when you are presented with this
option.
• If the Windows logo testing or publisher verification warning messages appear,
choose to continue the installation.
10 QL-800 User Guide

Getting Started
Resolving Windows 7 and Windows 8 USB Installation Issues
When you install the printer driver via USB, you first run the installation wizard and then
connect the printer to your PC via the USB cable.
If you connected the USB cable before running the installation wizard, Windows 7 and
Windows 8 will not recognize the printer correctly. In this case, the QL-800 will be listed
as an Unspecified item in the Devices and Printers window.
Use the following procedure to correct this issue. This procedure assumes you have
already installed the printer driver.
Note: This procedure requires administrator level access in Windows.
1 Open the Devices and Printers window in Windows 7 or Windows 8.
2 Right-click the QuickLabel QL-800 in the Unspecified list. Then choose
Properties. The QuickLabel QL-800 Properties window will open. Choose the
Hardware tab.
QL-800 User Guide 11

Getting Started
3 Select QuickLabel Systems QuickLabel QL-800 and choose Properties. The
Properties window will open. Choose the General tab.
4 Choose Change Settings. Then choose the Driver tab.
5 Choose Update Driver. When you are prompted, select the Search automatically
for updated driver software option. Windows will locate the driver on your system
and create a printer item.
Installing the Printer Driver (Network)
Use the following instructions to install the printer via a network connectio n on Windows
XP, Windows Vista, Windows 7, or Windows 8.
For detailed information about the topic of networking, refer to documentation
applicable to your network environment and/or contact your network administrator.
Note: When the Windows logo testing, publisher verification, or digital signing warning
messages appear, choose to continue the installation. These messages indicate that
the driver has not been “logo tested” by Microsoft. However, it has been tested
12 QL-800 User Guide

Getting Started
thoroughly by QuickLabel Systems, and will not cause any of the problems listed in
these messages.
1 Ensure the printer is powered on and connected to the network via a LAN cable.
2 Power on your computer and insert the QL-800 Installer CD in the CD drive. The
Installer CD wizard will open. Choose Next.
Note: If the autorun program does not start automatically, use Windows Explorer
to launch the “Setup.exe” file located in the root level of the CD.
3 Use the driver installation wizard to install the driver. Refer to the following
information during this process.
• Choose the Ethernet connection method when prompted.
• Allow the installer to access the network if prompted.
• Choose the QL-800 printer in the printer list when prompted. Alternately, you
can choose to find a specific printer by IP address or MAC address.
• Configure the printer for DHCP or a static IP address.
Ensure the printer has been in the “Ready” state fo r at least 30 seconds before
attempting to connect via DHCP or static IP address. Additionally, if you
change the selection from static IP address to DHCP, wait at least 30 seconds
before proceeding to allow the printer to establish DHCP communication.
• Select an installation location for the QL-800 Maintenance Utility when
prompted.
Choose Finish in the installation wizard after successfully installing the QL-800
Maintenance Utility and driver.
QL-800 User Guide 13

Getting Started
Using the After Shipping Wizard
After installing the driver, the QL-800 Maintenance Utility will be available for use. You
will use the After Shipping wizard in this utility to ready the maintenance roller, install
ink cartridges, and install the printhead.
1 Launch the QL-800 Maintenance Utility.
From the Windows Start Menu, choose Start > All Programs > QL-800 > QL-800
Maintenance Utility. A language and printer prompt will open.
Select a display language and the QL-800 printer you want to connect to. Choo se
OK.
2 Choose the Cleaning tab.
3 Choose After Shipping. Follow the on-screen instructions to complete this
procedure. This wizard will guide you through the following actions.
• Foam support block removal - See “Readying the Maintenance Roller” on page
14.
• Ink cartridge installation - See “Installing Ink Cartridges” on page 15.
• Printhead installation - See “Installing the Printhead” on page 16.
Readying the Maintenance Roller
A foam block is installed over the maintenance roller to protect it during shipping . Use
the following instructions to remove this foam block.
1 Open the top cover and cut the zip tie.
2 Remove the zip tie and foam support block from the printer.
14 QL-800 User Guide

Getting Started
Installing Ink Cartridges
Use the following instructions to install ink cartridges.
Warning: For safety, keep ink cartridges out of the reach of children. If ink is
accidentally ingested, contact a physician immediately.
1 Open the main side door.
2 Open both ink cartridge latches. Each latch can be opened by pressing the top of
the locking mechanism and pulling outward.
3 Slide in the ink cartridge, septum end first, label side up. Pus h the car tr idg e in all
the way.
You will feel slight resistance near the end of this process as the ink cartridge
engages the ink needles inside the printer. Repeat this step for each color.
QL-800 User Guide 15
Getting Started
Caution: There are sharp needles in the ink cartridge slot. Never put your fingers
in this area.
Note: The printer is designed so that ink cartridges cannot be inserted in the
wrong slots. Do not attempt to insert ink cartridges in the wrong slots.
4 Close the ink cartridge latches.
5 Close the main side door.
Installing the Printhead
Use the following instructions to install the printhead.
Caution: The printhead is sensitive to electrostatic discharge (ESD). Use ESD
protection when handling the printhead.
Caution: Do not touch the printhead cartridge ink couplings, nozzle surface, or the
electrical contacts when installing the printhead cartridge. Hold the printhead cartridge
ONLY by the handles.
Caution: To avoid dehydrating the printhead, do not remove the printhead from the
package until you are ready to use it.
Caution: Open the printhead packaging over an appropriate receptacle to safely
capture any excess shipping fluid.
1 Ensure the printer is powered on and ink cartridges have been installed.
16 QL-800 User Guide

2 Open the top cover.
3 Remove the fluidic cap protectors from the two fluidic couplings.
Getting Started
4 Open the end of the printhead package box and slide out the foil bag.
5 Inspect the integrity of the foil vacuum sealing. The foil bag should be formed tightly
to the contours of the printhead cartridge. If the foil is loose to any degr ee, then the
seal has been compromised.
Caution: If a poor seal is suspected, do not use that printhead. Report the issue
to Technical Support.
QL-800 User Guide 17

Getting Started
6 Carefully rip open the foil packaging at the notch. Use scissors if yo ur foil bag does
not have a notch or you are finding it difficult to tear the bag.
7 Remove the printhead from the foil bag.
Caution: Do not place the unprotected printhead cartridge on any surface prior to
installation in the printer. Protect the printhead cartridge at all times from
contamination by airborne contaminants such as dust or fibers.
8 Wipe any excess shipping fluid from the cartridge with a clean, lint-free cloth.
9 Remove the orange protective plastic cover from the printhead cartridge, holding
the printhead by the handle.
• Release the flaps covering the ink ports.
• Release the clip retaining the cover near the center of the printhead cartridge.
• Carefully remove the protective cover. Do not touch any of the fluid couplings
or nozzle plate after the orange cover is removed.
18 QL-800 User Guide

Getting Started
No less than 45°
10 Carefully remove the protective tape from the electrical contacts. While holding the
printhead cartridge by the handle with one hand, grasp the pull tab with the other
hand, and slowly peel back the plastic strip covering the electrical contacts.
Caution: Dispose of the removed strip immediately and do not allow the removed
strip to touch the electrical contacts.
11 Remove the protective strip from the printhead nozzles. While holding the
printhead cartridge by the handle with one hand, grasp the pull tab with the other
hand and slowly and carefully peel back the plastic strip to uncover the printhead
nozzles. Maintain an angle of no less than 45° with the printhead surface when
pulling on the strip.
Note: Dispose of the removed strip immediately and do not allow the removed
strip to contact the electrical contacts or the printhead nozzles.
12 Point the ink connections away from the front (that is, the label exit side) of the print
engine.
13 Align the printhead cartridge with the printhead slot.
QL-800 User Guide 19

Getting Started
14 Tilt the top of the printhead cartridge toward the back of th e printer, about 20º. Then
gently seat the back of the printhead cartridge into the print engine.
20°
15 When the back of the printhead is firmly seated, gently rotate the printhead
cartridge into position against the stops on the printhead connector board.
Caution: If the printhead will not rotate into position, do not force it. Reseat the
printhead and try again.
20 QL-800 User Guide

Getting Started
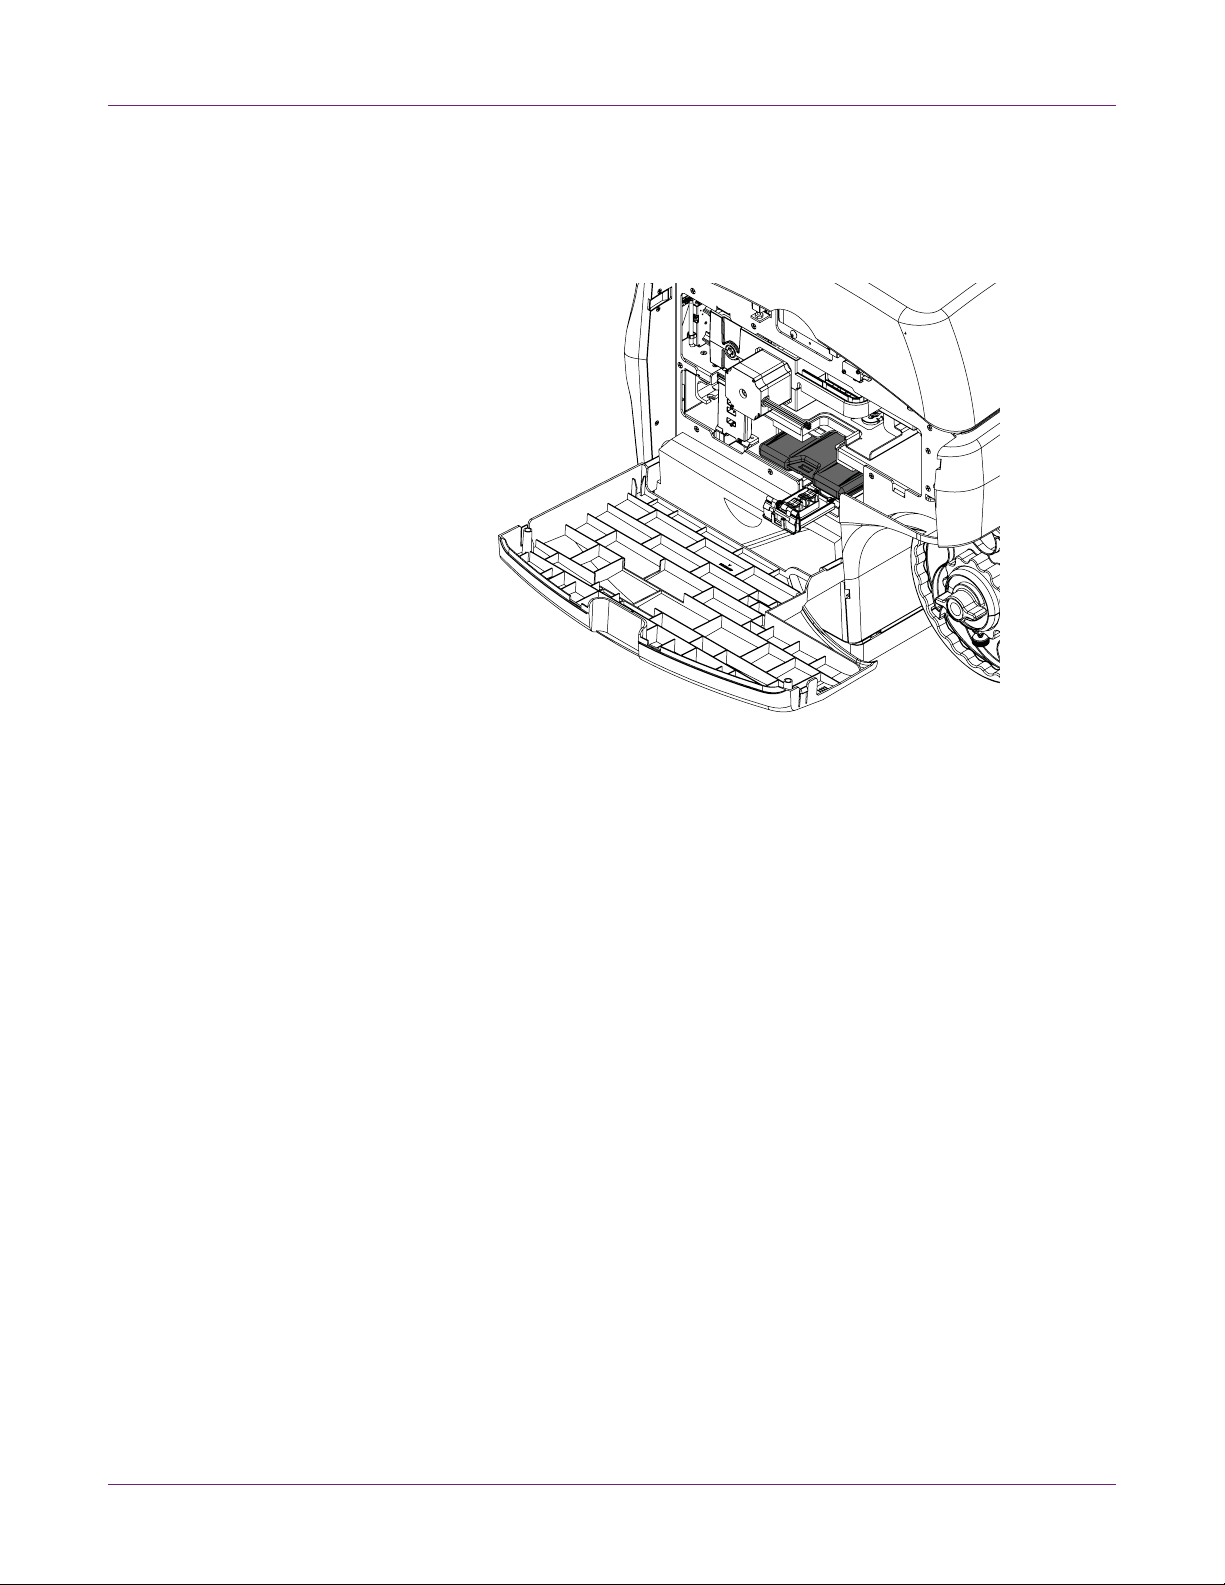
[1]
[2]
[4]
[3]
16 Slowly close the printhead latch. The fluidic couplings should advance and seal to
the printhead cartridge.
Caution: If the latch will not close, do not force it. Reseat the printhead and try
again.
17 Close the top cover.
Loading and Unloading Media
Loading Media
1 Turn the wing nut [1] on the end of the mandrel counterclockwise to loosen the
mandrel.
2 Orient the media roll [2] as illustrated and put it on the mandrel. Make sure the roll
contacts the inner flange [3].
QL-800 User Guide 21

Getting Started
[5]
[6]
[7]
3 Turn the wing nut [1] on the end of the mandrel clockwise un til you feel resistance.
This action secures the roll in place.
4 Put the outer flange [4] on the mandrel. Make sure the outer flange contacts the roll
[2].
5 Tighten the captive fastener on the outer flange [4] until you feel resistance. This
action secures the outer flange in place.
6 On the front of the printer, slide the media exit guide [5] all the way toward the
control panel. This guide will be adjusted later in the procedure.
7 Place the media near the entry slot and slide the adjustable media guide [6] to the
width of the media. The edges of the media should lightly contact the fixed media
guide [7] and adjustable media guide [6].
8 Slowly insert the media into the printer as illustrated until the media stops moving.
The printer will beep three times to indicate the media has been detected.
9 Release the media when the printer starts automatically feeding it into the printer.
The printer will feed media as needed and the media loading process will be
complete.
22 QL-800 User Guide

Getting Started
[1][2]
Note: If the automatic media feeding process fails, the media will be ejected back
out of the printer.
10 On the front of the printer, slide the media exit guide [5] so it lightly contacts the
edge of the media exiting the printer.
Unloading Media
1 Press and hold the back-feed key. The printer will back-feed media.
When the media has almost exited the back of the printer, back-feeding will stop
and the printer will beep once. This confirmation tone alerts you that media is about
to be unloaded.
2 To continue and unload media, press and hold the back-feed key again. Media will
back-feed fully out of the printer.
3 Loosen the captive fastener on the outer flange [1]. Then remove the flange from
the mandrel.
4 Turn the wing nut [2] on the end of the mandrel counterclockwise to loosen the
mandrel. Loosen the wing nut until the media roll moves freely.
5 Remove the media roll from the mandrel.
QL-800 User Guide 23

Getting Started
QuickLabel Services
QL-800 Label Materials
QuickLabel develops QL-800 label printing substrates. We sell cost-effective labels
that meet various end-use requirements, including industry and government regulatory
labeling standards.
QuickLabel BPO Blanket Purchase Order Program
As the manufacturer of the QL-800 and the supplies, QuickLabel has the advantage of
providing you with lower prices due to production efficiencies. QuickLabel's QL-800
BPO Program covers all of your requirements for printing supplies over a 12-month
period. You receive a discounted price for your annual commitment and regular
scheduled deliveries based on your production requirements. Customers wh o take
advantage of our BPO program receive maximum savings on all of their i nk and blank
label purchases!
Media Specialists
QuickLabel offers the services of our highly trained label experts to advise you on
choosing the right label material and on designing label files for custom and special
label shapes.
Your personal Media Specialist is available to:
• Provide a point of contact for ongoing development of label materials that may be
required for unique labeling applications
• Advise you on expected usage so you can plan purchasing and manage your
inventory levels
• Advise you on our convenient blanket orders, which automate shipment of your
supplies to your location on dates you specify in advance
• Take your orders for labels and new label shapes
• Take your orders for printer supplies
24 QL-800 User Guide

2
Printer Part Names and Functions
Front View
[1]
QL-800 Overview
[3]
[2]
[6]
# Part Description
1 Media Exit Slot Printed labels are ejected through this slot.
2 Operation Panel Use these keys to operate various printe r func -
tions.
3 Top Cover Open this cover to access the printhead.
4 Main Side Door Open this door to access the transport unit and
ink cartridges.
5 Lower Side Door Open this door to access the maintenance car-
tridge.
[4]
[5]
6 LED Indicators LEDs indicate the status of the printer.
QL-800 User Guide 25

QL-800 Overview
Back View
[1]
[2]
[3]
[4]
[5]
[6][7]
[8][9]
# Part Description
1 Media Entry Slot Media enters the printer through this slot.
2 Reserved This port is not used. Do not connect to this port.
3 USB Port Connect the USB cable here when using the USB
connection method.
4 LAN Port Connect the LAN cable here when using the LAN
connection method.
5 Power Inlet Connect the power cord here.
6 Inner Flange Position the media roll edge so it touches this
flange.
7 Mandrel Install the media roll on the mandrel.
8 Outer Flange Adjust this flange so it touches the media roll
edge opposite the inner flange.
9 Wing Nut Turn this nut to tighten or loosen the media roll
lock on the mandrel.
26 QL-800 User Guide

Operation Panel
[1] [2] [4]
[5]
[3]
QL-800 Overview
# Key Description
1 Power
2Feed
3 Pause/Resume
• If the printer power is off, press and release this
key to turn the power on.
• If the printer power is on, press and hold this
key to turn the power off.
• Press and release this key to recover from
some error conditions.
• Press and release the feed key to feed media
one label length.
• Press and hold the feed key to feed media until
you release the key.
• While printing, press and release this key to
pause the print job.
• While paused, press and release this key to
resume the print job.
• While paused, press and hold this key for
approximately three seconds to cancel the prin t
job.
QL-800 User Guide 27

QL-800 Overview
[1]
[2]
[3] [4] [5] [6] [7]
# Key Description
LED Indicators
4 Back-Feed
5 Cut If the printer is in the ready state, press and hold
• Press and release the back-feed key to
back-feed media one label length.
• Press and hold the back-feed key to back-feed
media until you release the key.
• To unload media, press and hold the back-feed
key until the printer beeps once. Press and hold
the back-feed key again to continue and unload
media.
this key for approximately one second to cut
media at the exit.
#LED Description
1 Power This green LED indicates the power status of the
printer.
• Off - Printer is off or in sleep mode.
• Flashing - Printer is initializing or busy.
• Solid - Printer is on and ready.
2 Error This red LED indicates when error conditions
occur.
28 QL-800 User Guide

QL-800 Overview
#LED Description
3 Cyan Ink These yellow LEDs indicate the status of each ink
cartridge.
4 Magenta Ink
5 Yellow Ink
6 Black Ink
7 Non-Ink Consumables This yellow LED indicates the status of the follow-
• Off - Ink cartridge has sufficient ink.
• Flashing - Ink cartridge is low.
• Solid - Ink cartridge is empty.
ing items.
• Printhead
• Cutter
• Aerosol Filter
• Maintenance Cartridge
• Maintenance Roller
The LED will illuminate based on remaining service life.
Color Basics
• Off - All items are above 20% service life
remaining.
• Flashing Slowly - One or more items are
below 20% service life remaining.
• Flashing - One or more items are below 10%
service life remaining.
• Solid - One or more items are at 0% service life
remaining.
Refer to the System Logs tab in the Maintenance
Utility to determine the affected items.
Color in design and printing is a sophisticated topic. At QuickLabel Systems, we have
worked to make using the QL-800 printer as easy as possible. We understand that your
goal is to design and print colorful, effective labels with consistency.
Color and Computers
While colors seem straightforward, describing colors using computers is not so simple.
Different display technologies can cause the same file to look different, and sometimes
different graphics programs or operating systems can display colors differently.
With printers there is frequently a difference between what is shown on a computer
screen and what comes out of the printer. The same file printed on printers using
different technologies may look very different as well.
QL-800 User Guide 29

QL-800 Overview
Color Profiling
These technical differences are universal, and as a result of them, software
developers, display manufacturers, and printer manufacturers have worked together to
develop a way to successfully describe and use color taking into consideration the
different technologies involved. This is called color profiling.
Color profiles have been developed to coordinate how each device displays or prints
that color. When using the proper profiles, color can be relatively consistent across
devices.
Color cannot be perfectly consistent because the huma n eye can see more colors th an
computer displays can show or printers can print. What’s more, the ranges of colors
available to displays and printers don’t completely overlap.
Profiles help out when these ranges don’t match; they help translate the differences to
create the widest and most accurate range of colors a device can display.
Display Profiling
There are devices that can help you develop profiles for your display to ensure that
what you see is close to what you are getting. Using QL-800 profiles will help with
consistency in printing, while using both QL-800 and display profiles will help with the
full design and printing process.
If color matching is important to you, you may consider profiling your computer display.
QuickLabel QL-800 Color Profiles
When printing, even the type of material printed on can chan ge the way colors appear.
QuickLabel Systems has created color profiles for the materials you will be using in
order to offer you the most accurate color reproduction possible.
A Profile for Each Device
The more of your devices that have profiles, the better. Since color is based on
technology, software, and the laws of physics, each device works with color differently.
In addition to your graphics program and the QL- 800 , you ma y be able to a dd profiles
for your display, your digital camera, and your scanner. This will help all of these
devices use color in a coordinated way. At minimum, to use color profiling, you need to
use a color profile for the QL-800.
30 QL-800 User Guide

3
Designing Labels
This section describes several factors you should consider before you start designing
labels.
Choosing Design Software
You can print to the QL-800 using any design software with printing function ality. There
are many graphic design software applications available, and the programs you choose
will depend on your desired workflow and design requirements.
Design software is available from QuickLab el Syst em s an d othe r so ftw ar e ven d or s.
• Custom QuickLabel Omni from QuickLabel Systems - This software product,
• Third Party Applications - There are a variety of graphic design programs
Designing and Printing Labels
developed by QuickLabel Systems, makes it easy to create barcodes and position
text and graphics on a label.
available from other software companies such as Adobe and Corel. Adobe
Photoshop, Illustrator, and similar professional image editing programs provide
advanced tools for creating your artwork.
A common scenario is to use a mixed approach to designing labels. For example, you
may want to edit a photographic element in Photoshop, create a logo in Illustra tor, and
then place both into a Custom QuickLabel Omni file for final layout and printing.
Disabling Anti-aliasing
Most graphic design software applications provide anti-aliasing features that result in
the appearance of smooth color transitions.
When designing labels that will be printed on the QL-800, do not use anti-aliasing. This
is especially important if you are printing text or barcode s. For example, an anti-aliased
barcode may not scan correctly due to the color transitions between lines.
For details about disabling anti-aliasing, refer to the user documentation for your
graphic design software
Planning Full-Bleed and Non-Bleed Labels
In full-bleed labels, color prints up to the edge of the label. With non-bleed labels, color
stops at a margin before the edge of the label.
Use the following guidelines when setting up a file for a full-bleed label.
• If you are using media with the matrix removed, you can print all the way to the
edge of die-cut labels, but doing so may cause a small amount of ink to deposit
onto the liner. In the event excess ink deposits on the liner, it will not dry and may
smear onto other surfaces, including hands and other printed labels.
QL-800 User Guide 31

Designing and Printing Labels
• The height and width of the label file “canvas” should be 0.04 to 0.08” (1-2 mm)
larger than the height and width of the physical label.
Excessive width and length will result in increased ink on the liner. You may need
to experiment to determine the optimal balance of bleed quality while minimizing
ink deposited on the liner. As a guideline, no more than 0.02” (0.5 mm) of ink should
be printed onto the liner.
• Design elements that will run to the edge of the label are the parts of the design
that will “bleed” across the edge. Your bleed will most commonly be a solid color,
pattern, or gradient background running off the edge of the label.
Use the following guidelines when setting up a file for a non-bleed label.
• The height and width of the label file “canvas” should be the same as the height
and width of the physical label.
• All design elements should be placed inside a 0.063” (1.5 mm) border of the
canvas. This will ensure such design elements never run to or over the edge of the
label.
Setting up the Label Design Software
This section describes how to set up your label design software to print on the QL-800.
Setting up Labels in Custom QuickLabel Omni
Custom QuickLabel Omni is a software application developed by QuickLabe l Systems
to access special features in our printers and allow customers to easily design and print
labels.
For detailed label setup and printing instructions, please refer to the Custom
QuickLabel Help.
Setting up Labels in Third-Party Design Applications
You can design and print label files exclusively within a third-party application such as
Adobe Photoshop or Illustrator. In this situation, use the following guidelines to en sure
best results.
Note: You can also use third-party applications to design components of a label to be
imported into Custom QuickLabel Omni. In this situation, save or export graphic files in
a .BMP, .PCX, uncompressed .JPG, uncompressed .TIF, .GIF, .PNG, or .PDF format.
• Select a resolution of 600 pixels per inch - For raster -based design applications
such as Adobe Photoshop, choose a resolution of 600 pixels per inch. This will
provide sufficient image resolution to produce super ior print quality. This setting is
not used in vector-based design applications such as Adobe Illustrator.
32 QL-800 User Guide
Designing and Printing Labels
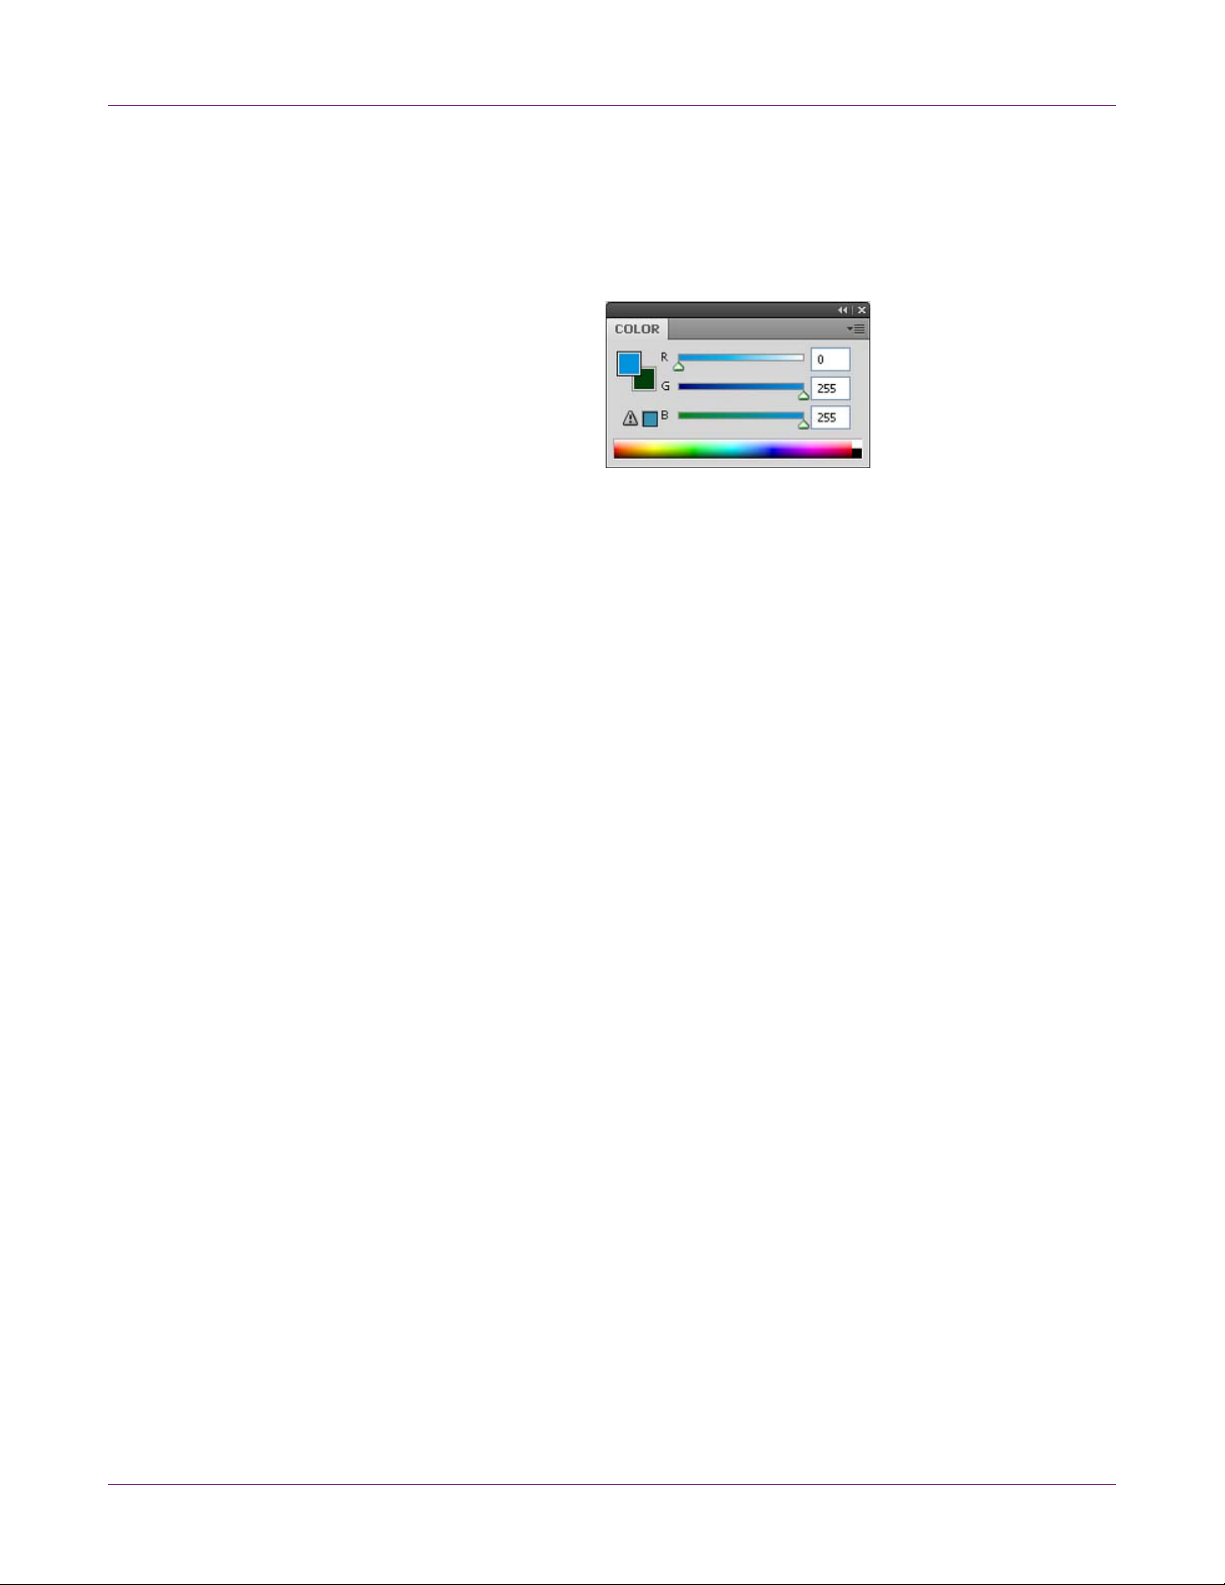
• Use in-gamut colors - When designing in color, ensure you use colors that are
within the printing gamut. Most design applications will indicate when a color is out
of gamut.
For example, in Adobe Photoshop and Illustrator, out-of-gamut colors are indicated
by an exclamation point icon in the Color palette.
Out-of-gamut colors cannot be accurately printed. There are often colors that can
be found to replace out-of-gamut colors.
• If the application supports color management, enable it - Professio nal design
applications support color management. This option is typically found in the
application’s print window.
Setting up the Printer Driver
Setting up General Options
Before you print using a third-party application, you will need to select the appropriate
general and label size options in the printer driver.
Note: Driver instructions apply only to printing via third party design applications. If you
are using Custom QuickLabel Omni, this process is not required.
1 Open the appropriate printer window based on your version of Windows.
• In Windows XP, choose Start > Printers and Faxes.
• In Windows Vista, choose Start > Control Panel > Printers.
• In Windows 7, choose Start > Devices and Printers.
• In Windows 8, access the Search option by pointing to the upper-right corner
of the screen. Search for “Control Panel” and click the Control Panel icon. In
the Control Panel window, click View Devices and Printers.
Right-click the printer icon and choose Printing Preferences. The QL-8 00 Driver
Printing Preferences window will open.
Note: You can also access the driver preferences via the application’s print dialog.
From the Print window in your software, select QuickLabel QL-800 from the printer
list and choose Properties or Setup (varies based on program).
QL-800 User Guide 33

Designing and Printing Labels
2 Choose the General tab.
3 If necessary, you can select a printing orientation. Orientation is often set within the
design application. However, if you cannot select an orientation in the design
application, choose from the following options:
• Portrait - Select this option if you want to print the label in a portrait orientation
on the label roll.
• Landscape - Select this option if you want to print the label in a landscape
orientation on the label roll.
4 If necessary, you can rotate the printed image 180 degrees by choosing Rotate
180°.
5 If necessary, you can print the image in a mirrored orientation by choosing Mirror
Image.
6 Select the page management options.
• Stitch - Choose this option to print with no gaps between labels. This option
should not be enabled when using gap media.
• Buffer - Choose this option to process print jobs completely before sending
them to the printer. This results in no pauses during printing.
• Mask Optimization - Choose this option to apply mask optimization. If you
observe image noise in printed labels, try turning off this option.
7 If necessary, you can select a printing quantity. Print copies are specified within the
application before printing. However, you can override that value here, or use this
setting if the application does not provide a setting.
34 QL-800 User Guide

Designing and Printing Labels
8 Select the type of material the label will be printed on.
9 Select a label size from the list.
Note: If necessary, you can set up a custom label size to meet your needs.
10 Select whether color or monochrome printing will be used.
• Color - Choose this option to print in full color.
• Composite Black - Choose this option to print in black using ink blended from
all ink cartridges.
• Black Only - Choose this option to print in black using only black ink.
11 Select a printing speed.
12 Choose OK.
Setting up a Custom Label Size
You can add and modify custom label sizes in the printer driver.
Note: Driver instructions apply only to printing via third party design applications. If you
are using Custom QuickLabel Omni, this process is not required.
1 Open the appropriate printer window based on your version of Windows.
• In Windows XP, choose Start > Printers and Faxes.
• In Windows Vista, choose Start > Control Panel > Printers.
• In Windows 7, choose Start > Devices and Printers.
• In Windows 8, access the Search option by pointing to the upper-right corner
of the screen. Search for “Control Panel” and click the Control Panel icon. In
the Control Panel window, click View Devices and Printers.
Right-click the printer icon and choose Printing Preferences. The QL-8 00 Driver
Printing Preferences window will open.
Note: You can also access the driver preferences via the application’s print dialog.
From the Print window in your software, select QuickLabel QL-800 from the printer
list and choose Properties or Setup (varies based on program).
QL-800 User Guide 35

Designing and Printing Labels
2 Choose the General tab.
3 Choose Manage Labels. The Custom Label Size window will open.
4 Enter or select a label name.
• To edit an existing label size profile, select the label name from the list.
• To create a new label size profile, enter a label name in the list.
5 Enter the height and width of your label. You can specify these measurements in
inches or millimeters.
6 Save the settings.
• If you edited an existing label size profile, choose Replace.
• If you created a new label size profile, choose Save.
36 QL-800 User Guide

Designing and Printing Labels
7 If necessary, you can delete a label size profile by selecting it from the list and then
choosing Delete.
8 Choose OK.
Setting up Media Options
Before you print using a third-party application, you will need to select media options
for your label.
Note: Driver instructions apply only to printing via third party design applications. If you
are using Custom QuickLabel Omni, this process is not required.
1 Open the appropriate printer window based on your version of Windows.
• In Windows XP, choose Start > Printers and Faxes.
• In Windows Vista, choose Start > Control Panel > Printers.
• In Windows 7, choose Start > Devices and Printers.
• In Windows 8, access the Search option by pointing to the upper-right corner
of the screen. Search for “Control Panel” and click the Control Panel icon. In
the Control Panel window, click View Devices and Printers.
Right-click the printer icon and choose Printing Preferences. The QL-8 00 Driver
Printing Preferences window will open.
Note: You can also access the driver preferences via the application’s print dialog.
From the Print window in your software, select QuickLabel QL-800 from the printer
list and choose Properties or Setup (varies based on program).
2 Choose the Media tab.
QL-800 User Guide 37

Designing and Printing Labels
3 If necessary, use the offset options to adjust th e location of a printed image relative
to the registration marks on the media.
• Horizontal Offset - Negative values move the image left on the label. Positive
values move the image right on the label.
• Vertical Offset - Negative values move the image down on the label (out away
from the printer). Positive values move the image up on the label (in toward the
printer).
4 Select a sensor type.
• Gap - Choose this option if you are using gap media.
• Reflective - Choose this option if you are using reflective mark media.
• None - Choose this option if you are using media without gaps or reflective
marks (continuous media).
5 Select the cutter settings.
• Check the Cutter Enabled option to enable the auto-cutter.
•Use the Labels Between Cut field to indicate the number of labels to print
between each cut.
6 Choose OK.
38 QL-800 User Guide

Designing and Printing Labels
Using Service Options
You can clean the printheads, launch the status monitor, order supplies, and contact
technical support using the printer driver.
1 Open the appropriate printer window based on your version of Windows.
• In Windows XP, choose Start > Printers and Faxes.
• In Windows Vista, choose Start > Control Panel > Printers.
• In Windows 7, choose Start > Devices and Printers.
• In Windows 8, access the Search option by pointing to the upper-right corner
of the screen. Search for “Control Panel” and click the Control Panel icon. In
the Control Panel window, click View Devices and Printers.
Right-click the printer icon and choose Printing Preferences. The QL-8 00 Driver
Printing Preferences window will open.
Note: You can also access the driver preferences via the application’s print dialog.
From the Print window in your software, select QuickLabel QL-800 from the printer
list and choose Properties or Setup (varies based on program).
2 Choose the Services tab.
3 To clean the printheads, choose Clean Printheads. The QL-80 0 Maintenance
Utility will launch, providing access to the cleaning options.
4 To launch the status monitor, choose Launch Status Monitor.
5 Use the service links to order supplies or contact technical support.
QL-800 User Guide 39

Designing and Printing Labels
6 Choose OK.
Related Topics:
- Cleaning Printheads on page 53
Saving and Recalling Driver Settings
After setting up the driver, you can save the driver settings. It may be helpful to save
driver settings for each label you will be printing.
1 Open the appropriate printer window based on your version of Windows.
• In Windows XP, choose Start > Printers and Faxes.
• In Windows Vista, choose Start > Control Panel > Printers.
• In Windows 7, choose Start > Devices and Printers.
• In Windows 8, access the Search option by pointing to the upper-right corner
of the screen. Search for “Control Panel” and click the Control Panel icon. In
the Control Panel window, click View Devices and Printers.
Right-click the printer icon and choose Printing Preferences. The QL-8 00 Driver
Printing Preferences window will open.
Note: You can also access the driver preferences via the application’s print dialog.
From the Print window in your software, select QuickLabel QL-800 from the printer
list and choose Properties or Setup (varies based on program).
2 Choose the General or Media tab.
3 Enter or select a settings profile name in the My Print Settings area.
40 QL-800 User Guide

Printing Labels
Designing and Printing Labels
• To edit an existing settings profile, select the profile name from the list.
• To create a new settings profile, enter a profile name in the list.
4 Edit the driver settings as needed.
5 Save the settings.
• If you edited an existing settings profile, choose Replace.
• If you created a new settings profile, choose Save.
6 If necessary, you can delete a settings profile by selecting it from the list and then
choosing Delete.
7 Choose OK.
1 Ensure the label media has been loaded.
2 If you are printing from a third-party design app licat ion , en su re the prin te r dr iver
preferences are configured.
3 Open the label file using the appropriate software. Then choose to print the label,
and enter the number of copies you would like to print.
Note: If your software has a collate option, disable it before printing.
4 Print the labels. The Status Monitor will automatically open and display information
about printer and job status.
The job progress will be displayed in the Status Monitor.
If necessary, you can cancel the print job by choosing Cancel Job/Reset Error on
the Status Monitor.
QL-800 User Guide 41

Designing and Printing Labels
5 If necessary, you can pause, resume, and cancel print jobs from the operation
panel on the front of the printer.
• While printing, press and release the pause/resume key to pause the print job.
• While paused, press and release the pause/resume key to resume the print
job.
• While paused, press and hold the pause/resume key for approximately three
seconds to cancel the print job.
6 Receive the printed labels.
Note: Do not pull the printed labels in any direction as they exit the printer. Pulling
the labels may result in a media jam.
•If Cutter Enabled is checked in the printer driver Media tab, the printed labe ls
will automatically be cut at the end of the job.
•If Cutter Enabled is not checked in the printer driver Media tab, the printed
labels will not be cut at the end of the job. Instead, you can use the manual cut
feature by pressing and holding the cut key for approximately one second.
42 QL-800 User Guide

Using the Status Monitor
Viewing the Printer Status
1 Open the QL-800 Status Monitor. You can access the Status Monitor from the
Windows Start Menu, QL-800 Maintenance Utility, or the printer driver.
• From the Windows Start Menu, choose Start > All Programs > QL-800 >
QL-800 Status Monitor.
• In the QL-800 Maintenance Utility, choose Status Monitor.
• In the QL-800 printer driver, choose Launch Status Monitor from the
Services tab.
Designing and Printing Labels
2 You can view status information in the Printer Status area. This area will display
informational, error, and warning messages related to your printer’s cur rent status.
3 If necessary, you can initiate printhead cleaning if the printer is in the Ready,
Sleeping, or Paused modes.
Two cleaning options are available (light and heavy). Start with light cleaning and
then print a test label. If the issue is not resolved, repeat using the heavy cleaning
method.
If multiple heavy cleanings do not resolve the issue, contact Technical Support.
4 If necessary, you can view help topics by choosing Help > Help Topics.
QL-800 User Guide 43

Designing and Printing Labels
Viewing the Job Status and Cancelling Jobs
1 Open the QL-800 Status Monitor. You can access the Status Monitor from the
Windows Start Menu, QL-800 Maintenance Utility, or the printer driver.
• From the Windows Start Menu, choose Start > All Programs > QL-800 >
QL-800 Status Monitor.
• In the QL-800 Maintenance Utility, choose Status Monitor.
• In the QL-800 printer driver, choose Launch Status Monitor from the
Services tab.
2 You can view print job information in the Job Status area.
3 If necessary, you can cancel an in-progress job by choosing Cancel Job.
You can also use the printer operation panel to cancel a job. Wh ile printin g, press
and release the pause/resume key to pause the print job. Wh ile paused, press and
hold the pause/resume key for approximately thr ee seconds to cancel the print jo b.
Viewing Ink and Consumable Levels
1 Open the QL-800 Status Monitor. You can access the Status Monitor from the
Windows Start Menu, QL-800 Maintenance Utility, or the printer driver.
• From the Windows Start Menu, choose Start > All Programs > QL-800 >
QL-800 Status Monitor.
• In the QL-800 Maintenance Utility, choose Status Monitor.
44 QL-800 User Guide

Designing and Printing Labels
• In the QL-800 printer driver, choose Launch Status Monitor from the
Services tab.
2 You can view estimates of remaining ink percentages in the Ink Levels area.
3 You can view an estimate of the maintenance cartridge level percentage in the
Maintenance Cartridge Level area.
QL-800 User Guide 45

Designing and Printing Labels
46 QL-800 User Guide

QL-800 Maintenance Utility
4
About the Maintenance Utility
The QL-800 Maintenance Utility is installed during the driver installation process. The
utility allows you to view printer information and perform a variety of maintenance
functions.
Printer Information Tab
Use the Printer Information tab to view printer system information, upgrade printer
firmware, and set the clock.
Viewing Printer Information
1 Launch the QL-800 Maintenance Utility.
From the Windows Start Menu, choose Start > All Programs > QL-800 > QL-800
Maintenance Utility. A language and printer prompt will open.
Select a display language and the QL-800 printer you want to connect to. Ch oose
OK.
QL-800 User Guide 47
QL-800 Maintenance Utility
2 Choose the Printer Information tab.
3 View the printer information.
• Printer - This section provides the serial number of the printer and the installed
firmware version number. It also provides the transport usage in inches.
• Print Module - This section provides the serial number o f the print module and
the installed firmware version.
• Ink Levels - This section provides the remaining ink percentages of ink
cartridges.
• Printhead - This section provides the remaining service life percentage of the
printhead. If print quality is acceptable, you can continue to use a printhead
past 100% of its service life.
This section also provides the serial number and number of inches printed with
the printhead.
• Parts Life - This section provides the remaining service life percentages of the
aerosol filter, maintenance roller, maintenance cartridge, and cutter.
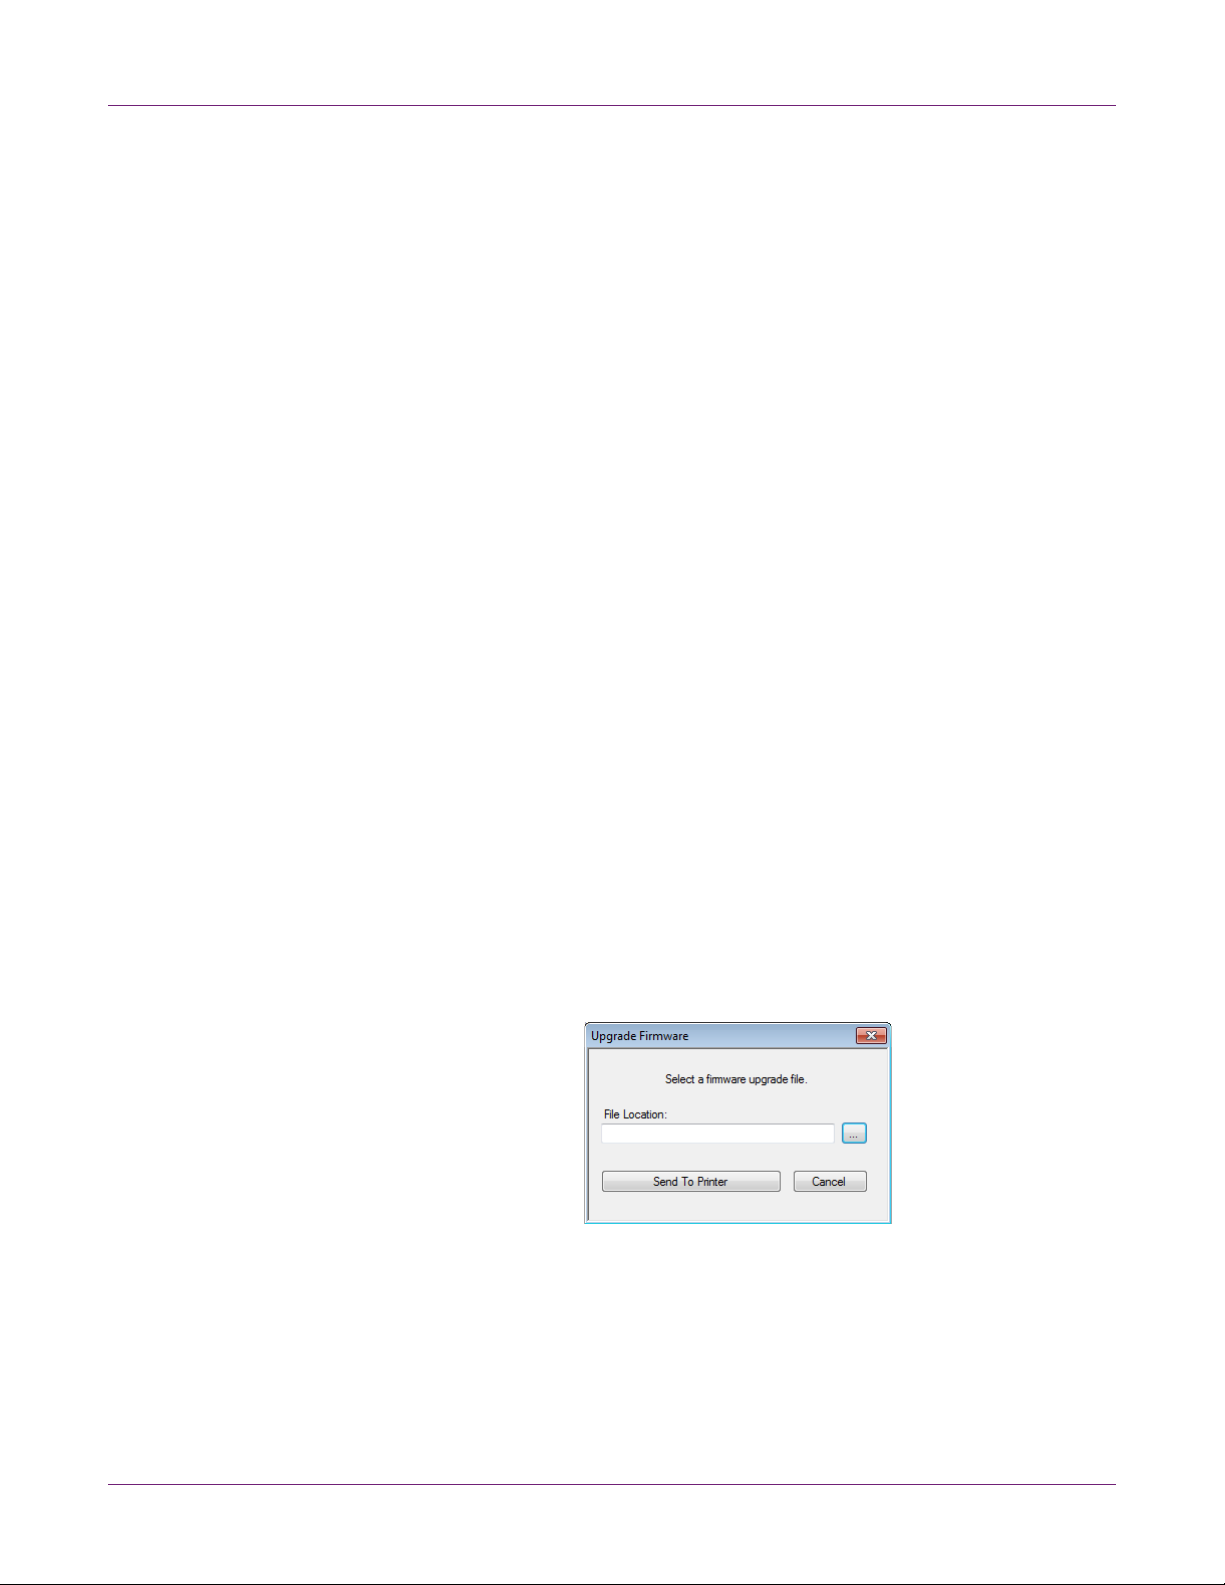
Upgrading the Printer and Print Module Firmware
1 Ensure the QL800_vX_X.upgrade file is accessible from your PC. The vX_X in the
file name indicates the firmware package version.
2 Launch the QL-800 Maintenance Utility.
From the Windows Start Menu, choose Start > All Programs > QL-800 > QL-800
Maintenance Utility. A language and printer prompt will open.
Select a display language and the QL-800 printer you want to connect to. Choo se
OK.
3 Choose the Printer Information tab.
4 Choose Upgrade Firmware. The Upgrade Firmware window will open.
5 Choose the ... button. Browse to the QL800_vX_X.upgrade file and choose Open.
6 Choose Send to Printer.
A progress indicator will be displayed and the firmware will be upgraded. When this
process is complete, proceed to the next step.
7 Power off the printer. On the rear of the printer, turn the power inlet switch off.
48 QL-800 User Guide

QL-800 Maintenance Utility
8 On the rear of the printer, turn the power inlet switch on. Power on the printer.
Setting the Clock
1 Launch the QL-800 Maintenance Utility.
From the Windows Start Menu, choose Start > All Programs > QL-800 > QL-800
Maintenance Utility. A language and printer prompt will open.
Select a display language and the QL-800 printer you want to connect to. Choo se
OK.
2 Choose the Printer Information tab.
3 To set the date/time controls to the current date/time as defined by your Windows
clock, choose Get Current Time.
4 To read the time from the printer's internal clock and set the date/time controls
accordingly, choose Read From Printer.
5 To set the printer’s internal clock, select a date/time with the controls and choose
Save to Printer.
Print Settings Tab
Use the Print Settings tab to adjust the vertical baseline, horizontal baseline, and
cut/stop position.
QL-800 User Guide 49
QL-800 Maintenance Utility
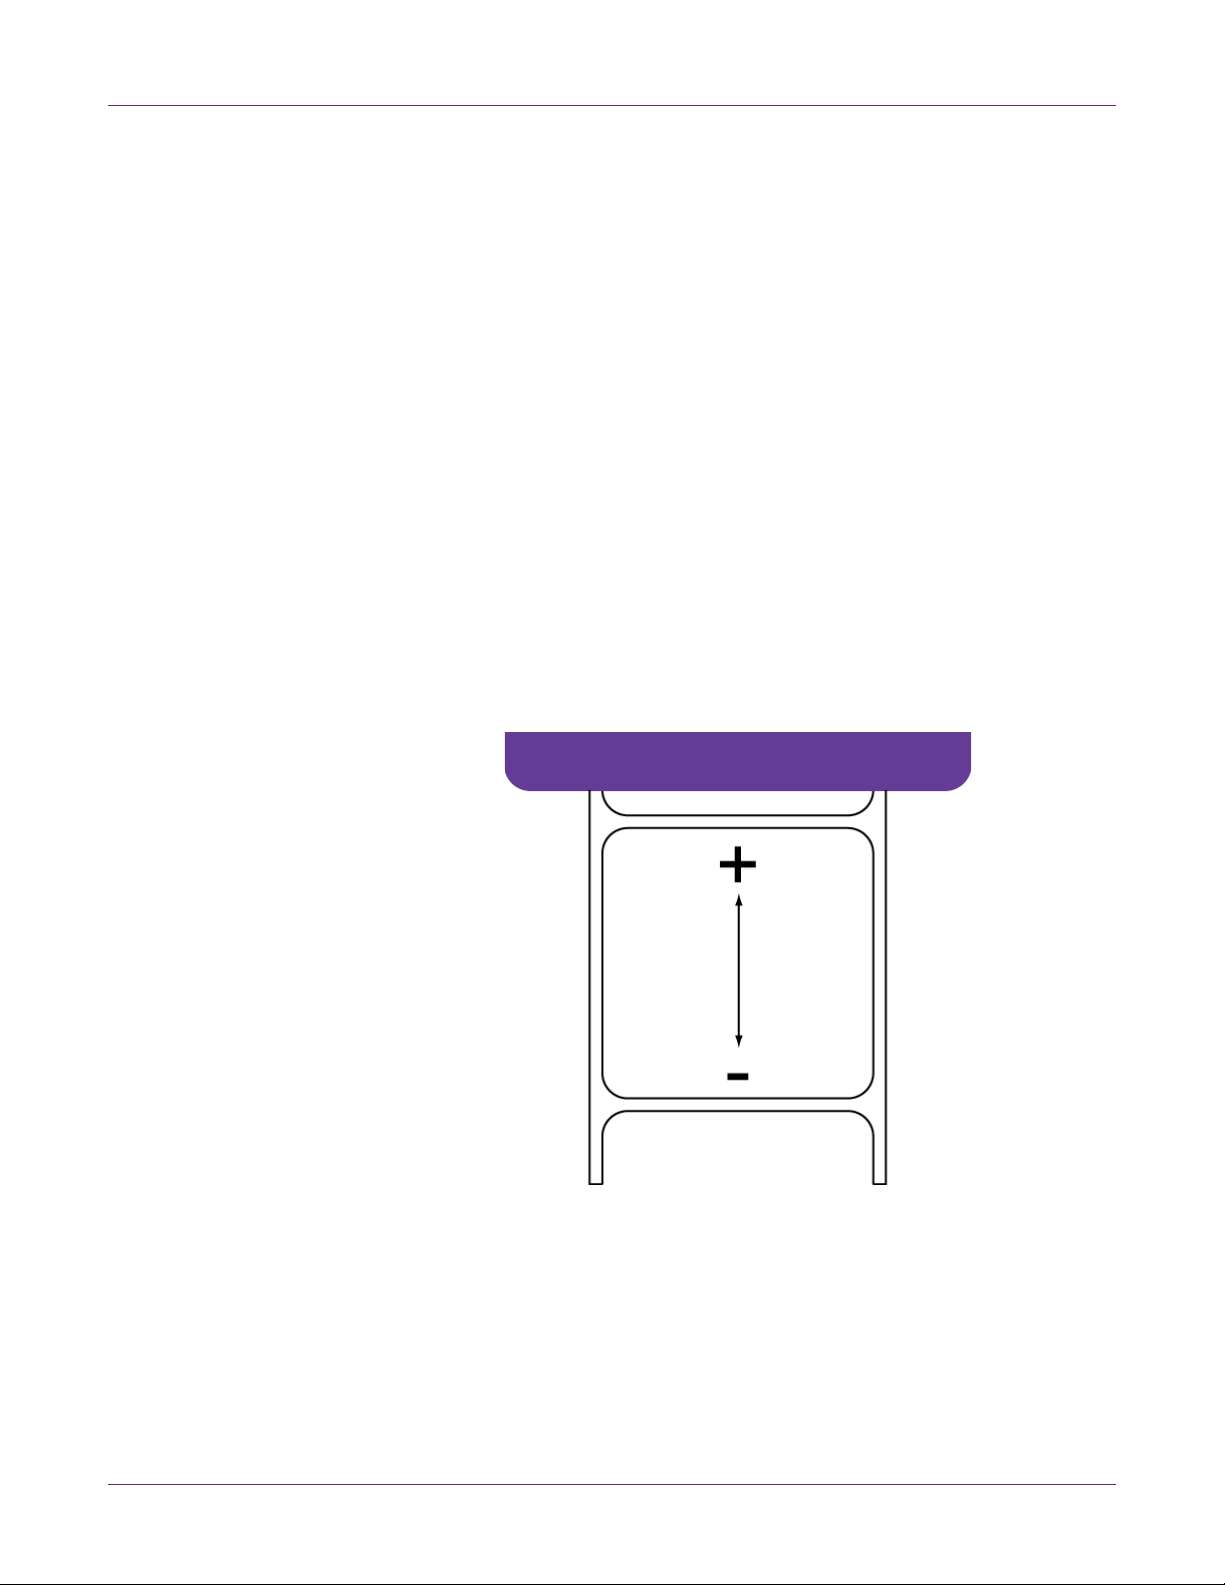
Setting the Vertical Baseline
If you send the same job to two or more QL-800 printers and notice that the image
prints in different locations, you can move the vertical baseline of a printer.
Note: Adjusting the baseline is needed only for synchronizing the output of two or
more printers. Baselines are adjusted at the factory and should be close from printer to
printer. If you are using one QL-800, baseline adjustment is not necessary.
1 Launch the QL-800 Maintenance Utility.
From the Windows Start Menu, choose Start > All Programs > QL-800 > QL-800
Maintenance Utility. A language and printer prompt will open.
Select a display language and the QL-800 printer you want to connect to. Choo se
OK.
2 Choose the Print Settings tab.
3 To read the vertical baseline value from the printer and set the Vertical Baseline
control accordingly, choose Read From Printer.
4 Enter a vertical baseline value.
In the following illustration, a label is exiting the printer. Note the positive and
negative adjustment directions.
5 To save the vertical baseline value, choose Save to Printer.
Setting the Horizontal Baseline
If you send the same job to two or more QL-800 printers and notice that the image
prints in different locations, you can move the horizontal baseline of a printer.
50 QL-800 User Guide

QL-800 Maintenance Utility
Note: Adjusting the baseline is needed only for synchronizing the output of two or
more printers. Baselines are adjusted at the factory and should be close from printer to
printer. If you are using one QL-800, baseline adjustment is not necessary.
1 Launch the QL-800 Maintenance Utility.
From the Windows Start Menu, choose Start > All Programs > QL-800 > QL-800
Maintenance Utility. A language and printer prompt will open.
Select a display language and the QL-800 printer you want to connect to. Choo se
OK.
2 Choose the Print Settings tab.
3 To read the horizontal baseline value from the printer and set the Horizontal
Baseline control accordingly, choose Read From Printer.
4 Enter a horizontal baseline value.
In the following illustration, a label is exiting the printer. Note the positive and
negative adjustment directions.
5 To save the horizontal baseline value, choose Save to Printer.
Setting the Cut/Stop Position
The cut/stop position setting adjusts the position at which media is fed after printing.
You can adjust the cut/stop position -20 to +20 mm.
1 Launch the QL-800 Maintenance Utility.
From the Windows Start Menu, choose Start > All Programs > QL-800 > QL-800
Maintenance Utility. A language and printer prompt will open.
Select a display language and the QL-800 printer you want to connect to. Choo se
OK.
QL-800 User Guide 51

QL-800 Maintenance Utility
Cleaning Tab
2 Choose the Print Settings tab.
3 To read the cut/stop position value from the printer and set the Cut/Stop Position
control accordingly, choose Read From Printer.
4 Enter a cut/stop position value.
• Positive values result in more media bein g fe d after pr inting before th e med ia
stops.
• Negative values result in less media being fed after printing before the media
stops.
5 To save the cut/stop position values, choose Save to Printer.
Use the Cleaning tab to set up auto-maintenance, clean the printheads, and prepare
the printer for transport.
Setting up Auto-Maintenance
You can schedule automatic maintenance routines for the printer. During an
auto-maintenance routine, the printer will perform a predefined cleaning of the
printhead. This maintenance helps ensure print quality.
52 QL-800 User Guide

QL-800 Maintenance Utility
Note: T he aut o-m ain te na n ce ro ut ine use s ink an d ot he r co ns um a ble s. Ru n the
auto-maintenance routine only as often as needed to maintain print quality.
1 Launch the QL-800 Maintenance Utility.
From the Windows Start Menu, choose Start > All Programs > QL-800 > QL-800
Maintenance Utility. A language and printer prompt will open.
Select a display language and the QL-800 printer you want to connect to. Choo se
OK.
2 Choose the Cleaning tab.
3 To read the auto-maintenance schedule values from the printer and set the
auto-maintenance controls accordingly, choose Read From Printer.
4 Set up the auto-maintenance schedule options.
• Pre-Job - Performs maintenance at the start of each print job.
• Mid-Job every - Performs maintenance during print jobs after the specified
number of meters have been printed.
• Post-Job - Performs maintenance at the end of each print job.
• When Idle every - Performs maintenance when the printer is idle for the
specified number of minutes.
• On Startup - Performs maintenance when the printer is powered on.
• On Shutdown - Performs maintenance before the printer is powered off.
5 To save the auto-maintenance setting s, choo se Save to Printer.
Cleaning Printheads
If you suspect print quality issues related to banding, clogged nozzles, or printing
defects, you might want to initiate a cleaning.
Printhead cleaning cannot be done during a print job or if an error is occurring. When
cleaning is in progress, do not perform any other operation.
Note: Cleaning the printhead consumes ink. Clean the printhead only when
necessary.
The cleaning options discussed in this procedure are also available in the Cleaning
menu of the QL-800 Status Monitor.
1 Launch the QL-800 Maintenance Utility.
From the Windows Start Menu, choose Start > All Programs > QL-800 > QL-800
Maintenance Utility. A language and printer prompt will open.
Select a display language and the QL-800 printer you want to connect to. Choo se
OK.
2 Choose the Cleaning tab.
3 Choose a cleaning option.
QL-800 User Guide 53

QL-800 Maintenance Utility
• Light - Start with light cleaning to resolve minor print defects. Then print a test
label. If the issue is not resolved, use the heavy cleaning method.
• Heavy - Use heavy cleaning to resolve major print defects, or when light
cleaning has not fully resolved a print defect.
If multiple heavy cleanings do not resolve the issue, contact Technical Support.
Preparing for Moving
Before moving the printer a short distance in your building, such as to a different flo or,
prepare it using the following instructions. This procedure will drain ink from the
printhead to avoid leakage when moving the printer a short distance.
1 Launch the QL-800 Maintenance Utility.
From the Windows Start Menu, choose Start > All Programs > QL-800 > QL-800
Maintenance Utility. A language and printer prompt will open.
Select a display language and the QL-800 printer you want to connect to. Choo se
OK.
2 Choose the Cleaning tab.
3 Choose Before Moving. Follow the on-screen instructions to complete this
procedure.
4 Power off the printer.
5 Carefully move the printer.
6 After setting up the printer in the new location, return to the Cleaning tab in the
QL-800 Maintenance Utility. Choose After Moving. Follow the on-screen
instructions to complete this procedure.
Preparing for Shipping
Before shipping the printer over long distances, prepare it using the following
instructions. This procedure will drain ink from the printhead and guide you through the
printhead removal process. Use this procedure when shipping the printer or moving
longer distances.
Note: The original packing materials are required for this procedure.
1 Launch the QL-800 Maintenance Utility.
From the Windows Start Menu, choose Start > All Programs > QL-800 > QL-800
Maintenance Utility. A language and printer prompt will open.
Select a display language and the QL-800 printer you want to connect to. Choo se
OK.
2 Choose the Cleaning tab.
3 Choose Before Shipping. Follow the on-screen instructions to complete this
procedure.
4 Power off the printer.
54 QL-800 User Guide

5 Pack the printer in its original packing material for shipping.
6 After setting up the printer in the new location, return to the Cleaning tab in the
System Logs Tab
Use the System Logs tab to view the error history and save log files. It also provides
a convenient way to e-mail QuickLabel Support.
QL-800 Maintenance Utility
QL-800 Maintenance Utility. Choose After Shipping. Follow the on-screen
instructions to complete this procedure.
Viewing the Error History
1 Launch the QL-800 Maintenance Utility.
From the Windows Start Menu, choose Start > All Programs > QL-800 > QL-800
Maintenance Utility. A language and printer prompt will open.
Select a display language and the QL-800 printer you want to connect to. Choo se
OK.
2 Choose the System Logs tab.
3 Use the scroll bars to browse the error history of the printer.
QL-800 User Guide 55

QL-800 Maintenance Utility
Saving Log Files
1 Launch the QL-800 Maintenance Utility.
From the Windows Start Menu, choose Start > All Programs > QL-800 > QL-800
Maintenance Utility. A language and printer prompt will open.
Select a display language and the QL-800 printer you want to connect to. Choo se
OK.
2 Choose the System Logs tab.
3 Choose Save Error History to File to save the error history to a text file on your
PC.
After the log file is created, a message will appear indicating the log was created
successfully.
Parts Replacement Tab
Use the Parts Replacement tab to replace printer wear items.
56 QL-800 User Guide

QL-800 Maintenance Utility
Replacing the Printhead Assembly
Use the following procedure to replace the printhead assembly. This process will
replace the printhead for each color.
Note: Wear protective gloves to prevent ink from staining your hands during this
procedure.
1 Launch the QL-800 Maintenance Utility.
From the Windows Start Menu, choose Start > All Programs > QL-800 > QL-800
Maintenance Utility. A language and printer prompt will open.
Select a display language and the QL-800 printer you want to connect to. Choo se
OK.
2 Choose the Parts Replacement tab.
3 Select Printhead. Then choose Start. Follow the on-screen instructions to
complete this procedure.
Replacing the Cutter
Use the following procedure to replace the cutter.
Note: The cutter blade is sharp. Use caution to avoid personal injury or damage to
clothing when working with cutting blades or around exposed blade surfaces.
1 Launch the QL-800 Maintenance Utility.
From the Windows Start Menu, choose Start > All Programs > QL-800 > QL-800
Maintenance Utility. A language and printer prompt will open.
Select a display language and the QL-800 printer you want to connect to. Choo se
OK.
2 Choose the Parts Replacement tab.
3 Select Cutter. Then choose Start. Follow the on-screen instructions to complete
this procedure.
Replacing the Aerosol Filter
Use the following procedure to replace the aerosol filter.
Note: Wear protective gloves to prevent ink from staining your hands during this
procedure.
1 Launch the QL-800 Maintenance Utility.
From the Windows Start Menu, choose Start > All Programs > QL-800 > QL-800
Maintenance Utility. A language and printer prompt will open.
Select a display language and the QL-800 printer you want to connect to. Choo se
OK.
2 Choose the Parts Replacement tab.
3 Select Aerosol Filter. Then choose Start. Follow the on-screen instructions to
complete this procedure.
QL-800 User Guide 57

QL-800 Maintenance Utility
Replacing the Maintenance Cartridge
When the maintenance cartridge is filled to capacity with collected ink, printing stops.
An error message and LED indicate this condition.
• A message indicating the maintenance cartridge is full will be displayed in the
Status Monitor and System Logs tab of the Maintenance Utility.
• The non-ink consumables LED will illuminate (solid).
Use the following procedure to replace the maintenance cartridge.
Note: For safety, keep the maintenance cartridge out of the reach of children. If ink is
accidentally ingested, contact a physician immediately.
• To prevent ink from leaking from a used maintenance cartridge , avoid dropping the
cartridge or storing it at an angle. Otherwise, ink may leak and cause stains.
• Ink adheres to the maintenance cartridge after it has been used. Handle the
maintenance cartridge carefully during replacement. The ink may stain clothing.
Note: Wear protective gloves to prevent ink from staining your hands during this
procedure.
1 Launch the QL-800 Maintenance Utility.
From the Windows Start Menu, choose Start > All Programs > QL-800 > QL-800
Maintenance Utility. A language and printer prompt will open.
Select a display language and the QL-800 printer you want to connect to. Choo se
OK.
2 Choose the Parts Replacement tab.
3 Select Maintenance Cartridge. Then choose Start. Follow the on-screen
instructions to complete this procedure.
58 QL-800 User Guide

Advanced Tab
QL-800 Maintenance Utility
Replacing the Maintenance Roller
Use the following procedure to replace the maintenance roller.
Note: Wear protective gloves to prevent ink from staining your hands during this
procedure.
1 Launch the QL-800 Maintenance Utility.
From the Windows Start Menu, choose Start > All Programs > QL-800 > QL-800
Maintenance Utility. A language and printer prompt will open.
Select a display language and the QL-800 printer you want to connect to. Choo se
OK.
2 Choose the Parts Replacement tab.
3 Select Main tenance Roller. Then choose Start. Follow the on-screen instructions
to complete this procedure.
The Advanced tab is reserved for use only by Technical Support.
QL-800 User Guide 59

QL-800 Maintenance Utility
60 QL-800 User Guide

5
Replacing Ink Cartridges
When the remaining ink level becomes low, a low ink message will be displayed on the
Status Monitor and in the System Logs tab of the maintenance utility. When an ink
cartridge is out of ink, an out of ink message will be displayed and printing will stop.
Additionally, four yellow LEDs on the printer indicate ink status. Flashing LEDs indicate
low ink. Illuminated LEDs indicate empty ink.
The printer has four ink cartridges: black (K), cyan (C), magenta (M), and yellow (Y).
Confirm the ink status and replace the appropriate ink cartridge.
Use the following instructions to replace ink cartridges. Before you begin, make sure
the printer is in an idle state.
Warning: For safety, keep ink cartridges out of the reach of children. If ink is
accidentally ingested, contact a physician immediately.
1 Open the main side door.
Printer Maintenance
QL-800 User Guide 61

Printer Maintenance
2 Open the ink cartridge latch for the empty ink cartridge. The latch can be opened
by pressing the top of the locking mechanism and pulling outward.
3 Remove the empty ink cartridge.
4 Slide in the new ink cartridge, septum end first, label side up. Push the cartridge in
all the way.
You will feel slight resistance near the end of this process as the ink cartridge
engages the ink needles inside the printer.
Caution: There are sharp needles in the ink cartridge slot. Never put your fingers
in this area.
Note: The printer is designed so that ink cartridges cannot be inserted in the
wrong slots. Do not attempt to insert ink cartridges in the wrong slots.
62 QL-800 User Guide

Cleaning
Printer Maintenance
5 Close the ink cartridge latch.
6 Close the main side door.
Cleaning the Printer Exterior
Over time, the plastic exterior panels of the printer may accumulate dust, dirt, etc. You
can clean these panels as needed.
1 Dampen a clean, lint-free cloth with water.
2 Gently clean the plastic exterior surfaces using the cloth.
Anti-static electronic equipment cleaner may be used for exterior cleaning as
needed.
Cleaning the Input Pinch Rollers
As media is fed into the printer, it is advanced by a series of rollers just inside the media
entry slot. Over time, these rollers may accumulate dust or adhesive residue. You can
clean these input pinch rollers as needed.
1 Remove media from the printer.
2 Power off the printer.
3 On the rear of the printer, turn the power inlet switch off.
4 Dampen a clean, lint-free cloth with deionized water.
Do not use paper towels, napkins, or any other material that may leave lint or debris
behind while cleaning. Problems can occur if lint enters the interior of the printer.
5 Wrap the cloth around the end of a flat wooden stick, such as a paint stirrer.
QL-800 User Guide 63

Printer Maintenance
[1]
6 Lift the roller handle [1] to open the input pinch rollers. There are two rollers on th e
top and one roller on the bottom of the media entry slot.
7 Insert the cloth end of the wooden stick into the roller area. Clean the rollers using
a side-to-side motion. You can rotate the rollers and expose other roller areas for
cleaning by using an in/out motion.
8 When you are finished cleaning the rollers, release the roller handle and the rollers
will return to their normal position.
9 If the rollers are damp from cleaning, allow them to dry completely before loading
media.
Cleaning the Maintenance Tray Area
During normal operation, waste ink is collected in the maintenance cartridge.
Occasionally, drops of ink may be deposited outsid e of th e ca rtr idg e into the
maintenance tray area. You can temporarily remove the maintenance cartr idge and
clean the maintenance tray area as needed.
Note: For safety, keep the maintenance cartridge out of the reach of children. If ink is
accidentally ingested, contact a physician immediately.
• To prevent ink from leaking from a used maintenance cartridge , avoid dropping the
cartridge or storing it at an angle. Otherwise, ink may leak and cause stains.
• Ink adheres to the maintenance cartridge after it has been used. Handle the
maintenance cartridge carefully. The ink may stain clothing.
Note: Wear protective gloves to prevent ink from staining your hands during this
procedure.
1 Power off the printer.
2 On the rear of the printer, turn the power inlet switch off.
3 Open the lower side door.
4 Grasp the maintenance cartridge and carefu lly slide it out of the printer. Put the
maintenance cartridge on a flat surface during the cleaning procedure.
64 QL-800 User Guide

Printer Maintenance
5 Dampen a clean, lint-free cloth with deionized water.
Do not use paper towels, napkins, or any other material that may leave lint or debris
behind while cleaning. Problems can occur if lint enters the interior of the printer.
6 Use the cloth to clean the empty maintenance tray area inside the printer.
7 When you are finished cleaning the maintenance tray area, reinstall the
maintenance cartridge.
8 Close the lower side door.
Cleaning the Transport Belts
Belts on the transport unit advance media through the printer. Occasionally, drops of
ink may be deposited onto the belts. You can clean the transport belts as needed.
Note: Wear protective gloves to prevent ink from staining your hands during this
procedure.
1 Remove media from the printer.
2 Open the main side door.
QL-800 User Guide 65

Printer Maintenance
[1]
3 Grasp the handle on the transport unit. Then pull the transport unit straight out of
the printer.
Note: If the yellow transport unit shipping lock is installed, you will not be able to
remove the transport unit. You must first remove the shipping lock by rotating it
counterclockwise and then pulling it straight out. This lock is usually removed
during the unpacking process.
4 Place the transport unit on a flat surface.
5 Dampen a clean, lint-free cloth with deionized water.
Do not use paper towels, napkins, or any other material that may leave lint or debris
behind while cleaning. Problems can occur if lint enters the interior of the printer.
6 Hold the transport unit cutter frame [1] with one hand. With your other hand, use
the cloth to clean the four belts on the transport unit.
66 QL-800 User Guide

Printer Maintenance
7 If necessary, you can grasp and move the belts manually in either direction to
expose more belt surface area for cleaning. All four belts will move at the same
time.
8 If the belts are damp from cleaning, allow them to dry completely before reinstalling
the transport unit.
QL-800 User Guide 67

Printer Maintenance
68 QL-800 User Guide

Troubleshooting
6
Error Messages
# Error Messages Problem Solution
1001 Paper Path Error The printer cannot move media
into the proper position.
1002 No Media at Pinch There is no media at the load-
ing pinch (where the media
enters the printer).
1003 Unwind too Slow The mandrel is moving slower
than expected.
1004 Unwind too Fast The mandrel is moving faster
than expected.
Look for and clear a potential
jam.
Press and release the power
key to resume the job. Or press
and hold the pause/resume key
to cancel the job.
Load media.
Press and release the power
key to resume the job. Or press
and hold the pause/resume key
to cancel the job.
Look for and clear obstructions
at the unwind mandrel.
Press and release the power
key to resume the job. Or press
and hold the pause/resume key
to cancel the job.
Look for and clear obstructions
at the unwind mandrel.
Press and release the power
key to resume the job. Or press
and hold the pause/resume key
to cancel the job.
1005 Out of Media The media roll is empty. Load media.
Press and release the power
key to resume the job. Or press
and hold the pause/resume key
to cancel the job.
QL-800 User Guide 69

Troubleshooting
# Error Messages Problem Solution
1006 Cutter Jam The cutter did not make it to the
opposite side.
Clear the obstruction in the cutter area.
Press and release the power
key to resume the job. Or press
and hold the pause/resume key
to cancel the job.
1007 Fan Error NA NA
1008 Continuous Media Selected Attempting an operation incom-
patible with continuous media
Press and release the power
key to clear the error.
(a single label feed, for example).
1009 Can't Calibrate Media The printer cannot read TOF
marks.
Press and release the power
key to clear the error.
Confirm the media meets spec-
ifications.
100A Main Side Door Open The main side door was
Close the door.
opened during a print job.
Press and release the power
key to resume the job. Or press
and hold the pause/resume key
to cancel the job.
100B Top Cover Open The top cover was opened dur-
ing a print job.
100C Maintenance Cartridge Missing The printer cannot detect the
maintenance cartridge.
100D Transport not Installed The printer cannot detect the
transport unit.
Close the top cover.
Press and release the power
key to resume the job. Or press
and hold the pause/resume key
to cancel the job.
Install the maintenance car-
tridge. If a maintenance car-
tridge is installed, try
repositioning it.
Press and release the power
key to clear the error.
Install the transport unit. If the
transport unit is installed, try
repositioning it.
Press and release the power
key to clear the error.
70 QL-800 User Guide

Troubleshooting
# Error Messages Problem Solution
100E Belt Motor Stall The belt motor has stalled. Remove the transport unit and
inspect it.
Press and release the power
key to resume the job. Or press
and hold the pause/resume key
to cancel the job.
100F Pinch Motor Stall The pinch motor has stalled. Inspect the loading pinch
(where the media enters the
printer).
1010 Can't Start Vacuum Fans There is an electronics failure. Turn the printer power off, wait
three seconds, and turn the
power on again.
If the issue persists, contact
Technical Support.
1011 Unwind Over Current Unwind motor requires more
current than should be sup-
Look for and clear obstructions
at the unwind mandrel.
plied.
Press and release the power
key to resume the job. Or press
and hold the pause/resume key
to cancel the job.
1012 TOF Mark not Found The printer cannot read TOF
marks.
Press and release the power
key to clear the error.
Confirm the media meets spec-
ifications.
1013 Internal Error There is an electronics failure. Press and release the power
key to clear the error.
Turn the printer power off, wait
three seconds, and turn the
power on again.
If the issue persists, contact
Technical Support.
1014 Internal Error There is an electronics failure. Press and release the power
key to clear the error.
Turn the printer power off, wait
three seconds, and turn the
power on again.
If the issue persists, contact
Technical Support.
QL-800 User Guide 71
Troubleshooting
# Error Messages Problem Solution
1015 Internal Error There is an electronics failure. Press and release the power
key to clear the error.
Turn the printer power off, wait
three seconds, and turn the
power on again.
If the issue persists, contact
Technical Support.
1016 Can't Tighten Unwind The printer cannot tighten
media at the supply mandrel.
Look for and resolve issues at
the unwind mandrel.
If the issue persists, contact
Technical Support.
1017 Print Engine Start Timeout The printer did not detect a
top-of-form mark after the job
Look for and clear a potential
jam.
was set to start.
1018 Loading Jam NA N A
1019 Can't Find Media - Loading NA NA
101A TOF Calibration The printer is not ready to start
calibration.
Press and hold the
pause/resume key to cancel
the job.
Press and release the power
key to clear the error.
1020 Shared Memory Read Timeout There is an internal communi-
cations failure.
Press and release the power
key to clear the error.
Turn the printer power off, wait
three seconds, and turn the
power on again.
If the issue persists, contact
Technical Support.
1021 Shared Memory Write Timeout There is an internal communi-
cations failure.
Press and release the power
key to clear the error.
Turn the printer power off, wait
three seconds, and turn the
power on again.
If the issue persists, contact
Technical Support.
72 QL-800 User Guide

Troubleshooting
# Error Messages Problem Solution
1022 Shared Memory Response
Timeout
There is an internal communi-
cations failure.
1023 System Initialization Timeout The print engine was not online
in the expected time.
1024 Unexpected Engine Response There is an internal communi-
cations failure.
Press and release the power
key to clear the error.
Turn the printer power off, wait
three seconds, and turn the
power on again.
If the issue persists, contact
Technical Support.
Turn the printer power off, wait
three seconds, and turn the
power on again.
If the issue persists, contact
Technical Support.
Press and release the power
key to clear the error.
Turn the printer power off, wait
three seconds, and turn the
power on again.
If the issue persists, contact
Technical Support.
1030 Can't Erase EEPROM An internal EEPROM failure
occurred.
1031 Can't Program EEPROM An internal EEPROM failure
occurred.
Press and release the power
key to clear the error.
Turn the printer power off, wait
three seconds, and turn the
power on again.
If the issue persists, contact
Technical Support.
Press and release the power
key to clear the error.
Turn the printer power off, wait
three seconds, and turn the
power on again.
If the issue persists, contact
Technical Support.
QL-800 User Guide 73

Troubleshooting
# Error Messages Problem Solution
1032 Invalid EEPROM Checksum An internal EEPROM failure
occurred.
1038 Upgrade Failure There was an internal upgrade
failure.
1039 Upgrade Failure There was an internal upgrade
failure.
Press and release the power
key to clear the error.
Turn the printer power off, wait
three seconds, and turn the
power on again.
If the issue persists, contact
Technical Support.
Press and release the power
key to clear the error.
Turn the printer power off, wait
three seconds, and turn the
power on again.
If the issue persists, contact
Technical Support.
Press and release the power
key to clear the error.
Turn the printer power off, wait
three seconds, and turn the
power on again.
103A Upgrade Failure There was an internal upgrade
failure.
1040 Failed to Read Job Status Corrupt or incomplete job sta-
tus message was received
from print engine.
If the issue persists, contact
Technical Support.
Press and release the power
key to clear the error.
Turn the printer power off, wait
three seconds, and turn the
power on again.
If the issue persists, contact
Technical Support.
Press and release the power
key to clear the error.
Turn the printer power off, wait
three seconds, and turn the
power on again.
If the issue persists, contact
Technical Support.
74 QL-800 User Guide

Troubleshooting
# Error Messages Problem Solution
1042 Can't find Job Parameter Job status message does not
contain valid horizontal offset
parameter.
1043 Can't find Job Parameter Job status message does not
contain valid vertical offset
parameter.
1044 Can't find Job Parameter Job status message does not
contain valid top-of-form
parameter.
1045 Can't find Job Parameter Job status message does not
contain valid cut at end of job
parameter.
1046 Can't find Job Parameter Job status message does not
contain valid cut every N
parameter.
Press and release the power
key to resume the job. Or press
and hold the pause/resume key
to cancel the job.
Press and release the power
key to resume the job. Or press
and hold the pause/resume key
to cancel the job.
Press and release the power
key to resume the job. Or press
and hold the pause/resume key
to cancel the job.
Press and release the power
key to resume the job. Or press
and hold the pause/resume key
to cancel the job.
Press and release the power
key to resume the job. Or press
and hold the pause/resume key
to cancel the job.
1050 The Maint Cartridge is Full. A print job cannot start if the
maintenance cartridge is full.
1051 Not ready to print The printer is unable to start a
print job in the current state.
10FF Print Engine Error There was an error with the
print engine.
Install a new maintenance cartridge.
Complete the current task.
Press and release the power
key to clear the error.
Clear the error using the Main-
tenance Utility or Status Monitor.
QL-800 User Guide 75

Troubleshooting
[1]
Removing a Media Jam
If a media jam occurs during a print job, the red error LED will light on the front panel
and the specific error message will be displayed in the Status Monitor.
Note: After clearing a media jam, you will need to reprint labels that were not
completed before the jam occurred.
1 If media is exiting the front of the printer, perform a manu a l cut by pressing and
holding the cut key for approximately one second.
2 Use scissors to cut the media at the entry poin t [1] on the back of the printer.
76 QL-800 User Guide

Troubleshooting
[2]
3 Open the main side door.
4 Lift the roller handle [2] to open the input pinch rollers. There are two rollers on th e
top and one roller on the bottom of the me dia entr y slot. The rollers must be open
to allow removal of the transport unit and remaining media in the next step.
QL-800 User Guide 77

Troubleshooting
5 Grasp the handle on the transport unit. Then pull the transport unit straight out of
the printer.
Note: If the yellow transport unit shipping lock is installed, you will not be able to
remove the transport unit. You must first remove the shipping lock by rotating it
counterclockwise and then pulling it straight out. This lock is usually removed
during the unpacking process.
6 Release the roller handle and the rollers will return to their normal position.
7 Inspect the transport unit and the media travel path inside the printer. Remove the
jam.
Warning: If you need to cut media inside the printer with scissors, first power off
the printer and turn the power inlet switch off on the rear of the printer.
8 After removing the jam, reinstall the tr ansport unit.
9 Reload the media.
78 QL-800 User Guide

7
Location
Safety Warnings and Precautions
Before using this printer, please read this section thoroughly. Warnings to heed and
important matters are described here to prevent user injury and printer damage.
Do not attempt to operate this printer in any way other than th ose mentioned in the User
Guide.
Make sure there is sufficient space around the pr inte r .
Warning
• Never place items on the printer. If such items were to fall on the printer, this could
cause a fire, electrical shock, or damage to the printe r .
• The electrical contacts inside the printer become extremely hot during normal
operation. To avoid causing a fire, never sto re flammable substances like alcohol,
thinner, etc. near the printer.
Caution
Avoid using the printer in the following types of locations.
• Where the printer is exposed to open air or high humid ity. This cou ld cause a fir e,
serious electrical shock, or damage to the printer. Also, if the printer is carried into
a warm room on a cold day, this could cause con densation inside the printer. If this
happens, allow the printer to sit for at least 1 hour at room tempera ture to adapt to
the ambient temperature and humidity.
• Never place the printer on a slanted or unstable stand or table. If the printer is
dropped or slides off, this could cause personal injury.
• Never expose the printer to dust. This could cause a fire, serious electrical shock,
or damage to the printer. Also, never locate the printe r near a water faucet or in any
other location where it will be exposed to water. This could cause serious electrical
shock.
• Never set up the printer in a location that is exposed to direct sunlight, high
temperature, or open flame. This could cause a fire or electr ical shock.
• Use the printer in an environment where temperature and humidity are within the
ranges of 41 to 95 degrees Fahrenheit (5 to 35 de grees Celsius) an d 20% to 80%
RH (with no condensation).
• Never block the ventilation ports on the printer. A blocked ventilation port could
cause heat to build up inside the printer and cause a fire. Also, place the printer in
an area where you can disconnect the power cord immediately; keep the area
around the power cord connection free of obstacles. This allows yo u to unplug the
power cord quickly in an emergency.
QL-800 User Guide 79

Safety Warnings and Precautions
Power Supply and Power Cord
Warning
• To avoid causing a fire or serious electrical shock, always use the power cord
provided with this printer. To avoid a fire or electrical shock, do not use an
extension cord.
• To avoid causing a fire or serious electrical shock, make sure that the power plug
is securely and completely inserted into the power source. To avoid personal injury
from an electrical shock, never handle the power cord or plug when your hands are
wet.
Caution
• Be sure to turn off the printer before removing the power plug from the outlet.
• Check the power plug and cord for any problem (ab normal heat, rust, bend, cracks,
scratches, etc.) at least once a month. If any problem with the power plug or cord
is found, replace it. Using it without replacement can result in a fire or electrical
shock hazard.
• To avoid damaging the power plug, which could cause a short circuit and cause a
fire or electrical shock, never pull on the power cord to unplug the cord from the
power supply. Always grip the plug to remove it from the power supply.
General Safety
• If the printer will not be used for a long period, for your safety disconnect the power
cord from the power source.
• Never use any power source other than the o ne rated for the printer. This pr inter is
designed to be used in the region where purchased. Also, make sure the power
source can supply sufficient power for the printer. This could cause a fire or serious
electrical shock, or damage the printer.
Warning
• If you find a large ink leak, switch the printer off immediately, disconnect the power
plug from the power source, and call for service. If you continue to use the printer,
this could cause a fire or serious electrical shock.
• Never clean the printer with water or any flammable liquid (alcohol, benzene,
thinner, etc.) either applied directly or with a cloth. If you accidentally spill liquid on
the printer, switch the printer off immediately, disconnect the power plug from the
power source, and call for service. If you continue to use the printer, this could
cause a fire or serious electrical shock.
• If the printer emits smoke, unusual odors, or makes noises, leaving it could cause
a fire or serious electrical shock or damage to the printer. Switch the printer off
immediately, disconnect the power plug from the power source, make sure that the
printer has stopped smoking, and call for service. Do not attempt to repair the
printer by yourself. This could cause a fire or serious electrical shock.
• Use only a slightly damp cloth, thoroughly wrung out, to clean the printer surfaces.
Never use alcohol, thinner or any other flammable liquids. If such materials come
80 QL-800 User Guide

Safety Warnings and Precautions
into contact with electrical components inside the printer, this could cause a fire or
serious electrical shock.
Caution
• There are high voltage points inside the printer. To avoid a fire or electrical shock,
never attempt to disassemble or repair the printer.
• Never insert or drop any metal objects into the printer when it is open. This could
cause a fire or serious electrical shock, or damage the printer. If something falls
into the printer accidentally, switch the printer off immediately, disconnect the
power plug from the power source, and call for service. If you continue to use the
printer, this could cause a fire or serious electrical shock.
• If the printer is dropped and damaged, switch the printer off immediately,
disconnect the power plug from the power source, and call for service. If you
continue to use the printer, this could cause a fire or serious electrical shock.
• To avoid a fire or electrical shock, never use flammable sprays around th e p rinte r.
• Never remove the fixed covers from the printer. This could cause a serious
electrical shock.
Important
• While the printer is printing, do not open any cove rs and do n ot remove th e power
plug.
• Do not apply excessive force or strong shock to the pr inter. Do ing so can resu lt in
a machine failure or impair printer quality. Be sure to open/close the covers slowly.
Moving the Printer
Warning
• Call the dealer for advice before you ship the printer a long distance or move the
printer by car or truck where it may be subjected to shock and vibration. Moving the
printer without the proper preparation could subject it to shocks and vibrations
which could damage the printer and cause a fire.
Caution
• Before moving the printer, use the appropriate procedures to drain ink from the
printhead or entire print system. See “Preparing for Moving” on page 54. See
“Preparing for Shipping” on page 54.
• Before you move the printer to another location in the same building, disconnect
the power cord and make sure that all other cables are disconnected.
QL-800 User Guide 81

Safety Warnings and Precautions
• The printer weighs about 70 pounds (31.75 kilograms). Two persons standing at
the front and back of the printer respectively must lift the printer by the indicated lift
points.
Lift the front of the printer by the recessed handle. Lift th e rear of the printer by th e
flat area of the purple frame above the mandrel.
Caution: Do not lift the printer by the mandrel.
• Always hold the printer level and carry it slowly. If ink is spilled inside the printer
while moving it, this could cause a fire or serious electrical shock or damage the
printer.
Important
• To prevent machine failures, do not relocate or tran sport this printer with the covers
open.
Ink Cartridge and the Maintenance Cartridge
Caution
• Always store these items out of the reach of small children. This prevents
accidents. If a child accidentally swallows ink, seek medical attention immediately.
• If ink gets into your eyes, wash it out with flowing water immediately. If irritation
persists, consult a physician.
• If ink comes into contact with your skin, rinse it off with flowing water immediately.
If irritation persists, consult a physician.
• Never drop or apply excessive force to an ink cartridge or the maintenance
cartridge. Ink can stain clothing and the work area.
• Never attempt to disassemble or modify the ink cartridges. They contain ink, which
may leak out and smear your clothes or things around you.
Important
82 QL-800 User Guide

Safety Warnings and Precautions
• Do not install or remove the ink cartridge or maintenance cartridge unless it ne eds
to be replaced. Doing so can accelerate wear of the pr int er compo n en ts .
QL-800 User Guide 83

Safety Warnings and Precautions
84 QL-800 User Guide

8
Printer Specifications
Printing Technology Thermal Inkjet
Resolution 1600 x 1600 dpi, 1600 x 800 dpi
Label Size/Print Area Width 2.0” (51 mm) - 8.3” (211 mm)
Print Speed 6 ips at 1600 x 1600 dpi
Media Sensing Gap, Reflective (bottom-only), Continu -
Specifications
Printer
Length 1.0” (25 mm) - 30.0” (762 mm)
12 ips at 1600 x 800 dpi
ous; Non-adjustable/fixed sensors
Ink Cartridge Capacity QuickLabel QL-800 CMYK dye car-
tridges, 250mL
Maintenance Cartridge Capacity Approximately 1 million linear inches or
850 mid-job servicing full replacement;
Near full warning at approximately 80%
full
Printhead Life Approximately 250,000 linear inches.
Printhead life varies with image content
and duty cycle, and is reported by the
QL-800 Maintenance Utility so the user
can anticipate end of life. Printing of vertical lines will accelerate printhead wear.
Maintenance Roller Life Approximately 1 million linear inches or
850 mid-job servicing
Ventilation Filter Approximately 500,000 linear inches
Cutter Blade Approximately 100,000 cuts on paper
liner
QL-800 User Guide 85

Specifications
Printer
Label Media Width: 2.125” (54 mm) - 8.425” (214
mm)
Length: 1.125” (29 mm) - 30.125” (765
mm)
Types: Glo ss Paper, Matte Paper and
Synthetic pressure-sensitive; Paper Tag
Stock
Roll: 8” OD (203 mm) QuickLabel®
paper and synthetic labels on 3” ID
(76.2 mm) core
Thickness: 5.5 mil - 7.5 mil (0.140 mm -
0.191mm)
Control Panel 5 buttons - Power, Pause, Feed, Back
Feed, Cut
6 LEDs - Power/Status, Error, Ink Out
C/M/Y/K
Wait Time to Ready On -> Ready 60 seconds
Connectivity USB 2.0; 10/100 BaseT Ethernet, RJ-45
connection
Software Custom QuickLabel Omni® label cre-
ation and print management progra m
suite and QL-800 Windows®
8/7/Vista/XP, Server 2008/2003,
64/32-bit driver
Barcodes All major barcodes supported, including
2D Datamatrix and QR Code
86 QL-800 User Guide

Printer
Environmental Printer Operating
41º F to 95º F (5º C to 35º C), 20% to
90% Relative Humidity (non-condens-
ing) Printer should be installed on level
surface with no more than 1º tilt in any
axis
No longer than 8 weeks powered off or
in standby.
Printer Non-Operating
23º F to 113º F (-5º C to 50º C), 5% to
95% Relative Humidity (non-condens-
ing)
No longer than 2 weeks powered off or
in standby.
Specifications
Ink Storage
32º F to 95º F (0º C to 35º C), 35% to
85% Relative Humidity (non-condens-
ing)
Ink Warranty
24 months from date of production or 6
months after installation in printer
Atmospheric Pressure
1060hPa (795mmHg) - 700hPa
(525mmHg)
Power Requirements 100-240 VAC 50-60 Hz, 2.6A
Power Consumption Operating: 260W (max) Idle: 60W (max)
Dimensions 30.0” L x 20.0” W x 24.0” H (762 mm x
508 mm x 610 mm)
Weight No Supplies: 64 lbs. (29 Kg)
With Supplies: 71 lbs. (32 Kg)
Packaged: 79 lbs. (36 Kg)
Optional Accessories Automatic Label Roll Rewinder
QL-800 User Guide 87

Specifications
Label Specifications
Label
Rollstock 8” OD (203 mm) QuickLabel® paper
and synthetic labels
Label Size/Print Area Width: 2.0” - 8.3” (51 mm - 211 mm)
Length: 1.0” - 30.0” (25 mm - 762 mm)
Construction Wid th (a): 2.125” - 8.425” (54 mm - 214
mm)
Edge Trim Left / Right (b): 0.063” (1.59
mm)
88 QL-800 User Guide

Specifications
Label
Reflective Mark Width (c): 0.75” (19 mm) minimum
Length (d): 0.125” (3.175 mm)
Density: >1.1 (reflective measured with
X-Rite 504) Non-glossy finish
Other Features Gap (e): 0.118” (3.0 mm) - 0.75” (19
mm)
Multi-Across/Down: Yes, 1.0” (25 mm)
min. width, 1.0” (25 mm) min. length
Maximum of 0.25” horizontal and verti-
cal gaps
Butt Cut Label Construction: acceptable
if no print required for length of reflective
mark
Splices: clear tape splices are permissi-
ble
QL-800 User Guide 89

Specifications
90 QL-800 User Guide
 Loading...