

QuickJack BL-3500SLX, BL-5000SLX, BL-5000EXT, BL-6000XLT, BL-7000SLX Setup And Operation Manual
...Page 1
1645 Lemonwood Dr.
Santa Paula, CA, 93060 USA
Toll Free: (888) 262-3880
Tel: (805) 421-5114
quickjack.com
QuickJack™ Portable Car Jack
Setup and Operation Manual
Manual P/N 5900959 — Manual Revision J1 — Released December 2018
Models:
• BL-3500SLX
• BL-5000SLX
• BL-7000SLX
BL-6000XLT
BL-5000EXT
BL-7000EXT
Visit http://www.quickjack.com/setup.html for a video demonstration of QuickJack setup.
QuickJack is designed and engineered by BendPak Inc. in Southern California, USA. Made in China.
IMPORTANT SAFETY INSTRUCTIONS, SAVE THESE INSTRUCTIONS!
⚠ DANGER
Read the
servicing, or maintaining this lift. Failure to follow the instructions and
safety precautions in this manual can result in serious injury or death.
Make sure all other operators also read this manual. Keep the manual
near the product for future reference. By proceeding with setup and
operation, you agree you fully understand the contents of this manual.
entire
contents of this manual
before
installing, operating,
Page 2

Manual. QuickJack™ Portable Car Jack, Setup and Operation Manual, P/N 5900959, Manual Revision J1,
• Only use this product if it can be used safely!
Released December 2018.
Copyright. Copyright © 2018 by BendPak Inc. All rights reserved. You may make copies of this document if you
agree that: you will give full attribution to BendPak Inc., you will not make changes to the content, you do not gain
any rights to this content, and you will not use the copies for commercial purposes.
Trademarks. BendPak and the BendPak logo are registered trademarks of BendPak Inc. QuickJack and
JackPak are trademarks of BendPak Inc. All other company, product, and service names are used for
identification only. All trademarks and registered trademarks are the property of their respective owners.
Limitations. Every effort has been made to ensure complete and accurate instructions are included in this
manual. However, product updates, revisions, and/or changes may have occurred since this manual was
published. BendPak reserves the right to change any information in this manual without incurring any obligation for
equipment previously or subsequently sold. BendPak is not responsible for typographical errors in this manual.
Warranty. The QuickJack warranty is more than a commitment to you: it is also a commitment to the value of
your new product. For full warranty details and to register your new QuickJack product, contact your nearest
QuickJack dealer or visit quickjack.com/warranty.
Safety. Your new product was designed and manufactured with safety in mind. Your safety also depends on
proper training and thoughtful operation. Do not set up, operate, maintain, or repair the unit without reading and
understanding this manual and the labels on the unit.
Owner Responsibility. In order to maintain your product properly and to ensure operator safety, it is the
responsibility of the product owner to read and follow these instructions:
• Follow all setup, operation, and maintenance instructions.
• Make sure product setup conforms to all applicable local, state, and federal codes, rules, and regulations,
such as state and federal OSHA regulations and electrical codes.
• Consult a qualified person or organization to address any special regional structural and/or seismic
requirements specified by any other agencies and/or codes such as the Uniform Building Code (UBC) and/or
International Building Code (IBC).
• Read and follow all safety instructions. Keep them readily available for operators.
• Make sure all operators are properly trained, know how to safely operate the unit, and are properly supervised.
• Do not operate the product until you are certain that all parts are in place and operating correctly.
• Carefully inspect the product on a regular basis and perform all maintenance as required.
• Service and maintain the unit only with approved replacement parts.
• Keep all instructions permanently with the product and make sure all labels are clean and visible.
Unit Information. Enter the Model Number, Serial
Number, and the Date of Manufacture from the label
on your unit. This information is required for part or
warranty issues.
Model:
Serial:
Date of Manufacture:
Page 3

Table of Contents
Introduction 3 Operation 34
Shipping 5 Maintenance 47
Safety 5 Troubleshooting 49
Components 8 Wiring Diagrams 52
Accessories 10 Labels 53
Specifications 11 Parts Sheets 56
FAQ 13 ALI Store 76
Setup Checklist 14 Maintenance Log 77
Setup 15 CE Documentation 78
Introduction
This manual covers all models of the QuickJack portable car jack, which makes Vehicle maintenance
in your garage or at the track fast and easy.
QuickJack models include:
• BL-3500SLX: Raises Vehicles up to 3,500 lbs. on a frame of 62.5"
• BL-5000SLX: Raises Vehicles up to 5,000 lbs. on a frame of 69"
• BL-7000SLX: Raises Vehicles up to 7,000 lbs. on a frame of 69"
• BL-5000EXT: Raises Vehicles up to 5,000 lbs. on an extended frame of 75"
• BL-7000EXT: Raises Vehicles up to 7,000 lbs. on an extended frame of 76.25"
• BL-6000XLT: Raises Vehicles up to 6,000 lbs. on an extremely long frame of 86.5"
All models are CE certified. This manual is mandatory reading for all QuickJack users, including anyone
who sets it up, operates it, maintains it, or repairs it.
⚠ DANGER Be very careful when setting up, operating, maintaining, or repairing your unit;
failure to do so could result in property damage, product damage, injury, or (in very
rare cases) death. Make sure only authorized personnel operate the unit. All repairs
must be performed by an authorized technician. Do not make modifications to the
unit; this voids the warranty and increases the chances of injury or property
damage. Make sure to read and follow the instructions on the labels on the unit.
Keep this manual on or near your QuickJack so that anyone who uses or services it can read it.
For technical support, visit quickjack.com/support or email QuickJack Technical Support at
support@quickjack.com. You can also request parts (be sure to have the serial and model
numbers of your unit available).
QuickJack™ Portable Car Jack 3 P/N 5900959 — Rev. J1 — Dec. 2018
Page 4
IMPORTANT!
LEASE READ
P
Only raise your QuickJack Frames
with a Vehicle on them!
The QuickJack is designed and engineered to be used with the weight of a Vehicle on it. You
should only raise the QuickJack Frames with the weight of a Vehicle on them, even the very
first time you use them. There is simply no reason to raise your QuickJack Frames unless
there’s a Vehicle on them.
Why are we telling you to do it this way? Because your QuickJack Frames may occasionally
become stuck up in the air if you raise them without the weight of a Vehicle. There is nothing
wrong with them if this happens, and the issue can be quickly and easily fixed, it’s just that
they are designed and engineered to work with the weight of a Vehicle.
QuickJack Frames with a Vehicle on them.
Only raise your
And since we have your attention…
Do
not
remove your Vehicle’s tires then lower the QuickJack to the ground.
The QuickJack requires space between the ground and your Vehicle to build up enough force
to raise a Vehicle. It cannot raise a full load from a completely flat starting position.
Do
Not
Do
This is not a problem in normal operation, as the Vehicles you want to raise are being held well
above the ground by their tires. The problem generally happens when people lower the
QuickJack to a completely flat position with the Vehicle’s tires removed.
What do you do if either of these problems happens to you? Refer to Troubleshooting.
This!
QuickJack™ Portable Car Jack 4 P/N 5900959 — Rev. J1 — Dec. 2018
Page 5

To protect yourself, do not sign the bill of lading until
you have inspected the
shipment.
Shipping
Your QuickJack was carefully checked before shipping. Nevertheless, you should thoroughly inspect
the shipment
When you sign the bill of lading, it tells the carrier that the items on the invoice were received in good
condition.
shipment until the carrier makes a notation on the bill of lading that lists the missing and/or damaged
goods.
If you discover missing or damaged goods
lading, notify the carrier at once and request the carrier to make an inspection. If the carrier will not
make an inspection, prepare a signed statement to the effect that you have notified the carrier (on a
specific date) and that the carrier has failed to comply with your request.
It is difficult to collect for loss or damage after you have given the carrier a signed bill of lading. If this
happens to you, file a claim with the carrier promptly. Support your claim with copies of the bill of
lading, freight bill, invoice, and photographs, if available. Our willingness to assist in helping you
process your claim does not make us responsible for collection of claims or replacement of lost or
damaged materials.
before
If any of the items listed on the bill of lading are missing or are damaged, do not accept the
you sign to acknowledge that you received it.
after
you receive the shipment and have signed the bill of
after
Safety
Refer to ANSI/ALI ALIS Standard (R2015) Safety Requirements for Installation and Service of
Automotive Lifts for more information about safely installing your QuickJack.
Important Safety Instructions
When using your garage equipment, basic safety precautions should always be followed, including:
1. Read all instructions.
2. Do not touch hot parts; you could be burned. Always use care with the equipment.
3. Do not operate equipment with a damaged cord or if the equipment has been dropped or
4. Do not let a cord hang over the edge of a table, bench, or counter or come in contact with hot
5. If an extension cord is necessary, a cord with a current rating equal to or greater than that of the
6. Always unplug equipment from electrical outlet when not in use. Never use the cord to pull the plug
7. Let equipment cool completely before putting away. Loop cord loosely around equipment when
damaged — until it has been examined by a qualified service person.
manifolds or moving fan blades.
equipment should be used. Cords rated for less current than the equipment may overheat. Care
should be taken to arrange the cord so that it will not be tripped over or pulled.
from the outlet. Grasp plug and pull to disconnect.
storing.
8. To reduce the risk of fire, do not operate equipment in the vicinity of open containers of flammable
liquids (gasoline).
9. Adequate ventilation should be provided when working on operating internal combustion engines.
QuickJack™ Portable Car Jack 5 P/N 5900959 — Rev. J1 — Dec. 2018
Page 6

10. Keep hair, loose clothing, fingers, and all parts of your body away from moving parts.
11. To reduce the risk of electric shock, do not use on wet surfaces or expose to rain.
12. Use only as described in this manual. Use only manufacturer’s recommended attachments.
13. Always wear safety glasses. Everyday glasses only have impact resistant lenses, they are not
safety glasses.
14. To reduce the risk of injury, close supervision is necessary when this product will be used around
children.
15. To reduce the risk of injury, never overload the drawers or shelves. Refer to loading instructions.
16. To reduce the risk of electric shock or fire, never overload receptacles. Refer to markings for the
proper load on receptacles.
Save these instructions!
QuickJack Safety Information
Please note the following:
• The product is a portable car jack. Use it only for its intended purpose.
• Read this manual thoroughly before installing, operating, servicing, or maintaining your QuickJack.
• The product should only be operated by authorized personnel.
• Do not make any modifications to the product.
• Never exceed the rated capacity of the jack.
• Make sure all operators read and understand this Setup and Operation Manual. Keep the manual
near the device at all times.
• Floor surface must be dry, flat, and have a minimum compressive strength of 500 PSI.
• Avoid using an extension cord; they can overheat. If you must use an extension cord, make sure it
is No. 14 AWG minimum.
• Make a visual inspection of the product before using it
parts. Do not use the product if you find any of these issues. Instead, stop using it, then contact
QuickJack at quickjack.com/support or support@quickjack.com.
• Make a
severely worn electrical cables, Hydraulic Hoses, decals, or warning labels. Do not use the product
until damaged or worn items have been replaced.
• Take care locating the electrical cable and Hydraulic Hoses; you do not want them driven over or
stepped on.
• Always wear heavy-duty footwear and safety glasses.
• While handling a Hydraulic Cylinder or a Hydraulic Hose, also wear gloves. In rare cases, a needlelike stream of hydraulic fluid (even at low pressure) can penetrate fingers, hands, or arms; such a
puncture can feel like a bite, electric shock, or a prick. While it may seem like a minor issue, any
amount of Hydraulic Fluid injected into the human body is a serious issue. Anyone suffering such a
puncture wound should be
extent of the injury. Explain the circumstances of the injury to the attending physician, including
what kind of Hydraulic Fluid was involved. Do not assume a puncture wound that could have been
caused by Hydraulic Fluid is a minor issue; it could be life threatening.
thorough
each time
inspection of the product at least once a year. Replace any damaged or
immediately
taken to a hospital emergency room to determine the
. Check for damage or missing
QuickJack™ Portable Car Jack 6 P/N 5900959 — Rev. J1 — Dec. 2018
Page 7

• Remove all jewelry while working with the product. Dangling jewelry can get caught in moving
parts; metal jewelry can conduct electricity. Avoid wearing loose-fitting clothing.
• Clear the area if a Vehicle is in danger of falling off the jack.
Make sure both Lock Bars are engaged before nearing an elevated Vehicle.
•
• Do not work under an elevated Vehicle unless properly rated Vehicle Jack Stands are used and
placed under the factory-approved Lifting Points.
Symbols
Following are the symbols used in this manual:
⚠ DANGER Calls attention to an immediate hazard that
⚠ WARNING Calls attention to a hazard or unsafe practice that
personal injury.
will
result in death or severe injury.
could
result in death or severe
⚠ CAUTION Calls attention to a hazard or unsafe practice that could result in minor personal
injury, product, or property damage.
Tip Calls attention to information that can help you use your QuickJack better.
Liability Information
BendPak assumes no liability for damages resulting from:
• Use of the equipment for purposes other than those described in this manual.
• Modifications to the equipment without prior, written permission from BendPak.
• Damage to the equipment from external influences.
• Incorrect operation of the equipment.
QuickJack™ Portable Car Jack 7 P/N 5900959 — Rev. J1 — Dec. 2018
Page 8

Components
QuickJack components include:
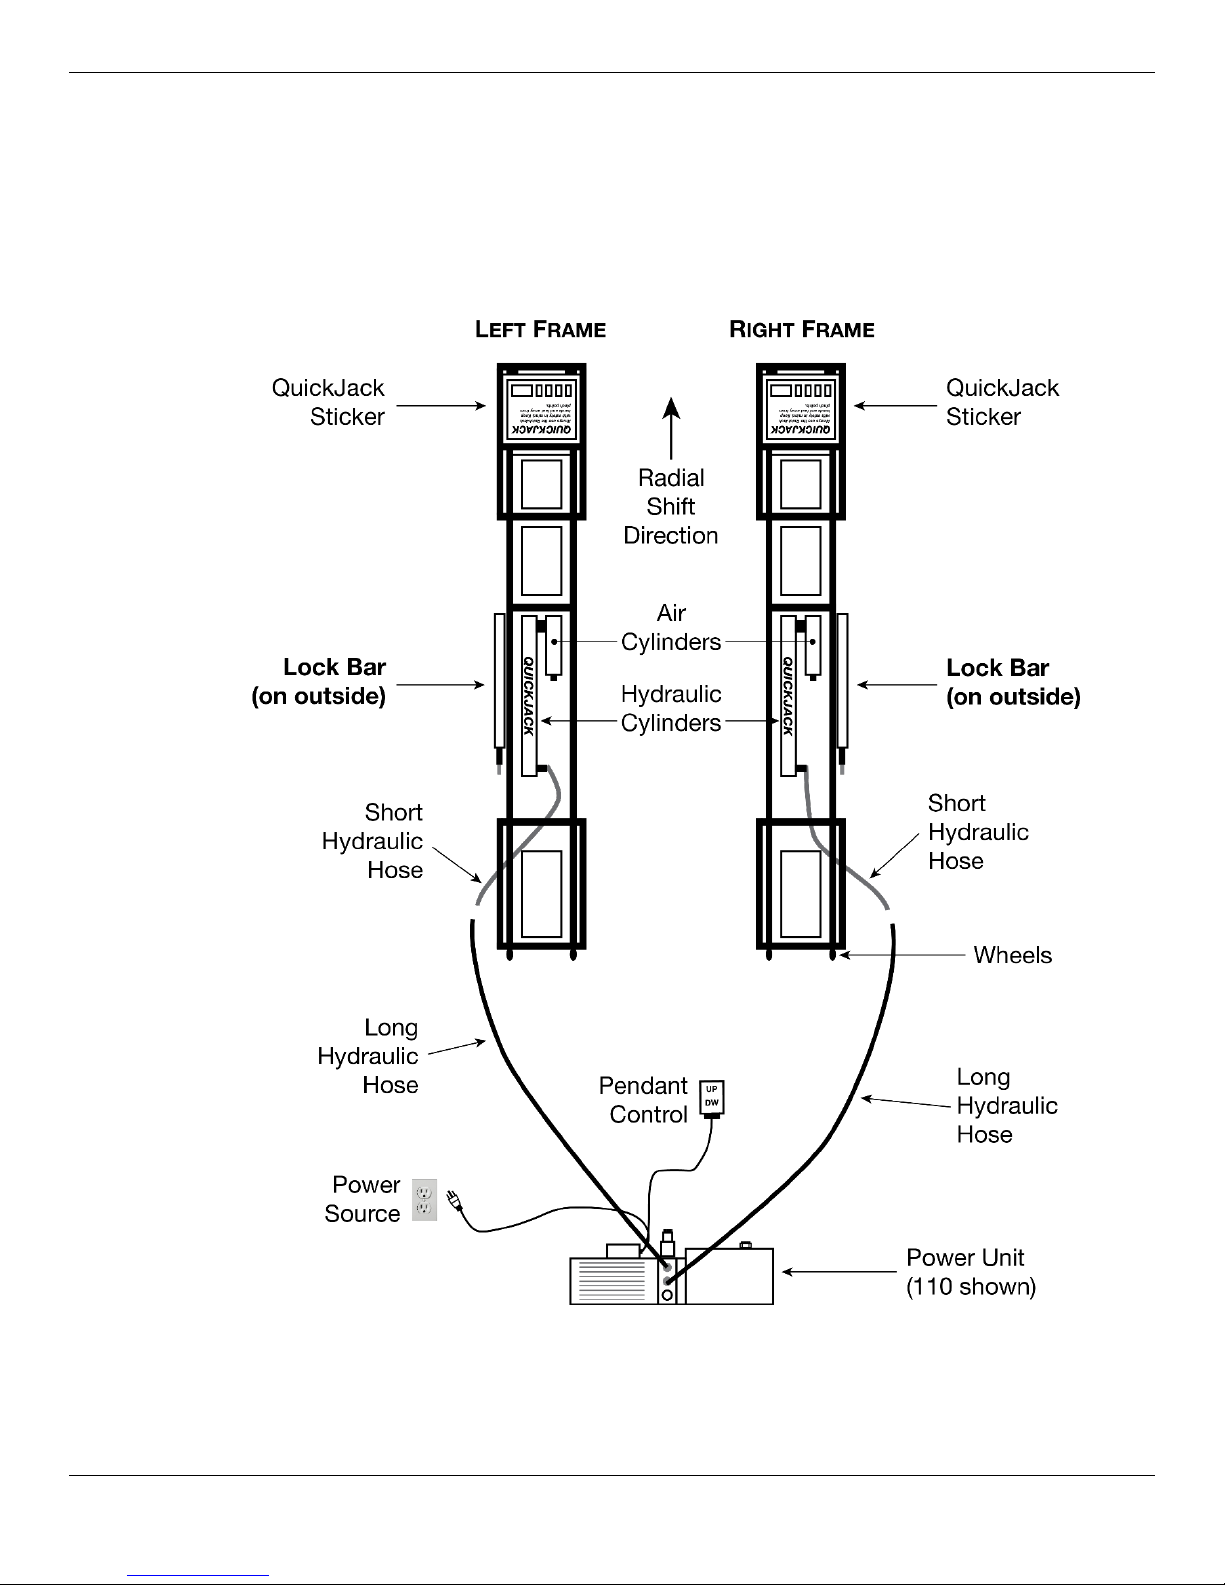
• Two QuickJack Frames. The Frames, working together, raise and lower Vehicles.
The two Frames are
outside when you orient the Frames.
Your QuickJack has a left Frame and a right Frame. If you put your QuickJack Frames next to each
other with both Lock Bars on the outside and the end with the sticker away from you, then the
Frame on the left is the “left” Frame and the Frame on the right is the “right” Frame.
These are the orientations noted on the boxes the QuickJack Frames are shipped in and they are
also shown in the drawing in Unpacking.
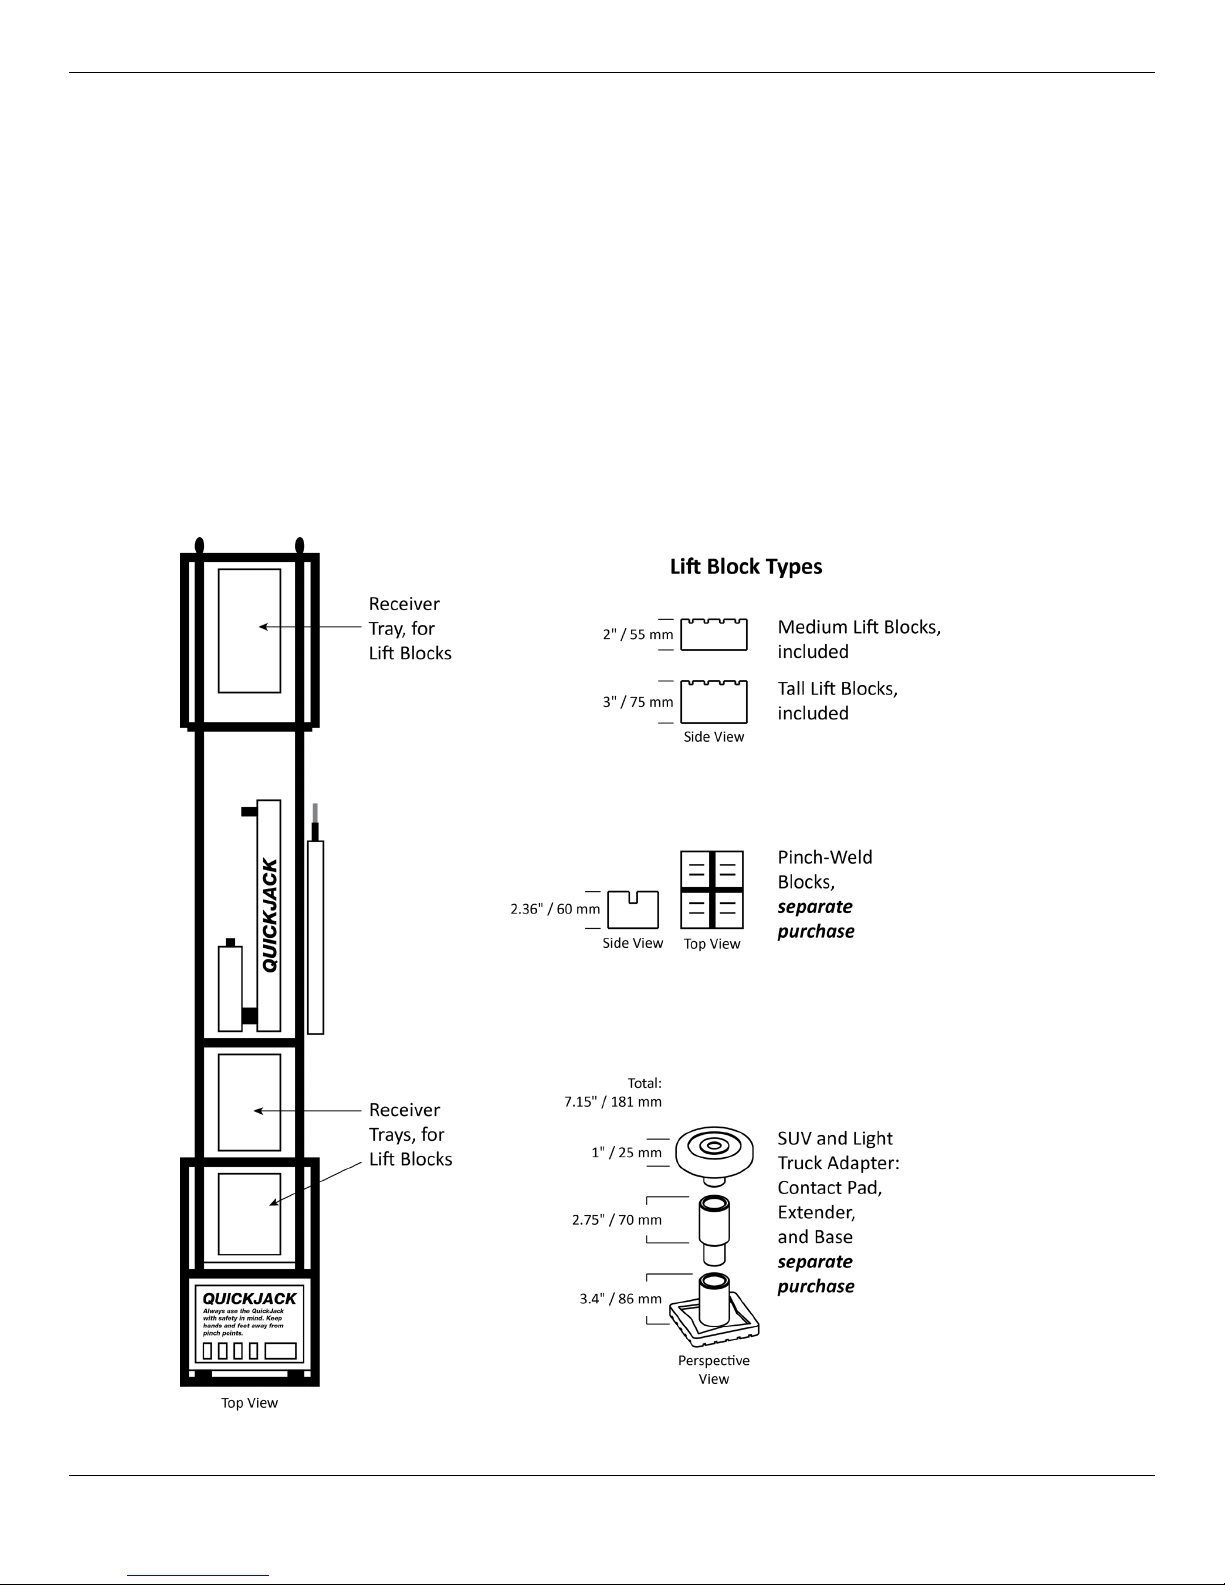
• Eight rubber Lift Blocks. Four are medium height (2 inches) and four are tall (3 inches high).
The Lift Blocks can be placed in different locations in the Receiver Trays, allowing you to hit the
factory-recommended Lifting Points on a wide variety of Vehicles. Always use Lift Blocks; do not
raise a Vehicle on just the QuickJack Frames.
Note: You can stack one medium and one tall block together, but not more than that.
If you have a Vehicle with a unibody/pinch-weld frame, QuickJack recommends ordering optional
Pinch-Weld Blocks, available on the QuickJack website. If you have an SUV or truck, there
is an SUV and Light Truck Adapter available for these Vehicles, also on the QuickJack website.
• One Power Unit (includes Pendant Control). Provides power to the QuickJack Frames. There
are four Power Units available: 110 VAC, 220/240 VAC, 12 VDC, and CE-approved 12 VDC. Note
that the Hydraulic Fluid reservoir of your Power Unit is shipped
fill it with approved fluid
• Two Short Hydraulic Hoses. Connect on one end to the Hydraulic Cylinder on each Frame
and on the other end to one of the Long Hydraulic Hoses. Note that the Short Hydraulic Hoses
must
be routed under the bottom of the Frame, never over the Frame.
• Two Long Hydraulic Hoses. Connect on one end to the Power Unit and on the other end to
one of the Short Hydraulic Hoses.
not
interchangeable. The Lock Bars, described below, must be on the
before
without
using your QuickJack.
Hydraulic Fluid; you
must
Tip To move your QuickJack components: disconnect the Long Hydraulic Hoses either
at the Power Unit or at the Short Hydraulic Hoses. This is easier than trying to move
the QuickJack with all components connected.
• Assembly Kit. Holds components used during setup. Refer to QuickJack Assembly Kit for
a list of all components in the Assembly Kit.
• Two Frame Positioning Handles. Used to easily move the QuickJack Frames, usually to
position the Frames under the Vehicle’s factory-recommended Lifting Points.
• Lock Bars. The two Lock Bars, one on each QuickJack Frame, hold the Frames in position when
they are raised—at either the First Locking Position or the Top Locking Position.
Only leave the QuickJack either fully lowered or engaged on one of the two locking positions.
Before using the QuickJack, check to make sure both Lock Bars are moving freely and are in their
tracks. If the Lock Bars get stuck in an up position or they come out of their tracks, the QuickJack
will not work correctly, which is a safety hazard.
QuickJack™ Portable Car Jack 8 P/N 5900959 — Rev. J1 — Dec. 2018
Page 9

• Hydraulic Cylinder and Air Cylinder. Each QuickJack Frame has one Hydraulic Cylinder and
one Air Cylinder. The Hydraulic Cylinder is welded to the Frame and the Air Cylinder is welded to
the Hydraulic Cylinder. The Hydraulic Cylinder receives Hydraulic Fluid from the Power Unit, which
is used to move the Frames up and down. The Air Cylinder acts like an air spring, which means
they assist in lowering the Frames. The Hydraulic Cylinders need Hydraulic Fluid to operate, the Air
Cylinders need to be pressurized from 40 to 50 PSI (2.75 to 3.4 BAR); do not exceed 50 PSI.
• Wheels. The two Wheels on the non-sticker end of each QuickJack Frame allow you to easily
move the Frame to a different location. Note that the Wheels and the weight of the Frame can
leave marks on some floors, so be careful using them.
• Handles. On the sticker end of each QuickJack Frame is an opening that can be used as a
Handle when you are moving the Frame. To pick up a Frame by its Handle, with one hand raise the
Frame just off the ground under the large yellow sticker, then put the other hand in the Handle and
continue to raise the Frame.
⚠ WARNING Be very careful when putting down the Frame; you do not want to crush your
fingers.
The following image shows the main components of a QuickJack.
Not all components shown. The Power Unit that came with your QuickJack may look slightly different,
but it will work the same.
QuickJack™ Portable Car Jack 9 P/N 5900959 — Rev. J1 — Dec. 2018
Page 10

Accessories
SUV and Light Truck Adapter Kit
The optional SUV and Light Truck Adapter Kit increases the service capability of your QuickJack by
providing stackable Lift Blocks that mount inside the Receiver Trays.
The Adapter Kit is available for Models BL-5000SLX/EXT and BL-7000SLX/EXT.
The Adapter Kit includes:
• Four low-profile, round Contact Pads
• Four Bases that accommodate the Contact Pads and the Extenders
• Four 3-inch Extenders that raise the Contact Pads
Visit the Accessories page of the QuickJack website for more information.
SLX Frame Extension Kit
The SLX Frame Extension Kit is a pair of QuickJack frame extenders that increase the lift-point spread
for BL-5000SLX and BL-7000SLX models by 6 inches, for a total lift point spread of 66 inches.
They fit snugly into your QuickJack with no setup required and can be easily taken off and put back
on, depending on what Vehicle you are raising.
Visit the Accessories page of the QuickJack website for more information.
Motorcycle Lift Adapter Kit
The Motorcycle Lift Adapter Kit lets you add a platform on top of your QuickJack Frames, converting it
into a motorcycle lift. This product is not CE certified.
The Adapter Kit includes a tread plate, heavy-duty tie-down rings, a support axle, a large clamp with
treaded-rubber padding, and an easy-to-use crank for wheel security.
Visit the Accessories page of the QuickJack website for more information.
Ranger RML-1100 Motorcycle Jack
The Ranger RML-1100 Motorcycle Jack is ideal for servicing motorcycles and ATVs up to 1,100
pounds / 499 kg. It is the perfect accessory for the QuickJack Motorcycle Lift Adapter Kit. This
product is not CE certified.
Visit the Accessories page of the QuickJack website for more information.
JackPak
The portable JackPak lets you add air to the Air Cylinders on each QuickJack Frame. It also includes
additional features for roadside assistance and emergencies.
Refer to jackpak.com for more information.
QuickJack™ Portable Car Jack 10 P/N 5900959 — Rev. J1 — Dec. 2018
Page 11

Specifications
Model BL-3500SLX BL-5000SLX BL-7000SLX
Lifting capacity 3,500 lbs / 1,588 kg 5,000 lbs / 2,268 kg 7,000 lbs / 3,175
A Lowered height (frame only) 3" / 76 mm 3" / 76 mm 3.6" / 91 mm
B Height, frame only *
16.5" / 419 mm 17.6" / 447 mm 18.2" / 462 mm
C Height, 2" blocks 17" / 432 mm 18.4" / 467 mm 18.6" / 471 mm
D Height, 3" blocks 18.5" / 470 mm 19.2" / 487 mm 19.4" / 493 mm
E Height, stacked blocks 20" / 508 mm 21.3" / 542 mm 21.6" / 548 mm
F Frame width 10.6" / 268 mm 11" / 278 mm 12.5" / 318 mm
G Max lifting point spread 50.5" / 1,283 mm 60" / 1,524 mm 60" / 1,524 mm
H Min lifting point spread 26.7" / 678 mm 29.5" / 749 mm 29.5" / 749 mm
I Frame length 62" / 1,575 mm 70" / 1,778 mm 71" / 1,803 mm
Individual frame weight 60 lbs / 27 kg 76 lbs / 35 kg 96 lbs / 44 kg
Power unit weight (no fluid) 35 lbs / 16 kg 35 lbs / 16 kg 35 lbs / 16 kg
Power Unit PRV setting 1,980 PSI 1,980 PSI 1,980 PSI
Sound (when raising/lowering) <70 dBA <70 dBA <70 dBA
Maximum allowed wind speed
<60 mph / <96.5 kph <60 mph / <96.5 kph <60 mph / <96.5 kph
*
For reference purposes only;
Specifications are subject to change without notice.
QuickJack™ Portable Car Jack 11 P/N 5900959 — Rev. J1 — Dec. 2018
do not
raise a Vehicle without Lift Blocks.
Page 12

Model
BL-6000XLT BL-5000EXT BL-7000EXT
Lifting capacity per pair 6,000 lbs / 2,722 kg 5,000 lbs / 2,268 kg 7,000 lbs / 3,175 kg
A Collapsed height 3.6" / 91 mm 3" / 76 mm 3.6" / 91 mm
B Height, no blocks *
18.2" / 462 mm 17.6" / 447 mm 18.2" / 462 mm
C Height, small blocks 18.6" / 471 mm 18.4" / 467 mm 18.6" / 471 mm
D Height, tall blocks 19.4" / 493 mm 19.2" / 487 mm 19.4" / 493 mm
E Height, stacked blocks 21.6" / 548 mm 21.3" / 542 mm 21.6" / 548 mm
F Frame width 12.5" / 318 mm 11" / 278 mm 12.5" / 318 mm
G Block position, max spread 75.8" / 1,926 mm 66" / 1,676 mm 66" / 1,676 mm
H Block position, min spread 47.4" / 1,205 mm 37.4" / 951 mm 37.4" / 951 mm
I Frame length 86" / 2,185 mm 75" / 1,905 mm 76" / 1,930 mm
Individual frame weight 110 lbs / 50 kg 80 lbs / 36 kg 101 lbs / 46 kg
Power unit weight 35 lbs / 16 kg 35 lbs / 16 kg 35 lbs / 16 kg
Power Unit PRV setting 1,980 PSI 1,980 PSI 1,980 PSI
Sound (when raising/lowering) <70 dBA <70 dBA <70 dBA
Maximum allowed wind speed
*
For reference purposes only;
Specifications are subject to change without notice.
QuickJack™ Portable Car Jack 12 P/N 5900959 — Rev. J1 — Dec. 2018
do not
<60 mph / <96.5 kph <60 mph / <96.5 kph <60 mph / <96.5 kph
raise a Vehicle without Lift Blocks.
Page 13

Frequently Asked Questions
Question: What kinds of Vehicles can I raise using my QuickJack?
Answer: A wide variety. The two main criteria are: is the Vehicle under the weight capacity of your
QuickJack and do the QuickJack’s Lift Blocks hit the Vehicle’s factory-recommended Lifting Points? If
the answers are yes, and for most Vehicles the answers are yes, then you can raise the Vehicle.
Q: What if I want to raise a Vehicle that is slightly over the weight capacity of my QuickJack?
A: This is not an intended use of the product. We strongly recommend against trying to raise a Vehicle
that is heavier than the rated capacity of your QuickJack.
Q: How many locking positions does my QuickJack have?
A: Two. We call them the First Locking Position and the Top Locking Position.
Q: Do the QuickJack Frames have a “left” and “right” orientation?
A: Yes. If you put your QuickJack Frames next to each other with both Lock Bars on the outside and
the end with the sticker away from you, then the Frame on the left is the “left” Frame and the Frame on
the right is the “right” Frame. These are the orientations noted on the boxes the QuickJack Frames
come in and is shown in the drawing in Unpacking.
Q: Can I use my QuickJack outdoors?
A: No. The QuickJack is approved for indoor installation and use only.
prohibited
protect it from the weather (for example, from falling dirt, rain, sleet, and snow).
. Your QuickJack is portable, however, so if you end up taking it outdoors, remember to
Outdoor installation is
Q: If I am going to move my QuickJack, do I have to take it apart?
A: Only a little: disconnect the Long Hydraulic Hoses at the Power Unit or at the Short Hydraulic
Hoses, then move the sections separately. This is easier than trying to move the QuickJack with all of
the components connected.
Q: Can I drive on the QuickJack Frames?
A: A Vehicle can be
on
a Vehicle
Q: What happens if I raise a Vehicle on my QuickJack but
A: First, do not do this; it is a safety hazard. Second, because the QuickJack is not in a locked
position, the weight of the Vehicle will eventually lower it to the ground. Always follow this rule: if you
raise a Vehicle, engage it on a locking position or lower it back to the ground.
Q: How long can I leave a Vehicle raised on my QuickJack?
A: As long as you want,
engaged on one of its two locking positions, gravity holds it in place; a loss of power or leaking
Hydraulic Fluid would not cause the QuickJack to lower.
Q: Anything else I should know about my QuickJack?
A: Two things. First, do not raise your QuickJack Frames to full height with no Vehicle on it. QuickJack
Frames are built to hold the weight of a Vehicle; they may get stuck at full rise if there is no weight on
them. Always raise your QuickJack Frames with a Vehicle on them. Second, do not try to raise a
Vehicle from no net rise (meaning, if you lower the QuickJack Frames to the ground while the Vehicle’s
tires are removed). QuickJack needs some space to build up enough force to raise a Vehicle.
the QuickJack Frames or the Hydraulic Hoses; this damages them.
above
your QuickJack Frames (this is normal operation, in fact), but
do not
if it is engaged on a locking position
do not
leave it in a locked position?
. Once your QuickJack is
drive
QuickJack™ Portable Car Jack 13 P/N 5900959 — Rev. J1 — Dec. 2018
Page 14

Setup Checklist
Following are the steps needed to install a QuickJack. Perform them in the order shown.
☐ 1. Review the setup Safety Rules.
☐ 2. Make sure you have the necessary Tools.
☐ 3. Select the setup Site.
☐ 4. Unpack the Components that came with the QuickJack.
☐ 5. Make sure there is adequate Clearance on all sides and above.
☐ 6. Locate the QuickJack Assembly Kit.
☐ 7. Locate and examine the Air and Hydraulic Cylinders.
☐ 8. Install the Hydraulic Elbow Fittings.
☐ 9. Prepare the Short Hydraulic Hoses.
☐ 10. Understand Quick-Connect Fittings
☐ 11. Route the Short Hydraulic Hoses.
☐ 12. Prepare and connect the Long Hydraulic Hoses.
☐ 13. Pressurize the Air Cylinders.
☐ 14. Find a location for the Power Unit.
☐ 15. Install fittings on the Power Unit.
☐ 16. Connect the Power Unit to a Power Source.
☐ 17. Fill the Hydraulic Fluid Reservoir.
☐ 18. Check the Breather Valve.
☐ 19. Review the Final Checklist.
☐ 20. Test the QuickJack.
☐ 21. Leave the Manual for the owner/operator.
QuickJack™ Portable Car Jack 14 P/N 5900959 — Rev. J1 — Dec. 2018
Page 15

Setup
This section describes how to set up your QuickJack.
⚠ WARNING
Your QuickJack is supplied with setup instructions that meet the criteria set by the American National
Standard “Automotive Lifts – Safety Requirements for Construction, Testing, and Validation” ANSI/ALI
ALCTV-2011.
Use only the factory-supplied parts that came with your QuickJack
you use parts from a different source, you void your warranty and compromise the
safety of everyone who sets up or uses the QuickJack. If you are missing parts, visit
quickjack.com/support or contact QuickJack Technical Support at
support@quickjack.com, (888) 262-3880, or (805) 933-9970.
. If
Setup Safety Rules
When setting up a QuickJack, your safety depends on proper training and thoughtful operation.
⚠ WARNING Always use proper tools, such as a forklift or shop crane, to move heavy
components. Do not install this equipment without reading and understanding this
manual and the labels on the unit.
BendPak recommends referring to the ANSI/ALI ALIS Standard (R2015) Safety Requirements for
Installation and Service for more information about safely setting up, using, and servicing your
QuickJack.
Pay attention at all times during setup.
moving parts. Keep hands and fingers away from pinch points.
Use appropriate tools and equipment. Stay clear of
⚠ WARNING You must wear protective equipment at all times during setup: leather gloves, steel-
toed work boots, eye protection, back belts, and hearing protection.
Tools
You need the following tools to set up your QuickJack:
• SAE / metric hex key set
• SAE / metric socket and ratchet set
• SAE / metric wrench set or an adjustable wrench
• Screwdriver set
Tip Keep a rag handy during setup; Hydraulic Fluid sometimes leaks.
At some point during setup, you will need to provide some air pressure (to 50 PSI, for the Air Cylinder)
and 2.1 quarts / 2 liters of Hydraulic Fluid.
QuickJack™ Portable Car Jack 15 P/N 5900959 — Rev. J1 — Dec. 2018
Page 16

Selecting a Site
Keep the following in mind when selecting a site for your QuickJack:
• Enough space. Make sure there is adequate space for the QuickJack and the Vehicles you will
be raising.
• Radial Shift. When you raise your QuickJack with a Vehicle on it, the geometry of the Frames
moves the Vehicle up at a slight angle, towards the sticker end of the QuickJack; refer to the
graphic in Unpacking. Radial shift is always towards the sticker end of the QuickJack, no matter
which way the Vehicle is facing.
Radial shift can be anywhere from 11 to 15 inches, depending on QuickJack model.
Make sure to account for radial shift when choosing where to set up and use your QuickJack.
• No overhead obstructions. Make sure your site is free of overhead obstructions such as
heaters, building supports, electrical lines, low-hanging lights, and so on. We recommend leaving
at least three feet above the top of the Vehicle when raised on the QuickJack.
• Level floor. Inspect the floor and check for defective concrete or asphalt. Make sure the floor is
dry, level, and has a minimum compressive strength of 500 psi.
• Power in the right place. You will need to have a power source for your Power Unit. If you are
using 110 or 220/240 VAC power, the Power Unit must be close enough to the power source for
the cord to reach.
If you are using a 12 VDC power source, the Power Unit must be close enough to the power
source for your connection method to reach. For example, if you are powering your 12 VDC Power
Unit with a Vehicle Battery, the Power Unit must be within reach of the Jumper Cables attached to
the Vehicle’s Battery.
⚠ WARNING Do not set up or use a QuickJack on a surface with 3° of slope or more, as this
could lead to personal injury or death if a raised Vehicle were to fall off the
QuickJack. The greater the slope, the more likely the Vehicle will become
unbalanced and fall off the QuickJack, which could damage the Vehicle and injure
anyone in the area.
QuickJack™ Portable Car Jack 16 P/N 5900959 — Rev. J1 — Dec. 2018
Page 17
Unpacking
Open the boxes and arrange the QuickJack components where you will be setting them up.
⚠ WARNING Your two QuickJack Frames are similar, but they are
line up your Frames as parallel to each other as the Lifting Points will allow, with the
Lock Bars on the outside
, as shown below.
not
interchangeable. Always
⚠ CAUTION Be sure to route the Short Hydraulic Hoses
are routed over the QuickJack Frames, the QuickJack will not work correctly and
the Hoses could be damaged.
QuickJack™ Portable Car Jack 17 P/N 5900959 — Rev. J1 — Dec. 2018
under
the QuickJack Frames. If they
Page 18
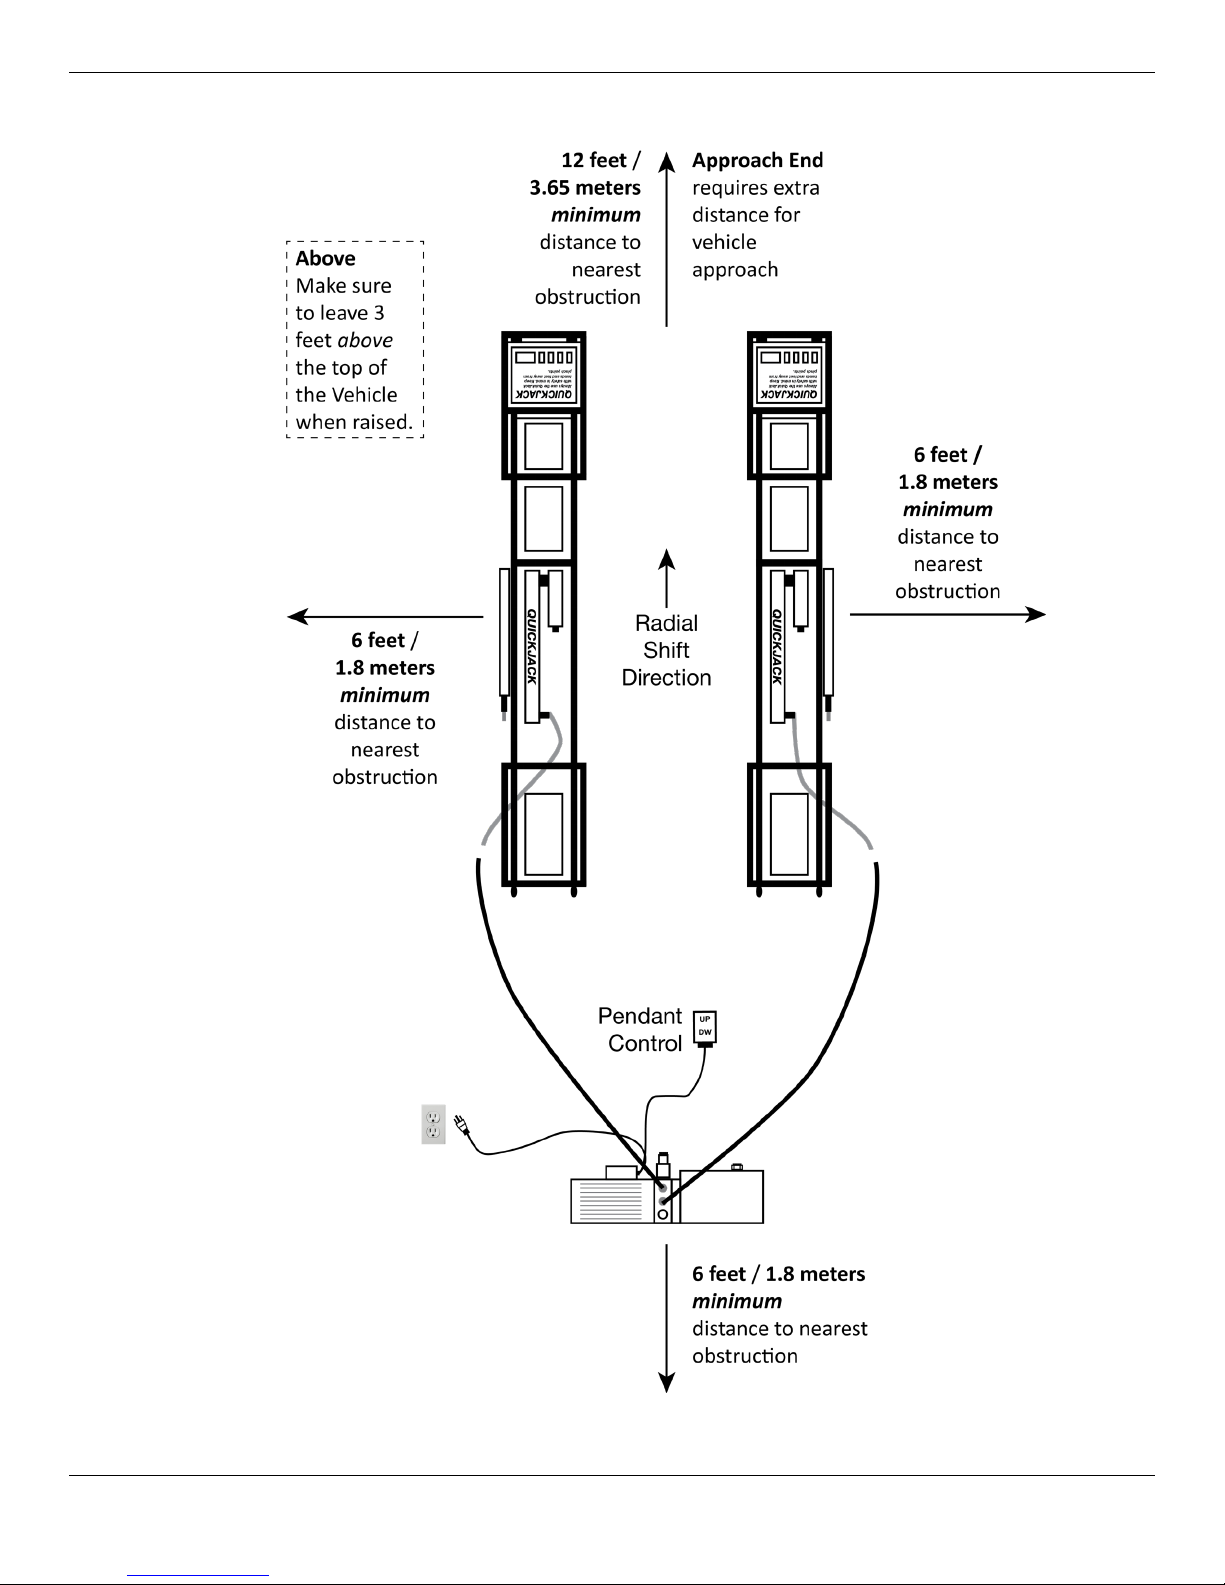
Clearances
Not necessarily to scale. Not all components shown. Vehicle approach must be opposite Power Unit.
Do not drive Vehicle on Hydraulic Hoses, Power Unit, or QuickJack Frames.
QuickJack™ Portable Car Jack 18 P/N 5900959 — Rev. J1 — Dec. 2018
Page 19

QuickJack Assembly Kit
Many of the items you will be using during initial setup come in the QuickJack Assembly Kit, which is a
clear plastic container included in your QuickJack packaging.
The QuickJack Assembly Kit includes:
• Four female Quick-Connect Fittings (for Long Hydraulic Hoses, both ends of each hose)
• Two male Quick-Connect Fittings (one for each Short Hydraulic Hose)
• Two Power Unit Quick-Connect Fittings (both connect to the Hydraulic Ports on the front of the
Power Unit, one above the other; put on the bottom one first)
• Two Hydraulic Elbow Fittings (one for each Hydraulic Cylinder)
• Thread Seal Tape
• Four plastic feet (for Power Units with carriers)
• Two
replacement
wheels
Air and Hydraulic Cylinders
Each QuickJack Frame has one Air Cylinder and one Hydraulic Cylinder.
The components of the Air and Hydraulic Cylinders are:
• Air Inflation Valve. Used to add air pressure to the Air Cylinder. Comes with the appropriate
valve (also called a Schrader® valve) installed.
• Hydraulic Cylinder Connector. Hydraulic Elbow Fitting attaches here. Use a 6 mm hex key to
remove the shipping plug before installing the Hydraulic Elbow Fitting.
• Bleeder Screw. Used to “bleed” the air from the Hydraulic System, if necessary. Refer to
Troubleshooting for more information.
QuickJack™ Portable Car Jack 19 P/N 5900959 — Rev. J1 — Dec. 2018
Page 20
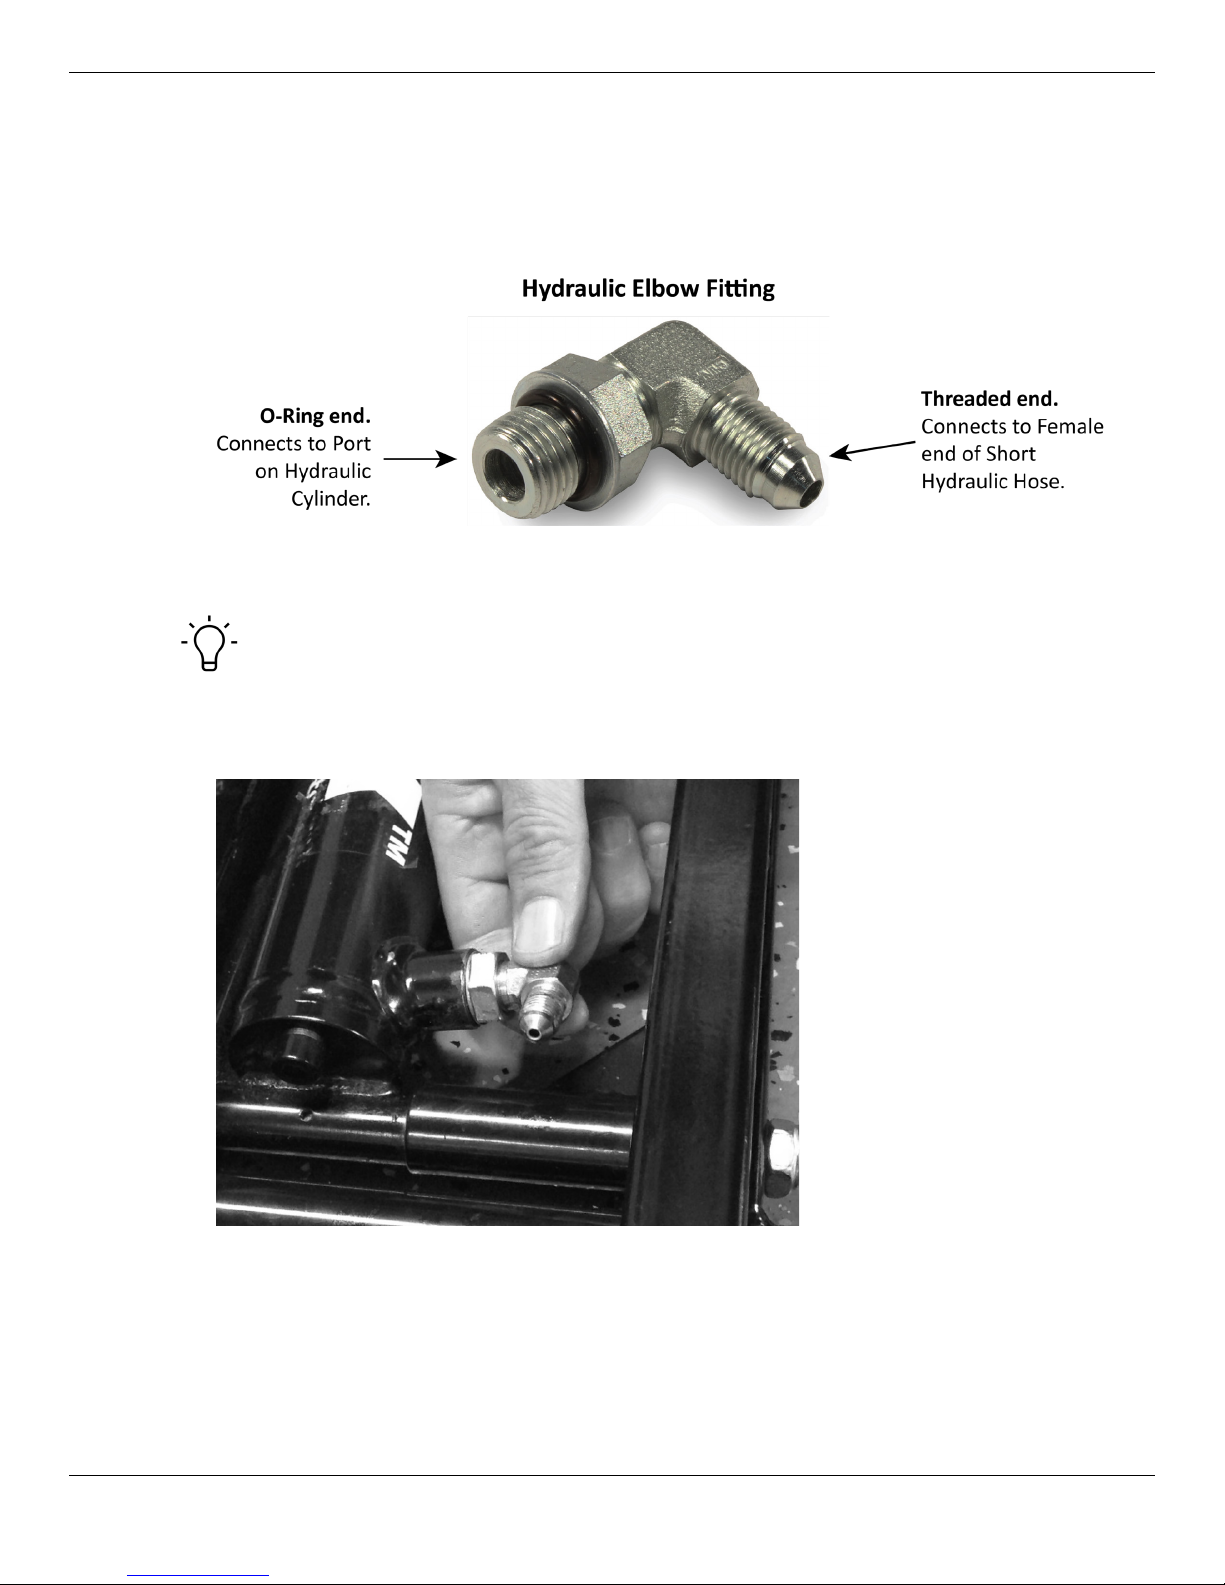
Installing the Hydraulic Elbow Fittings
You need to install one Hydraulic Elbow Fitting on each Hydraulic Cylinder.
To install a Hydraulic Elbow Fitting:
1. Remove the shipping plug from the Hydraulic Cylinder Port using a 6 mm hex key.
2. Get an Hydraulic Elbow Fitting from the QuickJack Assembly Kit; screw the O-ring fitting end into
the Hydraulic Cylinder Port.
Tip Raising the QuickJack Frame and putting a Lift Block under it or manually raising
the Platform to a locking position can provide a little bit of extra room, making it
easier to secure the Hydraulic Elbow Fitting.
Important: Do
3. Position the threaded fitting end as shown above; accessible but not pointed up.
You want the threaded fitting end accessible from above but
Hydraulic Hose would then angle up and could possibly impact the underside of a Vehicle.
not
use Thread Seal Tape on either end of the Hydraulic Elbow Fitting.
not
pointed up, as the Short
4. Tighten the fitting nut to 11 to 12 lbf-ft / 14 to 16 N-m.
5. Perform the same process for the Hydraulic Cylinder on the other QuickJack Frame.
QuickJack™ Portable Car Jack 20 P/N 5900959 — Rev. J1 — Dec. 2018
Page 21
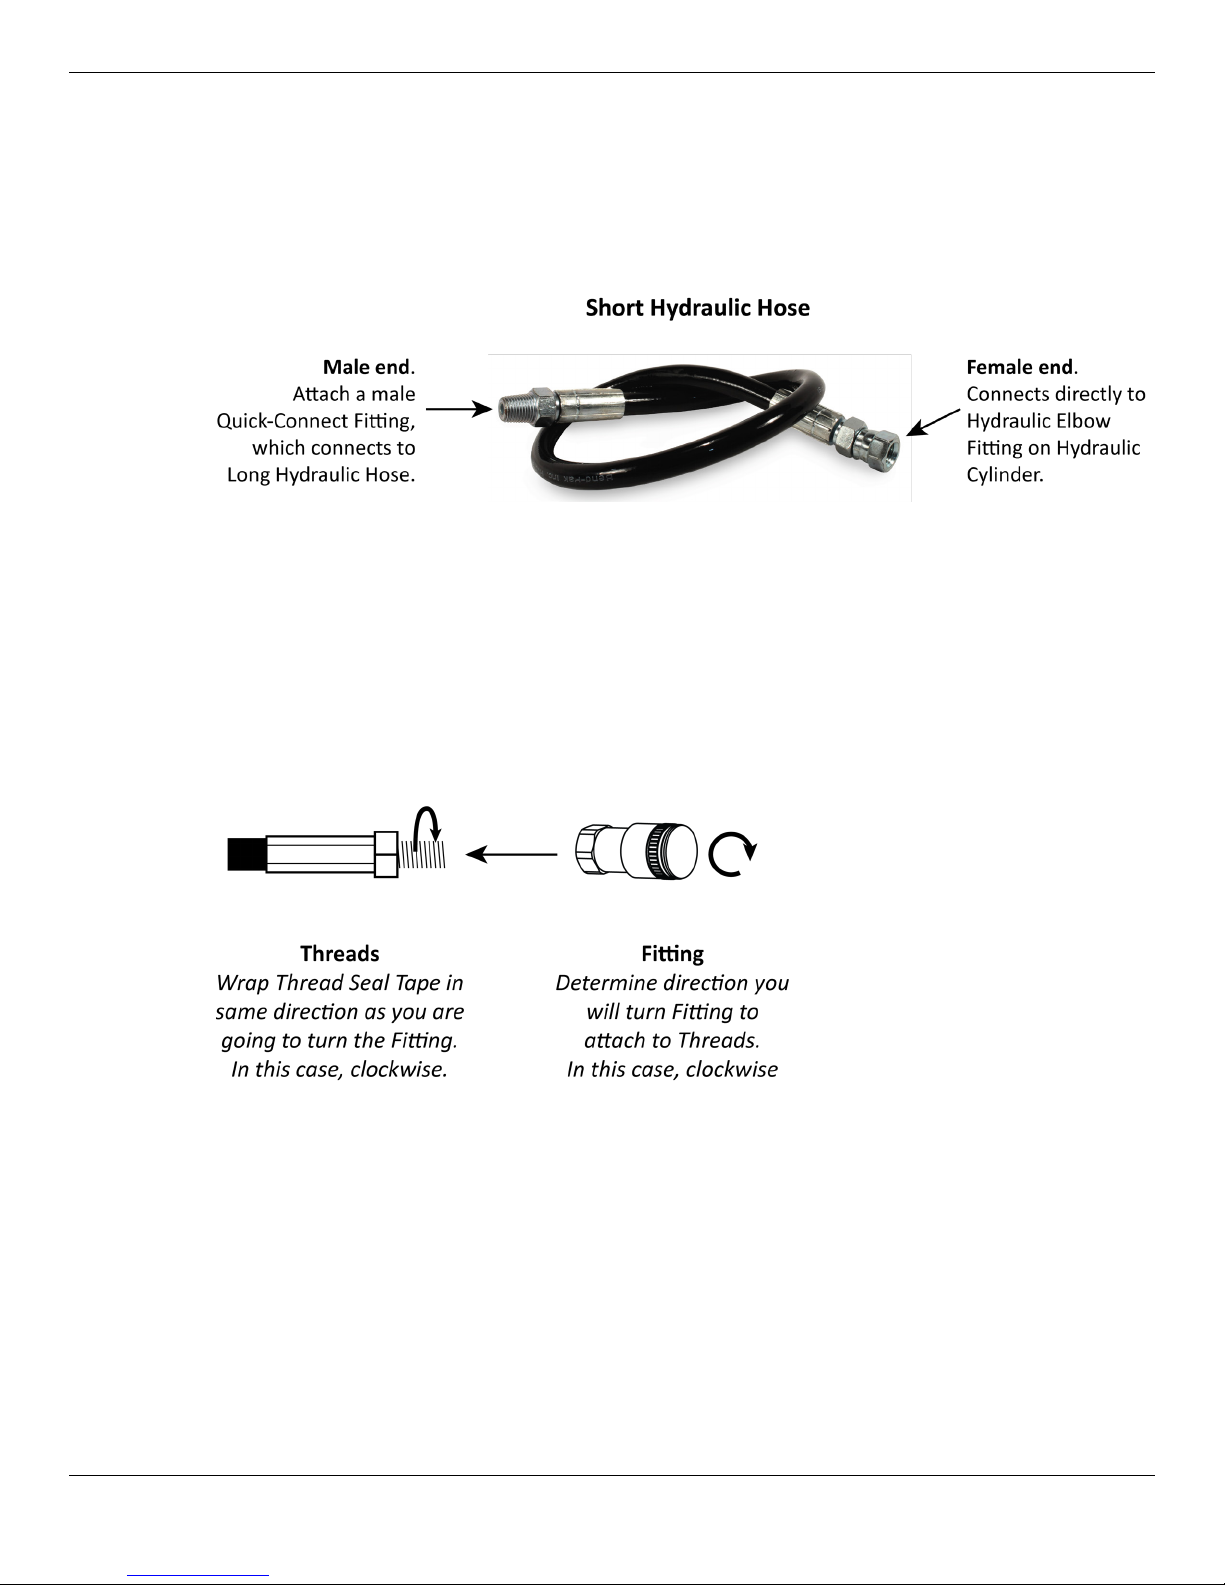
Preparing the Short Hydraulic Hoses
Your QuickJack comes with two Short Hydraulic Hoses:
• Female end. Attach directly to the Hydraulic Elbow Fitting on the Hydraulic Cylinder. You do not
need to add a fitting to this end of the Short Hydraulic Hose.
• Male end. Install a male Quick-Connect Fitting to the male end.
To set up and connect the Short Hydraulic Hoses:
1. Locate both Short Hydraulic Hoses and remove their protective caps.
2. Wrap the threaded fitting on the male end of each Short Hydraulic Hose with Thread Seal Tape.
Only one end of a Short Hydraulic Hose has a male threaded fitting; the other end has a female
fitting that attaches directly to the Hydraulic Elbow Fitting on the Hydraulic Cylinder.
To use Thread Seal Tape: determine what direction you will be turning the Fitting, wrap the
threads with Thread Seal Tape two or three times in the same direction, then attach the Fitting.
The following drawing shows how to apply Thread Seal Tape.
The drawing above show the Fitting being turned clockwise to attach it, so you would also attach
the Thread Seal Tape clockwise.
Important: Always wrap Thread Seal Tape in the same direction as you will be attaching the
Fitting.
If you apply Thread Seal Tape in the wrong direction, it is much more likely to come off as you
attach the Fitting, possibly getting into the Hydraulic Fluid and blocking fluid flow.
QuickJack™ Portable Car Jack 21 P/N 5900959 — Rev. J1 — Dec. 2018
Page 22

3. Attach one male Quick-Connect Fitting from the QuickJack Assembly Kit to the male threaded
fitting end of the Short Hydraulic Hose; tighten to 23 to 25 lbf-ft / 31 to 34 N-m.
To tighten, use one wrench to hold the Male threaded end in place and a second wrench on the
Male Quick-Connect Fitting.
Do the same for the other Short Hydraulic Hose.
4. Connect the female end of the Short Hydraulic Hose to the male connector on the Hydraulic Elbow
Fitting; tighten to 23 to 25 lbf-ft / 31 to 34 N-m.
The Hydraulic Elbow Fitting should already be installed on the Hydraulic Cylinder.
5. Route both Short Hydraulic Hoses
under
the Frame ends; make sure they are clear of pinch
points.
QuickJack™ Portable Car Jack 22 P/N 5900959 — Rev. J1 — Dec. 2018
Page 23

About Quick-Connect Fittings
Quick-Connect Fittings let you quickly connect and disconnect the QuickJack’s Hydraulic Hoses. This
makes it easier to separate the Hydraulic Hoses from the Power Unit for storage or to get the Power
Unit out of the way if the QuickJack Frames are engaged on a Locking Position.
Quick-Connect Fittings have a lock ball that lets you lock a connection.
To lock a connection: Push the Male Quick-Connect Fitting into the Female Quick-Connect Fitting,
then turn the Moveable Section so that the Lock Ball is not opposite the Notch.
To unlock and disconnect a connection: Turn the Moveable Section so that the Lock Ball is
opposite the Notch, then pull back on the Moveable Section and pull out the Male Quick-Connect
Fitting.
QuickJack™ Portable Car Jack 23 P/N 5900959 — Rev. J1 — Dec. 2018
Page 24

Routing the Short Hydraulic Hoses
After connecting the Short Hydraulic Hoses to the Hydraulic Elbow Fitting on the Hydraulic Cylinder,
make sure to route them
under the side of the QuickJack Frame
.
⚠ CAUTION If you mistakenly route a Short Hydraulic Hose over the QuickJack Frame, the
QuickJack will not work correctly and you could damage the hose and/or cause the
Vehicle on the QuickJack to become unstable.
The following drawing is a side view of a QuickJack with the Short Hydraulic Hose being routed under
the QuickJack Frame sections.
Drawing not necessarily to scale. Not all components shown, some exaggerated for clarity. Hydraulic
Elbow Fitting is shown pointed up for clarity; it is not actually installed this way.
QuickJack™ Portable Car Jack 24 P/N 5900959 — Rev. J1 — Dec. 2018
Page 25

Preparing and Connecting the Long Hydraulic Hoses
Your QuickJack comes with two Long Hydraulic Hoses:
• One end attaches to the Short Hydraulic Hose
• The other end attaches to the Power Unit
Both ends require the installation of a female Quick-Connect Fitting.
To prepare and connect your Long Hydraulic Hoses:
1. Locate both Long Hydraulic Hoses and remove their protective caps.
2. Wrap all four threaded ends with Thread Seal Tape.
Wrap the Thread Seal Tape in the same direction you will be turning the fittings.
3. Take all four female Quick-Connect Fittings from the QuickJack Assembly Kit.
4. Connect the female Quick-Connect Fittings to the male threaded connectors on both ends of both
Long Hydraulic Hoses; four connections in total.
To tighten, use one wrench to hold the Male connector in place and a second wrench on the
Female Quick-Connect Fitting to tighten it; tighten to 10 to 11 lbf-ft / 13 to 15 N-m.
QuickJack™ Portable Car Jack 25 P/N 5900959 — Rev. J1 — Dec. 2018
Page 26
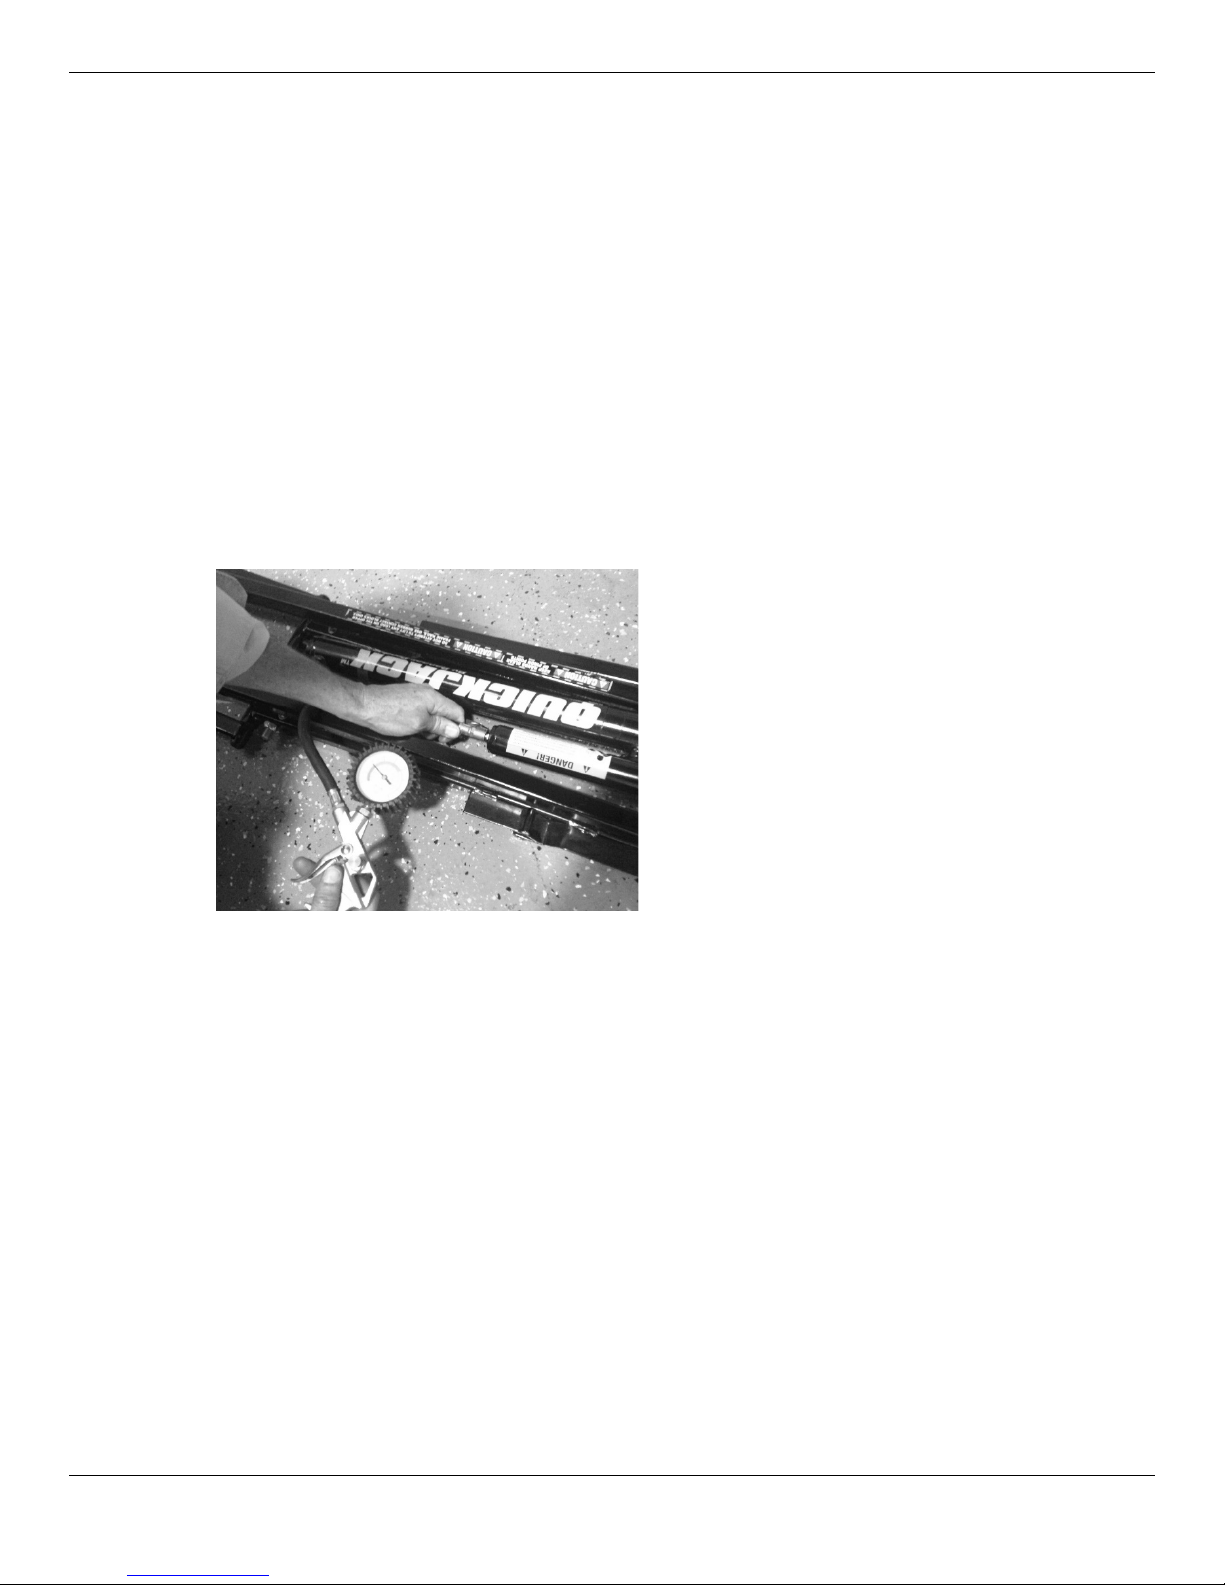
Pressurizing the Air Cylinders
The Air Cylinders (one on each QuickJack Frame) need to be pressurized before you can use your
QuickJack.
Air Cylinders help push the QuickJack Frames down.
Note that the valve stems on the Air Cylinders are installed at the factory.
Make sure the QuickJack Frames are fully lowered when you pressurize the Air Cylinders.
To pressurize the Air Cylinders:
1. Use a valve tool to release a short hiss of air to check the air inflation valve for proper operation and
to drain any accumulated oil.
Holding the valve open releases the air currently in the Air Cylinder.
2. Using a pump or air compressor, inflate the Air Cylinder to from 40 to 50 PSI / 2.75 to 3.4 BAR;
not exceed 50 PSI / 3.4 BAR
The JackPak accessory can also be used to pressurize the Air Cylinders.
3. When the pressure is between 40 and 50 PSI / 2.75 to 3.4 BAR, remove the pump or air
compressor.
.
⚠ WARNING Do not exceed 50 PSI / 3.4 BAR with the QuickJack Frames in the fully lowered
position, as there is a chance of explosion. Make sure to remove power and bleed
off air pressure before servicing.
do
4. Repeat Steps 1 through 3 for the other Air Cylinder.
QuickJack™ Portable Car Jack 26 P/N 5900959 — Rev. J1 — Dec. 2018
Page 27

Find a Location for the Power Unit
Your Power Unit must be located near the QuickJack Frames.
Note: Some Power Units come with a carrier and handle, some with just a handle. They work the
same.
Based on the combined length of the Short and Long Hydraulic Hoses, your Power Unit should be
about 10 to 12 feet away from your QuickJack Frames and out of the way of the Vehicles you will be
driving on to and off of the QuickJack.
Important: Do not drive vehicles
likely that they will leak.
⚠ WARNING
Risk of explosion
should not be exposed to flammable vapors. The Power Unit should be located at
least 460 mm (18 inches) above the floor.
on
the Hydraulic Hoses; this damages the hoses, making it more
. The QuickJack Power Unit has arcing or sparking parts that
Installing the Hydraulic Fittings on the Power Unit
Before you can connect your Power Unit to the Long Hydraulic Hose, you first need to install QuickConnect Fittings to the hydraulic ports on the front of the Power Unit.
Tip QuickJack recommends installing the bottom Power Unit Quick-Connect Fitting
first, then the top one. It is difficult to access the bottom fitting if you install the top
fitting first.
You usually only have to install these fittings once. To move your QuickJack later, just disconnect the
Power Unit from the Long Hydraulic Hoses using the Quick-Connect Fittings.
To connect Power Unit Quick-Connect Fittings to Power Unit hydraulic ports:
1. On the Power Unit, remove the plastic shipping plugs from the two hydraulic ports on the front.
2. Get a Power Unit Quick-Connect Fitting from the QuickJack Assembly Kit, insert the O-ring side
into one of the two hydraulic ports on the front of the Power Unit, then tighten to 11 to 12 lbf-ft /
14 to 16 N-m.
QuickJack recommends connecting the bottom hydraulic port first, then the top one.
Do not use Thread Seal Tape on the O-ring threads.
3. Repeat Step 2 for the second Quick-Connect Fitting on the Power Unit.
QuickJack™ Portable Car Jack 27 P/N 5900959 — Rev. J1 — Dec. 2018
Page 28

Connect the Power Unit to a Power Source
Your Power Unit must also be located near an appropriate power source.
Refer to the manufacturer’s information tag on your Power Unit for current and wattage information for
your specific unit.
Power Sources for VAC Power Units
If you are using a 110 or 220/240 VAC Power Unit with your QuickJack, connect it to an appropriate
power source.
110 VAC Power Unit
Drawing not necessarily to scale. Some Power Units may be slightly different.
220/240 VAC Power Unit
220 and 240 Power Units come with wiring for connection to a power source, but
You will need to have a certified Electrician connect the wiring to a plug appropriate for your location.
⚠ DANGER All wiring
done incorrectly, you could damage the QuickJack and/or cause serious injury.
must
be performed by a licensed, certified Electrician. If wiring the plug is
without a plug
.
Drawing not necessarily to scale. Some Power Units may be slightly different.
The wiring on the 220/240 VAC units uses the international wiring standard of Brown (hot), Blue
(neutral), and Green/Yellow (ground). In the United States, the corresponding wiring is Black (L1 hot),
Red (L2 hot), and Green or Green/Yellow (ground).
QuickJack™ Portable Car Jack 28 P/N 5900959 — Rev. J1 — Dec. 2018
Page 29

Power Sources for 12 VDC Power Units
If you are using a 12 VDC Power Unit with your QuickJack, you can connect it to a Vehicle battery.
Refer to Using the 12 VDC Power Unit for usage information.
12 VDC Power Unit
Drawing not necessarily to scale. Some Power Units may be slightly different.
Keep the following in mind:
• Connect your 12 VDC Power Unit directly to a 12-volt power source. The minimum requirement for
Jumper Cables is 7 gauge / 10 mm.
• Make sure to connect the 12 VDC
and the 12 VDC positive (red, +) power source to the positive (red, +) terminal.
• Remove all jewelry while working with the 12 VDC Power Unit.
negative
(black, –) source to the
negative
(black, –) terminal
QuickJack™ Portable Car Jack 29 P/N 5900959 — Rev. J1 — Dec. 2018
Page 30

Filling the Hydraulic Fluid Reservoir on the Power Unit
The Hydraulic Fluid Reservoir must be filled with Hydraulic Fluid or Automatic Transmission Fluid
before
you begin operation of the QuickJack.
When you receive it, the Fluid Reservoir is empty.
until it is filled with approved fluids.
⚠ CAUTION If you use the QuickJack
Power Unit.
Approved fluids are any general purpose ISO-32, ISO-46, or ISO-68 Hydraulic Fluid, approved
Automatic Transmission Fluids such as Dexron III, Dexron VI, Mercon V, Mercon LV, or any synthetic
multi-vehicle Automatic Transmission Fluid.
The fluid level should be approximately .5 inch (12 mm) below the Fill Hole when the QuickJack is fully
lowered. Note that the fluid level drops some after you start using the QuickJack; this is because some
fluid stays in the Hydraulic Hoses. If you notice that the fluid level has dropped more than a little, you
should fill it back up to half an inch below the Fill Hole (with the Frames on the ground).
Important: Do not completely fill the Fluid Reservoir while there is fluid in the hoses. If you do, the
reservoir could overflow when the fluid in the hoses returns (when you lower the
QuickJack Frames).
QuickJack recommends having a couple of rags nearby in case any fluid leaks.
To fill the Fluid Reservoir:
1. Remove the Reservoir Cap (if it has a Breather Valve they both come off together) from the Fill Hole
and put it down in a non-contaminated area.
without
fluid in the reservoir, you could damage the
The Power Unit will not work correctly
2. Fill the Fluid Reservoir with approximately 2.1 quarts / 2 liters of approved fluids (see above).
You want the fluid level about .5 inch (12 mm) below the Fill Hole with the QuickJack Frames
lowered.
Make sure the Funnel is clean; if there are contaminants on it, they could get into the Fluid
Reservoir.
3. Replace the Reservoir Cap in the Fill Hole and hand tighten it firmly.
QuickJack™ Portable Car Jack 30 P/N 5900959 — Rev. J1 — Dec. 2018
Page 31

Check the Breather Valve
If your Power Unit has a Reservoir Cap with a Breather Valve, you need to loosen the Breather Valve
before using the Power Unit. It ships tightened, so that no contaminants will get inside.
If your Power Unit has a Self-Venting Reservoir Cap (see drawing below), you do
To check the Breather Valve:
1. Determine what Breather Valve is on your Power Unit:
• Reservoir Cap, with Breather Valve. The Breather Valve comes from the factory
tightened. You must loosen it before you start using the Power Unit.
• Reservoir Cap, Self-Venting. There’s nothing to loosen; proceed to the next section.
not
need to loosen it.
⚠ CAUTION If you have a Reservoir Cap with a Breather Valve, you
turn counterclockwise before using the Power Unit. If you do not, the excess
pressure could damage the pump or cause the Fluid Reservoir to overflow.
2. To loosen a Breather Valve, turn it from one quarter to one half turn
This moves it to the open position, allowing air to move into and out of the Fluid Reservoir.
3. If you are going to move the Power Unit to a different location, tighten the Breather Valve before
you move it. This helps prevent fluid from leaking and contaminants from getting into the Fluid
Reservoir during transport.
Make sure to loosen the Breather Valve again
before
using the Power Unit at the new location.
must
loosen it about half a
counterclockwise
.
Connect All the Hydraulic Hoses
If you have not done so already, connect all of the Hydraulic Hoses:
• Short Hydraulic Hoses. Connect to the Hydraulic Cylinders on the QuickJack Frames on one
end and to the Long Hydraulic Hoses on the other end.
• Long Hydraulic Hoses. Connect to the Short Hydraulic Hoses on one end and to the QuickConnect Fittings on the front of the Power Unit on the other end.
The drawing in Unpacking shows the locations of the Hydraulic Hoses in relation to the QuickJack
Frames and the Power Unit.
QuickJack™ Portable Car Jack 31 P/N 5900959 — Rev. J1 — Dec. 2018
Page 32

Final Checklist Before Operation
Make sure these things have been done
• Review the Setup Checklist to make sure all steps have been performed.
• Make sure the Power Unit is getting power from the power source.
• Check the Hydraulic Fluid Reservoir; it must be full of approved Hydraulic Fluid or automatic
transmission fluid.
• Check the Hydraulic System for leaks.
• Make sure both Lock Bars are moving freely and in their tracks; make sure there are no
obstructions in the tracks.
You can harm the motor by running it without enough fluid.
before
using your QuickJack:
Test the QuickJack
Make a visual check of all components to make sure they are in good working order
Vehicle; do this
damage, or leakage; do not raise a Vehicle if the Quick-Connect Fittings are damaged or worn—you
must replace them.
Important:
⚠ WARNING
every time
Only raise the QuickJack Frames with a Vehicle on them
Frames are engineered and designed to support the weight of a Vehicle; they can
occasionally get stuck at full height if there is no Vehicle on them.
When raising or lowering a QuickJack, pay attention!
issue is lack of Operator attention; for example, do not be looking at a smartphone
while raising or lowering the QuickJack. It is your responsibility to pay attention; if
you do not, you could damage the QuickJack or the Vehicle on it and/or injure
people near it.
you use your QuickJack. Check the Quick-Connect Fittings for wear,
prior
to raising a
. The QuickJack
A common safety
Refer to Raising the QuickJack Frames for detailed information about raising the QuickJack
Frames and engaging the QuickJack on a locking position.
To test your QuickJack:
1. Place the QuickJack Frames in the desired location with
2. Check both Lock Bars and all of the Hydraulic Hoses.
The Lock Bars must be on the able to move freely along the bottom of their Channels; they must
not come up out of their Channels when you raise the Frames (if they do, the most likely problem is
that the Lock Bar Bolt is over-tightened). The Hydraulic Hoses must all be connected.
3. Make sure the Power Unit has been set up correctly and is connected to a power source.
The Power Unit fluid reservoir must have 2.1 quarts/2 liters of approved fluid. Use Dexron III,
Dexron VI, Mercon V, Mercon LV or comparable.
The fluid level should be approximately .5 inch (12 mm) below the fill hole.
Important: If you do not put enough Hydraulic Fluid in the reservoir, the QuickJack may start to
rise but will slow and then stop when the reservoir is out of fluid. To fix this, lower
the QuickJack Frames back down to the ground and then add additional fluid to
the reservoir. Fill it to approximately .5 inch (12 mm) below the Fill Hole.
4. Check the pressure in the Air Cylinders; they should register from 40 to 50 PSI (2.75 to 3.4 BAR).
Do
not
exceed 50 PSI / 3.4 BAR.
both Lock Bars on the outside
.
QuickJack™ Portable Car Jack 32 P/N 5900959 — Rev. J1 — Dec. 2018
Page 33

5. Put a Vehicle into place.
6. Position the Lift Blocks in the Receiver Trays for the Vehicle you are going to raise.
Be sure to use the factory-recommended Lifting Points for the Vehicle.
7. Press Up on the Pendant Control for a couple of seconds.
After a few seconds, the QuickJack Frames will start moving up. As this is the first use, it takes a
couple of seconds for the Hydraulic Hoses to fill with fluid.
If the QuickJack Frames do not move, make sure the Power Unit is connected to an appropriate
power source, make sure the Hydraulic Hoses are connected to the Power Unit, and make sure
there is sufficient Hydraulic Fluid in the reservoir. If you find any of these issues, fix them and then
try again. If the Frames still do not move, refer to Troubleshooting.
8. Just
9. Press Up to raise the Frames to just past the First Locking Position, then press Down for a
before
The Frames stop moving.
Check the locations where the Lift Blocks will hit the Lifting Points. If necessary, adjust the Lift
Blocks so they are properly positioned (you may need to lower the Vehicle to adjust them).
second or two.
the Frames make contact with the Lifting Points on the Vehicle, release Up.
⚠ WARNING If one Frame goes up faster than the other with the weight of a Vehicle on it, this is
a safety hazard. Release Up immediately and then press Down to lower the
Vehicle back down to the ground. Wait a minute and then try again. If the issue
continues, refer to Troubleshooting.
The Lock Bar will lock at the First Locking Position and the Frames will stop moving.
10. With the QuickJack engaged on the First Locking Position, check all Hydraulic Hose connections
for leaks. If you find any, tighten the leaking connection and wipe up the fluid.
If the motor gets hot or sounds irregular, check the Power Unit and all electrical connections.
11. Carefully rock the Vehicle to test its stability.
If the Vehicle seems stable, the QuickJack is ready for normal operation.
If the Vehicle does
Lift Blocks in the Receiver Trays.
not
seem stable, lower it back to the ground and check the positioning of the
12. If everything appears to be working normally, lower the QuickJack Frames back down to the
ground. To do this: press Up for a second or two so that the Lock Bars go past the Lock Blocks,
then press Down until the Lock Bars lower past the Lock Blocks.
When the Frames get to the ground, hold Down for another ~5 seconds so that the Hydraulic
Fluid returns to the reservoir.
If there are issues you cannot resolve, stop using the QuickJack, then refer to Troubleshooting,
or call QuickJack at (888) 262-3880 or (805) 933-9970.
Leave the Manual with the Owner/Operator
Make sure to leave the Setup and Operation Manual with the owner/operator so that it is available to
everyone who is going to use the QuickJack.
QuickJack™ Portable Car Jack 33 P/N 5900959 — Rev. J1 — Dec. 2018
Page 34

Operation
This section describes how to operate your QuickJack.
This manual must delivered to the owner/user/employer and be kept near the QuickJack.
QuickJack recommends using Vehicle Lifting Points for Frame-Engaging Lifts for proper positioning of
Vehicles on your QuickJack. It shows the factory-recommended Lifting Points for a wide variety of
Vehicles. It was supplied with your QuickJack.
QuickJack also recommends SAE Standard J2184, Vehicle Lift Points for Service Garage Lifting, as a
resource to assist you in the proper positioning of a Vehicle for raising.
⚠ WARNING Make sure to properly position each Vehicle on its Lifting Points. Improper
Safety
Before you raise or lower a Vehicle using your QuickJack:
• Check the QuickJack. Check the QuickJack Frames for any missing, heavily worn, or
damaged parts. Make sure the Lift Blocks are in their Receiver Trays. Do not operate the
QuickJack if you find any issues; instead, stop using it, then visit quickjack.com/support, email
support@quickjack.com, or call (888) 262-3880.
• Check the area. Check the area around the QuickJack for obstructions; anything that might
impact the raising or lowering of the Vehicle. Do not forget to check
find an obstruction, move it out of the way. Do not allow unauthorized people, children, or animals
near the QuickJack while it is being used.
• Check the operators. Make sure everyone who is going to operate the QuickJack has been
trained in its use, has read the labels on the unit, is not under the influence of drugs or alcohol, and
has read the manual.
positioning of a Vehicle could lead to it being unstable and potentially falling off the
QuickJack. This could damage the Vehicle, damage the QuickJack, and potentially
injure anyone nearby.
above
the QuickJack. If you
⚠ WARNING
• Check for safety. Make sure everyone who is going to be walking near the QuickJack is aware
of its presence and takes appropriate safety measures.
leave the QuickJack engaged on a locking position
not leave it until it is on the ground.
Do not work under an elevated Vehicle unless properly rated Vehicle Jack Stands are in place
under the factory-recommended Lifting Points.
⚠ WARNING
• Check the Vehicle. Never exceed the QuickJack’s weight rating. Do not allow people inside a
Vehicle you are raising. Make sure the Vehicle is not overbalanced on either end. You must use the
factory-recommended Lifting Points for the Vehicle. Never raise just one side, one corner, or one
end of a Vehicle.
QuickJack™ Portable Car Jack 34 P/N 5900959 — Rev. J1 — Dec. 2018
When raising or lowering a QuickJack, the Operator must pay
attention!
must
A common safety issue is lack of attention; for example, Operators
not
be looking at a smartphone.
When raising a Vehicle, always
. When lowering the QuickJack, do
Risk of explosion
should not be exposed to flammable vapors. The Power Unit should be located at
least 460 mm (18 inches) above the floor.
. The QuickJack Power Unit has arcing or sparking parts that
Page 35
About Lift Blocks
When raising a Vehicle with your QuickJack, the Vehicle should not touch the QuickJack Frames.
Instead, they should touch the Lift Blocks that are sitting in the QuickJack’s Receiver Trays.
There are three types of Lift Blocks available:
• Medium/Tall. Four Medium and four Tall Lift Blocks are included with each QuickJack. You can
stack one Medium on one Tall, but no more than that.
• Pinch Weld. Ideal for raising Vehicles by their pinch welds. Separate purchase.
• SUV and Light Truck Adapter. Each set includes four round Contact Pads, four Extenders,
and four Bases. Perfect for Vehicles with high ground clearance or non-standard Lifting Points.
Separate purchase.
⚠ CAUTION Do not raise a Vehicle on the QuickJack Frames; always use Lift Blocks, Pinch-
Weld Blocks, or SUV and Light Truck Adapters in the Receiver Trays. Raising a
Vehicle on the Frames could damage the Vehicle and/or damage the QuickJack.
Drawing not necessarily to scale. Not all components shown.
QuickJack™ Portable Car Jack 35 P/N 5900959 — Rev. J1 — Dec. 2018
Page 36

Special QuickJack Warnings
There are two special cases with QuickJack of which you need to be aware:
• Do not raise QuickJack Frames without a Vehicle on them. QuickJack Frames are
designed and engineered to be used with the weight of a Vehicle on them. You should only raise
the QuickJack Frames with the weight of a Vehicle on them,
. There is simply no reason to raise your QuickJack Frames unless there’s a Vehicle on them.
them
QuickJack Frames can occasionally get stuck in a raised position if you raise them without the
weight of a Vehicle. There is nothing wrong with them if this happens, and the issue can be quickly
and easily fixed, it’s just that they are designed and engineered to work with the weight of a
Vehicle.
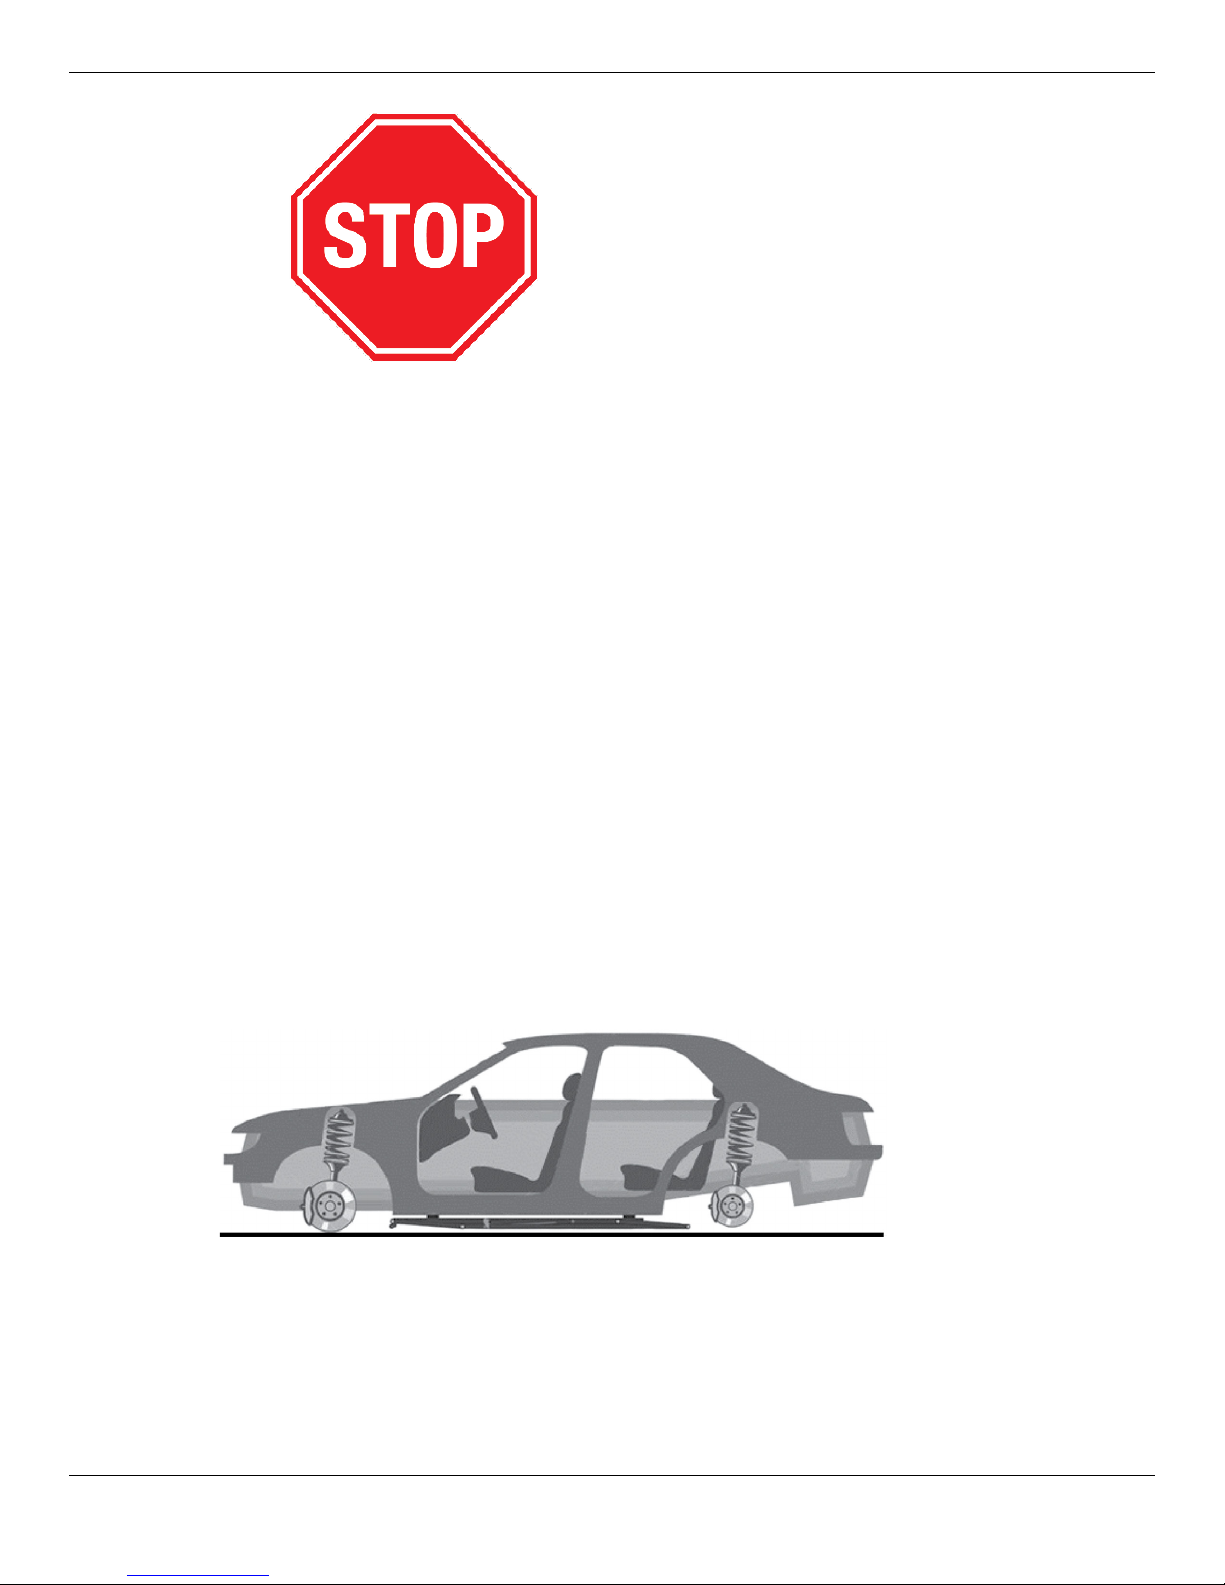
• Do not try to raise a load at no net rise. Your QuickJack requires some space between the
ground and your Vehicle to build up enough pressure to raise a load. It cannot raise a full load from
a completely flat starting position, as shown below.
This is not a problem in normal operation, as the Vehicles you want to raise are being held well
above the ground by their tires. The problem happens if you lower the QuickJack to a completely
flat position when the Vehicle’s tires are removed.
Only raise your QuickJack Frames with a Vehicle on them
even the very first time you use
.
⚠ WARNING This image shows the QuickJack Frames at a completely flat position holding a
Vehicle with no tires. Do not do this; the QuickJack will not be able to raise the
weight of the Vehicle under these circumstances. If this happens to you, refer to
Troubleshooting, visit quickjack.com/support, or send email to
support@quickjack.com for instructions.
QuickJack™ Portable Car Jack 36 P/N 5900959 — Rev. J1 — Dec. 2018
Page 37

Positioning the Lift Blocks and Frames
⚠ WARNING Always position the two QuickJack Frames as close to parallel as the Lifting Points
of the Vehicle allow; load stability can be compromised if they are too far off from
parallel.
There are two methods for positioning your QuickJack Frames:
• Outside in: Drive the Vehicle to the desired location, position the QuickJack Frames
Vehicle on different sides and between the wheels. If the distance between the wheels is not long
enough to accommodate the length of the QuickJack Frames, turn the Frames and push one end
under the Vehicle first, then the other end. Quick Frame Handles are typically not required. Make
not
sure
under the Vehicle when ready.
• Inside out: Position the QuickJack Frames next to each other, drive the Vehicle above the
Frames, then use your Quick Frame Handles to pull each Frame out to the desired location under
the Vehicle based on the factory-recommended Lifting Points. Make sure
QuickJack’s Hydraulic Hoses.
to drive on the QuickJack’s Hydraulic Hoses. Slide each Frame to the desired location
Make sure each Lock Bar is on the outside
not
to drive on the
Make sure each Lock Bar is on the outside
outside
.
.
⚠ CAUTION Before positioning QuickJack Frames, make sure they are both fully lowered and
that your working area is clear of obstructions. Also, make sure the Vehicle you will
be raising is neither rear or front heavy, which throws off its balance.
To position the QuickJack Frames:
1. Determine the desired method for positioning your QuickJack Frames.
2. Position the Lift Blocks, Pinch-Weld Blocks, or SUV and Light Truck Adapters in the Receiver
Trays.
Note: You can stack one Medium and one Tall Lift Block together, but not more than that.
⚠ CAUTION Do not raise any load on the Frames alone;
Blocks, or the SUV and Light Truck Adapters in the Receiver Trays.
always
use Lift Blocks, Pinch-Weld
the
3. Move the QuickJack Frames to the appropriate locations, based on positioning method.
4. If you are using the Inside out method, drive the Vehicle above the Frames.
5. Move the QuickJack Frames to the correct locations under the Vehicle based on the factoryrecommended Lifting Points.
⚠ WARNING If you do not know the factory-recommended Lifting Points for the Vehicle you are
raising, consult Vehicle Lifting Points for Frame-Engaging Lifts, supplied with your
QuickJack, and SAE Standard J2184, Vehicle Lift Points for Service Garage Lifting,
as a resource to assist you in the proper positioning of a Vehicle for raising. If the
Vehicle has an additional or uniquely positioned payload, have a qualified person
calculate the Vehicle center of gravity or have the Vehicle center of gravity
determined at a Vehicle scale.
6. Adjust the Lift Blocks in the Receiver Trays so that they are directly underneath the factory-
recommended Lifting Points for the Vehicle you are raising.
The QuickJack Frames and Lift Blocks are now positioned correctly for raising a Vehicle.
QuickJack™ Portable Car Jack 37 P/N 5900959 — Rev. J1 — Dec. 2018
Page 38

Raising the QuickJack Frames
QuickJack Frames have two locking positions, called First Locking Position and Top Locking Position.
When you raise the QuickJack Frames, always engage (lock) the Frames on either the First Locking
Position or the Top Locking Position, or lower them back down to the ground.
⚠ WARNING Do not raise a Vehicle unless the QuickJack Frames are properly positioned under
the Vehicle, the Frames are as close to parallel as possible, all personnel are a
sufficient distance away from the Vehicle, both Lock Bars are on the outside, there
is open space on all sides and above the Vehicle, and the operator is paying
attention (the operator must maintain visual contact with the Vehicle and the
surrounding area while raising or lowering the QuickJack Frames).
To raise a Vehicle:
1. Position the Lift Blocks, Pinch-Weld Blocks, or SUV and Light Truck Adapters in the Receiver
Trays.
Note: You can stack one Medium Lift Block on one Tall Lift Block, but
Do not stack Lift Blocks on Pinch-Weld Blocks or SUV and Light Truck Adapters.
⚠ CAUTION Do not raise any load on the Frames alone;
Blocks, or the SUV and Light Truck Adapters in the Receiver Trays.
2. Move the QuickJack Frames to the appropriate locations, based on positioning method.
3. If you are using the Inside out method, drive the Vehicle over the Frames.
4. Move the QuickJack Frames to the correct locations under the Vehicle based on the factoryrecommended Lifting Points.
always
use Lift Blocks, Pinch-Weld
not more than that
⚠ WARNING If you do not know the factory-recommended Lifting Points for the Vehicle you are
raising, consult Vehicle Lifting Points for Frame-Engaging Lifts, supplied with your
QuickJack, and SAE Standard J2184, Vehicle Lift Points for Service Garage Lifting,
as a resource to assist you in the proper positioning of a Vehicle for raising. If the
Vehicle has an additional or uniquely positioned payload, have a qualified person
calculate the Vehicle center of gravity or have the Vehicle center of gravity
determined at a Vehicle scale.
5. Adjust the Lift Blocks in the Receiver Trays so that they are directly underneath the factory-
recommended Lifting Points for the Vehicle you are raising.
6. Check both Lock Bars; raise them up and let them drop.
.
Not necessarily to scale. Not all components shown. Left side shows Lock Bar moving freely in
Lock Channel, right side shows Lock Bar stuck up in air, which
QuickJack™ Portable Car Jack 38 P/N 5900959 — Rev. J1 — Dec. 2018
must
be corrected.
Page 39

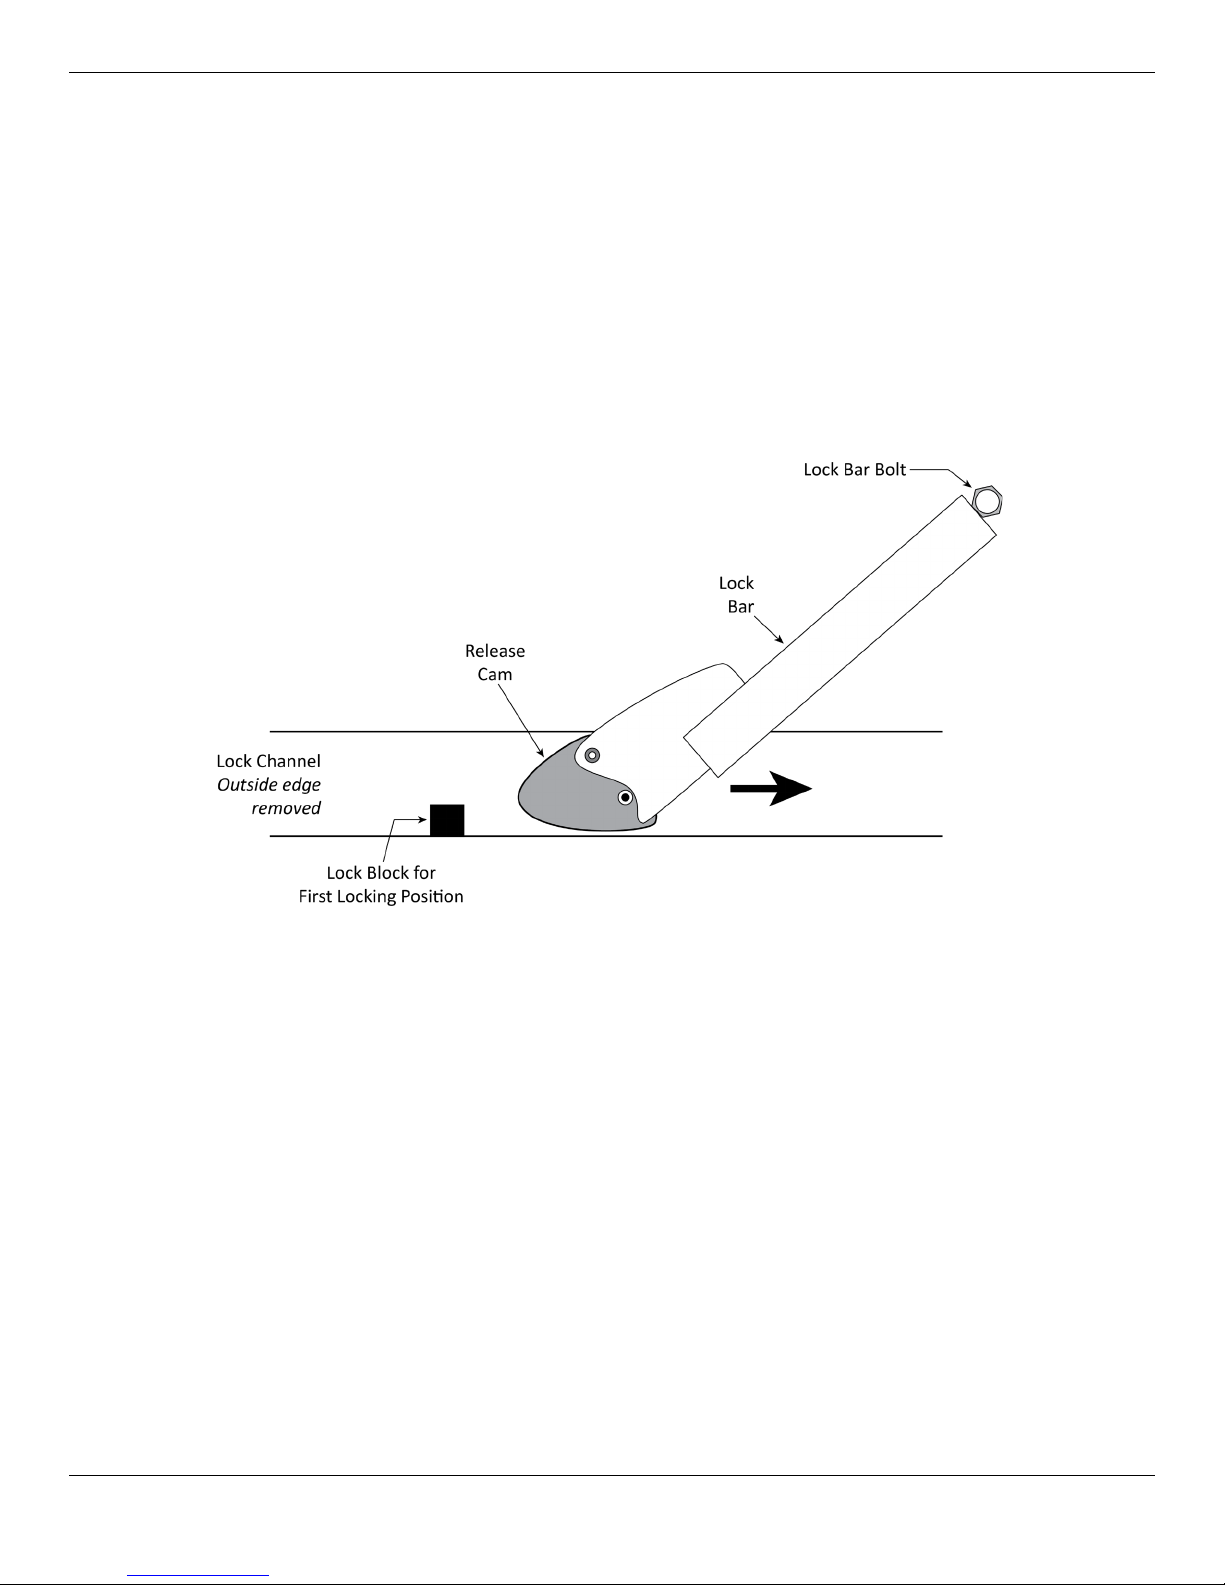
If the Lock Bar Bolt is too tight, it does not allow the Lock Bar to move freely in the Lock Channel.
This is a safety issue
moving freely in its Lock Channel. If the Lock Bar moves up with the Vehicle as it is raised (as
shown above on the right), it cannot lock.
; the QuickJack locks cannot be engaged unless each Lock Bar is
⚠ WARNING The Lock Bar
QuickJack cannot be put into a safe, locked position.
To fix an overtight Lock Bar Bolt, loosen the Lock Bar Bolt until the Lock Bar moves freely and
stays in the Lock Channel (as shown above, on the left).
7. Walk around the Vehicle and the QuickJack Frames; make sure everything is set up correctly.
8. Press and hold Up on the Pendant Control.
The QuickJack Frames start going up.
9. Just
10. After confirming the Lift Blocks are properly positioned, press Up on the Pendant Control.
before
Check the locations where the Lift Blocks will hit the factory-recommended Lifting Points on the
Vehicle. If necessary, adjust the Lift Blocks so that they are properly positioned (you may need to
lower the Vehicle some to adjust the Lift Blocks).
The QuickJack Frames start going up and the Lift Blocks hit the Vehicle’s Lifting Points.
the Frames make contact with the Vehicle, release Up. The Frames stop moving.
must
be moving freely in the Lock Channel. If it is not, the
⚠ WARNING Do not stop raising the Frames until you have passed the First Locking Position.
11. Stop raising the QuickJack Frames just past the First Locking Position (even if you eventually want
them on the Top Locking Position).
12. Make sure both Lock Bars are moving freely in their respective Lock Channels.
13. Make sure all Lift Blocks are still in contact with the factory-recommended Lifting Points.
If the Lift Blocks
If the Lift Blocks are
return the Vehicle to the ground, then make the necessary adjustments.
14. Rock the Vehicle gently to test for stability.
If the Vehicle is stable, press Up to continue raising the QuickJack Frames.
If the Vehicle is
the necessary adjustments.
15. To engage the QuickJack on the First Locking Position, press Down to lower the Frames until
they lock.
16. To engage the QuickJack on the Top Locking Position, press Up until you go just past the Top
Locking Position.
17. When you have gone just past the desired locking position, press Down on the Pendant Control
to lower the Frames onto the locking position. The Frames will stop moving down when they lock.
18. Release Down.
are
in the right positions, continue with raising the QuickJack Frames.
not
in the right positions, press Down on the Pendant Control and carefully
not
stable, press Down to
carefully
return the Vehicle to the ground, then make
QuickJack™ Portable Car Jack 39 P/N 5900959 — Rev. J1 — Dec. 2018
Page 40

19. Visually check to make sure both QuickJack Frames are engaged on the same locking position.
Not necessarily to scale. Not all components shown. Shows Release Cam and Lock Bar in Locked
Position.
⚠ WARNING Before doing anything else (like starting work on the Vehicle or leaving the area),
visually confirm
and that all Lift Blocks are in contact with the factory-recommended Lifting Points
of the Vehicle.
You can work on your Vehicle once you have visually confirmed that both Frames are engaged on the
same locking position and that all Lift Blocks are in contact with the Vehicle at the factoryrecommended Lifting Points.
that
both
QuickJack Frames are on the same locking positions
⚠ WARNING Do not work under an elevated Vehicle unless properly rated Vehicle Jack Stands in
place at the factory-recommended Lifting Points.
QuickJack™ Portable Car Jack 40 P/N 5900959 — Rev. J1 — Dec. 2018
Page 41
Lowering the Frames from the First Locking Position
Lowering the QuickJack’s Frames from the First Locking Position is different from lowering them from
the Top Locking Position, so it is described separately.
⚠ WARNING When lowering QuickJack Frames, make sure the Lock Bar and the Release Cam
stay in their Lock Channel. If they get knocked sideways they can get stuck on the
rail of the Lock Channel, which results in the QuickJack not lowering correctly.
To lower QuickJack Frames from the First Locking Position:
1. Press and hold Up on the Pendant Control just until the Release Cam clears the Lock Block, then
release Up.
The Release Cam / Lock Bar moves away from the Lock Block towards the Top Locking Position.
Not necessarily to scale. Not all components shown. Release Cam and the Lock Bar shown
moving off of the First Locking Position towards the Top Locking Position.
2. When the Release Cam and Lock Bar are clear of the Lock Block, press and hold Down until both
QuickJack Frames lower to the ground.
The Release Cam moves the Lock Bar over the Lock Block.
Note: If the Lock Bar locks again on the Lock Block, try again, going up a little bit further this
time. What you want is for the Release Cam to be in the Down position, as shown in the
drawing above.
QuickJack™ Portable Car Jack 41 P/N 5900959 — Rev. J1 — Dec. 2018
Page 42

Do not lower the Release Cam / Lock Bar if the Release Cam is in the Up
position
, as shown below. The Release Cam needs to be in the Down position, as shown in the
drawing on the previous page.
If the Release Cam is in the Up position, carefully use your hand to move it to the Down position.
Not necessarily to scale. Not all components shown. Release Cam shown in the Up position,
which must be changed to the Down position before lowering.
If one side re-engages on the Lock Block but the other does not, immediately release Down,
press and hold Up, go further past the Lock Block, release Up, and then press and hold Down. If
this issue continues, refer to Troubleshooting.
Note: QuickJack recommends pressing Down for ~5 seconds
after
the Frames are on the
ground; this ensures that as much Hydraulic Fluid as possible returns to the Fluid Reservoir.
3. Remove the QuickJack Frames from underneath the Vehicle; you may want to use the Quick
Frame Handles.
4. Move the Vehicle, if desired. Do not drive on the QuickJack Frames or the Hydraulic Hoses.
QuickJack™ Portable Car Jack 42 P/N 5900959 — Rev. J1 — Dec. 2018
Page 43

Lowering the Frames from the Top Locking Position
Lowering the QuickJack’s Frames from the Top Locking Position is different from lowering them from
the First Locking Position, so it is described separately.
⚠ WARNING When lowering QuickJack Frames, make sure the Lock Bar and the Release Cam
stay in their Lock Channel. If they get knocked sideways they can get stuck on the
rail of the Lock Channel, which results in the QuickJack not lowering correctly.
To lower the QuickJack Frames from the Top Locking Position:
1. Press and hold Up until the Lock Bar is off the Lock Block, then release Up.
2. Raise the Lock Bar
Block on both Frames, as shown below.
You can use your hand or your foot to raise the Lock Bar.
Not necessarily to scale. Not all components shown. Release Cam shown on top of the Lock Block
for the Top Locking Position.
on both QuickJack Frames
so that the Release Cam is on top of the Lock
3. When the Release Cam is on top of the Lock Block on both Frames, press and hold Down until
both QuickJack Frames lower to the ground.
If the Lock Bars engage on the Lock Block as the Frames go back down, start the process over
again.
If one side re-engages on the Lock Block but the other does not, immediately release Down and
then start the process again. If this issue continues, refer to Troubleshooting.
Note: QuickJack recommends pressing Down for ~5 seconds
ground; this ensures that as much Hydraulic Fluid as possible returns to the Fluid Reservoir.
4. Remove the QuickJack Frames from underneath the Vehicle; you may want to use the Quick
Frame Handles.
5. Move the Vehicle, if desired.
Do not drive the Vehicle on the QuickJack Frames or the Hydraulic Hoses.
QuickJack™ Portable Car Jack 43 P/N 5900959 — Rev. J1 — Dec. 2018
after
the Frames are on the
Page 44

Using the 12 VDC Power Unit
The 12 VDC Power Unit lets you power your QuickJack using a Vehicle Battery and a pair of Jumper
Cables, giving you the flexibility to use your QuickJack in a wide variety of locations.
The following drawing shows how to connect the 12 VDC Power Unit to a Vehicle Battery.
Not to scale. Not all components shown. The Jumper Cables and the Vehicle Battery are not supplied
with the 12 VDC QuickJack Power Unit.
Important: If your 12 VDC QuickJack Power Unit has a Reservoir Cap with a Breather Valve,
close the Breather Valve before transporting the Power Unit. Then make sure to open
the Breather Valve before using the Power Unit.
QuickJack™ Portable Car Jack 44 P/N 5900959 — Rev. J1 — Dec. 2018
Page 45

The following procedure applies only to the 12 VDC QuickJack Power Unit; none of the other
QuickJack Power Units can be used with a Vehicle Battery.
⚠ WARNING QuickJack recommends wearing safety glasses and removing all jewelry before
connecting the 12 VDC QuickJack Power Unit to a Vehicle Battery. If metal touches
in the wrong place, it could cause a short circuit that results in an exploded battery,
ruined Vehicle computer, burned fingers, and/or battery acid burns.
The following procedure assumes one of the Jumper Cable cables is red, the other black.
To connect the 12 VDC QuickJack Power Unit to a Vehicle Battery:
1. Move the QuickJack Frames to the desired location, find an appropriate location for the 12 VDC
QuickJack Power Unit, and then connect the two using the Hydraulic Hoses.
2. Drive the Vehicle whose Battery you want to use to a suitable location near the 12 VDC QuickJack
Power Unit.
The Jumper Cables need to be able to reach from the Vehicle Battery to the 12 VDC QuickJack
Power Unit.
3. Attach one end of the
other end to the Positive terminal on the 12 VDC QuickJack Power Unit.
See the drawing on the previous page.
red
Jumper Cable to the
Positive
terminal on the Vehicle Battery, the
⚠ WARNING Make sure to connect Positive to Positive and Negative to Negative. If you
connect Positive to Negative, you will almost certainly cause damage to the
electrical system of the Vehicle, including the battery. You could also damage the
12 VDC QuickJack Power Unit, cause an electrical fire, or cause an explosion.
4. Attach one end of the black Jumper Cable to the Negative terminal on the Vehicle Battery, the
other end to the Negative terminal on the 12 VDC QuickJack Power Unit.
5. Turn on the Vehicle’s engine.
BendPak recommends running the Vehicle’s engine while you use the QuickJack, so you do not
drain the Battery.
6. Use the QuickJack.
7. When you are done using the QuickJack, reverse the process: turn off the Vehicle’s engine,
remove the Jumper Cables from the Vehicle Battery and the 12 VDC QuickJack Power Unit, and
finally pack up the QuickJack Frames.
Additional Operating Information
Keep the following in mind when operating your QuickJack:
• Use it only on a hard, flat surface. Your QuickJack is portable; if you move it to a new location,
make sure the new location has a hard, flat surface.
• Check the weight of a Vehicle before attempting to raise it. Do not guess. Never exceed the rated
load capacity of your QuickJack.
• Always use Lift Blocks. Do not raise a load on the QuickJack Frames alone.
• Lift Blocks must be used in the Receiver Trays only. The provided Lift Blocks are
use with pinch-weld frames. If you have a Vehicle with a pinch-weld frame, QuickJack
recommends ordering optional Pinch-Weld Blocks, available on the QuickJack website.
QuickJack™ Portable Car Jack 45 P/N 5900959 — Rev. J1 — Dec. 2018
not
designed for
Page 46

• If you purchased the SUV and Light Truck Adapter Kit, the square pieces go rubber-down in the
Receiver Trays on the QuickJack Frames. You can then put the round stackable adapter in the
hole on the top of the square piece either by itself or combined with the extension.
•
Visually inspect your QuickJack before each use
severe wear.
• Do not rock the Vehicle while it is raised or remove heavy items that could cause excessive weight
shift.
• The QuickJack uses a parallelogram lifting system. As the Frames rise, both the mechanical forces
of the jack and pressure of the hydraulic system are reduced significantly as the parallel arms
elevate through the rise motion.
• When the parallel lifting arms are elevated (the angles increase), hydraulic system pressure is
reduced and mechanical load on the structure is minimized.
• Raising the QuickJack to the Top Locking Position and engaging it there is the most secure
method of support.
• When the parallel lifting arms are almost horizontal with the floor, both mechanical loading and
hydraulic system pressures reach maximum loading.
• Stopping the QuickJack prior to reaching the First Locking Position makes it difficult for the
hydraulic system to maintain equal pressure and properly support the load, as the parallel lifting
arms are almost horizontal with the ground.
• Do not stop raising the QuickJack Frames until you have passed the First Locking Position.
• Never leave a raised load unless your QuickJack Frames are engaged on a locking position. If you
do not want to engage them on a locking position, lower the raised load back down to the ground.
. Do not use it if you find any damage or
Hydraulic System Warnings
⚠ WARNING Failure to observe these precautions can result in serious personal injury, including,
in rare cases, death.
• All Hydraulic Hose connections must be correctly fastened together before using your QuickJack
or applying pressure.
• Do not attempt to connect or disconnect Hydraulic Hoses while equipment is loaded or while the
Hydraulic System is under pressure.
• Keep the Quick-Connect Fittings clean and free from debris.
• Use every precaution to guard against dirt entering the Hydraulic System.
• Use caution when using Thread Seal Tape while installing hydraulic fittings.
If using Thread Seal Tape, trim loose ends to prevent tape from entering the Hydraulic System.
Make sure no Thread Seal Tape or thread sealant enters the Hydraulic System. Thread Seal Tape
or thread sealant in the Hydraulic Fluid will impair fluid flow, possibly causing a system malfunction.
• Keep bare hands away from Hydraulic Fluid; always wear gloves when handling Hydraulic
Cylinders and Hydraulic Hoses.
• When dealing with Hydraulic Fluid, observe the safety instructions from the manufacturer.
• Use protective equipment (safety goggles, protective gloves, suitable working clothes, safety
boots, and so on) when dealing with the Hydraulic System.
• If Hydraulic Fluid comes into contact with the eyes, gets into the bloodstream, or is swallowed,
seek immediate medical attention.
QuickJack™ Portable Car Jack 46 P/N 5900959 — Rev. J1 — Dec. 2018
Page 47

Maintenance
Refer to ANSI/ALI ALIS Standard (R2015) Safety Requirements for Installation and Service of
Automotive Lifts for more information about safely servicing your QuickJack.
⚠ WARNING: Remove power from your QuickJack before performing
QuickJack must be de-energized and you must take steps to make sure that it
cannot be re-energized until all maintenance is complete.
Reorder labels and worn, damaged, or broken parts from quickjack.com/replacement-
parts.html. Only use factory-supplied parts as replacement parts.
All maintenance tasks can be performed by the owner/operator of the QuickJack.
To maintain your QuickJack:
• Daily. Make a visual inspection of all moving parts and check for damage or excessive wear.
Replace any damaged or worn parts before equipment is put back into operation.
• Daily. Keep all QuickJack components clean.
• Daily. Make sure the Safety Locks are in good operating condition. Do not use your QuickJack if
the Safety Locks are damaged or excessively worn.
• Daily. Inspect Lift Blocks for damage or excessive wear. Replace as required.
• Weekly. Check all hose and fitting connections to make sure they are tight.
• Monthly. Lubricate all hinge points and check for excessive wear.
• Monthly. Check Air Cylinders to make sure they have the correct amount of pressure.
• Every other month. Check Hydraulic Fluid levels and refill if required.
• When noticed. Replace all caution, warning, and safety-related labels if illegible or missing.
any
maintenance! The
Lubrication Points
QuickJack recommends using white lithium grease (or equivalent) and a grease gun with an
appropriate tip (a Lube-Link™, for example) for lubrication. Lubrication points are shown below.
QuickJack™ Portable Car Jack 47 P/N 5900959 — Rev. J1 — Dec. 2018
Page 48

About Outdoor Operation
Your QuickJack is approved for indoor installation and use only.
prohibited
Your QuickJack is portable, however, so if you end up taking it outdoors, remember to protect it from
the weather (for example, from falling dirt, rain, sleet, and snow).
Here are some additional things to consider if you end up taking your QuickJack outside:
• Extreme environmental conditions must be avoided. The QuickJack warranty does not
cover damage from rain, snow, sleet, excessive humidity, corrosive agents, hazardous and/or
combustible fibers and flyings, or other contaminants. Keep your QuickJack protected from these
environmental conditions at all times.
• The QuickJack lifetime may be reduced. Taking a QuickJack outside means it is subject to
a harsher environment: a QuickJack ages more quickly the more it is outside.
• Maintenance and replacement parts costs may increase. The longer you keep your
QuickJack outside, even when protected from the weather, the more often it will need
maintenance: metal parts rust, plastic parts break down and dry out, hydraulic fluid gets dirty
faster, and so on. Keeping your QuickJack outside for long periods is usually going to require extra
maintenance and more frequent replacement parts.
Here are some things customers have told us they did with QuickJacks they took outside:
• Move it back inside when done. It may seem obvious, but here it is: when you are done with
your QuickJack outside, even if it was protected from the weather, bring it back inside and
thoroughly clean it.
• Cover the Power Unit.
motor. If that motor gets wet, people could get electrocuted, a fire could start, and almost certainly
the motor will short circuit and stop functioning.
QuickJack warranty
protected from all sources of moisture.
• Put up a carport canopy, party tent, or other structure. And then put the QuickJack
under the structure. It blocks the sun and the rain, reducing the impact the outside environment
has on the QuickJack.
• Use Ground Fault Circuit Interrupter (GFCI) protection. If available, use a GFCI circuit
breaker in the service panel (breaker box) to protect the entire circuit.
• Increase the maintenance. If the maintenance instructions say to do something every day,
check it twice a day; if they say to do something once a week, check it two times a week; and so
on. This will help minimize the impact the outside environment has on your QuickJack.
• Increase the replacement parts. Parts on a QuickJack you take outside are not going to last
as long as normal. Be prepared to start ordering replacement parts sooner.
.
This one is really important
These things are not covered by the
. This advice applies your QuickJack at all times; keep the Power Unit
Outdoor installation is
. The Power Unit includes an electric
QuickJack™ Portable Car Jack 48 P/N 5900959 — Rev. J1 — Dec. 2018
Page 49

Troubleshooting
This section describes how to troubleshoot your QuickJack.
⚠ WARNING
Note: If your QuickJack is not functioning correctly, you
Important: All repair work
Issue Action to Take
Frames do not go up or
down.
Frames do not come down. Make sure there is a Vehicle on the Frames; if not, add some (the
Frames are stuck at full
height with no weight.
Frames do not rise from a
zero net rise position.
Only use factory-supplied parts as replacement parts
from a different source, you void your warranty and compromise the safety of
everyone who uses the QuickJack.
must
stop using it until it is fixed.
must
be done by qualified personnel.
Make sure the Power Unit is getting appropriate power; if not, check
the circuit breaker. Make sure none of the Hydraulic Hoses are
pinched or leaking. Make sure there is sufficient Hydraulic Fluid in the
Fluid Reservoir. Bleed the cylinders.
QuickJack is designed to work with weight). Check the pressure in the
Air Cylinders; inflate to 40 to 50 PSI, but do not exceed 50 PSI.
QuickJack Frames require weight to come down from a fully raised
position. Refer to
QuickJack Frames cannot raise a full load from a completely flat
position. Refer to
Frames at Full Height with No Load
Vehicle with No Tires Fully Lowered
. If you use parts
.
.
Hydraulic Fluid is dirty. Replace the dirty Hydraulic Fluid with clean fluids.
Jack makes odd noises Lubricate hinge points using white lithium grease.
Frames lower without using
the Pendant Control.
Air Cylinder is not holding
pressure.
Quick-Connect Fittings
becoming increasingly
difficult to connect.
Frames stop raising before
reaching the Top Locking
Position
No pressure from pump. Prime the pump.
If you continue to have an issue, visit quickjack.com/support or contact QuickJack Support at
support@quickjack.com, (888) 262-3880, or (805) 933-9970.
Make sure the QuickJack is engaged on a locking position (if it is not,
the Frames will slowly lower).
Make sure the valve core inside the valve stem is tightly in place; that
is, it is not letting air escape. You can use a standard valve tool to
check. Do not overtighten the valve core.
Pressure is building up in the hydraulic system. To release it, hold
Down
reach the ground, allowing as much Hydraulic Fluid as possible to
return to the Fluid Reservoir.
There is not enough Hydraulic Fluid in the reservoir. Return the
QuickJack Frames to the ground, then add fluid to the reservoir to
.5 inch below the fill hole.
on the Pendant Control for ~5 seconds
after
the Frames
QuickJack™ Portable Car Jack 49 P/N 5900959 — Rev. J1 — Dec. 2018
Page 50

Frames at Full Height with No Load
The issue is that the QuickJack is designed and engineered to work with the weight of a Vehicle on it.
If there is no Vehicle on the Frames at full height, the QuickJack can occasionally get stuck.
Methods that have fixed this issue include:
• Use lifting equipment to get weight onto the QuickJack Frames.
• Reduce the hydraulic force that is holding the QuickJack Frames. If you do this, keep a rag handy
in case there is some Hydraulic Fluid leakage.
If you are still unable to lower the frames, contact QuickJack Technical Support for assistance.
Vehicle with No Tires Fully Lowered
The issue is that there is too much weight on the QuickJack Frames with no room to get upward force
started. You need to reduce the weight by at least half or raise the Vehicle off the QuickJack Frames
some different way.
Methods that have fixed this issue include:
• Use a floor jack to raise the Vehicle from four to six inches.
• Using lifting equipment to raise the Vehicle.
If you are still unable to raise your Vehicle, contact QuickJack Technical Support for assistance.
Priming the Pump
Priming the pump pushes Hydraulic Fluid into the system. On rare occasions, there may not be
enough Hydraulic Fluid in the system for the pump to produce force. Priming the pump usually
resolves this issue.
Note: If your Power Unit does not have a relief valve, you cannot prime it.
To prime the pump:
1. On the Power Unit, remove the relief valve, then place a rag over the cavity and hold it there.
2. Press Up on the Pendant Control for a few seconds (until you feel pressure on the rag).
3. Reinstall the relief valve.
The pump should now have enough Hydraulic Fluid to operate normally.
Bleed the Hydraulic Cylinders
Bleeding the QuickJack Hydraulic Cylinders removes excess air pressure from the Hydraulic System.
The QuickJack Hydraulic Cylinders are generally self-bleeding, but if you notice jerking of the Frames
or Frames rising and/or lowering at different speeds, you may want to manually bleed them.
You are going to need a rag to wipe up fluid that leaks, and a 4.5 or 5 mm (3/16 inch) hex key (also
called an Allen® key or wrench), to loosen and tighten the Bleeder Screw.
QuickJack™ Portable Car Jack 50 P/N 5900959 — Rev. J1 — Dec. 2018
Page 51

⚠
2.
3.
4.
To bleed a Hydraulic Cylinder:
1. Make sure the QuickJack Frame is flat on the ground, then raise the rear end (the end with the
wheels on it) straight up.
It may help to brace the end that stays on the
ground.
Your QuickJack Frame should now look like the
drawing to the right.
CAUTION While raised, the Frame is
unstable. Have one person hold
the Frame and the Lock Bar in
place while a second person
loosens and then tightens the
Bleeder Screw, to make sure the
Frame does not fall. Keep hands
clear of pinch points at all times.
Using one hand, firmly hold the two sections of
the Frame and the Lock Bar in place.
Another option is to engage the QuickJack
Frame on the First Locking Position
raising it; this provides additional stability.
before
After raising the Frame, wait 15 to 30 seconds
for the air to move up towards the Bleeder
Screw.
Using your hex key, loosen the Bleeder Screw
approximately three quarters of a turn, then
slowly after that.
What you are listening for is the sound of air
escaping through the Bleeder Screw.
When you hear air escaping, do not loosen the
Bleeder Screw any further.
Note that a small amount of fluid may also come out of the Bleeder Screw as the air escapes; wipe
it up with your rag.
When the air stops escaping from the Bleeder Screw, and fluid is coming out
the air has been removed.
5. Hand tighten the Bleeder Screw with the hex key:
6. Lower the QuickJack Frame back down to the ground.
7. Bleed the Hydraulic Cylinder on the other QuickJack Frame.
do not overtighten.
without bubbles
,
QuickJack™ Portable Car Jack 51 P/N 5900959 — Rev. J1 — Dec. 2018
Page 52

Battery
Red
White
Black
+ –
M
Start
Switch
Up
Down
SB2
SB1
Remote
Control
Power
Unit
123
Ground
Motor
Start Switch
Coil
Solenoid
Valve Coil
Wiring Diagrams
12 VDC Wiring Diagram
208-230 VAC Wiring Diagram
Make sure to follow the 208-230 VAC electrical rules for the country in which you are using the unit.
QuickJack™ Portable Car Jack 52 P/N 5900959 — Rev. J1 — Dec. 2018
Page 53

Labels
QuickJack™ Portable Car Jack 53 P/N 5900959 — Rev. J1 — Dec. 2018
Page 54

QuickJack™ Portable Car Jack 54 P/N 5900959 — Rev. J1 — Dec. 2018
Page 55
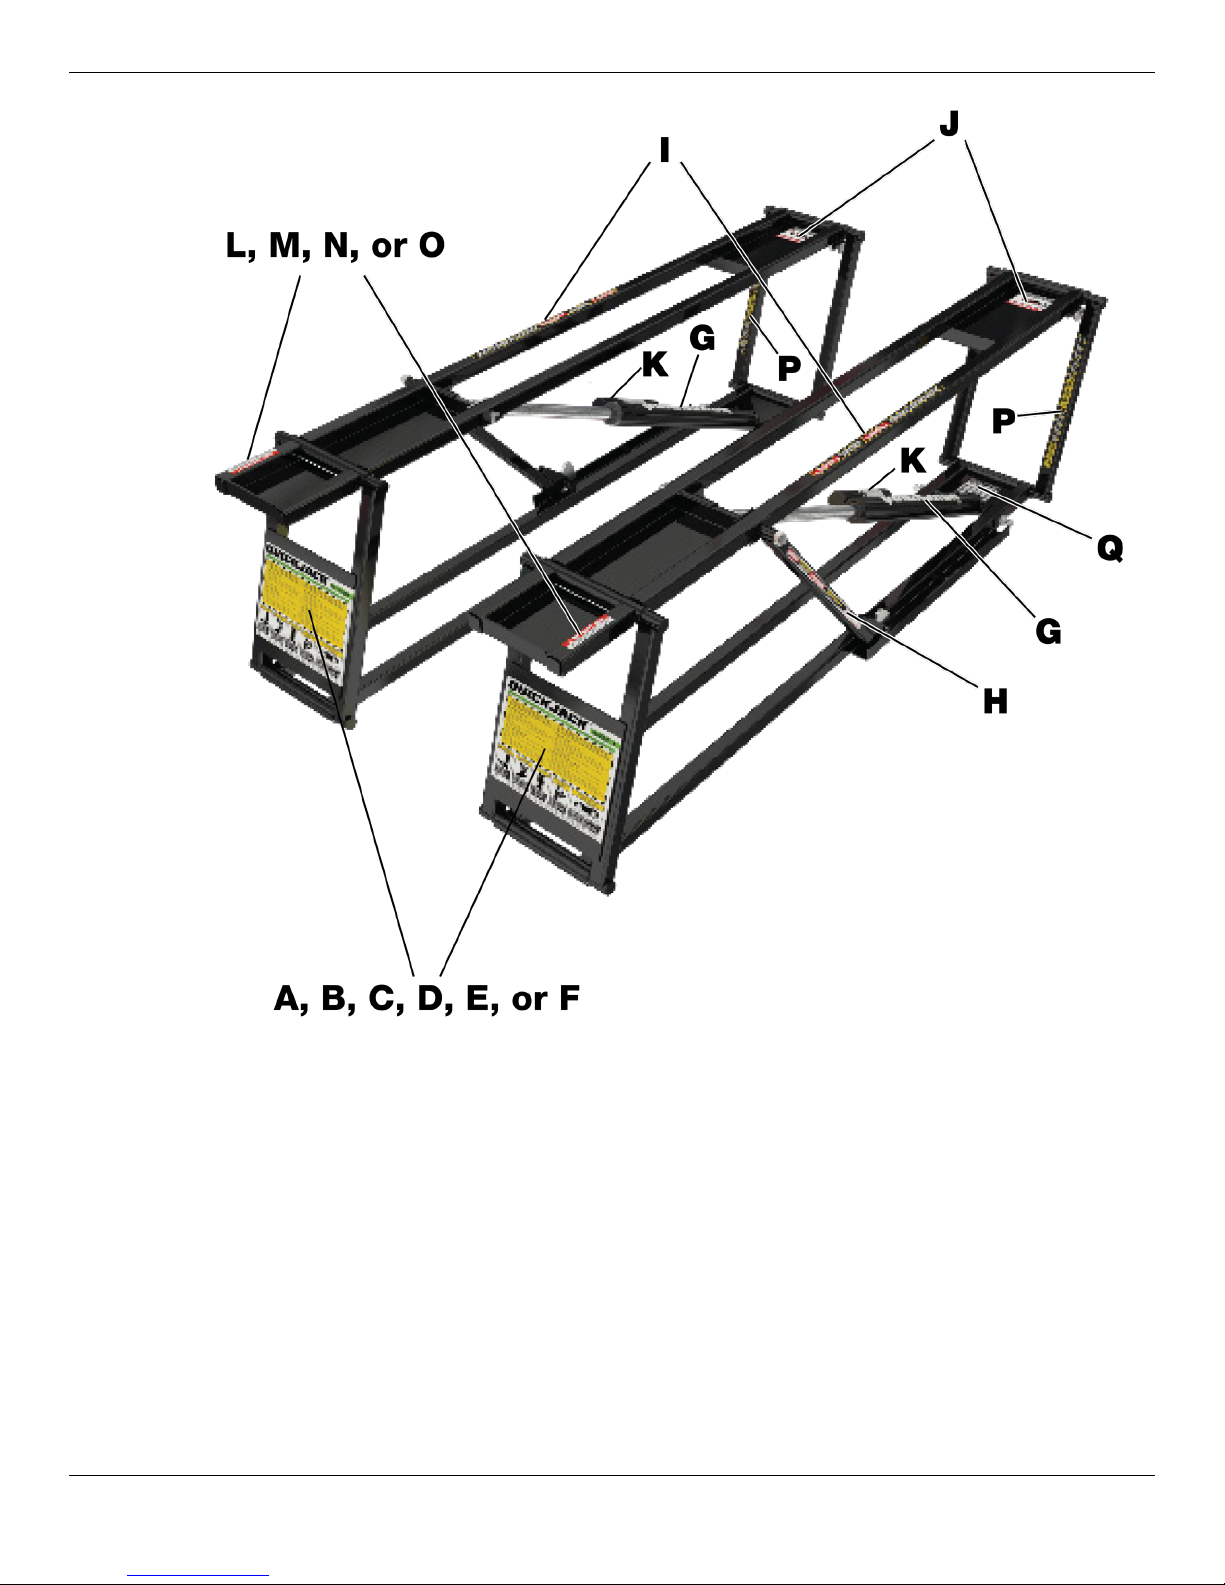
QuickJack™ Portable Car Jack 55 P/N 5900959 — Rev. J1 — Dec. 2018
Page 56

Parts Sheets
QuickJack™ Portable Car Jack 56 P/N 5900959 — Rev. J1 — Dec. 2018
Page 57

QuickJack™ Portable Car Jack 57 P/N 5900959 — Rev. J1 — Dec. 2018
Page 58

QuickJack™ Portable Car Jack 58 P/N 5900959 — Rev. J1 — Dec. 2018
Page 59
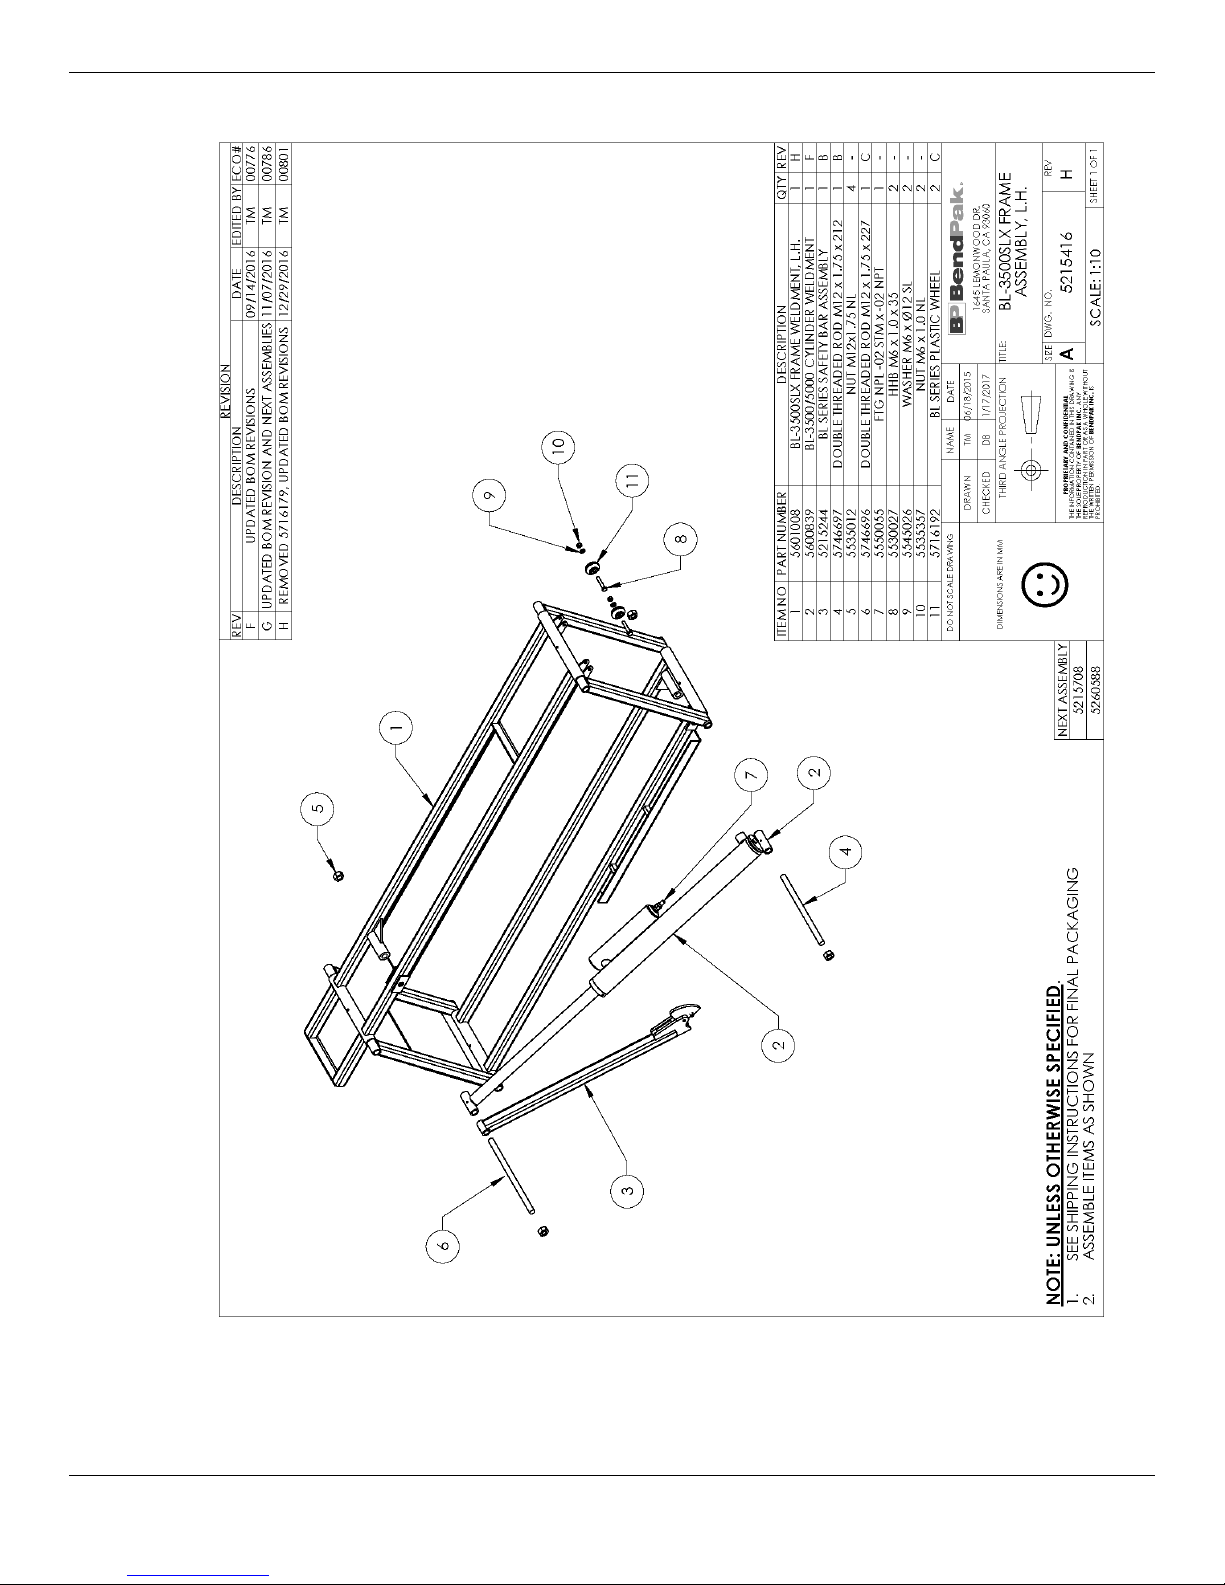
QuickJack™ Portable Car Jack 59 P/N 5900959 — Rev. J1 — Dec. 2018
Page 60

QuickJack™ Portable Car Jack 60 P/N 5900959 — Rev. J1 — Dec. 2018
Page 61

QuickJack™ Portable Car Jack 61 P/N 5900959 — Rev. J1 — Dec. 2018
Page 62
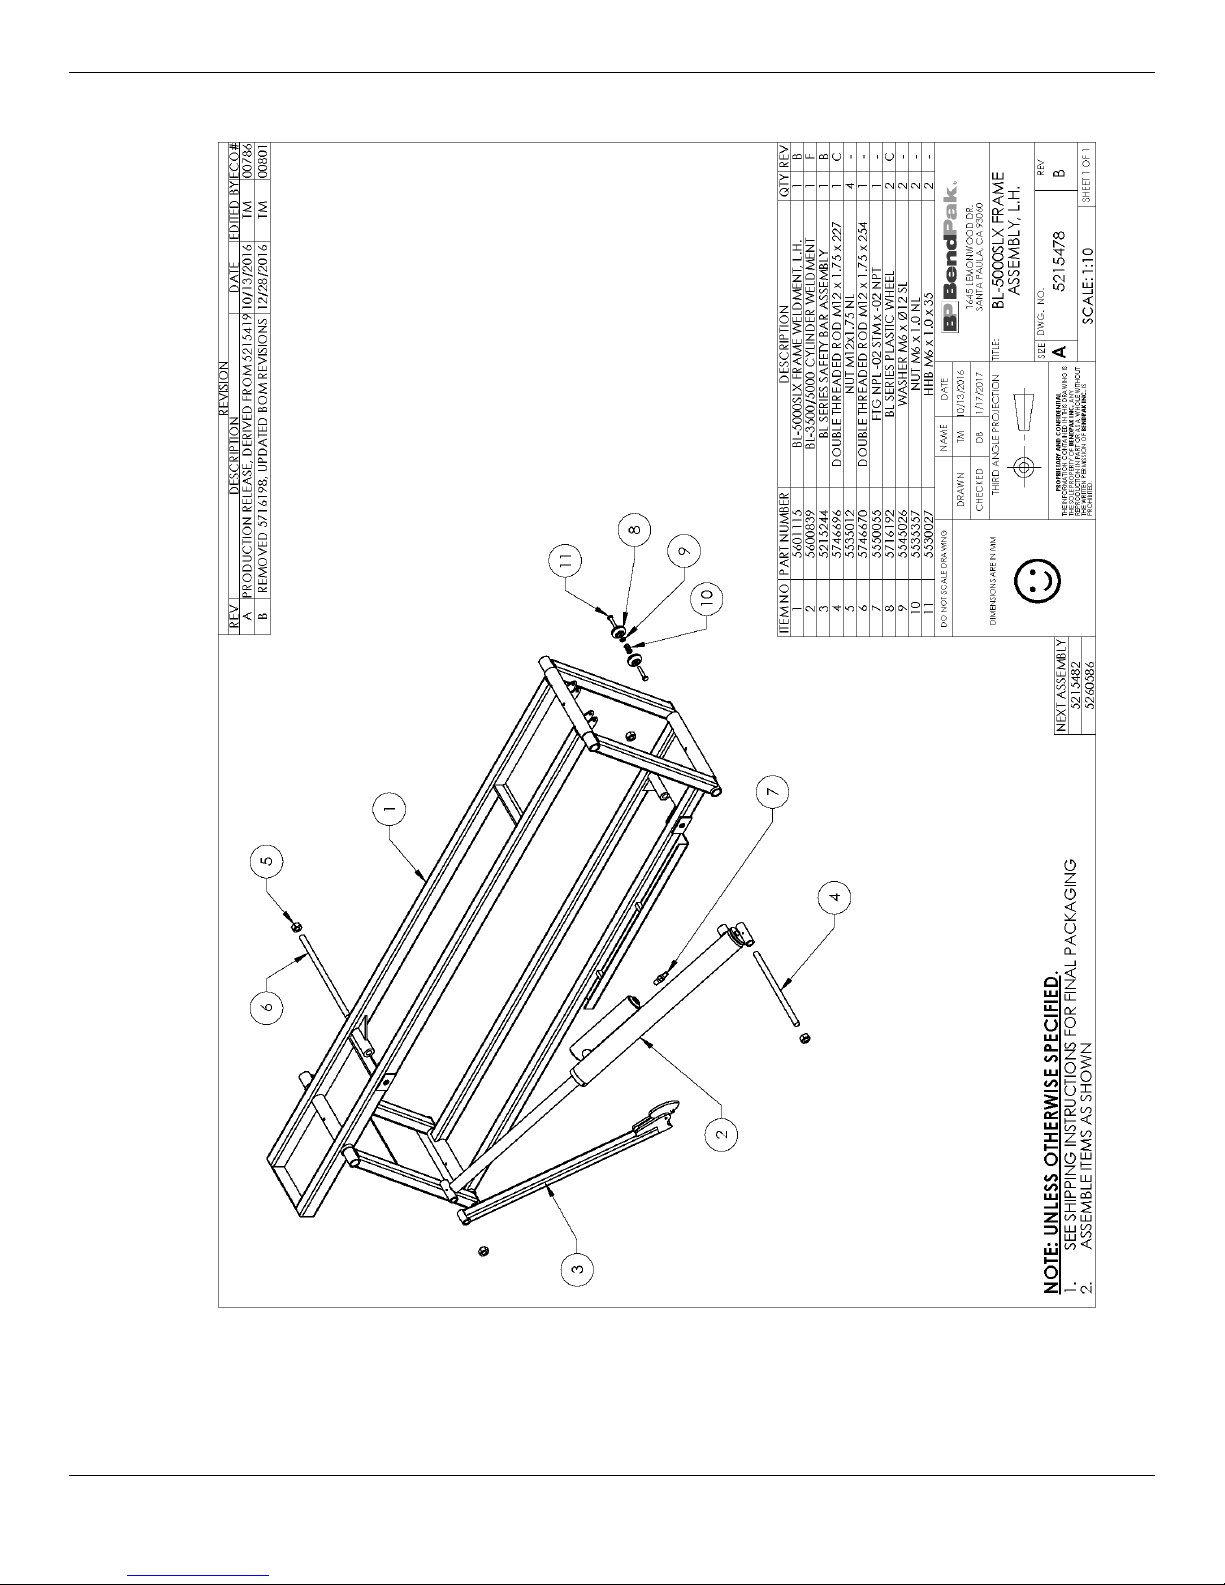
QuickJack™ Portable Car Jack 62 P/N 5900959 — Rev. J1 — Dec. 2018
Page 63

QuickJack™ Portable Car Jack 63 P/N 5900959 — Rev. J1 — Dec. 2018
Page 64
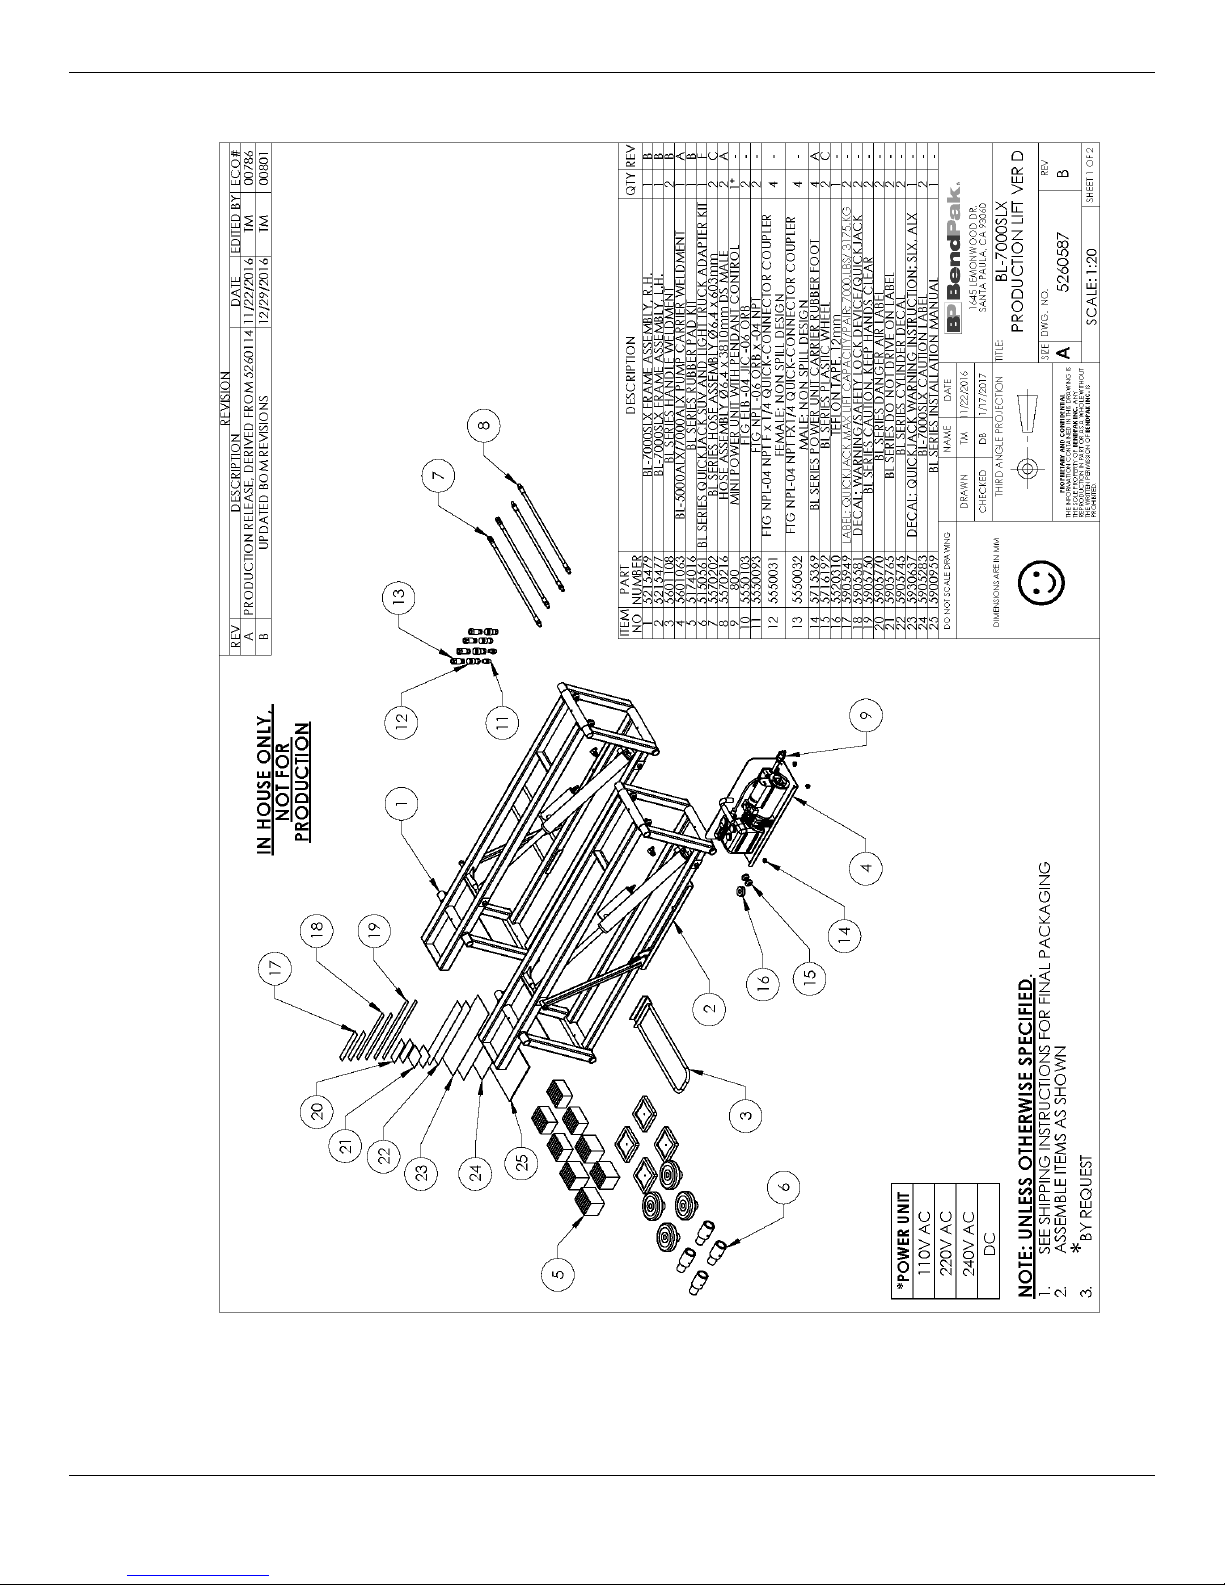
QuickJack™ Portable Car Jack 64 P/N 5900959 — Rev. J1 — Dec. 2018
Page 65

QuickJack™ Portable Car Jack 65 P/N 5900959 — Rev. J1 — Dec. 2018
Page 66
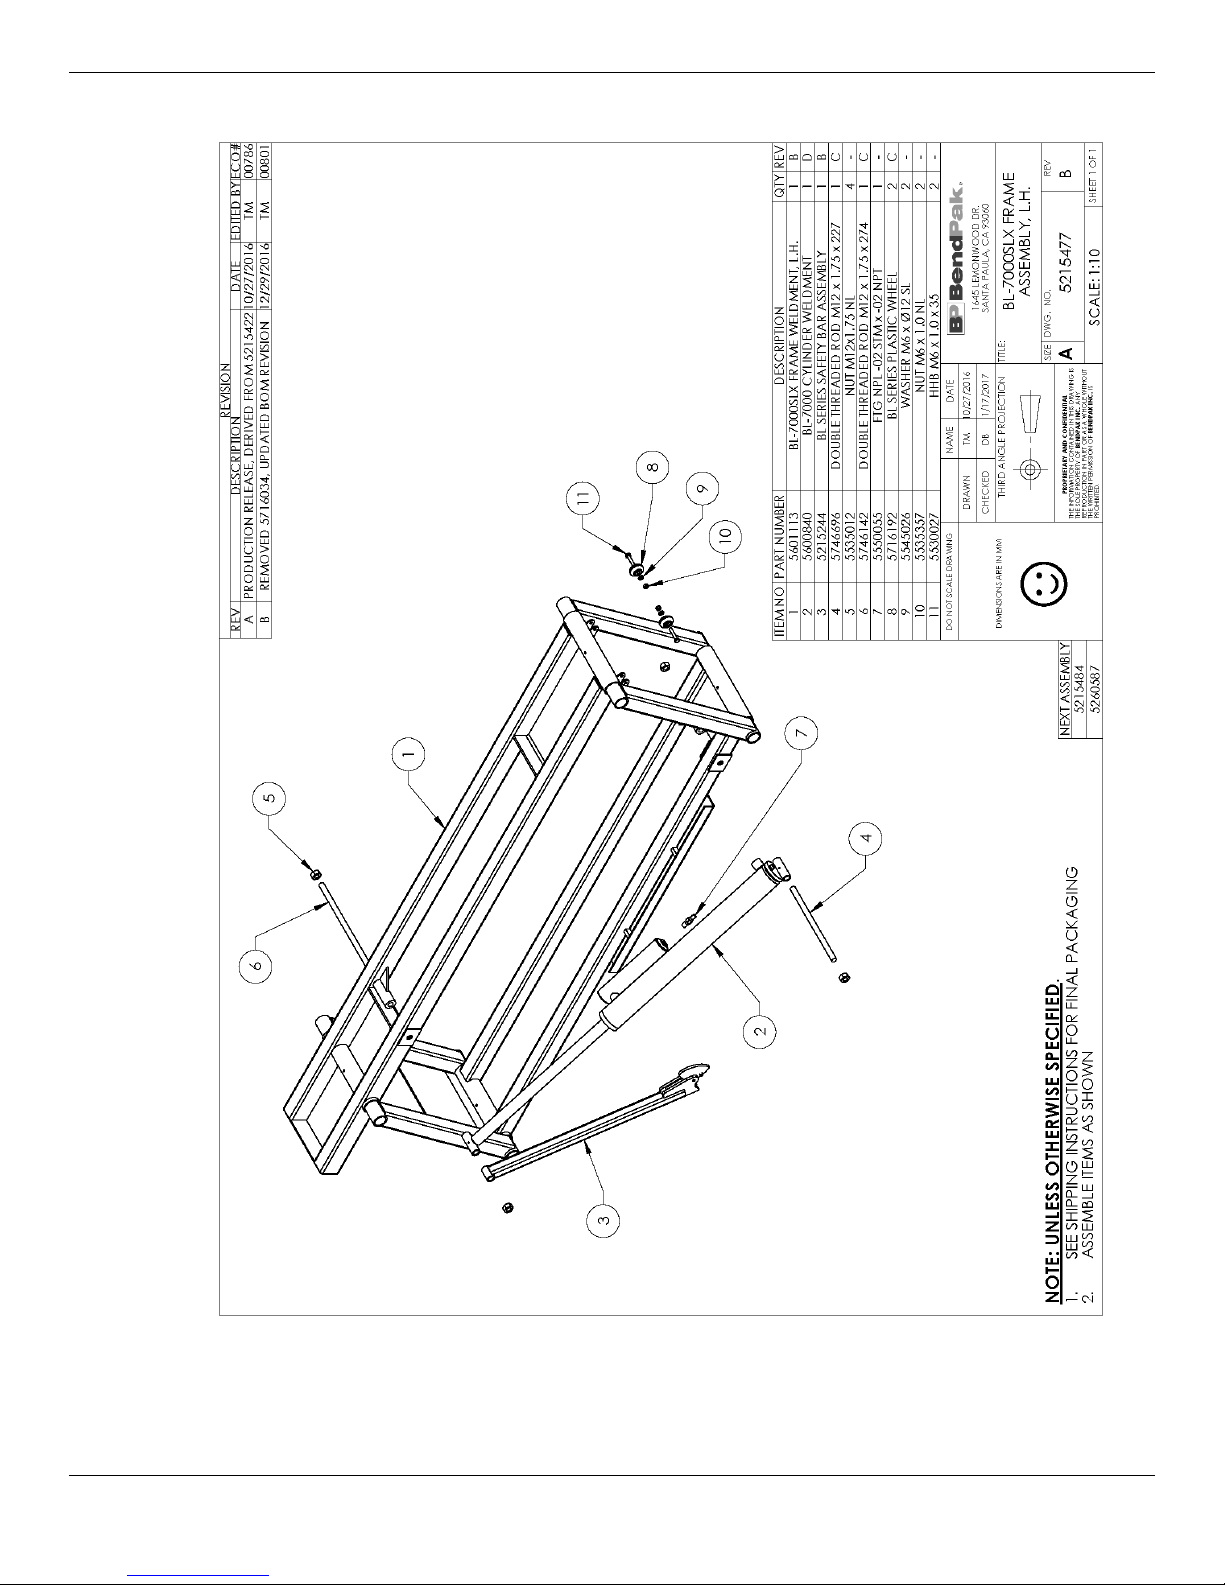
QuickJack™ Portable Car Jack 66 P/N 5900959 — Rev. J1 — Dec. 2018
Page 67
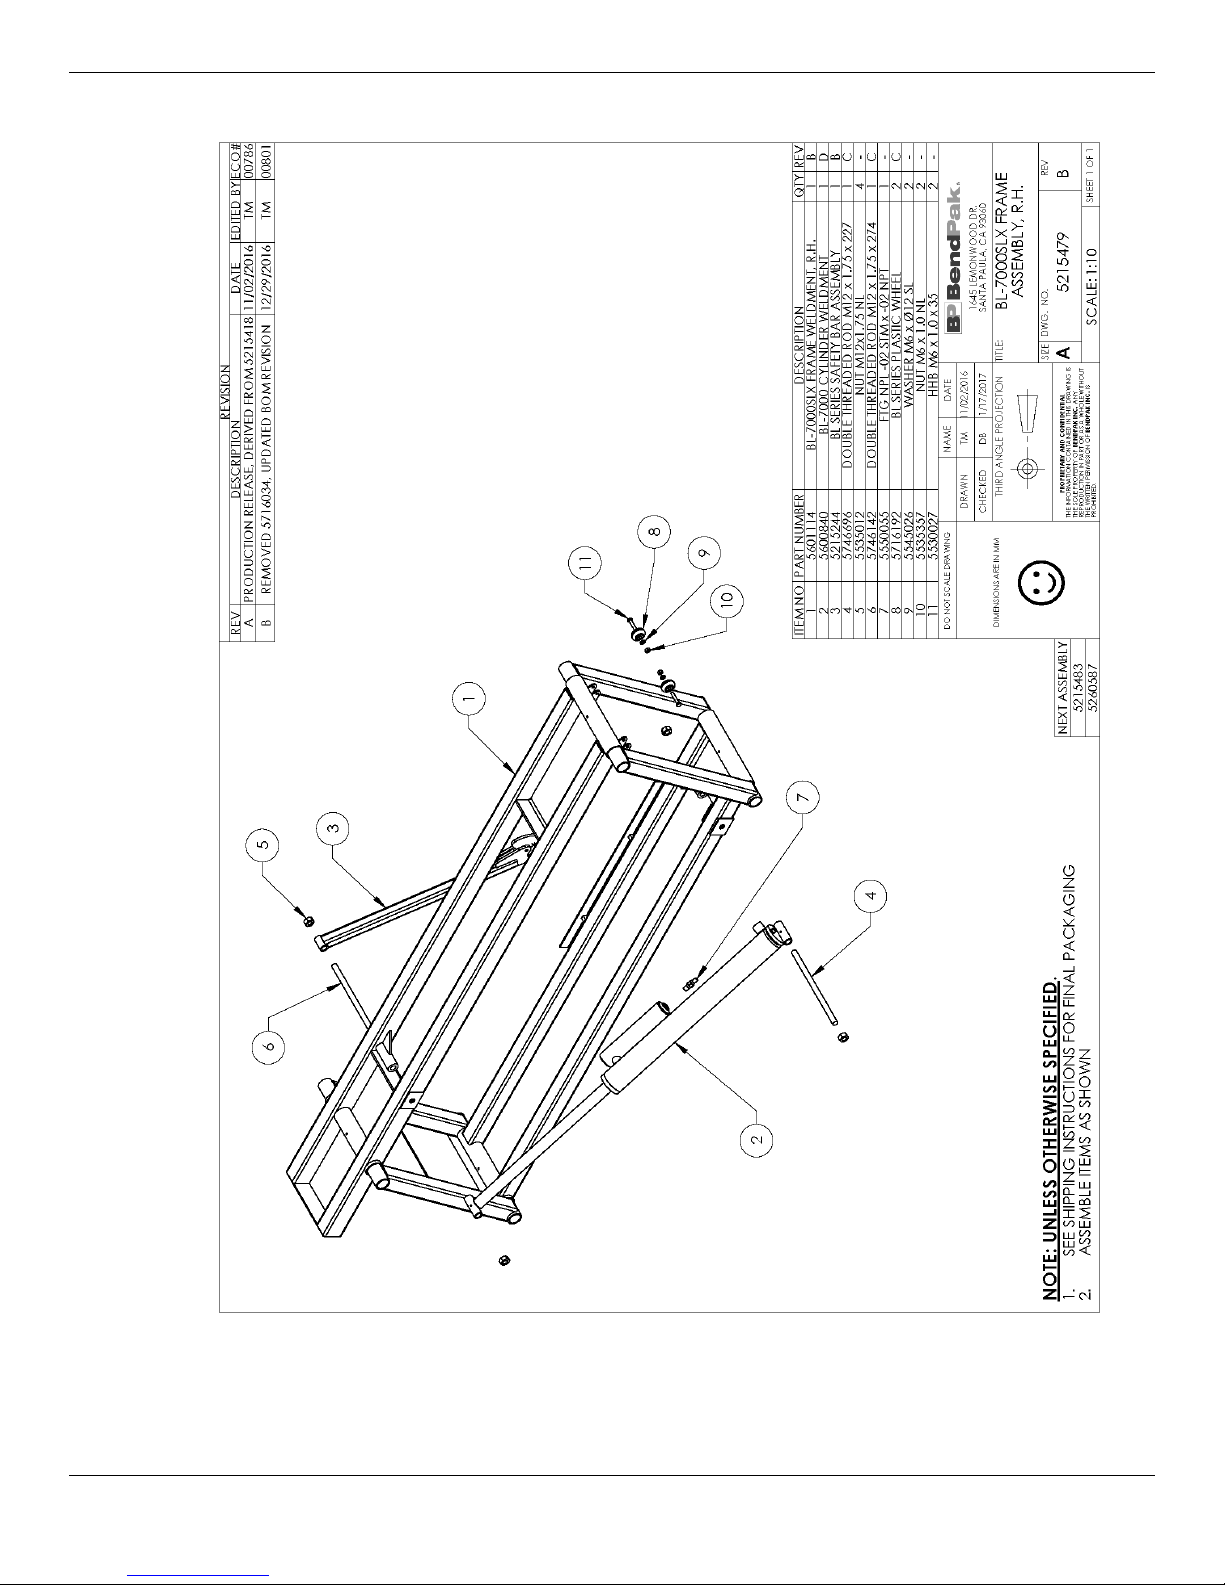
QuickJack™ Portable Car Jack 67 P/N 5900959 — Rev. J1 — Dec. 2018
Page 68

QuickJack™ Portable Car Jack 68 P/N 5900959 — Rev. J1 — Dec. 2018
Page 69

QuickJack™ Portable Car Jack 69 P/N 5900959 — Rev. J1 — Dec. 2018
Page 70
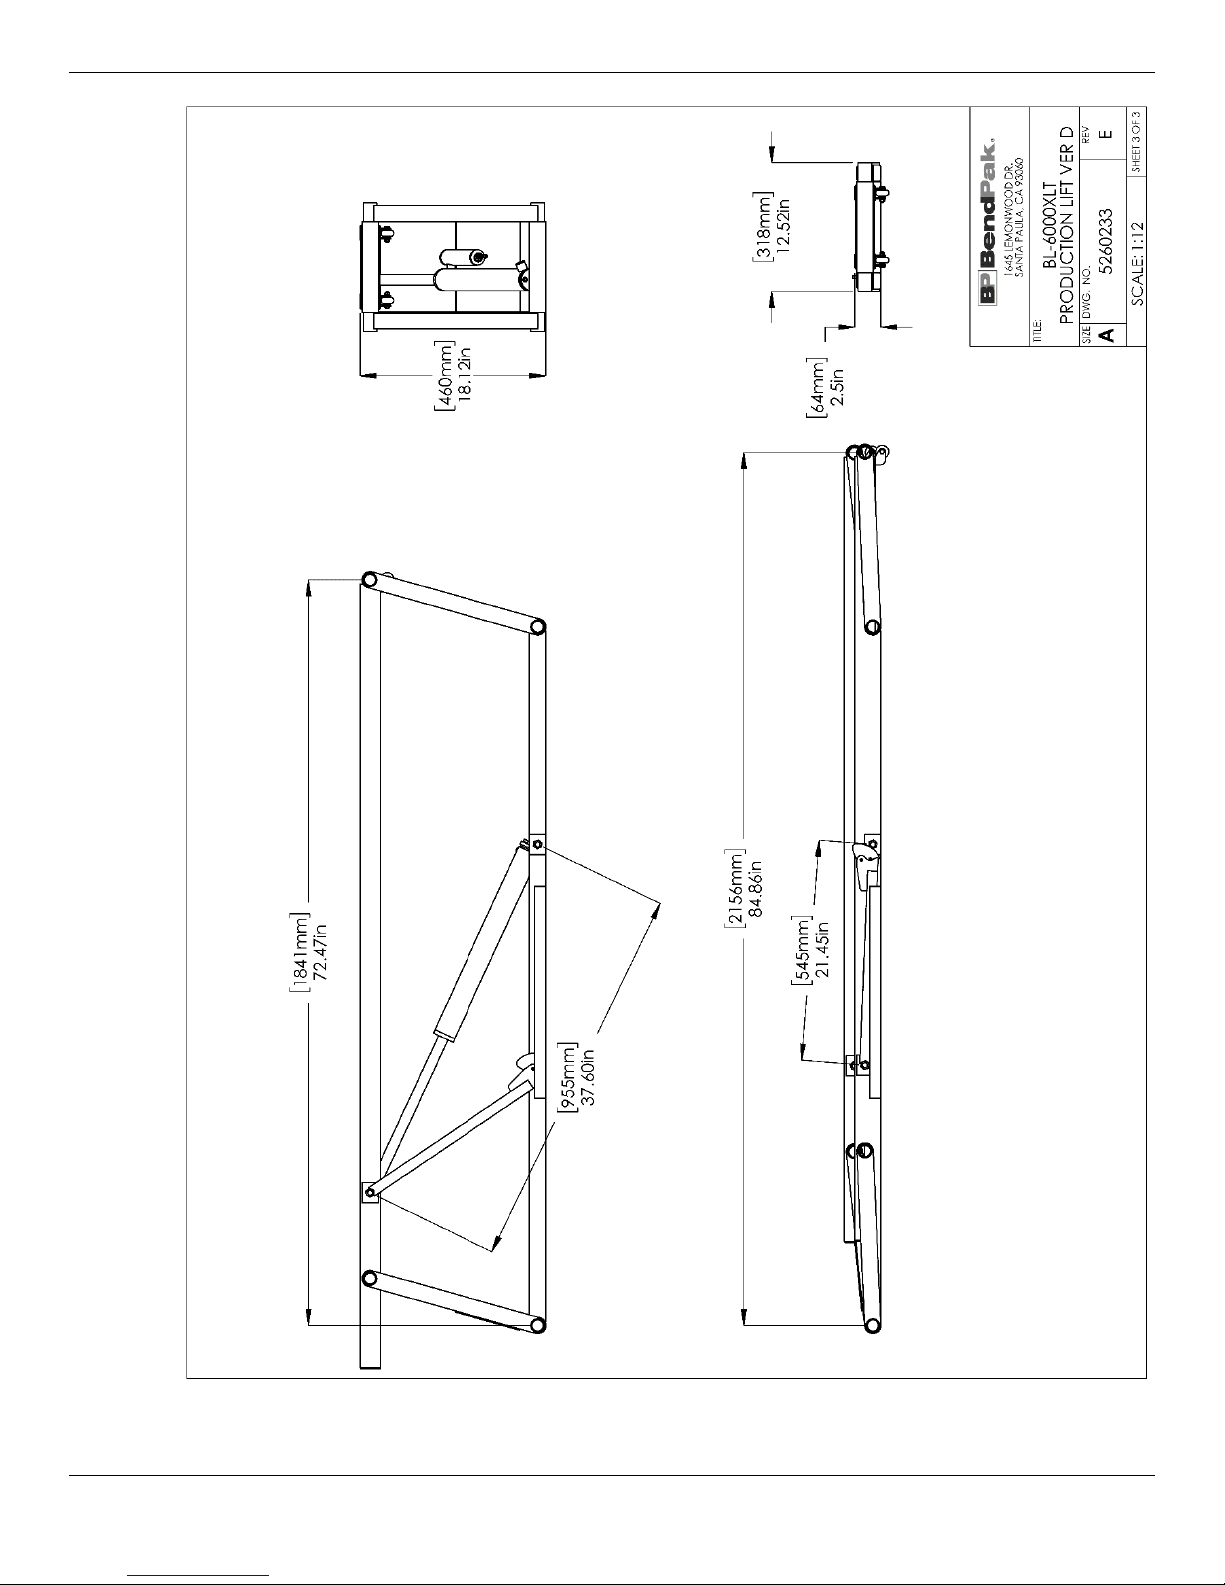
QuickJack™ Portable Car Jack 70 P/N 5900959 — Rev. J1 — Dec. 2018
Page 71

QuickJack™ Portable Car Jack 71 P/N 5900959 — Rev. J1 — Dec. 2018
Page 72
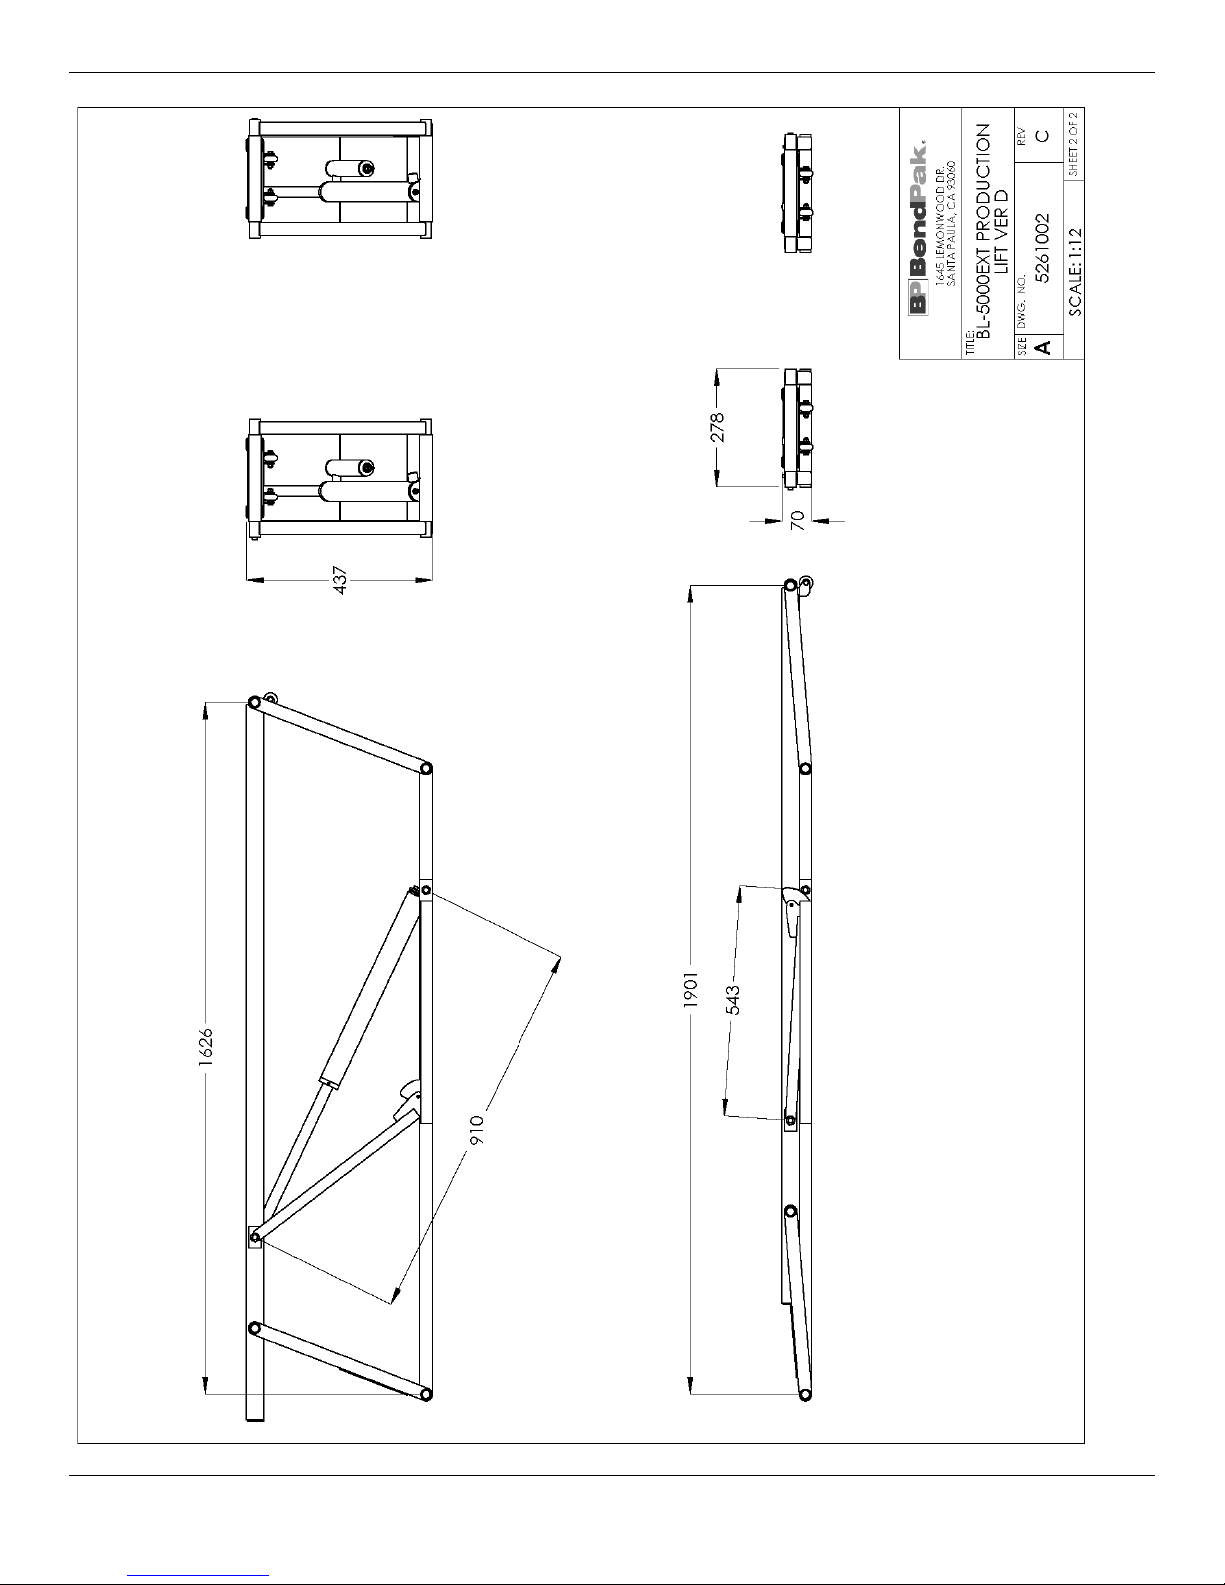
QuickJack™ Portable Car Jack 72 P/N 5900959 — Rev. J1 — Dec. 2018
Page 73

QuickJack™ Portable Car Jack 73 P/N 5900959 — Rev. J1 — Dec. 2018
Page 74
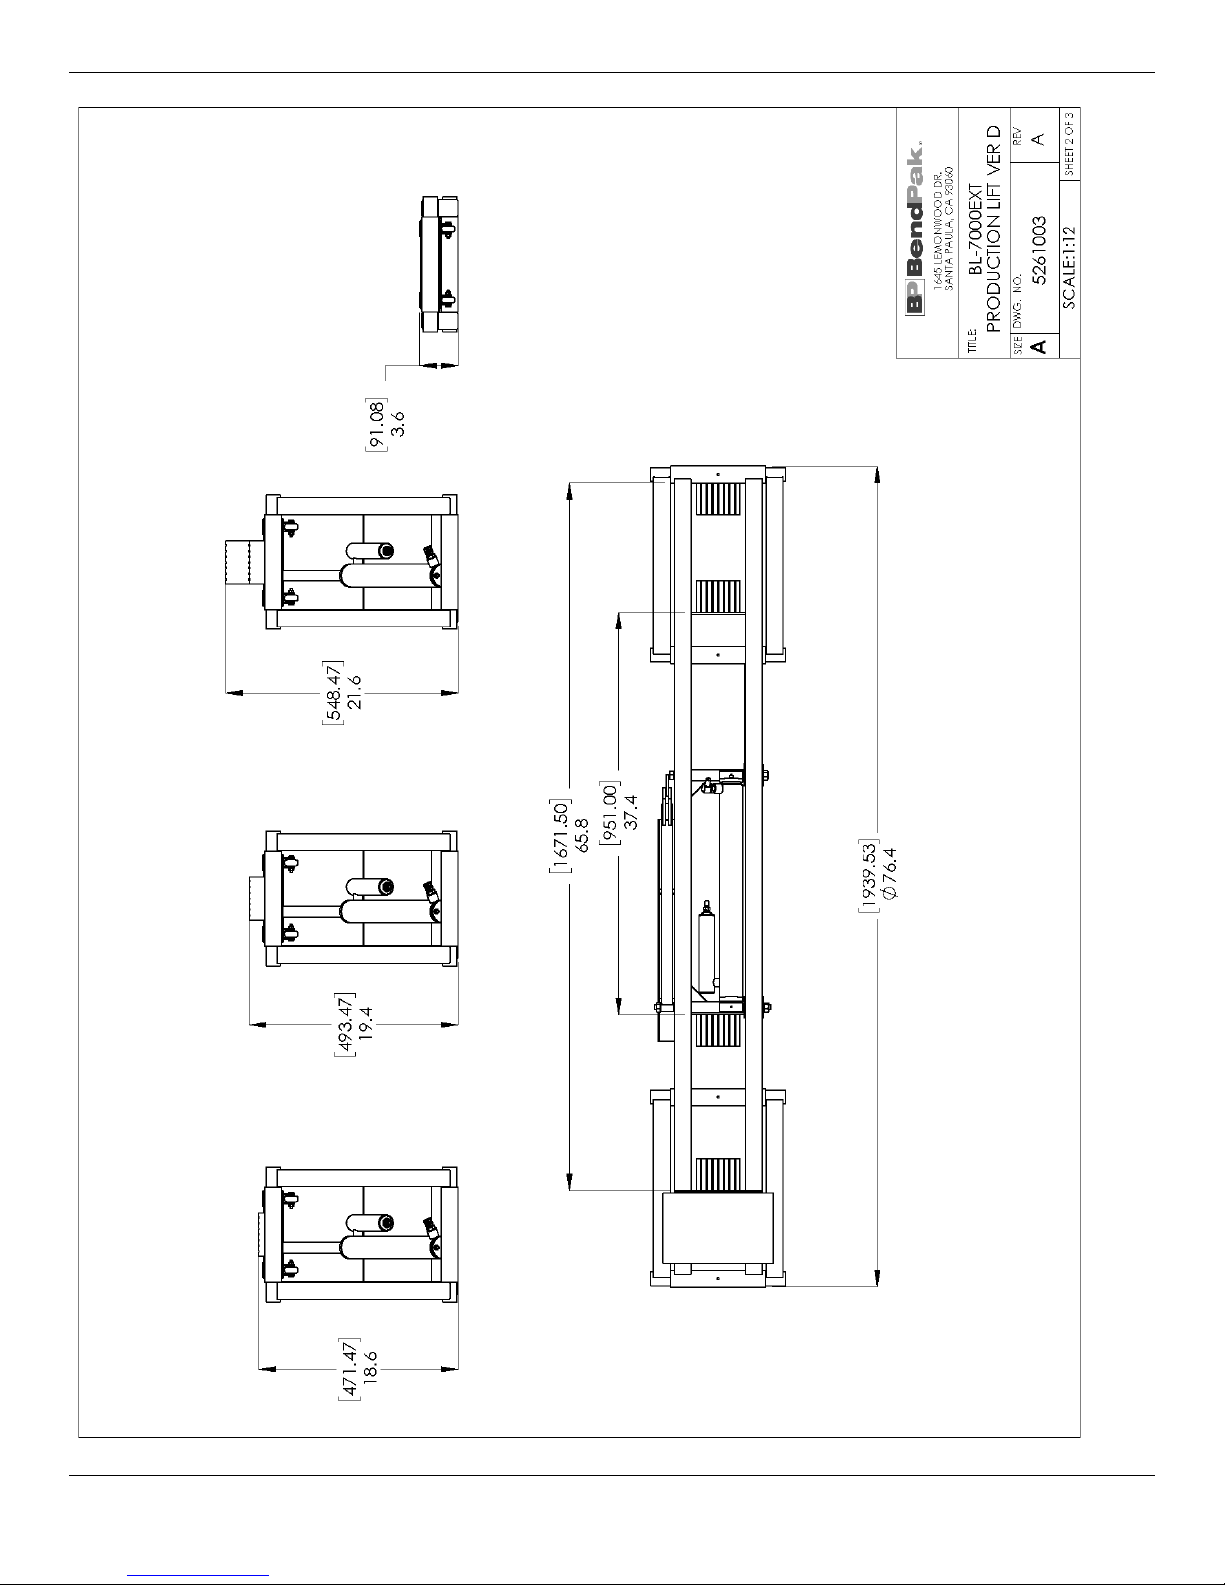
QuickJack™ Portable Car Jack 74 P/N 5900959 — Rev. J1 — Dec. 2018
Page 75

QuickJack™ Portable Car Jack 75 P/N 5900959 — Rev. J1 — Dec. 2018
Page 76

www.autolift.org/ali-directory-of-
certified-lifts/
Automotive Lift Institute (ALI) Store
You probably checked the ALI’s Directory of Certified Lifts (
(www.autolift.org/ali-store/) offers a wide variety of professional, easy-to-use, and reasonably
priced training and safety materials that will make your garage a safer place to work?
) before making your most recent Lift purchase, but did you know the ALI Store
The ALI Store is your trusted source for workplace safety!
Visit today and get the training and materials you need to work safely:
http://www.autolift.org/ali-store/.
QuickJack™ Portable Car Jack 76 P/N 5900959 — Rev. J1 — Dec. 2018
Page 77

Maintenance Log
QuickJack™ Portable Car Jack 77 P/N 5900959 — Rev. J1 — Dec. 2018
Page 78

CE Documentation
Page 79

Declaration of Conformity
The equipment that accompanies this declaration is in conformity with EU Directive:
2006/42/EC Machinery Directive
Manufacturer
BendPak Inc.
1645 Lemonwood Dr. Santa Paula,
CA 93060 USA
A copy of the Technical file for this equipment is available from:
CCQS UK Ltd., Level 7, Westgate House, Westgate Rd., London W5 1YY UK
Description of Equipment
Quickjack dual platform portable scissor vehicle lift
BL-3500SLX 1588 kg (3500 lb) capacity serial numbers 06581-00001-00000 to 99999-99999-99999
BL-5000SLX 2268 kg (5000 lb) capacity serial numbers 06581-00001-00000 to 99999-99999
-99999
BL-7000SLX 3175 kg (7000 lb) capacity serial numbers 06581-00001-00000 to 99999
-99999
-99999
BL-5000EXT 2268 kg (5000 lb) capacity serial numbers 06581-00001-00000 to 99999-99999-99999
BL-7000EXT 3175 kg (7000 lb) capacity serial numbers 06581-00001-00000 to 99999-99999-99999
A sample of this machinery has been presented to Notified Body number 1105. CCQS UK Ltd.,
Level 7, Westgate House, Westgate Rd., London W5 1YY UK
Who have issued an EC type-examination certificate number CE-GB-20150427-01-5C dated 2017.09.15. The
equipment in respect of which this declaration is made conforms to the example to which that certificate relates, and
that certificate remains valid.
This declaration of conformity is issued under the sole responsibility of the manufacturer.
The following harmonised standards have been used:-
EN1493:2010 Vehicle Lifts
Authorised signatory of manufacturer
Signature:
Name of signatory: Jeffrey S. Kritzer
Position in company: Senior Vice President of Marketing and Sales Place signed:
Santa Paula, CA, USA
Date signed: September 16, 2017
Page 80

© 2018 BendPak Inc. All rights reserved. bendpak.com
1645 Lemonwood Drive
Santa Paula, CA, 93060 USA
 Loading...