

Page 1
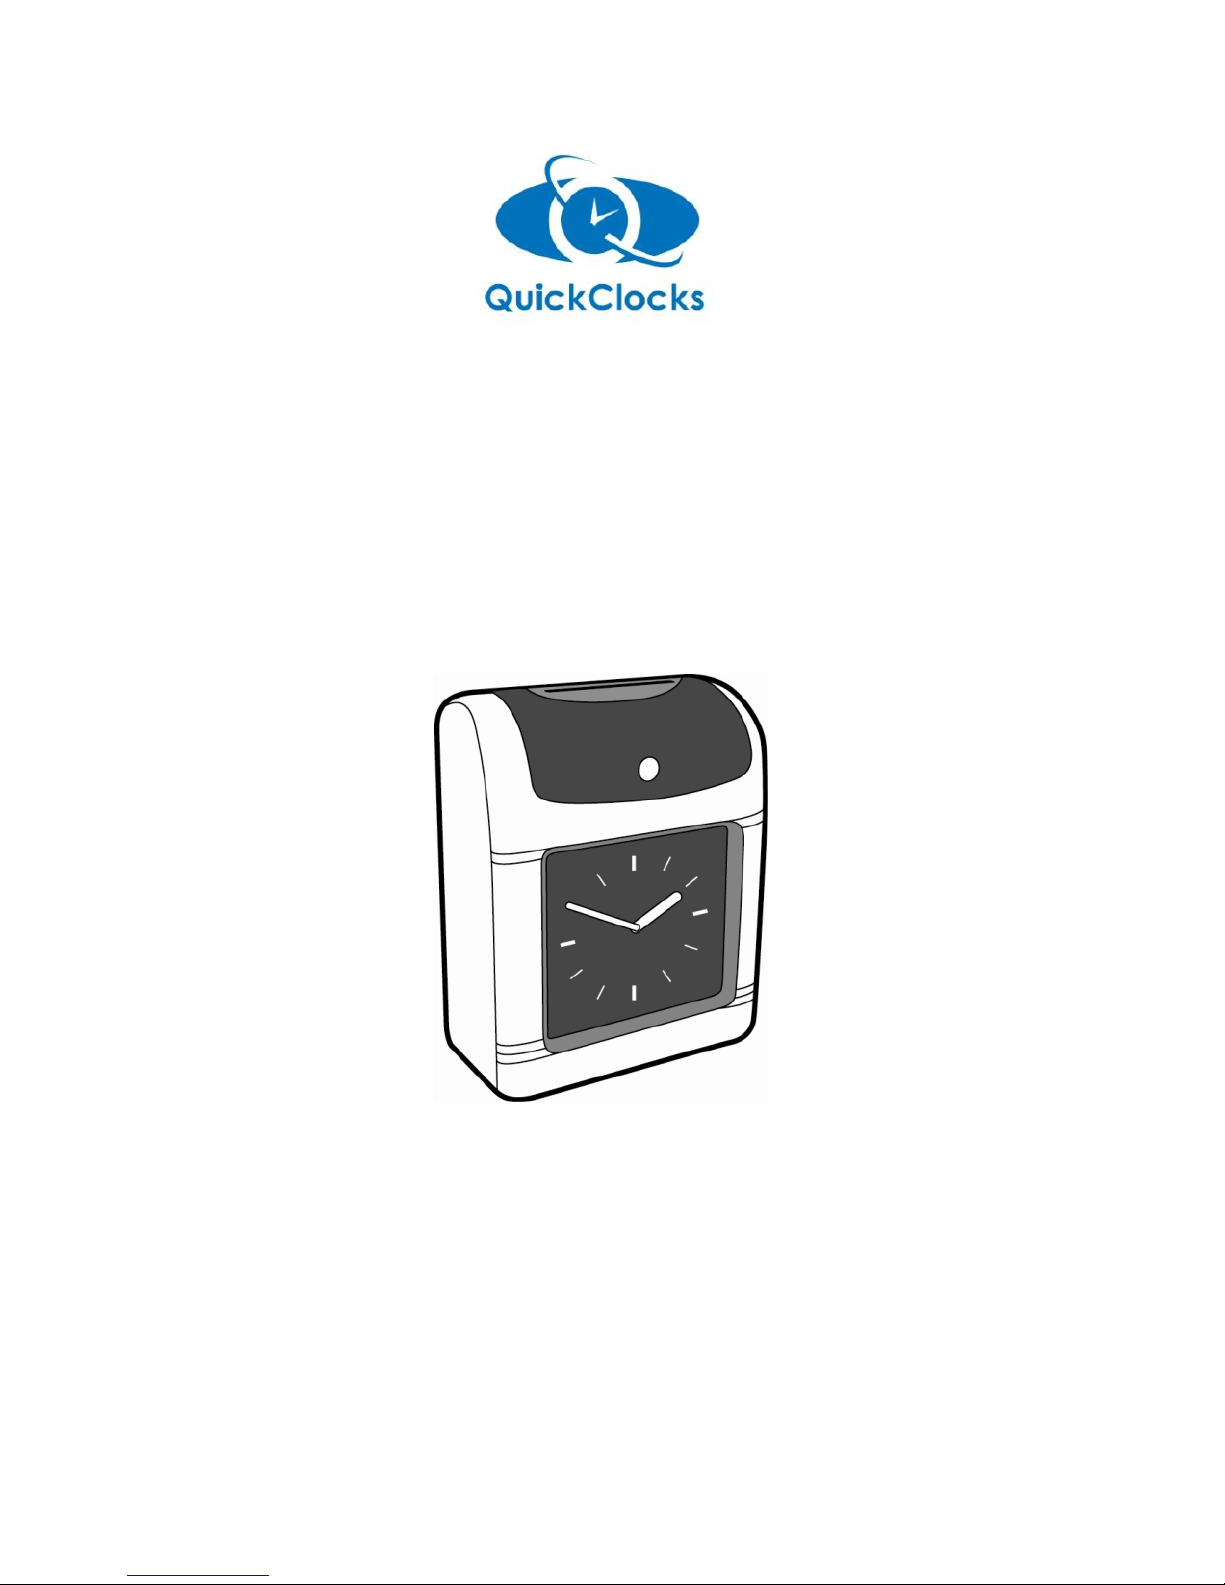
QC500N Clocking in Machine
Operation Manual
Page 2

- 2 -
CONTENTS
1. Introduction………………………………..……………......... 3
1.1 Package Contents……………………………………..... 3
1.2 Parts Identification…………………………………......... 4
1.3 Settings Buttons... ...………………………………......... 6
2. Function Options…………………………………………...... 6
2.1 Quick Codes
2.2 Detail Codes
3. Opening the case………………………………………......... 9
4. Function Settings…………………………………………..... 9-17
5. Trouble Shooting……………...…………………….…….…. 17
6. Replacing The Ribbon Cartridge………………………..…. 18
7. Precautions……………………….………………….…....….. 19
8. Specifications……….………………………………….……… 19
9. Error Codes……………..…………………………….…....… 19
Page 3

- 3 -
1. Introduction
Thank you for purchasing the QC500 Clocking in Machine. We hope that you
will be pleased with your purchase. Your Clocking in Machine should already be
set-up for immediate use however if you need to make some changes then this
operation manual contains instructions on how to do this.
1.1 Package Contents
First carefully unpack the clocking in machine and check the contents:
Clocking in Machine
Power supply with plug
Key
Page 4
- 4 -
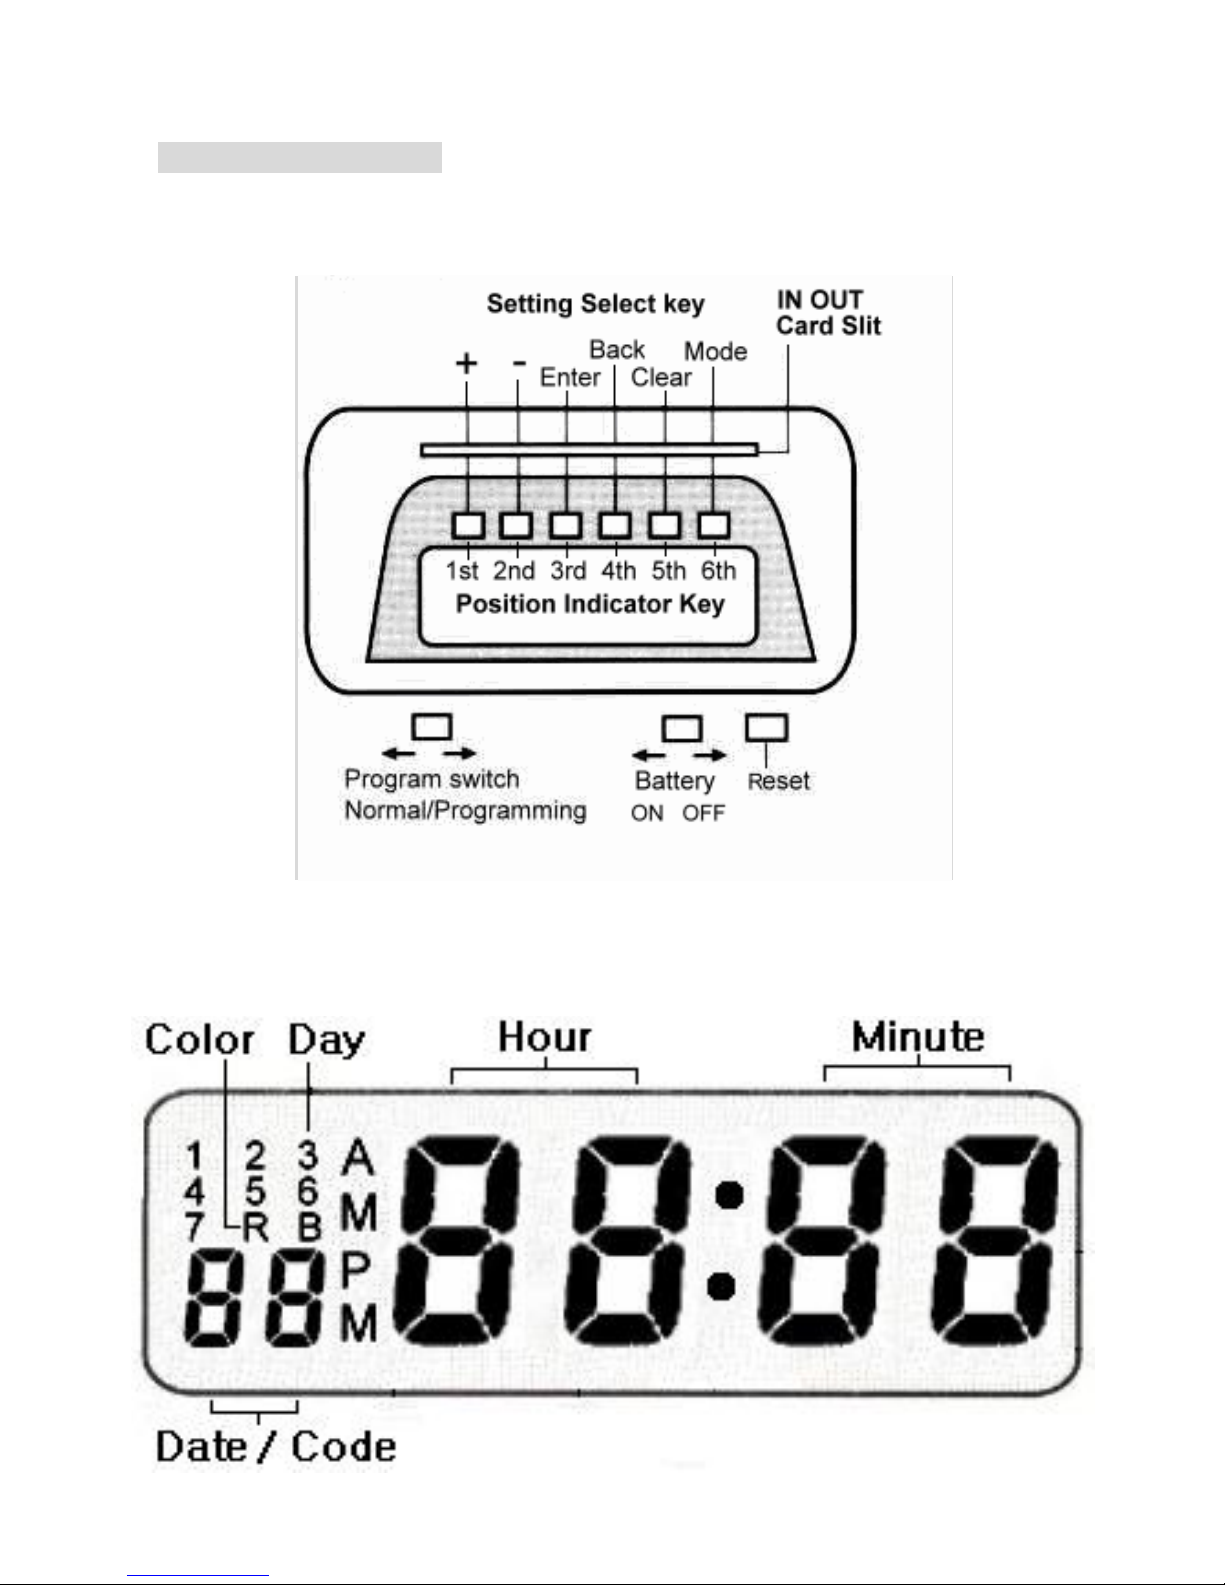
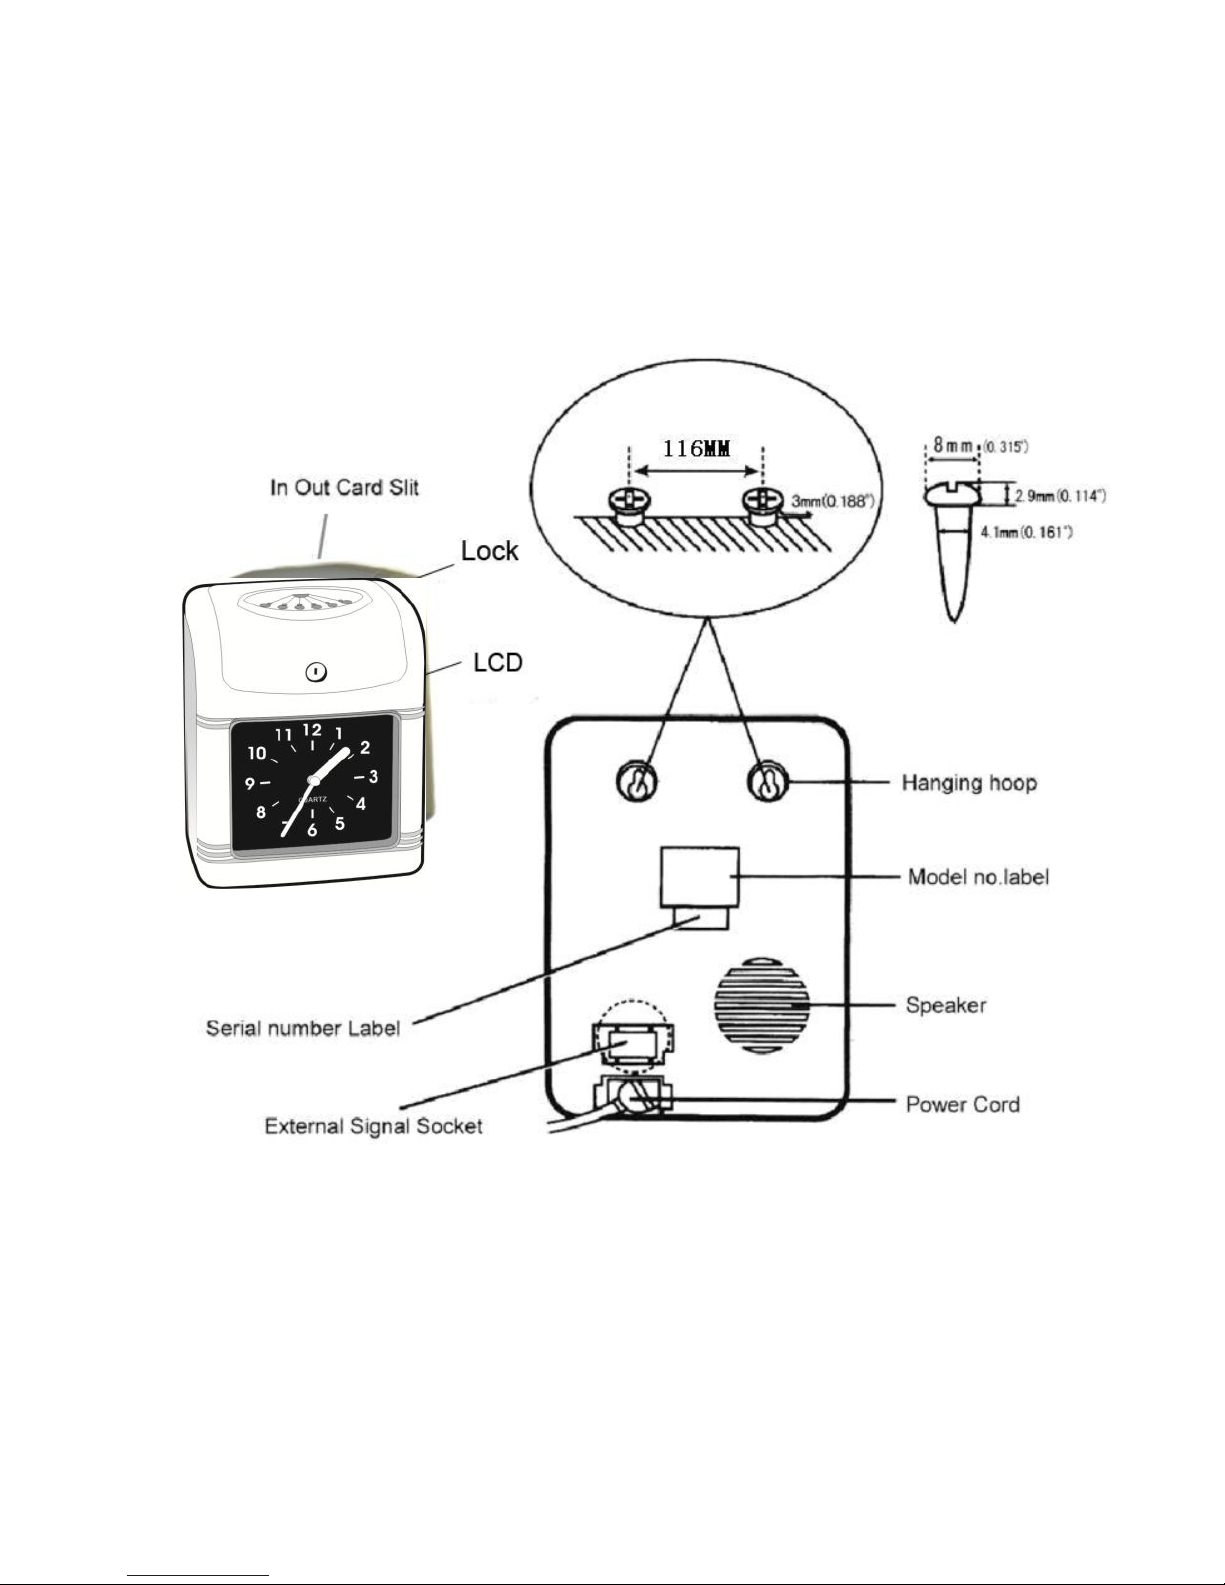
1.2 Parts identification
(a) Keypad
(b) LCD on the top
Page 5
- 5 -
(b) Case and Rear Fixings
Page 6
- 6 -
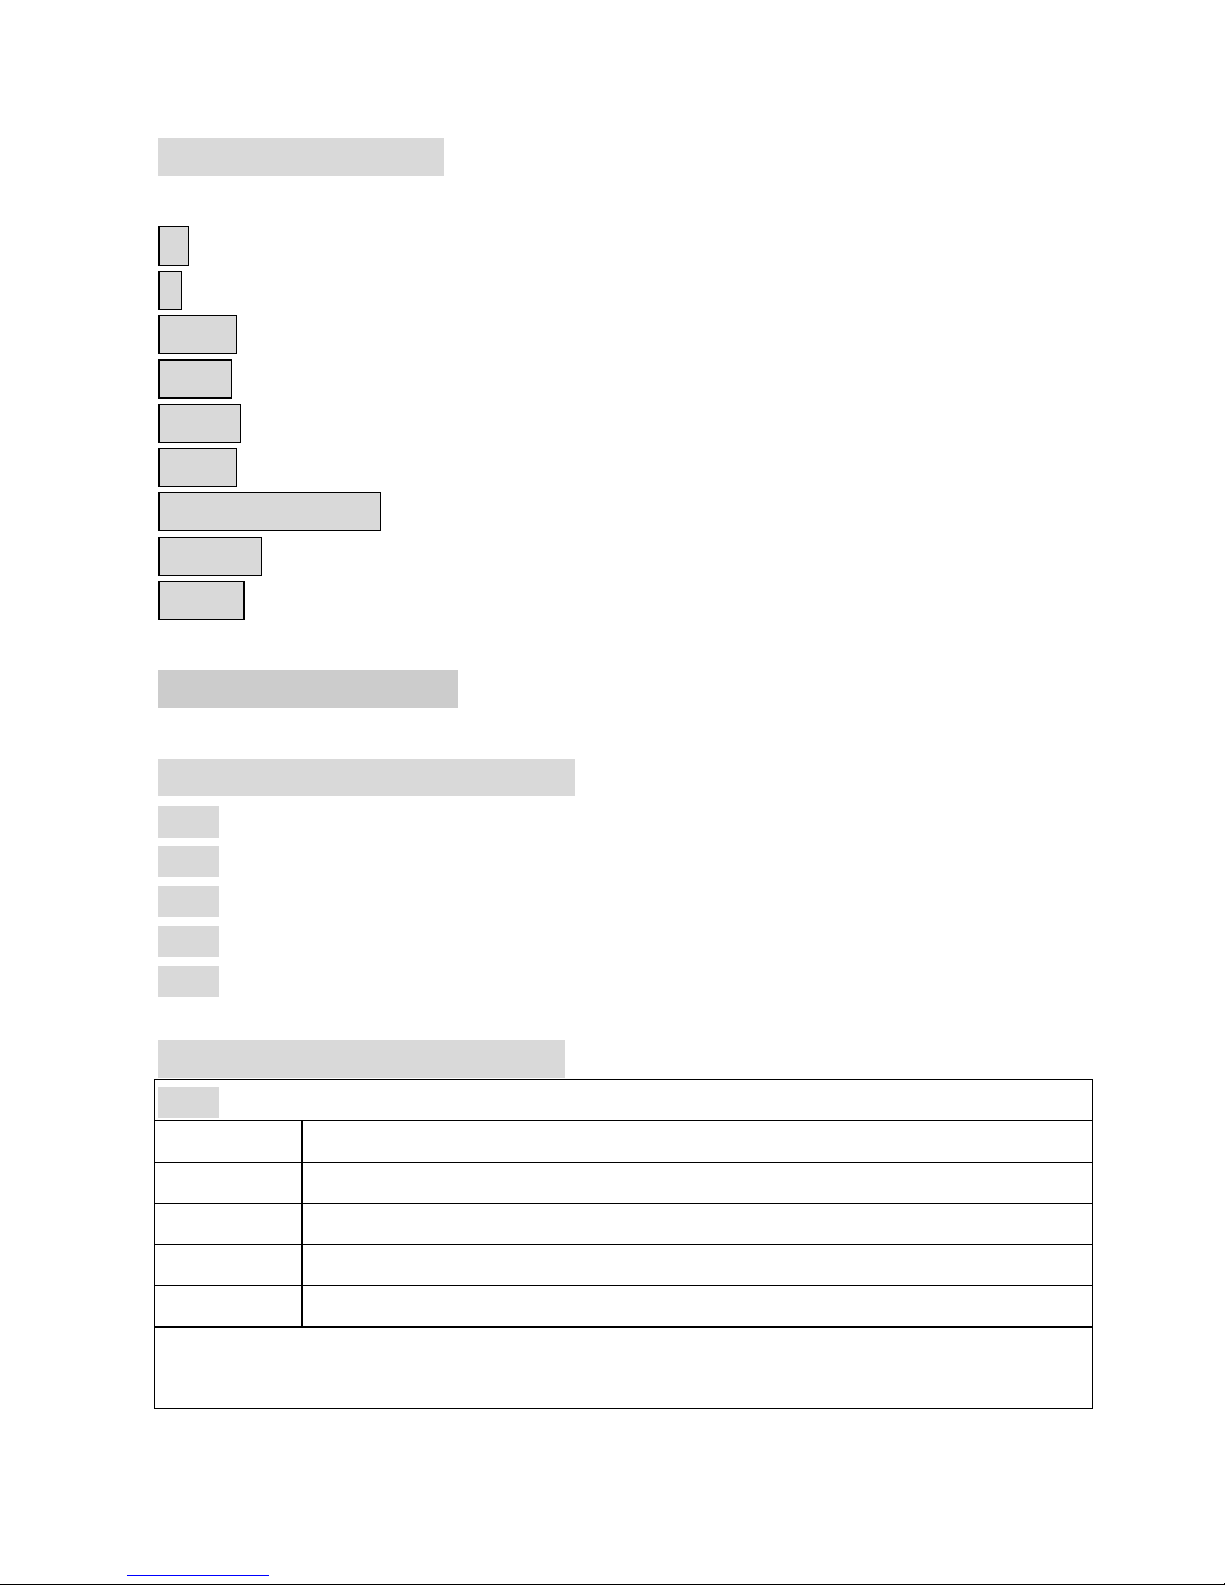
1.3 Settings Buttons
+
to increase the set value by 1
-
to decrease the set value by 1
Enter to save the set value & enter the next step
Back to go back
Mode Function Programming
Clear to cancel the set value
Program switch Normal/ Programming
Battery Battery On/Off
Reset Reset
2. Function Options
2.1 Quick codes selection:
b000--- Setting the time (Year, Month, Date, Time System,Hour, Minute)
b001--- Setting the Optional Function
b002--- Setting the regular time signal
b003--- Setting the shifting time
b004--- Setting the 2-color printing
2.2 Detail codes’ selection:
b000
Code
Functions
01
Setting the Year
02
Setting the Month/ Date
03
Setting the Time System
04
Setting the Hour/Minute
Page 7
- 7 -
b001
Code
Functions
01
Setting the date changing time
02
Setting the Monthly, Weekly, Bi-weekly pay period ending day
03
Setting the S/W BST/ EST start(month and day)
04
Setting the S/W BST/ EST start(hour and minute)
05
Setting the S/W BST/ EST end(month and day)
06
Setting the S/W BST/ EST end(hour and minute)
07
Setting Printing position ( up / down )
08
Setting Printing position ( left / right )
09
Detecting front/back of card
10
Setting the time signal(0~99 Seconds)
b002
Code
Functions
01~24
Setting the time of ringing (01~24 group)
b003
Code
Functions
01~18
Setting the time of shifting (01~18 column)
b004
Code
Functions
01
Setting the time 1st group of changing color (Red)
02
Setting the time 2nd group of changing color (Black)
03
Setting the time 3rd group of changing color (Red)
04
Setting the time 4th group of changing color (Black)
05
Setting the time 5th group of changing color (Red)
06
Setting the time 6th group of changing color (Black)
07
Setting the time 7th group of changing color (Red)
08
Setting the time 8th group of changing color (Black)
09
Setting the time 9th group of changing color (Red)
10
Setting the time 10th group of changing color (Black)
11
Setting the time 11th group of changing color (Red)
12
Setting the time 12th group of changing color (Black)
Page 8

- 8 -
13
Setting the time 13th group of changing color (Red)
14
Setting the time 14th group of changing color (Black)
15
Setting the time 15th group of changing color (Red)
16
Setting the time 16th group of changing color (Black)
17
Setting the time 17th group of changing color (Red)
18
Setting the time 18th group of changing color (Black)
Page 9
- 9 -
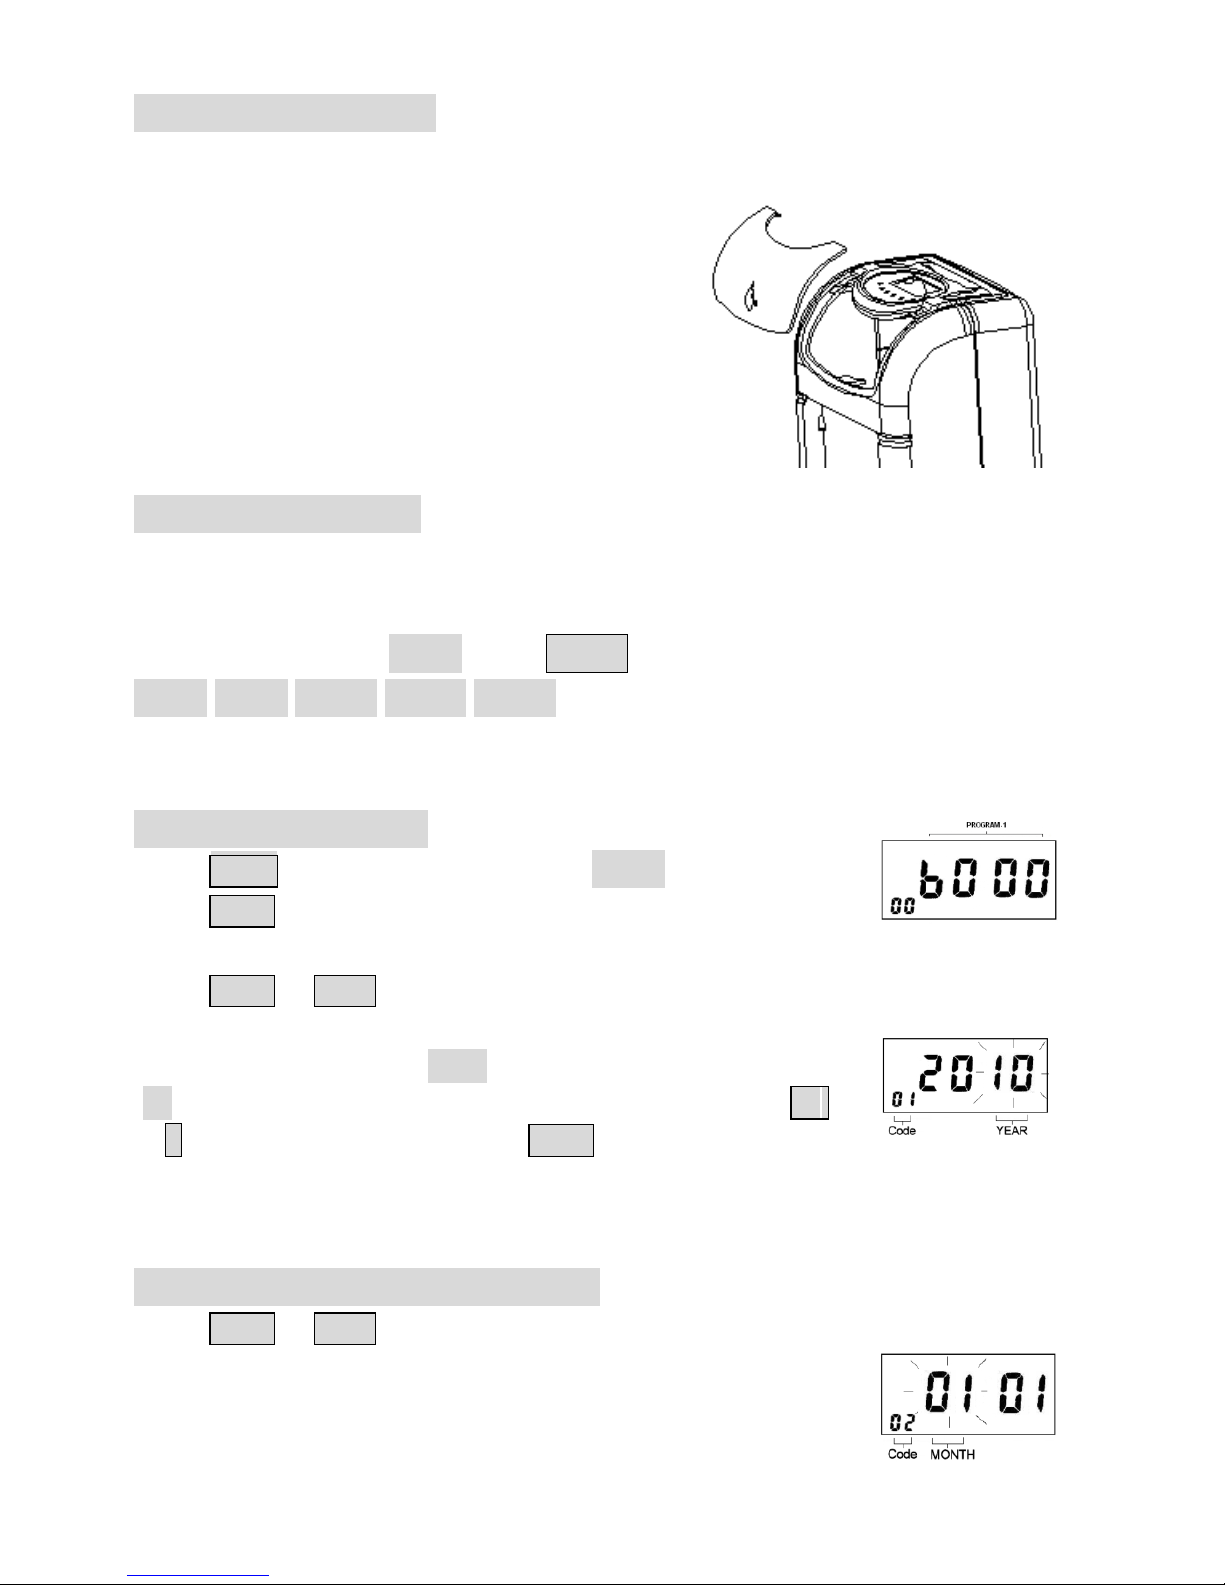
3. Opening the case
Using the key provided open the top cover and remove.
4. Function Setting
The programming mode is entered by unlocking and removing the top cover
from the time recorder with the program switch to the right hand side,
The LCD will shown b000 press Mode key to select the program required
b000,b001, b002, b003, b004
4.1 Setting the Year
Press Mode key to select the program b000
Press Enter again to register the setting value.
Press Enter or Back to enter the program Code 01,
(01 display on the left corner indicates the program Code),
The digital display reads 2010 indicates year 2010,the year
“10” flashes on the right of the digital display, press the +
or – button to set the year. Press Enter to register the
setting.
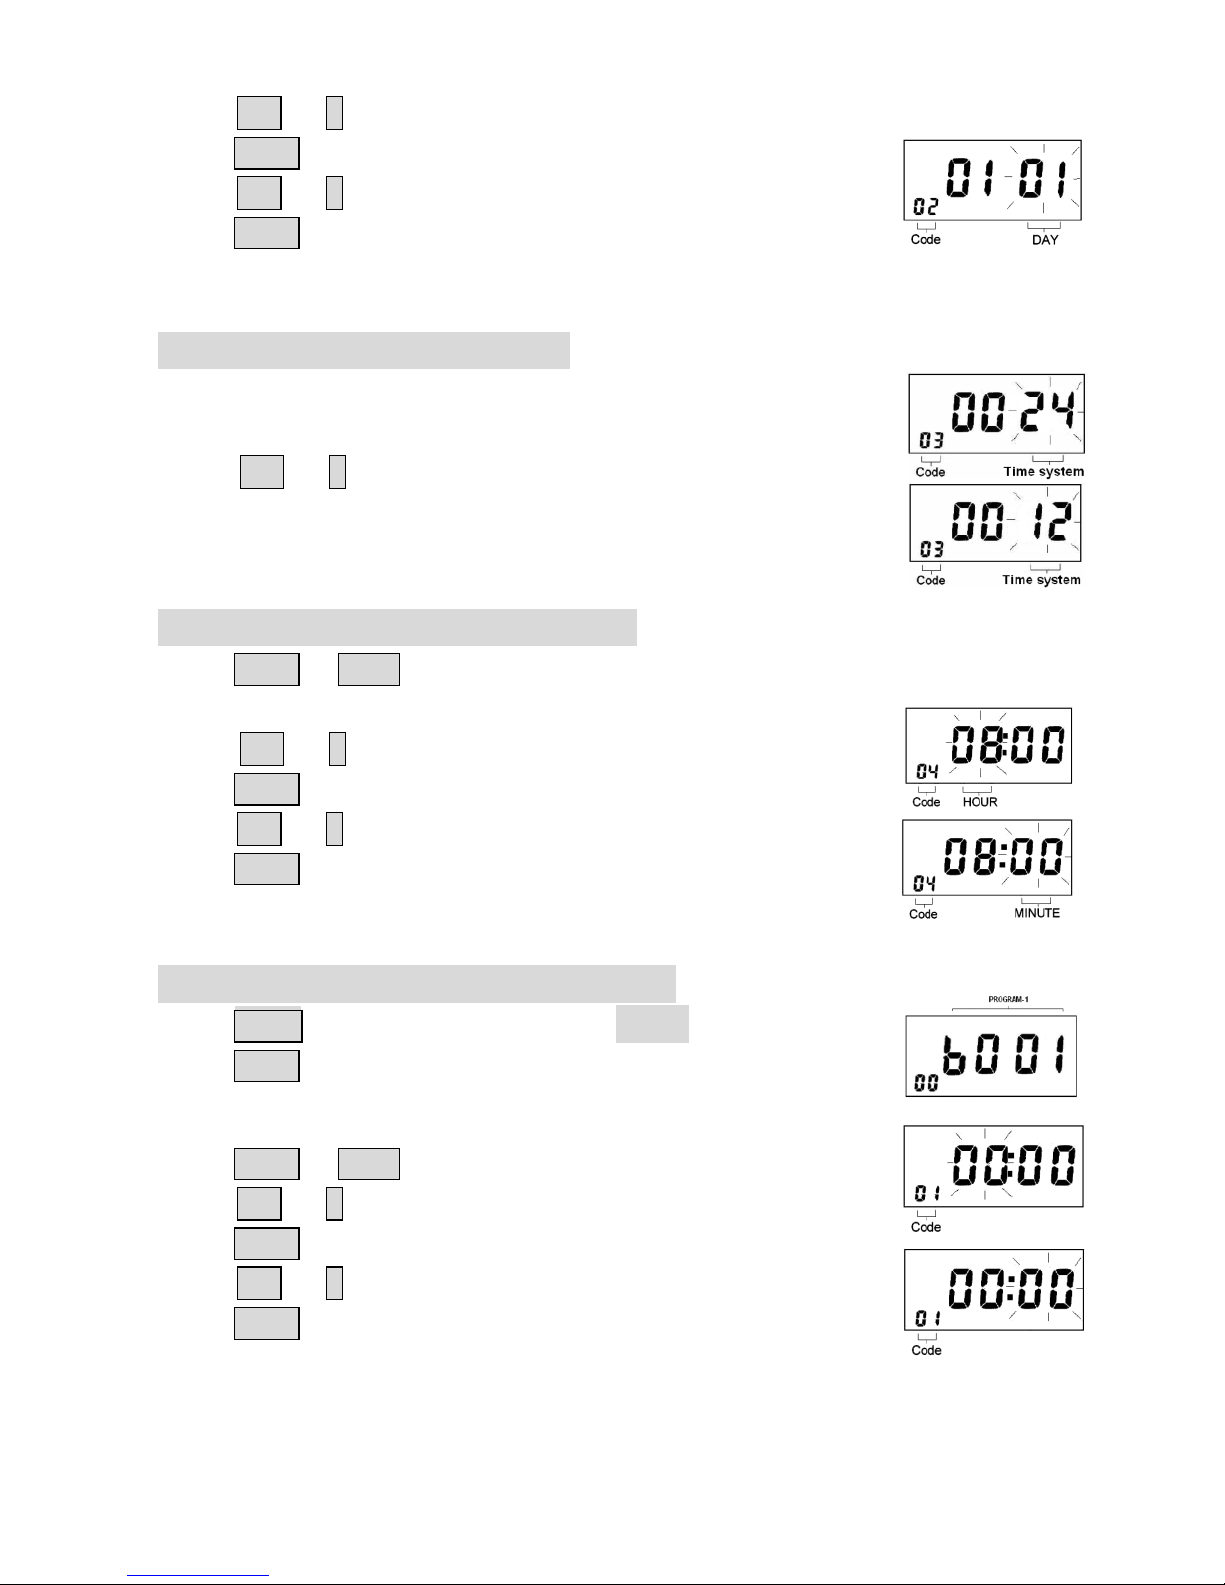
4.2 Setting the Month and Date
Press Enter or Back to enter the program Code 02,
Page 10
- 10 -
press + or – button to set the month.
Press Enter again to register the setting value.
press + or – button to set the day.
Press Enter again to register the setting value.
4.3 Setting the time system
Press Enter or Back to enter the program Code 03,
Press + or – button to set the time system.
Press Enter again to register the setting value.
4.4 Setting the Hour and Minute
Press Enter or Back to enter the program Code 04,
Press + or – button to set the Hour.
Press Enter again to register the setting value.
press + or – button to set the Minute.
Press Enter again to register the setting value.
4.5 Setting the date changing time
Press Mode key to select the program b001
Press Enter again to register the setting value.
Press Enter or Back to enter the program Code 01,
press + or – button to set the the Hour.
Press Enter again to register the setting value.
press + or – button to set the set the Minute.
Press Enter again to register the setting value.
Page 11
- 11 -
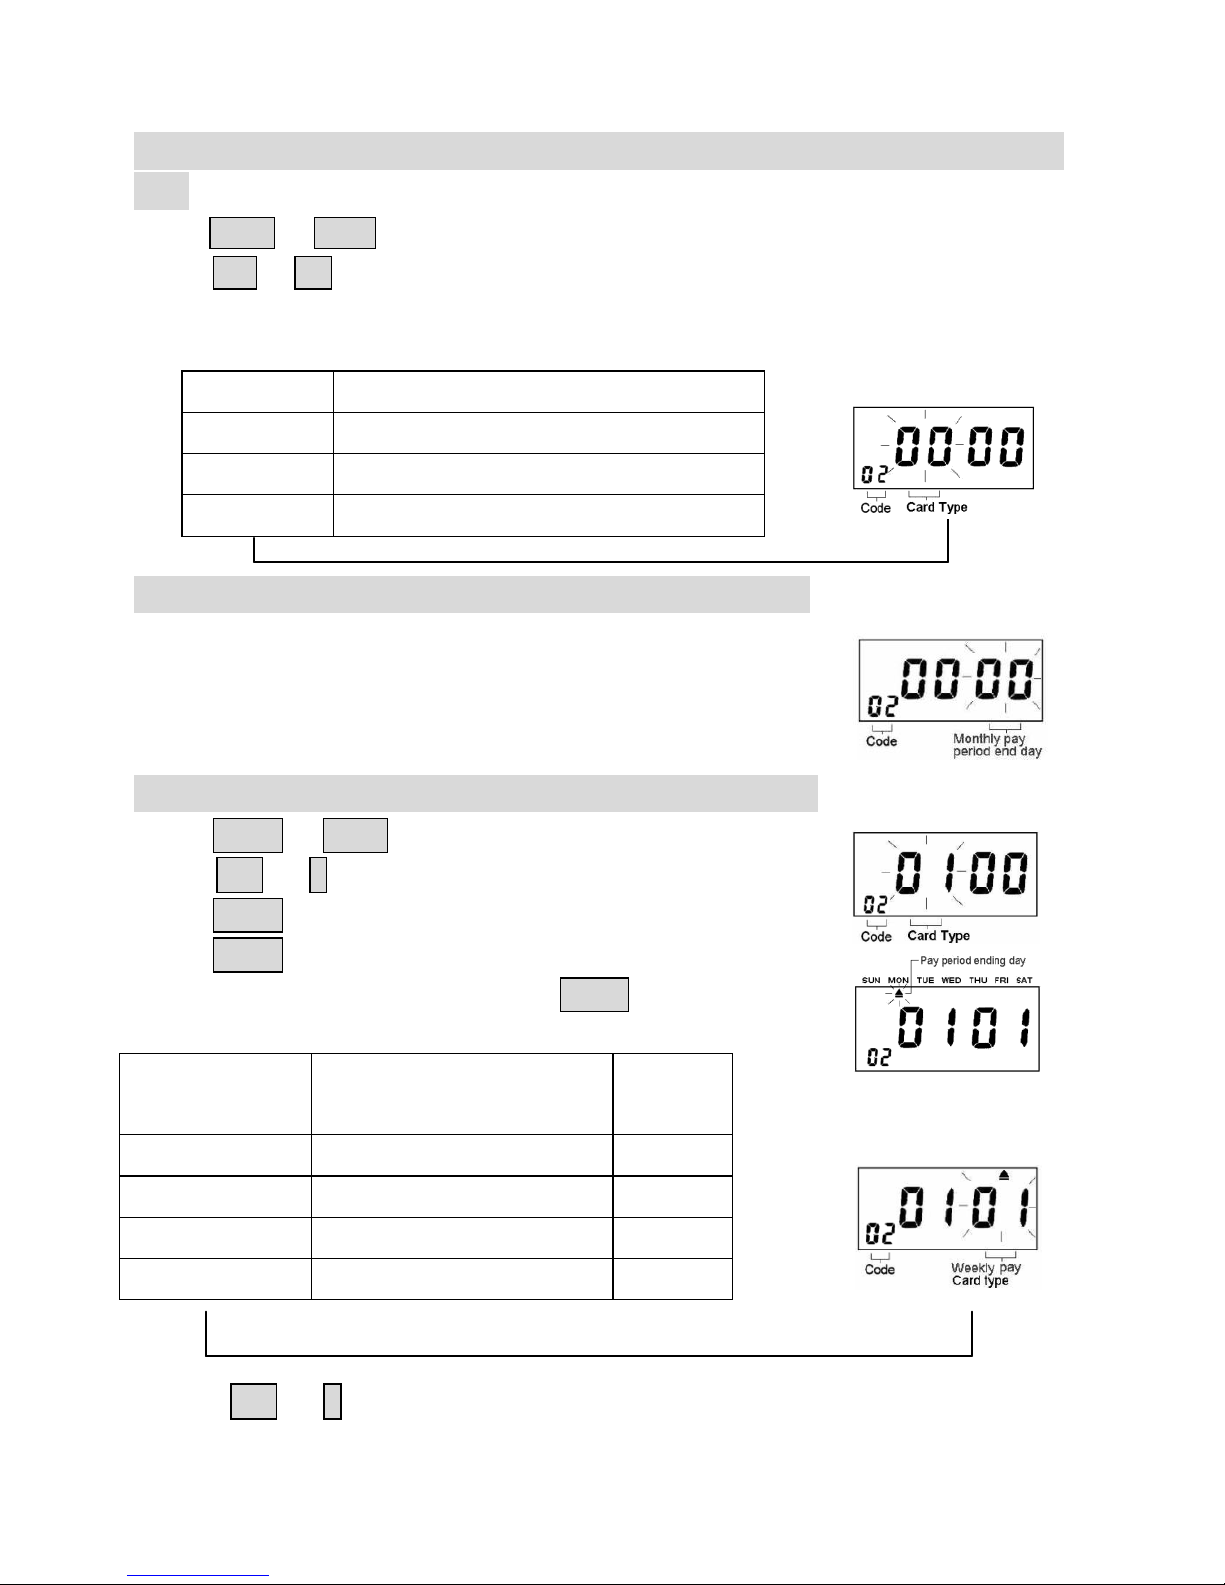
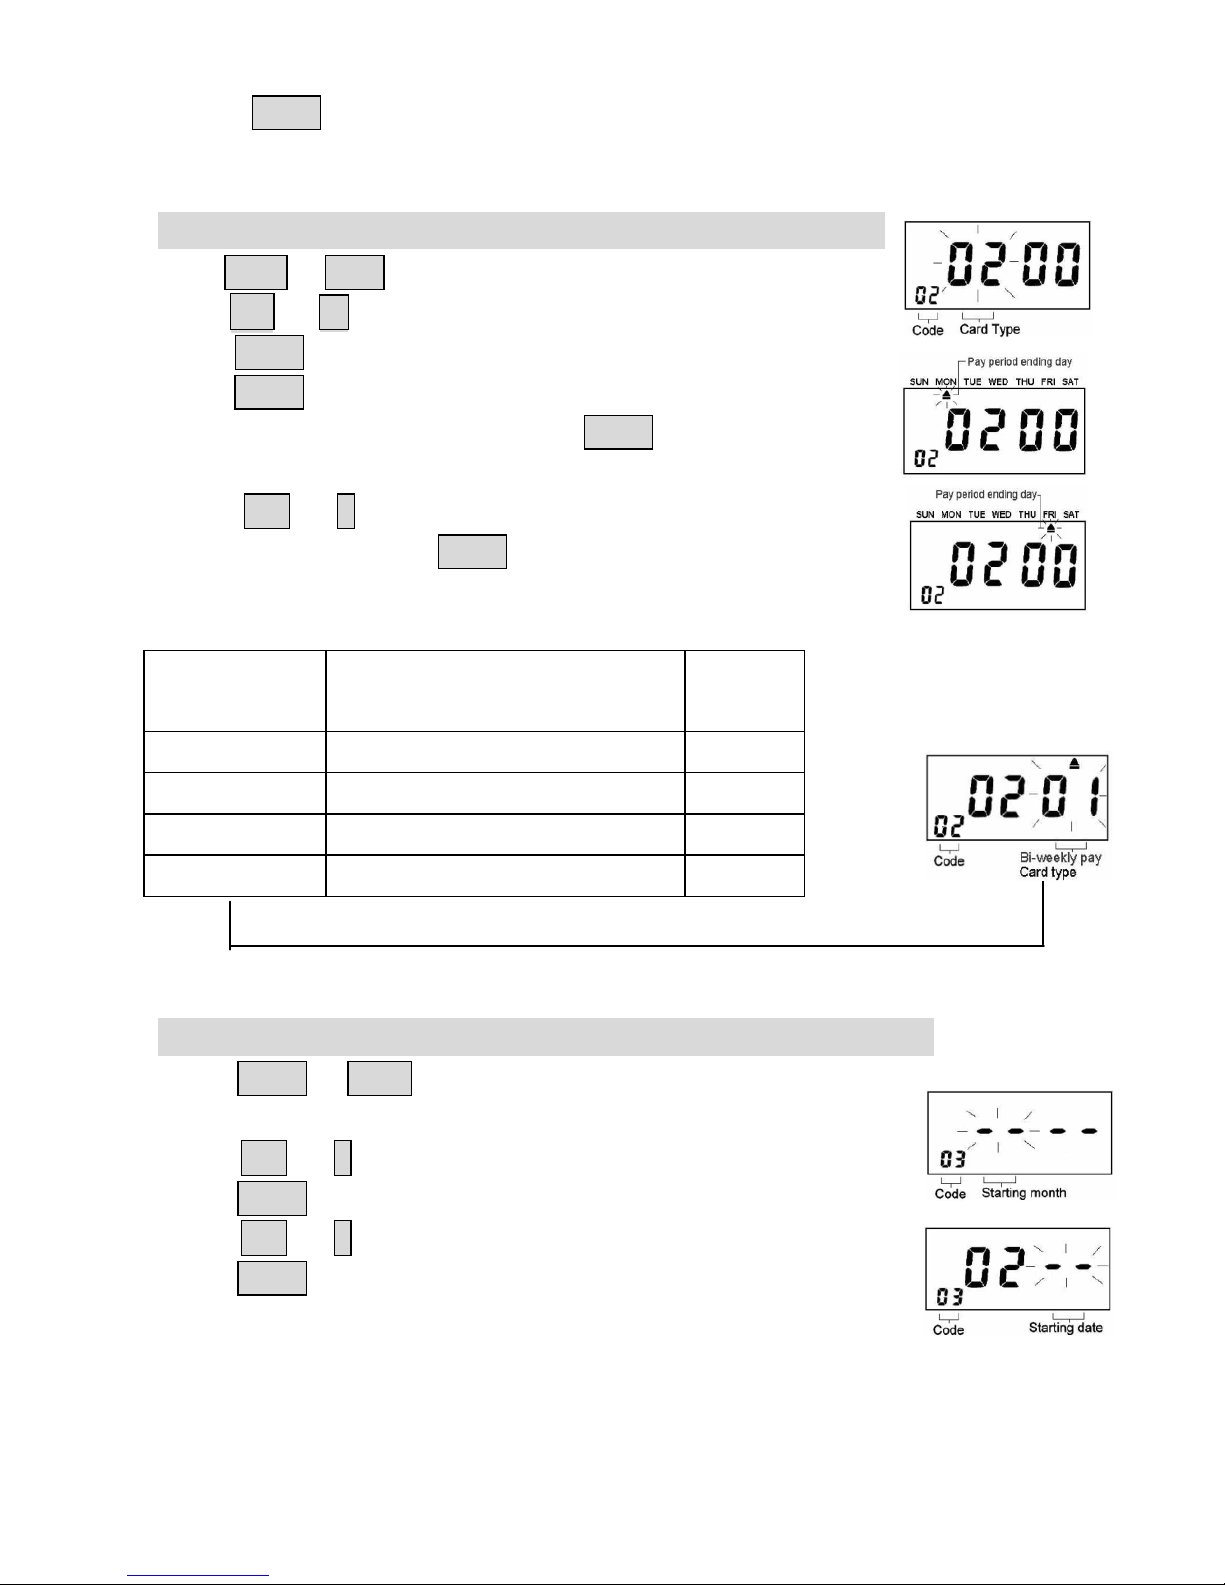
4.6 Setting the Monthly, Weekly, Bi-weekly pay period ending
day
Press Enter or Back to enter the program Code 02,
press + or – button to set the card type.
Press Enter again to register the setting value
4.6a Change the Monthly pay period end day
When the pay period end day is set to 00, the first row on
the 1~15 row card surface is automatically a blank row.
The set value is from 00 to 31.
4.7 Setting the Weekly pay period ending day
Press Enter or Back to enter the program code 02,
press + or – button to set the card type to 01
Press Enter again to register the setting value.
Press Clear button to select the required pay
period ending day and then Press Enter again to register
the setting value.
Weekly pay
Card type
Functions
Bottom
Space
01
Upper part weekly pay
23mm
02
Lower part weekly pay
23mm
03
Upper part weekly pay
35mm
04
Lower part weekly pay
35mm
press + or – button to set the weekly pay card type to 01
Card Type
Functions
00
Month pay time card
01
Weekly pay time card
02
Bi-weekly pay time card
Page 12
- 12 -
Press Enter again to register the setting value
4.8 Setting the Bi-Weekly pay period ending day
Press Enter or Back to enter the program code 02,
press + or – button to set the card type to 02
press Enter again to register the setting value
press Clear button to select the required pay
period ending day and then Press Enter again to register
the setting value.
Press + or – button to set the Bi-weekly pay
card type to 01. Press Enter again to register the
setting value
Bi-weekly pay
Card type
Functions
Bottom
Space
01
Bi-weekly pay current week
23mm
02
Bi-weekly pay second week
23mm
03
Bi-weekly pay current week
35mm
04
Bi-weekly pay second week
35mm
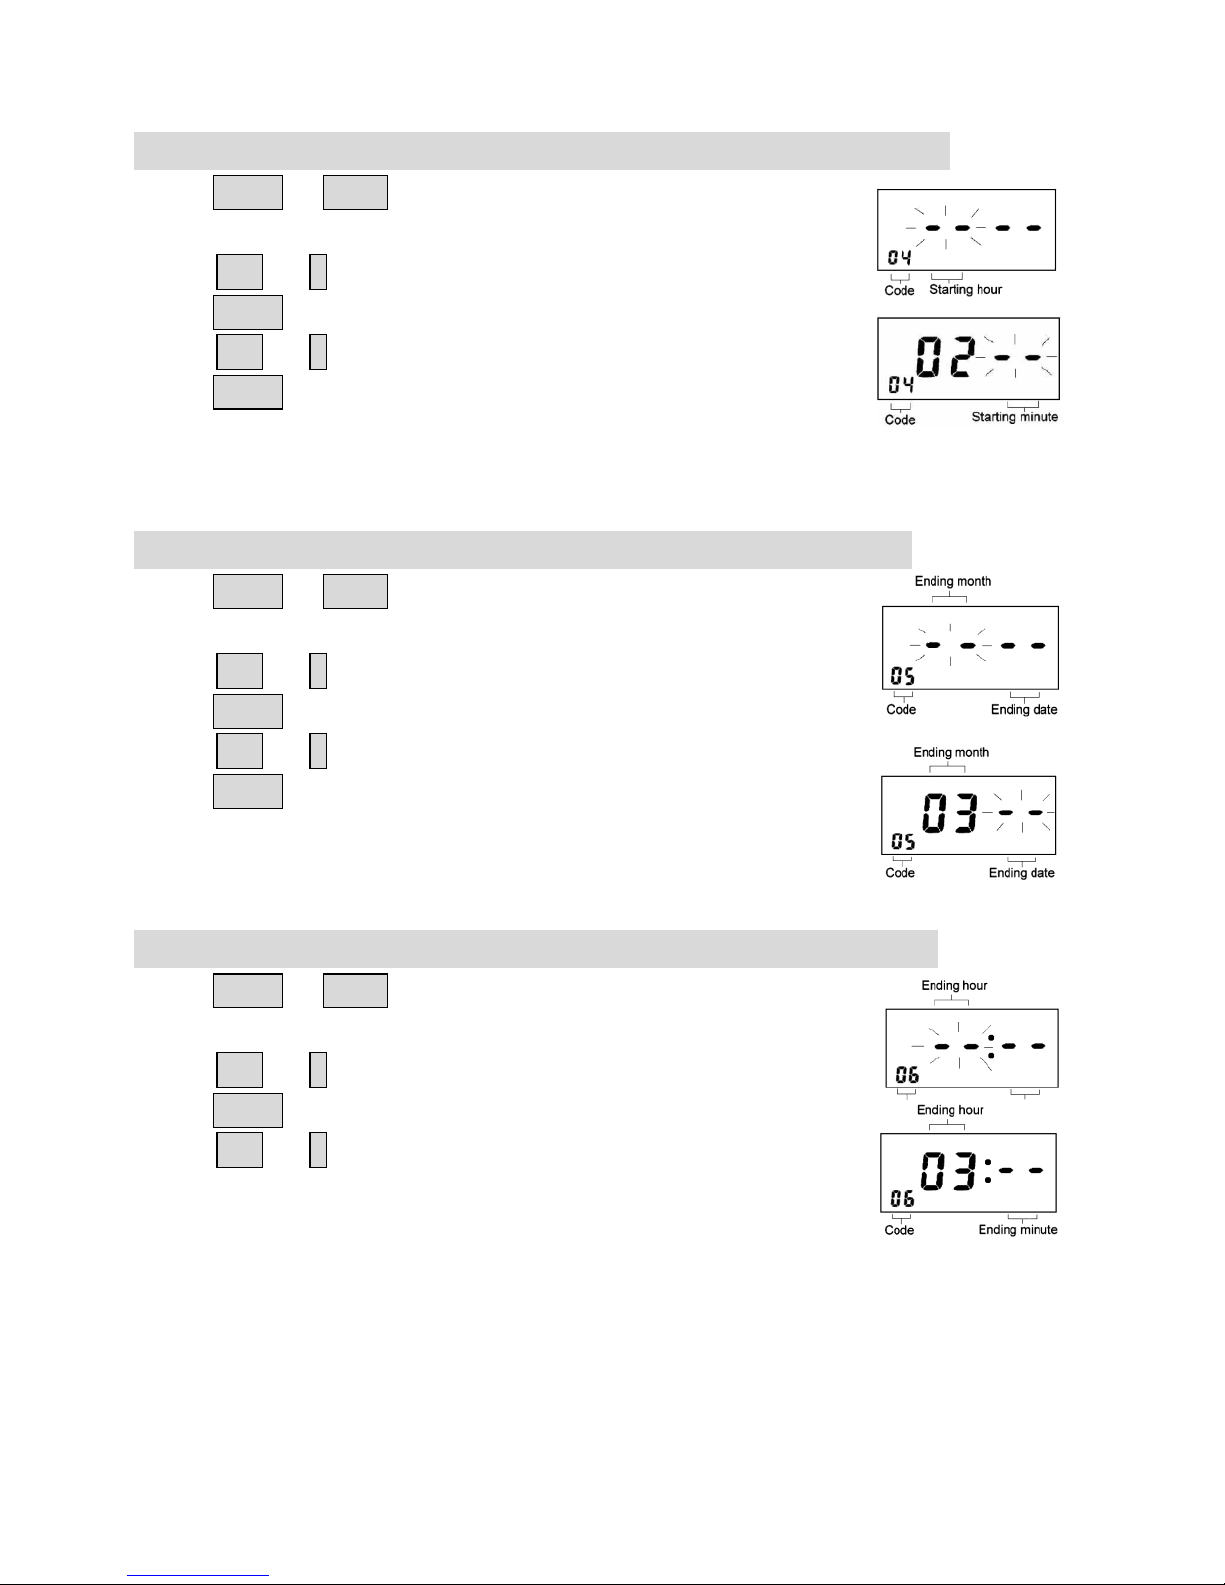
4.9 Setting the S/W BST/ EST start (month and day)
Press Enter or Back to enter the program code 03,
press + or – button to set the start month.
Press Enter again to register the setting value.
press + or – button to set the start date.
Press Enter again to register the setting value.
Page 13
- 13 -
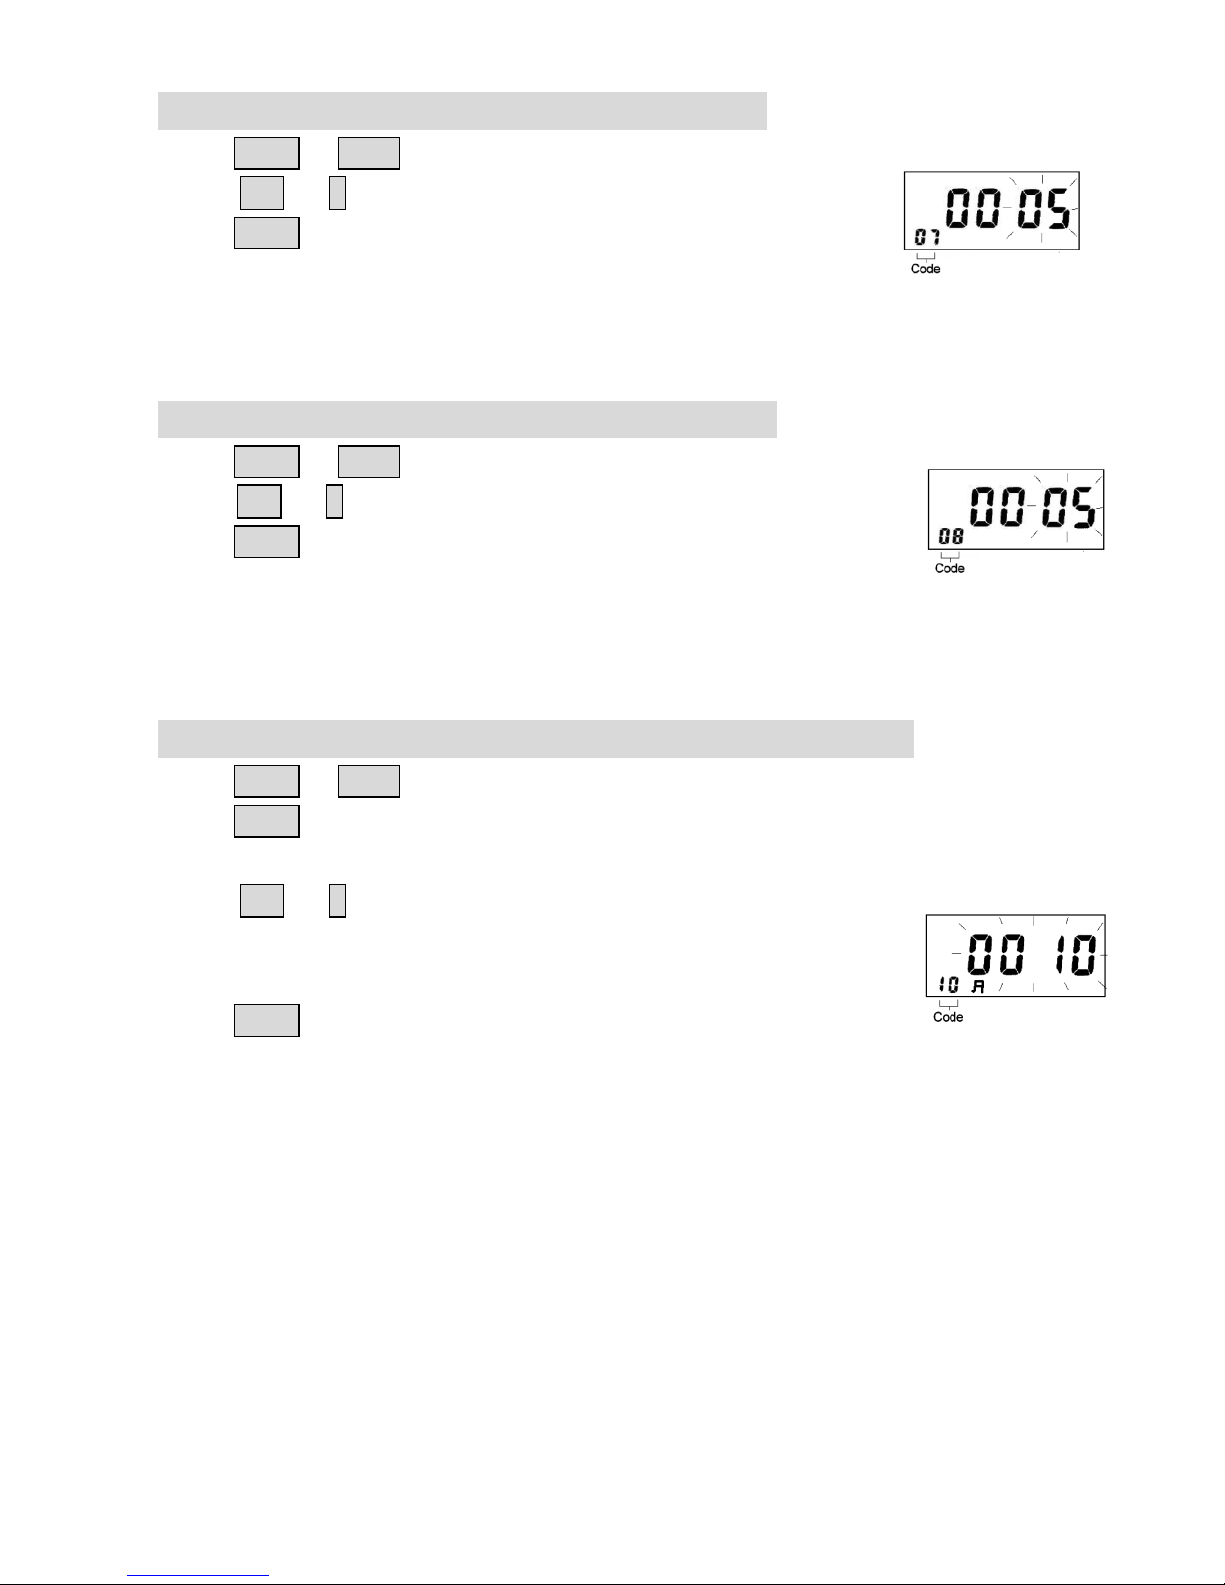
4.10 Setting the S/W BST/ EST start (hour and minute)
Press Enter or Back to enter the program code 04,
press + or – button to set the start hour.
Press Enter again to register the setting value.
press + or – button to set the start minute.
Press Enter again to register the setting value.
4.11 Setting the S/W BST/ EST end (month and day)
Press Enter or Back to enter the program code 05,
press + or – button to set the end month.
Press Enter again to register the setting value.
press + or – button to set the end date.
Press Enter again to register the setting value.
4.12 Setting the S/W BST/ EST end (hour and minute)
Press Enter or Back to enter the program code 06,
press + or – button to set the end hour.
Press Enter again to register the setting value.
press + or – button to set the end minute.
Press Enter again to register the setting value.
Page 14
- 14 -
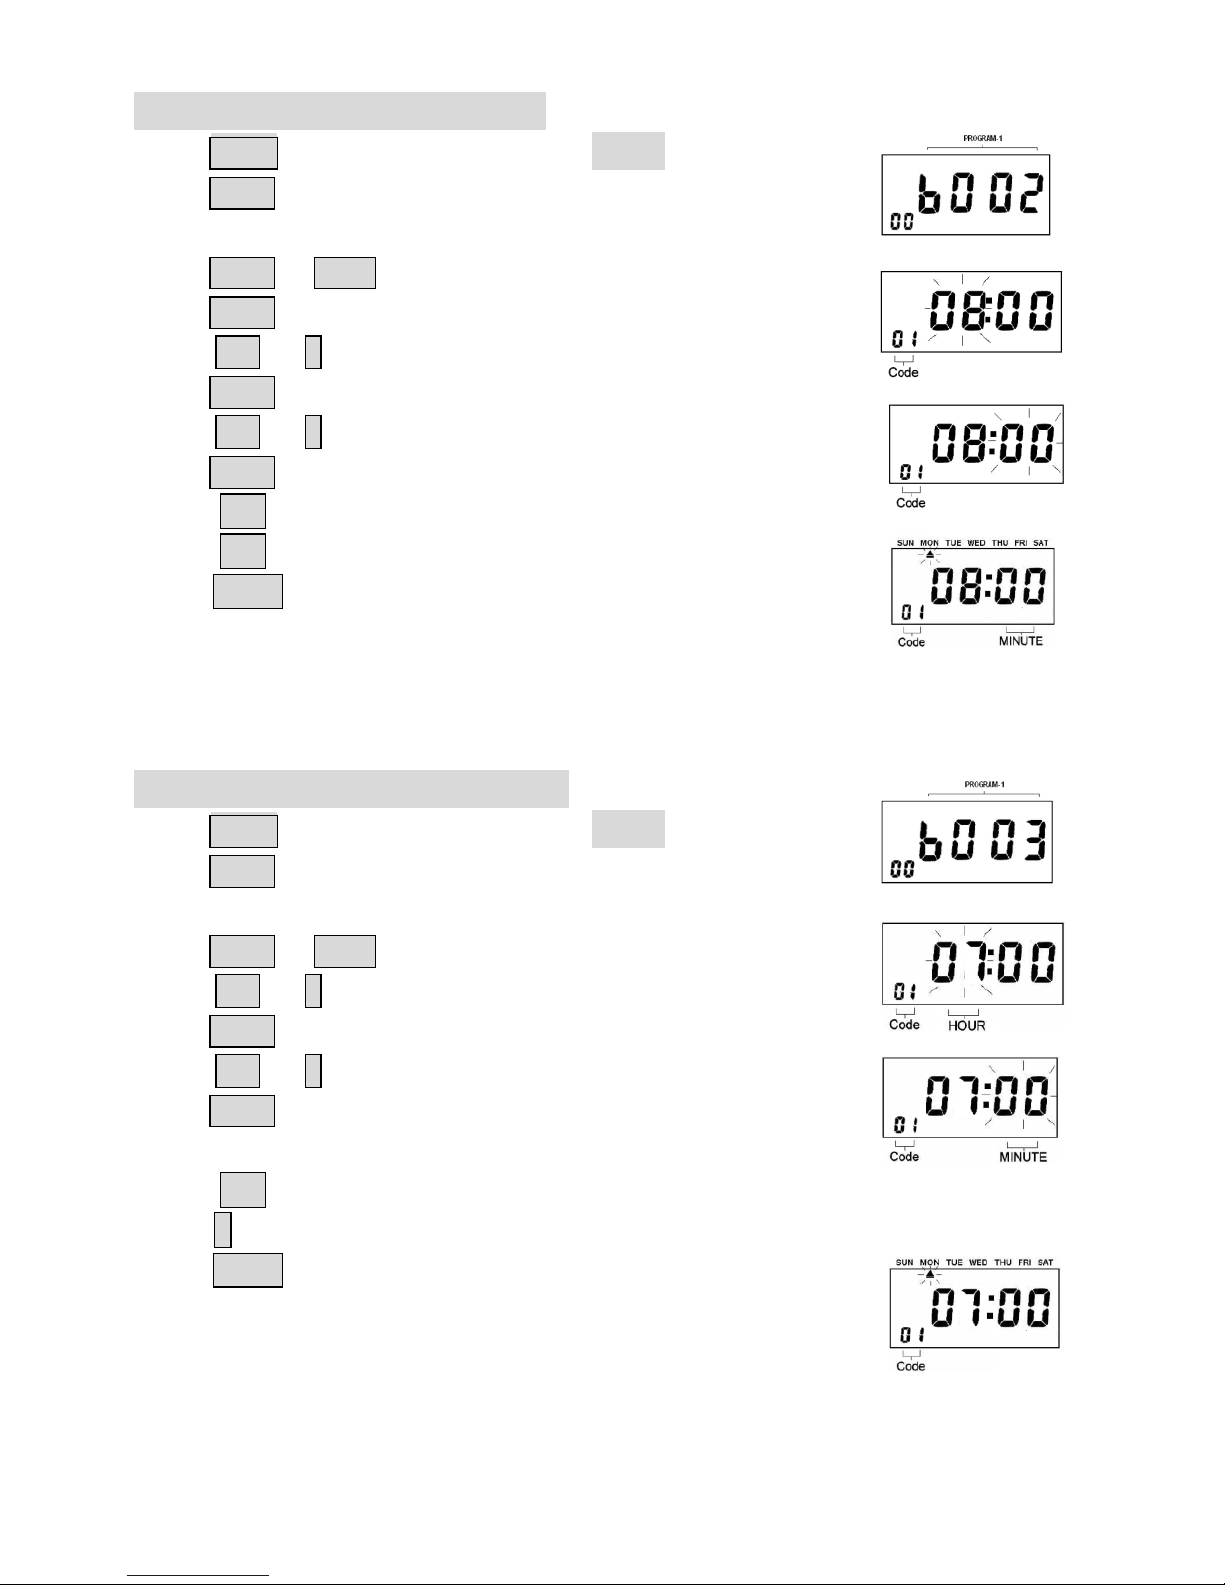
4.13 Setting printing position (Up/Down)
Press Enter or Back to enter the program code 07,
Press + or – button to set the printing position <0~9>
Press Enter again to register the setting value.
Higher value, printing moves upward, lower value,
printing moves downward.
4.14 Setting printing position (Left/Right)
Press Enter or Back to enter the program code 08,
press + or – button to set the printing position <0~9>
Press Enter again to register the setting value.
4.15 Setting the regular time signal (0-99Seconds)
Press Enter or Back to enter the program Code 10,
Press Enter again to register the setting value.
Press + or – button to set time signal duration and
the initial value (10 seconds) will appear.
The duration can be set from 0~99 seconds,
Press Enter again to register the setting value
Page 15
- 15 -
4.16 Setting the time signal
Press Mode key to select the program b002
Press Enter again to register the setting value.
Press Enter or Back to enter the program Code 01
Press Enter again to register the setting value.
Press + or – button to set the Hour.
Press Enter again to register the setting value.
Press + or – button to set the Minute.
Press Enter again to register the setting value.
Press + button to set the week.
Press – button to cancel the week.
Press Clear button to set everyday,
Doing the same as above to enter code 02~24 and
complete the setting of 2nd~24th ring times if necessary.
4.17 Setting the shifting time
Press Mode key to select the program b003
Press Enter again to register the setting value.
Press Enter or Back to enter the program Code 01,
Press + or – button to set the Hour.
Press Enter again to register the setting value.
Press + or – button to set the Minute.
Press Enter again to register the setting value.
Press + button to set the week.
Press – button to cancel the week.
Press Clear button to set everyday,
Doing the same as above to enter code 02~18 and
complete the setting of 2nd~ 18th shifting times if necessary.
Page 16
- 16 -
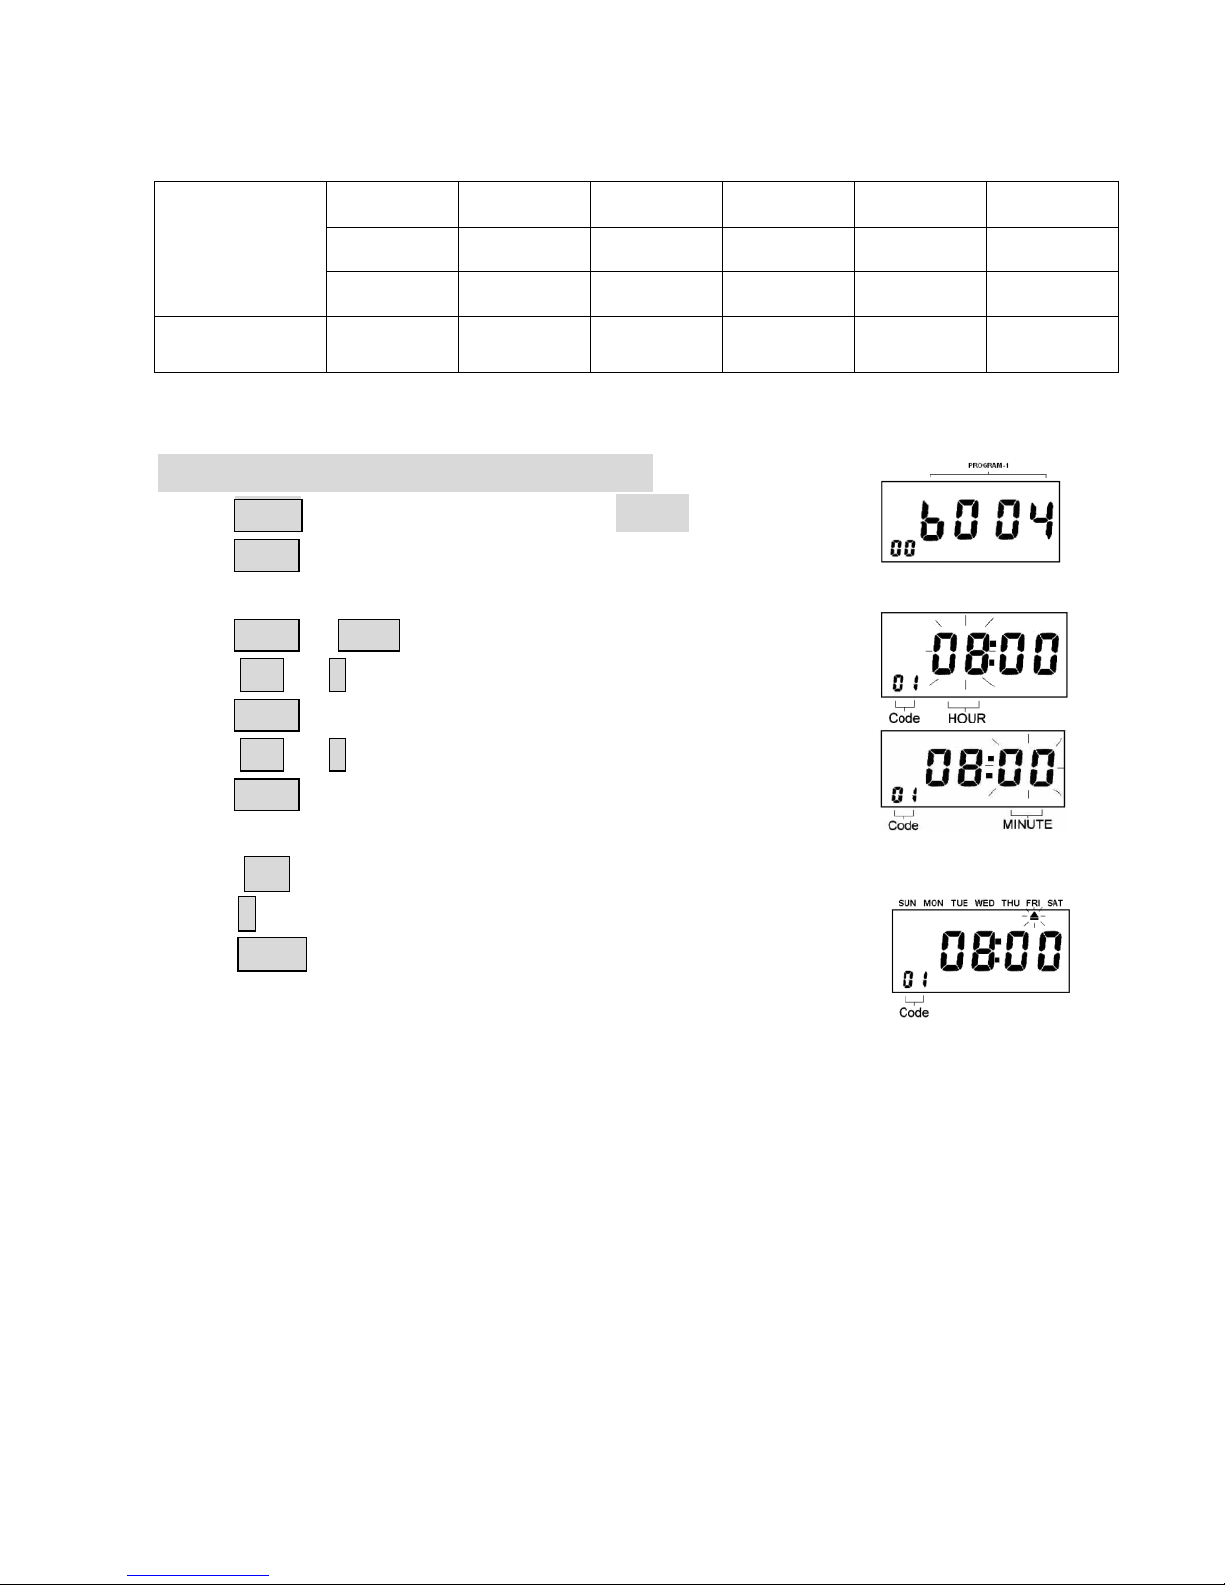
The format below is for reference:
4.18 Setting the 2-color printing
Press Mode key to select the program b004
Press Enter again to register the setting value.
Press Enter or Back to enter the program Code 01,
Press + or – button to set the Hour.
Press Enter again to register the setting value.
Press + or – button to set the Minute.
Press Enter again to register the setting value.
Press + button to set the week.
Press – button to cancel the week.
Press Clear button to set everyday,
Doing the same as above to enter code 02~18 and
complete the setting of 2
nd 18th
change color times if necessary.
Print Column
01
02
03
04
05
06
07
08
09
10
11
12
13
14
15
16
17
18
Function
A.M. IN
A.M. OUT
P.M. IN
P.M.OUT
O.T. IN
O.T. OUT
Page 17

- 17 -
5. Trouble Shooting
◎ Press RESET button to re-start the program if it is not working properly.
Trouble
Causes
Corrective Measures
The time
recorder
does not
accept time
card
1. Power failure.
2. The time card is
damaged.
3. The power cord is
disconnected.
4. Cards were inserted or
pulled out by force.
1. Wait until power supply is
restored.
2. Change to a new time card.
3. Insert the power plug firmly into
the power outlet.
4. Pull the power plug out of the
power outlet, then insert again.
The clock is
slow (or fast)
1. Error in setting the
clock.
2. Power failure.
Set it correctly.
Light printing
1. The ribbon cartridge is
not set correctly.
2. The cartridge has been
used for a long time.
1. Set it correctly.
2. Change the cartridge.
The printing
position is
wrong
1. Incorrect setting of day
change.
2. Improper use of the
time recorder.
1. Set it correctly.
2. Make sure to insert the card in
the card slot and remove it
properly.
The date is
incorrect
Error in setting the date.
Set it correctly.
Imperfect
printing
Improper use of the time
recorder
Make sure to insert card in the
middle of the card slot and remove
correctly.
Page 18
- 18 -
6. Replacing The Ribbon Cartridge
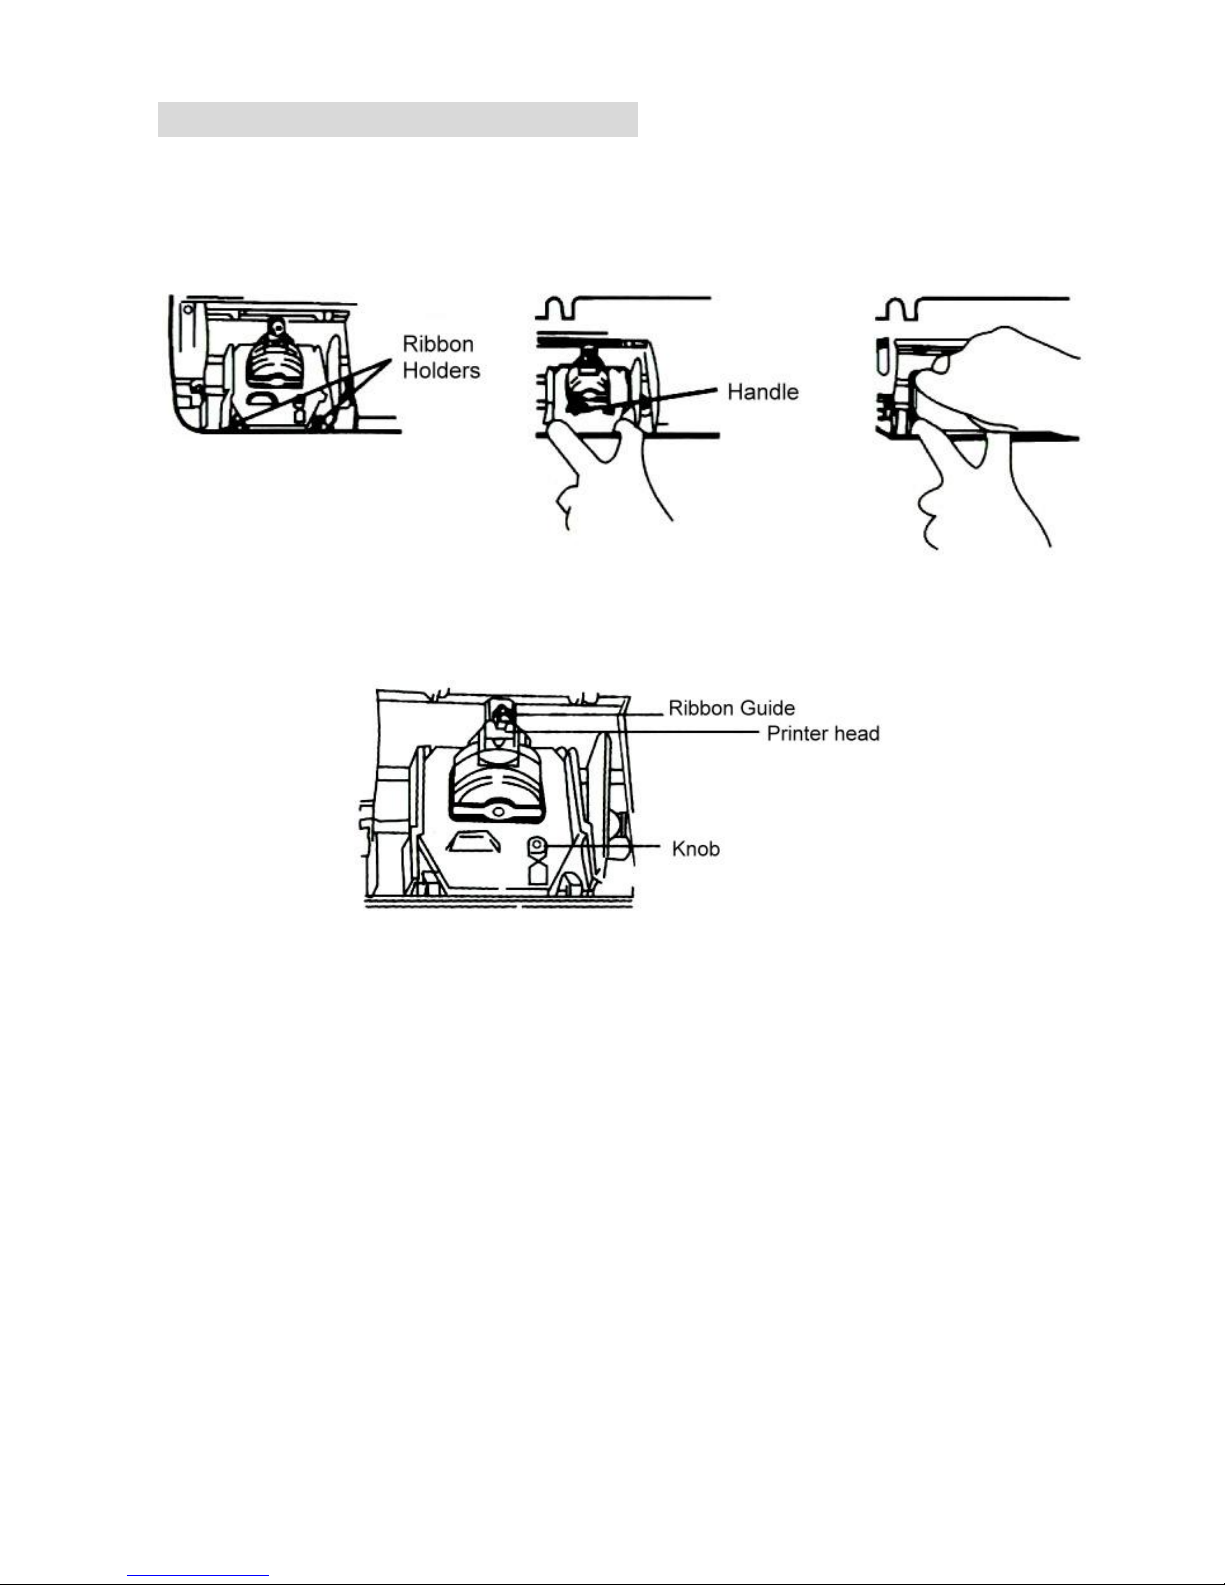
1. Open the top cover, press Column 4 to move the ribbon cartridge to the
center.
2. As shown in the figure below, pull the ribbon holders towards you and,
holding them steady in the position, use the handle to remove the cartridge.
3. Correctly insert a new cartridge between the ribbon guide and the printer
head. Push the cartridge head until it clicks into place. Then, turn the knob
clockwise to secure the ribbon.
Page 19
- 19 -
7. Precautions
1. To avoid fire or electric shock, please do not expose this machine to rain,
liquids or excessive condensed moisture.
2. Do not expose to direct sunlight, strong heat source or dusty environment.
8. Specifications
Power Supply
DC13V 1000MA Input
Power Consumption
Standby:2W / Work:10W
Dimensions
Approx. 193 x 244 x 123 mm ( L x W x H )
Weight
2.4 Kgs
Usage Environment
-30℃~40℃
10%RH~80%RH
Time Card Sizes
85 x 188 x 0.35 mm ( W x L x H )
Ribbon Cartridge
QC500 Print Ribbon
9. Error Code
E2E2--Wrong position (left & right)
E3E3—Battery needs to charge
It is advisable to only use genuine QuickClocks time recorder ribbons and
cards. Usage of non genuine or non compatible ribbons and cards may
damage the printer and void your warranty.
 Loading...