

Quick QM 67 Owner's Manual
Dual Boiler
Espresso Machine
by
Made In Italy

QM67 Dual Boiler Espresso Machine
Diagrams ........................................................................................................................................................................................ 2
Introduction ..................................................................................................................................................................................... 3
First Time Set Up ............................................................................................................................................................................ 3
Before Each Use............................................................................................................................................................................. 5
Normal Operation ........................................................................................................................................................................... 5
Gauges ...................................................................................................................................................................................... 5
Lights ......................................................................................................................................................................................... 6
Pump ......................................................................................................................................................................................... 6
Water Reservoir ......................................................................................................................................................................... 7
PID Controller ................................................................................................................................................................................. 8
Setting Temperature .................................................................................................................................................................. 8
Advanced PID Settings .............................................................................................................................................................. 9
Brewing Espresso ......................................................................................................................................................................... 10
Steaming Milk - Basics ................................................................................................................................................................. 11
Steaming Milk - Technique ........................................................................................................................................................... 12
Steaming Milk - Tips ..................................................................................................................................................................... 13
Hot Water Wand Operation .......................................................................................................................................................... 13
Maintenance ................................................................................................................................................................................. 14
Backflushing............................................................................................................................................................................. 14
Plain water backflushing .......................................................................................................................................................... 14
Backflushing with espresso machine cle aner .......................................................................................................................... 14
Setting Pump (Brew) Pressure................................................................................................................................................. 15
Group Gasket And Shower Screen Replacement .................................................................................................................... 16
Gasket and Screen Removal ................................................................................................................................................... 16
Cleaning The Group ................................................................................................................................................................. 17
Gasket And Screen Installation ................................................................................................................................................ 17
Maintenance Tip ...................................................................................................................................................................... 18
Descaling ................................................................................................................................................................................. 19
PID Controller .......................................................................................................................................................................... 19
Cleaning The Stainless Steel ................................................................................................................................................... 19
Troubleshooting ............................................................................................................................................................................ 20
No Steam From Steam Wand .................................................................................................................................................. 20
No Water From Hot Water Wand ............................................................................................................................................. 20
Not Heating .............................................................................................................................................................................. 21
PID and Heating Lights Are Not Working ................................................................................................................................. 21
PID Buttons Not Working ......................................................................................................................................................... 21
Espresso Coming Out Too Slow Or Not At All ......................................................................................................................... 22
Espresso Coming Out Too Fast ............................................................................................................................................... 22
Warranty ....................................................................................................................................................................................... 23
We Are Here To Help ................................................................................................................................................................... 23
Owner’s Manual Page 1
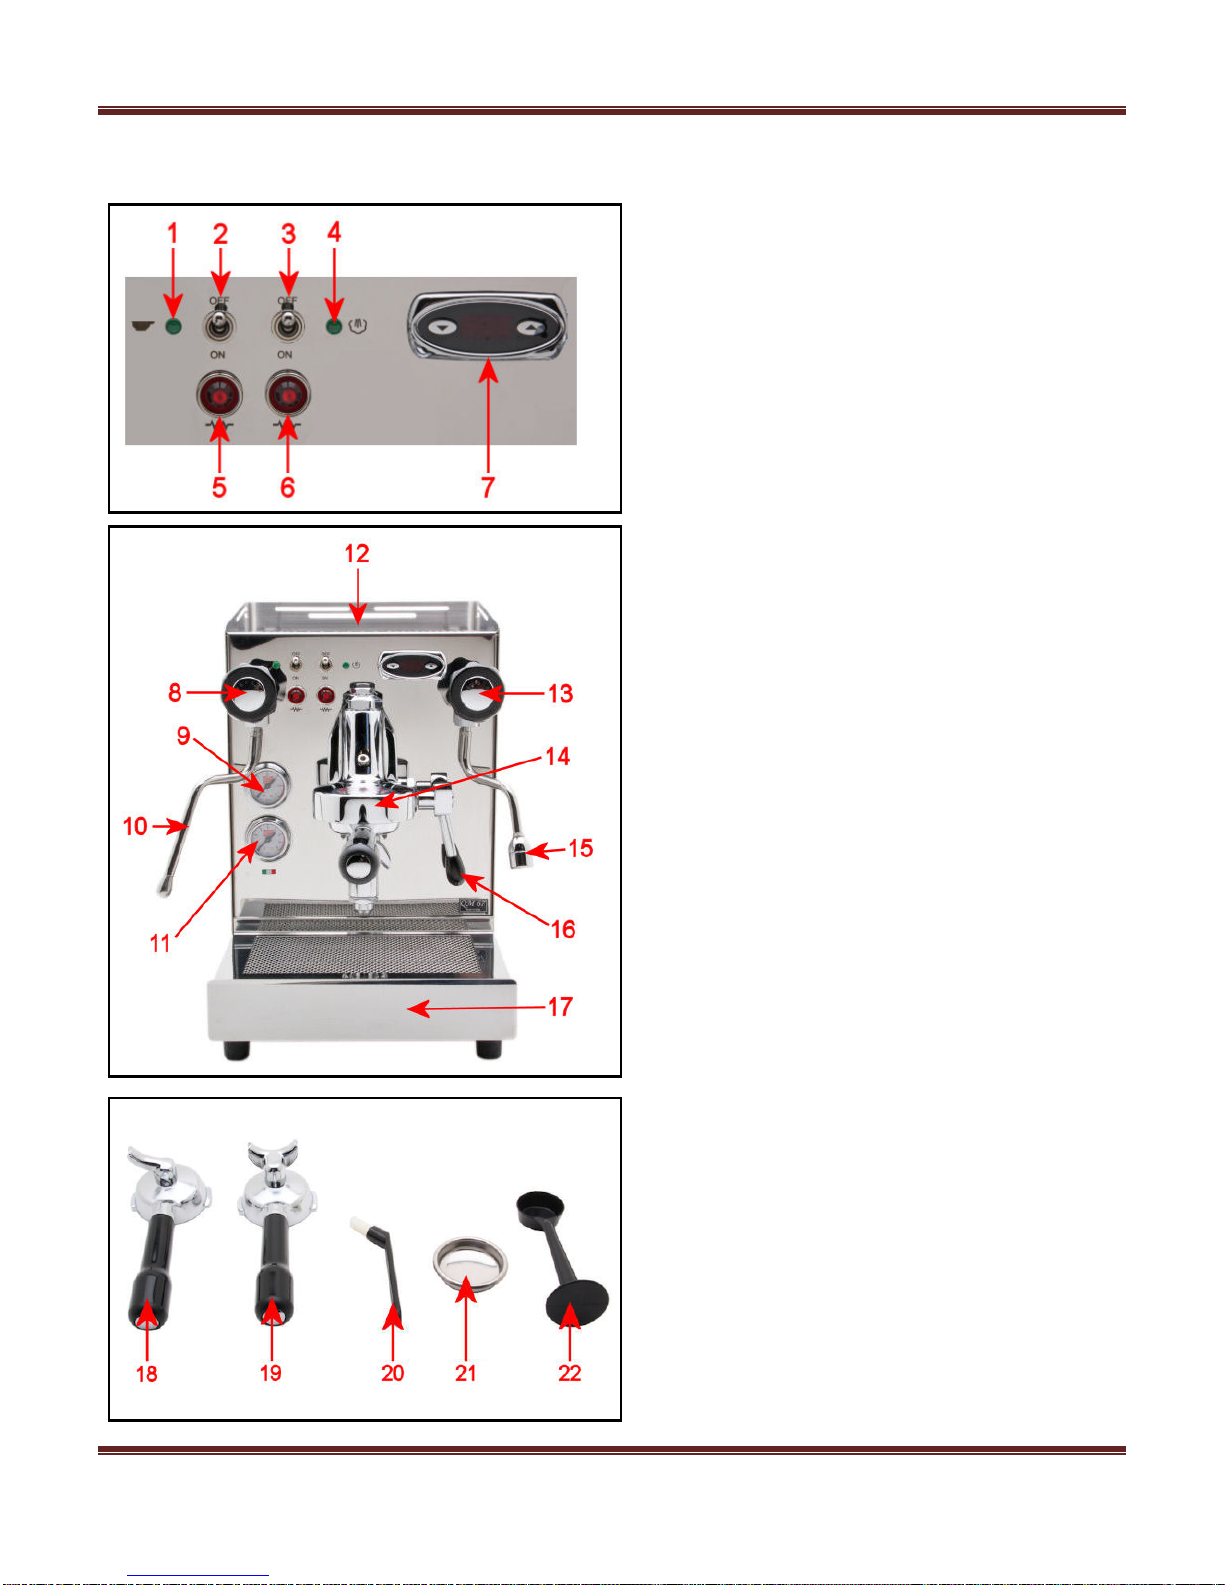
22. Coffee Scoop/Tamper
Diagrams
QM67 Dual Boiler Espresso Machine
1. Coffee Boiler Power Indicator
2. Coffee Boiler Power Switch
3. Steam Boiler Power Switch
4. Steam Boiler Power Indicator
5. Coffee Boiler Heating Indicator
6. Steam Boiler Heating Indicator
7. PID Controller
8. Steam Knob
9. Steam Pressure Gauge
10. Steam Wand
11. Pump Pressure Gauge
12. Cup Warming Tray (The water reservoir
is located under the hinged lid of the cup
warming tray)
13. Hot Water Wand (*Do not remove more
than 6oz of water at one time until it has had
time to refill or damage to the heating element
may occur which will not be covered under
warranty)
14. E61 Grouphead
15. Hot Water Faucet
16. E61 Brew Lever
17. Drip Tray
18. Single Portafilter
19. Double Portafilter
20. Cleaning Brush
21. Backflush Disc
Owner’s Manual Page 2

QM67 Dual Boiler Espresso Machine
Introduction
First of all, thank you for your business! You are going to love your new QM67 Dual Boiler
Espresso Machine. It combines classic beauty, value, and great performance for making the
best espressos, cappuccinos, and lattes you’ve ever tasted! These instructions include tips
that will help bring out the Barista that’s hidden within! Enjoy your new machine!
First Time Set Up
• Before using your machine, test your water for hardness using the provided test strips.
Fill a glass with cold tap water; dip the tip of the test strip into the water for one second,
then pull the strip out of the water and hold it horizontally for fifteen seconds. After fifteen
seconds, compare the color of the strip to the chart on the side of the package to
determine how many grains of hardness is in your tap water. Three grains or less of
hardness is acceptable to be used in the machine.
Note: Should your water’s hardness level exceed three grains, then it is strongly
recommended that an in tank softener be used or a different source of water that has
been tested for hardness. Some bottled water can be extremely hard and should always
be tested before using. Using a Brita or PUR style pitcher or faucet filter does NOT
remove any hardness from the water and should only be used in the machine if your
water source is under 3 grains of hardness. Using hard water in the machine will affect its
performance and may cause damage to the machine which is not covered under
warranty.
• Open the hinged reservoir door on the top of the machine and remove the water
reservoir. Rinse the water reservoir out and fill with cold softened water and then install it
back into the machine being careful not to spill any water inside the machine.
• Be sure that both silicone lines are sitting in the bottom of the reservoir like shown. There
is a notch on the right side of the reservoir for the lines to sit in and the float should be on
the left side of the machine.
• Make sure the silicone lines are not pushing
the float down or the PID and heating lights
will not turn on.
Owner’s Manual Page 3

QM67 Dual Boiler Espresso Machine
First Time Set Up, Continued
• Before plugging the machine in, verify the steam and hot water knobs are closed and
the brew lever is in the down position. Also make sure the power switches are in the
off position and the drip tray is in place.
• Plug the machine into the outlet* and then turn the coffee boiler power switch to the
on position.
• The pump will come on to fill the boilers and then will turn off after the boilers have
completed filling.
• If the pump turns off and the PID and heating lights do not come on then the water
reservoir needs to be refilled. It may take 2 reservoirs to completely fill both boilers.
• After the boilers have finished filling then place whichever portafilter you intend to use
into the group head. Then lift the brew lever to activate the pump and keep the lever
up until water comes out of the portafilter for at least 15 seconds and then lower the
brew lever.
• The heating indicator light and PID will illuminate and the machine will start heating.
You will hear some gurgling noises and a small amount of steam and water will be
discharged into the drip tray. This is normal to allow for the release of air and the
expansion of water in the boiler.
• If you plan on steaming milk or using the hot water wand then also be sure to turn on
the steam boiler power switch. The coffee boiler power switch must also be on for the
steam boiler to operate.
• The machine should reach temperature in approximately 15 minutes, but to make
delicious espresso with thick rich crema it is necessary to allow the machine to be
heated for 30-45 minutes with the portafilter kept in the grouphead.
* The electrical outlet must be a 3 prong 115V grounded outlet. No adaptors or extension
cords should be used. A timer may be used to turn the machine on and off, but it must be a 3
prong grounded timer rated for 15 amps. A GFCI outlet is highly recommended but is not
necessary.
Owner’s Manual Page 4

Before Each Use
• Verify the steam and hot water knobs are both closed and your brew lever is pointing
straight down.
• Fill the reservoir with cold softened water.
• Place whichever portafilter you intend to use into the group head and then turn the
coffee boiler power switch to the on position. If you plan on using the steam or hot
water wand then also turn on the steam boiler power switch.
• Let the machine warm up for 30-45 minutes for opti mal performance.
Normal Operation
Gauges
QM67 Dual Boiler Espresso Machine
• The top gauge is for your boiler steam pressure. After turning the machine on it will
take approximately 15 minutes before the gauge will show any pressure. Once up to
pressure the gauge will cycle back and forth roughly between 1.2-1.7 bar depending
on the steam boiler temperature setting. Should you need to adjust the steam
pressure please refer to the PID section of the owner’s manual.
• The lower gauge is for your pump (brew) pressure. When sitting idle the gauge is
reading trapped pressure in the system and may vary. To get an accurate pump
pressure reading install your backflush disc in the portafilter and lock it into the
grouphead and then raise the brew lever. After a few seconds the pressure should
rise to about 9 - 10 bar. When you make espresso the pressure on the gauge will be
slightly less at about 8.5 - 9.5 bar which is normal. This can be helpful in setting up
your grinder. If y our pr ess ur e goes t o 9 - 10 bar with the backflush disc, but when you
make espresso it is less than 8 bar then that means you need to go finer with your
grind which will create more resistance to raise the pressure. Should you need to
adjust the pump pressure please refer to the maintenance section of the owner’s
manual for instructions on setting the pump pressure.
Owner’s Manual Page 5

QM67 Dual Boiler Espresso Machine
Normal Operation, Continued
Lights
• On the front of the machine there are 4 indicator lights. The green indicator light to the
left of the coffee boiler power switch will illuminate whenever the coffee boiler is
turned on.
• The green indicator light to the right of the steam boiler power switch will illuminate
whenever the steam boiler is turned on. The coffee boiler power switch must be
turned on for the steam boiler to operate.
• The red coffee boiler heating indicator light located under the coffee boiler power
switch will illuminate whenever the coffee boiler is heating.
• The red steam boiler heating indicator light located under the steam boiler power
switch will illuminate whenever the steam boiler is heating. The coffee boiler must be
up to temperature before the steam boiler is able to heat.
• It is normal for the red heating lights to flash rapidly back and forth to maintain the
proper temperature in both boilers.
Pump
• The machine is equipped with a 52W vibratory pump that is thermally protected.
Vibratory pumps can be loud by nature and their tone may change during the course
of a shot which is normal.
• Periodically the pump will come on by itself to maintain the proper water level in the
boiler. Sometimes the pump will come on when you turn on the machine and
sometimes it may not depending on the water level in the boiler which is normal.
• The pump (brew) pressure is regulated by the expansion valve. To learn how to set
the pump pressure please refer to the maintenance section of the owner’s manual.
Owner’s Manual Page 6

QM67 Dual Boiler Espresso Machine
Normal Operation, Continued
Water Reservoir
• The water reservoir can be accessed by opening the hinged reser voi r door on the top
of the machine. It is recommended that the reservoir be removed prior to filling to
prevent the spilling of water inside the machine which can cause damage to sensitive
electrical components. Should water accidently get spilled inside the machine then
immediately turn the power switch to the off position and unplug the machine from the
electrical outlet. Do not plug the machine back in until it has had at least 1 full day to
dry out. If it does not operate after that time then unplug the machine and refer to the
troubleshooting section of the owner’s manual.
• The reservoir must be installed properly for the machine to function . Th e flo at inside
the reservoir must be on the left side of the machine. Also be sure the reservoir is
seated as far down as possible and the silicone hoses are not pushing the float down
or the PID and heating lights will not turn on.
• The machine is equipped with a magnetic floa t in the water reservoir to detect the
water level. When the water level gets low the PID and heating lights will go out and
the pump will no longer function until the reservoir has been refilled.
• The reservoir should be cleaned at least once a week with mild dish detergent and
rinsed thoroughly before use. DO NOT PUT IN DISHWASHER!!!
• Depending on your water quality it may be necessary to periodically sanitize the
reservoir or if you are using hard water and have a mineral build up inside. White
vinegar can be used to sanitize and will also remove the mineral deposits that can
accumulate. Fill the reservoir with white vinegar and then let it sit for an hour and then
rinse and clean the reservoir thoroughly. If the reservoir still has a vinegar taste or
odor you can mix some baking soda and water in the reservoir to remove the taste
and odor and then wash it with a mild dish detergent and rinse thoroughly.
Owner’s Manual Page 7
 Loading...