

Page 1

™
User guide
Page 2

elcome to duō, a compact handheld
sales and payment device for the Retail
and Hospitality industries. Until now, no
convenient portable solution has offered
Point-of-Sale and multiple secure payment technologies in
one device. The unique two-sided architecture allows sales
to be entered on one side, and payments processed on the
other. Separating the two core functions ensures that the
Point-of-Sale side remains open-architecture, whereas the
payment side remains compliant to nancial (PCI) standards.
W
Page 3

Before using
Check contents of the box 1
Product storage - Best practice 2
Charge the Battery 3
Cautions 4
duō at a glance 5
General operation 6
Battery Installation & Removal 7
SD Card Installation / Removal 8
SIM/ SAM Card Installation / Removal 8
Reset Switch 9
Power button 9
Battery Run Time 10
POS operation 11
POS Touchscreen 11
Home Button 12
Barcode Scanner 12
Status Bar 13
Home Screen 14
Tools 14
Settings 17
PINpad operation 18
Technical Specications 20
Cleaning 21
Service & Support 22
Accessories available 23
Software Development Kits 24
Declaration of Conformity 26
Important SAR Information 27
Stolen devices 28
End of Life requirement 28
Hardware Warranty 29
Software License & Warranty Agreement 30
Contents
Page 4

1
Before using
Check contents of the box
Thank you for selecting duō. Please check that your package comes with the
following items. If any of them are missing, please contact your place of purchase.
• duō
• Li-Ion Battery
• Polishing cloth
• Stylus
• Wrist lanyard
• Power Adapter (5vDC )
• USB cable
Page 5

2
Product Storage - Best practice
Important!
If you intend to leave duō unused for an extended period of time, please ensure a
fully charged Battery is tted prior to storage. If storage is expected to be GREATER
than 6 months, ensure the battery is periodically recharged (every 3-4 months).
Battery is fully charged
and can be left untouched
for 6 months
Battery is low or fully
depleted and should be
charged before storage
Charged Battery must be
tted to duo prior to being
stored for an extended period
Warning: Failure to maintain adequate battery charge may result
in the loss of stored information on
duō,
subsequently the unit will
need to be returned to Quest for recomissioning. If you have any
concerns about this, please contact the Quest Help desk.
Page 6
3
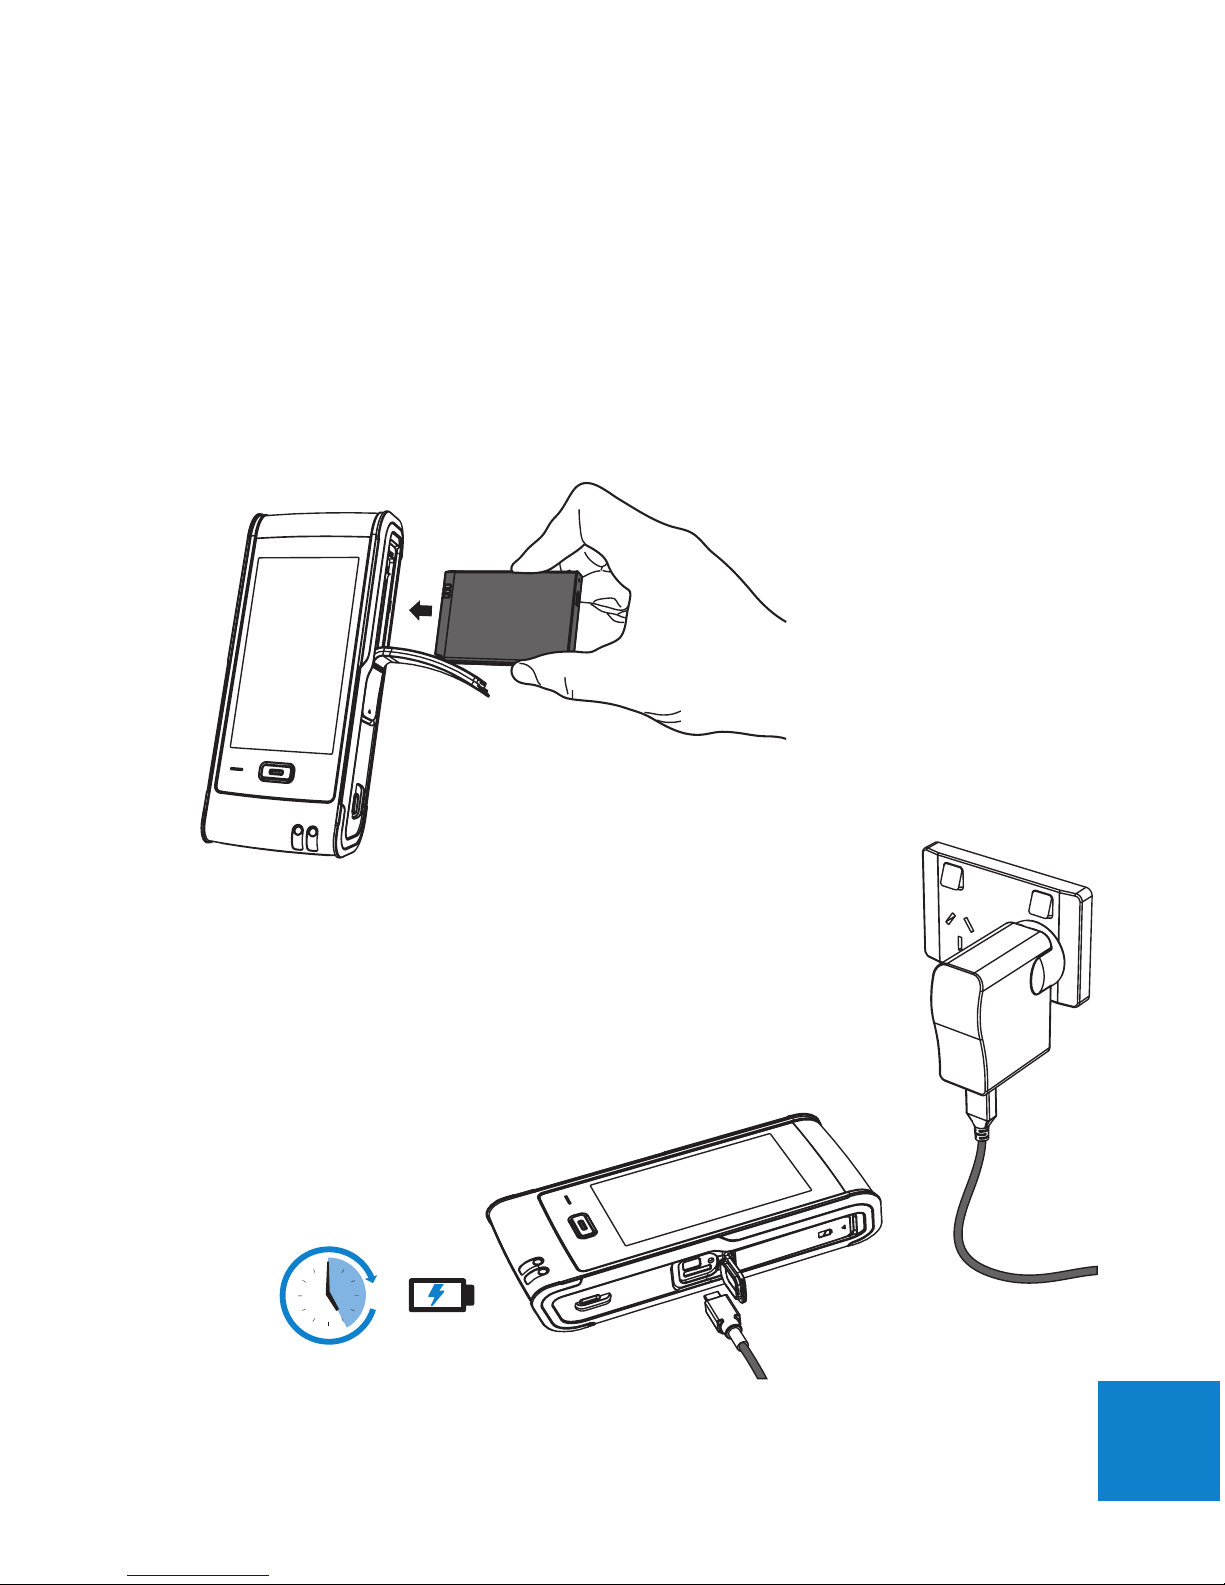
Charge the Battery
Before using duō for the rst time, charge the battery for at least 5 hours. Do this
by ensuring the Battery is installed in duō. Open the rubber access door, t Battery
as shown below, plug the supplied USB cable into the USB Port on duō, connect the
cable to the 5V Adapter or plug into a PC. See ‘Battery installation’ section for more
detail.
Note: If you charge the Battery by connecting the
USB cable to a PC, it will take longer to charge. If
you have purchased a
duō
cradle, you may use this
to charge the Battery directly.
Once fully charged, the LED on the Home button
will change from Orange to Green.
5H
Page 7

4
Cautions
Before operating duō, read and understand all instructions in this booklet.
• Do not look straight into the emitting laser barcode scanner. Class 2 laser
scanners use a low power visible light diode. As with any very bright light source,
such as the sun, avoid staring directly into the beam. Momentary exposure to a
Class 2 laser is not known to be harmful.
• Do not use this equipment in an extreme environment where high temperature
or high humidity exists.
• Do not abuse the equipment. Avoid striking, shaking or giving it a shock. When
not using the unit, lay it down or place in the recharge cradle to avoid possible
damage due to instability.
• Do not expose this equipment to rain or spilled beverages.
• Avoid charging the Battery in strong heat or extreme cold environment. The
battery has its optimum performance in an ambient temperature of 0°C to
+45°C. Do not store the Battery near a re or heat source. Never soak the
Battery in water or any other uid. Never try to open the Battery as it contains
substances that may be harmful if swallowed or allowed to come into contact
with unprotected skin. Never short-circuit the Battery, as it may overheat and
cause a re. Keep it away from jewellery and other metal objects. Never dispose
of the Battery in a re. It could explode and release harmful substances into the
environment. Never dispose of the Battery with your regular waste.
• Do not disassemble duō or its accessories. If service or repair is required,
contact your place of purchase to organise for the unit to be returned. If the unit
is disassembled this will void the warranty and tamper the device rendering it
inoperable.
Page 8

5
at a glance
1. Power button
2. POS LCD Touchscreen
3. Home button
4. Laser Barcode Scanner
5. PINpad LCD display
6. PIN entry keyboard
7. Magnetic swipe card channel
8. Chip & PIN card acceptor
9. Battery access cover (also access to SIM card)
10. USB port access cover (also access to Hard Reset switch & microSD card)
11. Wrist Lanyard attachment point
12. duōcharger contacts (note: duōcharger is an optional accessory)
13. Speaker
Page 9
6
General operation
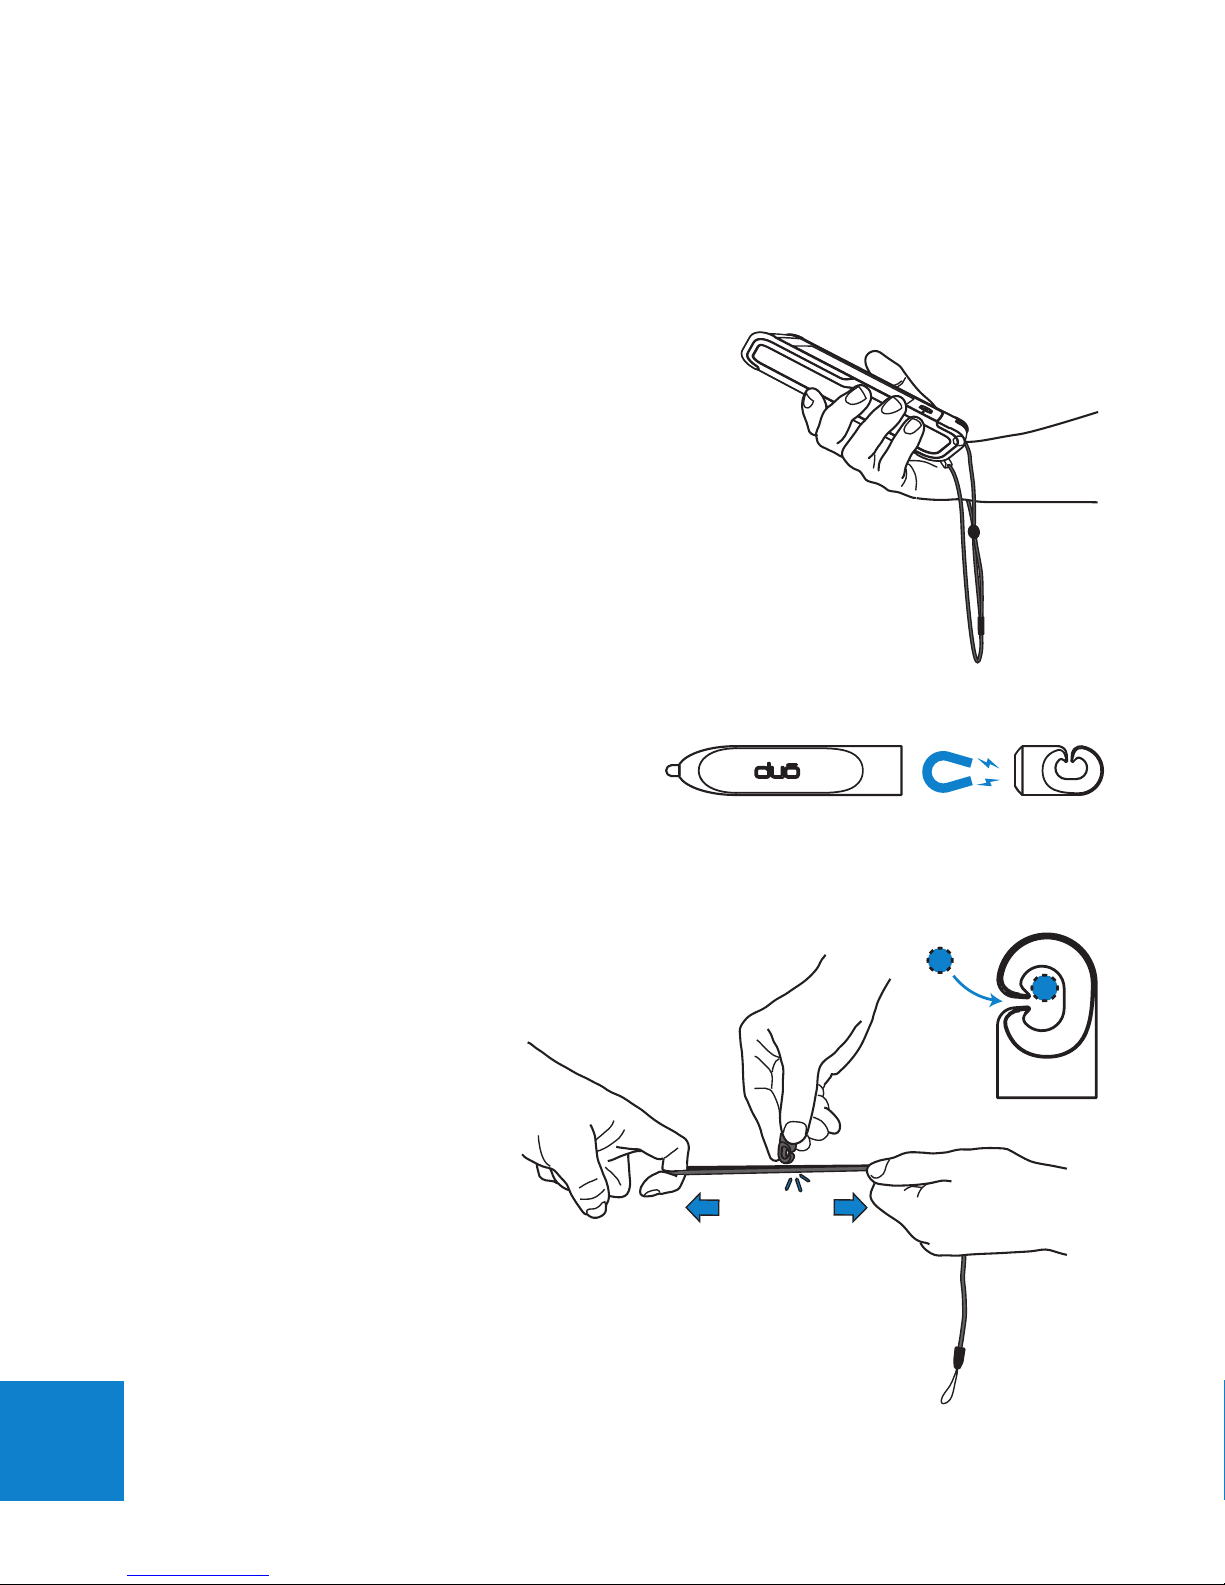
Wrist Lanyard
Wearing the wrist strap will prevent potential
damage to duō if dropped. The strap can either
be used around your wrist or tied to your person
or tied to the Waist bag accessory.
The length of the strap allows duō to be handed over to a
customer for PIN entry while still tied to your person.
Stylus
duōStylus can be used if people prefer that
method of input. It can be attached to the
Wrist strap provided. The Stylus end can be
detached from the attachment point offering
more freedom of use.
Fitting Stylus to Lanyard:
With the help of a friend,
stretch the loop end of the
lanyard tight, then push the
opening of the Stylus hook
onto one section of the
Lanyard.
Page 10

7
To remove:
Using the same method as above, clip the other
half of the cord loop into the Stylus hook. Now
simply slide the hook off the Lanyard.
Battery Installation & Removal
To install:
1. Use the tip of your nger to peel out the Rubber door.
2. Correctly orientate the battery to duō (note: the battery will only go in one
way. The access door will not close if the battery is inserted incorrectly)
3. Insert the Battery fully ensuring the catch engages (click!)
4. Ret the Rubber door.
Page 11

8
To remove:
1. With your nger, pull out the Rubber door (See previous Step 1)
2. Find the metal Battery release tab under the door and shift it sideways. The
Battery will eject enough for your ngers to grip the battery and slide it out.
SDCard Installation / Removal
1. Open the side rubber door to reveal the USB port & microSD slot
2. Insert microSD card in correct orientation (shown below). Push until it clicks.
To remove, push the card in further and release, the card will eject allowing
your ngers to grip it and pull it out.
SIM/SAM Card Installation / Removal
A SIM card is required for a duō with 3G.
A SAM card may be tted to duō if the Contactless module is tted.
1. Open the side rubber door to reveal the Battery
2. Release and remove the Battery
3. Insert SIM or SAM card in correct orientation (shown below). Push until it
clicks. To remove, push the card in further and release, the card will eject
allowing you to grip it and pull it out.
Page 12

9
Reset Switch
If for some reason duō will not respond to any inputs, press and hold down the
Reset switch for 4 seconds using a pen tip, duō will then power off.
Power button
Turn duō On: Press and hold the button until the
duō logo appears. Once On, you can press and
release the button again to Lock duō. Locking
will turn Off the display to save your battery and
to prevent unintended operation of duō. The
Home button ashes orange in this state.
Note: By default, if you don’t touch the screen
for a minute,
duō
will turn the display off
automatically to conserve battery power.
To wake duō, press the button, or press the
Home button. duō will wake to the last screen
accessed. To turn duō completely Off, press and
hold the button for 4 seconds.
Page 13

10
Battery Run time
The nominal capacity of the duō battery is 2.3Ah. Its run time is dependant on the
different duō states.
Note: Replacement Batteries can be ordered. Call Quest on 03 8807 4400
Active operation
Idle (Standby & Sleep
setting, set to ‘Never’)
Standby (Sleep setting, set
to ‘Never’)
Sleep
* Based on new, fully charged Battery. Based on duo without Contactless or 3G tted
State
3 items scanned, payment performed by chip card, 2
copies of EFTPOS receipt printed on Bluetooth printer
duō is ON, but not in use. Large LCD Screen is ON
duō is ON, but not in use. Large LCD Screen has
dimmed to half brightness
duō is asleep, ready to wake to last window open
(Large LCD Screen is OFF)
275 transactions
9.5 hours
16.5 hours
12.5 days
Run time*
Part name: Part Number:
duō Li-Ion Battery 270-0004-xx
Page 14

11
POS operation
This section refers to the generic operating system controls without detailing the
specic operations of proprietary applications by Quest or others.
POS Touchscreen
The Touchscreen can be activated with any type of pointer.
To prevent premature wear of the touchpanel, use only your
nger or the Stylus provided with its anti scratch tip.
The controls on the touch screen change depending on the
task you are performing. Tap the screen with your nger to
activate an on-screen button.
Drag up or down to scroll in certain windows. Dragging
your nger over the screen to scroll won’t choose or activate
anything on the screen. Tap an item in a list to choose it.
The back button, commonly situated in the upper-left corner
shows the name of the previous screen. Tap it to go back.
Page 15

12
Home Button
A single press of the Home button takes you to the
previous screen. The centre of the Home button has
a light indicator.
Colour What it means
Red Blinking duō is in Sleep mode
Orange Solid duō is connected to PC / Charging.
Green Booting, Fully charged
Red Internal fault in Battery (replace
battery inside duō.)
No light duō is Off or in general use
Barcode Scanner
Warning: Do not stare at the emitting Laser.
The barcode scanner reads 1D barcodes,
particularly useful in a Retail Sales environment.
Point the top of duō at the barcode with the
barcode printed surface parallel to duō. Tap the on
screen SCAN button. The laser beam will project
a red line onto the object surface, hold the scan
line still for a moment whilst over the barcode. By
default, the speaker will sound a single beep if the
read is successful. Two beeps sound if duō cannot
identify the barcode. Note: The Home button can
be congured to trigger the scanner.
Warning: Take care not to
scratch the scanner window as
it may affect the scanners ability to
decode the barcode.
SAMPLE BARCODE FOR SCANNING
Beep!
Page 16
13
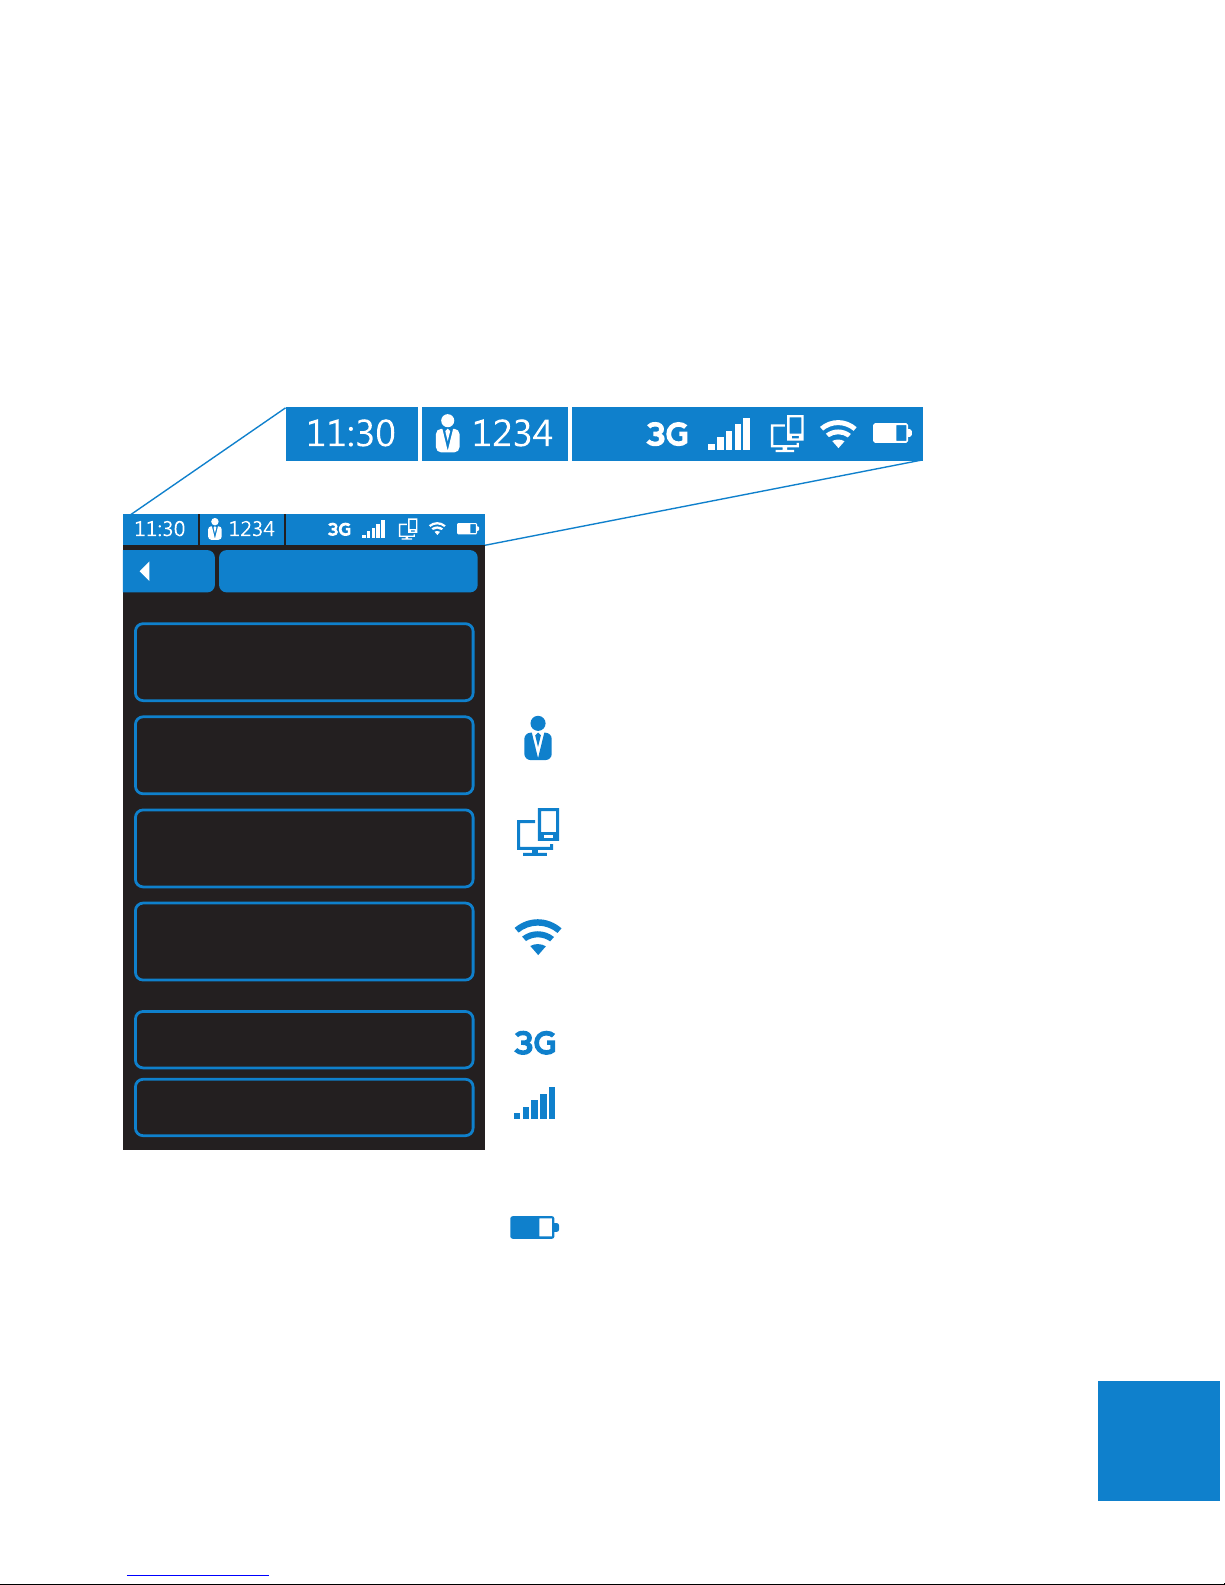
Status Bar
The icons in the status bar at the top of the screen provide dynamic information
about duō and the surrounding environment.
Time
The current time is situated on the left side of the
status bar.
Note: The time is set by the Bank.
Operator ID
Shows the ID of the user currently logged on.
POS
Indicates connection to a POS
WiFi
Indicates that duō is connected to a WiFi network.
The more bars, the stronger the connection.
3G (Factory build option)
‘3G’ icon indicates that 3G is enabled.
Indicates that duō is connected to a 3G network.
The more bars, the stronger the connection.
Battery indicator
Shows the power remaining in the battery.
Note: When duo is low on power, a popup
message will appear prompting you to recharge or
swap the battery
Page 17
14
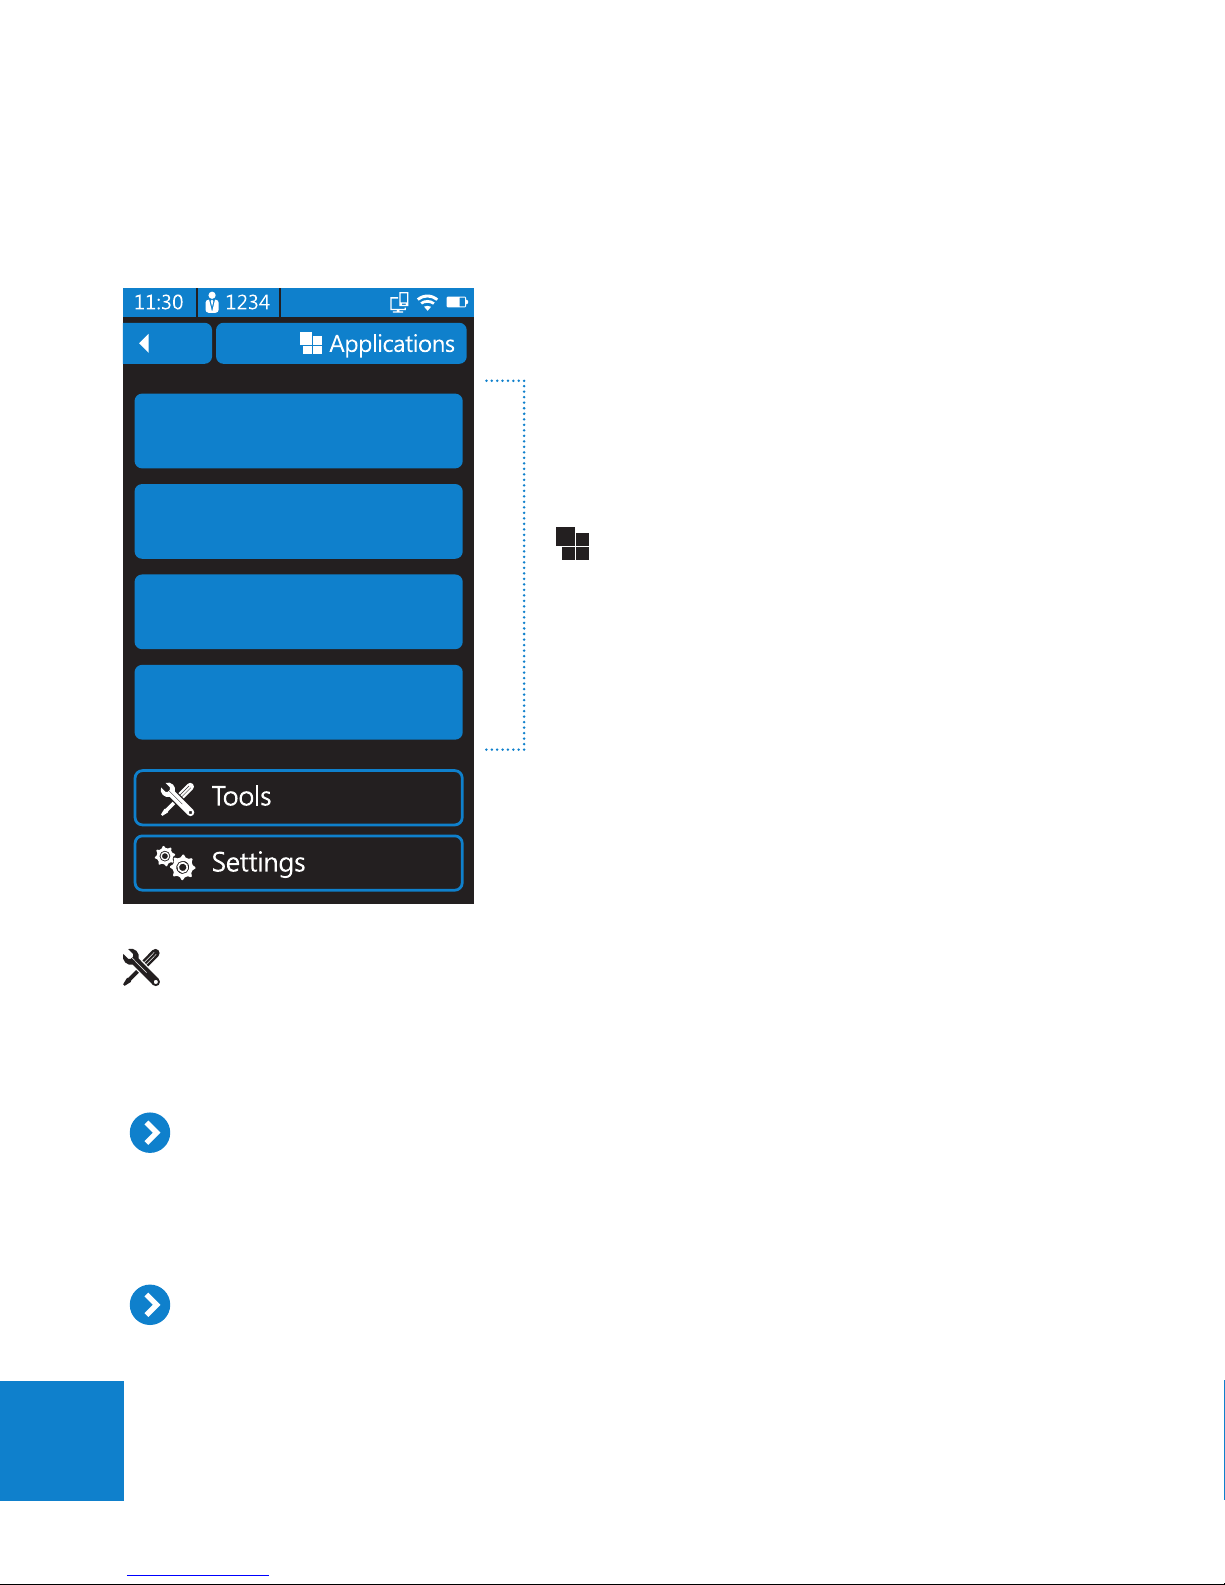
Home Screen
The Home screen is the place in which
Applications are launched. Tools and Settings
for duō are also accessed here.
Applications
To Launch an application, Tap the
application button once.
Note: Applications may differ from
those shown here.
Tools
The tools section is primarily for system management and diagnostic functions.
These may be accessed when troubleshooting with Quest Support Staff.
Bank Logon
Bank Logon will initiate a session between duō and the Bank, indicating to the
Bank that this duō is now ready to process nancial transactions. This function
can also be used to test the connection to the Bank.
Reprint EFT Receipt
This function is used to print a duplicate copy of the last EFT receipt.
Application 1
Application 2
Application 3
Application 4
Page 18

15
Tools
EFTPOS Totals
Settlement enquiry
Is used to retrieve and print a report of the current subtotals from the
Bank.
Settlement cutover
Informs the Bank that the Merchant is settling the current Settlement
period and is cutting over to a new Settlement period. All transactions
performed after the cutover has been performed will appear in the next
Settlement period.
Previous totals
This screen will report the Settlement totals for the previous settlement
period.
Shift totals
Used to retrieve and print a report of the current EFTPOS shift totals from
duō. To reset the Shift totals, tap the Reset button.
Upload ofines
Initiates a process to upload all stored transactions in the PINpad to the
Bank.
Ofine totals
Allows you to print a summary totals report of the Ofine transactions that
are currently stored in the PINpad.
Page 19

16
Diagnostics are primarily for troubleshooting potential hardware issues.
The following hardware functions can be tested:
PINpad POS
Smartcard Printer
MSR WiFi
Keyboard Scanner
Speaker Home button
Display Speaker
PINpad reboot Vibrater
Power on
Support
This section contains EFT related functions that a support desk may ask you to
run as part of troubleshooting an EFT issue.
TMS (Terminal Management System)
Your support desk may ask you to perform a TMS function in order to pickup
duō software maintenance or to diagnose an issue.
Updates
• Check for updates
• Update from SD Card
Page 20

17
Settings
Printer
Use this screen to pair duō to a Bluetooth printer or network printer for
receipt printing. If you do not use a printer, deselect ‘Enable printing’.
WiFi
This screen will allow you to congure duō to connect to your local area
network
Power
This screen allows you to adjust the power usage of duō. Three standard
proles are available, or simply adjust each component to achieve the
right balance between power savings and usability.
Audio
Drag the Slider to adjust the volume. When the slider is set all the way to
the left it will make duō silent.
Brightness
Brightness of the POS display can be adjusted to suit your current light
conditions. Drag the Slider to adjust the brightness.
EFTPOS
EFTPOS settings are set via the SnapCloud Web Portal. This screen does
however allow you to view the bank settings duō uses for EFT transactions.
Calibrate
Allows you to calibrate the touchpanel ensuring that a tap on the screen is
aligned with a button on the LCD.
Language
Use this to change language used. Note: duō will prompt to reboot for the
language change to be implemented.
Page 21
18
PINpad operation
The PINpad is tted with both a magnetic swipe card reader and EMV Chip card
accepter.
Note: Contactless payment facility is available as build level option.
Speak to your dealer or Quest Sales staff for more information.
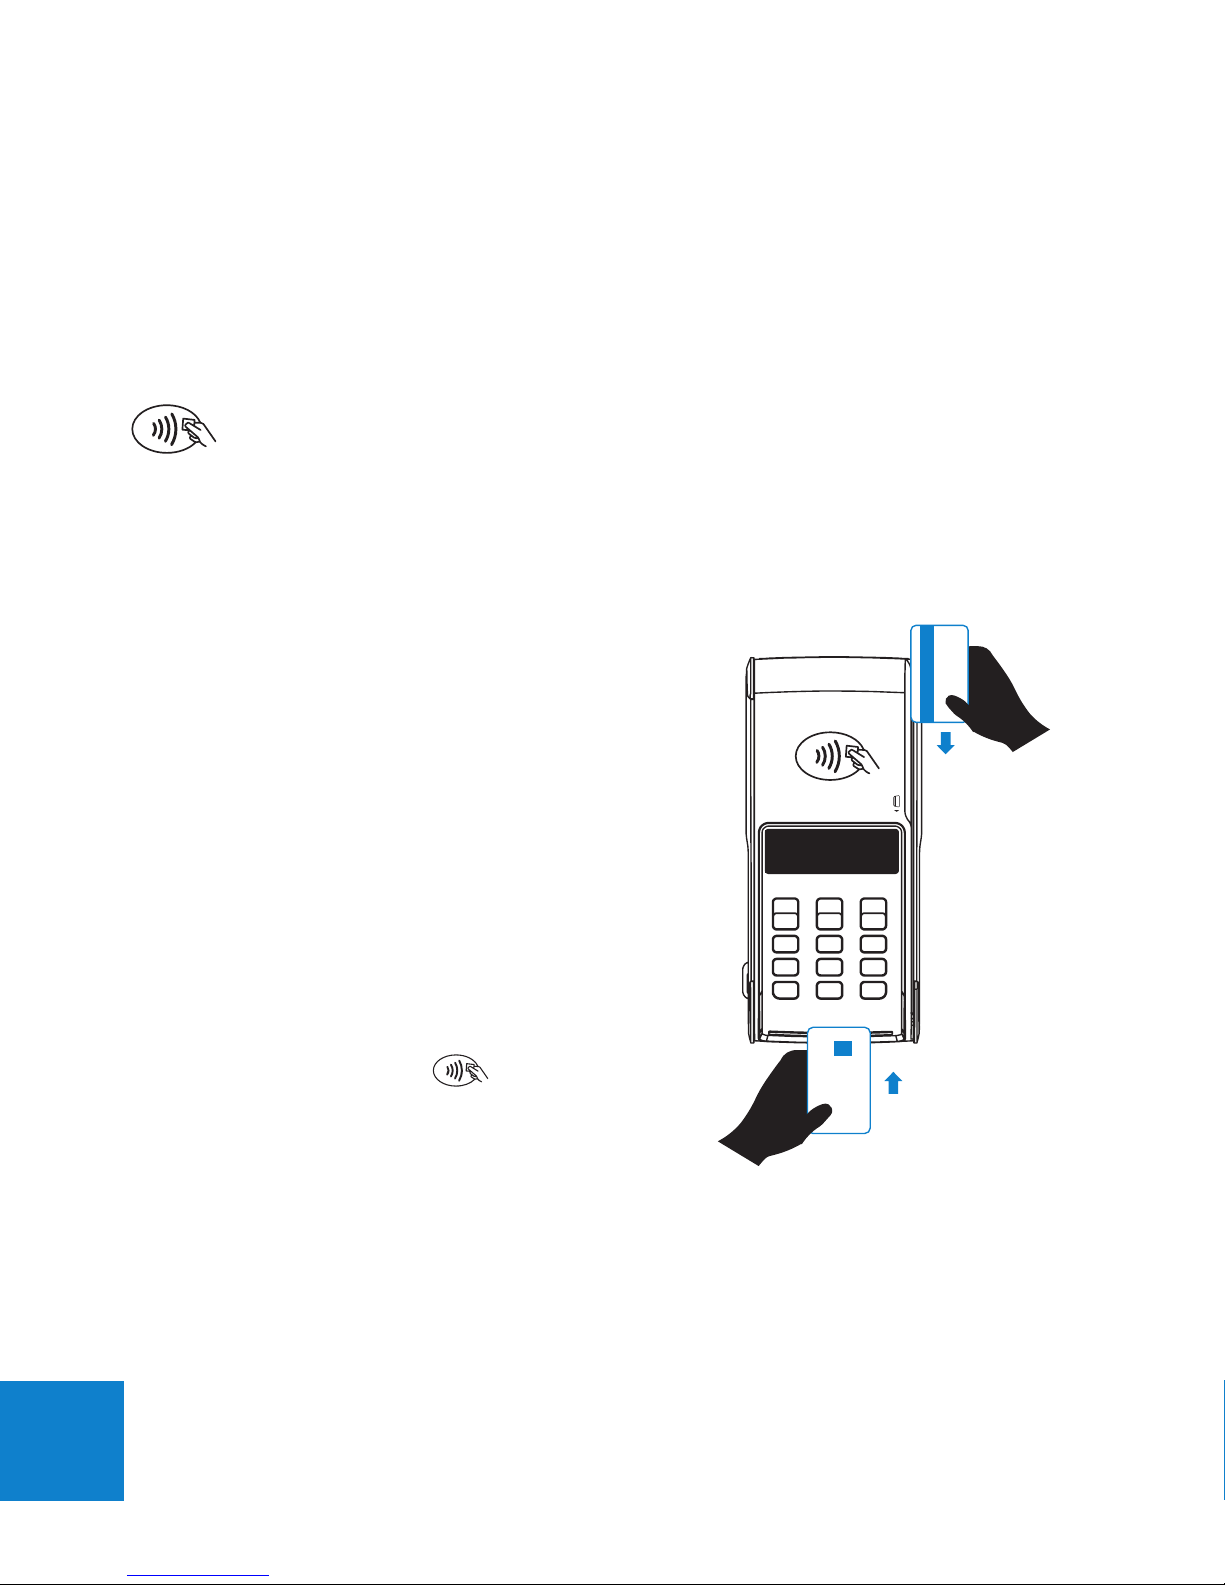
Magnetic swipe reader
Insert card into wide portion of channel with
strip facing inward. With one smooth motion,
swipe the card downwards. The PINpad
display will either prompt for account or if duō
detects a Chip Card was swiped, it will prompt
to insert the Card in the slot.
EMV Chip reader
If an EMV Chip card is presented by a
customer, insert it rst into the Slot. If there is
a problem reading the Chip, duō will prompt
to re-insert or swipe the card instead.
Contactless card reader
To pay with a Contactless enabled card, the
card should be presented to duō in close
proximity to the Contactless symbol located
above the PINpad LCD.
Page 22
19
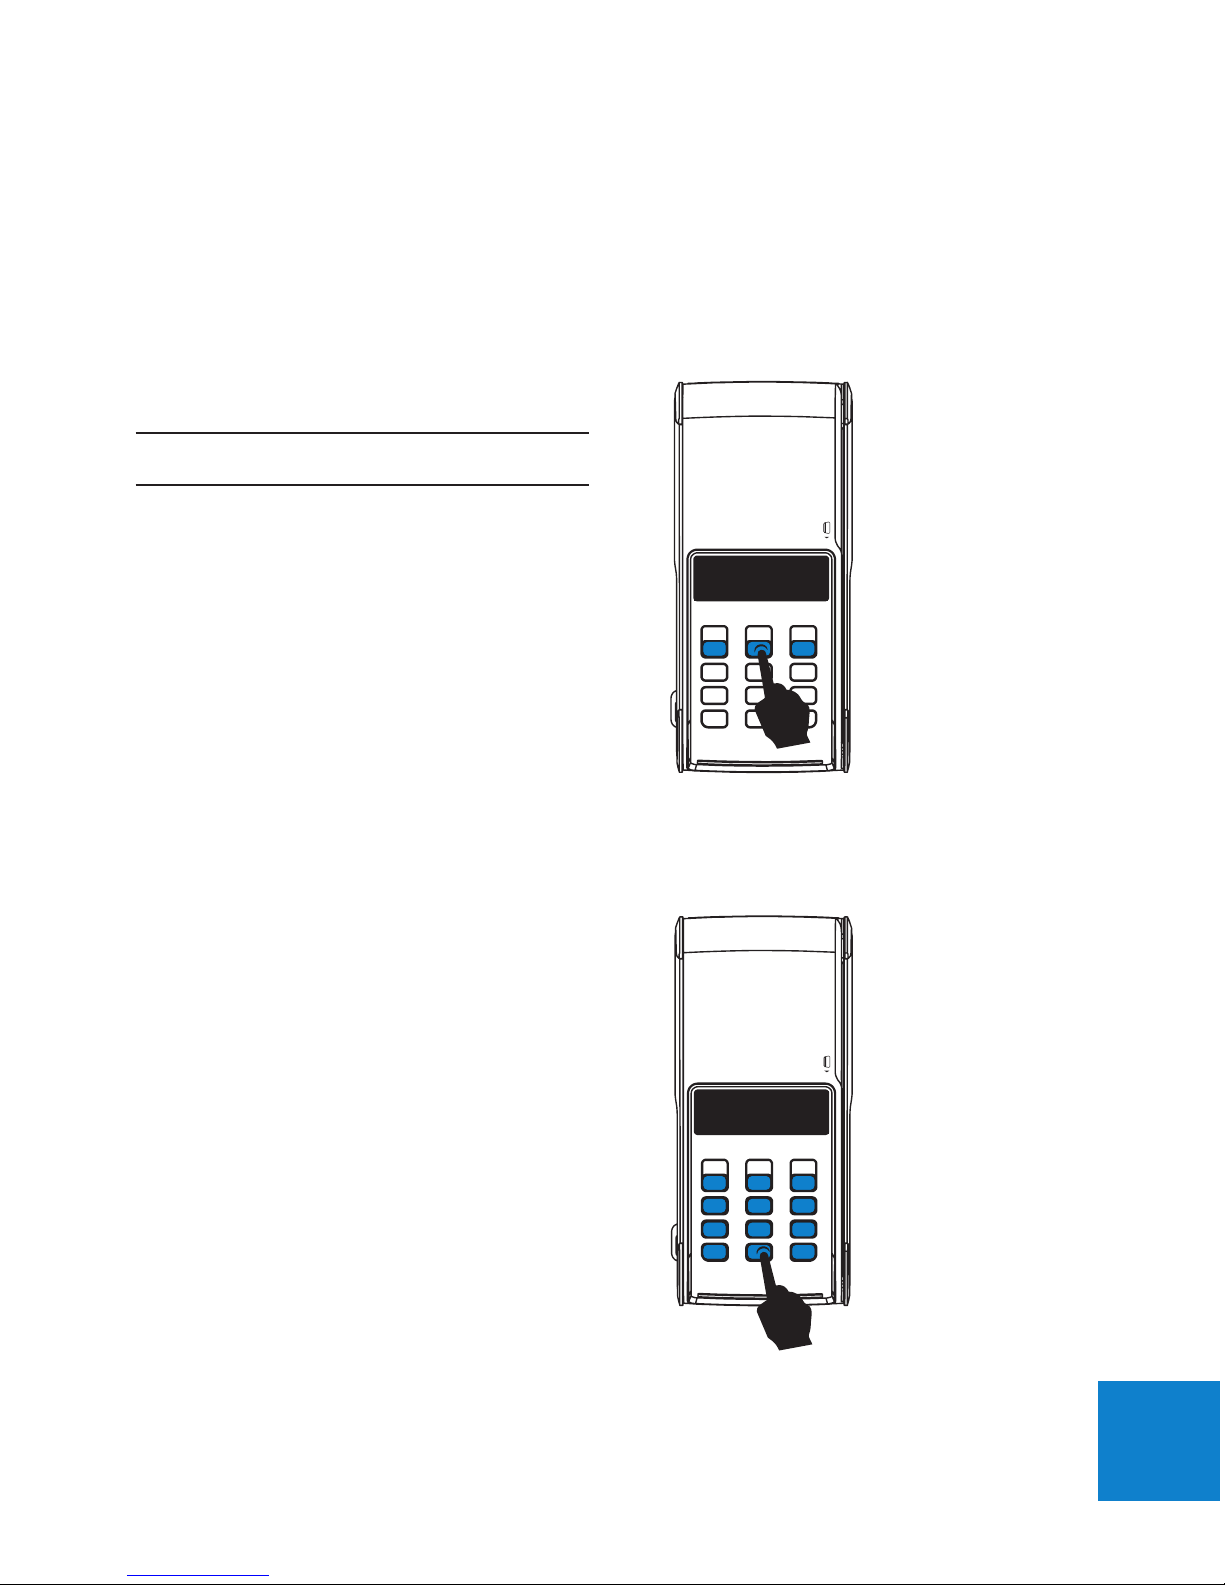
Account Selection
After swiping or inserting your card, you will be prompted to select an account.
Choose from the following:
Note: Account selection is not required
in some countries.
Entering PIN
To enter a Personal Identication Number (PIN), use the Numeric / Alpha keys on the
PINpad and press OK.
Enter PIN
****
Select Account
for CHEQUE account press ‘1’
for SAVINGS account press ‘2’
for CREDIT account press ‘3’
Page 23

20
Technical Specications
Size & Weight
• Dimensions: 78mm x 175mm x 29mm
• Weight: 400g (including Battery)
Operating Temperature
duō performs at its optimum in an ambient temperature of 0°C to +40°C.
POS Specications
• Processor: ARM9 (400MHz)
• Operating system: Microsoft Windows CE 6.0
• Memory: 128MB Flash, 128MB DDR SDRAM
• Expansion: Micro-SD card slot
• Display : Colour Transmissive TFT LCD, 4.3 inch, 480 x 272 pixels
• Touch panel: Resistive
• Interfaces
• Bluetooth: 2.1 + EDR (2.4GHz) Class 2
• WLAN: 802.11 b/g/n (2.4GHz)
• USB 2.0
• Barcode reader: 1D, Laser Class 2
• Power source: Li-Ion 2.3Ah Rechargeable Battery (Replaceable)
• 3G module (Build option):
• UMTS/HSPA 800, 850, 900, 1900 and 2100 MHz
• GPRS 900 and 1800 MHz
PINPAD Specications
• Processor: 32 Bit RISC (96MHz)
• Memory: 8MB Flash + 8MB SDRAM
• Display: Monochrome graphic LCD, 128 x 32 pixels, backlit
• Keypad: Numeric with 12 keys, backlit. ‘Never wear-out’ labelling
• Smart card reader: EMV Compliant
• Contactless (Build option): Works with ISO/IEC 14443 A & B cards
Page 24

21
Cleaning
Use the polishing cloth that came with duō to gently wipe the displays and the case
when required. You can also use a soft, slightly damp, lint-free micro bre cloth.
Turn off duō (press and hold the Power button) before cleaning.
To clean the scanner window
1. Dip the corner of a soft cloth in soapy water, or Isopropyl Alcohol (IPA) and
wring out the excess. Wipe the scanner window clean. Do not allow any
abrasive material to touch the window.
2. Wipe dry with a lint-free cloth.
Warning: Avoid getting moisture in openings. Do not
use window cleaners, household cleaners, aerosol
sprays, solvents, ammonia, or abrasives.
Page 25

22
Part name: Part Number:
duō Li-Ion Battery 270-0004-xx
duō Stylus 810-0009-xx
duō Wrist Lanyard (Long) 810-0012-xx
duō Wrist Lanyard (Short) 810-0011-xx
duō Carry Pouch 810-0010-xx
duō Recharge Cradle 320-0026-xx
duō USB door replacement Kit 335-0030-xx
Service & Support
For all duō Service and support, contact your agreed service provider. If you have a
service agreement with Quest:
Quest email: support@questps.com.au
Quest Support telephone: 03 8807 4444
When requesting support please have your duō serial number ready. It is located
under the Battery Access door on the side of duō.
The following table lists the available spare parts that can be ordered direct from
your Dealer or Quest.
Note: The standard hours of operation of the Quest Support Desk are 9.00am to
5:00pm (EST) Monday to Friday, excluding National and Victorian public holidays.
Page 26

23
Accessories available
Recharge Cradle
duōCradle contains charge contacts that connect directly
to the outside of duō. Simply drop in duo and walk
away. Because it’s so easy to use, duō will be charged
and ready to go all the time. The cradle has a separate
pocket for charging another battery. This is especially
convenient when you’re on the move and need to keep
duō running for another shift.
Multiple cradles can be joined together to provide a
neat array on the shelf or counter. A 12V Plug pack is
provided with the cradle.
Carry Pouch
This is a convenient method to store and protect duō
when not in use. The adjustable belt supplied in the kit,
can also be attached to the Pouch, keeping your hands
free to do other tasks. The Belt can assist in carrying a
wireless printer if required.
Bluetooth Printer
Bluetooth printers tested and recommended by Quest
are available for purchase. Contact Quest Payment
Systems or your authorised dealer for more information.
Page 27

24
Software Development Kits
Software Development Kits allow developers the ability to customise the
application/s running on duō to the specic needs of the business. Quest have
developed three Kits, SnapRetail, SnapHospitality & duōApplication. Contact your
Dealer or the Quest Sales team on email: duosales@questps.com.au
SnapRetail SDK
The duōRetail SDK allows retailers who don’t have a mobile version of their existing
Point of Sale to quickly integrate duō into their system. Designed for the Retail
market, duōRetail SDK allows full use of all hardware features, including Barcode
scanner & PINPad.
• No Windows CE knowledge or development required.
• Fast POS integration using PC based duōBridge POS plug-in architecture.
• Full sample source to get you up and running quickly.
• duō simulator included to enable rapid development.
• Support for Windows and Linux.
SnapHospitality SDK
The duōHospitality SDK allows Restaurants who don’t have a mobile version of their
existing Point of Sale to quickly integrate duō into their system. Features such as
Table management, menu management, kitchen printing, tipping & surcharging can
be fully integrated with your POS.
• No Windows CE knowledge or development required.
• Fast POS integration using PC based duōBridge POS plug-in architecture.
• Full sample source to get you up and running quickly.
• duō simulator included to enable rapid development.
• Support for Windows and Linux.
Page 28

25
duōApplication SDK
The duōApplication SDK allows porting of existing mobile applications to duo, or for
creating totally new applications.
• Windows CE 6 application development environment.
• Supports Microsoft Windows CE 6 API functions and .NET compact
framework 3.5
• Includes library functions to access duō hardware
(scanner, home button, vibrator, Bluetooth printing)
• Simple EFTPOS interface for performing payments.
• Integrate your applications into the duo Application Launcher with custom
icons & button text.
• duō Emulator included for PC based development of duo applications and
source level debugging.
Page 29

26
Declaration of Conformity
duō complies with the following standards:
1. PCI PIN Transaction Security Device Requirements PED v2.x (Security
requirements for payment terminals deployed internationally)
2. APCA CECS security requirements (Security requirements for payment
terminals deployed in Australia)
3. EMV 2000 Integrated Circuit Card – Specications for Payment Systems –
Version 4.0, December 2000. (Requirements for payment terminals that accept
chip & PIN cards)
4. AS/NZS CISPR22:2006. (EMC compatibility requirements)
5. Radio-communications (Electromagnetic Radiation-Human Exposure)
Standard 2003.
6. IEC/EN60825-1: 2007 (2nd Edition) Class 2. (Requirements for equipment with
Laser Emitters)
Page 30

27
Important SAR Information
duō is a radio transmitter and receiver. Specic absorption rate (SAR) is a measure
of the rate at which energy is absorbed by the body when exposed to a radio
frequency (RF) electromagnetic eld. duō is designed and manufactured not to
exceed the emission limits for exposure to radio frequency (RF) energy. These limits
are part of comprehensive guidelines and establish permitted levels of RF energy for
the general population. The guidelines are based on standards that were developed
by independent scientic organisations through periodic and thorough evaluation
of scientic studies. The standards include a substantial safety margin designed to
assure the safety of all persons, regardless of age and health.
Body-worn Operation.
duō was tested for typical body-worn operations. Third-party belt-clips, holsters, and
similar accessories used by this device should not contain any metallic components.
Body-worn accessories that do not meet these requirements may not comply with
RF exposure requirements and should be avoided. The genuine duō waist bag is
available for purchase as an accessory.
Page 31

28
Stolen devices
If your duō gets stolen, please call the Quest support team immediately for remote
deactivation. Ph +61 3 8807 4444. Acting promptly will help to reduce potential
fraud.
End of Life requirement
At end of life, your duō must be returned to Quest Payment Systems for secure
disposal. duō contains sensitive bank details. Contact Quest support team to arrange
for duō to be returned and disposed of securely.
Send hardware returns to:
Quest Payment Systems Pty Ltd
Service Centre
227 Burwood Road
Hawthorn VIC 3122
AUSTRALIA
Page 32

29
Hardware Warranty
Quest Payment Systems (Quest) hardware products are warranted against
defects caused by faulty workmanship and materials for twelve (12) months from
the date of shipment for new products, and three (3) months from the date of
repair for refurbished or repaired products.
To the extent permitted by law, the warranty excludes defects caused by the
products not being used in accordance with instructions, accidental damage,
damage caused by external forces, liquids damage, misuse, security tamper
activation, fair wear and tear, or repair or attempted repair by unauthorised
persons.
This warranty is provided on a return to depot basis, and freight and insurance
charges to and from the Quest Service Centre are not included.
All other warranties are hereby excluded. To the extent that such warranties
cannot be excluded they are included but the liability of Quest for the breach
of same is limited to, at the option of Quest, the repair or, replacement of the
hardware product, the supply of an equivalent hardware product or the payment
of the costs of replacing or repairing the hardware product.
Page 33

30
Software License & Warranty Agreement
LICENSE: Quest grants the licensee a non-exclusive license to use the Software in this package
on one (1) computer node, upon payment of an agreed fee. Quest retains title to and
ownership of this copy and all backup copies and all intellectual property rights related to the
Software. You may make copies of the Software for backup purposes. You may not copy
the relevant documentation, make alterations or modications to the Software, or attempt
to discover the source code of the Software. The software may not be sub-licensed, rented,
or leased. Both the license and your right to use the Software terminate automatically if you
violate any part of this agreement. In the event of termination, you must immediately destroy
all copies of the Software or return them to Quest. Quest may from time to time in its sole
discretion supply updates.
LIMITED SOFTWARE WARRANTY: If you discover defects in the media on which the software
is distributed or in the documentation, Quest will replace the media or documentation for
a period of ninety (90) days after purchase. You must return the disk or documentation to
Quest within the warranty period, accompanied by proof of purchase.
Quest disclaims all implied warranties, including without limitation warranties or merchantability,
performance, and tness for a particular purpose. Quest will not be liable for any bug, error,
omission, defect, deciency, or non conformity in any of the Software. As a result, the Software
is sold “as is” and the purchaser assumes the entire risk as to its quality and performance. To
the extent that such warranties cannot be excluded they are included but the liability of Quest
for the breach of same is limited to, at the option of Quest, re-supply or the costs of re-supply.
LIMITATION OF LIABILITY: Quest shall in no event be liable for direct, indirect, incidental,
contingent, or consequential damages resulting from any defect in the Software or its
documentation, including damages from loss of data, down-time, goodwill, damage to or
replacement of equipment or property, and any costs of recovering, reprogramming, or
reproducing any data or programme used in conjunction with Quest products.
The laws of the State of Victoria, Australia shall govern this agreement.
Page 34

Quest Payment Systems © 2013
All rights reserved.
Quest Payment Systems, the Quest logo, duō, SnapRetail,
SnapHospitality, duōDesktop are trademarks of Quest
Payment Systems, registered in Australia and other countries.
Other company and product names mentioned herein may
be trademarks of their respective companies. Mention of
third-party products is for informational purposes only and
constitutes neither an endorsement nor a recommendation.
Quest assumes no responsibility with regard to the
performance or use of these products. Every effort has been
made to ensure that the information in this manual is accurate.
Quest is not responsible for printing or clerical errors. Reverse
engineering or disassembly is prohibited.
789-0007-02
227 Burwood Road
Hawthorn VIC 3122
AUSTRALIA
support@questps.com.au
duosales@questps.com.au
www.questpaymentsystems.com
Support Email:
Sales Email:
Website:
+61 3 8807 4400
+61 3 8807 4444
+61 3 8807 4411
Ofce Telephone:
Support Telephone:
Ofce Fax:
 Loading...