

Page 1

User manual
This product fulfils all safety requirements of the
European standard for bicycles and bicycle trailers
(DIN EN 15918).
EN
Sportrex2 – Q6000A
Page 2

2 – 02|2016 – Subject to change. Sportrex2 – Q6000A
Certificates
The Sportrex2 has been tested and approved in accordance with the European Safety Standard
EN 15918. It also fulfils all emissions limit values laid down in accordance with Part 3 of the toy
safety standard EN 71.
Documentation
The statements in this documentation are not to be interpreted as an assurance of
particular product properties. Despite the greatest care being taken to avoid technical
inaccuracies or omissions, the possibility of these arising cannot be entirely excluded.
When necessary, individual items of information can be changed quickly and without
special notification.
This documentation can be ordered from Qeridoo GmbH in other languages, or is available for
download on our website if already available.
Visit us at: www.qeridoo.com
Copyright
All rights to the documentation remain with Qeridoo GmbH.
Texts, values and illustrations may not be reproduced, distributed, used for competitive purposes
or passed on to others. If other product names are used in this documentation, these must
normally be regarded as registered trademarks of the respective manufacturer.
Page 3

Introduction 4
Proper use 4
Performance limits 4
Notes on the user manual 5
Safety instructions 6
Users 6
Conditions of use 6
Passengers 7
Towing vehicle (Trailer mode) 7
Maintenance and storage 7
Cycling with a trailer 8
Additional lanes 8
Additional weight 8
Defensive riding 8
Product overview 9
Scope of delivery 9
Components and control elements 10
Side view 10
Rear view 11
Accessories 12
Assembly 13
Unfolding the cabin 13
Inserting the wheels 14
Fitting the wheel guard 14
Mounting the push handle 15
Tightening the backrest 16
Inserting the pennant 16
Optional assembly steps 17
Installing the buggy wheel 17
Mounting the tow bar 17
Mounting the coupler onto a bicycle 18
Utilisation 20
Applying the parking brake 20
Adjusting the push handle 20
Setting the mode 21
Adjusting the buggy wheel 21
Folding the tow bar in or out 22
Using the pennant 22
Folding up the push handle 22
Attaching the hand strap 22
Putting on the 5-point safety harness 22
Securing the load 22
Loading the baggage 22
Adjusting the safety harnesses 23
Embarking the children 23
Fastening in a child 24
Checking the weight distribution and
tow bar load 25
Connecting the trailer to a bicycle 26
Using the comfort functions 26
Using the climate functions 26
Adjusting the tilt of the backrest 28
Adjusting the suspension 28
Storage 29
Care and maintenance 30
Care 30
After every use 30
After use in harsh weather conditions 30
When not in use 30
Maintenance intervals 31
Before every ride 31
Monthly (or every 200 km) 31
Semi-annually (or every 500 km) 31
Every three years (or every 3000 km) 31
Appendix 32
Technical data 32
Warranty terms 33
Support information 33
Spare parts 34
Sportrex2 – Q6000A Subject to change. – 02|2016 – 3
Contents
Page 4

4 – 02|2016 – Subject to change. Sportrex2 – Q6000A
Introduction
Proper use
The Sportrex2 was designed as a bicycle trailer and comes with an additional buggy and walker
function. For Trailer mode, use a tow bar with coupler to connect the trailer to a suitable towing
vehicle (bicycle or motorised pedelec with a maximum speed of 25 km/h). With the buggy wheel
attached, the Sportrex2 can be used as a child carrier in Buggy mode. In Walker mode you can
use it when jogging or walking.
The Sportrex2 is for private transport only, carrying up to 2 children on paved routes. You can also
carry baggage in the compartments intended for that purpose, provided that you observe the
permissible weight limits and stow the baggage securely so that the load is evenly distributed.
During the journey, each child must be secured in the seat by a safety harness. If you are carrying
only one child, you must alter the harness arrangement as per the instructions in the chapter
“Adjusting the safety harnesses” on page 23 so that the child is seated securely in the centre.
The Sportrex2 fulfils all safety requirements of the European standard for bicycles and bicycle
trailers (DIN EN 15918). Use as a bicycle trailer is permitted in darkness or in conditions of poor
visibility only if a rear light conforming to the road traffic regulations has been retrofitted to the
back of the trailer.
It must not be used on unsurfaced ground, to transport baggage in the passenger compartment,
to carry animals or for commercial use. It is essential to observe the limit values specified in the
chapter “Performance limits” on page 4 and to check them before every journey. In all cases,
the rider of the combination or the person using it in Buggy or Walker mode is responsible for the
proper use and roadworthiness of the Sportrex2.
Performance limits
The Sportrex2 can only be safely used if you observe and adhere to the following performance
limits in every mode:
Requirements for passengers
Weights
Permissible total weight
(Sportrex2 + children + luggage)
60 kg
Maximum weight per child 18 kg
Age
Minimum age (without baby seat)
The child must be able to sit up independently. For children
aged up to 18 months, we recommend using a comfort insert,
see “Accessories” on page 12.
12 months
Minimum age (with baby seat) 1 month
Maximum age 6 years
Size
Maximum height 117 cm
Requirements for baggage
Storage space (behind the seats) 5 kg
Pouch for small items (under the push handle) 2 kg
Page 5

Sportrex2 – Q6000A Subject to change. – 02|2016 – 5
Introduction
The following additional restrictions apply to Trailer mode:
Requirements for the tow bar
Permissible tow bar load range (on the coupler pocket) 3 – 8 kg
Requirements for the towing vehicle
Vehicle type Bicycle (also recumbent bicycle), pedelec
(supported for up to 25 km/h)
Maximum permissible speed 25 km/h; in curves max. 7 km/h (walking
pace)
Rear wheel size 20" – 29"
Notes on the user manual
This user manual provides you with information about all technical and safety aspects that you
require for mounting, using and maintaining the Sportrex2.
f Read the user manual in full.
f Utilise the user manual to provide instruction for all users.
f Always keep the user manual close to the Sportrex2.
The following typographical elements are employed in the user manual to indicate the possible
danger sources or special information:
Danger!
Identifies notices pertaining to the Danger risk level. Indicates possible dangers that
can result in injury if the instructions are not followed.
Caution!
Identifies notices pertaining to the Caution risk level. Indicates possible dangers that
can result in material damage if the instructions are not followed.
Tip!
Identifies important information pertaining to the current subject. Indicates
alternative actions, other information sources or helpful tips.
All stated positions (left, right, front, back, top, bottom etc.) refer to the perspective of a viewer
standing behind the push handle and looking in the direction of travel. The tow bar is therefore in
front, the push handle behind.
In this user manual, the word user refers to the person transporting children with the Sportrex2
and making the necessary adjustments on the vehicle.
Page 6

6 – 02|2016 – Subject to change. Sportrex2 – Q6000A
Safety instructions
Danger!
Read the safely instructions below carefully.
The safety and accident prevention regulations valid in your region and statutory rules
such as the road traffic regulations also apply, and take precedence in cases where
there is doubt.
Make sure that the Sportrex2 is used only by suitable persons, as defined below. Users
must have read and understood this user manual in full.
Caution!
The Sportrex2 is not a toy and must not be misused as such. This means that it is not
permissible to attach the Sportrex2 to a child’s bicycle.
Users
Users are defined as the following persons:
– Any person carrying out assembly work on the vehicle or changing the settings.
– The rider of the towing vehicle in Trailer mode.
– The operator in Buggy or Walker mode.
The user must be at least 16 years old and mentally mature enough to operate the Sportrex2
and transport children.
In Buggy mode, operation by a younger person is allowed if he/she is supervised by a person
who meets the requirements stated above.
The user is at all times responsible for the proper use and roadworthiness of the Sportrex2.
Conditions of use
The Sportrex2 must not be used for commercial or competitive purposes.
Before every journey, check that the Sportrex2 is in a proper and technically faultless
condition. Perform a visual inspection and in particular pay attention to the instructions and
checklists in the chapter “Maintenance intervals” on page 31.
Also inform yourself about country-specific rules and traffic regulations if you are making trips
across borders or if you want to take the Sportrex2 with you on trips abroad.
Before every journey, make sure that the requirements for the particular mode have been
fulfilled. In particular, pay attention to the table and the instructions in the chapter “Setting
the mode” on page 21.
In Trailer mode, a rear light conforming to the road traffic regulations must be retrofitted to
the back of the trailer for journeys in darkness or conditions of poor visibility.
Before every journey, close the inner part of the 2-in-1 canopy so that the integrated insect
net protects the children from insects and small stones. When in traffic, the weather canopy
should also be closed and the ventilation window open to provide protection against exhaust
fumes.
Page 7

Sportrex2 – Q6000A Subject to change. – 02|2016 – 7
Safety instructions
Passengers
The Sportrex2 can carry up to two children aged between 1 month and 6 years. Special
accessories must be used in order to secure children who are under 12 months old or who
cannot sit upright independently, see “Accessories” on page 12.
So that they have sufficient headroom in all situations, the children must not be taller than
117 cm.
Each child must be properly fastened in with a 5-point safety harness.
The children must wear bicycle helmets for every journey. This is also recommended for the
bicycle rider in Trailer mode in order to set a good example.
Before each journey, explain to the children that they must behave appropriately. Undoing
safety harnesses, excessive rocking or leaning out must be strictly forbidden.
Make sure that the cabin is well ventilated and make sure that the children are wearing clothes
appropriate for the weather conditions and the cabin’s inside temperature.
Never leave children unsupervised in the Sportrex2 and make sure that they feel comfortable.
Make regular stops during longer journeys to give the children the opportunity to get out and
move around. Make sure that they drink sufficient liquids.
Towing vehicle (Trailer mode)
As the towing vehicle, it is not permitted to use vehicles that must be registered such
as motorised e-bikes for speeds up to 45 km/h (known as S-pedelecs) or vehicles with a
combustion engine.
The bicycle or the pedelec (motorised for speeds up to 25 km/h) must be technically sound
and suitable for towing loads up to 60 kg. For details, read the towing vehicle’s manual or
consult a specialist dealer for a suitable inspection to be carried out.
Before every journey, test the function of the bicycle’s brakes, brake linings and tyres and
inspect them for wear. Check that the coupler is secure.
For carrying passengers, the bicycle should be equipped with a rear-view mirror. Working lights
conforming to the road traffic regulations are mandatory for journeys in darkness or conditions
of poor visibility.
Maintenance and storage
Follow all instructions relating to the care and maintenance of the Sportrex2 and observe the
specified maintenance intervals, see “Care and maintenance” on page 30.
Use only original accessories and spare parts manufactured or recommended by Qeridoo.
Using other products relieves the manufacturer of liability.
Do not make any structural modifications or extensions to the vehicle. Any manipulation that is
not expressly approved by the manufacturer in writing relieves the manufacturer of liability in
the event of accidents and defects.
Follow the instructions in the chapter “Storage” on page 29 for storing the Sportrex2
properly when it is not in use.
Page 8

8 – 02|2016 – Subject to change. Sportrex2 – Q6000A
Safety instructions
Cycling with a trailer
The way in which the bicycle moves changes significantly when it is pulling a trailer, and this is
particularly noticeable when braking and cornering. With regard to this, pay attention to the
following:
Practice cycling with the trailer before going out onto the road.
Do not carry children until you have familiarised yourself with the different riding behaviour
on suitable terrain.
Think of the children’s safety whenever you ride. Always adapt your way of riding and your
speed to local conditions, and never forget that you are towing a trailer.
Additional lanes
The two wheels of the Sportrex2 run outside the familiar cycling lane. On all routes,
particularly when there are obstacles and potholes, remember that you will always need
3 suitable lanes for safe riding.
The Sportrex2 is 85 cm wide. Maintain a sufficient distance from obstacles and avoid routes
that are too narrow. Always negotiate narrow points and bends slowly.
Combined, the bicycle and trailer are at least 2.5 m long in total. Negotiate curves with wider
radii than usual and bear in mind the additional lane required for the inner wheel of the
Sportrex2.
Additional weight
When fully loaded, the Sportrex2 weighs up to 60 kg that in addition to its own weight and
that of the rider, the bicycle must pull, brake and keep on track:
– Jerky pulling and braking puts high loads on the coupler and tow bar, and thereby increases
wear.
– All stopping distances are much longer when braking, and the stress on the brake linings
is correspondingly greater. The stopping distance is further increased on wet surfaces and
downhill slopes.
– During braking, especially on bends, the trailer can swing out or push the bicycle’s rear
wheel to the side and reduce its traction.
– High centrifugal force on bends can result in the trailer tipping over.
Do not exceed the maximum permitted speed of 25 km/h and avoid riding at an angle.
Negotiate bends no faster than at walking pace (max. 7 km/h) in order to prevent excessive
centrifugal forces.
Defensive riding
Always ride defensively and with foresight.
Brake in good time before reaching bends, junctions, obstacles etc.
Always negotiate curbs and uneven surfaces slowly. Keep away from steps, escalators and very
steep stretches.
Page 9

Sportrex2 – Q6000A Subject to change. – 02|2016 – 9
Product overview
Scope of delivery
The scope of delivery includes some functional units of the Sportrex2 already preassembled.
f Unpack all supplied parts and place these on a clean surface.
f Check the contents of the package against the list provided.
Caution!
Contact our Service department immediately if any parts are missing or if you find that
the packaging or product is damaged, see “Support information” on page 33.
f Remove the packaging material and all protective caps, and dispose of them in accordance
with the environmental guidelines that apply in your region.
f Read the chapter “Assembly” on page 16 before you assemble parts.
1 Pennant with 2-part pennant staff and
centre piece
2 Tow bar with coupler and retaining strap
3 Push handle with hand strap
4 2 stabiliser tubes for the side panels
5 Cabin with seats and 5-point safety
harnesses
6 Wheel guard (2x)
7 2 wheels (20" with push-in axle and
2 reflectors on each)
8 2 head rests
9 Buggy wheel (in 2 parts with quick-release
clamp)
Page 10

10 – 02|2016 – Subject to change. Sportrex2 – Q6000A
Components and control elements
Side view
1 Cabin (frame made from aluminium tubes
with weatherproof fabric cover)
2 2-in-1 canopy to protect against insects
and rain, can be rolled up
3 Sun visor, removable
4 Side window
5 Seat with 5-point safety harnesses and
head rests
6 Axle suspension
7 20" wheel with push-in axle
8 Spoke reflector, orange
9 Air valve (Schrader valve)
10 Wheel guard for deflecting obstacles
11 Tow bar holder on the cabin frame with
cotter pin fastening
12 Tow bar for Trailer mode
13 Coupler pocket with cotter pin fastening
and impact damper, also retaining strap
for securing the tow bar on the bicycle
frame
14 Buggy wheel for three-wheel use in Buggy
or Walker mode
15 Mode switch:
Buggy mode: Wheel turnable
Walker mode: Wheel running straight
Trailer mode: Buggy wheel removed
16 Wheel mount on the cabin frame
17 Front reflector, white
Product overview
Page 11

Sportrex2 – Q6000A Subject to change. – 02|2016 – 11
Product overview
Components and control elements
Rear view
1 Star grip screw with tube clamp for
securing the push handle
2 Variable-height push handle (incl. hand
strap for Buggy and Walker mode); safety
function as roll-bar
3 Pushbutton for adjusting the height of the
push handle
4 Ventilation window, can be rolled up
5 Pouch for small items, for max. 2 kg
baggage
6 Reflective seams in the fabric cover
7 Rear reflector, red
8 Parking brake
9 Rubber cap for push-in axle release when
mounting the wheels
10 Beverage holder in the cabin’s foot space
11 Storage space behind the seats, accessible
from the outside (max. 5 kg baggage)
12 Pennant pouch for holding the pennant
staff
Page 12

12 – 02|2016 – Subject to change. Sportrex2 – Q6000A
Product overview
Accessories
Using the accessories listed here, you can extend your Sportrex2 and optimally adapt it to suit
your needs and the age of your children:
Coupler
Art. no.: K-587K
Rear light, battery operated
Art. no.: FK589
Jogger air wheel with hand brake
Art. no.: 8956-14
Baby seat
Art. no.: 12578
Baby seat, variable-length
Art. no.: BS.04.013.00
Comfort insert
Art. no.: S-58697
Seat cushion
Art. no.: SI-656
Rain cover
Art. no.: 02133
Folding garage
Art. no.: 035689
You can find our current list of dealers on the Internet at:
http://www.qeridoo.com/index.php/en/haendlersuche-english
Page 13

Sportrex2 – Q6000A Subject to change. – 02|2016 – 13
Assembly
Below you can read all the information that you will need to assemble your Sportrex2 properly.
f Make sure that you have sufficient space to assemble it.
Also pay attention to the door width at the place of installation: The Sportrex2 is 85 cm wide
with the wheel guards fitted.
f Have a size 4 Allen key to hand (not supplied).
f Perform each of the instructions step by step.
f If necessary, follow the QR code to call up a video about
assembly and operation on the Internet. Using the Sportrex1
as an example, the video shows a few functions that also
apply to the Sportrex2:
Danger!
Never perform assembly work if there are children in the cabin. Keep children away
from the vehicle during assembly.
When handling moving components, make sure that your hands or fingers do not get
trapped.
Unfolding the cabin
f Place the collapsed cabin in the assembly area.
f Position yourself behind the cabin.
f Pull both sides of the rear cabin frame all the way up.
f Open the storage space cover.
f Pull the rear frame rod assembly evenly back until
it engages audibly.
f Push the stabiliser tubes from behind into the two
slots in the side panels. These are located under the
windows.
Page 14

14 – 02|2016 – Subject to change. Sportrex2 – Q6000A
Inserting the wheels
f Place the cabin on one side to allow the wheel to be inserted more easily.
f Insert one wheel into the cabin’s axle retainer:
– Hold the wheel so that you can press your thumb
onto the rubber cap on the outside of the wheel
hub.
– Press on the rubber cap and keep it pressed in
order to open the push-in axle fastening.
– Insert the wheel’s push-in axle as far as it will go
into the axle retainer.
– Release the rubber cap to secure the push-in axle.
f Pull on the wheel to check that the wheel is locked in
the axle retainer.
f Turn the cabin onto its other side and insert the
second wheel in the same way.
Danger!
After mounting the wheels, secure the Sportrex2 whenever you park it so as to
prevent it from rolling away, see “Applying the parking brake” on page 20.
f Check whether there is sufficient air in the wheels (recommended air pressure: 1.7 – 2.4 bar).
If necessary, use an air pump for car valves to top up with air.
Fitting the wheel guard
The wheel guard on both sides of the cabin prevents the wheels from getting stuck on pillars
or similar obstacles.
f Tilt back the cabin and place it on its reverse side. This makes the lower cabin frame accessible
for assembly.
f Prepare the wheel guard by removing the two prefitted screws from the holes.
f Hold the wheel guard close to the wheel against
the cabin frame so that the following conditions are
fulfilled:
– The holes on the wheel guard face the holes in the
cabin frame tube.
– The curved outside of the wheel guard widens
towards the wheel.
Assembly
Page 15
Sportrex2 – Q6000A Subject to change. – 02|2016 – 15
f Insert a screw through the tube into a hole in the wheel guard.
f Loosely screw the self-locking nut onto the thread. When doing this, make sure that the
circular side of the nut is not against the thread.
f Connect the second screw in the same way.
f Use a size 4 Allen key to alternately tighten both screw connections (tightening torque
max. 4 Nm).
f Mount the second wheel guard in the same way for the other wheel.
Mounting the push handle
The push handle is secured to the top of the cabin frame with two robust tube clamps. It has
multiple height settings and is used for pushing, pulling and manoeuvring your Sportrex2. And if it
becomes necessary, it performs an important safety function as a roll-bar.
f Prepare the push handle by fully unfolding it. To do this, keep the light grey pushbuttons
pressed on both sides, see “Adjusting the push handle” on page 20.
f Position yourself behind the upright cabin.
f Loosen the two star grip screws at the bottom end of
the push handle to enable the tube clamps to be easily
pushed onto the tubes of the cabin frame.
f With both tube clamps, hold the push handle on
the tubes of the upper cabin frame. Two recesses in
the cover (next to the ventilation window) show the
intended mounting position.
f Attach the tube clamps in turn onto the cabin frame
tubes by applying gentle pressure. Secure them by
partly tightening the star grip screws.
f Align the push handle horizontally by pushing the tube
clamps all the way up at the same height.
f Securely tighten the star grip screws in order to fix the
tube clamps to the cabin frame.
Danger!
Make sure that the push handle is also mounted for every journey in Trailer mode.
Only then does the cabin have a roll-bar.
Assembly
Page 16

16 – 02|2016 – Subject to change. Sportrex2 – Q6000A
Assembly
Tightening the backrest
The stable backrest is an important safety element. The straps underneath and behind the cabin
must always be tightened for a secure hold.
f Tilt back the cabin and place it on its reverse side. This
makes the lower cabin frame accessible for assembly.
f Tighten the two harnesses so that the backrest is
fixed.
f Secure the straps using the buckles:
– In each case, thread the end of the strap into the
buckle as shown.
– It is essential to check that the two buckles are
secure.
f Put the cabin into the upright position and open the
storage space cover.
f Pull the harnesses that are tensioned around the
upper crossbar so that a clearance of approx. 2 cm
remains between the crossbar and the backrest.
Inserting the pennant
Danger!
The pennant must always be mounted in Trailer mode. Otherwise the very low
Sportrex2 is too easily not seen by other road users.
For safety reasons, we recommend putting the pennant into the pennant pouch so
that it is easily visible before every journey, including in Buggy or Walker mode.
f Using the connecting piece, insert the pennant staff
into the extension rod.
f Insert the extended pennant staff into the pennant
pouch on the outer left side.
f Unroll the pennant so that it can fly clearly visible on
the pennant staff.
Page 17

Sportrex2 – Q6000A Subject to change. – 02|2016 – 17
Assembly
Optional assembly steps
Installing the buggy wheel
You need the buggy wheel for Buggy and Walker mode. It consists of two components:
The wheel suspension is fitted to the wheel mount of the cabin frame by means of a quick-
release clamp.
The wheel itself is inserted into the wheel suspension and is mounted so that it can rotate
through 360°. The mode switch at the front enables you to optionally remove or lock the
wheel.
f Tilt back the cabin and place it on its reverse side. This
makes the lower cabin frame accessible for assembly.
f Release the quick-release clamp of the wheel
suspension.
f Push the wheel suspension as far as it will go into the
cabin frame’s wheel mount.
f Secure the connection with the quick-release clamp.
f Check whether there is sufficient air in the buggy wheel (maximum air pressure: 2 bar).
If necessary, use an air pump for car valves to top up with air.
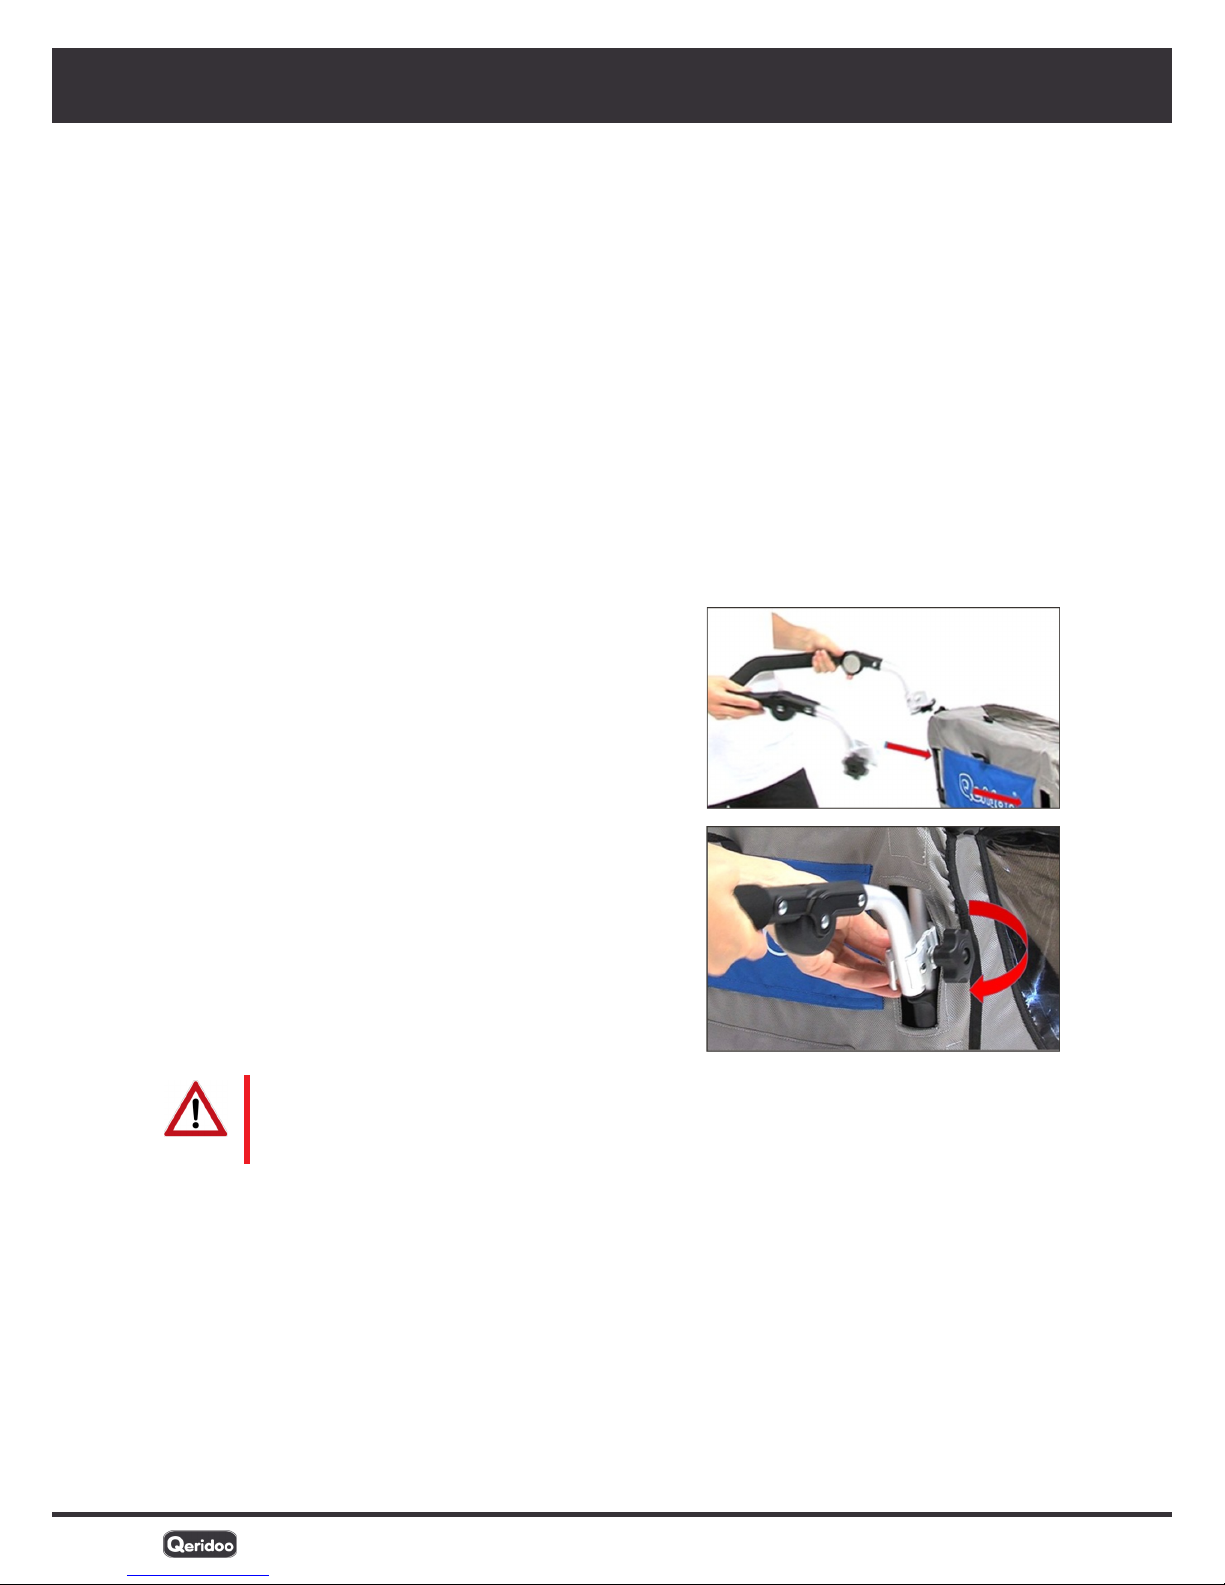
Mounting the tow bar
You only require the tow bar in Trailer mode. It is used to hook up the Sportrex2 behind a bicycle
equipped with a suitable coupler, see “Connecting the trailer to a bicycle” on page 26.
The tow bar is screwed into the tow bar mount with a screw and a star grip nut and can be folded
into two different positions:
Attachment position: The tow bar is facing forwards.
Standby position: The tow bar is facing to the rear and is carried under the cabin floor.
In both positions, the tow bar is also secured with a cotter pin.
f Tilt back the cabin and place it on its reverse side. This makes the tow bar mount on the lower
cabin frame accessible for assembly.
f Loosen the star grip nut and remove the washer, the spring lock washer and the screw from
the tow bar mount.
f Remove the retaining cotter pin from the tow bar.
f Hold the tow bar on the tow bar mount so that the
following conditions are fulfilled:
– The curve of the tow bar faces inwards.
– The holes in the tow bar mount and tow bar are
precisely aligned with each other.
f Insert the screw from the inside through the holes in
the tow bar mount and tow bar.
f Place the spring lock washer and the washer on the outside onto the screw and screw the star
grip nut loosely into the thread.
Page 18

18 – 02|2016 – Subject to change. Sportrex2 – Q6000A
Assembly
f Fold the tow bar into the desired position.
f Lock the tow bar in the front or rear hole of the tow
bar mount by pushing through the cotter pin and
folding closed the securing bracket.
f Tighten the star grip nut in order to securely connect
the tow bar to the cabin.
Tip!
You do not have to remove the tow bar after use. Instead, simply fold it under the
cabin floor, see “Folding the tow bar in or out” on page 22.
Mounting the coupler onto a bicycle
Danger!
Make sure that your bicycle is suitable for towing a bicycle trailer, see “Performance
limits” on page 4. Since it may in some cases be necessary to change the rear
wheel axle, it is best to consult your specialist dealer or the bicycle manufacturer in
order to do this.
Caution!
Secure the bicycle to prevent it from toppling over, and make sure that the rear wheel
cannot drop out of the axle mount after the screw connection has been undone. Use
for example an assembly stand, or turn the bicycle upside down so that you can place
it on its saddle and handlebars.
In the as-delivered state, the supplied coupler is in the coupler pocket of the tow bar:
f Undo the cotter pin fastening and remove the coupler.
f Next, insert the cotter pin fastening back into the
coupler pocket of the tow bar.
f Prepare the bicycle for mounting the coupler by
undoing the screw connection of the rear wheel axle:
– Quick-release axle: Open the bracket of the quick-release axle and unscrew the cap nut
on the other side of the rear wheel axle.
– Full axle: Unscrew the nut on the left side of the rear wheel axle.
f Mount the coupler on the rear wheel axle:
– Place the large hole of the coupler onto the left
side of the rear wheel axle so that the coupler is
facing outwards.
– Screw on the dedicated nut and tighten it slightly.
Page 19

Sportrex2 – Q6000A Subject to change. – 02|2016 – 19
Assembly
– Align the rear wheel so that it can turn freely.
– Align the coupler so that it faces horizontally to the rear.
f Tighten the connection firmly in order to secure the rear wheel:
– Quick-release axle: Tighten the cap nut until you can close the clamp with a certain amount
of pressure.
– Full axle: Tighten the nut with a spanner.
Tip!
The coupler can be permanently mounted on the bicycle. Additionally available
couplers enable you to use the Sportrex2 on different bicycles, see “Accessories” on
page 12.
The supplied universal coupler is suitable for mounting on most rear-wheel versions. If
it does not fit your bicycle, you can find suitable special couplers and conversion sets
on the Weber Technik GmbH website: www.weber-products.de
Page 20

20 – 02|2016 – Subject to change. Sportrex2 – Q6000A
Utilisation
Below you will find all the information for adapting the Sportrex2 to the required modes and
to allow you to use all the convenience functions.
Applying the parking brake
Danger!
When it is stationary, always apply the parking brake to secure the Sportrex2 in order
to prevent it from rolling away. Also remember to release it before you set off.
f Stand behind the cabin and hold it securely by the
push handle.
f Firmly push the parking brake forward with your foot
in order to block the wheels.
f To release the brake, grip under the parking brake with
your toes and pull it back.
Adjusting the push handle
Use the two light grey pushbuttons to alter the height of the push handle. These are identified
by the word “PUSH”. You can set and engage the push handle at several levels in the 74 – 107 cm
range.
f Hold the push handle with both hands so that your
thumbs rest on the light grey pushbuttons.
f Press both pushbuttons and keep them pressed in
order to release the height adjustment.
f Swing the push handle to the desired height.
f Release the two pushbuttons in order to activate the
engagement function.
f Move the push handle slightly up or down until the
height adjustment engages audibly.
Page 21

Sportrex2 – Q6000A Subject to change. – 02|2016 – 21
Setting the mode
You can use the Sportrex2 in one of the following modes:
Trailer mode: Carrying children in the Sportrex2 when cycling
Buggy mode: Using the Sportrex2 like a buggy
Walker mode: Carrying children in the Sportrex2 when jogging or walking
The table below shows the main settings that you must make for particular components for the
respective mode:
Component
Status of the components in mode
Trailer Buggy Walker
Buggy wheel
must be completely
removed
fitted
(freely rotating)
fitted
(fixed)
Tow bar
unfolded
(pay attention to tow
bar load!)
folded in folded in
Pennant must be mounted recommended recommended
Push handle
maximum height
(107 cm)
comfortable height comfortable height
Hand strap on the push
handle
–
wrapped around a
wrist
wrapped around a
wrist
5-point safety harness must be fastened must be fastened must be fastened
Bicycle
the correct coupler
must be installed
– –
Optional accessories
(see “Accessories” on
page 12)
Rear light
(mandatory in poor
visibility or darkness)
–
Jogger air wheel with
hand brake
Danger!
Before every journey, make sure that necessary adjustments have been made for the
particular mode. For details of this, see the instructions in the following sections.
Adjusting the buggy wheel
You must make the following settings, depending on the mode.
Removing the buggy wheel (Trailer mode)
The buggy wheel must not be fitted in Trailer mode, because in certain riding situations it can
make contact and cause serious accidents.
f Undo the quick-release clamp with which the wheel suspension is secured on the cabin frame.
f Lift the cabin slightly at the front and completely remove the buggy wheel.
Tip!
Carry the buggy wheel e.g. in the storage space in order to allow you to use the
Sportrex2 flexibly at your destination. Instructions for re-mounting it can be found in
the chapter “Installing the buggy wheel” on page 17.
Utilisation
Page 22

22 – 02|2016 – Subject to change. Sportrex2 – Q6000A
Utilisation
Setting the wheel so that it turns freely (Buggy mode)
It must be possible for the wheel to move freely through 360° in order to manoeuvre in Buggy
mode.
f Push up the red mode switch to release the wheel.
Securing the wheel (Walker mode)
In Walker mode, the wheel must not be at an angle to the direction of travel. You must lock the
wheel to run straight ahead in order to prevent abrupt blocking.
f Turn the inserted wheel forwards so that the red mode switch and the black release knob are
precisely aligned.
f Push down the red mode switch to lock the wheel.
Folding the tow bar in or out
You only require the tow bar for Trailer mode. Fit it as and when required.
If the tow bar is permanently fitted, simply fold it forward for Trailer mode. After the cycling trip,
you can fold the tow bar back in again and lock it under the cabin floor. Pay attention also to the
instructions in the chapter “Optional assembly steps” on page 17.
Danger!
When folding in the tow bar, also wrap the retaining strap around one of the cabin
floor tubes. Otherwise it could become trapped on obstacles.
Using the pennant
The pennant must be attached in Trailer mode, see “Inserting the pennant” on page 16.
For safety reasons, we also recommend this for the other modes.
Folding up the push handle
In Trailer mode, you should always fold the push handle into its highest position so that it can
provide maximum safety as a roll-bar, see “Adjusting the push handle” on page 20.
Attaching the hand strap
In Buggy and Walker mode, the hand strap secured to the push handle must be attached to your
wrist during every journey.
Putting on the 5-point safety harness
In every mode, the 5-point safety harnesses must be properly adjusted and every child must be
fastened in, see “Adjusting the safety harnesses” on page 23.
Securing the load
Loading the baggage
Loading the storage space
f Undo the Velcro fasteners of the storage space cover and lift it.
f Pack larger items such as bags, toys or coats in the storage space.
f Close the cover carefully.
Page 23

Sportrex2 – Q6000A Subject to change. – 02|2016 – 23
Utilisation
Filling the pouch for small items
f Open the zip fastener of the pouch for small items.
f Put in the utensils that you want to have readily to hand while you are on the road.
f Close the zip fastener.
Using the beverage holders
f Put the children’s drinking bottles into the beverage holders in the cabin’s foot space.
Danger!
When loading, pay attention to the total permissible weight and the weight limits for
the panniers, see “Performance limits” on page 4.
Adjusting the safety harnesses
To achieve optimum load distribution, it is important for the load’s centre of gravity to be
approximately in the middle of the cabin. In the as-delivered state, the 5-point safety harnesses
are pre-adjusted for carrying two children. If you only want to carry one child, you must adjust the
safety harnesses so that the child can sit in the middle.
Tip!
The optionally available accessories such as the baby seat, comfort insert etc. enable
you to optimally adapt the Sportrex2 to suit the age and size of your children, see
“Accessories” on page 12.
f Undo the upper fastener of the two inner harnesses.
f Change round their pads and tongues:
– Push the pad and the tongue of the inner left
harness onto the right harness.
– Push the pad and the tongue of the inner right
harness onto the left harness.
f Put the harness catch, including the pad, onto the
centre harness on the front of the seat. Use the
harness catch of the left or right seat to do this.
f Repeat this procedure in reverse order whenever you
require the safety harnesses for carrying two children.
Embarking the children
Preparing the cabin
f Apply the parking brake to secure the Sportrex2 in order to prevent it from rolling away.
f Undo the toggle and Velcro fasteners of the cover and fold open the cover completely.
f Adjust the safety harnesses to the number of children, see “Adjusting the safety harnesses” on
page 23.
Page 24

24 – 02|2016 – Subject to change. Sportrex2 – Q6000A
Utilisation
f Open the safety harnesses required:
– Release the harness catch by pressing the pushbutton.
– Pull the two-part tongue out of the harness catch.
– Detach the two parts of the tongue and pull the two harnesses apart.
Placing the children
f Let the children get in one after the other, or lift them into the cabin.
f If necessary, adjust the head rests by securing them to the seats at a different height with the
Velcro strips.
Tip!
A balanced load distribution is particularly important in Trailer mode. If the two
children differ greatly in terms of their weight, you should therefore put the heavier
child in the right-hand seat. Interacting with the tow bar mounted on the left, this
favourably influences handling.
Fastening in a child
f Help the child to put his/her arms through the two side parts of the 5-point safety harness.
f Adjust the safety harness, the harnesses pads and the head rests to the size of the child.
f Pull the side harnesses to the middle and connect the two parts of the tongue.
f Push the tongue into the harness catch until it engages audibly.
f Check that all parts of the 5-point safety harness fit properly and comfortably.
f Close the cover and the associated toggle and Velcro fasteners.
Danger!
Before every journey, check that the safety harnesses and harness catches are sitting
correctly. Failure of the restraining function can result in serious or even fatal injuries
in the event of an accident. Do not set off until all children are wearing a bicycle
helmet and are properly fastened in.
Page 25

Sportrex2 – Q6000A Subject to change. – 02|2016 – 25
Utilisation
Checking the weight distribution and tow bar load
An optimum weight distribution is important for safe handling: The load’s centre of gravity should
always lie in the centre of the wheel axle. The tow bar load with which the tow bar lies on the
coupler must be neither too great or too low in Trailer mode:
Tow bar load too great (> 8 kg): Too much load on the coupler.
Tow bar load too low (< 3 kg): The trailer could reduce the traction of the rear wheel through
lifting and thereby cause critical situations in curves.
Centre of gravity too far out: Loading on one side makes tipping over while cornering more
likely.
Danger!
Distribute the load evenly across the width of the Sportrex2. If you are carrying
only 1 child, he/she must sit in the middle, see “Adjusting the safety harnesses” on
page 23.
Check the tow bar load before every journey with a trailer. Tow bar loads outside the
permitted range of 3 – 8 kg cause critical handling performance.
Checking the tow bar load
Use bathroom scales, for example, to measure the tow bar load:
f Load the Sportrex2 in the usual way and fasten the children in.
f Do not connect the trailer to the bicycle yet.
f Place the bathroom scales next to the tow bar.
f Get onto the bathroom scales and note the weight displayed.
f Lift the tow bar’s coupler pocket to the coupler height (approx. 35 cm).
f Determine the tow bar load by making a comparison
with the previous measured value:
– The weight must be at least 3 kg more than the
measured value without the tow bar.
– The weight may be a maximum of 8 kg more than
the measured value without the tow bar.
Changing the towbar load
Adjust the tow bar load by moving or reducing your baggage:
f Tow bar load over 8 kg:
Move items of baggage to the rear, e.g. from the storage space to the pouch for small items.
f Tow bar load less than 3 kg:
Move items of baggage forward, e.g. from the pouch for small items to the storage space.
Total weight too heavy
f Reduce the baggage weight in the pouch for small items to max. 2 kg.
f Reduce the baggage weight in the storage space to max. 5 kg.
f Make sure that the loaded trailer weighs less than 60 kg.
Page 26

26 – 02|2016 – Subject to change. Sportrex2 – Q6000A
Utilisation
Connecting the trailer to a bicycle
Danger!
Do not connect the Sportrex2 to a bicycle until the following conditions have been
fulfilled:
The trailer is fully loaded.
The children are wearing bicycle helmets and are properly fastened in.
The buggy wheel has been removed.
The tow bar load has been checked and is within the permissible range (3 – 8 kg).
f Remove the retaining cotter pin from the tow bar’s
coupler pocket.
f Push the tow bar onto the coupler on the bicycle so
that the cotter pin holes in the coupler and coupler
pocket are aligned.
f Insert the cotter pin into the hole and lock the cotter
pin fastening.
f Check that the connection between the coupler and
the tow bar is secure.
f Guide the tow bar’s retaining strap through the
braces of the rear wheel so that the trailer is securely
connected to the bicycle frame.
f Hook the retaining strap with the carabiner hook
into the eye on the tow bar. Make sure that it cannot
flutter into the rear wheel’s spokes during the journey.
Danger!
Always secure the tow bar to the bicycle frame with the retaining strap. This ensures that
the trailer will remain connected even if the tow bar becomes detached from the coupler.
Irrespective, the coupler must always be properly mounted and the connection to the
tow bar must be secured with the locked cotter pin. Otherwise the tow bar can be
come detached and can be pushed into the rear wheel’s spokes during braking.
Using the comfort functions
The Sportrex2 offers some climate functions for the cabin and can be conveniently adjusted by
adapting the backrest tilt and the suspension.
Using the climate functions
Adjusting the 2-in-1 canopy
The 2-in-1 canopy is comprised of an insect net and a weather canopy:
The inner part of the 2-in-1 canopy must be closed during every journey because the integral
insect net provides protection against insects and small stones.
Page 27

Sportrex2 – Q6000A Subject to change. – 02|2016 – 27
Utilisation
The outer skin of the 2-in-1 canopy is comprised of a durable transparent sheet. It provides
protection against rain and strong winds, and dissipates exhaust gases out of the cabin.
Opening the weather canopy:
f Roll up the rain window and secure the roll at the top
with the two toggle fasteners.
Closing the weather canopy:
f Open the top toggle fasteners and unroll the rain
window over the insect net.
f Close all the surrounding toggle and Velcro fasteners.
Danger!
Never ride with the cover open. As a minimum, the insect net must be closed in order
to provide protection against stones. In bad weather or heavy traffic, also close the
weather canopy.
Using the ventilation windows
The purpose of the ventilation windows of the Sportrex2 is to improve air circulation in the cabin.
Right ventilation window:
f To open, release the Velcro fastener of the window
film in the cabin and fold it down.
f To close, secure the window film with the Velcro
fastener again.
Rear ventilation window:
f To open, roll up the cover and lock it with the top
Velcro fastener.
f To close, secure the cover again with the side Velcro
fasteners.
Danger!
Open the ventilation window on hot days or in heavy traffic in order to dissipate warm
air and exhaust fumes out of the cabin more quickly.
Using the sun visor
The sun visor is housed in the canopy between the insect
net and the rain window. The length can be adjusted with
Velcro fasteners.
f Roll up the rain window.
f Fold the sun visor to the desired length and lock it
with the side Velcro fasteners.
f If necessary you can also roll up the sun visor
completely and close the rain window again.
Page 28

28 – 02|2016 – Subject to change. Sportrex2 – Q6000A
Adjusting the tilt of the backrest
For the backrest you can set two tilt angles by moving its upper horizontal bar:
128 degrees: The horizontal bar is secured in the rear position.
This tilt is pre-set at the factory and is recommended for carrying small children who may fall
asleep during the journey.
115 degrees: The horizontal bar is secured in the front position.
This more upright seating position is recommended for older children who participate actively
in the journey.
Tip!
Do not adjust the tilt during the journey as this can take some time.
f Release the backrest’s upper horizontal bar by
removing the star grip screws on both sides.
f Put the horizontal bar into its new position between
the cabin frame holes.
f Insert the star grip screws through the holes into the
horizontal bar and tighten the screws securely.
f Tension the harnesses on the rear of the cabin, see
“Tightening the backrest” on page 16.
Adjusting the suspension
The suspension of the Sportrex2 adjusts itself automatically to the load being carried at the
time. They are pre-set at the factory to maximum spring deflection in order to provide maximum
comfort.
If necessary, you can adjust the suspension’s hardness
individually:
f Turn the disk above the spring clockwise to make the
suspension harder.
f Turn the disk anticlockwise to make the suspension
more comfortable.
Danger!
When altering the hardness, it is essential to ensure that you make the same
adjustments on both struts. Different spring deflections can have a negative influence
on riding performance. Alter the factory setting only in exceptional cases.
Utilisation
Page 29

Sportrex2 – Q6000A Subject to change. – 02|2016 – 29
Storage
To store the Sportrex2, simply fold it up and keep it in a protected location. Pay attention also to
the instructions in the chapter “Care” on page 30.
Danger!
Hands or fingers can become trapped on moving parts while setting up and folding up
the cab. Carry out work carefully and keep children away from the vehicle.
f Take position behind the cabin and open the storage
space cover.
f Pull both sliders on the vertical cabin tubes all the way
up. This releases the lock on the rear frame rod.
f Press the rear frame rod inwards.
f Fold up the cabin by pressing both sides of the rear
cabin frame all the way down.
Caution!
Only fold up the cabin after it has been cleaned both inside and outside and is
completely dry.
Utilisation
Page 30

30 – 02|2016 – Subject to change. Sportrex2 – Q6000A
Care and maintenance
Regular care and maintenance of all parts and components helps prevent premature wear and
keeps the Sportrex2 ready for use at all times. This is particularly important when one of the
following influencing factors applies to your individual conditions of use:
Frequent use with high mileage
Regular use close to the maximum permitted total weight
A sporty riding style (sudden starting and braking, cornering at speed etc.)
Excessive weather influences such as UV radiation, temperature fluctuations, moisture, contact
with salt (road salt, sea water, salty air)
Unfavourable storage conditions (lack of space, temperature fluctuations, sunlight)
Caution!
It is essential to adhere to the following care instructions and maintenance intervals.
Perform the tests stated in the checklists conscientiously and at the specified times in
order to use the Sportrex2 in a technically safe condition.
Replace damaged components immediately, see “Spare parts” on page 34. If
necessary, contact our service department or your local specialist dealer, see “Support
information” on page 33.
Care
Caution!
For cleaning, use only water and domestic care agents such as detergents and textile
care products, soft cloths or impregnation and silicone spray. Do not use any sharpedged tools or cleaning agents with a scouring effect. Cleaning agents containing acids
and solvents are also not permitted.
After every use
Clean the inside of the cabin.
Pay attention to coarse dirt and remove it immediately if possible.
After use in harsh weather conditions
Clean the inside and outside of the cabin thoroughly.
Care for all sliding or moving parts with silicone spray.
Only fold up the cabin after it has been cleaned and is completely dry.
When not in use
Store the Sportrex2 only in places where the storage temperature falls within the range of
-23 °C to maximum 65 °C.
The storage location should be dry, well ventilated and protected against direct sunlight.
At higher storage temperatures, you should store the wheels separately from the cabin
because the tyres’ rubber can cause odours.
Use a Qeridoo folding garage if the Sportrex2 must be kept outdoors, see “Accessories” on
page 12.
Page 31

Sportrex2 – Q6000A Subject to change. – 02|2016 – 31
Maintenance intervals
Caution!
Replace corroded steel and aluminium parts immediately.
Never bend back deformed or bent aluminium parts (risk of breakage). Replace
bent aluminium parts immediately.
Immediately replace plastic parts that have become porous or fragile due to the
effects of the weather, for example.
Before every ride
Check that the wheels are secure. The push-in axles must be engaged in the axle mount and it
must not be possible to pull them off without pressing the rubber cap.
Check the air pressure in the wheels. It should be in the range of 1.7 – 2.4 bar.
Check the air pressure of the buggy wheel (maximum air pressure: 2 bar).
Check the total weight, including children and baggage. A maximum of 60 kg is allowed.
Check the fasteners of the cover and close them if necessary.
Inspect all harnesses on the back and under the cabin to make sure that they are secure.
They must be firmly tightened to hold the cover and backrest securely.
Trailer mode: Make sure that the buggy wheel has been removed and that the requirements
described in the chapter “Connecting the trailer to a bicycle” on page 26 have been fulfilled.
Buggy mode: Make sure that the buggy wheel can rotate freely. Put the hand strap of the push
handle around your wrist in order to prevent accidental rolling away.
Walker mode: Make sure that the buggy wheel is secured facing straight ahead. Put the hand
strap of the push handle around your wrist in order to prevent accidental rolling away.
Monthly (or every 200 km)
Check the textile cover, all fasteners, the seats and the safety harnesses for cracks, wear and
missing parts.
Inspect all frame tubes and all connecting pieces and fastening components for signs of wear
and damage.
Check whether the tow bar, coupler and buggy wheel and their attachments are technically
OK.
Check that all screw and cotter pin connections are secure.
Check the condition of the wheels. Replace covers and hoses in good time.
Semi-annually (or every 500 km)
Care for all sliding and moving parts with silicone spray.
Clean the inside and outside of the cabin thoroughly.
Every three years (or every 3000 km)
Have a full inspection carried out by a specialist workshop no later than every three years.
Care and maintenance
Page 32

32 – 02|2016 – Subject to change. Sportrex2 – Q6000A
Appendix
Technical data
External dimensions
Length (without buggy wheel) 98 cm
Length (with buggy wheel) 116 cm
Length (with tow bar) 144 cm
Width (external width from wheel to wheel) 85 cm
Height (from ground to cabin roof) 90 cm
Height of push handle (lowest / highest set dimension) 74 cm / 107 cm
Pack size of the collapsed cabin (L x W x H) 113 cm x 72 cm x 30 cm
Internal dimensions
Seat width (max. width at shoulder height, across both sides) 64 cm
Seat height (max. height between seat and cabin roof) 74 cm
Legroom (max. length between backrest and foot rest) 57 cm
Storage space behind the backrest (L x W x H)
33 cm x 58 cm x 28 cm (approx. 55 l)
Weights
Cabin (incl. push handle) 10.9 kg
1 x 20" wheel / 1x buggy wheel / 1 x tow bar 1.3 kg / 1.5 kg /0.8 kg
Permitted total weight 60 kg
Max. load (Trailer or Buggy & Walker mode) 44 kg
Wheels
Wheel
Type 20" spoked wheel, push-in axle
Tyres 20 x 2.0 (54-406)
Hose size 20", 20 – 50 mm wide
Valve type Car valve (Schrader)
Recommended / maximum air pressure 1.7 – 2.4 bar / 2.7 bar
Buggy wheel
Type 8.5" air wheel
Valve type Car valve (Schrader)
Maximum air pressure 2 bar
Ambient conditions
Storage location dry, ventilated, no direct sunlight
Temperature range for storage -23 °C – 65 °C
Page 33

Sportrex2 – Q6000A Subject to change. – 02|2016 – 33
Appendix
Warranty terms
Qeridoo provides a two-year warranty commencing on the purchase date for plastic and
cover parts, as well as for load-bearing components. This warranty covers only material and
manufacturing faults arising on correctly used and maintained vehicles. In particular, the terms
and instructions in the user manual that you received with your vehicle are definitive in this
respect.
Under no circumstances shall Qeridoo be liable for material damage or injury attributable to
improper assembly, the intentional alteration of components or the non-observance of warning
and maintenance notices. Warranty claims for defects resulting from accidents or other external
forces, and caused by premature wear due to frequent and intensive use are also normally
excluded.
Commercial use such as rental or use for competitive purposes is deemed improper use and is not
covered by the warranty at all.
This warranty applies solely to the first owner and is non-transferable. Verbal agreements,
restrictions or reservations that go beyond the terms specified here have no bearing on the
validity of this warranty. The warranty regulations pertaining to your region also apply.
Tip!
To claim under the warranty, please contact our complaints management team directly
by e-mail: garantie@qeridoo-einkauf.de
With your complaint, please provide an exact description of the fault (if possible with
photos) and a copy of the original purchase receipt. Please also state the vehicle’s
serial number. You can find this on the label or on the frame rod assembly in the
storage space.
Support information
Please contact us directly if you have any questions about our products:
Qeridoo GmbH
Reutherstraße 3
URL:
www.qeridoo.com Hotline
53773 Hennef (Sieg)
Mail:
info@qeridoo.com +49 (0) 2242 9041233
Germany
Fax: +49 (0) 2242 9041247
(Mon. – Fri.: 9 am – noon & 2 pm – 4 pm)
You can find our current list of dealers on the Internet at:
http://www.qeridoo.com/index.php/en/haendlersuche-english
Page 34

34 – 02|2016 – Subject to change. Sportrex2 – Q6000A
Appendix
Frame components
Pos. Article Article no.
1 Roof rack hinge / connecting piece DST-30
2 Push handle HDG-600
3 Connecting rod (backrest, side frame) VERS-600
4 Rear frame rod HNT-600
5 Rear axle (incl. parking brake) ACH-600
6 FX folding system rod FXS-30
7 Brake pedal BRP-30
8 Rubber cap DECK-88
9 20" wheel R147
10 Tow bar DIE-60-1
11 Quick-release clamp (for buggy wheel) SCNE-Q2
12 Coupler (complete) 56897-KLL
13 8.5" air wheel (for buggy wheel) BG-589L
14 Wheel suspension (for buggy wheel) BGH-Q2
15 Main frame (lower part) HPT-600
16 Wheel guard (wheel deflector) RADA-Q2
17 Suspension (3.2 mm spring element) FED-QUN
18 Roof rack frame rod DTR-30
Spare parts
(valid from 2015)
Page 35
Sportrex2 – Q6000A Subject to change. – 02|2016 – 35
Appendix
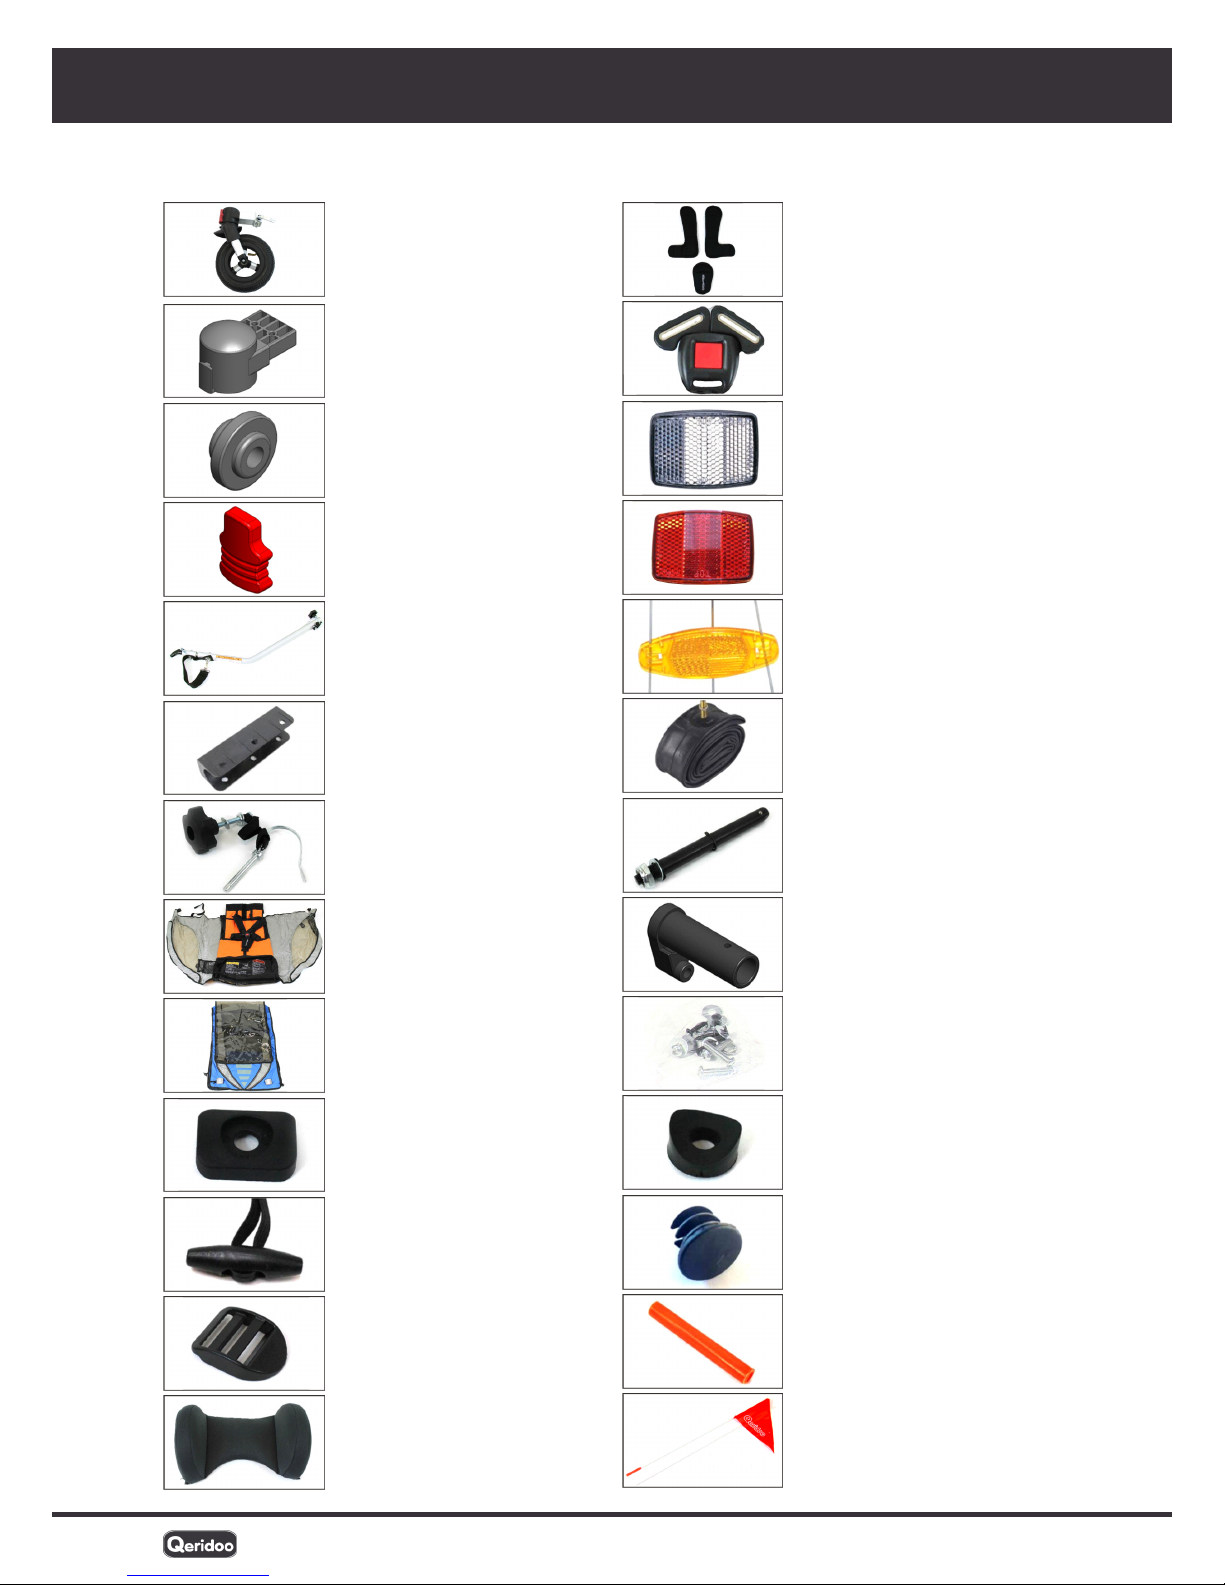
Other spare parts
8.5" buggy wheel, complete
(with wheel suspension and
quick-release clamp)
Art. no.: BG-555K
Connecting piece
(buggy wheel)
Art. no.: BG-UN-5
Disk for quick-release clamp
(buggy wheel)
Art. no.: BPP-UN-7
Mode switch
(buggy wheel)
Art. no.: BGRK-UN
Complete tow bar
(incl. coupler)
Art. no.: DIE-600
Tow bar mount
(plastic insert)
Art. no.: ING-58993
Screw set for tow bar
Art. no.: GFR-8899
Cover incl. harness system
(blue, violet, green, orange)
Art. no.: BEZUG-600
Cover, top part
(blue, violet, green, orange)
Art. no.: VERD-600
Screw washer for fitting the
cover
Art. no.: HAL-589
Toggle fastener with strap
Art. no.: KÖRD-55
Harness buckle
Art. no.: GRT-899
Head rest
Art. no.: KOP-Q8
Harness pad set
Art. no.: BGH-Q254
Harness catch
Art. no.: GUR-69
Light reflector, white
Art. no.: LRF-Weiss
Light reflector, red
Art. no.: LRF-ROT
Light reflector, yellow
(for wheel spokes)
Art. no.: LRF-Gelb
20" hose
Art. no.: 789SCH
Push-in axle / hub axle
Art. no.: ZT6HTU
Plastic cylinder for mounting
the wheel and parking brake
rod
Art. no.: BGH-30
Screw set
(1 set with all the required
assembly screws)
Art. no.: SCHR-30
Spacer
Art. no.: DIST-555
Tube cap
Art. no.: RDLL-Q8
Pennant holder, centre piece
Art. no.: WIM-H-UN
Pennant, complete
(incl. extension rod and centre
piece)
Art. no.: 121256
Page 36

Qeridoo GmbH
Reutherstraße 3, 53773 Hennef (Sieg)
Germany
www.qeridoo.com
info@qeridoo.com
Sportrex2 – Q6000A
 Loading...