


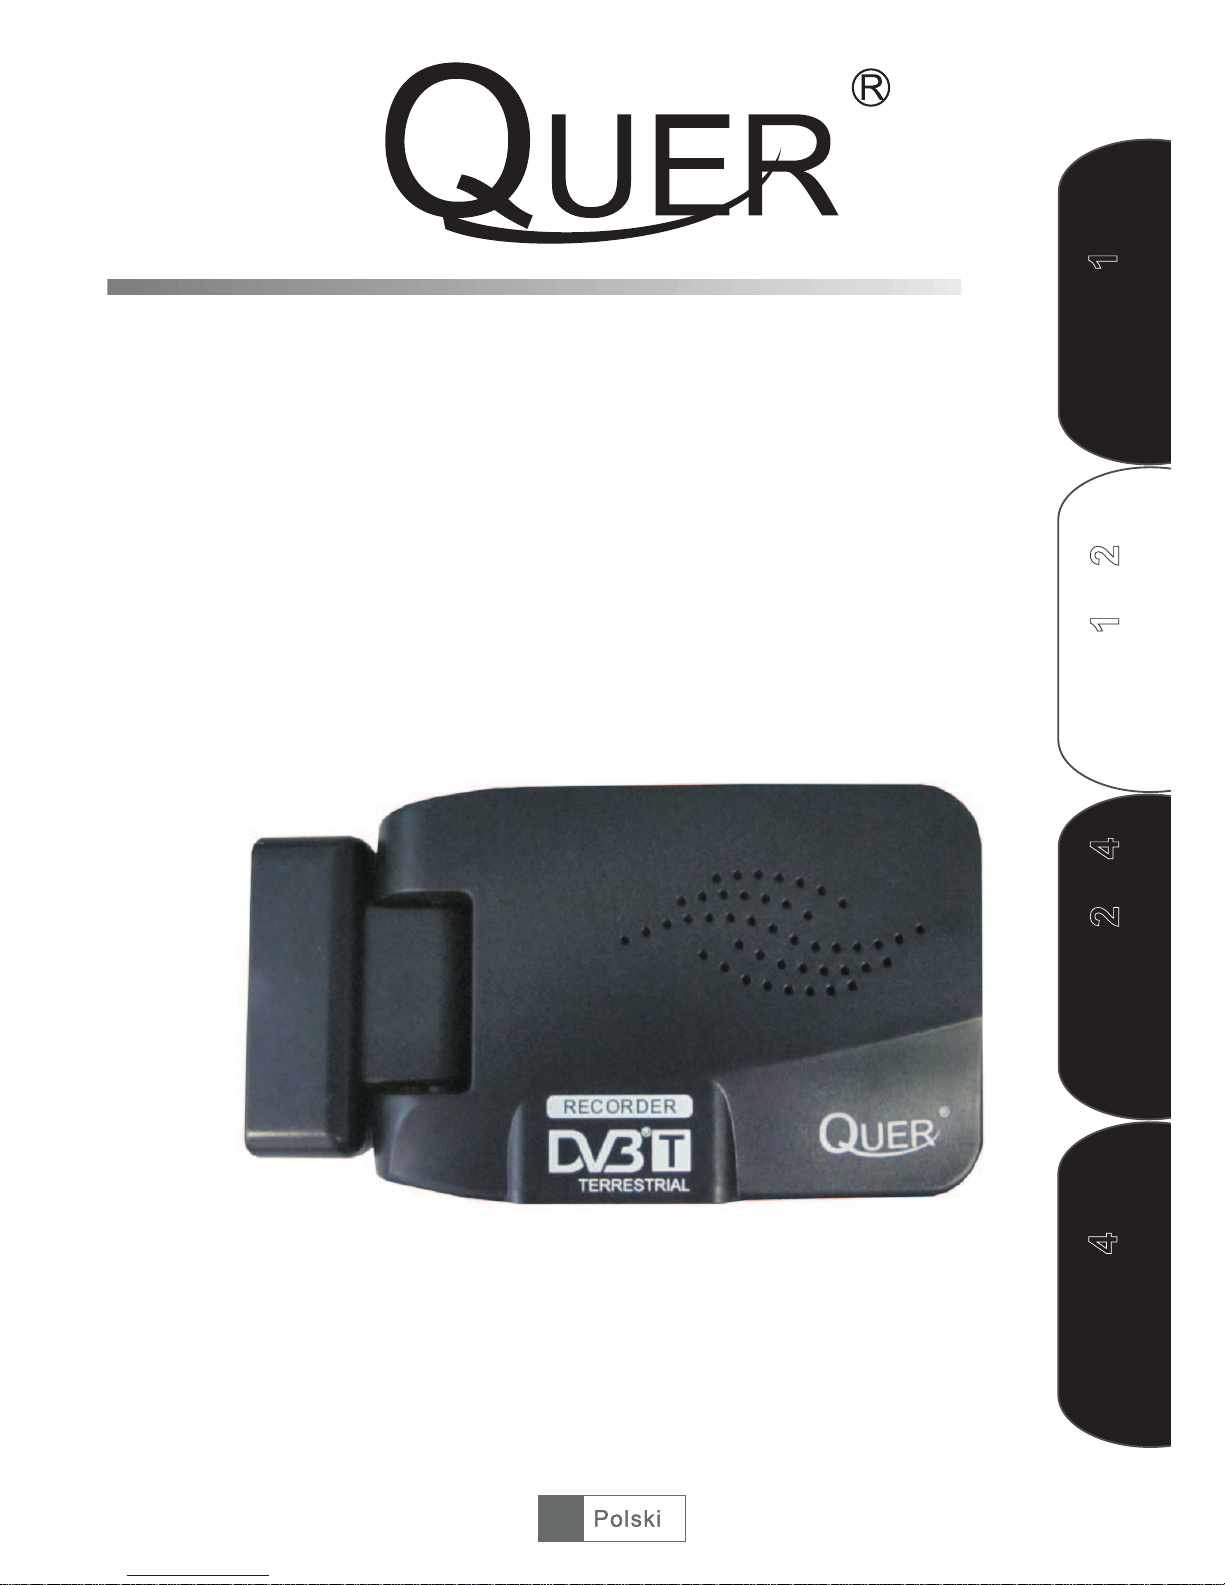
URZ0181
MPEG-4 TERRISTERIAL
RECEIVER
USER MANUAL
Deutsch 43-56 English 1-14
Românã 29- 42 Polski 15- 28


English
463
IMPORTANT SAFETY INSTRUCTIONS
WARNING
?TO PREVENT FIRE OR SHOCK HAZARD, DO NOT USE WITH AN
EXTENSION CORD, RECEPTACLE OR OTHER OUTLET UNLESS THE BLADES
CAN BE FULLY INSERTED TO PRESENT BLADE EXPOSURE.
?TO PREVENT FIRE OR SHOCK HAZARD, DO NOT EXPOSE THIS
APPLIANCE TO RAIN OR MOISTURE.
?TO PREVENT ELECTRICAL SHOCK, MATCH WIDE BLADE PLUG TO WIDE
SLOT FULLY INSERTED.
1. ANT IN
2. LOOP OUT
3. IR
4. USB
5. DC 5V
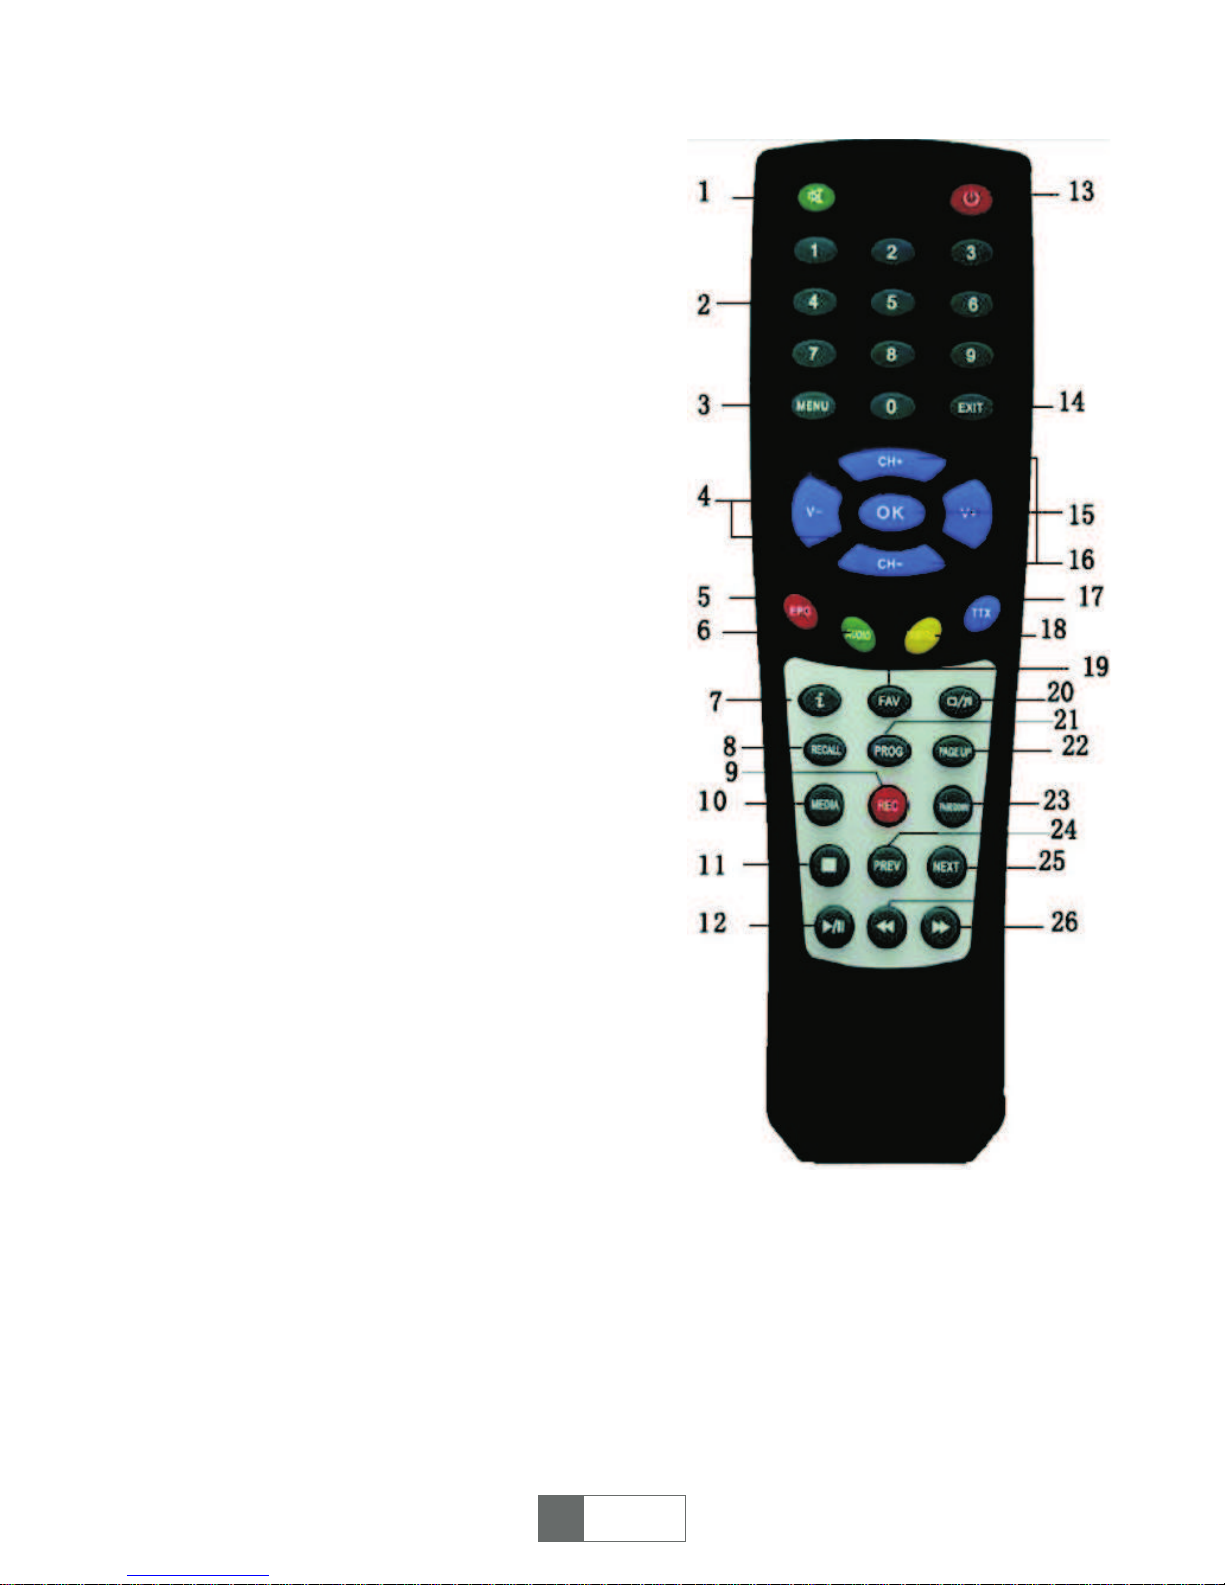
REMOTE CONTROL:
1. Mute: Turn off / on voice.
2. Number key: <0,9>
3. Menu: Enter main menu
4. VOL -/+: Volume adjustment
5. EPG: Electronic program guide
6. AUDIO: Audio mode operation
7. Info: Display program information in fullscreen playing or show operation guide in
current menu
8. RECALL: Change back to previous channel
9. RECORD: TV program recording
10. MEDIA: Play media
11. STOP: Stop program playing
12. PLAY/PAUSE: Pause/Play program
playing or movie playing
13. POWER: Turn on / off, standby
14. EXIT: Cancel current operation and return
to previous menu
15. OK: Confirm selection on operating menu
16. CH+/-: Channel up/down
17. TTX: DVB teletext
18. SUBTITLE: Subtitle
19. FAV: Display favourite programs
20. TV/RADIO: Switch between TV and Radio
mode
21. PROG: Recorder / wake up timer editing
22. PAGE UP: To the previous page
23. PAGE DOWN: To the next page
24. PREV: Play previous USB media
25. NEXT: Play next USB media
26. FF and FR: Screen image zoom in / out
when in zoom mode. Speed up / slow down
when USB media playing
English
46
English
4

Connecting your Set Top Box
a) Antenna to set top box connection
Connect the aerial to the unit through ANT IN jack.
b) Set top box to TV connection
Connect the unit to TV with scart cable through scart socket.
c) Turn on your TV and the unit, then select AV IN.
Main menu
1. Installation
When user connects set top box (STB) for the first time, no channels are stored in
the unit, User should search channels first as below:
Figure 1
Figure 2
1.1. Press <OK> to enter
Installation page , then press
<CH+> / <CH-> to select the item
you want to set up, <V-> / <V+>
and <OK> to select OSD
language, Country, Time Zone
where user locates in. Also turn
on/off Summer time, LCN (Logic
channel number list an exclusive
number for every channel in ON
mode), ANT Power (Supply power
for antenna connected). Press
<OK> to save the settings. See
figure 1.
1.2. Press red button <EPG> to
confirm the setting, system will
start to search channels
automaticcaly. Green button
<AUDIO> for search channels
when user know the frequency
point. See figure 2 & 3.
English
46
English
5
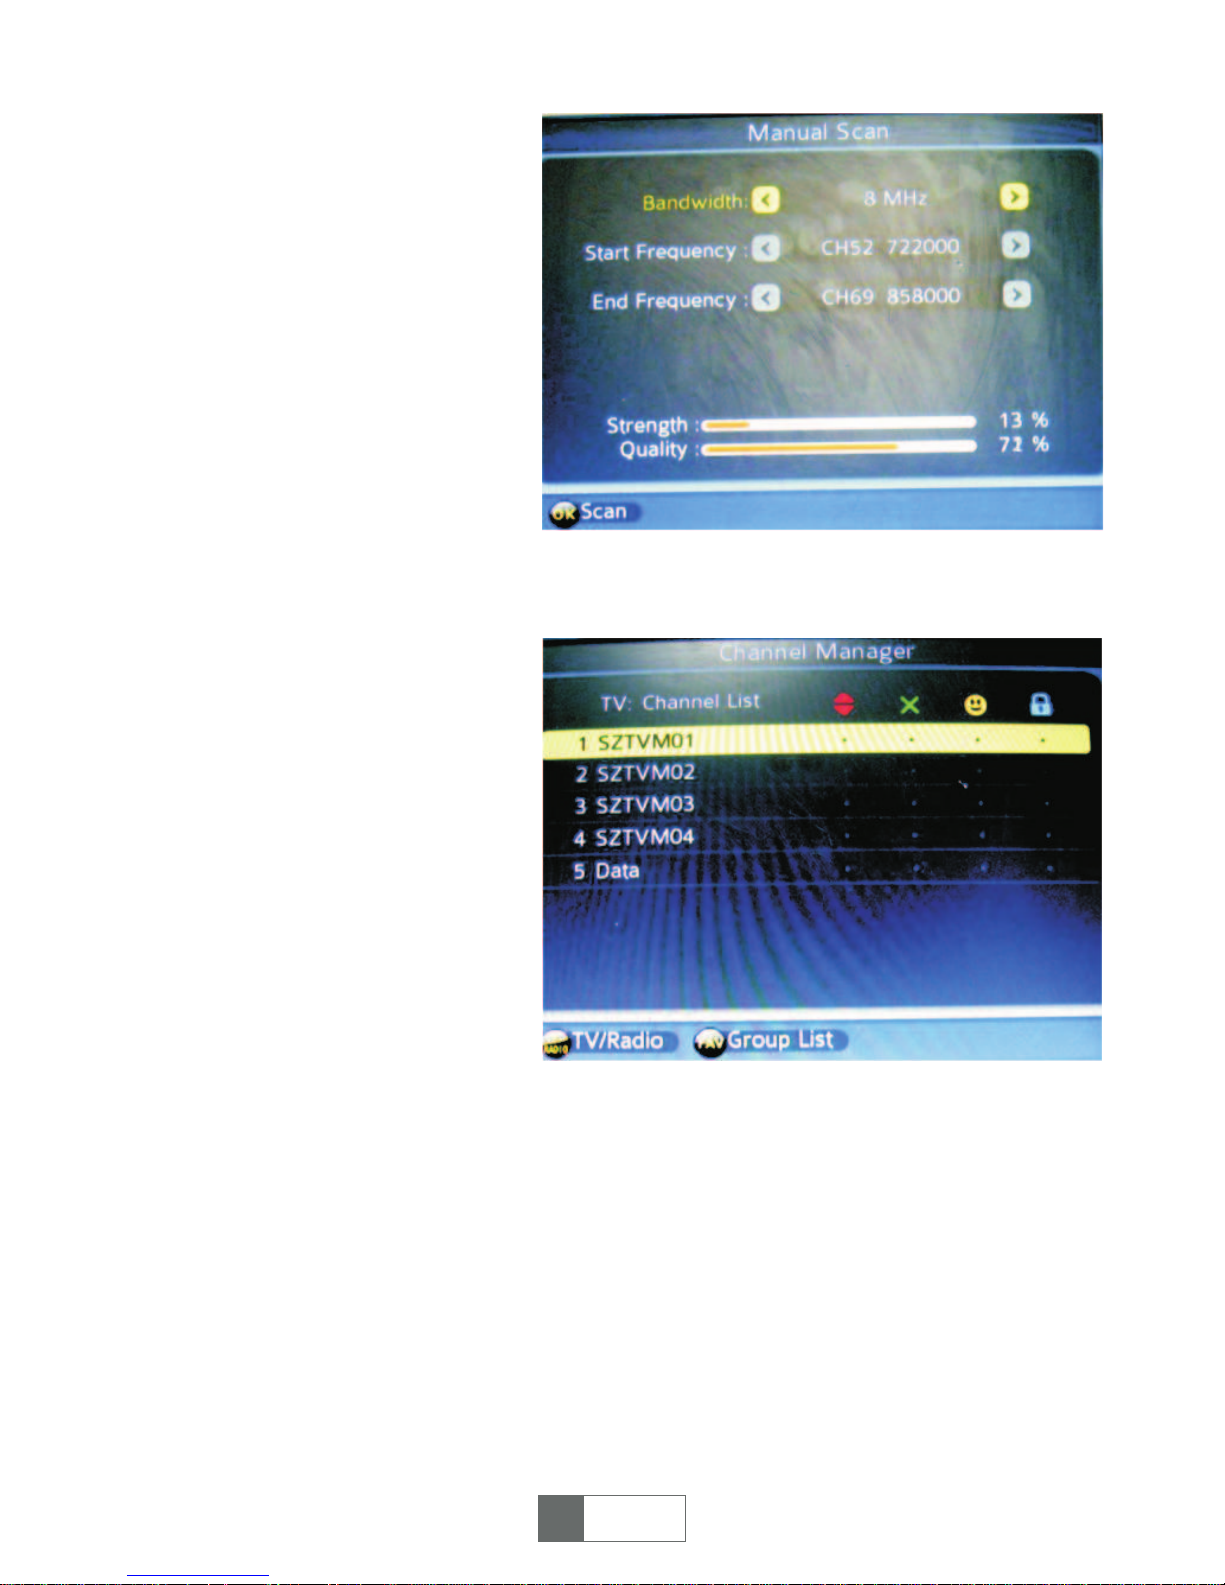
Figure 3
Figure 4
<NOTE> before searching, make
sure the antenna is connected to
the STB. Once the channel scan is
finished and all the channels are
stored into the database, you can
start to watch the digital TV
channels, some typical operations
are given in this chapter. Following
is Main Menu for operating
functions.
1. Press <MENU> to enter Main
Menu.
2. Press <LEFT> / <RIGHT> to
select item you want to operate.
2. Channel Manager
2.1. Press <OK> to enter „Channel
Manager” page through „Main
Menu - Channel Manager - OK”.
2.2. Press <CH+> / <CH-> to
select a TV channel, press <EPG>
<AUDIO> <SUBTITLE> <TTX> to
edit the channel, four functions are
available for editing channels, Skip
/ Delete / Fav / Lock. See figure 4.
Skip: Press red button <EPG> to
skip selected channel.
Delete: Press green button
<AUDIO> to delete selected
channel.
Fav: Press yellow button <SUBTITLE> to edit selected channel as a favourite
channel (Note: After setting favourite channel & exit „Channel Manager” page, user
may press hot key „FAV” on remote control to find them directly).
Lock: Press blue button <TTX> to lock a selected channel, see figure 3. If you want
to remove the lock function, pls re-press the blue button <TTX>.
NOTE: Press <TV/RADIO> button to operate same for radio channel edit. After you
have finished press, exit the „Channel Manager” page, system will automatically
save changes.
English
46
English
6
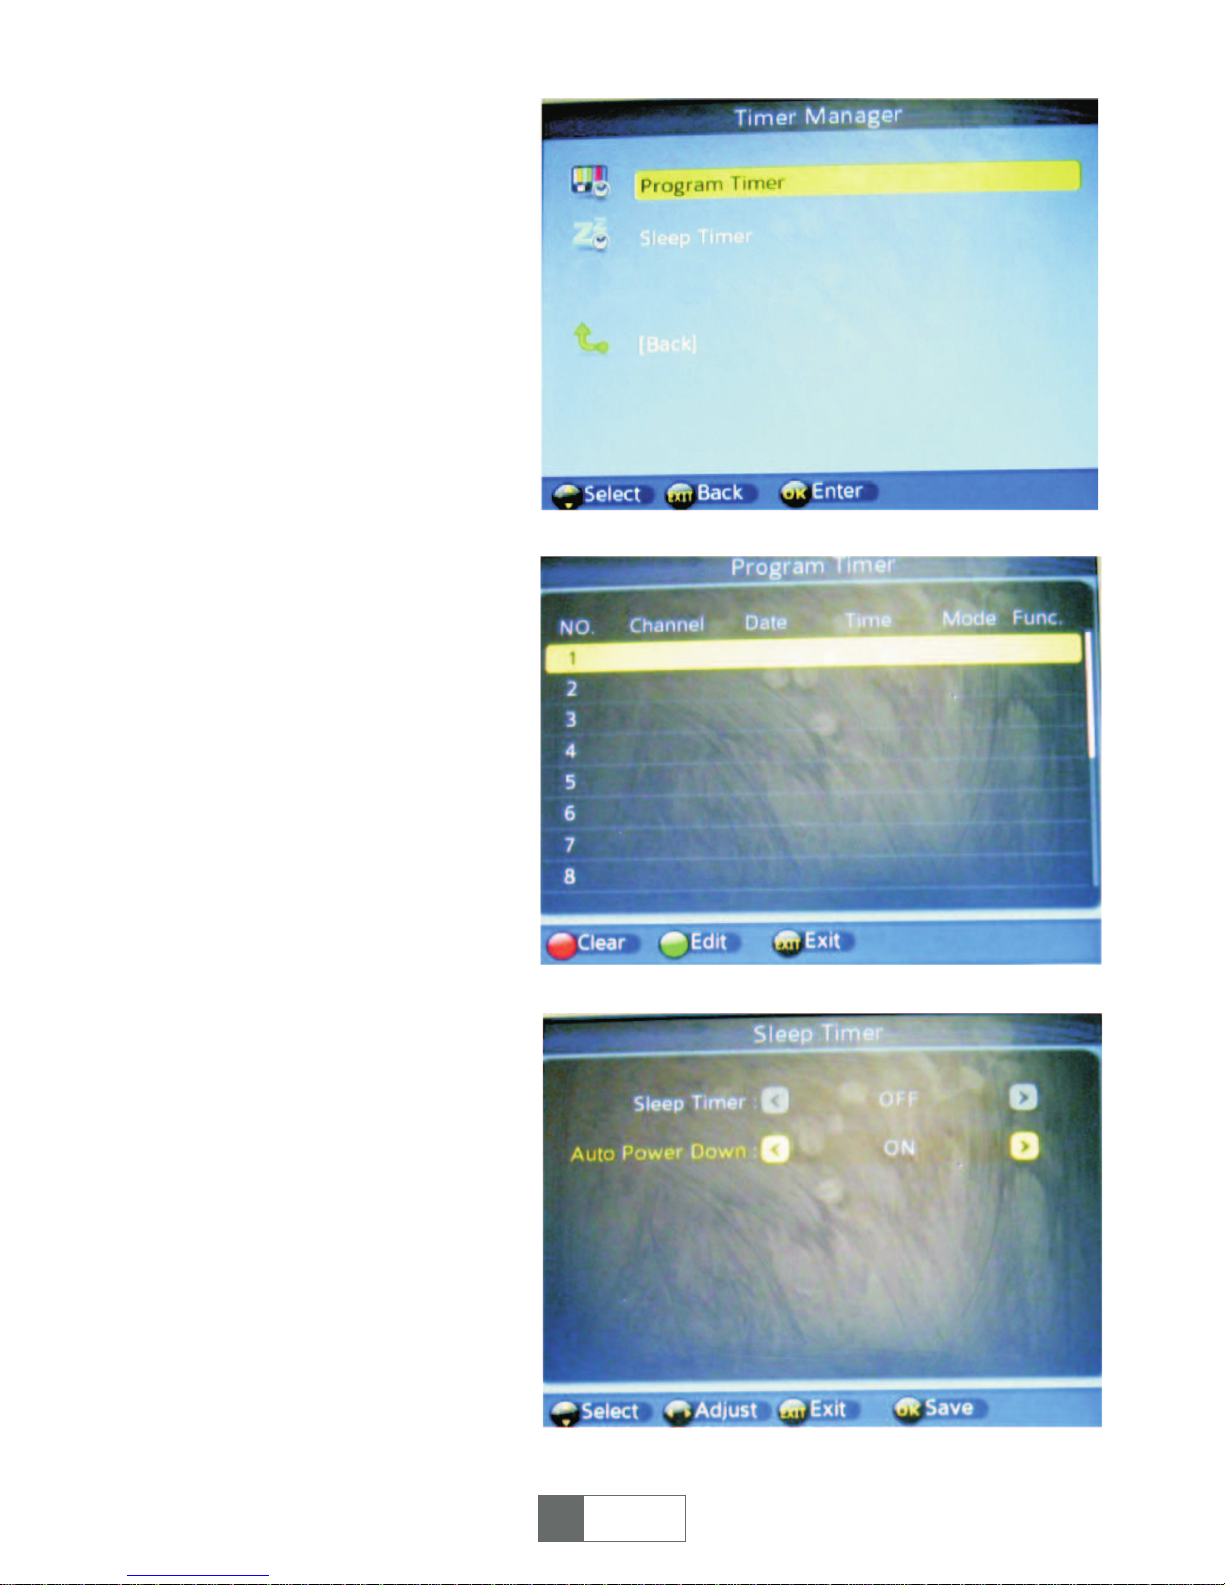
Figure 5
Figure 6
Figure 7
3. Time Manager
Press <OK> to enter „Time
Manager” page through „Main
Menu - Timer Manager - OK”, than
see figure 5.
3.1. Program Timer
Press <OK> to enter Program
Timer page, then press green
button <AUDIO> to set the
TV/Radio channel, Date, Start
Time, Duration, Mode, Function
which you’d like to record. Press
<OK> to confirm the setting. See
figure 6.
3.2. Sleep Timer
Press <OK> to enter Sleep Time
page. Press <CH+> / <CH-> to
select the item you wish to set, and
press <V+> / <V-> to set the time
for sleeping. While on mode for
„Auto Power Down”, it means the
unit enter standby mode after 3h
automatically (default set is ON for
this function, please press red
button <POWER> to restart
playing). See figure 7.
English
46
English
7
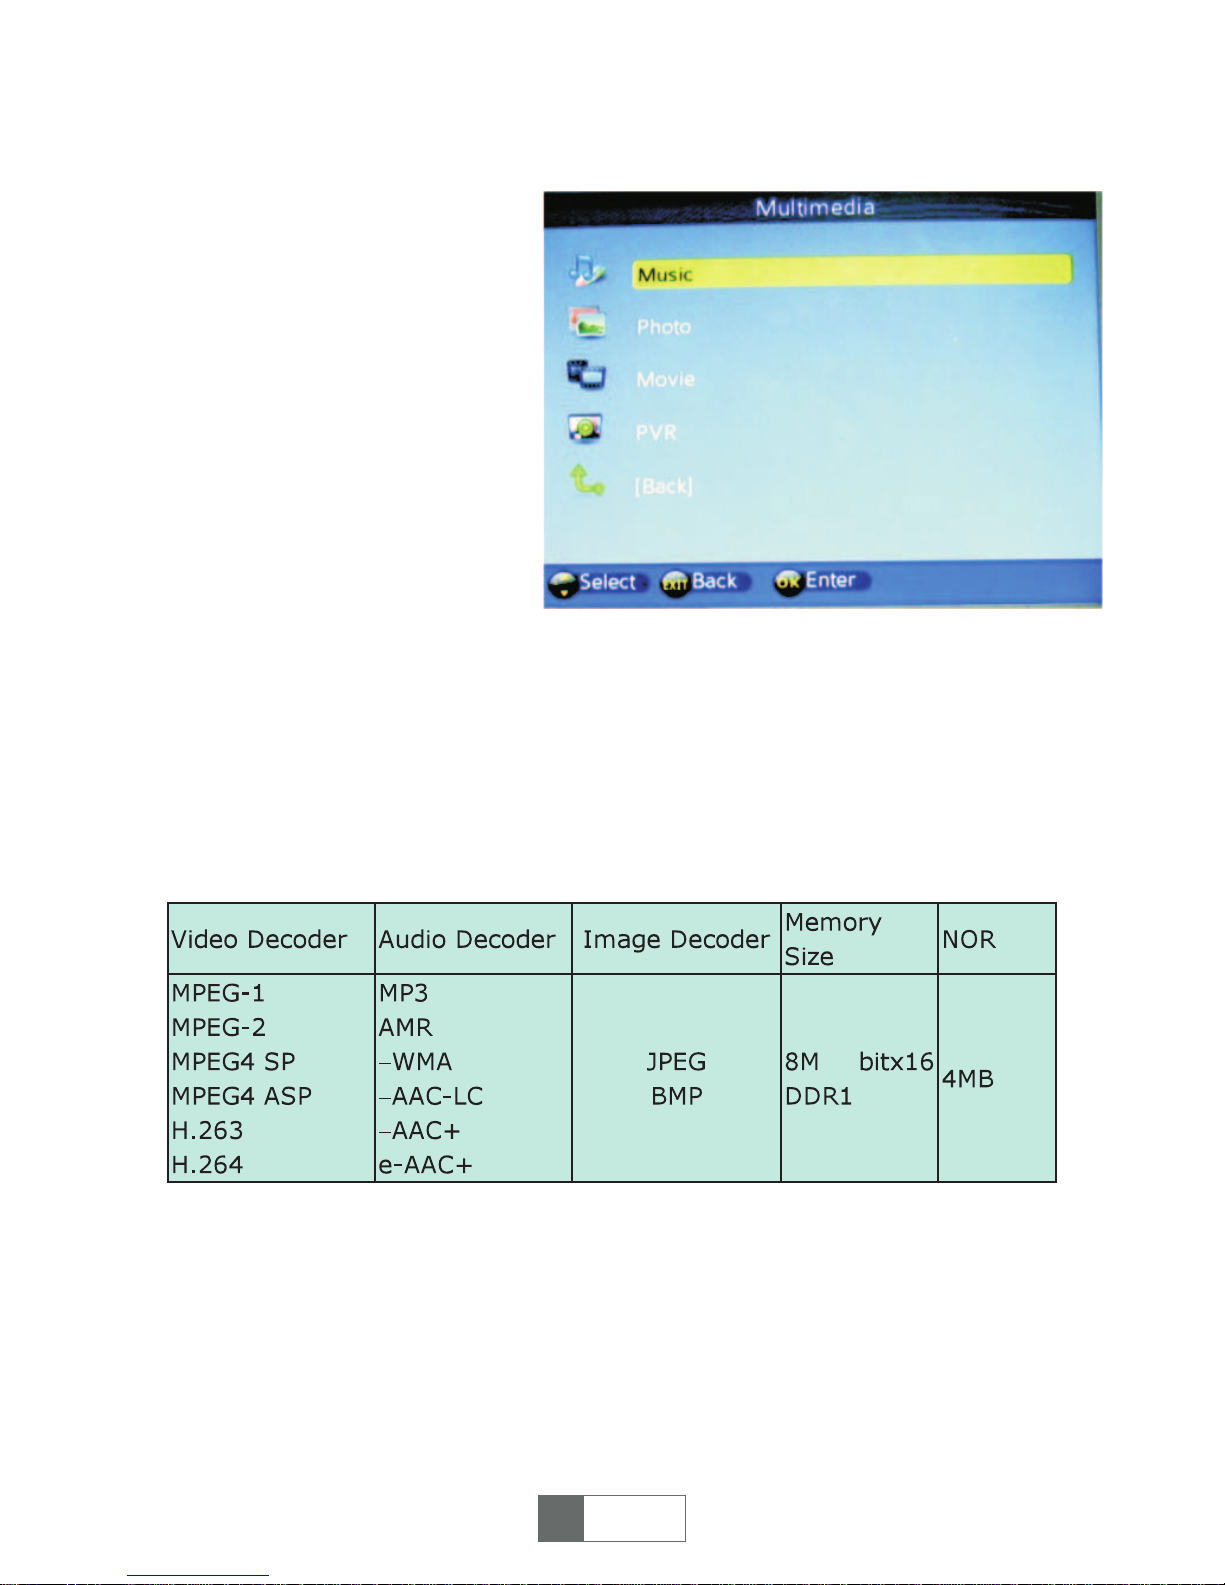
Figure 9
4. Multimedia
Insert USB device into USB slot,
then press <OK> to enter
„Multimedia” page through „Main
Menu - Multimedia - OK”, then se
figure 9.
4.1. Multimedia supported files ar ilustrated below. NTFS, FAT32 and FAT16 file
system can be supported at the moment.
1) Video sice: up to SD (standard definition)
2) Photo size: up to 256M pixels (16376*16376)
3) Audio channels: 2 channels
English
46
English
8
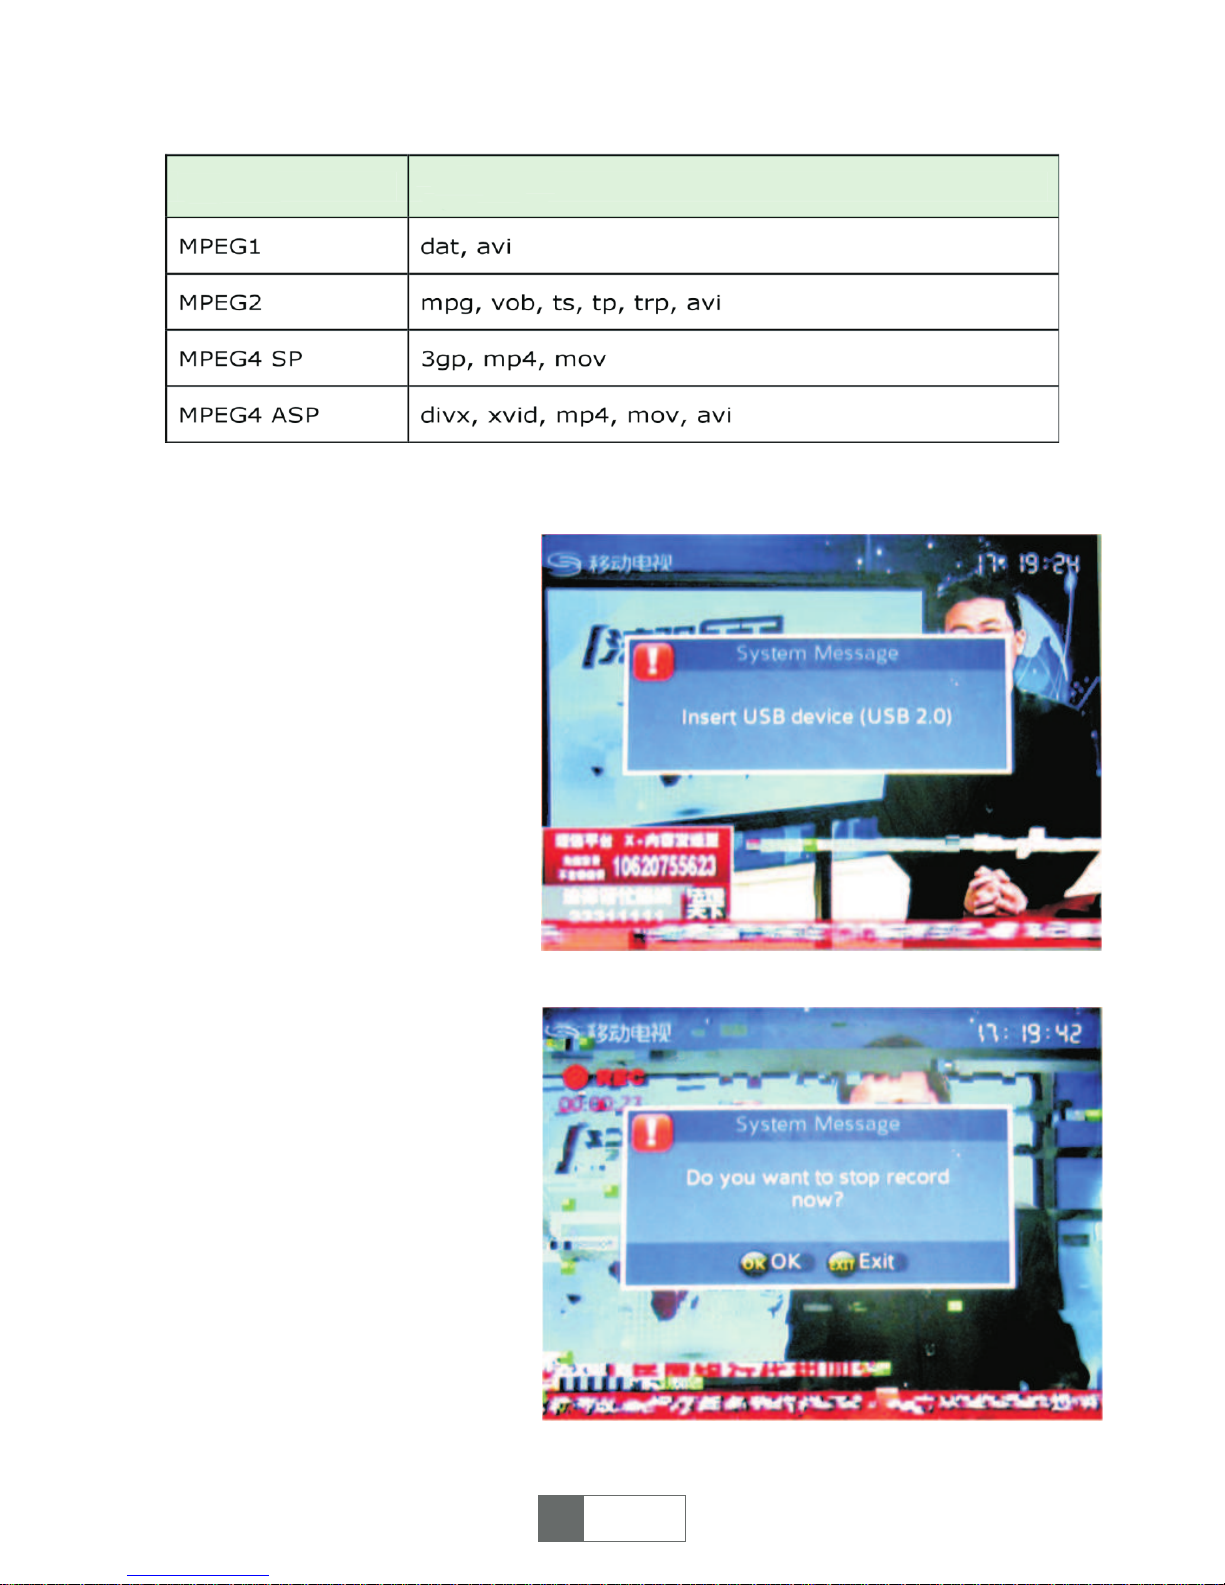
Figure 10
Figure 11
4.2. Press <CH+> / <CH-> to
select the item (Music, Photo,
Movie, PVR) you wish to play,
<OK> to enter playing mode.
NOTE: In PVR mode, if there isn’t
any recorded files on USB drive,
you can record live program first as
per below steps:
(a) Insert USB drive into USB
socket, after seeing a hint
message on the screen „Insert
USB device”, select a channel you
want to record, then press <REC>
on remote control. See figure 10.
(b) To stop recording, press
<STOP> button, a dialogue „Do
you want to stop record now?”
display, select „OK” to stop
recording and select „Exit” to
continue. A icon always display on
left-up side of the screen during
recording. See figure 11.
Note: When USB drive if full,
system will display a message
„Disk Full Error, Leaving...”.
English
46
English
9
Formats Extension
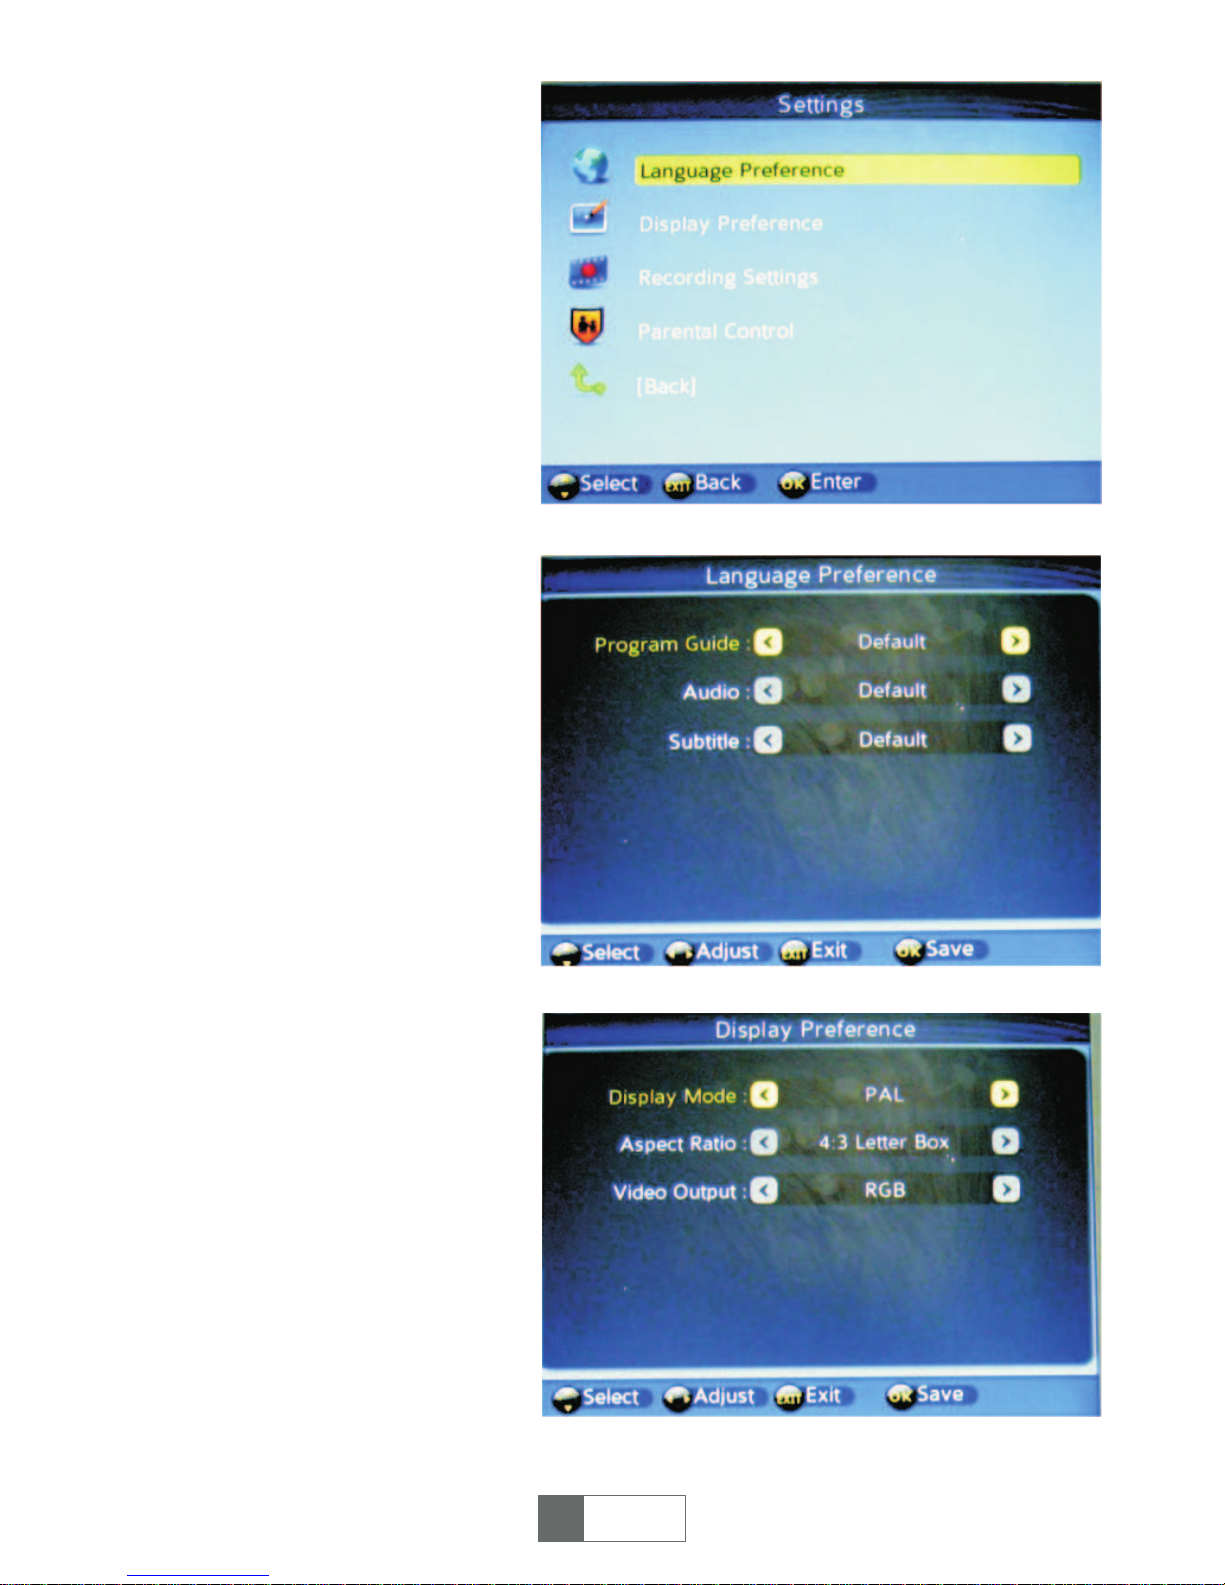
Figure 12
Figure 13
Figure 14
5. Settings
Press <OK> to enter „Settings”
page through „Main Menu Settings - OK”, <CH+> / <CH-> to
select the items you wish to adjust.
See figure 12.
5.1<OK> to enter Language
Preference page after you choose
this item, using <CH+> / <CH-> &
<V+> / <V-> to select language for
Program Guide, Audio, Subtitle.
See figure 13.
5.2. Press <OK> to enter Display
Preference page after you choose
this item, using <CH+> / <CH-> &
<V+> / <V-> to select the modes
(for Display Mode , Aspect Ratio,
Video Output) which are suitable
for user’s TV. See figure 14.
English
46
English
10
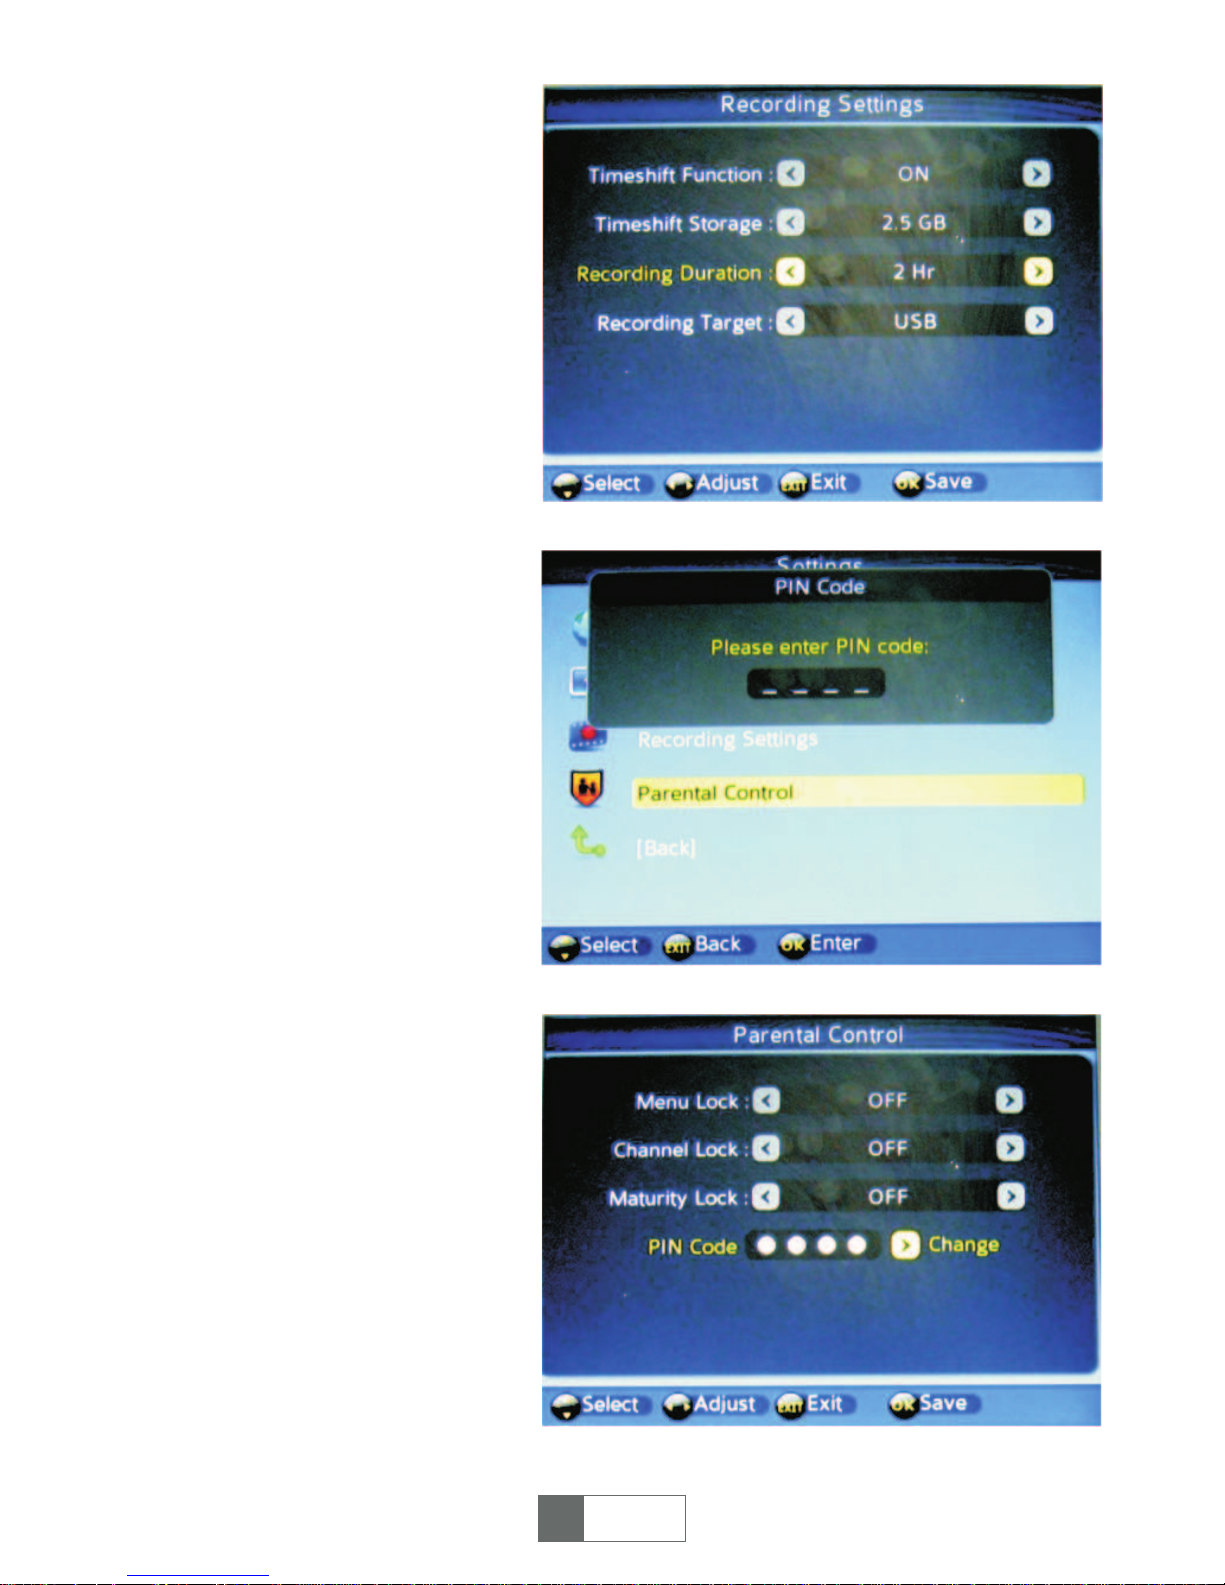
Figure 15
Figure 16
Figure 17
5.3 Press <OK> to enter
Recording Settings page after you
choose this item, using <CH+> /
<CH-> & <V+> / <V-> to set the
detailed data (for Timeshift
Function, Timeshift Storage,
Recording Duration, Recording
Target). See figure 15.
5.4. Press <OK> to enter Parental
Control page after you choose this
item, you can change the
password as per your needs
according to belows steps.
(1) Input old password (default
password is „0000") to enter
Parental Control page. See figure
16.
(2) using <CH+> / <CH-> & <V+> /
<V-> to turn on/off Menu Lock,
Channel Lock, Maturity Lock. See
figure 17.
(3) For PIN Code changing, press
<V+>, then input old password,
display shows „Please enter the
new PIN code”. Input the new
password, then „Confirm the new
PIN code”. Until displays shows
„The PIN code is changed!!”, which
means the password set success.
English
46
English
11

Figure 18
Figure 19
Figure 20
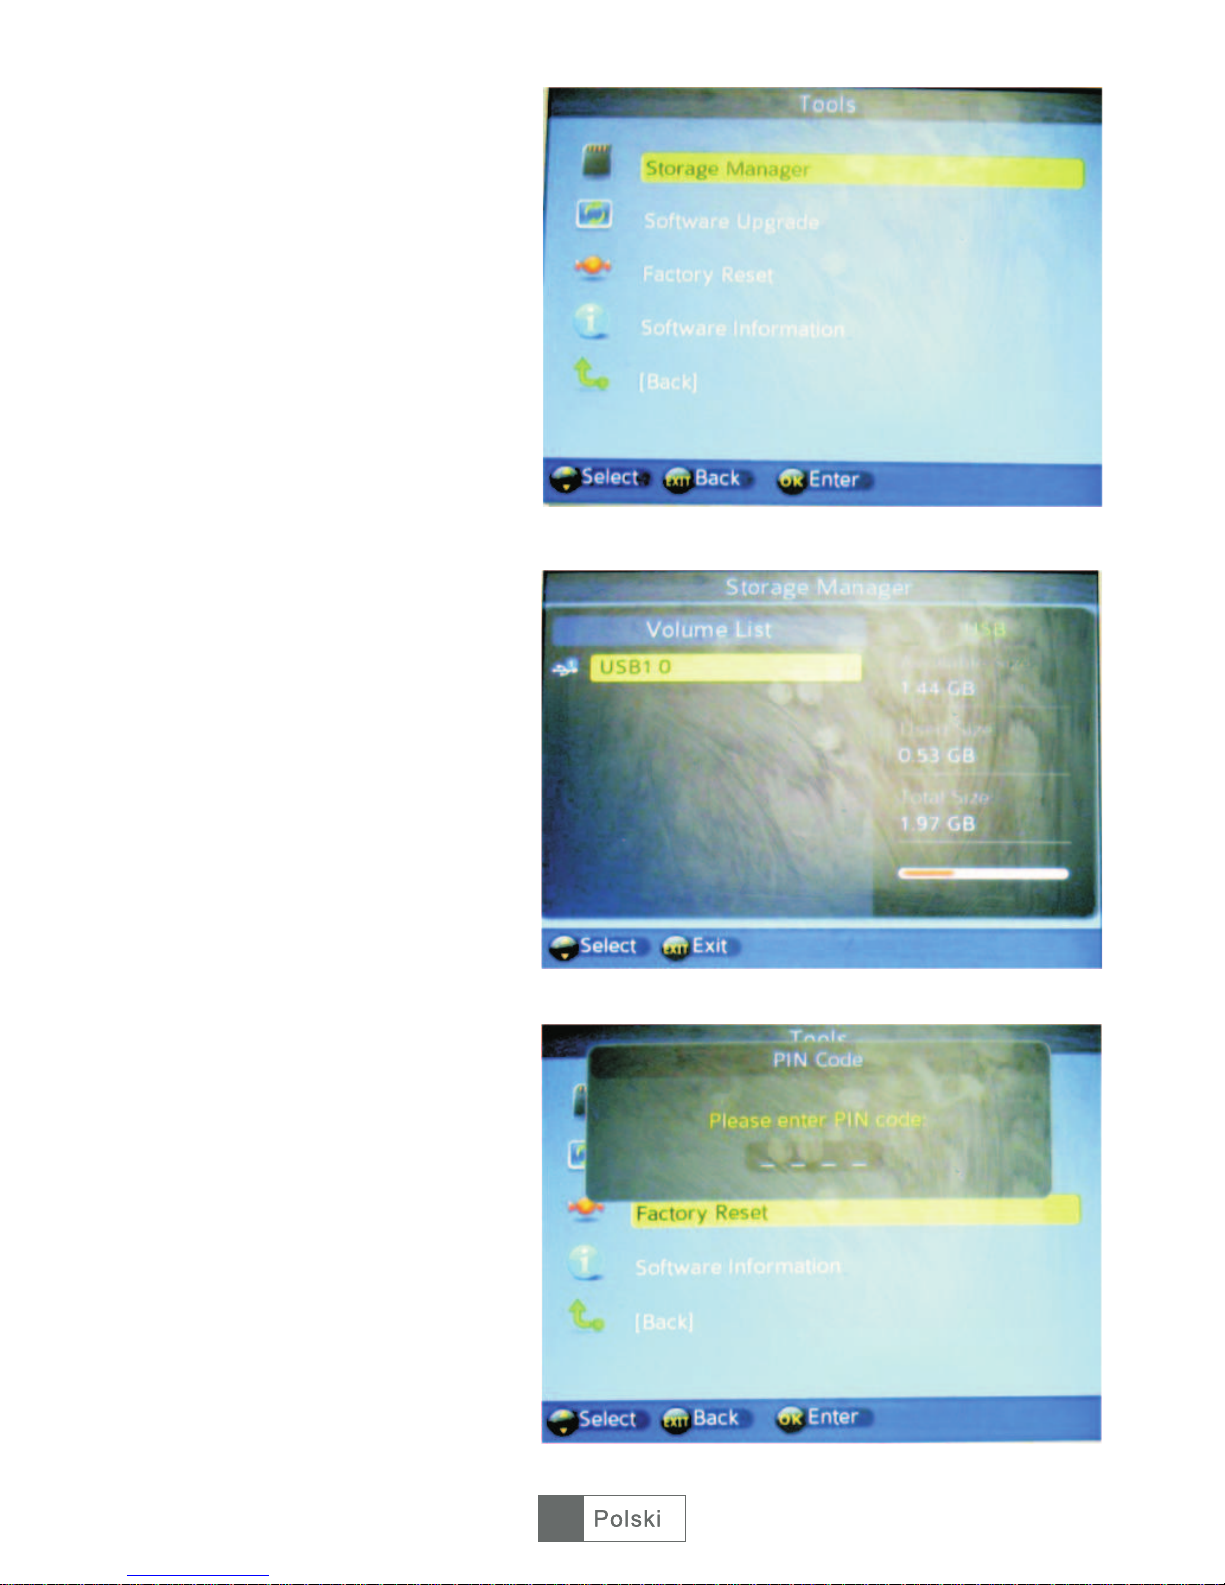
6. Tools
Press <OK> to enter „Tools” page
through „Main Menu - Tools - OK”
<CH+> / <CH-> to select the items
you wish to adjust. See figure 18.
6.1. Insert USB, then press <OK>
to enter Storage Manager page
after you choose this item. The
display will show the volume
information of the USB. See figure
19.
6.2. Press <OK> to enter Software
Upgrade via USB device.
6.3. Press <OK> to enter Factory
Reset page after you choose this
item, then input your password
(default password is „0000") the
unit will ask „The operation will
load default setting. Are you
sure?”. Choose No/Yes as you
wish. See figure 20 & 21.
English
46
English
12
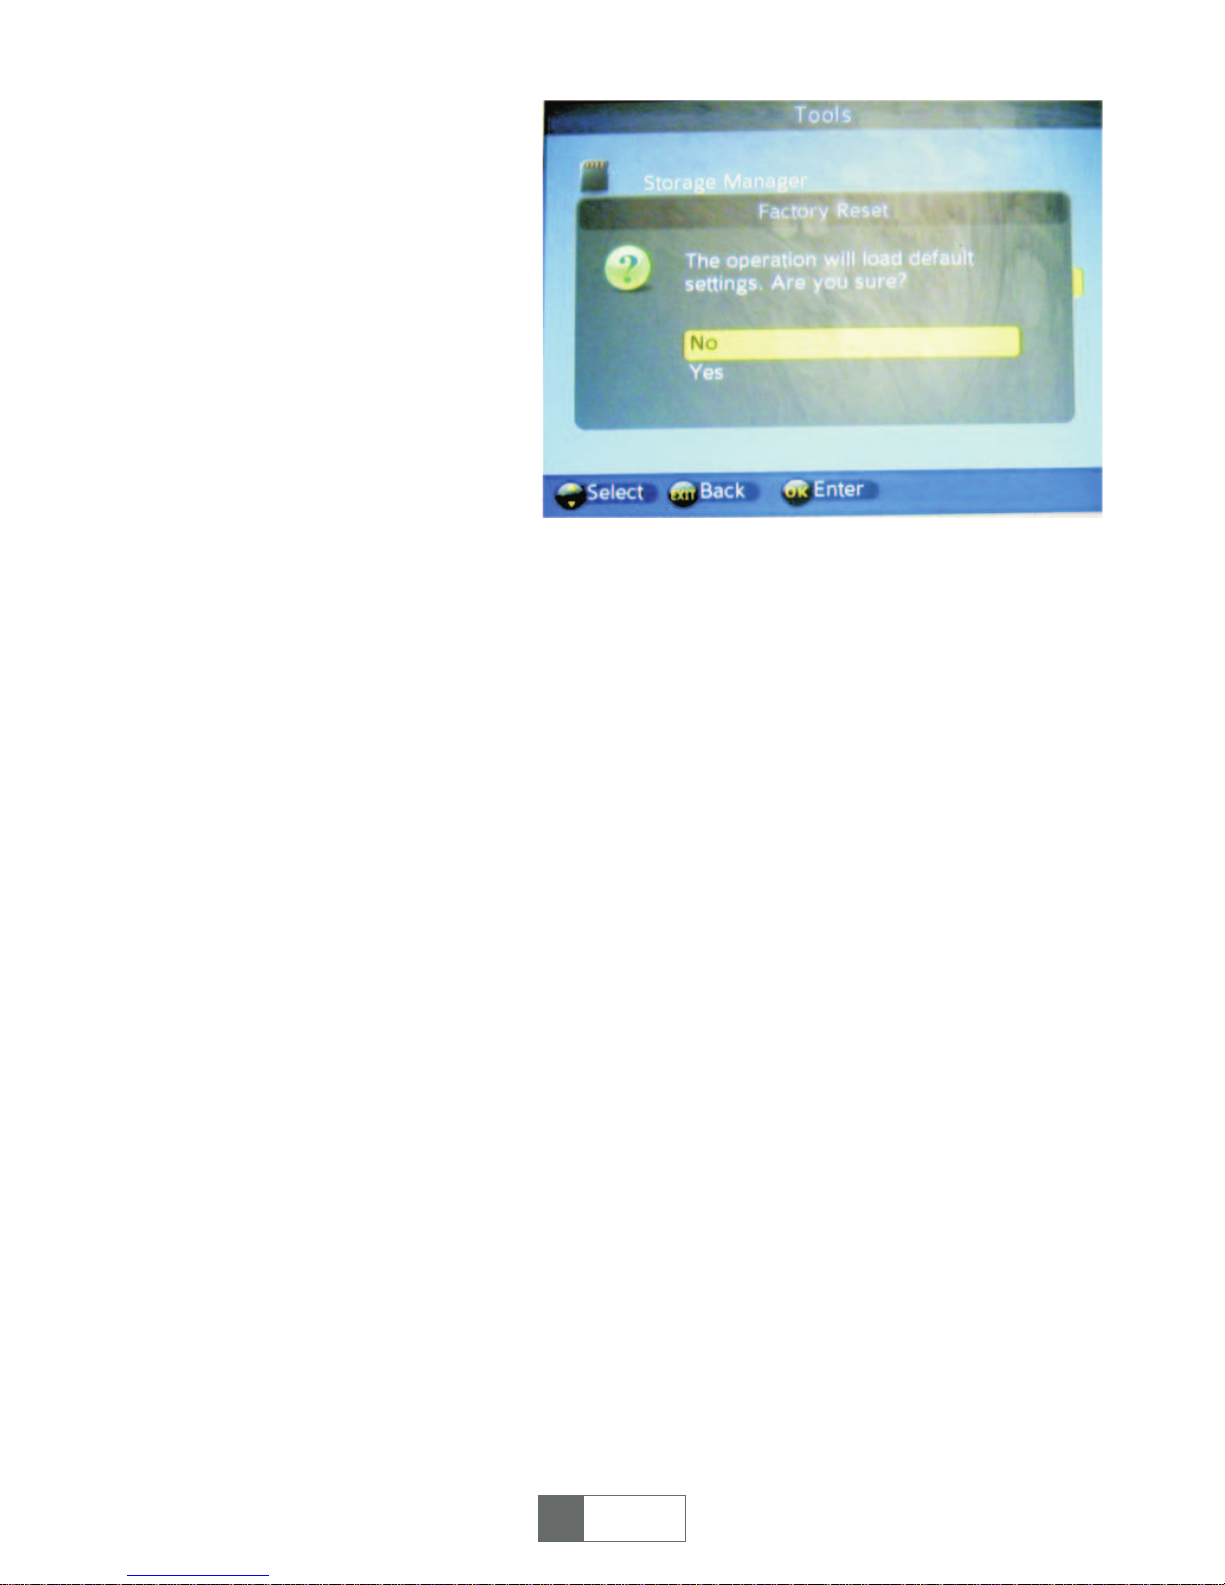
Figure 21
6.4. Press <OK> to enter Software Information page after you choose this item,
then display will show your present system version No...
Convenient functions
1. Ways of selecting program
STB provides four ways to select program.
(1) Press <Up/Down> button to next or previous program.
(2) Press <OK> to select program in program list.
(3) Press <0~9> to switch program.
If the input program number doesn,t exist, STB will ignore the input.
2. QUICK SELECT
(1) Press <OK> to display channel list.
(2) Press <Up/Down> to select channel, <OK> to confirm and switch to
corresponding channel.
3. EPG
Press <EPG> to enter „Program Guide” page in playing mode.
(1) Press <EPG> red button on remote control to enter Daily Mode.
(2) Select a channel by pressing <CH+> / <CH-> to previous day’s information.
Press yellow button <SUBTITLE> or blue button <TTX> to view former & next day’s
information.
(3) Press <OK> button to show program description.
4. SUBTITLE
Display subtitle on screen, the style of subtitle may be different by content provider.
(1) Press <SUBTITLE> yellow button to enter subtitle page.
(2) Press <V-/V+> and <OK> to turn on/off subtitle.
English
46
English
13

5. TTX
(1) Press <TTX> to enter Teletext page.
(2) Press <Up/Down> to go to previous or next page.
(3) Press <EXIT> to exit from teletext page.
6. AUDIO
Audio language selection.
(1) Press <AUDIO> to enter Multiaudio page.
(2) Press <Left> / <Right> to switch among stereo, left, right, press <UP> /
<DOWN> to select the language of sound.
(3) Press <OK> / <EXIT> to confirm the selection and return to full-screen play
mode.
7. Program information
To view the information of current program, press <i> on remote control to open it
when it is in full screen display, press again or <EXIT> to exit.
8. FAV
You can select favourite channel easily here after setting favourite channel
(1) Press <FAV> to enter favourite list.
(2) Press <Up/Down> to select channel.
(3) Press <EXIT> to exit.
9. TV/RADIO program switch
Press „TV/RADIO” to switch between TV program and Radio program when it is full
screen display.
NOTE: If no radio channels, system would display a hint message „No Radio
Program”.
10. PROG
Press <Prog> to enter program list.
11. RECORD
A hot-key to record live TV program. Detail information please refer to last section
„record set”.
12. PLAY/PAUSE
This button is used to play or pause the current live program or recorded program
playing.
13. RECALL
A hot-key to recall recorded program watched.
14. STOP
Stop to play current live program.
English
46
English
14
TUNER DVB-T
MPEG-4
INSTRUKCJA OBS£UGI
3
Przed u¿yciem przeczytaj instrukcjê obs³ugi.
15
URZ0181
Deutsch 43-56 English 1-14
R
omânã 29- 42 Polski 15- 28

316
INSTRUKCJE BEZPIECZEÑSTWA
UWAGA
?ABY UNIKN¥Æ RYZYKA PORA¯ENIA PR¥DEM NIE NALE¯Y
U¯YWAÆ PRZED£U¯ACZY, ROZGA£ÊNIKÓW LUB GNIAZDEK NISKIEJ
JAKOŒCI LUB NIE PASUJ¥CYCH DO WTYCZKI ZASILAJ¥CEJ.
?
URZ¥DZENIE PRZED KONTAKTEM Z WOD¥ ORAZ DZIA£ANIEM WILGOCI.
?ABY UNIKN¥Æ RYZYKA PORA¯ENIA PR¥DEM ZAWSZE UPEWNIJ SIÊ, ¯E
WTYCZKA ZASILANIA JEST PRAWID£OWO W£O¯ONA DO RÓD£A ZASILANIA.
PO¯ARU I
ABY UNIKN¥Æ RYZYKA PO¯ARU I PORA¯ENIA PR¥DEM CHROÑ
1. WEJŒCIE SYGNA£U ANTENOWEGO
2. WYJŒCIE SYGNA£U ANTENOWEGO
3. IR (SENSOR PODCZERWIENI)
4. PORT MINI USB
5. ZASILANIE DC 5V
317

PILOT ZDALNEGO STEROWANIA:
1. Wyciszenie: W³¹cza / wy³¹cza dŸwiêk.
2. Przyciski numeryczne: <0,9>
3. Menu: Wejœcie do menu
4. VOL -/+: Ustawienia g³oœnoœci
5. EPG: Elektroniczny przewodnik po
programach
6. AUDIO: Operacje audio
7. Info: Wyœwietlenie informacji o programie
8. RECALL: Powrót do poprzedniego kana³u
9. RECORD: Nagrywanie
10. MEDIA: Odtwarzanie multimediów
11. STOP: Zatrzymanie odtwarzania
12. PLAY/PAUSE: Odtwarzanie / pauza
13. POWER: W³¹czenie / wy³¹czenie
urz¹dzenia
14. EXIT: Anulowanie bie¿¹cej operacji i
powrót do poprzedniego menu
15. OK: Potwierdzenie wyboru
16. CH+/-: Zmiana kana³u w górê / dó³
17. TTX: Telegazeta
18. SUBTITLE: Napisy
19. FAV: Wyœwietlenie ulubionych programów
20. TV/RADIO: Prze³¹czenie pomiêdzy
odbiorem radia i telewizji
21. PROG: Edycja Timera nagrywania /
alarmu
22. PAGE UP: Powrót do poprzedniej strony
23. PAGE DOWN: Przejœcie do nastêpnej
strony
24. PREV: Odtworzenie poprzedniego utworu
z urz¹dzenia USB
25. NEXT: Odtworzenie nastêpnego utworu z
urz¹dzenia USB
26. FF i FR: Powiêkszenie / zmniejszenie
przybli¿enia przy funkcji Zoom. Zwiêkszenie /
zmniejszenie prêdkoœci odtwarzania przy
odtwarzaniu utworów.
318
Pod³¹czenie tunera STB
a) Pod³¹czenie anteny do tunera
Pod³¹cz antenê do wejœcia antenowego tunera (ANT IN).
b) Pod³¹czenie tunera do telewizora
Pod³¹cz tuner do telewizora poprzez z³¹cze scart.
c) W³¹cz tuner i telewizor a nastêpnie ustaw na telewizorze AV IN.
Menu g³ówne
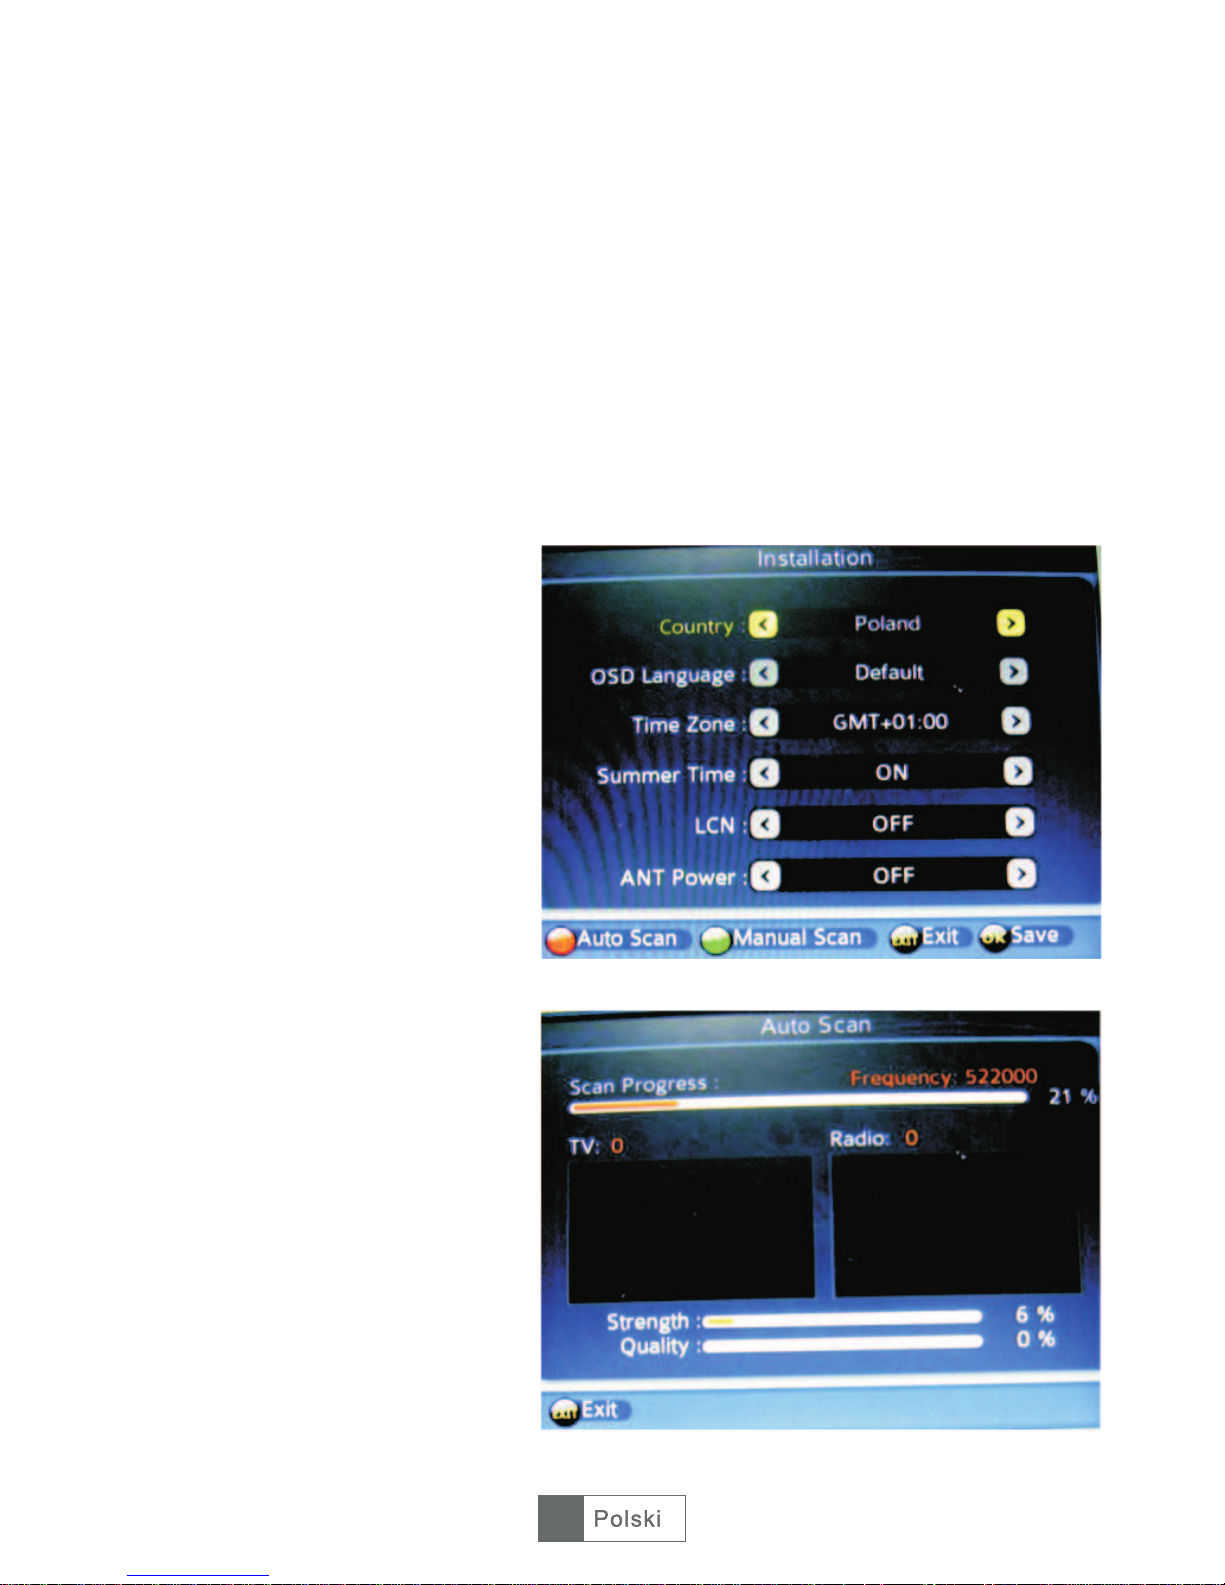
1. Instalacja
Przy pierwszym pod³¹czeniu tunera, w pierwszej kolejnoœci nale¿y wyszukaæ kana³y
radiowe i telewizyjne:
Rys. 1
Rys. 2
1.1. <OK>
przejœæ do wyszukiwania kana³ów,
nastêpnie za pomoc¹ <CH+> /
<CH-> wybierz parametry, które
chcesz ustawiæ i za pomoc¹
przycisków <V-> / <V+> oraz
<OK> ustaw ¿¹dane wartoœci:
jêzyk OSD, kraj, strefê czasow¹,
czas letni oraz zasilanie anteny.
Naciœnij przycisk <OK> aby
zapisaæ wprowadzone ustawienia.
Zobacz Rys 1.
1.2. Naciœnij czerwony przycisk
<EPG> aby potwierdziæ ustawienia
i przejϾ do automatycznego
wyszukiwania kana³ów. U¿yj
zielonego przycisku <AUDIO> aby
wyszukaæ kana³ je¿eli znasz jego
czêstotliwoœæ. Zobacz Rys. 1 i 2.
Naciœnij przycisk aby
319

Rys. 3
Rys. 4
<UWAGA> przed rozpoczêciem
wyszukiwania upewnij siê, ¿e
antena jest w³aœciwie pod³¹czona
do tunera TV. Po zakoñczeniu
wyszukiwania i zapisaniu
wszystkich wyszukanych kana³ów,
mo¿na ju¿ przejœæ do ogl¹dania
TV.
2. Menad¿er kana³ów
2.1. Naciœnij przycisk <OK> aby
przejœæ do Menad¿era kana³ów
„Main Menu - Channel Manager OK”.
2.2. Naciœnij przycisk <CH+> /
<CH-> aby wybraæ program TV,
nastêpnie naciœnij przycisk <EPG>
<AUDIO> <SUBTITLE> <TTX>
aby edytowaæ kana³. Dostêpne s¹
4 funkcje: Pomiñ / Usuñ / Ulubiony
/ Blokada. Spójrz Rys. 4.
Pomiñ: Naciœnij czerwony przycisk
<EPG> aby pomin¹æ wybrany
kana³.
Usuñ: Naciœnij zielony przycisk
<AUDIO> aby usun¹æ wybrany
kana³.
Ulubiony: <SUBTITLE> aby ustawiæ zaznaczony kana³ jako
ulubiony (Uwaga: Po ustawieniu kana³u jako ulubionego mo¿na uzyskaæ do niego
bezpoœredni dostêp poprzez naciœniêcie przycisku „FAV” na pilocie zdalnego
sterowania).
Blokada: Naciœnij niebieski przycisk <TTX> aby zablokowaæ zaznaczony kana³. Aby
odblokowaæ kana³ nale¿y ponownie nacisn¹æ niebieski przycisk <TTX>.
UWAGA: Naciœnij przycisk <TV/RADIO> aby zmieniæ ustawienia kana³ów
radiowych. Po wprowadzeniu wszystkich zmian naciœnij przycisk Exit aby wyjœæ i
zapisaæ zmiany.
Naciœnij ¿ó³ty przycisk
320

Rys. 5
Rys. 6
Rys. 7
3. Ustawienia czasu
Naciœnij przycisk aby przejœæ
do ustawieñ czasu „Main Menu -
Timer Manager - OK”, zobacz
Rys. 5.
3.1. Ustawienia Timera
Naciœnij przycisk <OK> aby przejœæ
do menu ustawieñ Timera, a
nastêpnie naciœnij zielony przycisk
<AUDIO> aby ustawiæ kana³
TV/Radiowy, datê, czas
pocz¹tkowy, czas trwania itp. Za
pomoc¹ przycisku <OK> potwierdŸ
wprowadzone dane. Zobacz
Rys. 6.
3.2. Funkcja Sleep
Naciœnij przycisk <OK> aby przejœæ
do ustawieñ funkcji Sleep. Za
pomoc¹ przycisków <CH+>/<CH->
i <V+>/<V-> wprowadŸ ¿¹dane
ustawienia. Przy ustawionej funkcji
„Auto Power Down”, urz¹dzenie po
3 godzinach automatycznie
przejdzie w tryb czuwania
(domyœlnie funkcja ta jest
w³¹czona). Zobacz Rys. 7.
<OK>
321

Rys. 9
4. Multimedia
Pod³¹cz urz¹dzenie USB do
gniazda USB, a nastêpnie naciœnij
przycisk <OK> aby przejϾ do
odtwarzania multimediów „Main
Menu - Multimedia - OK”, zobacz
Rys. 9.
4.1. W poni¿szej tabeli przedstawiono odtwarzane typy plików. Urz¹dzenie wspiera
system plików NTFS, FAT32 oraz FAT16.
1) Rozmiar video: do wielkoœci SD (standard definition)
2) Rozmiar obrazu: do 256M pikseli (16376*16376)
3) Kana³y audio: 2 kana³y
322
Dekoder video Dekoder audio Dekoder obrazu
Rozmiar
pamiêci
Rys. 10
Rys. 11
4.2. <CH+>/<CH->
aby wybraæ odtwarzanie: muzyki,
obrazów, video lub PVR a nastêpnie
naciœnij przycisk <OK> aby przejœæ
do odtwarzania.
UWAGA: W trybie PVR, je¿eli nie
ma wczeœniej nagranych plików na
urz¹dzeniu USB, mo¿na nagraæ
aktualnie ogl¹dany program.
(a) Pod³¹cz urz¹dzenie USB do
wejœcia USB na tunerze. Po
ukazaniu siê na ekranie informacji
„Insert USB device” (Urz¹dzenie
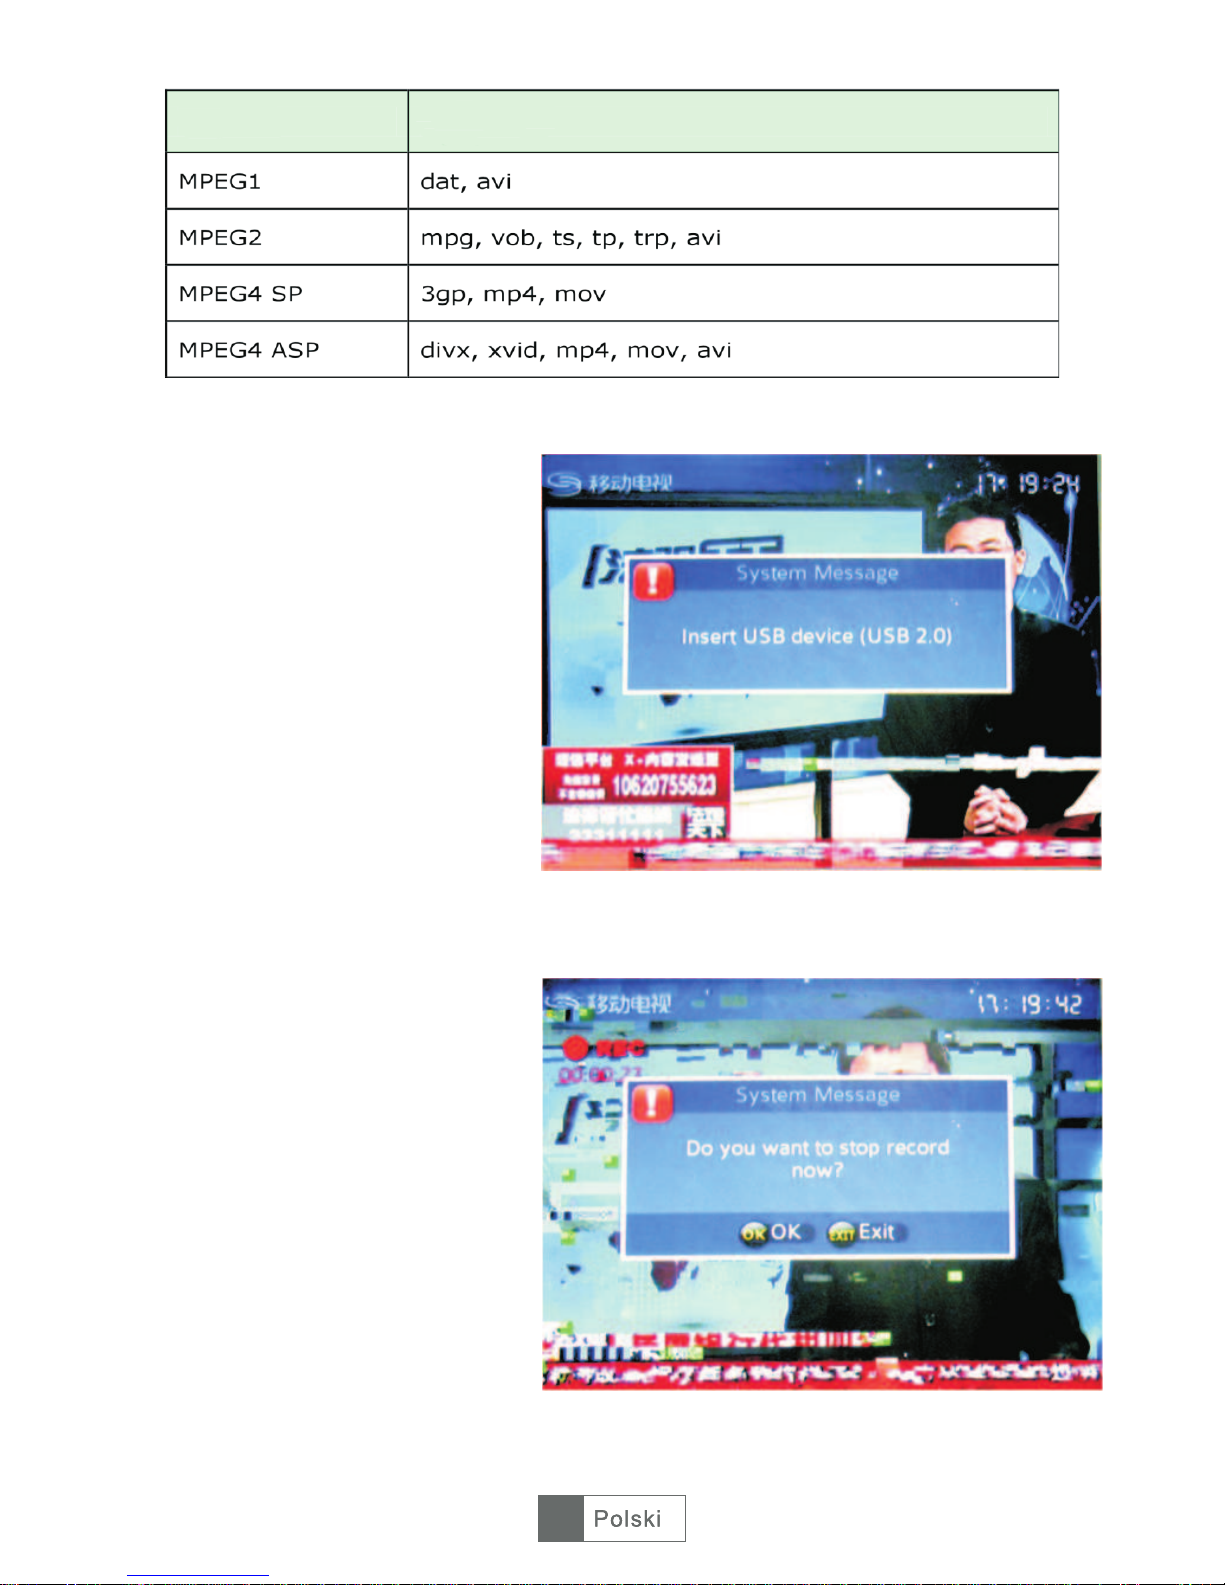
USB pod³¹czone), wybierz program,
który chcesz nagrywaæ a nastêpnie
naciœnij przycisk <REC> na pilocie
zdalnego sterowania. Zobacz Rys.
10.
(b) Aby zatrzymaæ nagrywanie,
naciœnij przycisk <STOP>, na
ekranie uka¿e siê informacja „Do
you want to stop record now?” (Czy
na pewno zatrzymaæ nagrywanie),
wybierz „OK” aby zatrzymaæ lub
„Exit” aby kontynuowaæ. Rys. 11.
Uwaga: Gdy urz¹dzenie USB jest
pe³ne na ekranie uka¿e siê
informacja „Disk Full Error,
Leaving...”.
Naciœnij przycisk
323
Format Rozszerzenie

Rys. 12
Rys. 13
Rys. 14
5. Ustawienia
Naciœnij przycisk <OK> aby przejœæ
do menu ustawieñ „Main Menu Settings - OK”, Za pomoc¹
przycisków <CH+> / <CH->
wybierz ustawienia, które chcesz
zmieniæ. Zobacz Rys. 12.
5.1. Naciœnij przycisk <OK> aby
przejœæ do ustawieñ jêzykowych.
Za pomoc¹ przycisków <CH+> /
<CH-> oraz <V+> / <V-> dostosuj
jêzyk menu, audio oraz napisów.
Zobacz Rys. 13.
5.2. Naciœnij przycisk <OK> aby
przejœæ do ustawieñ wyœwietlanego
obrazu. U¿ywaj¹c przycisków
<CH+> / <CH-> oraz <V+> / <V->
dostosuj wybrane w³aœciwoœci.
Zobacz Rys. 14.
324

Rys. 15
Rys. 16
Rys. 17
5.3 Naciœnij przycisk <OK> aby
przejœæ do ustawieñ nagrywania, a
nastêpnie za pomoc¹ przycisków
<CH+> / <CH-> oraz <V+> / <V->
ustaw ¿¹dane wartoœci. Zobacz
Rys. 15.
5.4. Naciœnij przycisk <OK> aby
przejœæ do ustawieñ ochrony
rodzicielskiej. Na ekranie uka¿e sie
okno dialogowe informuj¹ce o
koniecznoœci wprowadzenia has³a
dostêpu (PIN).
(1) WprowadŸ has³o dostêpu
(domyœlne has³o to„0000"). Zobacz
Rys. 16.
(2) Za pomoc¹ przycisków <CH+>
/ <CH-> oraz <V+> / <V-> ustaw
¿¹dane w³aœciwoœci ochrony
rodzicielskiej (blokada menu,
blokada kana³u, blokada wieku
oraz zmiana has³a). Zobacz
Rys. 17.
(3) Aby zmieniæ kod dostêpu (PIN)
naciœnij przycisk <V+>, na
wyœwietlaczu uka¿e sie informacja
„Please enter the new PIN code”.
WprowadŸ nowy kod dostêpu, na
wyœwietlaczu uka¿e siê informacja
o koniecznoœci potwierdzenia
wprowadzonego kodu „Confirm the
new PIN code”. PotwierdŸ
wprowadzony kod. Je¿eli zmiana
kodu zakoñczy³a siê
powodzeniem, to na wyœwietlaczu
uka¿e siê informacja „The PIN
code is changed!!”.
325
Rys. 18
Rys. 19
6. Narzêdzia
Naciœnij przycisk <OK> aby przejœæ
do Narzêdzi „Main Menu - Tools OK” a nastêpnie za pomoc¹
przycisków <CH+> / <CH->
wybierz ¿¹dane ustawienia.
Zobacz Rys. 18.
6.1. Pod³¹cz urz¹dzenie USB do
tunera a nastêpnie naciœnij
przycisk <OK> aby wyœwietliæ
informacje o pod³¹czonym
urz¹dzeniu. Zobacz Rys. 19.
6.2. Naciœnij przycisk <OK> aby
przejϾ do aktualizacji
oprogramowania tunera z
urz¹dzenia USB.
6.3. Naciœnij przycisk <OK> aby
przywróciæ ustawienia domyœlne
urz¹dzenia. Na ekranie uka¿e siê
informacja o koniecznoœci
wprowadzenia has³a dostêpu
(domyœlne has³o to „0000").
Nastêpnie na ekranie uka¿e siê
zapytanie czy na pewno
przywróciæ ustawienia domyœlne
urz¹dzenia „The operation will load
default setting. Are you sure?”.
Wybierz „Yes” aby potwierdziæ lub
„No” aby anulowaæ. Zobacz
Rys. 20 i 21.
326
Rys. 20

Rys. 21
6.4. Naciœnij przycisk <OK> aby zobaczyæ informacje o aktualnej wersji systemu
„Software Information”.
Przydatne funkcje
1. SPOSOBY ZMIANY KANA£U
Tuner STB umo¿liwia trzy sposoby zmiany kana³u.
(1) Naciœnij przycisk <Up/Down> aby przejœæ do nastêpnego / poprzedniego kana³u.
(2) Naciœnij przycisk <OK> aby wybraæ program z listy programów.
(3) Naciœnij przycisk <0~9> aby wybraæ odpowiedni program.
Je¿eli wprowadzony numer kana³u nie istnieje, tuner zignoruje wprowadzone dane.
2. SZYBKI WYBÓR
(1) Naciœnij przycisk <OK> aby wyœwietliæ listê kana³ów.
(2) Naciœnij przycisk <Up/Down> aby wybraæ kana³, a nastêpnie <OK> aby
potwierdziæ i prze³¹czyæ siê na wybrany kana³.
3. EPG
(1) Naciœnij czerwony przycisk <EPG> na pilocie zdalnego sterowania.
(2) Wybierz kana³ u¿ywaj¹c przycisków <CH+> / <CH->. Naciœnij ¿ó³ty przycisk
<SUBTITLE> lub niebieski przycisk <TTX> aby zobaczy informacje z dnia
poprzedniego / nastêpnego.
(3) Naciœnij przycisk <OK> aby zobaczyæ opis programu.
4. SUBTITLE
Styl wyœwietlanych na ekranie napisów mo¿e byæ ró¿ny w zale¿noœci od
nadawanego programu.
(1) Naciœnij ¿ó³ty przycisk <SUBTITLE> aby przejœæ do napisów.
(2) Za pomoc¹ przycisków <V-/V+> i <OK> w³¹cz lub wy³¹cz napisy.
327

5. TTX
(1) Naciœnij przycisk <TTX> aby w³¹czyæ telegazetê.
(2) Naciœnij przycisk <Up/Down> aby wyœwietliæ poprzedni¹ / nastêpn¹ stronê.
(3) Naciœnij przycisk <EXIT> aby wy³¹czyæ telegazetê.
6. AUDIO (Wybór jêzyka).
(1) Naciœnij przycisk <AUDIO> aby przejœæ do ustawieñ jêzykowych.
(2) Za pomoc¹ przycisków <LEFT> / <RIGHT> oraz <UP> / <DOWN> dostosuj
ustawienia dŸwiêku.
(3) Naciœnij przycisk <OK> / <EXIT> aby zapisaæ wprowadzone ustawienia i
powróciæ do trybu ogl¹dania.
7. Informacje o programie
Aby wyœwietliæ informacje o bie¿¹cym programie, naciœnij przycisk <i> na pilocie
zdalnego sterowania, aby zamkn¹æ informacje naciœnij przycisk <EXIT>.
8. FAV
Funkcja umo¿liwia szybkie prze³¹czenie siê na ulubiony kana³.
(1) Naciœnij przycisk <FAV> aby wyœwietliæ listê ulubionych kana³ów.
(2) Za pomoc¹ przycisku <UP/DOWN> wybierz ulubiony kana³.
(3) Naciœnij przycisk <EXIT> aby wyjœæ.
9. Prze³¹czanie odtwarzania TV / RADIO
Naciœnij przycisk „TV/RADIO” aby prze³¹czyæ siê pomiêdzy ogl¹daniem telewizji a
s³uchaniem radia.
UWAGA: Je¿eli nie zosta³y wyszukane ¿adne programy radiowe, na ekranie
zostanie wyœwietlona informacja „No Radio Program”.
10. PROG
Naciœnij przycisk <PROG> aby przejœæ do listy programów.
11. RECORD
Funkcja umo¿liwia nagrywanie bie¿¹cego kana³u.
12. PLAY/PAUSE
Funkcja umo¿liwia zatrzymanie / wznowienie odtwarzania ogl¹danego programu.
13. RECALL
Przywo³anie ogl¹danego programu.
14. STOP
Zatrzymanie aktualnie ogl¹danego programu.
328

Instructiuni de utilizare
29
Românã
URZ0181
MPEG-4 TERRISTERIAL
RECEIVER
Deutsch 43-56 English 1-14
Românã 29- 42 Polski 15- 28
Cititi cu atentie acest manual inainte de instalare si utilizare.

30
Românã

INSTRUCTIUNI PENTRU FUNCTIONAREA IN SIGURANTA
AVERTISMENT
? PENTRU A PREVENI PERICOLUL UNUI INCENDIU SAU A UNUI SOC
ELECTRIC, NU FOLOSITI APARATUL ALIMENTAT DE LA PRELUNGITOR SAU LA
PRIZA DE PERETE DECAT IN CAZUL IN CARE LAMELELE DE ALIMENTARE
SUNT INTRODUSE COMPLET, EVITANDU-SE ASTFEL EXPUNEREA LOR.
? PENTRU A PREVENI UN INCENDIU SAU UN PERICOL DE SOC ELECTRIC,
FERITI DISPOZITIVUL DE UMEZEALA.
? PENTRU A PREVENI RISCUL UNUI SOC ELECTRIC, POTRIVITI MUFA
LAMEI LATE LA ORIFICIUL CORESPUNZATOR.
1. Intrare ANTENA
2. Iesire bucla
3. IR
4. USB
5. DC 5V
31
Românã

Telecomanda:
1. Silentios: Oprire/pornire sunet.
2. Taste numerice: <0-9>
3. Meniu: accesati meniul principal
4. VOL-/+: reglare volum
5. EPG: Ghid programe
6. AUDIO
7. Info: afisarea informatiilor legate de
program pentru modul de redare pe intreg
ecranul sau afisarea ghidului de functionare
pentru meniul curent
8. Revocare: schimbati inapoi pe canalul
anterior
9. INREGISTRARE: inregistrarea programelor
TV
10. MEDIA: redare media
11. STOP: oprirea redarii programelor
12. REDARE/PAUZA: PAuza/Redare
programe sau redare film
13. PORNIRE: Pornire/oprire, Standby
14. EXIT: Anulati modul curent de functionare
si reveniti la meniul anterior
15. OK: Confirmati alegerea facuta in meniul
de functionare
16. CH+/-: Alegerea canalelor sus/jos
17. TTX: teletext DVB
18. SUBTITRARE: Subtitrare
19. FAV:Afisarea programelor favorite
20. TV/RADIO: schimbati intre modurile TV si
Radio
21. PROG: Inregistrare/editare alarma trezire
22. Derulare in sus pe pagina: la pagina
anterioara
23. Derulare in jos pe pagina: la pagina
urmatoare
24. ANT.: redarea dispozitivului media USB
anterior
25. URMATOR: redarea urmatorului dispozitiv
media USB
26. FF si FR: Marire imagine/micsorare pe
modul zoom. Mariti viteza/ reduceti in timpul
redarii USB.
32
Românã

Conectarea receptorului
a) Conectarea antenei la receptor
Conectati antena la unitate prin mufa INTRARII ANTENEI.
b) Conectarea receptorului la TV
Conectati aparatul la TV cu ajutorul cablului scart prin mufa scart.
c) Porniti TV-ul si aparatul, selectati apoi INTRAREA AV.
Meniul principal
1. Instalare
Cand utilizatorul conecteaza receptorul (STB) pentru prima oara,va trebui sa caute
canalele, deoarece aparatul nu dispune de nici un canal memorat, dupa cum
urmeaza:
Figura 1
Figura 2
1.1. Apasati <OK> pentru a accesa
pagina Instalarii, apoi apasati
<CH+>/<CH-> pentru a selecta
pozitia pe care doriti sa o setati,
<V->/<V+> si <OK> pentru a
selecta limbajul OSD, tara, fusul
orar.De asemenea porniti/opriti ora
de vara, LCN (lista canalelor
numerotate, un numar exclusiv
pentru fiecare canal pe modul ON),
putere ANT (alimentare pentru
antena conectata). Apasati tasta
<OK> pentru a salva setarile. Vezi
figura 1.
1.2. Apasati butonul rosu <EPG>
pentru a confirma setarea,
sistemul va cauta automat
canalele. Butonul verde <AUDIO>
este pentru cautarea canalelor
cand utilizatorul cunoaste
frecventa canalelor, vezi figura 2 si
3.
33
Românã

Figura 3
Figura 4
<NOTA> Inainte de a cauta,
asigurati-va ca antena este
conectata la receptorul STB. O
data ce scanarea canalelor este
completa si toate canalele sunt
memorate in baza de date, puteti
sa vizionati canalele TV digitale,
cateva moduri de functionare tipice
sunt prezentate in acest capitol.
1. Apasati <MENIU> pentru a
accesa Meniul principal.
2. Apasati tasta
<STANGA>/<DREAPTA> pentru a
selecta dispozitivul pe care doriti
sa-l puneti in functiune.
2. Gestionarea canalelor
2.1. Apasati tasta <OK> pentru a
accesa pagina de “Gestionare a
canalelor” prin intermediul
“Meniului principal – Gestionarea
Canalelor -OK”.
2.2. Apasati tasta <CH+>/<CH->
pentru a selecta un canal TV,
apasati <EPG> <AUDIO>
<SUBTITRARE> <TTX> pentru
editarea canalelor,
Omitere/Stergere/Fav/Blocare.
Vezi figura 4.
Omitere: Apasati butonul rosu
<EPG> pentru a sari peste canalul
selectat.
Stergere: Apasati butonul galben <SUBTITRARE> pentru editarea unui canal
selectat ca si canal favorit, (Nota: dupa setarea canalelor favorite & dupa ce ati
parasit pagina “Gestionarea canalelor”, utilizatorul poate apasa tasta “FAV” a
telecomenzii pentru a le gasi direct.)
Blocare: Apasati tasta albastra <TTX> pentru blocarea unui canal selectat, vezo
figura 3. daca doriti sa stergeti functia de blocare, apasati din nou butonul albastru
<TTX>.
NOTA: Apasati butonul <TV/RADIO> pentru actionare ca si pentru editarea postului
radio.Dupa finalizare, iesiti din pagina “Gestionarea canalelor”, sistemul va salva
automat schimbarile effectuate.
34
Românã

Figura 5
Figura 6
Figura 7
3. Gestionarea cronometrului
Apasati tasta <OK> pentru a
accesa pagina “Gestionarea
cronometrului” prin Meniul principal
– Gestionarea cronometrului –
OK”, vezi apoi figura 5.
3.1. Apasati tasta <OK> pentru a
accesa pagina Cronometrul
programului, apoi apasati butonul
verde <AUDIO> pentru a seta
canalul TV/RADIO, Data, Ora
inceperii programului, Durata,
Modul, Functia pe care ati dori sa
le inregistrati. Apasati tasta <OK>
pentru a confirma setarea. Vezi
figura 6.
3.2. Cronometru alarma
Apasati tasta <OK> pentru a
accesa pagina Sleep Timer.
Apasati <CH+>/<CH-> pentru a
selecta pozitia pe care doriti sa o
setati si apasati <V+>/<V-> pentru
a seta ora de oprire. In timp ce se
afla pe modul “Auto Power Down”,
ceea ce inseamna ca aparatul a
intrat in modul standby ( in
asteptare) automat dupa 3h
(setarea prestabilita este pornita
pentru aceasta functie, apasati
butonul rosu <PORNIRE> pentru a
porni din nou redarea). Vezi figura
7.
35
Românã

Figura 9
4. Multimedia
Introduceti dispozitivul USB in slotul USB, apasati apoi tasta <OK>
pentru a accesa pagina
“Multimedia” prin “Meniul Principal
– Multimedia – OK”, apoi observati
figura 9.
4.1. . Fisierele multimedia suportate sunt afisate mai jos. Sistemul de fisiere NTFS,
FAT32 si FAT16 poate fi suportat.
1) Dimensiuni fisiere video: pana la SD (definitie standard)
2) Dimensiuni fisiere imagine: pana la 256M pixeli (16376*16376)
3) Canale audio: 2 canale
Decodor video Decodor audio
Decodor imagine
Dimensiuni
memorie
36
Românã

Figura 10
Figura 11
4.2. Apasati tastele <CH+>/<CH->
pentru a selecta setarile (Muzica,
Poze, Filme, PVR) pe care doriti sa
le redati, apasati tasta <OK>
pentru a accesa modul de redare.
NOTA: Pe modul PVR, daca nu
exista fisiere inregistrate pe
dispozitivul USB, puteti inregistra
programe in direct urmand pasii de
mai jos:
(a) Introduceti dispozitivul USB in
mufa USB, dupa ce ati vazut
mesajul pe ecran “Introduceti
dispozitivul USB”, alegeti apoi un
canal pe care doriti sa-l inregistrati,
apasati apoi butonul <REC> al
telecomenzii. Vezi figura 10:
(b) Pentru a opri inregistrarea,
apasati butonul <STOP>, pe ecran
va fi afisat urmatorul mesaj “Doriti
sa opriti inregistrarea acum?”,
selectati optiunea “OK” pentru a
opri inregistrarea si selectati
optiunea “Exit” pentru continuare.
In timpul inregistrarii va fi afisata o
pictograma in partea stanga sus.
Vezi figura 11:
Nota: Cand dispozitivul USB este
plin, sistemul va afisa un mesaj:
“Eroare Disc Plin, ….”
37
Românã
Formate Extensii

Figura 12
Figura 13
Figura 14
5. Setari
Apasati tasta <OK> pentru a
accesa pagina de “Setari” prin
“Meniul principal – Setari – OK”,
<CH+>/<CH-> pentru a selecta
pozitiile ce doriti sa le reglati. Vezi
figura 12.
5.1. Apasati tasta <OK> pentru a
accesa pagina de Preferinte pentru
Limba dup ace ati ales aceasta
pozitie, folosind <CH+>/<CH-> &
<V+>/<V-> pentru a selecta limba
pentru Ghidul Programelor,
setarea Audio, Subtitrari. Vezi
figura 13.
5.2. Apasati tasta <OK> pentru a
accesa pagina de Preferinte pentru
Afisare dupa ce ati ales aceasta
pozitie, folosind <CH+>/<CH-> &
<V+>/<V-> pentru a selecta
modurile (pentru Modul de afisare,
Formatul imaginii, Iesire video)
corespunzatoare tipului de
televizor. Vezi figura 14.
38
Românã

Figura 15
Figura 16
Figura 17
5.3 Apasati tasta <OK> pentru a
accesa pagina de Setari pentru
Inregistrare dupa ce ati ales
aceasta pozitie, folosind
<CH+>/<CH-> & <V+>/<V-> pentru
a seta informatiile detaliate (pentru
Functia de Schimbare a duratei,
Stocare a schimbarii duratei,
Durata inregistrarii, Registru
inregistrare). Vezi figura 15.
5.4. Apasati tasta <OK> pentru a
accesa pagina de Programe ce pot
fi accesate doar cu Acordul
Parintilor dupa ce ati ales aceasta
pozitie, puteti schimba parola
conform nevoilor dumneavoastra,
in functie de pasii de mai jos.
(1) Introduceti parola veche (parola
prestabilita este “0000”) pentru a
accesa pagina de Control
Parental. Vezi figura 16.
(2) Folosind butoanele
<CH+>/<CH-> & <V+>/<V-> pentru
a porni/opri Blocarea Meniului,
Blocarea Canalelor,……..Vezi
figura 17.
(3) Pentru schimbarea Codului
PIN, apasati tasta <V+>, apoi
introduceti parola veche, pe ecran
va fi afisat mesajul “Introduceti
noul Cod PIN”. Introduceti parola
noua, apoi “Confirmati noul Cod
PIN”. Pana cand pe ecran va fi
afisat mesajul “Codul PIN s-a
schimbat!”, ceea ce reprezinta
faptul ca parola a fost setata cu
success.
39
Românã

Figura 18
Figura 19
Figura 20
6. Instrumente
Apasati tasta <OK> pentru a
accesa pagina “Instrumente” prin
“Meniul principal – Instrumente –
OK”, <CH+>/<CH-> pentru a
selecta setarile pe care doriti sa le
reglati. Vezi figura 18.
6.1. Introduceti dispozitivul USB,
apasati apoi tasta <OK> pentru a
accesa pagina Administrarea
Memoriei dupa ce ati ales setarea
aceasta. Pe ecran vor fi afisate
informatii legate de volumul
dispozitivului USB. Vezi figura 19.
6.2. Apasati tasta <OK> pentru a
accesa pagina “Actualizare soft”
dupa ce ati ales setarea aceasta
folositi apoi butonul <CH+>/<CH->
pentru a selecta cardul USB/SD ca
si instrument de actualizare. Vezi
figura 20.
6.3. Apasati tasta <OK> pentru a
accesa pagina “Resetare din
fabrica” dupa ce ati ales setarea
aceasta, introduceti apoi parola
veche (parola prestabilita este
“0000”) pe ecran va apara mesajul
“Aparatul va incarca setarile
implicite. Doriti sa continuati?”
Alegeti Nu/Da. Vezi figura 21 & 22.
40
Românã

Figura 21
6.4. Apasati tasta <OK> pentru a accesa pagina “Informatii soft” dupa ce ati ales
setarea aceasta, pe ecran va aparea numarul versiunii curente a sistemului.
Functii convenabile
1. Modalitati de selectare a programelor
Dispozitivul STB furnizeaza urmatoarele modalitati de selectare a programelor.
(1) Apasati tasta <Sus/Jos> pentru a merge la urmatorul program sau la cel
anterior.
(2) Apasati tasta <OK> pentru a selecta programul din lista de programe.
(3) Apasati butoanele <0~9> pentru a schimba programele.
Daca un anumit numar de program nu exista, dispozitivul STB va ignora intrarea.
2. SELECTARE RAPIDA
(1) Apasati tasta <OK> pentru a afisa lista de canale.
(2) Apasati tasta <Sus/Jos> pentru a selecta canalul, apasati tasta <OK> pentru a
confirma si a schimba pe canalul corespondent.
3. EPG
Apasati butonul <EPG> pentru a accesa pagina “Ghid de programe” pe modul
redarii.
(1) Apasati butonul rosu <EPG> al telecomenzii pentru a accesa Modul Zilnic.
(2) Selectati un canal apasand <CH+>/<CH-> pentru a examina informatiile acelei
zile. Apasati butonul galben <SUBTITRARE>. Sau butonul albastru <TTX> pentru a
vizualiza informatiile zilei de ieri si zilei de maine.
(3) Apasati tasta <OK> pentru afisarea descrierii programului.
4. SUBTITRARE
Afisati subtitrarea pe ecran, stilul subtitrarii poate fi diferit in functie de continut.
(1) Apasati butonul galben <SUBTITRARE> pentru a accesa pagina cu subtitrarile.
(2) Apasati butoanele <V-/V+> si butonul <OK> pentru a porni/opri subtitrarea.
41
Românã

5. TTX
(1) Apasati butonul <TTX> pentru a accesa pagina Teletextului.
(2) Apasati butoanele <Sus/Jos> pentru a merge la pagina anterioara sau la pagina
urmatoare.
(3) Apasati tasta <EXIT> pentru a iesi din pagina teletext.
6. AUDIO
Selectarea limbajului audio. Vezi figura 56.
(1) Apasati tasta <AUDIO>pentru a accesa pagina Multiaudio.
(2) Apasati tasta <Stanga>/<Dreapta> pentru a schimba intre setarile stereo,
stanga, dreapta. Apasati tasta <SUS>/<JOS> pentru a selecta limbajul sunetului.
(3) Apasati tasta <OK>/<EXIT> pentru a confirma alegerea facuta si a reveni la
modul de redare al imaginii pe tot ecranul.
7. Informatii legate de program
Pentru a vizualiza informatiile programului curent, apasati butonul <i> al
telecomenzii pentru a-l deschide atunci cand modul de afisare este pe intreg
ecranul, apasati inca o data sau <EXIT> pentru a iesi din setare.
8. FAV
Puteti selecta usor canalul favorit de acum inainte dupa setarea canalelor favorite.
(1) Apasati tasta <FAV> pentru a accesa lista canalelor favorite.
(2) Apasati tasta <Sus/Jos> pentru a selecta canalul.
(3) Apasati tasta <EXIT> pentru a iesi din setare.
9. Comutator program TV/RADIO
Apasati butonul “TV/RADIO” pentru a schimba intre programele TV si cele Radio
cand modul de afisare este cel pe intreg ecranul.
NOTA: In cazul in care nu se gasesc posturi radio, sistemul va afisa un mesaj “Nici
un post radio nu a fost gasit”.
10. PROG
Apasati tasta <PROG> pentru a accesa lista programelor.
11. INREGISTRARE
Tasta pentru inregistrarea emisiunilor TV difuzate in direct. In privinta informatiilor
detaliate consultati ultima sectiune “setare inregistrare”.
12. REDARE/PAUZA
Acest buton este folosit pentru a reda sau a intrerupe emisiunile curente difuzate in
direct sau redarea programelor inregistrate.
13. REVOCARE
Este o tasta rapida pentru revocarea emisiunilor inregistrate pe care le-ati vizionat o
data.
14. STOP
Suspendati redarea de emisiuni in direct.
42
Românã

Bedienungsanleitung
43
Deutsch
URZ0181
MPEG-4 TERRESTRISCHER
RECEIVER
Deutsch 43-56 English 1-14
R
omânã 29- 42 Polski 15- 28
Lesen Sie die Bedienungsanleitung
vor der Installation und Benutzung.

44
Deutsch
WICHTIGE SICHERHEITSHINWEISE
WARNUNG
?UM FEUERGEFAHR ODER ELEKTROSCHOCK ZU VERMEIDEN. GERÄT
NICHT MIT EINEM VERLÄNGERUNGSKABEL, NETZAUSGÄNGEN
VERWENDEN, WENN DIE KONTAKTE NICHT VOLLSTÄNDIG EINGEFÜGT
WERDEN KÖNNEN, BLOSSLIEGENDE KONTAKTE SIND ZU VERMEIDEN.
?UM FEUERGEFAHR ODER ELEKTROSCHOCK ZU VERMEIDEN. GERÄT
NICHT REGEN ODER FEUCHTIGKEIT AUSSETZEN.
?UM ELEKTROSCHOCK ZU VERMEIDEN. BREITER KONTAKT DES STECKERS
VOLLSTÄNDIG IN DIE STECKDOSE EINFÜGEN.
1. ANT IN - ANTENNENEINGANG
2. LOOP OUT – DURCHGESCHLEIFTER ANTENNENAUSGANG
3. IR - INFRAROTSENSOR
4. USB – USB-STECKPLATZ
5. DC 5V – ANSCHLUSS FÜR NETZGERÄT 5V GLEICHSTROM
45
Deutsch

Fernbedienung:
1. MUTE: Ton Ein/Ausschalten.
2. Zahlentasten: <0-9>
3. MENU: Hauptmenü aufrufen
4. VOL -/+ : Lautstärke regeln
5. EPG: Elektronischer Programmführer
6. AUDIO: Audioeinstellungen
7. INFO: Programminformation Anzeige im
Vollbildmodus oder Operationsinformationen
im aktuellen Menü
8. RECALL: Rückkehr zum vorherigen
Programm
9. REC: Aufnahme der TV Programme
10. MEDIA: Medienwiedergabe
11. STOPP: Beenden der Wiedergabe
12. WIEDERGABE/PAUSE: Anhalten oder
fortsetzen der Wiedergabe
13. POWER: Ein/Ausschalten, Standby
14. EXIT: Aktuelle Operation abbrechen und
Rückkehr zum vorherigen Menü
15. OK: Bestätigen der Auswahl im aktuellen
Menü
16. CH+/-: Programm Auf/Ab
17. TTX: DVB Teletext
18. SUBTITLE: Untertitel
19. FAV: Anzeige der Favoritprogramme
20. TV/RADIO: Umschalten zwischen Radio
und TV-Modus
21. PROG: Programmieren der Aufwachzeit
22. PAGE UP: Nächste Seite
23. PAGE DOWN: Vorherige Seite
24. PREV: Wiedergabe der vorherigen USB
Media
25. NEXT: Wiedergabe der nächsten USB
Media
26. 1. FF und FR: Bild
vergrößern/verkleinern im Zoommodus
Schneller Vorlauf /Rücklauf bei USBWiedergabe
46
Deutsch

Anschluss Ihrer Set Top Box
a) Antenne an Set Top Box anschließen
Antenne an den Antenneneingang anschließen [ANT IN].
b) Set Top Box am TV anschließen
Set Top Box an das TV-Gerät mittels SCART-Kabel anschließen.
c) TV-Gerät und Set Top Box einschalten und AV EIN auswählen.
Hauptmenü
1. Installation
Beim ersten Anschluss der Set Top Box (STB), sind keine Programme gespeichert.
Benutzer sollte zuerst die Programme suchen (siehe unten):
Abbildung 1
Abbildung 2
1.1. Drücken der Taste <OK> für
die Installationsseite, danach
durch drücken von <CH+>/<CH->
auswählen, <V-> /<V+> und <OK>
zur Einstellung: Land, OSD
Sprache, Zeitzone, Sommerzeit
Ein/Ausschalten, LCN (Logische
Kanalnummer vergibt eine
exklusive Nummer für jedes
Programm wenn eingeschaltet
[ON]), Antennenspannung
(Spannungsversorgung der
angeschlossenen Antenne).
Drücken von <OK> um die
Einstellungen zu speichern. Siehe
Abbildung 1.
1.2. Die rote Taste <EPG> drücken
zum bestätigen der Einstellungen,
das System beginnt automatisch
die Programmsuche. Grüne Taste
<AUDIO> drücken wenn die
Frequenzen bekannt sind. Siehe
Abbildung 2 & 3.
47
Deutsch

Abbildung 3
Abbildung 4
HINWEIS: Vor der
Programmsuche, stellen Sie sicher
dass die Antenne an der STB
angeschlossen ist. Nach beenden
der Programmsuche und
Speicherung in der Datenbank
können die digitalen Programme
betrachtet werden; einige
typischen Bedienfunktionen sind in
diesem Kapitel beschrieben, Es
folgt das Hauptmenü für die
Bedienfunktionen.
(1). Drücken der Taste <MENU>
für Hauptmenü.
(2). Drücken der Taste <CH-
>/<CH+> zum Auswählen des
Einstellungselement das verändert
wird.
2. Kanalmanager
2.1. Drücken der Taste <OK> zum
Aufruf der Seite „Kanalmanager“
über „Hauptmenü – Kanalmanager
– OK“.
2.2. Drücken der Taste
<CH+>/<CH-> zur Auswahl der
TV-Programme, drücken von
<EPG>, <AUDIO>, <SUBTITLE>,
<TTX> um das Programm zu
bearbeiten.
Vier Funktionen stehen zur Verfügung für die Programmbearbeitung, Überspringen/
Löschen/ Favorit/ Sperren. Siehe Abbildung 4.
Überspringen: Drücken der roten Taste <EPG> um das ausgewählte Programm zu
überspringen.
Löschen: Drücken der grünen Taste <AUDIO> um das ausgewählte Programm zu
löschen.
Favorit: Drücken der gelben Taste <SUBTITLE> um das ausgewählte Programm als
Favorit zu markieren. (Hinweis: Nach Einstellung der Favoritprogramme &
verlassen der Seite „Kanalmanager" können Benutzer sie direkt finden durch
drücken der Taste <FAV> auf der Fernbedienung.)
Sperren: Drücken der blauen Taste <TTX> um das ausgewählte Programm zu
sperren, Siehe Abbildung 4. Um die Sperrfunktion aufzuheben, die blaue Taste
<TTX> erneut drücken.
HINWEIS: Drücken der Taste < TV/RADIO> um mit denselben Programmfunktionen
die Radiosender zu bearbeiten. Nach beenden, drücken <EXIT> um die Seite
Kanalmanager zu verlassen. Das System speichert automatisch alle Änderungen.
48
Deutsch

Abbildung 5
Abbildung 6
Abbildung 7
3. Timer Manager
Drücken der Taste <OK> zum
Aufruf der Seite „Timer Manager“
über „Hauptmenü – Timer
Manager – OK“. Siehe Abbildung
5.
3.1. Programmtimer
Drücken der Taste <OK> zum
Aufruf der Seite „Programmtimer“,
danach drücken der grünen Taste
<AUDIO> zum Einstellen der
TV/Radio-Programme, Datum,
Startzeit, Dauer, Mode, Funktion,
zum Aufnehmen. Drücken der
Taste <OK> um die Einstellungen
zu bestätigen. Siehe Abbildung 6.
3.2. Schlaftimer
Drücken der Taste <OK> zum
Aufruf der Seite „Schlaftimer“.
Drücken der Taste <CH+>/<CH->
zur Auswahl des
Einstellungselement und danach
<V+>/<V-> zur Einstellung des
Schlaftimers. Wenn Automatische
Abschaltung [Auto Power Down]
eingeschaltet ist [ON], schaltet das
Gerät automatisch in den StandbyModus nach 3 Stunden (Werkseitig
auf Ein, drücken der roten Taste
<POWER> für beginn der
Wiedergabe). Siehe Abbildung 7.
49
Deutsch

Abbildung 9
4. Multimedia
Einstecken eines USB-Gerät in
den USB-Steckplatz, danach
drücken der Taste <OK> zum
Aufruf der Seite „Multimedia“ über
„Hauptmenü - Multimedia - OK".
Siehe Abbildung 9.
4.1. Multimedia-kompatible Dateien sind weiter unten aufgelistet. NTFS, FAT32 und
FAT16 Dateisysteme werden zurzeit unterstützt.
Videogröße: bis zu SD (Standard Definition)
Photogröße: bis zu 256 Megapixel (16376*16376)
Audiokanäle: 2 Kanäle
50
Deutsch
Videodecoder Audiodecoder Bilddecoder
Speichergröße
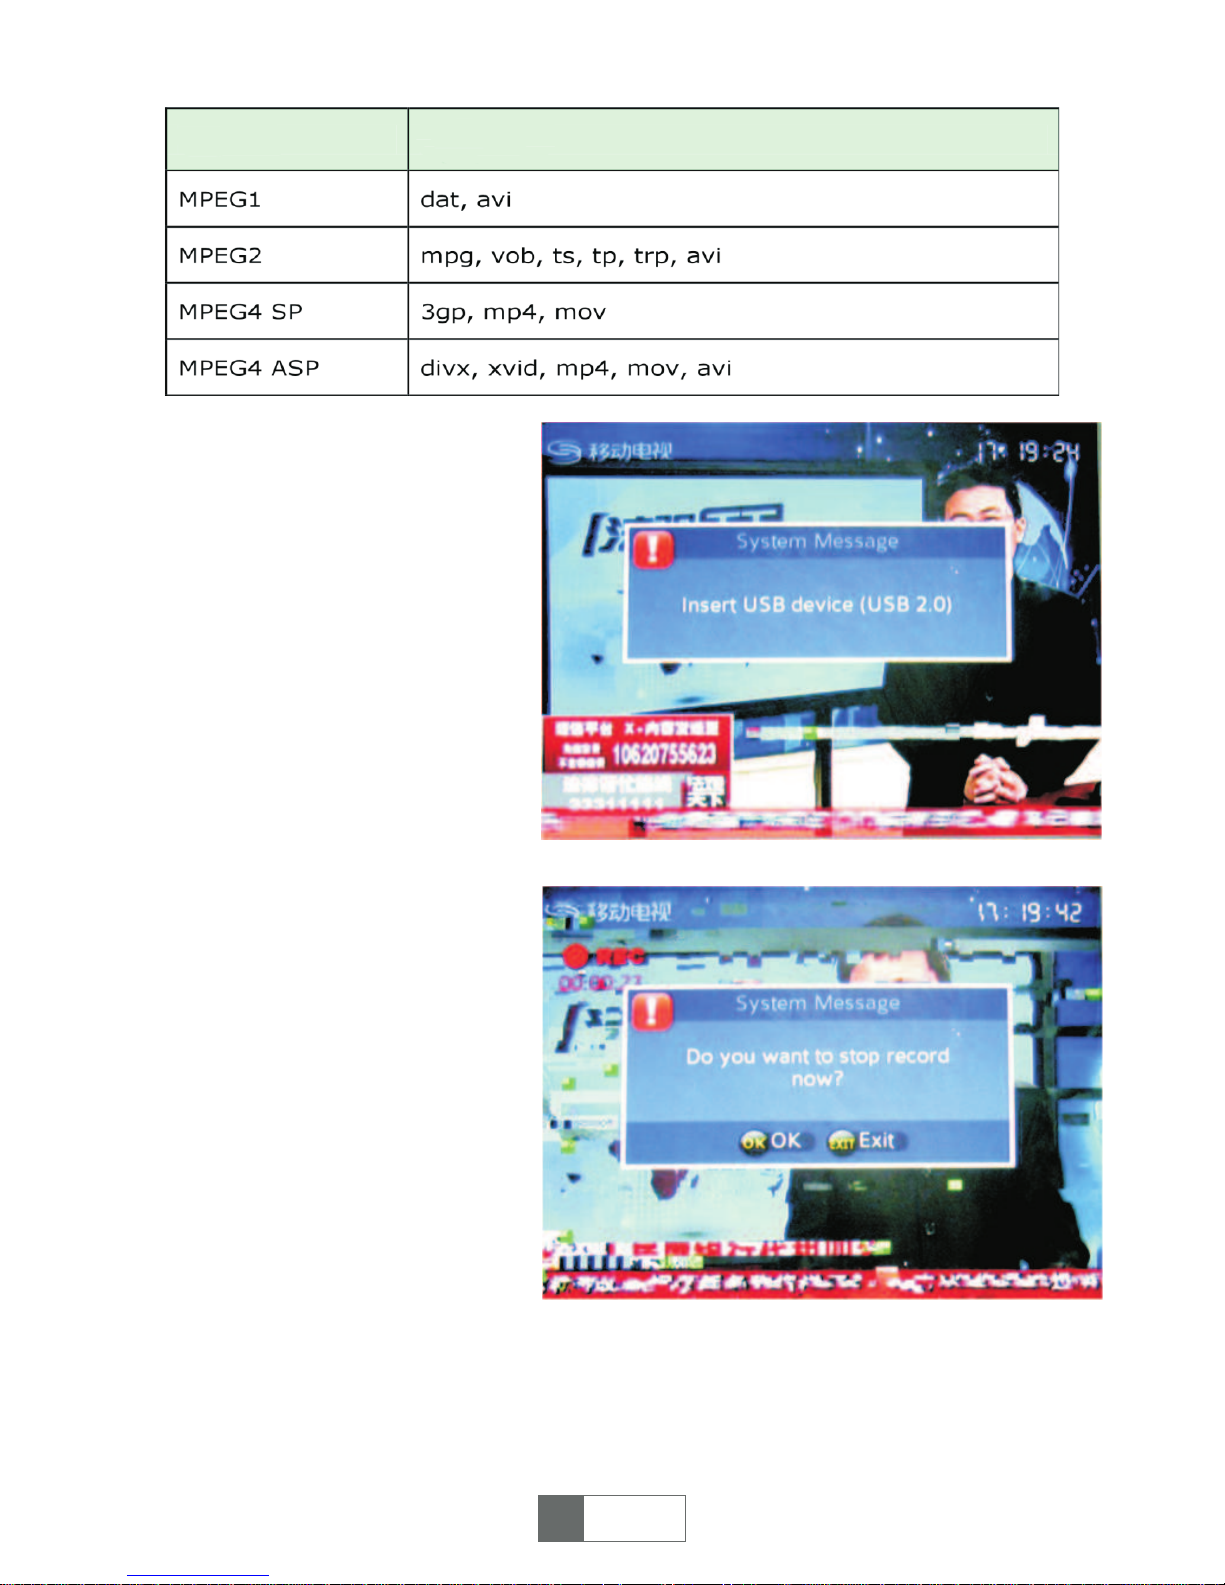
Abbildung 10
Abbildung 11
4.2. Drücken der Taste
<CH+>/<CH-> zur Auswahl der
Datei (Musik, Photo, Film, PVR) für
die Wiedergabe, <OK> drücken für
Wiedergabemodus.
HINWEIS: Im PVR-Modus, wenn
sich keine aufgenommene Datei
auf dem USB-Gerät befindet,
können Sie ein Programm
aufnehmen, siehe folgende
Schritte:
(a) USB-Gerät einstecken wenn
am Bildschirm die Meldung
erscheint „USB-Gerät einstecken
[Insert USB device]", auswählen
des Programms zum aufnehmen
und die Taste <REC> an der
Fernbedienung drücken. Siehe
Abbildung 10.
(b) Zum beenden der Aufnahme
Taste <STOP> drücken, am
Bildschirm erscheint die Meldung
„Möchten Sie die Aufnahme jetzt
beenden? [Do you want to stop
record now?]" <OK> zum beenden
der Aufnahme drücken, oder
<EXIT> zum fortsetzen.
Ein Symbol wird während der Aufnahme in der linken oberen Ecke des Bildschirms
angezeigt. Siehe Abbildung 11.
Hinweis: Wenn der USB-Speicher voll ist, wird die Meldung angezeigt „Fehler
Speicher voll, Beenden.. [Disk Full Error, Leaving...]"
51
Deutsch
Formate Dateiendung

Abbildung 12
Abbildung 13
Abbildung 14
5. Einstellungen
Drücken der Taste <OK> zum
Aufruf der Seite „Einstellungen“
über „Hauptmenü – Einstellungen
– OK, <CH+>/ <CH-> drücken zur
Auswahl des Einstellungselement.
Siehe Abbildung 12.
5.1. Drücken der Taste <OK> für
die Seite „Spracheinstellungen“,
nach Auswahl des
Einstellungselements durch die
Tasten <CH+>/<CH-> & <V+>/<V> wird die Sprache für
Programmführer, Audio, Untertitel
ausgewählt. Siehe Abbildung 13.
5.2. Drücken der Taste <OK> für
die Seite
„Bildschirmeinstellungen“, nach
Auswahl des Einstellungselements
durch die Tasten <CH+>/<CH-> &
<V+>/<V-> wird der
Funktionsmodus passend für Ihr
TV-Gerät ausgewählt
(Bildschirmmodus, Bildformat,
Videoausgang). Siehe Abbildung
14.
52
Deutsch

Abbildung 15
Abbildung 16
Abbildung 17
5.3 Drücken der Taste <OK> für
die Seite „Aufnahmeeinstellungen“,
nach Auswahl des
Einstellungselements durch die
Tasten <CH+>/<CH-> & <V+>/<V> werden detaillierte Daten
eingestellt (für Zeitversetzte
Aufnahme, Speicherung,
Aufnahmedauer, Aufnahmeziel).
Siehe Abbildung 15.
5.4. Drücken der Taste <OK> für
die Seite „Kindersicherung“. Hier
kann das Passwort für die
Kindersicherung gemäß Ihren
Wünschen geändert werden, siehe
folgende Schritte.
(1) Passwort eingeben (Werkseitig
"0000"). Siehe Abbildung 16.
(2) Mit den Tasten <CH+>/<CH->
& <V+>/<V-> wird die Sperre für
Menü, Programme,
Kindersicherung
Ein/Ausgeschaltet. Siehe
Abbildung 17.
(3) Zum ändern des Passwortes
[PIN Code] drücken der Taste
<V+>, altes Passwort eingeben,
am Bildschirm erscheint „Neues
Passwort eingeben [Please enter
the new PIN code]". Neue
Passworte eingeben; „Neues
Passwort bestätigen [Confirm the
new PIN code]“. Am Bildschirm
wird danach „Passwort geändert!!
[The PIN code is changed!!]”, das
Passwort wurde erfolgreich
geändert.
53
Deutsch
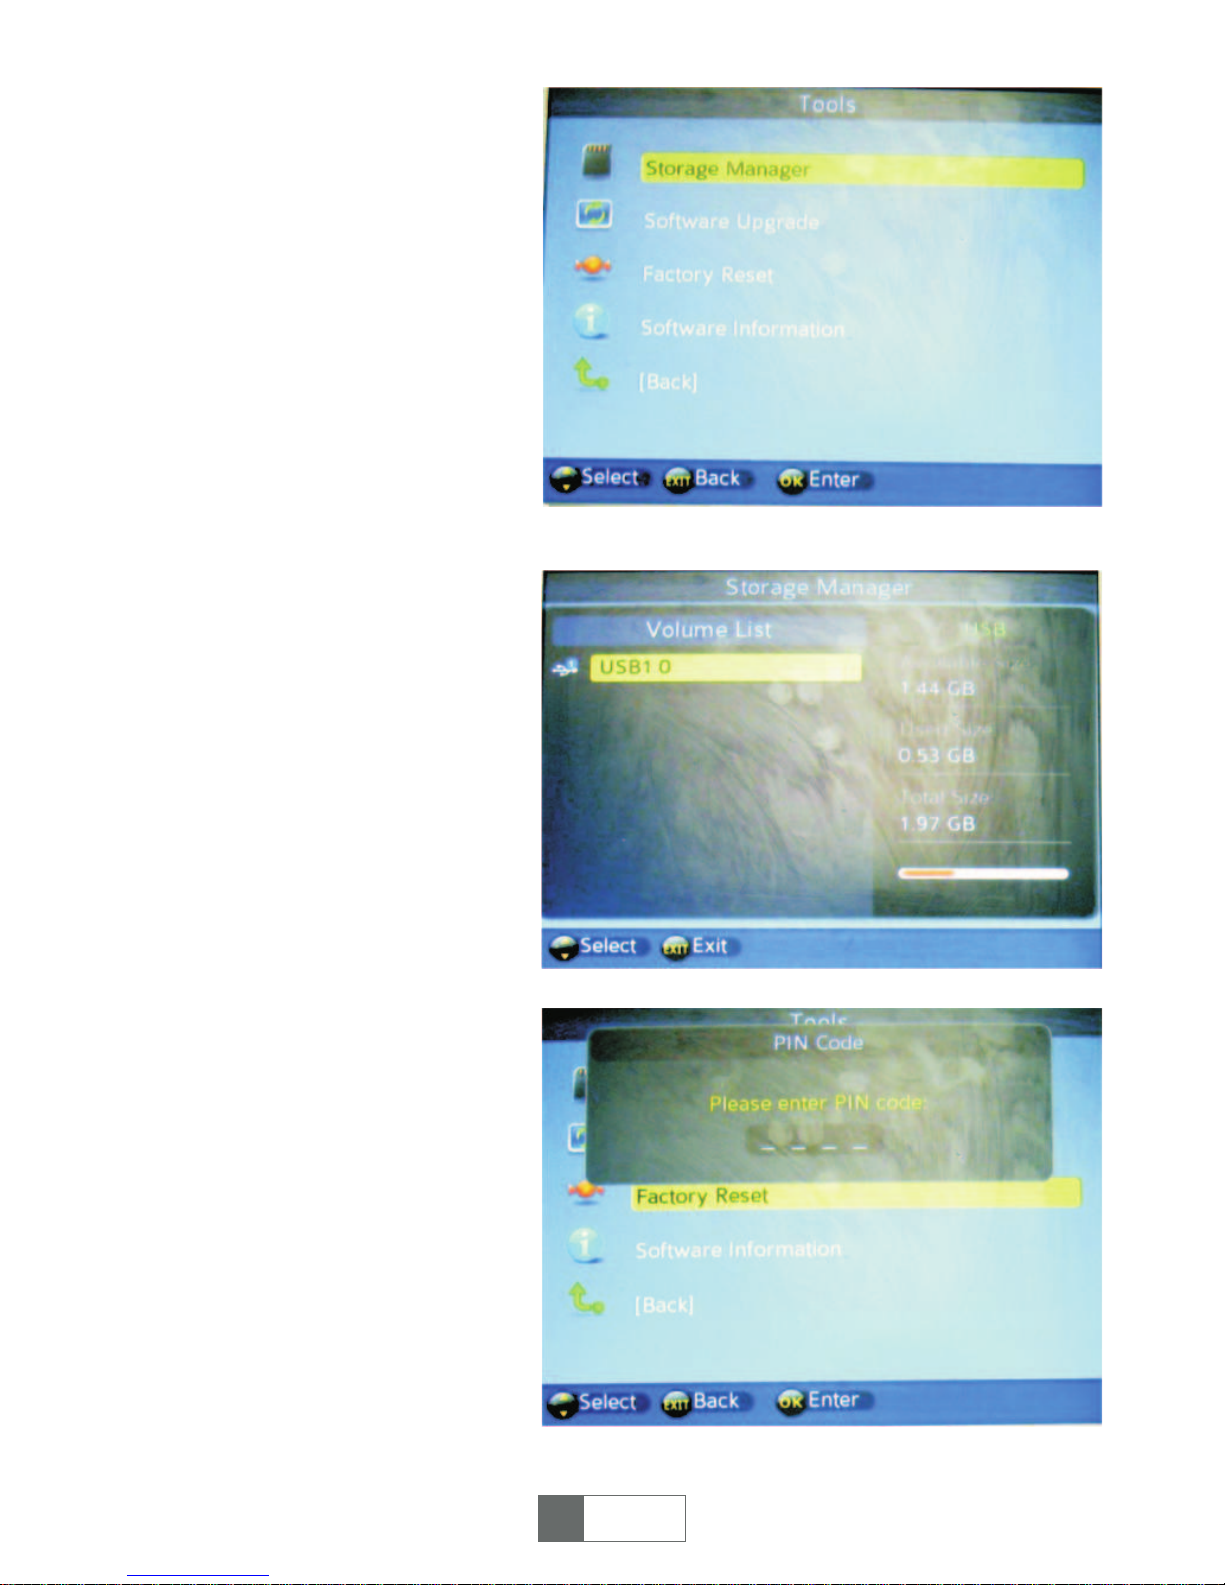
Abbildung 18
Abbildung 19
Abbildung 20
6. Werkzeuge
Drücken der Taste <OK> für die
Seite „Werkzeuge“, über
„Hauptmenü – Werkzeuge – OK“,
Auswahl des Einstellungselements
durch die Tasten <CH+>/<CH->.
Siehe Abbildung 18.
6.1. USB-Gerät einstecken,
danach die Taste <OK> drücken
für die Seite „Speichermanager“.
Am Bildschirm werden
Informationen über den USBSpeicher angezeigt. Siehe
Abbildung 19.
6.2. Drücken der Taste <OK> für
die Seite „Softwareaktualisierung“.
6.3. Drücken der Taste <OK> für
die Seite „Werkseinstellungen“.
Passwort eingeben (werkseitiges
Passwort ist "0000"), am
Bildschirm wird angezeigt „Diese
Operation ladet die
Werkseinstellungen. Sind Sie
sicher? [The operation will load
default setting. Are you sure?]"
Wählen Sie Nein/Ja [No/Yes] nach
belieben. Siehe Abbildung 21 & 22.
54
Deutsch

Abbildung 21
6.4. Drücken der Taste <OK> für die Seite „Softwareinformation“. Am Bildschirm wir
die Softwareversion des Gerätes angezeigt No...
Praktische Funktionen
1. PROGRAMMAUSWAHL
STB bietet vier Methoden zur Programmauswahl.
(1) Drücken der Taste <CH+>/<CH->: Nächstes oder vorheriges Programm.
(2) Drücken der Taste <OK> zur Auswahl des Programms aus der Programmliste.
(3) Drücken der Taste <0~9> zur Auswahl des Programms.
Wenn die ausgewählte Programmnummer nicht existiert ignoriert die STB die
Eingabe.
2. SCHNELLE AUSWAHL
(1) Drücken der Taste <OK> zur Anzeige der Programmliste.
(2) Drücken der Taste <CH+>/<CH-> zur Auswahl des Programms, <OK> zur
Bestätigung und umschalten zum ausgewählten Programm.
3. EPG
Drücken der Taste <EPG> zum Aufruf des Programmführers im Wiedergabemodus.
(1) Drücken der roten Taste <EPG> an der Fernbedienung.
(2) Auswahl eines Programms durch drücken der Tasten <CH+>/<CH-> um die
Tagesinformationen anzuzeigen. Drücken der gelben Taste <SUBTITLE> oder der
blauen Taste <TTX> für Informationen des vergangen & nächsten Tages.
(3) Drücken der Taste <OK> zur Anzeige der Programmbeschreibung.
4. UNTERTITEL
Anzeige der Untertitel am Bildschirm, der Stil der Untertitel kann unterschiedlich
sein abhängig von Inhaltsanbieter.
(1) Drücken der gelben Taste <SUBTITLE> für Anzeige der Untertitel.
(2) Drücken der Taste <V-/V+> und <OK> um Untertitel Ein/Ausschalten.
55
Deutsch

5. TTX
(1) Drücken der Taste <TTX> für Teletext.
(2) Drücken der Taste <CH+/-> für nächste oder vorherige Seite.
(3) Drücken der Taste <EXIT> verlassen der Teletexseite.
6. AUDIO
Auswahl der Audiosprache
(1) Drücken der Taste <AUDIO> für die Seite Multiaudio.
(2) Drücken der Taste <V->/<V+> für Umschalten zwischen stereo, links, rechts;
Drücken der Taste <CH+> /<CH-> zur Sprachauswahl.
(3). Drücken der Taste <OK>/ <EXIT> zum bestätigen der Auswahl und Rückkehr
zum Wiedergabemodus.
7. PROGRAMMINFORMATION
Zum anzeigen der Information des aktuellen Programms, drücken der Taste <i> an
der Fernbedienung im Vollbildmodus. Erneutes drücken der Taste oder der Taste
<EXIT> zum beenden.
8. FAVORIT
Sie können die Favoritprogramme direkt auswählen, nach einstellen der
Favoritprogramme.
(1) Drücken der Taste <FAV> öffnet die Favoritliste.
(2) Drücken der Taste < CH+/-> zur Auswahl eines Programms.
(3) Drücken der Taste <EXIT> zum beenden.
9. TV/RADIO
Drücken der Taste <TV/RADIO> im Vollbildmodus, umschalten zwischen TVProgramm und Radio-Programm.
HINWEIS: Wenn keine Radio-Programme vorhanden sind, erscheint die Meldung
„Keine Radio-Programme“
10. PROGRAMM
Drücken der Taste <PROG> Aufruf der Programmliste.
11. RECORD
Eine Taste zum aufnehmen der TV-Programme. Detaillierte Informationen siehe
Kapitel Aufnehmen.
12. WIEDERGABE/PAUSE
Taste zum anhalten oder fortsetzen des Programms oder Videoaufnahme.
13. RECALL
Taste für die Rückkehr zum vorherigen Programm.
14. STOP
Anhalten des aktuellen Programms.
56
Deutsch
57
Deutsch
Reciclarea corecta a acestui produs (reziduuri
provenind din aparatura electrica si electronica)
Marcajale de pe acest produs sau mentionate in instructiunile sale de folosire indica faptul ca produsul nu trebuie
aruncat impreuna cu alte reziduuri din gospod arie atunci cand nu mai este in stare de functionare. Pentru a preveni
posibile efecte daunatoare asupra mediului inconjurator sau a san ata tii oamenilor datorate evacuarii necontrolate a
reziduurilor, va rugam s¹ separati acest produs de alte tipuri de rezuduuri si sá-l reciclati in mod responsabil pentru a
promova refolosirea resurselor materiale.
Utilizatorii casnici sunt rugati s¹ ia legatura fie cu distribuitorul de la care au achizitionat acest produs, fie cu autoritatile
locale, pentru a primi informatii cu privire la locul si modul in care pot depozita acest produs in vederea reciclarii sale
ecologice.
Utilizatori institutionali sunt rugati s¹ ia legatura cu furnizorul si s¹ verifice conditiile stipulate in contractul de vanzare.
Acest produs nu trebuie amestecat cu alte reziduuri de natura comerciala.
(Applicable in the European Union and othor European countries with separate collection systems)
This marking shown on the product or Its literature, indicates that It should not be disposed with other household wastes at
the end of its working life. To prevent possible harm lo the environment or human health from uncontrolled waste disposal,
please separate this from other types of wastes and recycle it responsibly to promote the sustainable reuse of material
resources.
Household users should contact either the retailer where they purchased this product, or their local government office, for
details of where and how they can take this item for environmentally safe recycling. Business users should contact their
supplier and check the terms and conditions of the purchase contract This product should not be mixed with other
commercial wastes for disposal
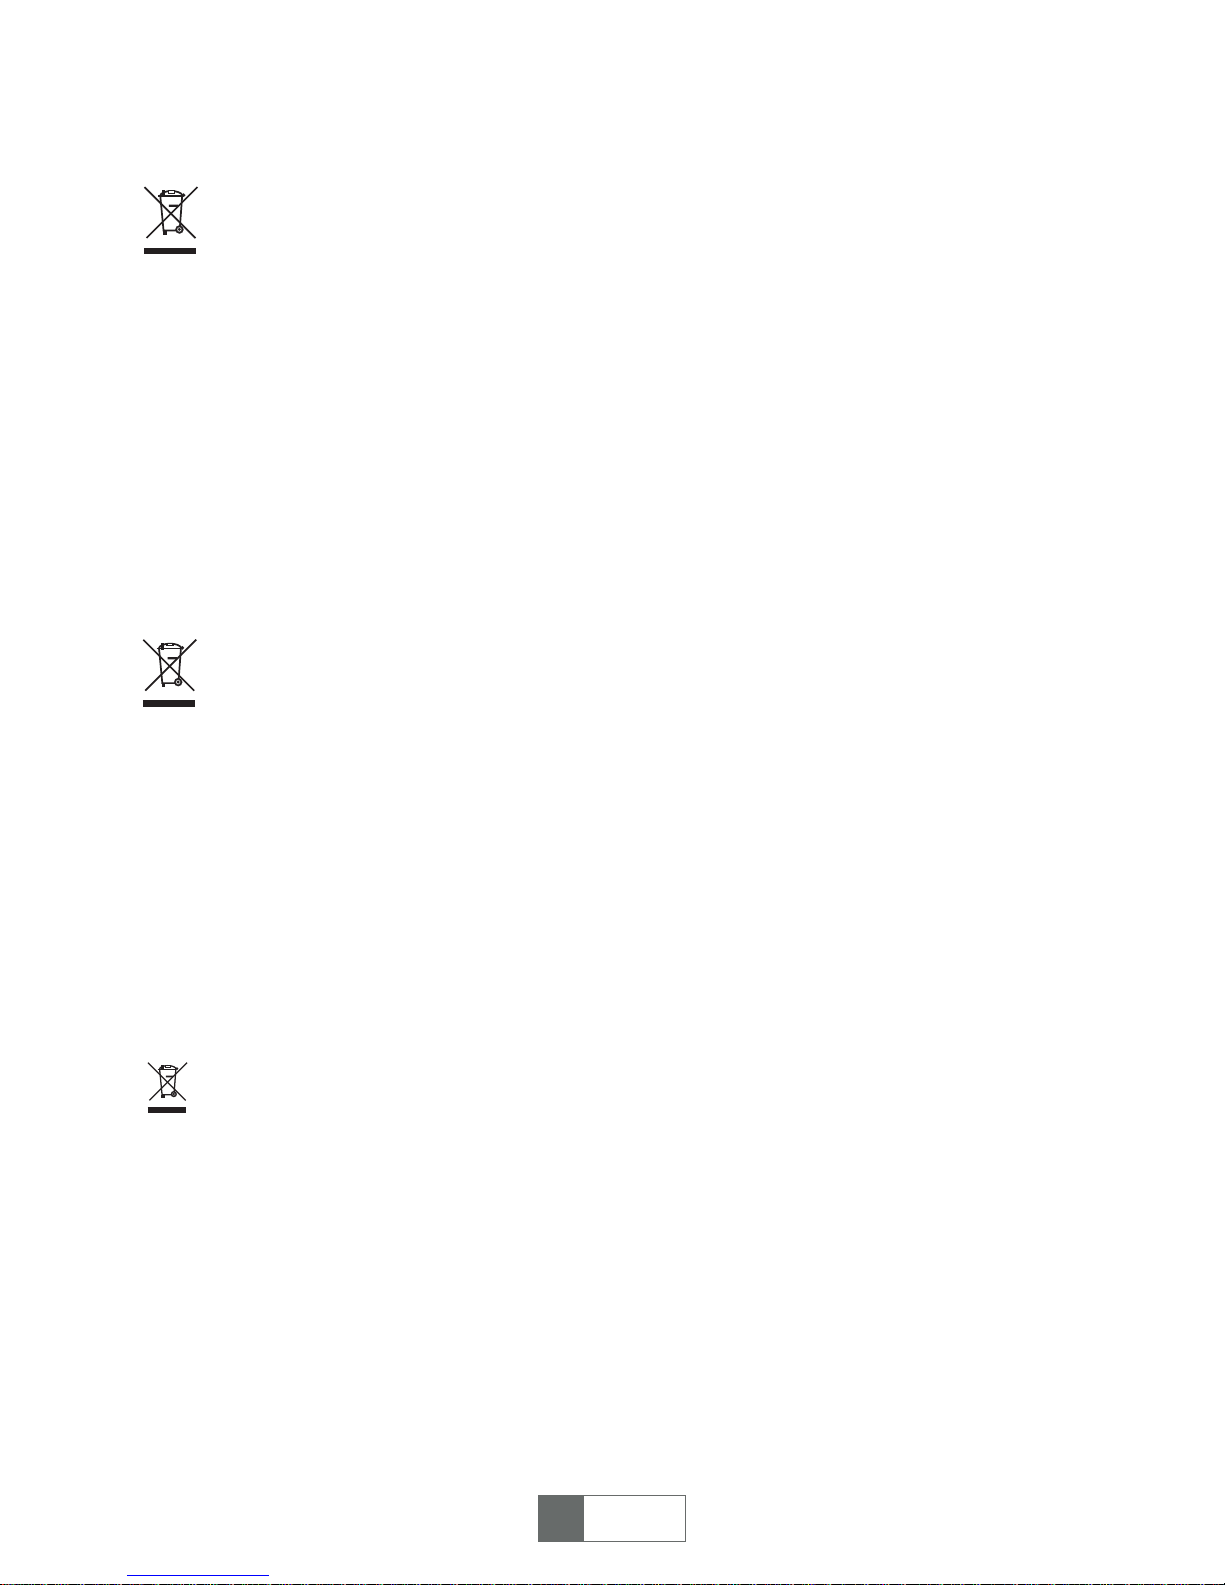
Correct Disposal of This Product
(Waste Electrical & Electronic Equipment)
Oznaczenie umieszczone na produkcie lub w odnosz¹cych siê do niego tekstach wskazuje, ¿e po up³ywie okresu
u¿ytkowania nie nale¿y usuwaæ z innymi odpadami pochodz¹cymi z gospodarstw domowych. Aby unikn¹æ szkodliwego
wp³ywu na œrodowisko naturalne i zdrowie ludzi wskutek niekontrolowanego usuwania odpadów, prosimy o oddzielenie
produktu od innego typu odpadów oraz odpowiedzialny recykling w celu promowania ponownego u¿ycia zasobów
materialnych jako sta³ej praktyki.
W celu uzyskania informacji na temat miejsca i sposobu bezpiecznego dla œrodowiska recyklingu tego produktu
u¿ytkownicy w gospodarstwach domowych powinni skontaktowaæ siê z punktem sprzeda¿y detalicznej, w którym dokonali
zakupu produkt, lub z organem w³adz lokalnych.
U¿ytkownicy w firmach powinni skontaktowaæ siê ze swoim dostawc¹ i sprawdziæ warunki umowy zakupu. Produkt nie
nale¿y usuwaæ razem z innymi odpadami komercyjnymi.
Prawid³owe usuwanie produktu
(zu¿yty sprzêt elektryczny i elektroniczny)
Produs in RPC pentru Lechpol Electronic SRL, Republicii nr . 5, Resita, CS , ROMANIA.
Romania
Made in China for LECHPOL Zbigniew Leszek, Miêtne, 1 Garwoliñska Street 08-400 Garwolin.
English
Wyprodukowano w CHRL dla LECHPOL Zbigniew Leszek, Miêtne ul. Garwoliñska 1 08-400 Garwolin.
Poland

58
Deutsch
Deutsch
Made in China für Lechpol Electronics Bv Provincialeweg 7, 3248 Lk Melissant, Holland
(Anzuwenden in den Ländern der Europäischen Union und anderen europäischen Ländern mit einem
separaten Sammelsystem)
Die Kennzeichnung auf dem Produkt bzw. auf der dazugehörigen Literatur gibt an, dass es nach seiner
Lebensdauer nicht zusammen mit dam normalen Haushaltsmüll entsorgt werden darf. Entsorgen Sie dieses Gerät
bitte getrennt von anderen Abfällen, um der Umwelt bzw. der menschlichen Gesundheit nicht durch unkontrollierte
Müllbeseitigung zu schaden. Recyceln Sie das Gerät, um die nachhaltige Wiederverwertung von stofflichen
Ressourcen zu fördern
Private Nutzer sollten den Händler, bei dem das Produkt gekauft wurde, oder die zuständigen Behörden
kontaktieren, um in Erfahrung zu bringen, wie sie das Gerät auf umweltfreundliche Weise recyceln können
Gewerbliche Nutzer sollten sich an Ihren Lieferanten wenden und die Bedingungen des Verkaufsvertrags
konsultieren. Dieses Produkt darf nicht zusammen mit anderem Gewerbemüll entsorgt werden
Korrekte Entsorgung dieses Produkts
(Elektromüll)


www.quer.pl
 Loading...