

Quer Micropower 400, Micropower 1000, Micropower 800, Micropower 600, Micropower 1200 User Manual
...
PL
DE
RO
Bedienungsanleitung
Instrukcja obsługi
Manual de utilizare
EN
User's manual
UPS
Uninterruptible Power Supply


3
Bedienungsanleitung
DE
SICHERHEITSWARNUNGEN
Diese USV nutzt Spannungen, die gefährlich sein können. Versuchen Sie nicht, das
Gerät zu zerlegen. Das Gerät enthält keine vom Anwender zu wartenden Teile. Nur
qualiziertes Fachpersonal darf Reparaturen durchführen.
• Im Falle eines Notfalls, drücken Sie die AUS-Taste und ziehen Sie das Netzkabel aus
der AC-Steckdose um die USV richtig abzuschalten.
• Lassen Sie keine Flüssigkeiten oder Fremdkörper in die USV gelangen. Stellen Sie keine Getränke oder andere Behälter mit Flüssigkeiten auf oder in der Nähe des Gerätes.
• Schließen Sie nicht den USV-Eingang in den eigenen Ausgang.
• Schließen Sie keine Nicht-Computer-bezogenen Elemente, wie z. B. medizinische
Geräte, lebenserhaltende Geräte, Mikrowellenherde, oder Staubsauger an die UPS.
• Um die Gefahr einer Überhitzung der USV zu verringern, bedecken Sie nicht die USV
Lüftungsöffnungen und vermeiden Sie direkte Sonneneinstrahlung auf das Gerät oder
Installation des Gerätes in der Nähe von Wärmequellen wie Heizlüftern oder Öfen.
• Trennen Sie die USV vor Reinigung und verwenden Sie keine üssigen Reinigungsmit-
tel oder Sprays.
• Akkus nicht ins Feuer werfen, da diese explodieren können.
• Öffnen Sie nicht die Batterien oder Akkus. Auslaufender Elektrolyt ist schädlich für Haut
und Augen. Es kann giftig sein.
EINLEITUNG
Diese USV wurde speziell für Personal Computer mit Multi-Funktionen ausgelegt. Sein
geringes Gewicht, kompakte Bauform passt perfekt zu der begrenzten Arbeitsumgebung. Die Linie der USV ist mit Boost- und Buck AVR ausgestattet um den EingangsSpannungs-Bereich zu stabilisieren. Es ist auch mit DC-Start-Funktion ausgestattet.
Diese Funktion ermöglicht die USV ohne Netzstrom einzuschalten. Obwohl es eine
kleine USV ist, sind die wichtigsten Merkmale der USV aufgeführt:
• Mikroprozessor-Steuerung garantiert eine hohe Zuverlässigkeit.
• mit Boost- und Buck AVR ausgestattet.
• Ökostrom Funktion zur Energieeinsparung.
• DC-Start-Funktion.
• Kompakte Größe, geringes Gewicht.
• Bietet AC Überlastschutz.
4
Bedienungsanleitung
DE
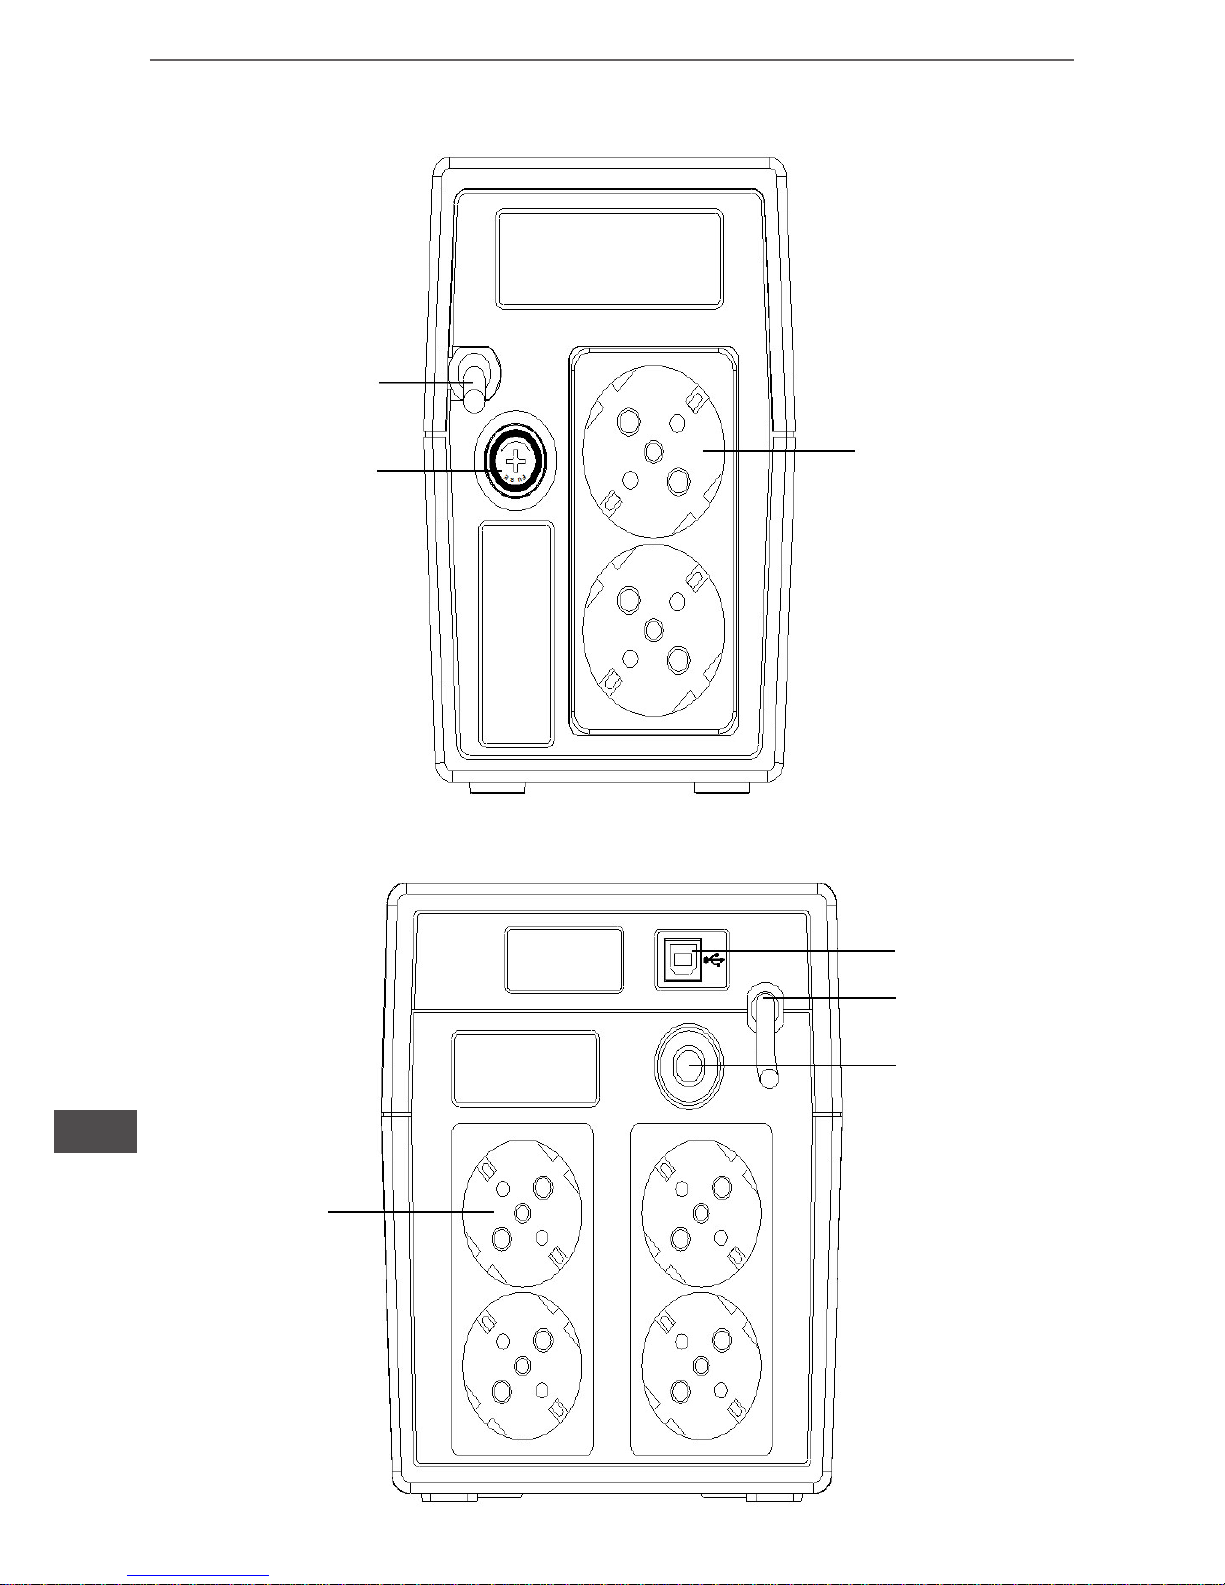
Rückseite
AC Eingang
Schutzschalter
Ausgangsbuchsen
Schutzschalte
AC Eingang
RJ11
Kommunikation
Ausgangs-
Buchsen
5
Bedienungsanleitung
DE
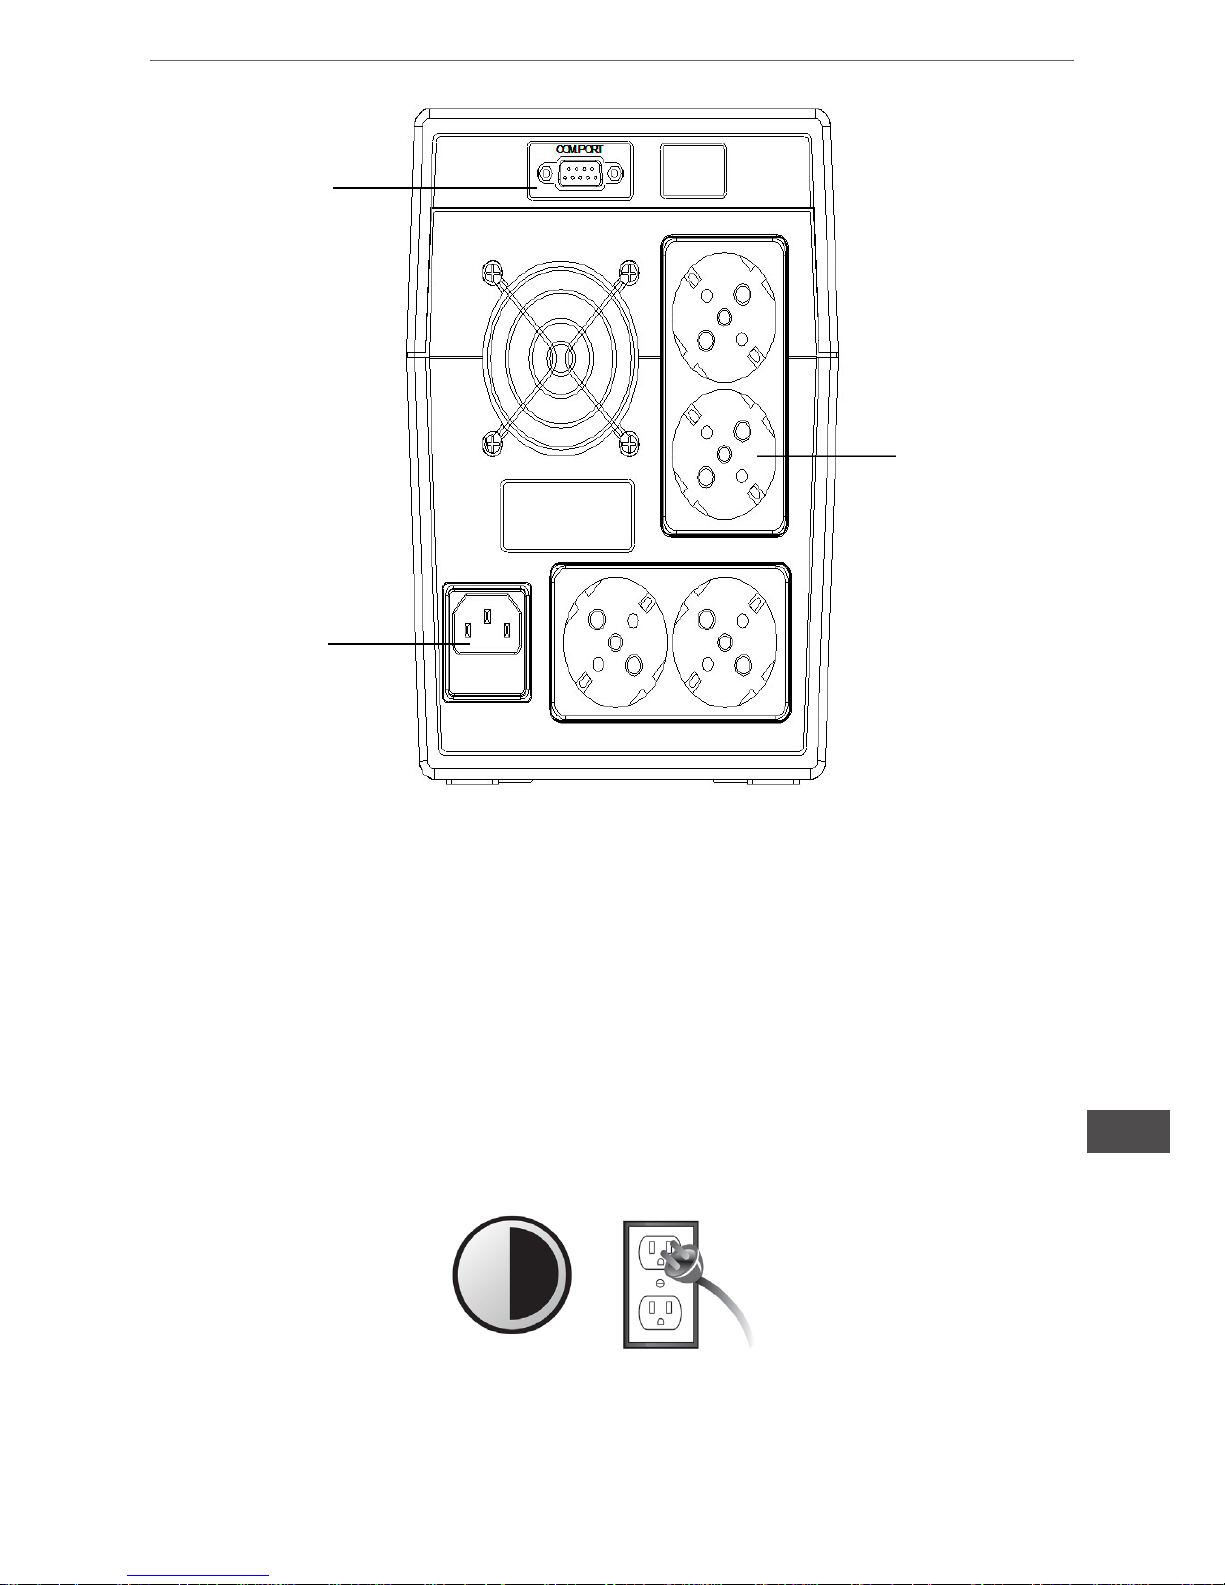
AC Eingang
AusgangsBuchsen
RS232
Kommunikation
1. Inspektion
Nehmen Sie die USV aus der Verpackung heraus und überprüfen Sie es auf Schäden,
die während des Transports entstehen könnten. Wenn Schäden festgestellt werden,
verpacken Sie das Gerät und schicken Sie es wieder zurück.
2. Auaden
Dieses Gerät wird ab Werk mit seinen internen Akku vollständig geladen ausgeliefert,
jedoch kann einige Ladung während des Transports verlieren und die Batterie sollte vor
der Benutzung wieder aufgeladen werden. Schalten Sie die UPS ein, stecken Sie das
Gerät in eine geeignete Steckdose und lassen die USV vollständig auaden, indem sie
diese für mindestens 6 Stunden ohne Last angeschlossen lassen (keine elektrischen
Geräte wie Computer, Monitore, usw. verbinden.).
6 Stunden
6
Bedienungsanleitung
DE
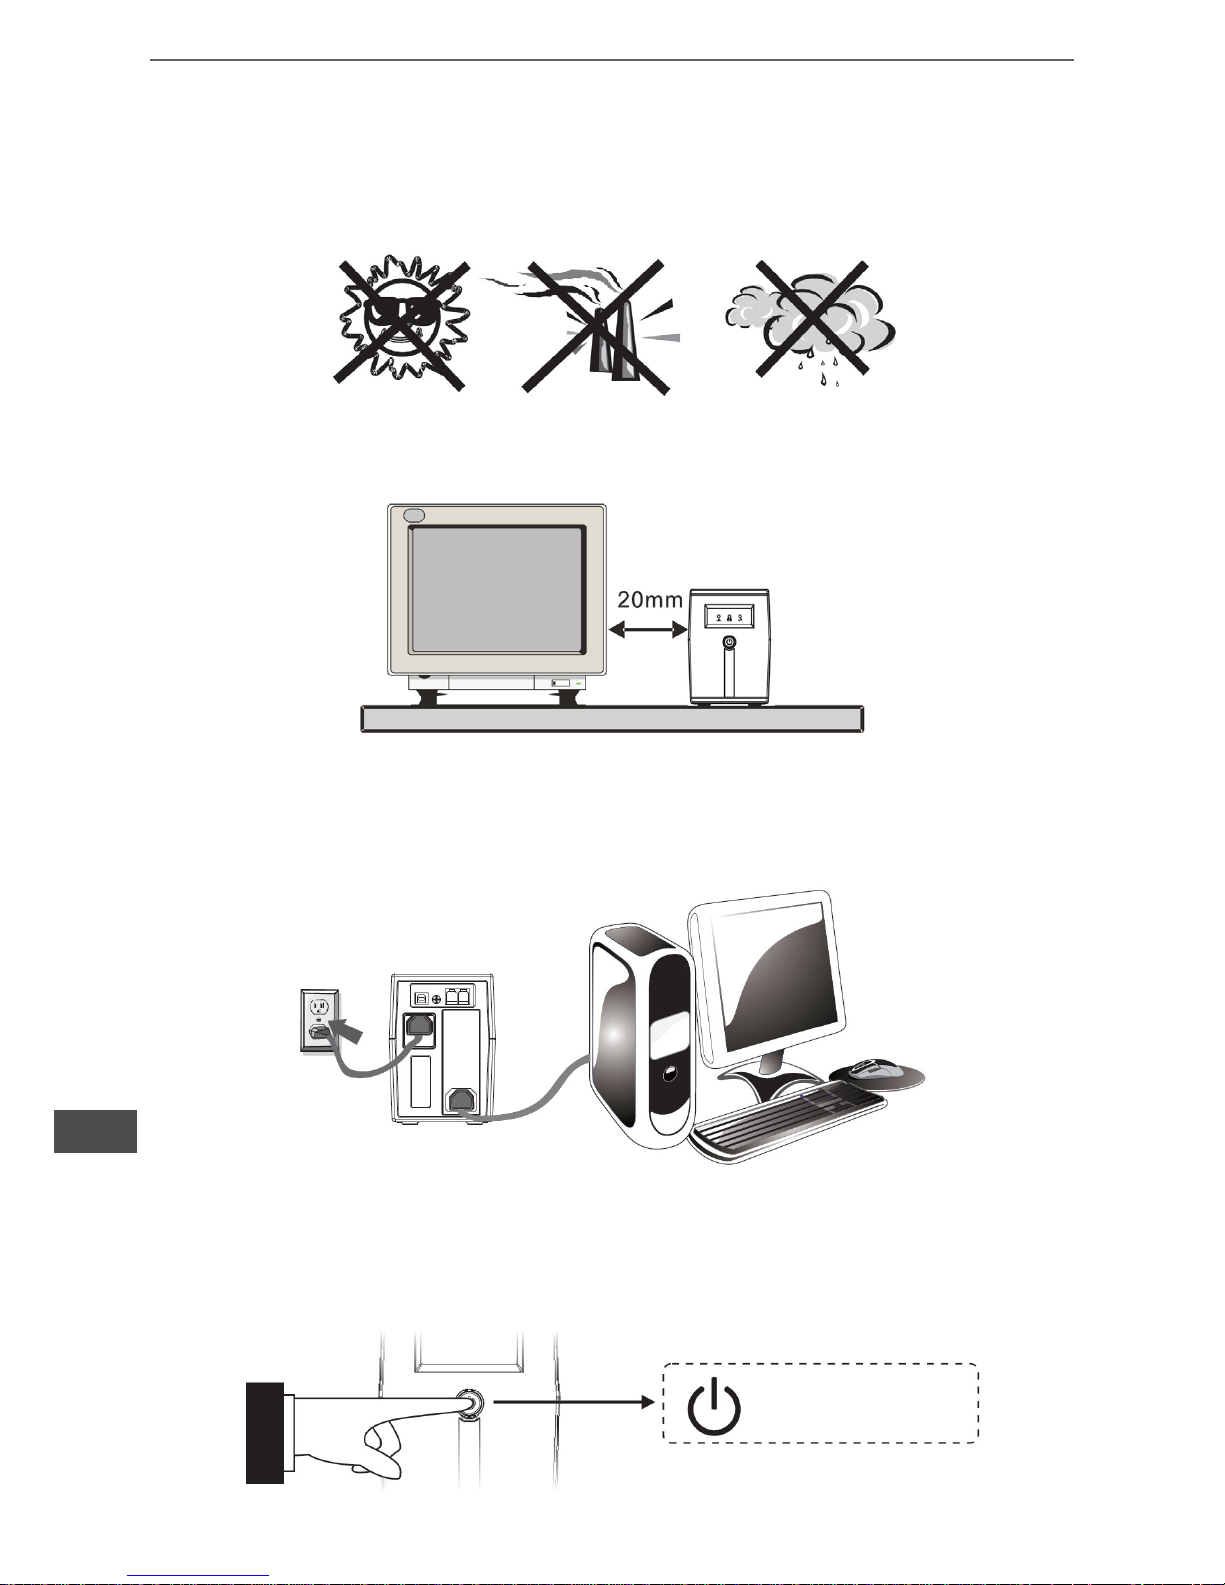
3. Aufstellung
Installieren Sie die USV-Einheit in einem geschützten Umfeld, die eine ausreichende
Luftzirkulation rund um das Gerät bietet und frei ist von übermäßigem Staub, ätzende
Dämpfe und leitfähige Verunreinigungen.
Betreiben Sie nicht Ihre USV in einem Umfeld, mit hoher Umgebungstemperatur oder
Luftfeuchtigkeit.
Stellen Sie die USV mindestens 20cm vom Monitor entfernt auf um Interferenzen zu
vermeiden.
4. Anschließen
Stecken Sie die USV in eine Zweipolige Dreikabel Steckdose mit Erdung. Danach
schließen Sie ein Computergerät an jede Ausgangsbuchse an der Hinterseite der USV
an.
5. Ein-/Ausschalten
Um das Gerät einzuschalten, drücken Sie leicht die Netztaste. Um die USV auszuschalten,
drucken Sie erneut die Netztaste.
Netztaste
7
Bedienungsanleitung
DE
TECHNISCHE DATEN
Model 400/600/800 1000/1200 1500/2000
KAPAZITÄT VA/W
400VA/240W 1000VA/600W 1500VA/900W
600VA/360W
1200VA/720W
2000V
A/1200W
800VA/480W
EINGANG
Spannung 110VAC/120VAC oder 220VAC / 230VAC /240VAC
Spannungsbereich 81-145VAC oder 162-290VAC
AUSGANG
Spannungsregelung
(Batteriemodus )
+/-10%
Frequenz 50Hz oder 60Hz
Frequenzregelung (Bat-
teriemodus)
+/-1Hz
Ausgangswellenform Geänderte Sinuswelle
BATTERIE
Batterietyp
12 V/4.5 AH x1
12 V/7.0 AH x1
12 V/9.0 AH x1
12 V/7.0 AH x 2 12 V/9.0 AH x2
Ladezeit 6-8 Stunden bis 90% nach voller Entladung
TRANSFER-
ZEIT
Typisch 2-6 ms
ANZEIGE
AC Modus Grüne Leuchte
Batteriemodus Gelbe blinkende LED
Störungsmodus Rote blinkende LED
HÖRBARER
ALARM
Backup Modus Ertönt jede 10 Sekunden
Schwache Batterie Ertönt jede Sekunde
Überladung Ertönt jede 0,5 Sekunden
Störung Ertönt ununterbrochen
SCHUTZ Vollschutz Entladen, überladen, und Überlastungsschutz
PHYSISCHE Abmessungen (mm) 298x101x142 338x149.3x162 380x158x198
GEWICHT Nettogewicht (kg) 3.85/4.35/4.7 7.8/8.4 10.1/10.5
UMGEBUNG
Betriebsumgebung 0°C - 40°C
Geräuschpegel Kleiner als 40dB
Die Spezikationen können ohne Ankündigung geändert werden.
8
Bedienungsanleitung
DE
STÖRUNGSBEHEBUNG
Symptom Mögliche Ursachen Behebung
Keine LED Anzeige an der
Frontseite
1. Batterie schwach 1. Batterie für mindestens 8
Stunden laden
2. Batterie defekt 2. Batterie mit demselben Typ
ersetzen
3. Netztaste ist nicht gedruckt 3. Netztaste erneut drücken
Alarmsummer ertönt
ununterbrochen bei normaler
AC Stromversorgung
Überlastung der USV Überprüfen Sie die dass
die Last der USV Kapazität
entspricht, gemäß
Technischen Daten
Bei Stormausfall ist die
Backupzeit verkürzt
1. Überlastung der USV 1. Einige unkritische Last
entfernen
2. Batteriespannung ist zu
klein
2. Batterie für mindestens 8
Stunden laden
3. Batteriedefekt durch zu
hohe Betriebstemperatur oder
unsachgemäße Batterie-
Bedienung
3. Batterie mit demselben Typ
ersetzen
Hauptstromversorgung ist
normal, doch die gelbe LED
blinkt
Netzkabel ist lose Netzkabel korrekt wieder
anschließen

9
Owner’s manual
EN
SAFETY - WARNING
• This UPS utilizes voltages that may be hazardous. Do not attempt to disassemble the
unit. The unit contains no user serviceable parts. Only factory service personnel may
perform repairs.
• In the event of an emergency, press the OFF button and disconnect the power cord
from the AC power supply to properly disable the UPS.
• Do not allow liquids or any foreign object to enter the UPS. Do not place beverages or
any other liquid-containing vessels on or near the unit.
• Do not plug the UPS input into its own output.
• Do not attach non-computer-related items, such as medical equipment, life-support
equipment, microwave ovens, or vacuum cleaners to UPS.
• To reduce the risk of overheating the UPS, do not cover the UPS cooling vents and
avoid exposing the unit to direct sunlight or installing the unit near heat emitting appli-
ances such as space heaters or furnaces.
• Unplug the UPS prior to cleaning and do not use liquid or spray detergent.
• Do not dispose of batteries in a re as they may explode.
• Do not open or mutilate the battery or batteries. Released electrolyte is harmful to the
skin and eyes. It may be toxic.
INTRODUCTION
This UPS is specially designed for Personal Computer with multi-functions. Its light
weight, compact design perfect ts to the limited working environment. The line of UPS
is equipped with boost and buck AVR to stabilize input voltage range. It is also built-in
with DC start function. This function enables the UPS to be started up without AC power
supplied. Although it’s a small UPS, The main features of UPS are listed below:
• Microprocessor control guarantees high reliability.
• Equipped with Boost and Buck AVR.
• Green Power Function for energy saving.
• DC Start Function.
• Compact size, Light Weight.
• Provides AC Overload protection.

10
Owner’s manual
EN
Back panel
AC input
Circuit breaker
Output
receptacles
Circuit breaker
AC input
RJ11 commuication
Output
receptacles

11
Owner’s manual
EN
AC input
Output
receptacles
RS232
communication
1. Inspection
Remove the UPS from its packaging and inspect it for damage that may have occurred
during shipping. If any damage is discovered, repack the unit and return it to the place
of purchase.
2. Charging
This unit is shipped from the factory with its internal battery fully charged, however, some
charge may be lost during shipping and the battery should be recharged prior to use.
Turn on the UPS, Plug the unit into an appropriate power supply and allow the UPS to
charge fully by leaving it plugged in for at least 6 hours with no load (no electrical devices
such as computers, monitors, etc.) connected.
6 hours

12
Owner’s manual
EN
3. Placement
Install the UPS unit in any protected environment that provides adequate airow around
the unit, and is free from excessive dust, corrosive fumes and conductive contaminants.
Do not operate your UPS in an environment where the ambient temperature or humidity
is high.
On the other hand, place the UPS away from the monitor at least 20cm to avoid
interference.
4. Connection
Plug the UPS into a 2-pole, 3-wire grounded receptacle. Then connect one computer-
related device into each of the power receptacles supplied on the back of the UPS.
5. Turn On/Off
To turn on the UPS unit, press the power switch lightly. To turn off the UPS unit, press
the power switch again.
power switch
13
Owner’s manual
EN
SPECIFICATION
Model 400/600/800 1000/1200 1500/2000
POWER VA/W
400VA/240W 1000VA/600W 1500VA/900W
600VA/360W
1200VA/720W
2000V
A/1200W
800VA/480W
INPUT
Voltage 110VAC/120VAC or 220VAC / 230VAC /240VAC
Voltage Range 81-145VAC or 162-290VAC
OUTPUT
Voltage Regulation
(Batt. Mode)
+/-10%
Frequency 50Hz or 60Hz
Frequency Regulation
(Batt. Mode)
+/-1Hz
Output Waveform Modied Sine wave
BATTERY
Battery Type
12 V/4.5 AH x1
12 V/7.0 AH x1
12 V/9.0 AH x1
12 V/7.0 AH x 2 12 V/9.0 AH x2
Recharge Time 6-8 hours to 90% after complete discharge
TRANSFER
TIME
Typical 2-6 ms
INDICATOR
AC Mode Green lighting
Battery Mode Yellow LED Flashing
Fault Mode Red LED Lighting
AUDIBLE
ALARM
Backup Mode Sounding every 10 seconds
Low Battery Sounding every 1 second
Overload Sounding every 0.5 second
Fault Continuously sounding
PROTECTION Full Protection Discharge, overcharge, and overload protection
PHYSICAL Dimension (mm) 298x101x142 338x149.3x162 380x158x198
WEIGHT Net Weight (kg) 3.85/4.35/4.7 7.8/8.4 10.1/10.5
ENVIRONME NT
Operating Environment 0°C - 40°C
Noise Level Less than 40dB
Specications are subject to change without notice.

14
Owner’s manual
EN
TROUBLE SHOOTING
Symptom Possible Cause Remedy
No LED display on the front
panel
1. Battery weak 1. Charge battery up to 8
hours
2. Battery defect 2. Replace with the same type
of battery
3. Power switch is not
pressed
3. Press the power switch
again
Alarm buzzer beeps
continuously when AC supply
is normal
Overload of the UPS Verify that the load matches
the UPS capability specied
in the specs
When power failure,
back-up time is
shorten
1. Overload of the UPS 1. Remove some non-critical
load
2. Battery voltage is too low 2. Charge battery 8 hours or
more
3. Battery defect due to high
temperature operation
environment, or improper
operation to battery
3. Replace with the same type
of battery
Mains normal but Yellow LED
is ashing
Power cord is loose Reconnect the power cord
prop

15
Instrukcja obsługi
PL
BEZPIECZEŃSTWO
• Wewnątrz urządzenia znajduje się niebezpieczne dla zdrowia i życia napięcie elektryczne. Nie należy samodzielnie próbować naprawiać UPS-a (wewnątrz nie znajdują
się żadne elementy, które mogły by być regulowane przez użytkownika). Wszelkie prace serwisowe należy powierzyć wykwalikowanemu serwisowi.
• W przypadku wystąpienia jakiegokolwiek niebezpieczeństwa, należy natychmiast wyłączyć UPS naciskając przycisk Power lub odłączając przewód zasilający.
• Należy niedopuścić aby do wnętrza przedostała się woda lub inne elementy mogące
spowodować uszkodzenie urządzenia.
• Nie należy podłączać wejść do wyjść UPS-a.
• Do urządzenia nie należy podłączać sprzętu nie związanego z komputerem (w szczególności sprzętu medycznego, podtrzymującego życie, mikrofalówek, odkurzaczy itp.).
• Aby nie dopuścić do przegrzania UPS-a, nie należy umieszczać go w pobliżu źródeł ciepła, miejscach o bezpośrednim padaniu promieni słonecznych oraz nie zasłaniać
otworów wentylacyjnych.
• Przed rozpoczęciem czyszczenia urządzenia, należy je wyłączyć i odłączyć od źródła
zasilania. Do czyszczenia należy używać wilgotnej miękkiej ściereczki.
• Nie wolno wrzucać baterii do ognia, pod wpływem wysokiej temperatury baterie mogą
eksplodować.
• Nie wolno otwierać ani w żaden sposób uszkadzać baterii lub akumulatorów. Uwolniony elektrolit jest szkodliwy dla skóry i oczu.
WSTĘP
UPS przeznaczony jest do awaryjnego zasilania komputera w czasie pozwalającym na
swobodne zapisanie wyników pracy i ich zamknięcie. Niewielkie wymiary pozwalają idealnie dopasować urządzenie do ograniczonego środowiska pracy. UPS jest wyposażony w układ stabilizacji napięcia (AVR). UPS cechuje:
• sterowanie mikroprocesorowe (zapewnia wysoką niezawodność)
• układ regulacji napięcia wyjściowego (AVR)
• funkcja oszczędności energii
• funkcja startu DC
• kompaktowy wymiar, niewielka waga
• ochrona przed przeciążeniem

16
Instrukcja obsługi
PL
Panel tylny
Wejście zasilania
Bezpiecznik
Wyjścia
zasilania
Bezpiecznik
Wejście
zasilania
Gniazdo RJ11
Wyjścia
zasilania

17
Instrukcja obsługi
PL
Wejście
zasilania
Wyjścia
zasilania
Port RS232
1. Rozpakowanie
UPS należy wyjąć z opakowania i sprawdzić czy nie posiada widocznych uszkodzeń
(powstałych w transporcie). W przypadku wykrycia jakichkolwiek uszkodzeń mechanicznych, nie należy podłączać UPS-a do źródła zasilania.
2. Ładowanie
Przed pierwszym użyciem UPS może wymagać doładowania. Należy go podłączyć do
źródła zasilania i pozostawić przynajmniej na 6 godzin bez obciążenia (bez podłączonego sprzętu komputerowego).
6 godzin

18
Instrukcja obsługi
PL
3. Miejsce instalacji
UPS należy umieścić w miejscu zapewniającym odpowiedni przepływ powietrza, wolnym od zanieczyszczeń, kurzu i wilgoci. Należy unikać miejsc z wysoką temperaturą i
wilgotnością.
Dodatkowo UPS powinien znajdować się w odległości minimum 20cm od monitora (może być źródłem zakłóceń).
4. Podłączenie
UPS należy podłączyć do gniazda zasilania z uziemieniem. Następnie należy podłączyć sprzęt komputerowy do wyjść zasilania znajdujących się na tylnym panelu UPS-a.
5. Włączenie
Aby włączyć urządzenie, należy nacisnąć przycisk Power. Ponowne naciśnięcie przycisku spowoduje wyłączenie UPS-a.
przycisk Power

19
Instrukcja obsługi
PL
SPECYFIKACJA
Model 400/600/800 1000/1200 1500/2000
MOC VA/W
400VA/240W 1000VA/600W 1500VA/900W
600VA/360W
1200VA/720W
2000V
A/1200W
800VA/480W
WEJŚCIE
Napięcie 110VAC/120VAC lub 220VAC / 230VAC /240VAC
Zakres napięcia 81-145VAC lub 162-290VAC
WYJŚCIE
Regulacja napięcia
(praca na baterii)
+/-10%
Częstotliwość 50Hz lub 60Hz
Regulacja częstotli-
wości
(praca na baterii)
+/-1Hz
Kształt napięcia wyj-
ściowego
sinusoida zmodykowana
BATERIA
Typ baterii
12 V/4.5 AH x1
12 V/7.0 AH x1
12 V/9.0 AH x1
12 V/7.0 AH x 2 12 V/9.0 AH x2
Czas ładowania 6-8 godzin do 90% po całkowitym rozładowaniu
CZAS PRZE-
ŁĄCZANIA
Typowy 2-6 ms
WSKAŹNIKI
Tryb AC Zielony (światło ciągłe)
Praca na baterii Żółty (miga)
Błąd Czerwony (światło ciągłe)
ALARM
DŹWIĘKOWY
Praca na baterii Sygnał dźwiękowy co 10 sekund
Niski stan baterii Sygnał dźwiękowy co 1 sekundę
Przeciążenie Sygnał dźwiękowy co 0.5 sekundy
Błąd Ciągły sygnał dźwiękowy
ZABEZPIECZENIA
Pełna ochrona
Zabezpieczenie przed rozładowaniem, przeładowa-
niem i przeciążeniem
WYMIARY mm 298x101x142 338x149.3x162 380x158x198
WAGA kg 3.85/4.35/4.7 7.8/8.4 10.1/10.5
ŚRODOWISKO
Temperatura pracy 0°C - 40°C
Poziom hałasu < 40dB
Specykacja produktu może ulec zmianie bez powiadomienia.

20
Instrukcja obsługi
PL
ROZWIĄZYWANIE PROBLEMÓW
Problem Przyczyna Rozwiązanie
Nie świeci się wyświetlacz
LED
1. Rozładowana bateria 1. Należy naładować baterię
(ok 8 godzin)
2. Uszkodzona bateria 2. Należy wymienić baterię na
nową (tego samego typu)
3. UPS nie jest włączony 3. Należy włączyć UPS
Ciągły alarm dźwiękowy przy
normalnym zasilaniu AC
Przeciążenie UPS-a Należy odłączyć nadmierne
obciążenie
Krótki czas pracy na baterii w
przypadku awarii zasilania
1. Przeciążenie UPS-a 1. Należy odłączyć nadmierne
obciążenie
2. Niski stan naładowania
baterii
2. Należy naładować baterię
(ok 8 godzin)
3. Uszkodzona bateria 3. Należy wymienić baterię na
nową (tego samego typu)
Miga żółta dioda LED przy
normalnym zasilaniu
Przewód zasilający nie jest
dobrze dociśnięty
Należy poprawić podłączenie
przewodu zasilającego

21
Manual de utilizare
RO
MASURI DE SIGURANTA - AVERTISMENT
• Acest UPS utilizeaza tensiuni care pot periculoase. Nu Incercati sa demontati
aparatul. Aparatul nu contine piese de schimb. Reparatiil etrebuiesc efectuate doar de
catre personal calicat.
• In caz de urgenta, apasati butonul OFF si deconectati cablul de alimentare de la priza
de perete, pentru a dezactiva UPS-ul.
• Nu permiteti ca substante lichide sau orice obiect strain sa patrunda in interiorul
UPS-ului. Nu asezati bauturi sau vase ce contin substante lichide pe sau in apropierea
aparatului (de ex. vaze cu ori)
• Nu conectati intrarea UPS la propria iesire.
• Nu atasati la aparat accesorii cum ar echipamente medicale, echipamente de prim
ajutor, cuptoare cu microunde, aspiratoare sau alte UPS-uri.
• Pentru a reduce riscul de supraincalzire a UPS-ului, nu acoperiti oriciile de aerisire ale
acestuia si evitati expunerea unitatii la lumina directa a soarelui sau instalarea aparatului
in apropierea aparatelor ce emit caldura, precum radiatoare sau cuptoare.
• Deconectati UPS-ul de la sursa de alimentare inainte de curatare si nu utilizati pentru
curatare substante lichide sau detergent cu pulverizator.
• Nu desafaceti sau distrugeti bateria sau bateriile. Electrolitul scurs este toxic si este
daunator mediului inconjurator, pielii si ochilor.
INTRODUCERE
UPS-ul este special conceput pentru alimentarea calculatoarelor personale. UPS-ul
este echipat cu un stabilizator AVR pentru a stabiliza intervalul tensiunii de intrare
si are , de asemenea, o functie de pornire DC, care permite pornirea UPS-ului fara
alimentarea de la retea. Desi este un UPS mic, principalele caracteristici ale acestuia
sunt enumerate mai jos:
• Control cu microprocesor, care garanteaza o abilitate ridicata.
• Echipat cu functie AVR.
• Functia Green Power Function, pentru economisirea energiei.
• Functia de pornire DC.
• Dimensiuni compacte, usor.
• Protectie la suprasarcina AC.

22
Manual de utilizare
RO
PANOUL DIN SPATE
Intrare
Intrerupator
Iesire prize
Intrerupator
Intrare
comunicare
RJ11
Iesire prize

23
Manual de utilizare
RO
Intrare
Iesire prize
comunicare
RS232
1. DESPACHETAREA PRODUSULUI
Scoateti UPS-ul din ambalaj și vericati-l pentru posibilele daune din timpul transportului.
Daca descoperiti orice daune, impachetati unitatea si returnati produsul la locul de
cumparare.
2. INCARCARE
Aceast dispozitiv este livrat din fabrica cu o baterie interna incarcata. Cu toate acestea,
bateria se poate descarca pe durata transportului si a depozitarii produsului, de aceea
bateria trebuie reincarcata inainte de utilizare.
Porniti UPS-ul, conectati unitatea la o sursa de alimentare adecvata si permiteti ca
UPS-ul sa se incarce complet lasandu-l conectat cel putin 6 ore, fara sarcina conectata
(aparate electrice cum ar calculatoare, monitoare, etc).
6 hours

24
Manual de utilizare
RO
3. AMPLASARE
Instalati unitatea UPS in locuri care furnizeaza un ux de aer adecvat in jurul
aparatului, lipsit de praf, gaze corozive si agenti de contaminare.
Nu utilizati UPS-ul intr-un mediu in care temperatura sau umiditatea ambianta este
ridicata.
Pe de alta parte, plasati UPS-ul departe de monitor la cel putin 20 cm, pentru a evita
interferentele.
4. CONEXIUNE
Conectati UPS-ul la o priza cu pamantare de 2 poli, 3 re. Apoi, conectati un dispozitiv
al calculatorului in ecare dintre prizele de alimentare furnizate pe partea din spate a
UPS-ului.
5. PORNIRE/OPRIRE
Pentru a porni unitatea UPS, apasati butonul de pornire usor. Pentru a opri aparatul
UPS, apasati din nou butonul de pornire.
power switch

25
Manual de utilizare
RO
SPECIFICATII
Model 400/600/800 1000/1200 1500/2000
CAPACITATE VA/W
400VA/240W 1000VA/600W 1500VA/900W
600VA/360W
1200VA/720W
2000V
A/1200W
800VA/480W
INTRARE
Tensiune 110VAC/120VAC sau 220VAC / 230VAC /240VAC
Interval tensiune 81-145VAC sau 162-290VAC
IESIRE
Stabilizare tensiune
(mod baterie)
+/-10%
Frecventa 50Hz sau 60Hz
Stabilizare frecventa
(mod baterie)
+/-1Hz
Forma tensiunii de
iesire
Unda sinusoidala modicata
BATERIE
Tipul bateriei
12 V/4.5 AH x1
12 V/7.0 AH x1
12 V/9.0 AH x1
12 V/7.0 AH x 2 12 V/9.0 AH x2
Durata reincarcare 6-8 ore la 90%, dupa o descarcare completa
TIMP
TRANSFER
Tipic 2-6 ms
INDICATOR
Mod AC Lumina verde
Mod baterie LED galben intermitent
Defectiune LED rosu
ALARMA
SONORA
Modul Backup Sunet la ecare 10 secunde
Baterie descarcata Sunet la ecare o secunda
Suprasarcina Sunet la ecare 0.5 secunde
Defectiune Sunet continuu
PROTECTIE Protectie completa
Descarcare,supraincarcare si protectie
suprasarcina
DIMENSIUNI Dimensiuni (mm) 298x101x142 338x149.3x162 380x158x198
GREUTATE Greutate neta (kg) 3.85/4.35/4.7 7.8/8.4 10.1/10.5
MEDIU
Temperatura de lucru 0°C - 40°C
Nivel de zgomot Mai putin de 40dB
Specicatiile sunt supuse schimbarilor fara noticare prealabila.

26
Manual de utilizare
RO
DEPANARE
Indicii Cauza posibila Solutii
Pe panoul frontal nu
functioneaza asajul cu
LED-uri
1.Baterie slaba 1. Lasati bateria la incarcat
pana la 8 ore
2. Baterie defecta 2. Inlocuiti bateriile defecte cu
altele noi de acelasi tip
3. Butonul de pornire nu este
apasat
3. Apasati butonul de pornire
din nou
Avertizorul sonor emite sunet
continuu cand sursa AC
functioneaza normal
UPS-ul este supraincarcat Vericati ca sarcina sa nu
depaseasca capacitatea
UPS-ului
In timpul unei intreruperi de
curent,durata de back-up este
mai scurta
1. UPS-ul este supraincarcat 1. Reduceti din sarcina
2. Tensiunea bateriei este
prea mica
2. Incarcati bateria 8 ore sau
mai mult
3.Bateria este defecta
din cauza temperaturii
ridicate a mediului de
lucru sau a functionarii
necorespunzatoare
3. Inlocuiti bateria defecta cu
alta noua de acelasi tip
Alimentarea este normala dar
LED-ul galben palpaie
Cablul de alimentare s-a
desfacut
Conectati corespunzator
cablul de alimentare


www.quer.pl
 Loading...