

High Denition Car Video Recorder
Quer
Operation Manual
KOM0474
EN
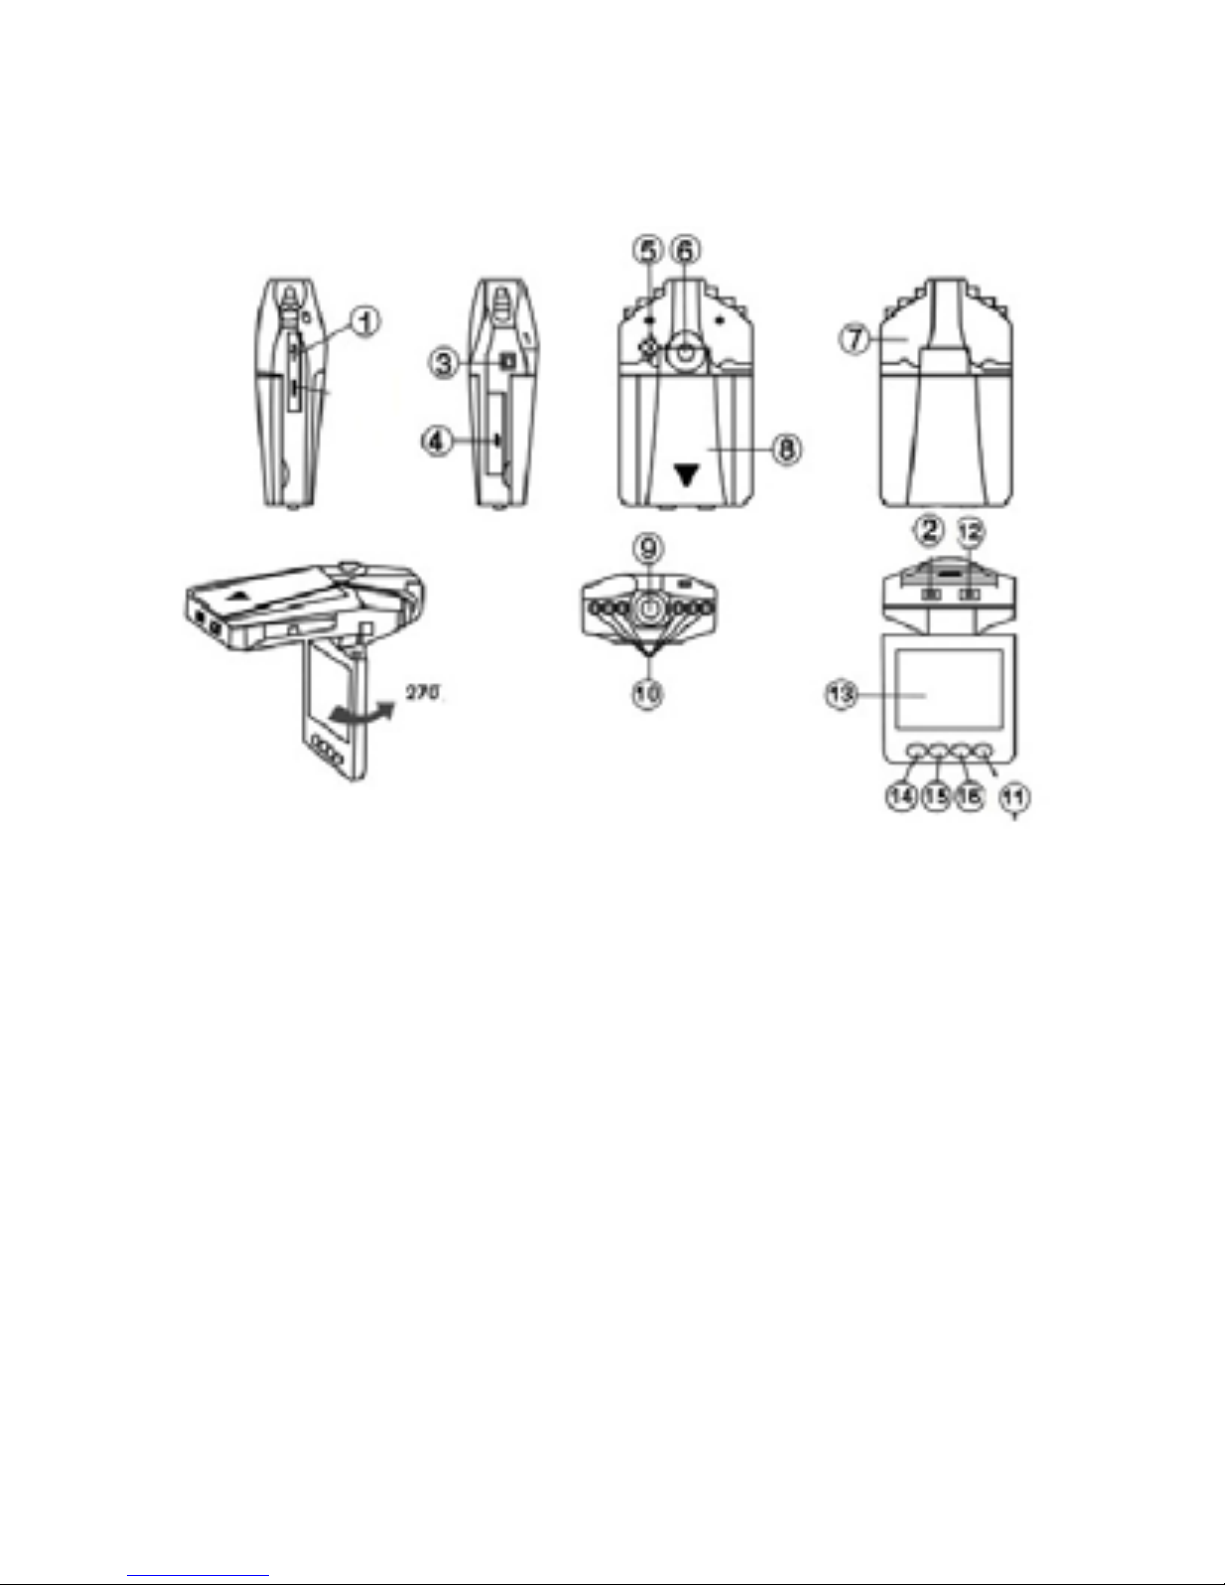
Instruction to Keys Function
1 USB Interface
2 On/Off key
3 .5V power input jack
4 SD/MMC card slot
5 Speaker
6 Bracket hole
7 MIC
8 Battery cover
9 Lens
10 Infrared lamp
11 Mode (Record/Photo/
Preview)
12 Record/Photo working (blue) indicator,
charge (red) indicator
13 2.5-inch color display
14 Menu
15, 16 Down/Up key

Accessories
● Operation Manual ● Bracket ● USB cable
● Car charger (with 24V/12V to 5V output voltage
converter inside)
Instruction of the car video recorder
Power supply (two modes):
A) Using built-in rechargeable lithium battery
Charge mode: 1) connect to car charger; 2) Connect
to computer by USB interface
The red indicator is on during charging. It will turn
off after the DVR is charged full.
Note: When supplying power with lithium battery,
it is required to press On/Off key 2 to start or stop
DVR recording.
B) Connecting 12V/24V car charger
After vehicle started, DVR starts recording automatically. It saves the le and turn off automatically 5
seconds later after vehicle is shut down.
Note: Only car charge source with 5V output can be
used.
Function Description
DVR has record/photo/preview functions. You can
switch between these modes at your discretion.
A) Record mode
Press down the On/Off key 2 or connect to car
charger, the DVR goes into record mode and starts

recording automatically. (Note: please insert SD/
MMC card before using.). Now the blue indicator
ashes.
The recorded video les are stored in SD/MMC
card. Press Record key 12 to stop recording. Now
the blue indicator illuminate solid.
B) Photo mode
Turn the unit on and press the Mode key 11 to enter
the photo mode. Press the Photo key 12 to take
photo.
C) Preview mode
Turn the unit on and press the Mode key 11 twice to
enter the preview mode.
Press the Up/Down key to select the desired le for
browsing. Press Record key 12 to “Play/Pause”.
D) Delete Function
In preview mode, press the Menu key 14 to enter
deletion screen. Press the Record key 12 to enter
the screen to select deleting “Single/All/Selected”
(with Up/Down). Finally, press the Record key 12
to conrm. You can also select “Thumbnails” and
“Preview Playback Volume” and press the Record
key 12 to conrm.
Menu Settings
Turn the unit on and press Menu key 14 to enter the
settings screen. Press Up/Down key to cycle through
the items listed.

Press key 12 to enter setting screen of the selected
item, press Up/Down key to select specic parameter. Finally, press key 12 to conrm and exit.
1) Video Resolution Settings: 1280×960 / 720×480 /
640×480 pixels.
Default setting of DVR is: 640×480 pixels.
2) Time marker: Close/Date/Date and Time (When
“Close” is selected, no time will be displayed on the
video le.)
3) Motion Detection: On/Off
With “On” selected, DVR enter standby mode automatically after vehicle started. When there is any
object moves before DVR, the DVR will start video
recording automatically. When the object stops moving, DVR will stop recording and save the le. Or
when power is off, it will also stop recording.
4) Recorder: On/Off (when “Off” is selected, DVR
will not record sound)
5) Video save time: 2 minutes / 5 minutes / 15
minutes
On the settings screen, press Menu key again, DVR
enters the following settings:
Press Up/Down key to select the items, press 12 key
to conrm and exit.
1) Format: Cancel/Execute;
2) Language: English / Traditional Chinese / Simplied Chinese / Japanese / Russian;

3) Reset system: Cancel/Execute (Select “Execute”
to restore default settings);
4) Optical frequency: 50HZ/60HZ
5) Date and Time:
Press REC key to enter, press UP/DOWN to set
date, press 12 key to go to the next setting. When
all settings are completed, press 12 key to conrm
and exit.
Note: Before setting, press DOWN/UP key to
select [Year/Month/Date], [Date/Month/Year] or
[Month/Date/Year] modes.
6) Infrared lamp: Auto/Off
Downloading File
1) Connect computer and DVR with USB cable;
2) “Removable disk” icon appears in My Computer;
3) Down the le in folder DEIM/100DSCIM.
Notices
1) Please insert SD/MMC card before recording;
2) This video recorder has cyclic recording function.
When the storage medium is full, the video recorder
will store the recorded content from the very beginning of the storage medium and cover the old le.
(Note: To present all the old les being deleted immediately, the saved les are separated into sections
by 2 minutes / 5 minutes / 15 minutes. When SD/
MMC card is full, the old les will be covered as

sections one by one.
3) When lithium battery is low, DVR screen displays
“Low Battery”, the unit turns off 10 seconds later.
4) If any abnormalities occur in the system, please
remove the battery and install it again to reset the
system.
Technical Parameters
1) Video Resolution: 1280×960 / 720×480 /640×480
pixels
2) Cyclic shooting:
3) Save format: AVI
4) Power supply: built-in lithium battery/car charger
5) Support SD/MMC card: 32GB maximum
6) Voice recording
7) Output: USB
8) 2.5-inch color display, 270 degrees rotation

Rejestrator samochodowy HD DVR
Quer
Instrukcja obsługi
KOM0474
PL

Opis urządzenia
1 Gniazdo USB
2 Włącznik
3 Gniazdo zasilania 5V DC
4 Gniazdo SD
5 Głośnik
6 Miejsce montowania
uchwytu
7 Mikrofon
8 Pokrywa baterii
9 Obiektyw
10 IR LED
11 Przycisk Zmiany trybu
12 Dioda kontrolna, przycisk
OK
13 Wyświetlacz 2.5 cala LCD
14 Przycisk MENU
15 Przycisk W DÓŁ
16 Przycisk W GÓRĘ

W zestawie
- Instrukcja
- Uchwyt
- Kabel USB
- Ładowarka samochodowa (12V/24V)
Zasilanie
- urządzenie jest wyposażone w wymienny akumulator
- urządzenie może być zasilane za pomocą zasilacza samochodo-
wego
Nagrywanie
Gdy w urządzeniu znajduje się karta SD, nagrywanie rozpoczyna
się automatycznie po włączeniu urządzenia. Wciśnij przycisk OK.
aby zatrzymać nagrywanie.
Fotografowanie
Wciśnij przycisk zmiany trybu MODE. Wciśnij OK. aby zrobić
zdjęcie.
Podgląd nagrań
Wciśnij przycisk MODE dwukrotnie aby włączyć tryb przeglądania nagrań. Wybierz żądany plik przyciskami góra/dół. Jeżeli
jest to plik wideo możesz go odtworzyć wciskając przycisk OK.
Wciśnij przycisk MENU aby skasować plik lub wszystkie pliki.
Funkcje urządzenia
Wciśnij przycisk MENU w trybie fotografowania lub lmowania
aby przejść do ustawień.

Ustawienia trybu wideo:
- Rozdzielczość
- Sygnatura czasu: brak / data / data i czas
- Wykrywanie ruchu: tak / nie
Gdy funkcja jest aktywna urządzenie automatycznie
rozpocznie nagrywanie gdy wykryje poruczające się obiekty,
przestanie nagrywać w przypadku braku ruchu.
- Rejestracja audio: tak / nie
- Długość nagrania w jednej sekcji: 2 / 5 / 15 minut.
Ustawienia trybu fotografowania:
- Rozmiar obrazu
- Jakość zdjęcia
- Ekspozycja
- Wyzwalacz: 2s, 10s, brak, seria
- Sygnatura czasu: brak / data i czas
Ustawienia urządzenia:
W trybie lmowania lub fotografowania wciśnij przycisk MENU
dwukrotnie:
Dostępne opcje:
- formatowanie nośnika SD
- wybór języka menu
- reset
- częstotliwość
- ustawienia daty
- diody podczerwieni: tryb auto lub wyłączone

Tryb USB
Podłącz urządzenie kablem USB do komputera, komputer rozpozna urządzenie, jako nowy dysk
Uwaga: Włóż kartę SD do urządzenia.
Podczas nagrywania w przypadku, gdy zapełni się przestrzeń na
nośniku SD urządzenie automatycznie nadpisze najstarsze pliki.
W chwili tworzenia nowego pliku może wystąpić 3s pauza w
nagraniu.
Specykacja techniczna:
- Rozdzielczość: 1280×960 / 720×480 /640×480 pixels
- Format wideo: AVI
- Zasilanie: wbudowana bateria / ładowarka samochodowa
- Obsługiwane nośniki danych SD/MMC: 32GB max
- Nagrywanie audio
- Gniazdo USB
- Wyświetlacz LCD 2.5 cala
 Loading...