

Page 1
UM_EN
Part No.: 1730015_02
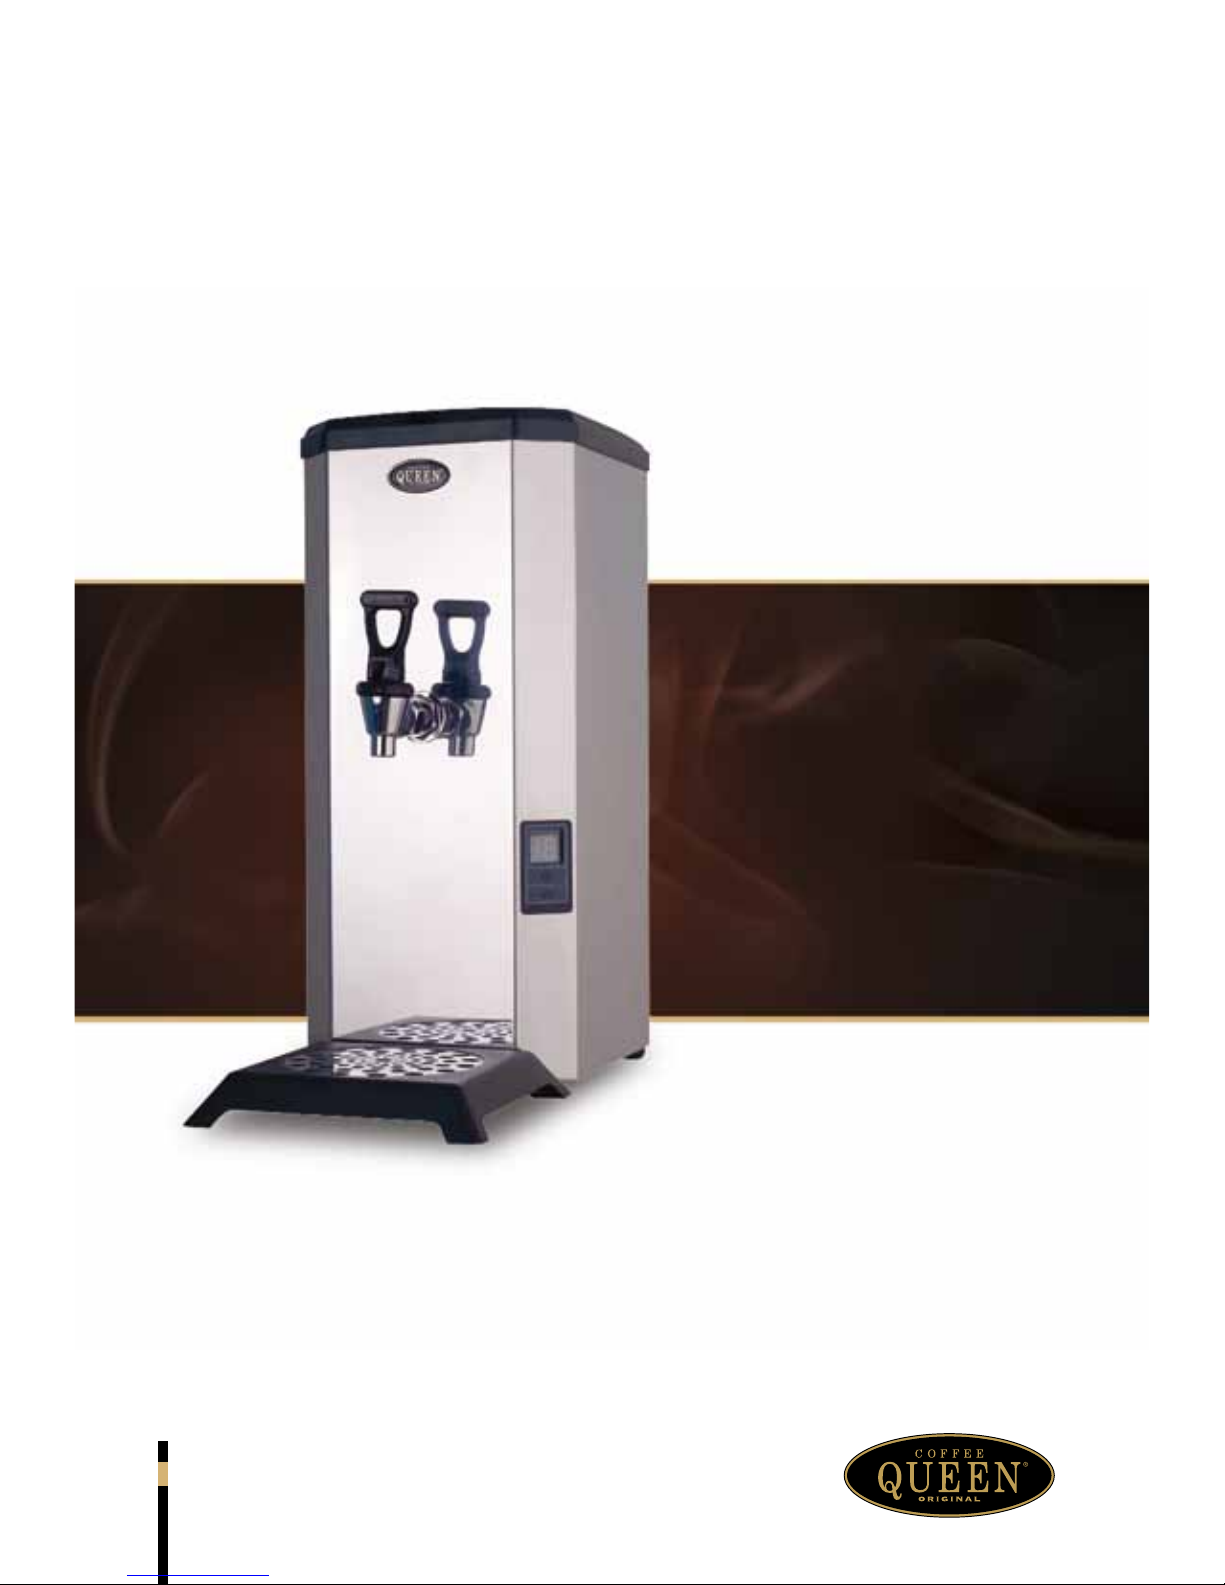
HVA/HVM
USER MANUAL
Page 2
2
HVA/HVM
CONTENT
CONTENT ........................................................................................................................................................ 2
GENERAL ........................................................................................................................................................... 3
Introduction ..............................................................................................................................................................3
Warnings ....................................................................................................................................................................3
Precautions ................................................................................................................................................................3
Intended use ..............................................................................................................................................................3
Facts & weight .........................................................................................................................................................4
OVERVIEW OF COMPONENTS ........................................................................................................ 5
INSTALLATION AND START-UP ........................................................................................................ 6
Positioning..................................................................................................................................................................6
Start-up procedure ..................................................................................................................................................6
Adjusting water temperature ................................................................................................................................7
Dispensing hot water ..............................................................................................................................................7
CLEANING AND CARE ........................................................................................................................... 8
ERROR MESSAGES ...................................................................................................................................... 9
PROGRAMMING ....................................................................................................................................... 10
Set machine for manual water filling ................................................................................................................. 10
DIMENSION SKETCH ............................................................................................................................. 11
HVA/HVM ............................................................................................................................................................... 11
IMPORTANT!
INFO.
CAUTION!
INFO.
More INFO.
INFO.
Some important information may appear in textboxes seen below
Note
Page 3
3
HVA/HVM
GENERAL
Introduction
Thank you for choosing a HVA/HVM hot water machine.
We hope you enjoy it !
Read the user guide before using the machine.
This guide contains important instructions for
proper and safe use of the vending machine.
Always keep this guide close at hand for future
reference.
Warnings
Never immerse the machine, plug or mains
cable in water because there is a danger of
electric shock.
The appliance is not intended for use by
persons (including children) with reduced
physical, sensory or mental capabilities, or
lack of experience and knowledge, unless they
have been given supervision or instruction
concerning the use of the appliance by a person
responsible for their safety.
Children should be supervised to ensure they
do not play with the appliance.
Do not use the machine if the mains cable, plug
is damaged or the machine has fallen down.
If the mains cable is damaged it must be
replaced by the manufacturer, service agent or
similarly qualified persons in order to avoid a
hazard.
Only plug the machine into a properly installed
earthed safety socket whose line voltage
matches the technical data for the machine.
Do not use the machine outdoors so it can be
exposed to weather (rain, snow, frost). It will
cause material damage to the machine.
Do not try to open the machine or repair it in
any way. To avoid danger only have the machine
repaired in a technical workshop, Service
Centre or by a qualified person.
Remove the mains cable from the socket when
the machine is not in use for longer periods. To
do this, pull the plug not the cable.
This appliance must be placed in a horizontal
position which is resistant to any water that
may leak.
Place the machine out of the reach of children.
Position the mains cable so that people cannot
trip over it. Keep it away from sharp edges and
heat sources.
The new hose-sets supplied with this appliance
are to be used, old hose-sets must not be reused.
This appliance is not suitable for installation in
an area where a pressure washer may be used.
This appliance must not be cleaned with a
pressure washer.
This appliance is intended to be used in
household and similar applications such as:
- Staff kitchen areas in shops.
- Offices and other commercial working
environments.
- On agricultural estates.
- By clients in hotels, motels and other
residential type environments.
- Bed and breakfast type environments.
For the optimal performance of the machine
these parameters shall not be exceeded:
- Maximum permissible inlet water pressure :
800KPa (8Bar)
- Minimum permissible inlet water pressure:
200KPa (2Bar)
- Maximum working temperature: 40°ºC
- Minimum working temperature: 10°ºC
Precautions
Intended use
Page 4
4
HVA/HVM
GENERAL
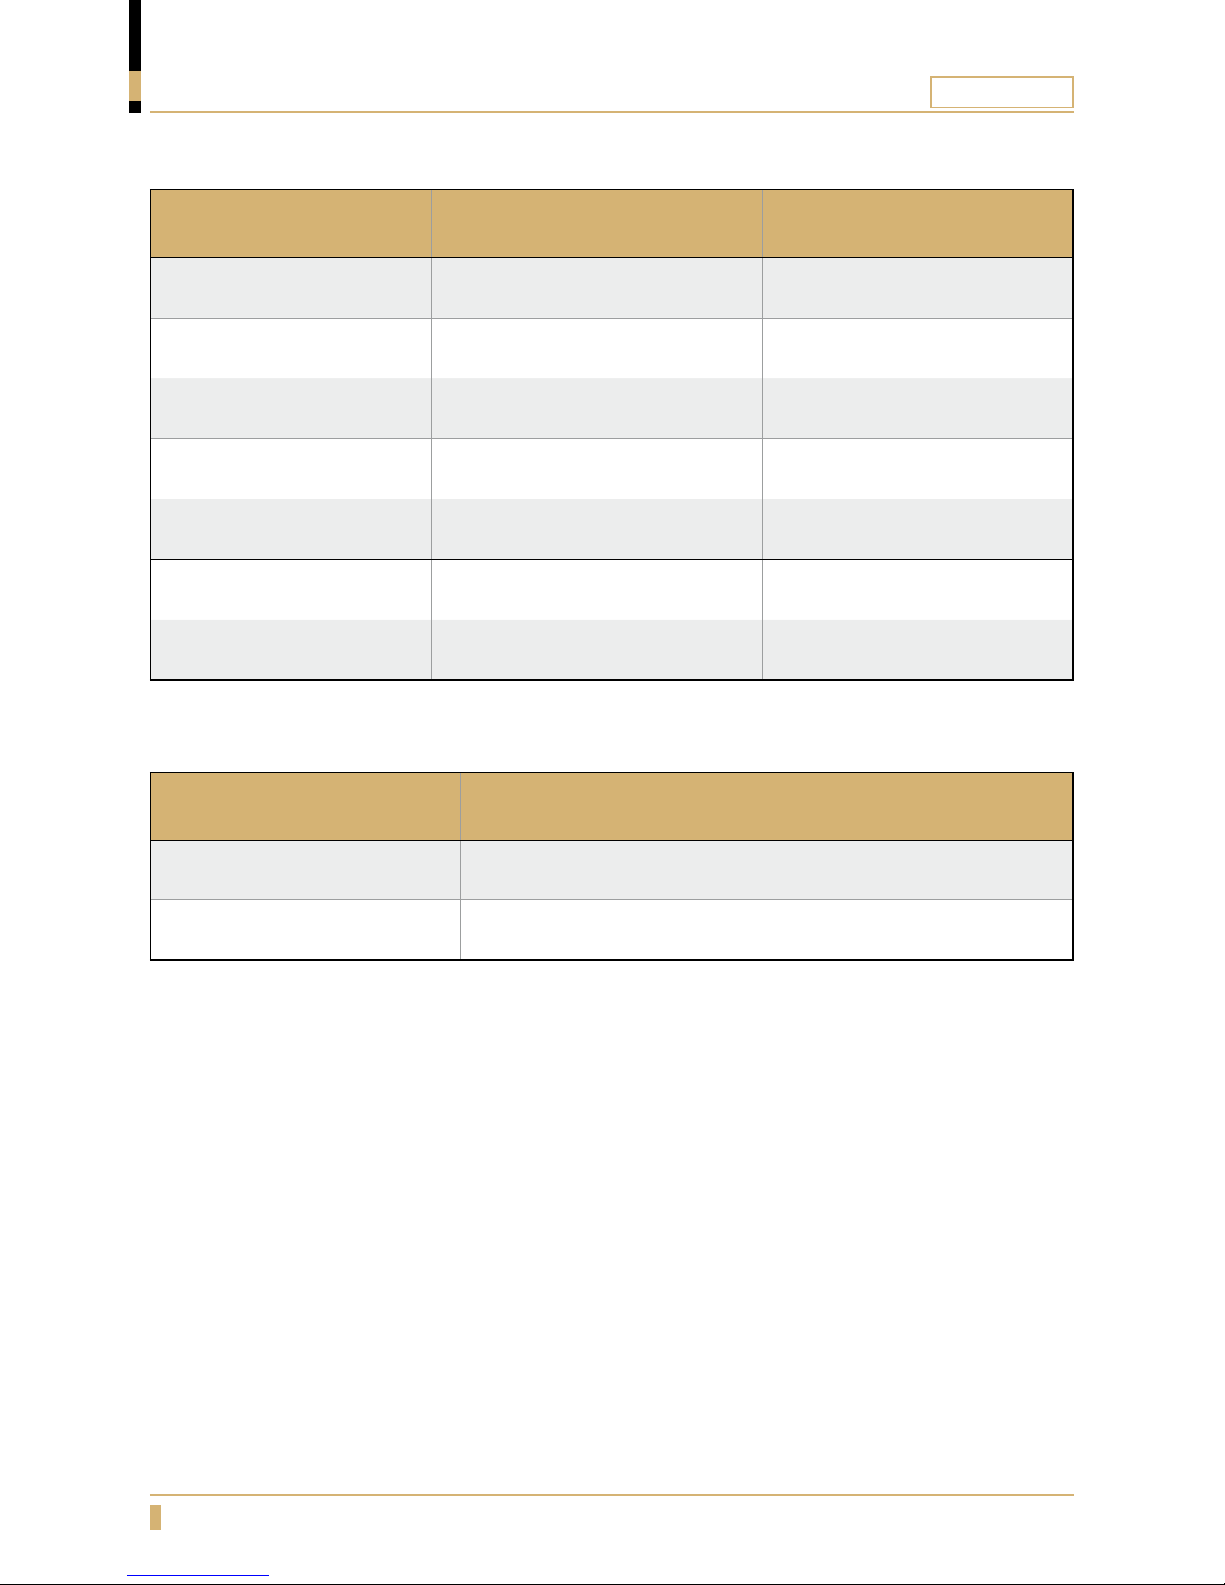
Facts & weight
FACTS HVA/HVM 1 phase HVA/HVM 3 phase
Height, Width, Depth
500, 225, 410mm 500, 225, 410mm
Tank volume
7.5 Litres 7.5 Litres
Power supply
220-230VAC 1N~ 2200W 50/60Hz 380VAC 3N~6600W 50/60Hz
Cold water connection
½” External thread ½” External thread
Capacity
18 litres/hour 67 litres/hour
Water purication lter
Option Option
Filling and heating time
~16.5min ~6min
MODEL/NAME WEIGHT
HVA/HVM 1 phase 9 kg
HVA/HVM 3 phase 10 kg
Page 5
5
HVA/HVM
OVERVIEW OF COMPONENTS
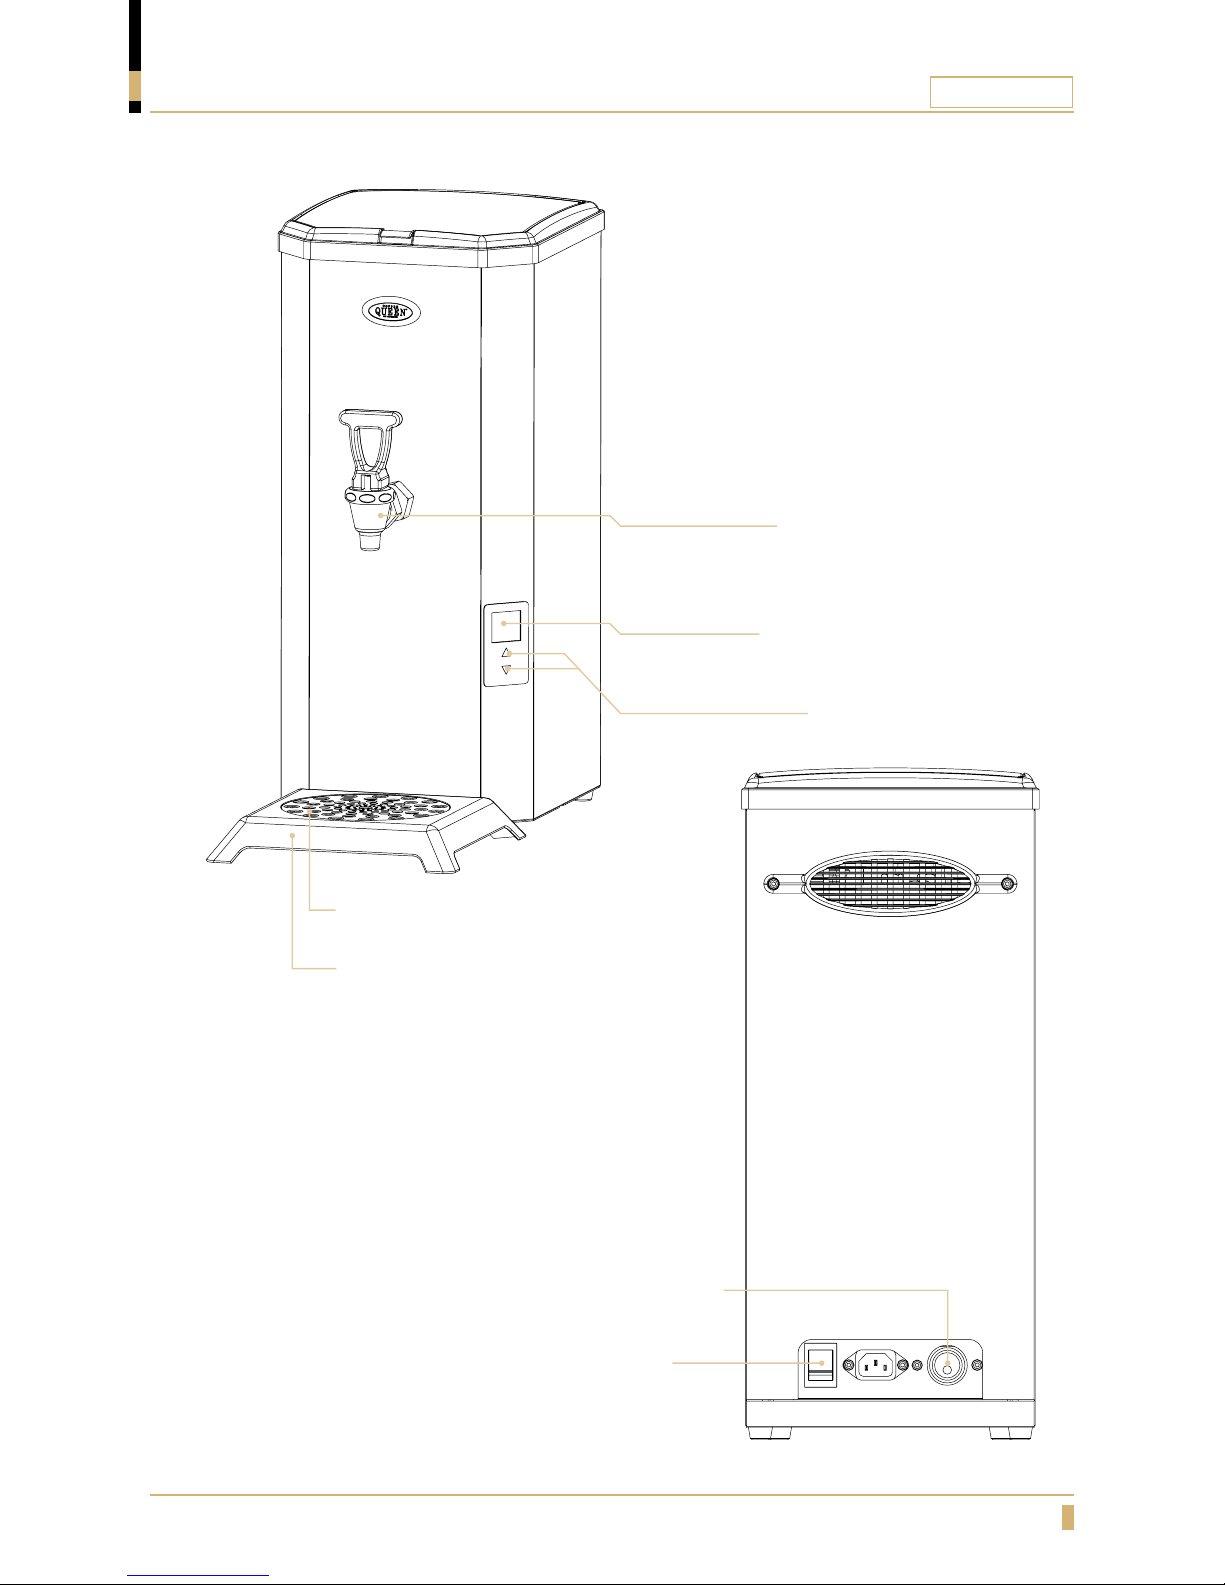
Hot Water Tap
Display
Temperature
Adjustment Buttons
Drip Tray Insert
Drip Tray
Power Switch
Water Connection
BACK
FRONT
Page 6
6
HVA/HVM
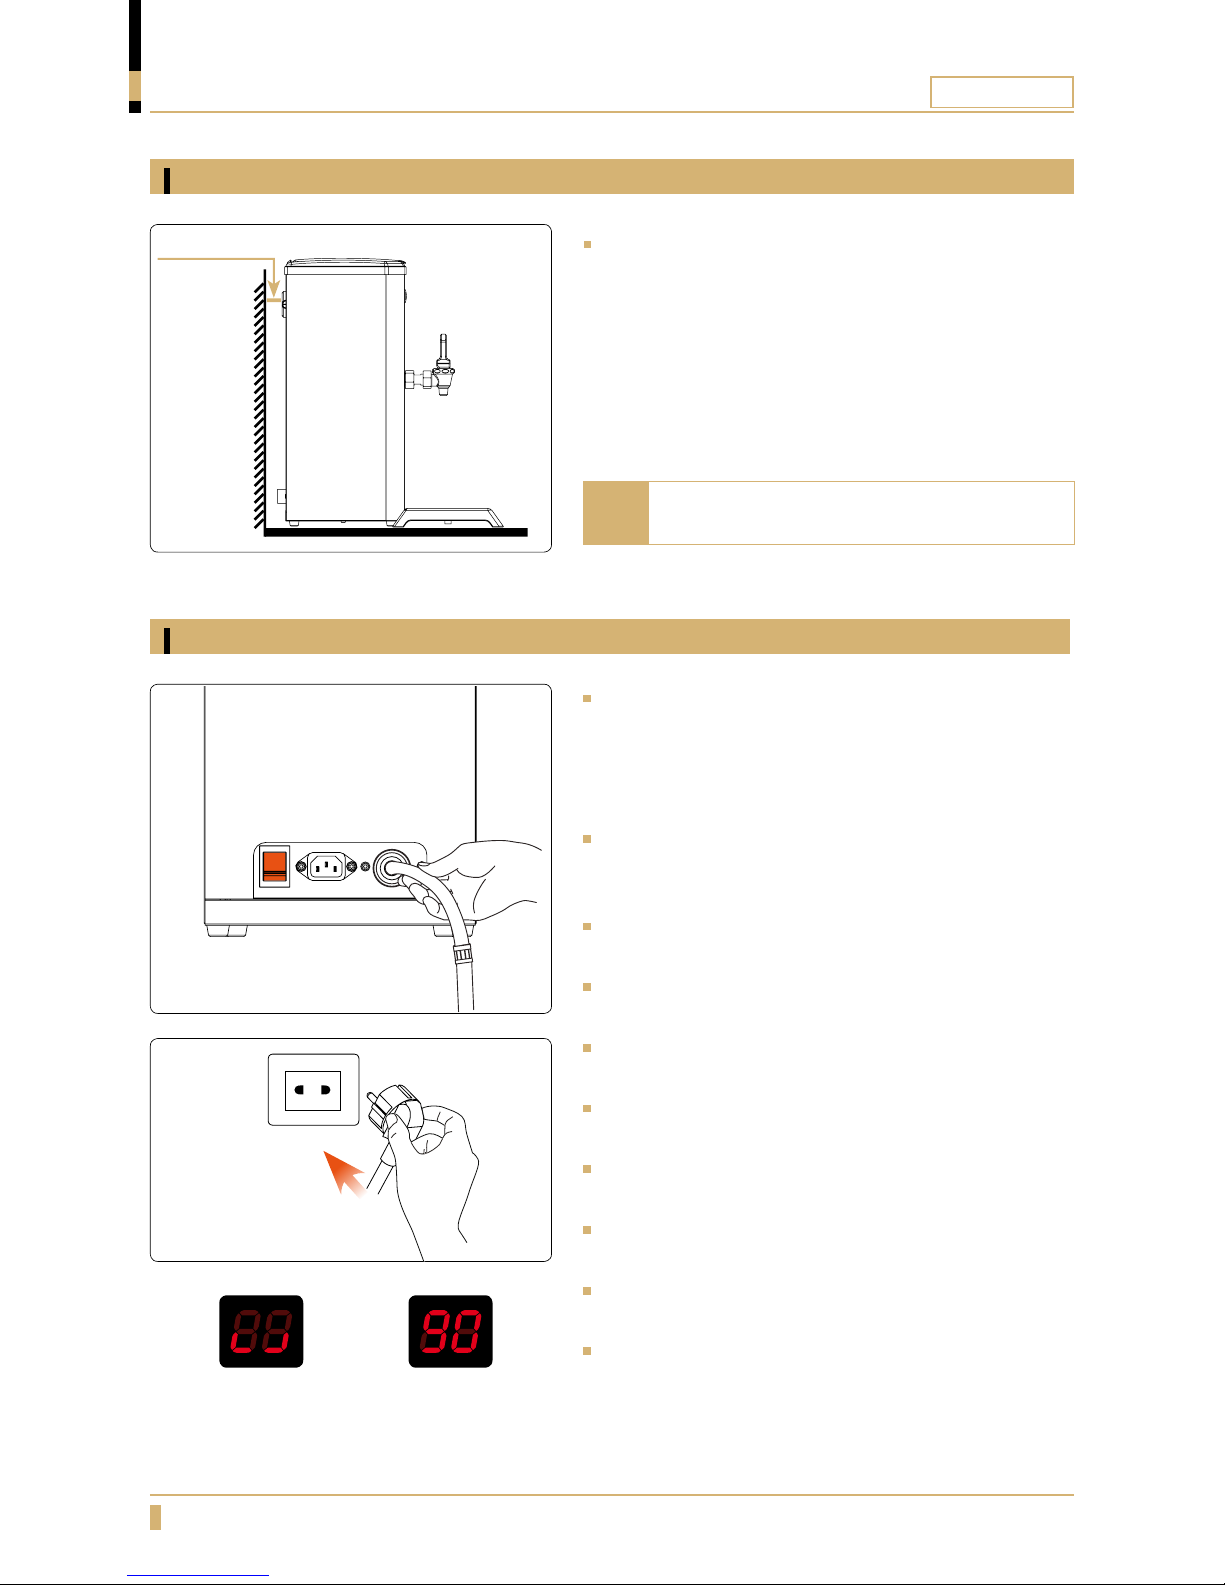
Place the machine on a flat and waterproof surface
that will support the weight of the machine.
Make sure air is able to circulate behind
the machine (minimum 10cm).
INSTALLATION AND START-UP
Positioning
Start-up procedure
MIN. 10cm
Note
Connect the supplied water hose to the cold water
connection using a ½’’ R-connection(A). When
pushing the machine into position make sure there is
no interference to the hose to ensure proper water
flow.
Water supply to the machine is the customer’s
responsibility according to instruction and advice from
the supplier.
In areas with high level lime problem, a descaling filter
should be mounted.
Insert the power plug in a separately-earthed wall
socket. (See fig.C)
Turn on the machine using the power switch(See fig.B)
that is located at the back of the machine.
The machine will now start to fill up with water and
then heat the water.
The display will flash while the machine is filling with
water (See fig.D).
While the machine is heating the current temperature
will flash in the display.
When the water has reached the preset temperature
of 90oC the display will show a steady light. (See fig.E)
The machine is now ready for use.
AB
C
D E
Page 7
7
HVA/HVM
A
B
INSTALLATION AND START-UP
Adjusting water temperature
Dispensing hot water
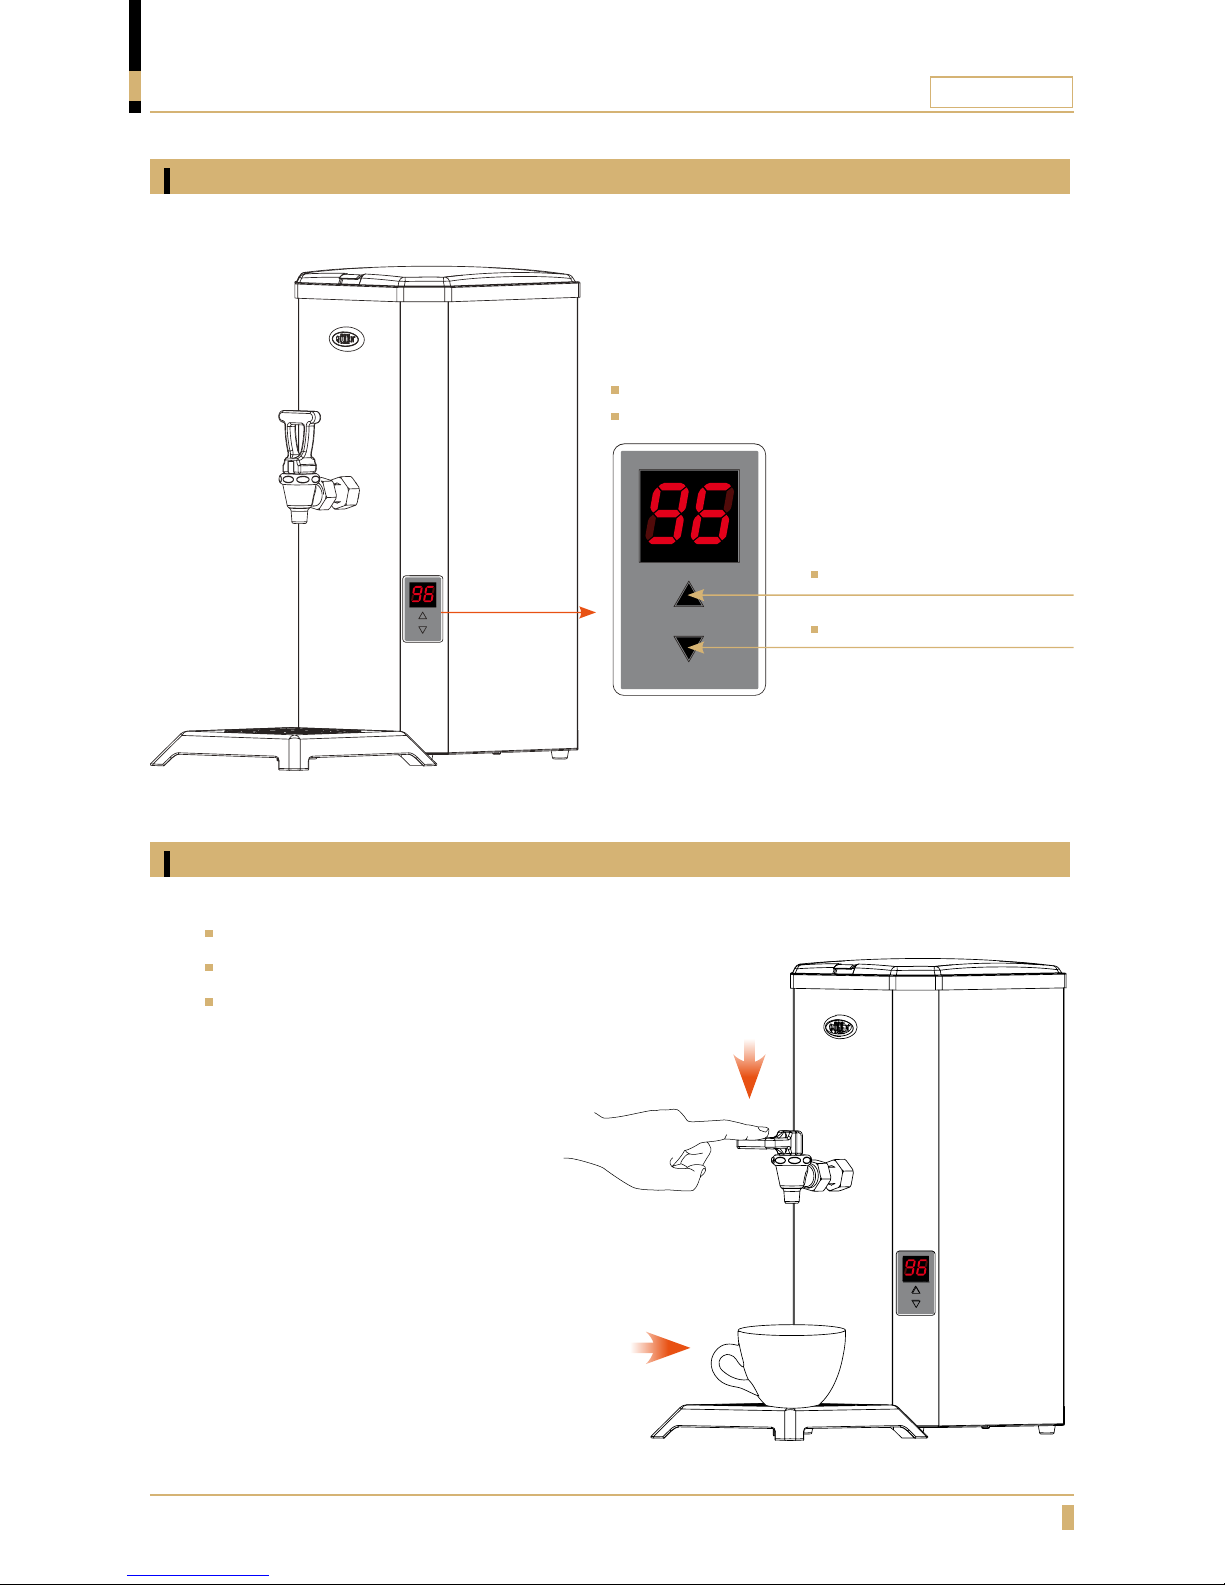
Adjust water temperature by pressing the buttons
on membrane switch.
Max temperature 96ºC
Min temperature 70ºC
Place a glass or decanter under the hot water tap.(A)
Pull down the tap handle to start dispensing water.(B)
Release tap handle to stop dispensing.
Increase the temperature
Reduce the temperature
Page 8
8
HVA/HVM
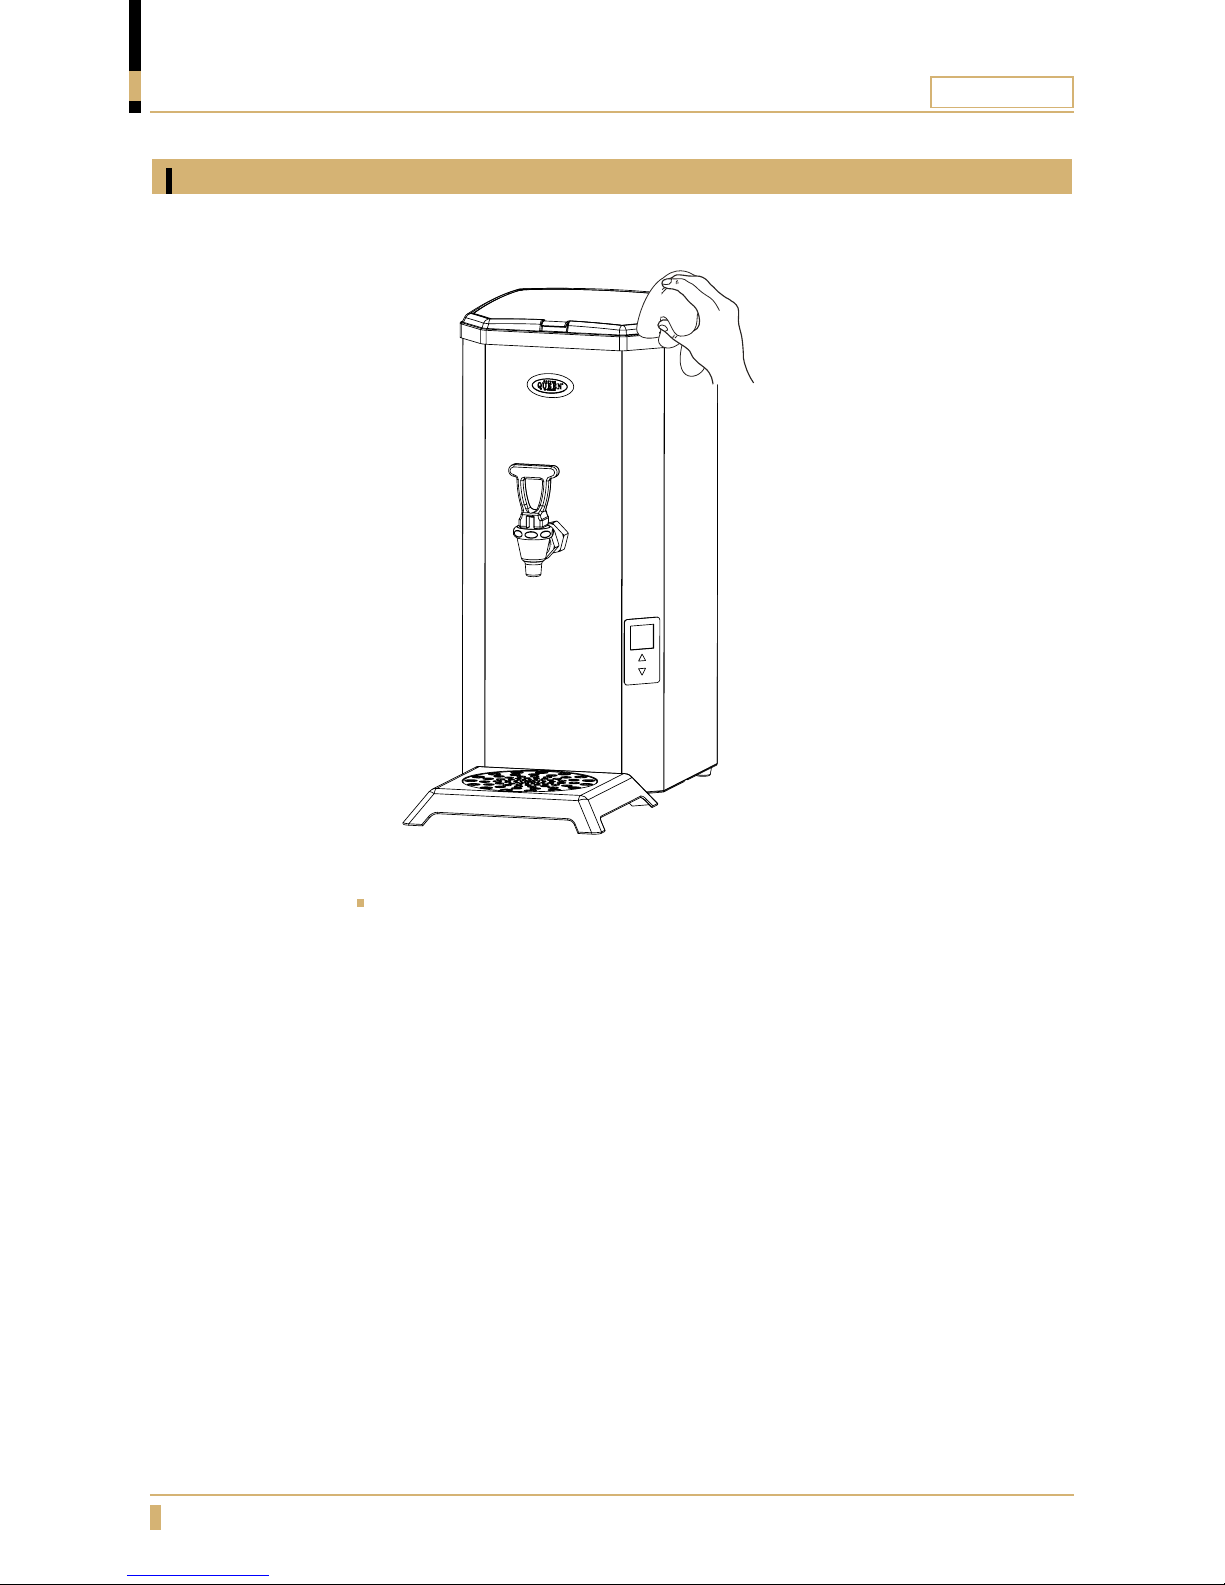
Exterior cleaning when necessary
CLEANING AND CARE
To clean the exterior of the machine, use a soft cloth and liquid cleaning agent
that is non-abrasive.
Page 9
9
HVA/HVM
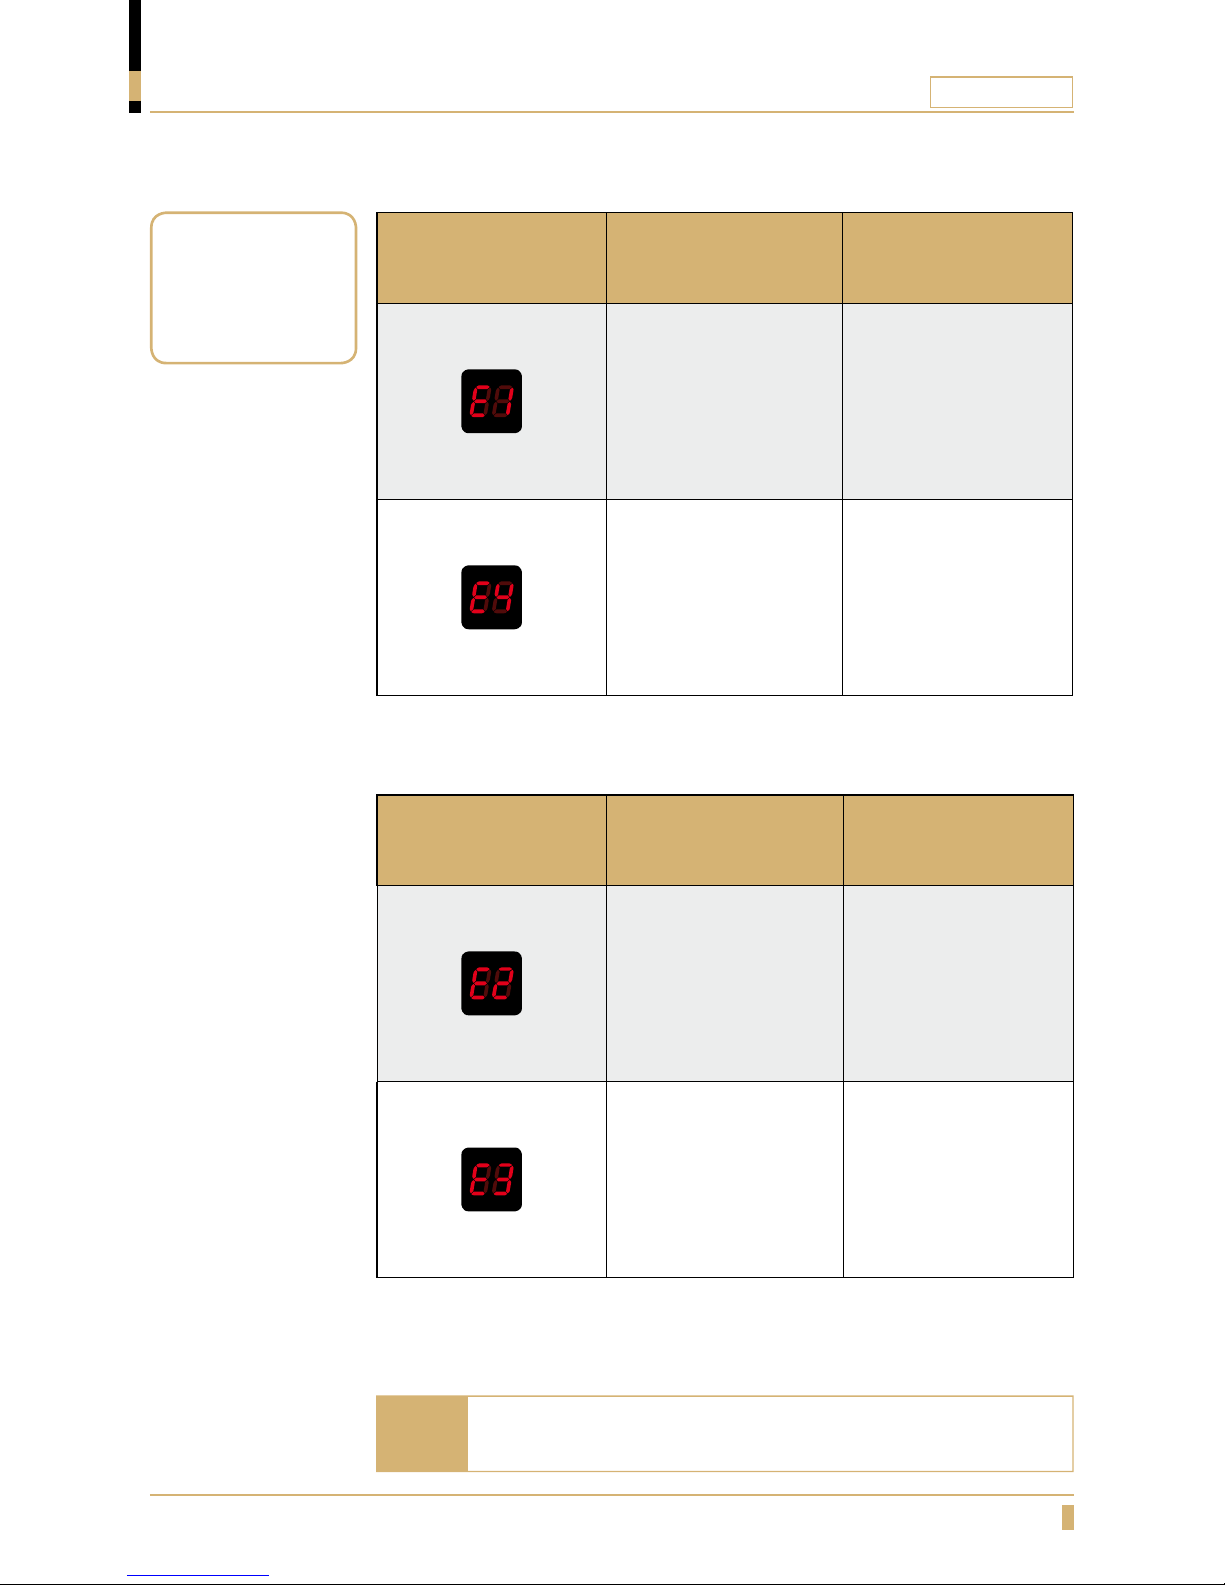
ERROR MESSAGES
LEVEL CONTROL
TEMPERATURE CONTROL
SHOWN ON THE
DISPLAY
POSSIBLE FAULT
POSSIBLE
SOLUTION
- The high water level
sensor is triggerd
before the low level
sensor.
- Clean the level sensor.
- Replace.
- Cables connected is
incorrectly.
- The machine fills slowly.
- Poor water pressure.
- Water connection tap
is not open
- Check water
connection.
- Restart machine.
SHOWN ON THE
DISPLAY
POSSIBLE FAULT
POSSIBLE
SOLUTION
- Temperature sensor
out of range.
- Temperature sensor is
broken.
- Cable loose.
- 50C - 1050C.
- Replace temperature
sensor.
- Check cables.
- Heating time too long.
- Solid state broken.
- Element broken.
- Overheating guard
tripped or broken.
- Restart the machine.
- Replace element.
- Replace solid state.
- Check overheating
protection.
The installation work and all repairs shall be done by a
qualied technician.
Note
Remove the power
cord from the wall
socket during any
installation work.
Page 10
10
HVA/HVM
PROGRAMMING
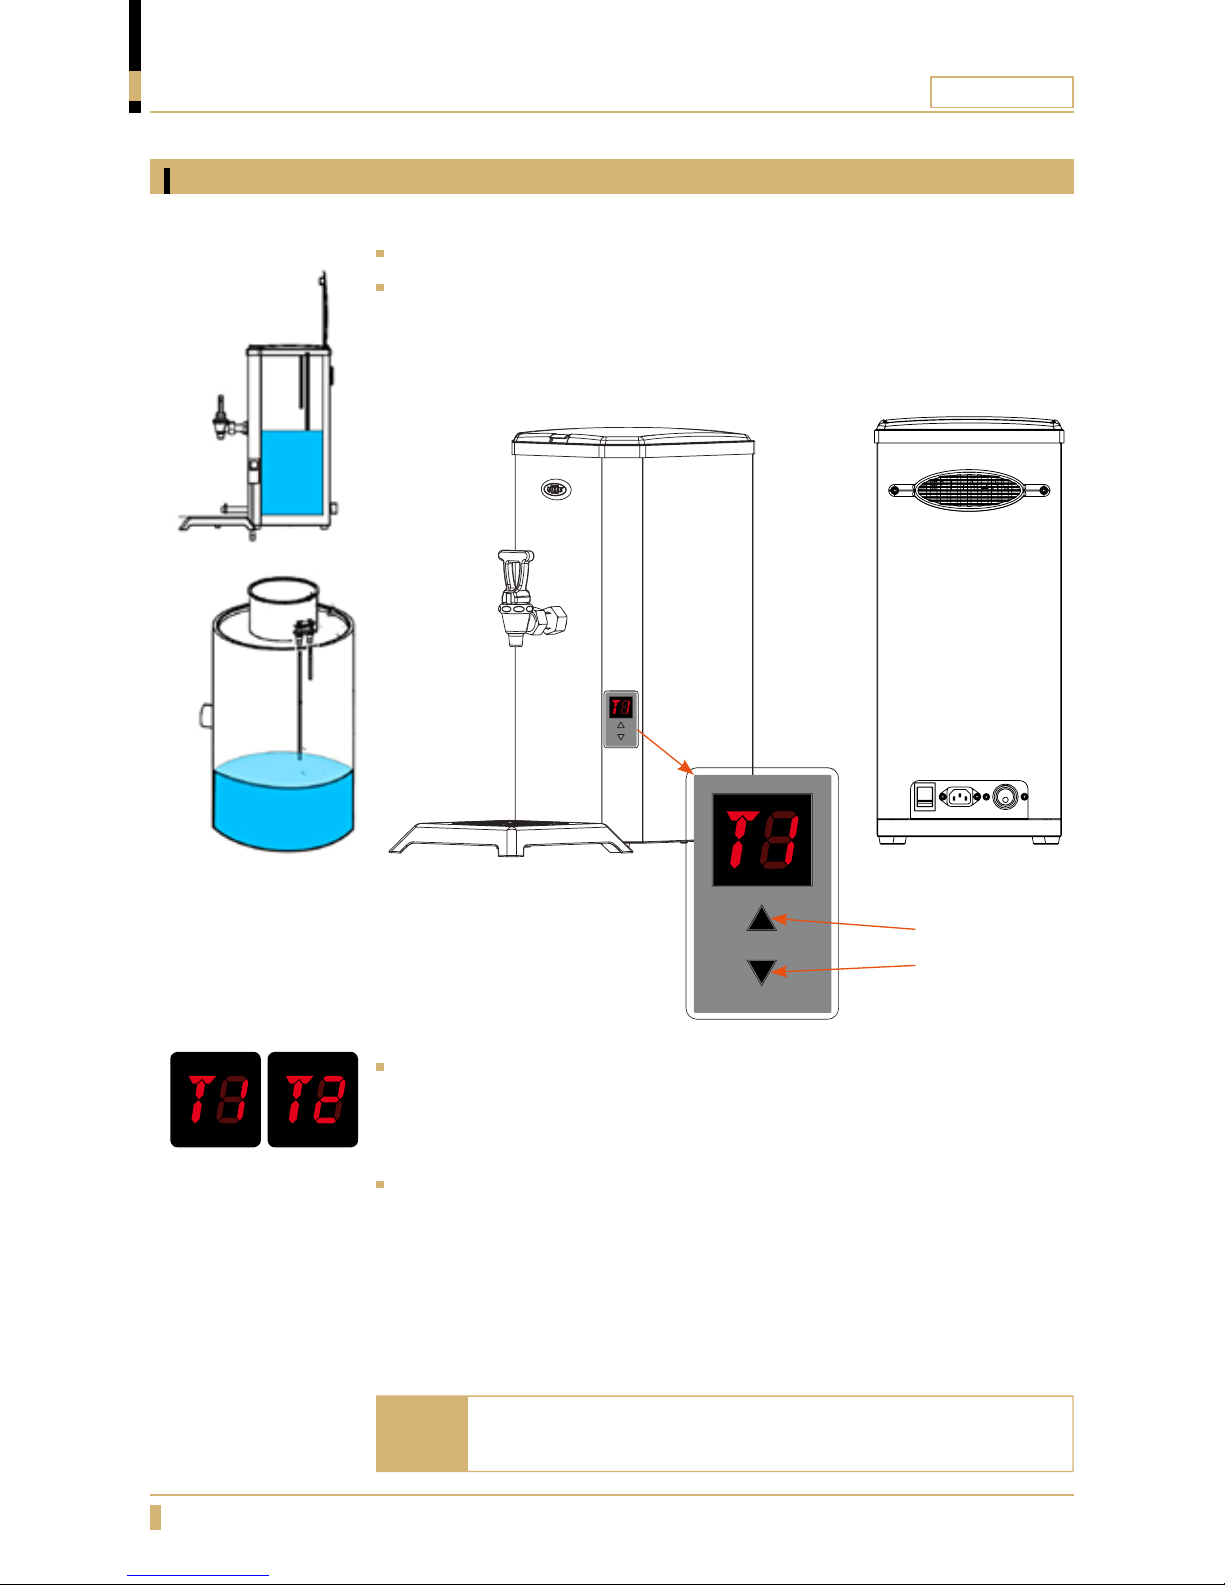
Set machine for manual water filling
Install the cover plug at the inlet valve (E) to avoid possible
leakage.
Note
The display will show T1, change the type of machine with buttons (B) or (C).
T1 = HVA automatic
T2 = HVM manual
Confirm the choice by holding down the buttons (B) and (C) at the same time
for approximately 5 seconds.
A
A
D E
Use a decanter to fill up the water tank to the long sensor pin.(A)
Keep button (B) pressed while turning on the power switch.(D)
B
C
Page 11
11
HVA/HVM
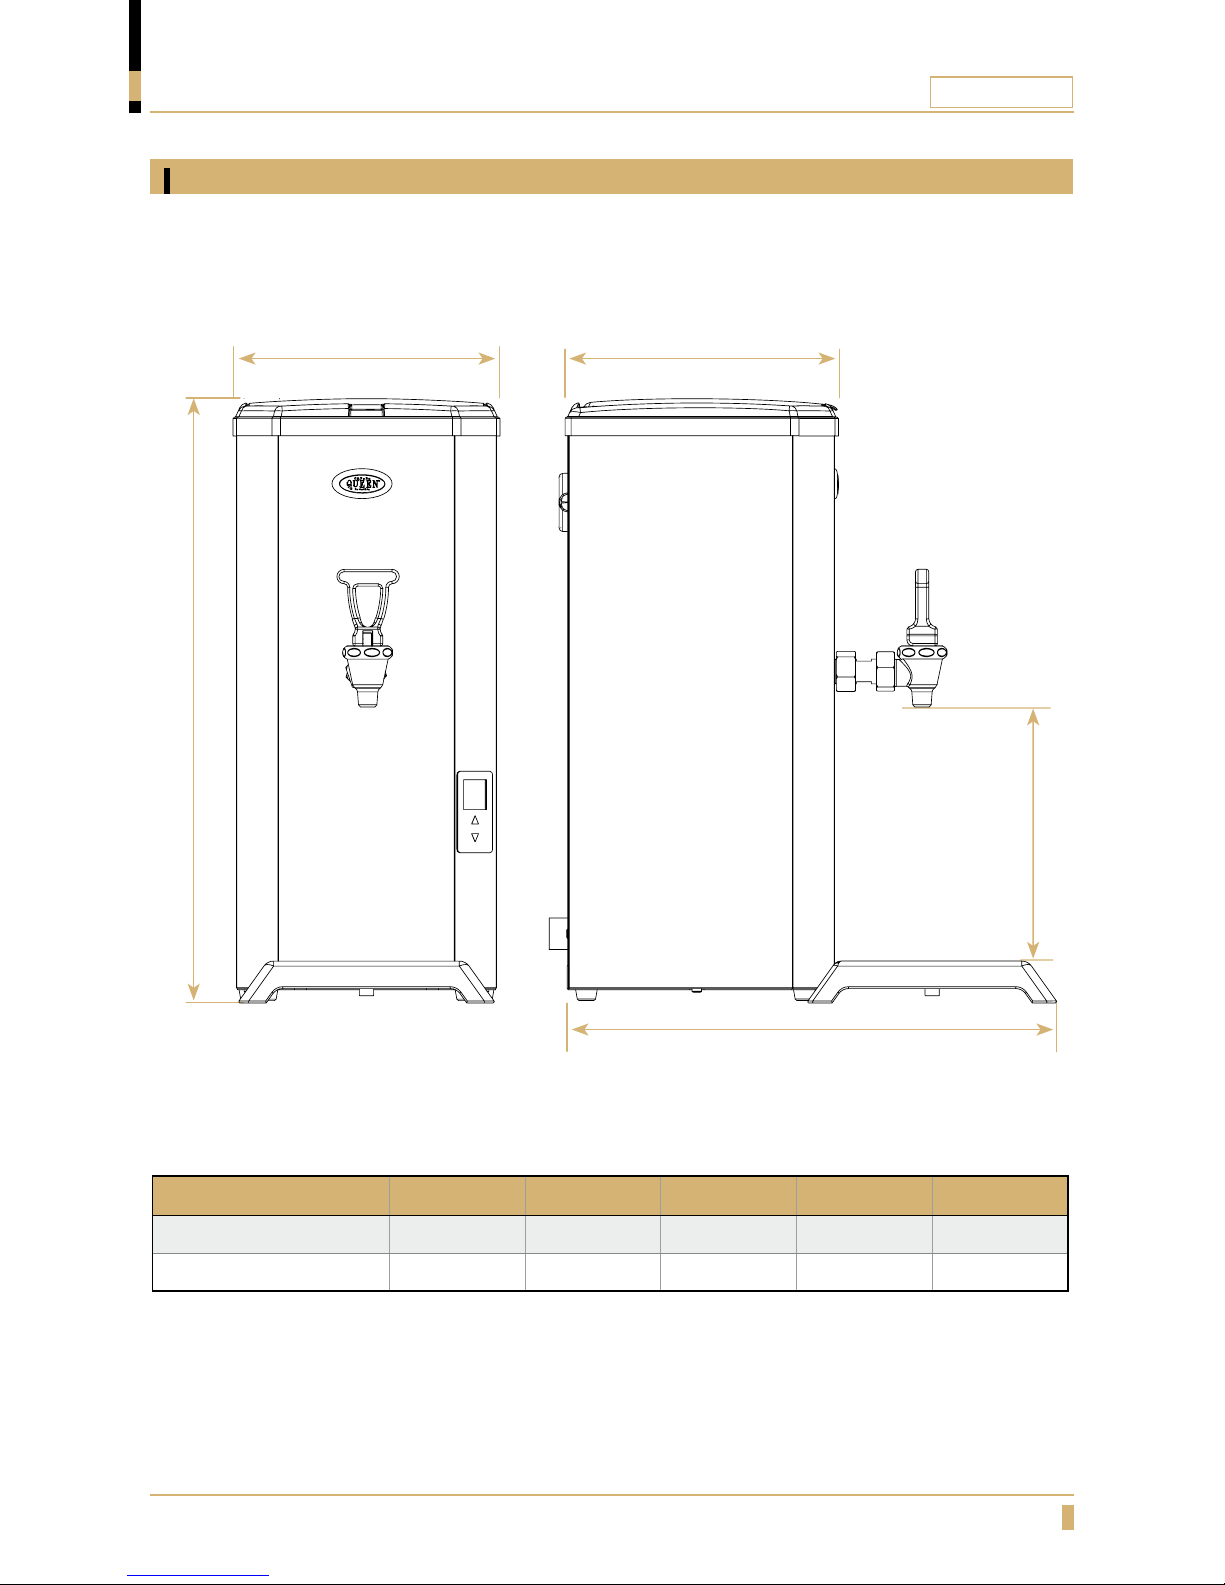
DIMENSION SKETCH
Model
A B C D E
HVA/HVM 1 phase 500mm 225mm 410mm 240mm 210mm
HVA/HVM 3 phase 500mm 225mm 410mm 240mm 210mm
E
A
B D
C
HVA/HVM
Page 12
Your Dealer
FOR SERVICE
Please contact your dealer
www.creminternational.com
For the warranty to be valid the conditions for maintenance must have been
followed according to our instructions, proper precaution has been made and
warranty claim been issued without delay.
The affected equipment may not be used during awaiting service if there is any risk
that the damage or defect would worsen.
The warranty will not cover consumption supplies such as glassware, normal
maintenance such as cleaning of filters, contaminations in water, lime, incorrect
voltages, pressure or adjustment of water amounts.
The warranty will not cover damages of defects caused by incorrect handling and
operation of the appliance.
 Loading...