

Page 1
FreedomUSB Series
PCD-U
FLASH CARD READER/WRITER
Users Manual
QUA TECH, Inc. TEL: (330) 434-3154
662 Wolf Ledges Pkwy FAX: (330) 434-1409
Akron, Ohio 44311 http://www.quatech.com
FLASH CARD READER/WRITER
FOR PERSONAL COMPUTERS
Page 2

PCD-U
User’s Manual
Revision 1.0
PN 940-0161-100
Page 3

Warranty Information
Quatech Inc. warrants the PCD-U to be free of defects for one (1)
year from the date of purchase. Quatech Inc. will repair or replace any
system component that fails to perform under normal operating conditions
in accordance with the procedures outlined in this document, provided the
failure occurs during the one year warranty period. Any damage resulting
from improper installation, operation or general misuse voids all warranty
rights. No representation is made regarding the suitability of this product
for any particular purpose.
Please complete the following information and retain for your records.
Date of Purchase:
Model Number: PCD-U
Product: Flash Card Reader/Writer__
Serial Number:
All products returned to Quatech for either warranty or nonwarranty repair MUST be assigned a Returned Material Authorization (RMA)
number prior to shipment. This RMA number must be clearly marked on the
exterior of the product’s return packaging and in any correspondence to
ensure proper routing and prompt attention. To obtain an RMA number,
contact the Quatech Technical Support Department at 1-800-553-1170 or
(330) 434-3154. In order to prevent damage to returned merchandise during
shipment, please package electronic components in anti-static/shock proof
materials.
For warranty repair/returns, please have the following information available
when contacting the T echnical Support department:
1. Model number and serial number of the product under warranty,
2. Repair instructions and/or specific description of the problem.
For non-warranty repairs or upgrades, contact the Technical Support
department for current repair charges and please have the following
information available:
1. Purchase order number to cover the cost of the service,
2. Model number and serial number of the product,
3. Repair or upgrade instructions relative to the product.
Page 4

Notice
The information contained in this document cannot be
reproduced in any form without the written consent of Quatech
Inc. Any softwar e programs accompanying this document can
be used only in accordance with any licensing agreement(s)
between the purchaser and Quatech Inc. Quatech Inc. reserves
the right to change this documentation or the product to which
it refers at any time and without notice.
The authors have taken due care in the preparation of this
document and any associated software program(s). Every
attempt has been made to ensure accuracy and completeness.
Under no circumstances will Quatech Inc. be liable for damages
of any kind, incidental or consequential, in regard to or arising
from the performance or form of the materials presented herein
or in any software program(s) that may accompany this
document.
Quatech Inc. encourages and appreciates feedback concerning
this document. Please send any written comments to the
Technical Support Department at the address listed on the
cover of this manual.
Page 5

Table of Contents
1. Introduction 7
2 . Installation 8
2.1 Using the “Add New Hardware” Wizard 8
3 . Operation 14
3.1 Device Status Indicators 14
3.2 Using the PCD-U 15
6. Specifications 23
Page 6

Figure 1-1 PCD-U Card Reader/W riter 8
Figure 2-1.1 Add New Hardware Dialog W indow #1 9
Figure 2-1.2 Add New Hardware Dialog W indow #2 10
Figure 2-1.3 Add New Hardware Dialog W indow #3 10
Figure 2-1.4 Add New Hardware Dialog W indow #4 12
Figure 2-1.5 Removable Disks in Windows Explor er 13
Figure 3-1.1 PCD-U Slot Identification 14
Figure 3-1.2 LED Indicators 14
List of Figures and Tables
Page 7

8 Quatech PCD-U Manual
1. Introduction
Part of the FreedomUSB Series, Quatech’s PCD-U USB Card
Reader/Writer implements the latest technology advancements in the PC industry. The PCD-U features USB technology to offer convenient, high-speed access to a variety of data
storage cards.
The PCD-U features include:
High-speed USB interface to storage cards
Data transfer rates up to 1.5 MB/sec
USB port power supply- no power supply adapter
required
Hot-swapping - dynamic plug-in and removal to/
from USB port without having to reboot
SmartMediaä card support
Type I, Type II PC Card ATA Flash/Compact Flash
Card support
Operating Systems: W indows 98Ò & Windows 2000
Ò
Package Contents:
PCD-U: USB Card Reader/Writer Unit (with con-
nected USB cable) See Figure 1-1.
Setup disk
User’s Manual
If the package does not include all of the items listed above,
please notify Quatech for immediate replacement.
Figure 1-1. PCD-U Card Reader / Writer
Page 8
Quatech PCD-U Manual 9
2.1 Using the Add New Hardware Wizard
The following procedures are step-by-step instructions for
installing the Quatech PCD-U adapter under W indows 98Ò or
Windows 2000Ò using the “Add New Hardware” wizard.
1. Turn on the computer and boot up the Windows
98Ò or Windows 2000Ò operating system.
2. Plug the wide flat end of the USB cable into the
downstream connector located on the back of the
computer or USB hub.
3. Once the cable is connected to the USB box, the
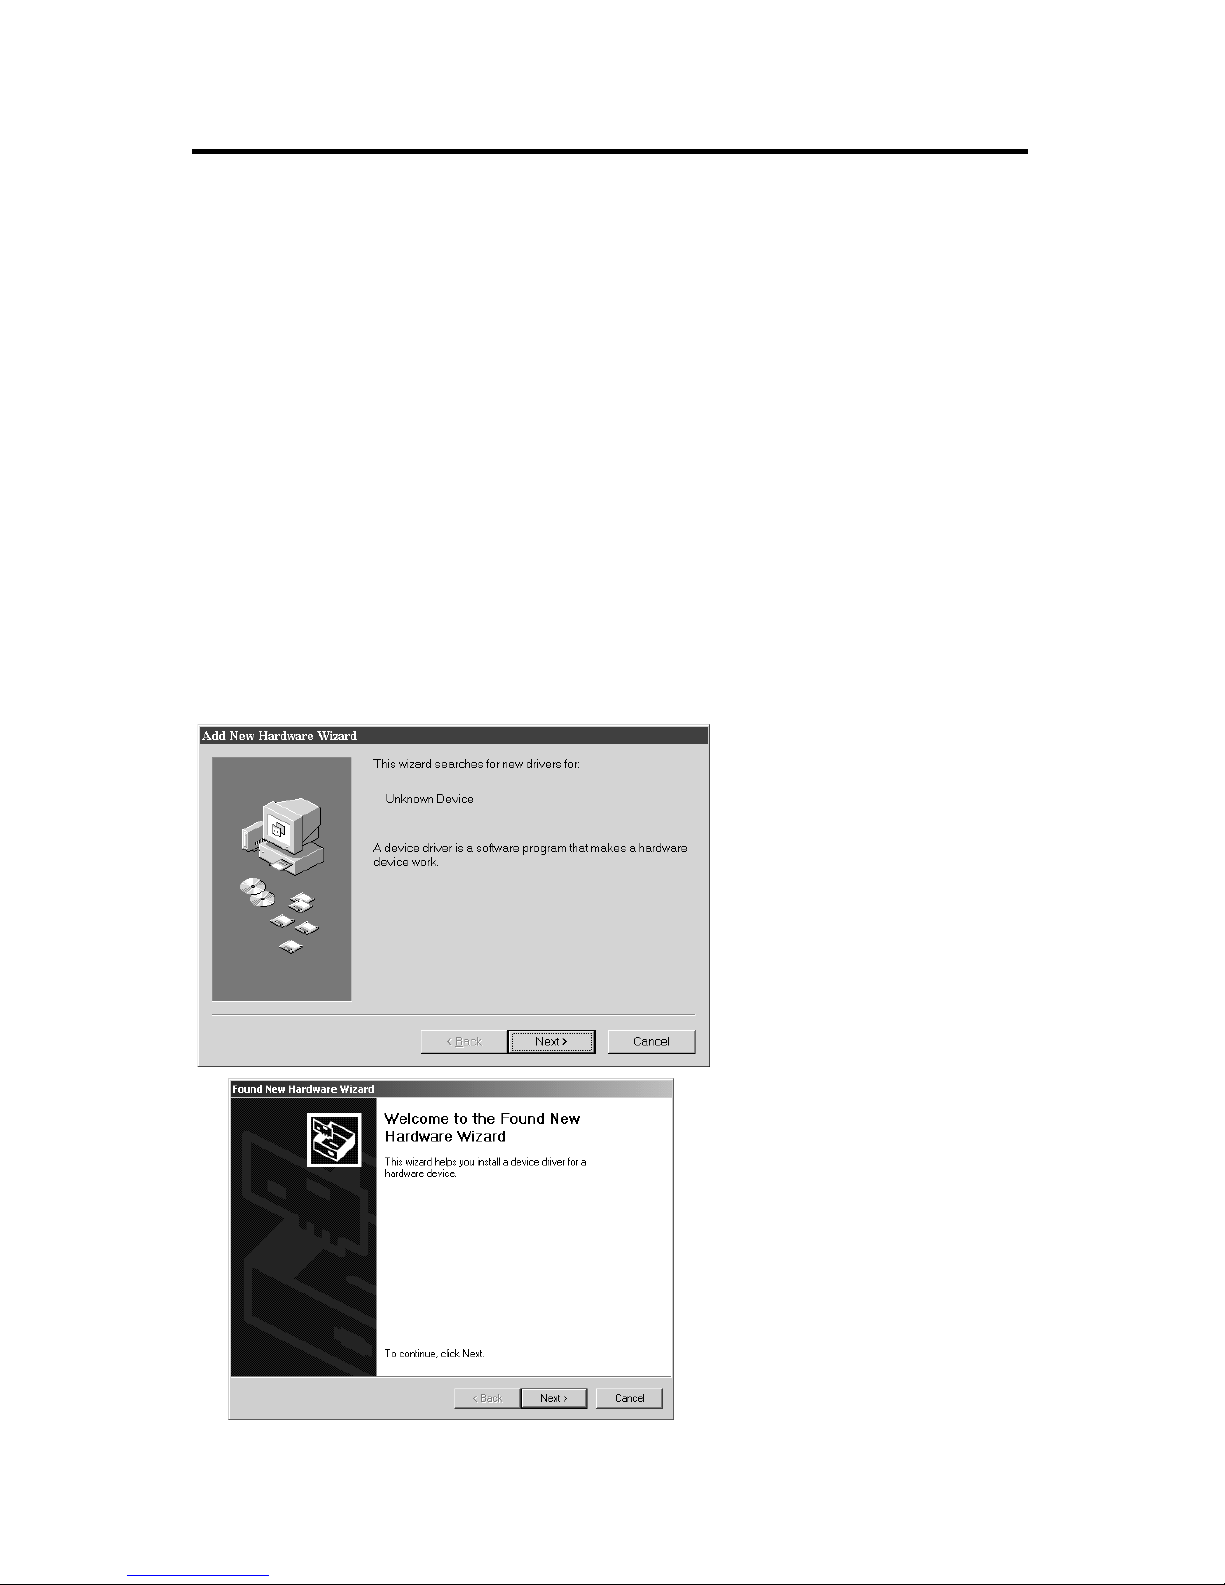
“Add New Hardware Wizard” dialog window
shown in Figure 2-1.1 should appear.
2. Installation
Figure 2-1.1 Add New Hardware Dialog Window #1
Windows 98
Windows 2000
Page 9

10 Quatech PCD-U Manual
Figure 2-1.2 Add New Hardware Dialog Window #2
4. Insert the setup disk provided with your hardware into the system’s floppy drive and press the
‘Next’ button to proceed to the dialog window
shown in Figure 2-1.2.
5. Select the recommended option: ‘Search for the best
driver for your device’ and then press the ‘Next’
button to proceed to the dialog window shown in
Figure 2-1.3.
Figure 2-1.3 Add New Hardware Dialog Window #3
Windows 98
Windows 2000
Windows 98
Windows 2000
Page 10

Quatech PCD-U Manual 11
Figure 2-1.4 Add New Hardware Dialog Window #4
6. Select the ‘Floppy Disk Drives’ check box and
click the ‘Next’ button to proceed to the dialog
window shown in Figure 2-1.4.
7. When the dialog window shown in Figure 2-1.4 appears, click the ‘Next’ button to view the final dia-
log window and then click ‘Finish’ to complete the
installation of your USB adapter.
8. Once the adapter configuration is finished, W indows
98 or Windows 2000 will then configure the Compact Flash / ATA card reader and the SmartMediaä
card reader which completes the hardware installation process.
9. To verify that the PCD-U is properly installed, open
Windows Explorer. (Click the Start button and se-
lect Program => W indows Explorer. ) In Windows
Explorer, check to see that two new icons have been
added under the My Computer directory. The
drives are labeled Removable Disk and represent
each of the two storage card sockets on the PCD-U.
The PCD-U’s lower socket is the first drive (Drive F
in Figure 2-1.5) while the upper socket is the second. (Drive G in Figure 2-1.5).
Figure 2-1.5 Removable Disks in Windows Explorer.
Windows 98
Windows 2000
Page 11
12 Quatech PCD-U Manual
3. Operation
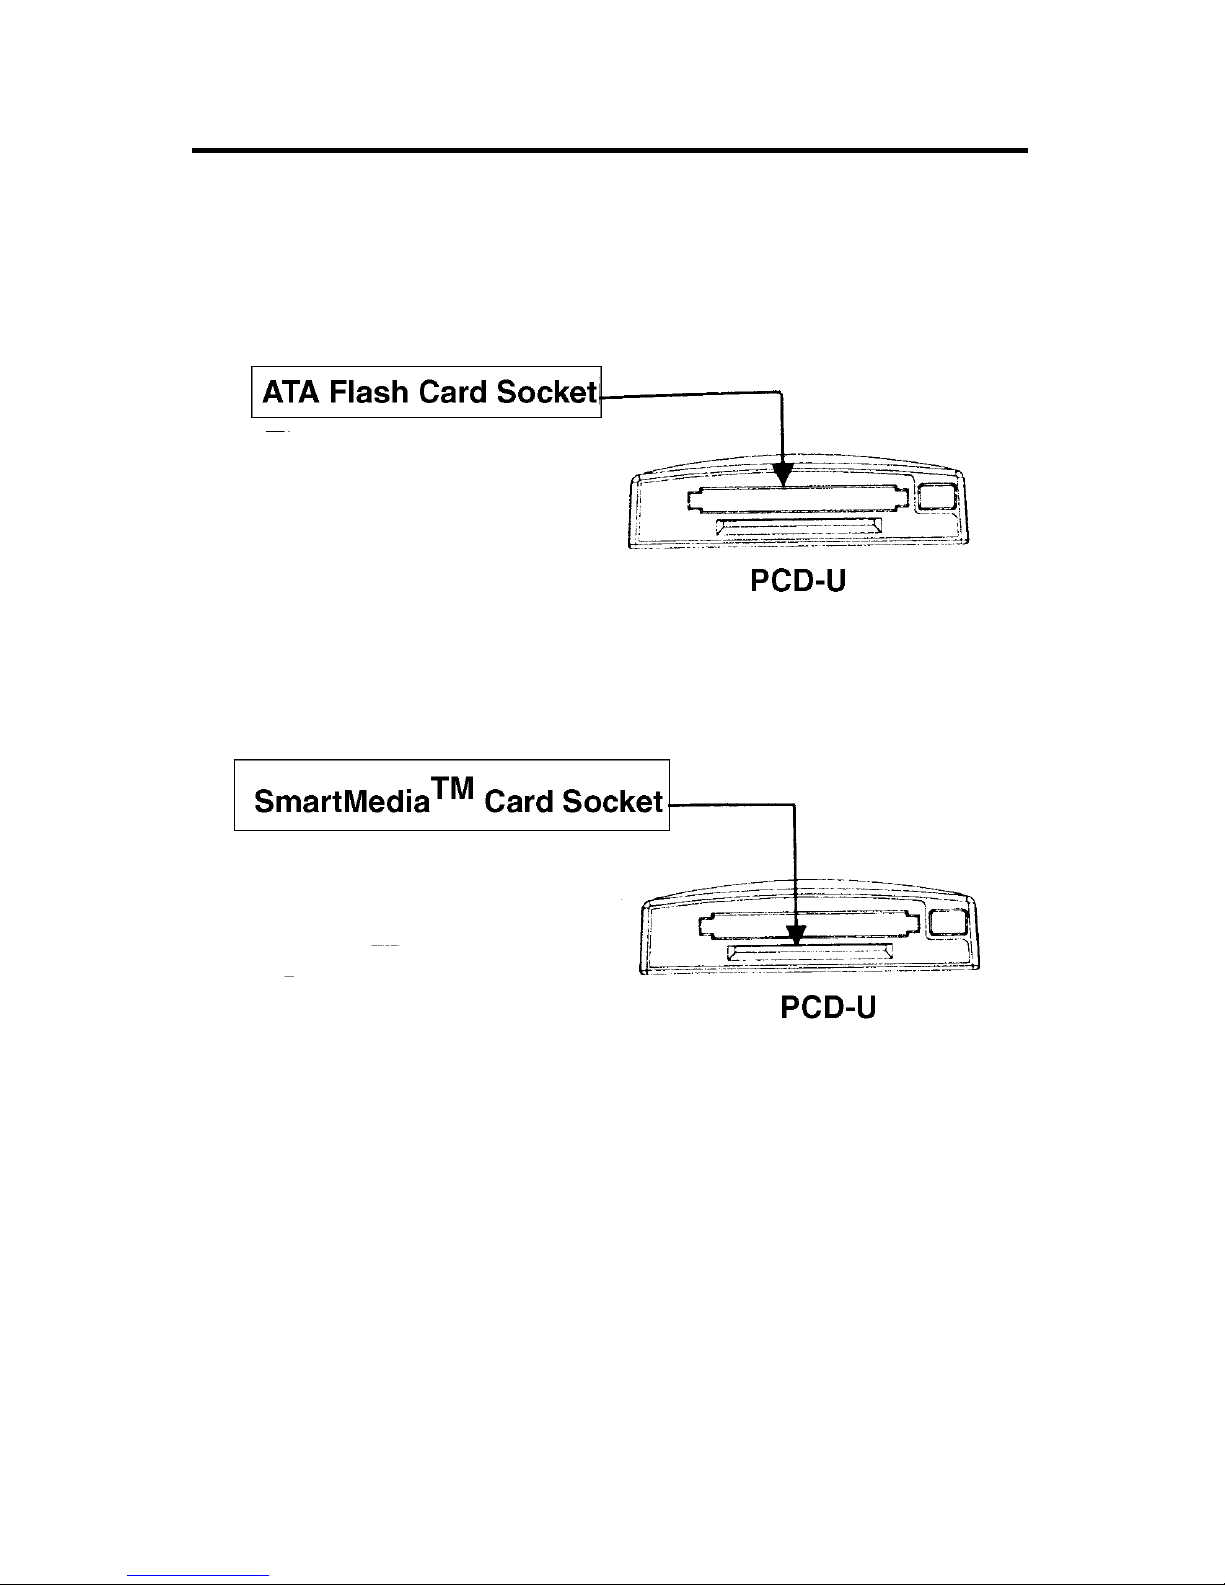
The PCD-U is easy to use. It has two slots for removable storage cards. As shown in Figure 3.1 below, the large upper slot
is for the Flash cards and the smaller bottom slot is for
SmartMedia ä cards.
Figure 3.1. PCD-U Slot Identification
3-1 Device Status Indicators
The PCD-U has two active LED indicators located on
the top of the card reader. These LEDs identify the PCD-U’s
status. The red LED indicates that the device is in use or busy.
For example, while files are being copied from the PC hard
drive to the SmartCardä in the PCD-U, then the red LED
flashes. The green LED indicates that the PCD-U is receiving
adequate power from the USB port. See Figure 3-1.1.
Page 12

Quatech PCD-U Manual 13
3.2 Using the PCD-U
Once the PCD-U is completely installed, it can be used
to transfer files from the data storage card to a computer or
laptop. Operation instructions are provided below.
1. Insert your data storage card into the PCD-U. For A T A/
Compact Flash cards, insert them into the top slot of
the device. For SmartMediaä cards, insert them into
the bottom slot of the device. Be sure to insert the
SmartMediaä card with the gold plate facing down.
2. Open My Computer or Windows Explorer.
3. Locate the Removable Disk icons. Double click any
one.
4. Explore images and files on the data storage cards.
Access images and files in the same manner as files are
accessed on the PC hard disk drive.
Warning: Do NOT remove the data storage card while
the red LED is flashing.
Figure 3-1.1 LED Indicators
Page 13

14 Quatech PCD-U Manual
6. Specifications
Bus In terface USB Specification 1.1
Data Rates 1.5 MB/sec
Sockets 1 SmartMediaTM card socket
1 PC Card A TA Flash card socket
Power Requirements USB bus powered,
DC +5 volts
Temperature: Operating: 0 to 70° C
Storage: -40 to 70° C
Humidity 10 to 95 %
OS Support Windows 98® and Windows 2000
®
PC Requirements Pentium, Pentium II
USB Port
 Loading...