

QUASAR SCIENCE
R2
LED Linear Light
Download Full Manual at QUASARSCIENCE.COM/R2
Quick Start Guide
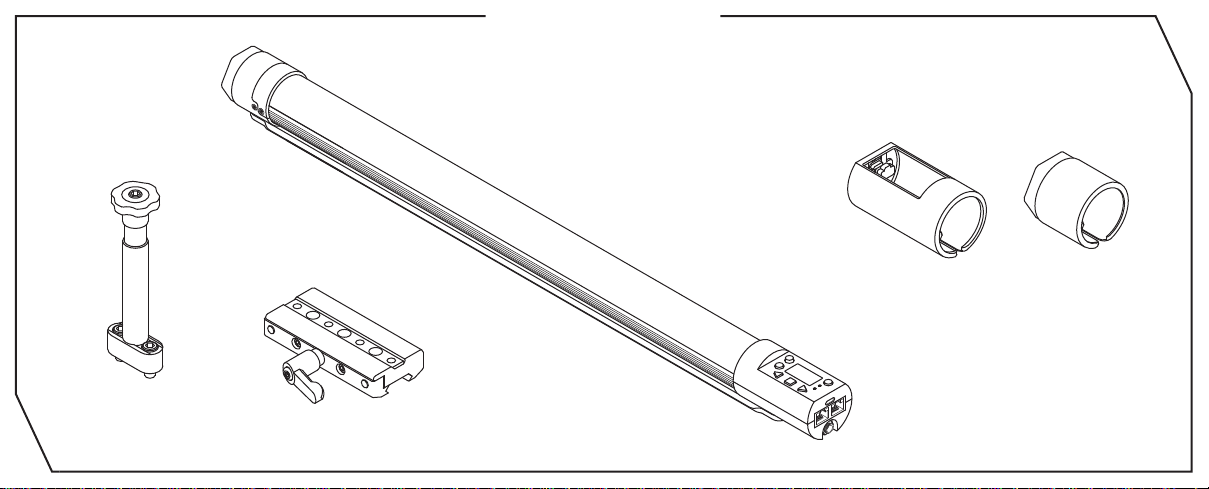
What’s in the Box
1 - QS Dual Screw
Baby Pin 1 - QS Slider
1
1 - R2 LED LINEAR Light
with Ossium Rail
(Q25R2 shown)
2 - Silicon Bumpers
1 - 8ft AC Power Cable
1 - 8ft DC Power Cable:
P-TAP to 2.1mm Barrel
1 - Quick Start Guide
1 - Short Cut Guide
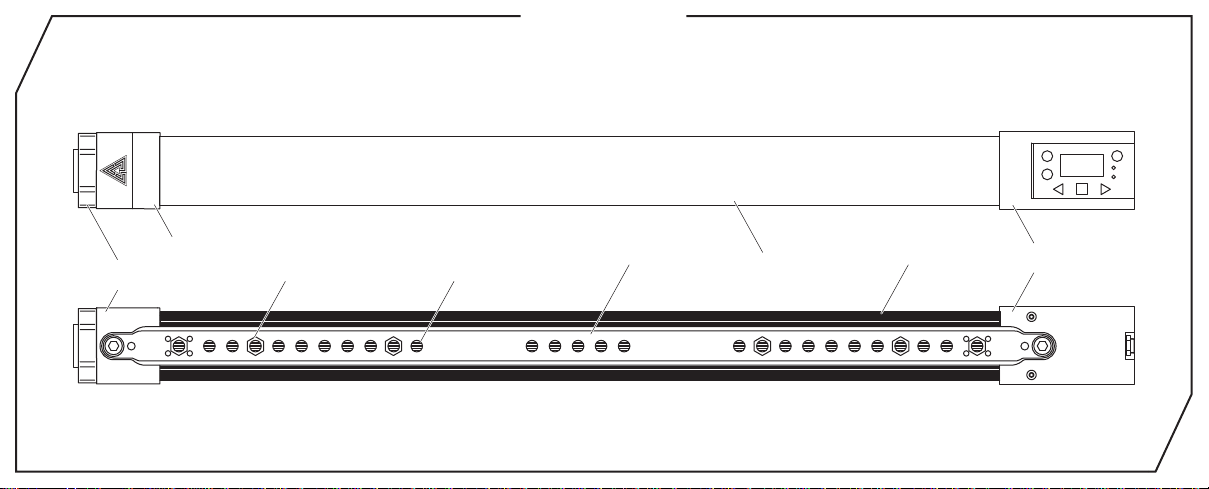
R2 Overview
*Q25R2 shown as reference
Lens Hatch
Power Side
End Cap
Ossium Mounting
Points
(White Hexagons)
1/4-20 Threaded
Mounting Holes
Slim Diffuser Heat SinkOssium Rail
Control Side
End Cap
2
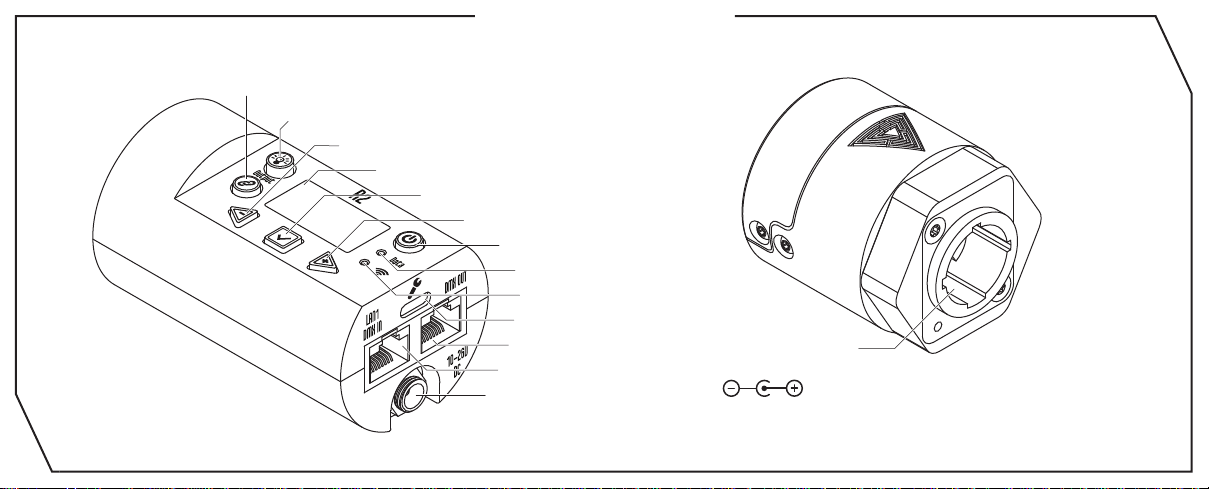
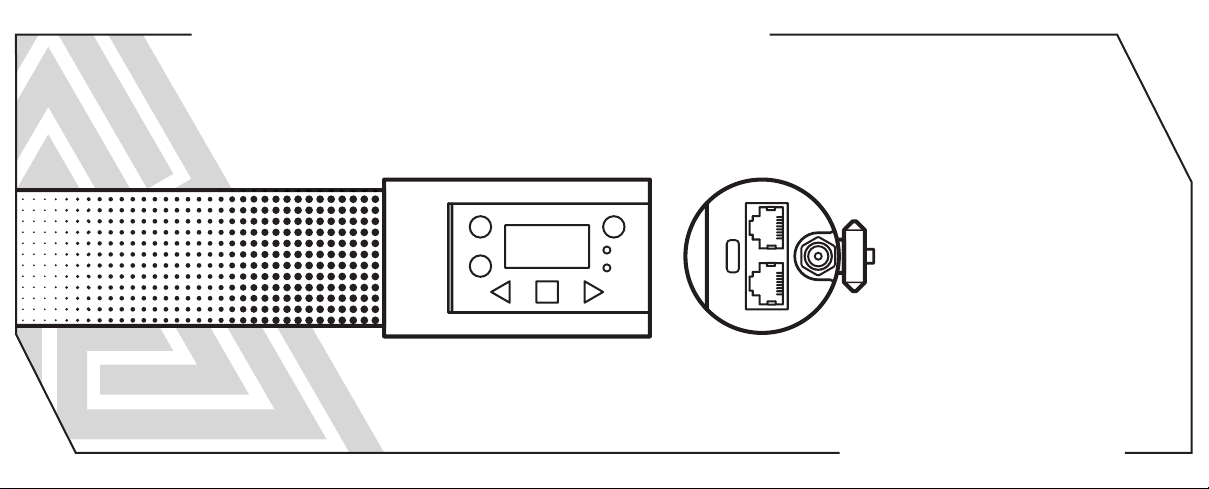
R2 Interface Layout
Control Side End Cap
3
“Link” Button
“Output” Button
“Left / -” Button
LED Screen
“Enter / Set” Button
“Right / +” Button
Power On / Off
“Data” Status Light
“Wireless” Status Light
USB-C Update Port
DMX OUT
LAN1 / DMX IN
DC IN Port - 2.1mm x 5.5mm
Power Side End Cap
AC IN Port
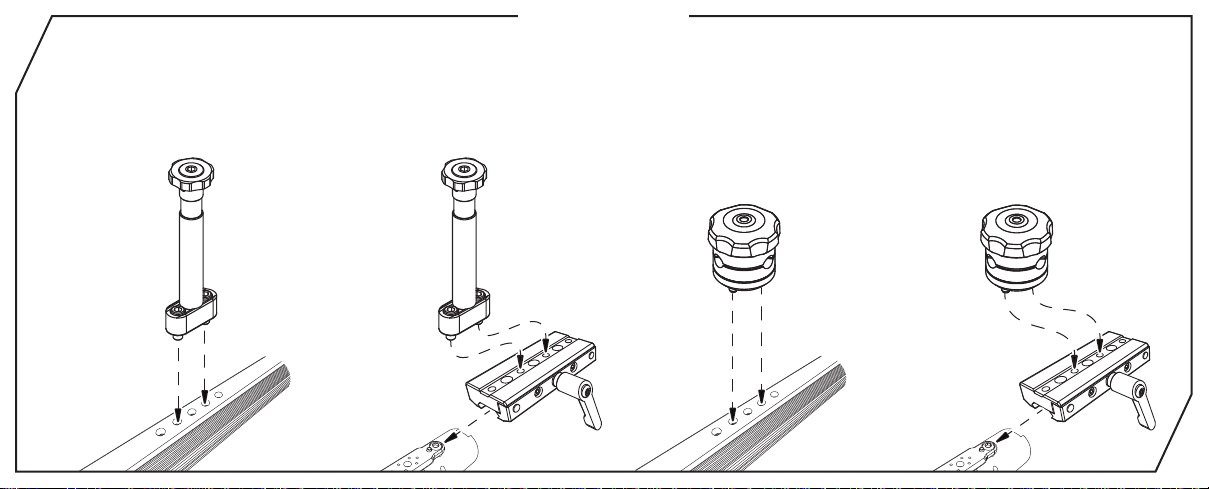
Mounting R2
Mount Dual Screw Baby Pin
directly to lamp
Mount Dual Screw Baby Pin
to Ossium Rail Slider for added
convenience and versatility
Mount Rotator Block
directly to lamp
*Rotator Blocks sold separately
Mount Rotator Block
to Ossium Rail Slider for added
convenience and versatility
*Rotator Blocks sold separately
4
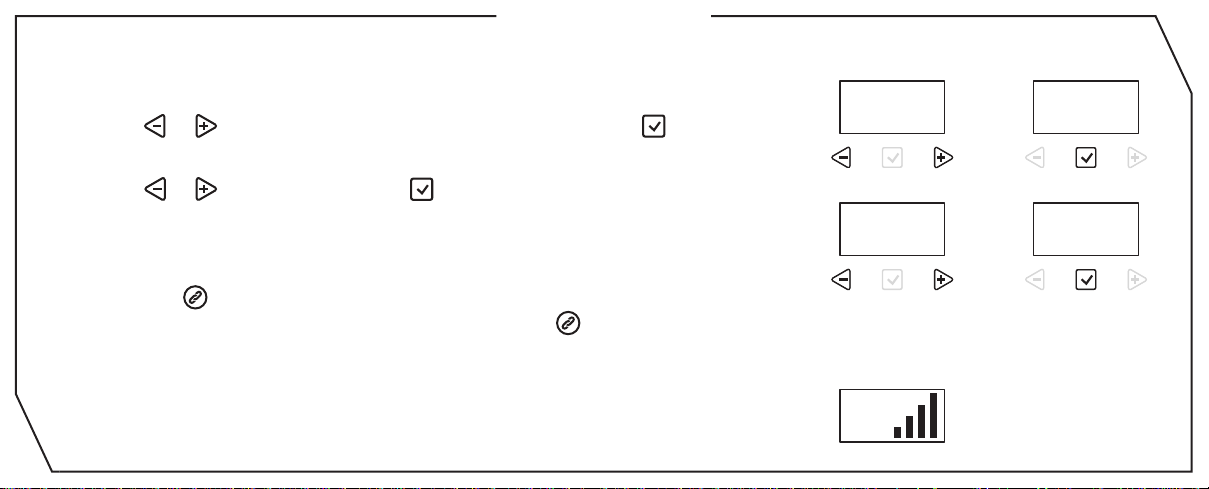
Getting Started
•To set the Intensity, Color Temp, +/- Green, Saturation and Hue:
1. Press or until desired function is shown on screen, and press to select.
2. The selection carets “> <” will move from the “>Function<” to the “>Value<”.
3. Press or to set the value. Press to save.
4. The selection carets “> <” will move from the “>Value<” back to the “>Function<”.
•To link an RR or R2 lamp to a CRMX /Wireless DMX transmitter:
1. Double tap . Go to Wireless Mode->Wireless DMX.
2. If the “Wireless” Status Light is flashing, press and hold to unpair.
3. On the DMX transmitter, tap the link button to pair.
4. The “Wireless” Status Light will start to flash and turn solid Green once paired.
•When connected wirelessly to a DMX transmitter or Lead Lamp, the Wireless signal
strength will be shown as vertical bars.
5
> <
Intensity
1. 2.
100%
Intensity
3. 4.
> <
87%
DMX
001
Intensity
> <
100%
> <
Intensity
87%
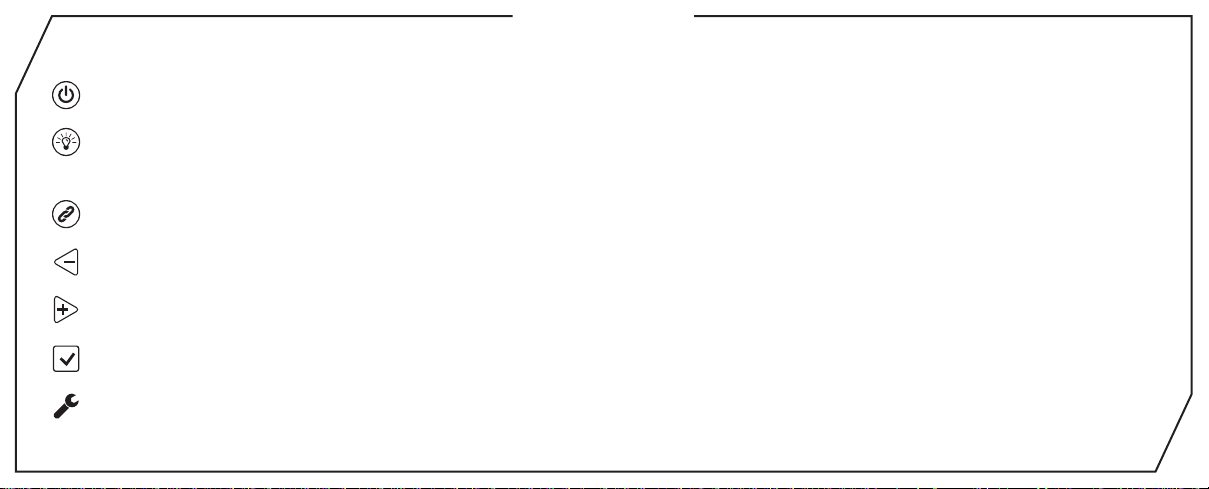
Key Interface
Power Button: Lamp on: Press and hold for 1 second. Lamp Off: Press and hold for 2 seconds.
Output Button: Toggle the button to enable/disable lamp output for manual mode operation. Change the color/intensity
without the change affecting the environment.
Link Button: Press and hold to unlink lamp. Double Tap to bring up Wireless Menu (Pg 13.)
Left / Minus Button: Decrease a value or navigate Left.
Right / Plus Button: Increase a value or navigate Right.
Enter / Save Button: Enter selection, Save Value.
Upgrade Port: USB-C Port for performing software updates with a USB-C Thumb Drive.
6
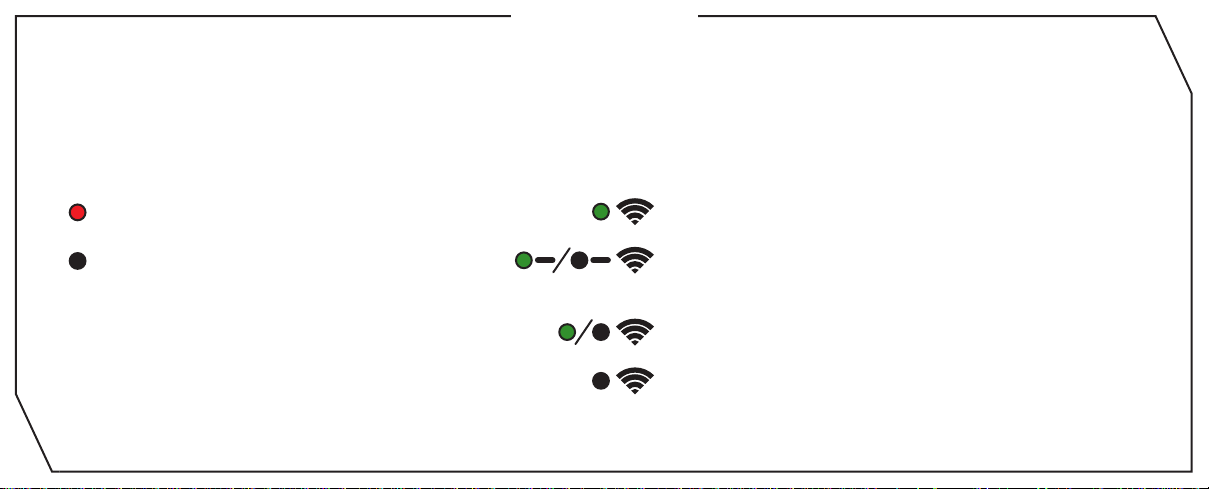
Status Lights
The Data and Wireless Status Lights can be various colors based on the connection type and status. Check that the lamp is in the
correct wired and wireless modes and that Status lights are enabled in the config. See Page 8 for color combinations.
Data LED
Data
Data
*Check the website for the most up-to-date Status Light information.
Solid LED – Data Received.
No Light – No Data Received or
Status Lights turned off.
7
Wireless LED
Solid LED – Connected to Wireless Device.
Slow Flashing – Lamp is paired with Wireless Device,
but device is not found.
Fast Flashing – Lamp is connecting to Wireless Device.
No Light – Lamp is Not Paired with Wireless Device,
Wireless Mode -> Off or Status Lights turned off.
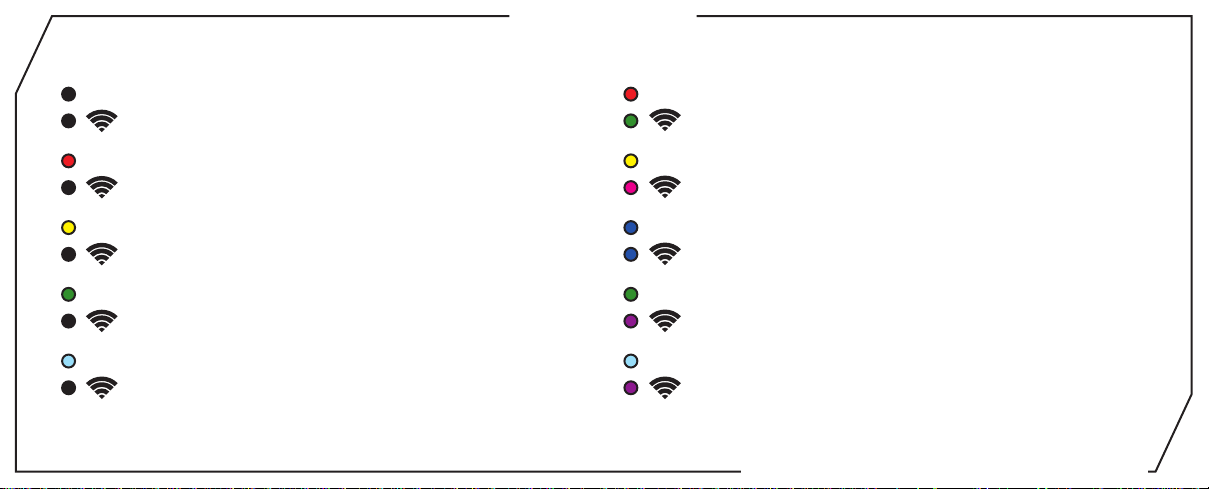
Status Lights
Data
Manual Mode
Data: Off / Wireless: Off
Data
DMX Mode / Data Received
Data: Red / Wireless: Off
Data
Ethernet Mode / Data Received
Data: Yellow / Wireless: Off
Data
Wired Leader (Lead/Follow Mode)
Data: Green / Wireless: Off
Data
Wired Follower (Lead/Follow Mode)
Data: Cyan / Wireless: Off
*Check Status Lights are enabled in Config
Data
Wireless DMX
Data:Red / Wireless: Green (Or Universe Color)
Data
Wifi Mode (Art-net over Wifi)
Data: Yellow / Wireless: Magenta
Data
Bluetooth Mode
Data: Blue / Wireless: Blue
Data
Wireless Leader (Lead/Follow Mode)
Data: Green / Wireless: Purple
Data
Wireless Follower (Lead/Follow Mode)
Data: Cyan / Wireless: Purple
Download Full Manual at QUASARSCIENCE.COM/SUPPORT
8

Button Shortcuts
Min / Max Value Jump: On parameter menus such as Intensity, Color Temperature, Saturation, Hue, and Effects Parameters.
While pressing and holding to increase the value, tapping will jump to the next value or max value.
While pressing and holding to decrease the value, tapping will jump to the next value or minimum value.
Enable/Disable Status Lights: Press and hold for 5 seconds to disable the status lights. Press again for 5 seconds to enable.
Enable/Disable RDM: Press and hold for 2 seconds to disable RDM. Press again for 2 seconds to enable.
Enable/Disable Wireless: Press and hold for 2 seconds to disable all Wireless Functions. Press again for 2 seconds to enable.
Reset to Default:
Link Button: Press and hold to unpair a lamp.
Wireless Menu: Double press to open the Wireless Menu.
Press and hold for 3 seconds to reset the lamp to Default settings.
9

Main Menu - Manual Mode
> Intensity
> Color Temp
> +/- Green
> Saturation
> Hue
> CT Preset
> Color Preset
> Effects
> Config
*Check the website for newly added effects
0 to 100% in 1% increments
1750K to 10,000K
100M to 0G to 100G
0 to 100% by 1% increments
0° to 360°
3200K - 4000K - 5000K - 5600K - 6000K - 2000K - 2800K
Red - Orange - Yellow - Green - Cyan - Blue - Violet - Magenta
Rainbow - Short Circuit - Paparazzi - Strobe - Fire - Emergency Lights - TV - Demo* (See Page 17-18)
Lamp Settings (See Page 11)
10

Config Menu
> DMX Channel
> Number of Pixels
> Profile
> Wired Settings
> Wireless Settings
> Lead / Follow
> Output Mode
> Rig Mode
> Status Lights
> Languages
> Lamp Hours
> Update Firmware
> Firmware
> Reset to Default
11
Set the DMX Channel.
Control the light as groups. (See Page 12)
Set the DMX profile for the light. (See Page 18-23)
Select the Wired data options to control the light. (DMX, Art-Net, sACN) (See Page 13)
Select the Wireless data options. (CRMX, Bluetooth, Wifi) (See Page 14)
Set Lead/Follow mode for the light. (See Page 15)
Set the lamp to Normal Output, High Output, or Low Output Mode.(See Page 16)
When Enabled, turns on when it is powered. When disabled, requires power button pressed. (See Page 16)
Turns the status lights on/off for use on camera.
English (Check the website for additional languages.)
Displays the total hours the lamp has been powered on. Press Enter to See LED Hours.
Set the lamp into Update mode.
Displays the firmware version on the lamp.
Sets the lamp back to all its default values.

Pixel Selection
> Number of Pixels
•When choosing DMX profiles, each group of parameters are repeated per pixel except for the FX Parameters.
-When a Q100R2 is set to 1 Pixel for an example, it will control the entire lamp as 1 pixel and require 1 set of DMX Data to control it,
plus additional channels required for FX Parameters.
-When a Q100R2 is set to 48 Pixels for an example, it will control the lamp as 48 pixels and require 48 sets of DMX Data to control it,
plus additional channels required for FX Parameters.
1, 2, 5,10 - These are the available grouping options for the Q25R2’s 10 individually controllable pixels.
1, 2, 3, 4, 6, 8, 12, 24 - These are the available grouping options for the Q50R2’s 24 individually controllable
pixels.
1, 2, 3, 4, 6, 8, 12, 16, 24, 48 - These are the available grouping options for the Q100R2’s 48 individually
controllable pixels.
12

Wired Control Menu
> Wired Mode
> DMX
> Ethernet
> DMX Settings
> DMX Channel
> Terminate
> Ethernet Settings
> View IP Address
> IP Address Mode
> DHCP (Auto)
> Static
> IP Address, Subnet Mask, Gateway
> Universe
> DMX Channel
> Ethernet Mode
13
Choose DMX512 or Ethernet Mode to Wire Control the light.
Control the lamp with DMX512.
Control the lamp with sACN or Art-Net.
Set the DMX Channel 001 to 508 (Does not allow address to be outside of 512).
Terminate the DMX Signal when last in line.
Show the IP address automatically received through DHCP or the Static IP address set.
Set the IP Address Mode.
Allow the lamp to obtain the IP address from the router automatically.
Allow the lamp to set the IP address manually.
Enter the IP address, Subnet mask, and Gateway.
Set the Universe for the lamp.
Set the DMX Channel 001 to 508 (Does not allow address to be outside of 512).
Choose the Ethernet protocol: sACN/Art-Net, sACN Only, Art-Net Only.

Wireless Control Menu
> Wireless Mode
> Wireless DMX
> Bluetooth
> Wifi
> Off
> Wireless DMX Settings*
> Wifi Settings*
> Bluetooth Settings
>Reset
> Status Lights On/Off
> Reset Wireless Settings to Default
Tip: Double Tap to bring up the Wireless Control menu.
*See the full Manual for Detailed Descriptions of the Wireless DMX Settings and Wifi Settings.
Lumen Radio CRMX wireless DMX. Press and hold to Clear. Tap transmitter to pair.
Connect to the lamp over Bluetooth.
Connect to a wireless network to receive Art-Net over Wifi.
Turns off all Wireless functionality.
Shows the Hardware and Firmware of the CRMX TimoTwo.
Turns the lamp into a wireless access point to allow mobile device to set up wireless settings.
Reset Bluetooth connection.
Turns off status lights for use when lamp is seen on camera.
Reset All Wireless Settings to factory default.
14

Lead/Follow Mode
•Lead/Follow mode allows one lamp to control many lamps at once. The Lead transmits DMX data wired or wirelessly to the Follows.
When the Lead changes levels, the Follows will change as well. This applies to on board FX as well.
•To use Lead/Follow mode, go to Config -> Lead/Follow. Set the leader to Lead and set all of the followers to Follo w 1 to match the leader.
Follow 2-8 are used with effects to do the same eff ect with different timings. This will run the same effects, intensities and lev els b ut not in sync.
MODE
Lead
•To use Lead/Follow wired, plug a Cat5 cable into the DMX OUT port of the leader into the In of the followers . Repeat out of the followers
and into the next. The Data light should be illuminated on all the followers.
•To use Lead/Follow wirelessly, on the followers, press and hold to unpair the lamp. Next tap on the leader. On all of the followers,
the Wireless signal light should begin flashing and then remain solid.
=
MODE
Follow 1
MODE
Follow 1
MODE
Follow 1
MODE
Lead
MODE
Follow 2
=
+ x sec. + y sec. + z sec.
MODE
Follow 3
MODE
Follow 4
15

Output Mode
•There are 3 different Output Modes, which are used to increase the light output or the resolution in different areas of the dimming range.
> Output Mode
Normal Output: Normal Operating Temperature, standard lamp output.
High Output: High Operating Temperature, maximum output.
Low Output: Gives maximum resolution in the low dimming section of the lamp. Maximum power is about 25% of
High Output.
Rig Mode
•Rig mode is used to define how you want to turn on the lamp. When Rig Mode is enabled, the lamp will turn on when it is powered.
This mode is preferred when the light is rigged on a spot that is remote or difficult to reach.
•When Rig mode is disabled, after being powered connecting power, the Power button must be pressed. This is recommended for
normal operation.
16

Effects (Manual)
Main Menu
Effect
Rainbow
Short Circuit
Paparazzi
Strobe
Fire
Emergency Lights
Demo
***Check the website for newly added effects.
17
Scroll through the hue from 0° at full saturation
Lamp is on with random bursts of turning off
Lamp is off with random flashes of turning on
Flashing lights of various colors
Scroll through the hue from 0° at 0%, 25%, 50%,
75% and 100% saturation at 2000k and 6000k
Result
Rhythmic flashes on
A fire flicker effect
Item
Effect
Intensity
Color T emp
+/- Green
Saturation
Hue
Rate
Effects Parameters
Result
Choose effect
Set Intensity of effect
Set base color temp
Set +/- green of the color temp
Saturate the effect
Set the hue
0-200% for the speed of the effect
100% is normal speed

Effect Controls (Manual)
Fire Submenu Emergency Light Submenu
Weight
Rate
Maximum
Minimum
Weight
Preset
Result
0-200% for the speed of the effect
100% is normal speed
Highest intensity level of effect
Lowest intensity level of effect
Low, Centered, High
+/-400k Color at 2400k, 3200k,4000k, 5600k
Item
Pattern
Color Presets
Color 1 & 2
Item
Color Presets
Result
Single, Double, Triple, Quad
R&B, B&B, R&32, R&56, B&32, B&56
R&B&32, R&B&56
Red, Orange, Yellow, Green, Blue, Magenta,
2000k, 3200k, 4000k, 5600k, 6000k
TV Submenu
Result
Blues & Whites, Blues and Warm
18

DMX Profiles (Overview)
DMX Profiles (Basic)
DMX Profiles (FX)
DMX Profiles (Extended FX)
*When using the lamp in multipixel modes, the color parameters are repeated for each pixel.
For FX Profiles, while the color parameters are repeated for each pixel, the effect parameters are per fixture.
*An example of patching as multiple pixels: when patching as 2 pixels in Profile 9 (HSIC+FX), it would be 5 channels per pixel plus 3 FX
Channels, for a total of 13 Channels.
19
Download Complete DMX Chart at QuasarScience.com/Support
Profiles 1 - 8
Profiles 13, 14
Profiles 9 - 12
Profiles 15 - 18
Different DMX channel arrangements to control the Parameters for your lamps.
Direct control of the 5 available colors channels; Red, Green, Blue, 2000K, 6000K
Control the basic parameters of the lamp and allow control of the built-in effects
of the lamp.
Control the basic parameters of the lamp and built in effects with added channels
to allow the effects made of two colors have additional parameters.

DMX Profiles (Basic)
When using as more than one pixel, 1 additional channel group must be add be added per additional pixel.
# Name
1
2
3
4
5
6
7
8
13
14
HSIC
HSIC-16
HSI
XFade with +/-G
XFade
CCT & RGB
CCT & RGB-16
RGB
RGBTD
RGBTD
Bit Depth
8 Bit
16 Bit
8 Bit
8 Bit
8 Bit
8 Bit
16 Bit
8 Bit
8 Bit
16 Bit
# of Channels
Per Pixel
5
8
3
3
2
7
9
3
5
10
Channel Description
1: Intensity 2: Color Temp 3: +/- Green Control 4: Hue 5: Saturation
1+2: Intensity 3+4: Color Temp 5: +/- Green Control 6+7: Hue 8: Saturation
1: Intensity 2: Hue 3: Saturation
1: Intensity 2: Color Temp 3: +/- Green Control
1: Intensity 2: Color Temp
1: Intensity 2: Color Temp 3: +/- Green Control 4: Crossfade 5: Red
6: Green 7: Blue
1+2: Intensity 3: Color Temp 4: +/- Green Control 5+6: Crossfade
7: Red 8: Green 9: Blue
1: Red 2: Green 3: Blue
1: Red 2: Green 3: Blue 4:2000K 5: 6000K
1+2: Red 3+4: Green 5+6: Blue 7+8:2000K 9+10: 6000K
Download Complete DMX Chart at QuasarScience.com/Support
20

DMX Profiles (Basic) Parameters
Available Parameters based on Profile
Parameter Value
Intensity
Color T emp
+/- Green
Hue
Saturation
Crossfade
Red
Green
Blue
21
Download Complete DMX Chart at QuasarScience.com/Support
DMX Value
0-255
0-255
0-255
0-255
0-255
0-255
0-255
0-255
0 - 100%
2000K-6000K
See Chart at right
0° - 360°
0 - 100%
0 - 100%
0 - 100%
0 - 100%
0 - 100%
+/- Green Control DMX Values
DMX Value Effect
0-10
11-20
21-119
120-145
146-244
245-255
%
0-4
5-8
8-46
47-57
57-96
96-100
No Effect
Full Minus Green
-99% to -1%
Neutral
1% to 99%
Full Plus Green

DMX Profiles (FX)
When using as multiple pixels, patch in a fixture for each set of channel per pixel. The FX parameters are for the entire light.
9
10
11
CCT & RGB-FX
12
CCT & RGB-FX
HSIC-FX
HSIC-FX
Bit DepthName#
16 Bit
16 Bit
8 Bit
8 Bit
# of Channels
Per Pixel
5
7
7
9
# of FX
Channels
3
3
3
3
Channel Description
1: Intensity 2: Color Temp 3: +/- Green Control 4: Hue 5: Saturation
6: FX 7: FX Rate 8: FX Size
1+2: Intensity 3: Color Temp 4: +/- Green Control 5+6: Hue 7: Saturation
8: FX 9: FX Rate 10: FX Size
1: Intensity 2: Color Temp 3: +/- Green Control 4: Crossfade 5:Red
6: Green 7: Blue 8: FX 9: FX Rate 10: FX Size
1+2: Intensity 3: Color Temp 4: +/- Green Control 5+6: Crossfade
7: Red 8: Green 9: Blue 10: FX 11: FX Rate 12: FX Size
Download Complete DMX Chart at QuasarScience.com/Support
22

DMX Profiles (FX) Parameters
Parameters
Effect %
OFF
Rainbow
Short Circuit
Paparazzi
Strobe
Fire
Emergency Lights
Demo
No Effect
23
Download Complete DMX Chart at QuasarScience.com/Support
DMX Value
28-38
41-53
54-68
69-78
79-91
92-104
105-116
117-255
0-27
%
0 - 10
11-15
16-20
21-25
26-30
31-35
36-40
41-45
46-100
Item
Effect
Intensity
Color T emp
+/- Green
Saturation
Hue
Rate
Effects Parameters
Result
Choose effect
Set intensity of effect
Set base color temp
Set +/- green of the color temp
Saturate the effect
Set the hue
0-200% for the speed of the effect
100% is normal speed

DMX Profiles (Extended FX)
When using as multiple pixels, patch in a fixture for each set of channel per pixel. The FX parameters are for the entire light.
#
15
16
17
18
*Please refer to page 23 for parameters
Name
HSIC-EXT-FX
HSIC-EXT-FX
CCT & RGB
- EXT-FX
CCT & RGB -
EXT-FX
Bit Depth Channel Description
8 Bit
16 Bit
8 Bit
16 Bit
# of Channels
Per Pixel
5
7
7
9
# of FX
Channels
7
8
9
8
1: Intensity 2: Color Temp 3: +/- Green Control 4: Hue 5: Saturatio
6: FX 7: FX Rate 8: FX Size 9: FX ColorTemp2 10: FX +/- Green2
11: FX Hue2 12: FX Saturation2
1+2: Intensity 3: Color Temp 4: +/- Green Control 5+6: Hue 7: Saturation
8: FX 9: FX Rate 10: FX Size 11: FX ColorTemp2 12: FX +/- Green2
13+14: FX Hue2 15: FX Saturation2
1: Intensity 2: Color Temp 3: +/- Green Control 4: Crossfade 5:Red
6: Green 7: Blue 8: FX 9: FX Rate 10: FX Size 11: FX ColorTemp2
12: FX +/- Green2 13: Crossfade2 14: Red2 15: Green2 16: Blue2
1+2: Intensity 3: Color Temp 4: +/- Green Control 5+6: Crossfade
7: Red 8: Green 9: Blue 10: FX 11: FX Rate 12: FX Size
13+14: Crossfade2 15: Red2 16: Green2 17: Blue2
Download Complete DMX Chart at QuasarScience.com/Support
24

Basic Specifications
25
Model
Wattage
Weight
Dimensions
Power
Consumption
Q25R2 Q50R2 Q100R2
Max 25 watts
1.76 lbs (0.8 kg)
23 x 1.75 in
(584.2 x 44.5 mm)
120v = 0.22 amp
240v = 0.11 amp
12v = 1.90 amp
24v = 0.95 amp
Max 50 watts
3.3 lbs (1.5 kg)
46.9 x 1.75 in
(1161.7 x 44.5 mm)
120v = 0.44 amp
240v = 0.22 amp
12v = 3.80 amp
24v = 1.90 amp
5.84 lbs (2.64 kg)
(2400 x 44.5 mm)
Max 100 watts
90.86 x 1.75 in
120v = 0.88 amp
240v = 0.44 amp
12v = 7.60 amp
24v = 3.80 amp

Warranty
3 Year warranty from date of purchase.
Customer must provide proof of purchase.
This warranty is transferable.
Quasar Science will pay for:
The replacement parts, repair and/or labor costs to correct defects in materials and workmanship.
*Service must be provided by Quasar Science or an Authorized Quasar Science Service Center*
Quasar Science will not pay for:
Damage resulting from accident, misuse or abuse. Acts of God. Any failure that occurs for any other reason than materials and workmanship. Any shipping or
handling costs.
Disclaimer of implied warranties / limitations of remedies:
Implied warranties, including the extent applicable warranties of merchantability or fitness for a particular purpose are excluded to the extent legally permissible.
Any implied warranties that may be imposed by law are limited to 3 years or the shortest period allowed by law. Some states, provinces or countries do not allow
limitations or exclusions on how long an implied warranty of merchantability or fitness lasts, the above limitations or exclusions may not apply to you.
If this product fails to work as warranted, customer's sole and exclusive remedy shall be repair or replacement according to the terms of this limited warranty.
Quasar Science, LLC does not assume any responsibility for incidental or consequential damages. This warranty gives you specific legal rights and you may
also have other rights which vary from state to state, province to province or country to country.
26

R2 LED Linear Light Quick Start Guide
Please do not return your light to your retailer.
Contact Quasar Science with any questions, problems or concerns.
687 S. Anderson St.
Los Angeles, CA 90023
|
info@quasarscience.com
QUASAR SCIENCEQUASAR SCIENCE
Please check at QuasarScience.com/Support for firmware updates and up-to-date downloadable Quick Start Guide.
(800) 876-0665
V1.0
 Loading...