

BSJ9FCCF-1911
Printed in Japan

Thank you very much for choosing
a Grand Seiko watch.
For proper and safe use of your Grand Seiko watch,
please read the instructions carefully in
this booklet before using it.
Keep this manual handy for easy reference.
Bracelet sizing is available at the retailer from whom the watch was purchased. If you cannot
have your watch band sized by the retailer from whom the watch was purchased because you
received the watch as a gift, or you moved to a distant place, please contact Grand Seiko
international service network mentioned on CERTIFICATE OF GUARANTEE or our website.
The service may also be available on a chargeable basis at other retailers, however, some
retailers may not undertake the service.
The battery in your watch at the time of purchase was inserted in the watch at the factory for
performance checks. Battery replacement is at cost even within the guarantee period.
If your watch has a protective film for preventing scratches, make sure to peel it off before using
the watch.
If the watch is used with the film on it, dirt, sweat, dust, or moisture may be attached to the film
and may cause rust.
CONTENTS
■ HANDLING CAUTIONS ....................................................................................... 2
■ CHECK THE CALIBER NUMBER AND WATER-RESISTANT LEVEL ............... 3
■ CAUTIONS ON WATER RESISTANCE .............................................................. 4
■ NAMES OF THE PARTS ...................................................................................... 7
■ HOW TO USE ..................................................................................................... 10
• Crown .............................................................................................................. 10
• HOW TO USE (FOR CAL. 9F83) ..................................................................... 11
• HOW TO USE (FOR CAL. 9F82, 9F62) ........................................................... 13
• HOW TO USE (FOR CAL. 9F85) ..................................................................... 15
• HOW TO USE (FOR CAL. 9F86) ..................................................................... 20
※ List of time zone differences in major regions of the world ........................... 26
• HOW TO USE (FOR CAL. 9F61, 4J51) ........................................................... 27
• HOW TO USE (FOR CAL. 4J52) ..................................................................... 28
• HOW TO USE (FOR CAL. 8J55) ..................................................................... 30
■ FUNCTIONS OF DIVER’S MODEL .................................................................... 31
• Unidirectional rotating bezel ............................................................................ 31
• Slide adjuster ................................................................................................... 32
• Battery replacement period indication ............................................................. 33
■ TO PRESERVE THE QUALITY OF YOUR WATCH .......................................... 34
• After-sale service ............................................................................................. 34
• Guarantee ....................................................................................................... 35
• Daily care ........................................................................................................ 36
• Band ................................................................................................................ 37
• Magnetic resistance (Magnetic influence) ....................................................... 38
• Lumibrite ......................................................................................................... 39
• Troubleshooting .............................................................................................. 39
■ LEAP SECOND .................................................................................................. 40
■ SPECIFICATIONS (MOVEMENT) ..................................................................... 40
■ BATTERY ........................................................................................................... 40
English
1
■ HANDLING CAUTIONS
To indicate the risks of serious consequences such as severe injuries
unless the following safety regulations are strictly observed.
Immediately stop wearing the watch in the following cases.
If the watch body or band becomes edged by corrosion etc.
If the pins protrude from the band.
* Immediately consult the retailer from whom the watch was purchased or Grand Seiko international
service network mentioned on CERTIFICATE OF GUARANTEE or our website.
Keep the watch, parts and battery out of the reach of babies
and small children.
Care should be taken to prevent a baby or a small child from accidentally swallowing the parts or
battery.
If a baby or child swallows the battery or accessories, immediately consult a doctor, as it will be
harmful to the health of the baby or child.
Do not remove the battery from the watch.
Replacement of the battery requires professional knowledge and skill. Please ask the retailer from
whom the watch was purchased for battery replacement.
Do not recharge the battery, as doing so can generate heat which may cause bursting, leakage or
ignition.
To indicate the risks of light injuries or material damages unless the
following safety regulations are strictly observed.
Avoid wearing or storing the watch in the following places.
Places where volatile agents (cosmetics such as polish remover, bug repellent, thinners, etc.) are
vaporizing
Places where the temperature drops below 5°C
or rises above 35°C for a long time
Places affected by strong magnetism or static
electricity
Places affected by strong vibrations
Places of high humidity
Dusty places
* Do not leave a dead battery within the watch for a long time as leakage may occur.
If you observe any allergic symptoms or skin irritation
Stop wearing the watch immediately and consult a specialist such as a dermatologist or an
allergist.
Other cautions
Replacement of the metallic band requires professional knowledge and skill.
Please ask the retailer from whom the watch was purchased for replacement of the metallic band,
as there is a risk of hand or finger injury and fear of losing parts.
Do not disassemble or tamper with the watch.
Keep the watch out of the reach of babies and children. Extra care should be taken to avoid risks
of any injury or allergic rash or itching that may be caused when they touch the watch.
When disposing of used batteries, follow the instructions of your local authorities.
If your watch is of the fob or pendant type, the strap or chain attached to the watch may damage
your clothes, or injure the hand, neck, or other parts of your body.
Please keep in mind that if a watch is taken off and placed down as it is, the case back, the band
and the clasp will rub against each other possibly causing scratches on the case back. We
recommend placing a soft cloth between the case back, the band and the clasp after taking off
your watch.
■ CHECK THE CALIBER NUMBER AND
b
WARNING
○
○
b
CAUTION
○
○
○
○
○
○
○
○
○
○
○
○
HANDLING CAUTIONS
2
WATER-RESISTANT LEVEL
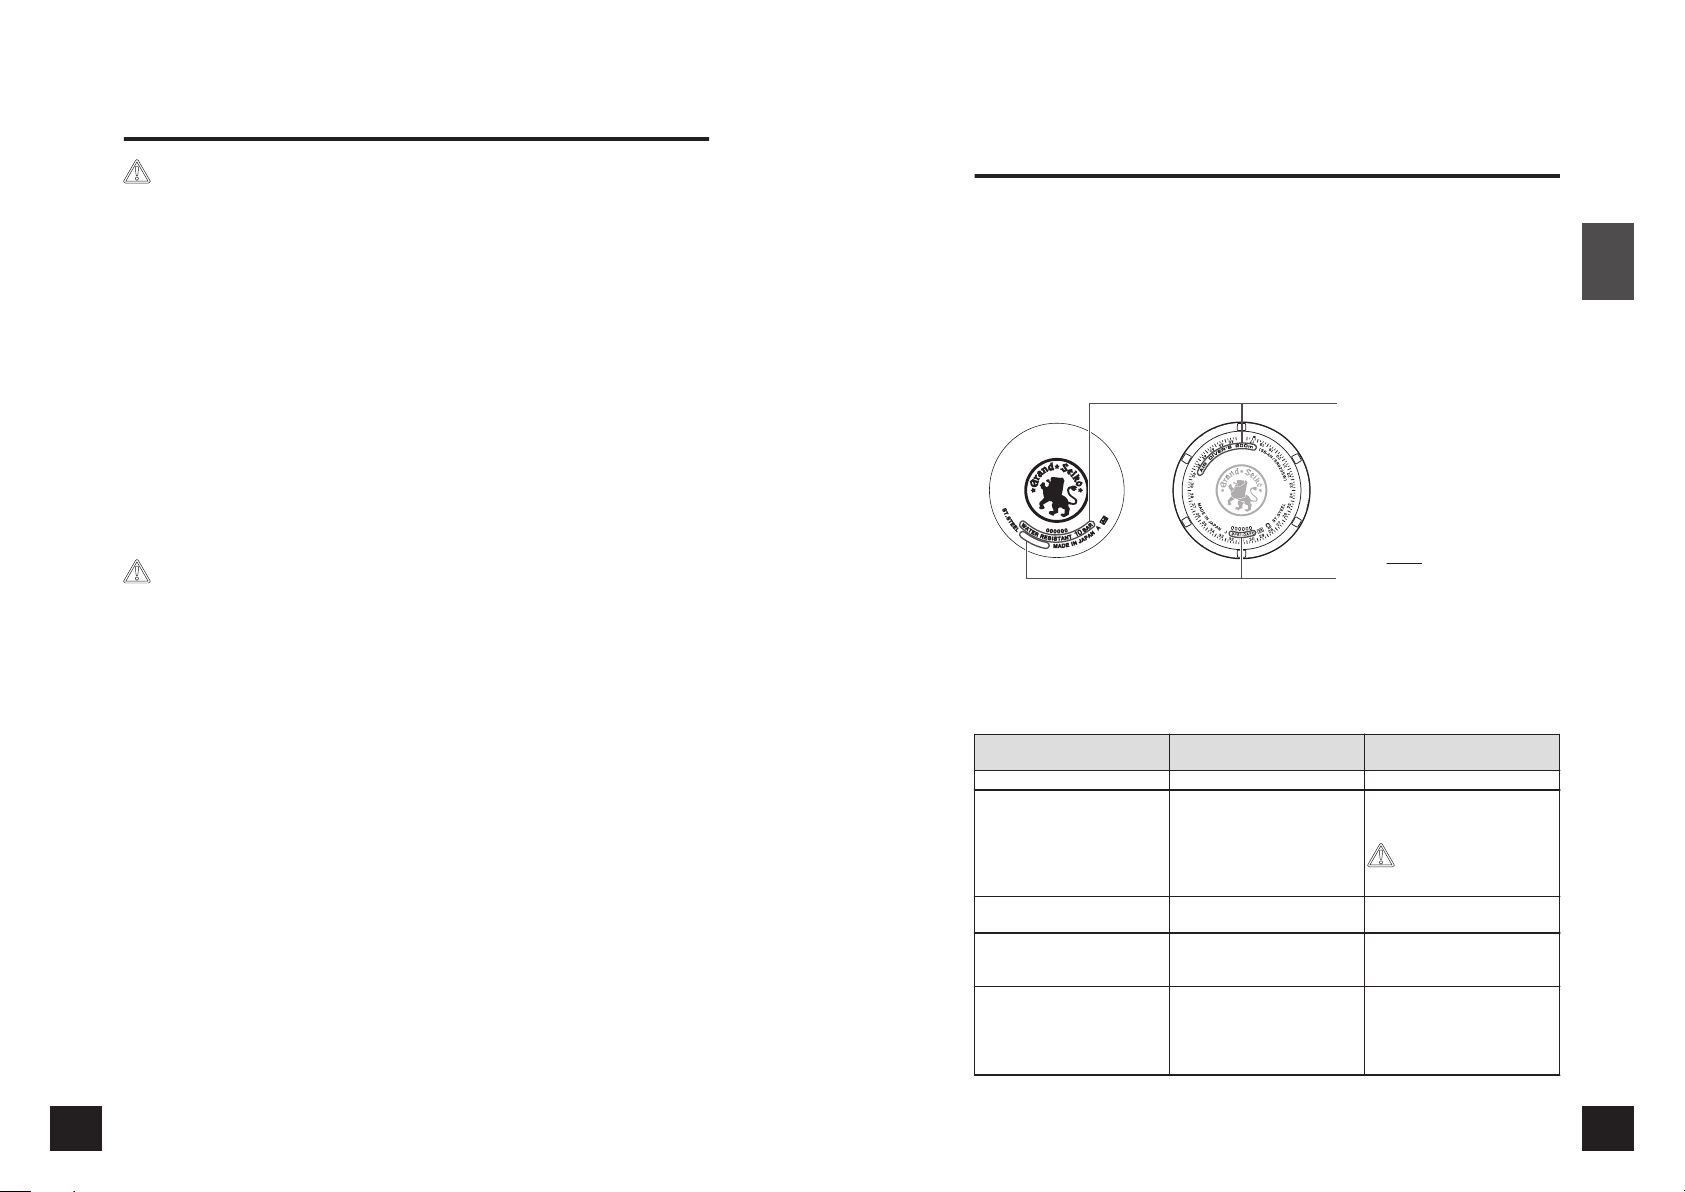
About the caliber number
The caliber number is a four-digit number that indicates the model of a movement (mechanical
part of a watch). The Grand Seiko watch is mounted with an exclusive movement, and the
mechanical caliber number starts with “9S”, the spring drive caliber number starts with “9R” and
the quartz caliber numbers are indicated with 4 digits starting with “9F”, “8J” and “4J”.
How to check the caliber number
The four-digit model number on the case back is the caliber number.
<Regular case back> <Diver’s watch case
9
F
6
1
-
0
A
A
0
* The above illustrations are examples and may differ from the case back of the watch you
purchased.
Water resistance
Refer to the table below for the description of each degree of water resistant
performance of your watch before using.
Indication on the case back
No indication Non-water resistance Avoid drops of water or sweat
WATER RESISTANT
WATER RESISTANT
5 BAR
WATER RESISTANT
10 (20) BAR
DIVER'S WATCH 200m
CHECK THE CALIBER NUMBER AND WATER-RESISTANT LEVEL
back>
Water resistant performance
Case Number
【Ex.】 9F61-0AA0
Caliber Number
Water resistant
performance
Water resistance for everyday
life
Water resistance for everyday
life at 5 barometric pressures
Water resistance for everyday
life at 10 (20) barometric
pressures
The watch can be worn for
diving using a compressed air
cylinder and can withstand
water pressure to a depth of
200 meters.
Conditions of Use
The watch withstands
accidental contact with water
in everyday life
b
WARNING
Not suitable for swimming
The watch is suitable for
swimming.
The watch is suitable for diving
not using an air cylinder.
The watch is suitable for
genuine scuba diving use.
English
3

■ CAUTIONS ON WATER RESISTANCE
b CAUTION
Do not turn or pull out the crown when the
watch is wet.
Water may get inside of the watch.
* If the inner surface of the glass is clouded with condensation or water
droplets appear inside of the watch for a long time, the water resistant
performance of the watch is deteriorated.
Immediately consult the retailer from whom the watch was purchased or
Grand Seiko international service network mentioned on CERTIFICATE OF
GUARANTEE or our website.
Do not leave moisture, sweat and dirt on the
watch for a long time.
Be aware of a risk that a water resistant watch may lessen its water resistant
performance because of deterioration of the adhesive on the glass or gasket,
or the development of rust on stainless steel.
Do not wear the watch while taking a bath or
a sauna.
Steam, soap or some components of a hot spring may accelerate the
deterioration of water resistant performance of the watch.
If water-resistant level of your watch is defined
as “WATER RESISTANT”
If water-resistant level of your watch is defined
as “DIVER'S WATCH 200m”
b
WARNING
b
CAUTION
○ Never use the watch in saturation diving using helium gas.
○ While diving, never operate the watch in any other manner than
described in this instruction manual.
Before using the diver’s watch, you have to be properly trained in
various types of diving and possess the requisite experience and skill
to dive safely. When diving, strictly abide by the rules of diving.
Precautions for diving
Before diving
Inspect the following items before diving.
“NAMES OF THE PARTS”→ P. 9
The time is correctly set.
1
The rotating bezel turns smoothly.
2
(The bezel rotation must not be too
loose or too tight.)
“Unidirectional rotating bezel”→
P. 31
1
2
English
b WARNING
Do not use the watch in scuba diving or
saturation diving.
The various tightened inspections under simulated harsh environment, which
are usually required for watches designed for scuba diving or saturation diving,
have not been conducted. For diving, use watches specifically designed for
diving.
b CAUTION
Do not pour running water directly from
faucet.
The water pressure of tap water from a faucet is high enough to degrade the
water resistant performance of a water resistant watch for everyday life.
CAUTIONS ON WATER RESISTANCE
4
The crown is completely screwed in.
3
“Screw down crown”→ P. 10
No abnormalities such as flaws or
4
cracks exist on the band or glass.
The band is reliably fixed with spring
5
bars, buckles or other parts.
b
CAUTION
If you notice any abnormalities, contact the retailer from whom the
watch was purchased or Grand Seiko international service network
mentioned on CERTIFICATE OF GUARANTEE or our website.
3
4
CAUTIONS ON WATER RESISTANCE
5
5
While diving
Make sure to observe the following instructions when you wear the watch while diving.
Wear the watch within the water depth
indicated on the dial.
Do not operate the crown or buttons
underwater.
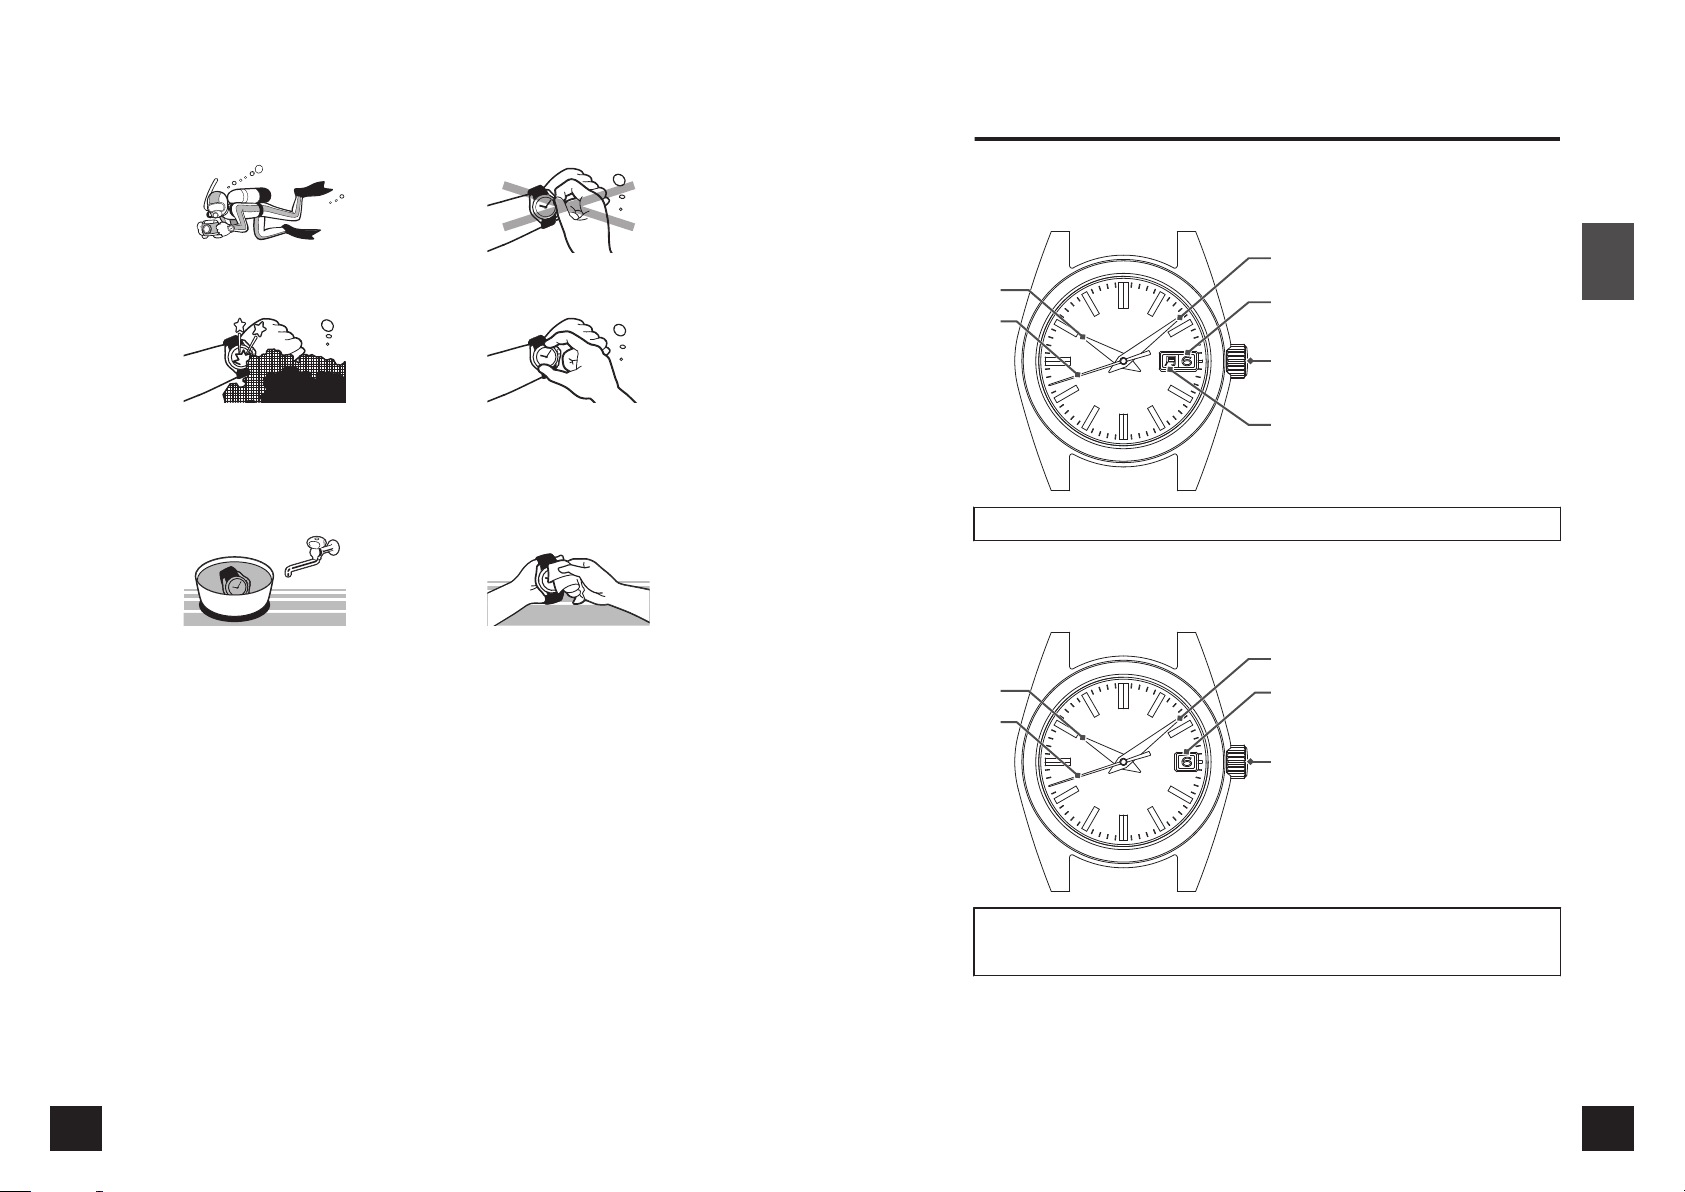
■ NAMES OF THE PARTS
9F83
3
1
2
4
5
Hour hand
1
Seconds hand
2
Minute hand
3
Date
4
Crown
5
Day of the week
6
English
Take care not to bump the watch against hard
objects such as rocks.
Bezel rotation may become slightly harder
underwater, but this is not a malfunction.
After diving
Please follow the care instructions below after diving.
Rinse the watch in fresh water and wipe it thoroughly dry.
Do not pour running water directly from a faucet onto the watch. Soak the watch in a container
filled with water to wash it.
6
How to set the time, date and day→ P. 11
9F85, 9F82, 9F62, 4J52
3
1
2
How to set the time and date→ P. 15 for Cal. 9F85
How to set the time and date→ P. 13 for Cal. 9F82, 9F62
How to set the time and date→ P. 28 for Cal. 4J52
4
5
Hour hand
1
Seconds hand
2
Minute hand
3
Date
4
Crown
5
CAUTIONS ON WATER RESISTANCE
6
NAMES OF THE PARTS
7
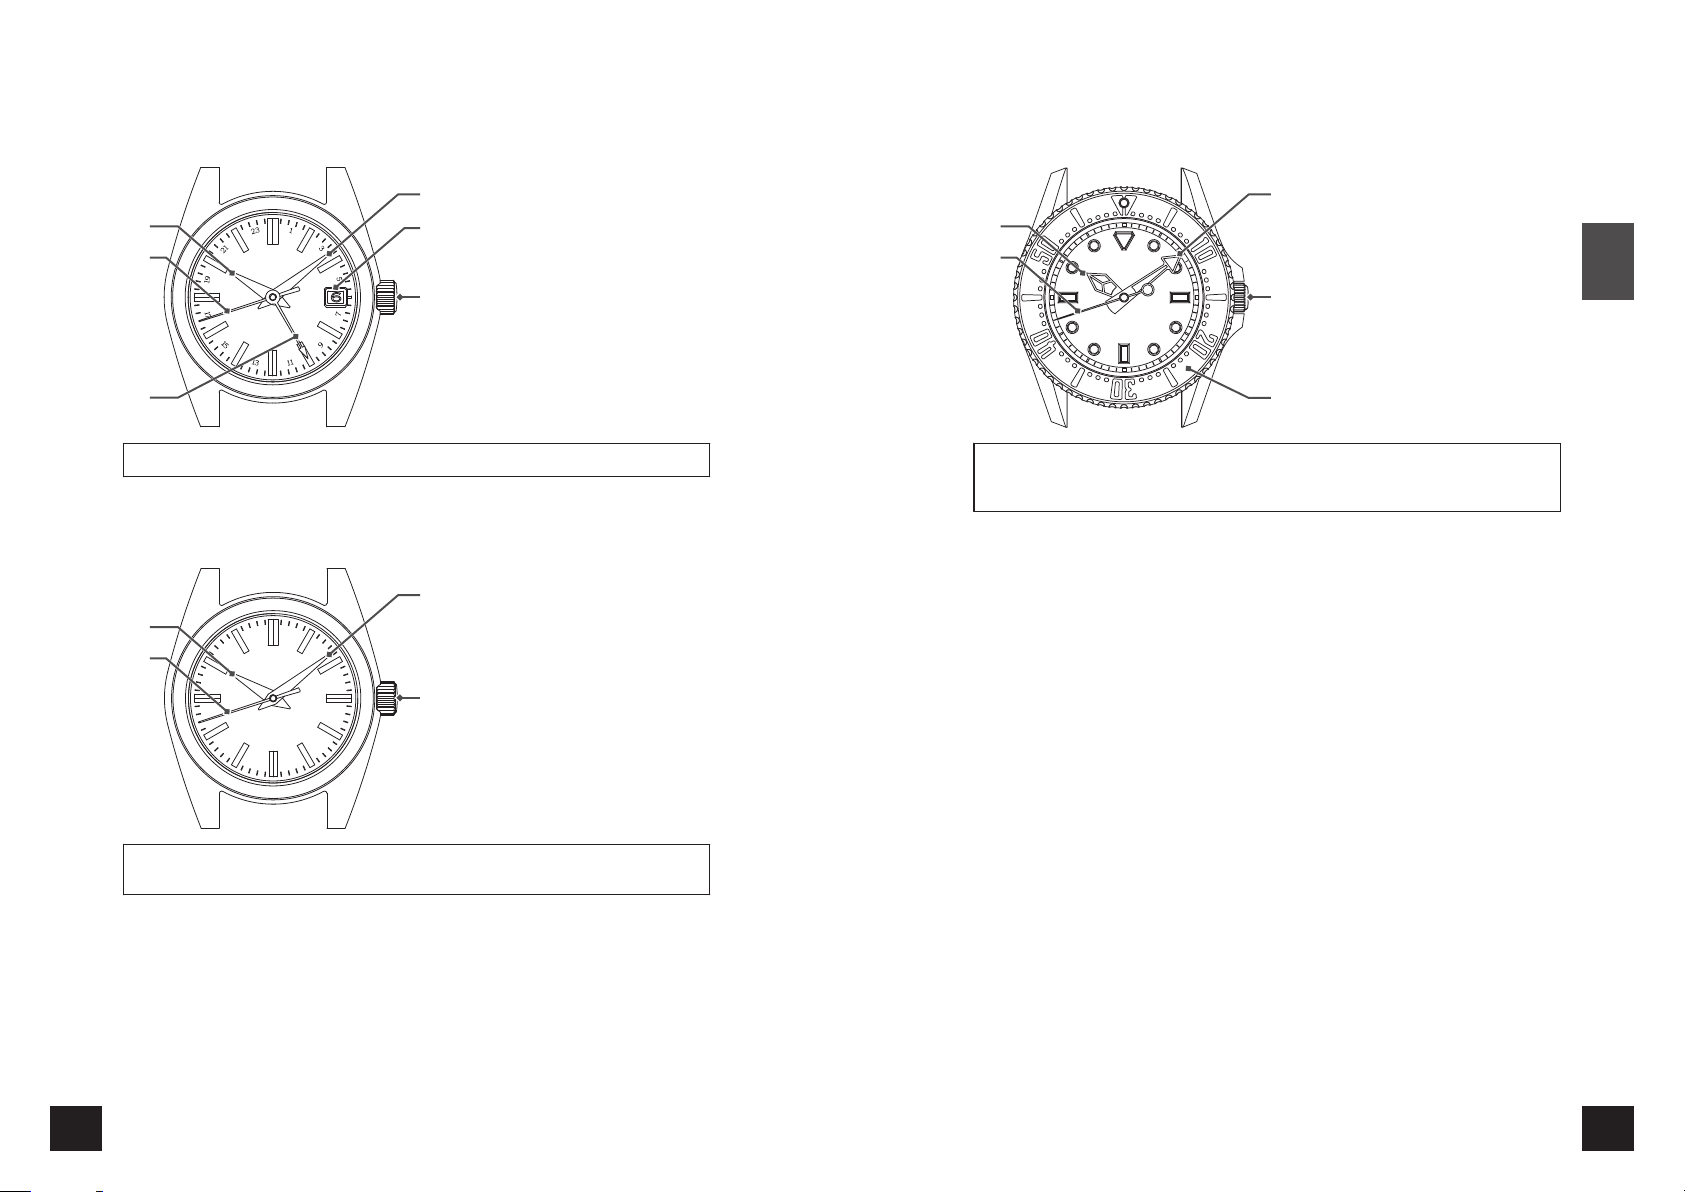
9F86
1
2
4
5
6
Hour hand
1
Seconds hand
2
24-hour hand
3
Minute hand
4
Date
5
Crown
6
9F61 (Diver’s model)
1
2
3
4
Hour hand
1
Seconds hand
2
Minute hand
3
Crown
4
Rotating bezel
5
English
3
How to set the time and date→ P. 20
9F61, 8J55, 4J51
1
2
How to set the time→ P. 27 for Cal. 9F61, 4J51
How to set the time→ P. 30 for Cal. 8J55
3
4
Hour hand
1
Seconds hand
2
Minute hand
3
Crown
4
5
How to set the time→ P. 27
FUNCTIONS OF DIVER’S MODEL→ P. 31
Precautions for diving→ P. 5
NAMES OF THE PARTS
8
NAMES OF THE PARTS
9
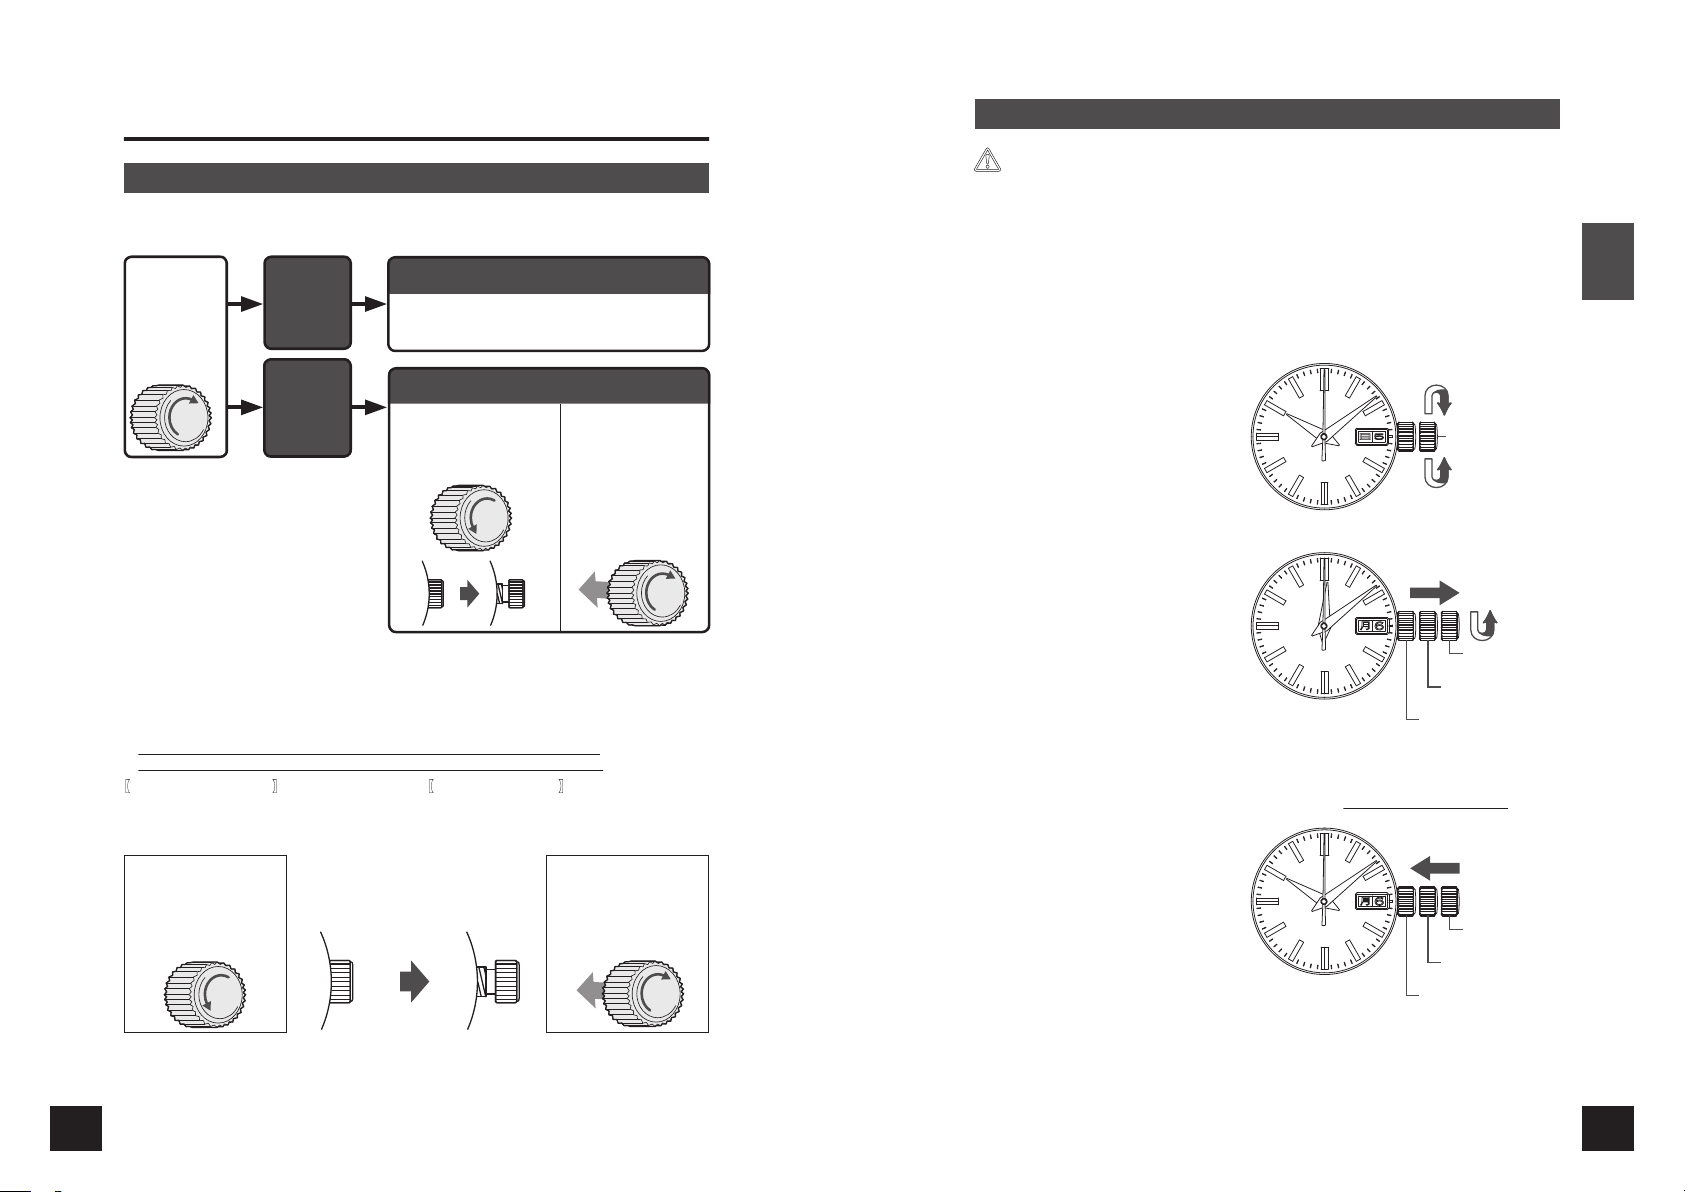
■ HOW TO USE
While pressing
the crown in, turn
it in the direction
indicated by the
arrow.
The crown
turns.
* By locking the crown by screw, a screw
down crown can prevent malfunction
and increase water resistance.
Rotate while pressing
the crown in.
Second click
position
Second click
position
Crown
There are two types of crowns, the regular one and one that can be locked.
Please confirm the crown of the watch that you are using.
HOW TO USE (FOR CAL. 9F83)
b
CAUTION
You may not be able to set the date and/or day when the time on your watch is between midnight
and 1:00 a.m. due to the mechanism of the watch. This is not a malfunction.
Please refrain from setting the date and/or day during this time.
English
Normal crown
The crown
does not
turn.
Pull out the crown and operate it.
Screw down crown
Unlock the crown
before operating it.
After operating the
crown, lock it.
Unscrew
* Be careful not to screw the crown
Rotate while
the crown in.
in by force as it may damage the
slots of the crown.
* Turn the crown from time to time. → P. 36
Screw down crown
The screw down crown features a mechanism that can securely lock the crown when
it is not being operated in order to prevent any operational errors and to improve its
water resistant performance.
It is necessary to unlock the screw down crown before operating it.
○
Once you have finished operating the crown, make sure to relock it.
○
To unlock the crown】
【
Turn the crown counterclockwise (6 o’clock
direction) to unscrew it. Now the crown can be
operated.
Unlock the crown
before operating it.
Crown locked
【
To lock the crown】
Turn the crown clockwise (12 o’clock
direction) while gently pressing it in toward the
watch body until it stops.
Crown unlocked
After operating the
crown, lock it.
pressing
How to set the time, date and day
First, set the date and day. Pull out the crown to the first click. The seconds hand keeps
1
moving.
Turn the crown until the previous
2
day’s date and day of the week
appear. Turn the crown
counterclockwise (6 o’clock direction)
to advance the date. Turn the crown
clockwise (12 o’clock direction) to
advance the day of the week. The
language of day indication changes
between Japanese and English
alternately.
Pull out the crown to the second click
3
when the seconds hand is at the 12
o’clock position. The seconds hand
stops on the spot. Turn the crown
counterclockwise (6 o’clock direction)
to advance the hands until the desired
date appears.
When setting the hour hand, check that a.m./p.m. is correctly set, as the date is designed to
4
change once in 24 hours.
Due to the mechanism of the quartz watch, to set the time accurately, first turn the minute
hand 4 to 5 minutes ahead of the desired time and then
Push the crown back into the normal
5
position in accordance with a time
signal. The watch immediately starts
moving.
return it to the correct time.
Day of the week
First click
position
Date
First click
position
Normal position
Unscrew
* When locking the crown, turn it slowly with care, ensuring that the screw is properly engaged.
Be careful not to push it in forcefully, as doing so may damage the screw hole in the case.
HOW TO USE
10
First click
position
Normal position
HOW TO USE (FOR CAL. 9F83)
HOW TO USE
11

Date adjustment at the end of the month
Second click
position
Second click
position
It is necessary to adjust the date after February (which has 28 days, 29 days in a leap year) and
a 30 day month.
【Ex.】 To adjust the date in the a.m. period on
the first day of a month following a 30-day
month
The watch displays “31” instead of “1”. Pull out
the crown to the first click. Turn the crown
counterclockwise (6 o’clock direction) to set
the date to “1”.
Push the crown back in to complete the time
setting.
First click
position
Instantly changing date and day
This watch is able to change the date and day of the week indication instantly between 0:00
a.m. and 0:05 a.m.
In case of conventional quartz watches, the date and day of the week indication change
gradually between 9:00 p.m. and 3:00 a.m.
* Instantly changing the date and time may not be possible, depending on how the time is set.
If the time you want to set is between 7:00 p.m. and 1:00 a.m., first return the time to 6:00
p.m., and then turn the crown counterclockwise (6 o’clock direction) so the hands advance
in the clockwise direction to set the time.
HOW TO USE (FOR CAL. 9F82, 9F62)
b
CAUTION
You may not be able to set the date when the time on your watch is between midnight and 1:00
a.m. due to the mechanism of the watch. This is not a malfunction.
Please refrain from setting the date and/or day during this time.
How to set the time and date
First, set the date. Pull out the crown to the first click. The seconds hand keeps moving.
1
The date can be set by turning the
2
crown counterclockwise (6 o’clock
direction). First turn the crown until the
previous day’s date from the desired
date appears.
Pull out the crown to the second click
3
when the seconds hand is at the 12
o’clock position. The seconds hand
stops on the spot. Turn the crown
counterclockwise (6 o’clock direction)
to advance the hands until the desired
date appears.
When setting the hour hand, check that a.m./p.m. is correctly set, as the date is designed to
4
change once in 24 hours.
Due to the mechanism of the quartz watch, to set the time accurately, first turn the minute
hand 4 to 5 minutes ahead of the desired time and then
Push the crown back into the normal
5
position in accordance with a time
signal. The watch immediately starts
moving.
return it to the correct time.
First click
position
Date
First click
position
Normal position
English
HOW TO USE (FOR CAL. 9F83)
HOW TO USE
12
First click
position
Normal position
HOW TO USE (FOR CAL. 9F82, 9F62)
HOW TO USE
13

Date adjustment at the end of the month
Second click
position
Second click
position
It is necessary to adjust the date after February (which has 28 days, 29 days in a leap year) and
a 30 day month.
【Ex.】 To adjust the date in the a.m. period on
the first day of a month following a 30-day
month
The watch displays “31” instead of “1”. Pull out
the crown to the first click. Turn the crown
counterclockwise (6 o’clock direction) to set
the date to “1”.
Push the crown back in to complete the time
setting.
First click
position
HOW TO USE (FOR CAL. 9F85)
How to set the time and date
To set the time and date, set the minute hand first, and then set the hour hand and date.
Pull out the crown to the second click
1
when the seconds hand is at the 12
o’clock position. (The seconds hand
stops on the spot.)
(If the watch is equipped with the
screw down crown, unscrew the
crown before pulling it out.)
English
Instantly changing date
This watch is able to change the date indication instantly between 0:00 a.m. and 0:05 a.m.
In case of conventional quartz watches, the date indication changes gradually between 9:00
p.m. and 0:00 a.m.
* Instantly changing the date and time may not be possible, depending on how the time is set.
If the time you want to set is between 7:00 p.m. and 1:00 a.m., first return the time to 6:00
p.m., and then turn the crown counterclockwise (6 o’clock direction) so the hands advance
in the clockwise direction to set the time.
Turn the crown counterclockwise (6
2
o’clock direction) to rotate the needle
and then set the time while paying
attention to the minute hand.
Due to the mechanism of the quartz
watch, to set the time accurately, first
turn the minute hand 4 to 5 minutes
ahead of the desired time and then
return it to the correct time.
* The date may change depending
on if the hour hand is indicating the
incorrect time, or on the position of
the hour hand, so first set the
minute hand.
First click
position
Normal position
First click
position
HOW TO USE (FOR CAL. 9F82, 9F62)
HOW TO USE
14
HOW TO USE (FOR CAL. 9F85)
HOW TO USE
15

First click position
First click position
First click position
Push the crown back in
First click position
First click position
First click position
First click position
3
simultaneously with the time signal.
* The minute hand and the seconds
hand will be set correctly.
Second click
position
Normal position
To move on to the hour hand and date
4
setting, pull out the crown to the first
click.
Turn the crown to set the hour hand.
5
While turning the crown, the moment
the date changes is midnight. When
setting the hour hand, be sure that
AM/PM is set correctly.
First click
position
Set the date also at this point if necessary.
* The crown can be turned in either direction to set the date, however, it is recommended
to turn the crown in the direction which enables you to set the date with a smaller
adjustment.
* If the time you want to set is between 7:00 p.m. and 1:00 a.m., first return the time to 6:00
p.m., and then turn the crown counterclockwise (6 o’clock direction) so the hands advance
in the clockwise direction to set the time.
* Turn the crown slowly, checking that the hour hand moves in one-hour increments.
* When setting the hour hand, the other hands may move slightly. However, this is not a
malfunction.
Push the crown back in to complete
6
the time setting.
(If the watch is equipped with the
screw down crown, relock the
crown.)
Date adjustment at the end of the month
It is necessary to adjust the date after February (which has 28 days, 29 days in a leap year) and
a 30 day month.
Two full rotations of the hour hand will change the date for one day.
The date advances one day by turning the hour hand two full rotations clockwise (for 24 hours).
Pull out the crown to the first click.
1
(If the watch is equipped with the
screw down crown, unscrew the
crown before pulling it out.)
Each time the hour hand makes two full rotations by turning the crown, the date is adjusted
2
one day.
While turning the crown, the moment the date changes is midnight.
When setting the hour hand, be sure that a.m./p.m. is set correctly.
Turning the crown counterclockwise (6 o’clock
direction):
Each time the hour hand makes two full
rotations, the date is advanced one day.
* The crown can be turned in either direction
Before date
adjustment
to set the date, however, it is recommended
to turn the crown in the direction which
enables you to set the date with a smaller
adjustment.
* Turn the crown slowly.
* When setting the hour hand, the other hands
may move slightly. However, this is not a
malfunction.
Turning the crown clockwise (12 o’clock
direction):
Each time the hour hand makes two full
rotations, the date is set back one day.
English
HOW TO USE (FOR CAL. 9F85)
HOW TO USE
16
Normal position
HOW TO USE (FOR CAL. 9F85)
HOW TO USE
17

Upon completion of setting, make sure that the time indicated is correct, and then push the
First click position
3
crown back in. The date setting is now completed.
(If the watch is equipped with the screw down crown, relock the crown.)
* The date is designed to work in conjunction with the movement of the hour hand, therefore,
incorrect setting of a.m./p.m. will cause the date to change at noon.
* The crown can be turned in either direction to set the date, however, it is recommended
to turn the crown in the direction which enables you to set the date with a smaller
adjustment.
* If the time you want to set is between 7:00 p.m. and 1:00 a.m., first return the time to 6:00
p.m., and then turn the crown counterclockwise (6 o’clock direction) so the hands advance
in the clockwise direction to set the time.
* Turn the crown slowly, checking that the hour hand moves in one-hour increments.
* When setting the hour hand, the other hands may move slightly. However, this is not a
malfunction.
Time difference adjustment function
For example, while traveling abroad and staying in a place with a different time from where you
live, you can conveniently set the watch to indicate the local time in the different time zone area
without stopping the watch.
The date works in conjunction with the movement of the hour hand. If the time difference is
correctly adjusted, the watch displays the correct date of the place where you are staying.
How to use the time difference adjustment function
Pull out the crown to the first click.
1
(If the watch is equipped with the
screw down crown, unscrew the
crown before pulling it out.)
Turn the crown to set the hour hand to indicate the time of the place where you are staying.
2
Make sure that a.m./p.m. and date are correctly set.
* The date is designed to work in conjunction with the movement of the hour hand, therefore,
incorrect setting of a.m./p.m. will cause the date to change at noon.
“List of time zone differences in major regions of the world”→ P. 26
First click
position
Turning the crown
counterclockwise
(6 o’clock
direction):
The hour hand is
First click
position
Turning the crown
clockwise (12
o’clock direction):
The hour hand is
set back.
advanced.
* Turn the crown slowly, checking that the hour hand moves in one-hour increments.
* While turning the crown, the moment the date changes is midnight.
* When setting the hour hand, the other hands may move slightly. However, this is not a
malfunction.
Upon completion of setting, make sure that the time indicated is correct, and then push the
3
crown back in. The setting procedure is now completed.
(If the watch is equipped with the screw down crown, relock the crown.)
* If the time you want to set is between 7:00 p.m. and 1:00 a.m., first return the time to 6:00
p.m., and then turn the crown counterclockwise (6 o’clock direction) so the hands advance
in the clockwise direction to set the time.
English
HOW TO USE (FOR CAL. 9F85)
HOW TO USE
18
Instantly changing date
This watch is able to change the date indication instantly between 0:00 a.m. and 0:05 a.m.
In case of conventional quartz watches, the date indication changes gradually between 9:00
p.m. and 0:00 a.m.
* Instantly changing the date and time may not be possible, depending on how the time is set.
If the time you want to set is between 7:00 p.m. and 1:00 a.m., first return the time to 6:00
p.m., and then turn the crown counterclockwise (6 o’clock direction) so the hands advance
in the clockwise direction to set the time.
HOW TO USE (FOR CAL. 9F85)
HOW TO USE
19

HOW TO USE (FOR CAL. 9F86)
Second click
position
Second click
position
First click position
First click position
First click position
How to set the time and date
To set the time and date, set the 24-hour hand and minute hand first, and then set the hour hand
and date.
Pull out the crown to the second click
1
when the seconds hand is at the 12
o’clock position. (The seconds hand
stops on the spot.)
(If the watch is equipped with the
screw down crown, unscrew the
crown before pulling it out.)
Turn the crown counterclockwise (6
2
o’clock direction) to rotate the 24-hour
hand and minute hand clockwise and
set them to the current time.
Due to the mechanism of the quartz
watch, to set the time accurately, first
turn the minute hand 4 to 5 minutes
ahead of the desired time and then
return it to the correct time.
* Only the 24-hour and minute
hands are to be set first. Even if the
hour hand is indicating incorrect
time, or the date may be altered
depending on the position of the
hour hand, it is not necessary to
make an adjustment at this stage.
First click
position
Normal position
First click
position
Push the crown back in
3
simultaneously with the time signal.
* The setting of the 24-hour, minute
and seconds hands is now
completed.
Second click
position
Normal position
To move on to the hour hand and date
4
setting, pull out the crown to the first
click.
Turn the crown to set the hour hand.
5
While turning the crown, the moment
the date changes is midnight. When
setting the hour hand, be sure that
AM/PM is set correctly.
First click
position
Set the date also at this point if necessary.
* The crown can be turned in either direction to set the date, however, it is recommended
to turn the crown in the direction which enables you to set the date with a smaller
adjustment.
* If the time you want to set is between 7:00 p.m. and 1:00 a.m., first return the time to 6:00
p.m., and then turn the crown counterclockwise (6 o’clock direction) so the hands advance
in the clockwise direction to set the time.
* Turn the crown slowly, checking that the hour hand moves in one-hour increments.
* When setting the hour hand, the other hands may move slightly. However, this is not a
malfunction.
Push the crown back in to complete
6
the time setting.
(If the watch is equipped with the
screw down crown, relock the
crown.)
English
HOW TO USE (FOR CAL. 9F86)
HOW TO USE
20
Normal position
HOW TO USE (FOR CAL. 9F86)
HOW TO USE
21

Date adjustment at the end of the month
First click position
First click position
First click position
First click position
It is necessary to adjust the date after February (which has 28 days, 29 days in a leap year) and
a 30 day month.
Two full rotations of the hour hand will change the date for one day.
The date advances one day by turning the hour hand two full rotations clockwise (for 24 hours).
Pull out the crown to the first click.
1
(If the watch is equipped with the
screw down crown, unscrew the
crown before pulling it out.)
Each time the hour hand makes two full rotations by turning the crown, the date is adjusted
2
one day.
While turning the crown, the moment the date changes is midnight.
When setting the hour hand, be sure that a.m./p.m. is set correctly.
Before date
adjustment
Turning the crown counterclockwise (6 o’clock
direction):
Each time the hour hand makes two full
rotations, the date is advanced one day.
* The crown can be turned in either direction
to set the date, however, it is recommended
to turn the crown in the direction which
enables you to set the date with a smaller
adjustment.
* Turn the crown slowly.
* When setting the hour hand, the other hands
may move slightly. However, this is not a
malfunction.
Turning the crown clockwise (12 o’clock
direction):
Each time the hour hand makes two full
rotations, the date is set back one day.
Upon completion of setting, make sure that the time indicated is correct, and then push the
3
crown back in. The date setting is now completed.
(If the watch is equipped with the screw down crown, relock the crown.)
* The date is designed to work in conjunction with the movement of the hour hand, therefore,
incorrect setting of a.m./p.m. will cause the date to change at noon.
* The crown can be turned in either direction to set the date, however, it is recommended
to turn the crown in the direction which enables you to set the date with a smaller
adjustment.
* If the time you want to set is between 7:00 p.m. and 1:00 a.m., first return the time to 6:00
p.m., and then turn the crown counterclockwise (6 o’clock direction) so the hands advance
in the clockwise direction to set the time.
* Turn the crown slowly, checking that the hour hand moves in one-hour increments.
* When setting the hour hand, the other hands may move slightly. However, this is not a
malfunction.
How to use the 24-hour hand
This watch has two different types of 24-hour hand usage.
<Type 1> :
Simply using the 24-hour hand to show the 24hour time as an a.m./p.m. indicator. (This is
the standard usage type for the 24-hour
hand.)
Both the hour hand and the 24-hour hand are
indicating the Japan time 10:00 a.m.
24-hour hand as an
a.m./p.m. indicator
<Type 2> : 24-hour hand as a dual
time indicator
Using the time difference adjustment function,
set the 24-hour hand to indicate a time
different from the time that the hour and
minute hand indicate, which is of a place in a
different time zone area with at least one hour
of time difference from where you are.
Hour hand : Japan time 10:00 a.m.
24-hour Hand : New York time 8:00 p.m.
English
HOW TO USE (FOR CAL. 9F86)
HOW TO USE
22
HOW TO USE (FOR CAL. 9F86)
HOW TO USE
23

Time difference adjustment function
First click position
For example, while traveling abroad and staying in a place with a different time from where you
live, you can conveniently set the watch to indicate the local time in the different time zone area
without stopping the watch.
The hour hand indicates the time of the place where you currently are, while the 24-hour hand
indicates the time of the place of origin.
The date works in conjunction with the movement of the hour hand. If the time difference is
correctly adjusted, the watch displays the correct date of the place where you are staying.
How to use the time difference adjustment function
Pull out the crown to the first click.
1
(If the watch is equipped with the
screw down crown, unscrew the
crown before pulling it out.)
Turn the crown to set the hour hand to indicate the time of the place where you are staying.
2
Make sure that a.m./p.m. and date are correctly set.
* The date is designed to work in conjunction with the movement of the hour hand, therefore,
incorrect setting of a.m./p.m. will cause the date to change at noon.
“List of time zone differences in major regions of the world”→ P. 26
First click
position
Turning the crown
counterclockwise
(6 o’clock
direction):
The hour hand is
advanced.
First click
position
Turning the crown
clockwise (12
o’clock direction):
The hour hand is
set back.
Selectable display mode
With the time difference adjustment function, the watch features a dual time display which
shows time in two different time zones. It offers two display modes which you can select to suit
your needs and preference.
First click
position
【Ex.1】
Hour hand and date : Area A (Japan)
24-hour Hand : Area B (New York)
Set the 24-hour hand first, and then set the hour hand.
【Ex.2】
Hour hand and date : Area B (New York)
24-hour Hand : Area A (Japan)
First click
position
Instantly changing date
This watch is able to change the date indication instantly between 0:00 a.m. and 0:05 a.m.
In case of conventional quartz watches, the date indication changes gradually between 9:00
p.m. and 0:00 a.m.
* Instantly changing the date and time may not be possible, depending on how the time is set.
If the time you want to set is between 7:00 p.m. and 1:00 a.m., first return the time to 6:00
p.m., and then turn the crown counterclockwise (6 o’clock direction) so the hands advance
in the clockwise direction to set the time.
English
* Turn the crown slowly, checking that the hour hand moves in one-hour increments.
* While turning the crown, the moment the date changes is midnight.
* When setting the hour hand, the other hands may move slightly. However, this is not a
malfunction.
Upon completion of setting, make sure that the time indicated is correct, and then push the
3
crown back in. The setting procedure is now completed.
(If the watch is equipped with the screw down crown, relock the crown.)
* If the time you want to set is between 7:00 p.m. and 1:00 a.m., first return the time to 6:00
p.m., and then turn the crown counterclockwise (6 o’clock direction) so the hands advance
in the clockwise direction to set the time.
HOW TO USE (FOR CAL. 9F86)
HOW TO USE
24
HOW TO USE (FOR CAL. 9F86)
HOW TO USE
25

List of time zone differences in major regions of the
world
Time difference
Names of the cities
Tokyo +9 hours 0 hours Seoul
Beijing +8 hours -1 hour Hong Kong, Singapore
Bangkok +7 hours -2 hours Jakarta
Dacca +6 hours -3 hours
Karachi +5 hours -4 hours
Dubai +4 hours -5 hours
Jeddah +3 hours -6 hours Baghdad
Cairo +2 hours -7 hours
HParis
HLondon
HAzores
HRio de Janeiro
Santo Domingo -4 hours -13 hours
HNew York
HChicago
HDenver
HLos Angeles
HAnchorage
Honolulu -10 hours -19 hours
Midway Island -11 hours -20 hours
HWellington
Nouméa +11 hours +2 hours
HSydney
* Regions marked with H use daylight saving time
* The time zone differences of each region and use of daylight saving time are based on data
as of January 2019. These are subject to change according to the governments of the
respective countries or regions.
from Universal
Time Coordinated
(UTC)
+1 hour -8 hours
0 hours -9 hours
-1 hour -10 hours
-3 hours -12 hours
-5 hours -14 hours
-6 hours -15 hours
-7 hours -16 hours
-8 hours -17 hours
-9 hours -18 hours
+12 hours +3 hours
+10 hours +1 hour Guam
Time difference
from Japan
Standard Time
(JST)
Other cities in the same
region
HAthens
HRome, HBerlin
HMontreal
HMexico City
HVancouver
HAuckland
HOW TO USE (FOR CAL. 9F61, 4J51)
How to set the time
Pull out the crown when the seconds
1
hand is at the 12 o’clock position as
shown in the illustration. The seconds
hand stops on the spot.
Turn the crown to set the hands to the
2
desired time.
Due to the mechanism of the quartz
watch, to set the time accurately, first
turn the minute hand 4 to 5 minutes
ahead of the desired time and then
return it to the correct time.
Push the crown back into the normal
3
position in accordance with a time
signal. The watch immediately starts
moving.
English
First click
position
First click
position
First click
position
Normal position
HOW TO USE (FOR CAL. 9F86)
HOW TO USE
26
HOW TO USE (FOR CAL. 9F61, 4J51)
HOW TO USE
27

HOW TO USE (FOR CAL. 4J52)
Second click
position
Second click
position
b
CAUTION
If you set the date when the time on your watch is between 9:00 p.m. and 3:00 a.m., the date
may not change correctly on the following day due to the mechanism of the watch.
Please refrain from setting the date and/or day during this time.
First, set the date. Pull out the crown to the first click. The seconds hand keeps moving.
1
The date can be set by turning the
2
crown counterclockwise (6 o’clock
direction). First turn the crown until the
previous day’s date from the desired
date appears.
Pull out the crown to the second click
3
when the seconds hand is at the 12
o’clock position. The seconds hand
stops on the spot. Turn the crown
counterclockwise (6 o’clock direction)
to advance the hands until the desired
date appears.
When setting the hour hand, check that a.m./p.m. is correctly set, as the date is designed to
4
change once in 24 hours.
Due to the mechanism of the quartz watch, to set the time accurately, first turn the minute
hand 4 to 5 minutes ahead of the desired time and then
Push the crown back into the normal
5
position in accordance with a time
signal. The watch immediately starts
moving.
return it to the correct time.
First click
position
Date
First click
position
Normal position
Date adjustment at the end of the month
It is necessary to adjust the date after February (which has 28 days, 29 days in a leap year) and
a 30 day month.
【Ex.】 To adjust the date in the a.m. period on
the first day of a month following a 30-day
month
The watch displays “31” instead of “1”. Pull out
the crown to the first click. Turn the crown
counterclockwise (6 o’clock direction) to set
the date to “1”.
Push the crown back in to complete the time
setting.
First click
position
English
HOW TO USE (FOR CAL. 4J52)
HOW TO USE
28
First click
position
Normal position
HOW TO USE (FOR CAL. 4J52)
HOW TO USE
29

HOW TO USE (FOR CAL. 8J55)
The hour hand
moves clockwise.
The hour hand moves
counterclockwise.
Second click
position
This watch features a time difference adjustment function. The hour hand can be easily
adjusted in one-hour increments without stopping the minute and seconds hands.
This function is convenient especially when traveling abroad.
How to use the independent hour-hand adjustment
function
Pull out the crown to the first click.
1
The seconds hand keeps moving.
Turn the crown clockwise (12 o’clock
2
direction) to advance the hour hand.
Turn the crown counterclockwise (6
o’clock direction) to set the hour hand
back. The hour hand moves in onehour increments.
How to set the time
After adjusting the hour hand position, pull out the crown to the second click when the
3
seconds hand is at the 12 o’clock position. The seconds hand stops on the spot.
Turn the crown to set the hour and
4
minute hands to the desired time.
Due to the mechanism of the quartz
watch, to set the time accurately, first
turn the minute hand 4 to 5 minutes
ahead of the desired time and then
return it to the correct time.
Push the crown back into the normal position in accordance with a time signal. The watch
5
immediately starts moving.
First click
position
Time setting
Normal position
■ FUNCTIONS OF DIVER’S MODEL
Unidirectional rotating bezel
By using the rotating bezel, you can measure the elapsed time since the start of an
event or an activity such as diving.
This watch has a unidirectional rotating bezel. As the evaluation of the remaining air in your
cylinder is based on the information of the elapsed time of the dive, the rotating bezels for a
diver’s watch is designed to rotate only counterclockwise, so that the watch is prevented from
displaying the elapsed time shorter than it actually is.
b
CAUTION
Make sure that you check the correct remaining amount of air in your cylinder before diving.
Use the display of the elapsed time by the rotating bezel only as a guide during diving.
How to use the rotating bezel
At the start of the activity, for which you want to measure the elapsed time (for example,
1
when you start diving), rotate the bezel so that the
minute hand.
Read the graduation on the rotating bezel to which the minute hand is pointing.
2
【Ex.】 When you start diving at 10:10.
Start of the dive After 15 minutes has elapsed
Align the
with the minute
hand
Rotating direction of the
bezel
mark
mark on the bezel is aligned with the
Elapsed
time
Read the graduation on the
rotating bezel to which the
minute hand is pointing.
English
HOW TO USE (FOR CAL. 8J55)
HOW TO USE
30
FUNCTIONS OF DIVER’S MODEL
31

Slide adjuster
Bracelet on the 12 o’clock
side of your watch
Jan.-Mar.
Apr.-Jun.
Jul.-Sep.
If your watch has a metallic band equipped with a slide adjuster mechanism, you can
easily adjust the bracelet length by yourself. This is very useful when you wear the
watch over a wetsuit or a heavy winter clothing.
Battery replacement period indication
As a guide to the battery replacement period, a battery life indicator is engraved on the
case back of the watch as shown in the diagram below. At the time of purchase of the
watch, the first battery replacement period is indicated by an engraved circle mark.
How to use the slide adjuster
Lift up the flap approximately 90° and press it down further approximately 20°, and hold it
1
there.
* You may feel slight resistance, but doing this requires only a light force. Please do not
push the flap down forcibly.
Lightly pull the bracelet on the 6 o’clock side of the watch along the curved line of the bracelet.
2
* Again, doing this requires only a light force. Please do not pull the bracelet forcibly.
* The slider can be pulled out approximately 30 mm. Be careful not to pull it out beyond the
limit mark inscribed on it.
1
Flap
2
Bracelet on the 6 o’clock
side of your watch
Holding down the push button, lift up the clasp to release the buckle, and strap the watch on
3
your wrist.
Close the clasp first (4-1) and then the flap (4-2).
4
With the hand which is not wearing the watch, adjust the length of the slider so that the watch
5
fits well around your wrist.
Limit mark (upper surface)
4-2
4 -1
3
How to identify the battery replacement period indicator
【Ex.】 The battery replacement period is from July to September of 2017.
Oct.-Dec.
○ Arabic numerals on the scale show the last two digits of the year.
○ For subsequent battery replacements, a circle mark will be engraved each time a watch is
returned to an authorized Grand Seiko retailer for battery replacement or watch repair.
English
FUNCTIONS OF DIVER’S MODEL
32
Slider
5
4
Push button
Buckle
Clasp
5
FUNCTIONS OF DIVER’S MODEL
33

■
TO PRESERVE THE QUALITY OF YOUR
WATCH
After-sale service
Notes on guarantee and repair
○ Contact the retailer from whom the watch was purchased or Grand Seiko international service
network mentioned on CERTIFICATE OF GUARANTEE or our website for repair or overhaul.
○ Within the guarantee period, present the certificate of guarantee to receive repair services.
○ Guarantee coverage is provided in the certificate of guarantee.
Read carefully and retain it.
○ For repair services after the guarantee period has expired, if the functions of the watch can
be restored by repair work, we will undertake repair services upon request and payment.
Replacement parts
○ Please keep in mind that if original parts are not available, they may be replaced with
substitutes whose outward appearance may differ from the originals.
Inspection and adjustment by disassembly and
cleaning (overhaul)
○ Periodic inspection and adjustment by disassembly and cleaning (overhaul) is recommended
approximately once every
for a long time.
According to use conditions, the oil retaining condition of your watch mechanical parts may
deteriorate, abrasion of the parts may occur due to contamination of oil, which may ultimately
lead the watch to stop.
As the parts such as the gasket may deteriorate, water-resistant performance may be
impaired due to intrusion of perspiration and moisture.
Please contact the retailer from whom the watch was purchased for inspection and
adjustment by disassembly and cleaning (overhaul). For replacement of parts, please specify
“GRAND SEIKO GENUINE PARTS”. When asking for inspection and adjustment by
disassembly and cleaning (overhaul), make sure that the gasket and push pin are also
replaced with new ones.
○ When your watch is inspected and adjusted by disassembly and cleaning (overhauled), the
movement of your watch may be replaced.
3 to 4 years in order to maintain optimal performance of the watch
Guarantee
Within the guarantee period, we guarantee free repair/adjustment service against any
defects according to the following guarantee regulations, provided that the watch was
properly used as directed in this instruction booklet.
Guarantee coverage
○ The watch body (movement, case) and metallic band.
Exceptions from guarantee
In following cases, repair/adjustment services will be provided at cost even within the guarantee
period or under guarantee coverage.
○ Exchange of leather, silicone, or fabric band.
○ Troubles or damage to the case, glass, or band, caused by use.
○ Scratches or grime caused by accidents or improper usage.
○ Troubles and damage caused by acts of God, natural disasters including fire, floods or
earthquakes.
○ Text in certificate has been altered.
○ No certificate is presented.
Procedure to claim free repair services
○ For any defects under guarantee, submit the watch together with the attached certificate of
guarantee to the retailer from whom the watch was purchased.
○ In the case where you cannot accept the guarantee from the retailer from whom the watch
was purchased due to gift-giving or relocation, etc., ask Grand Seiko international service
network mentioned on CERTIFICATE OF GUARANTEE or our website by attaching the
certificate without fail.
Others
○ For the watch case, dial plate, hands, glass, band etc., some alternative parts may be used
for repair if necessary.
○ For length adjustment service of metallic band, ask the retailer from whom the watch was
purchased or Grand Seiko international service network mentioned on CERTIFICATE OF
GUARANTEE or our website.
Other retailers may undertake the service on a chargeable basis or may not undertake the
service.
○ Free repair services are guaranteed only under the period and conditions specified in the
certificate of guarantee.
It does not affect specific legal rights of a consumer.
English
TO PRESERVE THE QUALITY OF YOUR WATCH
34
TO PRESERVE THE QUALITY OF YOUR WATCH
35

Daily care
The watch requires good daily care
○ Do not wash the watch when its crown is at the extended position.
○ Wipe away moisture, sweat or dirt with a soft cloth.
○ After soaking the watch in seawater, be sure to wash the watch in clean pure water and wipe
it dry carefully. Do not pour running water directly from a faucet onto the watch. Put some
water into a bowl first, and then soak the watch in the water to wash it.
* If your watch is rated as “non-water resistant” or “water resistant for daily use”, do not wash
the watch.
“CHECK THE CALIBER NUMBER AND WATER-RESISTANT LEVEL”→ P. 3
Turn the crown from time to time
○ In order to prevent corrosion of the crown, turn the crown from time to time.
○ The same practice should be applied to a screw down crown.
“Crown”→ P. 10
Band
The band touches the skin directly and becomes dirty from sweat or dust. Therefore,
lack of care may accelerate deterioration of the band or cause skin irritation or stain
on the sleeve edge.
The watch requires a lot of attention for long usage.
Metallic band
○ Moisture, sweat or soil will cause rust even on a stainless steel band if they are left for a long
time.
Lack of care may cause a yellowish or gold stain on the lower sleeve edge of shirts.
○
○ Wipe off moisture, sweat or soil with a soft cloth as soon as possible.
○ To clean the soil around the joint gaps of the band, wipe it out in water and then brush it off
with a soft toothbrush (Protect the watch body from water splashes by wrapping it up in plastic
wrap etc.)
Wipe off the remaining moisture with a soft cloth.
○ Because some titanium bracelets use pins made of stainless steel, which has outstanding
strength, rust may form in the stainless steel parts.
○ If rust advances, pins may poke out or drop out, and the watch case may fall off the bracelet,
or the clasp may not open.
○ If a pin is poking out, personal injury may result. In such a case, refrain from using the watch
and request repair.
Leather band
○ A leather band is susceptible to discoloration and deterioration from moisture, sweat and
direct sunlight.
○ Wipe off moisture and sweat as soon as possible by gently blotting them up with a dry cloth.
○ Do not expose the watch to direct sunlight for a long time.
○ Please take care when wearing a watch with light-colored band, as dirt is likely to show up.
○ Refrain from wearing a leather band watch other than Aqua Free bands while swimming, and
when working with water even if the watch itself is water-resistant enforced for daily use.
Silicone band
○ As for material characteristics, the band is easily dirtied, and may be stained and discolored.
Wipe off dirt with a wet cloth or cleaning tissue.
○ Unlike bands of other materials, cracks may result in the band being cut. Take care not to
damage the band with an edged tool.
English
TO PRESERVE THE QUALITY OF YOUR WATCH
36
Notes on skin irritation and allergy
Skin irritation caused by a band has various reasons such as allergy to metals or leathers, or
skin reactions against friction on dust or the band itself.
Notes on the length of the band
Adjust the band to allow a little clearance with your wrist to ensure proper airflow.
When wearing the watch, leave enough room to insert a finger between the band
and your wrist.
TO PRESERVE THE QUALITY OF YOUR WATCH
37

Magnetic resistance (Magnetic influence)
Affected by nearby magnetism, a watch may temporarily gain or lose time or stop operating.
Indication on the case
back
Conditions of use Certified level
No indication
* For diver’s model
Keep the watch more than 5 cm away
from magnetic products.
4,800 A/m
Keep the watch more than 1 cm away
from magnetic products.
16,000 A/m
MAGNETIC RESISTANT
40000A/m
The watch can maintain its
performance in most cases where it is
brought close to (at least 1 cm spaced
from) magnetic products not only in
normal daily life circumstances but
also in a special work environment.
40,000 A/m
* A/m (ampere meter) is the international unit (SI unit) for indicating the magnetic field.
If the watch becomes magnetized and its accuracy deteriorates to an extent exceeding the specified
rate under normal use, the watch may need to be demagnetized. In this case, you will be charged
for demagnetization and accuracy readjustment even if it happens within the guarantee period.
Examples of common magnetic products that may affect watches
Smartphone, cellular phone, tablet terminal
(speaker, magnet of cover)
AC adapter Bag
(with magnet
buckle)
AC-powered
shaver
Magnetic
cooking device
Portable radio
(speaker)
Magnetic
necklace
Magnetic health
pillow
The reason why analogue quartz watch is affected by magnetism
It is because the built-in motor of the watch, which, harnesses magnetic power and external strong
magnetism, affect each other to stop the motor or suppresses the turn of the motor.
If your watch has Lumibrite
Lumibrite is a newly-developed luminous paint that absorbs light energy of the sunlight and lighting
apparatus in a short time and stores it to emit light in the dark. For example, if exposed to a light of more
than 500 lux for approximately 10 minutes, Lumibrite can emit light for 3 to 5 hours. Please note, however,
Lumibrite emits the light it stores, the luminance level of the light decreases gradually over time. The
duration of the emitted light may also differ slightly depending on such factors as the brightness of the
place where the watch is exposed to light and the distance from the light source to the watch.
* In general, when you enter a dark place from a bright environment, your eye cannot adapt to the change
in light levels quickly. At first, you can hardly see anything, but as time passes, your vision gradually
improves. (Dark adaptation of the human eye)
* Lumibrite is a luminous paint that is completely harmless to human beings and the natural environment;
containing no noxious materials such as radioactive substance.
Reference data on the luminance
Condition Illumination
Sunlight
Fine weather 100,000 lux
Cloudy weather 10,000 lux
Indoor (Window-side
during daytime)
Fine weather more than 3,000 lux
Cloudy weather 1,000 to 3,000 lux
Rainy weather less than 1,000 lux
Lighting apparatus
(40-watt daylight
fluorescent light)
Distance to the watch: 1 m 1,000 lux
Distance to the watch: 3 m 500 lux (average room luminance)
Distance to the watch: 4 m 250 lux
Troubles Possible Causes Solutions
The watch stops
operating.
The battery runs down.
Consult the retailer from whom the watch
was purchased.
The watch
temporarily loses/
gains time.
The watch has been left in extremely high
or low temperatures for a long time.
Normal accuracy will resume when the
watch returns to normal temperature.
Readjust the time.
The watch was brought into close contact
with a magnetic object.
By distancing magnetism, accuracy is
recovered. Readjust the time.
If accuracy is not recovered, consult the
retailer from whom the watch was
purchased.
The watch was dropped, worn while
playing active sports, hit against hard
surfaces, or exposed to strong vibrations.
Readjust the time. If accuracy is not
recovered, consult the retailer from whom
the watch was purchased.
The seconds hand
moves at twosecond intervals.
The battery nears its end.
Consult the retailer from whom the watch
was purchased.
The date changes
during daytime.
A.m./p.m. is not correctly set.
Advance the hour hand for 12 hours and
reset the time and date.
Blur in the display
persists.
Small amount of water has got inside the
watch due to deterioration of the gasket,
etc.
Consult the retailer from whom the watch
was purchased.
TO PRESERVE THE QUALITY OF YOUR WATCH
38
Lumibrite
Troubleshooting
* For the solution of troubles other than above, contact the retailer from whom the watch was
purchased.
TO PRESERVE THE QUALITY OF YOUR WATCH
English
39

■ LEAP SECOND
Normally there are 86,400 seconds in a day. Due to a slight change in the earth’s rotation, an
extra second may be added to one day during the year. This is called the leap second. Every
year the decision is made whether such an adjustment is needed. When the adjustment takes
place, the standard time should be corrected by delaying the standard time one second.
○ To keep your Grand Seiko watch accurate with the world standard time, adjust your watch
to a time signal whenever such adjustment is made. According to the information from the
observatories all over the world, the standard time is delayed one second simultaneously
throughout the world by the Greenwich Royal Observatory.
○ In the Greenwich Mean Time, an extra second will be added to the one minute between 11:59
p.m. and 0:00 a.m. either on December 31st or on June 30th.
○ However, the adjustment may not be made in some years. Please check by a newspaper,
etc. whether such an adjustment will be made or not.
■ SPECIFICATIONS (MOVEMENT)
Frequency of crystal
oscillator
Loss/gain Annual rate ±10 seconds
Operational temperature
range
Driving system Step motor
IC (Integrated Circuit) C-MOS-IC: 1 piece
* When used on the wrist within a normal temperature range (between 5 ºC and 35 ºC) for
approximately 8 hours per day. Monthly rate of loss/gain may amount to approximately 2
seconds depending on the condition of use.
* The specifications are subject to change without prior notice due to product improvement.
32,768 Hz (Hz = Hertz...Cycles per second)
Between –10 ºC and +60 ºC
■ BATTERY
Caliber number Battery (SB-) Battery life
9F86
9F85
9F83
9F82
9F62
9F61
4J52 AG
4J51 AC
8J55 AN Approximately 5 years
○ The battery life is the estimated life for a watch with a new battery installed. The battery in
your watch at the time of purchase was inserted in the watch at the factory for performance
checks. It may run down earlier than the above-specified period.
○ When the battery nears its end, the seconds hand moves at two-second intervals instead of
normal one-second intervals. The watch remains accurate while the seconds hand is moving
at two-second intervals.
AN
Approximately 3 years
40
LEAP SECOND
Address
41
 Loading...