

Page 1
Operating Instructions. . . . . . . . . . 2
Manuel d’utilisation . . . . . . . . . . . . 3
Manual de utilización. . . . . . . . . . . 5
PQ1 2
PQ9
Skokie, IL 60077 USA
Page 2

2
PQ12 PQ9
Operating Instructions
IMPORTANT SAFETY INSTRUCTIONS
YOUR SAFETY AS WELL AS THE SAFETY
OF OTHERS IS IMPORTANT TO US. IN THIS
INSTRUCTION MANUAL AND ON THE
PRODUCT ARE IMPORTANT SAFETY
MESSAGES.READ THESE MESSA GES
CAREFULLY.
THE SAFETY ALERT SYMBOL PRE-
CEDES EACH SAFETY MESSA GE IN
THIS INSTRUCTION MANUAL.THIS SYMBOL
INDICA TES A POTENTIAL PERSONAL SAFETY HAZARD THAT COULD HUR T YOU OR
OTHERS,AS WELL AS CAUSE PRODUCT
DAMA GE OR PR OPER TY DAMAGE.
THE FOLLOWING WARNING IS FOUND ON
THE BOTTOM OF THE PRODUCT.
This safety message means that you could
be seriously hurt or killed if you open the
product and expose yourself to hazardous
voltage.
The following ISO and IEC symbols appear
on this product, and their meaning is as
follows:
Off
Power
Run
Temperature Control
Ready
IMPORTANT SAFEGUARDS
WARNING:FOR YOUR
PROTECTION DO NOT CONNECT
THE POUCH LAMINATOR TO ELECTRICAL
POWER UNTIL YOU READ THESE
INSTRUCTIONS COMPLETELY.KEEP THESE
INSTRUCTIONS IN A CONVENIENT
LOCATION FOR FUTURE REFERENCE.TO
GUARD AGAINST INJURY,THE FOLLOWING
BASIC SAFETY PRECAUTIONS MUST BE
OBSERVED IN THE SET-UP AND USE OF
THIS PRODUCT.
GENERAL SAFEGUARDS
• Use the Ibico pouch laminator only for its
intended purpose of laminating documents
according to the indicated specifications.
• Do not place anything in the throat open-
ing of the machine other than carriers with
pouches/documents.
• Place unit on a secure, stable work area to
prevent the machine falling and possibly
causing personal injury and damage to the
unit.
• Turn unit off when not in use for an
extended period of time.
• Follow all warnings and instructions
marked on the product.
ELECTRICAL SAFEGUARDS
• The pouch laminator must be connected to
a supply voltage corresponding to the
electrical rating of the machine as
indicated.
• Unplug the pouch laminator before moving
it, or when it is not in use for an extended
period of time.
• Do not operate with a damaged supply
cord or plug, after it malfunctions, or after it
has been damaged in any manner.
• Do not overload electrical outlets beyond
their capacity as this can result in fire or
electrical shock.
• Do not alter attachment plug. Plug is configured for the appropriate electrical supply.
• The unit is intended for indoor use only.
• Never push objects into this product
through cabinet slots. Do not spill liquid of
any kind on this product.
SERVICE
• Do not attempt to service or repair the
pouch laminator yourself. Unplug the unit
and contact an authorized service representative for any required repairs.
CLEANING
CAUTION: Unplug this product before
cleaning.
• Wipe exterior only with a damp cloth. Do
not use detergents or solvents.
SET-UP
1. Connect power cord to appropriate
power source.
2. Confirm the type of pouch you are using
–carrier or carrier-less– and move carrier/carrierless switch to appropriate
position.
3. Push the power switch to the “run”
position.
4. Select appropriate temperature for the
pouch gauge thickness and material
thickness you are laminating.
Temperature Setting Guidlines*
Set the temperature knob to the appropriate
setting for the pouch gauge and material
thickness you are laminating. When laminating thin paper with light ink coverage set
the temperature dial at the low end of the
range. Thick paper and heavy ink coverage
require higher settings within the range.
* Temperature setting will vary due to the
finish, chemistry and heat absorption
properties of the materials you are laminating. If pouch is cloudy the first pass through
the machine, adjust temperature setting
higher and run through again. If warping
occurs, reduce temperature. Run additional
pieces at lower setting once machine has
cooled. Always allow sufficient time for
laminator to adjust to changes in
temperature settings.
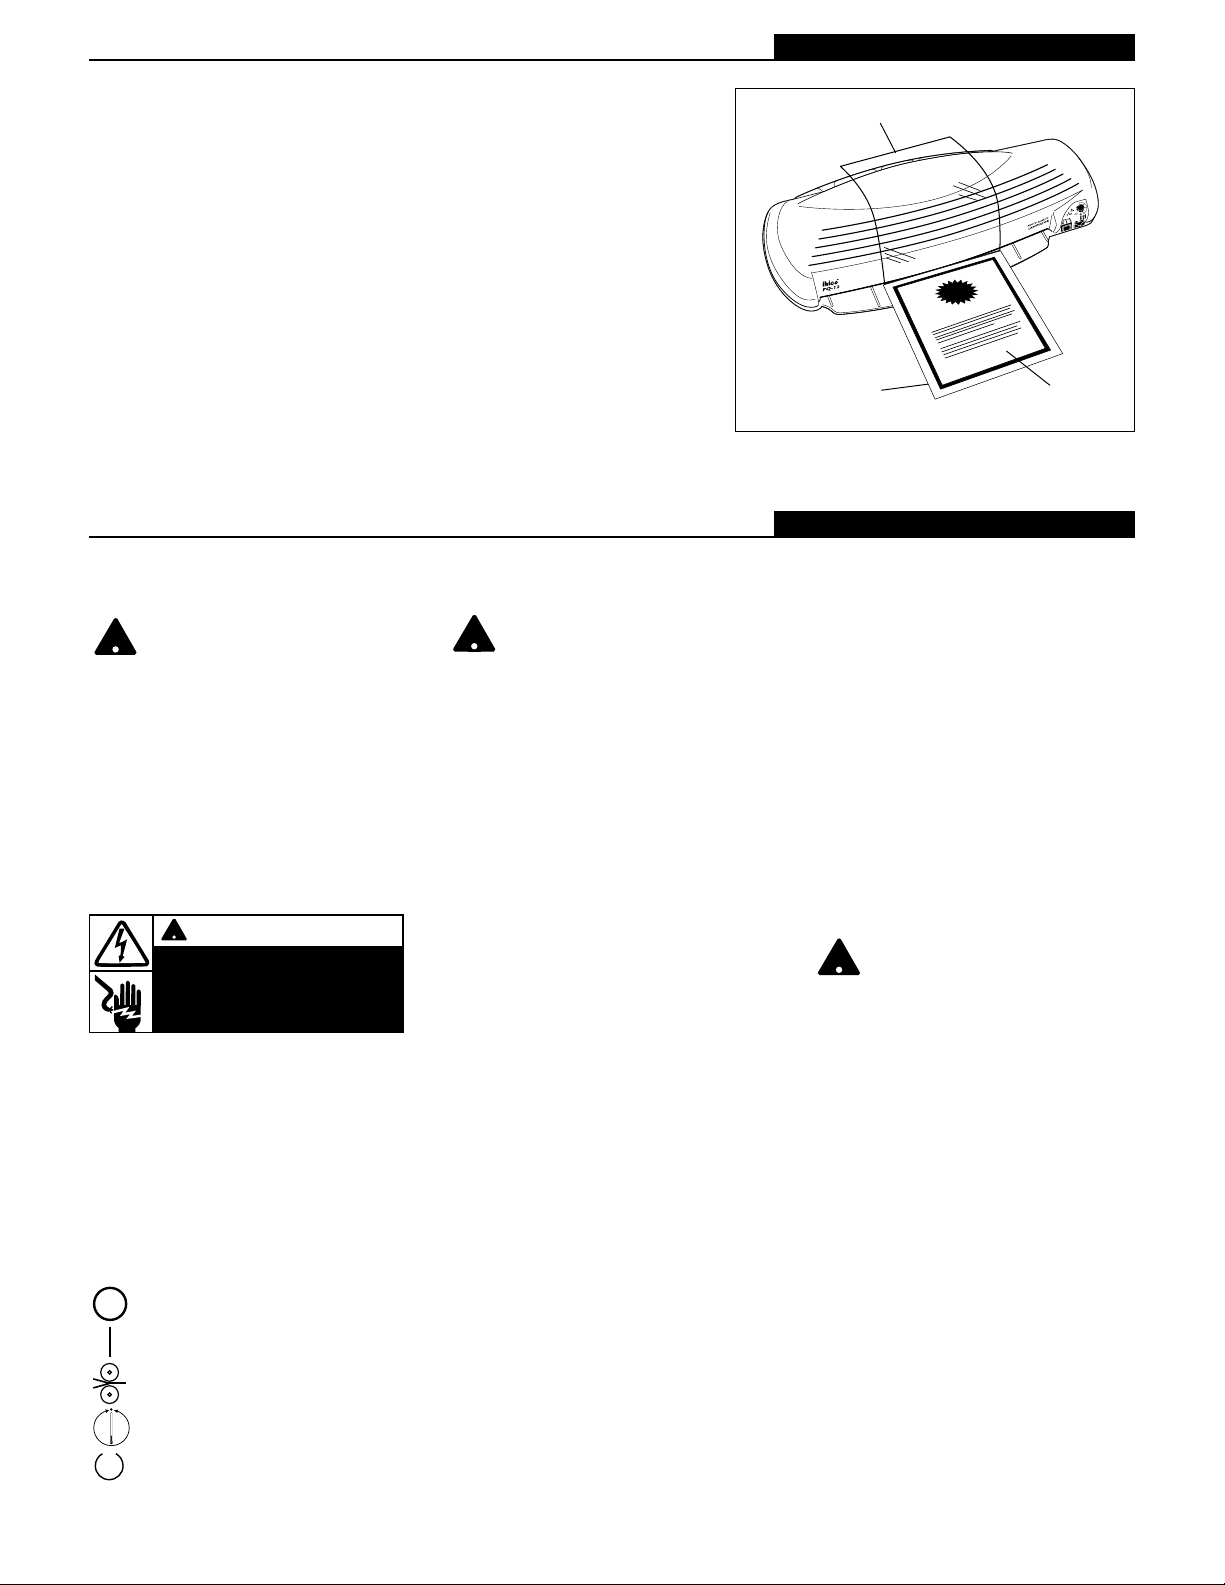
OPERATION
This Pouch Laminator is designed to run
Carrier or Carrierless pouches. Check your
pouches. Always run carrier pouches with a
carrier to prevent pouch adhesive from
oozing onto the rollers. Know your pouch
before operating the laminator.
Carrier Pouches
1. Move carrier/carrierless switch to “carrier”
position and move power switch to “run.”
2. Wait for ready light to illuminate.
3. Center the item to be laminated into a
pouch.
4. Insert the pouch and item into a carrier
which is provided with each carton of
pouches. Position the sealed edge of the
pouch against the inside folded edge of
the carrier. Handle carriers carefully so
they can be re-used.
5. Insert the folded edge of the carrier
straight into the front of the laminator until
you feel the rollers pick up the carrier.
6. Remove the warm carrier from the rear of
the pouch laminator after it has stopped
moving. Place on flat surface to cool for
one minute before removing finished
pouch.
7. When you are finished laminating switch
the machine to “OFF”.
Carrier-less Pouches
1. Move carrier/carrierless switch to “carrierless” position and move power switch to
“run.”
2. Wait for ready light to illuminate.
3. Center the item to be laminated into a
pouch.
4. Insert the sealed edge of the loaded pouch
into the laminator until you feel the rollers
pick up the pouch.
WARNING
!
Electrical shock hazard. Do not
open. No user servicable parts
inside. Refer servicing to
qualified service personnel.
!
!
!
Page 3
3
PQ12 PQ9
Operating Instructions
INSTRUCTIONS CONCERNANT
LA SECURITE
VOTRE SÉCURITÉ, COMME CELLE
DES AUTRES,EST IMPORTANTE
POUR NOUS. CES INSTRUCTIONS
CONTIENNENT D’IMPORTANTS MESSAGES
RELATIFS À LA SÉCURITÉ. MERCI DE LES
LIRE TRÈS A TTENTIVEMENT .
CE SYMBOLE “ATTENTION SÉCURITÉ”
PRÉCÈDE, DANS CE MANUEL D’UTILISATION, CHAQUE MESSAGE CONCERNANT
LA SÉCURITÉ. CE SYMBOLE INDIQUE UN
RISQUE POTENTIEL DE BLESSURE POUR
VOUS OU D’AUTRES PERSONNES, OU UN
RISQUE DE DOMMAGE POUR LA MACHINE
OU VOS BIENS PERSONNELS.
L’AVERTISSEMENT SUIVANT EST NOTIFIÉ
SUR LA PARTIE INFÉRIEURE DE
L’APPAREIL.
Ce message signifie que vous pourriez être
très sérieusement blessé si vous tentiez
d’ouvrir l’appareil en vous exposant ainsi à
un risque de choc électrique.
Les symboles ISO et IEC mentionnés
ci-après sont également visibles sur
l’appareil et ont la signification suivante :
Hors tension
Alimentation
En fonctionnement
Température
Prêt
MESURES DE SECURITE
IMPORT ANTES
ATTENTION : PAR MESURE DE
SÉCURITÉ, NE BRANCHEZ PAS LA
PLASTIFIEUSE À POCHETTES
AVANT D’AVOIR LU EN TOTALITÉ CES
INSTRUCTIONS. CONSERVEZ-LES DANS
UN ENDROIT APPROPRIÉ AFIN DE POUVOIR VOUS Y RÉFÉRER SI NÉCESSAIRE.
AFIN D’ÉVITER TOUTE BLESSURE,LES
PRÉCAUTIONS DE BASE SUIVANTES
DOIVENT ÊTRE OBSERVÉES À
L’INSTALLATION ET LORS DE
L’UTILISATION DE CET APPAREIL.
MESURES DE SECURITE GENERALES
• N’utilisez la plastifieuse à pochettes que
pour la plastification de documents en
vous conformant aux spécifications
indiquées.
• N’introduisez pas dans la fente
d’alimentation de la machine autre chose
que des transporteurs, des pochettes et
des documents.
• Installez la machine sur un emplacement
sûr et stable pour éviter qu’elle ne tombe;
cela pourrait l’endommager et causer
d’éventuelles blessures corporelles aux
utilisateurs.
• Coupez l’alimentation si vous n’utilisez pas
l’appareil.
• Conformez-vous aux avertissements et
aux instructions mentionnés sur l’appareil.
MESURES DE SECURITE ELECTRIQUES
• La plastifieuse ne doit être branchée que
sur une prise de courant dont le voltage
correspond à celui indiqué sur la plaque
d’identification de la machine.
• Débranchez la plastifieuse avant de la
déplacer ou en cas de non utilisation
prolongée.
• Ne l’utilisez pas avec une prise ou un
cordon endommagés, après un mauvais
fonctionnement ou après tout dommage
quel qu’il soit.
• Ne surchargez pas l’alimentation
électrique au-delà de ses capacités. Il
pourrait en résulter un incendie ou une
électrocution.
• Ne modifiez pas la prise de courant. Elle a
été prévue pour l’alimentation appropriée.
• N’utilisez pas la plastifieuse à l’extérieur
des locaux.
• N’introduisez pas d’objet dans la fente
d’alimentation. Veillez à ne pas renverser
de liquide sur la machine.
SERVICE APRES-VENTE
• N’essayez pas de réparer vous-même la
plastifieuse à pochettes. Débranchez l’appareil et contactez le Service Après-Vente
ou votre fournisseur pour toute réparation.
NETTOYAGE
ATTENTION : débranchez
l’appareil avant de le nettoyer.
• Essuyez l’extérieur avec un chiffon
humide. N’utilisez pas de détergents ni
solvant.
INSTALLATION
1. Branchez la prise sur une source de
courant appropriée.
2. Confirmez le type de pochette que vous
utilisez—avec transporteur ou sans
transporteur—et positionnez le commutateur CARRIER/CARRIERLESS
(transporteur/sans transporteur) à la
position appropriée.
3. Placez le commutateur de tension en
position “RUN”.
4. Sélectionnez la température
correspondant à l’épaisseur de la pochette
et du support à plastifier.
GUIDE DE REGLAGE DES
TEMPERA TURES*
Réglez le bouton de température sur la
position appropriée en fonction de la
pochette et du support que vous plastifiez.
Pour un papier fin peu imprimé, la
température se situe au bas de l’échelle de
5. Remove the warm laminated pouch from
the rear of the laminator after it has
stopped moving. Place the pouch on a flat
surface to cool.
6. When you are finished laminating switch
the machine to “OFF”.
Reverse:
Reverses the rotation of the rollers to correct
misfeeds.
OPERATION, COLD LAMINATION
GBC NO-HEAT LAMINATE™
Set the pouch laminator to “Cold” on the
temperature control. If the laminator has
recently been used for hot lamination, then
allow sufficient time to cool before beginning
cold lamination.
1. Select a GBC No-Heat Laminate
that is slightly larger than the document to be laminated.
2. Run the film, film-side faced up, for
about 3-6mm (1/8 - 1/4”) into the
laminator, and then press OFF to
stop the rollers.
3. Carefully separate the backing
release paper from the film, and
drape the clear film over the top of
the laminator.
4. Place the document between the
separated film and backing. Turn
the power switch to RUN.
5. After the laminated document exits
the rear of the laminator, then either
cut off the excess pouch edge for a
flush-cut appearance, or leave the
edge as an adhesive border.
Film Draped over
Laminator
Backing Release
Paper
Document
!
ATTENTION
!
Risque d’ électrocution.
Ne pas ouvrir. Aucune pièce
réparable par l’utilisateur.Entretien
par personnel qualifié.
Manuel d’utilisation
!
!
Page 4

4
PQ12 PQ9
Manuel d’utilisation
graduation. Un papier épais et chargé en
impression nécessite des réglages plus
élevés.
* Le réglage peut varier en fonction de la
finition, des propriétés chimiques et des
facultés d’absorption calorique des
supports. Si la plastification est nuageuse
lors du premier passage dans la machine,
ajustez le réglage sur une température
plus élevée et repassez le document
plastifié dans la machine. Si un gondolage
apparaît, réduisez la température.
Continuez la plastification sur un réglage
plus bas lorsque la machine a refroidi.
Laissez toujours suffisamment de temps à
la machine pour ajuster les changements
de température.
MODE D’EMPLOI
Cette plastifieuse a été conçue pour
l’utilisation de pochettes avec ou sans
transporteur. En ce qui concerne les
“pochettes avec transporteur,” veillez à bien
utiliser le transporteur afin d’empêcher les
pochettes d’adhérer aux rouleaux. Assurezvous de la qualité de vos pochettes avant de
procéder à la plastification.
Pochettes avec transporteur
1. Déplacez le commutateur CARRIER/CARRIERLESS en position “CARRIER”
(transporteur) et déplacez le commutateur
de tension sur “RUN” (MARCHE).
2. Attendez que le témoin “READY” s’allume.
3. Centrez le document à plastifier dans une
pochette.
4. Insérez la pochette contenant le document
à plastifier dans le transporteur fourni avec
chaque boîte de pochettes. Centrez la
pochette dans le transporteur, côté fermé
face à la pliure intérieure du transporteur.
Manipulez le transporteur avec précaution
afin de pouvoir le réutiliser ultérieurement.
5. Insérez le côté plié du transporteur vers
l’avant de la plastifieuse, jusqu’à ce que
vous sentiez les rouleaux l’entraîner.
6. Dès qu’il est arrêté, enlevez le transporteur à l’arrière de la machine et laissez
refroidir une minute sur une surface plane
avant de retirer le document plastifié du
transporteur.
7. Une fois la plastification terminée,
positionnez l’interrupteur sur “OFF”.
Pochettes sans transporteur
1. Déplacez le commutateur CARRIER/CARRIERLESS en position “CARRIERLESS” (sans transporteur) et
déplacez le commutateur tension sur
“RUN” (MARCHE).
2. Attendez que le témoin “READY”
s’allume.
3. Centrez le document à plastifier dans
la pochette de plastification.
4. Insérez le côté plié de la pochette
vers l’avant de la plastifieuse, jusqu’à
ce que vous sentiez les rouleaux
l’entraîner.
5. Dès qu’elle est arrêtée, enlevez la
pochette à l’arrière de la machine et
laissez refroidir une minute sur une
surface plane.
6. Une fois la plastification terminée,
positionnez l’interrupteur sur “OFF”.
Marche arrière :
Inversez le sens de rotation des rouleaux
pour corriger les problèmes d’alimentation.
MODE D’EMPLOI, PLASTIFICATION
A FROID GBC NO-HEAT LAMINATE™
Réglez le contrôle de température de la
plastifieuse sur “COLD” (FROID). Si la
machine vient d’être utilisée pour une
plastification à chaud, laissez-la refroidir
avant de commencer la plastification à froid.
1. Utilisez une pochette G.B.C. spéciale
plastification à froid légèrement plus
grande que le document à plastifier.
2. Engagez la pochette (côté film sur le
dessus) d’environ 3 à 6 mm dans la
plastifieuse, puis appuyez sur OFF pour
arrêter les rouleaux.
3. Séparez délicatement le support papier du
film et tendez le film au-dessus de la
plastifieuse.
4. Positionnez le document entre le support
papier et le film. Positionnez le commutateur sur “RUN” (MARCHE).
5. Le document plastifié ressort à l’arrière de
la machine. Vous pouvez, soit couper
l’excédent de film pour l’égaliser avec le
format de votre document, soit conserver
l’excédent de film pour obtenir une
bordure adhésive.
Film au-dessus de la plastifieuse
Support papier
Document
Page 5

5
PQ12 PQ9
Manual de utilización
ADVERTENCIAS IMPORTANTES
SU SEGURIDAD ES IMPORTANTE PARA
NOSOTROS.EN ESTE MANUAL EXISTEN
IMPORTANTES MEDIDAS PARA SU
SEGURIDAD,INDICADAS TAMBIÉN EN LA
MÁQUINA. POR FAVOR,LEALAS
CUIDADOSAMENTE.
ESTE SÍMBOLO PRECEDE CADA
MENSAJE P ARA SU SEGURIDAD EN
EL MANUAL.ÉSTE INDICA UN RIESGO
POTENCIAL PARA SU SEGURIDAD Y LA DE
LAS DEMÁS PERSONAS, ASÍ COMO
POTENCIALES DAÑOS PARA LA MÁQUINA.
EL SIGUIENTE ADVERTIMIENTO SE
ENCUENTRA EN LA PARTE INFERIOR DE
LA MÁQUINA.
Este mensaje indica que ud. podría resultar
gravemente herido o muerto si abre la
máquina y se expone al riesgo del alto
voltaje.
Los siguientes símbolos ISO y IEC aparecen
en la máquina; su significado es el siguiente.
apagado
encendido
funcionamiento
temperatura
dispuesto
IMPORTANTES PRECAUCIONES
ATENCIÓN: NO CONECTAR LA
PLASTIFICADORA A LA RED
ELÉCTRICA HASTA NO HABER LEIDO
TOTALMENTE ESTE MANUAL.TENER ESTE
MANUAL,SIEMPRE A MANO PARA
FUTURAS CONSULTACIONES. LAS
SIGUIENTES PRECAUCIONES DEBEN SER
TENIDAS EN CUENTA PARA LA PUESTA EN
MARCHA DE LA MÁQUINA Y LA
UTILIZACIÓN DE ESTA.
PRECAUCIONES GENERALES
• Usar la plastificadora sólo para plastificar
documentos en base a las especificaciones
indicadas.
• No insertar objetos en la máquina que no
sean los documentos para plastificar.
• Colocar la máquina en un lugar estable y
seguro para prevenir la caida y los
consiguientes daños para las personas y la
máquina.
• Apagar la máquina (off) cuando no va a ser
utilizada por un largo período de tiempo.
• Seguir todas las instrucciones y
precauciones indicadas en la máquina.
PRECAUCIONES RELATIVES A LA
INSTALACCION ELÉCTRICA
• Enchufar la máquina con un voltaje igual al
indicado en la misma.
• Desconectar de la red eléctrica la máquina
antes de moverla, o cuando no sea utilizada durante un cierto periodo de tiempo.
• No utilizar la máquina con un cable o
enchufe estropeado, o en mal
funcionamiento.
• No sobrecargar la toma eléctrica. Peligro
de incendio o de descarga eléctrica.
• No modificar el enchufe. Este está preparado para la correcta alimentación eléctrica.
• No utilizar la plastificadora en el exterior de
los locales.
• No introducir objetos en la máquina. No
verter ningún tipo de líquidos sobre la
máquina.
MANTENIMIENTO
• No realizar trabajos de mantenimiento de la máquina personalmente.
Desenchufar la máquina y contactar con
el servicio de asistencia autorizado.
LIMPIEZA
A TENCIÓN: quitar el enchufe antes de
proceder a la limpieza de la máquina.
• Limpiar la superficie sólo con un paño
húmedo. No utilizar ningún tipo de
detergentes o disolventes.
COLOCACION
1. Colocar el enchufe en una toma de
corriente adecuada.
2. Confirme el tipo de pouch que esté
utilizando - con carrier o sin carrier - y
mueva el conmutador con carrier/sin
carrier a la posición adecuada.
3. Empuje el conmutador de alimentación a
la posición “run”.
4. Seleccione la temperatura adecuada para
el grosor del pouch y para el espesor del
material que vaya a plastificar.
TABLA INDICATIVA DE LA
TEMPERA TURA*
Regular la temperatura adecuada en base al
espesor del film del pouche y del material que
se va a plastificar. Cuando se va a plastificar
papel delgado con tinta suave, regular la
temperatura al mínimo. El papel grueso con
tinta más fuerte necesita una temperatura
más elevada.
* La regulación de la temperatura podrá
variarse en base al acabado, al tratamiento
químico y la capacidad de absorción del
calor del material que se va a plastificar. La
tabla es sólo indicativa. Si después de la
plastificación el pouche resulta opaco,
nublado, aumentar la temperatura y
después probar de volver a plastificar. Si el
pouche está ondulado ó tiende a enrrollarse,
reducir la temperatura. Dejar enfriar la
máquina y probar de volver a plastificar.
Después de cada regulación dejar a la
máquina el tiempo necesario para alcanzar
la temperatura seleccionada.
UTILIZACION
Esta plastificadora a pouches puede
utilizarse con pouches “con carrier” y
pouches “sin carrier.” Controlar vuestros
pouches. Los pouches con carrier deben
utilizarse siempre con el carrier para evitar
que el adhesivo se enganche en el rollo. Es
necesario conocer el tipo de pouche antes
de usar la plastificadora.
Pouches con carrier
1. Mueva el conmutador con carrier/sin
carrier a la posición “carrier” y mueva el
conmutador de alimentación a la posición
“run”.
2. Espere a que se encienda la indicación
luminosa “ready”.
3. Centre el artículo que vaya a plastificar en
un pouch.
4. Insertar el pouche y el material en el
carrier que se encuentra en la caja de
pouches. Manejar el carrier con atención
de modo que pueda volverse a utilizar.
5. Insertar el lado plegado del carrier
directamente en la boca de entrada de la
plastificadora hasta que no este
enganchado por los rollos de arrastre.
6. Cuando se halla acabado mover el carrier
de la salida posterior de la plastificadora.
Dejar enfriar el carrier sobre una superficie
plana un minuto antes de sacar el pouche
plastificado.
7. Acabado el trabajo de plastificar apagar la
máquina apretando el interruptor y
colocandolo en “OFF”.
Pouches sin carrier
1. Mueva el conmutador con carrier/sin carrier
a la posición “sin carrier” y mueva el
conmutador de alimentación a la posición
“run”.
2. Espere a que se encienda la indicación
luminosa “ready”.
!!
ATENCION
!
Riesgo de descarga eléctrica.
No abrir. Adentro, no hay
piezas reparables para el
usuario. Solamente por el personal técnico cualificado.
!
!
Page 6

3. Insertar el material que debe ser
plastificado en el pouche.
4. Introducir el pouche en la plastificadora,
introduciendolo por el lado soldado, hasta
que no este enganchado por los rollos de
arrastre.
5. Cuando se halla acabado, mover el
pouche de la salida posterior de la
plastificadora. Dejar enfriar el pouche sobre
una superficie plana.
6. Acabado el trabajo de plastificar apagar la
máquina apretando el interruptor y
colocandolo en “OFF”.
Inverso: Invierte la rotación de los rodillos
para corregir una alimentación incorrecta.
OPERACIONES, PLASTIFICACION EN
FRIO GBC NO-HEAT LAMINATE™
Ponga el ajuste en la plastificadora a cold. Si
la plastificadora ha sido utilizado últimamente
para la plastificación caliente, hay que
esperar una tiempo antes de empezar el
proceso frío.
1. Escoger una película para plastificar
en frio ligeramente más ancha que
el documento a plastifcar.
2. Hacer correr la película en la
máquina, con el lado de la pelÌcula
vuelto hacÌa el alto, durante 3 ó 6
mm. y pulsar OFF para parar los
rodillos.
3. Delicadamente, separar el papel de
la parte de atras de la pelÌcula, y
extenderlo en la parte superior de la
máquina.
4. Meter el documento entre la
película, separado, y la parte de
atras despues. Ponga el ajuste a
RUN.
5. Después que el documento plastificado ha salido de la parte posterior de la
máquina, o cortais el borde en exceso, o
lo dejais como contorno.
Película extendida sobre la máquina
Papel de
respaldo
Documento
6
PQ12 PQ9
Manual de utilización
Page 7

SPECIFICA TIONS PQ9 PQ12
Electrical: 120v/60Hz, 6.2A, 750W 120v/60Hz, 7.8A, 940W
Machine Dimensions: Width 16" (406mm) Width: 20" (510mm)
Depth: 9 1/2" (243mm) Depth: 9 1/2" (243mm)
Height: 41/2" (110mm) Height: 41/2" (110mm)
Machine Weight: 10.4 lbs. (4.71 kg) 13.42 lbs. (6.08 kg)
Packaged Weight: 13.32 lbs. (6.04 kg) 17.02 lbs. (7.72 kg)
Maximum Pouch Width: 9" (229 mm) 13" (330 mm)
Maximum Pouch Thickness: 7 mil (175 microns) 7 mil (175 microns)
Warm-Up Time: 4 - 8 min. 4 - 8 min.
CARACTÉRISTIQUES : PQ9 PQ12
Alimentation électrique : 120v/60Hz, 6.2A, 750W 120v/60Hz, 7.8A, 940W
Dimensions machine : Largeur 406 mm 510 mm
Profondeur 243 mm 243 mm
Hauteur 110 mm 110 mm
Poids machine : 4.71 kg (10.4 lbs) 6.08 kg (13.42 lbs)
Poids avec emballage : 6.04 kg (13.32 lbs) 7.72 kg (17.02 lbs)
Largeur maximum 229 mm 330 mm
de plastification :
Epaisseur maximum : 7 mm (175mµ) 7 mm (175mµ)
Temps de préchauffage : 4 à 8 minutes 4 à 8 minutes
ESPECIFICACIONES: PQ9 PQ12
Eléctrica: 120v/60Hz, 6.2A, 750W 120v/60Hz, 7.8A, 940W
Dimensiones de la Máquina:
406mm x 243mm x 110mm 510mm x 243mm x110mm
Peso de la Máquina: 4.71 kg (10.4 lbs) 6.08 kg (13.42 lbs)
Peso (con empaque): 6.04 kg (13.32 lbs) 7.72 kg (17.02 lbs)
Anchura Máxima del Pouch: 229 mm 330 mm
Espesor Máximo del Pouch: 7 mm (175mµ) 7 mm (175mµ)
Tiempo de Calentamiento: 4 - 8 minutos 4 - 8 minutos
Warranty
Our local sales offices provide final customers
with a warranty on material and workmanship
defects in unused and new machines for a
period of 1 year. Within this warranty period,
IBICO will, at its own discretion, repair or
replace defective original parts in the machines
at no charge. This is dependent on the machine
being delivered carriage paid to one of the
authorized IBICO service partners or an IBICO
agency.
Garantie
Vis-à-vis du consommateur final, les
succursales de offrent une garantie de 1 an sur
les défauts de matière et de fabrication pour les
appareils non encore utilisés et à l’état neuf.
Pendant la durée de la garantie, IBICO décidera
de remplacer ou de réparer gratuitement les
pièces originales défectueuses de I’appareil. En
contrepartie, les frais du retour de l’appareil au
service technique agréé restent à la charge du
demandeur.
Garantia
Las filiales comerciales locales se encargan
de prestar garantia de 1 año al cliente final por
defectos de material y de producción, siendo
aplicable a aparatos nuevos y no usados.
Durante el periodo de garantía, IBICO reparará
o cambiará gratuitamente piezas originales
defectuosas del aparato y según su propia
consideración. Una condición indispensable
para ello es la entrega libre de gastos a un
colaborador autorizado de asistencia técnica de
IBICO o bien a una de las representaciones de
IBICO.
Page 8

Skokie, IL 60077 USA
 Loading...