

Page 1

Quartet IdeaShare (use logos)
https://www.supplychimp.com
Thank you for purchasing this exciting new product from GBC! The Quick Set Up Guide
explains how to install your new system quickly and easily. This Users Manual will show
you how to save t ime and m on ey b y capt uri ng note s a nd di agrams , co llaborat ing wit h
colleagues, and enhancing presentations. Please see the Software Reference Guide for
quick explanations of how to use the various features made possible by eBeam Software.
System Requirements
For PC
®
• Windows
-compatible PC wi th Pentium® 100Mhz + processor
• Windows 98, 2000, ME, XP and Windows NT
can participate in shared meetings via Java
®
4.0 compatible (other platform users
TM
applet through Java-enabled Inter-
net browser)
• 10 MB available hard driv e space
• 256 color VGA or SVGA monitor
• CD-ROM drive or Internet connection for software installation
• One available se r ia l po rt or U S B po rt
For Ma cintosh
• Power Macintosh
• Mac OS 9.X with Macintosh Runtime for Java 2.2 or higher and 64 MB RAM, or
• Mac
®
OS X v10.1 or higher
®
• 10 MB available hard driv e space
Page 2

https://www.supplychimp.com
Page 3

Chapter 1 . . . . . . . . . . . . . . . . . . . . . . . . . . . . . . . . . . . . . . . . . . . . . . . . . . . . . . 1
https://www.supplychimp.com
Quartet Portable IdeaShareTM . . . . . . . . . . . . . . . . . . . . . . . . . . . . . . . . . . . . 1
Software Features . . . . . . . . . . . . . . . . . . . . . . . . . . . . . . . . . . . . . . . . . . . . 1
Chapter 2 . . . . . . . . . . . . . . . . . . . . . . . . . . . . . . . . . . . . . . . . . . . . . . . . . . . . . . 3
Using Quartet Portable IdeaShare . . . . . . . . . . . . . . . . . . . . . . . . . . . . . . . . . . . 3
Using Quartet Por ta bl e Idea S ha re a s a Digi ta l W hite bo ard . . . . . . . . . . . . . . . . 3
Using Quartet Por tabl e Idea S hare as a Vir tual T ouchs c re en . . . . . . . . . . . . . . . 4
Using Quartet Portable IdeaShare with a Flip Chart . . . . . . . . . . . . . . . . . . . . . 6
Chapter 3 . . . . . . . . . . . . . . . . . . . . . . . . . . . . . . . . . . . . . . . . . . . . . . . . . . . . . . 9
Using eBeam Software with Quartet Portable IdeaShare . . . . . . . . . . . . . . . . . . . . 9
Terminology . . . . . . . . . . . . . . . . . . . . . . . . . . . . . . . . . . . . . . . . . . . . . . . . 9
Software Installation & First Time Use . . . . . . . . . . . . . . . . . . . . . . . . . . . . . 10
Whiteboard Mode . . . . . . . . . . . . . . . . . . . . . . . . . . . . . . . . . . . . . . . . . . . . 12
Calibrate Whiteboard Mode . . . . . . . . . . . . . . . . . . . . . . . . . . . . . . . . . . . . . 12
Using The Whiteboard Mode Application . . . . . . . . . . . . . . . . . . . . . . . . . . . . 12
Projection/Virtual Touchscreen Mode . . . . . . . . . . . . . . . . . . . . . . . . . . . . . . 16
Projection Mode Setup . . . . . . . . . . . . . . . . . . . . . . . . . . . . . . . . . . . . . . . . 16
Shortcut Strip - Calibrate & Use . . . . . . . . . . . . . . . . . . . . . . . . . . . . . . . . . . 17
The Whiteboard Mode Shortcut Strip . . . . . . . . . . . . . . . . . . . . . . . . . . . . . . 17
The Flip Chart Mode Shortcut Strip . . . . . . . . . . . . . . . . . . . . . . . . . . . . . . . . 18
The eBeam Software Help System . . . . . . . . . . . . . . . . . . . . . . . . . . . . . . . . 19
Chapter 4 . . . . . . . . . . . . . . . . . . . . . . . . . . . . . . . . . . . . . . . . . . . . . . . . . . . . . 2 1
Troubleshooting . . . . . . . . . . . . . . . . . . . . . . . . . . . . . . . . . . . . . . . . . . . . . . . 21
Troubleshooting Tips . . . . . . . . . . . . . . . . . . . . . . . . . . . . . . . . . . . . . . . . . 21
Website Support . . . . . . . . . . . . . . . . . . . . . . . . . . . . . . . . . . . . . . . . . . . . 22
Additional Technical Support . . . . . . . . . . . . . . . . . . . . . . . . . . . . . . . . . . . . 22
Page 4

https://www.supplychimp.com
Page 5
Chapter 1
https://www.supplychimp.com
Quartet
The Quartet Portable IdeaShare system uses eBeam
to capture notes and images from any standard whiteboard, easel, or even flip chart
pads. Using the Quartet Portable IdeaShare, whatever you draw on a whiteboard or
easel is captured electronically in color and in real time and can be saved to a PC, Mac,
the Internet or local Int ranet. Usi ng the software, you can also share sessi ons with
remote participants live over the Internet/Intranet and create interactive presentations
with the virtual touchscreen capability.
Portable IdeaShare
TM
TM
electroni c imaging tech nology
Software Features
Additional pop u lar s oftware featur e s:
• Share whiteboard drawings in real time over the Intranet/Inte rnet in an eBeam
meeting. Microsoft Netmeeting can also be used to share meetings.
• Replay, edit, and annotate images from your meetings and attach them to email
messages.
• Import images, files , or e ven a sna p s hot of yo ur ow n com p ute r s cree n into the
background of the current meeting for all users to see and annotate.
• Use eBeam Software with a projector to turn your whiteboard into a virtual touchscreen.
• A "wake up" or Autolaunch feature automatically wakes up the eBeam Software
and begins to record once an electronic pen touches the whiteboard.
Chapter 1 Page 1
Page 6

• eBeam Software automatically checks for software updates to make sure you
https://www.supplychimp.com
always have the latest features.
The Software Reference Guide is included for quick, easy-to-understand instructions
on how to use the mai n softw are f eatures . This g uide i s very h andy when your Qu artet
Portable IdeaShare is shared by many users. Simply leave the guide next to the pro duct so everyone can be comfortable with the software and begin taking advantage of
this collab oration tool! For more d etailed instruc tions on how to use all of the many
software features, refer to the Help menu in the software.
Page 2 Quartet“ Po rtable IdeaShareTM
Page 7

Chapter 2
https://www.supplychimp.com
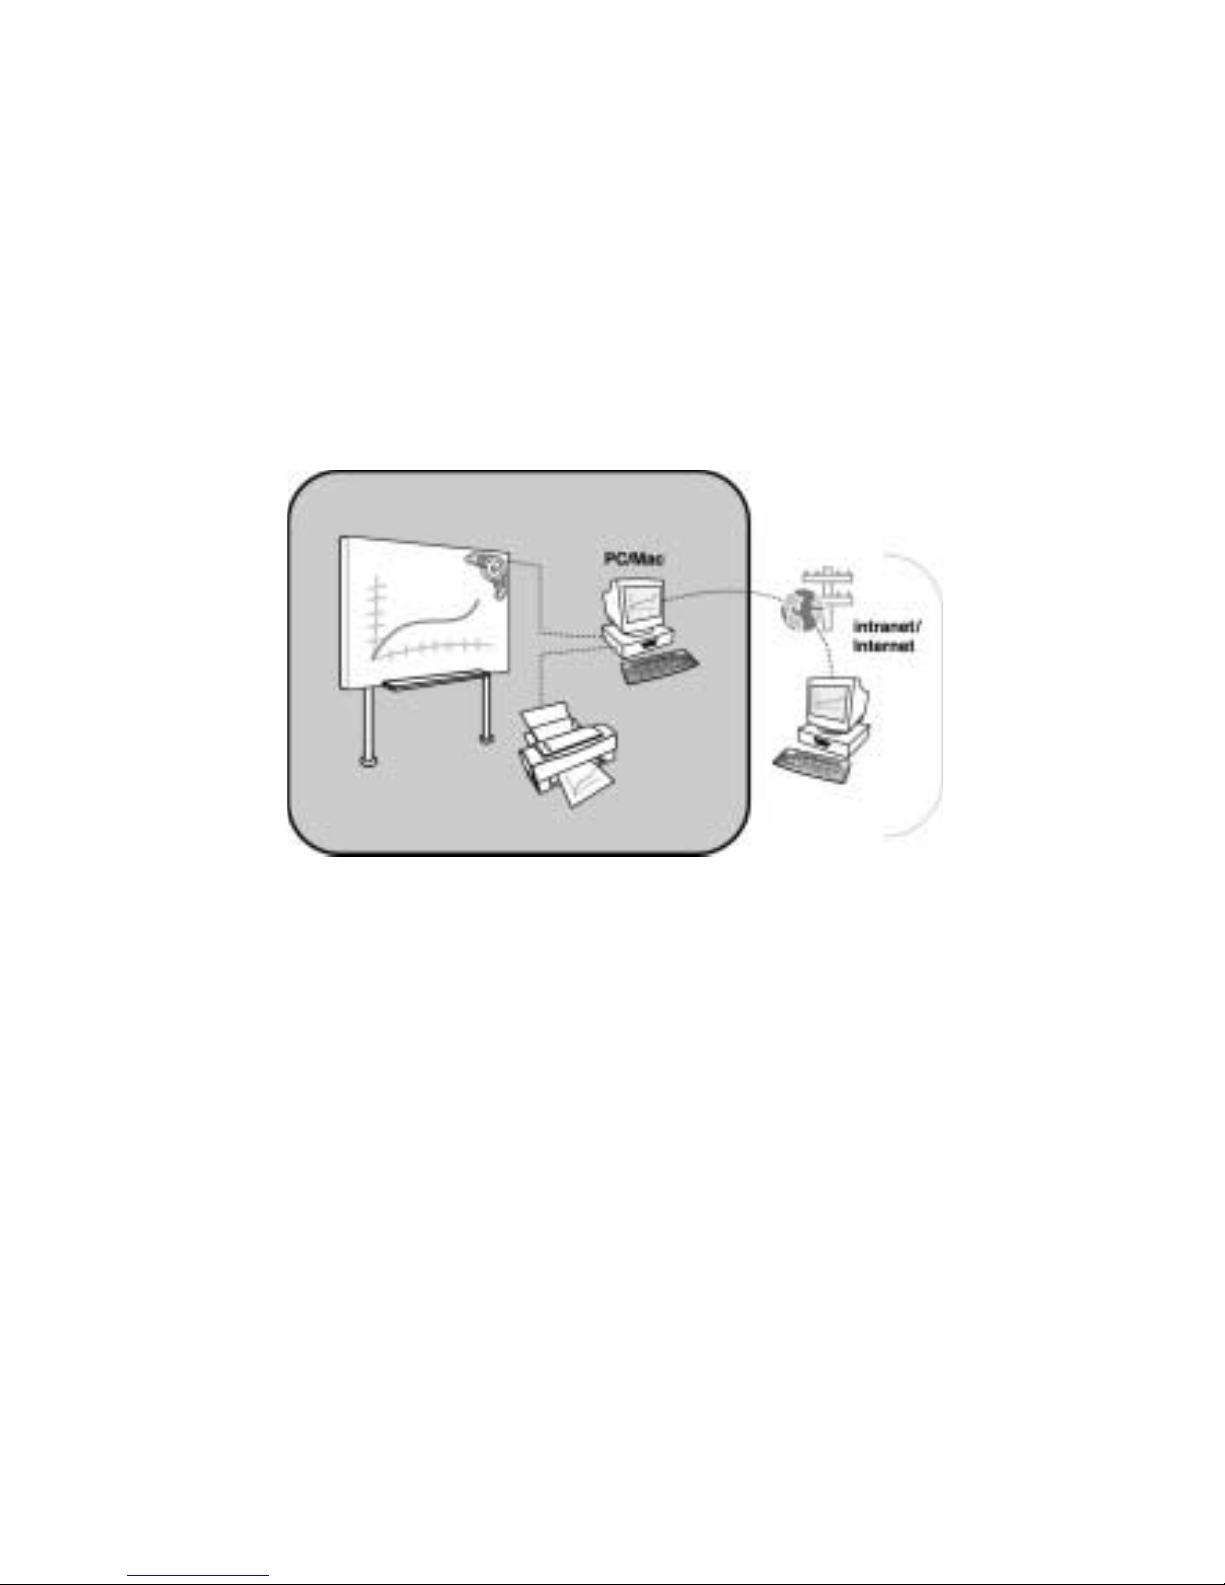
Using Quartet Portable IdeaShare
The Quartet Portable IdeaShare layout is shown in the image below...
Figure A
The following sections describe the three different ways to use the Quartet Portable
IdeaShare system:
• As a digital whiteboard (page 3).
• As a virtual to u ch screen (page 4).
• With a flip chart (PC Only) (page 6).
Using Quartet Portable IdeaShare as a Digital Whiteboard
Refer to “Termino logy” on page 9 for the de finition of vario us terms use d in this sec tion.
In whiteboard mo de, the Qua rtet Portable IdeaSha re rece iver is connec ted to a co mputer using eBeam Software. In whiteboard mode, notes and images that you draw on
a whiteboard are captured electronically in real time and available for storage and display both local ly an d re m ot el y th ro u gh your local intranet or th e Internet.
See “Using eBeam Software with Quartet Portable IdeaShare” on page 9 for more
information about using the software.
To use the Quartet Portable IdeaShare as a digital whiteboard:
Chapter 2 Page 3
Page 8

1. Set up the electronic pens, the electronic eraser , and the software as shown on the
https://www.supplychimp.com
Quick Set Up Guide, and make sure that the receiver is connected to your
computer using the USB cable.
2. Set up the Sho rtc ut S tri p on the w hite board by peeling a way t he backing and
placing the str ip a lo n g an ed ge o f the I m age Area. The Sh or tc u t Str ip is b e st
positioned along the bottom or side edge to avoid taking up writing space on the
whiteboard.
3. Launch eBeam Software on your computer, and make sure that you are in
whiteboard mode. You must calibrate the Quartet Portable IdeaShare to the
whiteboard, and also calibrate the Shortcut Strip. See “Software Installation &
First Time Use ” on pag e 10 . To make sure you are in whiteboar d mo de :
• PC: Open the eBeam task bar menu and select “C apture from Whiteboard”
• Macintosh O S 9.X : Open t he eBeam c ont ro l pa nel f rom t he con tr ol stri p me nu
and select “ Whiteboard mode”.
• Macintosh OS 10: Open the eBeam System Settings dialog from the eBeam
docklet icon. Select “Whiteboard mode”.
4. Begin writing on t he whiteboard using t he electronic pens and el ectronic eraser.
Notes and images drawn using the electronic pens and eraser are stored in your
computer . See “Using eBeam Software with Quartet Portable IdeaShare” on page 9
for more info rm a ti on a bo ut u s ing th e so ftwa r e.
Using Quartet Portable IdeaS hare as a Virtual To uchscreen
Refer to “Termino logy” on page 9 for the de finition of vario us terms use d in this sec tion.
In virtual touchscreen mode, Quartet Portable IdeaShare allows yo u to use your wh iteboard as your computer desktop. Both the Quartet Portable IdeaShare receiver and
the projector connect to your computer. The projector displays your computer desktop
onto the whiteboard and the Quartet Portable IdeaShare receiver detects when you
touch the board , allo wing an electr onic p en (usi ng the pla stic st ylus inse rt) to a ct as a
virt ual mouse used to control your computer’s desktop.
In virtual touchs creen mod e, you can opera te your compu ter directly from the whiteboard. You can open, work in, and close applications; draw freehand in painting and
drawing applic ations, o r you ca n opera te the e Beam m eeting a pplica tion d irectly from
the whiteboard.
Virtual touchscreen mode setup is illustrated below.
Page 4 Using Quartet Portable IdeaShare
Page 9

Figure B
https://www.supplychimp.com
To use the Quartet Portable IdeaShare in virtual touc hscreen mode:
1. Set up a single electr onic pen with th e plastic sty lus insert . The plastic st ylus insert
looks just like a dry-erase marker except it is entirely plastic and contains no ink.
2. Connect the USB cable to the Quartet Portable IdeaShare receiver and your
computer, and set up the softwar e as sho wn on the Quick Set Up Guide.
3. Attach the projector to your computer, and make sure that both the projector and
your comput er are turned on.
4. Aim and focus the projec tor as near the center of the whiteboard as possible.
5. Launch eBeam Software on your computer, and make sure that you are in
projection mode. You will also need to calibrate. See “Projection/Virtual
Touchscreen Mode” on page 16. To make sure that you are in projection mode:
• PC: Open the eBeam task bar menu and select “Use With Projector”
• Macintosh O S 9.X : Open t he eBeam c ont ro l pa nel f rom t he con tr ol stri p me nu
and select “Projection mode”.
• Macintosh OS 10: Open the eBeam System Settings dialog from the eBeam
docklet icon . Se le ct “ P ro j ect i on mode”.
6. Begin using the Quartet Portable IdeaShare and whitebaord as a virtual
touchscreen. Click or double-click applications to open them, move files, draw in
paint programs, or share a meetin g using the eBeam meeting software. Anyth ing
that you can do with the mouse attached to your computer, you can do with
Quartet P ortable IdeaShare using the electronic pen and sty lus.
Chapter 2 Page 5
Page 10

Using Quartet Portable IdeaS hare with a Flip Chart
https://www.supplychimp.com
Refer to “Termino logy” on page 9 for the de finition of vario us terms use d in this sec tion.
Important: To use Quartet Portable IdeaShare with a flip chart you must run eBeam
Software on a PC. The Mac version of eBeam Software is not compatible with Flip Chart
mode.
Quartet Portable IdeaShare with flip chart clip can be used with two standard flip chart
sizes (27” x 34” and 25” x 30.5”), or a custom size that the user specifies. The flip
chart clip (shown below) is included in the box.
Figure C
The flip chart clip (Figure C) has a raised portion that is used to mount the Quartet Portable IdeaS h are receiver, and an emb e dd ed Shortcut St rip.
To set up Quartet Portable IdeaShar e w ith a flip c hart:
1. Set up the electronic pens and the software as shown on the Quick Set Up Guide,
and make sure that the receiver is attached to your computer using the USB cable.
2. Attach the flip chart clip to the cardboard flip chart pad backing. The flip chart clip
is designed to atta ch on the rig ht si de o f the f lip ch ar t (you r le ft s id e when fac ing
the flip chart), and as close to the top as possible.
Page 6 Using Quartet Portable IdeaShare
Page 11

Figure D
https://www.supplychimp.com
3. The Quartet P ortable IdeaShare rec eiver attaches to t he flip chart clip in the same
way that it would attach to a mounting bracket (see Figure D and Figure E). Notice
that there are small hooks on the back of the receiver. These hooks fit into slots
located at the top left raised portion of the flip chart clip. Fit the receiver hooks
into the flip chart clip slots, and then press the receiver down until you either hear
a click or feel t he receiver snap into place on th e flip chart clip.
4. Connect the USB cable to the Quartet Portable IdeaShare receiver and your
computer. The smaller USB connector attaches to the receiver. The larger
connector attache s to your comp ute r.
5. Launch eBeam Software and make sure that you are in flip chart mode. To make
sure you are in flip chart mode, open the eBeam task bar menu and select
“Capture from Flipchar t”.
6. You must then select the flip chart size . The first time you select “C a ptu re f ro m
Flipchart” a calibration warning dialog opens warning you that you need to
Chapter 2 Page 7
Figure E
Page 12

calibrate. Click the Calibrate button to open the Flipchart Setup dialog. To manually
https://www.supplychimp.com
open the Flipchart Setup dialog, choose “eBeam Hardware>Flipchart Setup...”
from the Tools menu.
7. The Flipchart Setup dialog allows you to select a 27” x 34” flip chart size, a 25” x
30.5” flip chart size, or to specify a custom flip chart size. Select /Specify the flip
chart size and click OK.
8. Begin writing on the flip chart using the electronic pens (the electronic eraser
cannot erase markings on a flip chart). Notes and images draw n using th e
electronic pens are stored in your computer. See “Using eBeam Software with
Quartet Portable IdeaShare” on page 9 for more information about using the
software.
Page 8 Using Quartet Portable IdeaShare
Page 13

Chapter 3
https://www.supplychimp.com
Using eBeam Software with Quartet Portable IdeaShare
eBeam Software is provided with Quartet Portable IdeaShare.
Terminology
Commonly used terms are described below:
• Active Page: In whiteboard mode, the active page is the page that currently displays data as it is writte n on the w hit eb oa r d.
• Calibration: Calibration is a proc e ss tha t de fi ne s th e w id th a n d he ight of the
Image Area, as well as the accurate placement of each captured point within the
software window. T he whiteboard area must always be cal ibrated to ensure that
the electronic pe n pos it ion is p ro pe rl y dete ct ed . Af te r calibration, for each poi n t
that is tapped, the point is placed in the software window relative to the calibration
points. The software knows that the point must be within the calibrated width and
height range, or the point is not valid and is thrown out. The software also uses
the calibrated width and height to place the point within the coordinate system in
the software window.
• Flip Chart Mode: eBe am Software has three modes: whiteboard, projection, and
flip chart modes. Flip Chart mode is whiteboard mode for a flip chart. Flip chart
mode is used with t he Fl ip Ch art Clip that is shippe d w ith your Q u artet Portable
IdeaShare. The Flip Chart Clip and Quartet Portable IdeaShare are set up with
your flip chart as described in “Using Quartet Portable IdeaShare with a Flip Chart”
on page 6. Flip Chart mode identifies (for the software) the location of the Shortcut
Strip on the Flip Char t Clip, as well as the size of the flip chart itself, mak ing it
unnecessary to calibrate.
• Image Area: The Image Area of the whiteboard is the area of the whiteboard or
flip chart where the e le c tr onic pen str oke s you m ake a re ca p tur ed b y Quar te t Portable IdeaSh ar e a nd tran sf e rre d into the eBeam So ft war e w indo w. The Ima ge
Area is determin ed by the placement of the receiver(s), and the software ca libration.
• Projection Mode or Virtual Touchscreen mode: eBeam Software has three
modes: whit eboard, projection, and flip chart modes. Projecti on mode (also
known as virtual touchscreen mode) is when Quartet Portable IdeaShare, your
computer, and a projector are all used together to make your whiteboard a touchscreen. Q uar te t Portab le Ide aS h ar e a nd the p ro je cto r pl ug in to your c om p ute r.
The projector dis p lay s your com p ute r de s kto p on to the w h ite b oar d a nd Quartet
Portable IdeaShare detects when you touch, allowing any electronic pen to act as a
virtual mouse.
• Whiteboard Mode: eBeam Software has three modes: whiteboard (digital whi teboard), projection, and flip chart modes. Whiteboard mode is when Quartet Porta-
Chapter 3 Page 9
Page 14

ble IdeaShare acts as a whiteboard rec order; re cordin g data as it is w rit ten on the
https://www.supplychimp.com
whiteboard and displaying that data in the eBeam Software application window.
Software Installation & First Time Use
This chapter describes how to set up and use eBeam Software.
1. Set up Quartet Portab le Id e aShare as describe d in the Q uic k S et U p Gui de t ha t is
included with Quartet Portable Idea Share.
2. Insert the software CD into the CD-ROM drive on your computer. The installer
(Macintosh or PC) will start up automatically. If the installer does not start up
automatically, browse to your CD-ROM drive and select the setup program. Follow
all on-scree n dir e ct ion s .
3. Launch eBeam Software. The first time eBeam Software opens, it opens in
Whiteboard mode (see “Terminology” on page 9). You are prompted to calibrate
Whiteboard mode immediately.
If you do not wish to use White b oa rd m o de , sk ip thi s ste p.
If you do wi sh to use Wh iteb oar d mod e, c lick C ali b rat e to op en t he Wh it ebo ar d c alibration wizard a nd fo llow all on-scree n i ns tructions. See “ Cal ibra te W hiteboard
Mode” on page 12 for a description of how to manually start calibration for Whiteboard mode.
Note: If eBeam Software was unable to autodetect Quartet Portable IdeaShare,
see “Troubleshoo ting” on page 22.
4. Select the mode you wish to use. The three possible modes (described in
“Terminolo gy ” on pa g e 9 ) ar e:
• Whiteboar d mo de
• Flip Chart mode
• Projection mode
Note: In the PC version of eBeam Software, the first time you launch eBeam Software, eBeam Software opens a mode selection dialog. Select “Capture from
Whiteboard” (Whiteboard mode), “Capture from Flipchart” (Flip Chart mode), or
“Use with Projector” (Projection mode), and click the Calibrate button. eBeam
Software open s the appropriate calibration wizard.
Page 10 Using eBeam Software with Quartet Portable IdeaShare
Page 15

https://www.supplychimp.com
To select a mode, see the following table.
Platform Instructions
PC • The “Tools->eBeam Hardware” menu in eBeam Software’s
Whiteboar d mo de applicatio n. Se e “ Us ing The Whiteb oa r d
Mode Application” on page 12.
• The Status icon right-click menu in eBeam Software’s
Whiteboar d mo de applicatio n. Se e “ Us ing The Whiteb oa r d
Mode Application” on page 12.
• eBeam Software’s Windows taskbar menu.
Macintosh OS 9.X • The “Tools->eBeam Hardware” menu in eBeam Software’s
Whiteboar d mo de applicatio n. Se e “ Us ing The Whiteb oa r d
Mode Application” on page 12.
• eBeam Software’s control strip menu.
Macintosh OS 10 • The System menu in menu in eBeam Software’s Whiteboard
mode application. See “Using The Whiteboard Mode
Applicatio n” on pa g e 1 2.
• The Status icon menu in menu in eBeam Software’s
Whiteboar d mo de applicatio n. Se e “ Us ing The Whiteb oa r d
Mode Application” on page 12.
• The eBeam Syst em Settings icon from the docklet. File
menu.
5. The first time you use any m od e you are p ro m pted to c alibrate that mode
immediately. Click the Calibrate button to automatically open the calibration
wizard.
Manually s ta rt in g is d e sc ri be d in :
• “Calibrate Whiteboard Mode” on page 12 for Whiteboard mode.
• “Using Quartet Portable IdeaShare with a Flip Chart” on page 6 for Flip Chart
mode.
• “Projection/Virtual Touchscreen Mode” on page 16 for Projection mode.
6. Set up the Sho rtc ut S tri p if you are us ing either White board mode or Flip C h ar t
mode. Shortcut Strip setup is described in:
• “The Whiteboard Mode Shortcut Strip” on page 17.
• “The Flip Chart Mode Shortcut Strip” on page 18.
Chapter 3 Page 11
Page 16

Whiteboard Mode
https://www.supplychimp.com
Whiteboard mode is the Quartet Portable IdeaShare acting as a whiteboard recorder;
recording data as it is written on the whiteboard and displaying that data in the eBeam
Software application window.
Calibrate Whiteboard Mode
The first time you use Whiteboard mode you are automatically prompted to calibrate.
To manually start the calibration wizard, see the following table.
Platform Instructions
PC Select “eBeam Hardware>Calibrate eBeam Hardware” from the
Tools menu.
Macintosh OS 9.X Select “eBeam Hardware>Calibrate eBeam Hardware” from the
Tools menu.
Macintosh OS 10 Select “Calibrate” from the System menu.
Using The Whiteboard Mode Application
The look and feel of the whiteboard mode application varies between the PC and Macintosh platforms. The functionality remains the same.
Thumbnail Vie w
Menus
Toolbar
Participants View
Annotation Tools
Active Page
Page 12 Using eBeam Software with Quartet Portable IdeaShare
Play Controls
Page 17
Menus Allows access to all of software functions and features.
https://www.supplychimp.com
Toolbar Allows access to the most comm only used features.
Active Page Receives data writt en on the whiteboa rd . The active pag e w ill
always be the most recently crea ted page in the meeting.
Thumbnail Displays thumbnails of all pages in the meeting.
View
Participants Displays th e login name s of all user s connected to a meeting, as well
View as allows users to “chat” with each other using the software’s instant
messaging system.
Web View The Web View allows access to web pages, and allows the meeting
(PC Only) host to lead a Web Tour.
Annotation P alette of tools that allow the u s er to annotate/draw on the
Tools displayed meeting page using the a mouse and/or k eyboard.
Play Controls Allows you to play back the meeting like a movie. The meeting is
played f orward, li ne by line, at varying s peeds. Also , playb ack can be
restricted to either the current page, or set to play all pages.
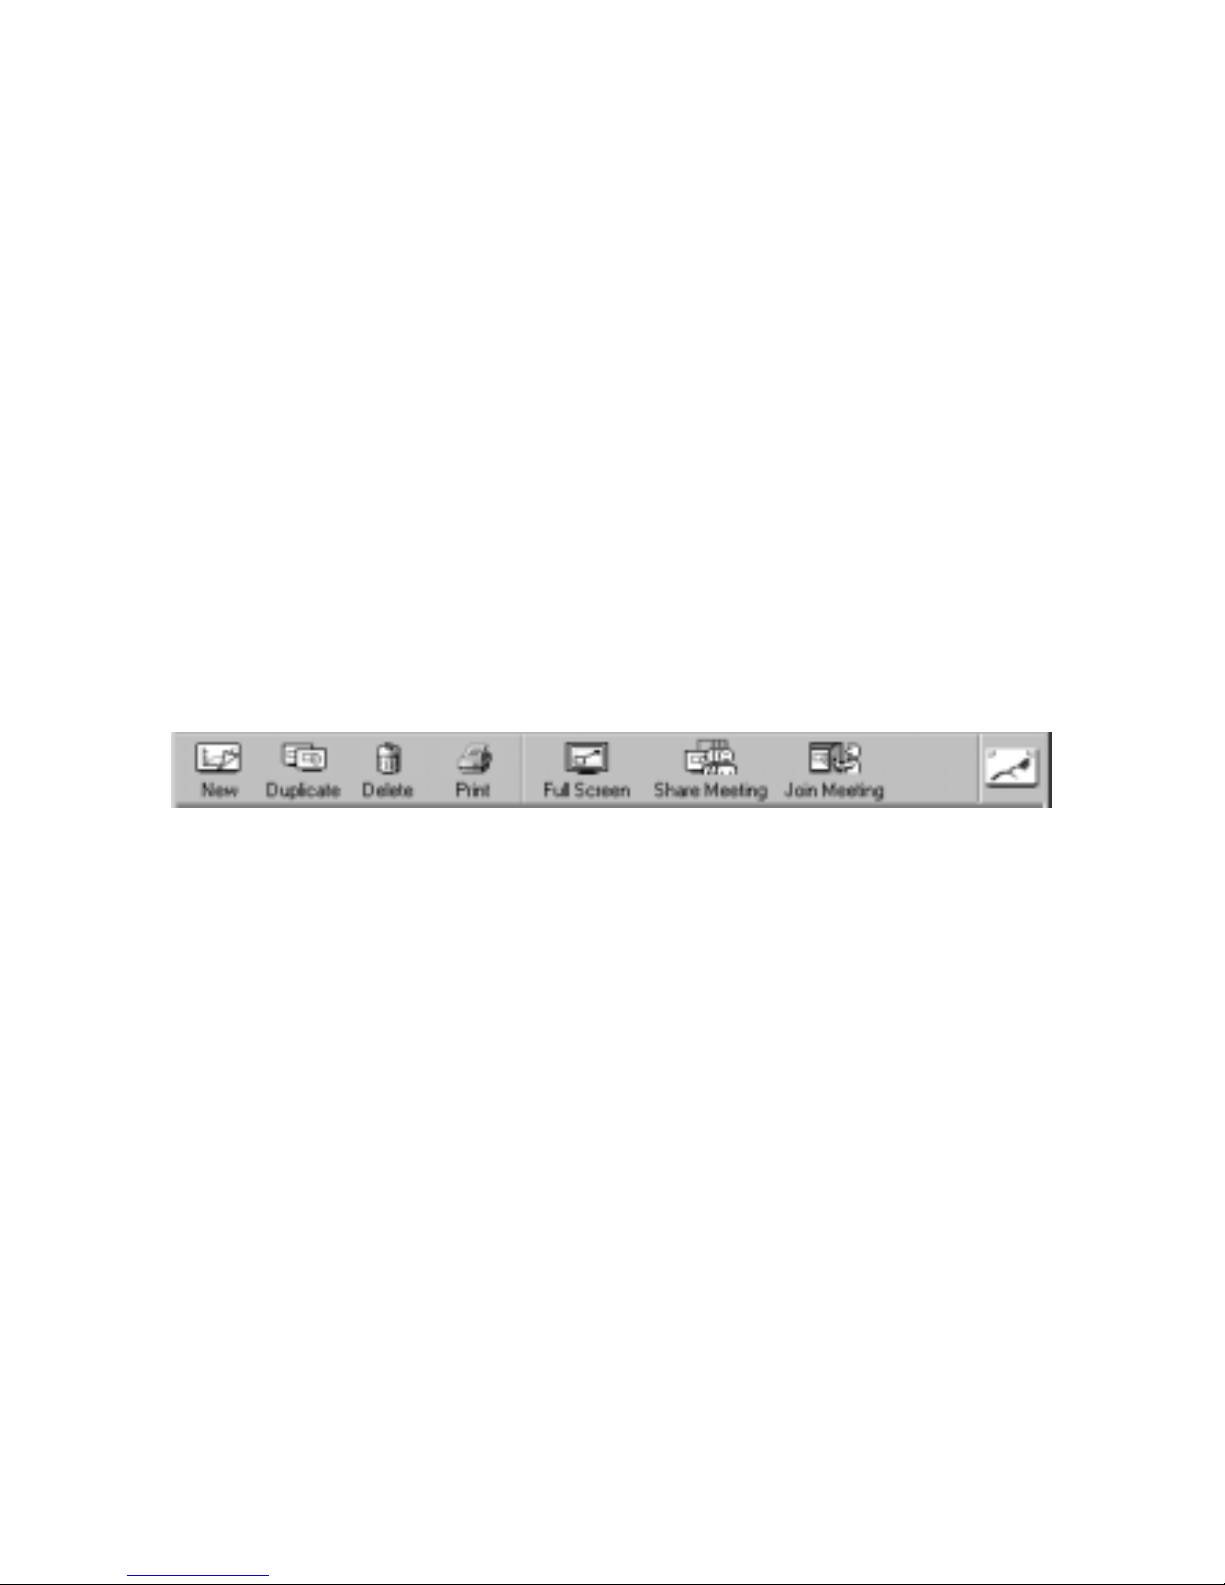
Toolbar
New Saves the active page and opens a new active page.
Duplicate Copies the selected page and makes the copy the Active Page.
Delete De le te s the se le cte d pa g e.
Print Prints the selected page to the printer connected to your
computer.
Full Screen Maximizes the software application window on the screen.
Share Meeting Allows you to share the current meeting either over the local
intranet or the Internet.
Join Meeting Allows you to log on to a meeting broadcasting over the local
intranet or Internet.
Status Icon The Status icon reports the connection status of eBeam Software
to the hard ware . A whi tebo ard ico n ind icate s Whit eboar d mode , a
projector icon indicates Projection mode, a flip chart icon
indicates Flip Chart Mode. A grayed out icon indicates that eBeam
Software is not connected to the hardware. See eBeam Software’s
help system for a desciption of the Status Ico n.
Chapter 3 Page 13
Page 18
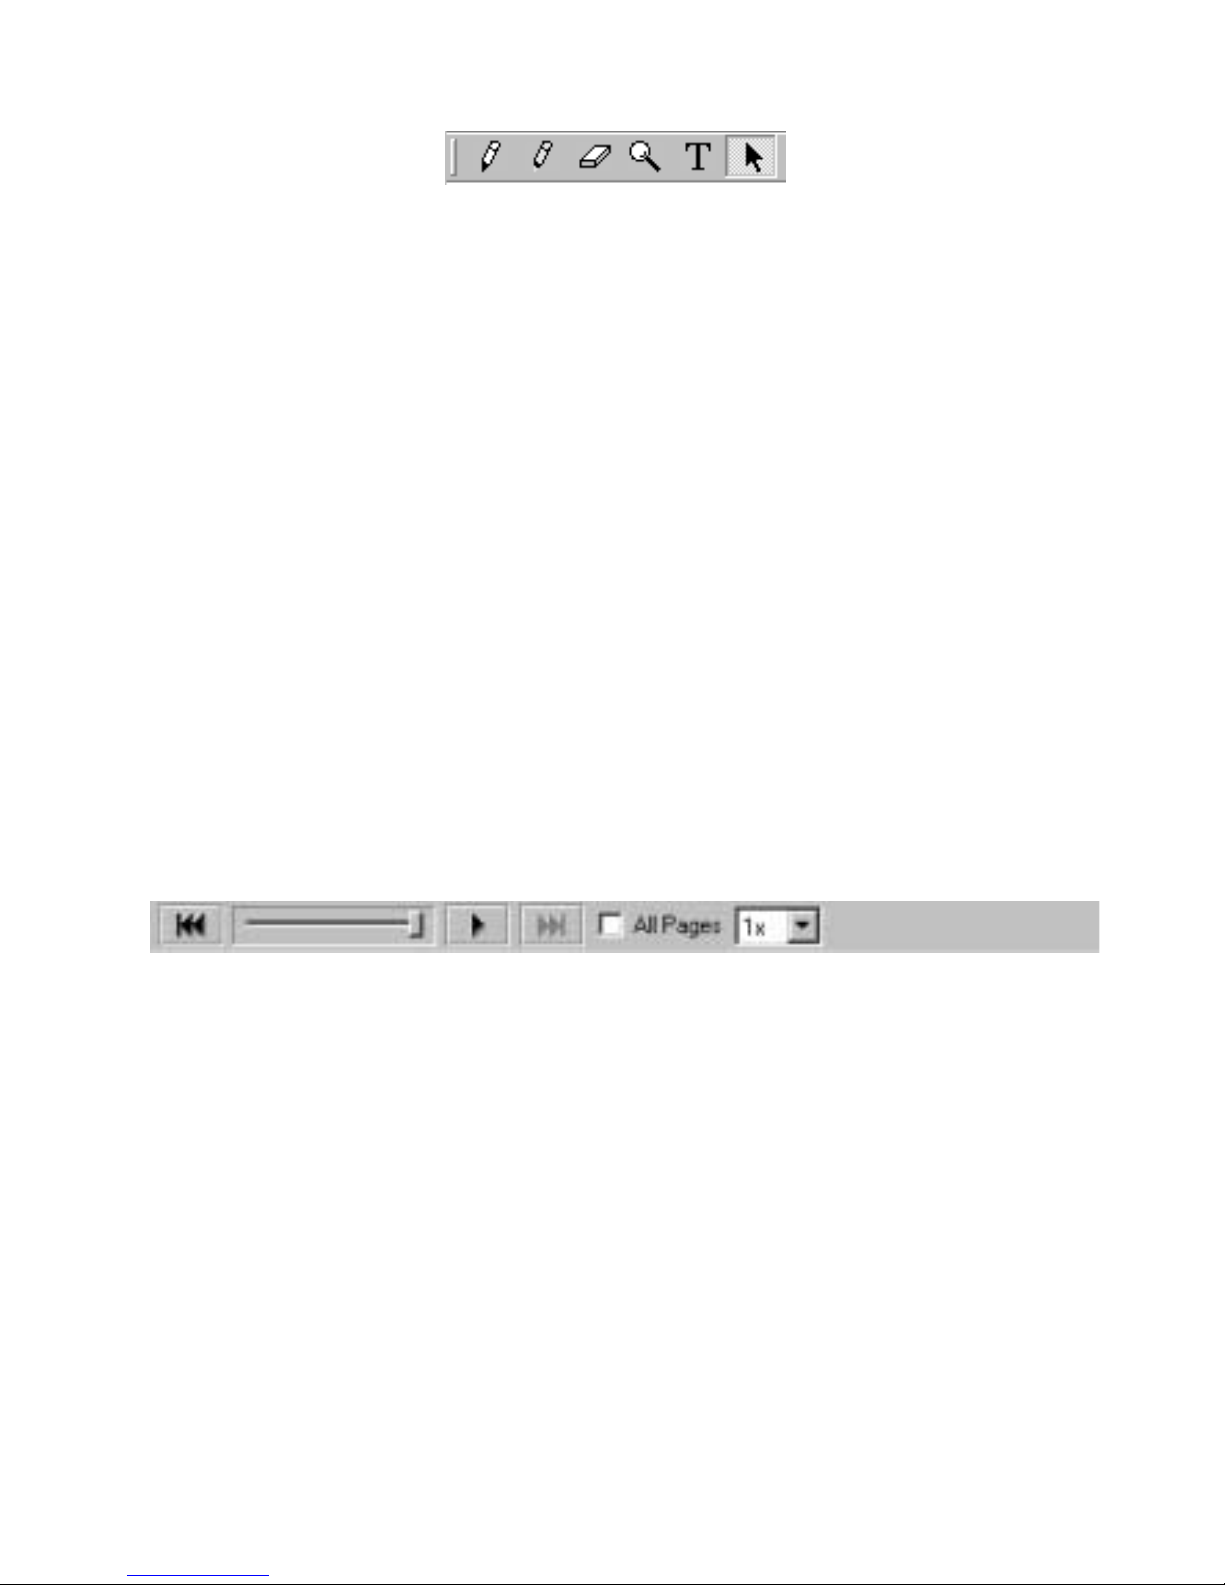
Annotation Tools
https://www.supplychimp.com
Marker Allows you to write freehand in one of four solid colors on any
page.
Highlighter Allows you to write freehand in one of four transparent colors on
any page.
Eraser Erases both whiteboard data and annotatio ns fr om wit hin the
software.
Zoom Enlarges the view of the displayed page.
Text Allows you to add text annotations to a page.
Pointer The Pointer tool is only enabled during a shared meeting. The
Pointer tool allows each participant in a meeting to point to data
anywhere within the meeting window. Each participant’s pointer is
displayed in a different color.
The pointer direction (right, left, up, down) can be selected from
the palette that appears when the Pointer tool is selected. You can
also hide the pointe r by c licking the “Hide Pointer ” bu tton f rom
the palette that appears when the Pointer tool is selected.
Selector Allows you to draw a selection rectangle in the displayed page,
and then copy and paste the s elected area into another
application.
Play Controls
Jump to
Beginning
Drag Control
Slider
Jumps to the very beginning of the meeting, which is always the
original blank page.
Allows you to step th r ough the meetin g fo rwa r d or re ve rs e by
clicking on the drag line, or to immediately jump to a specific
point in the meeting by dragging the drag bar to a location on the
drag line.
Play Replays the me eting from beginning to end, beginning with a
blank screen. While playing, the Play button changes to a Stop
button, allowing you to stop the playback. See Play Speed.
Jump to End Jumps to the end of the meeting, restoring all whiteboard strokes
and annotations.
Page 14 Using eBeam Software with Quartet Portable IdeaShare
Page 19

Loop Replays the meeting from begi nning to end, beginning with a
https://www.supplychimp.com
blank screen. Once the end of the meeting is reached, begins to
replay from the beginning. Runs continuously. While playing, the
Play button changes t o a Stop b utton, allowing you to stop th e
playback.
All Pages If “All Pages” is checked, then clicking “Play” causes the entire
meeting is pl ayed back. If “All Pages” is not checked, then only
the current ly displayed page i s played back.
Play Speed Speed at which the meeting is played. 0.5x is the slowest speed
possible, a nd 8.0x is the fastes t sp ee d p os si ble .
Chapter 3 Page 15
Page 20

Projection/Virtual Touchscreen Mode
https://www.supplychimp.com
Projection mode consists of Quartet Portable IdeaShare, your computer, and a projector; all used together to make your whiteboard a touchscreen.
Quartet Portable Ide aSha re and the pro jecto r plug i n to you r com puter. T he pr ojector
displays your c omputer desk top onto the w hiteboard a nd Quartet Portabl e IdeaShare
detects wh en you tou ch, all owing an electr onic pen ( using the plastic stylus ins ert) to
act as a virtual mouse, controlling your computer’s desktop.
In projection mode, you can operate your computer directly from the whiteboard. You
can open, work in, and close applications; draw freehand in painting and drawing
application s , or ev e n op era te th e digital white bo a rd m o de application dir e ct ly fr om the
whiteboard.
Projection m od e se tup is illustrated bel ow.
Projection Mode Setup
1. Set up Quartet Portab le Id e aShare as describe d in the Q uic k S et U p Gui de .
2. Set up the proje ct or, and attach to the sam e c om p ute r as Q u arte t Porta ble
IdeaShare.
3. Turn on your projector, and project your compu ter’s desktop on the whiteboard.
4. Open any elec tr oni c pe n and ins e rt the p las tic sty lus i nse r t. The plastic stylus
5. Launch the softwa re and switch to projection mode accordi ng to the description in
6. If this is the first time Projection Mode has been run on this computer, you will be
insert is a plastic piece that has the same shape as a dry-erase marker, but has a
plastic tip that does not leave marks.
“Software Insta llation & First Time Us e ” on page 10.
prompted t o ca l ibra te . That calibratio n is s ave d. If th e pr oje c tor is moved at any
time, you must reca lib rate the sof t ware to re tain ac c uracy.
Page 16 Using eBeam Software with Quartet Portable IdeaShare
Page 21

Note: In the PC version of eBeam Software, the first time you launch the software,
https://www.supplychimp.com
eBeam Software opens a mode selection d ialog. Select “Capture from Whiteboard” (Whiteboard mode), “Capture from Flipchart” (Flip Chart mode), or “Use
with Projector” (Projection mode), and click the Calibrate button. eBeam Software
opens the appropriate calibration wizard.
7. To manually open the calibration wizard for projection mode, use the followin g
table.
Platform Instructions
PC Click the eBeam Software icon from the Windows task bar, and
then choose “Proje ction M od e>C a lib rate” from the m enu.
Macintosh OS 9.X Select “Calibrate Projection Area” from the eBeam Software
Control Panel, which can be accessed through the eBeam
Software’s Control Strip menu.
Macintosh OS 10 Click the eBeam Sys tem Settings icon from the Mac OS 10
docklet, then choose “Calibrate Projection Area” from the File
menu.
8. You are now ready to use Projection mode. For more detailed explanations,
instructions, and tips on Projection mode, see eBeam Software’s help system,
accessible throug h th e He lp m en u .
Shortcut Strip - Calibrate & Use
Quartet Portable IdeaShare comes with two Shortcut Strips: one static adhesive Shortcut Strip for whiteboard mode, and one Shortcut Strip embedded on the flip chart clip
for Flip Chart mode.
The Shortcut Strip is only used in Whiteboard mode or Flip Chart mode, and is not
detected or us ed in Projection mode.
The Whiteboard Mode Shortcut Strip
The static adhesive Shortcut Strip included with Quar tet P ortabl e IdeaShare allows y ou
to issue Print Page and New Pag e comm ands w hile in whitebo ard m ode wit hout go ing
to your computer or leaving the whiteboar d.
With the Shor tcut Strip mounted o n your whiteboard wi thin the Image A rea, you can
print a page or start a new pa ge with a tap of the elec tronic pen to the S hortcut Strip
on the whiteboar d.
eBeam Softwa re does not detect the Shor tcut Strip used for Whiteb oard mode automatically, because you can app ly it anywhere on the whiteb oard. Before you can use
the Shortcut St rip, yo u must apply the s tri p to the b oa r d an d e na bl e it.
Calibrate the Shortcut Strip
1. After setting up the hardware and software, install the Shortcut Strip by removing
Chapter 3 Page 17
Page 22

the Shortcu t Stri p off it s backi ng and ap plying the stri p along an edge of t he Image
https://www.supplychimp.com
Area.
The Shortcut Strip is best positioned along the bottom or side edge to avoid taking
up writing space in the Image Area.
2. Launch eB e am Software in white b oa r d mo de a nd se le c t th e C alibrate Shortcut
Strip option as described in the table below.
Platform Instructions
PC Select “Shortcut Strip>Calibrate” from the Tools menu.
Macintosh OS 9.X Select “Shortcut Strip>Calibrate” from the Tools menu.
Macintosh OS 10 Select “Calibrate Shortcut Strip” from the System menu.
3. Follow the calibra tion in structions o n th e s cr een . When finis h e d, the software
shows the location of the Shortcut Strip within the Active Page as an outline of the
Shortcut Strip.
Note: It is possible to write over the Shortcut Strip on the whiteboard. However,
the software does not rec or d wr iting anywhere with in the S hor tc ut St rip a r ea .
Use the Short cut Strip
• New Page. The top box on the Shortcut Strip is the “New Page” shortcut. This creates a new empty page eBeam Software’s whiteboard meeting. Tap the shortcut
with an electr onic pen to issue a new page command .
Information written on the whiteboard needs to be erased after the New Page icon
has been tapped . We recommend using a standard whiteboard eraser (Quartet
Prestige eraser, model PE1) for erasing the entire whiteboard after tapping New
Page.
• Print Page. The bot tom box on the Shortcut Stri p is the “Pr int Page” s hortcut,
which prints the current Active Page. Tap the shortcut with an electronic pen to
issue a print page com mand to the printer co nnec te d to your c om p ute r.
Note: See eBeam’s Help system for more information on the Shortcut Strip. Accessing the Help system is described in “The eBeam Software Help System” on page 19
The Flip Chart Mode Shortcut Strip
The Shortcu t Strip atta ched to the flip chart clip allow s you to issu e Next Page, Previous Page, and Print C u rr e nt Page c om m an d s w hile in Flip Chart m ode without going to
your computer or leaving the flip chart.
Because the Sho rtcut Strip is embedd ed on the flip chart clip, eB eam Software automatically k nows the lo cation of the Shortcut Strip, making it unnecess ary to calib rate
the Shortcut Strip itself.
Page 18 Using eBeam Software with Quartet Portable IdeaShare
Page 23

Use the Short cut Strip
https://www.supplychimp.com
When using the flip chart clip, it is wise to place your computer where you can see
which page is displayed in the e Beam Sof tware flip ch art mee ting. In Fl ipchart mod e,
the page displayed in eBeam Software is the Active Page. It is important that the page
displayed in eBeam Software is the same page that you are modifying on the flip chart.
• Next Page. The top box on the Shortcut Strip is the “Next Page” shortcu t.
If the most recent flip chart meeting page is displayed in eBeam Software, the
Next Page shortcut creates a new empty page in eBeam Softwar e’s Flipchart
mode. Tap the shortcut with an electronic pen to issue a Next Page command.
If a previous flip chart meetin g page is displayed in eBeam Software, the Next
Page command causes the next pag e i n the meeting to be displayed.
• Previous Page. The middle box on the Shortcut Strip is the “Previous Page” shortcut.
If the first page in the flip chart meeting in not displayed in eBeam Software, the
Previous Page shortc ut causes the previo us page in the flip chart me e tin g to be
displayed. Tap the shortcut with an electronic pen to issue a Pre vio us Page co mmand.
If the first page in the flip chart meeting is displayed in eBeam Software, the Previous Page command is ignored.
• Pri nt Cur re nt Page . Th e bo ttom box on the Short cut Strip is the “P rint C urrent
Page” shortcut, which prints the currently displayed page in eBeam Software. T ap
the shortcut with an electronic pen to issue a print cur re nt pag e c om m and to the
printer connected to your computer.
Note: See eBeam’s Help system for more information on the Shortcut Strip. Accessing the Help system is described in “The eBeam Software Help System” on page 19.
The eBeam Softw are Help System
eBeam Software’s Help system contains information on each software feature. To
access help: in the Whiteboard mode application, choose “Contents” from the Help
menu.
Chapter 3 Page 19
Page 24

Chapter 3 Page 20
https://www.supplychimp.com
Page 25

Chapter 4
https://www.supplychimp.com
Troubleshooting
Commonly e n c ountered issu es c a n be re solved by following the instru c ti on s b e low.
Please see “Website Support” on page 22, and “Additional Technical Support” on
page 22, for more information on Quartet IdeaShare support.
Troubleshooting Tips
Quartet Port able IdeaS hare is set up as describ ed in the Qu ick Set Up Guide,
but eBeam Software is unable to detect the hardware.
PC • Check that the USB cable is attached to the receiver and to your computer.
Select Retry.
• Check for the green LED on the receiver. If the LED is not lit, this indicates that
the hardware is not getting any power. Try disconnecting and reconnecting the
USB cable, and then select Retry.
• If the LED is still not lit, did the Add New Hardware wizard open? If it did, follow
the instructions in the dialog. If Windows is unable to automatically find the
requested driver (hidden.drv), and you do not have the Windows installation
CD, browse to c:\Windows\system or c:\Windows\s yst e m 3 2 . Do not cancel
before the driver installation is complete, or the hardware will lose power.
• Select “eBeam Hardware>Detect eBeam Hardware” from the Tools Menu. This
attempts to connect to the hardware according to the settings in the
“Tools>eBeam Hardware Setup” dial og.
• Make sure no other software has the specified port open. For example, PDA
synchronization applications typically retain control of the port even when not
synching. Close any application that may be running.
• Do you have more than one copy of the software installed on your computer? If
so, the other copy may be running and have control of the port. Shut down the
other copy. W e recommend that ol d versions of the software b e uninstalled from
your computer.
• Exit the application and restart it.
• Check that the electronic eraser is not resting on the eraser pad. This might be
causing the eraser to send a signal to the hardware continuously.
Message “The eBeam hardware is currently in projection mode. Would you
like to use the eBeam hardware for this application.” This message might
appear at Whiteboard mode application startup, after selecting “Capture from
Whiteboard”, or after selecting “Capture from FlipChart”.
PC/ • Me ssage displayed if you are trying to open or switch to the digital whiteboard
Macintosh application while the software is in projection mode. See “Software Installation
& First Time Use” on page 10 for a description of how to change modes.
Chapter 4 Page 21
Page 26

eBeam Software indicates that the hardware is detected, but writing does not
https://www.supplychimp.com
appear in Whiteboard mode application’s Active page.
PC /
Macintosh
• Press the electronic pen down on the whiteboard. If you do not hear a faint
buzzing, replace the batteries.
• Try another electronic pen. If the other electronic pen works, replace the
batteries in the electronic pen that does not work.
• Make sure you are not holding the electronic pen too close to the tip of the
electronic pen. This blocks the signal.
Website Support
For additional help, consult the Frequently Asked Questions section of the Quartet
IdeaShare webpage at www.GBCOffice.com.
Additional Technical Support
If you have dif ficulties installing or usin g your Qu artet Portab le IdeaSh are, ple ase recheck the s ection of the Us er Guide or Qu ick Set Up Gui de that relate s to your problem. If you are still unable to solve the problem, please contact our Customer Service
Team for assistance.
Customer Service
(800) 541-0094
contactus@gbc.com
Please have the foll owing informa tio n r ead y wh e n you co nt ac t c ustomer serv ice :
• Model number of the product.
• Date and pr oof of purchas e.
• Operating syst em of your c om p ute r (W ind ow s 98 , XP, Macintosh OS 1 0, etc).
• Software you us e w ith th is product (eBeam So ftwar e ve rs ion, PDA software, etc ).
Page 22 Troubleshooting
Page 27

Copyright Notice
https://www.supplychimp.com
Copyright © 2002 Electronics For Imaging, Inc. All rights res erved.
This equipment is for use with general purpose, UL-Listed personal comput ers.
This publication is protected by copyright, and all rights are reserved. No part of it may
be reproduce d or transmitted in any form or by a ny means for any purpose wi thout
express prior written consent from Electronics For Imaging, Inc., except as expressly
permitted here in.
Information in thi s document is subject to ch ange without no tice and does not represent a commitment on the part of Electronics For Imaging, Inc.
The software descr ibed in t his pub lication is furnish ed under license and may only be
used or copied in accordance with the terms of such license.
Protected by U.S. Patent 5,866,856. Patents pending.
Trademarks
eBeam, e-Beam, eBeam Software, eBeam Mouse, eBeam Moderator, and ImagePort
are trademarks of Electronics For Imaging, Inc.
Acrobat, Adobe, and Adobe Acrobat are registered trademarks or trademarks of Adobe
Systems, Inc. in th e Unite d States and/or other coun tries. Mi crosoft, MS, NetMe eting,
Windows, and Windows NT are registered trademarks or trademarks of Microsoft Corporation in the United States and/or other countries. Netscape Navigator is a registered trademark or trademark of Netscape Communications Corporation in the United
States and/or other countries. Pentium is a registered trademark or trademark of the
Intel Corpo ration in the United St ates and/or other co untries. Sanford an d EXPO are
registered trademarks or trademarks of Sanford Corporation in the United States and/
or other countries. All other terms an d product names may be trademarks or registered trademarks of the ir res p ec ti ve ow ner s , an d are he r eb y ack nowledged.
ELECTRONICS FOR IMAGING, INCO RPORATED END-USER LICENSE AGREEMENT. YOU
SHOULD CAREFULLY READ THE FOLLOWING TERMS AND CONDITIONS BEFORE USING
THIS SOFTWARE. I F YOU DO NOT AGREE TO THE TERMS AND CONDITIONS OF THIS
AGREEMENT, DO NOT USE THE SOFTWARE. INTALLING OR USING THE SOFTWARE
INDICATES THAT YOU AGREE TO AND ACCEPT THE TERMS OF THIS AGREEMEN T.
LICENSE: Electronics For Imaging, Inc. (" EFI") grants you a non-exclusive license to
use the software ("Software") and accompanying documentation ("Documentation")
on any computer, provided that the Software is used only in connection with the
eBeam™ pro duct ("Pr oduct") you ha ve obta ine d, subje ct to the te rms an d r estric tions
set forth in this Agreement. The Software is licensed, not sold.
You may use the Software solely for your own customary business or personal purposes and solely in connection with the Product. You may permanently transfer all of
your rights under this A g re em e nt onl y a s par t of a sal e or tran sfe r of the Product, pro vided you retain no copies, you transfer all of the Software and Documentation (includ-
Page 28

ing all component parts, the media and printed materials, any upgrades, and this
https://www.supplychimp.com
Agreement), AND the recipient agrees to the terms of this Agreement. If the Software
is an upgrade, any transfer must include al l pri or versions of the Software.
You may not make or have made, or permit to be ma d e, any copies of the Softwa r e or
portions thereof, except as necessary for backup or archive purposes in support of
your use of the Software as p ermitted hereun der. You may not copy the Docu mentation. You may not attempt to alter, disassemble, decrypt or reverse engineer the Software. You may not lease or rent the Software.
PROPRIETARY RIGHTS: You acknowledge that the Software and Trademarks are proprietary to EFI and its suppliers and that title and other intellectual property rights
therein remain with EFI and its suppliers. Except as stated above, this Agreement
does not grant you any right to patents, copyrights, trade secrets, trademarks
(whether registered or unregistered), or any other rights, franchises or licenses in
respect of the Software or Trademarks. You may not adapt or use any trademark or
trade name whic h is likely to be simil ar to or confus ing with that of EFI or any of its
suppliers or take any other action which impairs or reduces the trademark rights of EFI
or its suppliers.
CONFIDENTIALITY: You agree to hold the Software in confidence, disclosing the Software only to authorized users having a need to use the Software as permitted by this
Agreement and to take all reasonable precautions to prevent disclosure to other parties.
REMEDIES AND TERMINATION: Unauthorized use, copying or disclosure of the Software, Trademark s or a ny bre a ch of this Agreeme n t wi ll re s ult in automatic term i n ation
of this license and will make available to EFI other legal remedies. In the event of t ermination, you mus t destroy all cop ies of the Software a nd all of its compo nent parts.
All provision s of this Agree ment rela ting to disclaim ers of warranti es, limitatio n of liability, reme dies , or da m a g e s, a nd E F I' s pr op rie ta r y rig h ts sh all survive term ina t ion.
LIMITED WARRANTY AND DISCLAIMER: EFI warrants to the original purchaser ("Customer") for one (1) year from the d ate of original p urchase from EFI o r its aut horized
retailer th at the Softwa re will perfo rm in sub stantial conf ormance t o the Docu mentation. EFI warrants the media containi ng the Softwa re again st failur e during th e above
warranty period. EFI makes no warranty or representation that the Software will meet
your specific re quire men ts, that th e o peration of the So ftware w ill be u ninter rupte d or
error free, or that all defects in the Software will be corrected.
EXCEPT FOR THE ABOVE EXPRESS LIMITED WARRANTY, EFI MAKES AND YOU RECEIVE
NO WARRANTIES OR CONDITIONS ON THE SOFTWARE, EXPRESS, IMPLIED, STATUTORY, OR IN ANY OTHER PROVISION OF THIS AGREEMENT OR COMMUNICATION
WITH YOU, AND EFI SPECIFICALLY DISCLAIMS ANY IMPLIED WARRAN TY OR CONDITION OF MERCHANTABILITY OR FITNESS FOR A PARTICULAR PURPOSE.
LIMITATION OF LIABILITY: IN NO EV ENT W ILL E FI O R ITS SUPPL IERS B E LIA BLE FO R
ANY DAMAGES, INCLUDING LOSS OF DATA, LOST PROFITS, COST OF COVER OR
OTHER SPECIAL, INCIDENTAL, CONSEQUENTIAL OR INDIRECT DAMAGES ARISING
FROM THE SALE, INSTALLATION, MAINTENANCE, USE, PERFOR MANC E OR FAILURE OF
Page 29

THE SOFTWARE, HOWEVER CAUSED AND ON ANY THEORY OF LIABILITY. THIS LIMI-
https://www.supplychimp.com
TATION WILL APPLY EVEN IF EFI HAS BEEN A DVISED OF THE POSSIBILITY OF SUCH
DAMAGE. YOU ACKNOWLEDGE THAT THE PRICE OF THE PRODUCT REFLECTS THIS
ALLOCATION OF RISK. BECAUSE SOME JURISDIC TIONS DO NOT ALLO W THE EXCLUSION OR LIMITATION OF LIAB ILITY FO R C ONS EQUEN TIA L O R INC IDEN TAL DAMAGES,
THE ABOVE LIMITATION MAY NOT APPLY TO YOU.
EXPORT CONTROLS: You agree that you will not ex port or re-expor t the Software in
any form in violation of any applicable laws or regulations of the United States or the
country in which you obtained them.
GOVERNMENT USE: Use, duplication or disclosure of the Software by the United
States Gove rnment is subje ct to restrictions as set forth in subdivision (c) (1) (ii) of
the Rights in Technical Data and Computer Software clause at DFARS 252.227-7013 or
in subparagraphs (c) (1) and (2) of the Commercial Computer Software-Restricted
Right Clause at 48 CFR 52.227-19, as applicable.
GENERAL: the laws of the State of California govern this Agreement. You agree that
this Agreemen t sha ll not be subje ct to the U nited N ations Conventi on on Con tracts for
the Internatio nal Sale of Good s (1980). This Ag reement is t he entire agre ement held
between us and supersedes any other communications or advertising with respect to
the Software . If any pr ovisi on o f this Agr eem ent is h eld invalid, t he re main de r of t his
Agreement shall continue in full for ce and effect.
 Loading...