

Page 1
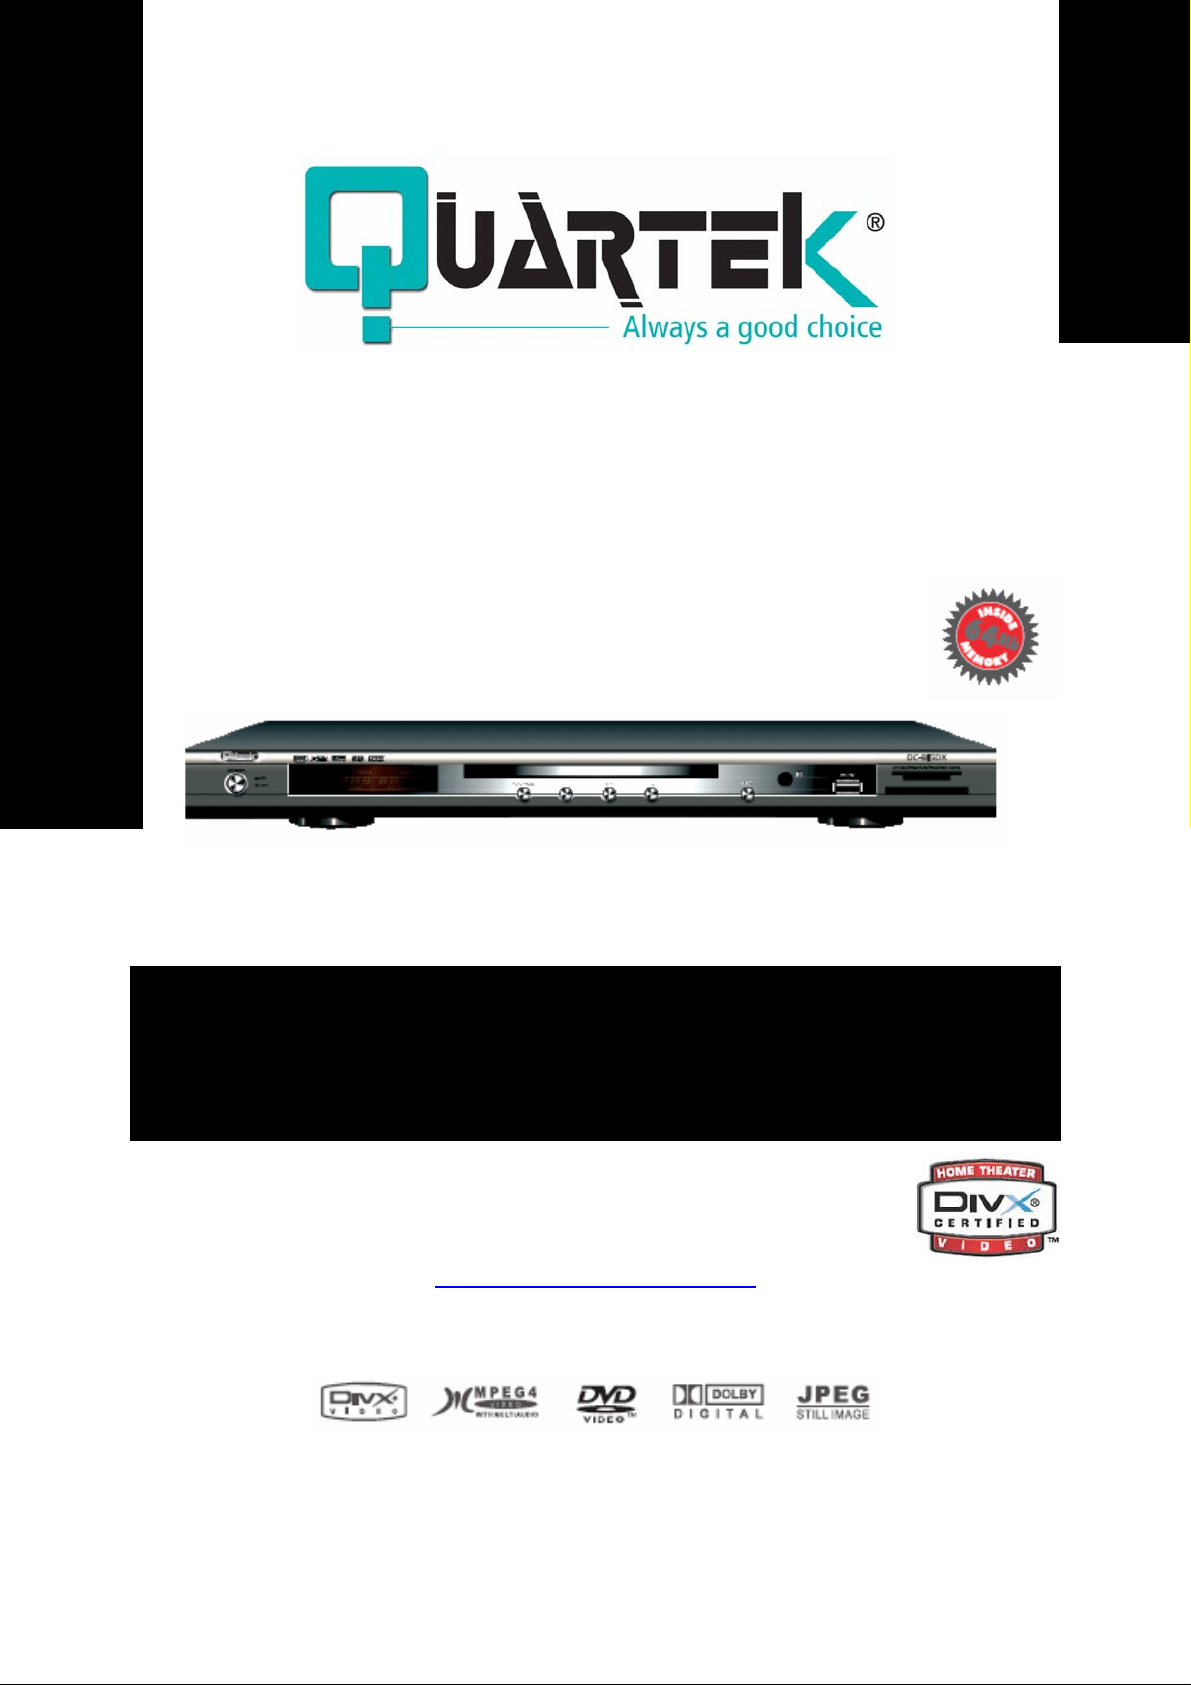
DC-815DX
USER’S MANUAL
ENGLISH
DVD PLAYER
DivX/MPEG-4 - MULTI-CARD READER 6 in 1
USB FRONT PANEL DVD/CD PLAYER
www.quartek-system.com
PLEASE CAREFULLY READ THIS MANUAL BEFORE OPERATING THIS UNIT
Page 2

TABLE OF CONTENTS
S
AFETY INFORMATION ………………………………………………………………… 4
DVD
PLAYER USER’S MANUAL …………………………………………………….. 5
– TYPES OF DISCS YOUR DVD PLAYER WILL PLAY ……………………………………………. 5
1
2
– FRONT AND REAR PANEL ILLUSTRATION …………………………………………………………. 6
3
– REMOTE CONTROLLER …………………………………………………………………………….. 7
YSTEM CONNECTION …..………………………………………………………….. 9
S
1
– SYSTEM CONNECTION …………………………………………………………………………….. 9
2
– SYSTEM CONNECTION TO A TV SET ………………………………………………………… 10
– SYSTEM CONNECTION TO AN AMPLIFIER …………………………………………………… 11
3
C
HAPTER 1 – BASIC OPERATION ……………………………………………..…… 12
– TURN ON YOUR DVD PLAYER …………………………………………………………………. 12
1
2
– PLACE A DISC INTO THE TRAY …………………………………………………………………. 12
3
– PLAYING DISCS ………………………………………………………………………………. 12
A – MENU PLAY …………………………………………………………………………….. 12
B – TITLE PLAY …………………………………………………………………………….. 13
C – SEQUENCE PLAY …………………………………………………………………………….. 13
D – PROGRAM PLAY …………………………………………………………………………….. 13
HAPTER 2 – ADDITIONAL OPERATION …………………………………………….. 14
C
1
– SELECTING TRACKS …………………………………………………………….………………….. 14
2
– SKIPPING TRACKS …………………………………………………………….………………….. 14
– MULTISPEED FAST MOTION PLAYBACK …….……………………………………………………….. 14
3
4
- MULTISPEED SLOW MOTION PLAYBACK …………………………………………………………….. 15
5
– USING PAUSE/STEP FEATURE …………………………………….……………………………….. 15
– USING THE REPEAT FEATURE ………………………………….……………………………….. 15
6
7
- USING THE OSD FEATURE …………………………………………………………………….. 16
8
- USING THE SEARCH FEATURE ………………………………………………………………….. 16
9
– CHANGING THE SOUNDTRACK …………………………………………………………………… 17
– CHANGING THE AUDIO LANGUAGE ……………………………………………………….. 17
10
11
– SUBTITLES ……………………………………………………………………………………….. 17
12
– CHANGING THE CAMERA ANGLE …………………………………………………………….. 18
– CHANGING THE TV SYSTEM ………………………………………………………………….. 18
13
14
– PSCAN ……………………………………………………………………………………………….. 18
– MUTE THE AUDIO OUTPUT …………………………………………………………………….. 18
15
– ZOOM IN THE VIDEO IMAGE ……………………………………………………………… 19
16
17
– REPEAT A SPECIFIC SEGMENT ON THE DISC THAT YOU DEFINE ……………………… 19
18
– VOLUME CONTROL …………………………………………………………………………….. 19
19
– 3D SURROUND MODE …………………………………………………………………….. 20
C
HAPTER 3 – MPEG-4 AND DIVX ………………..………………………………….. 21
HAPTER 4 – CARD READER AND USB ……………………………………………….. 22
C
QUARTEK USA TradeMark DC-815DX - User Manual– English V.2 2/31
Page 3

CHAPTER 6 – THE SETUP MENU SYSTEM ………………………………………….. 23
– GENERAL STEPS OF SETUP MENU ……………………………………………………………….. 23
1
2
– SETUP ITEMS INTRODUCTION …………………………………………………………………….. 23
A – SYSTEM SETUP …………………………………………………………………………….. 23
B – LANGUAGE SETUP …………………………………………………………………………….. 25
C – AUDIO SETUP …………………………………………………………………………….. 26
D – VIDEO SETUP …………………………………………………………………………….. 26
E – SPEAKER SETUP …………………………………………………………………………….. 27
F – DIGITAL SETUP …………………………………………………………………………….. 28
OW TO IDENTIFY DISC WITH HUB ………………………………………………… 29
H
T
ROUBLE SHOOTING …………………………………………………………………. 30
S
PECIFICATIONS …….…………………………………………………………… 31
ACCESSORIES …………….…………………………………………………… 31
H
OW TO CONTACT US …………………………………………………………………. 31
QUARTEK USA TradeMark DC-815DX - User Manual– English V.2 3/31
Page 4

SAFETY INFORMATION
The light flash with an arrowhead symbol, withi n an equila teral tria ngle, is inte nd to alert the user to the p resence
of uninsulated “dangerous voltage” within the product’s enclosure that may be of sufficient magnitude to
constitute a risk of electric shock to persons.
The exclamation point within the equilateral triangle is intented to alert the user to the presence of im portant
operating and maintenance (servicing) instructions in the literature accompanying th e appliance.
The digital videodisc player employs a laser System.
Use of controls, adjustment or the performance of procedures other than specified may result here in hazardous radiation
exposure.
Visible laser radiation when open and interlocks d efeated.
DO NOT STARE INTO BEAM
FCC NOTICE:
This equipment has been tested and found to comply with the limits for a Class B digital device, pursuant to part 15 of the FCC
rule. These limits are designed to provide reasonable protection against harmful interference in a residential instal lat ion.
This equipment generates uses and can radiate radio frequency energy and, if not installed and used in accordance with the
instructions, may cause harmful interferen ce to radio communica tions. However, this is no g uarantee that interferen ce will not
occur in a particular installation.
If this equipement does cause harmful interference to radio or television reception, which can be determined by turning the
equipment off or on, the user is encouraged to tr y to correct the interference by one or more of the follow measures.
- R eorient or relocate the receiving antenna,
- Increase the separation between the equipment and receiver,
- Connect the equipment into an outlet on a circuit different from that to which the receiver is connected,
- Consult the dealer or an experienced radio/TV technician for help.
This product incorporates copyright protection technology that is protected by metho d claims of certain U.S.
patentes and other intellectual property rights owned by macrovision co rporation and other rights owners. Use
of this copyright protection technology must be authorized by Macrovision Corporation, and is intended for
home and other limited viewing uses only unless otherwise authorized by Macrovision Corporation. Reverse
engineering or disassembly is prohibited.
IMPORTANT SAFETY INSTRUCTIONS
1) Read these instructions.
2) Keep these instructions.
3) Heed all warnings.
4) Follow all instructions.
5) Do not use this apparatus near water.
6) Clean only with dry cloth.
7) Do not block any ventilation openings. Instal l in accordance with the manufacturer’s instructions.
8) Do not install near any heat sources su ch as radia tor s, heat regi ste rs, stove s, or ot her ap paraty s (i nclud ing amp lifier s) tha t
produce heat.
9) Do not defeat the safety purpose of the polarized or grounding-type plug. A polarized plug has two blades with one wider
than the other. A grounding type plug has two blades and a third grounding prong.
The wide blade or the third prongs are provided for your safety. If the provided plug does not fit into your out let, consult an
electrician for replacement of the obsolete outlet.
10) Protect the power cord from being walked on or pinched particulary at plugs, convenience receptacles,
and the point where they exit from the apparatus.
11) Only use attachments/accessories specified by the manufacturer.
12) Use only with the cart, stand, tripod, bracket, or table specified by the manufacturer, or sold with the
apparatus. When a cart is used, use cautin when moving the cart/apparatus combination to avoid injury from
tip-over.
13) Unplug this apparatus during lightning storms or when unused for long periods of time.
14) Refer all servicing to qualified service person nel. Servicing is required when the apparatus has been damaged in any way,
such as power-supply cord or plug is damaged, liquid has been spiled or objects have fallen into the apparatus, the apparatus
has been exposed to rain or moisture, does not operate normallu, or has been dropped.
15) “WARNING” To reduce the risk of fire or electric shock, do not expose this apparatus to rain or moisture.
16) “CAUTION” These servicing instructions are for use by qualified service personnel only. To reduce the risk of electric
17) Shocks do not perform any servicing other than that contained in the operating instruction s unless you are qualif ied to do
so.
THE MANUFACTURER SAVES HIMSELF THE RIGHT TO MODIFY WITHOUT ANY PRELIMINARY OPINION TECHNICAL
SPECIFICATIONS OF THE PRODUCT
QUARTEK USA TradeMark DC-815DX - User Manual– English V.2 4/31
Page 5
DVD USER’S MANUAL
T
YPES OF DISCS YOUR DVD PLAYER WILL PLAY
Types of discs Diameter Playback Time Data Format Remark
USB & Card
Reader
12cm 74min
MPEG-4
8cm 20min
1 layer: 12min
12CM
2 layers: 240 min
DVD
1 layer: 80min
8cm
2 layers: 180 min
SVCD 12cm 45min
12cm 74cm
VCD
8cm 20cm
12cm 74min
CD
8cm 20min
HD-CD
12cm 74min HD-CD: Digital Audio
MP3/JPEG
12cm 600min Compressed Digital Audio
Note: DVD-R, CD-R, CD-RW discs can be played in this DVD player.
USB 2.0, MMC SD, MS,
MS-Pro, CF, SMC,
MircoDriver
MPEG-4
DVD format disc:
Compressed Digital Audio
Compressed Digital Video
(Moving picture)
MPEG-2
Compressed Digital Audio
Compressed Digital Video
(Moving picture)
MPEG-1
Compressed Digital Audio
Compressed Digital Video
(Moving picture)
CD-DA: Digital Audio
Includes:
SVCD,
CVD
Include:
VCD2.0,
VCD1.1,
VCD1.0,
DVCD
QUARTEK USA TradeMark DC-815DX - User Manual– English V.2 5/31
Page 6
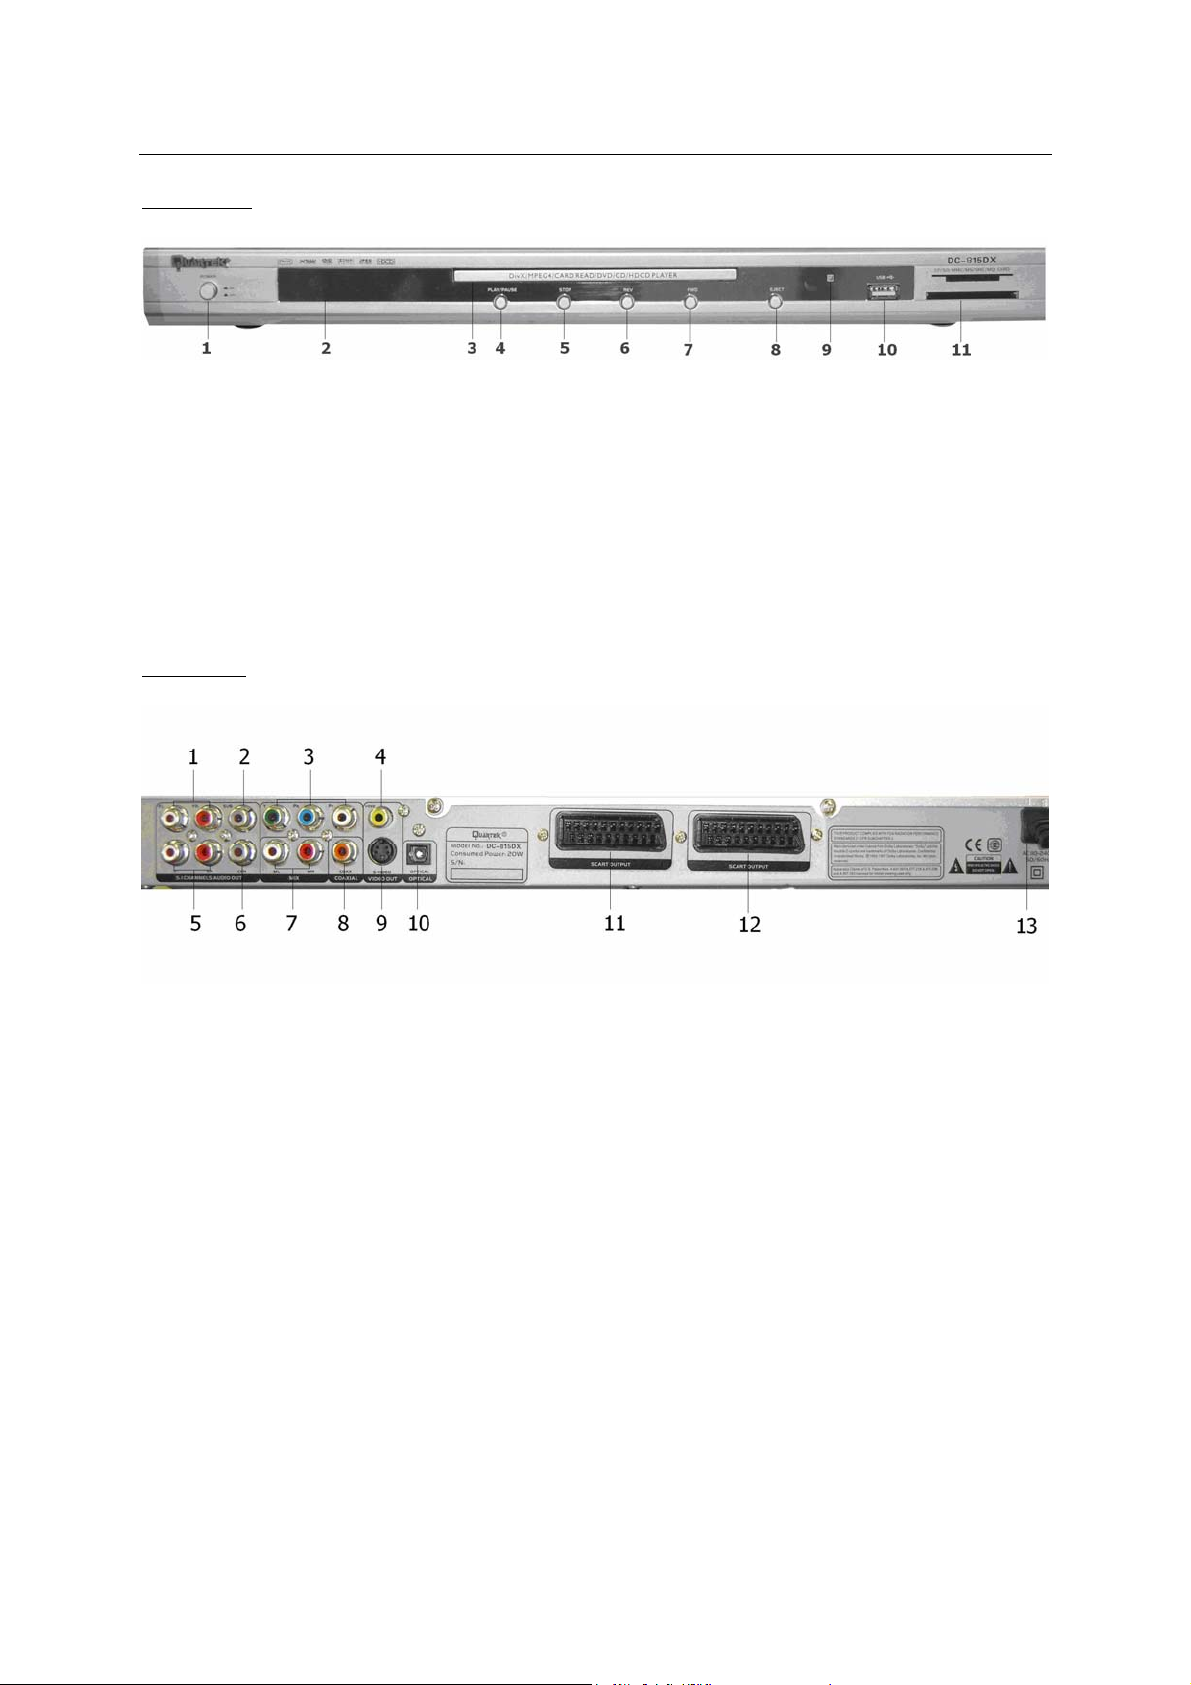
FRONT AND REAR PANEL ILLUSTRATION
Front Panel
1. Power (On/Off)
2. VFD
3. Disc Tray
4. Play/Pause Button
5. Stop Button
6. Fast backward
Rear Panel
7. Fast farward
8. Eject button
9. Remote receiver
10. USB jack
11. CF/SD/MMC/MS/SMC/MD card jack
1. 5.1 Channels front (left/right) Audio
Out
2. 5.1 Channels Subwoofer Audio Out
3. YPbPr Component Video Out
4. Composi te Video Out
5. 5.1 Channels Surround (left/right)
Audio Out
6. 5.1 Channels Center Audio Out
7. DownMix left/right Audio Out
8. Coaxial output
9. S-Video output
10. Optical output
11. Scart output
12. Scart output
13. AC 110-240V 50/60Hz
QUARTEK USA TradeMark DC-815DX - User Manual– English V.2 6/31
Page 7
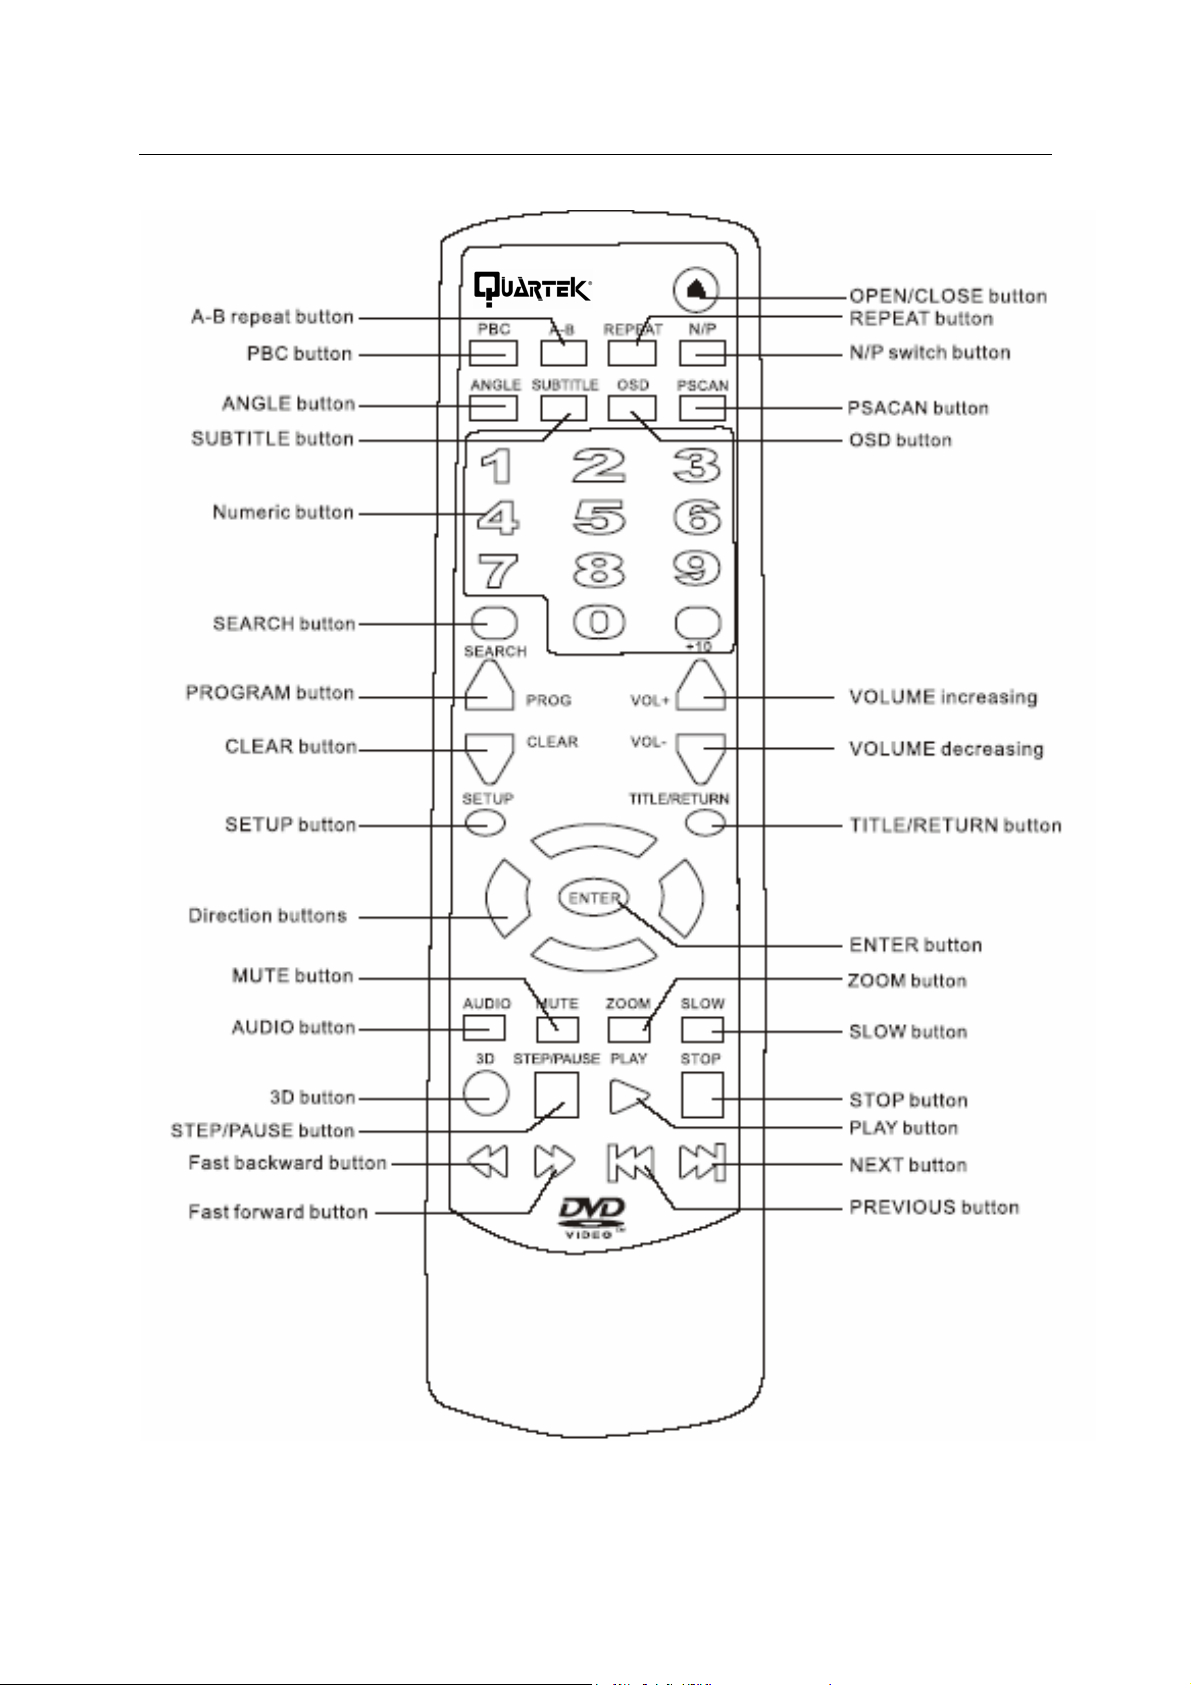
REMOTE CONTROLLER
QUARTEK USA TradeMark DC-815DX - User Manual– English V.2 7/31
Page 8
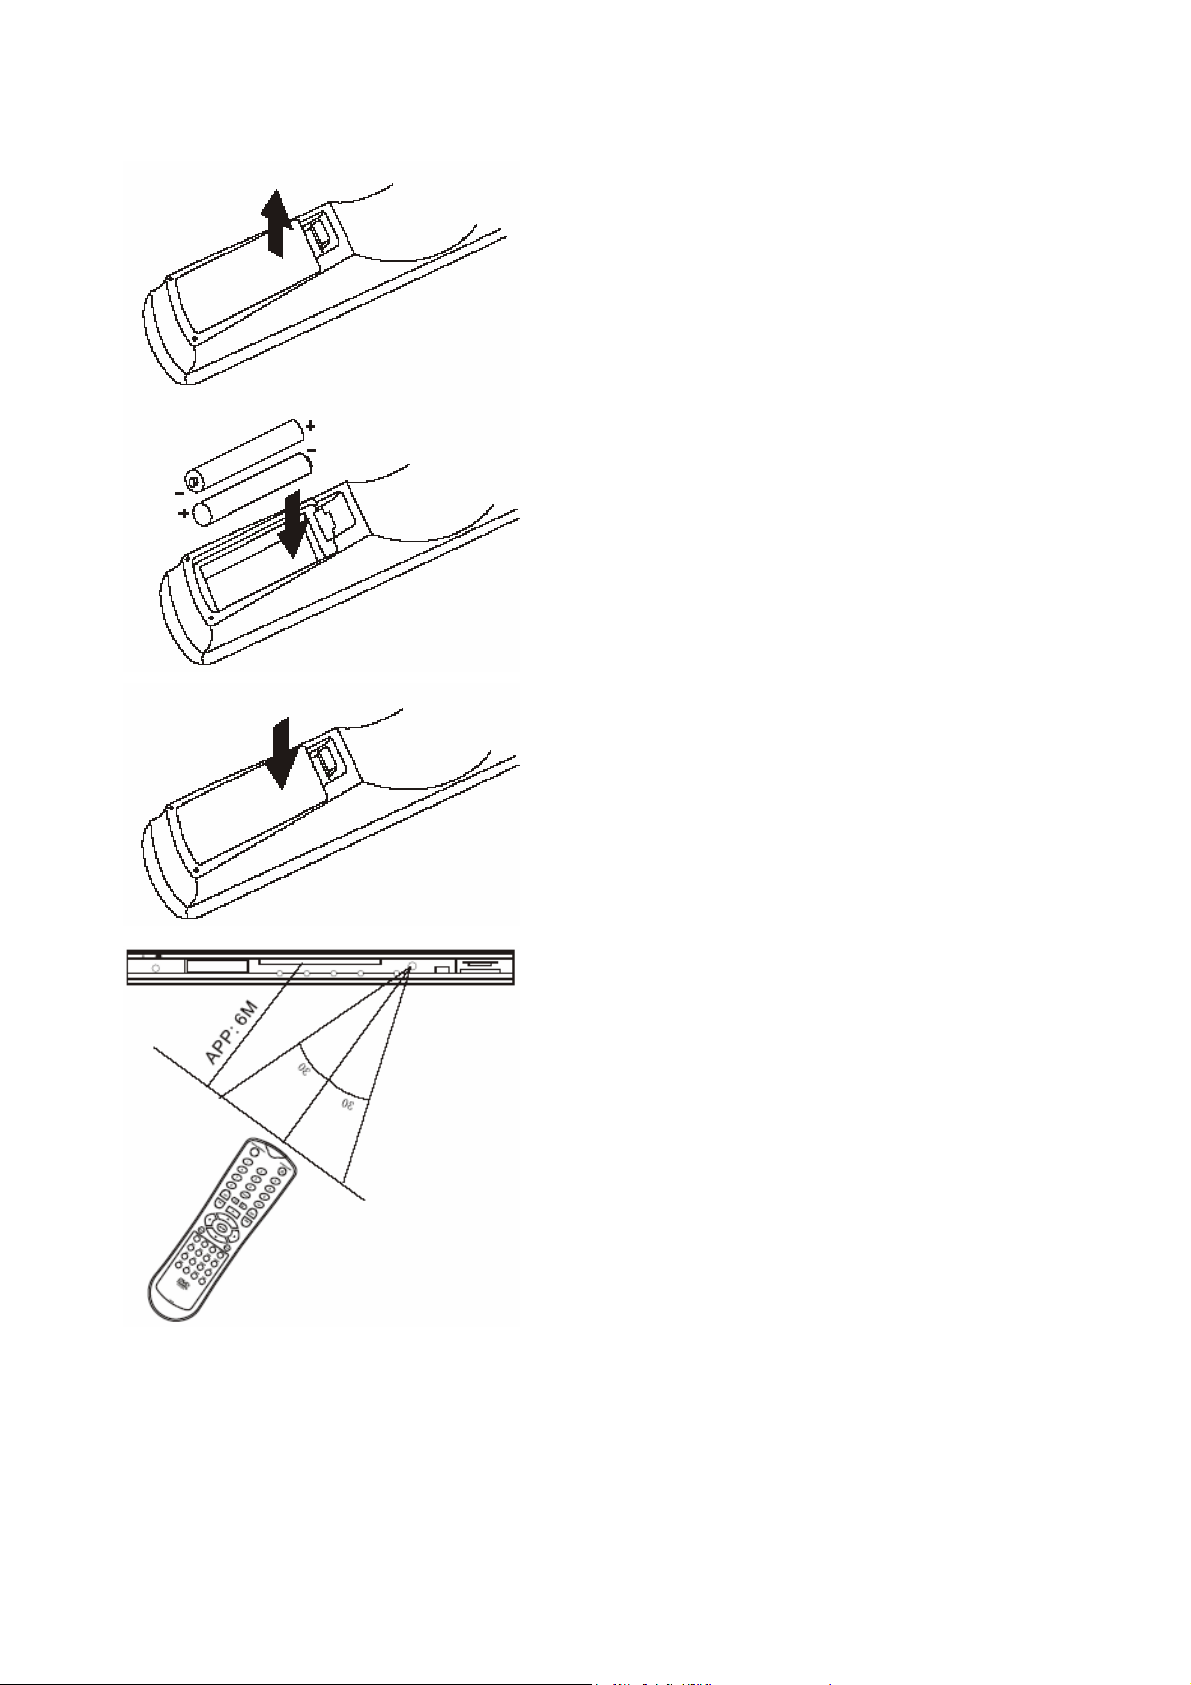
Battery installation
1 – Push downward and outward the leaf spring to
remove the battery compartment cover.
2 – Insert two size AAA batteries according to the “+”
and “-“ markings.
Note:
A – Do NOT mix different types together, or old batteries
with new batteries
B – While the remote con roller will not be used for an
extended period of time, remove the batteries t
t
o prevent
possible corrosion.
C – To prevent corrosion resulting in damage, re
exhausted batteries immediately. Where
exhausted batteries imediately. Where
the remote
controller doesn’t appear to operate normally,
move
the remote
replace
both of the batteries.
D – Typical life for the batteries provide is
product is about 6 months. The life expectan
d with th
ce may vary
according to the use status.
Use of the remote controller
Point the remote controller toward the remote se
y
our DVD home theater center. Upon receipt of the signal
f
rom the remote controller, the equipment will operate
accordingly.
T on the buttons on
he description in this manual is based
t
he equipment. You may use the counterparts on the
r
emote controller to do the same.
Note
:
A – Do not
direct sunlight or strong ligh
place this equipment in a place exposed to
t source like inverting
nsor on
fluorescent light, or else, it may interfere with correct
operation of the remote controller.
B – When other similar remote contr
oller is used in the
same room, or when this product is used near other
equipment using infrared ray, interference with the
operation of this remote controller may occur.
C – Do not place any object on the remote controller or
else it may cause unintentional depression of the buttons
and waste the batteries unnecessarily.
D – The front of the chassis should not b
e glazed with
color glass, or else, it may cause interference with normal
operation of the remote controller.
E – Any barrier between the remote controller a
nd
remote sensor will inactivate any operation of the remote
controller.
– The operating range between the remote controller
F
and the equipment shall be no more than 5 meters (16
feet). When the operating
replace the batteries with the new ones
range becomes shorter,
.
QUARTEK USA TradeMark DC-815DX - User Manual– English V.2 8/31
Page 9
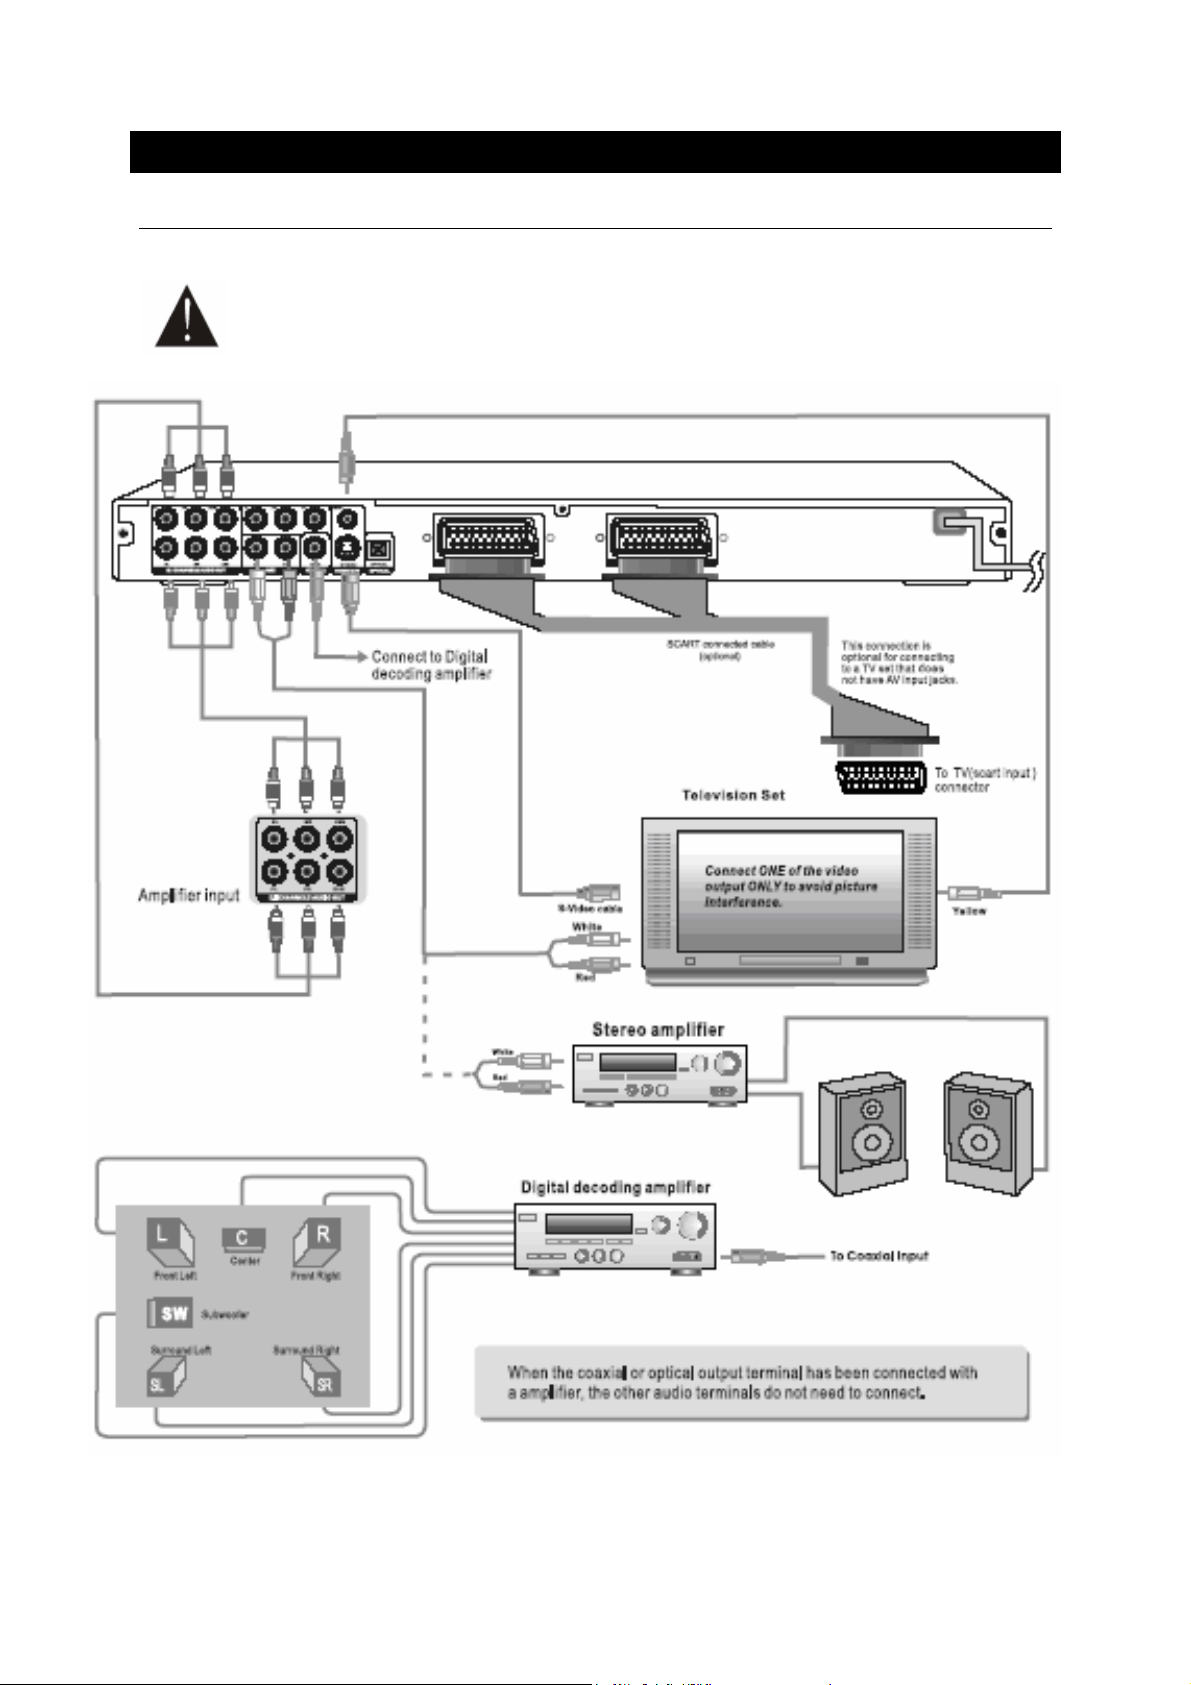
S
YSTEM CONNECTION
DO NOT Connect the AC power socket to the wall outlet before the system connection is
completed.
SYSTEM CONNECTION
QUARTEK USA TradeMark DC-815DX - User Manual– English V.2 9/31
Page 10
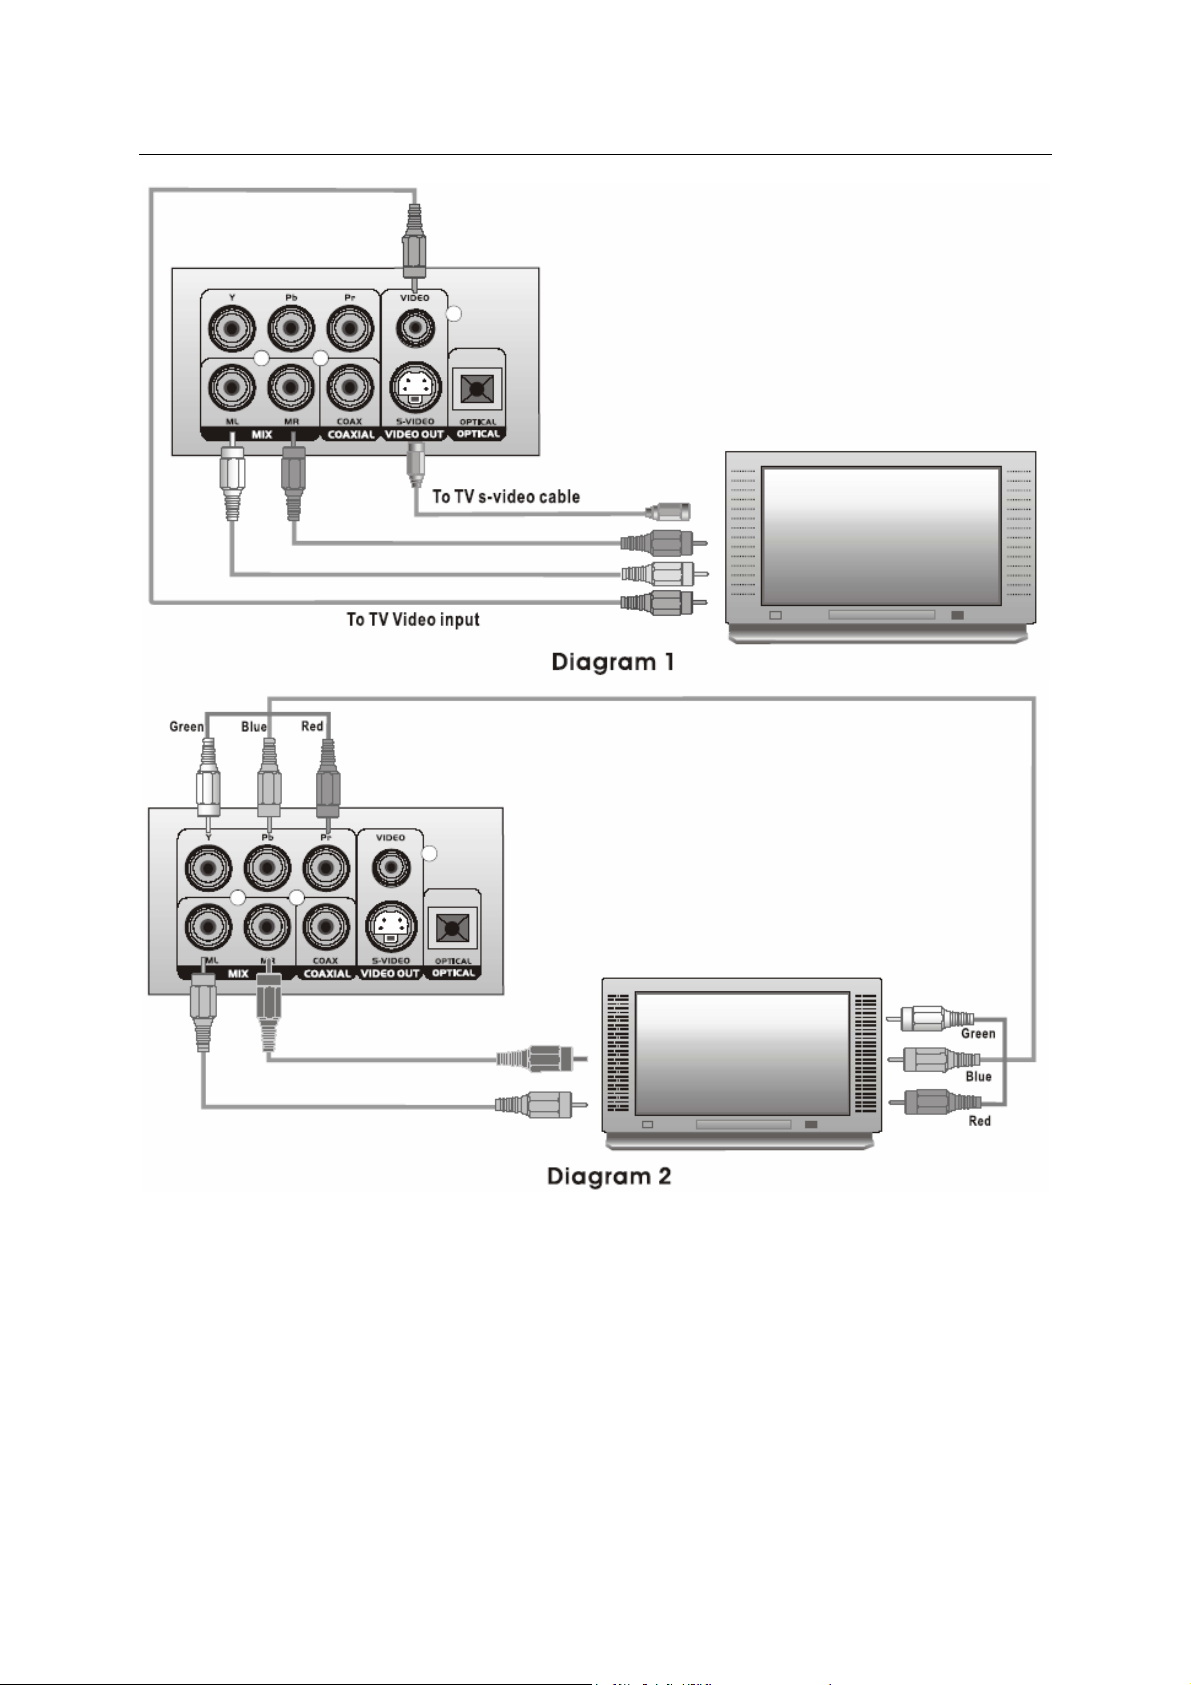
SYSTEM CONNECTION TO A TV SET
1 – The player is equipped with composite
A/V outputs at the rear of the player. Your
TV will require at least one set of A/V
inputs. The patch cord supplied with the
player will connect the A/V output jack of
your player to your TV’s inputs.
2 – To view the DVD signal, please press
‘AV/TV’ button on the TV or remote contro
of your TV to switch TV’s mode from
broadcast reception mode to one of the
3 – The player is equipped for stereo
playback. To fully realize 2 channel sound,
a Stereo TV or A/V receiver is necessary.
However, a Mono TV may be used
providing the TV one set of A/V inputs.
The A/V inputs on a Mono TV will only
include one Audio input for Mono sound.
You may connect either the Left or Right
audio channel from the DVD Composite
audio output to the Mono TV audio input.
A/V signals, your TV should have more
than one A/V input.
QUARTEK USA TradeMark DC-815DX - User Manual– English V.2 10/31
Page 11

SYSTEM CONNECTION TO AN AMPLIFIER
Audio connecting to a stereo Amplifier
Digital audio connection to a digital Amplifier
QUARTEK USA TradeMark DC-815DX - User Manual– English V.2 11/31
Page 12

CHAPTER I - BASIC OPERATION
T
URN ON YOUR DVD PLAYER
Press the power button on the Player or remote controller, and ‘Read’ appears on the TV
screen. If there hasn’t a disc in the DVD player, ‘No Disc’ will be displayed on both the
screen and the VFD.
PLACE A DISC INTO THE TRAY
Press the Open/Close button on the remote controller or the front of the DVD player, and
‘Open’ appears on the screen. Then place a disc gently into the tray with the disc’s label
facing up (double-sided discs have content on both sides, so you can place either side up),
and press the Open/Close button again to close the disc tray, ‘Close’ appears and the player
No e O some ce ain type discs,
starts to read. Then the disc starts playing automatically. (
after reading out the type, the Play or Enter bu on should be pressed to start playing.)
tt
PLAY DISCS
The contents of each disc menu vary according to how the disc was authored and what
features are included. The disc menu will be turned on for you to select, when Menu button
pressed. Also play and pause can be switched with the Pause button on the remote.
Moreover, such as menu play, title play, sequence play, etc., these dif ferent play modes are
offered.
Menu Play (compatible with DVD, SVCD, VCD2.0 discs)
1 – Press Menu button
- TV screen displays the DVD root menu when a DVD disc is loaded.
- When a SVCD or VCD2.0 disc is loaded, SVCD or VCD2.0 menu will be displayed on the
screen (when PBC is off) – At this moment, press PBC button once to display current PBC
state.
- PBC is initialized on when a SVCD or VCD2.0 disc is loaded.
2 – When a DVD disc is loaded, you can press Arrow buttons to highlight the menu items
you want to choose; as SVCD or VCD2.0, you can press Numeric buttons to select a track to
play.
3 – Press Enter or Play button, you can begin play with the highlighted.
4 – Return when playing: When a DVD disc is playing, press Menu (PBC) button, and you
can return to Root menu; as SVCD, VCD2.0, and PBC is on, press M enu (PBC) button, you
can return to the menu.
5 – Stop:
- When y ou press Stop button for the first time, the player turns into quasi stop state. At
the same time the OSD appears ‘Pre Stop’. To begin the title over, press stop twice.
- In Pre -stop state, the player remembers where you stop ped, when you start playing the
disc again, the DVD player picked up where you left off.
- In stop state, when you press Play, the player enteeers sequence playback mode.
For the disc protection, before you press Open/Close button to eject the disc tray
when playing, please press Stop button at first. After taking out the disc, press
Open/Close again to close the tray.
If you’re not going to use the DVD player for a long time, be sure to remove the
electronic plug.
t : f rt
QUARTEK USA TradeMark DC-815DX - User Manual– English V.2 12/31
Page 13

Title Play (compatible with DVD discs only)
1 – During DVD playback, press Title button to display the DVD title content.
2 – Press the Arrow buttons to highlight the title you want to choose, and press Enter. Also
you can press numeric buttons to choose.
3 – The DVD player begins with the chapter 1 of the chosen title.
Sequence Play (compatible with DVD, SVCD, VCD, HD-CD, MP3/JPEG discs)
1 – When a SVCD or VCD disc is loaded and PBC is on, once PBC button pressed, PBC
switches off. Then the player can play in sequence playback mode; when PBC button
pressed twice, PBC swiches on.
2 – Except for SVCD or VCD discs, in the stop state, when press Play b utton, the pl ayer then
enters sequence playback mode. This feature is effective to all the compatible discs.
Program Play (compatible with DVD, SVCD, VCD, HD-CD, MP3/JPEG discs)
The Program Playback option allows you to enter the order in which you want chapters or
tracks to play, maximum to 16.
1 – Program Menu:
DVD, MP3/JPEG discs: SVCD, VCD, CD, HD-CD discs:
If PBC is on, this operation will turn PBC off while the chapters / tracks plays in programmed
order.
2 – According to the highlight, use the Numeric buttons to enter the chapters / tr acks in the
order you want them to play. Then press Play or use Arrow buttons to highlight the ‘Play’
item and press enter. The chapters / tracks will play in the programmed order.
You can program maximum 16 titles/chapters/tracks.
3 – According to the direction indicator on the menu, you can press Arrow buttons to
highlight where you want to enter.
4 – During program Playback, if program button pressed, the programmed order and the
contents will be displayed on the screen, and the program playback will be stopped; Also you
can press Stop and Play to resume normal playback.
5 – Notes:
-
To clear the programmed order, use Arrow bu ons to highlight the ‘CLEAR’ item, then
tt
press Enter.
-
To modify the programmed order, use Arrow buttons to highlight the modifying it em and
enter the new chapter / ack you want to p ogram direc ly.
tr r t
6 – Meanwhile the program indicator in the VFD illuminate, and the playing chapter/track
also illuminate.
QUARTEK USA TradeMark DC-815DX - User Manual– English V.2 13/31
Page 14

CHAPTER II – ADDITIONAL OPERATION
S
ELECTING TRACKS
(compatible with DVD, SVCD, VCD, CD, HD- CD, MP3/JPEG discs)
1 – When playing a DVD disc, press Numeric buttons, on the menu or title page to select
tracks; During DVD playback, you can input desired title number directly.
2 – As a SVCD or VCD discs, during sequence playback, press numeric buttons to select
tracks. (During program playback and PBC is on, you can only press Prev/Next button to
select).
3 – As for CD, HD-CD, discs, press numeric buttons directly to select tracks.
4 – When playing MP3/JPEG discs, press numeric buttons to select different tracks on
current track list.
Notes: To select track from 1 to 10, press corresponding numeric buttons (1-9, 10)
To select tracks above 10, press 10+ button. For example, to select the track 15,
press 10+ and 5 button.
If the selected tracks is not available, the input would be invalid.
KIPPING TRACKS
S
(compatible with DVD, SVCD, VCD, CD, HD- CD, MP3/JPEG discs)
1 – To skip forward to the beginning of the next title/chapter/track on a disc, pr ess on the
remote.
2 – To skip backward to the beginning of the preceding title/chapter/track on a disc, press
on the remote.
When playing the last chapter/track on a SVCD or VCD disc with PBC off, pressing will
stop the playback; when playing the first chapter/track, pressing wi ll stop the playback;
When stop, pressing / will be invalid.
If a DVD disc is loaded, it varies according to how the disc was configured.
ULTISPEED FAST MOTION PLAYBACK
M
(compatible with DVD, SVCD, DviX, MPEG-4, VCD, CD, MP3/JPEG discs)
You can search in forward or reverse mode during playback.
1 – Press during playback to search through a disc. Press the button again on th e remote
to search at the next speed. Fast Forward playbarck has four speed : x2, x4, x8, x20. With
each, consecutive press of the button, the search speed in creases. If you press the button
five times, Fast Forward playback cycles back to normal playback.
During DVD playback, when Fast Forward Playback gets to the beginning of the next
title/chapter, it resumes normal playback; During SVCD or VCD playback with PBC on, when
Fast Forward Playback gets to the beginning of the next track, it resumes normal playback.
Press Play button to resume normal playback.
During CD, HD-CD, MP3 playback, with the speed FF x2, the player has audio output.
QUARTEK USA TradeMark DC-815DX - User Manual– English V.2 14/31
Page 15

2 – Press during playback to search through a disc. Press the button again on th e remote
to search at the next speed. Fast Reverse playbarck has four speed : x2, x4, x8, x20. With
each, consecutive press of the button, the search speed in creases. If you press the button
five times, Fast Reverse playback cycles back to normal playback.
During DVD playback, when Fast Reverse Playback gets to the beginning of the next
title/chapter, it resumes normal playback; During SVCD or VCD playback with PBC on, when
Fast Reverse Playback gets to the beginning of the next track, it resumes normal playback.
Press Play button to resume normal playback.
During CD, HD-CD, MP3 playback, with the speed FF x2, the player has audio output.
MULTISPEED SLOW MOTION PLAYBACK
(compatible with MPEG-4, DviX, DVD, SVCD, VCD, CD, HD-CD, MP3/JPEG discs)
Press slow button when pictures moving, you can enter slow motion playback mode.
Press the slow button on the remote during playback. Press the button again on the remote
to play at the next speed. Slow motion playback has six speeds: ½, 1/3, ¼, 1/5, 1/6, 1/7.
with each consecutive press of the button, the play speed decreas es. If y ou press the b utton
seven times, slow motion playback cycles back to normal playback.
Press play button to resume normal playback.
USING PAUSE/STEP FEATURE
(compatible with MPEG-4, DviX, DVD, SVCD, VCD, CD, HD-CD, MP3/JPEG discs)
1 – During CD, HD-CD or MP3/JPEG playback, press Pause/Step button one time to stop
playing. Then press Play button, it will resume play form. The point of pause, press
Pause/Step key again. Repeatedly, it will display “Invalid Key”. Press play button to resume
normal playback.
2 – During MPEG-4, Divx, DVD, SVCD or VCD pl ayback, press Pause/Step button one time t o
stop playing. Then press Play button, it will resume play form. The point of pause, press
Pause/Step key again. Repeatedly, it will play frame to fram (still picture). Press play to
resume normal playback.
USING THE REPEAT FEATURE
(compatible with DVD, SVCD, VCD, CD, HD-CD, MP3/JPEG discs)
While a disc is playing, press repeat button once, and the repeat banner appears to showw
current repeat mode.
1 – In SVCD, VCD, CD, HD-CD or MP3/JPEG sequence playback mode, press repeat button again
to turn on repeat mode.
Press the button again on the remote to turn to the next repeat mode. There are three repeat
options: Off, Track Repeat, and Disc Repeat. With each consecutive press of the button, the
repeat mode switches. If you press the button four times, repeat mode cycles back to off.
2 – In DVD playback, press repeat button again to turn on repeat mode.
There are three repeat options: Off, Chapter repeat, and Title repeat. With each consecutive
press of the button, the repeat mode switches. If you press the button four times, repeat mode
cycles back to off.
3 – In MP3/JPEG playback, press repeat button again to turn on repeat mode.
There are four repeat options: Off, Track repeat, Directory repeat, and Disc Repeat. With each
consecutive press of the button, the repeat mode switches. If you press the button five times,
repeat mode cycles back to off.
QUARTEK USA TradeMark DC-815DX - User Manual– English V.2 15/31
Page 16

USING THE OSD FEATURE
(compatible with DVD, SVCD, VCD, CD, MP3/JPEG discs)
1 – Loading and playing DVDs (two pages)
- Press OSD button once to show the first page:
‘Disc type, title */* (the playing title / total titles), chapter */* (the playing chapter / total
chapters), Elapsed time of the disc’.
- Press the button again to show the second page:
‘Language */* (the serial number of playing language / the amount of optional languages) or
Off, Language type, Auio type, Subtitle */* (the serial number of playing subtitle / the
amount of optional subtitles) or Off, Angle */* (the serial number of playing angle / the
amount of optional angles) or Off’.
- Press the button for the third time, the display menu fades out.
2 – Loading and playing SVCD disc (two pages)
- Press OSD button once to show the first page:
‘Disc type, track */* (the playing track / total tracks), Mute, PBC, repeat mode, elapsed time
of the playing track’.
- Press the button again to show the second page:
‘Language */* (the serial number of playing language / the amount of optional languages) or
Off, Language type, Auio type, Subtitle */* (the serial number of playing subtitle / the
amount of optional subtitles) or Off, Angle */* (the serial number of playing angle / the
amount of optional angles) or Off’.
- Press the button for the third time, the display menu fades out.
3 – Loading and playing VCDs
- Press OSD button once to show the page:
‘Disc type, track */* (the playing track / total tracks), Mute, PBC, repeat mode, elapsed time
of the playing track’.
- Press the button again, the display menu fades out.
4 – Loading and playing CD, HD-CD, MP3/JPEG discs:
- Press OSD button once to show the page:
‘Disc type, track */* (the playing track / total tracks), Mute, repeat mode, elapsed time of the
playing track’.
- Press the button again, the display menu fades out.
USING SEARCH FEATURE
(compatible with DVD, MPEG-4, DviX, SVCD, VCD, CD, HD-CD discs)
You can use Search feature to select a title/chapter/track number or go to a specific point in
a title. Firstly, press search Time button on the remote to bring up the search menu and
enter the edit state. Secondly, press Arrow buttons to highlight the title/chapter/track
number or the time option. Thrirdly, use numeric buttons to enter the title/chapter/track you
want to play or the elapsed time you want to go to in that titl e. A t last, pr ess Enter bu tton to
start playback. For example, entering 01:23:56 will start playback one hour, twenty-three
minutes and fifty-six seconds into the title. If the input number is illegal, the error
information INVALID KEY will be displayed on the screen.
Note : This fea ure does not work in Program Play mode t
t
If PBC is on, it will turn off automatically when search playback s arts.
When playing MP3/JPEG discs, search feature does not work.
QUARTEK USA TradeMark DC-815DX - User Manual– English V.2 16/31
Page 17

CHANGING THE SOUNDTRACK
(compatible with SVCD, VCD, CD, HD-CD, MP3/JPEG discs)
Press the L/R button to display current soundtrack.
1 – Press the button can switch soundtracks
2 – Press the button again on the remote to turn the next soundtrack.
- When pla ying a SVCD or VCD disc, there are five soundtracks: stereo (L /R), L/L, R/R, L/L
Auto A/D detect, and R/R Auto A/D detect. With each consecutive press of the button, the
soundtrack switches. If you press the button six times, soundtrack cycles back to stereo.
- When playing a CD, HD-CD or MP3 disc, there are three: stereo (L/R), L/L, R/R.
Notes: Switch to L/L Auto A/D detect or R/R Auto A/D Detect to have various antis rophes (you
can have an antistrophe xith the singing on the disc), according to the contents on the disc).
t
When playing a dual language VCD movie disc, press the L/R button to select the
desired language.
CHANGING THE AUDIO LANGUAGE
(compatible with DVD, SVCD discs)
During disc playback, press language on the remote once, and the audio language info
banner appears.
When a DVD or SVCD is recorded with multiple soundtracks, you can use the Language
feature to temporarily change the audio language (the language of the soundtrack).
There are 8 supported languages: English, French, Spanish, Germany, Portuguese, Chinese,
Japanese and Latin. With each consecutive press of the langugage button, the audio
language switches and the corresponding serial number appears on the screen. For example,
‘Language Icon: [1 English DTS 6CH] or [Off]’ (the availability of the languages are discdependent).
S
UBTITLES
(compatible with MPEG-4, DviX, DVD, SVCD discs)
Press the subtitle button on the remote once, and the subtitle info banner appears.
When a DVD or a SDVC is recorded with subtitles, you can use the subtitle features to view
subtitles on-screen. By default, subtitles are off. The info banner will display subtitle off.
To display subtitles, press the subtitles button again. The default language with its
corresponding serial number will be displayed in the info banner and subtitles will be
displayed in that language.
There are 8 supported subtitles: English, French, Spanish, Germany, Portuguese, Chinese,
Japanese and Latin. With each consecutive press of the subtitles button, the subtitles
switches. For example, ‘Language Icon: [1 English DTS 6CH] or [Off]’ (the availability of the
subtitles are disc-dependent).
To turn subtitles off, press the subtitles button until subtitle off is displayed.
QUARTEK USA TradeMark DC-815DX - User Manual– English V.2 17/31
Page 18

CHANGING CAMERA ANGLE
(compatible with DVD discs)
During disc playback, press angle on the remote once, and the angl e icon appears. Somme
DVDs contain multiple angles of a particular scene or sequence, so you can use the angle
feature to view.
Press the angle button again to go to the next camera angl e. If multiple camera angles are
available, the angle icon displays the current angle number and th e number angle avalaible.
For example: ‘Angle icon [*/*] or [Off]’; ¼ indicates that angle one is being displayed, and
there are four different angles avalaible. (This feature is disc-dependent. If no additional
camera angles are available, INVALID KEY will be displayed.)
HANGING THE TV SYSTEM
C
(compatible with DVD, SVCD, VCD, CD, HD- CD, MP3/JPEG discs)
Press P/N button on the remote to display current TV system.
Press P/N button again to change to the next TV system. There offers four systems: NTSC,
PAL60, PAL and AUTO. With each consecutive press of the P/N button, the TV system
switches. If you press the button five times, the TV system cycles back.
Notes: If AUTO TV system selected, it can auto reach the highest definition depends on
the disc.
If it isn’t full screen state (note: Wide screen program would never reach full screen
state) or in black and white, press P/N but on to adapt TV system t o the TV set of
t
NTSC or PAL.
When playing in different TV sys em, some discs may not have their fea ures
t t
entirely fulfilled in some certain standard.
t f t
Au o system o TV se is recommended.
PSCAN
It’s a switching button of Video output, press this button repeatedly, Video output will be
INTERLACE-YUV, TV-RGB, P-SCAN, PC-VGA, S-VIDEO as the progressi ve scan function, the
PSCAN Video output is available, if your TV has no progressive scan function, the PSCAN
Video Output will be unavailable.
MUTE THE AUDIO OUTPUT
(compatible with MPEG-4, DviX, DVD, SVCD, VCD, CD, HD-CD, MP3/JPEG discs)
Pressing the mute button allows you to reduce sound to an inaudible level, and ‘MUTE’ will
be displayed on screen. Press the button again or press the Vol +/ - button to return to the
normal condition.
Notes: When mute, the microphone also has no audio output.
If the player playback disc without sound, please try to press Mute button to
resume.
QUARTEK USA TradeMark DC-815DX - User Manual– English V.2 18/31
Page 19

ZOOM IN THE VIDEO IMAGE
(compatible with MPEG-4, DviX, DVD, SVCD, VCD, JPEG discs)
1 – The zoom function allows you to enlarge or zoom out the video image and to pan though
the image. Press zoom repeatedly to activate the function and choose the required zoom
factor: Zoom1, Zoom2, Zoom3, Zoom1/2, Zoom1/3, Zoom1/4, Zoom Off.
Notes: This feature does not work when the Disc menu appears.
2 – Use the arrow buttons to pan across the screen when the zoom factor is 1, 2 or 3.
EPEAT A SPECIFIC SEGMENT ON THE DISC THAT YOU DEFINE
R
(compatible with MPEG-4, DviX, DVD, SVCD, VCD, CD, HD-CD, MP3 discs)
1 – During the normal or fast motion playback, press the A-B button once, and ‘REPEAT A-‘
will appears on the screen. This indicates the start of the loop to be repeated.
2 – During the normal or fast motion playback, press A-B again, and ‘REPEAT A-B’ will
appears on the screen. It indicates the end of the loop.
Looping will run from set point A to set point B until you turn off repeat.
3 – Press A-B again to cancel A-B loop mode.
- when playing a SVCD, VCD or CD disc, you can repeat a specific segment only in one
track. When the next track begins, A-B repeat turns off automatically.
- When playing a DVD disc, you can repeat a specific segment only in one title/chapter.
V
OLUME CONTROL
(compatible with MPEG-4, DviX, DVD, SVCD, VCD, CD, HD-CD, MP3/JPEG discs)
1 – You can press the volume button on the front of TV set or the amplifier to control the
sound level.
2 – Pressing the Vol+ button on the remote allow you to amplify the sound level;
3 – Pressing Vol- will reduce the sound level.
Notes: During DVD PCM outpu playback, this feature does not work. t
QUARTEK USA TradeMark DC-815DX - User Manual– English V.2 19/31
Page 20

3D SURROUND MODE
(compatible with SVCD, VCD, CD, HD-CD, MP3 discs)
Press the 3D button on the remote once, and current 3D surround mode info will be
displayed on the screen. Press the arrow buttons to highlight the 3D surround setup menu
items; Press the 3D button again to turn off the menu.
Use the Up/Down arrow buttons and press
Enter to choose surround mode
‘EQ:[JAZZ]’ is highlighted, as the graph
showed below:
‘EQ:[STANDARD]’ is highlighted, as the
graph showed below:
‘EQ:[CLASSIC]’ is highlighted, as the graph
showed below:
‘EQ:[POP]’ is highlighted, as the graph
showed below:
‘EQ:[USER]’ is highlighted, as the graph
showed below, and the graph can vary
according to your settings: Press
Left/Right arrow buttons to highlight the
band you want to tune; Then press
Up/Down arrow buttons to increase or
decrease the value.
‘EQ:[ROCK]’ is highlighted, as the graph
showed below:
QUARTEK USA TradeMark DC-815DX - User Manual– English V.2 20/31
Page 21

Display the band:
Adjust the key:
Notes: When set ing SRND, EQ is auto setup yo Standard. t
When setting EQ, SRND is auto setup to off.
CHAPTER III – MPEG-4 & DVIX
MPEG-4 is an ISO/IEC standard being developed by MPEG (Moving Picture Experts Group).
These standards made interactive video on CD-ROM and Digital Television possible. MPEG-4
will be the result of another international effort involving hundreds of researchers and
engineers from all over the world. MPEG-4 is to be released in November 1998 and will be an
international Standard in January 1999.
MPEG-4 is building on the proven succes of three fields: digital television, interactive
graphics applications (synthetic content) and Wold Wide Web. And it will provide the
standardized technological elements enabling the integration of t he production, distribution
and content access paradigms of the three fields.
MPEG-4 is a graphics and video lossy compression algorithm standard. It is based on
MPEG-1 and MPEG-2 and Apple Quicktime technology. Wavelet based MPEG-4 files are
smaller than JPEG or Quicktime files, so they are designed to transmit video with text,
graphics and 2-d and 3-d animation layers. Wavelet techn ology can compress color images
at rates of 20:1 up to 300:1 and grayscale images at 2 to 50:1.
DviX is based on the MPEG-4 compression format. It is a new pay-per-view version of the
DVD movie-on-a-CD format. The discs are cheap to buy. DviX discs are encrypted and can
not be played in normal DVD players or in the DVD-ROM drives in newer computer.
Currently, the version of DviX have DviX 3.11, DviX 4.12 and DviX 5.05.
Support MP4 subtitle, including: English, simplified Chinese, complicated Chinese, Japanese,
Russian, West Europe and Middle Europe languages, but don’t support several subtitles at
the same time.
QUARTEK USA TradeMark DC-815DX - User Manual– English V.2 21/31
Page 22

p
CHAPTER IV – CARD READER AND USB
Card reader support: MMC, SD, MS/MS pro, CF, SMC, Micro Driver.
USB support: USB2.0
Removing the DVD from the tray, then put Card or USB, the player will auto search the
directories saved MP#/JPEG/MPEG-4/MPEG files. After searching, it will auto go to the first
directory saved MP3.
Use the direction buttons to enter the Directory Region and highlight th e desired directory,
then the first track under it starts playback. Also you ca n use the direction buttons to enter
the file region and select the file you want to play. The screen displays as the picture below:
Current MP3/JPEG file
name. If a JPEG file
Current displaying
playing, the name should be
*.jpg
The playing file is a
music file
The playing file is a
icture
JPEG
The playing file is a
movie file
File switch region :
Displays the file
type of the playing
and the switching.
Notes: 1 – Udisk : - When reading JPEG files, the display speed is slower, because the
transmit rate of system is lower.
t
2 – Due to the limit of authori y, DVD player can’t support Xd card
3 – Microdrive and CF card use the same slot, Microdrive’s consume is less than CF
- Don’t support USB hub, USB keyboard and USB mouse.
card.
QUARTEK USA TradeMark DC-815DX - User Manual– English V.2 22/31
Page 23

CHAPTER V – SETUP MENU SYSTEM
G
ENERAL STEPS OF SETUP MENU
1 – Press the setup button, the main setup
menu appears.
When the main menu displayed, the DVD
system will auto pause.
2 – Press the left and right arrow buttons
to highlight the icon of the desired page,
then press the down or right arrow butt on
to activate that page. For example, if you
want to setup the video page, press right
to highlight the video icon, the video page
will be displayed on the screen.
SETUP ITEMS INTRODUCTION
1 – System setup
The system setup options are illustrated bellow:
*
TV SYSTEM
3 – Press the down arrow button to
highlight the desired option. Press Enter or
press right to select, the choices of that
option appear on the right. For example,
press the down arrow button to highlight
the BRIGHTNESS option, then press Enter
to select, the brightness choices appear on
the right.
4 – Press the arrow buttons to highlight
the exit setup option, then press enter or
setup again to exit setup menu
Notes: When setup, he pressing of the
t
following buttons will turn off the setup
menu, while the choices that have been
changed will be saved P/N, SUBTITLE,
:
F.F, F.R, VOL +/-, PBC, TITLE, RETURN,
PLAY, STOP, PAUSE/STEP, NEXT, PREV,
S.F S.R, ZOOM, TIME, PROG, REPEAT,
,
A-B, ANGLE LANGUAGE, OSD MUTE,
, ,
SETUP, R/L.
- PAL: choose this setting if your DVD
player is connected to a PAL TV
- PAL60: choose this setti ng if your DVD
player is connected to a PAL60 TV
The default setting is NTSC.
According to the color system of the TV,
you can choose the TV system:
- AUTO: ch oose this setting if your DVD
player is connected to a multi-system TV
- NTSC: choose this setting if your DVD
player is connected to a NTSC TV
QUARTEK USA TradeMark DC-815DX - User Manual– English V.2 23/31
Page 24

* SCREEN SAVER
TV TYPE
*
If the screen saver is on, when your DVD
player is in stop, open or no disc state, or
there is a frame frozen for more than
60sec, the screen saver will be displayed.
This feature can protect the screen from
damage.
- On: choose this setting to activate the
screen saver
- Off: choose this setting to cancel the
screen saver
The default setting is ON.
VIDEO
*
- Interlace-YUV: choose this setting if
your DVD player is connected to a TV with
Y, Cb, Cr video cables
- TV-RGB: choose this setting if your
DVD player is connected to a TV with an
S-Video cable or composite video cables
- P-SCAN: choose this setting if your
DVD player is connected to a progressiv
scan TV with Y, Cb, Cr video cables
- PC-VGA: choose this setting if your
DVD player is connected to a progressiv
scan TV with a VGA video cable
Notes: - When your DVD player output
composite video, you can choose
the setting randomly
- Choose P-SCAN if your DVD
player is connected to a
progressiv scan TV.
- 16:9 (wide screen): choose this setting
if your DVD player is connected to a wide
screen TV. If you choose this setting and
you don’t have a wide screen TV, the
images on the screen may appear
distorted due to vertical compression.
- 4:3 LB (LetterBox): choose this setting
if your DVD player is connected to a
normal ratio TV. You’ll see the movies in
their original aspect ratio (height-to-width
ratio). You’ll see the entire frame of the
movie, but it will take up a smaller portion
of the screen vertically. The movie might
appear with black bars at the top and
bottom of the screen.
- 4:3 PS (Pan&Scan): ch oose this setting
if your DVD player is connected to a
normal ratio TV. You can fill the movie to
the entire screen of your TV. This might
mean that parts of the picture (the left
and right edges) won’t be seen.
Notes: - The image display ratio is
related to the recorded disc
format. Some disc can no
display images in the aspect ratio
you choose.t
- If you play a disc recorded in
4:3 format on a wide screen TV,
black bars will appear on the left
and right side of the screen
.
- You must adjust the screen
setting depending on the type of
the TV you have.
QUARTEK USA TradeMark DC-815DX - User Manual– English V.2 24/31
Page 25

* PASSWORD
* RATING
The password option is initialized locked,
and you cannot set the ratings limit or
change the password. In order for the
Ratings feature work, the password mode
must be turned on. If you want to set the
ratings limit, you will need to enter the
default password, which is 8888, then
press enter to confirm. To change the
password, you will be prompted for the old
password, then be prompted for a new.
Enter a 4-digit number (this is your
password).
2 – Language setup
The language setup options are illustrated bellow:
* Highlight the OSD language option and
press the arrow buttons to choose the
OSD language you prefer. Press enter to
confirm, and it will display OSD in that
language.
The rating feature is a rating limit system,
like movie ratings. It works with DVD discs
that have been assigned a rating. This
helps you control the types of DVDs that
your family watches.
* DEFAULT
Choose this option to resume all the setup
options to default setting.
* Highlight the SUBTITLE LANG option and
press arrow buttons to choose the subtitle
language you prefer. Press enter to
confirm. If the disc you are playing has
that language available, it will display
subtitles in that language.
* Highlight the AUDIO LANG option and
press arrow buttons to choose the audio
language you prefer. Press enter to
confirm. If the disc you are playing has
that language available, it will output
audio in that language.
* Highlight the MENU LANG option and
press arrow buttons to choose the menu
language you prefer. Press enter to
confirm. If the disc you are playing has
that language available, it will display
menu in that language.
Notes: - If your pre ered language is not available, the disc’s de ault language will be played.f f
QUARTEK USA TradeMark DC-815DX - User Manual– English V.2 25/31
Page 26

3 – Audio Setup
The audio setup options are illustrated bellow:
* Highlight the Audio Out and press the arrow
buttons to choose the audio output mode you
prefer. Press enter to confirm. There are 3
optional audio output modes: SPDIF/OFF,
SPDIF/RAW and SPDIF/PCM.
- SPDIF/OFF: From the coaxial output jack
and the optical output jack, no signal is
output.
- SPDIF/RAW: Choose this setting if your
DVD player is connected to a power amplifier
with a coaxial cable or an optical cable. When
playing a disc recorded with Dolby digital, DTS
and MPEG audio formats, the corresponding
digital signals will be output from the coaxial
output jack or optical output jack. This
player’s digital output jacks are designed for a
connection to a dolby digital, DTS or MPEG
receiver or decoder.
4 – Video Setup
The audio setup options are illustrated bellow:
*
BRIGHTNESS
- SPDIF/PCM: Choose this setting if your
DVD player is connected to a 2-channel digital
stereo amplifier. When playing a disc recorded
with Dolby Digital and MPEG audio formats,
audio signals will be modulated into a 2channel PCM signal, and it will be output from
the coaxial output jack or optical output jack.
* Highlight the DOWNSAMPLE option and
press the arrow buttons to choose the audio
output frequency, there are three optional
frequencies: 48K, 96K and 192K.
*
HUE
Use the up and down arrow buttons to
move the scroll and adjust the brightness.
*
CONTRAST
Use the up and down arrow buttons to
move the scroll and adjust the hue.
*
SATURATION
Use the up and down arrow buttons to
move the scroll and adjust the contrast.
QUARTEK USA TradeMark DC-815DX - User Manual– English V.2 26/31
Use the up and down arrow buttons to
move the scroll and adjust the saturation.
Page 27

5 – Speaker setup
The speaker setup options are illustrated bellow:
OWNMIX
* D
BASS MODE
*
Use the up and down arrow buttons to
move the scroll and adjust the downmix:
- LT/RT: Choose this setting, it will be
sound like in a movie theatre if the
original movie the disc was recorded from
was encoded in the Pro Logic Dolby
Digital format.
- STEREO: Choose this setting, when
5.1-channel sound playing, two channels
of signals will be output from the left and
right soundtrack. When 2-channel sound
playing, stereo signal will be output.
- VSS: Choose this setting, when a disc
recorded with 5.1-channel sound format
playing, the ficticious surround
soundtracks effect will be heard from the
main soundtrack.
- 5.1 CH: Choose this setting to output
the 5.1-channel sound.
No e: I you DVD disc is 5 1 ch audio out
t f r . ,
the DVD player will output 5.1-channel
sound. If your DVD disc is 2ch audio, the
DVD player will output 2 channel sound.
* SUBWOOFER
There are two setting in this option:
OFF/ON. When ON is chosen, the player
will auto detect the subwoofer input then
output it. When OFF is chosen, the
subwoofer input will not be output.
There are three settings in this option: ALL
LG SPK, ALL SM SPK, MIXED SPK. You can
adjust subwoofer volume in this option.
*
CENTER DELAY
You can adjust center delay in this option.
*
REAR DELAY
You can adjust the rear delay in this
option.
QUARTEK USA TradeMark DC-815DX - User Manual– English V.2 27/31
Page 28

6 – Digital setup
The digital setup options are illustrated bellow:
P MODE
* O
* DUAL MONO (LEFT + RIGHT)
- LINE OUT: Choose this setting to line
out the input signal. It will be more
suitable for playing in the nighttime, for
the output volume is low.
- RF REMOD: It will be more suitable to
choose this setting for playing in the
daytime, for the output volume is high.
* Dynamic Range
When LINE OUT is selected, choose this
setting to adjust the line out ratio and get
different effect. If adjusting to FULL, the
audio signal peak value will be the
minimum; while adjusting to off,
maximum.
Note: This option will be validated when
the DOWNMIX is OFF.
Choose this option to setup the L and R
mono output mode. There are four modes
in this option: STEREO, MONO L, MONO R
and MIX MONO. It is mainly used in
karaoke mode.
Reference:
- To protect your DVD player, the
interval between two consecutive Power
button operations must be above 30
seconds.
- No using for a period of time, please
pull out the plug from the electronic
outlet.
- The player s hould be operated only on
condition that the type of power supply
corresponds to the marking label. Other
wise, it doesn’t work or even be
damaged.
- The player may not be compatibl e with
some encrypted discs.
- The play er stops playback by accident,
please power it on again.
QUARTEK USA TradeMark DC-815DX - User Manual– English V.2 28/31
Page 29

HOW TO IDENTIFY UDISK WITH HUB
The product offert USB Mass Storage Classic Driver only, doesn’t of fer USB Hub Clas s Driver.
That means the DVD player temporarily doesn’t support the uDisk that needs Mass Storage
Class Driver and Hub Class Driver supported at one time. So how should you identify this
kind of uDisk?
You can use PC to identify the uDisk with Hub. Once this uDiskcollects PC, it calls Hub Class
Driver and Mass Storage Class Driver in-order. You can identify if the uDisk is with Hub or
not by checking ‘Hardware Device Manager’. To follow the steps as below:
1 – Firstly, open ‘Hardware Device Manager’. When no uDisk collects with PC, dialog box
shows as below. (To PC, the expanding items of GPIB controller are probably different, but
here in us focus on adding item only).
2 – When insert normal uDisk, ‘Hardware Device Manager’ shows as below: There will be
adding ‘USB Mass Storage Device’ item (as circled in red) in the expanding items of GPIB
controller, which represents PC’s USB port collects USB Mass Storage Class Device.
3 – When insert a uDisk with Hub, ‘Hardware Device Manager’ shows as below: There will be
adding ‘Generic USB Hub’ item as well as ‘USB Mass Storage Device’ item. which represents
PC’s USB port collects USB Hub and USB Mass Storage Class Device.
Hereby, you can identify if a uDisk is with Hub or not.
USERS INFORMATION
Please see below the various types of compatible hard disks tested and certified by
QUARTEK USA Trademark. Advice for formatting and use of your external hard disk
ALL CONNECTIONS FROM YOUR
QUARTEK ELECTRONIC DEVICES:
1) Format your disc in FAT32.
2) Your disc should not be partitioned.
3) Your external hard disk should contain only the Video, Music
and Photographs and no other files.
If the contrary should happen this could cause misreading on DVD player
NOTE: We carried out tests on the principal manufacturers of the market; t he fact of not
mentioning the other marks does not mean that they are not compatible with the turntable.
If you have any question please, contact us T
support@quartek-system.com
EXTERNAL HARD DISK SUPPORTED EXTERNAL HARD DISK NOT SUPPORTED
- Fujitsu IDE2.5"
- Hitachi IDE 2.5"
- Connect land IDE 3.5"
- Maxtor IDE 3.5"
- Western Digital 3.5"
- Toshiba IDE 2.5"
- WESTERN DIGITAL serie MEDIA CENTER 3.5"
- Archos Mini disque 2.5"
- Storex MobiDisk 3.5"
BEFORE
QUARTEK USA TradeMark DC-815DX - User Manual– English V.2 29/31
Page 30

TROUBLE SHOOTING
If your DVD player developped a problem, please check below situations before requesting service.
Troubles Solutions
No Power
Does not play No disc, load a disc.
No picture
(when you
connect this
player to a TV)
Picture noise/
distorted
Picture not full
screen
Problem
message
display on
screen
Malfunction Should the player develop a malfunction, unplug the player for 30 minutes. After 30
Cannot SKIP or
SEARCH
No sound or
sound output
not complete
MP3 disc no
sound or noisy
Remote control
does not
function
Type of disc DVD / CD-DA / CD-MP3 / CD-R / CD-RW
If your problem can not be settled after checking like upwards methods, please contact qualified
servicing personnel. Never attempt to remove the cover (or back) of the unit by yourself.
Check if the power cord has been properly connected to the power outlet.
Check if the main power has been switched on.
Disc has been loaded upside down. Place the disc with the label side up.
Disc's region code does not match to the player.
Disc's rating level is higher than the player' s rating level setting
Disc is not correct type for the player.
Disc is damaged or dirty, clean the disc or try another disc.
Moisture may be condensed inside the player. Remove the disc and leave the unit
power on for one or two hours.
Check if the TV set has power on, use TV remote to select A/V signal for DVD rather
than broadcast .
Check if the system connection is proper and secure.
Check if the connection cables are damaged.
Clean the disc.
Please press OPEN button, then press PROGRAM and ZOOM button to return factory
default status.
The disc is dirty or damaged. Clean the disc or try another disc.
Reset the color system of the TV set.
Try by connect player direct to the TV set, without via a VCR for example.
Select the screen format from the player’s SETUP MENU.
Select the screen format from DVD disc menu.
Following message will display when there is a problem with the loaded disc:
- Wrong regional disc: Disc’s region code does not match to the player
- Wrong password: the player’s refuse to play a disc with rating level higher than
the player’s rating level setting, or input the wrong password in setup menu.
- Wrong disc: the player is equiped with automatic disc quality detection software.
When the player detects a problem disc or a damaged disc, the player may keep
playing the disc at lower quality or stop playing, depending on the damage level of the
disc.
minutes, power on the player and the restore function should reset the player.
Some discs are programmed that do not allow users to SKIP or SEARCH at some
sections, especially at the beginning WARNING section.
Single Chapter disc cannot apply SKIP function.
Check if the TV and Amplifier have been switched on, and correctly set.
Check if the TV and Amplifier system connection is secured.
Press AUDIO button to select other audio tracks output of disc.
Check if the MUTE function of the TV o r Amplifier has been activated.
There will be no sound out put during REVERSE PLAY / PAUSE / STEP / SLOW and
SEARCH.
When PC program files or other data files are mixed with MP3 files in the same disc, the
player may play the non -MP3 files with noise or no sound.
Check the disc, if all the files on disc are MP3 files ,Skip the file, try other files.
Remove the obstacles between the remote control and the player.
Point the remote control to wards the remote sensor on the player.
Check if the batteries of the remote control have been loaded with correct polarities.
Replace the batteries of the remote control if without power
QUARTEK USA TradeMark DC-815DX - User Manual– English V.2 30/31
Page 31

SPECIFICATIONS
Card reader USB1.1 / MMC / SD / MS/MS Pro / CF / SMC / Micro driver
Video
Formats
Audio
DviX3.11, DviX4.12, DviX5.05, Dvix6.0, MPEG-4, DVD Video, DVD Audio, Super Video
CD, Video CD, CD-DA, HD-CD, OKO, CD-Rom, USB1.1, HOST 6 in 1 card.
MPEG 1, LAYER 1, LAYER 2, LAYER 3
Formats
Signal Output Color system: PAL / NTSC
Audio System: DOLBY DIGITAL down mix stereo
DOLBY DIGITAL digital output
Audio DAC 24bit/96KHz
Video output: 1Vpp (at 75 ohm)
Audio output (stereo): 2Vpp
Frequency
response
CD: 20Hz-20KHz (EIAT)
DVD: 20Hz-22KHz (48K)
20Hz-44KHz (96K)
S/N Ration >90dB
THD <0.05%
SDRAM 64Mo Cash Memory
Output
terminal
Video (composite) output
S-video output
Component Video (YPbCr) output
Digital audio output: coaxial
Down mix (L/R)
Scart x2
Power input AC110-240V 50/60Hz
20W (max)
Dimension 430x253x38mm
A
CCESSORIES
REMOTE CONTROL 1
BATTERIES 2
AUDIO VIDEO CABLES ( RED, WHITE, YELLOW) 1
SCART CABLE 1
USER’S MANUAL 1
GUARANTEE CARD 1
WWW.QUARTEK-SYSTEM.COM, CHOOSE THE COUNTRY WHERE YOU BOUGHT THE PRODUCT,
AND SEND AN EMAIL TO THE DISTRIBUTOR
HOW TO CONTACT US :
WWW.QUARTEK-SYSTEM.COM
QUARTEK USA TradeMark DC-815DX - User Manual– English V.2 31/31
USA TRADEMARK
MIAMI FL, 33154 USA
 Loading...