

Page 1

. . . . . . . . . . . . . . . . . . . . . . . . . . . . . .
STT2401A, STT3401A
. . . . . . . . . . . . . . . . . . . . . . . . . . . . . . .
Travan 40 tape drive
. . . . . . . . . . . . . . . . . . . . . . . . . . . . . . .
. . . . . . . . . . . . . . . . . . . . . . . . . . . . . . .
. . . . . . . . . . . . . . . . . . . . . . . . . . . . . . .
Product Manual
. . . . . . . . . . . . . . . . . . . . . . . . . . . . . . .
Page 2

© 2002 Seagate Removable Storage Solutions LLC. All rights reserved
Part Number 100249522
Seagate and the Seagate logo are registered trademarks of Seagate Technology LLC. Other product names are
trademarks or registered trademarks of their owners.
Seagate reserves the right to change, without notice, product offerings or specifications. No part of this publication may
be reproduced in any form without written permission from Seagate Removable Storage Solutions LLC.
Publication Number T-012, October 23, 2002
Page 3

FCC Notice
This equipment generates and uses radio frequency energy and, if not installed and used properly—that is, in strict
accordance with the manufacturer’s instructions—may cause interference to radio communications or radio and
television reception. It has been tested and found to comply with the limits for a Class B computing device in accordance
with the specifications in Part 15 of FCC Rules, which are designed to provide reasonable protection against such
interference in a residential installation. However, there is no guarantee that interference will not occur in a particular
installation. If this equipment does cause interference to radio or television reception, which can be determined by
turning the equipment on and off, you are encouraged to try to correct the interference by one or more of the following
measures:
• Reorient the receiving antenna.
• Relocate the computer with respect to the receiver.
• Move the computer into a different outlet so that the computer and receiver are on different branch circuits.
If necessary, you should consult the dealer or an experienced radio/television technician for additional suggestions. You
may find the booklet, How to Identify and Resolve Radio-TV Interference Problems, prepared by the Federal
Communications Commission, helpful. This booklet (Stock No. 004-000-00345-4) is available from the U.S. Government
Printing Office, Washington, DC 20402.
Warning. Changes or modifications made to this equipment, which have not been expressly approved by Seagate,
may cause radio and television interference problems that could void the user’s authority to operate the
equipment.
Further, this equipment complies with the limits for a Class B digital apparatus in accordance with Canadian Radio
Interference Regulations ICES-003.
Cet appareil numérique de la classe B est conforme a la norme NMB-003 du Canda.
Important Information About This Manual
Seagate provides this manual “as is,” without warranty of any kind, either expressed or implied, including, but not limited
to, the implied warranties of merchantability and fitness for a particular purpose. Seagate reserves the right to change,
without notification, the specifications contained in this manual.
Seagate assumes no responsibility for the accuracy, completeness, sufficiency, or usefulness of this manual, nor for any
problem that may arise from the use of the information in this manual.
Page 4

Table of Contents
Table of Contents
Introduction 1
Drive overview..............................................................................................................1
Key features ..........................................................................................................1
Typical system configurations......................................................................................2
Minicartridge technology overview...............................................................................3
Flash EEPROM............................................................................................................4
References...................................................................................................................4
Specifications 5
Performance specifications..........................................................................................5
Recording Specifications .............................................................................................5
Physical specifications.................................................................................................6
Power supply specifications.........................................................................................7
Current and power requirements...........................................................................7
Power connector ...................................................................................................8
Environmental requirements........................................................................................8
Reliability......................................................................................................................9
Mean-Time-Between-Failures...............................................................................9
Mean-Time-To-Repair...........................................................................................9
Tape compatibility......................................................................................................10
Regulatory compliance ..............................................................................................10
Installation 11
Before you begin........................................................................................................11
Handling guidelines.............................................................................................11
Setting jumpers..........................................................................................................11
Installing the drive......................................................................................................13
Mounting dimensions.................................................................................................14
Drive operation and maintenance 16
Introduction................................................................................................................16
Front panel LED.........................................................................................................16
Using Travan cartridges.............................................................................................17
Loading cartridges...............................................................................................17
Unloading cartridges ...........................................................................................17
Emergency cartridge removal .............................................................................18
Forcing cartridge ejection .............................................................................18
Page iv Seagate Travan 40 Product Manual
Page 5

Table of Contents
Manual ejection.............................................................................................18
Setting the write-protect switch...........................................................................19
Drive maintenance.....................................................................................................20
Caring for tape cartridges....................................................................................20
Cleaning the drive read/write head......................................................................20
Troubleshooting.........................................................................................................21
Initial checks........................................................................................................21
No drive response, front panel LED does not light..............................................21
Front panel LED blinks rapidly following power-up self-test................................21
Drive does not come ready.................................................................................22
Motor starts to drive cartridge but stops immediately..........................................22
Drive will not write but will read previously written tapes.....................................22
Tape does not stream.........................................................................................22
Drive not seen during boot-up.............................................................................23
Drive not seen by OS after boot-up.....................................................................23
Tape won’t load...................................................................................................23
Back-up program “freezes” or “locks up” ............................................................23
“Bad blocks,” media errors, etc...........................................................................24
Slow backups......................................................................................................24
Tape won’t eject..................................................................................................24
“Incompatible format,” “Won’t write on this tape”................................................24
Loading revised firmware via Seagate firmware cartridge.........................................25
ATAPI interface 27
Introduction................................................................................................................27
ATA-2 Interface pin assignments ..............................................................................27
ATAPI commands......................................................................................................28
Specification compliance...........................................................................................29
ERASE (Group 0, Op. Code 19)................................................................................30
INQUIRY (Group 0, Op. Code 12).............................................................................31
LOAD/UNLOAD (Group 0, Op. Code 1B)..................................................................33
LOCATE (Group 1, Op. Code 2B).............................................................................35
LOG SELECT (Group 2, Code 4C) ...........................................................................36
LOG SENSE (Group 2, Op. Code 4D) ......................................................................37
Page 00h—Supported Log Page ........................................................................38
Page 03h—Error Counter for READ (ATAPI) .....................................................38
Page 03—Error Counter for READ definitions .............................................39
Page 2Eh—TapeAlert Diagnostic .......................................................................40
Page 31h—Tape Capacity Page.........................................................................45
Page 31h—Special Information ..........................................................................46
Seagate Travan 40 Product Manual Page v
Page 6

Table of Contents
Page 31h—Special Information Definitions ..................................................46
Page 33h—Special Information in STT31401A mode ........................................47
Page 33h—Special Information Definitions ..................................................48
Page 3Eh—Report Check-Sum of FLASH-RAM (LOG SENSE only).................49
Page 3Eh—Report Check-Sum Definitions..................................................49
MODE SELECT (Group 0, Op. Code 15) ..................................................................51
CDB for MODE SELECT Command...................................................................51
MODE SENSE (Group 0, Op. Code 1A)....................................................................61
PREVENT/ALLOW MEDIA REMOVAL (Group 0, Op. Code 1E)..............................66
READ (Group 0, Op. Code 08)..................................................................................67
READ BUFFER (Group 1, Op. Code 3C)..................................................................69
READ POSITION (Group 1, Op. Code 34)................................................................71
REQUEST SENSE (Group 0, Op. Code 03) .............................................................73
Request Sense Keys...........................................................................................76
Sense Code (ASC) and ASC Qualifier Assignments ..........................................77
REWIND (Group 0, Op Code 01) ..............................................................................80
SEND DIAGNOSTIC (Group 0, Code 1D).................................................................81
SPACE (Group 0, Op. Code 11)................................................................................82
TEST UNIT READY (Group 0, Op Code 00).............................................................84
VERIFY (Group 0, Op. Code 13)...............................................................................85
WRITE (Group 0, Op. Code 0A)................................................................................86
WRITE BUFFER (Group 1, Op. Code 3B) ................................................................87
WRITE FILEMARK (Group 0, Op. Code 10) .............................................................89
ATA Command Descriptions .....................................................................................91
CHECK POWER MODE (ATA Command E5)..........................................................93
DEVICE RESET (ATA Command 08) .......................................................................94
EXECUTE DEVICE DIAGNOSTIC (ATA Command 90)...........................................95
IDENTIFY DEVICE (ATA Command EC)..................................................................97
IDENTIFY PACKET DEVICE (ATA Command A1)...................................................98
IDLE (ATA Command E3) .......................................................................................105
IDLE IMMEDIATE (ATA Command E1) ..................................................................106
NOP (ATA Command 00)........................................................................................107
PACKET (ATA Command A0).................................................................................108
SET FEATURES (ATA Command EF)....................................................................109
SLEEP (ATA Command E6)....................................................................................111
STANDBY (ATA Command E2) ..............................................................................112
STANDBY IMMEDIATE (ATA Command E0) .........................................................113
Travan 40 tape format 114
Introduction..............................................................................................................114
Page vi Seagate Travan 40 Product Manual
Page 7

Table of Contents
Tape partitioning......................................................................................................114
Track positions ........................................................................................................114
Track numbering......................................................................................................115
Track format ............................................................................................................115
Frames..............................................................................................................115
Blocks................................................................................................................117
Tape reference servo pattern..................................................................................117
Write equalization....................................................................................................118
Randomization.........................................................................................................118
Theory of operations 119
Overview..................................................................................................................119
Block diagram..........................................................................................................119
Drive mechanisms...................................................................................................120
Mechanics.........................................................................................................120
Cartridge-load mechanism................................................................................120
Capstan/drive-motor assembly.........................................................................120
Chassis .............................................................................................................120
Control circuits.........................................................................................................120
Head design.............................................................................................................121
Flash EEPROM .......................................................................................................121
Sensors and switches..............................................................................................121
Drive media (Travan minicartridges) .......................................................................122
Glossary 123
Seagate Travan 40 Product Manual Page vii
Page 8

Page 9

Introduction Chapter 1
Introduction
1
Drive overview
The Seagate® STT3401A and STT2401A extend the Seagate family of one-inch
high Travan drives that feature high performance, high reliability, and quiet operation.
The drives transfer data at up to 120 megabytes per minute (Mbytes/min) without
compression.
With optimal system resources and compressible data structures, nominal transfer
rates of up to 240 Mbytes per minute can be obtained using software data
compression (assuming a 2:1 compression ratio). The compression ratio is
dependent on the specific system and the nature of the files being compressed.
These drives are internal devices, providing affordable storage in either 3.5-inch
(STT3401A) or half-high 5.25-inch (STT2401A) form factors, for easy installation in
today's computers.
Key features
• Automated cartridge loading: When a cartridge is inserted into the drive, it is
automatically drawn into the drive mechanism. The cartridge is fully loaded within
the drive and does not extend beyond the front of the bezel during operation.
Pressing the Eject button causes the drive to unload the cartridge until it extends
out about one inch beyond the bezel.
• Backward read-compatible with Industry Standard QIC-3220-MC Travan 5 Data
Format
• Selectable sustained data transfer rate of 2.0 Mbytes per second (compressed)
or 1.22 Mbytes per second (native), to support various host systems
• Auto-Throttle™ tape speed adjusts to sustain streaming operation with the Host
transfer rates.
• ATAPI interface
• Servo-burst-controlled high-resolution head positioning system
• Available in either 3.5-inch, 1-inch high or 5.25-inch half-height form factors
• Data integrity of less than 1 hard read error in 1017 bits, with automatic retry
algorithm
• 8-Mbyte data buffer
• High-speed, 110 inch-per-second tape rewind
• EEPROM containing non-volatile option settings and diagnostic results
Seagate Travan 40 Product Manual Page 1
Page 10
Chapter 1 Introduction
With the availability of greater capacity disc drives and the growth of small networks,
the need for cost-effective, high-capacity storage has grown. The STT3401A is ideal
for standalone computers, workstations, and small networks.
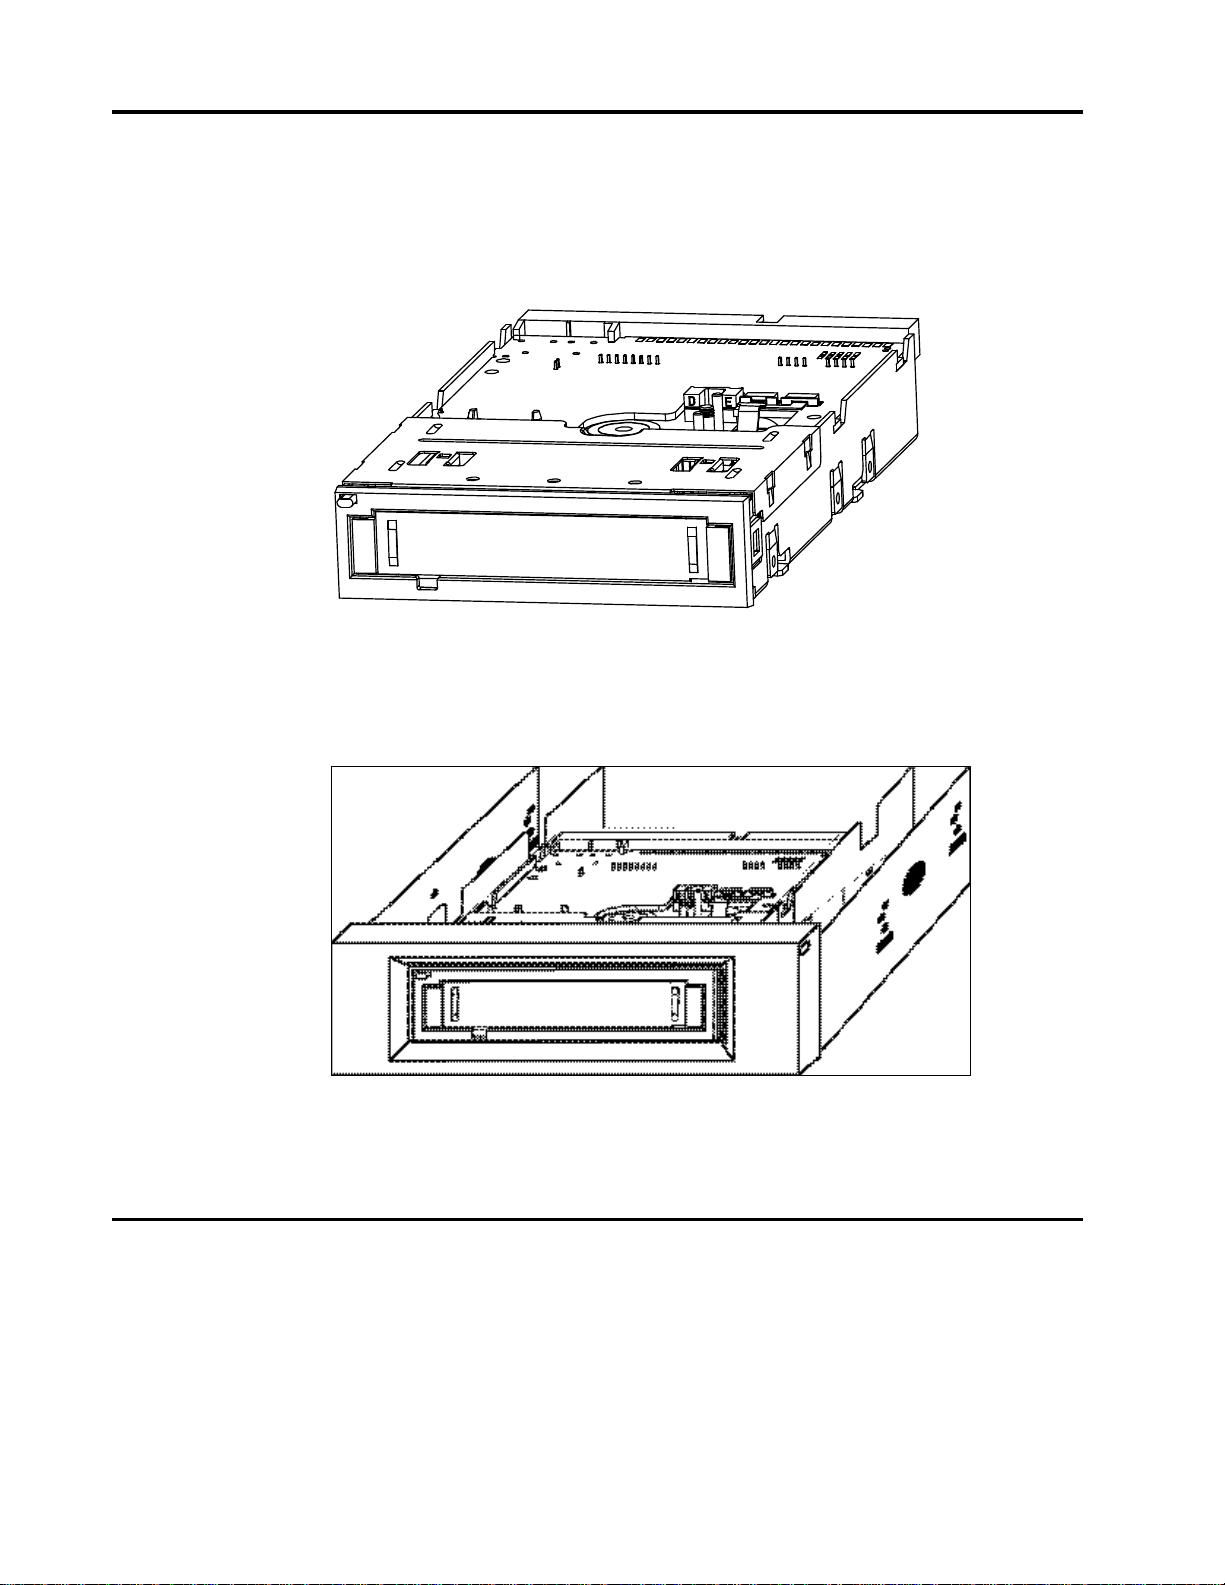
Figure 1 shows the STT3401A 3.5-inch internal drive. Figure 2 shows the
STT2401A, which comes with brackets for mounting in 5.25-inch drive bays.
Figure 1
STT3401A 3.5-inch internal drive
Figure 2
STT2401A 5.25-inch internal drives
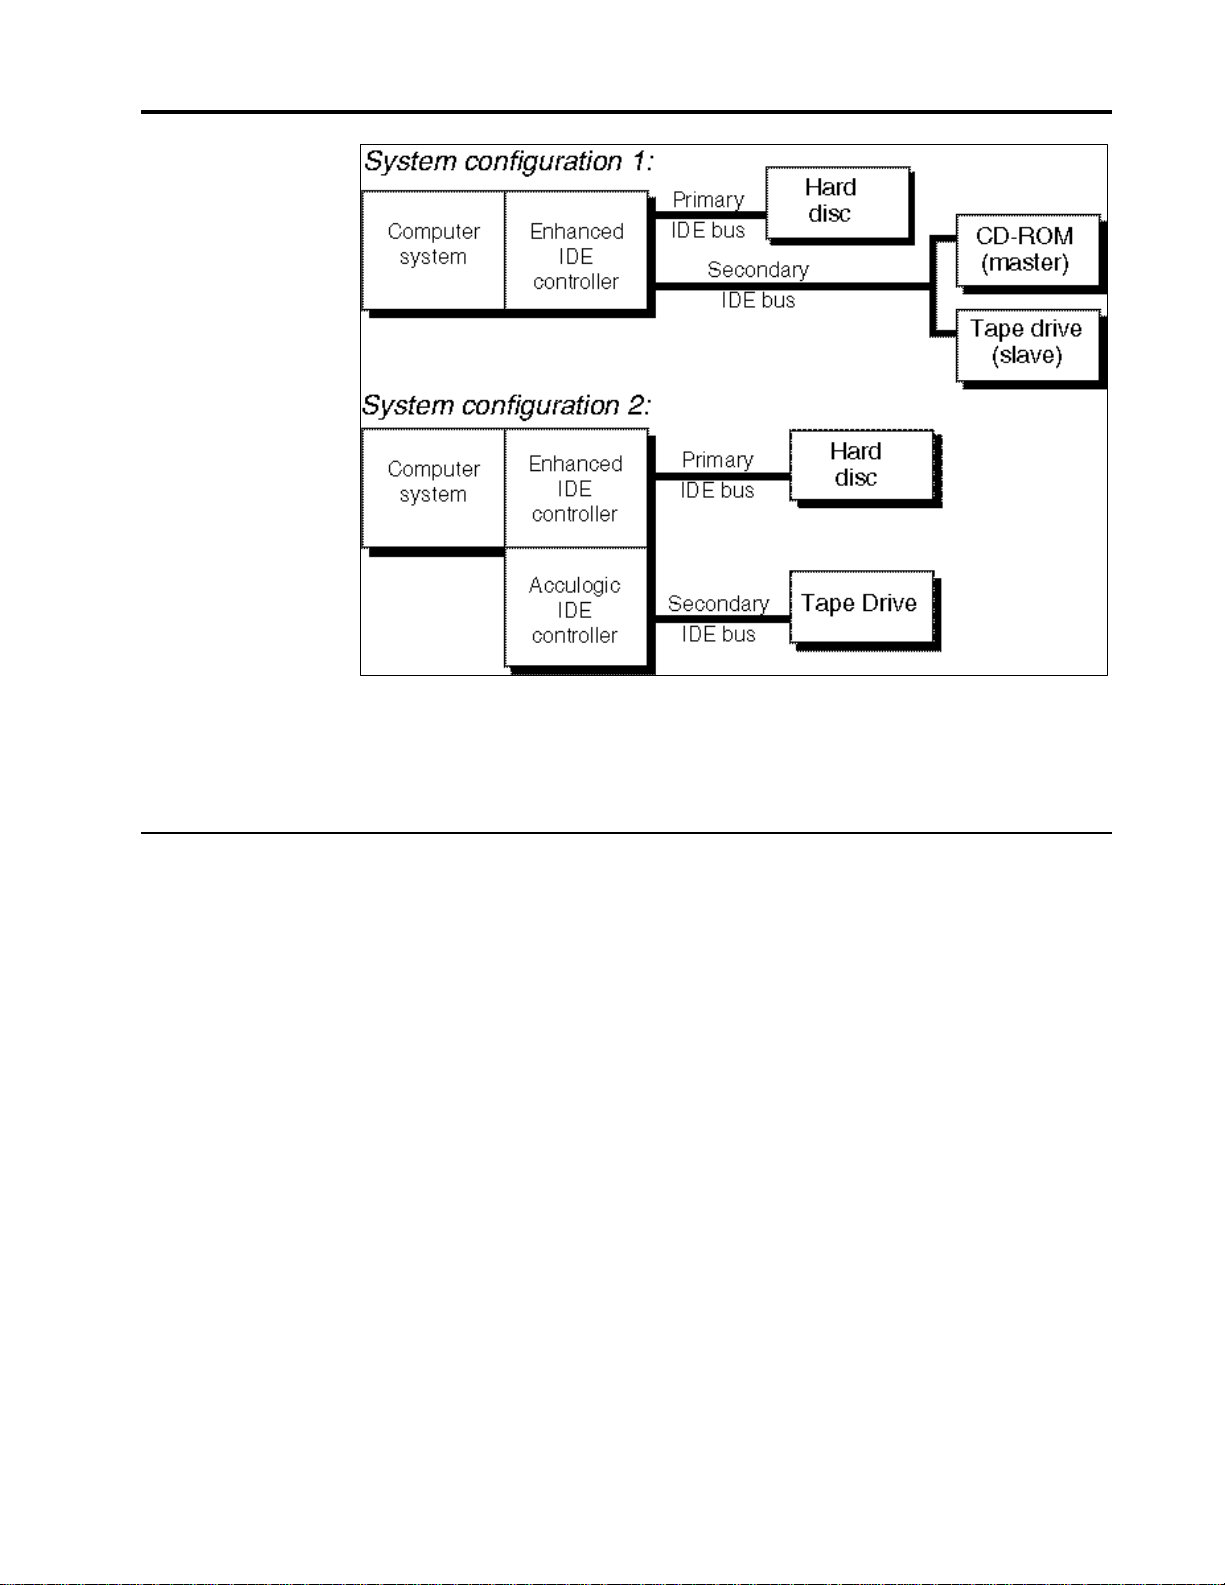
Typical system configurations
The Enhanced IDE standard supports up to four ATAPI peripherals: two devices on
the primary port and two devices on the secondary port. Of the two devices on each
port, one must be designated master and the other must be designated slave. Figure
3 on the following page shows sample configurations for two ATAPI systems.
Page 2 Seagate Travan 40 Product Manual
Page 11
Introduction Chapter 1
Figure 3
Sample ATAPI configurations
Minicartridge technology overview
Having evolved from the original mass-storage medium—reel-to-reel, one-half-inch
tape storage—the minicartridge technology of today offers fast, efficient, highcapacity storage in a compact, easily-removable hard-shell package. In little more
than a decade, storage capacities have increased from some 60 megabytes
(Mbytes) on 9 tracks (QIC-24, 1982) to the 40-Gbyte (compressed) capacity
achievable with a single Travan 40 cartridge.
The streaming-tape intelligence in the Travan drive provides a continuous tape
motion with an uninterrupted, precisely coordinated flow of data to and from the
minicartridge. This "streaming" motion combined with the "serpentine" recording
method is one element that contributes to the increased storage capacities,
efficiency, and speed of today's minicartridge technology.
Use of the "serpentine" recording method exploits the bi-directional capabilities of the
cartridge. With this method, the tape is not rewound at the end of a track. Instead,
the write-read heads are logically or mechanically switched to a different position on
the tape and another track is written or read in the reverse direction. That is, the
drive first records track 1 in one direction and when the end of the tape is reached,
the head is moved and the direction of tape motion is reversed to record track 2.
This serpentine process continues until the entire tape is recorded. The individual
tracks are sequential to minimize the amount of head motion as the heads change
position for each track.
Seagate Travan 40 Product Manual Page 3
Page 12

Chapter 1 Introduction
Flash EEPROM
The Seagate Travan drives incorporate leading-edge technology in the flash
EEPROM, which is useful should the drive's firmware need to be upgraded. With the
permanently installed, electrically upgradeable, flash EEPROM memory, revised
firmware for the drive can be loaded using a Seagate OEM firmware cartridge or
through the host IDE bus.
This feature enables qualified OEMs needing to revise the drive firmware to do so
rapidly and at a reduced cost. Flash EEPROM should also prolong the life cycle of a
drive because many new techniques—such as increasing the capacity of the drive
through support for longer tapes—may require only a firmware upgrade.
References
The following standards documents describe some of the technology incorporated in
the drives referenced in this manual.
• QIC-170—Preformatted magnetic minicartridge
• QIC-157—ATAPI command set for streaming tape
• QIC-3220-MC—Serial recorded magnetic tape minicartridge (TR-5)
• Travan 640 —Serial recorded magnetic tape minicartridge (Travan 40 or 40GB)
• Tape Alert Specification 3.0
For more information about a particular QIC standard, contact Quarter-Inch
Cartridge Standards, Inc., c/o Freeman Associates, 311 East Carrillo Street, Santa
Barbara, California 93101.
Page 4 Seagate Travan 40 Product Manual
Page 13

Specifications Chapter 2
Specifications
2
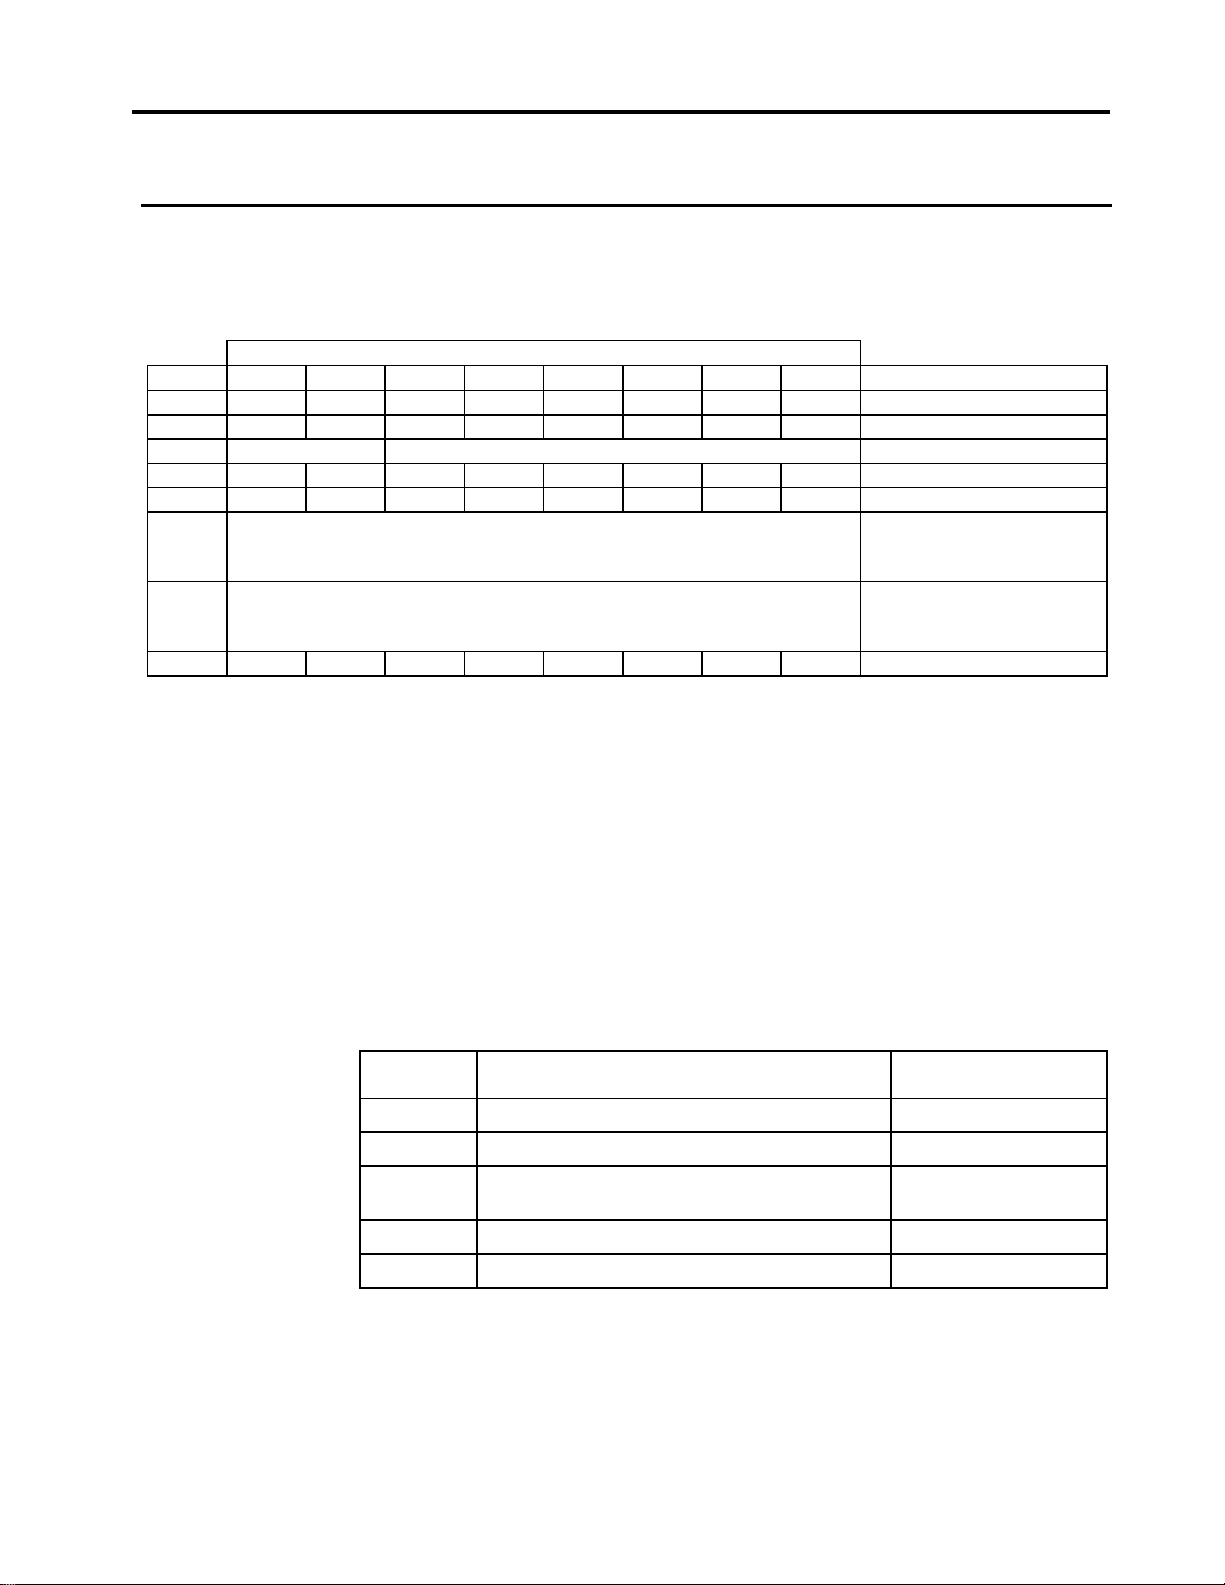
Performance specifications
The following table lists the performance specifications for the Seagate STT2401A
and STT3401A tape drives.
Feature Specification
Capacity
Sustained backup rate
Tape speed
Read/Write
Fast Forward/Rewind
Load time
Unload time
Recording Specifications
Recording method
Recording format
Recording code
20.0 Gbytes—Travan 40 cartridge (native)
(40.0 Gbytes, assuming 2:1 compression)
up to 120 Mbytes per minute native;
up to 240 Mbytes per minute with 2:1 compression
92 inches per second
(56 inches per second throttle-down speed)
110 inches per second
< 2 seconds (mechanical load)
<18 seconds to READY (from Beginning of Tape)
< 2 seconds (mechanical unload)
<10 seconds (plus rewind time to Beginning of Tape)
Serpentine
Travan 640
VRR
Head configuration
Recording media
Cartridge size
Data density
Tracks
Seagate Travan 40 Product Manual Page 5
Wide write/narrow read
1650-Oe 750' Travan 40 or 40 Gbytes (20 Gbytes native)
3.2 in. × 2.4 in. × 0.4 in. (81 mm × 61 mm)
192,000 bits per inch
108 data tracks, one (1) directory track
Page 14
Chapter 2 Specifications
Physical specifications
The physical specifications of the STT3401A and STT2401A are listed in the
following table.
Specification Drive for 3.5-inch mount Drive for 5.25-inch mount
Height
Width
Length
Weight
1.0 in / 25.4 mm 1.625 in (max) / 41.3 mm
including bezel
4.0 in / 101.6 mm 5.875 in / 149.2 mm
including bezel
6.4 in (max) / 161.5 mm 6.5 in (max) / 165.1 mm
including bezel
1.0 lbs / 0.45 kg 1.6 lbs / 0.72 kg
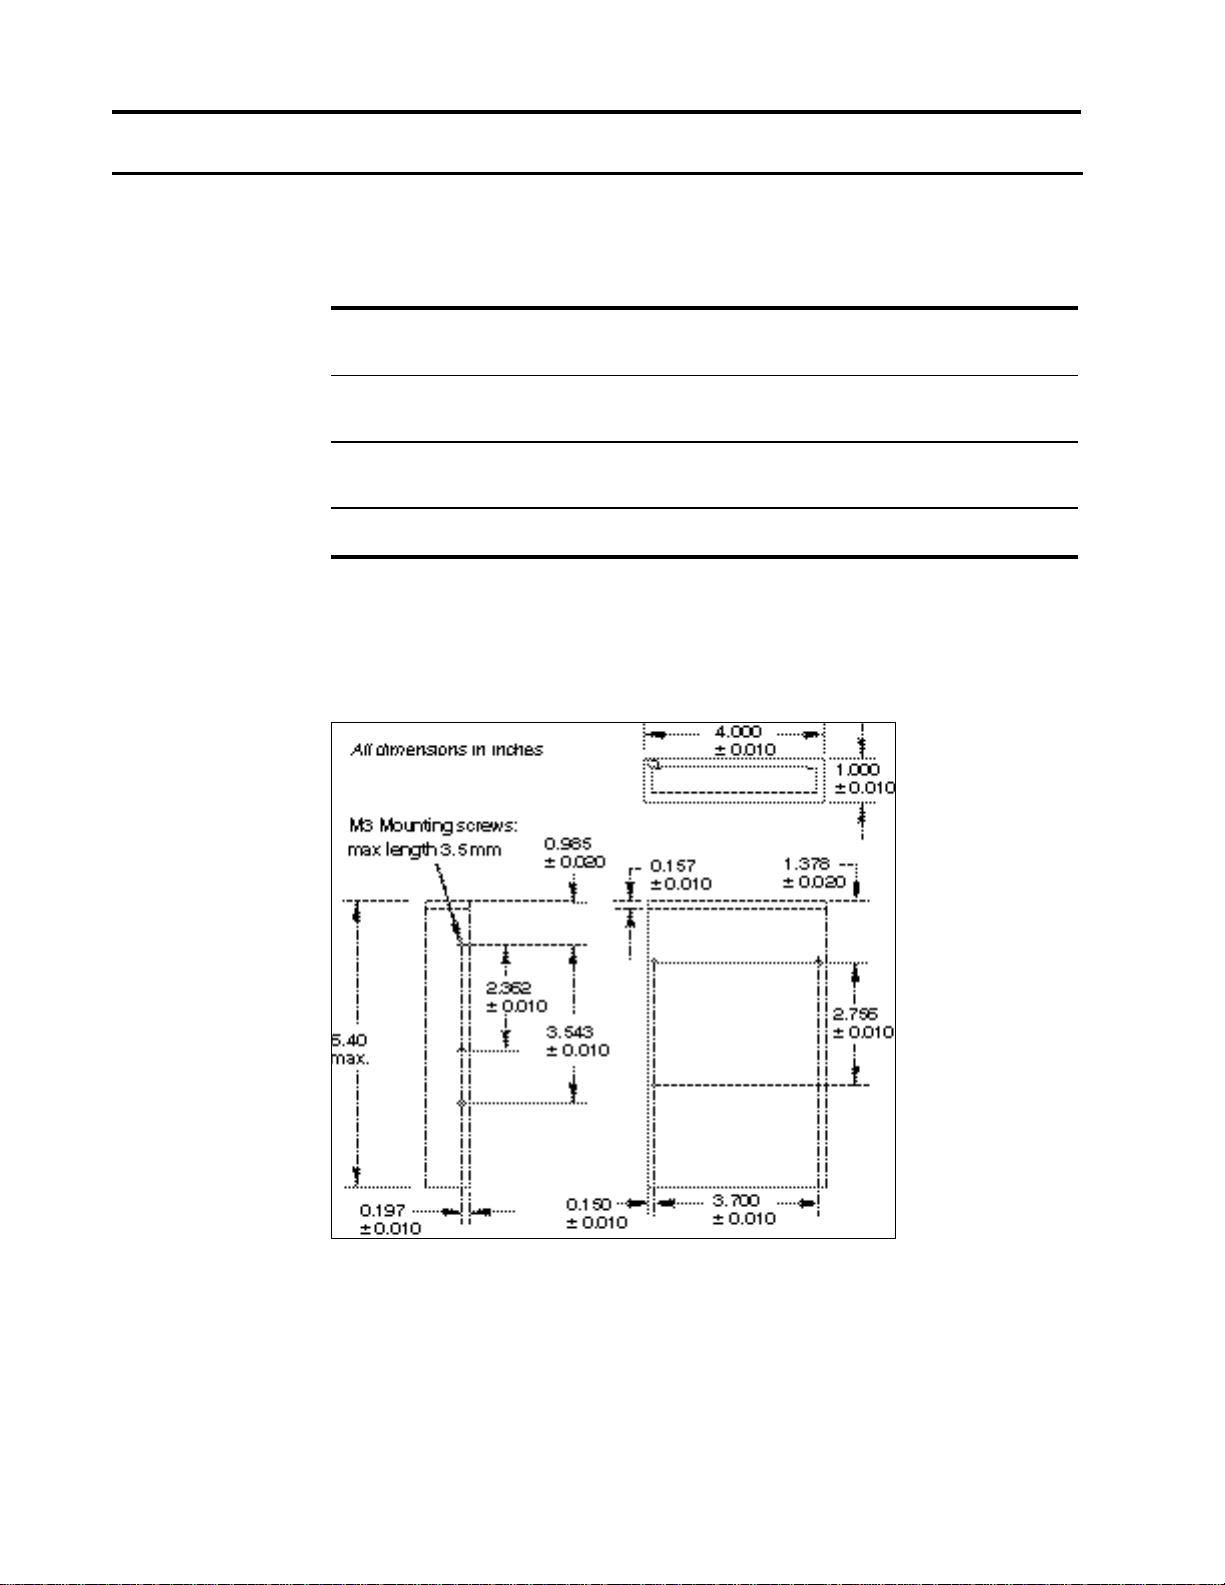
Figures 4 and 5 show the general dimensions of the 3.5-inch STT3401A (without
mounting brackets) and the 5.25-inch STT2401A (with mounting brackets).
Figure 4
STT3401A (3.5-inch mount) general dimensions
Page 6 Seagate Travan 40 Product Manual
Page 15
Specifications Chapter 2
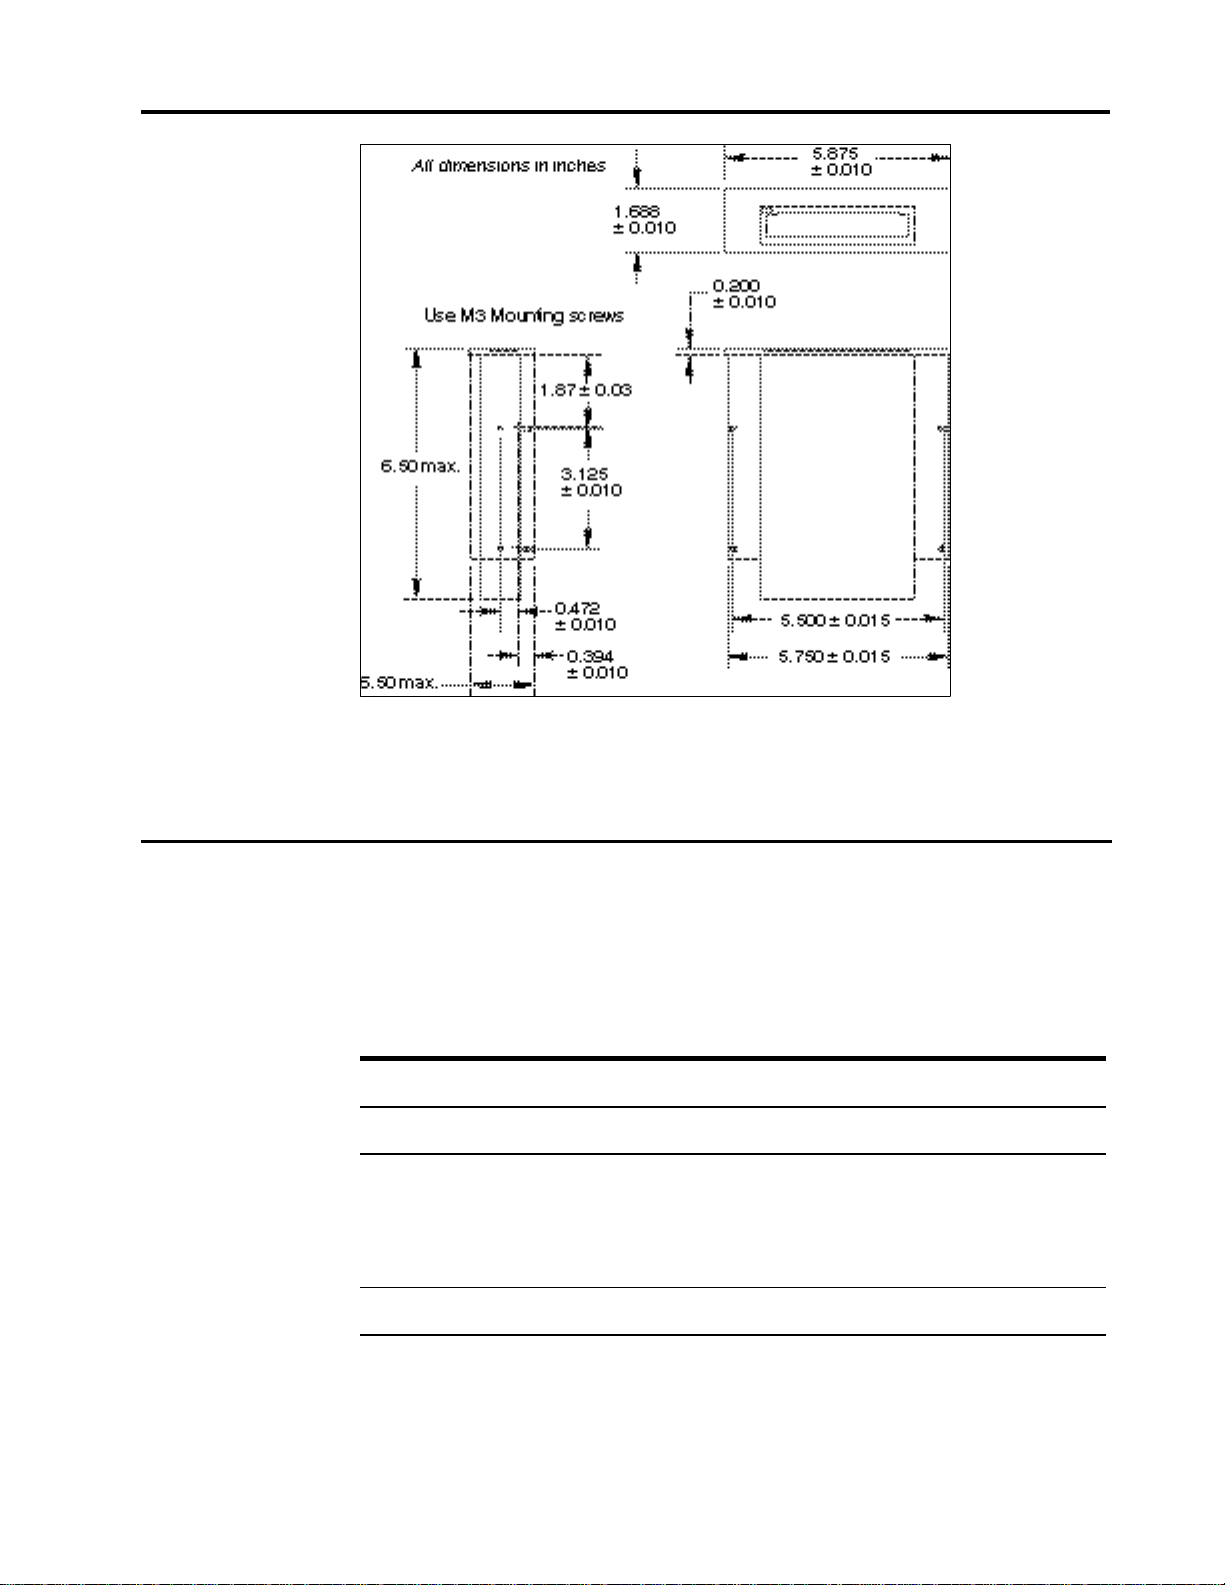
Figure 5
STT2401A (5.25-inch mount) general dimensions
Power supply specifications
The following table lists the power supply requirements for the Travan 40 drives.
Power specifications are measured at the tape drive power connector and are
nominal values.
Current and power requirements
Specification Power supply requirement
+12V DC supply +5V DC supply
Voltage tolerance
Current requirements
Seek
Load/unload
Capstan startup
Standby
±10% ±5%
0.8 amps rms
0.8 amps rms
2.0 amps rms (<200 ms)
0.03 amps rms
0.8 amps rms
0.6 amps rms
1.0 amps rms
0.5 amps rms
Ripple (peak to peak)
Seagate Travan 40 Product Manual Page 7
≤200 mV max ≤200 mV max
Page 16

Chapter 2 Specifications
Power use
Seek
Load/unload
Capstan startup
Standby
Power connector
The following table lists pin assignments for the power connector for the drive.
Pin Assignment
1
2
3
4
Environmental requirements
The following table lists the environmental specifications for the Seagate STT2401A
and STT3401A. All specifications apply to the drive mechanism unless otherwise
noted.
9.6 watts
9.6 watts
38 watts
0.4 watts
4.0 watts
3.0 watts
6.0 watts
2.3 watts
+12V DC
+12 return
+5 return
+5V DC
Specification Operational Non-operational
Temperature
Drive
Cartridge at baseplate
Thermal gradient
Relative humidity
Maximum wet bulb temperature
Altitude
Vibration:
Peak to peak displacement
Peak Acceleration
+41° to +104°F
(+5° to +40°C)
+41° to +134°F
(+5° to +57°C)
5°C per hour
20% to 80%
non-condensing
78.8°F (26°C) No condensation
–1,000 to +15,000 feet
(–305 to 4,572 meters)
0.005 in. max.
(5 to 54 Hz)
0.75 G rms
(54 to 500 Hz)
–40° to +149oF
(–40° to +65oC)
(18° F per hour)
5% to 95%
non-condensing
–1,000 to +50,000 feet
(–305 to 15,240 meters)
0.1 in. max.
(5 to 17 Hz)
1.5 G rms
(17 to 500 Hz)
Page 8 Seagate Travan 40 Product Manual
Page 17

Specifications Chapter 2
Reliability
Shock (1/2 sine wave)
Acoustic level operational
(A-wt sum)
Shock (1/2 sine wave)
7Gs peak, 11 msec
(retries may be occur)
55 dBA maximum
(measured at operator
position, per ISO 7779)
2.5 Gs peak, 11 msec 100 Gs peak, 11 msec
50 Gs peak, 11 msec
—
The STT3401A is designed for maximum reliability and data integrity. The following
table summarizes the reliability specifications.
Feature Specification
Non-recoverable (hard) error rate < 1 in 1017 bits
Correctable (soft) error rate < 1 in 107 bits
Error recovery and control
methods
Write Equalization;
Data Randomization;
Retry on read;
Reed-Solomon Error Correction Code
Mean-Time-Between-Failures
(MTBF)
Mean-Time-To-Repair (MTTR) Less than 0.5 hour
Mean-Time-Between-Failures
The Mean-Time-Between-Failures (MTBF) is greater than 250,000 hours. This
specification includes all power-on and operational time but excludes maintenance
periods. Operational time is assumed to be 20% of the power-on time. Operational
time is the time the tape is loaded.
Note: Seagate does not warrant the stated MTBF as representative of any
particular unit installed for customer use. The failure rate quoted here is
derived from a large database of test samples. Actual rates may vary from
unit to unit.
Mean-Time-To-Repair
The Mean-Time-To-Repair (MTTR) is the average time required by a qualified
service technician to diagnose a defective drive and install a replacement drive. The
MTTR for the drive is less than 0.5 hour (30 minutes).
More than 200,000 hours (20% duty rate)
Seagate Travan drives are field-replaceable. If a problem occurs with a subassembly
or component in the drive, the entire unit should be replaced. The faulty drive should
Seagate Travan 40 Product Manual Page 9
Page 18

Chapter 2 Specifications
be returned to the factory in its original packaging. Contact your distributor, dealer,
your computer system company, or your Seagate sales representative to arrange the
return.
Tape compatibility
The table below summarizes the types of tape cartridges that can be used with the
Seagate Travan 40 drives. All other tape formats are incompatible. The Travan 40
drives can read any NS20 or Travan 5 cartridge written per the QIC-3220-MC
standard. Travan 40 cartridges used by the drive must be preformatted in
accordance with the QIC-180 standard.
Note. If Travan tapes are magnetically erased, they cannot be reformatted and
become unusable.
Cartridge format
Travan 40
Travan NS20
Travan 5 (QIC-3220-MC)
*Note. The capacities shown above are based on 2:1 data compression.
Uncompressed values are one half as high. Capacities, backup speeds and
transfer rates will vary with file type and system configuration.
Regulatory compliance
The Seagate Travan 40 drive complies with the regulations listed in the following
table.
Agency Regulation
CSA
TUV & IEC-RHEINLAND
Capacity*
(Gbytes)
40 750 STTM40
20 740 STTM20
20 740 STTM20
Length
(feet)
C22.2, No. 950-M89
EN 60 950/IEC 950
Seagate part
number
UL
Canadian Dept. of Communications
EN55022 (CISPR-22)
with additional CE-Mark test requirements
FCC
1950
Class B
Class B
Class B, Part 15
Use these drives only in equipment where the combination has been determined to
be suitable by an appropriate certification organization (for example, Underwriters
Laboratories Inc. or the Canadian Standards Association in North America). You
should also consider the following safety points.
Page 10 Seagate Travan 40 Product Manual
Page 19

Specifications Chapter 2
• Install the drive in an enclosure that limits the user's access to live parts, gives
adequate system stability, and provides the necessary grounding for the drive.
• Provide the correct voltages (+5V DC and +12V DC) based on the regulation
applied—Extra Low Voltage (SEC) for UL and CSA and Safety Extra Low
Voltage for BSI and VDE (if applicable).
Installation
This chapter explains how to install the Seagate STT3401A and STT2401A drives. It
also describes how to set the master/slave jumpers and presents details of the
drive's power and ATAPI interface connectors.
Before you begin
Handling guidelines
Because the drive's electronic components can be damaged by electrostatic
discharge, use an electrostatic grounding strap when handling the drive. This strap
prevents an electrostatic discharge from damaging the electronic components on or
in the drive unit.
If you do not have an electrostatic grounding strap, perform the installation at a
static-safe workstation. If one is not available, follow these guidelines as you install
the drive unit:
• Work in an uncarpeted area.
• To protect the drive from static electricity, DO NOT remove the drive from its
3
anti-static bag until you are ready to install it.
• Before you remove the drive from the anti-static bag, touch a metal or grounded
surface to discharge any static electricity buildup from your body.
Caution: If you touch static-sensitive parts of the drive (such as the printed circuit
board) electronic components may be damaged.
• Hold the drive by the edges only. Avoid direct contact with any printed circuit
board.
• Lay the drive only on top of its anti-static bag or return the drive to its bag when
you need to lay the drive down.
Setting jumpers
In ATAPI systems, where two devices attached to a single interface cable, one of the
drives must be configured as "master" and the other must be configured as "slave."
In some cases, the assignment of master and slave can be made using a special
cable, as long as the devices provide a "cable select" setting.
Seagate Travan 40 Product Manual Page 11
Page 20
Chapter 4 Drive operation and maintenance
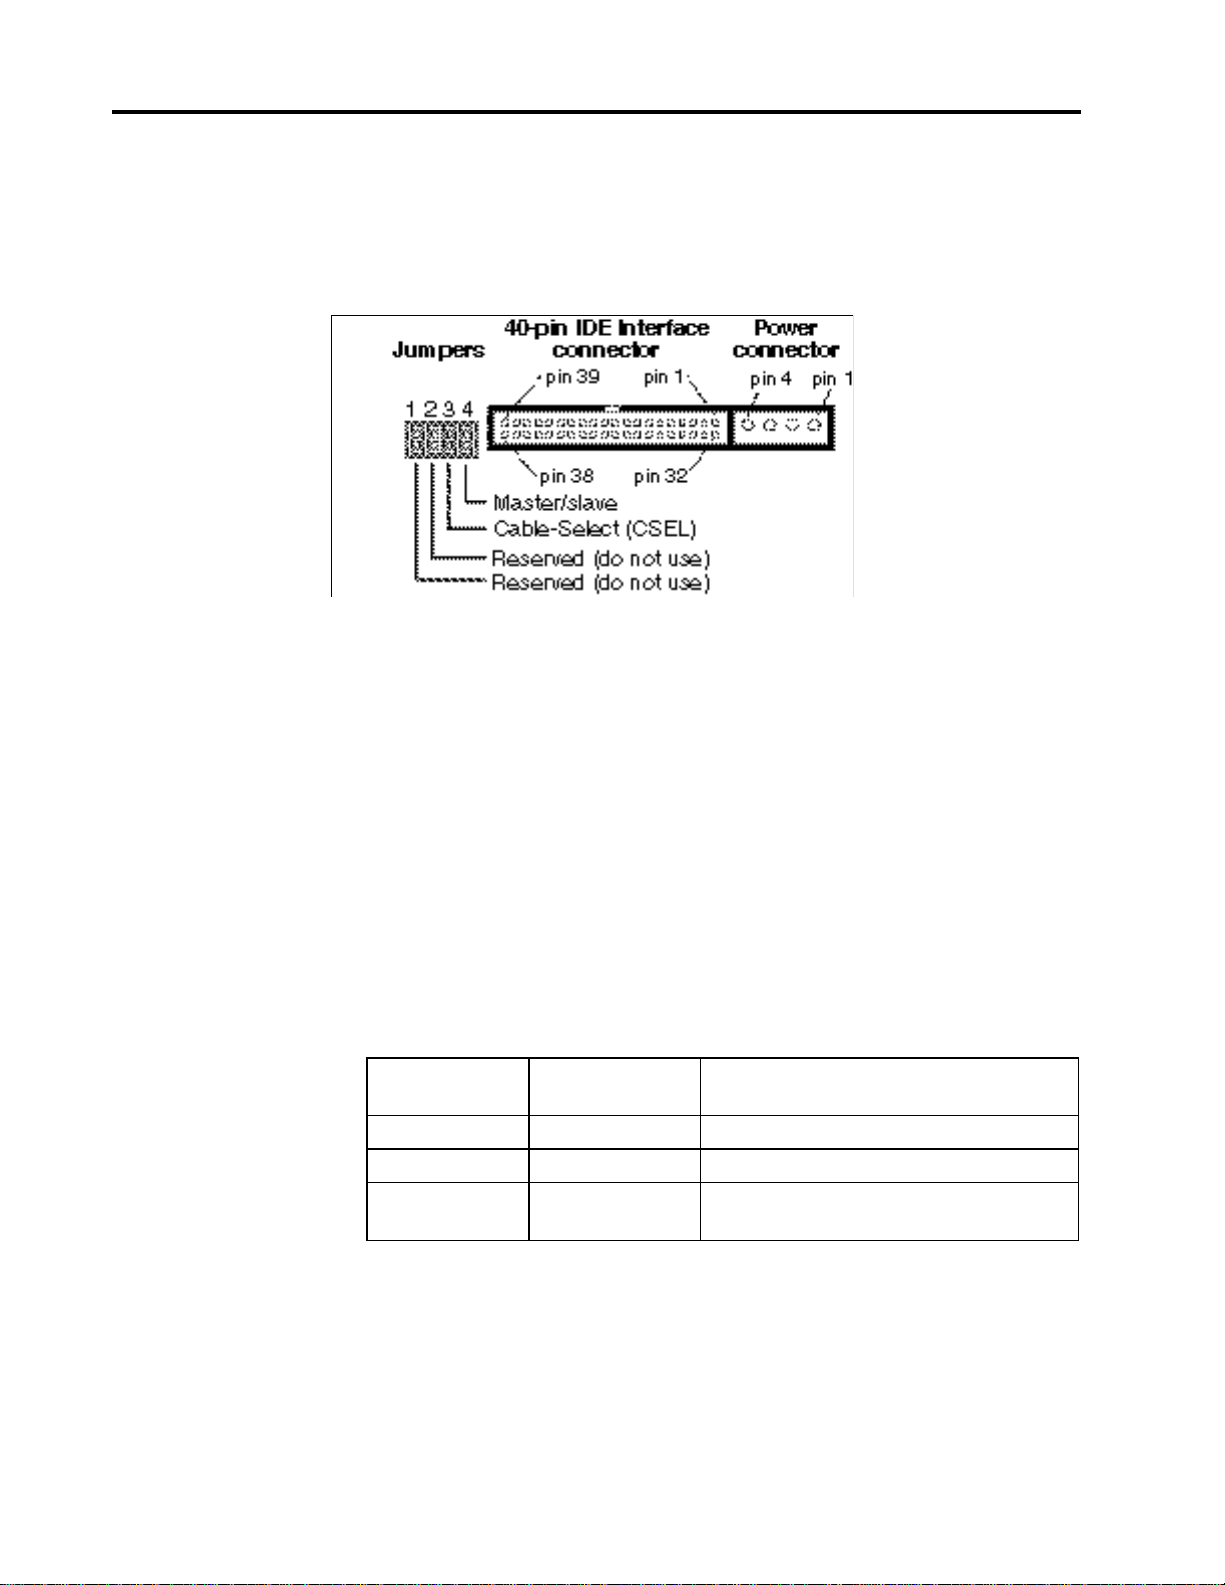
Before installing the Seagate Travan 40 drive make sure that the jumpers are
properly configured for your system. Figure 6 shows the location of the jumper block,
as well as master/slave jumper settings for various configurations.
Note: Record your jumper settings prior to installation. The jumpers are not visible
after the drive has been installed.
Figure 6
Jumper block settings for STT3401A and ST2401A
These jumper settings are explained in further detail below.
• Jumpers 1 and 2 are reserved for factory use. Do not install a jumper on these
pins.
• Cable Select: When the CSEL jumper is off, the device address (Master or
Slave) is determined by the setting of the "Master" jumper. When the CSEL
jumper is on, the Master jumper is ignored and the device address is defined by
the CSEL signal in the Host cable. If CSEL is tied to ground, the device address
is Device 0 (Master). If the signal is tied high (or open), the device address is
Device 1 (Slave).
• Master/Slave: When this jumper is on, drive will act as Master on the ATA port.
An ATAPI device cannot be a Master to an ATA device, only other ATAPI
devices. If there is no jumper on the Master or CSEL jumper blocks, the drive is
configured as a slave. See table below:
"CSEL"
jumper block
"Master"
jumper block
Drive's master/slave setting
Off On Device is Master (Device 0)
Off Off Device is Slave (Device 1)
On On or Off Device is Master or Slave depending
on CSEL signal level
Page 12 Seagate Travan 40 Product Manual
Page 21
Drive operation and maintenance Chapter 4
Installing the drive
The STT3401A can be installed in a one-half-inch high by 3.5-inch form factor drive
bay or in a one-inch high by 5.25-inch form factor (with mounting brackets). The
drive can be installed in three different orientations: horizontally (LED to the left) and
vertically (on either side).
The following section provides directions for mounting the drive in either a 3.5-inch
enclosure or in a 5.25-inch enclosure.
1. Before you install the drive, write down the serial number and model number
shown on the drive and store this information in a safe place. You need this
information if you ever call for service.
2. With the computer cover removed, remove the faceplate from the drive bay in
which you plan to install the drive. Refer to the manual that you received with
your computer for instructions about removing the computer's faceplate.
Note: If devices are installed in any drive bays adjacent to the one you are using
for the internal drive, partially removing those devices might give you more
working space.
3. Attach any special mounting hardware to the drive that your system might
require. Refer to the manual that you received with your computer for
requirements.
4. Locate the mounting screw holes in the drive brackets. Each side contains two
sets of holes. Use the set that aligns the drive properly within the drive bay.
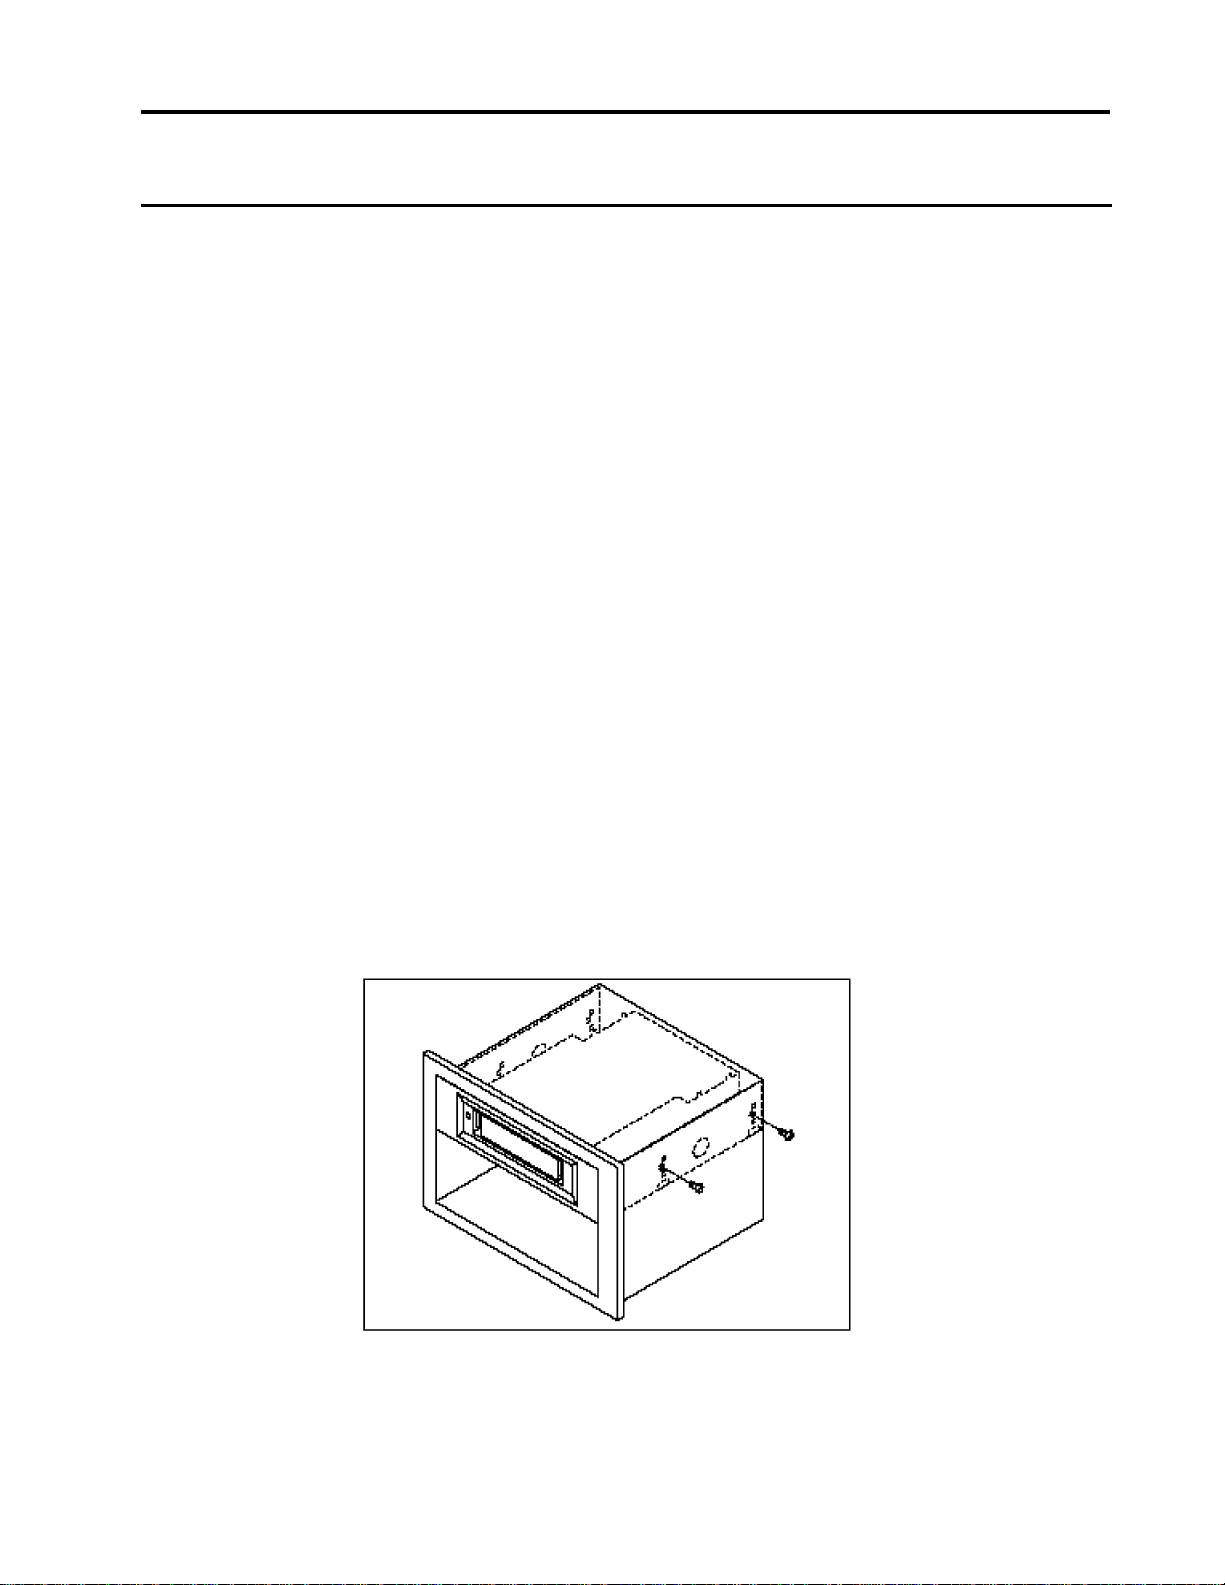
5. Slide the tape drive into the computer so that the drive bezel and the computer
faceplate are flush. Figure 7 shows the screws used to mount the STT2401A in
a 5.25-inch drive bay.
Figure 7
Mounting the STT2401A in a 5.25-inch drive bay
Seagate Travan 40 Product Manual Page 13
Page 22

Chapter 4 Drive operation and maintenance
6. Secure the drive using the mounting screws. The threaded mounting brackets
are designed for M3.0 metric screws. If you are mounting the drive in a 3.5-inch
bay, use the screw supplied with the drive. Do not substitute other screws. Using
longer screws may damage the drive. If slide rails are needed, use the plastic
slide rails (supplied with the drive in some configurations).
7. Connect an available power cable to the power connector on the drive. Figure 6
on page 12 shows the location of the power connector. The recommended
power mating connector should have an AMP 1-48024-0 housing with AMP
60617-1 pins or equivalent.
Note: Turn off all power before attaching power or interface connectors.
8. Connect the interface cable with the connector on the rear of the unit. When you
make the connection, be sure pin 1 of the connector aligns with pin 1 on the
cable connector. See Figure 6 on page 12 for the location of the connector and
the Pin 1 location.
Note: Pin 1 on the connector on the rear of the drive is to your right as you look at
the back of the drive (right side up). (See Figure 5.) Your cable should have
Pin 1 highlighted by a color or dark strip. Be sure to mate Pin 1 on the cable
to Pin 1 on the drive. Failure to do so could make the drive inoperative. Also,
the cable is keyed to prevent incorrect installation. Make sure that the
blocked pin in the cable connector coincides with the missing pin on the
connector on the rear of the drive. (See Figure 6.)
9. Replace the computer cover. Be sure to reconnect any peripherals that you
disconnected during the installation.
10. Plug the computer and any peripherals into an AC power outlet.
11. Start the computer and install your tape backup software.
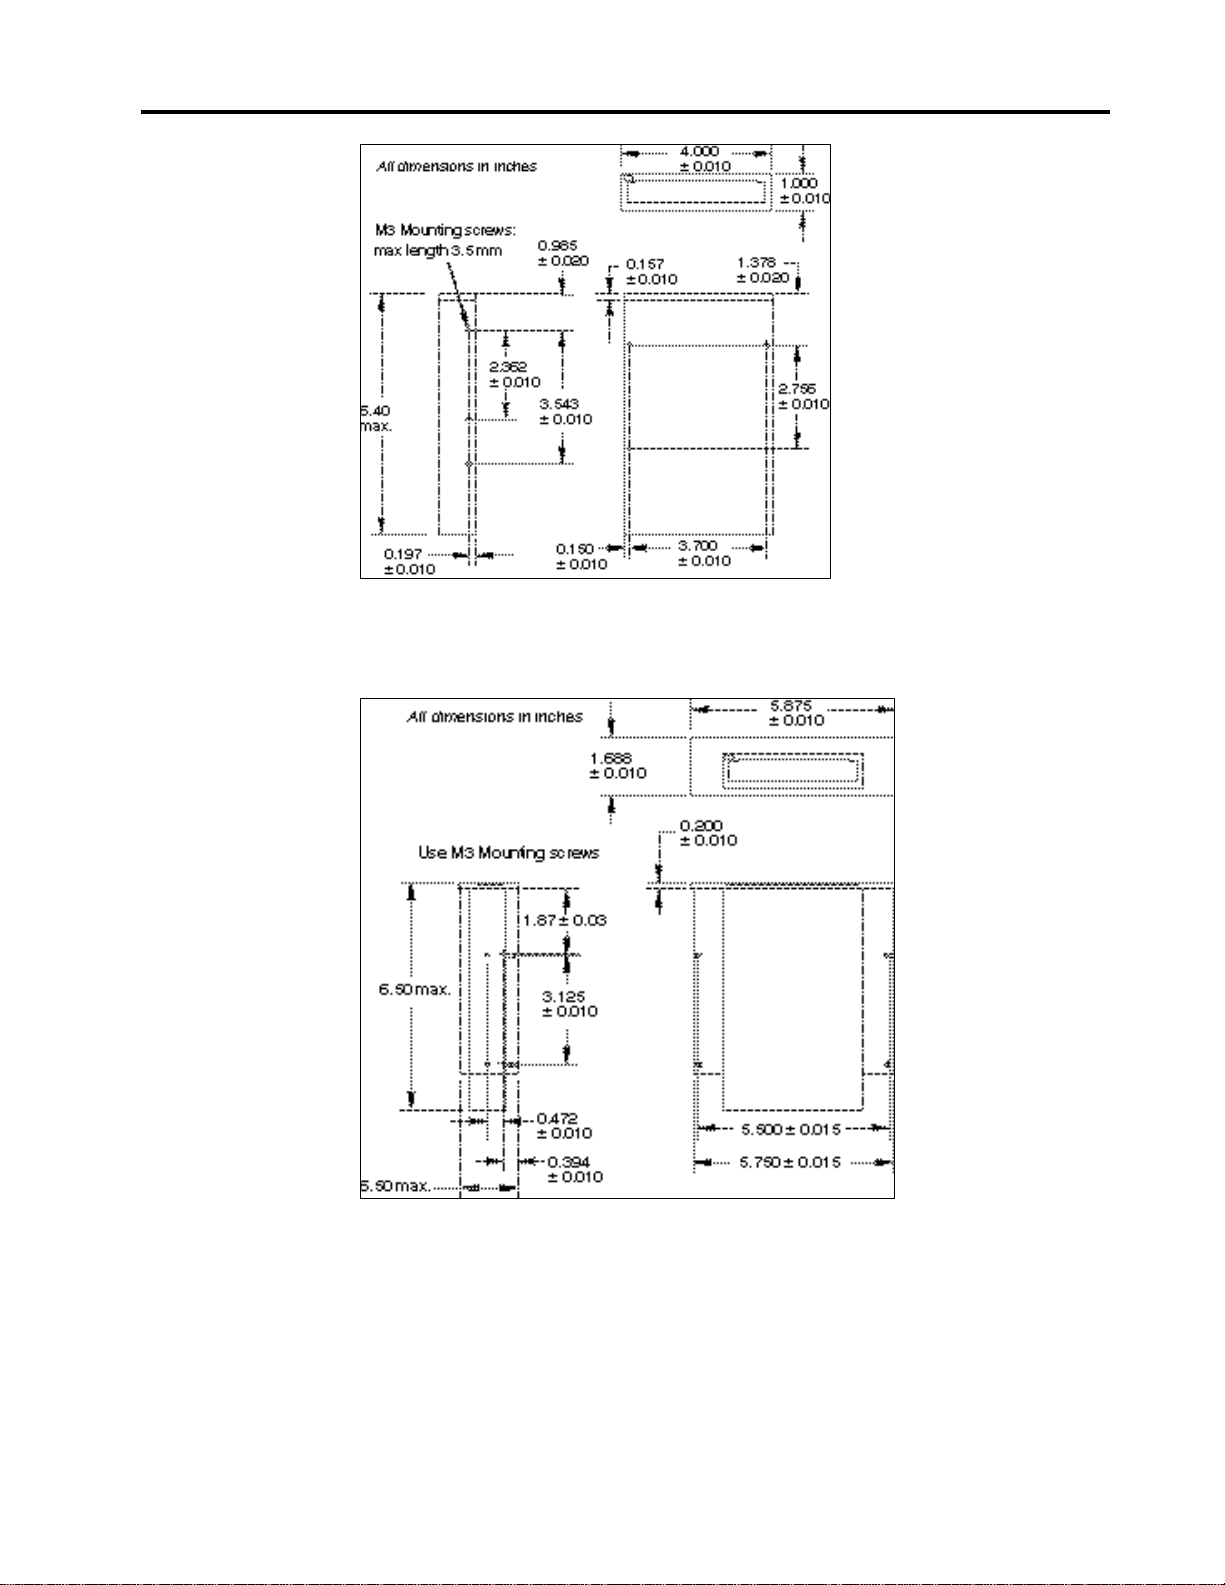
Mounting dimensions
Figures 8 and 9, respectively, show the location of the mounting holes for the
STT3401A and STT2401A.
Page 14 Seagate Travan 40 Product Manual
Page 23
Drive operation and maintenance Chapter 4
Figure 8
Mounting holes on STT3401A (without mounting brackets)
Figure 9
Mounting holes on STT2401A (with mounting bracket
Seagate Travan 40 Product Manual Page 15
Page 24
Chapter 4 Drive operation and maintenance
Drive operation and maintenance
4
Introduction
This chapter describes important operational procedures for the STT3401A and
STT2401A. It covers the following topics:
• The front panel LED (Drive Activity Light/Eject Button)
• Using Travan 40 cartridges
• Drive maintenance and troubleshooting instructions.
• Loading revised firmware (updating flash EEPROM)
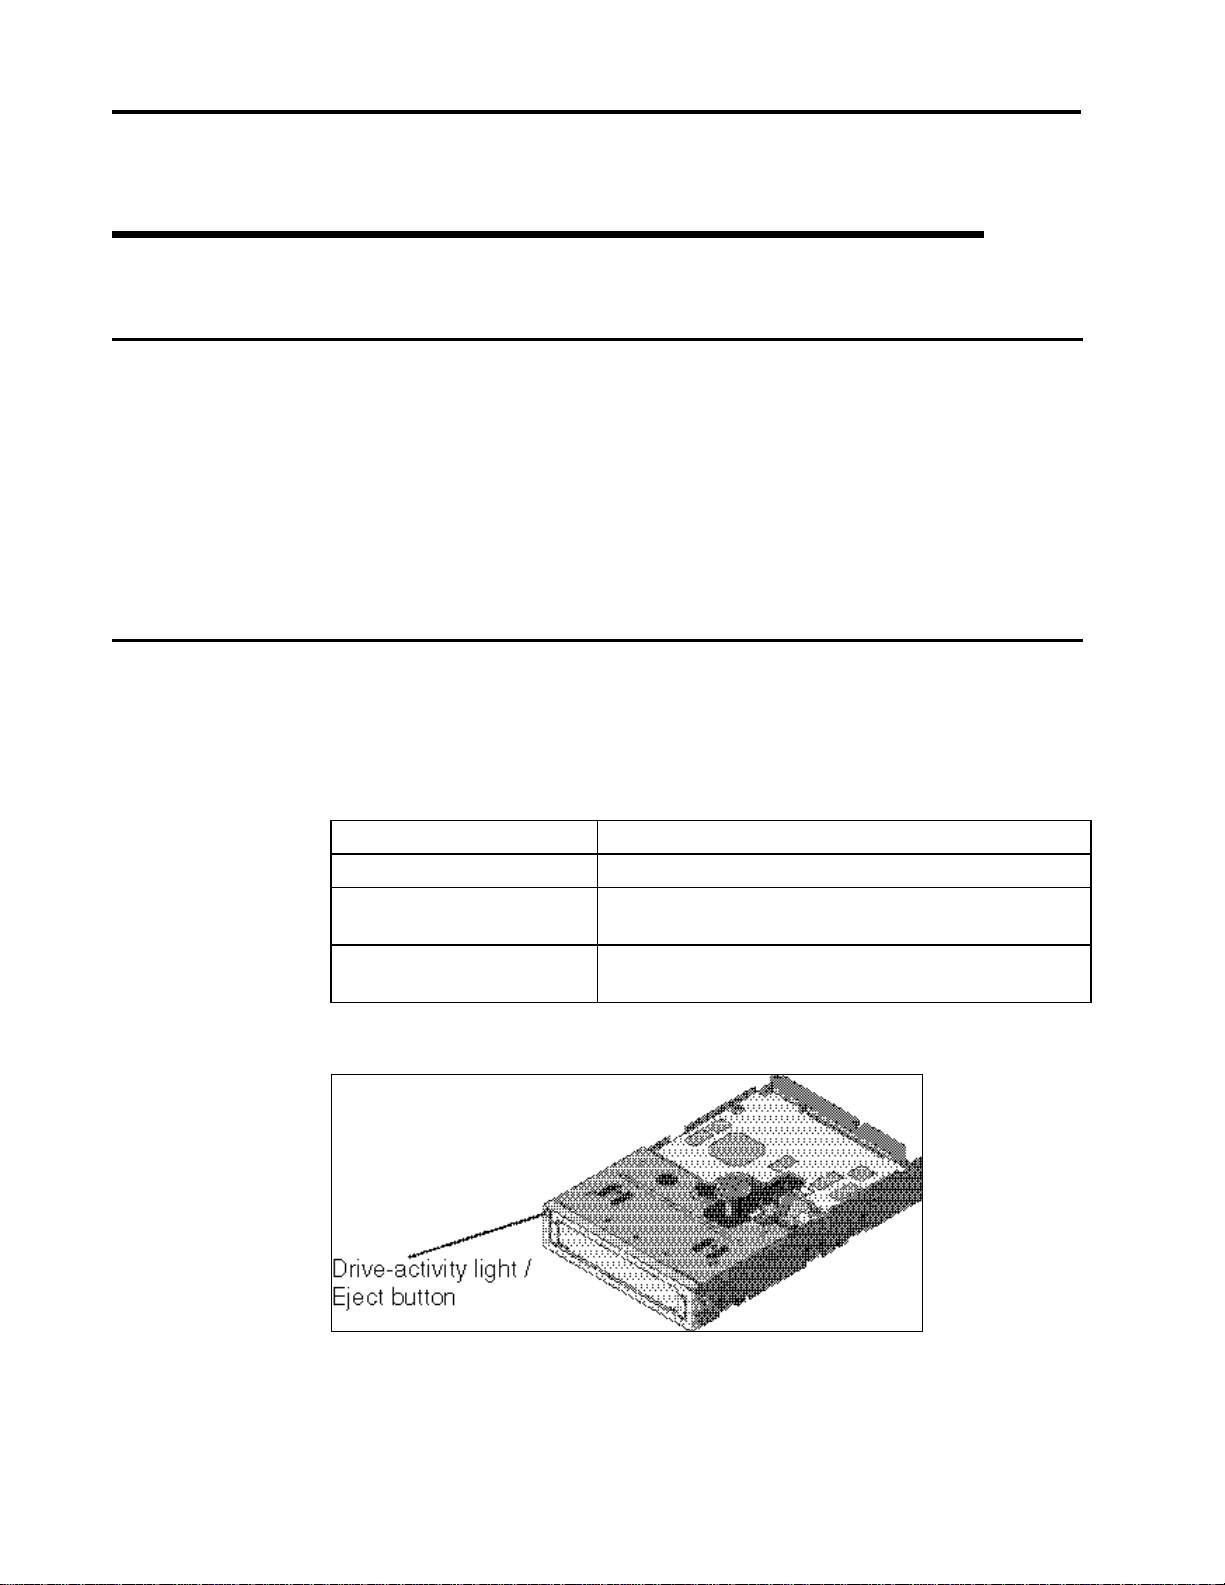
Front panel LED
As shown in Figure 10, the front panel of the Travan 40 drive contains the cartridge
opening and one light-emitting diode (LED), which doubles as an eject button.
The LED on the front of the drive may blink to indicate various drive conditions. The
basic blink patterns are shown below. See page 21 for a listing of diagnostic blink
patterns that may occur during drive startup.
LED blink pattern Drive status
On continuously Drive is ready; cartridge is loaded and initialized
Slow blinking Drive is active OR
a cartridge is being initialized
Fast blinking A drive fault has occurred OR
drive firmware is being downloaded or updated
Figure 10
Front Panel LED on the STT3401A (STT2401A is similar)
Page 16 Seagate Travan 40 Product Manual
Page 25
Drive operation and maintenance Chapter 4
Using Travan cartridges
The minicartridges recommended for use with the Travan 40 drive are listed in
Chapter 2. This section describes some operations using the cartridges.
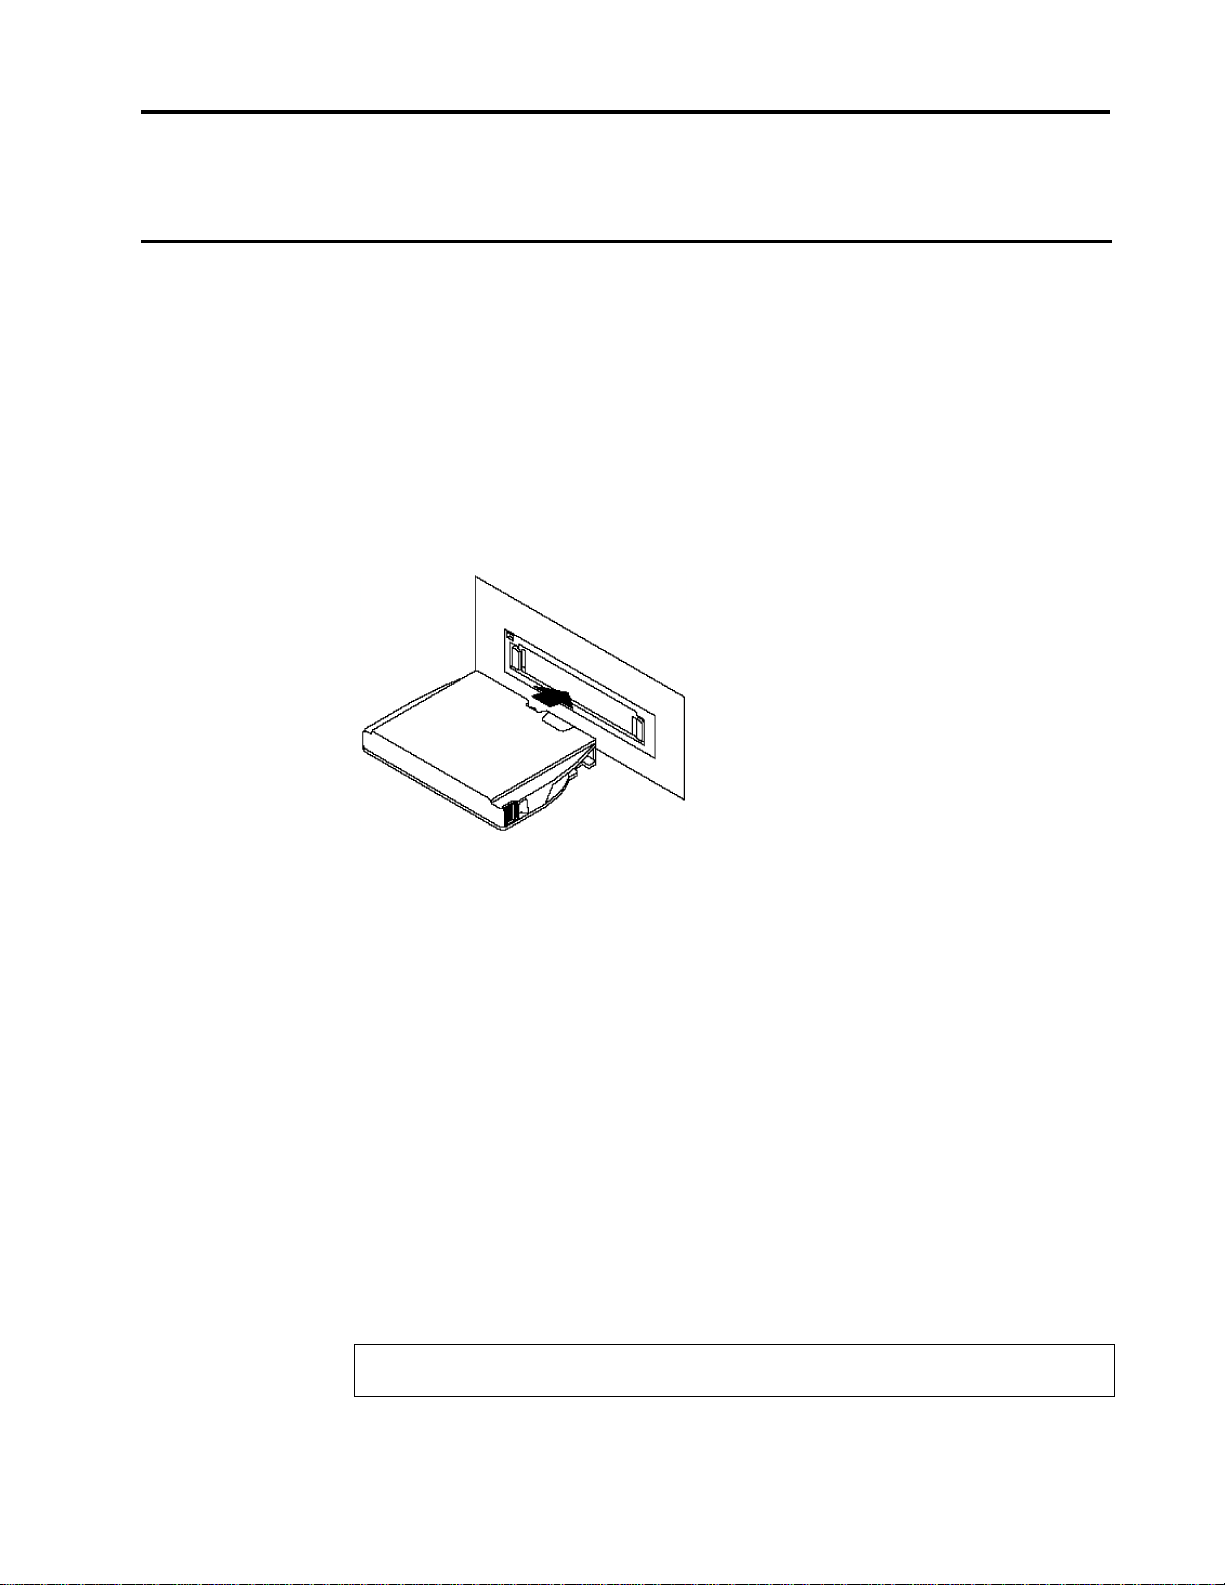
Loading cartridges
Your tape drive has a flip-up door that covers the cartridge opening when a tape
cartridge is not installed in the drive. The cartridge must be inserted into the drive
with the metal base plate down and the write-protect switch on the left. Inserting a
cartridge activates the drive's motorized “soft-load” mechanism, which draws the
cartridge all the way into the drive. Figure 11 shows the proper orientation of a
cartridge during loading.
Figure 11
Loading a Travan cartridge
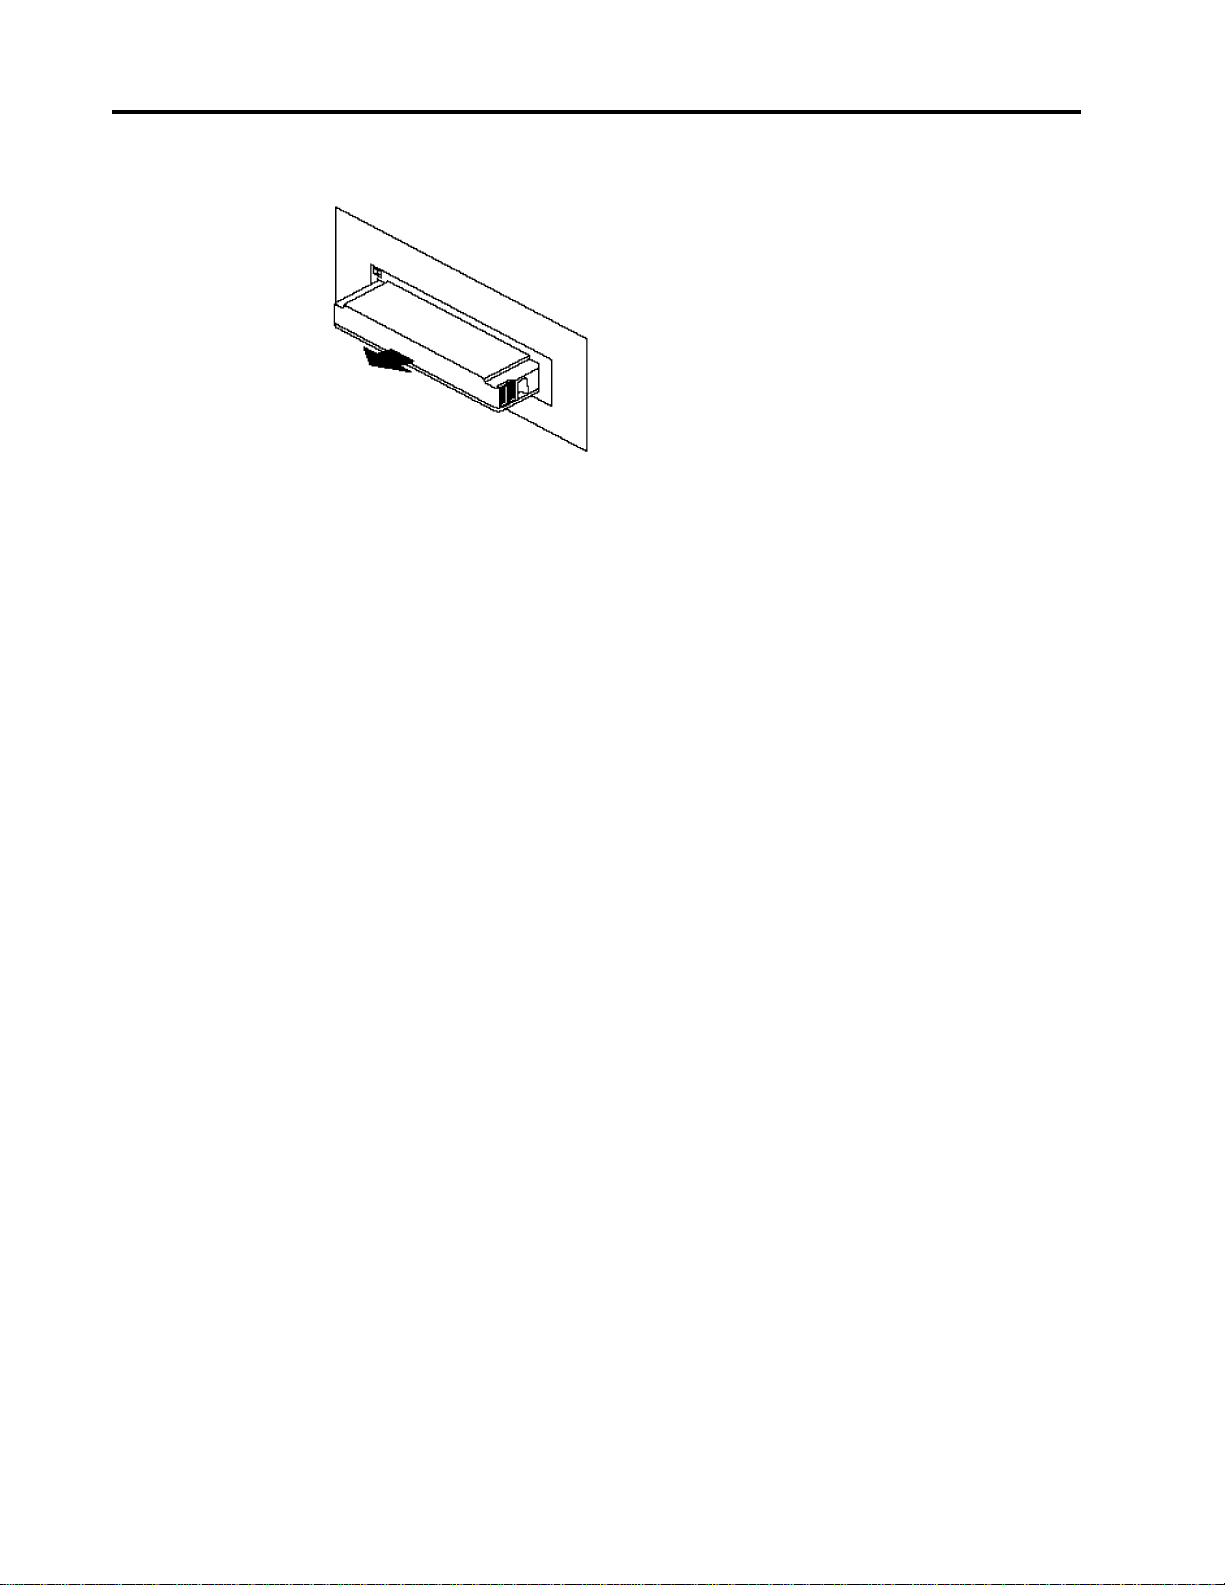
Unloading cartridges
To unload a cartridge, wait until the drive activity LED is OFF and then press the
Drive-activity Light/Eject button. The drive automatically unloads and ejects a
cartridge when the Eject button is pressed or when the drive receives an Unload
command from the Host. The cartridge is unloaded until it extends about 22 mm
beyond the bezel. At this point, you can pull the cartridge straight out, as shown in
Figure 12.
Alternatively, use the eject command from the backup software to eject the tape if
the drive LED does not turn off after the backup. Refer to your software
documentation to find the eject command for your particular software.
Note. The drive may retain the cartridge for up to 2 minutes after the Eject button
is pressed in order to complete the current operation, rewind, and update the
cartridge directory track.
Caution: Under normal circumstances, you should never attempt to remove the
cartridge manually or while the drive is active.
Seagate Travan 40 Product Manual Page 17
Page 26
Chapter 4 Drive operation and maintenance
Figure 12
Unloading a Tape cartridge
After removing the cartridge from the drive, place the cartridge in its protective case
and store it in a cool, dry location.
Emergency cartridge removal
Forcing cartridge ejection
If the drive will not eject a cartridge during normal operation, but you still have power
to the drive, try the following steps to force the drive to eject the cartridge:
1. Remove power from the drive.
2. Press and hold the eject button.
3. Power up the drive, while holding down the Eject button. The cartridge will be
ejected (unloaded).
As soon as the cartridge is unloaded, grasp the cartridge and pull it from the drive.
Manual ejection
If the power fails with a cartridge in the drive, and the procedure above does not
work, you may be able to remove the cartridge manually. However, there is a risk of
damaging the drive or the cartridge.
Note. Do not attempt to remove the cartridge while the drive is powered-on and
tape is in motion. This may result in an incomplete tape operation.
Take a small straight screwdriver and insert it into the notch in the lower left side of
the bezel below the cartridge. Make sure that the screwdriver is inserted straight into
the drive. The screwdriver will hit a stop. Push on the stop with a firm force. As the
stop is gradually pushed into the drive, the cartridge will come out of the drive.
Continue to push with the screwdriver until the edges of the cartridge can be
grasped. Then grasp the cartridge and pull it firmly from the drive.
Page 18 Seagate Travan 40 Product Manual
Page 27
Drive operation and maintenance Chapter 4
Caution. After using the emergency ejection procedure to remove a cartridge, you
must restart the drive before inserting a new cartridge. Power must be
reapplied to the drive before it will move the loading mechanism into
position for inserting a new cartridge.
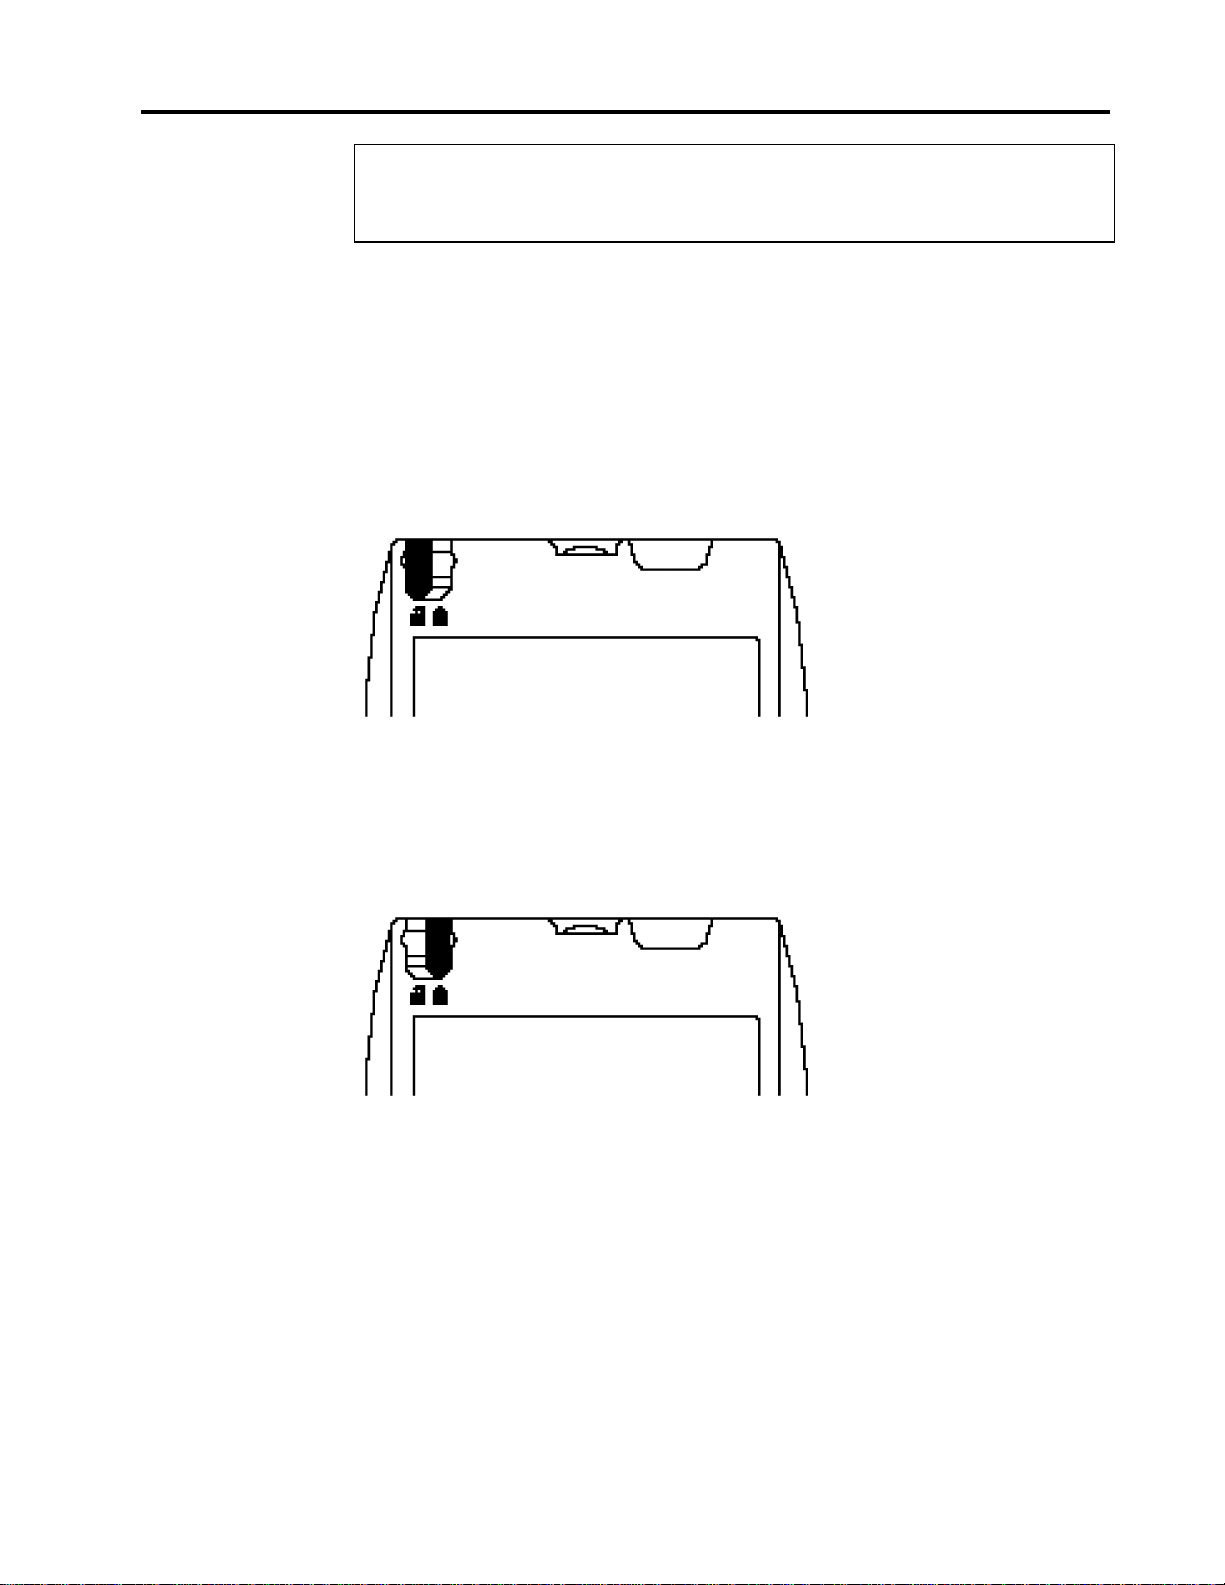
Setting the write-protect switch
Travan minicartridges feature a sliding write protect tab located in the upper left
corner of the cartridge. You can set the tab to keep data from being written on the
tape. Use this switch when you want to make sure that important data on the tape
will not be overwritten.
Figure 13 shows the cartridge with the switch in the non-protected (read/write) or
unlocked position.
Figure 13
Travan cartridge write-protect switch—unlocked position
Figure 14 shows the tab in the protected (read only) or locked position.
Figure 14
Travan cartridge write-protect switch—locked position
To return a cartridge to the "writeable" state, push the switch toward the end of the
cartridge or to the unlocked position.
Seagate Travan 40 Product Manual Page 19
Page 28

Chapter 4 Drive operation and maintenance
Drive maintenance
Minimal maintenance is needed to ensure that your Travan 40 drive operates at peak
condition. This section explains how to care for tape cartridges, how to clean the
drive head, and what to do if you experience problems with the drive.
Caring for tape cartridges
Although Travan tape cartridges are ruggedly built, they must be handled with care to
preserve the data they contain. The following points are guidelines for storing and
using minicartridges.
• Do not open the tape access door of the cartridge or touch the tape itself. One
fingerprint can prevent the drive from reading the tape.
• Keep the cartridge away from sources of electromagnetic fields, such as
telephones, dictation equipment, mechanical or printing calculators, motors, and
bulk erasers. Do not lay cartridges on the computer monitor or on the base unit
of the computer.
• Keep the cartridge away from direct sunlight and heat sources, such as radiators
or warm air ducts.
• Keep the cartridge free of moisture. Do not wet or submerge a cartridge in any
liquid.
• Do not expose the cartridge to temperature extremes. Allow the cartridge to
assume room temperature slowly.
• Retensioning the tape cartridge is always recommended for optimal
performance, particularly after exposure of the cartridge to temperature changes
or shock. Retensioning restores the proper tape tension to the media.
Cleaning the drive read/write head
Caution. Never clean the read/write head of the drive with anything other than a
Seagate-approved dry-process cleaning cartridge.
To properly maintain the tape drive, you should periodically clean the read/write
head. No other periodic maintenance is required.
Follow these guidelines to help ensure that your drive provides long, reliable service:
• Operate the drive in a clean, dust-free environment.
• Never apply a lubricant to the drive.
• Generally Travan drives are highly reliable and require little user maintenance.
For normal operations cleaning once per month is quite adequate.
• For new cartridges, clean the head after two hours of tape movement. Thereafter
the drive can be cleaned as per normal operations.
Generally, the more severe the operating conditions (the greater the amount of dust
or moisture in the air), the more often the drive should be cleaned. Be sure to clean
Page 20 Seagate Travan 40 Product Manual
Page 29

Drive operation and maintenance Chapter 4
the drive immediately if you observe an increase in the number of errors while
running your backup software, or if a TapeAlert cleaning message is displayed.
With the newer generation of Travan tape drive heads used in these drives, only the
dry-process cleaning cartridge method is recommended. This method does not
involve any flammable materials and provides a clean recording surface by wiping
away debris as the cleaning material passes across the recording head. Residents of
the U.S. can purchase Travan cleaning cartridges (model number STTMCL) directly
from Seagate on the web at: http://buytape.seagate.com.
Troubleshooting
If you experience problems after you install the drive, read through this section, and
try the remedies suggested here. If problems persist, contact your tape drive supplier
or Seagate technical support, as described below:
US and Canada 1-800-SEAGATE (1-800-732-4283)
Outside US and Canada 1-405-936-1234
Seagate web site http://www.seagate.com
Before you call technical support, be sure that you have the documentation for your
computer and for all installed peripheral devices.
Initial checks
Prior to performing detailed troubleshooting, check the drive and associated system
components for any obvious problems:
• Check that all connections are secure.
• Check the drive to be sure the jumper settings are correct.
The following paragraphs describe some possible drive problems and the
recommended procedure for addressing each problem.
No drive response, front panel LED does not light
Verify that +5V DC and/or +12V DC is applied to the drive. Insure that the power
supply connector is installed properly.
Front panel LED blinks rapidly following power-up self-test
If a drive failure is detected during the power-up self-test, the front panel LED blinks
rapidly a specific number of times, followed by a pause. This pattern is repeated until
power is removed from the drive. The number of blinks indicates the type of problem
with the drive, as shown in the table below. If you experience this problem, return the
drive to an authorized Seagate repair center.
Number of
LED blinks
Seagate Travan 40 Product Manual Page 21
Drive status
Page 30

Chapter 4 Drive operation and maintenance
1 DRAM Write Miscompare
2 DRAM Write Timed Out
3 DRAM Read Timed Out
4 DMA Timed Out
5 ATAPI Interface Failed
6 SRAM Self Test Failed
7 DRAM/SRAM Self Test Failed
8 Serial ASIC Failed
9 Buffer Manager ASIC Failed
11 Stepper Motor Test Failed
12 Transport Motor Test Failed
15 Attempt to install incompatible firmware
16 Transfer timeout
17 Load operation failed
Drive does not come ready
• Insure the cartridge is properly oriented and fully inserted.
• Insure the cartridge is not broken and the tape appears in good condition.
Motor starts to drive cartridge but stops immediately
Check the cartridge for tape run-off, or excessive torque. Replace cartridge if
required.
Drive will not write but will read previously written tapes
• Make sure the cartridge is not write-protected.
• Make sure the cartridge is a Travan 40 cartridge, not a Travan 5 or older Travan
cartridge.
• Verify proper cable attachment to the host PC.
• If this does not correct the problem, contact Seagate Technical Support (see
page 21).
Tape does not stream
Host data handshake may be too slow. Check BIOS setting for ATAPI interface
mode; the interface chipset may not be capable of high speed PIO mode. Some
backup application software is capable of higher transfer rates than others. Other
Host activity could restrict backup operation transfer rate.
If a power interruption occurs during a backup or restore operation, start over when
the power is restored.
Page 22 Seagate Travan 40 Product Manual
Page 31

Drive operation and maintenance Chapter 4
Drive not seen during boot-up
• Ensure that 5/12 volt power is plugged into tape drive. Insert tape:
– If soft load receives tape and tape movement back and forth occurs—power is
OK.
– If no tape movement occurs—power down system and use power plug from
other device such as CD-ROM. If soft load receives tape and tape movement
back and forth occurs—power plug is bad. If no tape movement occurs (soft
load does not receive and load tape)—return drive for repair.
• Check Master/Slave jumper settings; refer to Seagate Travan 40 User Guide for
installation possibilities.
• Check system BIOS settings and ensure that ATAPI is set for the Travan 40
channel.
• Check that Transfer Mode in BIOS is set for PIO Mode.
Drive not seen by OS after boot-up
• Ensure that correct drivers are installed for Windows operating systems. Refer to
Seagate PowerPoint presentation for loading Windows drivers.
• For Windows 2000/XP look for tape drive in Device Manager. If shown as
Unknown Device, use procedures to cause drive to be seen as a tape drive. Add
device driver as necessary.
Tape won’t load
• Ensure that 5/12 volt power is plugged into tape drive. Insert tape:
– If soft load receives tape and tape movement back and forth occurs—power is
OK.
– If no tape movement occurs—power down system and use power plug from
other device such as CD-ROM. If soft load receives tape and tape movement
back and forth occurs—power plug is bad.
• Remove ATAPI bus cable and insert tape:
– If no tape movement occurs (soft load does not receive and load tape)—return
drive for repair.
– If tape movement back and forth occurs—check Master/Slave jumper settings;
refer to Seagate Travan 40 User Guide.
Back-up program “freezes” or “locks up”
• Check that the system meets the hardware requirements for both the tape drive
and backup software.
• Check for any changes to the computer that may have caused IRQ, DMA, or
Address conflicts.
• Check that the system is not set to Boot from CD-ROM with tape as a master.
• Check available hard drive space on the drive where the software is installed.
The backup software may need to temporarily use hard drive space to function
correctly.
Seagate Travan 40 Product Manual Page 23
Page 32

Chapter 4 Drive operation and maintenance
• Hard disc problems can also cause system lock up. Run a hard disc diagnostic
utility such as CHKDSK or SCANDISK and repair any error it might find.
• Not enough system resources or a misbehaving memory resident program may
cause erratic system behavior. In some instances, files in some third party
Recycle Bins have caused the backup software to lock up. Try emptying the
Recycle Bin before attempting a backup.
• Disable anti-virus programs and Advanced Power Management (especially for
laptops).
“Bad blocks,” media errors, etc.
• Retensioning tape before every backup is recommended.
• Check for automatic retension capability in backup software.
• Use Seagate Stdiag tool to perform write/read test. Retension the tape with
Stdiag program. Stdiag write/read test will overwrite data on the tape. Set “Test
Size” to minimum of 100MB.
– If test write/read fails—replace tape with new tape and retry Stdiag test.
– If test write/read passes—retry backup. If backup fails, replace the tape.
Slow backups
• Check installation configuration per Seagate Travan 40 User Guide. Tape drive
• Check that system has enough memory available for backup software to
• Is backup from local hard drives or over a network? Backups over a network
• Disable memory resident programs such as fax software, Internet connections,
• Run tests with software compression on and off. Use the setting that will obtain
Tape won’t eject
• Ensure unit is powered on.
• Ensure tape is allowed to eject. Backup software often issues commands to
and hard drive should never be on the same IDE connector.
operate.
connection can often be slower than local hard drives. Attempt backup over local
hard drive and see if backup is faster.
anti-virus programs, screen savers, and others that are not essential to system
operation.
the best backup throughput.
prevent tape from being ejected via pushbutton. Issue the command from the
backup software to allow tape removal, if necessary.
“Incompatible format,” “Won’t write on this tape”
• Ensure that tape is a Travan 40 cartridge.
• Ensure that the tape is not write protected.
Page 24 Seagate Travan 40 Product Manual
Page 33

Drive operation and maintenance Chapter 4
• Use Stdiag to perform a write/read test. Retension the tape with Stdiag program.
The Stdiag write/read test will overwrite data on the tape. Set “Test Size” to
minimum of 100MB.
– If test write/read fails—replace tape with new tape and retry backup.
– If test write/read passes—retry backup. If backup fails, replace the tape.
• Sometimes not being able to write to a specific tape is due to backup software
configuration, especially with Media Pools setup. Read the software
documentation carefully.
Loading revised firmware via Seagate firmware cartridge
The Travan 40 drive uses flash EEPROM. Flash EEPROM enables you to download
new firmware when revisions to firmware are released. Firmware revisions are
released on specially encoded cartridges that are automatically recognized by these
drives. These firmware revisions are available for qualified OEMs only from Seagate
Removable Storage Solutions®.
To load a firmware upgrade tape, follow these steps.
1. Power on the host system and the Travan drive. Allow the system boot up
process to reach the point where there is no ATAPI bus activity.
2. Place the firmware upgrade cartridge record switch to the non-record position.
Insert the firmware upgrade cartridge in the drive and observe the green LED
light on the front of the drive.
3. Once the upgrade cartridge is inserted, tape motion begins. The drive LED
flashes on and off. Approximately 15 seconds later, tape motion stops and the
LED continues to flash.
4. The LED flashes on and off at a steady rate as the firmware upgrade continues.
Approximately 45 seconds later, the drive resets internally, and the tape moves
back and forth, then stops.
5. The LED light will go off and remain off. Double check that the LED remains off.
Make sure that there is no further tape motion. Remove the upgrade cartridge.
6. The firmware is now upgraded to the new revision. The drive is operational and
the new firmware is active. Turning power off at this time does not affect the
firmware revision level.
Note: Once the firmware upgrade cartridge is inserted in the drive, it is important
that no power interruption occurs while the firmware is loading. DO NOT
POWER OFF THE DRIVE AT THIS TIME. If a power interruption occurs, the
firmware may not be loaded correctly, and the drive may not operate
properly.
If a problem occurs during the firmware loading process, the LED on the front panel
goes out. In that case, the firmware upgrade cartridge may be defective, or the drive
may not be operating correctly.
Seagate Travan 40 Product Manual Page 25
Page 34

Chapter 4 Drive operation and maintenance
If after a repeat loading of the firmware cartridge the same condition is observed,
contact your Seagate sales representative.
Firmware upgrade cartridges are available to qualified Seagate OEM customers.
Contact your Seagate sales representative for information.
Page 26 Seagate Travan 40 Product Manual
Page 35

ATAPI Interface Chapter 5
ATAPI interface
5
Introduction
The Seagate Travan 40 drives come with an ATA Packet Interface (ATAPI)
controller for communications between the host computer and the drive. The drive
supports the QIC-157 standard interface.
Note: Refer to the QIC-157 Standard for detailed information about this interface.
This chapter clarifies the use of several ATA-2 signals and ATAPI commands that
are either vague or optional in the QIC-157 specification.
ATA-2 Interface pin assignments
The Seagate Travan drives provide a standard ATA-2 connector. The pin
assignments for this connector are listed in the following table for your reference.
Pin Assignment Description Source
1 RESET Reset Host
2 Gnd Ground N/A
3 DD7 Data Bus bit 7 Host/Device
4 DD8 Data Bus bit 8 Host/Device
5 DD6 Data Bus bit 6 Host/Device
6 DD9 Data Bus bit 9 Host/Device
7 DD5 Data Bus bit 5 Host/Device
8 DD10 Data Bus bit 10 Host/Device
9 DD4 Data Bus bit 4 Host/Device
10 DD11 Data Bus bit 11 Host/Device
11 DD3 Data Bus bit 3 Host/Device
12 DD12 Data Bus bit 12 Host/Device
13 DD2 Data Bus bit 2 Host/Device
14 DD13 Data Bus bit 13 Host/Device
15 DD1 Data Bus bit 1 Host/Device
16 DD14 Data Bus bit 14 Host/Device
17 DD0 Data Bus bit 0 Host/Device
18 DD15 Data Bus bit 15 Host/Device
19 GND Ground N/A
20 — Key pin N/A
Seagate Travan 40 Product Manual Page 27
Page 36

Chapter 5 ATAPI Interface
Pin Assignment Description Source
21 DMARQ DMA Request Device
22 GND Ground N/A
23 DIOW- I/O Write Host
24 –REQ Ground N/A
25 –I/O I/O Read Host
26 GND Ground N/A
27 IORDY I/O Ready Device
28 CSEL Cable Select Device
29 DMACK DMA Acknowledge Host
30 GND Ground N/A
31 INTRQ Interrupt Request Device
32 10CS16- 16-Bit I/O Device
33 DA1 Device Address Bit 1 Host
34 PDIAG Passed Diagnostics Device
35 DA0 Device Address Bit 0 Host
36 DA2 Device Address Bit 2 Host
37 CS0- Chip Select 0 Host
38 CD1- Chip Select 1 Host
39 DASP- Device Active or Slave
Present
40 Ground Ground N/A
Device
ATAPI commands
This section describes the ATAPI commands as implemented by the STT2401A and
ST3401A. The table below lists the commands in the order of their Operation Code,
and identifies the page number where the command is described in this manual.
Op Code (Hex) Command See Page
00 TEST UNIT READY 84
01 REWIND 80
03 REQUEST SENSE 73
08 READ 67
0A WRITE 86
10 WRITE FILEMARK 89
11 SPACE 82
12 INQUIRY 31
13 VERIFY 85
Page 28 Seagate Travan 40 Product Manual
Page 37

ATAPI Interface Chapter 5
Op Code (Hex) Command See Page
15 MODE SELECT 51
17 RELEASE UNIT 72
19 ERASE 29
1A MODE SENSE 61
1B LOAD / UNLOAD 33
1D SEND DIAGNOSTIC 81
1E PREVENT/ALLOW MEDIA REMOVAL 66
2B LOCATE 35
34 READ POSITION 71
3B WRITE BUFFER 87
3C READ BUFFER 69
4C LOG SELECT 36
4D LOG SENSE 37
Specification compliance
The STT3401A complies with the following specifications. Where conflicts occur, the
first listed document takes priority.
• This product description manual
• QIC-157 revision D
Seagate Travan 40 Product Manual Page 29
Page 38

Chapter 5 ATAPI Interface
ERASE (Group 0, Op. Code 19)
The ERASE command will erase the entire tape if the tape is positioned at BOT.
Both the Directory and the Data Partitions will be erased. If the drive is in the
Directory Partition when the ERASE command is received, the drive will remain in
the Directory Partition after the operation is completed. The drive performs a Logical
Erase by rewriting the directory information; the data on the tape is not physically
erased or overwritten.
If the ERASE command is issued when the drive is not at BOT, no erase operation
will be performed and the drive will return an Illegal Request Sense Key.
This command is used to erase previously written data.
Command Descriptor Block for ERASE Command
Data Bits
Byte 7 6 5 4 3 2 1 0 Hex
0 0 0 0 1 1 0 0 1 19
1 0 0 0 0 0 0 IMM LONG 0X
2 0 0 0 0 0 0 0 0 00
3 0 0 0 0 0 0 0 0 00
4 0 0 0 0 0 0 0 0 00
5 0 0 0 0 0 0 0 0 00
NOTE: The ATAPI interface does not have an IMM bit or functional equivalent. The
DSC and BUSY bits in the Host taskfile status register indicate bus and
command status.
LONG: Use of the LONG bit is optional. Drive operation is the same whether
LONG = 0 or LONG = 1.
Page 30 Seagate Travan 40 Product Manual
Page 39

ATAPI Interface Chapter 5
INQUIRY (Group 0, Op. Code 12)
The INQUIRY command allows the Host to determine the configuration of the tape
drive connected to the bus.
CDB for INQUIRY Command
Data Bits
Byte 7 6 5 4 3 2 1 0 Hex
0 0 0 0 1 0 0 1 0 12
1 0 0 0 0 0 0 0 0 00
2 0 0 0 0 0 0 0 0 00
3 0 0 0 0 0 0 0 0 00
4 Allocation Length XX
5 0 0 0 0 0 0 0 0 00
Allocation Length: This field may specify up to 54 bytes (36h) of data to be sent to
the Host. Any value greater than 36h sends 36h (54d) bytes. A 0 indicates no data is
to be sent and is not considered an error.
INQUIRY Data Block Format
Data Bits
Byte 7 6 5 4 3 2 1 0 Hex
0 Peripheral Qualifier SCSI Device Type 01
1 RMB Reserved 80
2 ISO Version ECMA Version ANSI Version 0X
3 0
4 Additional Length 31
5 Reserved 00
6 Reserved 00
7 0 0 0 Sync 0 0 0 0 10
8-0F Vendor Name in ASCII ASCII
10-1F Product Name in ASCII ASCII
20-23 Firmware Revision Level in ASCII ASCII
24-2D Reserved ASCII
2E-35 Reserved ASCII
SCSI-2 Format—INQUIRY Data Block
TrmIOP
Peripheral Qualifier: This field is set to 000b, unless an illegal LUN is specified, in
which case it is set to 011b.
SCSI Device Type: The Device Type 01h represents a sequential access device.
RMB: The Removable Media Bit is always set indicating that removable media is
used by the device.
0 0 Response Data Format 42
ISO Version: This field is 00b, indicating that the drive does not comply with ISO
version ISO DP 9316.
ECMA Version: This field is 000b, indicating that the drive does not comply with
ECMA version ECMA-111.
Seagate Travan 40 Product Manual Page 31
Page 40

Chapter 5 ATAPI Interface
ANSI Version: This field indicates the ANSI compliance level. A value of 001b
indicates compliance with SCSI Standard X3.131-1986. A value of 010b indicates
compliance with QIC-121 (SCSI-2).
TrmIOP: Terminate I/O message is supported. The Term I/O bit shall be set to 1.
Response Data Format: This field will have a value of 2h to indicate compliance
with the QIC-121 (SCSI-2) inquiry data format, or a value of 1h to indicate the
SCSI-1 option has been selected.
Additional Length: This field indicates that there are 31 (1Fh) bytes following this
byte.
Sync: The Sync bit is always set to 1, indicating the drive supports synchronous data
transfer.
Vendor Name: Bytes 8-0Fh are set to the ASCII values for the Vendor Name per the
table below.
Product Name: Bytes 10-1Fh are set to ASCII values for the Product Name. See the
table below.
Vendor name
( _ = space)
“Seagate_” “STT3401A” Travan 40 drive
Product name
Drive description
Firmware Revision Level: Bytes 20h-23h contain Firmware Revision.
Page 32 Seagate Travan 40 Product Manual
Page 41

ATAPI Interface Chapter 5
LOAD/UNLOAD (Group 0, Op. Code 1B)
This command has three functions.
• To position (LOAD) a tape cartridge to BOT
• To eject (UNLOAD) a cartridge
• To retension the installed cartridge in conjunction with a Load/Unload operation
Note. The Imation Travan Mini Cartridge specification requires cartridge
conditioning under specified conditions. Conditioning is achieved by running
the tape three complete end-to-end passes, and retensioning a cartridge
when loading is recommended.
While loading or unloading, the LED blinks slowly.
When an UNLOAD command is received, if the previous WRITE command
terminated with a Check Condition, any buffered data that cannot be written to tape
will be lost. All media access commands will be terminated with a Check Condition
and the Sense Key will be set to 2h (Not Ready) after successful execution of an
UNLOAD command.
CDB for LOAD/UNLOAD Command
Data Bits
Byte 7 6 5 4 3 2 1 0 Hex
0 0 0 0 1 1 0 1 1 1B
1 0 0 0 0 0 0 0 IMM 0X
2 0 0 0 0 0 0 0 0 00
3 0 0 0 0 0 0 0 0 00
4 0 0 0 0 0 0 RET LOA 0X
5 0 0 0 0 0 0 0 0 00
NOTE: The ATAPI interface does not have an IMM bit or functional equivalent. The
DSC and BUSY bits in the Host taskfile status register indicate bus and
command status. See the ATAPI note on page 80.
RET: The retension bit determines whether a retension operation is to be performed
as a part of the LOAD/UNLOAD command or not. A Retension operation is
performed by running the tape to EOT, then back to BOT. It is recommended to
retension the tape before every read/write of the tape. When set to 0, no retension
takes place. When set to 1, a tape retension is performed.
LOA: The LOA bit determines whether it is a LOAD or UNLOAD command. When
set to 0, an UNLOAD command is designated. When set to 1, a LOAD command is
designated.
Seagate Travan 40 Product Manual Page 33
Page 42

Chapter 5 ATAPI Interface
LOAD/UNLOAD Command (EOT, RET and LOA Bits)
Initial State EOT RET LOA Action Final State
Loaded, Ready 0 0 0 Position to BOT and set Unload
status
Loaded, Ready 0 0 1 Position to BOT Ready
Loaded, Ready 0 1 0 Retension, Position to BOT and set
Unload status
Loaded, Ready 0 1 1 Retension and Position to BOT Ready
Loaded, Ready 1 0 0 Set Unload status Unloaded, Not Ready
X 1 X 1 Check Condition, Illegal Request Same as Initial
Loaded, Ready 1 1 0 Retension and set Unload status Unloaded, Not Ready
Unloaded, NR X X 0 Check Condition, Not Ready Unloaded, Not Ready
Unloaded, NR 0 0 1 Load cartridge and Position to BOT Ready
Unloaded, NR 0 1 1 Load cartridge, Retension and
Position to BOT
Unloaded, Not Ready
Unloaded, Not Ready
Ready
Additional Sense Bits: CNI—Cartridge Not in Place, WP—Cartridge Write
Protected, EOM—End-of-Media, BOM—Beginning-Of-Media.
NOTE: Log Select page 32h (byte 17h bit 4) defines the action of the UNLOAD
command. If the bit is 1, the Unload command will eject the cartridge. If the
bit is 0, the Eject button must be pushed to eject the cartridge.
NOTE: If a cartridge has been ejected but not removed from the drive, a LOAD
command will draw the cartridge into the drive.
Page 34 Seagate Travan 40 Product Manual
Page 43

ATAPI Interface Chapter 5
LOCATE (Group 1, Op. Code 2B)
The LOCATE command causes the target to position the logical unit to the specified
block address in a specified partition. Upon completion, the logical position will be
before the specified location so that the specified block will be the next to be read, or
will be the append point if it follows an “Appendable Point” (see WRITE command).
Prior to performing the locate operation, the target shall ensure that all buffered data
and filemarks have been transferred to the media.
If the specified block is not found in the current partition, then a Check Condition
status is returned, the Sense Key is set to Blank Check (8h), the BNL bit is set in
byte 12h of the Sense Data, and the tape will be positioned at EOD.
CDB for LOCATE Command
Data Bits
Byte 7 6 5 4 3 2 1 0 Hex
0 0 0 1 0 1 0 1 1 2B
1 0 0 0 0 0 0 CP 0 0X
2 0 0 0 0 0 0 0 0 00
3
4
5
6
7 0 0 0 0 0 0 0 0 00
8 Partition XX
9 0 0 0 0 0 0 0 0 00
MSB
Block Address
LSB
XX
XX
XX
XX
CP: The Change Partition bit determines if a partition change is required before
positioning to the requested block. When set to 1, the partition specified in the
Partition field is selected. If necessary, the drive will change partitions before
positioning to the requested block. This is only allowed if the FDP bit in the Media
Partition Page (MODE SENSE Page 11h) has been set to 1. A CP bit of 0 indicates
no partition change required. The partition field is ignored.
Block Address: The Block Address field specifies the logical block address at which
the target shall be located.
Partition: The Partition field specifies which partition to select (if the CP bit is 1).
When set to 0, the Data Partition is selected. When set to 1, the Directory Partition is
selected.
Application Notes:
The CP field is one of two methods to change the active partition between the Data
and Directory Partitions. The second method is to use the Device Configuration Page
of the MODE SELECT command.
The Travan 40 format specifies that there will always be two partitions physically on
the tape.
Seagate Travan 40 Product Manual Page 35
Page 44

Chapter 5 ATAPI Interface
LOG SELECT (Group 2, Code 4C)
The LOG SELECT command provides a means for the Initiator to manage statistical
information maintained by the tape drive about itself.
CDB for LOG SELECT Command
Data Bits
Byte 7 6 5 4 3 2 1 0 Hex
0 0 1 0 0 1 1 0 0 4C
1 0 0 0 0 0 0 PCR SP 0X
2 PC 0 0 0 0 0 0 X0
3 0 0 0 0 0 0 0 0 00
4 0 0 0 0 0 0 0 0 00
5 0 0 0 0 0 0 0 0 00
6 0 0 0 0 0 0 0 0 00
7
8
9 0 0 0 0 0 0 0 0 00
Parameter List Length
MSB
LSB
XX
XX
PCR: The Parameter Code Reset (PCR) bit shall be set to 1 with the parameter list
length equal to 0 to reset CERTAIN FIELDS OF Log Sense Page 03h (see their
respective definitions). If PCR bit is 1, and the parameter list length is greater than 0,
the command will terminate with Check Condition status. The Sense Key will be set
to Illegal Request and the additional Sense Code will be set to Invalid Field in CDB.
SP: The Save Parameters (SP) bit must be set to 0.
PC: The Page Control (PC) field must be set to 01b. This field defines the type of
parameter values to be selected. The Cumulative Values parameter is the only one
supported.
Parameter Length: This field must be set to 0 when the PCR bit is set to 1 to cause
the parameters to be reset. This field must be set to the appropriate size when using
page 32 to modify the configuration and the PCR bit must be 0 when sending
parameters.
Page 36 Seagate Travan 40 Product Manual
Page 45
ATAPI Interface Chapter 5
LOG SENSE (Group 2, Op. Code 4D)
The LOG SENSE command provides a means for the Initiator to retrieve statistical
information maintained by the tape drive about the tape drive.
CDB for LOG SENSE Command
Data Bits
Byte 7 6 5 4 3 2 1 0 Hex
0 0 1 0 0 1 1 0 1 4D
1 0 0 0 0 0 0 PPC SP 0X
2 PC Page Code XX
3 0 0 0 0 0 0 0 0 00
4 0 0 0 0 0 0 0 0 00
5
6
7
Parameter List Length
8
9 0 0 0 0 0 0 0 0 00
MSB
Parameter Pointer
LSB
MSB
LSB
XX
XX
XX
XX
PPC: The Parameter Pointer Control (PPC) bit shall be set to 0 with the Parameter
Pointer field 0. This will cause all available log parameters for the specified log page
to be returned to the Initiator subject to the specified allocation length. If the PPC bit
is set to 1 or if the PPC is set to 0 with the Parameter Pointer field other than 0, the
command is terminated with Check Condition status. The Sense Key will be set to
Illegal Request and the additional Sense Code will be set to Invalid Field in CDB.
SP: The Save Parameters bit must be set to 0.
PC: The Page Control field must be set to 01b. This field defines the type of
parameter values to be selected. The Cumulative Values parameter is the only one
supported.
Page Code: The Page Code field indicates which page of log data is being
requested. The supported Page Codes are:
Code Page Description Ref Page
00h Supported Log Pages 38
03h Error Counter For Read 38
2Eh TapeAlert if enabled via Log Select page 32,
byte 17, bit 7)
31h Tape Capacity, Special Information) 45
3Eh Firmware Checksum 49
40
Parameter Pointer: Shall be set to 0. See PPC.
Parameter List Length: Specifies the number of bytes allocated for Log data. The
number of bytes returned in the Data-In Phase will be the lesser of the Parameter
List Length or the data available in the specified page.
Seagate Travan 40 Product Manual Page 37
Page 46

Chapter 5 ATAPI Interface
C MSB
00
Page 00h—Supported Log Page
Data Bits
Byte 7 6 5 4 3 2 1 0 Hex
0 0 0 Page Code 00
1 0 0 0 0 0 0 0 0 00
2
3
4
5
6
7
8
9
10
11
Additional Page Length
Supported Page List
Supported Log Page: The Supported Log Page provides a list of supported log
pages other than itself. Bytes 4-9 are coded as shown, indicating the valid page
codes.
MSB
LSB
00
09
03
2E
31
33
3E
Code Page Description
00h Supported Log Pages
03h Error Counter For Read
2Eh TapeAlert if enabled via Log Select page 32, byte 17, bit 7
31h Tape Capacity, Special Information
33h Special Information
3Eh Firmware Checksum
Page 03h—Error Counter for READ (ATAPI)
Data Bits
Byte 7 6 5 4 3 2 1 0 Hex
0 0 0 Page Code 03
1 0 0 0 0 0 0 0 0 00
2
Additional Page Length
3
4
5
6 DU DS TSD ETC TMC 0 LP 40
7 Parameter Length 04
8
9
Total Blocks Recovered by ECC
A
B
MSB
LSB
MSB
Parameter Code
LSB
MSB
LSB
00
10
00
00
XX
XX
XX
XX
Page 38 Seagate Travan 40 Product Manual
Page 47

ATAPI Interface Chapter 5
D
Parameter Code
LSB
E DU DS TSD ETC TMC 0 LP 40
F Parameter Length 04
10
11
12
Total Errors Corrected
MSB
LSB
13
NOTE: (Total Blocks Recovered by ECC) + Total Errors Corrected = Total Blocks Read
Page 03—Error Counter for READ definitions
Byte
00 Page Code
01 Reserved
02-03 Additional Page Length
04-05 Parameter Code
06 DU
DS
TSD
ETC
TMC
LP
07 Parameter Length
08-09 Total Re-Reads (*)
…
0E-10 Total Errors Corrected
(*)
…
15-16 Frames Corrected By
ECC Alone (*)
…
1B-1F Total Bytes Processed
(*)
…
1B-1F Total Bytes Corrected
by ECC (*)
Set to 03h.
Set to 00h.
Set to 1Ch.
0000h—# of block recovered by ECC alone
0001h—# of blocks recovered without using ECC
0002h—total # of rereads
0003h—total errors corrected
0004h—# of frames corrected by ECC alone
0005h—total # of bytes processed
8004h—total # of bytes corrected by ECC
The Disable Update bit is always set to 0, indicating the drive
updates parameter values for all events.
The Disable Save bit is always set to 1, indicating the drive
does not save parameter values.
The Target Save Disable bit is always set to 0 indicating the
drive defines a method for saving log parameters.
The Enable Threshold Comparison bit is always set to 0,
indicating comparison to the threshold value is not performed
whenever the cumulative value is updated.
The Threshold Met Criteria bits are used with the ETC bit and
are always set to 0.
The List Parameters bit is always set to 0, indicating all
parameters are data counters.
Set to 02h, indicating 2 bytes in the counter.
Total number of uncorrectable frames. An uncorrectable
frame will generate a Re-Read recovery sequence.
Total number of frames corrected is the sum of the number of
frames corrected by ECC plus the number of frames corrected
by the Re-Read recovery procedure.
The total number of frames containing one or more blocks that
failed the CRC check. For the total number of blocks, see
REQUEST SENSE.
The transfer length of all Fixed Block Mode READ commands
times the block length specified in Mode Data plus the total
transfer length of all Variable Block Mode READ commands.
The total number of bytes corrected by ECC during all READ
commands.
01
XX
XX
XX
XX
Seagate Travan 40 Product Manual Page 39
Page 48

Chapter 5 ATAPI Interface
Note: Fields marked with (*) will reset on power cycle, SCSI reset, cartridge insertion, rewind, or
PCR.
Page 2Eh—TapeAlert Diagnostic
Data Bits
Byte 7 6 5 4 3 2 1 0 Hex
0 0 0 Page Code 2E
1 Reserved 00
2
3
5n-1
5n
5n+1 DU DS TSD ETC TMC Res LP 80
5n+2 Parameter Length 01
5n+3 Value of Flag (set when bit 0 = 1) 01
TapeAlert Diagnostic page conforms to TapeAlert Specification 2.0. This page is
supported when LOG SELECT page 32, byte 17, bit 7 is set to enable TapeAlert
Diagnostic reporting.
MSB
Page Length
LSB
TapeAlert Flags
MSB
Parameter Code
LSB
00
140
nn
nn
TapeAlert is a tape drive status monitoring and messaging standard that detects
problems that could have an impact on backup quality. TapeAlert provides easy-tounderstand warnings of errors as they arise, and suggests a course of action to
remedy the problem. The TapeAlert standard has been designed to allow easy
integration into backup applications from any software vendor.
To take advantage of TapeAlert, you need TapeAlert-compatible tape drives and
TapeAlert-compatible backup software.
TapeAlert firmware constantly monitors the drive hardware and the media, checking
for errors and potential difficulties. Any problems identified are flagged on the
TapeAlert Diagnostic page, where 64 bytes have been reserved for use by
TapeAlert.
After a backup has been completed, the TapeAlert-compatible backup application
will automatically read the drive’s TapeAlert log page to check for any problems. If an
error is flagged, the backup software displays a clear warning message on the user’s
screen, and adds the TapeAlert messages to its logs. These messages are standard
across all applications that support TapeAlert, and are designed to give clear
explanation of the problem and suggested resolution. For example, a user
attempting to backup onto an expired tape would encounter the message:
WARNING: The tape cartridge has reached the end of
its useful life:
1.Copy any data you need to another tape
2.Discard the old tape
TapeAlert currently checks for errors occurring in the following main categories:
• Drive recoverable and unrecoverable read problems
• Drive recoverable and unrecoverable write problems
Page 40 Seagate Travan 40 Product Manual
Page 49

ATAPI Interface Chapter 5
• Drive hardware defects
• Worn out media or wrong media
• Expired cleaning tapes
• Abnormal error conditions
The TapeAlert information is accessed via a Log Sense page, and configuration is
via a MODE SELECT page. The Mode Sense/Select configuration of the TapeAlert
interface is compatible with the SMART diagnostic standard for disc drives. The Host
software should first check the tape drive/library to determine whether it supports the
TapeAlert Log Sense page 0x2e. By default the Host software access to the
TapeAlert Log Sense page is via polling.
The TapeAlert Log Sense page is read from a tape drive/autoloader device at the
following times as a minimum:
• At the beginning of a write/read job, even if media is not loaded
• Immediately after a fatal error during the write/read job
• At the end of each tape when the write/read job spans multiple tapes. If the tape
is to be ejected then the Log Sense page must be read BEFORE this.
• At the end of a write/read job
Each time the Host software reads the TapeAlert Log page, it should check all 64
flags to discover which are set (there may be more than one). The definitions of the
64 flags are device type specific, so that there is one definition for tape
drive/autoloader devices, and a different definition for stand-alone changer devices
(in libraries). For each set flag, the Host software should communicate the defined
error message and severity for that flag to the user, and also log it. If multiple flags
are set simultaneously, they will be displayed together in ascending order of severity.
At the beginning of each set of TapeAlert error messages, the tape device/library that
initiated them must be identified. For the tape drive media-related flags (flags 4, 7
and 14) the software label of the media should be included in the TapeAlert error
messages so that the user is aware what piece of media the error refers to. Such
information could also be displayed with the messages for other flags as well, if
required. The information read in the TapeAlert flags should not in itself cause the
software to stop a current backup/restore job.
Each flag will be cleared to 0 in the following circumstances:
• At drive power on
• When the TapeAlert Log page is read
• When specified corrective action has been taken (such as using a cleaning
cartridge)
• On ATAPI bus reset
• On Log Select reset
Seagate Travan 40 Product Manual Page 41
Page 50

Chapter 5 ATAPI Interface
2. If the problem persists, call the tape drive
NOTE: When a flag is cleared by reading the TapeAlert Log page, a flag cannot be
set again until the error condition is removed (e.g., the specified corrective
action has been taken). So, for example, if the cartridge in the drive is not
data grade, once flag 8 has been cleared by the Host software reading the
Log page it cannot be set again until the cartridge has been removed. All
other methods of clearing allow the flag to be set again.
There are three types of flags, listed below in order of increasing severity:
Severity Urgent User
Intervention
Critical X X
Warning X X
Information X
Risk of Data
Loss
Explanations
The definitions of the 64 alert flags in the Log page vary depending on the device
type. The following table details ONLY those TapeAlert error flags supported by the
Seagate STT3401A drive.
The tape drive/autoloader flag definitions are grouped as follows:
• Flags 1 to 19: For tape drive write/read management
• Flags 20 to 25: For cleaning management
• Flags 26 to 39: For tape drive hardware errors
• Flags 40 to 64: For tape autoloader errors
TapeAlert Flags
No. Flag Type Required Host Message Cause
1 Read
Warning
2 Write
Warning
3 Hard Error W The operation has stopped because an error has
4 Media C Your data is at risk:
5 Read Failure C The tape is damaged or the drive is faulty. Call the
6 Write Failure C The tape is from a faulty batch or the tape drive is
W The tape drive is having problems reading data.
No data has been lost, but there has been a
reduction in the performance of the tape.
W The tape drive is having problems writing data. No
data has been lost, but there has been a reduction
in the capacity of the tape.
occurred while reading or writing data that the drive
cannot correct.
1. Copy any data you require from this tape.
2. Do not use this tape again.
3. Restart the operation with a different tape.
tape drive supplier helpline.
faulty:
1. Use a good tape to test the drive.
The drive is having severe
trouble reading.
The drive is having severe
trouble writing.
The drive had a hard read or
write error.
Media can no longer be
written/read, or performance is
severely degraded.
The drive can no longer read
data from the tape.
The drive can no longer write
data to the tape.
Page 42 Seagate Travan 40 Product Manual
Page 51

ATAPI Interface Chapter 5
No. Flag Type Required Host Message Cause
supplier helpline.
7 Media Life W The tape cartridge has reached the end of its
calculated useful life:
1. Copy any data you need to another tape
2. Discard the old tape.
9 Write Protect C You are trying to write to a write-protected
cartridge.
Remove the write-protection or use another tape.
10 No Removal I You cannot eject the cartridge because the tape is
in use. Wait until the operation is complete before
ejecting the cartridge.
11 Cleaning
Media
12 Unsupported
Format
13 Recoverable
Snapped
Tape
16 Forced Eject C The operation has failed because the tape
17 Read Only
Format
18 Tape
Directory
Corrupted
19 Expired
Media
21 Clean
Periodic
29 Drive
Maintenance
30 Hardware A C The tape drive has a hardware fault:
I The tape in the drive is a cleaning cartridge.
If you want to back up or restore, insert a datagrade tape.
I You have tried to load a cartridge of a type that is
not supported by this drive.
C The operation has failed because the tape in the
drive has snapped:
1. Discard the old tape.
2. Restart the operation with a different tape.
cartridge was manually ejected while the tape drive
was actively writing or reading.
W You have loaded a cartridge of a type that is read-
only in this drive. The cartridge will appear as write
protected.
W The directory on the tape cartridge has been
corrupted.
File search performance will be degraded.
W The tape cartridge is nearing the end of calculated
life. It is recommended that:
1. Another cartridge be used for storing data
2. This cartridge be stored for archival recovery
W The tape drive is due for routine cleaning:
1. Wait for the current operation to finish.
2. Then use a cleaning cartridge.
The drive must be cleaning using a cleaning
cartridge to clear this flag.
W Preventive maintenance of the drive is required.
Check the tape drive users manual for device
specific preventive maintenance tasks or call the
tape drive supplier help line.
1. Eject the tape cartridge.
2. Reset the drive.
The media has exceeded its
specified life.
WRITE command is attempted
to a write-protected tape.
Manual unload attempted
when prevent media removal
is on.
Cleaning tape encountered
during backup or restore.
e.g., TR3 cartridge is not
supported
Tape snapped/cut in the drive
where media can be ejected
Manual or forced eject while
drive actively writing or reading
e.g., NS8 cartridge is read
only
Directory data stored on tape
has been corrupted.
Media exceeded number of
recommended passes.
The drive is ready for a
periodic clean
The drive requires preventive
maintenance (not cleaning)
The drive has a hardware fault
that requires reset to recover.
Seagate Travan 40 Product Manual Page 43
Page 52

Chapter 5 ATAPI Interface
No. Flag Type Required Host Message Cause
3. Restart the operation.
31 Hardware B C The tape drive has a hardware fault:
1. Turn the tape drive off and on again.
2. Restart the operation.
3. If the problem persists, call the tape drive
supplier helpline. Check the tape drive users
manual for device-specific instructions on turning
the device power on and off.
32 Interface W The tape drive has a problem with the Host
interface:
1. Check the cables and cable connections.
2. Restart the operation.
33 Eject Media C The operation has failed:
1. Eject the tape.
2. Insert the tape again.
3. Restart the operation.
34 Download
Fail
W The firmware download has failed because you
have tried to use the incorrect firmware for this
tape drive. Obtain the correct firmware and try
again.
The drive has a hardware fault
that is not read/write related or
requires a power cycle to
recover.
The drive has identified an
interfacing fault.
Error recovery action
Firmware download failed.
Page 44 Seagate Travan 40 Product Manual
Page 53

ATAPI Interface Chapter 5
Page 31h—Tape Capacity Page
Data Bits
Byte 7 6 5 4 3 2 1 0 Hex
0 0 0 Page Code 31
1 0 0 0 0 0 0 0 0 00
2
3
4
5
6 DU DS TSD ETC TMC 0 LP 40
7 Parameter Length 04
8
9
A
B
C
D
E DU DS TSD ETC TMC 0 LP 40
F Parameter Length 04
10
11
12
13
14
15
16 DU DS TSD ETC TMC 0 LP 40
17 Parameter Length 04
18
19
1A
1B
1C
1D
1E DU DS TSD ETC TMC 0 LP 40
1F Parameter Length 04
20
21
22
23
Remaining Capacity Directory Partition
Maximum Capacity Directory Partition
Additional Page Length
Remaining Capacity Data Partition
Maximum Capacity Data Partition
MSB
LSB
MSB
Parameter Code
LSB
MSB
LSB
MSB
Parameter Code
LSB
MSB
LSB
MSB
Parameter Code
LSB
MSB
LSB
MSB
Parameter Code
LSB
MSB
LSB
00
20
00
01
XX
XX
XX
XX
00
02
XX
XX
XX
XX
00
03
XX
XX
XX
XX
00
04
XX
XX
XX
XX
Seagate Travan 40 Product Manual Page 45
Page 54

Chapter 5 ATAPI Interface
Page 31h—Special Information
Data Bits
Byte 7 6 5 4 3 2 1 0 Hex
0 0 0 Page Code 31
1 0 0 0 0 0 0 0 0 00
2
Additional Page Length
3
4
5
6 DU DS TSD ETC TMC 0 LP E1
7 Parameter Length 06
8
Unit Serial Number
D
Page 31h—Special Information Definitions
MSB
LSB
MSB
Parameter Code
LSB
MSB
LSB
00
1F
00
00
XX
XX
Byte
00
01
02-03
04-05
06
07
08-13
Page Code Set to 31h.
Reserved Set to 00h
Additional Page Length Set to 1Eh.
Parameter Code Set to 00 00h, indicating the first parameter follows.
DU The Disable Update bit is always set to 1.
DS The Disable Save bit is always set to 1, indicating the drive
does not save parameter values.
TSD The Target Save Disable bit is always set to 1, indicating the
drive does not provide a target defined method for saving log
parameters.
ETC The Enable Threshold Comparison bit is always set to 0,
indicating comparison to the threshold value is not performed
whenever the cumulative value is updated.
TMC The Threshold Met Criteria bits are used with the ETC bit and
are always set to 0.
LP The List Parameters bit is always set to 1, indicating the
parameter is a list parameter.
Parameter Length Set to 0Ch, indicating 12 bytes in the counter.
Unit Serial Number Set to the ASCII value of the drives ten-digit serial number.
Page 46 Seagate Travan 40 Product Manual
Page 55

ATAPI Interface Chapter 5
Page 33h—Special Information in STT31401A mode
Data Bits
Byte 7 6 5 4 3 2 1 0 Hex
0 0 0 Page Code 33
1 0 0 0 0 0 0 0 0 00
2
3
4
5
6 DU DS TSD ETC TMC 0 LP 40
7 Parameter Length 0C
8
13
14
15
16 DU DS TSD ETC TMC 0 LP 40
17 Parameter Length 03
18
1A
1B
1C
1D DU DS TSD ETC TMC 0 LP 40
1E Parameter Length 04
1F
22
23
24
25 DU DS TSD ETC TMC 0 LP 40
26 Parameter Length 02
27
28
29
2A
2B DU DS TSD ETC TMC 0 LP 40
2C Parameter Length 04
2D
30
31
32
33 DU DS TSD ETC TMC 0 LP 40
Additional Page Length
Unit Serial Number
Cartridge Insertions
Number of Cleanings
Time Since Last Cleaning
MSB
LSB
MSB
Parameter Code
LSB
MSB
LSB
MSB
Parameter Code
LSB
MSB
LSB
MSB
Parameter Code
LSB
MSB
Tape Moved
LSB
MSB
Parameter Code
LSB
MSB
LSB
MSB
Parameter Code
LSB
MSB
(in Minutes)
LSB
MSB
Parameter Code
LSB
00
140
00
00
XX
XX
00
01
XX
XX
XX
00
02
XX
XX
XX
XX
00
03
XX
XX
00
04
XX
XX
XX
XX
00
05
Seagate Travan 40 Product Manual Page 47
Page 56

Chapter 5 ATAPI Interface
Data Bits
Byte 7 6 5 4 3 2 1 0 Hex
34 Parameter Length 04
35
38
39
3A
Longest Time Between Cleanings
MSB
(in Minutes)
LSB
MSB
Parameter Code
LSB
XX
XX
XX
XX
00
06
3B DU DS TSD ETC TMC 0 LP 40
3C Parameter Length 02
3D
3E
Cleaning Interval (in Minutes)
Page 33h—Special Information Definitions
MSB
LSB
XX
XX
Byte
00 Page Code
01 Reserved
02-03 Additional Page
Length
04-05 Parameter Code
06 DU
DS
TSD
ETC
TMC
LP
07 Parameter Length
08-13 Unit Serial Number
…
18-1A Cartridge Insertions
…
Set to 31h.
Set to 00h
Set to 1Eh.
Set to 00 00h, indicating the first parameter follows.
The Disable Update bit must be set to 0, indicating the drive
updates parameter values for all events.
The Disable Save bit is always set to 1, indicating the drive does
not save parameter values.
The Target Save Disable bit is always set to 0 indicating the
drive defines a method for saving log parameters.
The Enable Threshold Comparison bit is always set to 0,
indicating comparison to the threshold value is not performed
whenever the cumulative value is updated.
The Threshold Met Criteria bits are used with the ETC bit and
are always set to 0.
The List Parameters bit is always set to 1, indicating the
parameter is a list parameter.
Set to 0Ch, indicating 12 bytes in the counter.
Set to the ASCII value of the drive’s ten-digit serial number. The
ten-digit value is interpreted as follows: PPSYWWNNNN.
Where: PP is the product code, i.e., TG is NS20 SCSI.
S is the manufacture location, i.e., T is Thailand.
Y is the last digit of the calendar year, i.e., 8 is 1998.
WW is the calendar week.
NNNN is the alphanumeric serial number.
(The serial number markings are detailed in document 44872.)
The number of physical loads of any cartridge type during the
life of the drive. The number of cartridge loads includes cleaning
cartridge loads and failed load attempts. The field is never reset.
Page 48 Seagate Travan 40 Product Manual
Page 57

ATAPI Interface Chapter 5
1F-22 Tape Moved
…
27-28 Number of Cleanings
…
2D-30 Time Since Last
Cleaning
…
35-38 Longest Time
Between Cleanings
…
3C-
3E
Note: Fields on page 33h are not reset on power cycle.
Cleaning Interval
The length of tape (estimated in feet) passed over the head
since the last head cleaning. The field is incremented by 740
feet at EOT and BOT when tape motion is reversed. It is only
incremented when the full length of the tape has been traversed
and the direction of tape motion is reversed. The field is reset if
a cleaning operation is performed successfully.
The number of successful cleanings performed during the life of
the drive. If a cleaning cartridge is inserted and does not
complete the cleaning cycle, this field will not increment. The
field is never reset.
The calculated time in minutes (1.5 minutes per full track) since
the last cleaning was performed. The field is reset if a cleaning
operation is performed successfully.
The longest calculated time interval in minutes between cleaning
cycles. It is compared to the “Time Since Last Cleaning” value
after every successful cleaning cycle and the greatest value is
retained. The field is never reset.
The interval in minutes (3000 minutes = 50 hours) for setting the
TapeAlert cleaning flag. This field is only changeable at the
factory. In the field the value will remain the same.
Page 3Eh—Report Check-Sum of FLASH-RAM (LOG SENSE only)
Data Bits
Byte 7 6 5 4 3 2 1 0 Hex
00 Page Code 3E
01 0 0 0 0 0 0 0 0 00
02
Additional Page Length
03
04
05
06 DU DS TSD ETC TMC 0 LP 40
07 Parameter Length 04
08
.
Existing Check-Sum
09
0A
Calculated Check-Sum
0B
Page 3Eh—Report Check-Sum Definitions
Byte
0 Page Code
1 Reserved
2-3 Additional Page Length
4-5 Parameter Code
MSB
LSB
MSB
Parameter Code
LSB
MSB
LSB
MSB
LSB
The Report Check Sum of Flash-RAM (core firmware for
TRAVAN 6/7) Page Code is set to 3E.
Set to 00h.
Set to 08h.
Set to 00 00h, to indicate the first (and only) parameter
00
08
00
00
XX
.
XX
XX
XX
Seagate Travan 40 Product Manual Page 49
Page 58

Chapter 5 ATAPI Interface
follows.
6 DU
DS
TSD
ETC
TMC
LP
7 Parameter Length
8-9 Existing Check-Sum
0A0B
Calculated Check-Sum
The Disable Update bit must be set to 0, indicating the drive
updates parameter values for all events.
The Disable Save bit is always set to 1, indicating the drive
does not save parameter values.
The Target Save Disable bit is always set to 0 indicating the
drive defines a method for saving log parameters.
The Enable Threshold Comparison bit is always set to 0,
indicating comparison to the threshold value is not performed
whenever the cumulative value is updated.
The Threshold Met Criteria bits are used with the ETC bit and
are always set to 00b.
The List Parameters bit is always set to 1.
Set to 04h, indicating 04 bytes of parameter data.
2-byte check-sum value that is hard coded in the firmware and
stored in the EEPROM.
2-byte check-sum value that is calculated when this Log
Sense page is requested.
NOTE: When the existing and calculated check sums are equal, the firmware load
was successful.
NOTE: The existing check sum is saved into EEPROM.
Page 50 Seagate Travan 40 Product Manual
Page 59

ATAPI Interface Chapter 5
MODE SELECT (Group 0, Op. Code 15)
The Host issues the MODE SELECT command to establish certain drive
parameters. These parameters are sent to the drive as data. The parameters
established by this command are not unique to the Initiator issuing the command. If a
second Initiator changes the parameters at any time, these new parameters are
used for all Hosts communicating with the drive. After accepting the MODE SELECT
parameters from the Initiator, the drive sets Unit Attention condition for all other
Initiators. The unit will accept this command when positioned anywhere on tape.
CDB for MODE SELECT Command
Data Bits
Byte 7 6 5 4 3 2 1 0 Hex
0 0 0 0 1 0 1 0 1 15
1 0 0 0 PF 0 0 0 0 X0
2 0 0 0 0 0 0 0 0 00
3
4
5 0 0 0 0 0 0 0 0 00
PF (Page Format): A PF bit of 1 indicates that MODE SELECT Parameters
following header and block descriptor are structured as pages of related parameters.
Only the following pages are valid: Page 01h (Error Recovery and Reporting
Parameter), Page 02h (Disconnect/Reconnect Control Parameters), Page 10h
(Device Configuration Parameters), Page 11h (Media Partition Parameters), Page
0Fh (Data Compression Parameters), and Page 20h (Forced Streaming
Parameters).
Parameter List Length XX
XX
Parameter List Length (PLL): This field specifies the number of bytes for the
Parameter List to be transferred from the Host. When 0, no bytes are transferred
and this is not considered an error. When greater than 12h and PF is set to 1, the
data following the Block Descriptor is in Page Format.
NOTE: This field is 2 bytes in length.
Parameter List: The first four bytes of the Parameter List comprise the Header,
while the remaining bytes comprise the Block Descriptor.
Header Data Bits
Byte 7 6 5 4 3 2 1 0 Hex
0 0 0 0 0 0 0 0 0 00
1 0 0 0 0 0 0 0 0 00
2 0 0 0 BUFM
3 Block Descriptor Length 08
BUFM: The BUFM enables the Buffered Mode for WRITE commands. If BUFM is
set to 0, Buffered Mode is disabled for all WRITE commands, which do not terminate
and send a Good Sense until the last data block has been written onto the tape by
the drive. If BUFM is set to 1, Buffered Mode is enabled. WRITE commands
terminate and return a Good Status as soon as the Host places the last data block in
the buffer. If an error occurs while writing data after the command terminates, the
drive returns a Check Condition Status on the next command received from the
Host. The Host must then issue a REQUEST SENSE command to determine the
Speed Code XX
Seagate Travan 40 Product Manual Page 51
Page 60
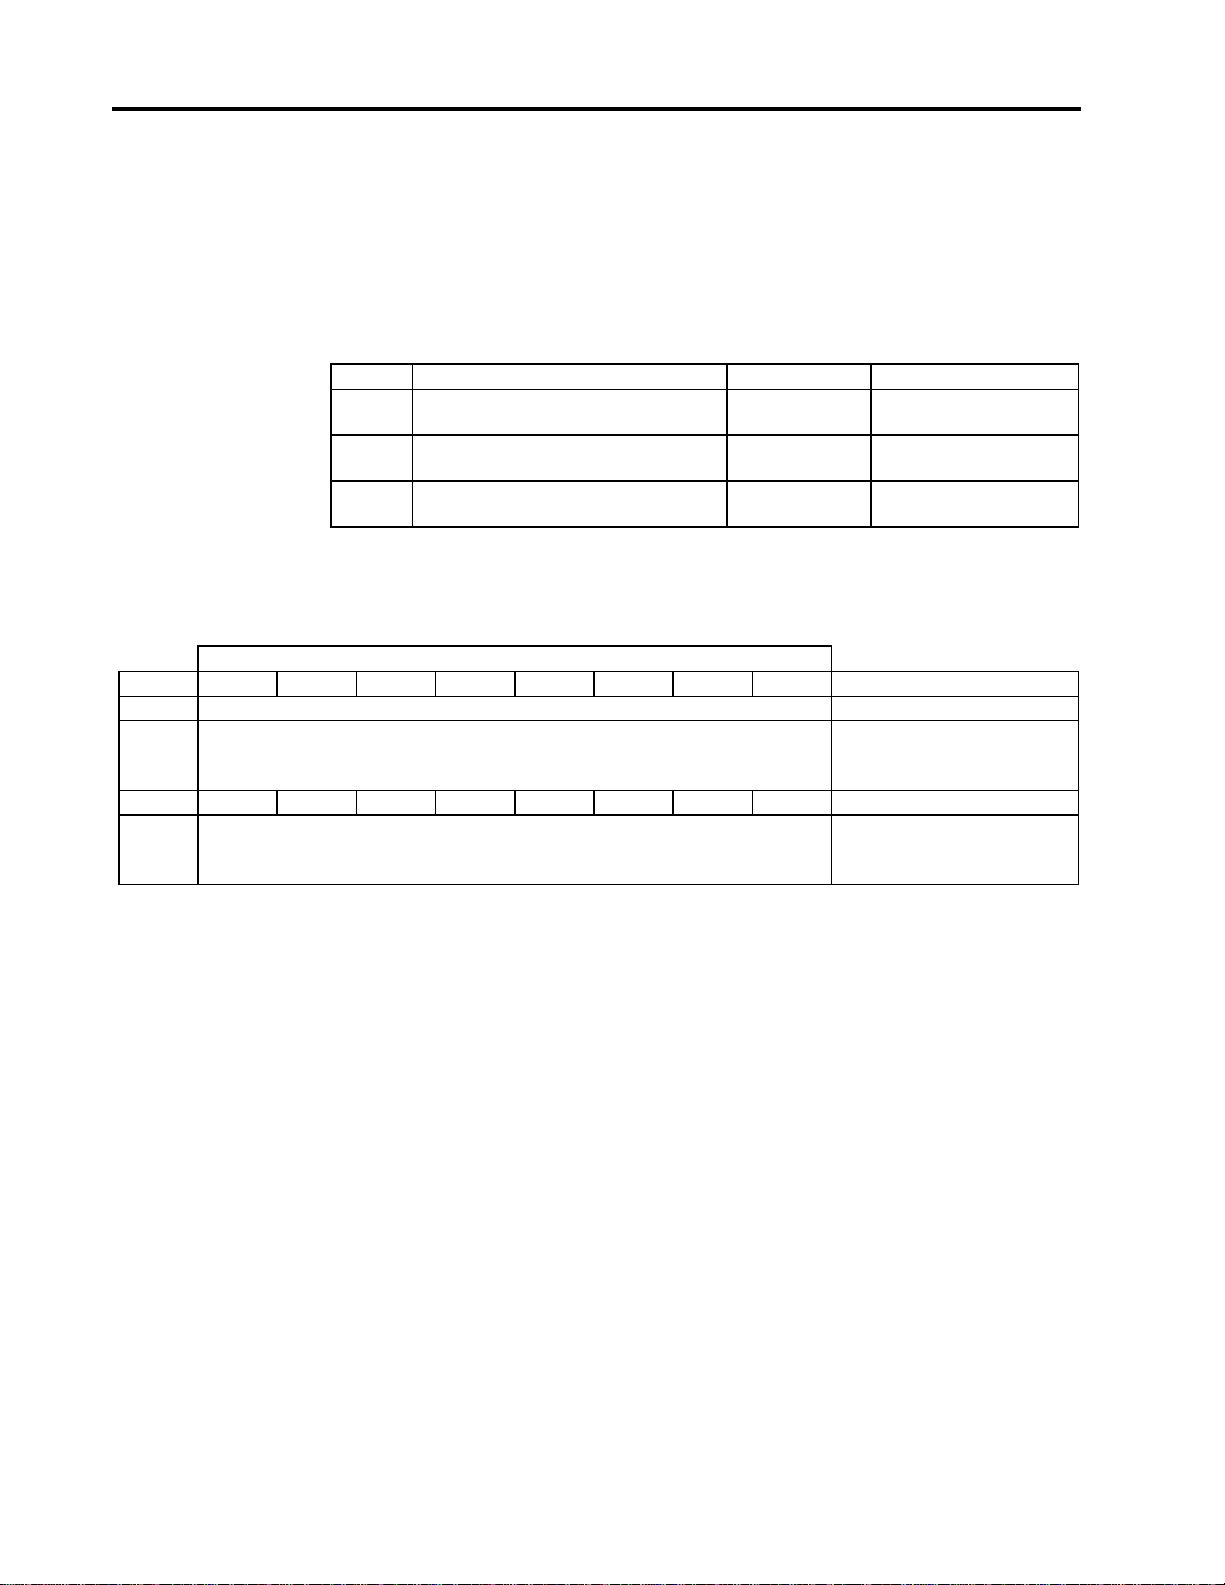
Chapter 5 ATAPI Interface
cause of the error. While writing, the drive will revert to Unbuffered Mode when
Logical Early Warning (LEW) is reached. A REWIND issued at this point will cause
the drive to rewind to BOT and return to Buffered Mode.
Speed Code: The values of speed codes are given in the table below. The Speed
Code may be set explicitly by MODE SELECT command, or implicitly when AVC
(Auto-Throttle) is set to 1 (bit 4, byte 8 of page code 10h). If AVC is set to 1, MODE
SENSE will report the actual speed selected to optimize data throughput.
Code Meaning Tape Speed Transfer Rate
0h Use default speed. 92 ips 2.0 MBps
1h Use lowest tape speed. 56 ips 1.2 MBps
2h-Fh Use highest tape speed. 92 ips 2.0 MBps
Block Descriptor Length: Specifies the number of bytes in the Block Descriptor.
This value is 08.
Block Descriptor
Data Bits
Byte 7 6 5 4 3 2 1 0 Hex
0 Density Code 45h
1
2
3
MSB
Number of Blocks
LSB
00
00
00
4 0 0 0 0 0 0 0 0 00
5
6
7
MSB
Block Length
LSB
XX
XX
XX
Density Code: This byte identifies the bit density and format of the media used by
the drive. The value returned by this field is determined by the last MODE SELECT
command, or is the default value based on the cartridge type and/or previously
recorded density following a power-up reset. See MODE SELECT for a table of valid
Density Codes.
Number of Blocks: This field must be 0.
Block Length: This field specifies the block length and mode. If this field is 00h, the
drive operates in variable length block mode. If this field is non-0, the drive operates
in fixed length block mode and the logical block length is equal to the value of this
field. The STT3401A default block length is 512 bytes.
Page Code 01h is used to specify target Error Recovery and Reporting parameters.
Page 52 Seagate Travan 40 Product Manual
Page 61

ATAPI Interface Chapter 5
Page Code 01h—Error Recovery and Reporting Parameters
Data Bits
Byte 7 6 5 4 3 2 1 0 Hex
0 0 0 Page Code 01
1 Additional Page Length 0A
2 0 0 TB 0 EER PER DTE DCR X8
3 Read Retry Count 10
4 0 0 0 0 0 0 0 0 00
5 0 0 0 0 0 0 0 0 00
6 0 0 0 0 0 0 0 0 00
7 0 0 0 0 0 0 0 0 00
8 Write Retry Count 10
9 0 0 0 0 0 0 0 0 00
0A 0 0 0 0 0 0 0 0 00
0B 0 0 0 0 0 0 0 0 00
TB: A Transfer Block bit of 1 indicates that a data block not recovered in a READ
operation within the recovery limits specified shall be transferred to the Initiator. A TB
bit of 0 indicates that the failing data block shall not be transferred to the Initiator.
The default value on power-up / reset condition is zero. This value is changeable by
the Host.
EER: An Enable Error Recovery bit of 1 instructs the drive to apply ECC before
attempting read retries. A 0 instructs the drive to exhaust the read retry count first
then apply ECC. The power-up default is 1 and may not be changed by the Host.
PER: A Post Error Reporting bit of 1 instructs the drive to report Check Condition
status on a recovered error. A 0 instructs the drive not to report Check Condition
status on a recovered error. The power-up default is 0. The value may be changed,
but the drive always operates as though the value is 0.
DTE: The Disable Transfer on Error bit is valid only if PER is set to 1. A 1 instructs
the drive not to transfer recovered data. A 0 instructs the drive to transfer recovered
data. The power-up default is 0. The value may be changed, but the drive always
operates as though the value is 0.
DCR: The Disable Correction bit is valid only if EER is 0. A 1 instructs the drive not to
apply ECC on a block in error; the drive will do a retry instead. A 0 instructs the drive
to apply ECC on a block in error. The power-up default is 0. The value may be
changed, but the drive always operates as though the value is 0.
Read Retry Count: Specifies the number of times that the target should attempt its
read recovery algorithm. The Read Retry Count depends upon the format being
written. Its value is not changeable by the Host.
Write Retry Count: This count is ignored and is not used by the drive.
Seagate Travan 40 Product Manual Page 53
Page 62

Chapter 5 ATAPI Interface
Page Code 10h—Device Configuration Parameters
Data Bits
Byte 7 6 5 4 3 2 1 0 Hex
0 0 0 Page Code (10h) 10
1 Additional Page Length 0E
2 0 CAP CAF Active Format X0
3 Active Partition XX
4 Write Buffer Full Ratio XX
5 Read Buffer Empty Ratio XX
6
7
MSB
Write Delay Time
LSB
00
00
8 DBR BIS RSMK AVC SOCF RBO REW XX
9 Gap Size 00
0A EOD Defined EEG SEW 0 0 0 XX
0B
0C
0D
Buffer Size At Early Warning
MSB
LSB
00
00
00
0E 0 0 0 0 0 0 0 0 00
0F 0 0 0 0 0 0 0 0 00
Additional Page Length: Set to 0Eh to specify the length of the Device
Configuration page.
CAP: Change Active Partition bit, set to 1, will set the logical partition to the one
specified by the active partition field. This is only allowed if the FDP bit in the Media
Partition Page (MODE SELECT/Sense Page 11h) has been set to 1. A CAP bit set to
0 indicates no partition change is specified. The default value is 0. This value is
changeable by the Host.
CAF: The Change Active Format field shall always be set to 0, which specifies no
change to format. The Density Code in the Block Descriptor is used to specify the
format.
Active Format: The field specifies the format to be sued when the tape is positioned
at BOT and CAF is set to 1. Refer to Density Code field for valid format values. The
power-up default is 00h. This value is not changeable by the Host.
Active Partition: The field contains the partition number, which will become active
when the CAP bit is set to 1. The drive supports 2 partitions: When set to 0, the Data
Partition is selected. When set to 1, the Directory Partition is selected. To set the
Active Partition to one, FDP must also be set in Page 11h.
Write Buffer Full Ratio: On WRITE commands, this field indicates to the target how
full the buffer shall be before writing data to the media. This field is not changeable
and is ignored. The drive buffer will hold up to 28 frames of user data. When writing,
the drive will start tape motion when 10 frames hare assembled in the buffer.
Read Buffer Empty Ratio: On READ commands, this field indicates to the target
how empty the buffer shall be before retrieving additional data from the media. This
field is not changeable and is ignored. The drive buffer will hold up to 28 frames of
user data. When reading, the drive will start tape movement when the buffer has free
space for a minimum of 16 frames.
Page 54 Seagate Travan 40 Product Manual
Page 63

ATAPI Interface Chapter 5
Write Delay Time: This field indicates the maximum time, in 100 millisecond
increments, that the drive shall retain buffered data without subsequent write or
synchronizing commands before forcing it to the media. Filler blocks containing
invalid filler data required to fill out ECC frames will accompany data forced to tape.
A value of 00 00h indicates data will never be forced to tape. Valid values are 00 00h
and up to 10 00h (27.3 minutes). Invalid values will be rounded up. The default value
is 00 00h and this field is changeable.
Data Buffer Recovery is set to 0 and the RECOVER BUFFERED DATA command
is not supported and will not be accepted.
BIS: A Block Identifiers Supported (BIS) bit is reported as 1 in MODE SENSE. This
field is non-changeable.
RSMK: The Report Setmark (RSMK) bit, if set to 1, instructs the drive to report
Setmarks by the same rules applying to Filemarks. If set to 0, Setmarks will be
ignored when reading, and commands to write Setmarks will not be accepted. This
value is 0 by default and is not changeable. Setmarks are not supported
AVC: The Automatic Velocity Control (AVC) bit enables the Auto-Throttle feature.
When set to 0, the tape speed is set by the speed code in the device specific
parameter byte. When set to 1, the drive uses Auto-Throttle to reduce tape speed
from the Speed Code setting to minimize repositioning of the tape. The adjusted tape
speed will be reported in MODE SENSE.
NOTE: If Speed Code 0h is used with AVC on, the drive will default to 92 ips (2.0
Mbytes/Sec native transfer rate). If the system is unable to sustain streaming
at that rate, the drive will Auto-Throttle to the lower speed (56 ips). At the
beginning of each track, the drive will increase speed to 92 ips in an attempt
to increase throughput.
SOCF: Stop On Consecutive Filemarks bit is not a supported function and must be
set to 00b.
BRO: Recover Buffered Order bit determines the order in which data will be returned
to the Host for a RECOVER BUFFERED DATA command. When set to 1, the data
blocks will be returned to in LIFO order. When set to 0, FIFO order will be utilized.
Only a value of 0 is supported. This field is non-changeable.
REW: A Report Early-Warning bit of 1 indicates the target shall return Check
Condition status with the EOM bit set to 1 when the logical early-warning position is
encountered during Read and Write operations. A REW bit of 0 indicates the target
shall not report this condition for read operations (but it shall report the early warning
for write operations). The default value is 0b. This field is not changeable.
NOTE: Early Warning is reported only on WRITE commands.
Gap Size field value determines the size of the inter-block gap while writing data and
must be set to 0. This field is non-changeable.
End-of-Data (EOD) Defined: This field indicates which format type the logical unit
shall use to detect and generate the EOD area. The only type supported is 000b,
indicating a device default EOD definition per QIC format standard. Values 001b to
111b are reserved. This field is non-changeable.
Seagate Travan 40 Product Manual Page 55
Page 64

Chapter 5 ATAPI Interface
EEG: Enable EOD Generation—When set to 1, this bit indicates that the logical unit
shall generate the appropriate EOD area, as determined by the EOD Defined field. A
value of 0 indicates that EOD generation is disabled. 1 is the value supported. This
field is non-changeable.
SEW: Synchronize at Early Warning (SEW)—When set to 1, and Logical Early
Warning is encountered during a WRITE operation, the tape drive will truncate the
current command, write any buffered data to the tape, and return a Check Condition
with EOM set in the Sense Data. 1 is the value supported. This field is nonchangeable.
NOTE: When Logical Early Warning is detected, the drive will not interrupt the
current DMA, which will be 64Kbytes or less. Notification will be given when
the current command completes, or if the data left to be written is to large
notification will be given on the maximum burst DMA boundary.
Buffer Size at Early Warning is always 0, indicating the buffer size is device
specific.
Page Code 11h—Media Partition Page
Data Bits
Byte 7 6 5 4 3 2 1 0 Hex
0 0 0 Page Code 11
1 Additional Page Length 06
2 Maximum Additional Partitions 00
3 Additional Partitions Defined 00
4 FDP SDP IDP PSUM 0 0 0 XX
5 Media Format Recognition 03
6 0 0 0 0 0 0 0 0 00
7 0 0 0 0 0 0 0 0 00
Additional Page Length shall be set to 6.
Maximum Additional Partitions field indicates the maximum umber of additional
partitions supported by the drive. The value of this field is returned during a MODE
SENSE command. It will always be set to 0, indicating the drive supports one data
partition consistent with QIC-157D, table 5-44. This parameter is not changeable.
Additional Partitions Defined field specifies the number of additional partitions to
be defined for a volume when SCP or IDP is set to 1. This field must be set to 0, and
is not changeable.
FDP: Fixed Data Partition bit may be changed by a MODE SELECT command only
when the drive is positioned to BOT. When set to 0, the drive considers the entire
media as a single partition. When FDP is set to 1 the drive is in dual partition mode.
FDP does not cause the selected partition to change. CAP in page 10h is used for
that function. The FDP bit default value is 1 and it is not changeable in STT3401A
mode.
Select Data Partition (SDP), Initiator-Defined Partitions (IDP), and Partitions
Size Unit of Measure (PSUM) fields shall be set to 0, indicating that the STT3401A
drive assigns partitions base on its pre-defined definition of the data and directory
partitions. These values are not changeable by the Host.
Page 56 Seagate Travan 40 Product Manual
Page 65

ATAPI Interface Chapter 5
Media Format Recognition field is intended for use by the MODE SENSE
command, in which it is set to 03h, indicating that the drive is capable of recognizing
the format and partition of the tape automatically. This is per QIC-157D, table 5-45.
This field is ignored in MODE SELECT commands.
Page Code 1Ch is used for TapeAlert Diagnostics.
Page Code 1Ch—TapeAlert Diagnostics
Data Bits
Byte 7 6 5 4 3 2 1 0 Hex
0 0 0 Page Code 1C
1 Page Length 0A
2 Perf Reserved Dexcpt Test Resrvd LgErr XX
3 Reserved MRIE XX
4
5
Interval Timer
XX
6
7
8
9
Report Count / Test Flag Number
XX
10
11
The Page Code is set to 1Ch. The purpose of the TapeAlert Mode page is similar to
the SMART disc diagnostic interface. The TapeAlert Mode page will return to the
default settings when a bus reset is received. The following fields are in the Mode
page:
Dexcpt (Default set to 1): When this bit is set to 0 the reporting method indicated by
the MRIE field is used. When this bit is set to 1 this indicates that the target shall
disable all information exception operations, ignoring the MRIE field (in this mode the
software must poll the TapeAlert Log page). Thus to enable “Check Condition”
mode, set the bit to 0.
LogErr (Default set to 0): When this bit is set to 0, this indicates that the logging of
informational exception conditions within a target is vendor specific. When this bit is
set to 1, the target shall log informational exception conditions.
Perf (Default set to 0): When this bit is set to 0, this indicates that informational
exception operations that can cause delays are acceptable. When this bit is set to 1,
the target shall not cause delays while doing informational exception operations (may
cause the target to disable some or all of the informational exception operations).
Test (Default set to 0): When this bit is set to 0, this indicates that the target shall
not generate any false/test informational exception conditions.
When this bit is set to one and Test Flag Number is set to 0, the target will generate
a false informational exception condition based on the MRIE field (the Interval Timer
field is ignored and the Report Count field is used as the Test Flag Number). When a
false information exception condition is posted, the TapeAlert flags in the Log page
are not modified. However, real informational exception conditions have priority over
false informational exception conditions. The Test bit will be automatically cleared
when the false information exception condition is posted on the first command
(excluding Inquiry and Request Sense) that is received with no real information
exception condition pending. The false informational exception condition will then be
Seagate Travan 40 Product Manual Page 57
Page 66

Chapter 5 ATAPI Interface
reported in the method specified by the MRIE value, except with the additional Sense
Code set to 0x5DFF. If both the Test and Dexcpt bits are set to 1 and Test Flag
Number set to 0, then the MODE SELECT command will return Check Condition,
with Sense Key set to Illegal Request and extended sense set to Invalid Field in
Parameter List.
When the Test bit is set to 1 and the Test Flag Number is set to valid non-0 value,
the target will generate/clear a test informational exception condition. The value of
the Test bit returned by a Mode Sense command will remain at 0. The test action is
based on the Test Flag Number value:
1 to 64: This will set in the Log page the TapeAlert flag indicated by the Test Flag
Number. Once the TapeAlert flag is set it is processed normally based on the
Dexcpt, MRIE, Interval Count and Report Count values.
–1 to –64: This will clear the TapeAlert flag indicated by the absolute value of the
Test Flag Number. Clearing the flag in this way is equivalent to performing the
specified corrective action for that flag, thus allowing a real information exception
condition to be set if the real error condition occurs for that flag.
32767 (0x7FFF): This will set all of the TapeAlert flags in the Log Page that are
supported by the target. Once the supported TapeAlert flags are set they are
processed normally based on the Dexcpt, MRIE, Interval Count and Report Count
values.
Interval Timer (Default set to 0): When this field is set to 0, this indicates that the
target shall only report the informational exception condition one time. When this
field is set to non-0, the value indicates the period in 100 millisecond increments for
reporting that an informational exception condition has occurred. The target shall not
report informational exception conditions more frequently than the specified timer
interval and as soon as possible after the timer interval has elapsed. A value of
0xFFFFFFFF in the field indicates the timer interval is vendor specific.
Report Count/Test Flag Number (Default set to 0): This field has a dual purpose.
When the Test bit is set to 0, then the value of this field in the MODE SELECT data
represents the Report Count, which is what is always returned in response to a Mode
Sense command. When the Report Count field is set to 0, this indicates that there is
no limit on the number of times the target shall report the informational exception
condition (assuming that Interval Timer is set to non-0). When the Report Count field
is set to non-0 this indicates the number of times to report an informational exception
condition. If multiple TapeAlert flags are set simultaneously, these are reported as a
single informational exception condition. The report count is controlled by the most
recent flag set.
When a MODE SELECT command is sent with the Test bit is set to 1, then the value
of this field in the MODE SELECT data represents the Test Flag Number, which is
never returned in response to a Mode Sense command. Valid vales of the Test Flag
Number are –64 to 64 and 32677 (0x7FFF). Negative numbers are represented
using the 2’s complement method. If the Test Flag Number is set to an invalid value,
then the MODE SELECT command will return Check Condition, with Sense Key set
to Illegal Request and extended sense set to Invalid Field in Parameter List. If the
device does not support Test Flag Number, then when the Test bit is set to 1 and the
Test Flag Number is set to non-0, the MODE SELECT command will return Check
Condition. The Sense Key is set to Illegal Request and extended sense set to Invalid
Field in Parameter List.
Page 58 Seagate Travan 40 Product Manual
Page 67

ATAPI Interface Chapter 5
MRIE (Default set to 0x3): This field indicates the method used by the target to
report informational exception conditions (note that this is standard SCSI terminology
and is not related in any way to the “Information” severity level for the flags). The
priority of reporting informational exception conditions is vendor specific. If the
informational exception condition was generated by an event that caused a real
Check Condition to occur, then this real Check Condition will over-ride (i.e. be used
instead of) the Check Condition defined in MRIE modes 0x1 to 0x5. The values
defined for this field are:
0×0: No reporting of informational exception conditions. This method
instructs the device server to not report information exception conditions
0×1: Asynchronous Event Reporting. This method instructs the device server
to report information exception conditions by using the rules for asynchronous event
reporting as described in the SCSI-3 Architecture Model and the relevant protocol
standard. The Sense Key shall be set to RECOVERED ERROR and the additional
Sense Code shall indicate the cause of the information exception condition (which is
5D00 for a TapeAlert event).
0×2: Generate Unit Attention. This method instructs the device server to report
information exception conditions by returning a Check Condition status on the next
SCSI command (excluding Inquiry and Request Sense) after an informational
exception condition was detected. The Sense Key shall be set to Unit Attention and
the additional Sense Code shall indicate the cause of the information exception
condition (which is 5D00 for a TapeAlert event). The command that has the Check
Condition shall NOT be executed before the informational exception condition is
reported (and thus needs to be repeated).
0×3: Conditionally generate Recovered Error. This method instructs the device
server to report information exception conditions, if reporting of recovered errors is
allowed, by returning a Check Condition status on the next SCSI command
(excluding Inquiry and Request Sense) after an informational exception condition
was detected. The Sense Key shall be set to RECOVERED ERROR and the
additional Sense Code shall indicate the cause of the information exception condition
(which is 5D00 for a TapeAlert event). The command that has the Check Condition
shall complete without error before any exception condition may be reported (and
thus does NOT need to be repeated).
0×4: Unconditionally generate Recovered Error. This method instructs the
device server to report information exception conditions, regardless of the value of
the per bit of the error recovery parameters mode page, by returning a Check
Condition status on the next SCSI command (excluding Inquiry and Request Sense)
after an informational exception condition was detected. The Sense Key shall be set
to Recovered Error and the additional Sense Code shall indicate the cause of the
information exception condition (which is 5D00 for a TapeAlert event). The command
that has the Check Condition shall complete without error before any exception
condition may be reported (and thus does NOT need to be repeated).
0×5: Generate No Sense. This method instructs the device server to report
information exception conditions by returning a Check Condition status on the next
SCSI command (excluding Inquiry and Request Sense) after an informational
exception condition was detected. The Sense Key shall be set to No Sense and the
additional Sense Code shall indicate the cause of the information exception condition
(which is 5D00 for a TapeAlert event). The command that has the Check Condition
shall complete without error before any exception condition may be reported (and
thus does NOT need to be repeated).
Seagate Travan 40 Product Manual Page 59
Page 68

Chapter 5 ATAPI Interface
0×6: Only report informational exception condition on request. This method
instructs the device server to preserve information exception(s) information. To find
out about information exception conditions the application client polls the device
server by issuing an unsolicited REQUEST SENSE command. The Sense Key shall
be set to No Sense and the additional Sense Code shall indicate the cause of the
informational exception condition (which is 5D00 for a TapeAlert event).
With MRIE modes 0x1 to 0x6, the additional Sense Code of 5D00 indicates that a
TapeAlert event has occurred on the device, and detailed information about this
event is stored in the TapeAlert Log page. Note that the MRIE modes do not affect
the logging of events in the TapeAlert Log page.
Page 60 Seagate Travan 40 Product Manual
Page 69

ATAPI Interface Chapter 5
MODE SENSE (Group 0, Op. Code 1A)
The MODE SENSE command provides the Host with information pertaining to the configuration of the drive. The drive
does not disconnect from the Initiator while executing this command.
CDB for MODE SENSE Command
Data Bits
Byte 7 6 5 4 3 2 1 0 Hex
0 0 0 0 1 1 0 1 0 1A
1 0 0 0 0 DBD 0 0 0 0X
2 PC Page Code XX
3 0 0 0 0 0 0 0 0 00
4 Allocation Length XX
5 0 0 0 0 0 0 0 00
DBD—Disable Block Descriptor: A DBD bit of 0 will enable transfer of the block
descriptor. A DBD bit of 1 will disable transfer of block descriptor parameters.
PC—Page Control: PC field as described below defines the type of values to be
returned for Parameter Page.
Bit 7 Bit 6 Type of Parameter Values to be Returned
0 0 Current Values
0 1 Changeable Values 2
1 0 Default Values 2
1 1 Saved Values
Note: 1) This is not supported by the drive. If PC=11b, the command will result in
an Illegal Request (Sense Key 5).
2) With the ATAPI interface drive, PC must equal 00b. Other values will
return an Illegal Request (Sense Key 5)
1,2
Page Code: The Page Code field specifies which Parameter Page(s) is (are) to be
returned. Any Page Code value other than listed below will result in an Illegal
Request.
Page Code Description
01h Error Recovery and Reporting Parameter Page will Be Returned
02h Disconnect / Reconnect Control Parameter Page Will Be Returned
10h Device Configuration Parameter Page Will Be Returned
11h Media Partition Page Will Be Returned
1C TapeAlert Diagnostics Page Will Be Returned
Seagate Travan 40 Product Manual Page 61
Page 70

Chapter 5 ATAPI Interface
Page Code Description
20h Forced Streaming Page Will Be Returned
2Ah Capabilities and Mechanical Status Page
3Fh All Pages (01h through 3Fh) Will Be Returned
Refer to MODE SELECT command for a description of the Parameter Pages.
Allocation Length: This field specifies the number of bytes requested from the
Parameter List. A maximum of 12 (0Ch) may be returned. When set to 0, no bytes
are transferred and this is not considered an error.
Parameter List: The first four bytes of the Parameter List comprise the Header,
while the remaining bytes comprise the Block Descriptor.
Header Data Bits
Byte 7 6 5 4 3 2 1 0 Hex
0 Sense Data Length XX
1 Media Type XX
2 WP 0 0 BUFM
Speed Code XX
3 Block Descriptor Length 08
Sense Data Length: The Sense Data Length of 11 (0Bh) includes the four-byte
Header and eight-byte Block Descriptor.
Media Type: This byte identifies the cartridge type installed in the drive. 00h
indicates no cartridge or unknown cartridge. See table below for valid cartridge
codes.
Code Cartridge Type
00h No cartridge, cleaning cartridge, or type unknown
85h Travan 5
95h Travan 7
WP: When this bit is 1, the cartridge installed in the drive is Write Protected.
BUFM: The BUFM bit indicates the Buffered Mode is enabled for WRITE
commands. If set to 0, Buffered Mode is disabled for the WRITE command. The
command does not terminate and send a Good Sense until the last data block has
been written onto the tape by the drive. If BUFM is set to 1, the Buffered Mode is
enabled. The WRITE command terminates and returns a Good Status as soon as
the Host places the last data block in the buffer. If an error occurs while writing data
after the command terminates, the drive returns a Check Condition Status on the
next command received from the Host. The Host must then issue a REQUEST
SENSE command to determine the cause of the error. While writing, the drive will
revert to Unbuffered Mode when Logical Early Warning (LEW) is reached. A
REWIND issued at this point will cause the drive to rewind the BOT and return to
Buffered Mode.
Page 62 Seagate Travan 40 Product Manual
Page 71

ATAPI Interface Chapter 5
Speed Code: Speed code values are listed in the table below. The Speed Code may
be set explicitly by MODE SELECT command, or implicitly when AVC ( AutoThrottle) is set to 1 (bit 4, byte 8 of page code 10h). If AVC is set to 1, MODE SENSE
will report the actual speed selected to optimize data throughput.
Code Meaning
0h Use default speed.
1h Use lowest tape speed.
2h-Fh Use highest tape speed
Block Descriptor Length: Specifies the number of bytes in the Block Descriptor.
This value is 08.
Block Descriptor
Data Bits
Byte 7 6 5 4 3 2 1 0 Hex
0 Density Code XXh
1
2
3
MSB
Number Of Blocks
LSB
00
00
00
4 0 0 0 0 0 0 0 0 00
5
6
7
MSB
Block Length
LSB
XX
XX
XX
Density Code: This byte identifies the bit density and format of the media used by
the drive. The value returned by this field is determined by the last MODE SELECT
command, or is the default value based on cartridge type and/or previously recorded
density following a power-up reset.
Density Code QIC Reference Read Write
46 Travan 5, QIC-3220-MC Yes No
*** Travan 40 Yes Yes
Number of Blocks: This field must be 0.
Block Length: This field indicates the selected block length and mode. The
STT3401A default block length is 512 bytes. The maximum fixed block length is
1024 bytes.
Parameters: MODE Sense Data pages are as specified in the MODE SELECT
commands. See Section 0 for page, field, and bit specifications.
Seagate Travan 40 Product Manual Page 63
Page 72

Chapter 5 ATAPI Interface
Page Code 2A Capabilities and Mechanical Status Page
Data Bits
Byte 7 6 5 4 3 2 1 0 Hex
0 0 0 Page Code (2A) 2A
1 Page Length (12h) 12
2 Reserved XX
3 Reserved XX
4
5
6
7
8
9
0A
0B
0C
0D
0E
0F
10
11
12
13
Rsvd Rsvd Rsvd SPREV Rsvd Rsvd Rsvd RO 1
Rsvd Rsvd QFA Rsvd EFMT Rsvd Rsvd Rsvd
CMPRS ECC Rsvd DIS-
CONNECT
Rsvd Rsvd Rsvd Rsvd Rsvd BLK1024 BLK512 Rsvd
EJECT
1
PREVENT LOCKED
MSB
Maximum Speed Supported (in KBps)
LSB
MSB
Reserved
LSB
MSB
Continuous Transfer Limit (in blocks)
LSB
MSB
Current Speed Selected (in KBps)
LSB
MSB
Buffer Size (in 512 byte units)
LSB
MSB
Reserved
LSB
1
LOCK
20 or 21
28
XX
06
07
D0
XX
XX
00
00
07
D0
10
00
XX
XX
NOTE: 1) These values may change depending on cartridge type and drive status.
SPREV: If the SPREV bit is set, the device supports SPACE in the reverse direction.
RO: If the RO bit is set, the device is operating in read-only mode. This bit does not
reflect the state of the write protect flag on the cartridge which is indicated by the WP
bit in the Mode Page Header.
QFA: If the QFA bit is set, the device supports a two-partition format, which may be
used for quick file access.
EFMT: If the EFMT bit is set, the device supports ERASE command initiated
formatting.
CMPRS: If the CMPRS bit is set, the device supports data compression.
ECC: If the ECC bit is set, the device performs error correction.
DISCONNECT: If the DISCONNECT bit is set, the device can break up data
transfers without the need to restrict transfer lengths to the Continuous Transfer
Limit.
EJECT: If the Eject bit is set, the device can mechanically unload the cartridge with
the LOAD / UNLOAD command.
Page 64 Seagate Travan 40 Product Manual
Page 73

ATAPI Interface Chapter 5
PREVENT: If the PREVENT bit is set, the device defaults to the Prevent state after
power-up.
LOCKED: If the LOCKED bit is set, the volume is locked.
LOCK: If the LOCK bit is set, the device supports locking the volume using the
PREVENT/ALLOW MEDIA REMOVAL command.
BLK1024: If the BLK1024 bit is set, the device is capable of using a 1024-byte block
size.
BLK512: If the BLK512 bit is set, the device is capable of using a 512-byte block
size.
Maximum Speed Supported: This field indicates the maximum data rate the device
supports. This value is the maximum sustained native data transfer rate of the
device returned in 1000 byte per second units.
Continuous Transfer Limit: This field indicates the number of blocks (of the current
block size) that can be transferred without delay due to a buffer limitation. When
DISCONNECT is set to 0, transfers restricted to the Continuous Transfer Limit will
result in efficient use of the bus. When DISCONNECT is set to 1, this field is ignored.
Current Speed Selected: This field indicates the actual data rate the device is
currently using. This value is returned in 1000 byte per second units.
Buffer Size: This field is an estimate of the read and write buffer size in 512-byte
units.
Seagate Travan 40 Product Manual Page 65
Page 74

Chapter 5 ATAPI Interface
PREVENT/ALLOW MEDIA REMOVAL (Group 0, Op. Code 1E)
This command is used to prevent or allow the removal of the tape cartridge.
CDB for PREVENT/ALLOW MEDIA REMOVAL Command
Data Bits
Byte 7 6 5 4 3 2 1 0 Hex
0 0 0 0 1 1 1 1 0 1E
1 0 0 0 0 0 0 0 0 00
0 0 0 0 0 0 0 0 0 00
3 0 0 0 0 0 0 0 0 00
0 0 0 0 0 0 0 0 PRE 0X
5 0 0 0 0 0 0 0 0 00
PRE: When set to 0, an ALLOW command is indicated. Following this command,
cartridge unloading via the front panel Eject button or the UNLOAD command is
allowed.
When set to 1, a PREVENT command is indicated. Following this command, an
UNLOAD command or an Eject button push will be rejected. An UNLOAD command
will be terminated with Check Condition Status. The Sense Key will be set to 5h
(Illegal Request), and the ASC and ASCQ codes will be set to 53/02h (Media
Removal Prevented). This command is canceled by a hard reset or a
PREVENT/ALLOW command with the PRE bit set to 0. The drive does not
disconnect from the Initiator while executing this command. A PREVENT command
can be cleared by an ALLOW command only if sent by the same Initiator.
Page 66 Seagate Travan 40 Product Manual
Page 75

ATAPI Interface Chapter 5
READ (Group 0, Op. Code 08)
The READ command transfers the specified amount of data from the tape drive to
the Initiator. The command terminates when one of the following conditions occurs:
• The Transfer length specified in the CDB has been satisfied.
• A Filemark or Setmark has been read.
• Logical Early Warning or physical End-of-Media has been reached.
• An unrecoverable read error has occurred (i.e., a command was issued to Read
data that could not be recovered by ECC or rereading).
• An Illegal Length indication occurred (unless the SILI bit is set and the Illegal
Length is an under length condition).
• End of Recorded Data is encountered.
When the command terminates for a reason other than the first, the residue can be
obtained with a REQUEST SENSE command.
CDB for READ Command
Data Bits
Byte 7 6 5 4 3 2 1 0 Hex
0 0 0 0 0 1 0 0 0 08
1 0 0 0 0 0 0 SILI FBM 0X
2
3
4
5 0 0 0 0 0 0 0 0 00
SILI: Suppress Illegal Length Indicator (SILI) applies only to the variable block length
mode, which is not supported by ATAPI-interface tape drives. The combination of the
SILI bit and the FBM bit both set to 1 causes Illegal Request (Sense Key 5h).
NOTE: If ILI condition exists for a Fixed Block Transfer, the Illegal Length block will
not be transferred.
FBM: Fixed Block Mode (FBM) is associated with the Transfer Length field. When
set to 1, the transfer length is given in blocks as specified in the MODE SELECT
data.
NOTE: If the block length on tape is different than the block length specified in
MODE SELECT data, an Illegal Length error is declared.
Transfer Length: If FBM is set to 1, this field specifies the number of blocks to be
transferred to the Initiator.
MSB
Transfer Length
LSB
XX
XX
XX
When Reading, the STT3401A keeps track of “soft” read errors (corrected blocks)
and data overruns. These error counters are available by means of the REQUEST
SENSE command.
Data Error Counter: This counter is incremented each time a block must be
corrected using ECC. It is cleared when any command is issued that terminates the
Seagate Travan 40 Product Manual Page 67
Page 76

Chapter 5 ATAPI Interface
READ process (e.g., REWIND). See REQUEST SENSE, bytes 14-15 and LOG
SENSE, Page 3.
Data Under-Run Counter: This counter is incremented each time a buffer overrun
causes the tape to reposition. The counter is cleared when the READ process is
terminated. See REQUEST SENSE, bytes 16-17.
Page 68 Seagate Travan 40 Product Manual
Page 77

ATAPI Interface Chapter 5
READ BUFFER (Group 1, Op. Code 3C)
The READ BUFFER command will cause the contents of the drive’s data buffer to be
returned to the Host and is intended to be used in conjunction with the WRITE
BUFFER command as a Diagnostic tool. Using Buffer I.D. and Buffer Offset, the
data transfer may be started from any location in the buffer. This command tests the
ATAPI Bus and the drive’s Data Buffer. The tape is not affected.
CDB for READ BUFFER Command
Data Bits
Byte 7 6 5 4 3 2 1 0 Hex
0 0 0 1 1 1 1 0 0 3C
1 0 0 0 0 0 Mode 0X
2 Buffer I.D. XX
3
4
5
6
7
8
9 0 0 0 0 0 0 0 0 00
MSB
Buffer Offset
LSB
MSB
Transfer Length
LSB
XX
XX
XX
XX
XX
XX
MODE: The Mode field determines the format of the data that is returned to the
Host.
Mode Type Description
0-1h Reserved
2h Data Only Mode The drive will send the data only, and no header.
3-7h Reserved
Buffer I.D.: The data buffer is divided into 256 equal segments of 2048 bytes each.
The number of each segment is specified by the Buffer I.D. To perform a read buffer
at the first segment (or beginning) of the buffer, a Buffer I.D. of 00h must be
specified. To perform a read buffer at the 128th segment, a Buffer I.D. of 7Fh must
be specified (etc.).
Buffer Offset: This field specifies the byte location in the specified buffer in which
the first data byte to be transferred to the Host will be found. Offset values greater
than 7FFh will cause Check Condition, Illegal Request.
Transfer Length: This field specifies the number of bytes to be read from the Buffer
by the Host. The value includes the four-byte Header.
NOTE: The STT3401A has an 8 MB buffer. Each segment, as defined by Buffer
I.D., will be 2K bytes in size and the maximum offset will be 7ffh.
Seagate Travan 40 Product Manual Page 69
Page 78

Chapter 5 ATAPI Interface
READ BUFFER Header (Mode 00h)
Data Bits
Byte 7 6 5 4 3 2 1 0 Hex
0 0 0 0 0 0 0 0 0 00
1
2
3
MSB
Buffer Capacity
LSB
XX
XX
XX
Buffer Capacity: This field specifies the total number of bytes in the drive’s buffer.
Page 70 Seagate Travan 40 Product Manual
Page 79
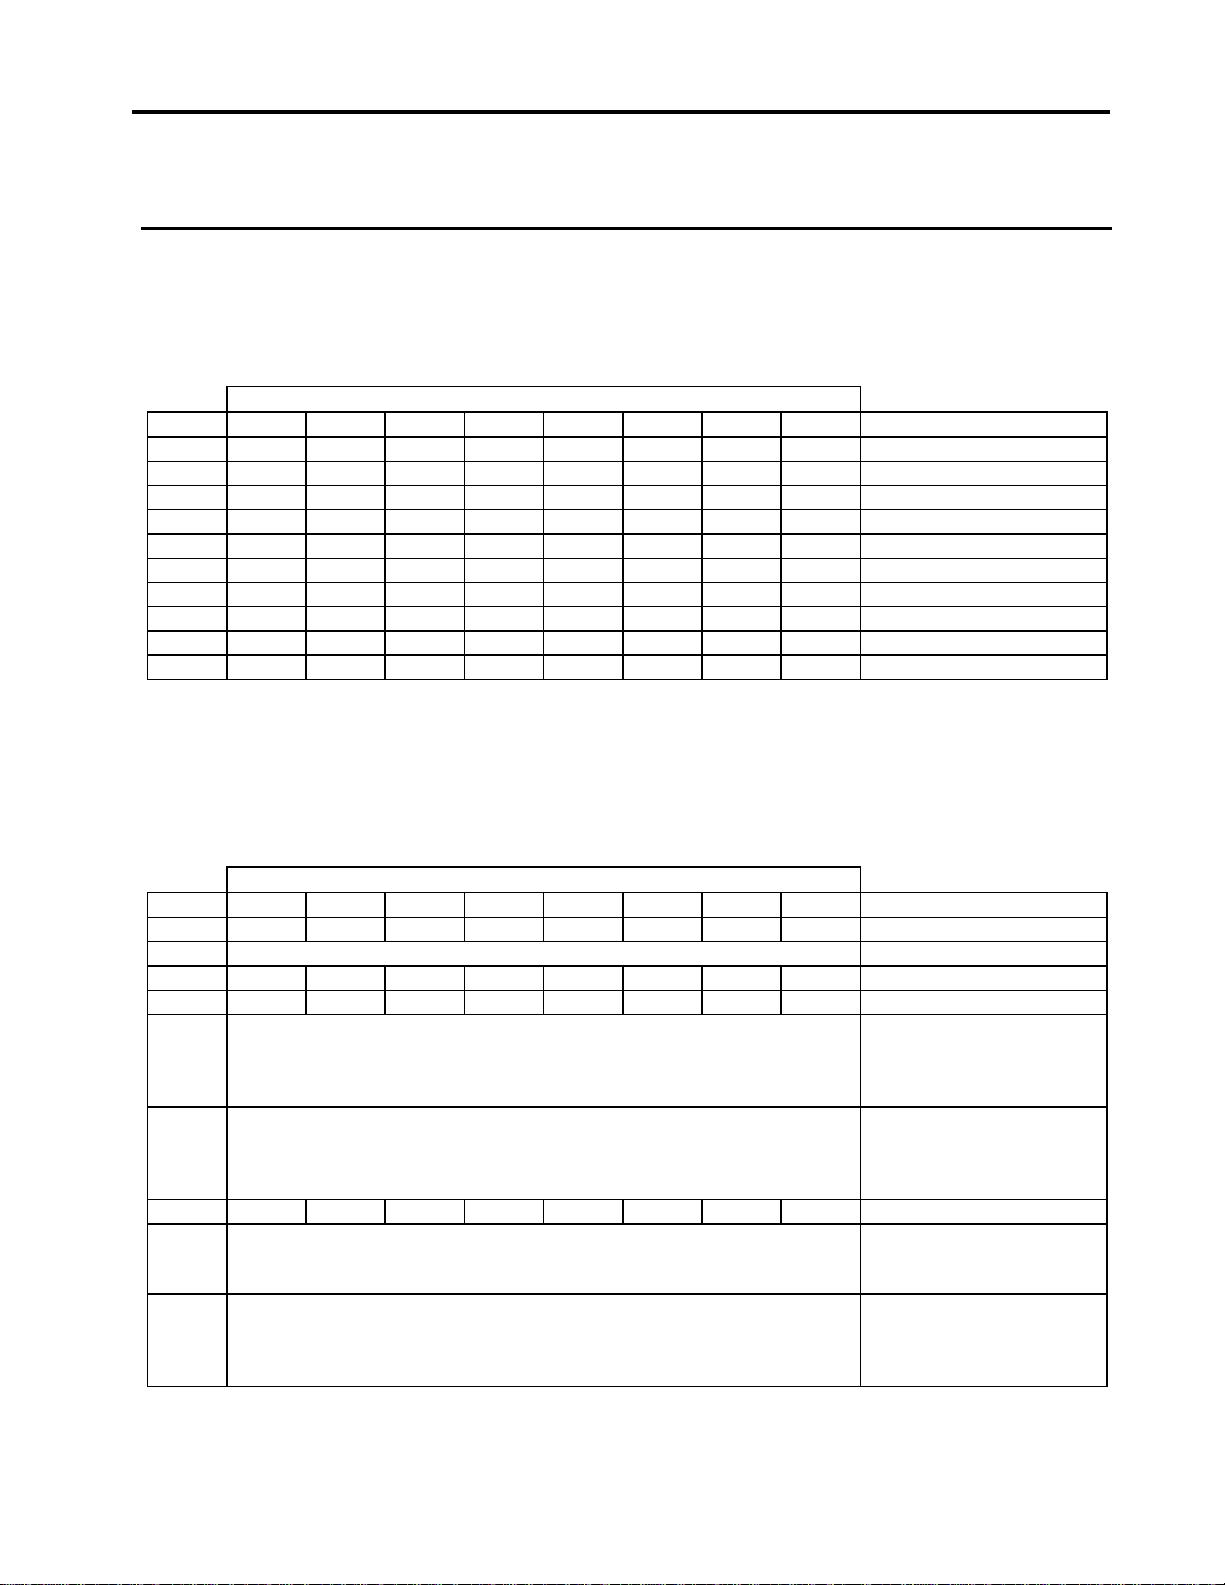
ATAPI Interface Chapter 5
READ POSITION (Group 1, Op. Code 34)
The READ POSITION command reports the current position of the logical unit and
any data blocks in the buffer. No tape movement shall occur as a result of the
command. The drive may disconnect during this command.
CDB for READ POSITION Command
Data Bits
Byte 7 6 5 4 3 2 1 0 Hex
0 0 0 1 1 0 1 0 0 34
1 0 0 0 0 0 0 0 BT 0X
2 0 0 0 0 0 0 0 0 00
3 0 0 0 0 0 0 0 0 00
4 0 0 0 0 0 0 0 0 00
5 0 0 0 0 0 0 0 0 00
6 0 0 0 0 0 0 0 0 00
7 0 0 0 0 0 0 0 0 00
8 0 0 0 0 0 0 0 0 00
9 0 0 0 0 0 0 0 0 00
BT: The Block Address Type bit determines the reporting method of the block
location field. If 0, the logical addresses are returned for current block and the last
block in the data buffer. If set to 1, the physical block address is returned for the first
block location and the last block in the data buffer. Information is returned to the host
in the format shown below.
READ POSITION Data Format
Data Bits
Byte 7 6 5 4 3 2 1 0 Hex
0 BOP EOP 0 0 0 BPU 0 0 XX
1 Partition Number XX
2 0 0 0 0 0 0 0 0 00
3 0 0 0 0 0 0 0 0 00
4
5
6
7
8
9
0A
0B
0C 0 0 0 0 0 0 0 0 00
0D
0E
0F
10
11
12
13
First Block Location
Last Block Location
Number of Blocks in Buffer
Number of Bytes in Buffer
MSB
LSB
MSB
LSB
MSB
LSB
MSB
LSB
XX
XX
XX
XX
XX
XX
XX
XX
XX
XX
XX
XX
XX
XX
XX
Seagate Travan 40 Product Manual Page 71
Page 80

Chapter 5 ATAPI Interface
BOP: The Beginning Of Partition bit, if set to 1, indicates that the logical unit is at the
beginning-of-partition in the current partition.
EOP: The End Of Partition bit, if set to 1, indicates that the logical unit is at the end-
of-partition in the current partition.
BPU: A Block Position Unknown bit of 1 indicates that the first and last block
locations are not known or cannot be obtained.
Partition Number: The Partition Number reports the current partition position. 00h
indicates the Data partition, 01h indicates the Directory Partition.
First Block Location: The First Block Location reports the current tape block
address (i.e., the next to be read to the Host for READ command).
Last Block Location: The Last Block Location reports the last tape block address to
be written to tape from the buffer for the WRITE command. This field is 0 if the
previous command was READ, VERIFY, SEEK, SPACE, or LOCATE.
Page 72 Seagate Travan 40 Product Manual
Page 81

ATAPI Interface Chapter 5
10 MSB
XX
REQUEST SENSE (Group 0, Op. Code 03)
Information pertinent to the completion of a command is obtained by the REQUEST
SENSE command. Although a REQUEST SENSE command may be issued at any
time, it is typically issued immediately following a command that has resulted in a
Check Condition (Status 02h). Sense Data remains valid until reset by a subsequent
command issued by the same Initiator selecting the same LUN as the one that
resulted in the Check Condition. In the case of the single Initiator option, the drive will
assume that the REQUEST SENSE command is from the same Initiator. A
REQUEST SENSE command also resets the Sense Data and Sense information
(byte 0 to 11h). All other sense information is preserves, or in the case of Data Error
and Under-run Counters, updates may occur.
CDB for REQUEST SENSE Command
Data Bits
Byte 7 6 5 4 3 2 1 0 Hex
0 0 0 0 0 0 0 1 1 03
1 0 0 0 0 0 0 0 0 00
2 0 0 0 0 0 0 0 0 00
3 0 0 0 0 0 0 0 0 00
4 Transfer Length XX
5 0 0 0 0 0 0 0 0 00
The REQUEST SENSE command returns a Check Condition status only upon a
catastrophic failure in reporting the Sense Data. For example, a 1 bit in a reserved
field of the CDB or repeated bus parity errors. Under these conditions it is likely that
the Sense Data returned is not valid.
Transfer Length: Specifies the number of sense bytes requested by the Host. The
command terminates when either the number of bytes requested or all available
bytes are transferred whichever is less.
The following figure represents the Sense Byte Format.
Sense Data Format (for all Sense Keys except 0Ah—Copy Aborted)
Data Bits
Byte 7 6 5 4 3 2 1 0 Hex
00 AVF Error Code (70h or 71h) XX
01 0 0 0 0 0 0 0 0 00
02 FM EOM ILI 0 Sense Key XX
03
–
06
07 Additional Sense Length (56 bytes) 38
08
–
0B
0C Additional Sense Code XX
0D Additional Sense Code Qualifier XX
0E Field Replaceable Unit Code XX
0F SKSV C/D 0 0 BPV Bit Pointer XX
Command Specific Information
MSB
Sense Information
LSB
MSB
LSB
XX
XX
XX
XX
XX
XX
Seagate Travan 40 Product Manual Page 73
Page 82

Chapter 5 ATAPI Interface
Data Bits
Byte 7 6 5 4 3 2 1 0 Hex
11
Field Pointer
LSB
XX
12 0 CNI 0 WP PEOM UDE BNL FIL XX
13 0 0 NDT 0 BOM BPE 0 0 XX
14
15
16
17
Data Error Counter
Data Overrun/Under-run Counter
MSB
LSB
MSB
LSB
XX
XX
XX
XX
18 Track Number XX
19 Cartridge Type XX
1A
1B
1C
1D
1E
Physical Block Number
MSB
Filemark Count
LSB
MSB
LSB
XX
XX
XX
XX
XX
1F Tape Module Error Code (High Byte) XX
20 Tape Module Error Code (Low Byte) XX
21 Reserved XX
22
2B
2C
–
3F
Last 10 Commands
Least
Most
Reserved
XX
XX
0X
–
0X
AVF: Address Valid Flag. When the AVF is 1, the Sense Information (bytes 3-6)
contains valid information.
FM: When the Filemark bit is set to 1, a Filemark has been encountered during a
read operation.
EOM: The End-of-Media bit, when set to 1, indicates the tape has reached the
Logical Early Warning Point.
ILI: The Illegal Length Indicator, when set to 1, indicates that the length of the block
read from the media does not match the block length specified by the READ or
COPY command, or the length specified by MODE SELECT.
Sense Key: Defines the type of failure associated with the current Check Condition
(02h Status). The Sense Keys are defined in the following table.
Sense Information: When the AVF bit is 1, the Sense Information bytes represent
the difference between the Transfer Length requested by the command and the
actual number of blocks or bytes transferred (i.e., the residue).
Additional Sense Length: The Additional Sense Length specifies the number of
bytes to follow this byte. For all commands except the COPY command, this field is
38h.
Page 74 Seagate Travan 40 Product Manual
Page 83

ATAPI Interface Chapter 5
Command Specific Information: This field contains information that depends on
the command that was last executed. Further meaning for this field is defined within
the command description.
Additional Sense Code & Qualifier: Specifies detailed information related to the
additional Sense Code. If the error or exception condition is reportable by the device
the value returned will be as specified. If the condition is not reportable by the device,
a value of 00h is used.
Field Replaceable Unit: The value of this field will be 0, indicating that no specific
mechanism or unit has been identified to fail or that the data is not available. There
are no FRUs in the drive.
SKSV: The Sense Key Specific Valid bit of 1 indicates that the Sense Key Specific
fields (bytes 0Fh, 10h & 11h) are valid. This bit is 0, not supported.
The following fields are not cleared by a REQUEST SENSE command.
CNI: Cartridge Not In Place.
WP: Cartridge Write Protected.
PEOM: Physical-End-of-Media—Indicates the position is past the Physical Early
Warning hole on the tape. (Note that the EOM bit in byte 02h denotes the Logical
Early Warning Point).
UDE: Unrecoverable Data Error.
BNL: Block Not Located. (Cleared by a successful MEDIA ACCESS command.)
FIL: Filemark Detected (Same as FM). (Cleared by a successful MEDIA ACCESS
command.)
NDT: No Data Detected. Same as Sense Key 8h. (Cleared by a successful MEDIA
ACCESS command.)
BOM: Physical Beginning-Of-Media (Beginning of Partition).
BPE: Not applicable
Data Error Counter: For write operations, this is the number of blocks since the
start of the current write operation re-written because they were detected to be in
error by the READ-WHILE-WRITE check. For read operations, this is the number of
blocks recovered by ECC or read-retry since the tape was last at BOT.
Buffer Overrun / Under-run Counter: For write operations, this is the number of
times that the under-run logic was forced to rewrite a data block in and under-run
condition. (An under-run can occur without tape reposition.) For read operations, this
is the number of times a reposition cycle was required due to buffer overrun.
Track Number: The track number that the read/write head is currently positioned to.
Cartridge Type: The allowable cartridge types are listed below.
Cartridge Type Codes
Seagate Travan 40 Product Manual Page 75
Page 84

Chapter 5 ATAPI Interface
Code Travan 7
00h N/A No cartridge, cleaning cartridge, or type unknown
85h Read / Write Travan 5, NS20
95h N/A Travan 7
Filemark Count: This is the number of Filemarks encountered since the tape was
last at BOM. This counter is not reset by a REQUEST SENSE command, but is reset
when tape is positioned back to BOM.
Physical Block Number: The number of the next physical block to be read/written
by the Host.
Tape Module Error Code (TMC): Vendor unique error codes provided for firmware
and drive-related diagnostic purposes.
Last 10 Commands: This field shows the last 10 CDBs received by the drive from
the host.
Request Sense Keys
Sense Key
(hex value) Type
0 No Sense
1 Recovered
2 Not Ready
3 Media Error
4 Hardware
5 Illegal
6 Unit
7 Data Protect
8 Blank Check
Compatibility
Data
Error
Request
Attention
Cartridge Type
Meaning
Indicates that there is no specific Sense Key information to
be reported. This would be the case for a successful
command or a command that received Check Condition or
command Terminated status because one of the Filemark,
EOM, or ILI bits is set to 1.
Indicates that the last command completed successfully
with some recovery action performed by the target. Details
may be determined by examining the additional sense bytes
and the information bytes. When multiple recovered errors
occur during one command, the choice of which error to
report (first, last, most severe, etc.) is device specific.
The tape drive cannot be accessed. Operator intervention
may be required.
An unrecoverable error occurred that was caused by either
a flow in the media, or an error in the recorded data.
The drive detected an unrecoverable hardware failure
during the performance of a command or internal
diagnostics.
There was an illegal parameter in the command Description
block or associated additional parameters or an
inappropriate sequence of commands was issued.
The tape cartridge may have been changed or the drive
Reset since the last command was issued. This error is
reported by the first command following this condition and
the function of this condition is not performed. The Unit
Attention is reported to all Initiators that subsequently issue
commands to the drive.
A write or erase operation was attempted on a device with
the cartridge in the Safe state.
The drive encountered the End-of-Recorded Media. This is
Page 76 Seagate Travan 40 Product Manual
Page 85

ATAPI Interface Chapter 5
Sense Key
(hex value) Type
9 Vendor
Unique
A Copy
Aborted
B Aborted
Command
C Reserved
D Volume
Overflow
E Miscompare
F Reserved
Meaning
not the same as the physical EOM.
This Sense Key is available for reporting vendor unique
conditions (Not Used).
A COPY command was aborted due to an error on the
source or destination device (Not Supported).
The drive aborted the command either at the request of the
Initiator or due to a hardware failure, such as the removal of
a cartridge during a read or write operation. The Initiator
may recover by trying the command again.
(Not Used)
The physical End-of-Media has been reached. The data
remaining in the buffer may be read with a Recover Buffer
Data command.
Indicates that the source data did not match the data read
from the media.
Reserved
Sense Code (ASC) and ASC Qualifier Assignments
Sense Key ASC ASCQ Meaning
00 00 00 Normal
00 00 00 Illegal length
00 00 00 Busy
00 00 00 Command failed because of reservation conflict
00 00 01 Filemark found
00 00 02 Early EOM detected
00 00 04 Blank check (EOD reached)
00 00 06 SCSI terminated I/O message response
00 5D 00 Tape Alert - no sense
01 5D 00 Tape Alert- triggered by previous command
02 04 01 Not ready, but is coming ready
02 30 02 Unknown cartridge type or cartridge type is incompatible (ex.
compressed data on tape, but compression hardware option
not installed)
02 3A 00 No media in drive
02 3A 00 Media is present, but is not ready
03 0C 00 Media error on write command
03 11 00 Media error on read command
03 30 00 Write denied due to incompatible cartridge type
04 02 00 Seek error, failed to reach target track
04 3F 02 Bad checksum detected while attempting to update flash
04 40 00 Power On Self Test failed
Seagate Travan 40 Product Manual Page 77
Page 86

Chapter 5 ATAPI Interface
Sense Key ASC ASCQ Meaning
04 44 00 Hardware error occurred
04 44 81 Fan error
04 47 00 SCSI parity error non-command state
04 47 00 SCSI parity error in command state
05 00 00 Attempted to erase tape when not at BOT
05 20 00 Invalid CDB opcode
05 21 00 Invalid LBA
05 22 00 Invalid function requested
05 24 00 Invalid data byte in CDB
05 25 00 Invalid LUN
05 26 00 Invalid parameter in data
05 2C 00 Log select failed
05 3D 00 SCSI bad id
05 3D 00 SCSI parity error in identify message
05 49 00 SCSI LUN is non-zero (in msg)
05 50 00 Attempted to write when not at either BOT or EOD
05 53 02 Command not allowed because of previous Prevent/Allow
CDB command
06 28 00 Media just came ready, normal status after cartridge
insertion
06 29 00 Drive was just initialized, normal status after power-on
06 2A 00 Mode select parameters changed
06 2A 02 Log select parameters changed
06 5D 00 Tape alert- unit attention
06 5D FF Tape alert- bad mode
07 27 00 Attempted to write on a write-protected cartridge
08 00 05 Read or located into EOD: blank check
0B 00 00 Host aborted the command
0B 00 00 Command was aborted
0B 00 00 ATA 'nop' command
0B 3A 00 Cartridge was removed before a medium operation was
completed
0B 48 00 SCSI error - extended message
0B 49 00 SCSI error - bad message (not in command state)
0B 49 00 Fatal drive firmware error occurred
0B 49 00 SCSI error (received bad message while in command state
0B 4E 00 Command was aborted because of attempted command
overlap condition
Page 78 Seagate Travan 40 Product Manual
Page 87

ATAPI Interface Chapter 5
Sense Key ASC ASCQ Meaning
0D 00 00 Physical end of medium detected
Seagate Travan 40 Product Manual Page 79
Page 88

Chapter 5 ATAPI Interface
REWIND (Group 0, Op Code 01)
When operating in single partition mode, the REWIND command causes the drive to
rewind the tape to the physical Beginning-Of-Partition (BOP) or load point.
CDB for REWIND command
Data Bits
Byte 7 6 5 4 3 2 1 0 Hex
0 0 0 0 0 0 0 0 1 01
1 0 0 0 0 0 0 0 IMM 0X
2 0 0 0 0 0 0 0 0 00
3 0 0 0 0 0 0 0 0 00
4 0 0 0 0 0 0 0 0 00
5 0 0 0 0 0 0 0 0 00
IMM—Immediate: Not applicable for ATAPI drives
Application Note: When Writing in Buffered Mode, the target shall discard any
buffered data after a REWIND command is validated if the previous command was
terminated with a Check Condition status, and the drive is unable to write the data to
tape (as when a “hard” write error occurred).
Page 80 Seagate Travan 40 Product Manual
Page 89

ATAPI Interface Chapter 5
SEND DIAGNOSTIC (Group 0, Code 1D)
The SEND DIAGNOSTIC command requests the target to perform diagnostic tests
on it. Except when the Self-Test bit is one, this command is usually followed by a
Receive Diagnostic Results command.
CDB for SEND DIAGNOSTIC command
Data Bits
Byte 7 6 5 4 3 2 1 0 Hex
0 0 0 0 1 1 1 0 1 1D
1 0 1 0 0 0 0 0 0 40
2 0 0 0 0 0 0 0 0 00
3
4
5 0 0 0 0 0 0 0 0 00
Parameter List Length: The Parameter List must be set to 0.
Parameter List Length
MSB
LSB
00
00
Seagate Travan 40 Product Manual Page 81
Page 90

Chapter 5 ATAPI Interface
SPACE (Group 0, Op. Code 11)
The SPACE command provides a means of positioning the tape forward or reverse
of the current position. The command can space over data blocks, filemarks,
sequential filemarks, or to the End-of-Data.
CDB for SPACE command
Data Bits
Byte 7 6 5 4 3 2 1 0 Hex
0 0 0 0 1 0 0 0 1 11
0 0 0 0 0 0
2
3
4
MSB
Count
LSB
5 0 0 0 0 0 0 0 0 00
DFE—Data, Filemarks, End-of-Data: The DFE field determines the type of blocks
to be spaced over.
0
DFE 0X
XX
XX
XX
Bit 1 Bit 0 Description
0 0 Data (Logical) Blocks
0 1 Filemarks
1 0 Consecutive Filemarks
1 1 End of Recorded Data
Count: The Count Field specifies the number of data blocks, filemarks or
consecutive filemarks to be spaced over. A value of 0 results in no tape movement
and is not considered an error. A negative value -N (2’s complement notation) results
in a logical reverse space over N blocks or filemarks ending on the BOM side of the
last block or filemark.
Spacing Over Data Blocks: The number of logical (not physical) data blocks to be
spaced over is determined by the Count Field. If a Filemark or EOD is encountered
while spacing over data blocks, tape movement is stopped and the command
terminates with a Check Condition (Status 02h). The number of data blocks
remaining to be spaced over is located in the Sense Information bytes. If termination
was caused by a Filemark, the tape is positioned following the Filemark, the Sense
Key is set to 0h (No Sense) and the FM flag bit is set. If termination was caused by
EOD (End of Recorded Data), the Sense Key will be set to Blank Check (8h). If
Logical Early Warning is encountered, the command will complete normally, but
Check Condition Status will be reported. The Sense Key will be set to No Sense (0h)
and the EOM flag bit will be set. Bad data blocks will not be reported.
Spacing Over Filemark Blocks: In Space Over Filemark mode, data blocks are
ignored. When the command terminates normally, the tape is positioned following
the last Filemark read. If EOD s encountered, the command terminates with a Check
Condition (Status 02h) and the number of Filemarks remaining to be spaced over is
located in the Sense Information bytes returned by a REQUEST SENSE command.
Page 82 Seagate Travan 40 Product Manual
Page 91

ATAPI Interface Chapter 5
If Logical Early Warning is encountered, the command continues to normal
completion, then reports Check Condition with No Sense and EOM set in the Sense
Data.
NOTE: If RSMK is set in Mode Data Page 10h, Byte 8, Bit 5, Set Marks will be
treated as Filemarks when spacing over data.
Spacing Over Consecutive Filemark Blocks: The number of consecutive
filemarks to be spaced over is specified in the Count Field. The tape is positioned
following the last Filemark in the sequence. If a data block is encountered, the count
is restored to its original value and the space operation continues, following the data
block. If Logical Early Warning is encountered, the command continues to normal
completion, then reports Check Condition with No Sense and EOM set in the Sense
Data.
Spacing to the End-of-Data: When spacing to the End-of-Data, the Count Field is
ignored. The drive will take the most direct route available to position the tape at
EOD.
When Logical Early Warning is encountered during the SPACE EOD operation, the
drive will complete the command normally, except that it will send back a Check
Condition, No Sense, and the EOM bit set in the Sense Key byte.
NOTE: The drive may accept a non-media command while DSC is 0 and if BUSY is
0.
Seagate Travan 40 Product Manual Page 83
Page 92

Chapter 5 ATAPI Interface
TEST UNIT READY (Group 0, Op Code 00)
This command performs a test to ensure that the tape drive is ready and a tape
cartridge is installed. TEST UNIT READY does not initiate the internal diagnostic
self-test. The drive does not disconnect during execution of this command.
CDB for TEST UNIT READY command
Data Bits
Byte 7 6 5 4 3 2 1 0 Hex
0 0 0 0 0 0 0 0 0 00
1 0 0 0 0 0 0 0 0 00
2 0 0 0 0 0 0 0 0 00
3 0 0 0 0 0 0 0 0 00
4 0 0 0 0 0 0 0 0 00
5 0 0 0 0 0 0 0 0 00
Page 84 Seagate Travan 40 Product Manual
Page 93

ATAPI Interface Chapter 5
VERIFY (Group 0, Op. Code 13)
The VERIFY command performs a Verification Check on a specified number of data
blocks on the tape without involving the Host. Verification starts at the present
position of the tape and continues for the specified number of blocks. If a data block
cannot be verified by CRC recovery then ECC and read retries will be employed in
an attempt to recover the data. The command terminates as a result of one of the
following conditions:
• The specified number of blocks has been verified.
• A Filemark or Setmark has been detected.
• The End-of-Data has been reached.
• A Verification failure occurred.
Upon termination, the tape is positioned to read the block following the last data
block or Filemark read correctly.
CDB for VERIFY command
Data Bits
Byte 7 6 5 4 3 2 1 0 Hex
0 0 0 0 1 0 0 1 1 13
1 0 0 0 0 0 IMM
2
3
4
5 0 0 0 0 0 0 0 0 00
Length Of Verification
MSB
LSB
BytCmp
FBM 0X
XX
XX
XX
IMM: When the IMMEDIATE bit is set to 0, status will be returned to the Host when
the VERIFY operation is completed. When set to 1, the status will be returned to the
Host as soon as the VERIFY operation is initiated.
NOTE: The ATAPI interface does not have an IMM bit or functional equivalent. The
DSC and BUSY bits in the Host taskfile status register indicate bus and
command status.
BytCmp: When the Byte Compare bit is set to 0, the drive will perform a media data
recoverability verification only. A Byte Compare bit set to 1 indicates the drive will
perform a byte-by-byte compare between data read from the media and data sent
from the Host. BytCmp=1 is not supported.
FBM: The Fixed Block Mode bit (FMB) set to 1 indicates fixed block mode operation.
Seagate Travan 40 Product Manual Page 85
Page 94

Chapter 5 ATAPI Interface
WRITE (Group 0, Op. Code 0A)
The WRITE command transfers the specified amount of data from the Initiator to the
tape drive. A rewind or other Write process terminating command (e.g., WRITE
FILEMARK with length set to 0) must be issued after the last write command to allow
the drive to finish writing all buffered data.
NOTE: The Imation Travan Cartridge specification requires cartridge conditioning
under specified conditions. Conditioning is achieved by running the tape one
complete end-to-end pass, and retensioning a cartridge when loading is
recommended.
The command terminates when one of the following conditions occurs.
• The Transfer length field in the CDB has been satisfied and the data has been
transferred to the tape drive’s buffer (Buffered Mode).
• The drive failed to find the append point.
• An unrecoverable write error occurred. (Failed after 16 attempts to write the
block correctly.)
• The physical or logical End-of-Media has been reached.
When the command terminates for a reason other than the first, the residue can be
obtained with a REQUEST SENSE command.
CDB for WRITE command
Data Bits
Byte 7 6 5 4 3 2 1 0 Hex
0 0 0 0 0 1 0 1 0 0A
1 0 0 0 0 0 0 0 FMB 0X
2
3
4
5 0 0 0 0 0 0 0 0 00
Fixed Block Mode: The Fixed Block Mode (FBM) bit is associated with the Transfer
length field, as indicated below.
Transfer Length: If FBM is set to 1, this number specifies the number of blocks to
be transferred from the Initiator.
NOTE: The drive writes a “frame-oriented” recording format to tape. Data which
does not fill a frame will be retained in the buffer until:
1) enough additional data to fill a frame is received,
2) a terminating command to the WRITE process is received, or
3) Write Buffer Delay Time expires (see MODE SELECT).
Terminating commands are WRITE FILEMARK with IMM set to 0, REWIND,
SPACE, LOCATE, or Load/Unload.
MSB
Transfer Length
LSB
XX
XX
XX
The STT3401A drive will only accept WRITE commands at the Beginning-of-Tape
(BOT), Beginning-of-Partition (BOP) and End-of-Recorded-Data (EOD).
Page 86 Seagate Travan 40 Product Manual
Page 95

ATAPI Interface Chapter 5
WRITE BUFFER (Group 1, Op. Code 3B)
The WRITE BUFFER command is used in conjunction with the READ BUFFER
command as a diagnostic tool or for downloading firmware. This command tests the
ATAPI Bus and the drive’s Data Buffer. The tape is not affected. Using Buffer ID and
Buffer Offset, data can be placed in any location in the buffer.
CDB for WRITE BUFFER command
Data Bits
Byte 7 6 5 4 3 2 1 0 Hex
0 0 0 1 1 1 0 1 1 3B
1 0 0 0 0 0 Mode 0X
2 Buffer I.D. XX
3
4
5
6
7
8
9 0 0 0 0 0 0 0 0 00
MSB
Buffer Offset
LSB
MSB
Transfer Length
LSB
00
00
XX
XX
XX
XX
MODE: The Mode Bits determine the operation and format as indicated in the table
below.
Mode Bits
2 1 0 Description
0 0 0
0 0 1
0 1 0
1 0 0
1 0 1
1 1 0
1 1 1
Reserved
Reserved
Data only is written, no header.
Download firmware segments 1 through (N-1). Firmware is not
saved in EEPROM.
Download firmware segment N (last segment). Firmware is
saved (“flashed”) into EEPROM.
Reserved
Reserved
Buffer I.D.: The Data Buffer is divided into 256 equal segments. (If the buffer size is
512KB, each segment is 2K). The Buffer ID specifies the segment into which the first
byte of data transferred by the Host is to be placed.
NOTE: If the buffer size is 2048KB, each segment will be 8K bytes in size and the
maximum offset will be 09ffh.
Seagate Travan 40 Product Manual Page 87
Page 96

Chapter 5 ATAPI Interface
Buffer Offset: This field specifies where the first data byte received from the Host is
to be placed in the Buffer specified by the Buffer ID field. Values greater than 07FFh
will give Check Condition, Illegal Request.
Transfer Length: This field specifies the number of bytes to be written into the
Buffer by the Host. The value includes the four-byte Header.
WRITE BUFFER Header (Mode 000b)
Data Bits
Byte 7 6 5 4 3 2 1 0 Hex
0 0 0 0 0 0 0 0 0 00
1
2
3
MSB
Buffer Capacity
LSB
00
00
00
Buffer Capacity: All bytes of this field must be set to 00h or the command will
terminate with an Illegal Request (Sense Key 5).
When Firmware is downloaded and saved to “Flash” EPROM, it is possible to verify
the check-sum stored in the firmware against the check-sum calculated as the
firmware was loaded. See LOG SENSE command page 3E.
Page 88 Seagate Travan 40 Product Manual
Page 97

ATAPI Interface Chapter 5
WRITE FILEMARK (Group 0, Op. Code 10)
This command writes a specified number of Filemark blocks to the tape.
CDB for WRITE FILEMARK command
Data Bits
Byte 7 6 5 4 3 2 1 0 Hex
0 0 0 0 1 0 0 0 0 10
1 0 0 0 0 0 0
2
3
4
5 0 0 0 0 0 0 0 0 00
WSMK—Write Setmarks: This bit must be set to 0. Writing Setmarks is not
supported. If RSMK is set to 0 in Mode Data page 10h, Byte 8, Bit 5, Illegal Request
will result when this bit is set in the CDB. Reading Setmarks is supported and
Setmarks are treated as Filemarks, but Setmarks are counted separately.
IMM—Immediate: When IMM is set to 1, the drive returns status upon verification of
the CDB. When IMM is set to 0, the drive writes all buffered data to the tape
including the specified number of filemarks, prior to sending command Complete
with “Good” status. Filemarks written in Immediate mode do not interrupt streaming.
MSB
Transfer Length
LSB
WSMK
IMM 00
XX
XX
XX
NOTE: The ATAPI interface does not have an IMM bit or functional equivalent. IMM
is assumed to be set (1).
Transfer Length: Specifies the number of Filemark blocks to be written. When this
value is 0 (and IMM = 0), the drive writes all data in the Data Buffer to tape and no
Filemarks are written, but an EOD frame will be written. If it is successful, the drive
issues a Good Status. If not, it issues a Check Condition (Status 02). The Sense
Information Bytes returned by the REQUEST SENSE command reflect the number
of blocks remaining in the Data Buffer.
NOTE: The STT3401A maintains the total number of filemarks written in a session.
The counter may be read by means of the REQUEST SENSE command. If
the Immediate bit is set to 0, streaming will be interrupted when the last
block is written and the data buffer is flushed.
The locations of the filemarks are recorded in the media header. If the tape
is not rewound after the last WRITE command or WRITE FILEMARK
command, the media header will not be updated and it will not be accurate. If
the Eject button is pressed, the cartridge will be rewound and the media
header will be updated. If AutoPark is enabled, the drive will rewind the
cartridge and update the media header after the drive is idle for several
minutes.
If AutoPark is not enabled and the cartridge is not ejected, the cartridge in
the drive is vulnerable to a power shutdown or a power failure causing the
drive to leave the cartridge with an old version of the media header. The
cartridge will be useable, but the lack of an accurate header will cause
substantial delays during a SPACE or LOCATE command. This problem can
Seagate Travan 40 Product Manual Page 89
Page 98

Chapter 5 ATAPI Interface
be avoided by simply insuring the cartridge is removed from the drive
following any WRITE or WRITE FILEMARK operations
Page 90 Seagate Travan 40 Product Manual
Page 99

ATAPI Interface Chapter 5
ATA Command Descriptions
The following ATA commands are supported.
General Feature Set
• EXECUTE DEVICE DIAGNOSTIC
• IDENTIFY DEVICE
• NOP
• SET FEATURES
ATAPI Feature Set
• ATAPI ‘DEVICE’ RESET
• IDENTIFY PACKET DEVICE
• PACKET
Power Management Feature Set
• CHECK POWER MODE
• IDLE
• IDLE IMMEDIATE
• SLEEP
• STANDBY
• STANDBY IMMEDIATE
Much of this section is taken directly from the ATA-4 specification. Information that is
not relevant to this device has been omitted.
Opcode (Hex) Command Ref. page
00 NOP 107
08 DEVICE RESET 94
90 EXECUTE DEVICE DIAGNOSTIC 95
A0 PACKET 108
A1 IDENTIFY PACKET DEVICE 98
E0 STANDBY IMMEDIATE 113
E1 IDLE IMMEDIATE 106
E2 STANDBY 112
Seagate Travan 40 Product Manual Page 91
Page 100

Chapter 5 ATAPI Interface
Opcode (Hex) Command Ref. page
E3 IDLE 105
E5 CHECK POWER MODE 93
E6 SLEEP 111
EC IDENTIFY DEVICE 97
EF SET FEATURES 109
Page 92 Seagate Travan 40 Product Manual
 Loading...