

Page 1

Vista QXTRA quick user guidel V1.0
Quick user guide for QXTRA range of
DVRs
Quantum XTRA – Quick User manual
Page 2

2
Vista QXTRA User and installation manual V1.0
This page is intentionally left blank
Page 3

3
Vista QXTRA User and installation manual V1.0
CE Information
The product must be installed according to the currently valid installation regulations
for EMC to guarantee the designed use and to prevent EMC problems.
The device supplied with this manual is according to the EC, EMC Directive,
2004/108/EC & LVD 2006/95/EC
Standard used for showing compliance with the essential requirements of the device:
EN 55022
EN 61000-3-2
EN 61000-3-3
EN 50130-4
EN 55024
LVD: EN60950-1
Safety Precautions
Caution before Use
Please read this manual before installing or using the DVR.
Please keep this manual in a safe place, to allow for future reference
For the safety and proper use, The DVR is marked with various symbols. Please read these
to prevent injury of financial loss.
Installation Site
Ensure installation position is level, secure and adequately ventilated.
Avoid installing close to sources of humidity or water.
Contact details
Belgium +32 (0) 3 369 8080
Nederland +31 (0) 76 579 2577
Portugal +351 234 301900
South Africa +27 (0) 11 887 1546
Spain +34 91 503 06 78
Middle East +971 4 881 14332
UK +44 (0) 118 912 5000
Rest of world +44 (0) 118 912 5000
Page 4

4
Vista QXTRA User and installation manual V1.0
This page is intentionally left blank
Page 5

5
Vista QXTRA User and installation manual V1.0
Contents
OPERATION ......................................................................................................................... 6
1. NAVIGATION ..................................................................................................................... 6
1-1. Mouse Control .......................................................................................................................................... 6
1-2. Menu Navigation ...................................................................................................................................... 6
2. MONITORING .................................................................................................................... 7
2-1. Live screen OSD Description ................................................................................................................... 7
2-2. Select Channel ......................................................................................................................................... 7
2-3. Digital Zoom ............................................................................................................................................. 7
3. PLAYBACK ....................................................................................................................... 8
3-1. OSD Description ....................................................................................................................................... 8
3-2. Playback Control ...................................................................................................................................... 9
3-3. Playback Search .................................................................................................................................... 10
DATE & TIME, EVENT AND BOOKMARK SEARCH ..................................................................... 11
Calendar / Date and time searches ............................................................................................................... 12
Event Search ................................................................................................................................................. 13
Log search ..................................................................................................................................................... 14
Bookmark search ........................................................................................................................................... 15
GOTO SEARCH OPTION .......................................................................................................16
4. ARCHIVING EVIDENCE TO DVD/CD OR USB .....................................................................17
Time and Date archive................................................................................................................................... 17
Event list archiving ......................................................................................................................................... 20
CLIENT VIEWER SOFTWARE ............................................................................................21
1. LIVE MONITORING ...........................................................................................................24
2. REMOTE SEARCH ................................ ................................................................ ............25
2-1. Search .................................................................................................................................................... 25
2-2. Archive.................................................................................................................................................... 27
INSTALLATION ...................................................................................................................30
1. FRONT PANEL CONTROLS ................................................................................................30
2. REAR PANEL CONNECTORS .............................................................................................32
3. REMOTE CONTROL ..........................................................................................................34
4. CONNECTION GUIDE ........................................................................................................35
5. TURNING ON THE DVR ....................................................................................................37
Page 6

6
Vista QXTRA User and installation manual V1.0
Operation
1. Navigation
You can navigate the on screen menus using the front panel buttons, remote controller or
mouse.
1-1. Mouse Control
Right clicking the mouse brings up the following popup menu.
Screen view selection
PAN/Tilt Menu
Search menu
Goto function (only in Search mode)
Setup menu icon
Sequence icon
Eject icon
Emergency record icon (Stop/start toggle)
Playback mode
1-2. Menu Navigation
To enter the Setup menu, the user has to have the required access rights and be logged on.
Press the Menu button or right click with mouse on screen and select the menu icon.
The following screen will be displayed asking for password.
Select the user ID.
Enter the password.
The default password is 00000000(8 zeros).
Press OK, the setup menu will be displayed
on screen.
All menus are navigated around using the Left/
Right/ Up/ Down and the Select button or mouse.
To step back out of the menus, press MENU button
or click the right button of the mouse.
Page 7

7
Vista QXTRA User and installation manual V1.0
2. Monitoring
2-1. Live screen OSD Description
The Status Bar on screen shows HDD capacity, network connection, current time, etc.
Archiving in background
- HDD capacity: Used capacity / Total capacity
- Network connection: It is shown that admin or user is connected.
- Mouse connection
~ - Multi-screen Display Buttons
- Current Date/Time
– Click here to temporarily hide the information bar
2-2. Select Channel
Use the Multi-screen display buttons on the status bar to select the display mode.
Example: 9 Channel
Also you can use the DIS button on the remote controller to change the display mode.
Display switches in the following order when the DIS button is pressed.
Single Channel 4 Channel 9 Channel 16 Channel 17 Channel
2-3. Digital Zoom
When the system is in full-screen mode, left click and drag your mouse over the area to be
enlarged a grey rectangle will appear. Left click the mouse to zoom in on the highlighted
Page 8

8
Vista QXTRA User and installation manual V1.0
area.
To exit digital zoom, right click the mouse.
3. Playback
Click the right button on the mouse, the popup menu will be displayed on screen.
(Ensure that the PTZ function is turned off – Otherwise Play back mode will not operate)
3-1. OSD Description
The Control Bar on screen shows Playback control buttons, Progress bar, Display mode
buttons, Playback time, etc.
To begin playback, press the
Play button on the popup
menu.
Page 9

9
Vista QXTRA User and installation manual V1.0
3-2. Playback Control
Play Forward
When the Play Forward button( ) is pressed, the unit will play forward at the rate the data
was recorded. While in the play mode, the user may change the playback direction, playback
speed. To return to play forward operations, press the Play Forward button( ).
Reverse Play
To begin reverse playback, press the Reverse Play button( ).
Pause
During playback, press the Pause button( ). This feature pauses all full screen and multiscreen images. To release the pause press the pause button for a second time.
Single Frame Advance
During the pause mode, press the Frame Advance button( ) to view the frame directly after
the frame displayed on screen.
Single Frame Rewind
During the pause mode, press the Frame Rewind button( ) to view the frame directly before
the frame displayed on screen.
Fast Forward
In playback mode, press the Fast Forward button( ) to switch between various fast play
modes such as x2, x4, x8, x16 play.
Fast Backward
In reverse playback mode, press the Fast Backward button( ) to switch between various
reverse play modes such as x2, x4, x8, x16 reverse play.
Stop
To stop playback and return to the live mode, press the Stop button( ).
Page 10

10
Vista QXTRA User and installation manual V1.0
3-3. Playback Search
To search within the recorded video, while in play back mode, right click on the screen, the
following menu icon menu will appear,
Cameras Selection
Click the Camera selection icon to display the following box:
Interlace selection
A choice of OFF, D1 or D2 will be offered
OFF – Optimized for resolution, but shows 2 individual fields so can produce juddering on
moving objects.
D1 - Optimized for moving images, with slight reduction in resolution
D2- Optimized for resolution but shows integration artefacts on moving objects
Camera selection
Interlace selection
Date & Time, Event and
Bookmark search
GOTO selection
Main menu
Sequence selection
DVD Eject
Emergency record
Return to live
Full screen camera selection
Quad screen selection
Nine way split selection
Sixteen way split selection
Page 11

11
Vista QXTRA User and installation manual V1.0
Click on the Date and time search icon to display the following selection window:
Review screen
Playback of recordings will be displayed in this window, in either full screen or split screen
format, format is chosen using icons below the screen.
Playback time
The time at which the recorded images were made is displayed in this box
Bookmark toggle arrows
Click on the right arrow to display the Bookmark search screen, see Book marks below.
Time
line
Calendar search,
days with recording
shown in blue
Date and Time
selection
Date and Time /
Event search
and log
selection bar
Toggle to
Bookmark
search
Review screen
split selection
Review
screen
Playback
time
Archive button
Page 12

12
Vista QXTRA User and installation manual V1.0
Calendar / Date and time searches
Time Line
When a specific date is chosen in the calendar search box, cameras with recordings will be
graphically displayed in the this box,
Blue – Time-lapse recording
Red – Alarm recording
Yellow – Motion recording
Calendar Search
Select the required month using the arrows, days within this month that have recordings
related to them, will be displayed in blue
Time and Date selection
A specific time and date can be chosen; click on the start time, a data entry box will appear,
enter the correct start time and press PLAY.
Page 13

13
Vista QXTRA User and installation manual V1.0
Event Search
Click on the Event search selection button the screen below will be displayed.
Event type
Select either motion or alarm events
Time period
Set the start and stop times for the parameters of the search
Camera selection
Select the camera channels that are valid for the search
Start search
Click start search, the search results will be displayed in the table on the right side of the
screen. To play the events, double click on the entry in list
Archiving Events
To Archive, tick the boxes on the right hand side of the list for the required events, then click
the Archive box at the bottom of the list.
Event type
Event search selection
Camera selection
Time period selection
Start search
Move to archive
screen
Archive
selection
tick box
Page 14

14
Vista QXTRA User and installation manual V1.0
Log search
The system logs can be accessed and reviewed from the same search screen, click on the
Log search button to display the menu below:
A total of 5000 events can be recorded the oldest being overwritten when a new one occurs,
they can be viewed all together or as individual types.
The log file contains information on the following:
Power : Power on, Power off, Power fail
Record : Rec fail, Rec start, Rec stop, Rec error, Rec full
Operation : Play start, Play stop, HDD format, Menu set
Event : Alarm, Motion, Audio, Video loss, Email fail
Archive : This lists the user, time/date when archive was done, and time range of
archived section.
Select the parameters to be search.
Press the Start Search button, the list will appear in the box on the right
Selecting any event from the list will display it is detail in the Log detail box.
Log
display list
Start search
Log parameter
selection
To export the log,
click the archive
button, this will
display the Archive
menu screen
Page 15

15
Vista QXTRA User and installation manual V1.0
Bookmark search
Using the arrows on the left side of the screen toggle to the Bookmark option, to display the
screen below:
To play the recorded data, double click on the entry in the list.
Bookmark
list
Bookmark
details
Delete all bookmarks
Page 16

16
Vista QXTRA User and installation manual V1.0
To operate the GOTO function, while in playback, right click on the screen to display the
following icon option menu:
The following selection bar will appear on screen:
Click on the time and date box, a data entry screen will appear on screen, fill in the desired
Time and date, click ok then click on the GOTO button.
Select the GOTO icon
Page 17

17
Vista QXTRA User and installation manual V1.0
4. Archiving Evidence to DVD/CD or USB
Once the required video has been found, it may be necessary to down load it for evidential
purposes. This can be done either onto the internal CD/DVD-R writer or via the USB port.
Archives can be made from a known time and date period or from a list of events.
Time and Date archive
To do this press the Archive icon then follow steps below for a know time and date period:
Device
This allows selection between the internal CD /DVD-R writer and the FLASH option via the
USB port.
Insert media (disc or USB flash drive) and then press Device box.
The media will be automatically recognised by DVR.
Device Format
This is only required when using a USB pen, there is no need to format CDs or DVDs.
Type
Exclusive : If evidence is downloaded as an Exclusive file, the DVR will download
bespoke player software on to the CD / DVD or USB device along with the
evidence. This means that no special software is required, by the reviewing
PC. This format is secure and watermarked.
AVI : The evidence is downloaded as an AVI file, this backup file can be played on
a PC using the well known media player like Windows media player. Only
one camera at a time can be downloaded.
Devices
Device format
Calculate
Archive Size
Transfer
Type
Log
Config
From / To
Page 18

18
Vista QXTRA User and installation manual V1.0
Log
The Log file can be downloaded from this menu screen, check the Log box.
Config
The Configuration files for the DVR can be downloaded and saved.
From / To
Click on the select to edit box, the following screen will appear:
Click on add, the following screen will appear:
When selection is complete click OK
The Archive list screen will reappear:
Add button
Enter the
start and stop
time
Select the
camera inputs
to be archived
Page 19

19
Vista QXTRA User and installation manual V1.0
Right click on the list, an “ACCEPT LIST” box will appear, click YES.
The original Archive screen will be displayed:
Click on the Calculate Archive size, to confirm the file will fit on the available media.
Next click on the “Transfer” button, a percentage done, during downloading, will be shown
on the screen. Once the download process has started, it will operate in the background,
while the DVR is being used normally.
NOTE Do not shutdown the DVR during the archiving process.
Ensure the
boxes for any
periods
required are
ticked
Page 20

20
Vista QXTRA User and installation manual V1.0
Event list archiving
To create an archive from an list of events, create the list of events as described in the
previous section “Event Search”. At this point the following screen will be displayed:
Once the archive box has been clicked, the original Archive screen will be displayed.
Click on the Calculate Archive size, to confirm the file will fit on the available media.
Next click on the “Transfer” button, a percentage done, during downloading, will be shown
on the screen. Once the download process has started, it will operate in the background,
while the DVR is being used normally.
Tick the boxes of
the events to be
archived.
Click the
“Archive” box
Page 21

21
Vista QXTRA User and installation manual V1.0
Client Viewer software
Each DVR comes with license free viewer software to view the DVR across a network.
To be able to do this the recommended minimum specification for the PC is as follows:
Minimum PC specification
> CPU: Core 2 Duo 3.16GHz,
> Graphic Memory: 512MB
Installing software
When you put Network installation CD into your PC, it will auto run and lead you through an
installation wizard. Follow the instructions. Once the software is loaded it will automatically
run.
Connection
To connect to the Unit, open the Viewer Software and click the connection button,
Page 22

22
Vista QXTRA User and installation manual V1.0
Logging on
The following window will appear.
To connect to the QXTRA, enter the units: IP address; DVR Port (2000 by default), ID and
Password. Then, click “OK”, to start the live monitoring.
Description field is the name of area / Building / location of the DVR, this should be typed in
he first time the unit is connected to, this will store it in the address book.
Address book
Click on the Arrow to the left of the IP
address, the following box will appear.
This lists the last 22 units that have
been accessed. To reconnect to one of
these units simply double click, then
add the ID and Password.
Page 23

23
Vista QXTRA User and installation manual V1.0
Explanation of Screen Buttons
When the toolbar selection arrows are selected, a second tool bar option will be
shown as below:
Connect
Tool bar selection
Remote
Search
Remote
setup
Local
Search
Local
Setup
Pan/Tilt
Zoom/
Focus
Firmware
upgrade
Close
Client
version
Split screen
options
Full screen
Return to live
Turn off OSD
Camera re-arrange
Save image
Open saved images
Audio
Audio controls
Playback controls
Camera selection
Buttons
Connect
Reboot DVR
Page 24

24
Vista QXTRA User and installation manual V1.0
1. Live Monitoring
The software is best viewed with the PC monitor resolution, set to: 1024 x 768.
Split Screen options (1/4/6/7/8/9/10/13/6)
Spilt Screens can be viewed during both live and playback. The splits screens available are:
full screen,4,6,7, 8,9,10,13 and 16 way.
1) Full Screen 2) 10 Way
Page 25

25
Vista QXTRA User and installation manual V1.0
2. Remote Search
Search(Date/Time/Event/Calendar), Archive(Remote Archive), Log(Remote Log) are
available.
2-1. Search
This Remote Search is able to play back video on the PC direct from the hard disk storage
on the DVR. There are 3 options for as follows.
1) Date/Time
2) Event
3) Calendar
Date/Time
Event
When the cursor is placed over a part of the
time and date a drop down arrow will
appear, use this to set the required value.
When set.
Click “Play” button, this window disappears
and Remote Playback will start.
To stop playing back press Stop
the search screen will appear to allow
another search to be carried out, if not
required, click cancel followed by live .
Click on the Event button on the right hand
side, the software will search for all event
types. This may take a short while.
A list of the available events will appear.
To play an Event select it and click Play.
To stop playing back press Stop the
search screen will appear to allow another
search to be carried out, if not required, click
cancel followed by live .
Page 26

26
Vista QXTRA User and installation manual V1.0
Calendar
Select the date required (as long as the date is highlighted in Blue there is recorded data on
from that day).
There are 3 options for selecting the required time once the date has been selected.
1) Drag the Red line along the colour bar (I.e. Blue: Normal Recording) till the required time
is reached.
2) Click on the required time for playback on the blue bar then the red line will move to this
point.
3) Hover over the time box, a drop down arrow will appear allowing the manual selection of
Hours, mins and seconds.
Next click the “Play” button for Remote Playback. Or, click “Prev” to go back to previous
stage.
Page 27

27
Vista QXTRA User and installation manual V1.0
Select Channel
.
2-2. Archive
Remote Archive – Date/Time
Remote Archive – Event
Enter the Start and End dates and times, by
hovering over the selections, a drop down box
will appear.
Once selection is made, then “click” calculate,
the file size will be displayed. Finally click
“Archive”, the file will be transferred to
C:\ H264CD \Download.
Select either: Alarm, Motion or Audio
from the top of the screen. A list of
events will appear.
Click on the event required, it will be
come highlighted.
Click on Calculate, the file size will be
calculated, this may take a few
seconds.
Finally click Archive; the file will be
transferred to C:\ H264CD\Download.
Channels can be included or excluded dependent
on query. This is available within Search, Backup
and Logs.
Page 28

28
Vista QXTRA User and installation manual V1.0
Remote Archive – Calendar
Select the date required (Days with recorded video a data present are highlighted in Blue)
There are 3 options for selecting the required time once the date has been selected.
1) Drag the Red line along the colour bar (I.e. Blue: Normal Recording) till the required time
is reached.
2) Click on the required time for playback on the blue bar then the red line will move to this
point.
3) Hover over the time box, a drop down arrow will appear allowing the manual selection of
Hours, minutes and seconds.
Then click the “Next” button to set “End” Archive time, in the same manner.
Page 29

29
Vista QXTRA User and installation manual V1.0
The backup procedure is same as Date/Time & Event backup as previous page.
* “Prev” to go back to previous stage.
*The downloaded data is saved in the follows location.
C:\H264CD\Download.
Play back down loaded files
Open the viewer software but do not connect to a unit, click the cancel button to remove the
log on box.
Next click on the Local search button the normal search box will appear, use the
same method to search the files on the PC and Play back
Quit (Exiting Client program)
To exit the Client viewer program click the Quit button.
Page 30

30
Vista QXTRA User and installation manual V1.0
Installation
1. Front Panel Controls
Power
System Power On/Off
Record button
Press to stop recording (password protected)
Video play back keys
Play, Stop, Pause, fast forward etc.
Search key
Press once to put unit into playback mode, press a second time to enter the search menus
Select key
Used as an enter button in the menus
Menu
Displays the menu on the screen
PTZ Camera select key
Select the cameo image to be controlled in the multi screen views.
Page 31

31
Vista QXTRA User and installation manual V1.0
Audio select key
Selects the audio track (with reference to a cameo image) to be played.
Decrease volume
DVD
Increase volume
Multi screen selection
Use the Multi-screen display button to select the display mode (single/4way/9way/
16way/17way screen).
PTZ mode selection
Turns the telemetry function on or off
Arrow keys
Used to navigate around the menu pages
Zoom control
This toggles the function of the arrow keys, when in PTZ mode the front arrow keys can
be used to pan and tilt or to zoom and focus
Number Buttons
Used for individual camera selection and selection of numbers & letters within the setup
menus and searches
Page 32

32
Vista QXTRA User and installation manual V1.0
2. Rear Panel Connectors
Spot Monitor Outputs
Spot Video Output (Composite Video)
Video Inputs
8 Channel
16 Channel
16
HDMI For future
development
HDMI For future
development
Page 33

33
Vista QXTRA User and installation manual V1.0
16 camera inputs
Video Outputs
16 camera loop outputs
Audio Input
Audio input through line
AC Power Input
AC 100-240V 50/60Hz
VGA Output (Dual Monitor)
VGA video output for dual monitor (1024x768)
HDMI Output
For future use - not yet functional
VGA Output (Main Monitor)
VGA video output for main monitor (1920x1080)
Audio Output
Audio output
RS232
Serial Communication (for service)
Network Port
Connecting to the DVR through Internet or LAN
USB Port
USB 2.0 port for mouse
eSATA Port
Port for e-SATA HDD
PTZ Camera Controller
Serial Communication for Pan / Tilt Camera
Alarm Output
Alarm(relay) output port
Sensor Input
16 Sensor input ports
16
Page 34

34
Vista QXTRA User and installation manual V1.0
3. Remote Control
POWER : Power on/off
P/T/Z : Entering PTZ Setup menu directly
REC : Start & Stop Recording
Numbers and letters (1 to 9)
INFO : Direct access system information
ID : Entering control ID set mode
MUTE : Audio Mute
AUDIO : Switches through Audio channels
MENU: Entering system menu
SEARCH: Entering search
ARROW : Left, Right, Up and Down
SEL : Select/Enter
VOL +/- : Up, down volume
CH +/- : Up, down channel
( ) : Reverse play
( ) : Play (or fast forward)
I I : Pause
: Stop playback
OSD : On Screen Display ON/OFF
SEQ : Sequence operation
LOG : Direct access Log list
CAM : Changing PTZ icon
P/T : Pan &Tilt
Z/F : Zoom/ & Focus
DIS : Channel Division
Page 35

35
Vista QXTRA User and installation manual V1.0
4. Connection Guide
Connecting the monitor
There are four available monitor outputs on the DVR.
● VGA(main) output : Connect to the VGA port of the main monitor.
● VGA(sub) output : Connect to the VGA port of the sub monitor.
● Composite output : Connect to the Video Input of the spot monitor.
● HDMI – For future development, not yet functioning
Spot
Camera
Mic
Main
Monitor
Sub
Speaker
System
PC
Mouse
PTZ
Camera
Siren
Sensor
e-SATA
HDD
Page 36
36
Vista QXTRA User and installation manual V1.0
Connecting cameras
This unit comes with either 8 or 16 video inputs. Each video input has a corresponding
looping output beneath it for passing the video signal to another monitoring/recording device.
● Video input : Connect to the video out of the camera.
Connecting audio
To record audio on the DVR, connect to the audio source.
● Audio input : Connect to the audio out of the microphone.
To listen to live or recorded audio, connect to an amplified speaker system.
● Audio output : Connect to the audio in of the audio AMP.
Connecting to a network
Use the Ethernet port to connect to remote PC via Ethernet network.
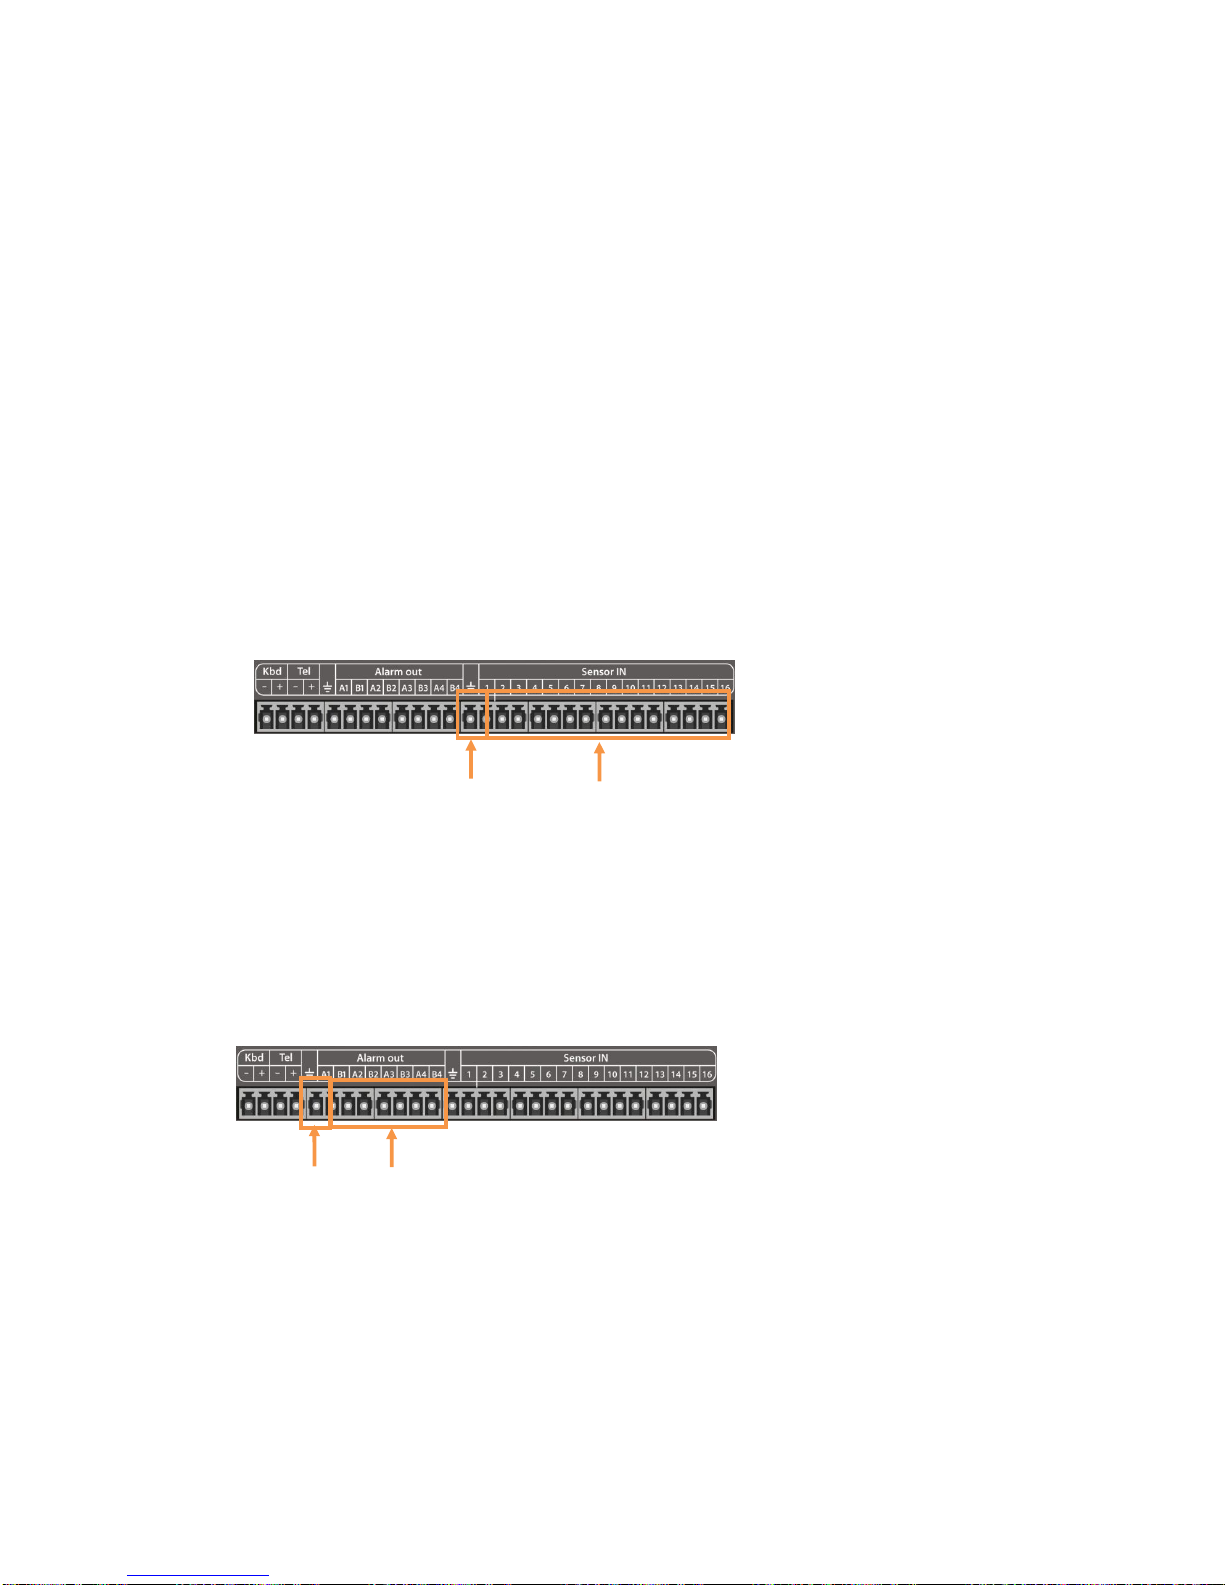
Connecting to a sensor input
There are 16 individual alarm inputs marked as Sensor In (1-16).
● Sensor inputs : Connect to (+) terminal of a sensor.
● Common GND : Connect to (–) terminals of sensors.
Connecting to a alarm output
The DVR can activate external devices such as buzzers or lights using the relay.
There are 4 relay outputs marked as Alarm out.
● Alarm outputs : Connect to (+) terminal of buzzer or light.
● Common GND : Connect to (–) terminals of buzzers or lights.
Common
Sensor
Common
GND
Alarm
Page 37

37
Vista QXTRA User and installation manual V1.0
Connecting to a PTZ camera
This RS485 connector can be used to control Pan / Tilt / Zoom camera.
● Telemetry (+) : Connect to RS485 Rx(+) of PTZ camera.
● Telemetry (-) : Connect to RS485 Rx(-) of PTZ camera.
Connecting to a mouse
● USB 2.0 : Connect to the mouse.
Connecting to a external HDD
To expand the HDD capacity, connect the external storage.
● e-SATA : Connect to the e-Sata HDD storage.
5. Turning on the DVR
1. Connect the power cable.
2. Connect camera cables.
3. Connect a network cable and a monitor cable.
4. Press the POWER button on the front panel and wait until the main screen is displayed on
the connected monitor; this process may take a couple of minutes.
(-)
(+)
Page 38

38
Vista QXTRA User and installation manual V1.0
Operator Notes
Page 39

39
Vista QXTRA User and installation manual V1.0
Operator Notes
 Loading...