

Page 1

[7DON0DQDJHPHQW&RQVROHIRU:LQGRZV
[7DON0DQDJHPHQW&RQVROHIRU:LQGRZV
[7DON
5SERS'UIDE5SERS'UIDE5SERS'UIDE5SERS'UIDE5SERS'UIDE
81-81610-04 A01
Page 2

xTalk Management Console for Windows User’s Guide, 81-81610-04 Revision A01, September 2007, Made in U.S.A.
Quantum Corporation provides this publication “as is” without warranty of any kind, either express or implied,
including but not limited to the implied warranties of merchantability or fitness for a particular purpose. Quantum
Corporation may revise this publication from time to time without notice.
COPYRIGHT STATEMENT
Copyright 2007 by Quantum Corporation All rights reserved.
Your right to copy this manual is limited by copyright law. Making copies or adaptations without prior written
authorization of Quantum Corporation is prohibited by law and constitutes a punishable violation of the law.
TRADEMARK STATEMENT
Quantum, the Quantum logo, DLT, and DLTtape, and the DLTtape logo are registered trademarks of Quantum
Corporation in the U.S.A. and other countries. The DLT logo, GoVault, and DLTSage are trademarks of Quantum
Corporation. LTO and Ultrium are trademarks of HP, IBM and Quantum in the U.S.A. and other countries. All other
trademarks are the property of their respective companies.
Page 3

Contents
Preface viii
Chapter 1 Environment and Main Window 1
Layout of the Main Window ............................................................................1
Menu .................................................................................................................... 3
Toolbar................................................................................................................. 3
Device Selection Panel.......................................................................................6
Displayed Information............................................................................... 6
Selecting a Non-Supported Device .......................................................... 7
When No Devices Are Detected ...............................................................7
When Connected Devices Don’t Display ................................................ 7
Script Selection Panel ........................................................................................ 8
Differences Between Scripts and Commands......................................... 8
Script Description Panel.................................................................................... 9
Results Panel.......................................................................................................9
Status Bar............................................................................................................. 9
Show/Hide Status Bar ............................................................................. 10
Exiting xTalk Management Console ............................................................. 11
xTalk Management Console for Windows User’s Guide iii
Page 4

Contents
Chapter 2 Using the Results Panel 12
Displayed Information .................................................................................... 13
Using Verbose Mode .......................................................................................13
Saving the Contents of the Results Panel ..................................................... 14
Sending the Contents of the Results Panel...................................................15
Clearing the Contents of the Results Panel..................................................15
Searching the Results Panel............................................................................16
Adding Comments to the Results Panel....................................................... 17
Copying Information from the Results Panel.............................................. 18
Chapter 3 Shortcuts 19
Keyboard Shortcuts .........................................................................................19
Right-click Shortcuts........................................................................................20
Double-click Shortcuts .................................................................................... 21
Chapter 4 Setting Preferences 22
General Setup ................................................................................................... 24
Generate Log File......................................................................................24
Show Splash............................................................................................... 24
Show Startup Caution.............................................................................. 25
Configure Update Wizard – Update Check................................................. 26
Folders ............................................................................................................... 26
Change Color of Items..................................................................................... 27
Return to Default Settings............................................................................... 27
Chapter 5 Getting Updates 28
Updating xTalk Management Console......................................................... 28
Updating Device Firmware............................................................................ 29
Error Messages.......................................................................................... 31
Chapter 6 Running a Test or Task 32
Checking Device Readiness............................................................................ 32
Running a Test or Task.................................................................................... 34
Aborting a Test or Task................................................................................... 35
xTalk Management Console for Windows User’s Guide iv
Page 5

Contents
Chapter 7 Log Files 36
Generating and Saving Log Files................................................................... 37
Viewing Log Files ............................................................................................ 37
Sending a Log File to a Recipient...................................................................38
Chapter 8 Viewing Media Data 39
Viewing Media Compatibility ....................................................................... 39
Viewing Medium Auxiliary Memory (MAM)............................................. 42
Chapter 9 Viewing TapeAlerts 43
Chapter 10 FA Data Files 47
Generating an FA Data File ............................................................................ 47
Sending an FA Data File to a Recipient ........................................................ 50
Sending Immediately After Generating ................................................ 50
Sending Any Time .................................................................................... 51
Chapter 11 General Device Commands 52
Compression Status – Viewing ......................................................................53
GENERATE EEPROM BUFFER .................................................................... 54
GENERATE TRACE BUFFER........................................................................ 54
INQUIRY INFORMATION ........................................................................... 55
Removable Storage Settings ........................................................................... 56
RESCAN............................................................................................................ 56
RETENSION ..................................................................................................... 57
Chapter 12 Using Push Pins 58
Enabling the Push Pin and Attaching the Dialog Box................................ 59
Disabling the Push Pin and Closing the Dialog Box................................... 59
xTalk Management Console for Windows User’s Guide v
Page 6

Contents
Chapter 13 Getting Help 60
Access the Users Guide................................................................................... 60
Use the Help Menu..........................................................................................61
Appendix A Specifications 62
Minimum PC Requirements........................................................................... 62
Supported Operating Systems ....................................................................... 63
Supported Interfaces........................................................................................ 63
Supported Host Bus Adapters ....................................................................... 63
Supported Devices........................................................................................... 64
Glossary 65
Index 67
xTalk Management Console for Windows User’s Guide vi
Page 7

Figures
Figure 1 Main Window ...............................................................................2
Figure 2 Preferences Dialog Box.............................................................. 23
Figure 3 Splash Screen............................................................................... 25
Figure 4 Caution Screen............................................................................ 26
Figure 5 Firmware Update Warning....................................................... 30
Figure 6 GoVault System Reboot Message ............................................ 30
Figure 7 Media Compatibility Tool Main Page ..................................... 40
Figure 8 Media Compatibility Tool Device Page .................................. 41
Figure 9 TapeAlert Dialog Box ................................................................ 44
Figure 10 Viewing a Warning TapeAlert .................................................45
Figure 11 FA Data Collection Successful.................................................. 49
Figure 12 Sending FA Data To a Recipient ..............................................50
Figure 13 Disabled Push Pin ...................................................................... 59
Figure 14 Enabled Push Pin........................................................................ 59
xTalk Management Console for Windows User’s Guide vii
Page 8

Preface
xTalk Management Console is a software application designed to allow
customers to evaluate tape device health and determine when a device
needs to be sent for service or repair.
xTalk Management Console provides media and device diagnostic tools,
the ability to view general analysis information, and the ability to quickly
update application software and device firmware.
You can download the latest version of this application from the
Quantum Web site at:
http://www.quantum.com/ServiceandSupport/SoftwareandDocument
ationDownloads/Index.aspx.
Audience
Purpose
xTalk Management Console for Windows User’s Guide viii
This manual is written for users of xTalk Management Console.
This document provides information about how to use the features of
xTalk Management Console including:
• Understanding and using the program
• Customizing the program
•Getting updates
• How to get help when problems arise
Page 9

Preface
Document Organization
This document is organized as follows:
• Chapter 1,
Environment and Main Window, provides an overview of
xTalk Management console. It describes the layout of the main
window, including selection and results panels, menu commands,
and toolbar buttons.
• Chapter 2,
Using the Results Panel, describes the functions and
features of the Results Panel, which displays results of actions
performed.
• Chapter 3,
Shortcuts, describes the keyboard and right-click shortcuts
available to you.
• Chapter 4,
Setting Preferences, explains how to customize views and
automated information.
• Chapter 5,
Getting Updates, explains how to update xTalk
Management Console software, and to update device firmware,
including how to make a firmware update tape.
• Chapter 6,
Running a Test or Task, explains how to determine if a
device is ready to be tested, how to run a test or task, and how to
abort a test or task.
• Chapter 7,
Log Files, explains how to create log files and open log
files. It also explains how to enable or disable automatic log file
creation.
• Chapter 8,
Viewing Media Data, explains how to view information
stored on the tape.
• Chapter 9,
Viewing TapeAlerts, provides information about
TapeAlert flags and how to view them.
• Chapter 10,
FA Data Files, explains how to generate and view failure
analysis (FA) data files.
• Chapter 11,
General Device Commands, details commands that are
not covered in other chapters.
• Chapter 12,
Using Push Pins, provides instructions on how to keep
dialog boxes open by enabling and disabling “push pins.”
xTalk Management Console for Windows User’s Guide ix
Page 10

Preface
• Chapter 13, Getting Help, lists the kinds of help you can access and
how to get it.
Notational Conventions
Related Documents
Contacts
• Appendix A,
Specifications, lists the minimum PC requirements
needed to run xTalk Management Console, as well as supported
operating systems, host bus adapters, and devices.
This document concludes with a glossary and a detailed index.
This manual uses the following conventions:
Note: Notes emphasize important information related to the main
topic.
Caution: Cautions indicate potential hazards to equipment and are
included to prevent damage to equipment.
Refer to the appropriate product manuals for information about your
hard disk drive, tape drive, or cartridges.
Quantum company contacts are listed below.
Quantum Corporate Headquarters
To order documentation on xTalk Management Console or other
products contact:
Quantum Corporation
141 Innovation Drive
Irvine, CA 92617
(949) 856-7800
(800) 284-5101
xTalk Management Console for Windows User’s Guide x
0
Page 11

Preface
Technical Publications 0
To comment on existing documentation send e-mail to:
doc-comments@quantum.com
Quantum Home Page 0
Visit the Quantum home page at:
http://www.quantum.com
Getting More Information or
Help
More information about this product is available on the Service and
Support Web site at
http://www.quantum.com/ServiceandSupport/Index.aspx
. The Service
and Support Web site contains a collection of information, including
answers to frequently asked questions (FAQs). You can also access
software, firmware, and drivers through this site.
For further assistance, or if training is desired, contact:
Quantum Technical Assistance Center in the USA: 800-284-5101
For additional contact information, go to:
http://www.quantum.com/AboutUs/ContactUs/Index.aspx
.
To open a Service Request, go to:
http://www.quantum.com/ServiceandSupport/eSupport/Index.aspx
.
For the most updated information on Quantum Global Services, please
visit:
http://www.quantum.com/ServiceandSupport/Contacts/Worldwide/I
ndex.aspx.
xTalk Management Console for Windows User’s Guide xi
Page 12

Preface
xTalk Management Console for Windows User’s Guide xii
Page 13

Chapter 1
1Environment and Main Window
When you start xTalk Management Console, it displays the main
window. This chapter describes the following features and functions of
the xTalk Management Console environment and main window:
• Layout of the Main Window
• Menu
• Toolbar
• Device Selection Panel
• Script Selection Panel
• Script Description Panel
• Results Panel
• Status Bar
• Exiting xTalk Management Console
Layout of the Main Window 1
Figure 1 shows the layout of the main window.
You can change the size of the panels by placing your cursor over a
border, or “splitter bar.” When the cursor changes to a set of parallel
xTalk Management Console for Windows User’s Guide 1
Page 14
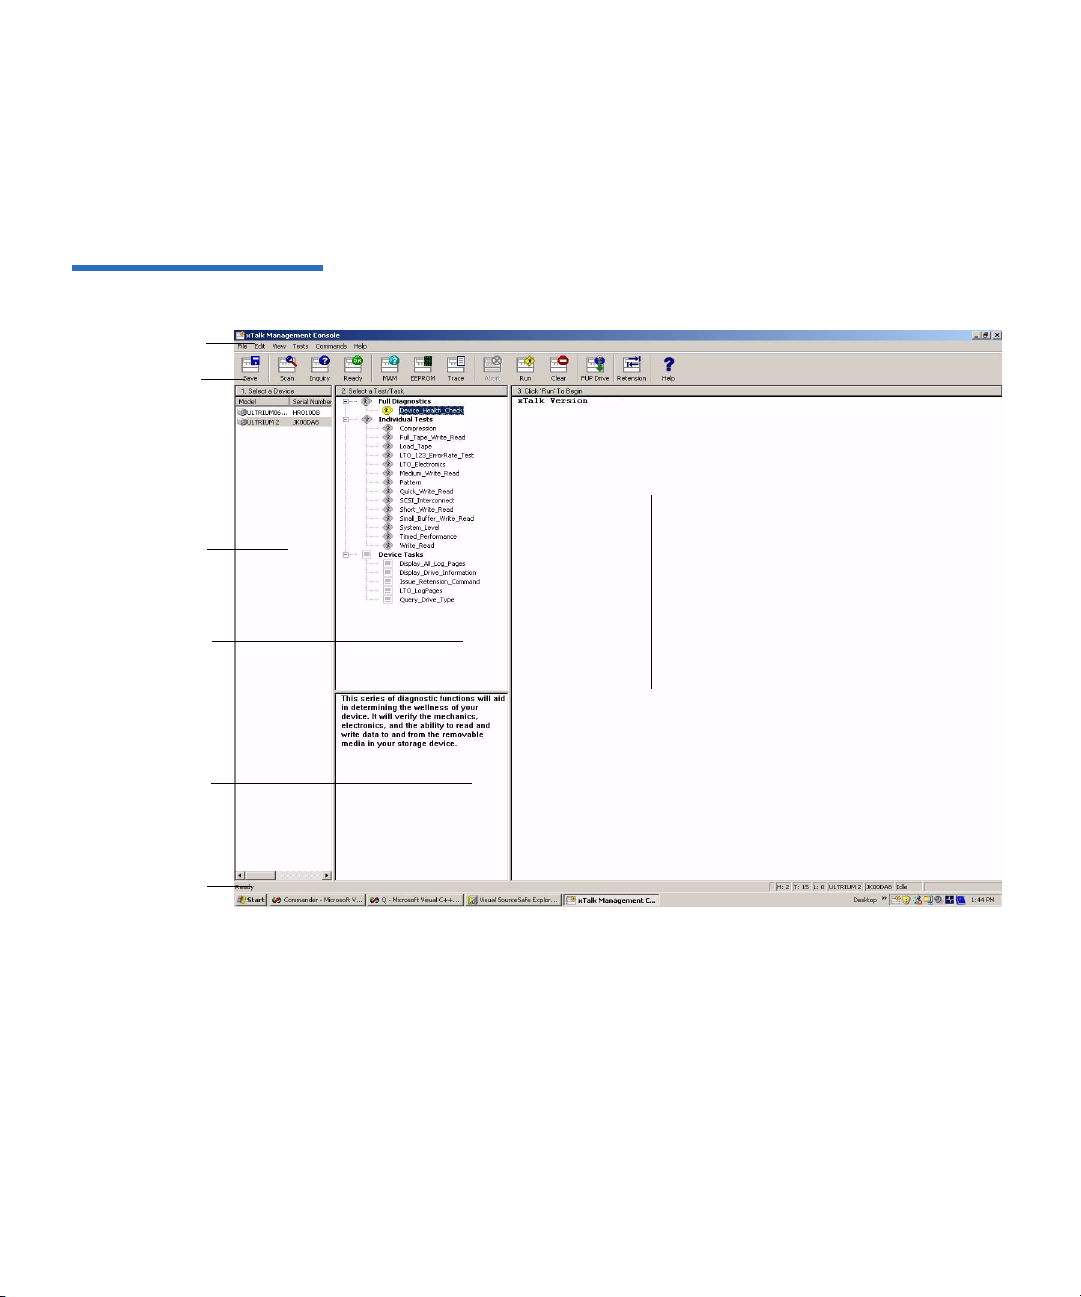
Figure 1 Main Window
Menu
Device
Selection
Panel
Too lba r
Results
Panel
Status Bar
Script
Selection
Panel
Script
Description
Panel
Chapter 1 Environment and Main Window
Layout of the Main Window
lines, you can click and drag the border to where you want it. When you
exit xTalk Management Console and reopen, your border settings are
saved.
xTalk Management Console for Windows User’s Guide 2
Page 15

Chapter 1 Environment and Main Window
Menu
Menu 1
Across the top of the main window is a menu containing tasks and
commands, all of which are explained in detail in this document. For
more information about a specific command, use the Contents
locate where in this document a command is described in detail.
or Index to
Too lba r 1
The toolbar is a line of buttons immediately under the menu. The buttons
on the toolbar allow you to perform standard tasks or commands. Click
on a device in the Device Selection Panel and then click a toolbar button.
To view the full name of a button, place your cursor directly over the
button. The name appears directly below the button.
To view a description of what the button does, place your cursor over a
button and read the description in the Status Bar (see Status Bar
page 9).
For more information on using these commands, use the Contents
Index
to find where a specific command is described in detail.
xTalk Management Console for Windows User’s Guide 3
on
or
Page 16
Chapter 1 Environment and Main Window
Toolbar
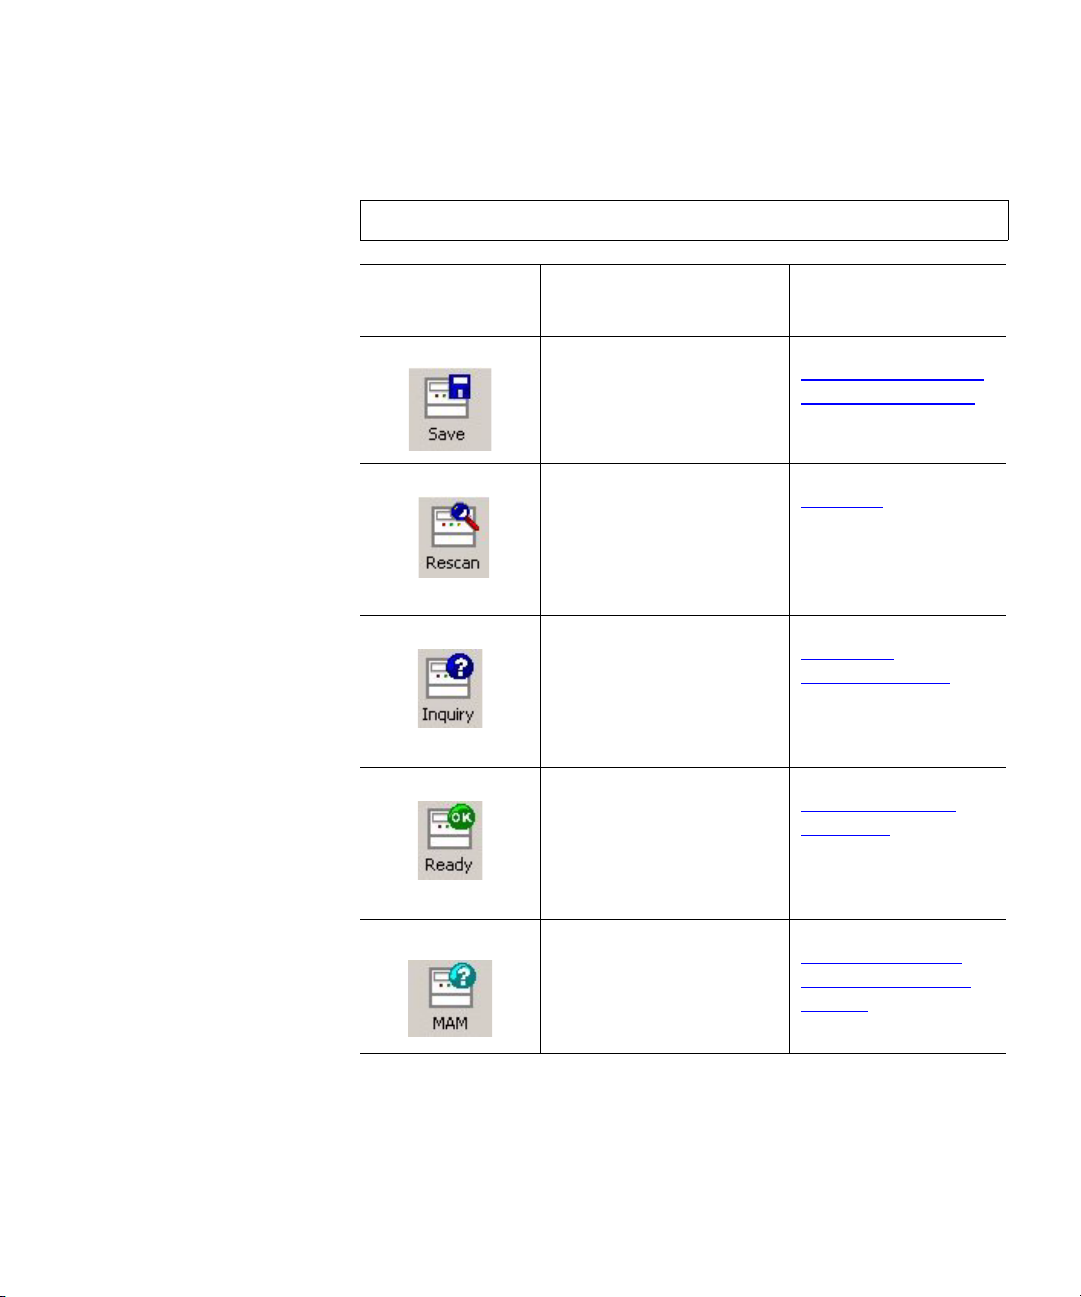
The toolbar button icons are shown below, in order of appearance on the
toolbar.
Note: Not all buttons are available for all device types.
Toolbar Button
Icon
Button Name and
Description
Save. Saves the contents
of the Results Panel to a
file.
Rescan Bus. Rescans the
SCSI bus and displays a
list of devices found in
the Device Selection
Panel.
Inquiry Information.
Displays a dialog box
containing information
about the selected
device.
Test Unit Ready. Queries
the device to determine if
it is ready to run a test or
task and displays the
result in a dialog box.
For More
Information see...
Saving the Contents
of the Results Panel
on page 14
RE
SCAN on page 56
INQUIRY
INFORMATION on
page 55
Checking Device
Readiness on
page 32
Show MAM Information.
View the information
stored in the medium
Viewing Medium
Auxiliary Memory
(MAM) on page 42
auxiliary memory.
xTalk Management Console for Windows User’s Guide 4
Page 17
Chapter 1 Environment and Main Window
Toolbar
Toolbar Button
Icon
Button Name and
Description
Collect Failure Analysis
Data. Saves failure
analysis data to a file that
can be used by support
personnel for
troubleshooting.
Generate EEPROM
Buffer. Collects drive
information from the
EEPROM and saves it to
a file.
Generate Trace Buffer.
Collects drive status
information from the
trace buffer and saves it
to a file.
Abort. Stops the
currently running test or
task at the earliest
opportunity.
For More
Information see...
Generating an FA
Data File on page 47
GENERATE
EEPROM BUFFER on
page 54
GENERATE TRACE
BUFFER on page 54
Aborting a Test or
Task on page 35
Run. Starts and runs the
selected test or task on
Running a Test or
Task on page 34
the selected device.
Clear. Clears all data
from the Results Panel.
Clearing the Contents
of the Results Panel
on page 15
xTalk Management Console for Windows User’s Guide 5
Page 18
Chapter 1 Environment and Main Window
Toolbar
Toolbar Button
Icon
Button Name and
Description
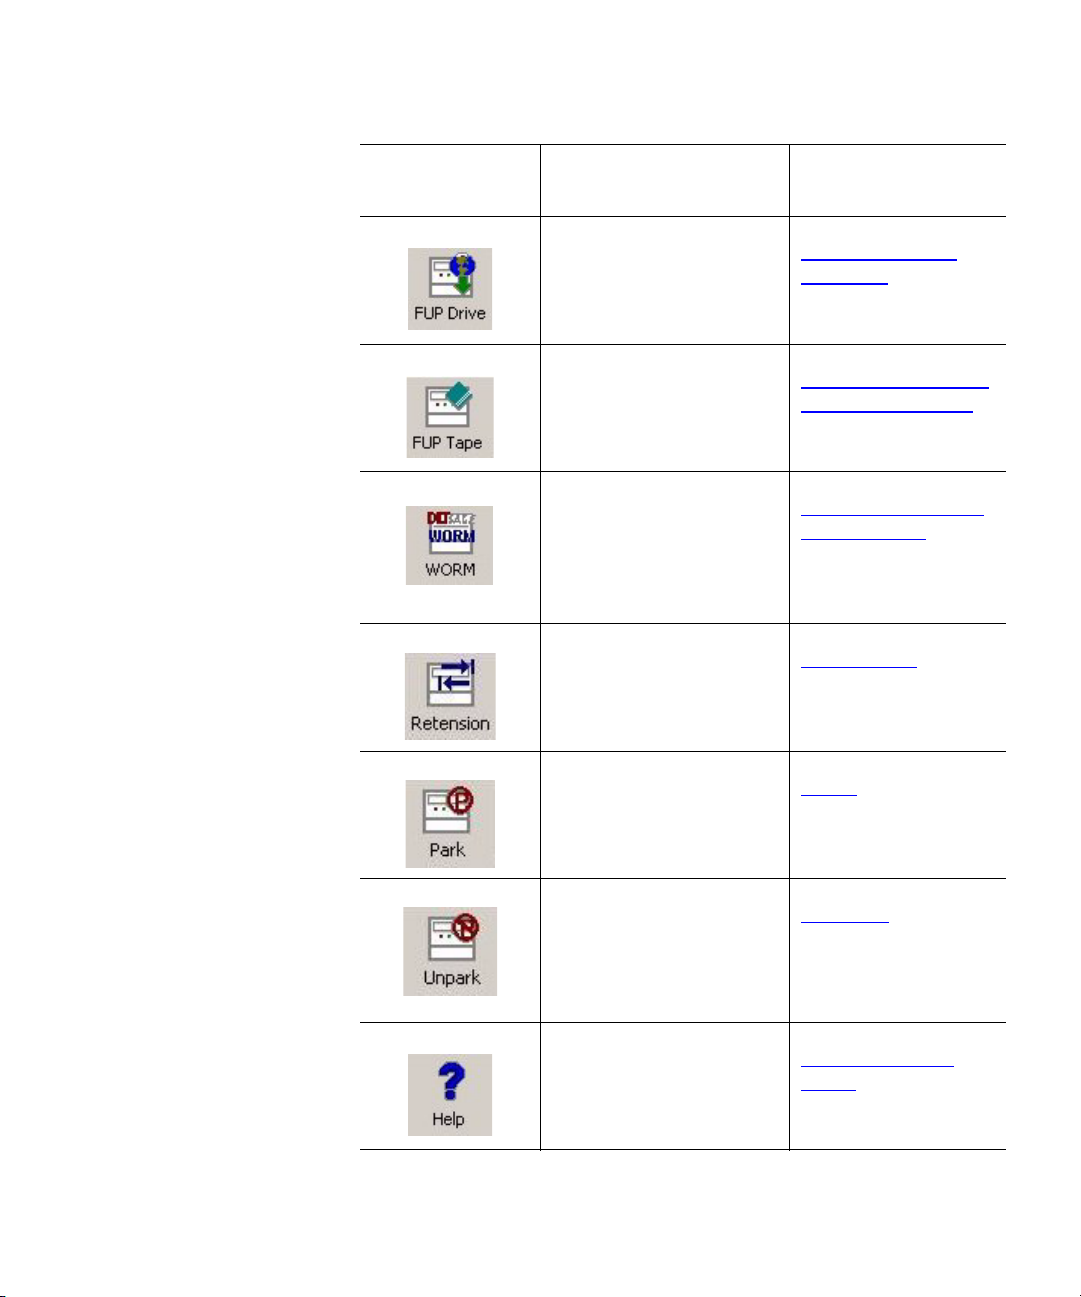
Firmware Update.
Transfers a new
firmware image file to
the device.
Write FUP Tape. Creates
a firmware update tape.
Create DLTSage WORM
Tape. Creates a writeonce read-many tape for
certain DLT devices and
media combinations.
Retension. Forwards the
tape to EOM, then
rewinds to BOM.
For More
Information see...
Updating Device
Firmware on page 29
Creating a Firmware
Update (FUP) Tape
on page 33
CREATE DLTSAGE
WORM TAPE on
page 57
RETENSION on
page 57
Park. Parks the drive
PARK on page 61
arm.
Unpark. Unparks the
UNPARK
on page 63
drive arm.
Help. Opens the online
User’s Guide.
Access the Users
Guide on page 60
xTalk Management Console for Windows User’s Guide 6
Page 19

Chapter 1 Environment and Main Window
Device Selection Panel
Device Selection Panel 1
The Device Selection Panel displays a list of SCSI devices connected to
your computer, as detected by xTalk Management Console when it scans
the bus.
From this panel you can select a device on which to view information or
run a test, task, or command.
Note: You may only select one device at a time.
Displayed Information 1 The Device Selection Panel displays the model, serial number, product
revision, and vendor of all devices in four columns. Use the horizontal
scroll bar at the bottom of the Device Selection Panel to view all the
columns. You can change the size of the columns by clicking and
dragging the vertical column dividers.
For more specific information about an individual device, place your
mouse over a device and a box will briefly appear displaying the
following information: model, vendor, serial number, revision, HBA ID,
SCSI ID, and LUN ID.
In addition, the status bar lists the HBA ID, SCSI ID, LUN ID, model, and
serial number for the selected device (see Status Bar
Selecting a Non-Supported Device
xTalk Management Console for Windows User’s Guide 7
xTalk Management Console does not support all device types. If you
select a non-supported device, xTalk Management Console displays this
1
message:
xTalk does not support this device. Please refer to the xTalk help file
for a list of all the supported devices.
For a list of supported devices, see Supported Devices
on page 9).
on page 70.
Page 20

Chapter 1 Environment and Main Window
Script Selection Panel
When No Devices Are Detected
When Connected Devices Don’t Display
If no devices are detected by the bus scan, the following message is
displayed:
1
No devices have been detected. Please inspect your system’s cables
and device terminators. Also, be sure you have installed the latest
device driver for your tape product. If you feel you received this
message by error try re-scanning the SCSI bus. You may need to close
and restart the application.
Click
OK and follow the instructions in the message.
If you have properly connected a device to the bus and it does not display
in the Device Selection Panel, try re-scanning the bus (see RE
1
page 56). Sometimes it takes the operating system a little longer to
recognize a new device, causing the bus scan not to see the device. You
may need to rescan the bus several times, or you may need to close and
restart xTalk Management Console.
SCAN on
Script Selection Panel 1
The Script Selection Panel displays a list of tests and tasks (scripts) that
you can run on a selected device. The scripts are listed functionally as
follows:
Full Diagnostics – A long test, or series of tests, that takes more than a
•
few minutes to complete (for example, Device_Health_Check). Full
diagnostics are used to determine any problems that a device may be
having.
•
Individual Tests – A series of operations strung together to accomplish
a specific function. The Full Diagnostics script,
Device_Health_Check, is composed of individual tests that can be
run separately to find specific issues without running the full health
check.
•
Device Tasks – Short, usually one-step operations. These are not tests,
but are used to engage or view the characteristics of a device.
The list of available tests/tasks changes depending on the device
selected.
xTalk Management Console for Windows User’s Guide 8
Page 21

Chapter 1 Environment and Main Window
Script Description Panel
Once you select a device and a test or task, you are ready to run the test or
task (see chapter 6,
Caution: The scripts displayed in the Script Selection Panel for your
Running a Test or Task).
use are
these
way, you will not be able to run that script again. To
restore functionality of that script, you will be required to
reinstall the xTalk Management Console executable.
.xcs files stored in the Scripts folder. Do not change
.xcs files! If you alter one of these .xcs files in any
Differences Between Scripts and Commands
Some commands available through the menu and toolbar buttons
perform the same function as scripts in the Script Selection Panel. You can
1
use either method; however, using the menu commands or toolbar
buttons generally provides more information and help in dialog boxes,
whereas the script usually displays more information in the Results
Panel.
Script Description Panel 1
The Script Description Panel is directly below the Script Selection Panel.
When you click on a test or task, a description of what that script does
displays in the Script Description Panel.
Results Panel 1
The right-most vertical panel is the Results Panel, which displays
information about the command, test, or task you are running. You can
search, comment on, and save the contents of this panel (see chapter 2,
Using the Results Panel).
xTalk Management Console for Windows User’s Guide 9
Page 22

Chapter 1 Environment and Main Window
Status Bar
Status Bar 1
The Status Bar runs along the bottom of the window and displays
information about xTalk Management Console and the selected device as
follows, in this order along the bar:
Section Description of Displayed Information
xTalk status
information
Host ID Host bus adapter identifier. Not available for all
Target ID/
Tape ID
LUN ID Logical Unit Number of the selected device. Not
Primary
Secondary
Channel
Device label The type of device selected for testing.
Device serial
number
Current status of xTalk Management Console
(usually displays “Ready,” meaning it is ready to
perform a command or run a script). Also provides
a description of menu commands and toolbar
buttons when you place the cursor over the item.
When you run a test or task and generate a log file,
the status bar displays the path of the log file (see
Generating and Saving Log Files
interface types.
SCSI ID: SCSI ID of the selected device.
Tape ID: Tape number of the selected device.
available for all interface types.
GoVault designations that provide information
similar to Target ID/Tape ID and LUN ID.
Serial number of the selected device.
on page 37).
Application
state
Iteration
Counter
xTalk Management Console for Windows User’s Guide 10
The current status of the test, task, or command
that you are running (for example, Idle or
Running).
The progress of the current operation; for example,
if writing to tape, this shows the number of blocks
written and the total number of blocks to be
written in the current operation (40/250).
Page 23

Chapter 1 Environment and Main Window
Exiting xTalk Management Console
Show/Hide Status Bar 1 You can decide whether or not you want the Status Bar to appear in the
main window. To show or hide the Status Bar:
1 From the menu bar, select
View.
Note: If the status bar is showing, the option is checked. If
hidden, the option is unchecked.
2 Click
Status Bar.
As soon as you click the selection, its status changes; for example, if
the window currently displays the Status Bar, when you click
Bar
, the Status Bar immediately disappears from the window.
Status
Exiting xTalk Management Console 1
To exit xTalk Management Console, do one of the following:
• Choose
•Click the
Console window.
File > Exit, from the menu.
X in the upper right corner of the xTalk Management
xTalk Management Console for Windows User’s Guide 11
Page 24

Chapter 2
2Using the Results Panel
The Results Panel displays results of the command, test, or task you are
running, including error messages.
This chapter discusses the things you can view and do with the
information displayed in the information panel as follows:
• Displayed Information
• Using Verbose Mode
• Saving the Contents of the Results Panel
• Sending the Contents of the Results Panel
• Clearing the Contents of the Results Panel
• Searching the Results Panel
• Adding Comments to the Results Panel
• Copying Information from the Results Panel
xTalk Management Console for Windows User’s Guide 12
Page 25

Chapter 2 Using the Results Panel
Displayed Information
Displayed Information 2
The information about each script you run is displayed consecutively in
the Results Panel, until you clear the contents (see Clearing the Contents
of the Results Panel on page 15) or exit xTalk Management Console (see
Exiting xTalk Management Console
The information in the Results Panel is displayed in several colors. You
can change some of these colors using the Preferences dialog box (see
Change Color of Items
Item Color
Comment Green
Background White
on page 27).
on page 11).
Using Verbose Mode 2
Verbose Mode is a feature that allows you to view all the information on
every command: what is sent to and from the device, the command
status, and all the information it returns. This information is displayed in
the Results Panel and it is the same information that is sent to the log file
if you enable automatic log file generation (see Generating and Saving
Log Files on page 37).
This amount of information can be useful for diagnostic purposes;
however, you may not want to see all this information all the time, so you
can decide at any time to enable or disable Verbose Mode by toggling
between Verbose Mode and Standard Mode.
To enable/disable Verbose Mode, press <
appears telling you whether Verbose Mode is enabled or disabled.
The default setting for Verbose Mode is disabled. If you shut off xTalk
Management Console, the system reverts to disabled the next time you
log on, and you must press <
xTalk Management Console for Windows User’s Guide 13
Ctrl+Alt+V> again to enable it.
Ctrl+Alt+V>. A dialog box
Page 26

Chapter 2 Using the Results Panel
Saving the Contents of the Results Panel
Saving the Contents of the Results Panel 2
You can save the entire contents of the Results Panel to a .txt file any time
the status bar shows the system is Idle.
Saving data to a new text file
To save the contents of the Results Panel to a new text file:
1 Do one of the following:
• Choose
File > Save As from the menu.
• If you have not saved the contents of the Results Panel yet, click
the
Save button on the toolbar.
The
Save xTalk Log File dialog box opens.
2 Browse to and select the location where you want to save the file;
name the file; and click
Save.
The information is saved to the file in the location you specify.
Notice that the location and filename now appear in the xTalk
Management Console Windows title bar. This file is now considered
active and the only way to make it non-active is to exit xTalk
Management Console or
Save As to a new file.
If you change the contents of the Results Panel, you can either:
• Continue to
contents (see Saving data to the active text file
• Save the data to a new file by selecting
Save to this active file, which overwrites the current
, below) or
File > Save As again. This
new file then becomes the active file.
2
Saving data to the active text file
To save data to the currently active text file, do one of the following:
• From the menu bar select
File > Save.
• From the toolbar, click the Save button.
xTalk Management Console for Windows User’s Guide 14
2
Page 27

Chapter 2 Using the Results Panel
Sending the Contents of the Results Panel
The most recently created file stays active until you exit xTalk
Management Console.
Note: xTalk Management Console will only
the file is closed. If the file is open, no new changes will be
saved.
Save to an existing file if
Sending the Contents of the Results Panel 2
This option allows you to e-mail the contents of the Results Panel to
someone. You may do this manually any time the status bar shows the
system is Idle.
To send a view:
1 Choose
An e-mail message opens. The contents of the Results Panel are
placed into a
e-mail is “xTalk Management Console Log File.” The e-mail is
addressed to
2 Address and send the e-mail.
File > Send View from the menu bar,.
.txt file and attached to the e-mail. The subject line of the
support@quantum.com.
Clearing the Contents of the Results Panel 2
This option allows you to clear all data from the Results Panel. To clear,
perform one of the following actions:
• Choose
•Click the
xTalk Management Console for Windows User’s Guide 15
Edit > Clear View from the menu
Clear button on the toolbar.
Page 28

Chapter 2 Using the Results Panel
Searching the Results Panel
• Right-click anywhere in the Results Panel and select Clear View from
the pop-up menu.
Note: Clearing the view removes information from the Results
Panel. However, it does not close the active file (see Saving the
Contents of the Results Panel on page 14). If you perform a
save after clearing the view, you will overwrite the contents of
the active file with NOTHING. Make sure you want to do this.
Searching the Results Panel 2
To find a specific word or string of characters in the Results Panel:
1 Do one of the following:
• Choose
• Type the keyboard shortcut
• Right-click anywhere in the Results Panel and select
Edit > Find from the menu.
<Ctrl+F>.
Find from
the pop-up menu.
2 Enter the text you want to find.
3 Click
Find Next.
The first instance of the item you are searching for is highlighted in
the Results Panel.
4 To find the next instance of the item, click the
Find Next button again.
5 Once you close the window, you can search for the last searched-for
item by doing one of the following:
• Choose
•Press the
Edit > Find Next from the menu.
<F3> key.
xTalk Management Console for Windows User’s Guide 16
Page 29

Chapter 2 Using the Results Panel
Adding Comments to the Results Panel
Adding Comments to the Results Panel 2
While you cannot change any of the data in the Results Panel, you can
enter comments at the end of the displayed text.
You can also run a number of consecutive tests or tasks and add
comments after each one.
Note: You can keep the Comments dialog open in the window as
you perform other operations by using the Push Pin feature
(see chapter 12,
To add a comment to the Results Panel:
1 Do one of the following:
Using Push Pins).
• Choose
• Right-click in the Results Panel and select
window
The
Comment dialog box opens.
2 Click in the
3 Click
Edit > Add Comments To Window from the menu.
Add Comments to the
.
Comment dialog box and enter your comments.
Apply.
The comment appears in the Results Panel at the end of the displayed
text, and disappears from the
4 When finished commenting, click
Comments dialog box.
Done.
Note: You can change the color of the comments using the
Preferences dialog box (see Change Color of Items
on
page 27).
xTalk Management Console for Windows User’s Guide 17
Page 30

Chapter 2 Using the Results Panel
Copying Information from the Results Panel
Copying Information from the Results Panel 2
You can copy information from the Results Panel to paste into another
application (you cannot alter the contents of the Results Panel itself). To
copy information from the Results Panel:
1 Select the information to copy by doing one of the following:
• Use your mouse to select the information you want to copy.
• To select all the information, right-click anywhere in the Results
Panel and choose
2 Copy the information by doing one of the following:
Select All from the pop-up menu.
• Choose
• Right-click anywhere in the Results Panel and choose
the pop-up menu.
The data is copied to the Windows clipboard, and you can now paste
it into another application.
Edit > Copy from the menu.
Copy from
xTalk Management Console for Windows User’s Guide 18
Page 31

Chapter 3
3Shortcuts
There are a number of shortcuts you can use instead of menu commands
and toolbar buttons:
• Keyboard Shortcuts
• Right-click Shortcuts
• Double-click Shortcuts
Keyboard Shortcuts 3
If you are more comfortable and efficient using the keyboard, you can use
keyboard shortcuts to issue certain commands. The following table
shows commands and the shortcut for each.
Command Keyboard Shortcut
Abort script
Copy
Find
Find Next
xTalk Management Console for Windows User’s Guide 19
<Ctrl+A>
<Ctrl+C>
<Ctrl+F>
<F3>
Page 32

Chapter 3 Shortcuts
Right-click Shortcuts
Command Keyboard Shortcut
View online User’s Guide (this
document)
Inquiry
Run script
Save
Test unit ready
<Shift+F1>
<Ctrl+I>
<Shift+R>
<Ctrl+S>
<Ctrl+T>
Right-click Shortcuts 3
You can execute a number of common commands by right-clicking a
device or in the results panel and then selecting what you want to do
from the menu that appears upon right-click. The following table
describes these actions:
Right-click this Available menu choices
A device in the Device
Selection Panel
• Inquiry Information
•Test Unit Ready
• Medium Auxiliary Memory
(MAM)
• Media Compatibility
•FUP Drive
Anywhere in the Results
Panel
xTalk Management Console for Windows User’s Guide 20
•Clear View
•Copy
•Select All
•Find
• Add Comments to the window
• Preferences
Page 33

Chapter 3 Shortcuts
Double-click Shortcuts
Double-click Shortcuts 3
You can avoid clicking the Run button by double-clicking the script you
want to run on a selected device.
xTalk Management Console for Windows User’s Guide 21
Page 34

Chapter 4
4Setting Preferences
The Preferences dialog box allows you to perform the following
activities:
• Generate Log File
• Show Splash
• Show Startup Caution
• Load Count Threshold
• Configure Update Wizard – Update Check
• F
olders
• Change Color of Items
• Return to Default Settings
To set preferences, follow these steps:
1 Select
xTalk Management Console for Windows User’s Guide 22
View > Preferences from the menu.
The
Preferences dialog box shows the options that are available to
you (see figure 2
Note: If the sub-items are not displayed, click the plus sign to the
left of the category.
).
Page 35

Figure 2 Preferences Dialog
Box
Chapter 4 Setting Preferences
xTalk Management Console for Windows User’s Guide 23
Page 36

Chapter 4 Setting Preferences
General Setup
2 Follow the instructions below for setting each condition.
3 When finished, do one of the following:
•Click
•Click
Note: To reset preferences to default settings click
Apply to accept all changes and close dialog box, or
Cancel to close the dialog box without accepting any
changes.
Return to Default Settings
on page 27).
Defaults (see
General Setup 4
Generate Log File 4 When selected, this feature enables automatic log-file generation after
every script has completed. The log files are stored in the directory listed
in the Log Folder section of the
The information saved to the log file is often more than what is displayed
in the Results Panel (unless you have Verbose Mode enabled — see Using
Verbose Mode on page 13). This can be useful for debugging.
Show Splash 4 Show Splash displays xTalk Management Console splash screen at
startup (see figure 3
also select the “Don’t show this screen again” box at the bottom of the
splash screen when it displays).
). To disable this screen, deselect the option. (You can
Preferences dialog box.
xTalk Management Console for Windows User’s Guide 24
Page 37

Figure 3 Splash Screen
Chapter 4 Setting Preferences
General Setup
Show Startup Caution 4 Show Startup Caution displays a Caution screen at startup (see
figure 4
the “Don’t show this screen again” check box at the bottom of the
). To disable this Caution, deselect the option. (You can also select
Caution
screen.)
xTalk Management Console for Windows User’s Guide 25
Page 38

Figure 4 Caution Screen
Chapter 4 Setting Preferences
Load Count Threshold
Load Count Threshold 4
This feature is currently disabled.
Configure Update Wizard – Update Check 4
This feature is currently disabled.
Folders 4
The Folders section displays the default path to the Logs folder, the
FAData folder, and the Scripts folder. This information is read-only. You
xTalk Management Console for Windows User’s Guide 26
Page 39

Chapter 4 Setting Preferences
Change Color of Items
can use the path information to find where these files are located on your
system.
Note: You always have the option to save files elsewhere; this just
shows you the system default.
Change Color of Items 4
Color Items allows you to change the color for information displayed in
the Results Panel. (The default colors are listed in Displayed Information
on page 13.)
To change a color setting:
1 Click the square showing the color you want to change.
xTalk displays a color selection chart.
2 Click the color you want to use.
Return to Default Settings 4
To remove preference settings and return to default values, click the
Defaults
the application to its default state. If you do, click
xTalk Management Console for Windows User’s Guide 27
button. A dialog box opens asking if you are sure you want to set
Yes .
Page 40

Chapter 5
5Getting Updates
This chapter shows you how to update xTalk Management Console and
device firmware. It covers the following topics:
• Updating xTalk Management Console
• Updating Device Firmware
• Creating a Firmware Update (FUP) Tape
Updating xTalk Management Console 5
To update xTalk Management Console:
1 Go to the following Web site and download the xTalk Management
Console executible file to your computer.
http://www.quantum.com/ServiceandSupport/
SoftwareandDocumentationDownloads/Index.aspx
2 Double-click the executible file.
The installer deletes previous versions of xTalk Management Console
system files and replaces them with with the latest version. Any usercreated files that are not part of the install package (for example,
scripts, log files, FA dumps) remain intact.
xTalk Management Console for Windows User’s Guide 28
Page 41

Chapter 5 Getting Updates
Updating Device Firmware
The installation includes the latest versions of:
• xTalk Management Console application software
•Help files
•Test scripts
• Release notes (to access the Release Notes, select
the xTalk Management Console menu bar)
Help > Read Me from
Updating Device Firmware 5
This option updates the firmware image; that is, it transfers a new
firmware image file to the device.
Note: Previous versions of xTalk Management Console included a
feature that automatically searched the Web for the latest
firmware updates and installed them upon startup. This
feature has been disabled. Instead, you must go out to the
Web, find the latest firmware version, and download it to your
PC yourself (see step 1
automatic Web search-and-install feature.
To update the firmware image, follow these steps:
1 Download the latest firmware image file to your PC from the
following Web site:
below). Future releases will include the
http://www.quantum.com/ServiceandSupport/
SoftwareandDocumentationDownloads/Index.aspx
2 Select the device you want to update from the Device Selection Panel.
3 If the device you want to update is a tape drive, remove the tape
cartridge completely from the device.
xTalk Management Console for Windows User’s Guide 29
Page 42

Chapter 5 Getting Updates
Updating Device Firmware
4 If the device you want to update is a GoVault™ device, be sure the
hard drive cartridge is loaded in the unit.
Note: You cannot load firmware onto a password-protected
GoVault cartridge unless the password has been entered
using the GoVault System Application since the last power
up or cartridge insertion. If the GoVault cartridge is
password protected, make sure the GoVault System
Application is installed on the same computer as xTalk
Management Console.
The GoVault System Application prompts you for the
password and allows access to the cartridge. If the
GoVault System Application is not installed, you will not
be prompted for the password and you will receive error
messages when trying to load firmward.
You can download the GoVault System Application from
the installation CD that came with your GoVault, or from
http://www.quantum.com/ServiceandSupport/
SoftwareandDocumentationDownloads/GoVault/Index.aspx
.
5 Do one of the following:
• Choose
•Click the
xTalk displays a Warning message (see figure 5
Commands > FUP Drive from the menu.
FUP Drive button on the toolbar.
).
Note: For GoVault drives only, the last two sentences of the error
message are incorrect. This will be fixed in future versions
of xTalk.
xTalk Management Console for Windows User’s Guide 30
Page 43

Figure 5 Firmware Update
Warning
Chapter 5 Getting Updates
Updating Device Firmware
6 Click OK.
7
GoVault devices only: A dialog box opens warning you that xTalk will
force a system reboot when the firmward update is complete (see
figure 6
). Click OK.
Figure 6 GoVault System
Reboot Message
8 A dialog box opens allowing you to browse for the firmware image
file. Locate the firmware image file on your PC that you want to
install and click
xTalk Management Console for Windows User’s Guide 31
Open.
Page 44

Chapter 5 Getting Updates
Updating Device Firmware
A dialog box opens telling you the update is about to start, as follows:
Your device will now start the firmware update. This will take up
to 8 minutes to complete. Please wait for the firmware update
process to be completed before making any changes to the state
of your system or power.
9 Click
OK.
The firmware update begins. A Warning message opens stating:
Your device is being updated with firmware. DO NOT disturb
the device for a period of 8 minutes, even if your computer stops
functioning. The device will complete the firmware update once
it has started, without the assistance of the computer or SCSI bus.
Progress is shown via text and a status bar. When the image file has
completed transfer onto the device, the following message displays in
a dialog box: “The drive has completed the firmware update
procedure.”
10 Click
11
OK.
GoVault devices only: A brief message displays, stating “the system
will now reboot.” Then your computer automatically reboots.
Error Messages 5 If you get an error message during the firmware update process, click OK
in the error dialog box. Another dialog box opens listing the Sense Key,
Additional Sense Code (ASC), Additional Sense Code Qualifier (ASCQ),
and a description of the error. Fix the problem and click
OK.
xTalk Management Console for Windows User’s Guide 32
Page 45

Chapter 5 Getting Updates
Creating a Firmware Update (FUP) Tape
Creating a Firmware Update (FUP) Tape 5
This option allows you to write a firmware image onto a data cartridge to
be used as a firmware update (FUP) tape.
Note: This feature can only be used with tape drives. Not all tape
drives support this feature.
To write a FUP tape:
1 Select a device from the Device Selection Panel.
2 Do one of the following:
• Choose
•Click the
Commands > Write FUP Tape from the menu.
FUP Tape button on the toolbar.
A warning message appears stating: “You are about to permanently
overwrite data on this tape. Click OK to select the image file or click
Cancel to discontinue the FUP tape operation.”
3 Click
OK.
The
Open dialog box opens.
4 Browse to and select a firmware image file.
5 Click
Open.
The tape rewinds. A dialog box opens reminding you to “write
protect this tape before attempting to use it to update firmware in a
drive.”
6 Click
OK.
The firmware image is written to the data cartridge. When complete,
a dialog box displays this message: “FUP tape operation complete.”
7 Click
OK.
Note: When the FUP tape operation is complete, you can use the
tape to update the firmware in other tape devices. For
instructions, refer to the tape drive’s product manual.
xTalk Management Console for Windows User’s Guide 33
Page 46

Chapter 6
6Running a Test or Task
When you run a test or a task, xTalk Management Console sends a script
to the device telling it to perform the specified action. This chapter covers
the following test/task related functions:
• Checking Device Readiness
• Running a Test or Task
• Aborting a Test or Task
Checking Device Readiness 6
This option queries the device to determine if it is ready to run a test or
task. This option also clears check condition buffers.
To determine whether a device is ready:
1 Select a device from the Device Selection Panel.
2 Do one of the following:
• Choose
•Click the
As the device readiness is checked, the status displays briefly in a
dialog box. Then another dialog box opens, telling you if the device is
ready or not.
xTalk Management Console for Windows User’s Guide 32
Commands > Test Unit Ready from the menu.
Ready button on the toolbar.
Page 47

Chapter 6 Running a Test or Task
Checking Device Readiness
3 Proceed as follows:
If the device is... This happens: Do this:
Ready The
dialog box opens,
stating, “Your drive
is ready to run a test
or task. Click OK,
select a test/task, and
then click the ‘Run’
button to select and
run a script.”
Not ready The
dialog box opens,
stating, “Your device
is not ready to run a
test or task. Click
View Error to
determine the
problem or OK to
return to the
application.”
Test Unit Ready
Test Unit Ready
Click
OK to close the
dialog box, return to
xTalk main window,
and begin running a
test or task normally
(see Running a Test
or Task, below).
Click
OK to return to
xTalk main window,
or click
View Error to
display a dialog box
that contains check
conditions and a brief
description of the
error. Click
OK to
close the dialog box
Fix the error and try
again.
xTalk Management Console for Windows User’s Guide 33
Page 48

Chapter 6 Running a Test or Task
Running a Test or Task
Running a Test or Task 6
To run a test or task:
1 Select the device on which you want to run the test or task from the
Device Selection Panel.
2 Select the script you want to run from the Script Selection Panel, or
click a toolbar button (if you click a button, skip step 3
3 Start the test or task by doing one of the following:
).
•Click the
• Double-click the test or task.
Note: If the test or task will take a long time to complete, a dialog box
opens telling you how long it will take. You can click
continue or
Note: If a TapeAlert exists, xTalk Management Console displays the
TapeA lert dialog box (see chapter 9, Viewing TapeAlerts). The
test or task may or may not continue running, depending on
the severity of the TapeAlert.
4 Follow the instructions displayed in the Results Panel or in any
dialog box that may open regarding the test or task.
xTalk runs the test or task, displaying the results in the Results Panel.
5 For information on how to save these results or send them to a
recipient, see the following sections:
• Chapter 7,
• Saving the Contents of the Results Panel
• Sending the Contents of the Results Panel
Run button on the toolbar.
Yes to
No to stop.
Log Files
on page 14
on page 15
xTalk Management Console for Windows User’s Guide 34
Page 49

Chapter 6 Running a Test or Task
Aborting a Test or Task
Aborting a Test or Task 6
This option allows you to stop a running test or task before it reaches
completion.
Note: The Abort function is only available for scripts, not
commands. The Abort function is available only when a script
is running.
To abort a test:
1 Click the
A dialog box opens asking, “Are you sure you want to abort this
test?”
2 Click
Note: If the device is executing certain operations, the abort signal
Abort button on the toolbar.
OK.
may not stop the test until the operation is complete.
xTalk Management Console for Windows User’s Guide 35
Page 50

Chapter 7
7Log Files
Log files are records of individual tests or tasks performed. This chapter
describes the following operations:
• Generating and Saving Log Files
• Viewing Log Files
• Sending a Log File to a Recipient
Note: A log file contains the results of a script (and some commands)
performed. This may be different than the information
displayed in the Results Panel (unless you have Verbose Mode
enabled -- see Using Verbose Mode
contents of the Results Panel is different than saving a log file
(see Saving the Contents of the Results Panel
on page 13). Saving the
on page 14).
xTalk Management Console for Windows User’s Guide 36
Page 51

Chapter 7 Log Files
Generating and Saving Log Files
Generating and Saving Log Files 7
You can set xTalk Management Console to automatically generate a log
file for each script (and some commands) you run. To do this, you must
manually enable the
box (see Generate Log File
enabled; that is, xTalk Management Console will not automatically create
log files unless you tell it to.
Generate Log File feature in the Preferences dialog
on page 24). The default setting is not
The log files are stored where indicated in the
F
olders on page 26). The filename and path are also displayed in the
Status Bar once the log file has been saved.
The log file name includes these components:
• Application name (xTalk)
• Date (for example, 01-15-2006)
• Time (24 hour clock) (for example, 143230)
• Device serial number (for example, HV0053Q) (this item may or may
not be present)
•A
.txt extension
Put together, the log file name looks like this: xTalk_09-192006_143230_HV0053Q.txt.
Preferences dialog box (see
Viewing Log Files 7
To view the contents of a log file:
1 Locate the directory in which the log files are stored. The default
location is indicated in the
page 26).
2 Double-click the file you want to open.
Using standard Windows commands, you can print or delete the selected
file.
xTalk Management Console for Windows User’s Guide 37
Preferences dialog box (see Folders on
Page 52

Chapter 7 Log Files
Sending a Log File to a Recipient
Sending a Log File to a Recipient 7
You can send a log file to a recipient any time you like. To send a log file:
1 Choose
The
2 Browse to and select the log file you want to send.
3 Click
An e-mail message opens. The log file is attached to the e-mail and
“xTalk Management Console Log File” appears in the e-mail Subject
line. The e-mail is addressed to
4 Type any message and send the e-mail.
File > Send Log from the menu.
Select Log File dialog box opens.
Open.
support@quantum.com.
xTalk Management Console for Windows User’s Guide 38
Page 53

Chapter 8
8Viewing Media Data
This chapter describes how to view the following media information:
• Viewing Media Compatibility
• Viewing Medium Auxiliary Memory (MAM)
Note: This chapter applies only to tape drives.
Viewing Media Compatibility 8
The Media Compatibility Tool allows you to see the following for each
drive type:
• Recommended media
•Compatible media
• Compatible cleaning media
To open the Media Compatibility Tool:
1 Select a device from the Device Selection Panel.
2 Do one of the following:
• Choose
Media Compatibility Tool main page, from which you can select
any drive (see figure 7
xTalk Management Console for Windows User’s Guide 39
View > Media Compatibility from the menu. This opens the
).
Page 54

Figure 7 Media Compatibility
Tool Main Page
Chapter 8 Viewing Media Data
Viewing Media Compatibility
• Select a device, then right-click in the Device Selection Panel and
select
Media Compatibility from the pop-up menu. This opens the
Media Compatibility Tool to the page corresponding to the
selected device (see figure 8
).
3 When you are finished viewing, close the Media Compatibility Tool
window.
xTalk Management Console for Windows User’s Guide 40
Page 55

Figure 8 Media Compatibility
Tool Device Page
Chapter 8 Viewing Media Data
Viewing Media Compatibility
xTalk Management Console for Windows User’s Guide 41
Page 56

Chapter 8 Viewing Media Data
Viewing Medium Auxiliary Memory (MAM)
Viewing Medium Auxiliary Memory (MAM) 8
Information about the device, the medium, and the host is stored directly
on the tape in the medium auxiliary memory (MAM).
Note: This command is not available for all device types.
To view the information stored in MAM:
1 Select a device from the Device Selection Panel.
2 Do one of the following:
•Click the
• For DLT devices: Choose
Memory (MAM)
• For LTO devices: Choose
Memory (MAM)
MAM button on the toolbar.
Commands > View Medium Auxiliary
from the menu.
Commands > Generate Medium Auxiliary
from the menu.
One of the following happens:
If the selected device is an LTO device:
The MAM data is saved to a.bin file. A dialog opens telling you the
filename and location of this file. The filename includes the device
serial number. Click
to read. However, you can e-mail this
for diagnosis (mail to
OK. This file is in ASCII text and will be difficult
.bin file to Quantum Support
support@quantum.com). Process is complete;
none of the following steps apply to LTO devices.
If the selected device is a DLT device:
The MAM dialog box opens (see figure 9). Continue to step 3.
3 Click one of the tabs to view the information. The tabs are as follows:
Note: Not all tabs are available for all device types.
•
Device Data to view standard device type attributes
•
Medium Data to view standard medium type attributes
•
Host Data to view standard host type attributes
4 When finished viewing, click
xTalk Management Console for Windows User’s Guide 42
OK.
Page 57

Figure 9 MAM Dialog Box
Chapter 8 Viewing Media Data
Viewing Medium Auxiliary Memory (MAM)
xTalk Management Console for Windows User’s Guide 43
Page 58

Chapter 9
9Viewing TapeAlerts
TapeAlert flags indicate the results of a tape drive’s ongoing self
diagnosis, allowing you to monitor the tape drive's behavior. When a
TapeAlert flag is detected, it is displayed in the
Tap eAl ert dialog box.
Note: This feature is not
DLT 7000, DLT 8000, DLT1, VS80, VS160, GoVault.
You can view the
• Before running any test or task, xTalk Management Console checks
for TapeAlert flags. If it detects them, it displays them in the
dialog box. If the TapeAlert is critical, you have the option to abort
the script.
• When finished running a test or task, if xTalk Management Console
detects one or more TapeAlerts, it displays the
TapeA lert dialog box under the following conditions:
available for the following devices:
TapeA lert
Tap eAl ert dialog box.
xTalk Management Console for Windows User’s Guide 43
Page 59

Figure 9 TapeAlert Dialog Box
Chapter 9 Viewing TapeAlerts
The Tap eAl ert dialog box lists all possible TapeAlerts. To the left of
the TapeAlert is an icon depicting the severity of the TapeAlert for
this device. Problem TapeAlerts are at severity levels of Warning or
Critical. The Severity column tells you if the TapeAlert is a Warning
or Critical. If a TapeAlert was detected at startup or before beginning
a test or task, it is displayed in the area beneath the list of TapeAlerts.
Level of Severity Definition Color
OK No problem Green
Warning Possible loss of data Yellow
Critical Possible loss of data requiring
Red
user intervention, service call,
or both
xTalk Management Console for Windows User’s Guide 44
Page 60

Figure 10 Viewing a Warning
TapeAlert
Chapter 9 Viewing TapeAlerts
Use the TapeAlert dialog box as follows:
1 Use the scroll bar to scroll through the list of TapeAlerts to see which
ones are Warning or Critical.
2 Click on a “Warning” or “Critical” TapeAlert to read information and
instructions.
Information about the selected TapeAlert displays in the area beneath
the list of TapeAlerts (see figure 10
).
3 When finished viewing, click OK to exit.
4 If the TapeAlert is detected before the script runs, and the TapeAlert
is “Critical,” a second dialog box opens asking if you wish to
continue runing the script. Click
5 Follow the instructions that were given in the
xTalk Management Console for Windows User’s Guide 45
Yes or No as desired.
TapeAl ert dialog box.
Page 61

Chapter 9 Viewing TapeAlerts
TapeAlerts are specific to the tape drive; for additional information on a
TapeAlert, refer to the product manual and/or SCSI interface guide for
the tape drive.
xTalk Management Console for Windows User’s Guide 46
Page 62

Chapter 10
10FA Data Files
A Failure Analysis (FA) data file provides a “snapshot” of the current
state of a selected device. This information can be used by service
personnel to analyze or troubleshoot device problems.
Note: FA data cannot be gathered for all device types. The FA Data
features described in this section work with the following
device types: SDLT 220, SDLT 320, SDLT 600, DLT-S4, VS-160,
DLT-V4. Some other device types allow you to generate FA
data in the form of a trace buffer (see GENERATE TRACE
BUFFER on page 54) or an EEPROM buffer (see GENERATE
EEPROM BUFFER on page 54).
This section provides instructions on:
• Generating an FA Data File
• Sending an FA Data File to a Recipient
Generating an FA Data File 10
You use the FA Data Collection Wizard to generate FA data files. The FA
Data Collection Wizard queries the tape drive, retrieves diagnostic and
core data, and compresses it into a file. The default filename consists of
xTalk Management Console for Windows User’s Guide 47
Page 63

Chapter 10 FA Data Files
Generating an FA Data File
the device serial number with a .dmz or .dmp extension, depending on
device type (for example,
JK00DA8.dmz).
To generate an FA data file:
1 Select a device from the Device Selection Panel.
2 Do one of the following:
• Choose
•Click the
Commands > Failure Analysis Data from the menu.
FA Data button on the toolbar.
Note: You can also select the appropriate FA Data or FA Dump
script (depending on device type) from the Script Selection
Panel then click the
Run button on the toolbar. However,
running this script instead of the Wizard has several
differences:
•The script leads you through slightly different dialogs.
•Status information is displayed in the Results Panel
rather than in dialog boxes.
•You cannot send the file immediately after generating (as
described in Sending Immediately After Generating
page 50).
The FA Data Collection Wizard opens, stating, “Welcome to the FA
Data Collection Wizard. It will help you generate FA Data. Click
’Next’ when ready.”
3 Click
Next.
The second dialog box opens, displaying a default filename and
location where the FA Data file will be saved.
on
4 Do one of the following:
• To save to the listed filename and location, click
• To save to a different location or filename, click
Data Filename
location, then click
dialog box opens. Choose a new filename and/or
Open. You return to the previous dialog box,
with your chosen filename and path listed. Click
Next.
Browse. The FA
Next.
An information-gathering dialog box opens asking for information
about you and the problem with the device.
5 Fill out the information requested and click
xTalk Management Console for Windows User’s Guide 48
Next.
Page 64

Chapter 10 FA Data Files
Generating an FA Data File
A dialog box opens stating, “The FA Data Wizard is ready to collect
the requested information. Click ‘Start’ when ready.”
Figure 11 FA Data Collection
Successful
6 Click
Start.
The FA data file is generated saved to the specified location. This may
take several minutes.
If the FA data collection is successful, a message states, “The FA Data
Collection Wizard has successfully collected the device data” (see
figure 11
).
At this point, you have the option to send the FA Data file to a
recipient (see Sending an FA Data File to a Recipient
7 If you choose not to send the FA data file, click
).
Exit.
If the FA data collection fails, the message in the dialog box states,
“FA Data collection failed. Click ‘Back’ to try again. If this continues,
verify your SCSI cabling, termination, and firmware version for your
product.” Click
xTalk Management Console for Windows User’s Guide 49
Back or Exit.
Page 65

Chapter 10 FA Data Files
Sending an FA Data File to a Recipient
Sending an FA Data File to a Recipient 10
You can send FA Data files via e-mail in two ways:
• Sending Immediately After Generating
• Sending Any Time
Sending Immediately After Generating
Figure 12 Sending FA Data To
a Recipient
After you successfully generate an FA Data file using the FA Data
Collection Wizard, you have the option to immediately send the file to a
10
recipient as follows:
1 Select the
When you select the checkbox, the
Send FA Data to recipient checkbox (see figure 12).
Exit button changes to Send.
2 Click Send.
An e-mail message opens. The FA data file is attached to the e-mail
and “xTalk Management Console FA Data File” appears in the e-mail
Subject line. The e-mail is addressed to
3 Type a message and send the e-mail.
The dialog box closes once you send the e-mail.
xTalk Management Console for Windows User’s Guide 50
support@quantum.com.
Page 66

Chapter 10 FA Data Files
Sending an FA Data File to a Recipient
Sending Any Time 10 You can send an FA Data file to a recipient any time you like as follows:
1 Select
File > Send FA Data from the menu.
The
Select FA Data File dialog box opens.
2 Browse to and select the FA data file you want to send.
3 Click
Open.
An e-mail message opens. The FA data file is attached to the e-mail
and “xTalk Management Console FA Data File” appears in the e-mail
Subject line. The e-mail is addressed to
support@quantum.com.
4 Type a message and send the e-mail.
xTalk Management Console for Windows User’s Guide 51
Page 67

Chapter 11
11General Device Commands
This chapter details general device commands that are not covered in
other chapters of this manual. For additional information about SCSI
commands, refer to the SCSI reference manual for the device you are
testing.
Note: Some device types may not support all of these commands. If a
selected device does not support a listed command, the
command will not appear in the menu or toolbar, or it will
appear but be greyed out.
This chapter discusses the following commands:
• Compression Mode – Viewing and Setting
• Compression Status – Viewing and Setting
• CREATE DLTSAGE WORM TAPE
• GENERATE EEPROM BUFFER
• GENERATE TRACE BUFFER
• INQUIRY INFORMATION
• PARK
• Removable Storage Settings
• RESCAN
• RETENSION
• UNPARK
xTalk Management Console for Windows User’s Guide 52
Page 68

Chapter 11 General Device Commands
Compression Mode – Viewing and Setting
Compression Mode – Viewing and Setting 11
This feature is currently not functional.
Compression Status – Viewing and Setting 11
When compression is enabled, the tape drive compresses data at a 2:1
ratio (the tape drive compression bit is set to 1).
When compression is disabled, the system does not compress data (the
tape drive compression bit is set to zero).
You can view and set compression status for the selected device as
follows:
Note: For LTO devices only, you can also set the compression mode,
which overrides the compression status (see Compression
Mode – Viewing and Setting on page 56).
VIEW CURRENT STATUS 11 You can see whether compression is enabled or disabled for a particular
device by doing the following:
1 Select a device from the Device Selection Panel.
2 Select
ENABLE/DISABLE COMPRESSION STATUS
xTalk Management Console for Windows User’s Guide 53
You can enable or disable the compression status by doing the following:
11
1 Select a device from the Device Selection Panel.
2 Select
3 Choose either
The new status is displayed in the Results Panel.
Commands > Compression Status > View Current Status from
the menu.
The current status is displayed in the Results Panel.
Commands > Compression Status from the menu.
Enable or Disable from the menu.
Page 69

Chapter 11 General Device Commands
CREATE DLTSAGE WORM TAPE
When you exit xTalk Management Console and log back in, the
compression status remains where it was when you exited.
CREATE DLTSAGE WORM TAPE 11
This command sets a tape cartridge to be DLTSage WORM compatible
[formats the tape cartridge as write-once read-many (WORM)].
Note: This command only works on media that does not already
have data written on it. It works on the following device and
tape combinations:
• SDLT 600 with a Super DLTtape II cartridge
• DLT-S4 with a Super DLTtape II or Super DLTtape III
cartridge
• DLT-V4 with a DLTtape VS1 cartridge
To perform this command:
1 Select a device from the Device Selection Panel.
2 Insert a blank tape cartridge that contains no data and wait for the
drive to come ready.
3 Do one of the following:
•Select
•Click the
•You may also select the
The
xTalk Management Console for Windows User’s Guide 54
Commands > DLTSage WORM Tape from the menu.
DLTSage WORM button on the toolbar.
Create_DLTSate_WORM_Tape task from
the Script Selection Panel and click the
perform the operation without bringing up the Wizard. All
results are displayed in the Results Panel.
DLTSage WORM Wizard dialog box opens (see figure 14).
Run button. This will
Page 70

Figure 13 DLTSage WORM
Wizard
Chapter 11 General Device Commands
CREATE DLTSAGE WORM TAPE
4 Click Format.
The tape cartridge is formatted as a DLTSage WORM cartridge.
Note: If the cartridge has already been formatted with DLTSage
WORM, a dialog box opens stating “This is a DLTSage
WORM cartridge” and displays the DLTSage WORM
signature.
Note: If the media is not blank, a dialog box opens stating it
cannot be used to create a DLTSage WORM cartridge.
After the cartridge has been successfully formatted, the dialog box
message tells you so.
5 Click
Exit to return to xTalk Management Console.
xTalk Management Console for Windows User’s Guide 55
Page 71

Chapter 11 General Device Commands
GENERATE EEPROM BUFFER
GENERATE EEPROM BUFFER 11
The GENERATE EEPROM BUFFER command collects drive information
from the electrically erasable programmable read-only memory
(EEPROM) and saves this information to a
Note: This command is only available for LTO tape drives.
To perform this command:
1 Select a device from the Device Selection Panel.
2 Do one of the following:
.bin file.
• Choose
•Click the
The EEPROM data is saved to a
name and path are displayed in a dialog box. The name of the file is
the
EEPROM_<device serial number>.bin.
You can open this
file since it is in ASCII text. However, you can e-mail the file to
Quantum Support for diagnosis (mail to
3 Click
Commands > Generate EEPROM Buffer from the menu.
EEPROM button on the toolbar.
.bin file, written in ASCII text. The
.bin file, but you will not be able to easily read the
support@quantum.com).
OK to exit.
GENERATE TRACE BUFFER 11
The GENERATE TRACE BUFFER command collects current drive status
information from the trace buffer and saves it to a
Note: This command is only available for DAT and LTO tape drives.
To perform this command:
.bin or .svm file.
1 Select a device from the Device Selection Panel.
xTalk Management Console for Windows User’s Guide 56
Page 72

2 Do one of the following:
Chapter 11 General Device Commands
INQUIRY INFORMATION
•Select
•Click the
DAT trace buffer data is saved to a
saved to an
Commands > Generate Trace Buffer from the menu.
Trace button on the toolbar.
.bin file. LTO trace buffer data is
.svm file. The files are written in ASCII text. The name and
path are displayed in a dialog box. The name of the file is
ChannelTrace Buffer_<device serial number>.svm (for DAT) or Trace
Buffer_<device serial number>.svm
You can open the
.bin and .svm files using a text editor. More
(for LTO).
commonly, however, you will e-mail the file to Quantum Support for
diagnosis (mail to
3 Click
OK to exit.
support@quantum.com).
INQUIRY INFORMATION 11
The INQUIRY INFORMATION command retrieves information about the
device from the device firmware and displays it in a dialog box.
To display information about a device:
1 Select a device from the Device Selection Panel.
2 Do one of the following:
•Select
•Click the
The
Commands > Inquiry Information from the menu
Inquiry button
Inquiry dialog box opens, with tabs displaying various data. The
following tabs may be displayed (not all tabs are available for all
devices).
• Standard Data
•Vendor Unique Data
• Vital Product Data
• Log Information (DAT 72 and DDS-4 devices only)
3 Click the tab to view the information you want.
4 To close the dialog box, click
xTalk Management Console for Windows User’s Guide 57
OK.
Page 73

Chapter 11 General Device Commands
PARK
PARK 11
The PAR K command parks the drive arm. Before performing this
command you must first remove the tape cartridge completely from the
device.
Note: This command is only available for LTO full-height tape
drives.
To perform this command:
1 Select a device from the Device Selection Panel.
2 Click the
Park button on the toolbar.
Removable Storage Settings 11
Removable Storage is a Microsoft® media-management product that
comes bundled with Windows 2000 and later operating systems. When
Removable Storage is running, it can interfere with xTalk Management
Console operations. Therefore, Removable Storage should always be OFF
when xTalk Management Console is running.
You can turn Removable Storage on or off at your convenience using
Microsoft Management Console (refer to Microsoft documentation for
how to do this).
Regardless of how you set Removable Storage, whenever you open xTalk
Management Console, Removable Storage turns OFF. When you shut
down xTalk Management Console, Removable Storage returns to the
state it was set at before you opened xTalk Management Console.
xTalk Management Console for Windows User’s Guide 58
Page 74

Chapter 11 General Device Commands
RESCAN
RESCAN 11
When you launch xTalk Management Console, it scans the bus for
devices before opening. These devices are then displayed in the Device
Selection Panel.
If you want to scan the bus at any other time, do one of the following:
•Click the
•Select
Any new devices found are displayed in the Device Selection Panel.
Note: If you add new devices, it may take the operating system a
Rescan button on the toolbar.
Commands > Rescan from the menu.
little while to complete recognition. If the bus scan misses an
attached device, try the rescan again -- you may need to rescan
the bus more than once to display all the devices, or you may
need to restart xTalk Management Console.
RETENSION 11
The RETENSION command causes the tape to move from its current
position to the end of media (EOM), then rewinds to the beginning of
media (BOM), to remove excessive tension or slackness on the tape.
Note: This command is only available for LTO tape drives.
To perform this command:
1 Select a device from the Device Selection Panel.
2 Click the
The tape retensioning begins. This process takes several minutes.
Status is shown by a series of asterisks displayed in the Results Panel.
Each asterisk represents 2 seconds. Each line of 30 asterisks equals
one minute.
When complete, “Retension complete” displays in the Results Panel.
xTalk Management Console for Windows User’s Guide 59
Retension button on the toolbar.
Page 75

Chapter 11 General Device Commands
UNPARK
UNPARK 11
The UNPARK command unparks the drive arm. Before performing this
command you must remove the cartridge completely from the device.
Note: This command is only available for LTO full-height tape
drives.
To perform this command:
1 Select a device from the Device Selection Panel.
2 Click the
Unpark button on the toolbar.
xTalk Management Console for Windows User’s Guide 60
Page 76

Chapter 12
12Using Push Pins
A push pins is a feature available in some dialog boxes that allows you to
keep the dialog box open when it would normally close. When you
enable the push pin, the dialog box stays open on your computer screen
until you disable the push pin or manually close the dialog box. This is
helpful if you want to look at the information in the dialog box while
using other xTalk features or commands. You can continue to update
information in the open dialog box by clicking anywhere inside the
dialog box to activate it.
If you do not enable the push pin, xTalk closes the dialog box when you
click anywhere outside it.
• Enabling the Push Pin and Attaching the Dialog Box
• Disabling the Push Pin and Closing the Dialog Box
xTalk Management Console for Windows User’s Guide 58
Page 77

Chapter 12 Using Push Pins
Enabling the Push Pin and Attaching the Dialog Box
Enabling the Push Pin and Attaching the Dialog Box 12
To enable the push pin and attach the dialog box, click the disabled (side-
Figure 13 Disabled Push Pin
Figure 14 Enabled Push Pin
facing) push pin icon located in the dialog box (see figure 13
The push pin is now enabled. The icon changes to look like it is pushed in
(see figure 14
pin is enabled.
). Notice that you cannot close the dialog box when the push
).
Disabling the Push Pin and Closing the Dialog Box 12
To disable the push pin and close the dialog box do one of the following:
• Click the enabled push pin (see figure 14
disabled. The icon changes to the side-facing push pin (see figure 13
Now you can click outside the dialog box and it will close.
•Click
•Click the
When you reopen the dialog box, the push pin is disabled.
xTalk Management Console for Windows User’s Guide 59
Close or Cancel in the dialog box.
X in the upper right corner of the dialog box.
). The push pin is now
).
Page 78

13Getting Help
The Help feature offers a number of features. You can:
Chapter 13
• Access the Users Guide
• Use the Help Menu
(the manual you are currently reading)
to perform a number of other tasks
Access the Users Guide 13
To access online help (the User’s Guide you are currently reading), do one
of the following:
•Select
•Click the
• Type the keyboard shortcut
Help > Online User’s Guide from the menu.
Help button on the toolbar.
<Shift+F1>.
xTalk Management Console for Windows User’s Guide 60
Page 79

Chapter 13 Getting Help
Use the Help Menu
Use the Help Menu 13
To access other Help features, choose Help from the menu. Then select the
option you want:
Option Description
About xTalk Provides version and copyright information.
Check for xTalk
Updates
Contact Support Opens the Quantum Web site,
Online User’s
Guide
Read Me Opens the xTalk Management Console Release
Send Feedback Opens an e-mail addressed to xTalk
Currently disabled.
www.quantum.com, where you can find contact
information for Customer Support.
Opens the xTalk Management Console for
Windows User’s Guide (the manual you are
currently reading).
Notes.
Management Console developers allowing you
to e-mail feedback regarding xTalk
Management Console.
xTalk Management Console for Windows User’s Guide 61
Page 80

This section covers the following:
• Minimum PC Requirements
• Supported Operating Systems
• Supported Interfaces
• Supported Host Bus Adapters
• Supported Devices
Appendix A
ASpecifications
Minimum PC Requirements 1
You need the following, at a minimum, to run xTalk Management
Console:
• Pentium-class PC (300 MHz or higher recommended)
• Administrator Privileges on the system (required)
• 128 MB of RAM (256 MB or greater is recommended)
• 30 MB of available hard-disk space
• Microsoft Internet Explorer 5 or higher
xTalk Management Console for Windows User’s Guide 62
Page 81

Appendix A: Specifications
Supported Operating Systems
• Super VGA monitor with screen resolution set to at least 1024 x 768,
small fonts setting (recommended)
• Adobe® Acrobat Reader (version 5.0 or later)
• Supported operating system (see S
upported Operating Systems)
Supported Operating Systems 1
The xTalk Management Console software runs on the following
operating systems:
Operating System Versions
Microsoft Windows® 2000 (SP 2)
2003 Server
XP
Vista
Supported Interfaces 1
xTalk Management Console supports the following interfaces:
• Small Computer System Interface (SCSI)
• Serial Attached SCSI (SAS)
• Serial Advanced Technology Attachment (SATA)
• Fibre Channel (FC)
• Universal Serial Bus (USB)
xTalk Management Console for Windows User’s Guide 63
Page 82

Appendix A: Specifications
Supported Host Bus Adapters
Supported Host Bus Adapters 1
xTalk Management Console is designed to support all standardscompliant host bus adapters.
Supported Devices 1
xTalk Management Console supports the following devices:
• DAT 40 (DDS-4)
• DAT 72
• DAT 160
•DLT1
• DLT 7000
• DLT 8000
•DLT-S4
•DLT-V4
•DLT VS80
• DLT VS160
• GoVault™
•LTO-1
•LTO-2
•LTO-2 HH
•LTO-3
•LTO-3 HH
• SDLT 220
• SDLT 320
• SDLT 600
xTalk Management Console for Windows User’s Guide 64
Page 83

Glossary
A
ASC
ASCQ Additional sense code qualifier
ATA Advanced Technology Attachment. A type of disk drive that
Additional sense code
integrates the drive controller directly on the drive itself.
B
C
E
F
BOM
BOT Beginning of tape
CUP
EEPROM
EOD End of data (last data position)
EOM End of medium
EOT End of tape
FA
FC Fibre Channel
FUP Firmware update (used interchangeably with CUP)
Beginning of media
Code update (used interchangeably with FUP)
Electrically erasable programmable read-only memory
Failure analysis
xTalk Management Console for Windows User’s Guide 65
Page 84

Glossary
G
H
L
M
N
S
GUI
HDD
LBA
LUN Logical unit number
MAM
NOP
SAS
SATA Serial ATA (see ATA). An evolution of the Parallel ATA physical
Graphical user interface
Hard disk drive
Logical block address
Medium auxiliary memory
No operation
Serial Attached SCSI
storage interface. Serial ATA is a serial link (a single cable with a
minimum of four wires creates a point-to-point connection
between devices).
Script The instructions sent to the device when you run a test, task, or
command.
SCSI Small computer systems interface
W
WORM
Write-once read-many. Applies to tape cartridges. Does not
allow erasure of data once it is written to the tape.
xTalk Management Console for Windows User’s Guide 66
Page 85

Index
A
abort button 35
aborting a test, task, or script
35
B
buttons. See toolbar
C
clear view 15–16
clearing Results Panel
colors, changing settings
commands
See specific commands by name
differences between scripts and
commands
general tape device commands
52–57
commenting in results panel 17
15–16
27
8
compression status 53
copying information from results
panel 18
D
default settings 27
device information
device selection panel
displayed information 6
selecting non-supported devices
7
devices
non-supported
supported
dialog boxes, staying open 58–59
downloading. See updating
drive information
7
64
55
55
6–7
E
EEPROM buffer
generating (LTO)
e-mailing. See sending
ending a test, task, or script
exiting
11
F
FA data files 26, 47–51
generating
location of
saving 26
sending
firmware, updating
folders, viewing paths to 26
FUP drive
47–49
26
50–51
29–31
54
35
29–31
xTalk Management Console for Windows User’s Guide 67
Page 86

Index
G
GENERATE EEPROM BUFFER 54
GENERATE TRACE BUFFER 54–55
H
help 60–61
I
icons. See toolbar
INQUIRY INFORMATION 55
K
key strokes. See shortcuts, keyboard
L
log files 24, 26, 36–38
auto-generating
generating
location of 26
saving
26, 37
sending
viewing 37
38
24
24, 37
M
main window 1–10
MAM, viewing 42
media
39–41
compatibility
media compatibility tool 39–41
medium auxiliary memory, viewing
42
menu 3
39–41
N
non-supported devices 7
O
operating systems, supported 63
P
preferences 22–27
See specific preferences by name
setting
22–27
viewing
push pins, using 58–59
22
R
removable storage services,
enabling and disabling
RESCAN the SCSI bus
results panel
adding comments to 17
clearing
colors, changing
copying 18
displayed information
9, 12–18, 27
15–16
56
56
27
13
saving
14–15
searching
sending contents of 15
RETENSION
return to default settings
run button 34
running a test or task
16
57
S
save 14–15
save as
14–15
saving results panel
scan SCSI bus 56
script description panel
script selection panel
scripts
altering
differences between scripts and
location of
SCSI bus
rescanning
searching, results panel
sending
FA data files
log files
results panel contents 15
view
settings
changing
return to default settings
shortcuts
keyboard 19–20
right-click
show splash screen at startup
show startup caution 25–26
8
commands 8
26
56
50–51
38
15
22–27
19–20
20
27
34
14–15
9
8
16
27
24–25
xTalk Management Console for Windows User’s Guide 68
Page 87

Index
software, updating 28–29
specifications
splash screen, showing and hiding
24–25
starting a test or task
startup caution, showing and
hiding 25–26
status bar
show/hide 10
stopping a test, task, or script
supported devices
supported operating systems 63
62–64
34
9–10
35
64
T
TapeAlerts 43–46
viewing 43–46
tasks. See tests/tasks
TEST UNIT READY
tests. See tests/tasks
tests/tasks
aborting 35
determining device readiness
running 34
toolbar
trace buffer, generating
32–35
32–33
3–6
32–33
54–55
scripts
28–29
software
xTalk Management Console 28–
updating xTalk
28–29
29
26
V
verbose mode 13
viewing
log files
37
W
WebUpdate Wizard 26
U
unsupported devices 7
updating
xTalk Management Console for Windows User’s Guide 69
28–31
application 28–29
firmware
help files
release notes 28–29
29–31
28–29
 Loading...