

Page 1

Using the
VolServ
VolServ Version 5.2
November 2003
6-01002-01 Rev A
®
GUI
Page 2

Trademark Notice
AMASS, DataMgr, EMASS, FileServ, and VolServ are either trademarks or registered
trademarks of ADIC, Advanced Digital Information Corporation. DAS is a trademark of
Grau, an ADIC subsidiary. All other product names and identifications are trademarks or
registered trademarks of their respective manufacturers.
Copyright Notice
© 1996-2003 ADIC®. All rights reserved. This document is the property of ADIC. No part
of this document may be reproduced, transmitted, transcribed, stored in a retrieval system,
or translated into any language or computer language in any form or by any means,
electronic, mechanical, magnetic, optical, chemical, manual, or otherwise, without the
express written permission of:
ADIC USA
Tel.: +1 303-705-3900
Fax: +1-303-792-2465
ATAC: 1-800-827-3822
http://www.adic.com
ADIC Europe
ZAC des Basses Auges
1, rue Alfred de Vigny
78112 Fourqueux, France
Tel.: +33.1.3087.5300
Fax: +33.1.3087.5301
ADIC Germany Beteiligungs
GmbH, KG
Eschenstraße 3
D-89558 Böhmenkirch, Germany
Tel:+00.800.9999.3822
U.S. Government Rights Restricted
Use, duplication, or disclosure of either the software or documentation is subject to
restrictions set forth by the U.S. Government in FAR 52.227-19(c)(2) and subparagraph
(c)(1)(ii) of the Rights in Technical Data and Computer Software clause at DFARS 52.2277013 and/or in similar or following clauses in the FAR, DoD, or NASA FAR Supplement.
Technical Assistance
ADIC Technical Assistance Center:
• In the USA and Canada, call 1-800-827-3822.
• Outside the USA and Canada, call 303-874-0188 or toll-free 00800-9999-3822.
• Send e-mail to: support@adic.com.
Documentation
Although the material contained herein has been carefully reviewed, ADIC does not
warrant it to be free of errors or omissions. We reserve the right to make corrections,
updates, revisions, or changes to the information contained herein.
• Send e-mail to: techdocs@adic.com
Page 3
READER COMMENT FORM
ADIC includes this Form in an effort to provide the best possible documentation to our
customers. Please take a few moments to mail or FAX your response to:
ADIC USA
Tel.: +1 303-705-3900
Fax: +1-303-792-2465
ATAC: 1-800-827-3822
http://www.adic.com
ADIC Europe
ZAC des Basses Auges
1, rue Alfred de Vigny
78112 Fourqueux, France
Tel.: +33.1.3087.5300
Fax: +33.1.3087.5301
ADIC Germany Beteiligungs
GmbH, KG
Eschenstraße 3
D-89558 Böhmenkirch, Germany
Tel:+00.800.9999.3822
Question Circle One
Information was complete. Agree Disagree
Information was easy to find. Agree Disagree
Information was easy to follow. Agree Disagree
Is there anything you especially like or dislike about the organization, presentation,
or writing in this manual?_______________________________________________
___________________________________________________________________
___________________________________________________________________
___________________________________________________________________
___________________________________________________________________
Book Title Document Number
Customer Name Telephone
E-mail Address
Company Name
Address
City, State, Zip
Page 4

NOTES
Page 5

Command Reference
Preface
Purpose of This Book . . . . . . . . . . . . . . . . . . . . . . . . . . . . . . . . . . . . . . . . . . . . . . . . P-3
Who Should Read This Book . . . . . . . . . . . . . . . . . . . . . . . . . . . . . . . . . . . . . . . . . P-3
How This Book is Organized . . . . . . . . . . . . . . . . . . . . . . . . . . . . . . . . . . . . . . . . . P-3
Conventions . . . . . . . . . . . . . . . . . . . . . . . . . . . . . . . . . . . . . . . . . . . . . . . . . . . . . . . P-5
Books . . . . . . . . . . . . . . . . . . . . . . . . . . . . . . . . . . . . . . . . . . . . . . . . . . . . . . . . . . . . . P-6
Online Books . . . . . . . . . . . . . . . . . . . . . . . . . . . . . . . . . . . . . . . . . . . . . . . . . . . . P-6
Related Publications . . . . . . . . . . . . . . . . . . . . . . . . . . . . . . . . . . . . . . . . . . . . . P-7
Contact Publications Department . . . . . . . . . . . . . . . . . . . . . . . . . . . . . . . . . . P-7
Secured Web Site . . . . . . . . . . . . . . . . . . . . . . . . . . . . . . . . . . . . . . . . . . . . . . . . P-7
Getting Started 1
Using the GUI . . . . . . . . . . . . . . . . . . . . . . . . . . . . . . . . . . . . . . . . . . . . . . . . . . . . . . .1-3
Volume Server System Console Icons . . . . . . . . . . . . . . . . . . . . . . . . . . . . . . . .1-3
Archive Console . . . . . . . . . . . . . . . . . . . . . . . . . . . . . . . . . . . . . . . . . . . . . . . . . .1-6
GUI Actions . . . . . . . . . . . . . . . . . . . . . . . . . . . . . . . . . . . . . . . . . . . . . . . . . . . . .1-7
GUI Windows . . . . . . . . . . . . . . . . . . . . . . . . . . . . . . . . . . . . . . . . . . . . . . . . . . . .1-8
Status Boxes . . . . . . . . . . . . . . . . . . . . . . . . . . . . . . . . . . . . . . . . . . . . . . . . . . . .1-13
Common GUI Windows . . . . . . . . . . . . . . . . . . . . . . . . . . . . . . . . . . . . . . . . . . . . .1-17
Message and Question . . . . . . . . . . . . . . . . . . . . . . . . . . . . . . . . . . . . . . . . . . .1-18
File Pop-up Window . . . . . . . . . . . . . . . . . . . . . . . . . . . . . . . . . . . . . . . . . . . . .1-20
Printer Pop-up Window . . . . . . . . . . . . . . . . . . . . . . . . . . . . . . . . . . . . . . . . . .1-21
Filter Pop-up Window . . . . . . . . . . . . . . . . . . . . . . . . . . . . . . . . . . . . . . . . . . . .1-23
Select Items . . . . . . . . . . . . . . . . . . . . . . . . . . . . . . . . . . . . . . . . . . . . . . . . . . . . .1-25
Select Media . . . . . . . . . . . . . . . . . . . . . . . . . . . . . . . . . . . . . . . . . . . . . . . . . . . .1-27
6-01002-01 Rev A Contents 5
Page 6

Command Reference
Printer Tasks . . . . . . . . . . . . . . . . . . . . . . . . . . . . . . . . . . . . . . . . . . . . . . . . . . . .1-29
Label Printing . . . . . . . . . . . . . . . . . . . . . . . . . . . . . . . . . . . . . . . . . . . . . . . . . . .1-32
Archive Operation 2
Automated Archive Console Windows . . . . . . . . . . . . . . . . . . . . . . . . . . . . . . . . .2-3
Console Window . . . . . . . . . . . . . . . . . . . . . . . . . . . . . . . . . . . . . . . . . . . . . . . . .2-3
Enter Window . . . . . . . . . . . . . . . . . . . . . . . . . . . . . . . . . . . . . . . . . . . . . . . . . . .2-5
Eject Window . . . . . . . . . . . . . . . . . . . . . . . . . . . . . . . . . . . . . . . . . . . . . . . . . . .2-12
Audit Window . . . . . . . . . . . . . . . . . . . . . . . . . . . . . . . . . . . . . . . . . . . . . . . . . .2-18
Manual Archive Console Windows . . . . . . . . . . . . . . . . . . . . . . . . . . . . . . . . . . .2-27
Shelf Console Window . . . . . . . . . . . . . . . . . . . . . . . . . . . . . . . . . . . . . . . . . . .2-27
Stage Console Window . . . . . . . . . . . . . . . . . . . . . . . . . . . . . . . . . . . . . . . . . . .2-41
Fail Codes Window . . . . . . . . . . . . . . . . . . . . . . . . . . . . . . . . . . . . . . . . . . . . . .2-52
Media Management 3
Import Media . . . . . . . . . . . . . . . . . . . . . . . . . . . . . . . . . . . . . . . . . . . . . . . . . . . . . . .3-3
New Media . . . . . . . . . . . . . . . . . . . . . . . . . . . . . . . . . . . . . . . . . . . . . . . . . . . . . . . . .3-7
Export Media . . . . . . . . . . . . . . . . . . . . . . . . . . . . . . . . . . . . . . . . . . . . . . . . . . . .3-9
Check In Media . . . . . . . . . . . . . . . . . . . . . . . . . . . . . . . . . . . . . . . . . . . . . . . . . . . .3-12
Check Out Media . . . . . . . . . . . . . . . . . . . . . . . . . . . . . . . . . . . . . . . . . . . . . . . .3-14
Manual Eject . . . . . . . . . . . . . . . . . . . . . . . . . . . . . . . . . . . . . . . . . . . . . . . . . . . . . . .3-16
Clear Eject . . . . . . . . . . . . . . . . . . . . . . . . . . . . . . . . . . . . . . . . . . . . . . . . . . . . . .3-18
Mount Media . . . . . . . . . . . . . . . . . . . . . . . . . . . . . . . . . . . . . . . . . . . . . . . . . . . . . .3-20
Dismount Media . . . . . . . . . . . . . . . . . . . . . . . . . . . . . . . . . . . . . . . . . . . . . . . .3-25
6Contents 6-01002-01 Rev A
Page 7

Command Reference
Modify Media . . . . . . . . . . . . . . . . . . . . . . . . . . . . . . . . . . . . . . . . . . . . . . . . . . . . . .3-28
Move Media . . . . . . . . . . . . . . . . . . . . . . . . . . . . . . . . . . . . . . . . . . . . . . . . . . . . . . .3-31
Reclassify Media . . . . . . . . . . . . . . . . . . . . . . . . . . . . . . . . . . . . . . . . . . . . . . . . . . . .3-34
Administer the GUI 4
Change Archive Parameters . . . . . . . . . . . . . . . . . . . . . . . . . . . . . . . . . . . . . . . . . . .4-3
Vary Archive . . . . . . . . . . . . . . . . . . . . . . . . . . . . . . . . . . . . . . . . . . . . . . . . . . . . .4-6
Vary Component . . . . . . . . . . . . . . . . . . . . . . . . . . . . . . . . . . . . . . . . . . . . . . . . .4-8
Vary Component (Second Window) . . . . . . . . . . . . . . . . . . . . . . . . . . . . . . . .4-10
Vary Drive . . . . . . . . . . . . . . . . . . . . . . . . . . . . . . . . . . . . . . . . . . . . . . . . . . . . . .4-12
Cancel Request . . . . . . . . . . . . . . . . . . . . . . . . . . . . . . . . . . . . . . . . . . . . . . . . . .4-14
Reprioritize Request . . . . . . . . . . . . . . . . . . . . . . . . . . . . . . . . . . . . . . . . . . . . .4-16
Unlock Drive . . . . . . . . . . . . . . . . . . . . . . . . . . . . . . . . . . . . . . . . . . . . . . . . . . . .4-18
Reprint Media Labels . . . . . . . . . . . . . . . . . . . . . . . . . . . . . . . . . . . . . . . . . . . .4-20
Configuration 5
Configuration . . . . . . . . . . . . . . . . . . . . . . . . . . . . . . . . . . . . . . . . . . . . . . . . . . . . . . .5-3
Configure Libraries . . . . . . . . . . . . . . . . . . . . . . . . . . . . . . . . . . . . . . . . . . . . . . .5-4
Automated Archives . . . . . . . . . . . . . . . . . . . . . . . . . . . . . . . . . . . . . . . . . . . . . . . . .5-9
AML . . . . . . . . . . . . . . . . . . . . . . . . . . . . . . . . . . . . . . . . . . . . . . . . . . . . . . . . . . . .5-9
DataTower . . . . . . . . . . . . . . . . . . . . . . . . . . . . . . . . . . . . . . . . . . . . . . . . . . . . . .5-10
StorageTek ACS . . . . . . . . . . . . . . . . . . . . . . . . . . . . . . . . . . . . . . . . . . . . . . . . .5-14
SCSI/Scalar DLC . . . . . . . . . . . . . . . . . . . . . . . . . . . . . . . . . . . . . . . . . . . . . . . .5-19
Media Type Information . . . . . . . . . . . . . . . . . . . . . . . . . . . . . . . . . . . . . . . . . .5-24
6-01002-01 Rev A Contents 7
Page 8

Command Reference
Manual Archives . . . . . . . . . . . . . . . . . . . . . . . . . . . . . . . . . . . . . . . . . . . . . . . . . . .5-30
DataShelf . . . . . . . . . . . . . . . . . . . . . . . . . . . . . . . . . . . . . . . . . . . . . . . . . . . . . . .5-30
Stage . . . . . . . . . . . . . . . . . . . . . . . . . . . . . . . . . . . . . . . . . . . . . . . . . . . . . . . . . . .5-44
Reconfigure Automated Libraries . . . . . . . . . . . . . . . . . . . . . . . . . . . . . . . . . . . . .5-50
Automated Libraries . . . . . . . . . . . . . . . . . . . . . . . . . . . . . . . . . . . . . . . . . . . . .5-50
Reconfigure Manual Libraries . . . . . . . . . . . . . . . . . . . . . . . . . . . . . . . . . . . . . . . .5-56
DataShelf . . . . . . . . . . . . . . . . . . . . . . . . . . . . . . . . . . . . . . . . . . . . . . . . . . . . . . .5-56
Stage . . . . . . . . . . . . . . . . . . . . . . . . . . . . . . . . . . . . . . . . . . . . . . . . . . . . . . . . . . .5-59
Drive . . . . . . . . . . . . . . . . . . . . . . . . . . . . . . . . . . . . . . . . . . . . . . . . . . . . . . . . . . . . .5-61
Define Drive . . . . . . . . . . . . . . . . . . . . . . . . . . . . . . . . . . . . . . . . . . . . . . . . . . . .5-64
Delete Drive . . . . . . . . . . . . . . . . . . . . . . . . . . . . . . . . . . . . . . . . . . . . . . . . . . . .5-66
Associate Drive . . . . . . . . . . . . . . . . . . . . . . . . . . . . . . . . . . . . . . . . . . . . . . . . . .5-68
Disassociate Drive . . . . . . . . . . . . . . . . . . . . . . . . . . . . . . . . . . . . . . . . . . . . . . .5-72
Drive Pool Windows . . . . . . . . . . . . . . . . . . . . . . . . . . . . . . . . . . . . . . . . . . . . . . . .5-75
Create Drive Pool . . . . . . . . . . . . . . . . . . . . . . . . . . . . . . . . . . . . . . . . . . . . . . . .5-77
Modify Drive Pool . . . . . . . . . . . . . . . . . . . . . . . . . . . . . . . . . . . . . . . . . . . . . . .5-79
Delete Drive Pool . . . . . . . . . . . . . . . . . . . . . . . . . . . . . . . . . . . . . . . . . . . . . . . .5-83
Media Class Windows . . . . . . . . . . . . . . . . . . . . . . . . . . . . . . . . . . . . . . . . . . . . . . .5-86
Create Media Class . . . . . . . . . . . . . . . . . . . . . . . . . . . . . . . . . . . . . . . . . . . . . .5-87
Modify Media Class . . . . . . . . . . . . . . . . . . . . . . . . . . . . . . . . . . . . . . . . . . . . . .5-92
Delete Media Class . . . . . . . . . . . . . . . . . . . . . . . . . . . . . . . . . . . . . . . . . . . . . .5-98
Archive Media Class . . . . . . . . . . . . . . . . . . . . . . . . . . . . . . . . . . . . . . . . . . . . . . .5-100
Create Archive Media Class . . . . . . . . . . . . . . . . . . . . . . . . . . . . . . . . . . . . . .5-102
Modify Archive Media Class . . . . . . . . . . . . . . . . . . . . . . . . . . . . . . . . . . . . .5-110
Delete Archive Media Class . . . . . . . . . . . . . . . . . . . . . . . . . . . . . . . . . . . . . .5-118
Media Type . . . . . . . . . . . . . . . . . . . . . . . . . . . . . . . . . . . . . . . . . . . . . . . . . . . . . . .5-121
Create Media Type . . . . . . . . . . . . . . . . . . . . . . . . . . . . . . . . . . . . . . . . . . . . . .5-123
Modify Media Type Window . . . . . . . . . . . . . . . . . . . . . . . . . . . . . . . . . . . . .5-125
8Contents 6-01002-01 Rev A
Page 9

Command Reference
Label Pattern . . . . . . . . . . . . . . . . . . . . . . . . . . . . . . . . . . . . . . . . . . . . . . . . . . . . . .5-129
Create Label Pattern . . . . . . . . . . . . . . . . . . . . . . . . . . . . . . . . . . . . . . . . . . . .5-130
Delete Label Pattern . . . . . . . . . . . . . . . . . . . . . . . . . . . . . . . . . . . . . . . . . . . . .5-132
Client Commands . . . . . . . . . . . . . . . . . . . . . . . . . . . . . . . . . . . . . . . . . . . . . . . . .5-135
Operator Commands . . . . . . . . . . . . . . . . . . . . . . . . . . . . . . . . . . . . . . . . . . . . . . .5-138
Reports and Queries 6
Reports . . . . . . . . . . . . . . . . . . . . . . . . . . . . . . . . . . . . . . . . . . . . . . . . . . . . . . . . . . . . .6-3
Archive Reports . . . . . . . . . . . . . . . . . . . . . . . . . . . . . . . . . . . . . . . . . . . . . . . . . .6-4
Drive Reports . . . . . . . . . . . . . . . . . . . . . . . . . . . . . . . . . . . . . . . . . . . . . . . . . . . .6-5
Media Reports . . . . . . . . . . . . . . . . . . . . . . . . . . . . . . . . . . . . . . . . . . . . . . . . . . .6-6
Query Request Report . . . . . . . . . . . . . . . . . . . . . . . . . . . . . . . . . . . . . . . . . . . . .6-8
Enterprise Connection Report . . . . . . . . . . . . . . . . . . . . . . . . . . . . . . . . . . . . . .6-9
Report Windows . . . . . . . . . . . . . . . . . . . . . . . . . . . . . . . . . . . . . . . . . . . . . . . . . . .6-10
Query Archive . . . . . . . . . . . . . . . . . . . . . . . . . . . . . . . . . . . . . . . . . . . . . . . . . .6-10
Query Drive . . . . . . . . . . . . . . . . . . . . . . . . . . . . . . . . . . . . . . . . . . . . . . . . . . . .6-13
Query Drive Pool . . . . . . . . . . . . . . . . . . . . . . . . . . . . . . . . . . . . . . . . . . . . . . . .6-15
Query Mount . . . . . . . . . . . . . . . . . . . . . . . . . . . . . . . . . . . . . . . . . . . . . . . . . . .6-17
Query Media . . . . . . . . . . . . . . . . . . . . . . . . . . . . . . . . . . . . . . . . . . . . . . . . . . . .6-19
Query Media Location . . . . . . . . . . . . . . . . . . . . . . . . . . . . . . . . . . . . . . . . . . . .6-22
Query Intransit Media . . . . . . . . . . . . . . . . . . . . . . . . . . . . . . . . . . . . . . . . . . . .6-23
Query Media Class . . . . . . . . . . . . . . . . . . . . . . . . . . . . . . . . . . . . . . . . . . . . . . .6-25
Query Request . . . . . . . . . . . . . . . . . . . . . . . . . . . . . . . . . . . . . . . . . . . . . . . . . .6-28
Query Connect . . . . . . . . . . . . . . . . . . . . . . . . . . . . . . . . . . . . . . . . . . . . . . . . . .6-29
6-01002-01 Rev A Contents 9
Page 10

Command Reference
Archive Console Procedures A
Console Operations . . . . . . . . . . . . . . . . . . . . . . . . . . . . . . . . . . . . . . . . . . . . . . . . . A-3
Archive Console Options Menu . . . . . . . . . . . . . . . . . . . . . . . . . . . . . . . . . . . . . . A-4
Selecting Status Beeps . . . . . . . . . . . . . . . . . . . . . . . . . . . . . . . . . . . . . . . . . . . . A-4
Selecting Sweep Select List . . . . . . . . . . . . . . . . . . . . . . . . . . . . . . . . . . . . . . . . A-4
Autoadding Media . . . . . . . . . . . . . . . . . . . . . . . . . . . . . . . . . . . . . . . . . . . . . . . . . . A-5
AML . . . . . . . . . . . . . . . . . . . . . . . . . . . . . . . . . . . . . . . . . . . . . . . . . . . . . . . . . . . A-5
StorageTek ACS . . . . . . . . . . . . . . . . . . . . . . . . . . . . . . . . . . . . . . . . . . . . . . . . . A-7
DataTower . . . . . . . . . . . . . . . . . . . . . . . . . . . . . . . . . . . . . . . . . . . . . . . . . . . . . . A-9
SCSI/Scalar DLC . . . . . . . . . . . . . . . . . . . . . . . . . . . . . . . . . . . . . . . . . . . . . . . A-12
Manually Entering Media . . . . . . . . . . . . . . . . . . . . . . . . . . . . . . . . . . . . . . . . . . . A-15
AML/SCSI/ Scalar DLC . . . . . . . . . . . . . . . . . . . . . . . . . . . . . . . . . . . . . . . . . A-15
Automated Archive . . . . . . . . . . . . . . . . . . . . . . . . . . . . . . . . . . . . . . . . . . . . . A-16
Manual Archive . . . . . . . . . . . . . . . . . . . . . . . . . . . . . . . . . . . . . . . . . . . . . . . . A-19
Bulk Load . . . . . . . . . . . . . . . . . . . . . . . . . . . . . . . . . . . . . . . . . . . . . . . . . . . . . A-20
Viewing the Enter List . . . . . . . . . . . . . . . . . . . . . . . . . . . . . . . . . . . . . . . . . . . . . . A-22
Automated Archive . . . . . . . . . . . . . . . . . . . . . . . . . . . . . . . . . . . . . . . . . . . . . A-22
Manual Archive . . . . . . . . . . . . . . . . . . . . . . . . . . . . . . . . . . . . . . . . . . . . . . . . A-23
Failing the Enter List . . . . . . . . . . . . . . . . . . . . . . . . . . . . . . . . . . . . . . . . . . . . . . . A-24
Automated Archive . . . . . . . . . . . . . . . . . . . . . . . . . . . . . . . . . . . . . . . . . . . . . A-24
Manual Archive . . . . . . . . . . . . . . . . . . . . . . . . . . . . . . . . . . . . . . . . . . . . . . . . A-25
10 Contents 6-01002-01 Rev A
Page 11

Command Reference
Ejecting Media . . . . . . . . . . . . . . . . . . . . . . . . . . . . . . . . . . . . . . . . . . . . . . . . . . . . A-27
Automated Archive . . . . . . . . . . . . . . . . . . . . . . . . . . . . . . . . . . . . . . . . . . . . . A-27
Manual Archive . . . . . . . . . . . . . . . . . . . . . . . . . . . . . . . . . . . . . . . . . . . . . . . . A-28
Remove Eject List Media . . . . . . . . . . . . . . . . . . . . . . . . . . . . . . . . . . . . . . . . . . . . A-30
Automated Archive . . . . . . . . . . . . . . . . . . . . . . . . . . . . . . . . . . . . . . . . . . . . . A-30
Manual Archive . . . . . . . . . . . . . . . . . . . . . . . . . . . . . . . . . . . . . . . . . . . . . . . . A-31
Auditing an Archive . . . . . . . . . . . . . . . . . . . . . . . . . . . . . . . . . . . . . . . . . . . . . . . A-32
AML . . . . . . . . . . . . . . . . . . . . . . . . . . . . . . . . . . . . . . . . . . . . . . . . . . . . . . . . . . A-32
DataTower . . . . . . . . . . . . . . . . . . . . . . . . . . . . . . . . . . . . . . . . . . . . . . . . . . . . . A-33
StorageTek ACS . . . . . . . . . . . . . . . . . . . . . . . . . . . . . . . . . . . . . . . . . . . . . . . . A-34
SCSI/Scalar DLC . . . . . . . . . . . . . . . . . . . . . . . . . . . . . . . . . . . . . . . . . . . . . . . A-36
DataShelf . . . . . . . . . . . . . . . . . . . . . . . . . . . . . . . . . . . . . . . . . . . . . . . . . . . . . . A-37
Stage . . . . . . . . . . . . . . . . . . . . . . . . . . . . . . . . . . . . . . . . . . . . . . . . . . . . . . . . . . A-39
Mount . . . . . . . . . . . . . . . . . . . . . . . . . . . . . . . . . . . . . . . . . . . . . . . . . . . . . . . . . . . A-40
Dismount . . . . . . . . . . . . . . . . . . . . . . . . . . . . . . . . . . . . . . . . . . . . . . . . . . . . . . . . . A-41
Reprint Labels . . . . . . . . . . . . . . . . . . . . . . . . . . . . . . . . . . . . . . . . . . . . . . . . . . . . . A-42
Media Management Procedures B
Import Media . . . . . . . . . . . . . . . . . . . . . . . . . . . . . . . . . . . . . . . . . . . . . . . . . . . . . . B-3
Generate Media IDs . . . . . . . . . . . . . . . . . . . . . . . . . . . . . . . . . . . . . . . . . . . . . . . . . B-7
Export Media . . . . . . . . . . . . . . . . . . . . . . . . . . . . . . . . . . . . . . . . . . . . . . . . . . . . . . B-9
Check In Media . . . . . . . . . . . . . . . . . . . . . . . . . . . . . . . . . . . . . . . . . . . . . . . . . . . B-11
Check Out Media . . . . . . . . . . . . . . . . . . . . . . . . . . . . . . . . . . . . . . . . . . . . . . . . . . B-13
Using Manual Eject . . . . . . . . . . . . . . . . . . . . . . . . . . . . . . . . . . . . . . . . . . . . . B-15
Clearing Eject List . . . . . . . . . . . . . . . . . . . . . . . . . . . . . . . . . . . . . . . . . . . . . . B-17
Mount Media . . . . . . . . . . . . . . . . . . . . . . . . . . . . . . . . . . . . . . . . . . . . . . . . . . . . . B-18
6-01002-01 Rev A Contents 11
Page 12

Command Reference
Dismount Media . . . . . . . . . . . . . . . . . . . . . . . . . . . . . . . . . . . . . . . . . . . . . . . . . . B-22
Modify Media . . . . . . . . . . . . . . . . . . . . . . . . . . . . . . . . . . . . . . . . . . . . . . . . . . . . . B-24
Move Media . . . . . . . . . . . . . . . . . . . . . . . . . . . . . . . . . . . . . . . . . . . . . . . . . . . . . . B-27
Reclassify Media . . . . . . . . . . . . . . . . . . . . . . . . . . . . . . . . . . . . . . . . . . . . . . . . . . . B-30
Administration Procedures C
Change Library Parameters . . . . . . . . . . . . . . . . . . . . . . . . . . . . . . . . . . . . . . . . . . C-3
Vary a Library . . . . . . . . . . . . . . . . . . . . . . . . . . . . . . . . . . . . . . . . . . . . . . . . . . . C-4
Vary a Library Component . . . . . . . . . . . . . . . . . . . . . . . . . . . . . . . . . . . . . . . . C-5
Vary a Drive . . . . . . . . . . . . . . . . . . . . . . . . . . . . . . . . . . . . . . . . . . . . . . . . . . . . . . . C-8
Unlock a Drive . . . . . . . . . . . . . . . . . . . . . . . . . . . . . . . . . . . . . . . . . . . . . . . . . . C-9
Cancel a Request . . . . . . . . . . . . . . . . . . . . . . . . . . . . . . . . . . . . . . . . . . . . . . . . . . C-10
Reprioritize a Request . . . . . . . . . . . . . . . . . . . . . . . . . . . . . . . . . . . . . . . . . . . C-10
Reprint Media Labels . . . . . . . . . . . . . . . . . . . . . . . . . . . . . . . . . . . . . . . . . . . . . . C-12
Configuration Procedures D
Configure Libraries . . . . . . . . . . . . . . . . . . . . . . . . . . . . . . . . . . . . . . . . . . . . . . . . . D-4
AML . . . . . . . . . . . . . . . . . . . . . . . . . . . . . . . . . . . . . . . . . . . . . . . . . . . . . . . . . . . D-5
StorageTek ACS . . . . . . . . . . . . . . . . . . . . . . . . . . . . . . . . . . . . . . . . . . . . . . . . . D-9
DataTower . . . . . . . . . . . . . . . . . . . . . . . . . . . . . . . . . . . . . . . . . . . . . . . . . . . . . D-13
SCSI . . . . . . . . . . . . . . . . . . . . . . . . . . . . . . . . . . . . . . . . . . . . . . . . . . . . . . . . . . D-19
Configure a Scalar DLC . . . . . . . . . . . . . . . . . . . . . . . . . . . . . . . . . . . . . . . . . . D-23
DataShelf . . . . . . . . . . . . . . . . . . . . . . . . . . . . . . . . . . . . . . . . . . . . . . . . . . . . . . D-28
Stage . . . . . . . . . . . . . . . . . . . . . . . . . . . . . . . . . . . . . . . . . . . . . . . . . . . . . . . . . . D-39
12 Contents 6-01002-01 Rev A
Page 13

Command Reference
Reconfigure an Archive . . . . . . . . . . . . . . . . . . . . . . . . . . . . . . . . . . . . . . . . . . . . . D-44
Reconfigure an AML/E . . . . . . . . . . . . . . . . . . . . . . . . . . . . . . . . . . . . . . . . . D-44
Reconfigure an Archive - Part 1 . . . . . . . . . . . . . . . . . . . . . . . . . . . . . . . . . . . D-44
Modify General Information . . . . . . . . . . . . . . . . . . . . . . . . . . . . . . . . . . . . . D-48
Modify Media Type Information . . . . . . . . . . . . . . . . . . . . . . . . . . . . . . . . . . D-50
Modify RPC Information . . . . . . . . . . . . . . . . . . . . . . . . . . . . . . . . . . . . . . . . D-55
Remap Hardware . . . . . . . . . . . . . . . . . . . . . . . . . . . . . . . . . . . . . . . . . . . . . . . D-56
Add Component . . . . . . . . . . . . . . . . . . . . . . . . . . . . . . . . . . . . . . . . . . . . . . . D-59
Delete Media Type Information . . . . . . . . . . . . . . . . . . . . . . . . . . . . . . . . . . . D-63
Reconfigure an Archive - Part 2 . . . . . . . . . . . . . . . . . . . . . . . . . . . . . . . . . . . . . . D-65
Delete a Library from the System . . . . . . . . . . . . . . . . . . . . . . . . . . . . . . . . . . . . D-67
View an Automated Library Configuration . . . . . . . . . . . . . . . . . . . . . . . . . . . D-70
DataTower . . . . . . . . . . . . . . . . . . . . . . . . . . . . . . . . . . . . . . . . . . . . . . . . . . . . . D-72
DataShelf . . . . . . . . . . . . . . . . . . . . . . . . . . . . . . . . . . . . . . . . . . . . . . . . . . . . . . D-73
Stage/SCSI/Scalar DLC . . . . . . . . . . . . . . . . . . . . . . . . . . . . . . . . . . . . . . . . . D-75
Define a Drive . . . . . . . . . . . . . . . . . . . . . . . . . . . . . . . . . . . . . . . . . . . . . . . . . . . . . D-76
Define a Drive for an Existing AML . . . . . . . . . . . . . . . . . . . . . . . . . . . . . . . D-77
Associate a Drive with a Library . . . . . . . . . . . . . . . . . . . . . . . . . . . . . . . . . . D-77
Disassociate a Drive from a Library . . . . . . . . . . . . . . . . . . . . . . . . . . . . . . . D-79
Delete a Drive . . . . . . . . . . . . . . . . . . . . . . . . . . . . . . . . . . . . . . . . . . . . . . . . . . D-80
Delete a Drive in an AML . . . . . . . . . . . . . . . . . . . . . . . . . . . . . . . . . . . . . . . . D-80
Drive Pool Configuration . . . . . . . . . . . . . . . . . . . . . . . . . . . . . . . . . . . . . . . . . . . D-81
Create a Drive Pool . . . . . . . . . . . . . . . . . . . . . . . . . . . . . . . . . . . . . . . . . . . . . D-81
Modify a Drive Pool . . . . . . . . . . . . . . . . . . . . . . . . . . . . . . . . . . . . . . . . . . . . D-82
Delete a Drive Pool . . . . . . . . . . . . . . . . . . . . . . . . . . . . . . . . . . . . . . . . . . . . . D-83
6-01002-01 Rev A Contents 13
Page 14

Command Reference
Media Class Configuration . . . . . . . . . . . . . . . . . . . . . . . . . . . . . . . . . . . . . . . . . . D-84
Create a Media Class . . . . . . . . . . . . . . . . . . . . . . . . . . . . . . . . . . . . . . . . . . . . D-84
Modify a Media Class . . . . . . . . . . . . . . . . . . . . . . . . . . . . . . . . . . . . . . . . . . . D-88
Delete a Media Class . . . . . . . . . . . . . . . . . . . . . . . . . . . . . . . . . . . . . . . . . . . . D-91
Associate a Media Class with a Library . . . . . . . . . . . . . . . . . . . . . . . . . . . . . . . D-93
Modify Library Media Class . . . . . . . . . . . . . . . . . . . . . . . . . . . . . . . . . . . . . D-96
Disassociate a Media Class from a Library . . . . . . . . . . . . . . . . . . . . . . . . D-100
Media Type Configuration . . . . . . . . . . . . . . . . . . . . . . . . . . . . . . . . . . . . . . . . . D-102
Define a Media Type . . . . . . . . . . . . . . . . . . . . . . . . . . . . . . . . . . . . . . . . . . . D-102
Redefine a Media Type . . . . . . . . . . . . . . . . . . . . . . . . . . . . . . . . . . . . . . . . . D-103
Configure Label Pattern . . . . . . . . . . . . . . . . . . . . . . . . . . . . . . . . . . . . . . . . . . . D-105
Define Label Patterns . . . . . . . . . . . . . . . . . . . . . . . . . . . . . . . . . . . . . . . . . . D-105
Delete a Label Pattern Definition . . . . . . . . . . . . . . . . . . . . . . . . . . . . . . . . . D-106
View Label Pattern Definitions . . . . . . . . . . . . . . . . . . . . . . . . . . . . . . . . . . D-107
Authorize Client Commands . . . . . . . . . . . . . . . . . . . . . . . . . . . . . . . . . . . . . . . D-108
Authorize Operator Commands . . . . . . . . . . . . . . . . . . . . . . . . . . . . . . . . . . . . D-109
Reports and Query Procedures E
Overview . . . . . . . . . . . . . . . . . . . . . . . . . . . . . . . . . . . . . . . . . . . . . . . . . . . . . . . . . . E-3
Query Library . . . . . . . . . . . . . . . . . . . . . . . . . . . . . . . . . . . . . . . . . . . . . . . . . . . . . . E-4
Query Drive . . . . . . . . . . . . . . . . . . . . . . . . . . . . . . . . . . . . . . . . . . . . . . . . . . . . . . . E-7
Query Drive Pool . . . . . . . . . . . . . . . . . . . . . . . . . . . . . . . . . . . . . . . . . . . . . . . . . . . E-9
Query Mount . . . . . . . . . . . . . . . . . . . . . . . . . . . . . . . . . . . . . . . . . . . . . . . . . . . . . E-11
Query Media . . . . . . . . . . . . . . . . . . . . . . . . . . . . . . . . . . . . . . . . . . . . . . . . . . . . . . E-12
Query Media Location . . . . . . . . . . . . . . . . . . . . . . . . . . . . . . . . . . . . . . . . . . . . . . E-14
Query Intransit Media . . . . . . . . . . . . . . . . . . . . . . . . . . . . . . . . . . . . . . . . . . . . . . E-16
14 Contents 6-01002-01 Rev A
Page 15

Command Reference
Query Media Class . . . . . . . . . . . . . . . . . . . . . . . . . . . . . . . . . . . . . . . . . . . . . . . . . E-17
Query Media Type . . . . . . . . . . . . . . . . . . . . . . . . . . . . . . . . . . . . . . . . . . . . . . . . . E-19
Query Request . . . . . . . . . . . . . . . . . . . . . . . . . . . . . . . . . . . . . . . . . . . . . . . . . . . . E-21
Query Connect . . . . . . . . . . . . . . . . . . . . . . . . . . . . . . . . . . . . . . . . . . . . . . . . . . . . E-23
6-01002-01 Rev A Contents 15
Page 16

Command Reference
16 Contents 6-01002-01 Rev A
Page 17

Preface
Purpose of This Book . . . . . . . . . . . . . . . . . . . . . . .P-3
Who Should Read This Book . . . . . . . . . . . . . . . .P-3
How This Book is Organized . . . . . . . . . . . . . . . .P-3
Conventions . . . . . . . . . . . . . . . . . . . . . . . . . . . . . .P-5
Books . . . . . . . . . . . . . . . . . . . . . . . . . . . . . . . . . . . .P-6
Online Books . . . . . . . . . . . . . . . . . . . . . . . . . . .P-6
Related Publications . . . . . . . . . . . . . . . . . . . .P-7
Contact Publications Department . . . . . . . . .P-7
Secured Web Site . . . . . . . . . . . . . . . . . . . . . . .P-7
P
Preface
Page 18

Using the VolServ GUI
NOTES
P-2 Preface 6-01002-01 Rev A
Page 19

Using the VolServ GUI
Preface
Purpose of This Book
Who Should Read This Book
How This Book is Organized
This book describes how to use the VolServ graphical user
interface (GUI).
This book is written for the system administrator who uses the
GUI to operate VolServ.
This book assumes the administrator has a strong familiarity
with:
• UNIX operating systems
• The precepts and concepts of using GUIs
This book contains the following chapters:
Chapter 1: Getting Started — Controlling access to the GUI for
clients, GUI design and navigation, and icon description.
Chapter 2: Archive Operation — Details Archive Console GUIs
and operations associated with archive-specific pull-down menus.
Chapter 3: Media Management — Details media management
operations associated with the MEDIA icon pull-down menu on the
Volume Server System console
Chapter 4: Administer the GUI— Details administration
operations associated with the ADMIN icon pull-down menu on the
Volume Server System console.
Chapter 5: Configuration — Details configuration operations
associated with the CONFIG icon pull-down menu on the Volume
Server System console.
6-01002-01 Rev A Preface P-3
.
Page 20

Using the VolServ GUI
Chapter 6: Reports and Queries— Details information from the
REPORTS pull-down menu on the Volume Server System console.
Appendix A: Archive Console Procedures — Provides the
step-by-step procedures for Archive Console Operations
.
Appendix B: Media Management Procedures — Provides the
step-by-step procedures for Media Management Operations.
Appendix C: Administration Procedures — Provides the
step-by-step procedures for Administration Operations.
Appendix D: Configuration Procedures — Provides the
step-by-step procedures for Configuration Operations.
Appendix E: Reports and Queries Procedur es — Provides the
step-by-step procedures for Reports and Queries operations.
P-4 Preface 6-01002-01 Rev A
Page 21
Using the VolServ GUI
Preface
Conventions
The conventions used throughout the VolServ technical books
are listed below:
Convention Example
Screen text, file names, program names, and
commands are in Courier font.
The root prompt is shown as a number
symbol.
What you should type in is shown in Courier
bold font.
Site-specific variables are in a Times italics
font.
A backward slash ( \ ) denotes the input is
continued onto the next line; the printed page
is just not wide enough to accommodate the
line.
Pressing <Return> after each command is
assumed.
Request to add a new volume:
Volume group will be “20”
Volume position will be “A123”.
# su root
vsarchiveqry
tar -xvf tapedevicename
#
remsh nodename -n dd if=/dev \
/tapedevicename/bs=20b | tar xvfb \
- 20
(You should type the entire command witho ut
the backward slash.)
A menu name with an arrow refers to a
sequence of menus.
6-01002-01 Rev A Preface P-5
Config-->MediaType-->Redefine
Page 22

Using the VolServ GUI
Books
The books described below are part of the technical
documentation set, and are shipped on CD along with the
VolServ software:
Overview
Provides an ov erview of VolServ . Co ntains a
glossary.
Installing VolServ
Describes server requirements, installation
instructions, troubleshooting procedures,
and configuration parameters.
Using the VolServ GUI
Describes how to perform system
administrative tasks using th e graphical user
interface.
API Guide
Provides a list of API functions.
Administrative Tasks
Describes how to perform system
administrative tasks using VolServ
commands.
Command Reference
Contains a list of VolServ comman ds
Error Messages
Provides corrective action f or system log
errors.
Quick Reference Card
Summarizes commands.
Online Books
The documentation CD contains VolServ book files and
requires the Adobe® Acrobat® Reader to view the
accompanying electronic documentation. The Reader allows
you to view and navigate the electronic documentation files yet
preserves the page design and graphics from the printed books.
P-6 Preface 6-01002-01 Rev A
Page 23

Using the VolServ GUI
Preface
Related Publications
Related Publications Description
“Release Notes” For each v ersion of VolServ, the “Release Notes” contain:
“Product Alerts” Informs customers of technical problems and solutions.
“Product Bulletins” Conveys technical information—not problems—to
The publications described in the table below are created and
distributed on an as-needed basis.
• Summary of enhancements
• Describes:
- Fixed problems
- Known problems
- Installation and configuration issues
•Lists:
- Operating system patches
- System requirements
customers.
Contact Publications Department
Secured Web Site
To make corrections or to comment on VolServ publications,
please contact Software Technical Publications at our e-mail
address: techdocs@adic.com.
To receive access to the secured site on our home page
containing technical product information (Release Notes,
Product Alerts, Product Bulletins, FAQs), visit
http://partners.adic.com/ and follow the password request
procedure. In return, ADIC will send you instructions and a
password.
6-01002-01 Rev A Preface P-7
Page 24

Using the VolServ GUI
NOTES
P-8 Preface 6-01002-01 Rev A
Page 25

Using the GUI . . . . . . . . . . . . . . . . . . . . . . . . . . . . .1-3
Volume Server System Console Icons . . . . . . 1-3
Archive Console . . . . . . . . . . . . . . . . . . . . . . . . 1-6
GUI Actions . . . . . . . . . . . . . . . . . . . . . . . . . . . 1-7
1
GUI Windows . . . . . . . . . . . . . . . . . . . . . . . . . .1-8
Status Boxes . . . . . . . . . . . . . . . . . . . . . . . . . . 1-13
Common GUI Windows . . . . . . . . . . . . . . . . . . .1-17
Message and Question . . . . . . . . . . . . . . . . . 1-18
File Pop-up Window . . . . . . . . . . . . . . . . . . . 1-20
Printer Pop-up Window . . . . . . . . . . . . . . . . 1-21
Filter Pop-up Window . . . . . . . . . . . . . . . . . . 1-23
Select Items . . . . . . . . . . . . . . . . . . . . . . . . . . . 1-26
Select Media . . . . . . . . . . . . . . . . . . . . . . . . . . 1-27
Printer Tasks . . . . . . . . . . . . . . . . . . . . . . . . . . 1-29
Label Printing . . . . . . . . . . . . . . . . . . . . . . . . .1-32
Getting Started
Getting
Started
Page 26
Using the VolServ GUI
Roadmap
Topic
Introduction to the GUI. 1
Information about the archive console and its
interface with an archive .
How to add or remove media from archives and
other media operations.
How to control command requests and vary an
archive, archive component, or drive operational
state.
How to view, remove, or reconfigure the VolServ
configuration parameters.
How to use the GUI to perform queries or get
reports on system information or parameters.
How to execute selected Archive Console
procedure segments.
How to execute selected Media Management
procedure segments.
Refer To
Chapter
2
3
4
5
6
A
B
How to execute selected Administration
procedure segments.
How to execute selected Configuration
procedure segments.
How to execute selected Reports and Queries
procedure segments.
1-2 Getting Started 6-01002-01 Rev A
C
D
E
Page 27
Using the VolServ GUI
Using the GUI
Volume Server System Console Icons
The automated VolServ system provides the user with a
sophisticated means to store and retrieve data on multiple types
of storage media in both automated and manual archives.
The VolServ GUI is designed using the OSF/Motif user
interface standards. The GUI provides object-oriented
execution of the VolServ commands.
Two types of windows are used based upon operational
position. The Volume Server System console is used by the
VolServ System Administrator (SA). The archive Console is
used by the VolServ Archive Operator (AO). Both of these
windows are discussed in the following paragraphs.
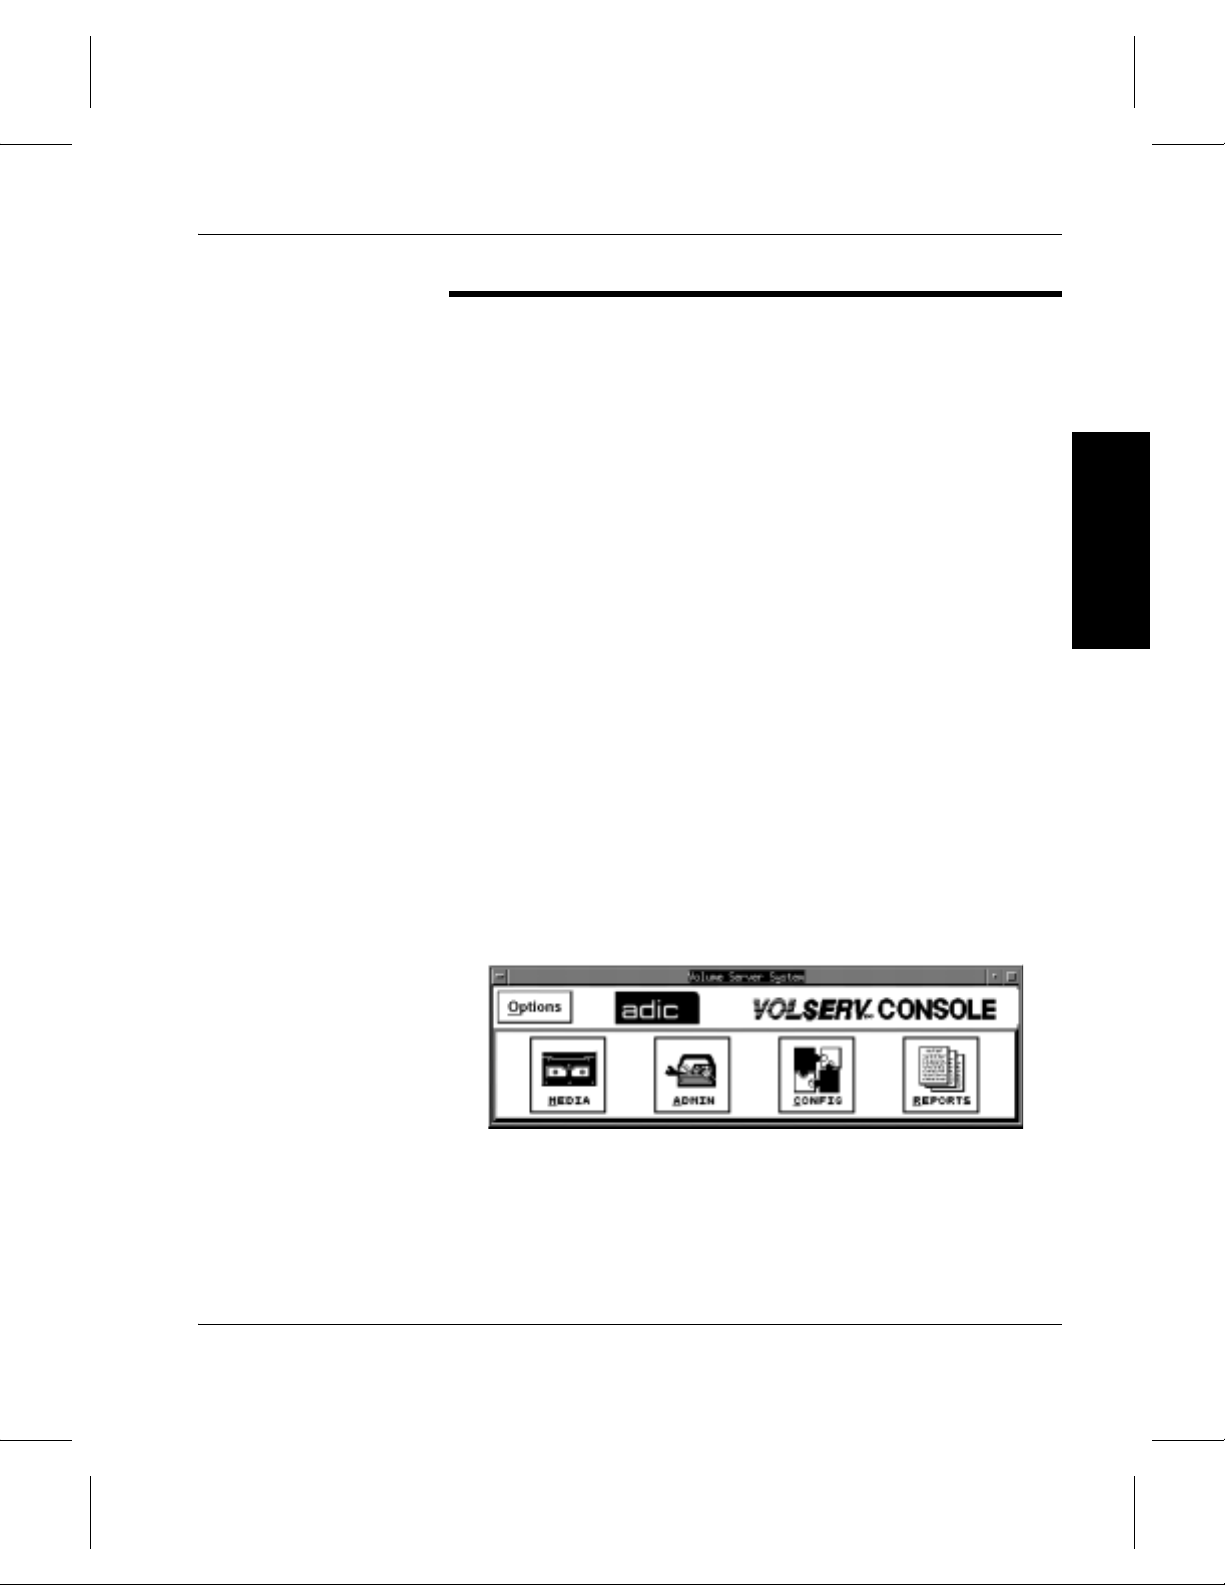
Operations that are available to the SA are grouped under one of
four icons: MEDIA, ADMIN, CONFIG, and REPORTS.
Figure 1-1 shows the Volume Server System console and the
four icons. Each icon has an associated pull-down menu of
selectable operations. The SA selects the appropriate operation
from the pull-down menu.
Getting Started
Figure 1-1 Volume Server System Console
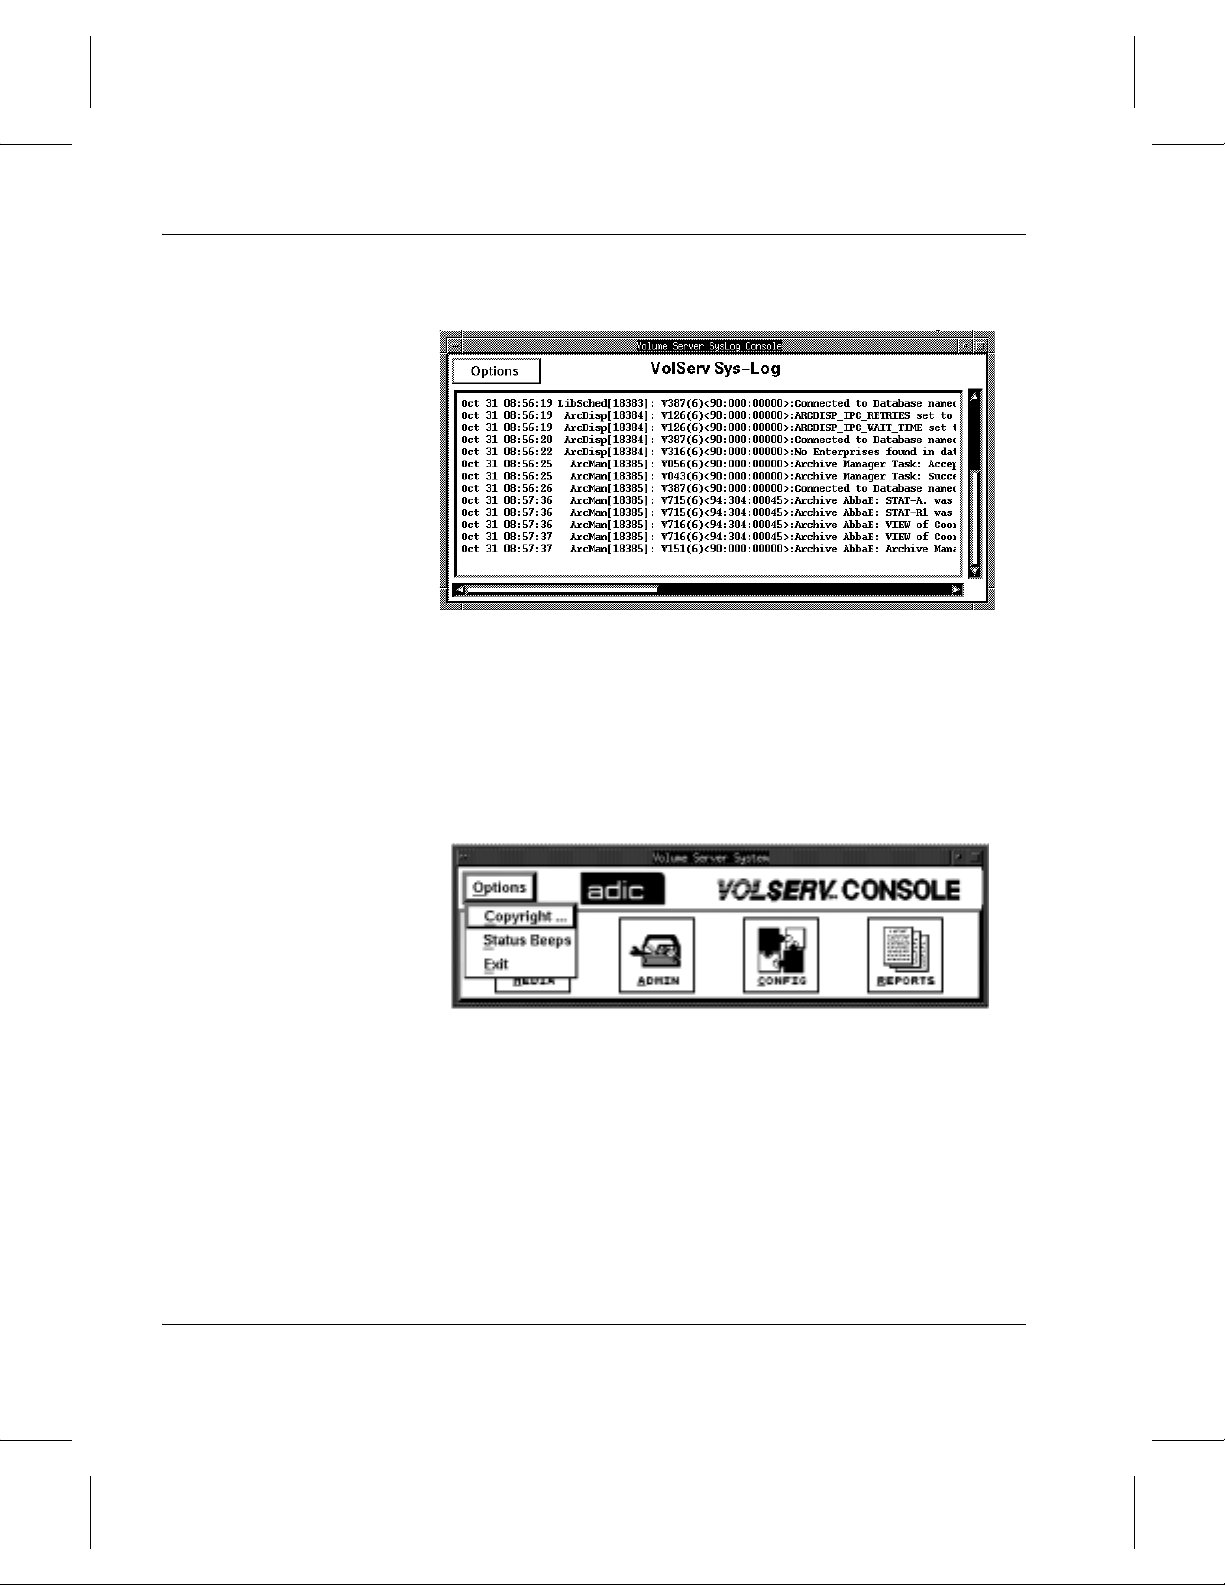
The Volume Server SysLog Console window displays VolServ
status and messages as they are being logged by the system.
One control menu, Options, enables an audible beep to occur
when status is returned to the console. Figure 1-2 shows the
Volume Server SysLog Console.
6-01002-01 Rev A Getting Started 1-3
Page 28
Using the VolServ GUI
Figure 1-2 Volume Server Syslog Console Window
The Volume Server System console has one control menu,
Options. The Options menu allows the user to display software
release information, enables an audible beep to occur when
status is returned to the console, or terminates the window. See
Figure 1-3, Figure 1-4 on page 1-5, and Figure 1-5 on page 1-5.
Figure 1-3 Volume Server System Console Options Menu
1-4 Getting Started 6-01002-01 Rev A
Page 29
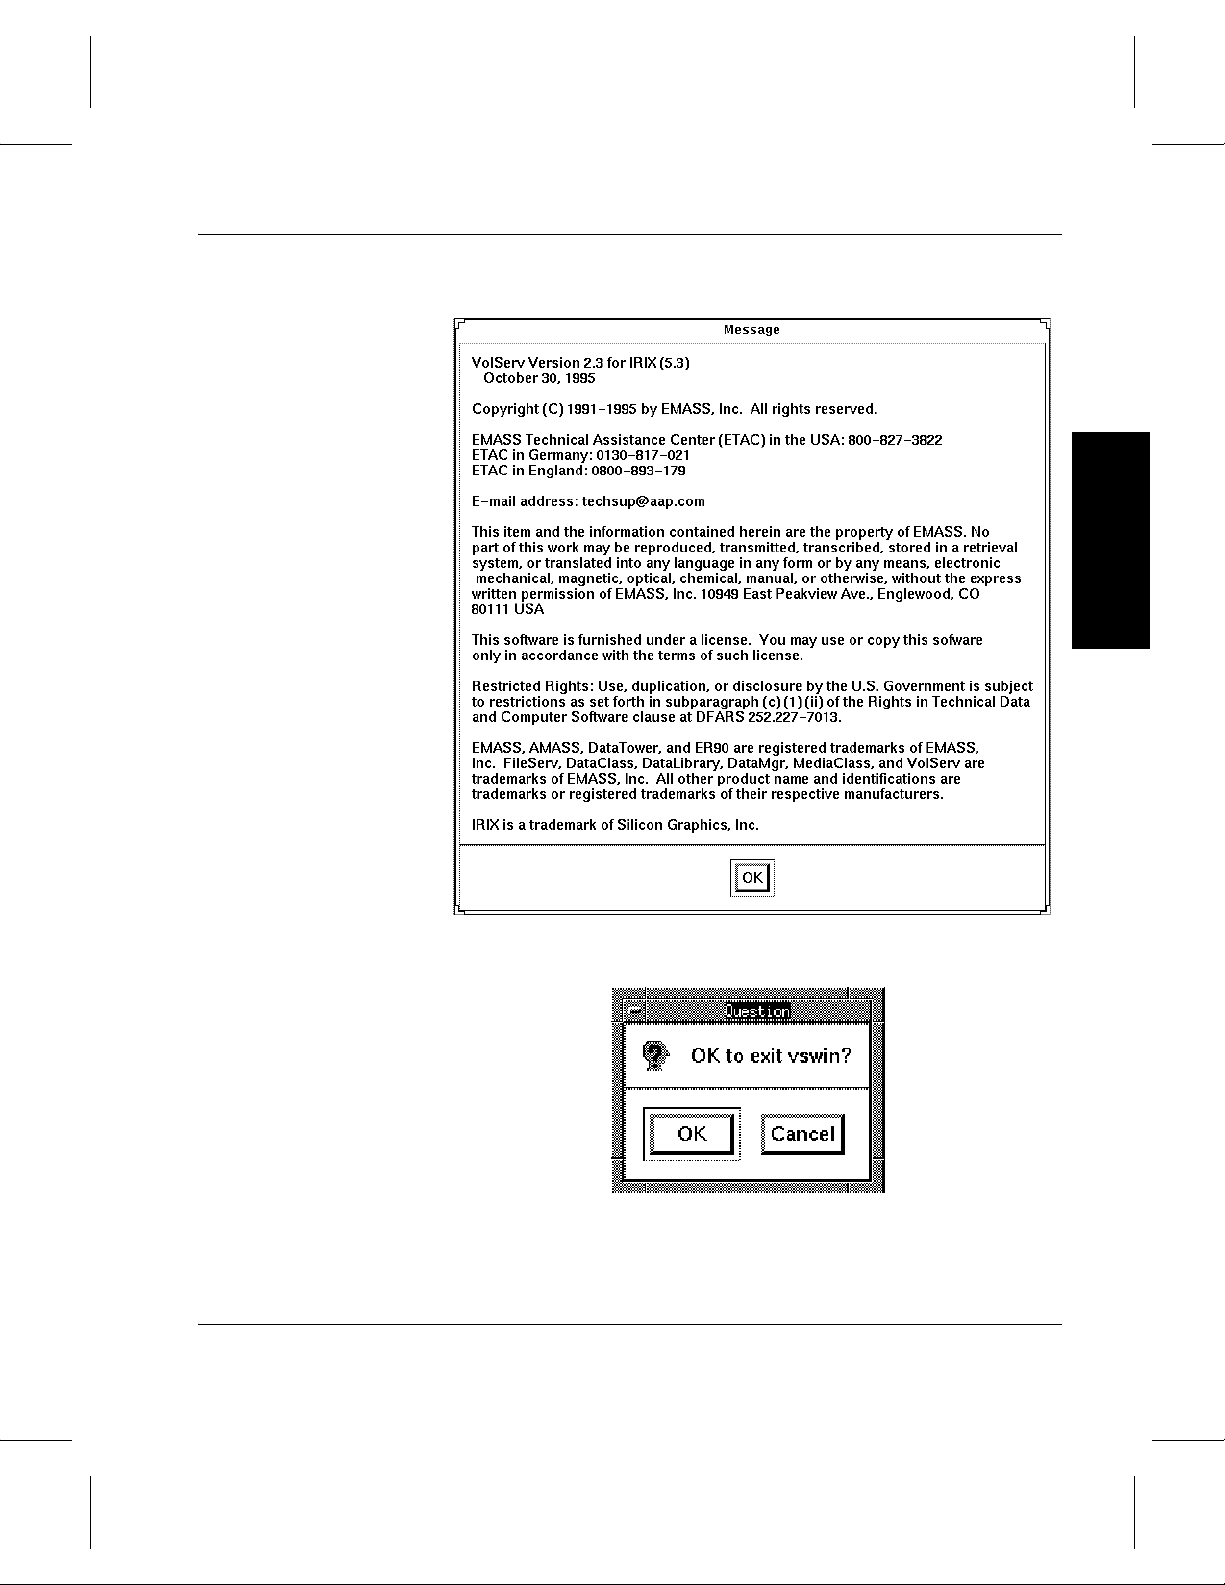
Figure 1-4 Sample VolServ Copyright Message Window
Using the VolServ GUI
Getting Started
Figure 1-5 Exit vswin Question Window
6-01002-01 Rev A Getting Started 1-5
Page 30
Using the VolServ GUI
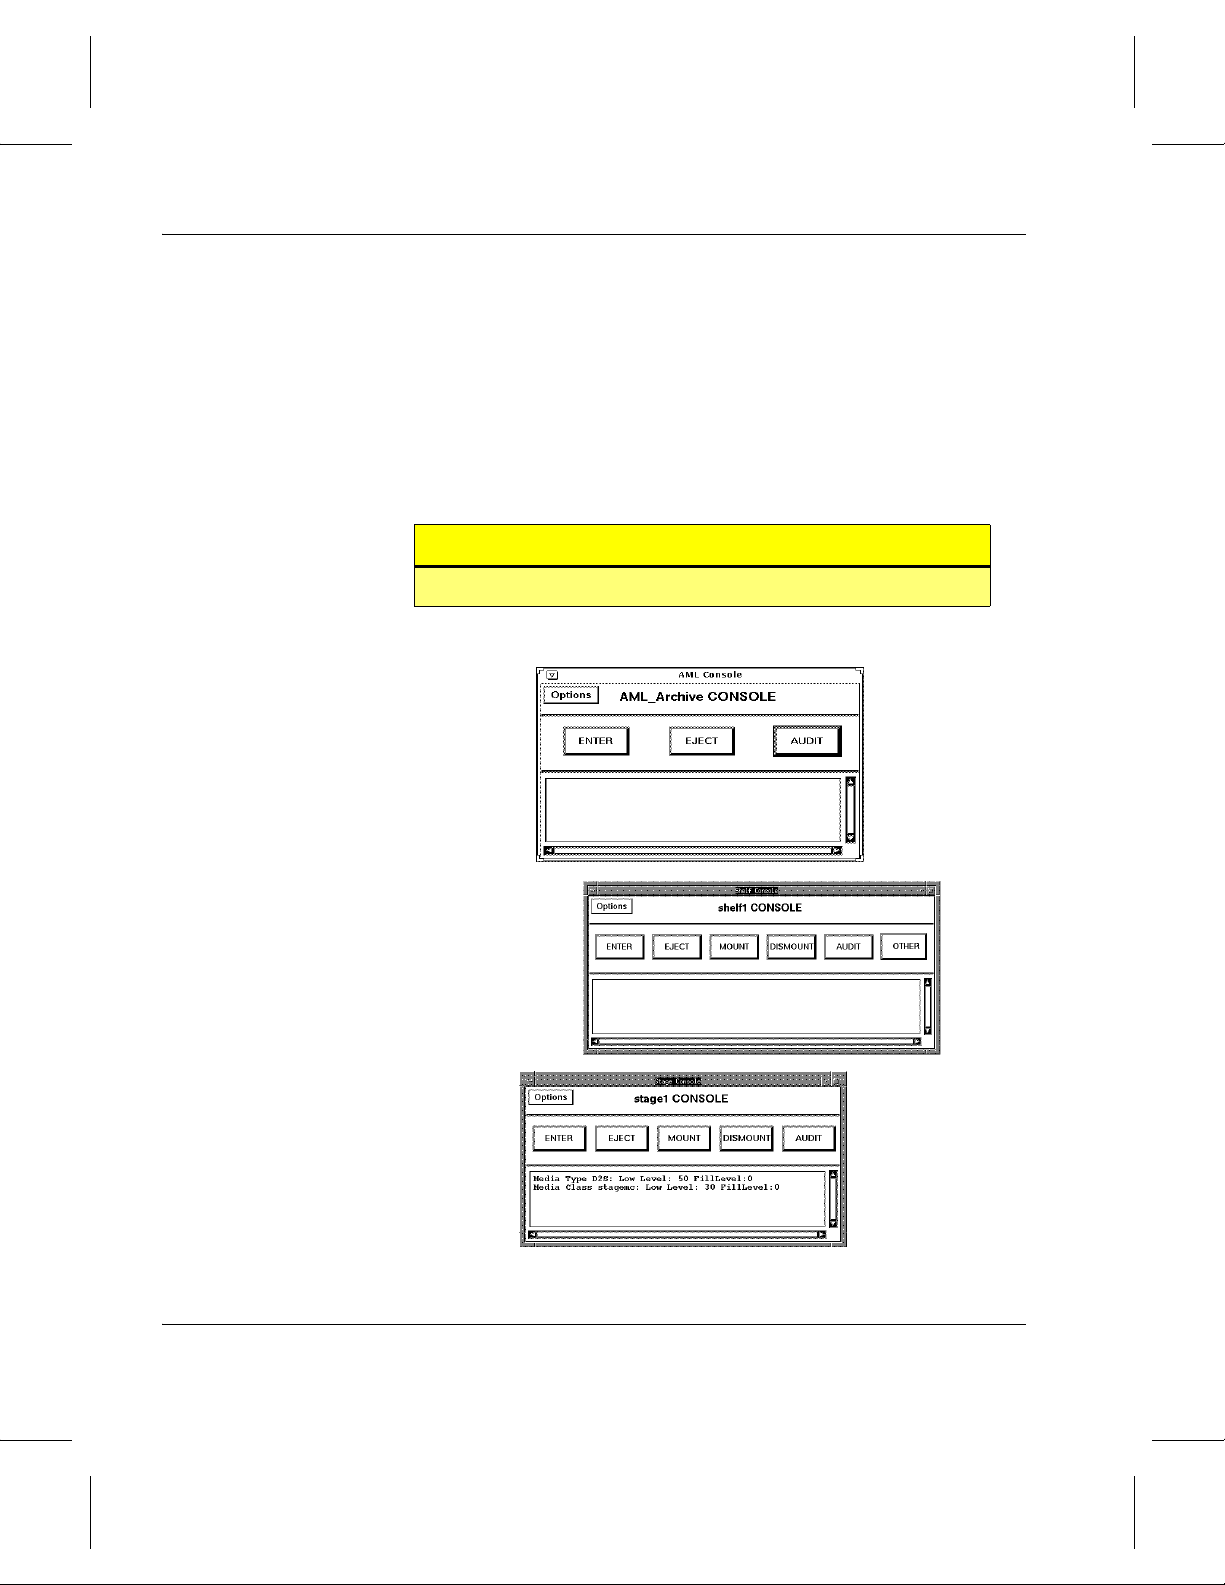
Archive Console
The archive Console is used to interface with the archive.
Depending on the archive, number of pushbuttons on the
Console will differ.
Figure 1-6 shows va rious types of arch ive Consoles. Each push
button performs a specific function. Each archive Console has
one control menu, Options. The Options menu allows the user
to initiate status beeps and enable the sweep select list function.
Tip
For step-by-step procedures refer to Appendix A.
Figure 1-6 Archive Console Examples
1-6 Getting Started 6-01002-01 Rev A
Page 31

Using the VolServ GUI
GUI Actions
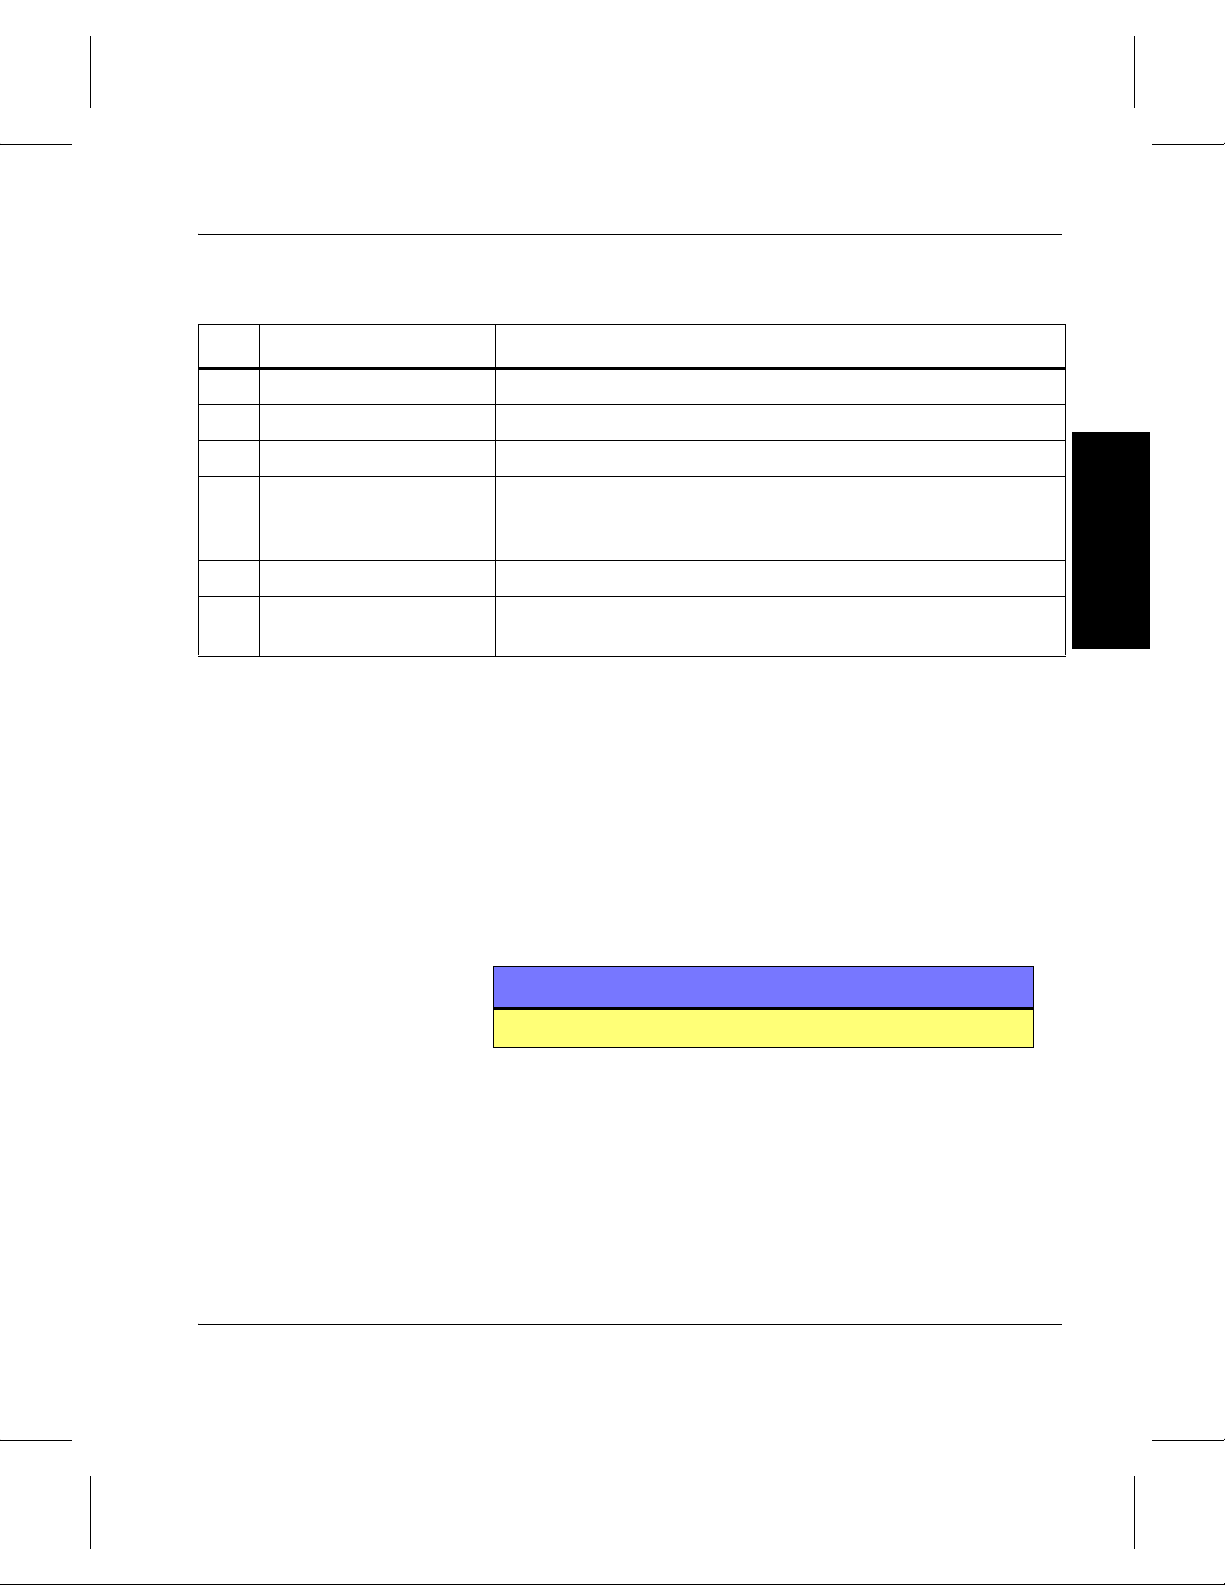
T able 1-1 lists the basic actions used to manipulate data within a
VolServ window.
Table 1-1 Basic GUI Actions
GUI Action Function
Enter
Click & Double-click Position the pointer over an object and press the left mouse
Drag Position t he cursor on a specific g raphical item, press down and
Highlight Position the cursor at the beginning of the text selection, hold
Insert Position the cursor in a text box and click the left mouse button
Enter the information into a text field. Press <
each entry.
button once (click) or twice in quick succession (double-click).
Double-clicking text automatically places the text into the Text
box.
hold the left mouse button, mo ve th e mouse to position the item
at a new location, and release the left mouse button.
down the left mouse button, drag from left to right, and release
the left mouse button.
or press the spacebar.
RETURN> after
Getting Started
Select Position th e cursor on an item and click the left mouse button.
Selecting a highlighted item causes the item to deselect.
Delete Position the cursor at th e end of the text selection to be deleted
and press the <
remove and press the <
Tab
Arrow keys Press the arrow keys to move the cursor within a tab group.
Scroll bars Align both horizontally and vertically on the right and bottom of
6-01002-01 Rev A Getting Started 1-7
Press the <
selections within a window.
Select items in a selectable list by positioning the cursor with
the arrow keys and pressing the spacebar.
status box es and selectab le list s. Allo w mov ement up and down
a list or sideways to view text not shown in a window.
BACKSPACE> key or highlight the t ext to
DELETE> key.
TAB> key to move the cursor to the next group of
Page 32

Using the VolServ GUI
GUI Windows
The VolServ windows have many conventional features
common to the windows that display when various command
functions are selected. These features include: pulldown menus,
scroll bars, resizing, pushbuttons, toggle buttons, text entry
boxes, and selectable list. Many of these objects are
manipulated by using the mouse and pointer to click on the
object and select it.
Pulldown Menu To select an item from a pulldown menu, position the cursor on
a specific graphical item that generates the pulldown, hold
down or click the left mouse button, mo ve the pointer to a menu
entry, and release the left mouse button.
Scroll Bars The scroll bars shown in Figure 1-7, allow the user to scroll
through the list. Vertical and horizontal scroll bars allow the
user to move up and down or sideways to view any text that is
not shown. Scroll bars are present on all scrollable lists. If the
number of displayed items exceeds the available space in the
scrollable list, the list is filled, and the scroll bars’ size is
reduced. If fewer items are displayed, the scroll bar fills the
entire scroll bar area to indicate no additional information is
present and scrolling cannot occur.
Figure 1-7 Scroll Bars
Text Display Items
Scroll Bars
1-8 Getting Started 6-01002-01 Rev A
Page 33

Using the VolServ GUI
Resizing VolServ GUI Windows
The VolServ GUI windows are resized using the mouse and
cursor. Position the cursor in one of the window corners, click
the left mouse button and drag the window until the desired size
is obtained. Release the mouse button to retain the present
window size
Pushbuttons Seven pushbuttons are found on many VolServ window
displays. The figure below shows the pushbuttons used to
command an operation.
The functions of the buttons are described in the table below.
Pushbutton Function
Execute Begins the operation with the current text input, list selections, toggle
selections, or button settings.
Getting Started
Clear Deselects or resets all lists, selections, text entry boxes, and buttons to
default values.
Dismiss Removes the display from the screen without executing a process .
Reset Returns input to the original state.
Remove
Selections
OK Begins or executes the primary function of the operation. On some
Cancel Removes the window from the screen without executing any process.
6-01002-01 Rev A Getting Started 1-9
Deletes selected items from the selection list. Usually located below a
selection list.
windows, clicking this button, displays a second or corresponding window.
Also, this button is usually present on a message window. Clicking the OK
button removes the message window.
Located on displays with a single function.
Page 34

Using the VolServ GUI
Toggle Buttons The two forms of toggle buttons are shown below:
Check Buttons: Radio Buttons:
InclusiveExclusive
Radio Buttons - diamond shaped:
• Displayed in groups of two or more
• Only one Radio button is selectable
• When one is selected, all other buttons in the group deselect
Check Buttons - square shaped:
• Displayed individually or in groups
• Represent inclusive options
• Any number (0-All) of Check buttons can be selected
1-10 Getting Started 6-01002-01 Rev A
Page 35

Using the VolServ GUI
Text Entry Boxes The figure below shows the user text entry boxes.
Text Entry Boxes:
• Often displayed with default values
• Displayed at the top of a selection list if manual entry is
required
To enter text into a text box:
Step 1. Click inside the text box.
Step 2. Enter the appropriate text in either of three ways:
Getting Started
• Enter the appropriate text
• Tab to the corresponding list box using the
<TAB> key and highlight an item from the list
• Click the corresponding Select button to
generate a window that displays a selectable list.
Highlight an item from the list and click the OK
button.
Note
The highlighted item is transferred to the text
box.
Selectable Lists The selectable lists displays text items that the user selects.
Items in the list shown below are selected in one of four ways:
6-01002-01 Rev A Getting Started 1-11
Page 36

Using the VolServ GUI
• Point and click the appropriate item in the list
• Double-click on the item
• Press the Select All button to highlight all text items in a list
• On the archive Console, enable the Sweep Select Lists
option to highlight user-selected items in a list by dragging
the cursor across them
Scroll Bar
Text Selection Item
1-12 Getting Started 6-01002-01 Rev A
Page 37

Using the VolServ GUI
Status Boxes
The GUI command windows contain a Status: box on the
bottom of the window. This box provides status messages
pertaining to the operation being performed. See Figure 1-8.
Figure 1-8 Status Message Window
Status: Box Control Menu
The Status: box has an invisible control menu that is displayed
by positioning the cursor in the Status: box and clicking the
right mouse button.
Getting Started
The following functions are available:
• Clear - Clears the Status: box of all messages.
• Print - Prints the contents of the Status: box or saves it to a
file.
• Auto Scroll - Automatically scrolls the box as messages are
received.
To perform these functions, refer to the following procedures:
6-01002-01 Rev A Getting Started 1-13
Page 38

Using the VolServ GUI
Deleting all Data in a Status: Box
To clear the content within a Status: box:
Step 1. On the Status: box pulldown menu, press and hold
the right mouse button.
Step 2. Drag the cursor to the Clear line.
Step 3. Release the right mouse button.
Step 4. The Question window displays.
Step 5. Accept the operation in either of two ways:
• Click the OK button
The content of the status box clears.
• Click the Cancel button
The process stops and the user is returned to the
original window.
Printing Data in the
To print the contents of the Status: box:
Status: Box
Step 1. On the Status: box pulldown menu, press and hold
the right mouse button.
Step 2. Drag the cursor to the Print line.
Step 3. Release the right mouse button.
The Printer window displays.
Step 4. Enter the printer name in the text box.
Step 5. Click the OK button.
1-14 Getting Started 6-01002-01 Rev A
Page 39

Using the VolServ GUI
The user is returned to the original window and the
contents of the Status: box are printed on the
requested printer.
Saving Status: Box Data to a Text File
To save the contents of the Status: box to a softcopy text file:
Getting Started
Step 1. On the Status: box pulldown menu, press and hold
the right mouse button.
Step 2. Drag the cursor to the Print line.
Step 3. Release the right mouse button.
The Printer window displays.
Step 4. Click the Print Only to File Named button.
Step 5. Enter the complete destination filename in the
corresponding text box.
If the full path name is not specified, the file is saved
in the directory where vsadm was executed.
Step 6. Click the OK button.
The user is returned to the original window and the
contents of the Status: box are saved in the specified
file
Controlling
To turn ON or OFF automatic scrolling:
Automatic Scrolling
Step 1. On the Status: box pulldown menu, press and hold
the right mouse button.
Step 2. Drag the cursor to the Auto Scroll line.
Step 3. Release the right mouse button.
6-01002-01 Rev A Getting Started 1-15
Page 40

Using the VolServ GUI
Automatic scrolling is toggled between enabled and
disabled each time the Auto Scroll line is selected.
The dark square to the left of Auto Scroll displays
when automatic scrolling is enabled.
Unsupported Functions
VolServ supports multiple types of automated and manual
archives. Therefore, similar windows are used between the
listed archives. Any occurrence of an unsupported function
appears desensitized.
1-16 Getting Started 6-01002-01 Rev A
Page 41

Using the VolServ GUI
Common GUI Windows
This section presents GUI windows that occur during
procedures described in this guide. Each window presents only
a specific function and is not intended to represent a complete
procedure.
Getting Started
Common Windows:
• Occur in designated windows
• Generate as a result of user action
• Generate corresponding windows
• Display as a warning to the user
When the window disappears, the user is returned to the
original window. Any information from the window is
transferred to the original window.
The list of windows includes:
• Message and Question
• Filter
• Select
• Filtered Select
• Copy From
• Printer
• Label Printer
6-01002-01 Rev A Getting Started 1-17
Page 42

Using the VolServ GUI
Message and Question
and require user response to continue the VolServ operation.
See Figure 1-9 and Figure 1-10.
Figure 1-9 Message Window Examples
1
2
Message and Question windows occur in designated windows
Table 1-2 lists the elements of the Message window.
Table 1-2 Message Window Elements
No. Element Function
1 OK Button Closes Message window and continues the VolServ operations.
2 Cancel Button Aborts the specified process.
1-18 Getting Started 6-01002-01 Rev A
Page 43

Figure 1-10 Question Window Example
Using the VolServ GUI
Getting Started
1
Table 1-3 lists the elements of the Question window.
Table 1-3 Question Window Elements
No. Element Function
1 OK Button Closes Message window and
2 Cancel Button Aborts the specified process.
Responding to
Message and
Step 1. (Optional) Click the OK button to continue the
VolServ operation.
Question Boxes
The Message or Question window is removed.
OR
Step 2. (Optional) Click the Cancel button.
2
executes the specified process.
6-01002-01 Rev A Getting Started 1-19
Page 44

Using the VolServ GUI
The user is returned to the original window.
File Pop-up Window
Most of the Queries and Reports windows contain a Report
Destination: box. This box allows the user to direct the output
of the query or report to the screen, file, or printer. The File
pop-up window is displayed when the File button is selected in
the Report Destination: box. This window allows the user to
specify the name of the soft copy file where the direct output of
the query or report will be saved. See Figure 1-11.
Figure 1-11 File Pop-up Window
1
2
Table 1-4 lists the elements of the File pop-up window.
Table 1-4 File Pop-up Window Elements
3
No. Element Function
1 File Name: Text
Box
2 OK Button Begins the redirect operation and
3 Cancel Button Removes the File pop-up window
1-20 Getting Started 6-01002-01 Rev A
Provides a user entry field for the
name of the softcopy file to which to
direct the query or report output.
removes the File pop-up window. The
user is returned to the original
window.
without performing the redirect
operation.
Page 45

Using the VolServ GUI
Printer Pop-up Window
Most of the Queries and Reports windows contain a Report
Destination: box. This box allows the user to direct the output
of the query or report to the screen, file, or printer.
The Printer pop-up window allows the user to obtain a
hardcopy of the direct output of the query or report.
Getting Started
This window allows the user to specify the printer name and
number of copies of the information to print. See Figure 1-12 on
page 1-22.
6-01002-01 Rev A Getting Started 1-21
Page 46

Using the VolServ GUI
Figure 1-12 Printer Pop-up Window
1
2
3
4
1
Printer Name Pulldown List
2
Number of Copies Pulldown List
Table 1-5 lists the elements of the Printer pop-up window.
1-22 Getting Started 6-01002-01 Rev A
Page 47

Using the VolServ GUI
Table 1-5 Printer Pop-Up Window Elements
No. Element Function
1 Printer Name: Text Box Provides a user entry field for the name of the designated
printer.
Note: Press and hold the right mouse button to generate a
pulldown list of available printers.
2 Copies: Box Provides a user entry field for the number of copies to print.
Note: Press and hold the right mouse button to generate a
pulldown list of possib le v alues. To p rint a larger number than
indicated on the pulldown list, the value must be text entered.
3 OK Button Begins the Print operation and removes the Printer window.
The user is returned to the original window.
4 Cancel Button Removes the Printer window without performing the Print
operation.
Getting Started
Filter Pop-up Window
6-01002-01 Rev A Getting Started 1-23
The Filter pop-up window is used to specify the restrictive
filters that identify media IDs. See Figure 1-13 on page 1-24.
Page 48

Using the VolServ GUI
Figure 1-13 Filter Menu
1
2
4
3
5
6
8
7
9
11
10
Clicking the OK button generates a list of media that are:
• Filtered from selected archives
• Filtered from specified Media Classes
With specified media identifier characteristics. At least one of
the criteria previously listed must be specified from the Filter
window. However, any two or all three can be specified. Table
1-6 lists the elements of the Filter window.
1-24 Getting Started 6-01002-01 Rev A
Page 49

Using the VolServ GUI
Table 1-6 Filter Pop-up Window Elements
No. Element Function
1 Media ID Filter: Button Selects the Media identifier as a valid filter.
2 Media ID Filter: Text Box Provides a user entry field for a string and/or wildcard
characters used to restrict the list of media identifiers
available for selection.
Two wildcard characters are available for use:
UNIX standard * and ?.
* - represents all
? - represents any single character
3 Media Class: Button Selects Media Class as a valid filter.
4 Media Class: Text Box Provides a user entry field for the name of a Media Class to
which all media presented for select ion must belong.
5 Select Button Generates the Select window from which a Media Class is
selected. Refer to on page 1-25.
6 Archive Name: Button Selects Archive Name as a valid filter.
Getting Started
7 Archive Name: Text Box Provides a user text entry field for the archive name of the
medium for which user fields are viewed or modified.
8
9 OK Button Generates the Select Media window and returns the user to
10 Clear Button Clears all user entry fields.
11 Cancel Button Removes the Filter window and returns the user to the
Select Items
Select
Button
The Select window, shown below, generates a selectable list.
Generates the Select window from which the archive name
is selected. Refer to “Select Items” on page 1-25.
the original window. Refer to “Select Media” on page 1-27.
original window.
The generated list is a reference for the original window. See
Figure 1-14.
6-01002-01 Rev A Getting Started 1-25
Page 50

Using the VolServ GUI
Figure 1-14 Select Window
1
2
3
4
5
The user can select an item (or items) from this list. After
clicking the OK button, any item show n in the Select Item text
box or highlighted in the Select Item: list box is automatically
placed in the text entry box of the original window.
Table 1-7 lists the elements of the Select window.
Table 1-7 Select Window Elements
No. Element Function Entry
1 Select Item: Text Box Provides a user text entry of selected item.
2 Select Item: List Box Displays a selectable list of information associated with the
original window.
3 OK Button Removes the Select window and automatically transfers the
item listed in the Select Item text box or highlighted in the
Select Item: list box into the text entry box of the original
window.
1-26 Getting Started 6-01002-01 Rev A
Page 51

No. Element Function Entry
4 Clear Button Clears all user entry fields.
5 Dismiss Button Removes the Select window.
Using the VolServ GUI
Select Media
The Select Media window is the generated result from the
Getting Started
Filter window. The user can select an item (or items) from the
selection list. After clicking the OK button, the highlighted item
or item shown in the Media ID: text box are transferred to the
original window.
To generate the Select Media window:
Note
Refer to “Filter Pop-up Window” on page 1-23.
Step 1. Click the Select button from the original window.
The Filter pop-up window displays.
Step 2. Select one of the filter options: Media ID Filter,
Media Class, or Archive Name.
Step 3. Enter the corresponding information in the text box.
Click the OK button.
The Select Media window displays a list of
identifiers specific to the criteria entered in the Filter
window. In the figure below, Media ID is the option
selected as the filter. See Figure 1-15.
6-01002-01 Rev A Getting Started 1-27
Page 52

Using the VolServ GUI
Figure 1-15 Select Media Window
1
2
3
4
5
6
Table 1-8 lists the elements of the Select Media window.
1-28 Getting Started 6-01002-01 Rev A
Page 53
Using the VolServ GUI
Table 1-8 Select Media Window Elements
No. Element Function Entry
1 Media ID: Text Box Provides a user text entry for a specific medium identifier.
2 Media ID: List Box Displays a list of media that meet the filter requirements.
3 Select All Button Selects all items in the Media ID list.
4 OK Button Removes the Select Media window. The highlighted item or
items shown in the Media ID: text box are transferred to the
original window. The user is returned to the original window.
5 Clear Button Clears all user entry fields.
6 Dismiss Button Removes the Select Media window and returns the user to the
original window.
Getting Started
Printer Tasks
The Printer window available through all command and
archive Console windows status boxes (See Figure 1-16 on
page 1-30.) allows you to do the following tasks:
• Specify the name of the printer and number of copies to
obtain a hardcopy of the output for the operation.
• Specify the name of a softcopy file where the output of the
operation will be saved.
Note
Refer to “Printing Data in the Status: Box” on page 1-14
• Print the data displayed in a Status: Box.
• Print audit output.
6-01002-01 Rev A Getting Started 1-29
Page 54

Using the VolServ GUI
Figure 1-16 Printer Pop-Up Window
1
3
5
2
4
6
1
Printer Name Pulldown List
2
Number of Copies Pulldown List
Table 1-9 lists the elements of the Printer pop-up window:
Table 1-9 Printer Pop-Up Window
No. Element Function
1 Printer Name: Text Box Provides a user entry field for the name of t he designated
printer.
Note: Press and hold the right mouse b utton to gener ate a
pulldown list of available printers.
1-30 Getting Started 6-01002-01 Rev A
Page 55

Using the VolServ GUI
No. Element Function
2 Copies: Text Box Provides a user entry field for the number of copies to
print.
Note: Press and hold the right mouse b utton to gener ate a
pulldown list of possible values. To print a larger number
than indicated on the pulldown list, the value must be
entered.
Getting Started
3 Print Only to File Named:
Button
4 Print Only to File Named:
Text Box
5 OK Button Begins the Print operation and removes the Printer
6 Cancel Button Removes t he Printer win do w without per formi ng th e Print
Enables the output to save to a designated file.
Note: If the full pathname is not specified, the file is saved
in the directory where vsadm was executed.
Provides a user entry field for the designated path,
filename. (Active only if the Print Only to File Named:
option is selected).
window. The user is returned to the original window.
operation.
T o print e xternal media labels, refer to Refer to “Label Printing”
on page 1-32.
6-01002-01 Rev A Getting Started 1-31
Page 56

Using the VolServ GUI
Label Printing
labels during the Import and Reprint Media Label operations.
Click the OK Button on the Label Printer window to execute
the print operation.
Copies cannot be specified for a label printer.
1
3
The table below lists the Label Printer window elements.
No. Element Function
The Label Printer window is used for printing external media
1 Printer Name:
Text Box
Provides a user entry field for the na me of t he design ated label p rinter.
Note: Press and hold the right mouse button to generate a pulldown
list of available printers.
2
2 Cancel Button Removes the Label Printer window. The user is returned to the
original window.
3 OK Button Begins the Label Printer operation and removes the Label Printer
window. The user is returned to the original window.
1-32 Getting Started 6-01002-01 Rev A
Page 57

NOTES
Using the VolServ GUI
Getting Started
6-01002-01 Rev A Getting Started 1-33
Page 58

Using the VolServ GUI
NOTES
1-34 Getting Started 6-01002-01 Rev A
Page 59

Automated Archive Console Windows . . . . . . . 2-3
Manual Archive Console Windows . . . . . . . . .2-28
Shelf Console . . . . . . . . . . . . . . . . . . . . . . . . . 2-29
Stage Console . . . . . . . . . . . . . . . . . . . . . . . . . 2-44
2
Arc h ive
Operation
Archive Operation
Page 60

Using the VolServ GUI
Roadmap
Topic
Introduction to the GUI. 1
Information about the archive console and its
interface with an archive .
How to add or remove media from archives and
other media operations.
How to control command requests and vary an
archive, archive component, or drive operational
state.
How to view, remove, or reconfigure the VolServ
configuration parameters.
How to use the GUI to perform queries or get
reports on system information or parameters.
How to execute selected Archive Console
procedure segments.
How to execute selected Media Management
procedure segments.
Refer To
Chapter
2
3
4
5
6
A
B
How to execute selected Administration
procedure segments.
How to execute selected Configuration
procedure segments.
How to execute selected Reports and Queries
procedure segments.
2-2 Archive Operation 6-01002-01 Rev A
C
D
E
Page 61

Using the VolServ GUI
Automated Archive Console Windows
This chapter includes information about the archive Console
used by the Archiv e Operator (AO) to interface with an archiv e.
After an archive is configured, its Console displays at the
location specified during the configuration process.
The archive Console operations depend on whether the
configured archive is automated or manual. The Console
operations for an automated archive are: ENTER, EJECT, and
AUDIT. In addition to these three operations, manual archives
also include: MOUNT, DISMOUNT, and OTHER. (Only the
Shelf archive supports the OTHER function.) .
Tip
Detailed archive operation procedures are contained in
Appendix A.
Six types of archive Consoles are supported by VolServ . Four of
these types are automated archives. The automated archive
console types include:
•AML Console (AML/E, AML/2, and AML/J Archives)
Archive Operation
•Silo Console (StorageTek ACS Product Family Archives)
• DataTower Console
•SCSI Console (ADIC Scalar 100, Scalar 1000, and Scalar
10K)
Console Window
6-01002-01 Rev A Archive Operation 2-3
The Console window shown in Figure 2-1 is an example of all
the automated archive consoles.
Page 62

Using the VolServ GUI
Figure 2-1 Sample Automated Archive Console Window
1
2
3
4
5
6
7
AML_Archive
AML Console
Each of the automated archives contain the Options button,
ENTER button, EJECT button, AUDIT button, and status box.
Table 2-1 lists the elements of the automated archive Console
window.
Table 2-1 Console Window Elements
No. Element Function
1 Options Button Displays the Options pull-down menu.
2 Status Beeps Option Enables an audible beep to occur when status is
returned to the archive Console.
3 Sweep Select Lists
Option
4 ENTER Button Displays the Enter window. Refer to “Enter Window” on
5 EJECT Button Displays the Eject window. Refer to “View/Fail Enter
6 AUDIT Button Displays the Audit window. Refer to “AML Eject
7 Status Box Reports the status/activity of its associated archive.
2-4 Archive Operation 6-01002-01 Rev A
Enables the AO to highlight items from window selection
lists for selection by swee ping across the items.
page 2-5.
Window” on page 2-10.
Window” on page 2-14.
Page 63

Using the VolServ GUI
Enter Window
The Enter window enters media placed on the Enter list into the
archive (Enter operation) or removes media from the archive’s
Enter list. A utomatic Checkin and Automatic Import override
options are also enabled from the Enter window (Refer to the
Command Reference book). Media being entered into the
archive is shown by selecting the View/Fail button. This button
displays the View/Fail Enter window showing the media
identifier (ID) to be entered into the archive.
To display the Enter window, click the ENTER button from
the Console. A sample Enter window is shown in Figure 2-2.
Figure 2-2 Sample Enter Window
1
4
Archive Operation
2
3
5
6
7
8
9
10
11
12
13
If the consoles ENTER button is highlighted, there is at least
one media on the archive’s Enter list.
6-01002-01 Rev A Archive Operation 2-5
Page 64

Using the VolServ GUI
Table 2-2 lists the elements of the Enter window that are
common to all automated archive types.
Table 2-2 Standard Enter Window Elements
No. Element Function
1 Media Type: Text Box Provides an AO entry field for media type . Selecting this bo x
desensitizes all fields in the System Default Overrides
subwindow.
2 Automatic Checkin
Toggle Button
3 Automatic Import
Toggle Button
4 Media Class: Text Box Provides an AO entry field to specify a diff erent Media Class
5
Select
…Button
6 Manufacturer: Text Box Provides an AO entry field for the media type Manufacturer
7 Batch: Text Box Provides an AO entry field for the Batch identifier.
8 Enter Priority: Slide Bar Sets priority level of the Enter operation.
9 Enter Button Begins the Enter operation.
10
View/Fail
… Button
Enables the System Default Override for Automatic
Checkin. If any media in the EIF is checked out, VolServ
performs an Automat ic Chec kin of the media. Refer to “Auto
Check-in” on page 3-9 of the Administrative Tasks manual.
Enables the System Default Override for Automatic Impor t.
If any media in the EIF is in the Intransit state or is not
known in the VolServ database, VolServ performs an
Automatic Import of the media. Refer to “Auto Import” on
page 3-12 of the Administrative Tasks manual.
name other than using the default Media Class.
Displays the Select window showing all Media Classes
associated with the archive. Refer to “Select Items” on
page 1-25.
name.
Displays the View/Fail Enter window. Refer to “Fail Eject”
on page 2-17.
11 Clear Button Clears all entry fields and returns them to their original
default values
12 Dismiss Button Removes the Enter window and returns the AO to the
Console.
2-6 Archive Operation 6-01002-01 Rev A
Page 65

Using the VolServ GUI
No. Element Function
13 Status: Box Reports the status as media are added into the archiv e after
clicking the Enter button or reports the status of Fail Enter
operation media after the Fail button is clic ked in the
View/Fail Enter window.
The media IDs from the Enter list disappear as they are
processed. Failed media reappear on the Enter list.
AML Enter Window Figure 2-3 shows the elements that are specific to the AML
Enter window.
Figure 2-3 AML Enter Window
1
2
Archive Operation
Table 2-3 lists the elements of the Enter window that are
specific to the AML archives.
6-01002-01 Rev A Archive Operation 2-7
Page 66

Using the VolServ GUI
Table 2-3 AML-Specific Enter Window Elements
No. Element Function
1 Enter EIF-Media Type:
Text Box
2 Enter EIF-Media Type:
List Box
Silo Enter Window
Figure 2-4 shows the elements that are specific to the Silo
Enter window.
Figure 2-4 Silo Enter Window
1
2
3
Provides an AO entry field for the Eject Insert Facility (EIF).
Displays a selectable list of available Eject Insert Facilities
associated with the AML archive. Double-clicking an entry
automatically transfers t he entry into the Enter EIF-Media
Type: text box.
Table 2-4 lists the elements of the Enter window that are
specific to the Silo archives.
2-8 Archive Operation 6-01002-01 Rev A
Page 67

Using the VolServ GUI
Table 2-4 Silo-Specific Enter Window Elements
No. Element Function
1 Enter Count: Text Box Shows the number of media to be entered and provides an
AO entry filed for the number of media to be placed in the
enter port. The archive enters the quantity of media
contained in the text box.
2 Enter Port ID: Text Box Provides an AO entry field for the Port ID.
3 Enter Port ID: List Box Displays a selectable list of available Port IDs.
Double-clicking on a port ID automatically transfers it to the
Enter Port ID: text box.
SCSI Enter Window Figure 2-5 shows the elements that are specific to the SCSI
Enter window.
Archive Operation
6-01002-01 Rev A Archive Operation 2-9
Page 68

Using the VolServ GUI
Figure 2-5 SCSI Enter Window
1
2
Table 2-5 lists the elements of the Enter window that are
specific to the SCSI archives.
Table 2-5 SCSI-Specific Enter Window Elements
No. Element Function
1 Enter Port ID: Text Box Provides an AO entry field for the Port ID.
2 Enter Port ID: List Box Displays a selectable list of available Port IDs.
Double-clicking on a port ID automatically transfers it to the
Enter Port ID: text box.
View/Fail Enter Window
2-10 Archive Operation 6-01002-01 Rev A
The View/Fail Enter window is common for all automated
archives.
Page 69

The View/Fail Enter window displays the archive Enter list.
Media can be removed from the Enter list by performing a Fail
Enter operation. The View/Fail Enter window lists reasons to
fail the media during a Fail Enter operation.
To reach the View/Fail Enter window from the Enter window ,
click the View/Fail. button. See Figure 2-6.
Figure 2-6 Sample View/Fail Enter Window
Using the VolServ GUI
2
1
5
4
6
3
Archive Operation
Table 2-6 lists the elements of the View/Fail Enter window.
6-01002-01 Rev A Archive Operation 2-11
Page 70

Using the VolServ GUI
Table 2-6 View/Fail Enter Window Elements
No. Element Function
1 Media List List of available media to View/Fail.
2 Failure Reason: Option
Boxes
3 Fail Button Fails the selected media of the Media List with the specified
4 Clear Button Clears any selected media from the Media List.
5 Print List Button Displays the Printer window. Refer to “Printer Pop-up
6 Dismiss Button Removes the View/Fail Enter window and returns the AO
Eject Window
The Eject window displays the archive Eject list. The Eject
Reasons specifying a media’s removal from the archive’s
Enter list can include:
• Media not found (default)
• Media label damaged
• Media damaged
• Archive off-line or unavailable
• Archive mechanical error
• Port off-line or unavailable
• Incompatible media type
•Other
error.
Window” on page 1-21
to the Enter Window.
window also removes media from the archive (Eject operation)
or removes media from the Eject list without performing an
Eject operation.
Tip
Double-clicking on any media ID in the list is equivalent to
selecting the media and clicking the Eject button. The doubleclicked media and all highlighted media are ejected.
2-12 Archive Operation 6-01002-01 Rev A
Page 71

To display the Eject window, click the EJECT button from the
Console. See Figure 2-7.
Figure 2-7 Sample Eject Window
1
2
Using the VolServ GUI
Archive Operation
6
7
5
3
4
8
If the console EJECT button is highlighted, at least one media
is on the archive’s Eject list. Table 2-7 lists the elements of the
Eject window that are common to all automated archive types.
Table 2-7 Standard Eject Window Elements
No. Element Function
1 Eject List Box Selectable list of media available to eject.
2 Eject Priority: Slide Bar Sets the priority level of the Eject operation.
3 Clear Button Clears all entry fields and returns them to their original
default values.
6-01002-01 Rev A Archive Operation 2-13
Page 72

Using the VolServ GUI
No. Element Function
4 Print List Button Displays the Printer window. Refer to “Printer Pop-up
Window” on page 1-21.
5 Fail Button Displays the Fail Eject window. Refer to Refer to “View/Fail
Enter Window Elements” on page 2 -1 2.
6 Eject Button Begins the Eject operation.
7 Status: Box Reports the status of the Eject operation after the Eject
button is clicked. Reports the status of the Fail Eject
operation after the OK button is click ed in the Fail Eject
window. The media identifiers (IDs) from the Eject list
disappear as they are processed . F ailed media reappear on
the Eject list.
8 Dismiss Button Removes the Eject window and returns the AO to the AML
Console.
AML Eject Window Figure 2-8 shows the elements that are specific to the AML
Eject window.
2-14 Archive Operation 6-01002-01 Rev A
Page 73

Figure 2-8 AML Eject Window
Using the VolServ GUI
AML
1
2
Archive Operation
Table 2-8 lists the elements of the Eject window that are
specific to the SCSI archives.
Table 2-8 AML-Specific Eject Window Elements
No. Element Function
1 Eject EIF-Media Type:
Text Box
2 Eject EIF-Media Type:
List Box
6-01002-01 Rev A Archive Operation 2-15
Provides an AO entry field for the Eject Insert Facility (EIF)
port. (An EIF port must be selected. If all selected media are
of the same type, the selected media are ejected through
the specified port.)
Displays a selectable list of available Eject Insert Facilities
associated with the archive. Double-clicking an entry
automatically transfers the entry into the Eject EIF-Media
Type: text box.
Page 74

Using the VolServ GUI
Silo/Tower/SCSI Eject Window
Figure 2-9 shows the elements that are specific to the Silo,
Tower, and SCSI Eject windows.
Figure 2-9 SCSI Eject Window
1
2
Table 2-9 lists the elements of the Eject window that are
specific to the Silo, Tower, and SCSI archives.
Table 2-9 Silo/Tower/SCSI-Specific Eject Window Elements
No. Element Function
1 Eject Port ID (optional):
Text Box
2-16 Archive Operation 6-01002-01 Rev A
Provides an AO entry field for the Eject Port Identifier (ID).
(An Eject port must be selected. If all select ed media are of
the same type, the selected media are ejected through the
specified port.)
Page 75

Using the VolServ GUI
No. Element Function
2 Eject Port ID: List Box Displays a selectable list of available Eject Port IDs
associated with the archive. Double-clicking an entry
automatically transfers the ent ry into the Eject Port ID: te xt
box.
Fail Eject This is a common pop-up window for all automated archives.
This GUI does not support the AML archive.
During the Fail Eject operation, the reason to fail (remove) a
media from the Eject list is identified. The Fail Eject window
lists possible failure reasons, depending on the type of
automated archive soliciting it.
To display the Fail Eject window after completing the Eject
window, click the Fail button. See Figure 2-10.
Figure 2-10 Fail Eject Window
Archive Operation
1
2
3
Table 2-10 lists the elements of the Fail Eject window.
6-01002-01 Rev A Archive Operation 2-17
Page 76

Using the VolServ GUI
Table 2-10 Fail Eject Pop-up Window Elements
No. Element Function
1 Failure Reason:
Optional Buttons
2 OK Button Begins the Fail Eject operation. The Status Box at the
3 Cancel Button Removes the Fail Eject window and returns the AO to the
Audit Window
The Audit window verifies the contents of the archive against
Reasons specifying a media’s removal from the archive’s
Eject list can include:
• Media not found (default)
• Archive off-line or unavailable
• Archive mechanical error
• Port off-line or unavailable
•Other
bottom of the Eject window shows the progress of each
removed media. The AO is returned to the Eject window.
Eject window.
VolServ database inventory. Two types of audits are performed,
standard audit and remap. Refer to the Administrative Tasks
book.
To display the Audit window, click the AUDIT button on the
Console. Each archive type has different elements in the Audit
window. Each type is described in detail below.
AML Audit Window The AML Audit window is shown in Figure 2-11.
2-18 Archive Operation 6-01002-01 Rev A
Page 77

Figure 2-11 AML Audit Window
1
2
3
4
Using the VolServ GUI
Archive Operation
7
5
6
8
The Audit window displays with the initial selection default of
Remap Archive. Location fields are desensitized until the
Inventory Range of Bins within a Storage Unit is enabled.
Table 2-11 lists the elements of the AML Audit window.
Table 2-11 AML Audit Window Elements
No. Element Function
1 Type of Audit to
Perform: Option Box
Options include:
• Inventory & Remap Entire Archive
• Inventory Range of Bins within a Storage Unit
• Remap Archive (default)
9
6-01002-01 Rev A Archive Operation 2-19
Page 78

Using the VolServ GUI
No. Element Function
2 Starting Location: Text
Box
Provides an AO entry field f or Starting Location of Range of
Bins within a storage unit:
• Device Type
• Storage Unit
•Surface
•Row
•Bin
3 Ending Location: Text
Box
Provides an AO entry field for the Ending Location of Range
of Bins within a storage unit:
•Surface
•Row
•Bin
4 Audit Priority: Slide Bar Sets the priority level of the Audit operation.
5 Execute Button Begins th e Audit operation.
6 Clear Button Clears all entry fields and returns them to their original
default values.
7 Cancel Button Cancels the Audit operation before it completes.
8 Status: Box Reports the status of the Audit operation.
9 Dismiss Button Removes the Audit window and returns the AO to the AML
Console.
Silo Audit Window The Silo Audit window is shown in Figure 2-12.
2-20 Archive Operation 6-01002-01 Rev A
Page 79

Figure 2-12 Silo Audit Window
5
6
Using the VolServ GUI
1
2
3
Archive Operation
4
7
8
9
Table 2-12 lists the elements of the Silo Audit window.
Table 2-12 Silo Audit Window Elements
No. Element Function
1 Audit Component:
Option Box
6-01002-01 Rev A Archive Operation 2-21
Options include:
• Entire Archive (default)
•LSM
• Panel
• Subpanel
• Remap Archive
Page 80

Using the VolServ GUI
No. Element Function
2 Starting Location: Text
Boxes
3 Ending Location: Text
Boxes
4 Audit Priority: Slide
Bar
Provides an AO entry field for starting location of a range of
components:
•LSM
• Panel
•Row
•Column
The LSM field is sensitized when the Entire Archive
component option is selected.
The LSM and Panel fields are sensitized when the Panel
component option is selected.
The LSM through Row fields are sensitized when the Row
component option is selected.
All fields are sensitized when the Column component option is
selected.
Provides an AO entry field for the ending location of a range of
components that are the same as f or the Starting Locati on text
boxes.
Sets the priority level of the Audit operation.
5 Clear Button Clears all entry fields and returns them to their original default
values.
6 Cancel Button Cancels the Audit operation before it completes.
7 Execute Button Begins the Audit operation.
8 Status: Box Reports the status of the Audit operation.
9 Dismiss Button Removes the Audit window and returns the AO to the Silo
Console window.
2-22 Archive Operation 6-01002-01 Rev A
Page 81

Using the VolServ GUI
Tower Audit Window The Tower Audit window is shown in Figure 2-13. Figure 2-13 DataTower Audit Window
1
2
3
4
6
Archive Operation
5
7
8
Table 2-13 lists the elements of the Tower Audit window.
6-01002-01 Rev A Archive Operation 2-23
Page 82

Using the VolServ GUI
Table 2-13 Tower Audit Window Elements
No. Element Function
1 Audit Type: Option Box Options include:
• Entire Archive (default)
•MU
• Remap Archive
2 Starting Location: Text
Boxes
3 Ending Location: Text
Boxes
4 Audit Priority: Slide Bar Sets the priority level of the Audit operation.
5 Cancel Button Cancels the Audit operation before it completes.
6 Execute Button Begins th e Audit operation.
7 Status: Box Reports the status of the Audit operation.
8 Dismiss Button Removes the Audit window and returns the AO to the
Provides an AO entry field f or starting location of MU. This
entry is sensitized when the MU audit type is selected.
Provides an AO en try field for the ending location of an MU.
This entry is sensitized when the MU audit type is selected.
Tower Console.
SCSI Audit Window The SCSI Audit window is shown in Figure 2-14.
2-24 Archive Operation 6-01002-01 Rev A
Page 83

Figure 2-14 SCSI Audit Window
1
2
3
Using the VolServ GUI
4
5
6
7
Table 2-14 lists the elements of the SCSI Audit window.
Table 2-14 SCSI Audit Window Elements
No. Element Function
1 Audit Component:
Option Box
2 Audit Priority: Slide Bar Sets the pr io rity level of the Audit operation.
3 Execute Button Begins th e Audit operation.
4 Clear Button Clears all user entry fields.
Options include:
• Entire Archive (default)
• Remap Archive
Archive Operation
6-01002-01 Rev A Archive Operation 2-25
Page 84

Using the VolServ GUI
No. Element Function
5 Cancel Button Cancels the Audit operation before it completes.
6 Status: Box Reports the status of the Audit operation.
7 Dismiss Button Removes the Audit window and returns the A O to the SCSI
Console.
2-26 Archive Operation 6-01002-01 Rev A
Page 85

Using the VolServ GUI
Manual Archive Console Windows
Shelf Console Window
Figure 2-15 Shelf Console
1
2
3
4
5
6
VolServ supports two types of manual archives and their
consoles. These archives are the:
• Shelf Console (DataShelf Archive)
• Stage Console (Stage Archive)
Each of the manual archive consoles contain an Options b utton,
ENTER button, EJECT button, MOUNT button,
DISMOUNT button, AUDIT button, and status box. Only the
Shelf Console contains an extra button labeled OTHER.
The Shelf Console window is shown in Figure 2-15. The
OTHER button pull-down menu is displayed.
Archive Operation
7
8
Table 2-15 lists the elements of the Shelf Console window.
6-01002-01 Rev A Archive Operation 2-27
Page 86

Using the VolServ GUI
Table 2-15 Shelf Console Window Elements
No. Element Function
1 Options Button Displays the Option pull-down menu.
Status Beeps Option Enables an audib le beep to occur when status is returned to
the archive Console.
Sweep Select Lists
Option
2 ENTER Button Displays the Enter window. Refer to “Shelf Enter Window”
3 EJECT Button Displays the Eject window. Refer to “Shelf Eject Window”
4 MOUNT Button Displays the Mount window. Refer to
5 DISMOUNT Button Displays the Dismount window. Refer to
6 AUDIT Button Displays the Audit window. Refer to
7 OTHER Button Displays a pull-down menu with Reprint Shelf Label
8 Status Box Reports the status/activity of its associated Shelf archive.
Enables the AO to highlight items from window selection
lists for selection by sweeping across the items.
on page 2-28.
on page 2-30.
“Shelf Mount Window” on page 2-32.
“Shelf Dismount Window” on page 2-34.
“Shelf Audit Window” on page 2-35.
option. Refer to
“Reprint Shelf Labels Window” on page 2-37.
Shelf Enter Window The Shelf Enter window displays the Enter list for the Shelf
archive. The Shelf Enter window enters media placed on the
Enter list into the archive (Enter operation) or removes the
media from the Enter list. Shelf labels (not barcodes) are also
generated from the Enter window.
To display the Shelf Enter window, click the ENTER button
from the Shelf Console. See Figure 2-16 on page 2-29. If the
console ENTER button is highlighted, at least one media is on
the Shelf archive Enter list.
2-28 Archive Operation 6-01002-01 Rev A
Page 87

Figure 2-16 Shelf Enter Window
1
Using the VolServ GUI
2
3
4
5
Table 2-16 lists the elements of the Shelf Enter window.
Table 2-16 Shelf Enter Window Elements
No. Element Function
1 Enter List Box Displays a selectable list of media that are to be added into
the archive.
2 Entered Button The AO presses this b utto n when the me dia identified in the
Enter List box are placed in the archive.
3 Fail Button Displays the Fail Codes window. Refer to
“Shelf Fail Codes Window” on page 2-39.
4 Reset Button Clears all media selections.
5 Status: Box Reports the statu s as media are added into t he archiv e after
clicking the Entered button or reports the status of the Fail
Enter operation on media after the Fail button is clicked.
The media IDs from the Enter list disappear as they are
processed. Failed media reappear on the Enter list.
8
7
Archive Operation
6
6-01002-01 Rev A Archive Operation 2-29
Page 88

Using the VolServ GUI
No. Element Function
6 Print Shelf Labels
Button
7 Print List Button Displays the Printer window. Refer to“Printer Pop-up
8 Dismiss Button Removes the Enter wind ow and re turns the AO to the Shelf
Displays the Label Printers window. Refer to“Label
Printing” on page 1-32.
Window” on page 1-21.
Console window.
Shelf Eject Window The Shelf Eject window displays the Shelf archive Eject list.
The Shelf Eject window also removes media from the archive
(Eject operation) or removes media from the Eject list without
performing an Eject operation.
Tip
Double-clicking on any media ID in the list is equivalent to
selecting the media and clicking the Eject button. The doubleclicked media and all highlighted media are ejected
To display the Shelf Eject window, click the EJECT button on
the Shelf Console. See Figure 2-17 on page 2-31. If the console
EJECT button is highlighted, there is at least one media on the
archive’s Eject list.
2-30 Archive Operation 6-01002-01 Rev A
Page 89

Figure 2-17 Shelf Eject Window
1
2
Using the VolServ GUI
3
4
5
Table 2-17 lists the elements of the Shelf Eject window.
Table 2-17 Shelf Eject Window Elements
No. Element Function
1 Eject List Box Selectable list of media available to eject.
2 Retain Home Bin:
Toggle Button
3 Ejected Button Indicates that the AO removed the media identified in the
Option that causes each checked-out or moved media to
retain its address (location) within the Shelf archive. The
bins associated with media identified in this way are not
used to store other media when imported.
Eject list selection box from the archive.
8
Archive Operation
7
6
6-01002-01 Rev A Archive Operation 2-31
Page 90

Using the VolServ GUI
No. Element Function
4 Status: Box Reports the status of the Eject operation after the Eject
button is clicked. Reports the status of the Fail Eject
operation after the OK button is click ed in the Fail Eject
window . The media IDs from the Eject list disap pear as they
are processed. Failed media reappear on the Eject list.
5 Fail Button Displays the Fail Eject window. Refer to
“Shelf Fail Codes Window” on page 2-39.
6 Reset Button Clears all media selections.
7 Print List Button Displays the Printer window. Refer to “Printer Pop-up
Window” on page 1-21.
8 Dismiss Button Removes the Eject window and returns the AO to the Shelf
Console.
Shelf Mount Window
The Shelf Mount window displays the Shelf Mount list. The
Shelf Mount window also mounts media into a drive (Mount
operation) or generates the Fail Code Mount window to
remove media from the Mount list.
To display the Shelf Mount window, click the MOUNT button
from the Shelf Console. See Figure 2-18 on page 2-33. If the
console MOUNT b utton is highlighted, at least one media is on
the Shelf archive Mount list.
2-32 Archive Operation 6-01002-01 Rev A
Page 91

Figure 2-18 Shelf Mount Window
1
Using the VolServ GUI
2
7
6
3
5
4
Table 2-18 lists the elements of the Shelf Mount window.
Table 2-18 Shelf Mount Window Elements
No. Element Function
1 Mount List Box Selectable list of media to be mounted.
2 Mounted Button Indicates that the AO has mounted the media identified in
the Mount list box on the appropriate drive.
3 Status: Box Reports the status of the Mount operation after the
Mounted button is clicked. Reports th e status of the Fail
Mount operation after the OK button is clicked in the Mount
Fail Codes window. The Mount list entries di sappear as
they are processed.
4 Fail Button Displays the Mount Fail Codes window. Refer to “Shelf Fail
Codes Window” on page 2-39.
Archive Operation
6-01002-01 Rev A Archive Operation 2-33
Page 92

Using the VolServ GUI
No. Element Function
5 Reset Button Clears all media selections.
6 Print List Button Displays the Printer window. Refer to“Shelf Fail Codes
Window” on page 2-39.
7 Dismiss Button Removes the Mount window and returns the AO to the
Shelf Console.
Shelf Dismount Window
The Shelf Dismount window displays the Shelf Dismount list
and dismounts media from a drive (Dismount operation) or
generates the Fail Codes window to remove media from the
Dismount list.
To display the Shelf Dismount window, click the DISMOUNT
button on the Shelf Console. See Figure 2-19. If the console
DISMOUNT button is highlighted, there is at least one media
on the Shelf Dismount list.
Figure 2-19 Shelf Dismount Window
1
2
3
4
2-34 Archive Operation 6-01002-01 Rev A
7
6
5
Page 93

Using the VolServ GUI
Table 2-19 lists the elements of the Shelf Dismount window.
Table 2-19 Shelf Dismount Window Elements
No. Element Function
1 Dismount List Box Selectable list of media to be dismounted.
2 Dismounted Button Indicates that the AO has dismounted the media identified
in the Dismount list box from a drive.
3 Status: Box Reports the status of the Dismount operation after the
Dismounted b utton is click ed. Reports the status of the F ail
Dismount operation after the OK button is clicked in the
Dismount Fail Codes window. The Dismount list entries
disappear as they are processed.
4 Fail Button Displays the Dismount Fail Codes window. Refer to “Shelf
Fail Codes Window” on page 2-39.
5 Reset Button Clears all media selections.
6 Print List Button Displays the Printer window. Refer to “Printer Pop-up
Window” on page 1-21.
Archive Operation
7 Dismiss Button Removes the Dismount window and returns the AO to the
Shelf Console.
Shelf Audit Window The Audit window verifies the contents of the archive against
VolServ database inventory. Refer to “Audit” on page 5-7of the
Administrative Tasks manual.
To display the Shelf Audit window, click the Audit button on
the Shelf Console. See Figure 2-20 on page 2-36. The Audit
window displays with the initial selection default of Entire
Archive.
6-01002-01 Rev A Archive Operation 2-35
Page 94

Using the VolServ GUI
Figure 2-20 Shelf Audit Window
1
1
3
4
5
6
Table 2-20 lists the elements of the Shelf Audit window.
Table 2-20 Shelf Audit Window Elements
2
7
8
No. Element Function
1 Component Type:
Option Box
2-36 Archive Operation 6-01002-01 Rev A
Options include:
• Entire Archive (default)
•Row
• Column
•Shelf
•Bin
Page 95

No. Element Function
Using the VolServ GUI
2 Send Audit Results To:
Option Box
3 Starting Location: Text
Boxes
4 Ending Location: Text
Boxes
5 Execute Button Begins the Audit operation.
6 Status: Box Displays the inventory list created by the Audit operation
Options include:
• Screen (default)
• Printer
• File
The audit inventory created by VolServ software is directed
to the Status box by default.
If the Printer option is selected and the Execute button is
pressed, the Printer pop-up window is generated. Refer
to“Printer Pop-up Window” on page 1-21.
If the File option is selected and the Execute button is
pressed, the File pop-up window is gen er a ted. Refer to“File
Pop-up Window” on page 1-20.
Provides an AO entry field for the Audit operation starting
location. Successive entries of type Row, Column, Shelf,
and Bin are sensitized according to the Component Type
option selected.
Provides an AO entry field for the Audit operation ending
location.
when the Send Audit Results To: option is selected.
Archive Operation
7 Clear Button Clears entries in the Audit window.
8 Dismiss Button Removes the Audit windo w and returns the A O to the Shelf
Console.
Reprint Shelf Labels Window
6-01002-01 Rev A Archive Operation 2-37
The Reprint Shelf Labels windo w provides the options to print
Shelf labels.
Page 96

Using the VolServ GUI
The Shelf media typically contains two external media labels:
Shelf labels (performed here) and barcode labels containing
machine-readable information (printed when the media was
entered (Imported) into the archive). VolServ normally
generates the printing or reprinting of barcode media labels
from the Volume Server System console. Refer to Figure 4-10
on page 4-21.
To display the Reprint Shelf Labels window, click the
OTHER button on the Shelf Console and select the Reprint
Shelf Label option. See Figure 2-21 on page 2-38.
Figure 2-21 Shelf Reprint Shelf Labels Window
1
2
3
4
5
6
2-38 Archive Operation 6-01002-01 Rev A
Page 97

Table 2-21 lists the elements of the Reprint Shelf Labels
window.
Table 2-21 Reprint Shelf Labels Window Elements
No. Element Function
Using the VolServ GUI
1 Reprint for Media ID:
Text Box
2 Entered Media ID: List
Box
3 Execute Button Begins the Reprint Shelf Label operation.
4 Status: Box Reports the statu s as media are added into t he archiv e after
5 Remove Selections
Button
6 Dismiss Button Removes the Reprint Shelf Labels windo w and returns the
Shelf Fail Codes Window
Figure 2-29 on page 2-53 shows the Fail Codes pop-up
window. This pop-up window is displayed whenever the Fail
Provides an AO entry field for individual media identifiers.
A list of media identifiers that are entered from the Reprint
for Media ID: text box each time the <RETURN> key is
pressed.
clicking the Enter button or reports the status of Fail Enter
operation media after the Fail button is clic ked in the
View/Fail Enter window.
The media IDs from the Enter list disappear as they are
processed. Failed media reappear on the Enter list.
Clears entries in the Entered Media ID: list box.
AO to the Shelf Console window.
button located on the Enter, Eject, Mount, and Dismount
windows is selected. A media or media is selected and the
operation is cancelled by selecting one of the failure codes.
Archive Operation
T o display the F ail Codes (Enter) windo w, the Enter window is
completed and the Fail button is clicked. See Figure 2-22 on
page 2-40.
6-01002-01 Rev A Archive Operation 2-39
Page 98

Using the VolServ GUI
Figure 2-22 Shelf Fail Codes Pop-up Window
1
2
Table 2-22 lists the elements of the Fail Codes window.
Table 2-22 Shelf Fail Codes Pop-up Window Elements
No. Element Function
1 Failure Reason:
Optional Buttons
Reasons specifying a media’s removal from the archive’s
Enter list can include any or all of the following:
• Media not found (default)
• Media label damaged
• Media damaged
• Archive off-line or unavailable
• Archive at full capacity
• Bin non-functional
• Invalid bin
• Incompatible media type
•Other
3
2-40 Archive Operation 6-01002-01 Rev A
Page 99

Using the VolServ GUI
No. Element Function
2 OK Button Cancels the operation. The AO is r eturned to the originating
window.
3 Cancel Button Removes the Fail Codes window and returns the AO to the
originating window.
Stage Console
The Stage Console window is shown in Figure 2-23.
Window
Figure 2-23 Stage Console Window
1
2
7
3
Table 2-23 lists the elements of the Stage Console window.
Table 2-23 Stage Console Window Elements
No. Element Function
4
5
Archive Operation
6
1 Options Button Displays the Option pull-down menu.
Status Beeps Option Enables an audib le beep to occur when status is retu rned to
the archive Console.
Sweep Select Lists
Option
6-01002-01 Rev A Archive Operation 2-41
Enables the AO to highlight items from window selection
lists for selection by sweeping across the items.
Page 100

Using the VolServ GUI
No. Element Function
2 ENTER Button Displays the Enter window. Refer to “Stage Enter Window”
on page 2-42.
3 EJECT Button Displays the Eject window. Refer to “Stage Eject Window”
on page 2-44.
4 MOUNT Button Displays the Mount window. Refer to
“Stage Mount Window” on page 2-46.
5 DISMOUNT Button Displays the Dismount window. Refer to
“Stage Dismount Window” on page 2-48.
6 AUDIT Button Displays the Audit window. Refer to “Stage Audit Window”
on page 2-50.
7 Status Box Reports the status/activity of its associated Stage archive.
Stage Enter Window
The Stage Enter window displays the Enter list for the Stage
archive. The Stage Enter window also enters media into the
archive (Enter operation) or removes media from the Enter list
without performing an Enter operation.
To display the Stage Enter window, click the ENTER button
from the Stage Console. See Figure 2-24. If the console
ENTER button is highlighted, there is at least one media on the
Stage archive Enter list.
2-42 Archive Operation 6-01002-01 Rev A
 Loading...