

Page 1

Quantum Key Manager
6-66531-02 A
Quantum Key Manager
Quantum Tape Libraries
User’s Guide User’s Guide User’s Guide User’s Guide User’s Guide User’s Guide
Page 2

Quantum Key Manager User’s Guide, 6-66531-02, Rev A, July 2009. Product of USA.
Quantum Corporation provides this publication “as is” without warranty of any kind, either express or implied,
including but not limited to the implied warranties of merchantability or fitness for a particular purpose. Quantum
Corporation may revise this publication from time to time without notice.
COPYRIGHT STATEMENT
Copyright 2009 by Quantum Corporation. All rights reserved.
Your right to copy this manual is limited by copyright law. Making copies or adaptations without prior written
authorization of Quantum Corporation is prohibited by law and constitutes a punishable violation of the law.
TRADEMARK STATEMENT
Quantum, the Quantum logo, and Scalar are registered trademarks of Quantum Corporation. IBM is a trademark of
International Business Machines Corporation. Windows is a registered trademark of Microsoft Corporation in the
United States, or other countries (or regions), or both. UNIX is a registered trademark of The Open Group in the
United States and other countries (or regions). Other trademarks may be mentioned herein which belong to other
companies.
Page 3

Contents
Preface ix
Chapter 1 Overview 1
Library Managed Encryption........................................................................... 2
Encryption-Enabled Tape Drive............................................................... 2
Quantum Key Manager (QKM)................................................................ 2
Encryption-Enabled Tape Library............................................................ 2
How QKM Key Management Works.............................................................. 3
Encryption Keys ................................................................................................ 4
Encryption Certificates...................................................................................... 4
Keystore............................................................................................................... 5
Mirrored Hard Disk Drives.............................................................................. 6
Why You Need to Back Up Your Keystore.................................................... 6
Chapter 2 Safety 7
Electrical Safety ................................................................................................. 8
Handling Static-Sensitive Devices .................................................................. 9
Quantum Key Manager User’s Guide iii
Page 4

Chapter 3 Planning Your QKM Environment 10
QKM Server Requirements............................................................................. 10
Cooling and Airflow Requirements .............................................................. 11
Rack Considerations........................................................................................ 12
Multiple Libraries Accessing One QKM Server Pair.................................. 13
Disaster Recovery Planning............................................................................ 13
Chapter 4 Installation and Initial Configuration 15
Items Required ................................................................................................. 16
Installing the QKM Servers ............................................................................ 16
Configuring the QKM Servers ....................................................................... 18
Scalar i500 – Library Setup and Configuration............................................ 20
1. Installing the EKM License on the Scalar i500.................................. 21
2. Scheduling Sufficient Time..................................................................21
3. Preparing QKM Partitions................................................................... 21
4. Configuring the QKM Server IP Addresses on the Library ........... 22
5. Installing the TLS Certificates on the Scalar i500 ............................. 22
6. Running QKM Path Diagnostics on the Scalar i500 ........................ 23
7. Configuring QKM Partitions and Generating Data
Encryption Keys................................................................................. 24
8. Saving the Library Configuration ...................................................... 25
9. Backing Up the Keystores.................................................................... 25
Scalar i2000 – Library Setup and Configuration.......................................... 26
1. Installing the EKM License on the Scalar i2000................................ 26
2. Scheduling Sufficient Time..................................................................27
3. Preparing QKM Partitions................................................................... 27
4. Installing the TLS Certificates on the Scalar i2000 ........................... 27
5. Configuring the QKM Server IP Addresses and
Generating Data Encryption Keys .................................................. 28
6. Running QKM Path Diagnostics on the Scalar i2000 ...................... 29
7. Waiting for Key Generation to Complete ......................................... 30
8. Configuring QKM Partitions...............................................................30
9. Saving the Library Configuration ...................................................... 31
10. Backing Up the Keystores.................................................................. 31
Quantum Key Manager User’s Guide iv
Page 5

Chapter 5 Using the QKM Server 33
QKM Server Controls, LEDs, and Connectors ............................................ 34
Front Panel................................................................................................. 34
Rear Panel ..................................................................................................36
Turning On the QKM Server.......................................................................... 37
Turning Off the QKM Server .........................................................................38
Logging in to the QKM Server....................................................................... 38
Accessing QKM Admin Commands............................................................. 39
Notes on Using QKM Command Line Interface and Admin
Commands................................................................................................. 40
Running the Setup Wizard ............................................................................. 41
Changing the Password ..................................................................................42
Changing the IP Address................................................................................ 43
Changing the Time Zone ................................................................................ 44
Changing the Date and Time ......................................................................... 45
Backing Up the Keystore ................................................................................ 45
Restoring the Keystore .................................................................................... 48
Setting the QKM Server Hostname ............................................................... 50
Accessing QKM Server Information .............................................................51
Displaying the Help Menu......................................................................51
Displaying the QKM Server Software Version..................................... 52
Capturing QKM Server Logs Without Stopping the Key Server....... 52
Displaying the End User License Agreement....................................... 52
Turning Trace Level Logging On and Off............................................. 53
Chapter 6 Using the Library to Initiate QKM Functions 54
Generating Data Encryption Keys................................................................. 54
Generating Data Encryption Keys at Initial Setup............................... 55
Generating Data Encryption Keys When the Set is Depleted ............ 55
Importing and Exporting Data Encryption Keys........................................ 57
Importing and Exporting Encryption Certificates ...................................... 58
Sharing Encrypted Tapes Offsite................................................................... 58
Running QKM Path Diagnostics ................................................................... 60
Quantum Key Manager User’s Guide v
Page 6

Chapter 7 Logs 61
QKM Encryption Key Import Warning Log................................................ 61
QKM Server Logs............................................................................................ 62
Retrieving QKM Server Logs Via the Library ...................................... 62
Capturing QKM Server Logs Via the Server Without
Stopping the Key Server Process..................................................... 63
Capturing QKM Server Logs Via the Server While
Stopping the Key Server Process..................................................... 63
Chapter 8 Troubleshooting 65
Library RAS Tickets......................................................................................... 65
QKM Server LED Error Indicators ................................................................ 66
POST Beep Codes............................................................................................. 67
Common Problems ..........................................................................................68
Chapter 9 Hardware Replacement Procedures 71
Replacing a Hard Disk Drive .........................................................................72
Replacing a QKM Server and Both Hard Disk Drives ............................... 75
Terminology .............................................................................................. 76
Required Items .......................................................................................... 76
Procedure ................................................................................................... 76
Chapter 10 Updating and Rolling Back QKM Server Software 78
Viewing the Currently Installed Version of QKM Server Software......... 79
Updating QKM Server Software.................................................................... 79
Equipment Required ................................................................................ 79
Procedure ................................................................................................... 79
Rolling Back QKM Server Software .............................................................. 81
Equipment Required ................................................................................ 81
Procedure ................................................................................................... 81
Quantum Key Manager User’s Guide vi
Page 7

Appendix A Specifications 83
QKM Server Physical Specifications ............................................................. 83
QKM Server Environmental Specifications ................................................. 84
Air Temperature ....................................................................................... 84
Humidity.................................................................................................... 84
QKM Server Acoustical Noise Emissions..................................................... 84
QKM Server Heat Output............................................................................... 84
QKM Server Electrical Input .......................................................................... 85
Number of Data Encryption Keys Generated..............................................85
Supported Quantum Libraries....................................................................... 85
Supported Tape Drives ................................................................................... 86
Firmware Requirements ................................................................................. 86
Library Firmware Requirements ............................................................ 86
Tape Drive Firmware Requirements ..................................................... 86
Supported Backup Applications.................................................................... 87
Glossary 88
Index 90
Quantum Key Manager User’s Guide vii
Page 8

Figures
Figure 1 Rear Panel.................................................................................... 17
Figure 2 Front Panel .................................................................................. 17
Figure 3 Front Panel Controls, LEDs, and Connectors ........................ 34
Figure 4 Rear Panel Connectors............................................................... 36
Figure 5 Rear Panel LEDs......................................................................... 37
Figure 6 QKM Admin Commands (Example) ...................................... 40
Figure 7 Help Menu .................................................................................. 52
Figure 8 LED Locations on Front of Server............................................ 66
Figure 9 LED Locations on Front of Server............................................ 73
Figure 10 Replacing a Hard Disk Drive ................................................... 74
Quantum Key Manager User’s Guide viii
Page 9

Preface
Audience
Purpose
Document Organization
Quantum Key Manager User’s Guide ix
This book is intended for storage and security administrators responsible
for security and backup of vital data, and anyone assisting in the setup
and maintenance of Quantum Key Manager servers and software in the
operating environment. It assumes the reader has a working knowledge
of storage devices and networks.
This book contains information to help you install, configure, and run
your QKM system.
This document is organized as follows:
• Chapter 1,
the Quantum Key Manager (QKM) components.
• Chapter 2,
information.
• Chapter 3,
considerations for how to set up your QKM server environment.
Overview, provides an overview of tape encryption and
Safety, provides basic electrical and electrostatic safety
Planning Your QKM Environment, provides
Page 10

• Chapter 4, Installation and Initial Configuration, provides
instructions on how to set up the QKM server and configure the
library to use QKM.
Notational Conventions
• Chapter 5,
Using the QKM Server, provides instructions on using the
QKM server hardware and general usage commands.
• Chapter 6,
Using the Library to Initiate QKM Functions, provides
information on how to use the library remote web client to generate,
import, and export data encryption keys and encryption certificates,
and how to share encrypted tapes offsite.
• Chapter 7,
Logs, describes the various QKM logs and how to access
them.
• Chapter 8,
Troubleshooting, describes how to detect and resolve
problems with the QKM server hardware or operation.
• Chapter 9,
Hardware Replacement Procedures, describes how to
replace a defective hard disk drive and how to replace a QKM server.
• Chapter 10,
Updating and Rolling Back QKM Server Software,
explains how to update and roll back QKM server software.
• Appendix A,
Specifications,, provides hardware and operational
specifications for the QKM server.
This document concludes with a glossary
and an index.
This manual uses the following conventions:
Note: Notes emphasize important information related to the main
topic.
Caution: Cautions indicate potential hazards to equipment and are
included to prevent damage to equipment.
Warning: Warnings indicate potential hazards to personal safety and
are included to prevent injury.
Quantum Key Manager User’s Guide x
Page 11

Documentation and Firmware
The following publications provide information related to Quantum Key
Manager. For the latest versions of library documents, visit
www.quantum.com
. For the latest QKM documentation and firmware
updates, see www.quantum.com/serviceandsupport/
softwareanddocumentationdownloads/qkm/index.aspx.
Document No. Document Title
6-66532-xx Quantum Key Manager Quick Start Guide
6-66533-xx Quantum Key Manager Rack Installation
6-66572-xx Quantum Key Manager Safety Information by IBM
6-66535-xx Quantum Key Manager Open Source License
Agreement
6-01210-xx Scalar i500 User’s Guide
6-00421-xx Scalar i2000 User’s Guide
Contacts
Quantum company contacts are listed below.
Quantum Corporate Headquarters
To order documentation on Quantum Key Manager or other products
contact:
Quantum Corporation
P.O. Box 57100
Irvine, CA 92619-7100
(949) 856-7800
(800) 284-5101
Technical Publications
To comment on existing documentation send an e-mail to:
doc-comments@quantum.com
0
0
Quantum Key Manager User’s Guide xi
Page 12

Quantum Home Page 0
Visit the Quantum home page at:
http://www.quantum.com
Getting More Information or
Help
StorageCare™, Quantum’s comprehensive service approach, leverages
advanced data access and diagnostics technologies with crossenvironment, multi-vendor expertise to resolve backup issues faster and
at lower cost.
Accelerate service issue resolution with these exclusive Quantum
StorageCare services:
•
Service & Support Web site - Register products, license software,
browse Quantum Learning courses, check backup software and
operating system support, and locate manuals, FAQs, firmware
downloads, product updates and more in one convenient location.
Benefit today at: http://www.quantum.com/ServiceandSupport/
Index.aspx.
•
Online Service Center - Submit online service requests, update contact
information, add attachments, and receive status updates via email.
Online Service accounts are free from Quantum. That account can
also be used to access Quantum’s Knowledge, a comprehensive
repository of product support information. Sign up today at: http://
www.quantum.com/osr.
For further assistance, or if training is desired, contact a Technical
Assistance Center:
North America and Mexico +1 800-827-3822
Europe, Middle East, and Africa 00800-9999-3822
Worldwide support: http://www.quantum.com/ServiceandSupport/
Contacts/Worldwide/Index.aspx
For the most up to date information on Quantum Global Services, please
visit: http://www.quantum.com/ServiceandSupport/Contacts/
Worldwide/Index.aspx.
Quantum Key Manager User’s Guide xii
Page 13

Chapter 1
1Overview
Data is one of the most highly valued resources in a competitive business
environment. Protecting that data, controlling access to it, and verifying
its authenticity while maintaining its availability are priorities in our
security-conscious world. Data encryption is a tool that answers many of
these needs.
The HP LTO-4 Fibre Channel or SAS tape drive is capable of encrypting
data as it is written to any LTO-4 data cartridge. Encryption is performed
at full line speed in the tape drive after compression. (Compression is
more effectively done before encryption.) This new capability adds a
strong measure of security to stored data without the processing
overhead and performance degradation associated with encryption
performed on the server or the expense of a dedicated data encryption
appliance.
This chapter covers:
• Library Managed
• How QKM Key Management Works
• Encryption Keys
• Encryption Certificates
• Keystore
• Mirrored Hard Disk Drives
• Why You Need to Back Up Your Keystore
Quantum Key Manager User’s Guide 1
Encryption
Page 14

Library Managed Encryption
The library managed tape drive encryption solution is composed of three
major elements:
• Encryption-Enabled Tape Drive
• Quantum Key Manager (QKM)
• Encryption-Enabled Tape Library
Overview
Library Managed Encryption
Encryption-Enabled Tape
Drive 1
Quantum Key Manager
(QKM) 1
Encryption-Enabled Tape
Library 1
HP LTO-4 Fibre Channel and SAS tape drives are encryption-capable. This
means that they are functionally capable of performing hardware
encryption, but this capability has not yet been activated. In order to
perform hardware encryption, the tape drives must be encryption-enabled.
They can be encryption enabled via the tape library.
See Supported Backup Applications
drives are supported by QKM on your library.
Encryption involves the use of several kinds of keys, in successive layers.
How these keys are generated, maintained, controlled, and transmitted
depends upon the operating environment where the encrypting tape
drive is installed. Some host applications are capable of performing key
management. For environments without such applications or those
where application agnostic encryption is desired, Quantum provides the
Quantum Key Manager (QKM) solution to perform all necessary key
management tasks. How QKM Key Management Works
describes these tasks in more detail.
On an encryption-enabled library, tape encryption occurs automatically
and transparently. The library communicates with the QKM server to
obtain data encryption keys for the drives to read from or write to tapes.
on page 87 for a list of which tape
on page 3
Library managed encryption is provided for HP LTO-4 tape drives in a
Quantum Scalar i500 or Scalar i2000 tape library. Key generation and
management is performed by QKM. Data encryption keys pass from
QKM to the drives via the library, making encryption transparent to
applications.
Quantum Key Manager User’s Guide 2
Page 15

How QKM Key Management Works
Quantum Key Manager (QKM) generates, protects, stores, and maintains
data encryption keys that are used to encrypt information being written
to, and decrypt information being read from, HP LTO-4 tape media (tape
and cartridge formats).
QKM acts as a process awaiting key generation or key retrieval requests
sent to it through a secure TCP/IP communication path between QKM
and the tape library.
When a new data encryption key is needed, the tape drive requests a key,
which the library forwards to the primary QKM server. The library
requests a data encryption key from the primary QKM server first, unless
the primary QKM server is down and failover to the secondary QKM
server has occurred. If failover to the secondary QKM server occurred,
then the library continues to request data encryption keys from the
secondary QKM server until either the library is rebooted or the
secondary server goes down and failover back to the primary occurs.
After a library reboot, the library goes back to forwarding requests to the
primary server.
Overview
How QKM Key Management Works
Upon receipt of the request, QKM retrieves an existing data encryption
key from the keystore and securely transfers it to the library, which then
provides it to the tape drive where it is used to encrypt the data being
written to tape. Once a data encryption key is assigned to a tape, it is
never reused on another tape.
When an encrypted tape is read by an HP LTO-4 tape drive, the tape
drive requests, via the library, the required data encryption key from the
QKM server. QKM retrieves the required data encryption key from the
keystore and securely transfers it to the library, which provides it to the
tape drive. The HP LTO-4 tape drive uses the data encryption key to
perform encryption or decryption.
No data encryption key is stored anywhere on the cartridge memory or
the tape. Only the name of the data encryption key is stored on the tape,
so that in the future the key can be requested for further read or write
purposes. The first read/write operation on an encrypted tape requires
the tape drive to request the data encryption key.
Quantum Key Manager User’s Guide 3
Page 16

Encryption Keys
Overview
Encryption Keys
An encryption key is typically a random string of bits generated
specifically to encrypt and decrypt data. Encryption keys are created
using algorithms designed to ensure that each key is unique and
unpredictable. The longer the length of key used, the harder it is to break
the encryption code.
The HP LTO-4 method of encryption uses 256-bit AES algorithm to
encrypt data. 256-bit AES is the encryption standard currently recognized
and recommended by the US government, which allows three different
key lengths. 256-bit keys are the longest allowed by AES.
QKM uses two types of encryption algorithms:
• Symmetric
• Asymmetric
Symmetric, or secret key encryption, uses a single key for both encryption
and decryption. Symmetric key encryption is generally used for
encrypting large amounts of data in an efficient manner. 256-bit AES
encryption uses symmetric keys.
Asymmetric, or public/private encryption, uses a pair of keys. Data that
is encrypted using one key can only be decrypted using the other key in
the public/private key pair. When an asymmetric key pair is generated,
the public key is typically used to encrypt, and the private key is typically
used to decrypt.
QKM uses both symmetric and asymmetric keys—symmetric encryption
for high-speed encryption of user or host data stored on tape, and
asymmetric encryption (which is necessarily slower) for secure
communication and protecting the symmetric keys while in transit.
Encryption Certificates
Each QKM server pair uses one unique encryption certificate. The
encryption certificate contains the public key of the public/private key
Quantum Key Manager User’s Guide 4
Page 17

Overview
Keystore
pair that protects data encryption keys during transit to another site. The
destination QKM server provides its public key to the source QKM server
as part of its encryption certificate, which the source QKM server uses to
wrap (encrypt) exported data encryption keys for transport. Upon
arrival, the file containing the wrapped data encryption keys can only be
unwrapped by the corresponding private key, which resides on the
destination QKM server and is never shared.
For more information, see the following:
Keystore
• Encryption Keys
• Sharing Encrypted Tapes Offsite
• Importing and Exporting Data Encryption Keys
• Importing and Exporting Encryption Certificates
The keystore contains:
• All of the data encryption keys generated by the QKM server on
which it resides. These keys are used for encrypting and decrypting
tapes.
• A copy of the data encryption keys generated by the other QKM
server in the pair.
• Data encryption keys that you imported (for example, keys that other
companies or individuals sent to you). These keys can be used to
decrypt tapes provided by the other companies or individuals.
on page 4)
on page 58
on page 57
on page 58
• Your QKM server pair’s encryption certificate
• Encryption certificates that you imported (for example, that other
companies or individuals sent to you). These are used to wrap your
data encryption keys for transit to another party to use in decrypting
tapes you may have provided to them.
• Public and private keys used for secure communication.
• Metadata (for example, which data encryption keys were used on
which tapes).
Quantum Key Manager User’s Guide 5
Page 18

Mirrored Hard Disk Drives
Each QKM server contains two hard disk drives in a RAID 1 (mirrored)
configuration. The two hard disk drives are constantly being
synchronized, so that each is an exact duplicate of the other. If one hard
disk drive fails, the other one contains all the required information to
allow the server to continue to work as normal. As soon as the failed hard
disk drive is replaced, all the data on the working hard disk drive is
duplicated onto the new hard disk drive.
Why You Need to Back Up Your Keystore
Quantum requires you to back up your keystores every time you
generate data encryption keys (and before you start using these keys).
Overview
Mirrored Hard Disk Drives
Although QKM contains features designed to protect your keystore in
case of hard disk drive or server failure, these features do not cover every
situation.
In the following cases, if you have no backup, there is no way to recover
your keystores:
• If both QKM servers and all four hard disk drives were to suffer
environmental damage causing them to become inoperable, the only
way to recover your keystore is via the backup.
• If you forget your password, the only way to recover your data is to
completely replace your server and its hard disk drives, and perform
a restore from your backup.
Also, each QKM server generates its own unique data encryption keys,
meaning that the keystore on each QKM server is different. This is why
you need to back up each QKM server separately, every time a server
generates data encryption keys.
For instructions on how to perform a backup, see Backing Up the
Keystore on page 45.
Quantum Key Manager User’s Guide 6
Page 19

Chapter 2
2Safety
This chapter provides some important information for handling your
server safely. Please also review the safety information in Safety
Information by IBM located on the Quantum Key Manager Documentation
CD.
This chapter covers:
• Electrical Safety
• Handling Static-Sensitive Devices
Quantum Key Manager User’s Guide 7
Page 20

Electrical Safety
Safety
Electrical Safety
Warning: DANGER: Electrical current from power, telephone, and
communication cables is hazardous. To avoid a shock
hazard:
• Do not connect or disconnect any cables or perform installation,
maintenance, or reconfiguration of this product during an electrical
storm.
• Connect all power cords to a properly wired and grounded electrical
outlet.
• Connect to properly wired outlets any equipment that will be
attached to this product.
• When possible, use one hand only to connect or disconnect signal
cables.
• Never turn on any equipment when there is evidence of fire, water,
or structural damage.
• Disconnect the attached power cords, telecommunications systems,
networks, and modems before you open the device covers, unless
instructed otherwise in the installation and configuration
procedures.
• Connect and disconnect cables as described in the following table
when installing, moving, or opening covers on this product or
attached devices.
To Connect:
1. Turn everything OFF.
2. First, attach all cables to devices.
3. Attach signal cables to connectors.
4. Attach power cords to outlet.
5. Turn device
Quantum Key Manager User’s Guide 8
ON
To Disconnect:
1. Turn everything OFF.
2. First, remove power cords from outlet.
3. Remove signal cables from connectors.
4. Remove all cables from devices.
Page 21

Handling Static-Sensitive Devices
Caution: Static electricity can damage the server and other
electronic devices. To avoid damage, keep static-sensitive
devices in their static-protective packages until you are
ready to install them. To reduce the possibility of damage
from electrostatic discharge, observe the following
precautions:
• Limit your movement. Movement can cause static electricity to build
up around you.
• The use of a grounding system is recommended. For example, wear
an electrostatic-discharge wrist strap, if one is available. Always use
an electrostatic-discharge wrist strap or other grounding system
when you work inside the server with the power on
• Handle the device carefully, holding it by its edges or its frame.
Safety
Handling Static-Sensitive Devices
• Do not touch solder joints, pins, or exposed circuitry.
• Do not leave the device where others can handle and damage it.
• While the device is still in its static-protective package, touch it to an
unpainted metal surface on the outside of the server for at least 2
seconds. This drains static electricity from the package and from your
body.
• Remove the device from its package and install it directly into the
server without setting down the device. If it is necessary to set down
the device, put it back into its static-protective package. Do not place
the device on the server cover or on a metal surface.
• Take additional care when you handle devices during cold weather.
Heating reduces indoor humidity and increases static electricity.
Quantum Key Manager User’s Guide 9
Page 22

Chapter 3
3Planning Your QKM
Environment
Use the information in this chapter to determine the operating
environment for your QKM system. This chapter includes:
• QKM Server Requirements
• Cooling and Airflow Requirements
• Rack Considerations
• Multiple Libraries Accessing One QKM Server Pair
• Disaster Recovery Planning
QKM Server Requirements
QKM comes standard with two key servers pre-loaded with software.
One QKM server is to be used as the primary key server; the other one is
to be used as a secondary server for failover purposes, in case the primary
server stops working.
Quantum Key Manager User’s Guide 10
Page 23

Planning Your QKM Environment
Cooling and Airflow Requirements
Caution: The server appliances are designed for one purpose only
— to store and manage your encryption keys. Do not
install additional hardware on the server. Never install
any software, file, or operating system on the server unless
it is an upgrade or patch supplied by Quantum. Doing so
may make your server inoperable and will void your
warranty.
• The QKM server must have IP connectivity through any firewalls to
all Quantum libraries using the QKM server to obtain LTO-4
encryption keys.
• QKM uses TCP port 6000 for the QKM server, and secure sockets
layer (SSL) is always enabled. These settings cannot be changed.
• Refer to the QKM Server Environmental Specifications
temperature and humidity requirements.
Cooling and Airflow Requirements
To maintain proper airflow and system cooling, observe the following:
• Ensure there is adequate space around the server to allow the server
cooling system to work properly. Leave approximately 2 inches
(50 mm) of open space around the front and rear of the server.
• Do not place objects in front of the fans.
• Do not leave open space above or below an installed server in your
rack cabinet. To help prevent damage to server components, always
install a filler panel to cover the open space and to help ensure proper
air circulation.
Caution: Do not operate the server for more than 10 minutes
without a drive installed in each bay.
on page 84 for
Quantum Key Manager User’s Guide 11
Page 24

Caution: Do not open the server cover to adjust or fix internal
Rack Considerations
If the QKM server is installed in a rack, consider the following:
Warning: Do not place any object weighing more than 110 lb. (50 kg)
• Install the server only in a rack cabinet that has perforated doors.
• Do not block any air vents. Usually 6 in. (15 cm) of air space provides
Planning Your QKM Environment
Rack Considerations
components. If the server has a problem, contact
Quantum Service & Support for a replacement.
on top of rack-mounted devices.
proper airflow.
• Plan the device installation starting from the bottom of the rack
cabinet.
• Install the heaviest device in the bottom of the rack cabinet.
• Do not leave open space above or below an installed server in your
rack cabinet. To help prevent damage to server components, always
install a filler panel to cover the open space and to help ensure proper
air circulation.
• Do not extend more than one device out of the rack cabinet at the
same time.
• Connect all power cords to properly wired and grounded electrical
outlets.
• Do not overload the power outlet when installing multiple devices in
the rack.
Quantum Key Manager User’s Guide 12
Page 25

Planning Your QKM Environment
Multiple Libraries Accessing One QKM Server Pair
Multiple Libraries Accessing One QKM Server Pair
Multiple libraries may access and use the same QKM server pair. The
only requirement is that they be available to the QKM servers through
TCP/IP connectivity. If you want to connect more than one library to a
QKM server pair, keep the following in mind:
• Each library must be licensed to use QKM. See 1. Installing the EKM
License on the Scalar i500 on page 21 or 1. Installing the EKM License
on the Scalar i2000 on page 26.
• Each library can only access one QKM server pair at a time.
• Each library triggers the QKM servers to create a unique set of data
encryption keys. When more libraries are connected to a QKM server,
more initial data encryption keys will reside in the QKM server’s
keystore.
• Each library’s set of unique data encryption keys is maintained
separately on the QKM server. When you generate more keys for a
particular library, this does not affect any of the other libraries and
their sets of encryption keys. Each library only triggers creation of its
own set of keys.
Disaster Recovery Planning
Quantum recommends that you plan for disaster recovery in the
following ways:
• Maintain each of the two QKM servers in a different geographical
location, preferably in a different city, state, or country, to mitigate
the possibility of both servers being compromised in the event of
natural disaster or theft.
Quantum Key Manager User’s Guide 13
Page 26

Planning Your QKM Environment
Disaster Recovery Planning
• Back up the QKM server each time new keys are generated and store
the backups in a safe location (see Backing Up the Keystore
on
page 45).
Caution:
Do not use QKM to encrypt the sole copy of your QKM
server keystore backup.
If both servers were to fail,
you would not be able to recover the encrypted
backup and would lose all data you had stored on all
your encrypted tapes.
• Remember your password. If you lose your password, you lose login
access to the QKM server, including backup and restore capability. If
you lose your password, Quantum will not be able to recover it for
you.
• Replace a failed hard disk drive immediately. Even though the
second hard disk drive allows you to continue to operate,
redundancy is removed and a second hard disk drive failure would
cause the server to fail.
• Replace a failed server immediately. Even though the other QKM
server allows you to continue to operate, you do not want to risk the
second server failing as well.
Quantum Key Manager User’s Guide 14
Page 27

Chapter 4
4Installation and Initial
Configuration
This chapter provides instructions for how to set up and configure the
QKM server. Perform the QKM server installation and configuration
steps; then perform all of the steps in the section appropriate for your
library,
This chapter contains the following sections.
• Items Required
• Installing the QKM Servers
• Configuring the QKM Servers
• Scalar i500 – Library Setup and Configuration
in order, before you begin encrypting tapes.
• Scalar i2000 – Library Setup and Configuration
Caution: The server appliances are designed for one purpose only
— to store and manage your encryption keys. Do not
install additional hardware on the server. Never install
any software, file, or operating system on the server unless
it is an upgrade or patch supplied by Quantum. Doing so
may make your server inoperable and will void your
warranty.
Quantum Key Manager User’s Guide 15
Page 28

Items Required
Installation and Initial Configuration
Items Required
You need the following to install and configure each QKM server:
• QKM server (each comes with two hard disk drives installed).
• Power cord (supplied).
• Rackmount kit (supplied).
• Ethernet cable, crossover (for initial configuration, not supplied).
• Ethernet cable, standard (for standard operation, not supplied).
• Laptop or PC, to connect to each server to perform initial
configuration.
• The most recent library firmware installed on your library.
(Minimum versions required:
• For Microsoft ® Windows®, you may need to install a utility to use
secure shell (SSH) and secure file transfer protocol (SFTP). Two such
utilities are PuTTY, available at http://
www.chiark.greenend.org.uk/~sgtatham/putty/ and WinSCP,
available at http://winscp.net
Scalar i500: 570G; Scalar i2000: 595A.)
.
Installing the QKM Servers
Follow the instructions below for both QKM servers.
1 Determine the location for the servers. It is recommended that the
two servers be in different geographical locations for disaster
recovery purposes. Ensure the air temperature is below 95 °F (35 °C).
2 Install the QKM server in a rack. Follow the Rack Installation
Instructions (included with the rail kit and located on the Quantum
Key Manager Documentation CD).
3 Connect the power cord into the rear of the QKM server (see
Figure 1
Quantum Key Manager User’s Guide 16
) and plug it into a grounded power outlet.
Page 29

Figure 1 Rear Panel
Power cord connector
Ethernet Port 1
(configuration)
Ethernet Port 2
(network)
Power button
Power-on LED
Installation and Initial Configuration
Installing the QKM Servers
4 Approximately 20 seconds after you connect the server to AC power,
the power button becomes active, and one or more fans might start
running loudly for about 20 seconds. Observe the Power-on LED on
the front panel of the QKM server (see Figure 2
). It should be
flashing, indicating the server is turned off and connected to an AC
power source. If the LED is not flashing, there could be a problem
with the power supply or the LED. Check the power connection. If
this LED still does not flash, contact Quantum Service & Support.
5 Turn on the QKM server by pressing the power button on the front of
the server (see Figure 2
).
Figure 2 Front Panel
6 Again observe the Power-on LED on the front panel of the QKM
server. Wait until it is on but not flashing, indicating the server is
turned on.
Wait about 3 minutes to allow the server to complete startup before you
Quantum Key Manager User’s Guide 17
connect via SSH in the next step.
Page 30

Configuring the QKM Servers
Follow the instructions below for both QKM servers.
Note: Both QKM servers must be configured, operational, and
connected to the network before any libraries can be set up to
use them.
The configuration process requires you to read and accept the end user
license agreement, and then complete a setup wizard. The setup wizard
helps you configure your password, IP address, netmask, gateway, time
zone, date, and time. Before beginning, decide what you want each of
these values to be. You can also change these values in the future.
Allow 30 minutes per server to complete the configuration.
1 Set the IP address of the laptop or PC you will use to connect to the
QKM server to
Installation and Initial Configuration
Configuring the QKM Servers
192.168.18.100.
2 Connect a crossover Ethernet cable from the laptop or PC to
Port 1
on the rear of the QKM server (see Figure 1).
Note: Ethernet Port 1 is used only for configuration. Once you
perform the initial configuration, you will use Ethernet
Port 2 for QKM server communication via your network.
3 Using SSH, connect to the server using the IP address
192.168.18.3.
Note: The IP address of Ethernet Port 1 is a static IP address that
cannot be changed.
4 At the login prompt, enter the user login ID (which will never
change):
akmadmin
5 At the password prompt, enter the default password:
password
6 At the command prompt, enter:
./qkmcmds
Ethernet
Quantum Key Manager User’s Guide 18
Page 31

Installation and Initial Configuration
Configuring the QKM Servers
7 At the password prompt, enter the default password again:
password
The End User License Agreement displays.
8 Read and accept the license agreement. Press
through the agreement, and at the end, enter
9 Press
10 The first setup wizard task prompts you to change your password.
<Enter> to begin the setup wizard.
There is only one password for QKM, which is required for all login
and access to Admin commands, including backup and restore.
lose the password, there is no way to retrieve it.
• If you do not wish to change the password at this time, just press
<Enter> at the “change password” prompts and the default
password (
any time later using the Admin commands menu.
• If you wish to change the password:
a At the “(current) UNIX password” prompt, enter the default
password:
password
b Enter the new password.
c Enter the new password again.
d Press
password) remains. You can change the password at
<Enter>.
<Enter> to scroll
y to accept.
If you
EXTREMELY IMPORTANT:
Remember Your Password!
If you forget your password, there is no way to retrieve it!
Each QKM server has its own password.
If you set them differently, you must remember both.
If you forget your password, y ou will los e lo gin acc ess to the
QKM server, including backup and restore capability.
Quantum will NOT be able to restore the password.
CAUTION! CAUTION! CAUTION! CAUTION!
Quantum Key Manager User’s Guide 19
Page 32

Installation and Initial Configuration
Scalar i500 – Library Setup and Configuration
11 Continue through the setup wizard to configure the rest of the
settings: time zone, date and time, QKM server IP address, netmask,
and gateway. If you press
<Enter> without entering a value, the
existing value remains.
Note: The IP address you are configuring is for Ethernet Port 2,
the port you will be using for QKM operations.
Ethernet Port 1 IP Address (never changes): 192.168.18.3
Ethernet Port 2 Default IP Address: 192.168.18.4
12 When the setup wizard is complete, press
<Enter>.
The list of QKM Admin commands displays. If you made any
mistakes during the setup wizard, you can go back and change them
by entering the number corresponding to the item. To view the list at
any time, enter
13 Enter
q at the command prompt to save your changes and restart the
./qkmcmds at the command prompt.
QKM key server process. This process takes a few seconds.
14 Disconnect the crossover Ethernet cable from
15 Connect a standard Ethernet cable from
Ethernet Port 2 on the back of
the QKM server to your network (see Figure 1
this port using the IP address assigned in step 11 above.
16 Repeat the above steps on the other server in the QKM server pair.
Scalar i500 – Library Setup and Configuration
If you are using a Scalar i500 library with QKM, follow all the steps in this
section, in order.
Ethernet Port 1.
). You will connect to
If you are using a Scalar i2000 library, skip this section and follow
Scalar i2000 – Library Setup and Configuration
on page 26.
If you will have multiple libraries accessing the same QKM server pair,
repeat these steps for each additional library.
Quantum Key Manager User’s Guide 20
Page 33

Installation and Initial Configuration
Scalar i500 – Library Setup and Configuration
1. Installing the EKM License on the Scalar i500 4
2. Scheduling Sufficient Time 4
Make sure that you purchased enough license capacity to cover all the
tape drives that you will be using for library-managed encryption. If you
want more than one library to use QKM, you must install a separate
license on each library.
If you purchased QKM at the same time as your library, then your
Encryption Key Management (EKM) license may already be installed on
the library. If it is, you can skip this step. You can check the
Licenses page
on the library interface to see if the EKM license is installed.
If you purchased QKM separately from the library, you will receive,
separately, instructions on how to obtain your license key and install it on
the library. Follow the instructions to install your license key. If you have
any questions, contact Quantum Service & Support.
All of the steps that follow deal with configuring your library for QKM
and generating data encryption keys. Depending on the size of your
library, it may take up to 2 hours to complete all of the following steps.
Also, please note that you cannot perform the following configuration
steps
until all previous steps have been completed.
Caution: Do not perform any library or host-initiated operations on
the partitions to be used for QKM until all of the following
steps are complete.
3. Preparing QKM Partitions 4
1 Install HP LTO-4 tape drives in the library, if not already installed.
2 Ensure that the partitions you want to configure for QKM contain
only HP LTO-4 tape drives.
3 On the HP LTO-4 tape drives, install the latest version of firmware
that is qualified for the library firmware installed on your library.
Refer to the library release notes for the correct version of tape drive
firmware.
Quantum Key Manager User’s Guide 21
Page 34

Installation and Initial Configuration
Scalar i500 – Library Setup and Configuration
4. Configuring the QKM
Server IP Addresses
on
the Library 4
5. Installing the TLS Certificates on the Scalar i500 4
1 On the library’s remote web client, navigate to the encryption server
setup screen:
Setup > Encryption > System Configuration.
2 Enter the QKM primary and secondary server IP addresses or
hostnames in the fields provided.
3 Click
Apply.
The TLS certificates allow the library to securely communicate with the
QKM servers.
Items Required 4
• A computer with a CD ROM drive and Internet access.
•The Quantum Key Manager TLS Certificates CD (shipped separately
from the QKM servers). The CD contains one .tgz file. This .tgz file
contains all the certificates that need to be loaded onto your library.
Note: You do not need to open or extract any of the files from the
.tgz file.
Procedure 4
1 Make sure the date on the library and both QKM servers is set to the
current date. Incorrect date settings may interfere with the TLS
certificates and cause the library to stop communicating with the
QKM servers.
2 Check to see if the certificates are already installed on your library.
From your library’s remote web client, select
Management > Encryption Certificate > Import.
Tools > QKM
On this screen, next to the Import TLS Certificates checkbox, there is a
line of text stating whether the certificates are currently installed on
the library. If the certificates are installed, then you do not need to
install them again, and you can skip the rest of this section. If
certificates are
not installed, continue to the next step.
3 Insert the Quantum Key Manager TLS Certificates CD into the
computer’s CD ROM drive.
4 From the
screen, select the
Quantum Key Manager User’s Guide 22
Tools > QKM Management > Encryption Certificat e > Import
Import TLS Certificates checkbox.
Page 35

Installation and Initial Configuration
Scalar i500 – Library Setup and Configuration
5 Browse to the .tgz file located on the CD. (If desired, you can copy the
.tgz file to another location on your computer and browse to it there.)
6. Running QKM Path Diagnostics on the Scalar i500 4
6 Select the .tgz file and click
7 Click
Apply.
Open.
8 When the operation completes, make sure the certificates were
installed on the library by reading the text next to the
Certificates
checkbox. The text should state that the certificates are
Import TLS
installed on the library.
This is an optional, but recommended, step.
QKM path diagnostics consists of a series of short tests to validate
whether the key servers are running, communicating with the library,
and able to serve keys as required:
• Ping Test — Verifies the Ethernet communication between the library
and the QKM servers.
• Path Test — Verifies that QKM services are running on the QKM
servers.
• Config Test — Verifies that the QKM servers are capable of serving
encryption keys.
If the library detects any communication issues, or if the TLS certificates
are not installed, you receive an error message.
On the library’s remote web client, access the diagnostics test as follows:
1 From the menu, click
2 Click the
Click here to run EKM Path Diagnostics link.
Setup > Encryption > System Configuration.
3 If you get the screen allowing you to choose which type of
diagnostics to run, select
4 Click
Apply to run the QKM path diagnostics.
QKM Path Diagnostics.
The library performs the diagnostics and reports pass/fail results on
each of the tests in the Progress Window.
Quantum Key Manager User’s Guide 23
Page 36
Installation and Initial Configuration
Scalar i500 – Library Setup and Configuration
5 If any of the tests fail, try the following resolutions and run the
diagnostics again to make sure all tests pass:
Ping Test Failure Verify that the QKM server host is running
and accessible from the network on which
the library is running.
Path Test Failure Verify that the QKM server is running and
that the port/SSL settings match the settings
configured on the library.
7. Configuring QKM Partitions and Generating Data Encryption Keys 4
Config Test
Failure
A Config Test failure means that the database on the server is reporting one or more
corrupted key records.
If this test fails prior completing initial setup,
rerun the test. If it continues to fail, contact
Quantum Service & Support.
If this test fails after initial setup, rerun the
test. If it continues to fail, restore the server
from the most recent backup.
QKM is enabled at the partition level.
• You must enable library managed encryption on each partition
separately.
• Partitions you want to configure for QKM must contain
only HP
LTO-4 tape drives.
• Both QKM servers must be fully configured and up and running.
1 On the library’s remote web client, navigate to the encryption
partition configuration screen. From the menu bar, click
Encryption > Partition Configuration.
Setup >
2 For each partition in which you will use QKM, in the Encryption
Method
drop-down list, select Enable Library Managed.
Note: When you change the encryption method on a partition,
the partition is taken offline. When the change completes,
the partition comes back online automatically.
Quantum Key Manager User’s Guide 24
Page 37

Installation and Initial Configuration
Scalar i500 – Library Setup and Configuration
Note: If the library encounters any problems accessing the QKM
servers, or if the TLS certificates are not installed, the
library generates an error message. Correct the error and
try again.
3 Click Apply.
4
Key generation begins. When you enable library managed encryption
on a partition in the library for the first time, the library automatically
triggers each QKM server to generate a set of unique data encryption
keys. This may take 15 minutes to an hour, depending on the size of
your library and where the QKM servers are located. The library
notifies you when the process is complete.
5 Wait for the process to complete before continuing to the next step.
8. Saving the Library Configuration 4
9. Backing Up the Keystores 4
Save the library configuration. From the web client menu, select Tools >
Save/Restore Configuration
details about saving the configuration.
Back up both keystores NOW following the instructions provided in
Backing Up the Keystore
. See your library documentation for more
on page 45.
EXTREMELY IMPORTANT:
Back Up Your Keystores!
It is critical that you back up both keystores
before using the keys to encrypt data.
The only way to read encrypted tapes is via the keys
in the keystore. If your servers fail without a backup, you will
permanently lose access to all your encrypted data.
If both servers are lost, and no backup exists, Quantum will be
unable to restore any data from your encr ypted media.
The backup is required for server hardware replacement.
CAUTION! CAUTION! CAUTION! CAUTION! CAUTION!
Quantum Key Manager User’s Guide 25
Page 38

Installation and Initial Configuration
Scalar i2000 – Library Setup and Configuration
Note:
For multiple libraries accessing the same QKM server pair: If
you are configuring more than one library to use the same
QKM servers, be aware that each library triggers the QKM
servers to create a set of data encryption keys which are added
to the keystore. You need to make sure all the keys are
included in your backup before you start using those keys. If
you are configuring several libraries at the same time, you can
wait until all the keys are generated and then perform a single
backup of each server, provided that you do not use the keys
before you back them up. However, if there is a time delay
between the key generation during which you intend to begin
serving keys for encryption, you will need to perform multiple
backups — one after each key generation session.
Scalar i2000 – Library Setup and Configuration
If you are using a Scalar i2000 library with QKM, follow all the steps in
this section, in order.
If you are using a Scalar i500 library, skip this section and follow
Scalar i500 – Library Setup and Configuration
on page 20.
If you will have multiple libraries accessing the same QKM server pair,
repeat these steps for each additional library.
1. Installing the EKM License on the Scalar i2000 4
Quantum Key Manager User’s Guide 26
Make sure that you purchased enough license capacity to cover all the
tape drives that you will be using for library-managed encryption. If you
want more than one library to use QKM, you must install a separate
license on each library.
If you purchased QKM at the same time as your library, then your
Encryption Key Management (EKM) license may already be installed on
the library. If it is, you can skip this step. You can check the
on the library interface to see if the EKM license is installed.
If you purchased QKM separately from the library, you will receive,
separately, instructions on how to obtain your license key and install it on
the library. Follow the instructions to install your license key. If you have
any questions, contact Quantum Service & Support.
Licenses page
Page 39

Installation and Initial Configuration
Scalar i2000 – Library Setup and Configuration
2. Scheduling Sufficient Time 4
3. Preparing QKM Partitions 4
4. Installing the TLS Certificates on the Scalar i2000 4
All of the steps that follow deal with configuring your library for QKM
and generating data encryption keys. Depending on the size of your
library, it may take up to 2.5 hours to complete all of the following steps.
Also, please note that you cannot perform the following configuration
steps
until all previous steps in this section have been completed.
Caution: Do not perform any library or host-initiated operations on
the partitions to be used for QKM until all of the following
steps are complete.
1 Install HP LTO-4 tape drives in the library, if not already installed.
2 Ensure that the partitions you want to configure for QKM contain
only HP LTO-4 tape drives.
3 On the HP LTO-4 tape drives, install the latest version of firmware
that is qualified for the library firmware installed on your library.
Refer to the library release notes for the correct version of tape drive
firmware.
The TLS certificates allow the library to securely communicate with the
QKM servers.
Items Required 4
• A computer with a CD ROM drive and Internet access.
•The Quantum Key Manager TLS Certificates CD (shipped separately
from the QKM servers). The CD contains one .tgz file. This .tgz file
contains all the certificates that need to be loaded onto your library.
Note: You do not need to open or extract any of the files from the
.tgz file.
Quantum Key Manager User’s Guide 27
Page 40

Installation and Initial Configuration
Scalar i2000 – Library Setup and Configuration
Procedure
1 Make sure the date on the library and both QKM servers is set to the
current date. Incorrect date settings may interfere with the TLS
certificates and cause the library to stop communicating with the
QKM servers.
2 Check to see if the certificates are already installed on your library.
From your library’s remote client, select
Encryption Certificate > Import.
Tools > QKM Management >
On this screen, next to the Import TLS Certificates checkbox, there is a
line of text stating whether the certificates are currently installed on
the library. If the certificates are installed, then you do not need to
install them again, and you can skip the rest of this section. If
certificates are
not installed, continue to the next step.
3 Insert the Quantum Key Manager TLS Certificates CD into the
computer’s CD ROM drive.
4 From the
screen, select the
Tools > QKM Management > Encryption Certificat e > Import
Import TLS Certificates checkbox.
5 Browse to the .tgz file located on the CD. (If desired, you can copy the
.tgz file to another location on your computer and browse to it there.)
6 Select the .tgz file and click
7 Click
OK.
Open.
4
When the operation completes, make sure the certificates were installed
on the library by reading the text next to the
Import TLS Certificates
checkbox. The text should state that the certificates are installed on the
library.
5. Configuring the QKM Server IP Addresses and Generating Data Encryption Keys 4
1 On the library’s remote client, navigate to the encryption server setup
screen:
Setup > Encryption > Server Configuration.
2 Enter the QKM primary and secondary server IP addresses or
hostnames in the fields provided.
3 Click
4
OK.
Key generation begins. As soon as you apply the QKM server IP
addresses, the library automatically triggers each QKM server to
generate a set of unique data encryption keys. This takes 1 to 2 hours,
Quantum Key Manager User’s Guide 28
Page 41

Installation and Initial Configuration
Scalar i2000 – Library Setup and Configuration
depending on the size of your library and where the QKM servers are
located. The library generates a RAS ticket when the process is
complete.
6. Running QKM Path Diagnostics on the Scalar i2000 4
Note:
If the key generation does not complete successfully , the
library generates a RAS ticket telling you the key
generation failed. Follow the instructions in the ticket to
resolve any errors, then initiate manual key generation by
changing the encryption method on a QKM partition to
Library Managed (see the instructions in 8. Configuring
QKM Partitions on page 30.)
This is an optional, but recommended, step. You can perform this step
while data encryption keys are being generated in the background.
QKM path diagnostics checks to make sure the key servers are running,
communicating with the library, and able to serve keys as required. These
tests are:
• Ping Test — Verifies the Ethernet communication between the library
and the QKM servers.
• Path Test — Verifies that QKM services are running on the QKM
servers.
• Config Test — Verifies that the QKM servers are capable of serving
encryption keys.
If the library detects any communication issues, or if the TLS certificates
are not installed, you receive an error message.
On the library’s remote client, access the diagnostics test as follows:
1 From the menu, click
2 Click the EKM Path Diagnostics
Setup > Encryption > Server Configuration.
Test button.
3 A dialog box appears after the tests are completed, indicating success
or failure. If a problem is encountered, a RAS ticket is generated to
provide help with resolving the problem.
Quantum Key Manager User’s Guide 29
Page 42

Installation and Initial Configuration
Scalar i2000 – Library Setup and Configuration
4 If any of the tests fail, try the following resolutions and run the
diagnostics again to make sure all tests pass:
Ping Test Failure Verify that the QKM server host is running
and accessible from the network on which
the library is running.
Path Test Failure Verify that the QKM server is running and
that the port/SSL settings match the settings
configured on the library.
7. Waiting for Key Generation to Complete 4
8. Configuring QKM Partitions 4
Config Test
Failure
A Config Test failure means that the database on the server is reporting one or more
corrupted key records.
If this test fails prior completing initial setup,
rerun the test. If it continues to fail, contact
Quantum Service & Support.
If this test fails after initial setup, rerun the
test. If it continues to fail, restore the server
from the most recent backup.
The key generation process that you initiated in 5. Configuring the QKM
Server IP Addresses and Generating Data Encryption Keys can take 1 to 2
hours. When complete, the library generates a RAS ticket telling you the
process completed and you need to back up your keystore. Wait until you
receive this ticket before going to the next step.
QKM is enabled at the partition level.
• You must enable library managed encryption on each partition
separately.
• Partitions you want to configure for QKM must contain
only HP
LTO-4 tape drives.
• Both QKM servers must be fully configured and up and running.
1 On the library’s remote client, navigate to the encryption partition
configuration screen. From the menu bar, click
Partition Configuration.
Setup > Encryption >
Quantum Key Manager User’s Guide 30
Page 43

Installation and Initial Configuration
Scalar i2000 – Library Setup and Configuration
2 For each partition in which you will use QKM, in the Encryption
Method
drop-down list, select Enable Library Managed.
Note: When you change the encryption method on a partition,
the partition is taken offline. When the change completes,
the partition comes back online automatically.
Note: If the library encounters any problems accessing the QKM
servers, or if the TLS certificates are not installed, the
library generates an error message. Correct the error and
try again.
9. Saving the Library Configuration 4
10. Backing Up the Keystores 4
3 Click
Save the library configuration. From the remote client menu, select Tools
> Save/Restore
saving the configuration.
Back up both keystores NOW following the instructions provided in
Backing Up the Keystore
OK.
. See your library documentation for more details about
on page 45.
EXTREMELY IMPORTANT:
Back Up Your Keystores!
It is critical that you back up both keystores
before using the keys to encrypt data.
The only way to read encrypted tap es is via the keys
in the keystore. If your servers fail without a backup, you will
permanently lose access to all your encrypted data.
If both servers are lost, and no backup exists, Quantum will be
unable to restore any data from your encrypted media.
The backup is required for server hardware replacement.
CAUTION! CAUTION! CAUTION! CAUTION! CAUTION!
Quantum Key Manager User’s Guide 31
Page 44

Installation and Initial Configuration
Scalar i2000 – Library Setup and Configuration
Note: For multiple libraries accessing the same QKM server pair: If
you are configuring more than one library to use the same
QKM servers, be aware that each library triggers the QKM
servers to create a set of data encryption keys which are added
to the keystore. You need to make sure all the keys are
included in your backup before you start using those keys. If
you are configuring several libraries at the same time, you can
wait until all the keys are generated and then perform a single
backup of each server, provided that you do not use the keys
before you back them up. However, if there is a time delay
between the key generation during which you intend to begin
serving keys for encryption, you will need to perform multiple
backups — one after each key generation session.
Quantum Key Manager User’s Guide 32
Page 45

Chapter 5
5Using the QKM Server
This chapter discusses the QKM server hardware and general operating
instructions. Topics include:
• QKM Server Controls, LEDs, and Connectors
• Turning On the QKM Server
• Turning Off the QKM Server
• Logging in to the QKM Server
• Accessing QKM Admin Commands
• Running the Setup Wizard
• Changing the Password
• Changing the IP Address
• Changing the Time Zone
• Changing the Date and Time
• Backing Up the Keystore
• Restoring the Keystore
• Setting the QKM Server Hostname
• Accessing QKM Server Information
• Displaying the QKM Server Software Version
• Displaying the End User License Agreement
• Turning Trace Level Logging On and Off
Quantum Key Manager User’s Guide 33
Page 46
QKM Server Controls, LEDs, and Connectors
Power-on LED
Hard disk drive activity LED
Not used
Server error LED
CD drive activity LED
USB connector
USB connector
CD eject button
Power button
Reset button
Hard disk drive 0
Hard disk drive 1
Hard disk drive 1
status LED
Hard disk drive 0
status LED
Hard disk drive 0
activity LED
Hard disk drive 1
activity LED
.
Caution: Never install any software, file, or operating system on the
server unless it is an upgrade or patch supplied by
Quantum. Doing so may make your server inoperable and
will void your warranty.
QKM Server Controls, LEDs, and Connectors
This section describes the controls, light-emitting diodes (LEDs), and
connectors on the front and rear of the server.
Using the QKM Server
Front Panel 5
Figure 3 Front Panel Controls,
LEDs, and Connectors
Figure 3 shows the controls, light-emitting diodes (LEDs), and connectors
on the front of the server.
Quantum Key Manager User’s Guide 34
Page 47

Using the QKM Server
QKM Server Controls, LEDs, and Connectors
Power-on LED:
When this LED is lit and not blinking, it indicates that the
server is turned on. When this LED is blinking, it indicates that the server
is turned off and still connected to an AC power source. When this LED is
off, it indicates that AC power is not present, or the power supply or the
LED itself has failed.
Note: If this LED is off, it does not mean that there is no electrical
power in the server. The LED might be burned out. To remove
all electrical power from the server, you must disconnect the
power cord from the electrical outlet.
Power button: Press this button to turn the server on and off manually.
You may need to use a pen to press the button. A power-control-button
shield comes installed around the button to prevent the server from being
turned off accidentally.
Reset button: Press this button to reset the server and run the power-on
self-test (POST). You might need to use a pen or the end of a straightened
paper clip to press the button.
Hard disk drive activity LED: When this LED is blinking, it indicates that a
hard disk drive is in use. It blinks at the same time as one or both of the
hard disk drive activity LEDs on the hard disk drives.
Server error LED: This amber LED has an exclamation point in it. When
this LED is illuminated, it indicates that a server error has occurred
(including when a hard disk drive is not in a slot; for example, when you
replace a damaged hard disk drive).
USB connectors: You may connect a USB device to either of these
connectors. The only reason you might use a USB device is to connect
directly to the command line interface without using an SSH connection.
CD-eject button: Press this button to release a CD from the CD drive.
CD drive activity LED: When this LED is lit, it indicates that the CD drive is
in use.
Hard disk drive 0 and 1 activity LEDs: These green LEDs blink once every
16 seconds during normal activity. When the hard disk drive is being
accessed, the LED blinks at a faster rate. During RAID rebuild (which
occurs when a hard disk drive is replaced), the LED flickers very fast so
that it may appear to be on solid.
Hard disk drive 0 and 1 status LEDs: These amber LEDs will be on solid to
indicate a problem with the hard disk drive. During RAID rebuild (which
Quantum Key Manager User’s Guide 35
Page 48

Using the QKM Server
Power cord
connector
Systems-management
connector (reserved)
USB connector
USB connector
Ethernet Port 1
(for setup/configuration)
Ethernet Port 2
(for network connection)
Video connector
Serial connector
(reserved)
QKM Server Controls, LEDs, and Connectors
occurs when a hard disk drive is replaced), the LED of the hard disk drive
that is updating will blink.
Rear Panel 5
Figure 4 Rear Panel
Connectors
Figure 4 shows the connectors on the rear of the server. Figure 5 shows
the LEDs on the rear of the server.
Power-cord connector: Connect the power cord to this connector.
Serial connector: Reserved.
Video connector: Connect a monitor to this connector. The only reason
you might connect a monitor is to connect directly to the command line
interface without using an SSH connection.
Ethernet Port 1: Use this port for setup and initial configuration with a
local SSH connection only. You might also use this port if you forget the
IP address of Port 2 need reconfigure the QKM server. to reconfigure Port
2. Do not connect this port to your network. The IP address of Port 1 is
static and cannot be changed. The IP address is
Ethernet Port 2: Use this port to connect the QKM server to your network.
The default IP address for this port is
Quantum Key Manager User’s Guide 36
address during initial setup.
192.168.18.4. You will change the IP
192.168.18.3.
Page 49

Using the QKM Server
Ethernet Port 1 activity LED
Ethernet Port 1 link LED
Ethernet Port 2 activity LED
Ethernet Port 2 link LED
Turning On the QKM Server
Figure 5 Rear Panel LEDs
USB connector:
You may connect a USB device to either of these
connectors. The only reason you might use a USB device is to connect
directly to the command line interface without using an SSH connection.
Systems-management connector: Reserved.
Ethernet activity LED:
This LED is on each Ethernet connector. When this
LED is on, it indicates that there is activity between the server and the
network.
Ethernet link LED: This LED is on each Ethernet connector. When this LED
is on, it indicates that the Ethernet controller is connected to the network.
T urning On the QKM Server
You can turn on the server and start the operating system by pressing the
power button. Approximately 20 seconds after the server is connected to
AC power, the power button becomes active, and one or more fans might
start running to provide cooling while the server is connected to power. It
is normal for the fan to start up loudly at first, for about 20 seconds, then
become quiet.
Note: If a power failure occurs while the server is turned on, the
server will restart automatically when power is restored.
Quantum Key Manager User’s Guide 37
Page 50

Turning Off the QKM Server
You can press the power-control button to start an orderly shutdown of
the operating system and turn off the server. While the server remains
connected to AC power, one or more fans might continue to run. To
remove all power from the server, you must disconnect it from the power
source.
Caution: The power button on the server does not turn off the
electrical current supplied to the device. To remove all
electrical current from the device, ensure that the power
cord is disconnected from the power source.
Logging in to the QKM Server
Using the QKM Server
Turning Off the QKM Server
While most encryption operations will occur automatically and
transparently, you will need to access the QKM server on occasion to
perform certain functions, which are described in this chapter.
To access the QKM server command line at any time after initial setup:
1 Connect to the QKM server via SSH, using the IP address assigned to
Ethernet Port 2. Remember that there are two QKM servers with
different IP addresses. Make sure that you are accessing the correct
server.
Note: If you are using Microsoft
install a utility to use SSH. Two such utilities are PuTTY,
available at http://www.chiark.greenend.org.uk/
~sgtatham/putty/ and WinSCP, available at http://
winscp.net.
2 At the login prompt, enter the login ID:
akmadmin
3 At the password prompt, enter your password.
Quantum Key Manager User’s Guide 38
®
Windows®, you may need to
Page 51

Accessing QKM Admin Commands
1 Log in to the QKM server (see Logging in to the QKM Server on
page 38).
2 At the command prompt, enter the following command to retrieve
the list of QKM commands:
./qkmcmds
3 Enter your password.
A message displays alerting you that performing QKM Admin
commands will stop the QKM key server process.
Using the QKM Server
Accessing QKM Admin Commands
4 Enter
5 Press
y to agree to stop the QKM key server process and continue.
A message appears stating the QKM key server process is being
stopped.
<Enter> to continue.
The list of QKM Admin commands displays (see Figure 6
example).
for an
Quantum Key Manager User’s Guide 39
Page 52

Figure 6 QKM Admin
Commands (Example)
Using the QKM Server
Notes on Using QKM Command Line Interface and Admin Commands
Notes on Using QKM Command Line Interface and Admin
Commands
Take note of the following points about using the QKM command line
interface and QKM Admin commands.
• When changing the settings, you can just press
current setting unchanged.
•
Login ID: There is only one login ID, akmadmin. This login ID cannot
be changed.
•
Password: There is one user account password. The password can be
different on each server. You need to enter the password frequently
to gain access to certain functions. You can change this password at
any time, but be careful. It is critical that you do not lose your
Quantum Key Manager User’s Guide 40
<Enter> to leave the
Page 53

Using the QKM Server
Running the Setup Wizard
password, because if you do there is no way to recover it. Without the
password, you lose login access to the QKM server, including backup
and restore capability. The default password is
password. You can
change the password using the Setup Wizard or by selecting it from
the Admin commands list.
• You can make as many changes in a row as you wish, but in order to
save your changes, you must enter
q to quit Admin commands.
Quitting Admin commands saves any changes you requested and
restarts the QKM server process. If your session terminates before
you enter
q, any changes you made will not be saved. You should
always quit Admin commands to terminate your session before
closing the command line window or ending your SSH session.
• Only one user can use QKM Admin Commands at a time. If you try
to log in and another user is logged in, you will receive a message
that the system is already running and you will not be able to log in.
• You may log in to the QKM server directly (without using SSH) by
connecting a monitor and keyboard directly to the QKM server.
Running the Setup Wizard
You should not need to run the entire Setup Wizard after initial setup, but
if you wish to, do so as follows:
1 Log in to the QKM server (see Logging in to the QKM Server
page 38).
2 Display the list of Admin commands (see Accessing QKM Admin
Commands on page 39).
3 Enter the number or letter corresponding to
wizard
.
Launch QKM server setup
4 Complete the Setup Wizard.
5 Enter
q to quit Admin commands, apply your changes, and restart
the QKM key server process.
Quantum Key Manager User’s Guide 41
on
Page 54

Changing the Password
There is only one password for a QKM server, which is required for all
login and access to Admin commands, including backup and restore.
Each QKM server has a password, and the passwords may be different on
the two QKM servers in the pair.
If you lose the password, there is no way to retrieve it. The only way to
recover from such a situation is to completely replace the QKM server
(see Replacing a QKM Server and Both Hard Disk Drives
If you forget your password, there is no way to retrieve it!
If you forget your password, you will lose login access to
the QKM server, including backup and restore capability.
Quantum will NOT be able to restore the password.
Using the QKM Server
Changing the Password
on page 75).
EXTREMELY IMPORTANT:
Remember Your Password!
CAUTION! CAUTION! CAUTION! CAUTION! CAUTION!
1 Log in to the QKM server (see Logging in to the QKM Server
page 38).
2 Display the list of Admin commands (see Accessing QKM Admin
Commands on page 39).
3 Enter the number or letter corresponding to
password
Follow the prompts to change your password.
4 Enter
restart the QKM key server process.
Quantum Key Manager User’s Guide 42
.
q to quit the Admin commands, apply your changes, and
Change user account
on
Page 55

Changing the IP Address
When you first install your QKM server and run the setup wizard, you
set the IP address (see Configuring the QKM Servers
time after that, you can change the IP address as follows.
Caution: Changing the IP address should not be taken lightly.
1 Log in to the QKM server (see Logging in to the QKM Server on
page 38
Using the QKM Server
Changing the IP Address
on page 18). At any
Remember that if you change the IP address on your
server, you must also change it in the library remote web
client of each library that is attached to the QKM server
pair or the libraries will not be able to communicate with
the QKM server. This requires a number of coordinated
steps that are detailed below.
).
2 Display the list of Admin commands (see
Accessing QKM Admin
Commands on page 39).
3 Enter the number or letter corresponding to Set
address
.
QKM server IP
4 Follow the prompts to change your IP address.
5 Enter
q to quit the Admin commands, apply your changes, and
restart the QKM key server process.
6 Update the IP address on each library that uses this QKM server, as
follows:
a Make sure that no tape cartridges are mounted in any of the tape
drives in any of the QKM partitions on the library.
b Access the library’s remote Web client.
c Navigate to the encryption partition configuration page (
Encryption > Partition Configuration
).
Setup >
d Change the encryption method on all QKM partitions from
Enable Library Managed to Allow Application Managed.
Quantum Key Manager User’s Guide 43
Page 56

e Navigate to the encryption key server setup screen:
• Scalar i500:
• Scalar i2000: Setup > Encryption > Server Configuration
f Update the IP address of the QKM server.
Caution: Be sure to update the correct IP address (primary
g Navigate back to the encryption partition configuration screen
and change the encryption method on all QKM partitions from
Allow Application Managed to Enable Library Managed.
Changing the Time Zone
To change the time zone at any time after initial configuration:
Using the QKM Server
Changing the Time Zone
Setup > Encryption > System Configuration
vs. secondary).
1 Log in to the QKM server (see Logging in to the QKM Server
page 38).
2 Display the list of Admin commands (see Accessing QKM Admin
Commands on page 39).
3 Enter the number or letter corresponding to
zone
.
4 Follow the prompts to set the time zone.
5 Enter
Quantum Key Manager User’s Guide 44
q to quit the Admin commands, apply your changes, and
restart the QKM key server process.
Set QKM server time
on
Page 57

Changing the Date and Time
To change the date and time at any time after initial configuration:
Using the QKM Server
Changing the Date and Time
1 Log in to the QKM server (see Logging in to the QKM Server
page 38).
2 Display the list of Admin commands (see Accessing QKM Admin
Commands on page 39).
3 Enter the number or letter corresponding to
time
.
4 Follow the prompts to set the date and time.
5 Enter
q to quit the Admin commands, apply your changes, and
restart the QKM key server process.
Backing Up the Keystore
EXTREMELY IMPORTANT:
on
Set QKM server date and
Back Up Your Keystores!
It is critical that you back up both keystores
before using the keys to encrypt data.
The only way to read encrypted tap es is via the keys
in the keystore. If your servers fail without a backup, you will
permanently lose access to all your encrypted data.
If both servers are lost, and no backup exists, Quantum will be
unable to restore any data from your encrypted media.
The backup is required for server hardware replacement.
CAUTION! CAUTION! CAUTION! CAUTION! CAUTION!
Quantum Key Manager User’s Guide 45
Page 58

Using the QKM Server
Backing Up the Keystore
For more information on why you need to back up your QKM servers,
see Why You Need to Back Up Your Keystore
on page 6.
You must a perform a backup of both keystores every time data
encryption keys are generated (and before you start using those keys for
encryption). You must back up each keystore separately because they
contain different data. If a server fails and needs to be replaced, the
backup is required to restore operation.
The backup contains your keystore database, which includes the data
encryption keys generated on the QKM server, the copies of the data
encryption keys generated on the other QKM server in the pair, and the
metadata (which data encryption keys were used on which tapes). The
backup does not contain information that is not related to keys; for
example, your password, server IP addresses, and so on.
You can perform a backup as often as you like. It is often not practical to
back up the servers every time there is a change to the metadata (in other
words, every time a data encryption key is used on a tape drive). Every
time you serve a new data encryption key after you take the backup, the
metadata will be out of synch with what is stored in your backup. This
means that if you ever needed to restore from your backup, it might not
contain the complete metadata that was on the server. However, the
metadata is “nice to have” but not required. The backup will contain the
crucial data, which is your keystore.
• The library keeps track of the name of the last data encryption key
issued for encryption purposes. If your server crashes and you
perform a restore, the next time the library requests a data encryption
key, it will ask for the next key. Even if you lose your metadata, data
encryption keys will not be duplicated on tape cartridges.
• The metadata keeps track of which data encryption keys were used
on which tape cartridges. The name of the data encryption key (not
the key itself) is stored on the cartridge. If an encrypted tape needs to
be appended to or read from, the tape drive requests the data
encryption key from the server. As long as the server has the required
key, you will be able to obtain the correct key.
Quantum Key Manager User’s Guide 46
Page 59

Using the QKM Server
Backing Up the Keystore
Note: For multiple libraries accessing the same QKM server pair: If
you are configuring more than one library to use the same
QKM servers, be aware that each library triggers the QKM
servers to create a set of data encryption keys which are added
to the keystore. You need to make sure all the keys are
included in your backup before you start using those keys. If
you are configuring several libraries at the same time, you can
wait until all the keys are generated and then perform a single
backup of each server, provided that you do not use the keys
before you back them up. However, if there is a time delay
between the key generation during which you intend to begin
serving keys for encryption, you will need to perform multiple
backups — one after each key generation session.
When you perform a backup, all of the files you would need to resume
normal operation upon restore are pulled and placed into two .tgz files.
Perform the following steps for
1 Log in to the QKM server (see Logging in to the QKM Server
each QKM server separately.
on
page 38).
2 Display the list of Admin commands (see Accessing QKM Admin
Commands on page 39).
3 Enter the number or letter corresponding to
Back up keystore.
All the relevant files that you need to restore your server are gathered
and placed in two files. The names and paths (also displayed on the
command line interface) are:
/home/akmadmin/QKMApp<SN><date><time>.tgz
/home/akmadmin/QKMData<SN><date><time>.tgz
4 Use the secure file transfer protocol (SFTP) to copy the files to a
desired location.
Note: If you are using Microsoft Windows, you may need to
install a program to use SFTP. Two such utilities are
PuTTY, available at http://
www.chiark.greenend.org.uk/~sgtatham/putty/ and
WinSCP, available at http://winscp.net
.
Quantum Key Manager User’s Guide 47
Page 60

Using the QKM Server
Restoring the Keystore
Caution: You must copy these backup files to another location
and not just leave them on the QKM server. Then, if
the QKM server fails, you can restore the backup from
the remote location onto the new server.
Caution:
5 Press <Enter>.
The list of QKM Admin commands displays.
6 Enter
process.
7 Repeat the above steps on the other server in the QKM server pair.
Restoring the Keystore
The only time you should need to restore the keystore is when you
replace a QKM server and both of its hard disk drives. You perform the
restore procedure as part of the server replacement procedure. See
Replacing a QKM Server and Both Hard Disk Drives
Do not use QKM to encrypt the sole copy of your QKM
server keystore backup.
you would not be able to recover the encrypted
backup and would lose all data you had stored on all
your encrypted tapes.
q to quit the Admin commands and restart the QKM key server
If both servers were to fail,
on page 75.
The restore procedure places all of the information contained in your
backup onto a QKM server. The backup contains your keystore database,
which includes:
• the data encryption keys generated on the QKM server,
• the copies of the data encryption keys generated on the other server
in the QKM server pair, and
• any metadata for data encryption keys used up until the time the
backup was performed.
The backup does not include metadata for data encryption keys used
after the backup was performed.
Quantum Key Manager User’s Guide 48
Page 61

Using the QKM Server
Restoring the Keystore
1 Get the backup files you wish to restore and place them in a location
you can access via your network.
Caution: Make sure you use the backup for the failed server,
not the working server. The backups are not the same.
The filenames of the backup files contain the serial
number of the server.
2 Log in to the QKM server (see Logging in to the QKM Server
on
page 38).
3 Display the list of Admin commands (see Accessing QKM Admin
Commands on page 39).
4 Enter the number or letter corresponding to
Restore the keystore.
A message displays instructing you to copy the following two files to
the
/home/akmadmin folder using SFTP:
• QKMApp<serialnumber><lastbackupdate>.tgz
• QKMData<serialnumber><lastbackupdate>.tgz
5 Use the secure file transfer protocol (SFTP) to move the files from
your known location to the
/home/akmadmin folder on the QKM
server.
Note: If you are using Microsoft Windows, you may need to
install a program to use SFTP. Two such utilities are
PuTTY, available at http://www.chiark.greenend.org.uk/
~sgtatham/putty/ and WinSCP, available at http://
winscp.net.
6 When finished copying the files, press
<Enter>.
A message appears telling you the configuration was restored and
reminding you to quit Admin commands and then synchronize the
server with its attached libraries.
7 Press
<Enter> again.
The list of Admin commands displays.
8 Enter
q to quit the Admin commands and restart the QKM key server
process.
The files are loaded onto the QKM server’s hard disk drives and the
QKM key server process restarts.
Quantum Key Manager User’s Guide 49
Page 62

Using the QKM Server
Setting the QKM Server Hostname
9 As soon as possible, synchronize the restored QKM server with each
library that accesses it, as follows:
Note: The library cannot use the restored key server to serve new
data encryption keys until you synchronize. Each library
keeps track of the last data encryption key served by the
key server. Synchronization resets the restored key server
so that it does not serve previously used data encryption
keys.
a Access the library’s remote web client.
b Navigate to the partition encryption screen (
Partition Configuration
Enable Library Managed to Allow Application Managed. Make sure
) and change one QKM partition from
to apply the change. On some libraries, you click
Setup > Encryption >
Apply. On
others, you may need to go through several screens before
finishing.
c Wait 3 minutes to allow the changes to complete.
d Change the QKM partition back to
Enable Library Managed.
e Check to see if any RAS tickets were generated. If not, the
synchronization succeeded.
f Repeat the above steps on each library that accesses the QKM
server.
Note:
On the i2000 library only, an alternate method of
synchronizing the QKM server with the library is to reboot
the library, and check for RAS tickets after the reboot
completes to make sure it was successful. If your library is
small, this may take less time than the above method.
Setting the QKM Server Hostname
The QKM server’s default hostname is qkmserver. You can change the
hostname during initial configuration using the Setup Wizard, or any
time thereafter using the Admin command.
Quantum Key Manager User’s Guide 50
Page 63

Using the QKM Server
Accessing QKM Server Information
1 Log in to the QKM server (see Logging in to the QKM Server on
page 38).
2 Display the list of Admin commands (see Accessing QKM Admin
Commands on page 39).
3 Enter the number or letter corresponding to
hostname
The command prompt displays the current hostname in brackets.
4 Enter a new hostname.
5 Press
6 Enter
restart the QKM key server process.
.
<Enter>.
q to quit the Admin commands, apply your changes, and
Accessing QKM Server Information
You can access information about the QKM server itself. The information
you can obtain is:
• Displaying the Help Menu
• Displaying the QKM Server Software Version
• Capturing QKM Server Logs Without Stopping the Key Server
• Displaying the End User License Agreement
Set QKM server
• Turning Trace Level Logging On and Off
Displaying the Help Menu5
Quantum Key Manager User’s Guide 51
1 Log in to the QKM server (see Logging in to the QKM Server on
page 38).
2 At the command prompt, enter the following command to display
the list of commands (see Figure 7
./qkmcmds -h
):
Page 64

Figure 7 Help Menu
Using the QKM Server
Accessing QKM Server Information
Displaying the QKM Server Software Version 5
Capturing QKM Server Logs Without Stopping the Key Server 5
Displaying the End User License Agreement 5
1 Log in to the QKM server (see Logging in to the QKM Server on
page 38).
2 At the command prompt, enter the following command:
./qkmcmds -v
This feature is explained in Capturing QKM Server Logs Via the Server
Without Stopping the Key Server Process on page 63.
The End User License Agreement (EULA) is displayed during initial
configuration of the QKM server. You were required to accept the terms
of the agreement before configuring the server. If you want to read the
license agreement at any time after initial setup, do the following:
1 Log in to the QKM server (see Logging in to the QKM Server
on
page 38).
2 At the command prompt, enter the following command:
./qkmcmds -E
The first few paragraphs of the license display.
3 Press
Quantum Key Manager User’s Guide 52
<Enter> to scroll through the license agreement one line at a
time. Type
end to advance one paragraph (or several lines) at a time.
Page 65

Using the QKM Server
Accessing QKM Server Information
At the end of the license agreement, the date of acceptance displays.
Turning Trace Level Logging On and Off 5
4 Press
<Enter>.
QKM server software logging can get very verbose, so this option is
turned off by default. If you turn it on, the key server software generates
more logging, which may be useful for troubleshooting purposes. You
should keep this turned
OFF unless Quantum Service & Support directs
otherwise.
1 Log in to the QKM server (see Logging in to the QKM Server
on
page 38).
2 At the command prompt, enter one of the following commands:
./qkmcmds -D on or
./qkmcmds -D off
Quantum Key Manager User’s Guide 53
Page 66

Chapter 6
6Using the Library to Initiate
QKM Functions
There are certain operations and functions that you can access and use via
the Scalar i500 and Scalar i2000 Web library remote web clients. These
operations include:
• Generating Data Encryption Keys
• Importing and Exporting Data Encryption Keys
• Importing and Exporting Encryption Certificates
• Sharing Encrypted Tapes Offsite
• Running QKM Path Diagnostics
Generating Data Encryption Keys
Data encryption keys are generated in sets of a specified quantity (see
Number of Data Encryption Keys Generated
generate data encryption keys at the following times:
• Generating Data Encryption Keys at Initial Setu
• Generating Data Encryption Keys When the Set is Depleted
The library tracks data encryption key usage and reminds you to generate
more keys when needed. If you try to generate data encryption keys on a
QKM server that already has sufficient unused data encryption keys, then
Quantum Key Manager User’s Guide 54
on page 85). You can
p
Page 67

Using the Library to Initiate QKM Functions
Generating Data Encryption Keys
it will not create more. You will receive a message to that effect on the
library remote web client.
Note: Each library that you connect to a QKM server requires its
own set of data encryption keys. Each library only pulls data
encryption keys from the set that “belongs” to it. This means
that a QKM server may contain several distinct sets of data
encryption keys. When the data encryption keys for one
library have all been used, then more keys must be generated.
Generating Data Encryption Keys at Initial Setup 6
Generating Data Encryption Keys When the Set is Depleted 6
At initial setup, the library triggers each QKM server to generate a set of
data encryption keys. The process is described in the following sections:
Scalar i500 7. Configuring QKM Partitions and Generating
Data Encryption Keys on page 24
Scalar i2000 5. Configuring the QKM Server IP Addresses and
Generating Data Encryption Keys on page 28
When a QKM server has used 80 percent of the data encryption keys
assigned to a particular library, that library generates a RAS ticket to let
you know.
•
Scalar i500: You should schedule a time to manually generate more
data encryption keys as described below and back up both QKM
server keystores.
Scalar i2000: Make sure that both QKM servers are running and
•
operational. As soon as the 80-percent RAS ticket is generated, the
library attempts to automatically generate data encryption keys on
the QKM server. Both QKM servers must be running and operational
in order for key generation to succeed.
•
If automatic key generation succeeds, the “80% depleted” RAS
ticket closes and is replaced by a “completed generating new
keys” RAS ticket. Back up both QKM server keystores as soon as
possible.
Quantum Key Manager User’s Guide 55
Page 68

Using the Library to Initiate QKM Functions
Generating Data Encryption Keys
• If automatic key generation fails, the library generates a “failed to
generate new keys” RAS ticket. Every time the library requests a
new data encryption key, it re-opens the “80% depleted” RAS
ticket if it was closed, and attempts automatic key generation
again.
If a QKM server completely runs out of data encryption keys for a
particular library, that library generates a different RAS ticket, which
states that you have run out of data encryption keys and that the library
attempted to failover to the other QKM server. If this happens, it is
imperative that you manually generate a new set of data encryption keys
on the depleted server immediately and then back up both QKM server
keystores.
The data encryption key generation process can take 15 minutes to an
hour, depending on the library type. During key generation and backup,
the QKM server will not be able to process any library requests for data
encryption keys. You should not run any library or host-initiated
operations on QKM partitions during key generation and backup.
To manually generate data encryption keys, you need to temporarily
disable library managed encryption on a partition, and then enable it
again. Enabling library managed encryption on a partition triggers the
library to check both QKM servers to see if new data encryption keys are
needed. If so, it creates the keys.
To manually generate data encryption keys:
1 Make sure that both QKM servers are running and operational.
2 From the library’s remote Web client, access the encryption partition
modification screen. From the menu bar, click
Partition Configuration.
Setup > Encryption >
3 Select a QKM partition configured for library managed encryption,
and temporarily disable library managed encryption by changing the
encryption method from
Managed
Quantum Key Manager User’s Guide 56
. Remember which partition it is, because you will be changing
Enable Library Managed to Allow Application
Page 69

Using the Library to Initiate QKM Functions
Importing and Exporting Data Encryption Keys
it back in a few minutes. Make sure to apply the change. On the i500
library, click
Apply. On the i2000, you need to go through several
screens before finishing.
Note: When you change the partition’s encryption method to
Allow Application Managed, the data that was written to the
tapes while the partition was configured for
Managed
partition back to
can no longer be read, until you change the
Enable Library Managed. You will only be
Enable Library
disabling for a short time, and then changing back to
Enable Library Managed (just to trigger the key generation
process) so this should have little effect, unless you forget
to turn it back to
Enable Library Managed.
4 Wait 3 minutes to allow the changes to complete.
5 Go back to the partition modification screen and change the partition
back to
Enable Library Managed. Again, make sure to save the
changes.
6 Wait for the process to complete before resuming library operations.
7 Back up the QKM keystore. You must back up the keystore every
time you generate new data encryption keys to protect against
catastrophic server failure. See Backing Up the Keystore
Note:
On the i2000 library only, an alternate method of manually
initiating data encryption key generation is to reboot the
library. If your library is small, this may take less time than the
above method.
Importing and Exporting Data Encryption Keys
When you want to share encrypted tape cartridges with another site, or to
read tapes encrypted by another site, you need to import and export data
encryption keys via the library remote web client. See Sharing Encrypted
Tapes Offsite on page 58 for information and instructions on this process.
on page 45.
Quantum Key Manager User’s Guide 57
Page 70

Using the Library to Initiate QKM Functions
Importing and Exporting Encryption Certificates
Both QKM servers must be connected and operational in order to import
or export data encryption keys.
The menu paths to import and export data encryption keys from the
library remote web client:
• Tools > QKM Management > Encryption Key > Import
• Tools > QKM Management > Encryption Key > Export
If errors occur during a data encryption key import operation, you
receive an error message and a RAS ticket. See QKM Encryption Key
Import Warning Log on page 61 for more information.
Importing and Exporting Encryption Certificates
You need to import and export encryption certificates as part of sharing
encrypted tapes with other organizations. See Encryption Certificates
page 4 and Sharing Encrypted Tapes Offsite
and instructions on this process.
on page 58 for information
on
Both QKM servers must be connected and operational in order to import
and export encryption certificates.
The menu paths to import and export encryption certificates from the
library remote web client:
•
Tools > QKM Management > Encryption Certificate > Import
• Tools > QKM Management > Encryption Certificate > Export
Sharing Encrypted Tapes Offsite
It is common practice to share tapes with other organizations for data
transfer, joint development, contracting services, or other purposes. If
you are using QKM, you can share encrypted tapes with other companies
and individuals who also use QKM.
Quantum Key Manager User’s Guide 58
Page 71

Using the Library to Initiate QKM Functions
Sharing Encrypted Tapes Offsite
QKM creates unique key aliases across all QKM installations worldwide.
This ensures that you can safely share QKM-encrypted tapes with other
sites or companies.
In order to share encrypted data on an HP LTO-4 tape, a copy of the
symmetric key used to encrypt the data on the tape must be made
available to the other organization to enable them to read the tape.
In order for the symmetric key to be shared, the other organization must
share their public key with you. This public key will be used to wrap the
symmetric key when it is exported from the QKM keystore.
When the other organization imports the symmetric key into their QKM
keystore, it will be unwrapped using their corresponding private key.
This ensures that the symmetric key will be safe in transit since only the
holder of the private key will be able to unwrap the symmetric key.
With the symmetric key that was used to encrypt the data in their QKM
keystore, the other organization will then be able to read the data on the
tape.
The general process for sharing a tape from an originating (i.e., source)
organization to a receiving (i.e., destination) organization is as follows.
1 The destination administrator navigates to the
Certificate
Management > Encryption Certificate > Export
screen on the library remote web client (Tools > QKM
Export Encryption
), exports the encryption
certificate that belongs to the destination QKM server, and saves the
file to a known location on a computer.
2 The destination administrator e-mails the encryption certificate file to
the source administrator.
3 The source administrator saves the encryption certificate file to a
known location on a computer.
4 The source administrator navigates to the
Certificate
Management > Encryption Certificate > Import
screen on the library remote web client (Tools > QKM
Import Encryption
) and imports the
encryption certificate onto the source QKM server.
5 The source administrator navigates to the
screen on the library remote web client (
Encryption Key > Export
) and exports the data encryption key(s) used
Export Encryption Keys
Tools > QKM Management >
to encrypt the shared tape(s), assigning the same encryption
certificate noted above to wrap the data encryption keys. The source
administrator saves the file containing the wrapped data encryption
keys to a known location on a computer.
Quantum Key Manager User’s Guide 59
Page 72

Using the Library to Initiate QKM Functions
Running QKM Path Diagnostics
6 The source administrator e-mails the file containing the wrapped
data encryption keys to the destination administrator.
7 The destination administrator saves the file containing the wrapped
data encryption keys to a known location on a computer.
8 The destination administrator navigates to the
Keys
screen on the library remote web client (Tools > QKM
Management > Encryption Key > Import
encryption keys onto the destination QKM server.
9 The destination library can now read the encrypted tapes.
Running QKM Path Diagnostics
QKM path diagnostics consists of a series of short tests to validate
whether the key servers are running, communicating with the library,
and able to serve keys as required.
You should run the diagnostics any time you change the QKM server
settings or library encryption settings.
For complete information about the diagnostic tests, how to run them,
and how to troubleshoot them, see the following sections:
Scalar i500 6. Running QKM Path Diagnostics on the
Scalar i500 on page 23
Import Encryption
) and imports the data
Scalar i2000 6. Running QKM Path Diagnostics on the
Scalar i2000 on page 29
Quantum Key Manager User’s Guide 60
Page 73

Chapter 7
7Logs
The QKM server collects data about its activities that you may need to
access, mostly for troubleshooting purposes. The logs are:
• QKM Encryption Key Import Warning Log
encryption keys that did not get imported during a standard key
import operation.
• Q
KM Server Logs — Several logs that are useful to Quantum Service
& Support when troubleshooting.
QKM Encryption Key Import Warning Log
During a key import operation, if at least one data encryption key in the
file of exported keys is successfully imported but at least one data
encryption key is not successfully imported, the library generates an
“import warning” message as well as a RAS ticket. The RAS ticket directs
you to view the Import Warning Log, which contains a list of the data
encryption keys that were not imported.
When this error occurs, it may mean that the file containing the data
encryption keys is corrupted. Obtain a new copy of the file and try the
key import operation again.
— Lists any data
Quantum Key Manager User’s Guide 61
Page 74

QKM Server Logs
The library remote web client menu paths to access this log are:
Logs
QKM Server Logs
• Scalar i500:
• Scalar i2000: Too ls > QKM > Manage me nt > Re trie v e QKM Lo gs
The QKM server logs contain information about all activities performed
by the QKM server. Quantum Service & Support may request that you
retrieve the logs using one or more methods described below. You should
not need to retrieve these logs unless directed to do so by Quantum
Service & Support.
The three methods of retrieving the logs are:
• R
etrieving QKM Server Logs Via the Library
• Capturing QKM Server Logs Via the Server Without Stopping the
Key Server Process
• Capturing QKM Server Logs Via the Server While Stopping the Key
Server Process
The logs collected via the library are a smaller subset of the logs collected
via the server. Logs collected via the library include the QKM server error
log, audit log, and systems log. Logs pulled from the server include the
preceding plus operating system and configuration logs.
Reports > Log Viewer
As the log files are collected on the server, when they reach maximum
size, old information is deleted as new information is added.
Retrieving QKM Server Logs Via the Library 7
Quantum Key Manager User’s Guide 62
1 From the library remote web client, access the Retrieve QKM Logs
page. The menu path is:
Logs
2 Choose the server from which you want to pull the logs (primary or
secondary).
The library pulls the logs from the QKM server and places them in a
single .tgz file that you can download or e-mail to a recipient.
To ols > QKM Management > Retrieve QKM
Page 75

Logs
QKM Server Logs
Capturing QKM Server Logs Via the Server Without Stopping the Key Server Process 7
The most efficient way to collect the logs from the QKM server is to do so
without stopping the QKM key server process.
1 Log in to the QKM server (see Logging in to the QKM Server
on
page 38).
2 Display the list of Admin commands (see Accessing QKM Admin
Commands on page 39).
3 At the command prompt, enter the following command:
./qkmcmds -L
The logs are gathered and consolidated into a single .tgz file.
The file is named
QKM server directory
qkm_logcapture_<SN><date>.tgz and is stored in the
/home/akmadmin/.
4 Use a secure file transfer protocol (SFTP) to copy the backup file to a
desired location.
Note: If you are using Microsoft Windows, you may need to
install a utility to use SFTP. Two such utilities are PuTTY,
available at http://www.chiark.greenend.org.uk/
~sgtatham/putty/ and WinSCP, available at http://
winscp.net.
5 Press
<Enter>.
Capturing QKM Server Logs Via the Server While Stopping the Key Server Process 7
An alternative method of collecting the QKM server logs is via the QKM
Admin commands. This method stops the QKM key server process.
Normally you would not choose this method, but if the key server
process is stopped anyway and you want to capture the logs at the same
time, you can do so.
1 Log in to the QKM server (see Logging in to the QKM Server
on
page 38).
2 Display the list of Admin commands (see Accessing QKM Admin
Commands on page 39).
3 Enter the number or letter corresponding to
Capture QKM server logs.
The logs are gathered and consolidated into a single .tgz file.
The file is named
QKM server directory
Quantum Key Manager User’s Guide 63
qkm_logcapture_SN_<date>.tgz and is stored in the
/home/akmadmin/.
Page 76

Logs
QKM Server Logs
4 Use the secure file transfer protocol (SFTP) to copy the backup file to
a desired location.
Note: If you are using Microsoft Windows, you may need to
install a utility to use SFTP. Two such utilities are PuTTY,
available at http://www.chiark.greenend.org.uk/
~sgtatham/putty/ and WinSCP, available at http://
winscp.net.
5 Enter
process.
q to quit the Admin commands and restart the QKM key server
Quantum Key Manager User’s Guide 64
Page 77

This chapter discusses the following error scenarios and resolutions:
• Library RAS Tickets
• QKM Server LED Error Indicators
• POST Beep Codes
• Common Problems
Library RAS Tickets
Chapter 8
8Troubleshooting
The library will generate Reliability, Availability, and Serviceability
(RAS) tickets for certain QKM server conditions and library-initiated
QKM operations. Some RAS tickets are for information only. Others alert
you to problems that need to be fixed. Follow the resolution instructions
in the ticket to help clear or diagnose problems. Contact Quantum Service
& Support if you cannot resolve the problem yourself.
Quantum Key Manager User’s Guide 65
Page 78
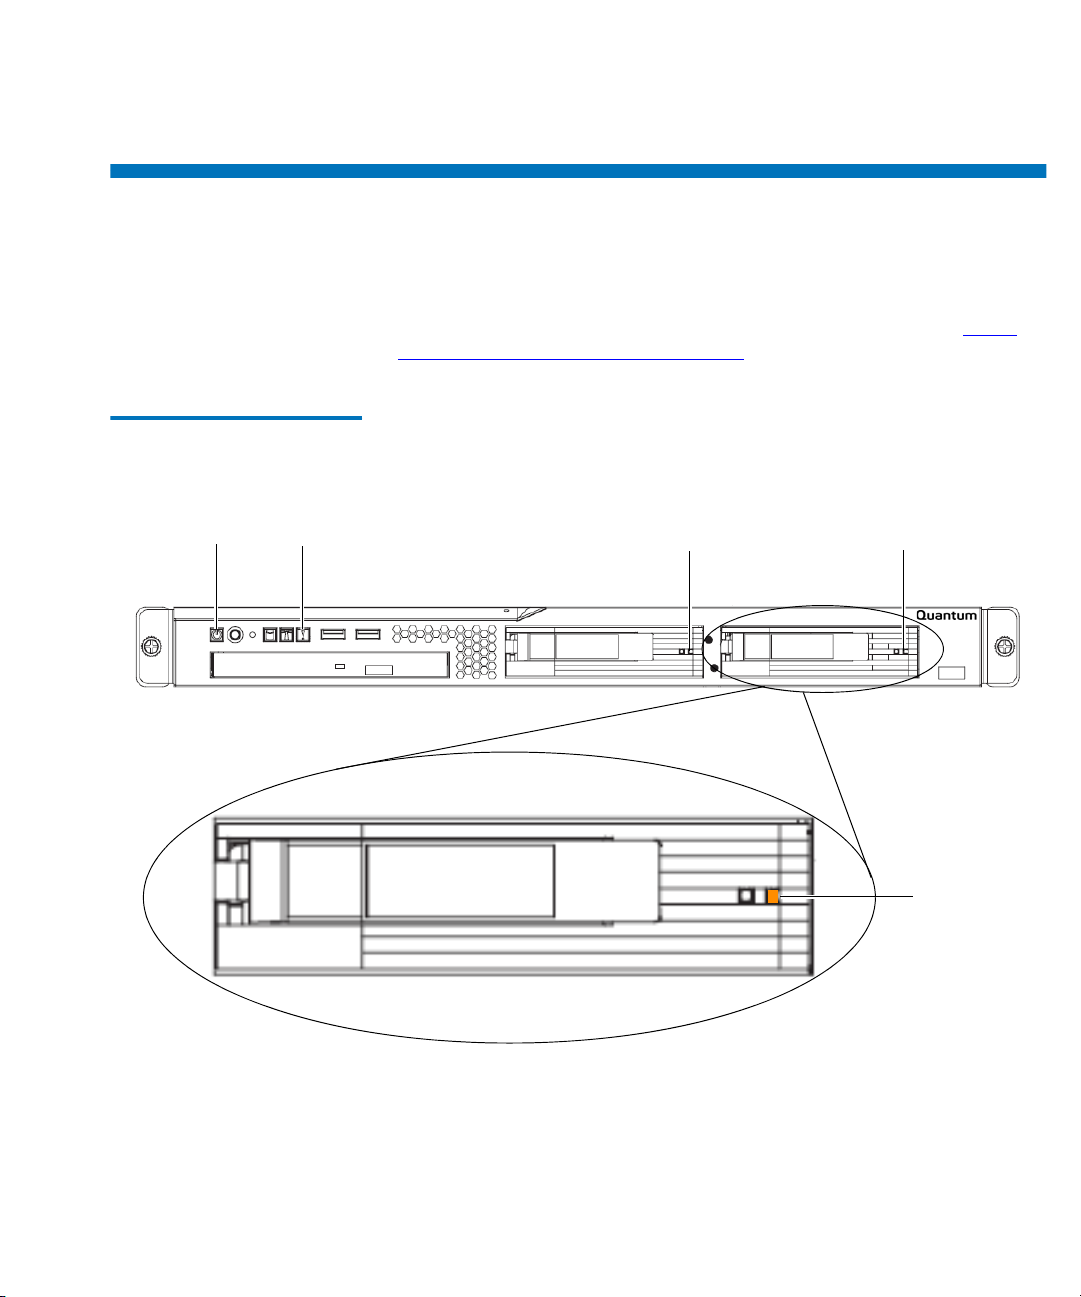
QKM Server LED Error Indicators
Power-on LED
Server error LED
Hard disk drive 0
status LED
Hard disk drive 1
status LED
Hard disk
drive status
LED
The LEDs on the front of the QKM server can signal problems with the
server. This section describes LED activity and the errors to which they
point. For an explanation of all the LEDs and their function, see QKM
Server Controls, LEDs, and Connectors on page 34.
Figure 8 LED Locations on
Front of Server
Troubleshooting
QKM Server LED Error Indicators
Quantum Key Manager User’s Guide 66
Page 79

Troubleshooting
POST Beep Codes
LED Color Error Code What it means and what to do
Power-on LED Green blinking Server is turned off but is still connected to an AC
power source. Turn the server
power button on the front panel.
Off AC power is not present, or LED is burned out.
Check to see if the server is connected to a working
AC power source. If it is, the LED may be burned
out. Contact Quantum Service & Support for a
replacement server.
ON by pressing the
Server error LED Amber
(with
exclamation point)
Hard disk drive
status LED
Amber On solid The hard disk drive is faulty and must be replaced.
POST Beep Codes
The power-on self-test (POST) beep codes can help you identify whether
the server is working or not:
On solid This LED illuminates during hard disk drive
replacement when a hard disk drive is missing
from its slot. It should go off again when the hard
disk drive is replaced.
If this LED is illuminated and both hard disk drives
are properly installed, there is a problem with the
server. Contact Quantum Service & Support.
Contact Quantum Service & Support.
Blinking Indicates that a RAID rebuild is taking place.
Beep Code Indicates
One beep Successful completion of POST with no
errors.
Quantum Key Manager User’s Guide 67
Page 80

Beep Code Indicates
Troubleshooting
Common Problems
More than one beep;
any sequence of beeps.
Common Problems
Symptom Action
A problem occurs only occasionally
and is difficult to diagnose.
The power-control button does not
work, and the reset button does
work (the server does not start).
Note: The power-control button will
not function until 20 seconds after
the server has been connected to
AC power.
Make sure that all cables and cords are connected securely to the
rear of the server and attached devices.
Make sure that the power-control button is working correctly:
1. Disconnect the server power cords.
2. Reconnect the power cords.
3. Press the power button.
4. If the server does not start, replace the server.
POST detected a problem with the server.
Contact Quantum Service & Support.
The QKM server unexpectedly
shuts down, and the LEDs on the
front panel are not on.
1. Make sure the power cord is connected to the server and
plugged in to a working power source.
2. Check the airflow from the fan. When the server is turned on,
air is flowing from the fan grille. If there is no airflow, the fan is
not working. This can cause the server to overheat and shut
down.
3. Contact Quantum Service & Support for QKM server
replacement.
The fan is not working. Contact Quantum Service & Support.
The fan is very noisy. It is normal for the fan to be noisy upon startup for about 20
seconds, after which the fan should become quieter. If the fan
does not quiet down after about 20 seconds, contact Quantum
Service & Support.
Quantum Key Manager User’s Guide 68
Page 81

Symptom Action
Troubleshooting
Common Problems
The library cannot communicate
with the QKM server.
Check all of the following. If you have tried all of these items
and the problem still exists, contact Quantum Service &
Support.
• Verify IP address on the QKM server and make sure it is
configured correctly on the library.
• Ensure the QKM server Ethernet cables and power cords are
attached.
• Ensure that the QKM server is turned on and is running.
• Check the LEDs on the QKM server and hard disk drives to
make sure that none indicate errors (see QKM Server LED
Error Indicators on page 66).
• Make sure the date on both QKM servers and the library is set
to the current date. Incorrect date settings may interfere with
the TLS certificates and cause the library to stop
communicating with the QKM servers.
• Ensure that the QKM TLS certificates are installed on the
library. Go to the
library remote web client (
Encryption Certificate > Import
Certificates
Import Encryption Certificat es screen on the
Tools > QKM Management >
). Next to the Import TLS
checkbox is a statement telling you whether the
certificates are installed on the library. If they are not
installed, install them (see 5. Installing the TLS Certificates on
the Scalar i500 on page 22 or 4. Installing the TLS Certificates
on the Scalar i2000 on page 27).
• Check to see if there are any RAS tickets on the library
relating to QKM. If so, follow any instructions listed in them.
• Ensure that at least one library QKM partition is configured
for library managed encryption.
Quantum Key Manager User’s Guide 69
Page 82

Symptom Action
Troubleshooting
Common Problems
You forgot the QKM Admin
password.
You don’t remember the QKM
server IP address and you can no
longer connect to the QKM server
via SSH.
There is no way to retrieve or reset a forgotten password. The
only way to recover from this situation is to completely replace
your QKM server and both hard disk drives:
1. Contact Quantum Service & Support for a replacement server.
Note: Charges may apply.
2. Replace the server and both hard disk drives (see Replacing a
QKM Server and Both Hard Disk Drives on page 75). This
process includes setting a new password on the replacement
server.
1. Connect a crossover Ethernet cable directly to the QKM
server’s Ethernet Port 1.
2. Connect to the server via SSH using the IP address for Port 1:
192.168.18.3.
3. Log in to the QKM server using the login ID akmadmin and
your password.
4. Display the list of Admin commands (see Accessing QKM
Admin Commands on page 39).
5. Enter the number or letter corresponding to Set QKM server IP
address
. The QKM server’s current IP address appears on the
command line with the option for you to change it.
6. Make a note of the IP address, then press <Enter> to scroll
through the IP address, netmask, and gateway address settings
without changing them.
7. Enter q to exit Admin commands.
Quantum Key Manager User’s Guide 70
Page 83
Chapter 9
9Hardware Replacement
Procedures
There are only two possible hardware replacement scenarios for the
QKM server:
Procedure When to perform
Replacing a Hard Disk
Drive
Replacing a QKM Server
and Both Hard Disk
Drives
Quantum Key Manager User’s Guide 71
When a single hard disk drive fails.
When any of the following occurs:
• The QKM server fails but both hard
disk drives remain intact.
• Both hard disk drives fail.
• When a QKM server and both its hard
disk drives are not operational.
Page 84

Replacing a Hard Disk Drive
The QKM server comes with two 3.5-inch, hot-swappable, SAS hard disk
drives. The hard disk drives are configured as RAID 1, in which the data
on both hard disk drives is continuously being mirrored, so if you lose
one, your data is preserved.
If a single hard disk drive fails, your QKM system will failover to the
remaining hard disk drive. The remaining hard disk drive will continue
to handle operations on that QKM server, but without the security of a
redundant hard disk drive. To restore redundancy and protect against
server failure in case the other hard disk drive fails, you should replace
the failed hard disk drive as soon as possible.
Since the hard disk drives are hot swappable, you do not need to turn off
the server in order to replace a single hard disk drive. During the
replacement process, normal library and QKM server functions can
continue.
Hardware Replacement Procedures
Replacing a Hard Disk Drive
Caution: Never remove more than one hard disk drive while the
system is powered up.
Caution: To maintain proper system cooling, do not operate the
server for more than 10 minutes without a hard disk drive
installed in each bay.
1 Read the safety information in Chapter 2,
2 Locate the failed hard disk drive. The amber hard disk drive status
LED will be solidly illuminated on the failed hard disk drive. See
Figure 9
Quantum Key Manager User’s Guide 72
for location of LED.
Safety.
Page 85

Figure 9 LED Locations on
Hard disk drive 0
status LED
Hard disk drive 1
status LED
Hard disk
drive status
LED
Server Error LED
Front of Server
Hardware Replacement Procedures
Replacing a Hard Disk Drive
3 Pull open the drive handle on the failed hard disk drive and remove
the hard disk drive from the bay (see Figure 10
).
The amber Server Error LED illuminates, indicating a server fault due
to a missing hard disk drive.
4 Open the drive tray handle of the replacement hard disk drive so that
the handle is perpendicular to the front of the drive (see Figure 10
).
5 Align the drive assembly with the guide rails in the bay.
6 Gently push the drive assembly into the bay until the drive stops (see
Figure 10
).
Caution: To prevent damage to the drive tray, do not force the
drive into the bay at an angle. Make sure that you
carefully insert the hard disk drive straight into the
drive bay as shown in Figure 10
Quantum Key Manager User’s Guide 73
.
Page 86
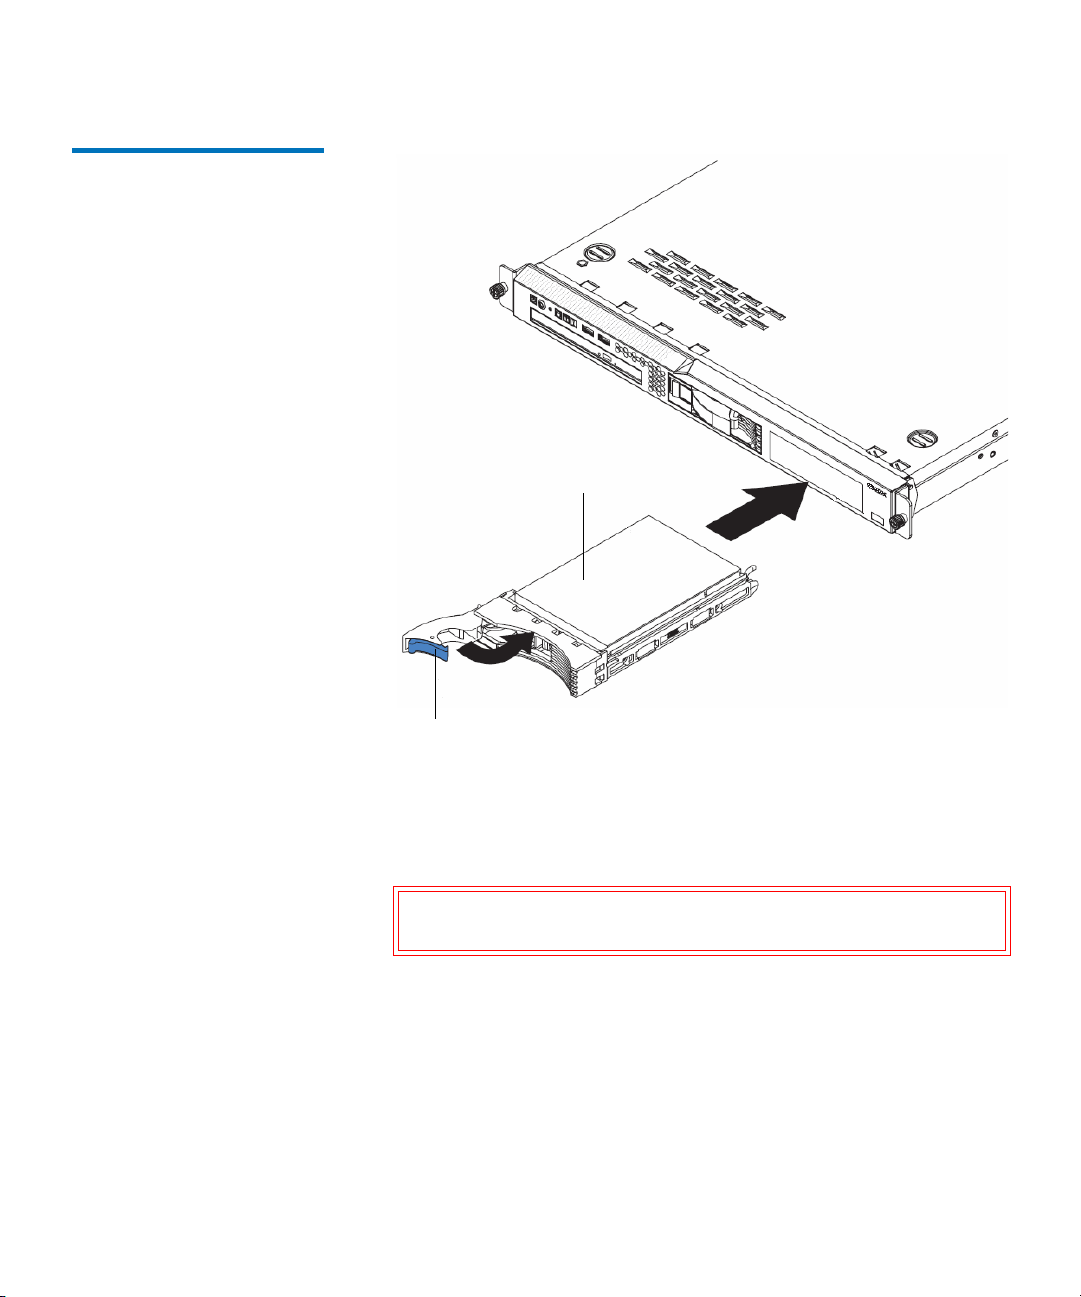
Figure 10 Replacing a Hard
Hard disk drive handle
(in open position)
Hard disk drive tray
assembly
Disk Drive
Hardware Replacement Procedures
Replacing a Hard Disk Drive
Quantum Key Manager User’s Guide 74
7 Push the tray handle to the closed (locked) position.
The RAID rebuild process begins. The following sequence of LEDs
indicates the stages of the rebuild.
Caution: Do not interfere with or remove a hard disk drive
during the RAID rebuild.
a The replacement hard disk drive’s green activity LED blinks
rapidly for 5 seconds as the hard disk drive registers with the
system.
b The amber hard disk drive status LED illuminates. (This LED
indicates the hard disk drive is “defective” because it is not
mirrored yet, and it should turn off once the RAID rebuild is
complete.)
Page 87

Hardware Replacement Procedures
Replacing a QKM Server and Both Hard Disk Drives
c The green activity LED on the existing good hard disk drive
blinks, indicating it is being accessed.
d After about 5 seconds, the RAID rebuild begins, during which the
green activity LEDs on both hard disk drives blink very fast so
that they may appear to be on solid, and the replacement hard
disk drive’s amber status LED blinks. The RAID rebuild process
may take up to 45 minutes.
e The amber server error LED turns off as soon as the RAID rebuild
process starts.
f When the RAID rebuild is complete, the green activity LEDs on
both hard disk drives blink in unison once every 16 seconds. The
amber status LED on the replacement hard disk drive turns off.
When the RAID rebuild is complete, check the hard disk drive
LEDs to make sure that the hard disk drive is operating correctly.
8 The RAID rebuild is complete. The amber hard disk drive status LED
should be
contact Quantum Service & Support.
9 Properly dispose of the failed hard disk drive. Quantum requests that
you do not return your hard disk drive because it may still contain
your data encryption keys.
OFF. If it is still on, the drive is faulty, and you should
Caution: Do not use the failed hard disk drive in any other
QKM server.
Replacing a QKM Server and Both Hard Disk Drives
You will replace the entire QKM server and its two hard disk drives for a
number of different reasons, including:
• The QKM server fails but both hard disk drives remain intact.
• Both hard disk drives fail.
• When a QKM server and both its hard disk drives are not
operational.
Quantum Key Manager User’s Guide 75
Page 88

Hardware Replacement Procedures
Replacing a QKM Server and Both Hard Disk Drives
The replacement procedure includes configuring the replacement QKM
server and restoring your last saved backup onto the replacement server.
The entire process takes about one hour.
Caution: Do not remove the hard disk drives from the replacement
server. You will replace the entire unit, including the hard
disk drives.
Terminology 9
Required Items 9
Procedure 9
For ease of communication, we will use the following terminology:
•
Failed Server — The QKM server, with its two hard disk drives
installed, that you are removing and replacing. We will call it “failed
server” even if it did not technically fail (for example, both hard disk
drives failed but the server itself is working).
•
Replacement Server — The replacement QKM server, with its own
two hard disk drives installed.
• Replacement QKM server with two installed hard disk drives.
• Crossover Ethernet cable for initial configuration (not supplied).
• Laptop or PC to connect to the replacement server for initial
configuration.
• The latest saved backup taken from the failed server, placed in a
retrievable location (see R
estoring the Keystore on page 48).
• Remote access to your library.
1 If not already turned off, turn OFF the failed server by pressing the
power button on the front panel.
2 Unplug the power cord and Ethernet cable from the back of the
server.
3 Remove the server from the rack.
4 Install the replacement server following the instructions in Installing
the QKM Servers on page 16.
5 Configure the replacement server following the instructions in
Configuring the QKM Servers
on page 18. (Only configure the
replacement server; leave the currently working QKM server as is.)
Quantum Key Manager User’s Guide 76
Page 89

Hardware Replacement Procedures
Replacing a QKM Server and Both Hard Disk Drives
Caution: It is highly recommended that you configure the
replacement server with the same settings as the failed
server, and that you do not change the IP address.
Changing the IP address requires you to perform a
number of lengthy steps on each library that uses the
QKM server (see Changing the IP Address
on
page 43).
6 If you changed the IP address of the replacement server from what it
was on the failed server, update it on each library that is attached to
the QKM server pair (for instructions, see Step 6
in Changing the IP
Address on page 43).
7 Restore your last saved backup of the failed server following the
instructions in R
estoring the Keystore on page 48.
8 Run the QKM path diagnostics to ensure the library can
communicate with the replacement server (see 6. Running QKM Path
Diagnostics on the Scalar i500 on page 23 or 6. Running QKM Path
Diagnostics on the Scalar i2000 on page 29).
Note: If the server you are replacing is the primary server, you
will need to reboot the library in order for the library to
start requesting keys from the primary server again. Once
failover to the secondary server has occurred, the library
continues to request keys from the secondary server until
either the library is rebooted or the secondary server goes
down and failover to the primary server occurs.
9 Remove the hard disk drives from the failed server and properly
dispose of them. Quantum requests that you do not return your hard
disk drives because they may still contain your data encryption keys.
Caution: Do not use the failed hard disk drives in any other
QKM server.
10 Return the failed server to Quantum.
Quantum Key Manager User’s Guide 77
Page 90
Chapter 10
10Updating and Rolling Back
QKM Server Software
Periodically Quantum may issue updates or patches to the QKM
firmware/software. These updates will include any needed operating
system (Ubuntu) updates.
Caution: Never install any software or operating system onto your
QKM server unless it is an upgrade or patch supplied by
Quantum. Doing so may make your server inoperable and
will void your warranty.
There is no automatic notification to alert you when new firmware/
software is released. You must go to the following Quantum Web site to
check for updates, then install them according to the procedures in this
section:
www.quantum.com/serviceandsupport/
softwareanddocumentationdownloads/qkm/index.aspx
Caution: If you update or roll back the software on one server in a
QKM server pair, remember to also update/rollback the
other one. The servers do not automatically sync or check
to see whether they are both running the same version.
Quantum Key Manager User’s Guide 78
Page 91

Updating and Rolling Back QKM Server Software
Viewing the Currently Installed Version of QKM Server Software
Viewing the Currently Installed Version of QKM Server
Software
To view the version of QKM server software installed on your server,
type
./qkmcmds -v at the command prompt after you log in.
Updating QKM Server Software
Equipment Required 10
Procedure 10
To perform this procedure, you need:
• Remote access to your library.
• Physical access to your QKM servers.
• A blank, writable CD.
• The ability to download an ISO image from the Quantum Web site
and burn it to a CD which you will place in the QKM server’s CD
ROM drive.
1 Go to the Quantum QKM Web site:
www.quantum.com/serviceandsupport/
softwareanddocumentationdownloads/qkm/index.aspx
2 Download the ISO image containing the latest version of software
(the filename contains the version).
3 Burn the ISO image onto a CD.
4 Take
5 Log in to the QKM server (see Logging in to the QKM Server
offline all QKM partitions in all libraries attached to the QKM
server pair that are set to use library managed encryption.
on
page 38).
Quantum Key Manager User’s Guide 79
Page 92

Updating and Rolling Back QKM Server Software
Updating QKM Server Software
6 Display the list of Admin commands (see Accessing QKM Admin
Commands on page 39).
7 Enter the number or letter corresponding to
software
.
Update QKM server
8 Load the CD containing the ISO image into the a QKM server’s CD
ROM drive and press
<Enter>.
The upgrade process executes.
9 When the upgrade process completes, press
<Enter> to return to the
Admin commands.
Note: If no CD is loaded, you are again requested for the CD.
Load the CD and press
<Enter>, or enter q to quit and
return to the Admin commands.
10 At the command prompt, enter
11 Execute
./qkmcmds -v to see that the new version is loaded.
q to quit Admin commands.
12 Remove the CD from the CD ROM drive.
13 Repeat the above steps on the other QKM server.
14 Bring back
online all the QKM partitions in all libraries attached to
the QKM server pair that are set to use library managed encryption.
15 Save the CD in case you need to perform a rollback in the future.
Quantum Key Manager User’s Guide 80
Page 93

Updating and Rolling Back QKM Server Software
Rolling Back QKM Server Software
You can only roll back to the last previously installed version of software
on the server.
Rolling Back QKM Server Software
Equipment Required 10
Procedure 10
To perform this procedure, you need:
• Remote access to your library.
• Physical access to your QKM servers.
• The CD used to load the current version of software (see Updating
QKM Server Software on page 79). If you no longer have the CD, note
which version of software is currently installed on the server, then
download that version from the Quantum Web site and burn it to a
new CD. The Web site URL is:
www.quantum.com/serviceandsupport/
softwareanddocumentationdownloads/qkm/index.aspx
The software version on the CD must match the version currently
installed on the QKM server. If it does not, you will not be able to
perform the rollback. To see what version is currently installed on
your server, see Viewing the Currently Installed Version of QKM
Server Software on page 79.
1 Obtain the CD containing the currently installed version of software.
2 Take
3 Log in to the QKM server (see Logging in to the QKM Server
offline all QKM partitions in all libraries attached to the QKM
server pair that are set to use library managed encryption.
on
page 38).
4 Display the list of Admin commands (see Accessing QKM Admin
Commands on page 39).
5 Enter the number or letter corresponding to
software
Quantum Key Manager User’s Guide 81
.
Rollback QKM server
Page 94

Updating and Rolling Back QKM Server Software
Rolling Back QKM Server Software
6 Insert the CD into the QKM server’s CD ROM drive and press
<Enter>.
The rollback process executes.
7 When the rollback completes, press
<Enter> to return to the Admin
commands.
• If the wrong upgrade CD is loaded, the rollback stops and you
receive an error message. Press
<Enter> to return to the Admin
commands menu.
• If no CD is loaded, you are again requested for the CD. Load the
CD and press
<Enter>, or enter q to quit and return to the Admin
commands.
8 At the command prompt, enter
9 Execute
./qkmcmds -v to see that the rollback version is loaded.
q to quit Admin commands.
10 Remove the CD from the CD ROM drive.
11 Repeat the above steps on the other QKM server.
12 Bring back
online all the QKM partitions in all libraries attached to
the QKM server pair that are set to use library managed encryption.
Quantum Key Manager User’s Guide 82
Page 95

QKM Server Physical Specifications
Height: 1.75 in. (43 mm), 1U
Width: 17.32 in. (440 mm)
Depth: 22 in. (559 mm)
Weight: 24.3 lb. (11 kg)
Power Supply: 351 watt (110 or 220 V AC auto-sensing)
Appendix A
ASpecifications
Power Cords: The Quantum Key Management Server includes the
following power cords:
• IBM P/N 39M5081 - North American
• IBM P/N39M5377- Rack cord
Quantum Key Manager User’s Guide 83
Page 96

QKM Server Environmental Specifications
QKM Server Environmental Specifications
Air Temperature 1
Humidity 1
Server on: 50.0° to 95.0°F (10° to 35°C); altitude: 0 to 3000 ft. (914.4 m)
Server on: 50.0° to 89.6°F (10° to 32°C); altitude: 3000 ft. (914.4 m) to 7000
ft. (2133.6 m)
Server off: 50.0° to 109.4°F (10° to 43°C); maximum altitude: 7000 ft.
(2133.6 m)
Shipping: -40° to 140°F (-40° to 60°C)
Server on: 8% to 80%
Server off: 8% to 80%
QKM Server Acoustical Noise Emissions
Sound power, idling: 6.5 bel maximum
Sound power, operating: 6.5 bel maximum
QKM Server Heat Output
Approximate heat output in British thermal units (BTU) per hour:
341 BTU per hour (100 watts)
Quantum Key Manager User’s Guide 84
Page 97

QKM Server Electrical Input
Sine-wave input (50 - 60 Hz) required
Input voltage low range:
• Minimum: 100 V AC
• Maximum: 127 V AC
Input voltage high range:
• Minimum: 200 V AC
• Maximum: 240 V AC
Approximate input kilovolt-amperes (kVA):
• Minimum: 0.102 kVA
• Maximum: 0.55 kVA
QKM Server Electrical Input
Number of Data Encryption Keys Generated
Each time the QKM server generates data encryption keys in response to
a library request, the number of keys generated is:
•
Scalar i500: 1024 data encryption keys
•
Scalar i2000: 4096 data encryption keys
Supported Quantum Libraries
The following libraries support library-managed encryption via QKM:
• Scalar i500
• Scalar i2000
Quantum Key Manager User’s Guide 85
Page 98

Supported Tape Drives
QKM supports the following tape drives:
Firmware Requirements
Supported Tape Drives
Library Firmware Requirements 1
Tape Drive Firmware Requirements 1
Scalar i500 tape library
Scalar i2000 tape library
You should always download the latest released version of firmware in
order to take advantage of new features and improvements. The
following table lists the minimum library firmware requirements needed
to run QKM:
Scalar i500 tape library
Scalar i2000 tape library
On the HP LTO-4 tape drives, install the latest version of tape drive
firmware that is qualified for the library firmware installed on your
library. Refer to the library release notes for the correct version of tape
drive firmware.
HP LTO-4 Fibre-Channel
HP LTO-4 SAS
HP LTO-4 Fibre-Channel
570G
595A
Quantum Key Manager User’s Guide 86
Page 99

Supported Backup Applications
QKM supports the following backup applications:
• Symantec NetBackup
• Symantec Backup Exec
•EMC NetWorker
• CA ARCserv
• CommVault Galaxy
•IBM Tivoli
• HP Data Protector
Supported Backup Applications
Quantum Key Manager User’s Guide 87
Page 100

Glossary
This glossary defines the special terms, abbreviations, and
acronyms used in this document.
C
D
E
H
I
K
Quantum Key Manager User’s Guide 88
certificate
data encryption key
encryption
HDD
IP
keystore
A digital document that binds a public key to the identity of
the certificate owner, thereby enabling the certificate owner to be
authenticated.
The conversion of data into a cipher. A key is required to
encrypt and decrypt the data. Encryption provides protection
from persons or software that attempt to access the data without
the key.
Hard disk drive.
Internet Protocol. The method or protocol by which data is
transmitted from one computer (or host) to another over the
Internet using a system of addresses and gateways.
A database that contains the data encryption keys and their
associated metadata.
An alphanumeric string used to encrypt data.
 Loading...