

Page 1
PX500 Series DLTSage™ Tape Security
Quick Start Guide
TABLE OF CONTENTS
Introduction .......................................1
Notational Conventions .................1
Creating a Secure User ......................1
Creating a Secure Key........................ 2
Protection Mode for Cartridges.....3
Enable/Disable Secure Key for
Drives...............................................4
Modify Secure Key for Library .......4
Assign Secure Key to Cartridge......4
Create Secure Key Name/Secure Key
Pair...................................................4
Delete Secure Key Name................. 5
Backup Secure Key File ...................5
Upload Secure Key File ...................6
Importing Secured Tape Cartridges..6
Secure Key Maintenance ...................6
Introduction 0
The PX500 Series (PX502, PX506, and PX510) tape libraries with DLT-S4 tape drives
are capable of utilizing DLTSage Tape security. DLTSage Tape Security is a unique
solution designed to prevent unauthorized access to tape cartridges which is
particularly valuable when protecting tapes that are transported offsite. DLTSage
Tape Security is a firmware feature designed into the DLT-S4 tape drive which uses
an electronic key to prevent or allow reading and writing of data on to a tape
cartridge. This key is managed through the remote management pages of the
PX500 Series tape library (refer to the
81290 located on the
the remote management pages). DLTSage Tape Security is available at no
additional cost as an integrated feature in of the DLT-S4 tape drive and PX500
Series tape library (firmware version 20 or later).
Notational Conventions 0
This instruction uses the following conventions:
PX500 Series Documentation CD
Quantum PX500 Series User’s Guide
for more information on
, PN 81-
OTE: Notes emphasize important information related to the main topic.
N
AUTION: Cautions indicate potential hazards to equipment and are included
C
to prevent damage to equipment.
ARNING: Warnings indicate potential hazards to personal safety and are
W
included to prevent injury.
Setting up your PX500 Series tape library with DLTSage Tape Security consists of
the following steps:
• Creating a Secure User
• Creating a Secure Key
Creating a Secure User 0
C
AUTION: If the Secure Key information is lost, any tape cartridges that were
secured with the lost key will be unavailable for reading or writing.
The Secure User is the only user that has the ability to create, modify, and delete a
Secure Key for the Library. The Secure User also has the ability to enable and
Page 2

PX500 Series DLTSage™ Tape Security Quick Start Guide
disable Secure Capable Drives for reading and writing
data to and from tapes using the Secure Key.
When a user is created with administrator privileges (other
than the default admin user), the Create Secure User
section appears at the bottom of the Users page (see
figure 1
).
Figure 1 Create Secure User
To create a secure user:
N
OTE: Only users with administrator privileges (other
than the default administrator) can create a
secure user.
There is only one Secure User and the username is always
skadmin.
1 Enter a secure password.
OTE: Secure Passwords must be alphanumeric
N
strings of at least one character. A blank
secure password will be rejected. Secure
Password and Verify Password must
match.
1 Enter a secure password.
N
OTE: Secure Passwords must be alphanumeric
strings of at least one character. A blank
secure password will be rejected. Secure
Password and Verify Password must
match.
2 Verify the secure password by entering the password a
second time in the Verify Password box.
3 Click Update to update the Secure Key password.
The Secure Key password is updated.
Creating a Secure Key 0
The Secure Key tab displays when a secure user has been
added to the library and the secure user is logged in.
OTE: When logging on as a secure user, the IP address
N
entered in the address line of the internet browser
uses https, not the common http. Example:
https://<ip address>
To access the Secure Key page, from the Setup page, click
on the Secure Key tab at the top of the page.
The Secure Key page displays (see figure 3
).
2 Verify the secure password by entering the password a
second time in the Verify Password box.
3 Click Create to create the Secure Key password.
Once the Secure Key administrator password is added,
the Remove Secure User section displays at the
bottom of the Users page (see figure 2
).
Figure 2 Remove Secure User
To update the Secure Key password:
OTE: Only the Secure User can change the secure user
N
password.
2
Page 3

PX500 Series DLTSage™ Tape Security Quick Start Guide
Figure 3 Secure Key Page
The Secure Key page is divided into the following sections:
• Protection Mode for Cartridges
• Enable/Disable Secure Key for Drives
• Modify Secure Key for Library
• Assign Secure Key to Cartridge
• Create Secure Key Name/Secure Key Pair
• Delete Secure Key Name
• Backup Secure Key File
• Upload Secure Key File
Protection Mode for
Cartridges 0
Refer to figure 4 for information on Protection Mode for
Cartridges.
Figure 4 Protection Mode for
Cartridges
The Protection Mode for Cartridges area defines when the
Secure Key is used for a cartridge in a tape drive with a
Secure Key enabled. In all modes, the Secure Key is used to
read data from cartridges that have a pre-existing Secure
Key. If the Secure Key on the cartridge does not match the
current Secure Key on the library, the data on the cartridge
can not be read.
Three write protection modes are available:
• Never Write Secure Key to a Cartridge - The Secure
Key will never be written to a cartridge placed in a
secured tape drive.
• Only Write Secure Key to Blank Cartridges - The
Secure Key will only be written to blank, unformatted
cartridges.
• Write Secure Key to All Cartridges - The Secure Key
will be written to all cartridges, including blank and
formatted cartridges containing data. This mode may
be used to apply a Secure Key to cartridges with preexisting data.
3
Page 4

PX500 Series DLTSage™ Tape Security Quick Start Guide
Enable/Disable Secure Key for Drives 0
Refer to figure 5 for information on Enable/Disable Secure
Key for Drives.
Figure 5 Enable/Disable Secure
Key for Drives
The Secure Key can only be used with tape drives that are
Secure Key capable. This section lists the tape drives in the
library that are Secure Key capable. A checkmark in the
Secure Key column indicates a Secure Key is enabled for
the tape drive.
1 The Secure Key can be enabled or disabled for all tape
drives by clicking the corresponding radio button.
2 Click the Secure Key check box for individual tape
drives to enable/disable Secure Key for a tape drive.
3 Click Update to activate the changes.
1 Select the Secure Key name from the list of available
names.
OTE: Selecting None to will cause the library to
N
NOT use a Secure Key.
2 Click Update.
OTE: The system must be offline to modify a
N
Secure Key.
Assign Secure Key to Cartridge 0
Refer to figure 7 for information on Assign Secure Key to
Cartridge.
Figure 7 Assign Secure Key to
Cartridge
N
OTE: The system must be offline to Enable/Disable
Secure Key setting for drives.
Modify Secure Key for Library
0
Refer to figure 6 for information on Modify Secure Key for
Library.
Figure 6 Modify Secure Key for
Library
To m o d i f y t he Secure Key used by the library:
Click Find to list all secured cartridges and their assigned
Secure Key names.
To assign a Secure Key to a cartridge:
1 Enter the barcode of the cartridge. Separate multiple
barcodes with either spaces or commas.
2 Select a Secure Key name from the list of available
names.
3 Selecting Remove will remove the association between
the cartridge and a Secure Key name in the cartridge
database.
4 Click Update to accept the changes.
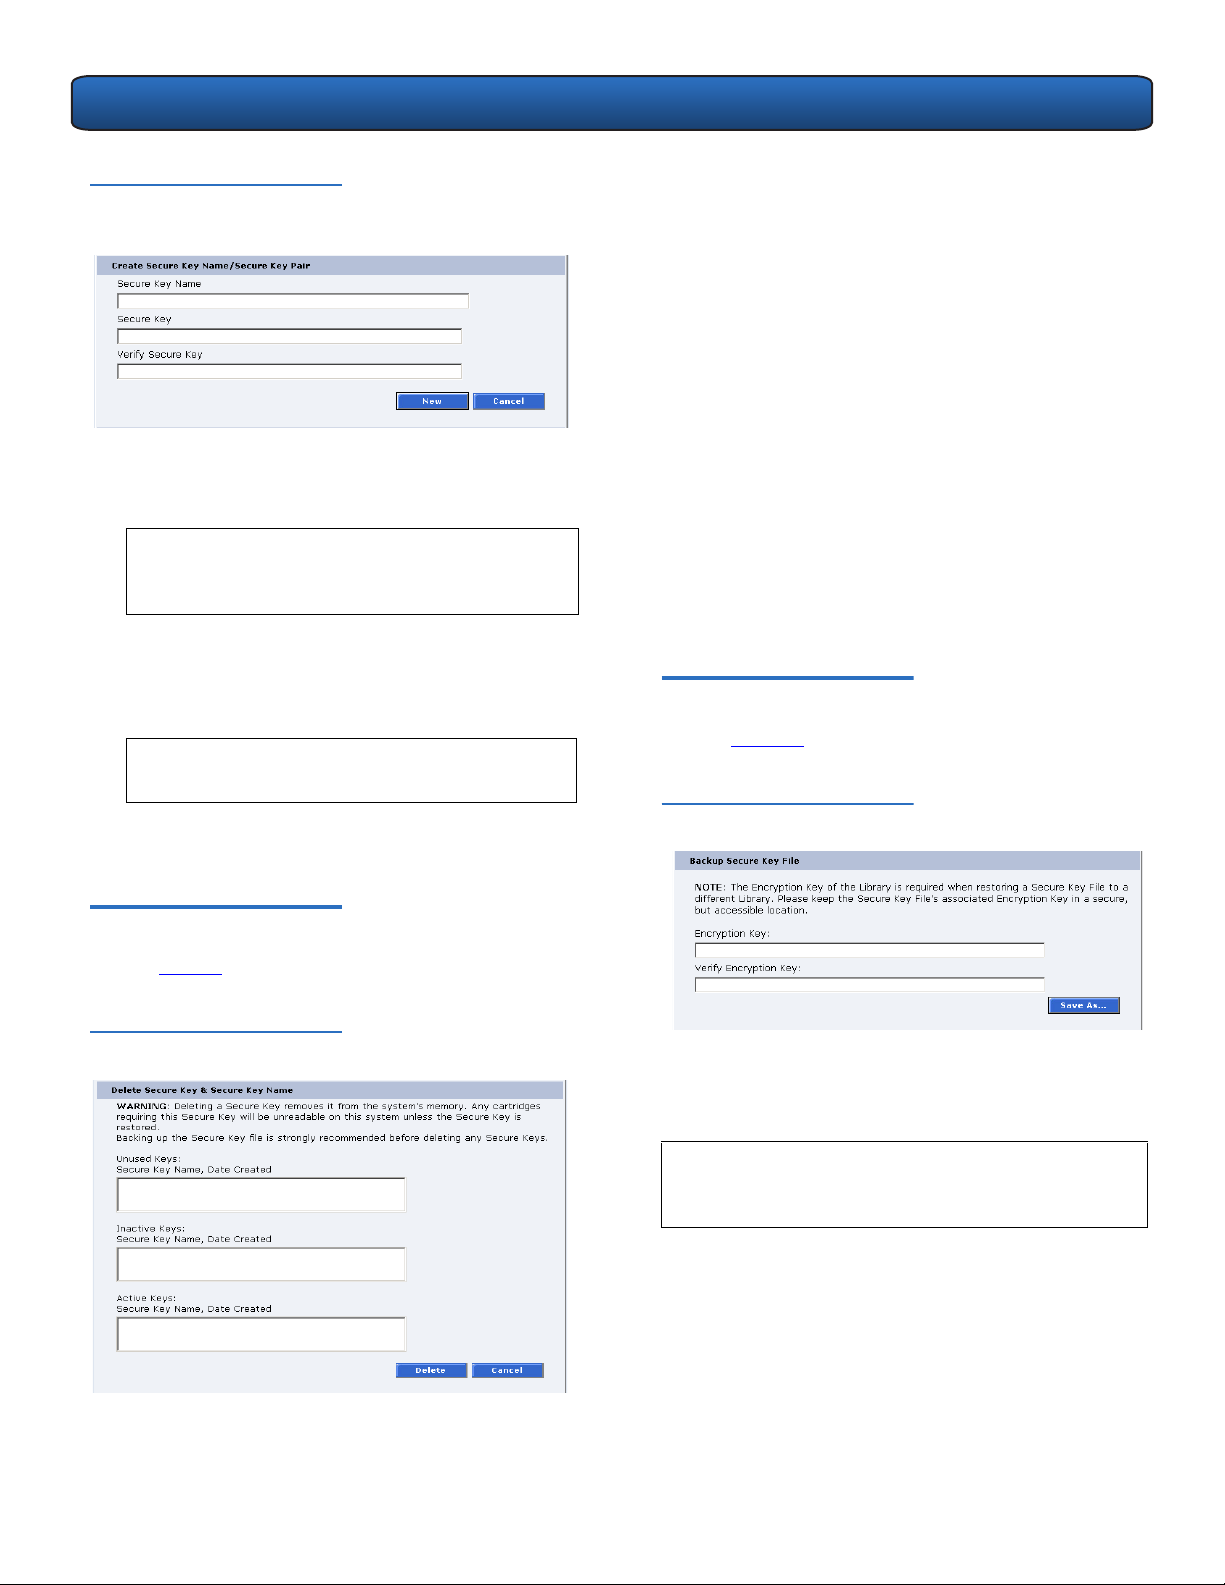
Create Secure Key Name/ Secure Key Pair 0
Refer to figure 8 for information on Create Secure Key
Name/Secure Key Pair.
4
Page 5
PX500 Series DLTSage™ Tape Security Quick Start Guide
Figure 8 Create Secure Key
Name/Secure Key Pair
To create a secure key name/secure key pair:
1 Enter the Secure Key Name.
OTE: The Secure Key name must be less than 12
N
characters, may include spaces, but cannot
contain the following characters: ( ) = ;
2 Enter a securekey in the protected Secure Key field.
3 Enter the same Secure Key in the Verify Secure Key
field.
OTE: The Secure Key must be at least 8 characters
N
and no more than 32 characters.
• Unused Secure Keys - keys not associated with any
cartridges or tape drives currently in the system.
• Inactive Secure Keys - keys associated with cartridges
in the library, or currently assigned to the library, but
not assigned to any tape drives.
• Active Secure Keys - keys currently assigned to a tape
drive.
To d e le t e a Secure Key Name/Secure Key pair from the
library:
1 Select the desired Secure Key Names from the
available lists.
2 Click Delete.
A confirmation message will be displayed, click Yes to
continue.
Any tape drives that have been Secure Key enabled will
remain enabled, but the Secure Key will not be used to
read or write cartridges.
Backup Secure Key File 0
Refer to figure 10 for information on Backup Secure Key
File.
4 Click New to create the Secure Key name/key pair.
Delete Secure Key Name 0
Refer to figure 9 for information on Delete Secure Key
Name.
Figure 9 Delete Secure Key Name
Figure 10 Backup Secure Key File
The list of Secure Key Name/Secure Key Pairs maintained
on the library should be backed up to a local device
whenever a change is made to the security keys.
N
OTE: Note the library's Encryption Key. The Encryption
Key is required when restoring the file to any
library.
1 Click Save As...
2 From the browser's Save window, select a path and
name the file.
3 Click OK.
The Secure Key Names maintained on the library are
displayed in one of three lists:
5
Page 6

PX500 Series DLTSage™ Tape Security Quick Start Guide
Upload Secure Key File 0
Refer to figure 11 for information on Upload Secure Key
File.
Figure 11 Upload Secure Key File
A file containing a list of Secure Key Name/Secure Key
Pairs can be restored to the library.
N
OTE: The Encryption Key of the library originally
maintaining the list is required to restore the file.
To upload (restore) a Secure Key File:
1 Enter the Encryption Key of the original library.
2 Enter the path and file name of the file to be uploaded
(click Browse...)
3 Click Upload button.
A progress window is displayed indicating when the
upload is complete or if any errors occurred during the
upload or restoration of the file.
The Secure Key page is refreshed listing restored
secure keys.
NOTE: An error is displayed if the serial number provided
does not match the serial number used to encode
the secure keys.
Importing Secured Tape Cartridges 0
If you need to import tape cartridges into your library which
have been secured with a key from another PX500 Series
library, you need to import the Secure Key before the library
can read or write to the tape cartridges.
To import secured tapes:
1 Write down the barcodes for every secured tape that
will be imported into the library. You will need to have
these barcodes available when associating the tape
cartridges with the Secure Key.
2 Insert the tape cartridges into the PX500 Series library
(refer to the PX500 Series User’s Guide (PN 81-81290)
for information on inserting tape cartridges.
3 On the PX500 Series library where the tape cartridges
were originally secured with a key, backup the specific
Secure Key associated with those tape cartridges (see
Backup Secure Key File
).
4 Upload the Secure Key from the original library to the
where the tape cartridges were imported (see Upload
Secure Key File).
5 Assign the barcode labels from the imported tape
cartridges with the Secure Key from the original library
(see Assign Secure Key to Cartridge).
The imported tape cartridges are now associated with
the Secure Key.
Secure Key Maintenance 0
Quantum strongly recommends that you backup your secure
keys whenever a new key is added (see Backup Secure Key
File). The location of these keys should be available to library
administrators who need access to secured tape cartridges.
AUTION: If the Secure Key information is lost, any
C
tape cartridges that were secured with the
lost key will be unavailable for reading or
writing.
United States of America
Quantum Corporation
141 Innovation Drive
Irvine, CA 92612
U.S.A.
phone 949.856.7800
fax 949.856.7799
©2006 Quantum Corporation. Quantum, the Quantum logo, and the DLTtape logo are all registered trademarks of Quantum Corporation. SDLT and Super DLTtape are trademarks of
Quantum Corporation. Other trademarks may be mentioned herein which belong to other companies.
European Headquarters
Quantum Corporaton
3 Bracknell Beeches
Old Bracknell Lane West
Bracknell
Berkshire RG12 7BW
United Kingdom
phone +44 1344 353500
fax +44 1344 353510
Asia Pacific
Quantum Corporation
9 Temasek Boulevard, #08-03
Suntec Tower Two
Singapore 038989
Tel: +65 6334 0660
Fax: +65 6432 2830
Email: singapore.sales@quantum.com
81-81627-01 A01 June 2006
 Loading...