

Page 1

User’s Guide
Quantum NDX NAS Tower
6-67444-01 Rev A
Page 2

ii Quantum NDX NAS Tower User’s Guide
Quantum NDX NAS Tower User’s Guide, 6-67444-01 Rev A, October 2011, Product of USA.
Quantum Corporation provides this publication “as is” without warranty of any kind, either express or
implied, including but not limited to the implied warranties of merchantability or fitness for a particular
purpose. Quantum Corporation may revise this publication from time to time without notice.
COPYRIGHT STATEMENT
© 2011 Quantum Corporation. All rights reserved.
Your right to copy this manual is limited by copyright law. Making copies or adaptations without prior
written authorization of Quantum Corporation is prohibited by law and constitutes a punishable
violation of the law.
TRADEMARK STATEMENT
Quantum, the Quantum logo, DLT, DLTtape, the DLTtape logo, SuperLoader, Scalar, StorNext, and DXi are
registered trademarks of Quantum Corporation, registered in the U.S. and other countries.
Preserving the World's Most Important Data. Yours., Backup. Recovery. Archive. It’s What We Do., the
DLT logo, DLTSage, Dynamic Powerdown, FastSense, FlexLink, GoVault, MediaShield, Optyon, Pocketsized. Well-armored, SDLT, SiteCare, SmartVerify, StorageCare, Super DLTtape, and Vision are trademarks
of Quantum.
LTO and Ultrium are trademarks of HP, IBM, and Quantum in the U.S. and other countries. All other
trademarks are the property of their respective companies.
Specifications are subject to change without notice.
Page 3

Quantum NDX NAS Tower User’s Guide iii
Contents
Preface vii
Chapter 1 Introduction 1
Chapter 2 System Safety 3
Warnings and Precautions. . . . . . . . . . . . . . . . . . . . . . . . . . . . . . . . . . . 3
Electrical Safety Precautions . . . . . . . . . . . . . . . . . . . . . . . . . . . . . . . . . 4
General Safety Precautions . . . . . . . . . . . . . . . . . . . . . . . . . . . . . . . . . . 5
System Safety . . . . . . . . . . . . . . . . . . . . . . . . . . . . . . . . . . . . . . . . . . . . 6
Chapter 3 Initial Setup and System Interface 7
Initial Setup . . . . . . . . . . . . . . . . . . . . . . . . . . . . . . . . . . . . . . . . . . . . . . 7
First Use . . . . . . . . . . . . . . . . . . . . . . . . . . . . . . . . . . . . . . . . . . 7
Connecting to Ethernet. . . . . . . . . . . . . . . . . . . . . . . . . . . . . . . 7
Hardware Overview . . . . . . . . . . . . . . . . . . . . . . . . . . . . . . . . . . . . . . . . 8
Control Panel Buttons . . . . . . . . . . . . . . . . . . . . . . . . . . . . . . . . . . . . . 11
Control Panel LEDs . . . . . . . . . . . . . . . . . . . . . . . . . . . . . . . . . . . . . . . 11
Page 4

Contents
iv Quantum NDX NAS Tower User’s Guide
Chapter 4 Chassis Setup and Maintenance 15
Removing the Chassis Cover . . . . . . . . . . . . . . . . . . . . . . . . . . . . . . . . 16
Replacing a Hard Drive . . . . . . . . . . . . . . . . . . . . . . . . . . . . . . . . . . . . 17
Removing Hard Drive Carriers . . . . . . . . . . . . . . . . . . . . . . . . . 18
Installing the Hard Drive into Hard Drive Carrier . . . . . . . . . . . 19
Installing a Peripheral Drive . . . . . . . . . . . . . . . . . . . . . . . . . . . . . . . . . 20
Adding or Replacing a Peripheral Drive. . . . . . . . . . . . . . . . . . 20
Installing Add-on or Expansion Cards . . . . . . . . . . . . . . . . . . . . . . . . . 22
Add-on Card/Expansion Slot Setup . . . . . . . . . . . . . . . . . . . . . 22
Removing the Fan Duct and System Fan . . . . . . . . . . . . . . . . . . . . . . . 23
Removing the Fan Duct and System Fan . . . . . . . . . . . . . . . . . 23
Checking the Server's Air Flow. . . . . . . . . . . . . . . . . . . . . . . . . . . . . . . 24
Power Supply . . . . . . . . . . . . . . . . . . . . . . . . . . . . . . . . . . . . . . . . . . . 24
Changing the Power Supply . . . . . . . . . . . . . . . . . . . . . . . . . . 25
Appendix A Power Supply Specifications 27
Page 5

Quantum NDX NAS Tower User’s Guide v
Figures
Figure 1 Front Chassis Panel . . . . . . . . . . . . . . . . . . . . . . . . . . . . . . . 9
Figure 2 Rear Chassis . . . . . . . . . . . . . . . . . . . . . . . . . . . . . . . . . . . 10
Figure 3 Removing the Chassis Cover . . . . . . . . . . . . . . . . . . . . . . . 16
Figure 4 Removing the Hard Drive Carrier from Chassis . . . . . . . . . 17
Figure 5 Chassis Drive Carrier . . . . . . . . . . . . . . . . . . . . . . . . . . . . . 18
Figure 6 Removing Hard Drive . . . . . . . . . . . . . . . . . . . . . . . . . . . . 19
Figure 7 Replacing Hard Drive in Chassis . . . . . . . . . . . . . . . . . . . . 20
Figure 8 Installing the Peripheral Drive. . . . . . . . . . . . . . . . . . . . . . 21
Figure 9 Installing Add-on or Expansion Cards. . . . . . . . . . . . . . . . 22
Figure 10 Replacing the Fan Shroud. . . . . . . . . . . . . . . . . . . . . . . . . 23
Figure 11 Removing the Power Supply . . . . . . . . . . . . . . . . . . . . . . . 25
Page 6

Figures
vi Quantum NDX NAS Tower User’s Guide
Page 7

Quantum NDX NAS Tower User’s Guide vii
Preface
This manual introduces the Quantum NDX NAS Tower. This preface
includes:
• About This Manual
• Document Organization
• Notational Conventions
• Product Safety Statements
• Contacts
• Worldwide End-User Product Warranty
About this Manual This manual provides information for the installation and use of the
Quantum NDX NAS Tower chassis. Please read this manual before
performing installation or maintenance.
The Quantum NDX NAS Tower chassis features 4 hard disk drives, Intel
Core i3 Processor and 4GB of RAM. The chassis is equipped with a 500W
high-efficiency power supply for superb power savings.
This document lists compatible parts available when this document was
published. Always refer to the our Web site for updates on supported
parts and configurations.
Page 8

Preface
viii Quantum NDX NAS Tower User’s Guide
Document Organization Following is a brief description of chapter contents.
• Chapter 1 Introduction provides a high level summary of the system
features.
• Chapter 2 System Safety lists warnings, precautions, and system
safety. It recommended that you thoroughly familiarize yourself
with all safety precautions.
• Chapter 3 System provides details on the system interface—
including the functions and information provided by the control
panel on the tower, as well as initial setup and other LEDs located
throughout the system.
• Chapter 4 Chassis Setup and Maintenance provides procedures for
installing, removing, or reconfiguring your Quantum NDX NAS
To wer .
• Appendix A: Power Supply Specifications
Notational Conventions This manual uses the following conventions:
Convention Example
User input is shown in bold font. ./DARTinstall
Computer output and command
line examples are shown in
monospace font.
./DARTinstall
User input variables are enclosed in
angle brackets.
http://<ip_address>/cgi-bin/
stats
For UNIX and Linux commands, the
command prompt is implied.
./DARTinstall
isthesameas
#./DARTinstall
File and directory names, menu
commands, button names, and
window names are shown in bold
font.
/data/upload
Page 9

Preface
Quantum NDX NAS Tower User’s Guide ix
The following formats indicate important information:
Note: Note emphasizes important information related to the main
topic.
Caution: Caution indicates potential hazards to equipment or data.
WARNING: Warning indicates potential hazards to personal safety.
• Right side of the system — Refers to the right side as you face the
component being described.
• Left side of the system — Refers to the left side as you face the
component being described.
•b — All binary numbers are succeeded by “b.”
•h — All hexadecimal numbers are succeeded by “h.”
• Error or attention conditions are represented in parenthesis that
translate as follows:
(SK=S ASC=AA ASCQ=QQ)
where:
S — hexadecimal sense key value
AA — hexadecimal additional sense code
QQ — hexadecimal additional sense code qualifiers
Product Safety
Statements
Quantum will not be held liable for damage arising from unauthorized
use of the product. The user assumes all risk in this aspect.
This unit is engineered and manufactured to meet all safety and
regulatory requirements. Be aware that improper use may result in
Menu names separated by arrows
indicate a sequence of menus to be
navigated.
Utilities > Firmware
Convention Example
Page 10
Preface
x Quantum NDX NAS Tower User’s Guide
bodily injury, damage to the equipment, or interference with other
equipment.
WARNING: Before operating this product, read all instructions and
warnings in this document and in the system, safety, and
regulatory guide.
Page 11
Preface
Quantum NDX NAS Tower User’s Guide xi
Contacts Visit the Quantum home page at:
http://www.quantum.com
Getting More
Information or Help
StorageCare™, Quantum’s comprehensive service approach, leverages
advanced data access and diagnostics technologies with crossenvironment, multi-vendor expertise to resolve backup issues faster and
at lower cost.
Accelerate service issue resolution with these exclusive Quantum
StorageCare services:
• Servic
e and Support Web site - Register products, license
software, browse Quantum Learning courses, check backup
software and operating system support, and locate manuals, FAQs,
firmware downloads, product updates and more in one convenient
location. Benefit today at:
http://www.quantum.com/ServiceandSupport/Index.aspx
• eSupport - Submit online service requests, update contact
information, add attachments, and receive status updates via email. Online Service accounts are free from Quantum. That account
Page 12

Preface
xii Quantum NDX NAS Tower User’s Guide
can also be used to access Quantum’s Knowledge Base, a
comprehensive repository of product support information. Sign up
today at:
http://www.quantum.com/osr
For further assistance, or if training is desired, contact the Quantum
Customer Support Center:
United States 800-284-5101 (toll free)
949-725-2100
EMEA 00800-4-782-6886 (toll free)
+49 6131 3241 1164
APAC +800 7826 8887 (toll free)
+603 7953 3010
For worldwide support:
http://www.quantum.com/ServiceandSupport/Index.aspx
Worldwide End-User
Product Warranty
For more information on the Quantum Worldwide End-User Standard
Limited Product Warranty:
http://www.quantum.com/pdf/QuantumWarranty.pdf
Page 13

Quantum NDX NAS Tower User’s Guide 1
Chapter 1
Introduction
Quantum’s NDX tower chassis features a unique and highly-optimized
NAS storage design. The NDX NAS is business ready - equipped with 4
hot swappable enterprise class hard disk drives, an Intel Core i3
processor and 4GB of RAM.
In addition, you can customize the NDX NAS to meet your needs. It
offers 2 5-1/4” peripheral bays, 4 external USB ports, an internal PCI-e
slot, and additional internal SATA and USB ports.
This document guides you through all of the hardware related
information you require to use your Quantum NDX NAS system.
Page 14

Chapter 1: Introduction
2 Quantum NDX NAS Tower User’s Guide
Page 15

Quantum NDX NAS Tower User’s Guide 3
Chapter 2
System Safety
This chapter provides information on warnings, precautions, and system
safety.
Important: Please thoroughly familiarize yourself with all safety
precautions.
Warnings and Precautions
You should inspect the box the chassis was shipped in and note if it was
damaged in any way. If the chassis itself shows damage, file a damage
claim with carrier who delivered your system.
Decide on a suitable location for the NDX Tower. It should be situated in
a clean, dust-free area that is well ventilated. Avoid areas where heat,
electrical noise and electromagnetic fields are generated.
You will also need it placed near at least one grounded power outlet.
The Quantum NDX NAS Tower includes one power supply.
Page 16

Chapter 2: System Safety
Electrical Safety Precautions
4 Quantum NDX NAS Tower User’s Guide
Electrical Safety Precautions
Basic electrical safety precautions should be followed to protect yourself
from harm and the Quantum NDX NAS Tower from damage:
• Be aware of the locations of the power on/off switch on the chassis
as well as the room’s emergency power-off switch, disconnection
switch or electrical outlet. If an electrical accident occurs, you can
then quickly remove power from the system.
• Do not work alone when working with high-voltage components.•
• Power should always be disconnected from the system when
removing or installing main system components, such as the server
board, memory modules or option peripherals like a DVD-ROM (not
necessary for hot swappable drives). When disconnecting power,
you should first power down the system with the operating system
and then unplug the power cords from all the power supply
modules in the system.
• When working around exposed electrical circuits, another person
who is familiar with the power-off controls should be nearby to
switch off the power, if necessary.
• Use only one hand when working with powered-on electrical
equipment. This is to avoid making a complete circuit, which will
cause electrical shock. Use extreme caution when using metal tools,
which can easily damage any electrical components or circuit boards
they come into contact with.
• Do not use mats designed to decrease electrostatic discharge as
protection from electrical shock. Instead, use rubber mats that have
been specifically designed as electrical insulators.
• The power supply power cord must include a grounding plug and
must be plugged into grounded electrical outlets.
• Server board battery:
Page 17

Chapter 2: System Safety
General Safety Precautions
Quantum NDX NAS Tower User’s Guide 5
Caution: There is a danger of explosion if the onboard battery is
installed upside down, which will reverse its polarities
This battery must be replaced only with the same or an
equivalent type recommended by the manufacturer.
Dispose of used batteries according to the
manufacturer’s instructions.
• Please handle used batteries carefully. Do not damage the battery in
any way; a damaged battery may release hazardous materials into
the environment. Do not discard a used battery in the garbage or a
public landfill. Please comply with the regulations set up by your
local hazardous waste management agency to dispose of your used
battery properly.
General Safety Precautions
• Keep the area around the chassis clean and free of clutter.
• Place the chassis top cover and any system components that have
been removed away from the system or on a table so that they
won’t accidentally be stepped on.
• While working on the system, do not wear loose clothing such as
neckties and unbuttoned shirt sleeves, which can come into contact
with electrical circuits or be pulled into a cooling fan.
• Remove any jewelry or metal objects from your body, which are
excellent metal conductors that can create short circuits and harm
you if they come into contact with printed circuit boards or areas
where power is present.
• After accessing the inside of the system, close the system back up
and secure it to the rack unit with the retention screws after
ensuring that all connections have been made.
Page 18

Chapter 2: System Safety
System Safety
6 Quantum NDX NAS Tower User’s Guide
System Safety
Electrostatic discharge (ESD) is generated by two objects with different
electrical charges coming into contact with each other. An electrical
discharge is created to neutralize this difference, which can damage
electronic components and printed circuit boards. The following
measures are generally sufficient to neutralize this difference before
contact is made to protect your equipment from ESD:
• Do not use mats designed to decrease electrostatic discharge as
protection from electrical shock. Instead, use rubber mats that have
been specifically designed as electrical insulators.
• Use a grounded wrist strap designed to prevent static discharge.
• Keep all components and printed circuit boards (PCBs) in their
antistatic bags until ready for use.
• Touch a grounded metal object before removing any board from its
antistatic bag.
• Do not let components or PCBs come into contact with your
clothing, which may retain a charge even if you are wearing a wrist
strap.
• Handle a board by its edges only; do not touch its components,
peripheral chips, memory modules or contacts.
• When handling chips or modules, avoid touching their pins.•
• Put the server board and peripherals back into their antistatic bags
when not in use.
• For grounding purposes, make sure your computer chassis provides
excellent conductivity between the power supply, the case, the
mounting fasteners and the server board.
Page 19

Quantum NDX NAS Tower User’s Guide 7
Chapter 3
Initial Setup and System
Interface
This chapter describes initial setup, buttons, and LEDs on the Quantum
NDX NAS Tower front chassis panel, and provides procedures for first
use, connecting to ethernet, and correcting an overheat/fan fail
condition.
Initial Setup
First Use When you first use the Quantum NDX NAS Tower, connect the unit to a
keyboard, monitor, and mouse, and proceed with several Microsoft
Windows setup wizards. This is a requirement for initial setup only.
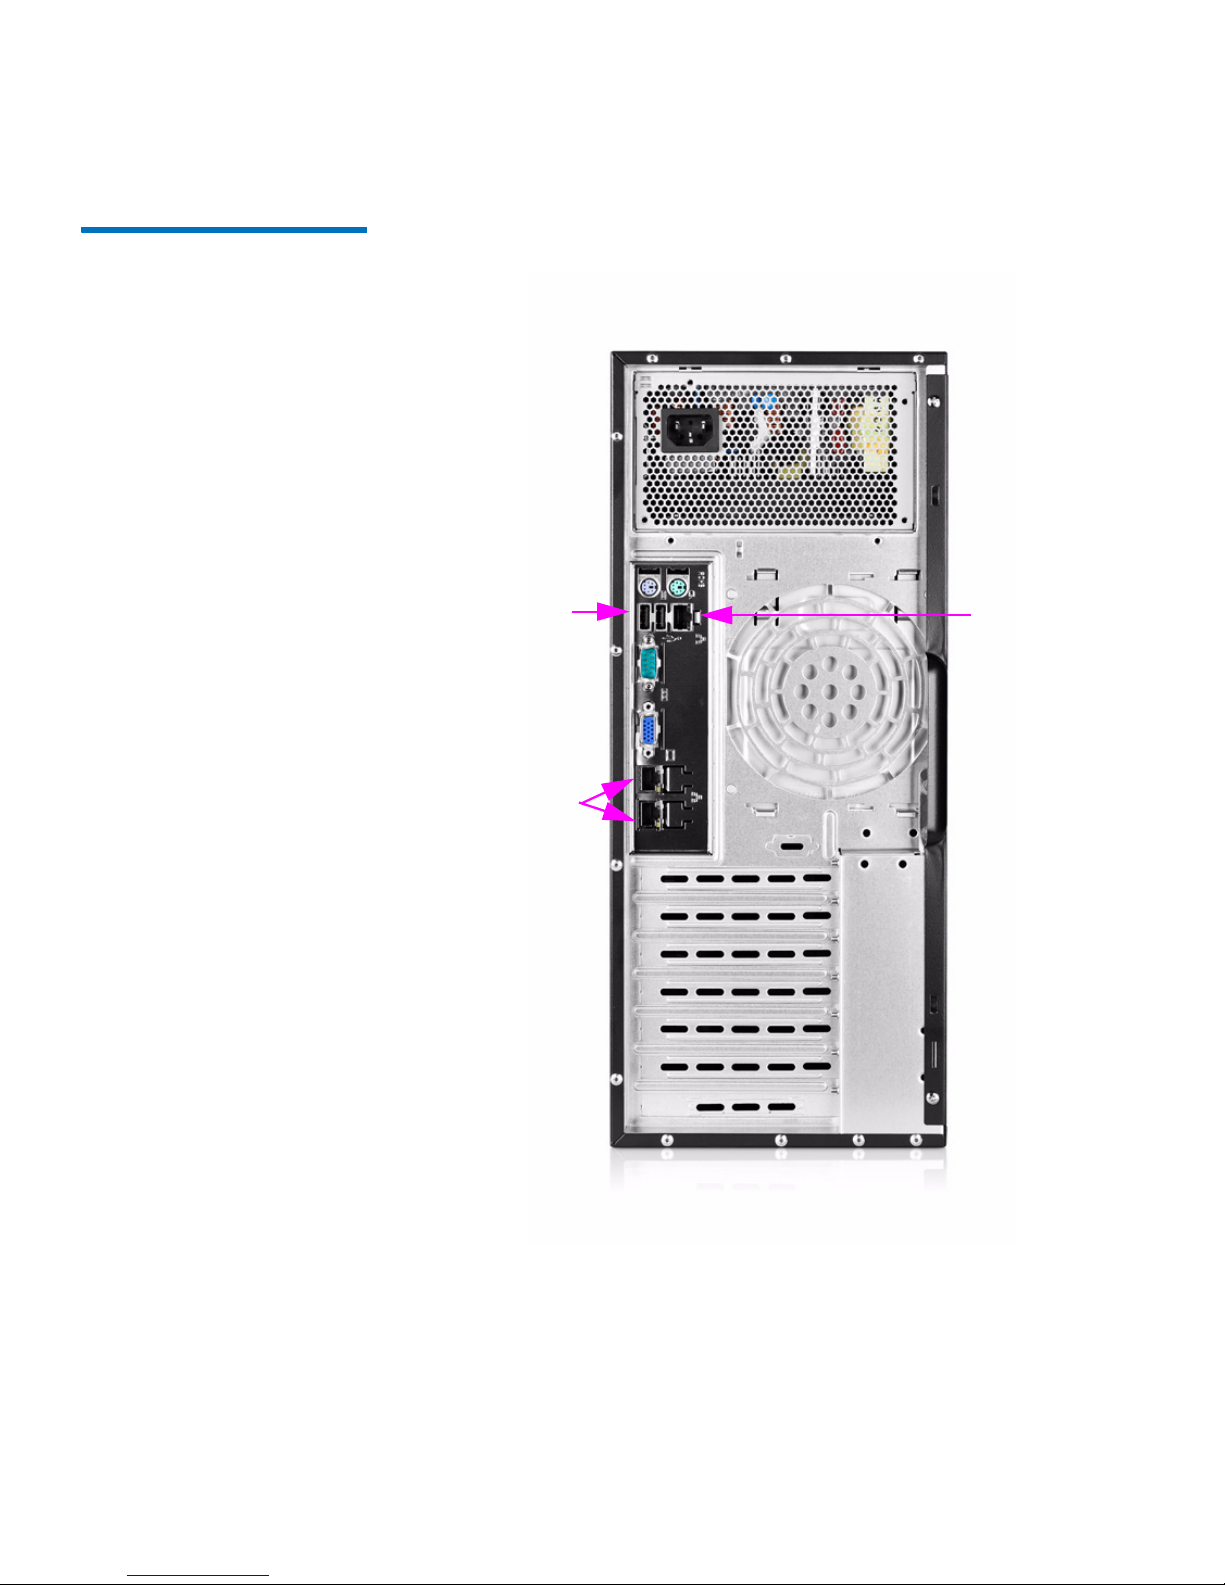
Connecting to Ethernet The Quantum NDX NAS Tower comes with three RJ45 ports (see Figure 2
on page 10). Two are ethernet ports positioned together. Connect the
NDX NAS to your network using these two ports.
Page 20

Chapter 3: Initial Setup and System Interface
Hardware Overview
8 Quantum NDX NAS Tower User’s Guide
The third RJ45 port is for IPMI (Intelligent Platform Management
Interface). This port is used or system monitoring, troubleshooting and
technical support.
Hardware Overview
There are several LEDs on the control panel as well as others on the drive
carriers to keep you constantly informed of the overall status of the
system as well as the activity and health of specific components.
Quantum NDX NAS Tower models have two buttons on the chassis
control panel: a reset button and a power on/off switch. This chapter
explains the meanings of all LED indicators and the appropriate
response you may need to take.
Page 21
Chapter 3: Initial Setup and System Interface
Hardware Overview
Quantum NDX NAS Tower User’s Guide 9
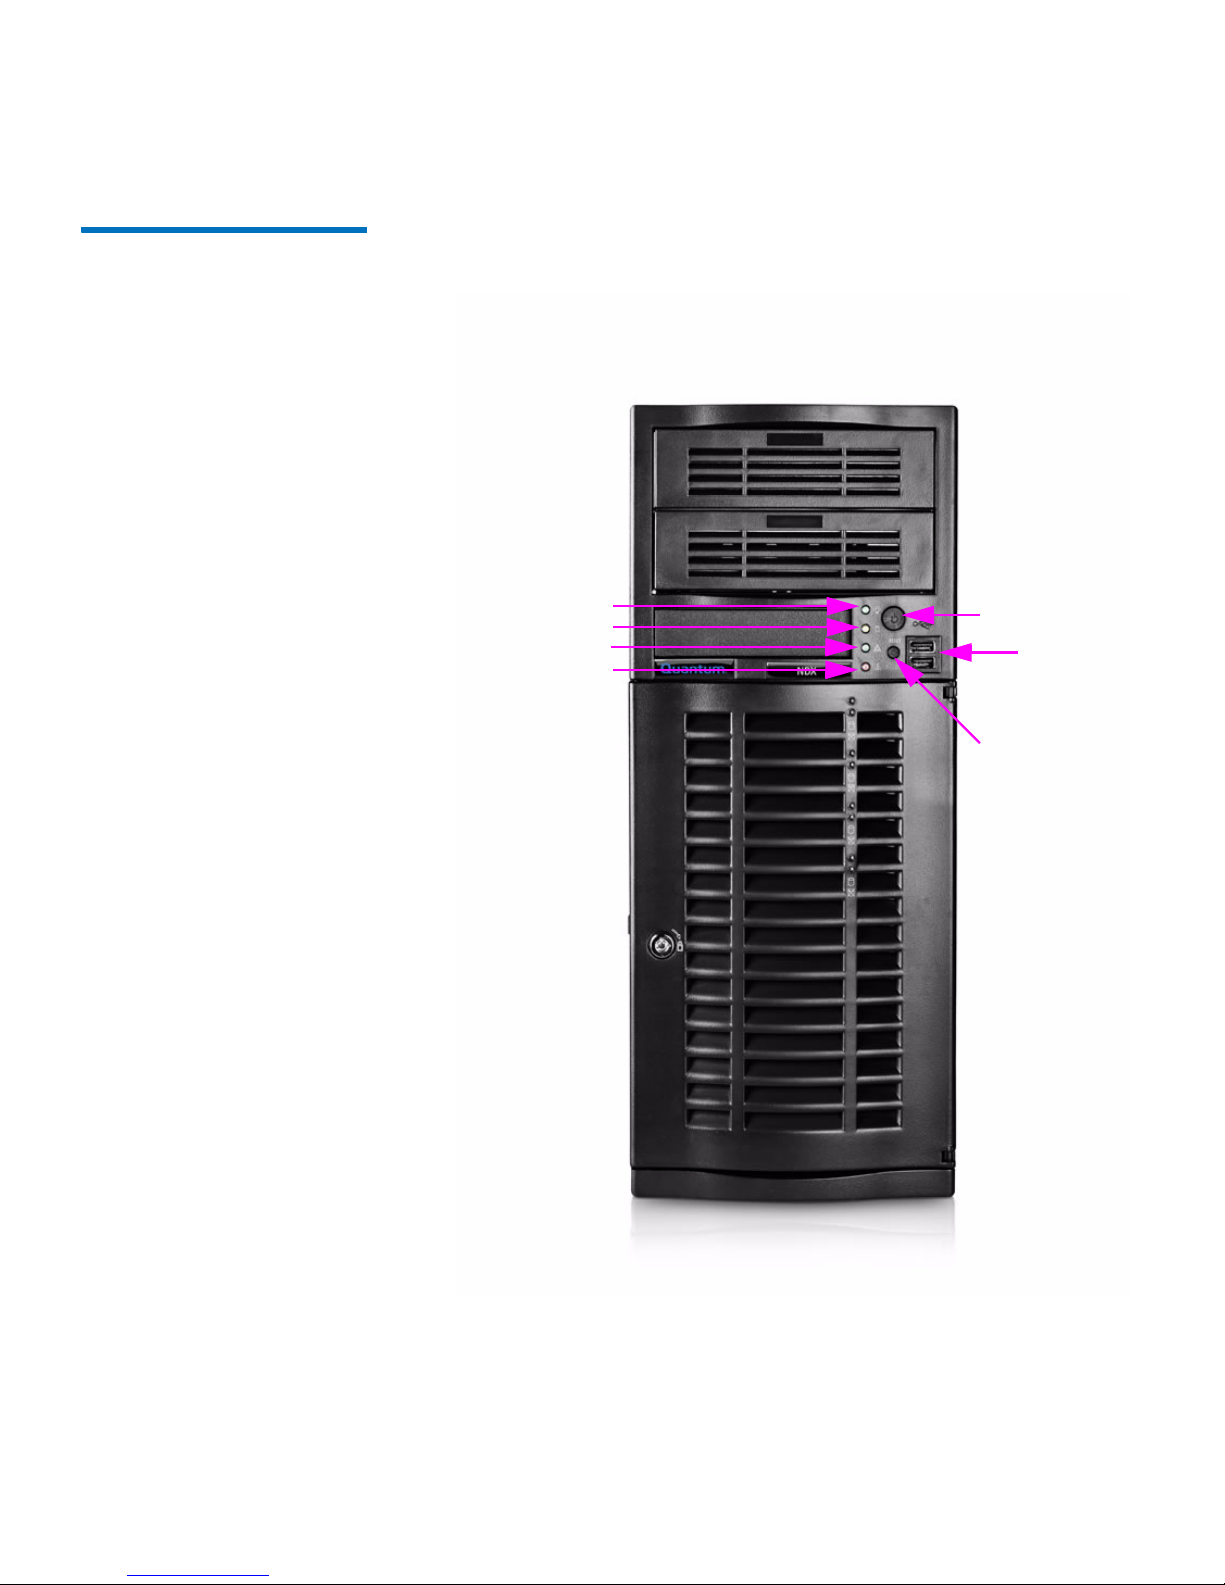
Figure 1 Front Chassis Panel
Power LED
HDD LED
NIC LED
OH LED
Power button
USB Ports
Reset button
Page 22
Chapter 3: Initial Setup and System Interface
Hardware Overview
10 Quantum NDX NAS Tower User’s Guide
Figure 2 Rear Chassis
USB ports
IPMI port
Ethernet posts
Page 23

Chapter 3: Initial Setup and System Interface
Control Panel Buttons
Quantum NDX NAS Tower User’s Guide 11
Control Panel Buttons
There are two push-buttons located on the front of the chassis. These
are (in order from left to right) a reset button and a power on/off
button.
• Reset: The reset button is used to reboot the system.
• Power: The main power switch is used to apply or remove power
from the power supply to the server system. Turning off system
power with this button removes the main power but keeps standby
power supplied to the system. Therefore, you must unplug system
before servicing.
Control Panel LEDs
The control panel located on the front of the NDX Tower chassis has five
LEDs. These LEDs provide you with critical information related to
different parts of the system. This section explains what each LED
indicates when illuminated and any corrective action you may need to
take.
Page 24

Chapter 3: Initial Setup and System Interface
Control Panel LEDs
12 Quantum NDX NAS Tower User’s Guide
Power: Indicates power is being supplied to the system's power supply
units. This LED should normally be illuminated when the system is
operating.
HDD: Indicates IDE channel activity. Hard Disk Drive and/or DVD-ROM
drive activity when flashing.
NIC1: Indicates network activity on GLAN1 when flashing.
Overheat: Indicates an overheating or fan failure condition when
flashing.
Page 25

Chapter 3: Initial Setup and System Interface
Control Panel LEDs
Quantum NDX NAS Tower User’s Guide 13
Correcting an Overheat/Fan Fail Condition
1 Check the routing of the cables and move any cables the restrict
airflow.
2 Confirm that all fans are operating normally.
3 Verify that the heatsinks are installed properly.
4 If the chassis cover is not aligned correctly, the airflow may be
disrupted. This leads to overheating. Confirm that the chassis cover
is placed correctly.
5 This LED will remain active as long as the overheat condition exists.
Page 26

Chapter 3: Initial Setup and System Interface
Control Panel LEDs
14 Quantum NDX NAS Tower User’s Guide
Page 27

Quantum NDX NAS Tower User’s Guide 15
Chapter 4
Chassis Setup and
Maintenance
This chapter covers the steps required to install components and
perform maintenance on the chassis. The only tool you will need to
install components and perform maintenance is a Phillips screwdriver.
Print this chapter to use as a reference while setting up your chassis.
WARNING: Review the warnings and precautions listed in the manual
before setting up or servicing this chassis. These include
information in Chapter 2: System Safety and the warning/
precautions listed in the setup instructions.
Page 28
Chapter 4: Chassis Setup and Maintenance
Removing the Chassis Cover
16 Quantum NDX NAS Tower User’s Guide
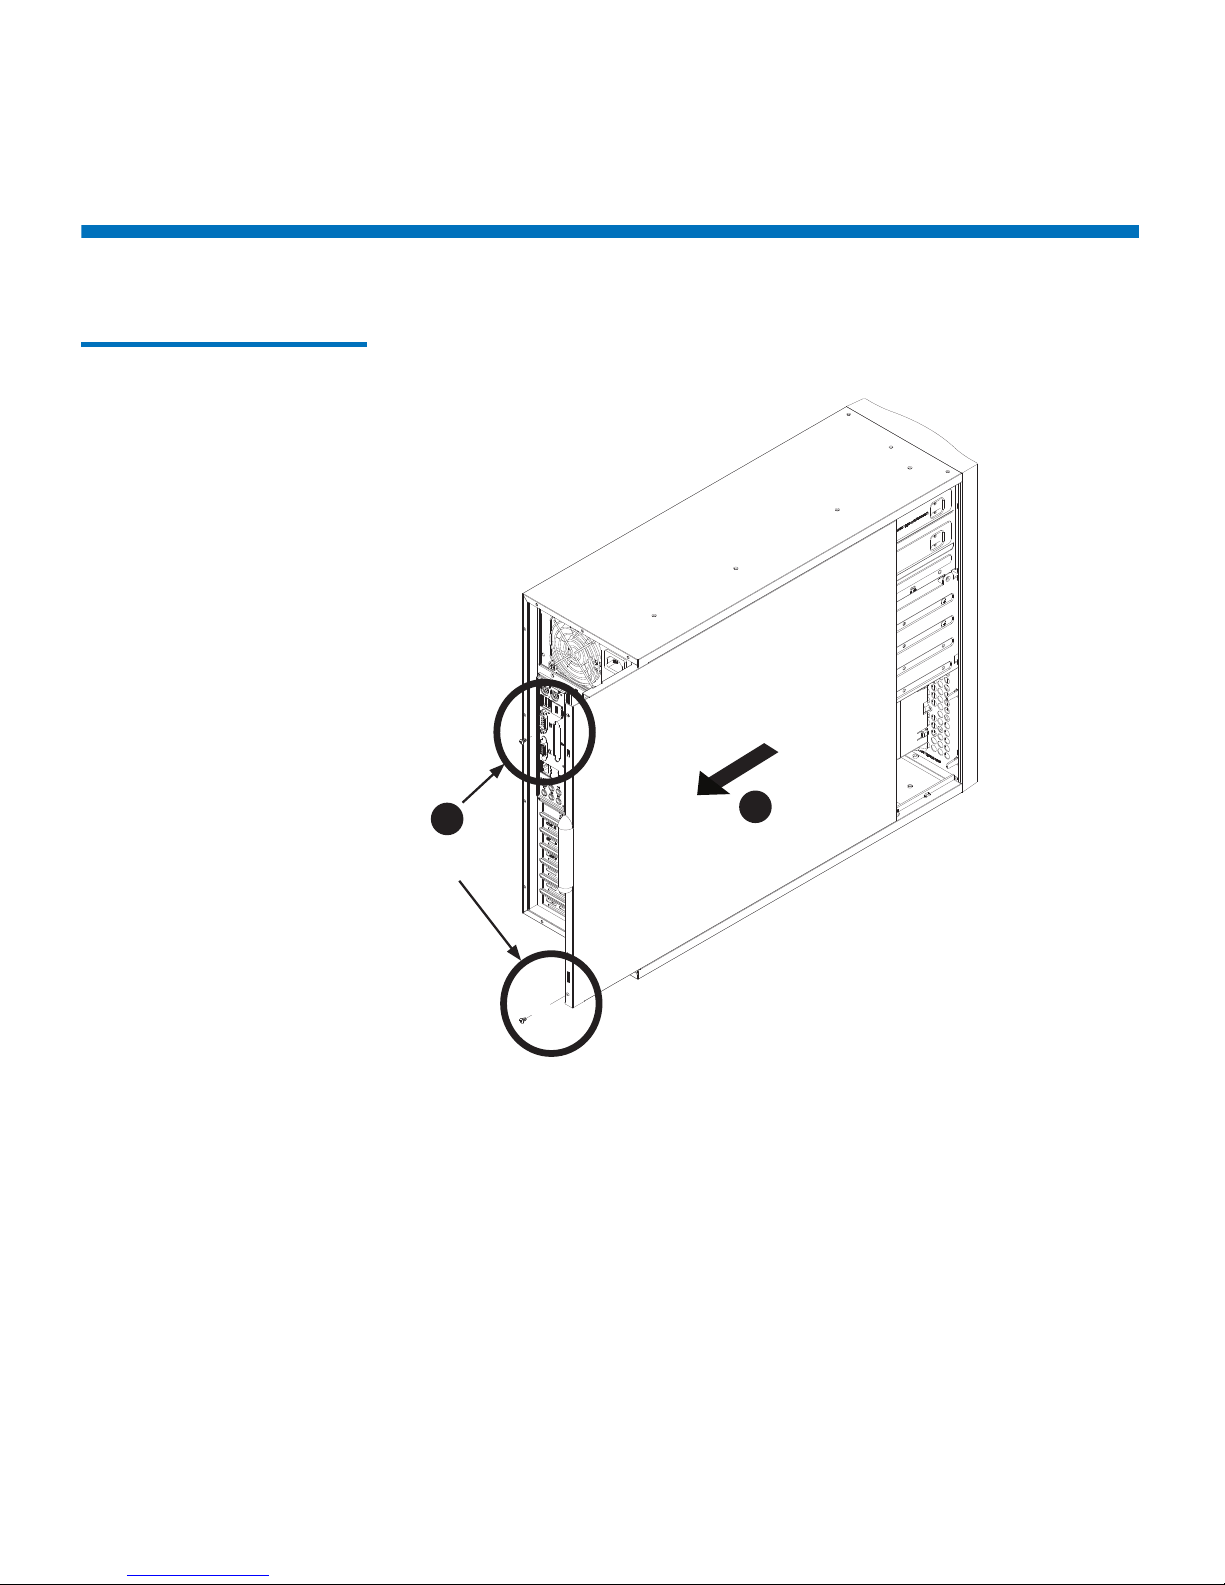
Removing the Chassis Cover
Figure 3 Removing the Chassis
Cover
Remove
Screws
3
2
1 Disconnect the chassis from any power source.
2 On
the rear of the chassis, remove the two screws holding the cover
in place.
3 Slide
the cover back, toward the rear of the chassis.
4 Lift the cover off
the chassis.
Page 29
Chapter 4: Chassis Setup and Maintenance
Replacing a Hard Drive
Quantum NDX NAS Tower User’s Guide 17
WARNING: Except for short periods of time, do NOT operate the
server without the cover in place. The chassis cover must
be in place to allow proper airflow and prevent
overheating.
Replacing a Hard Drive
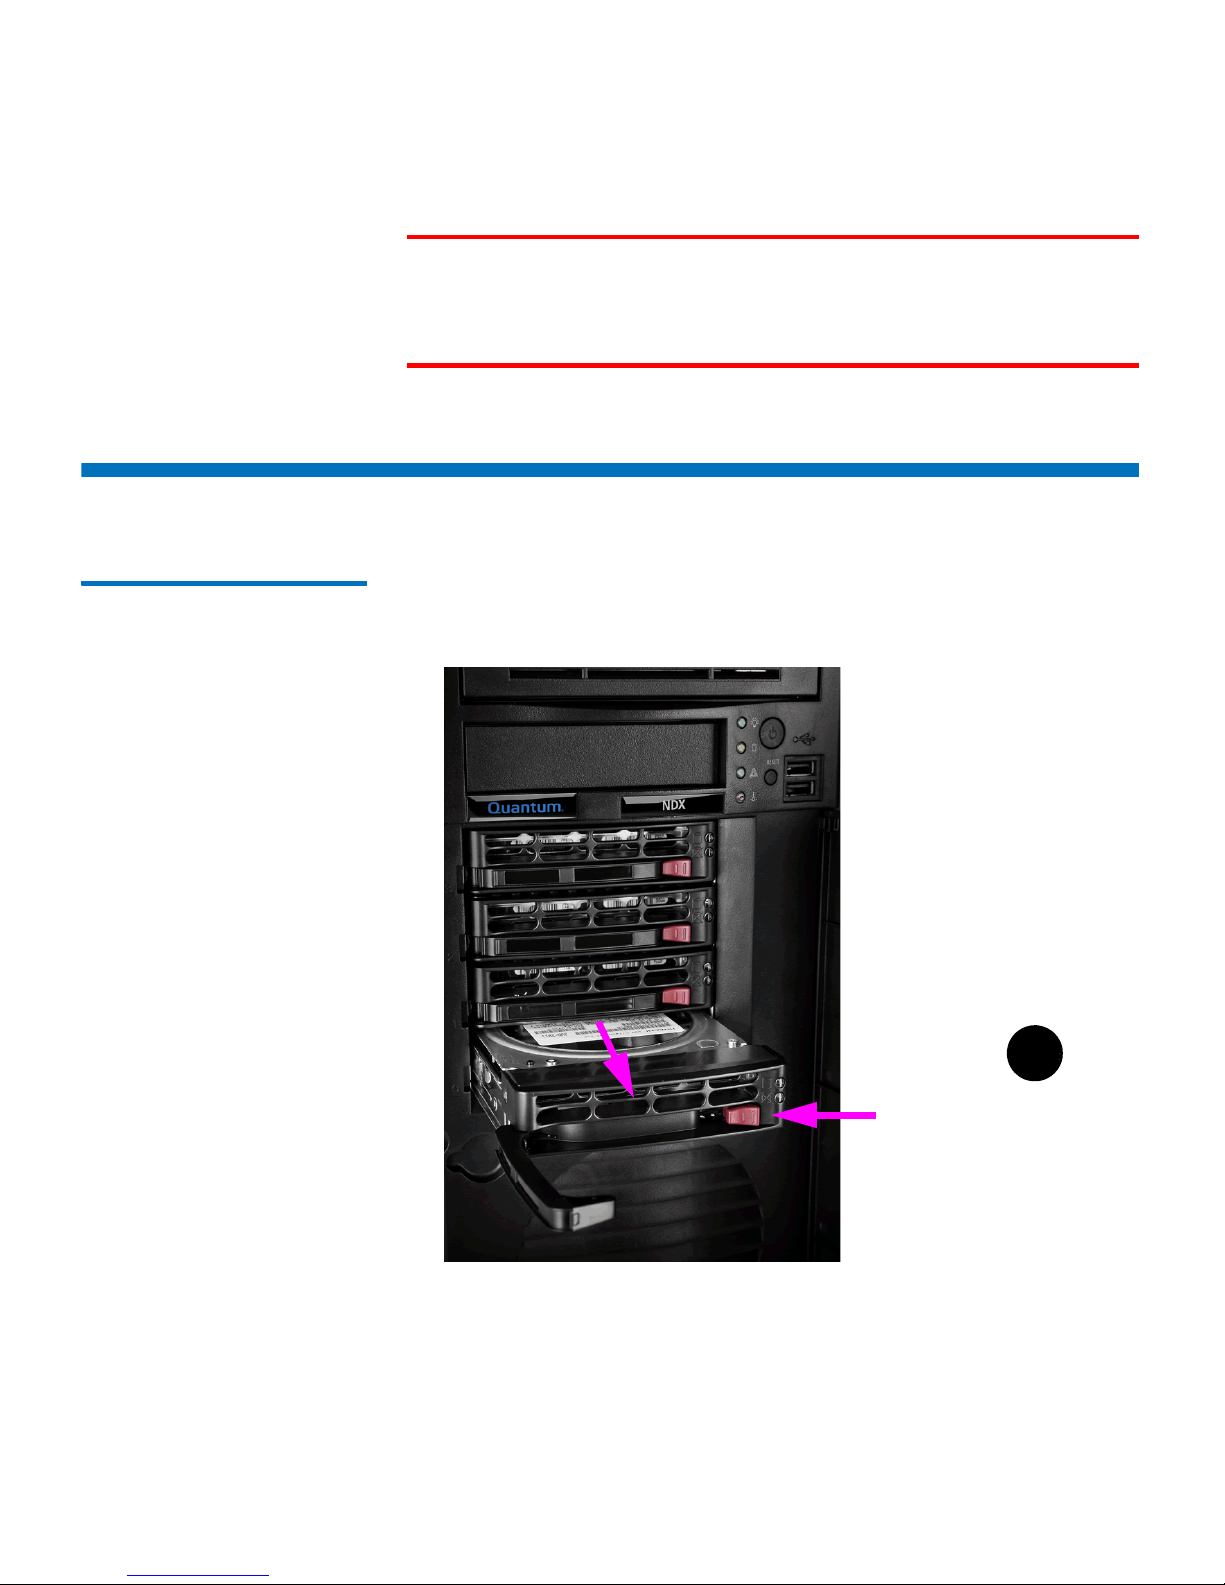
Figure 4 Removing the Hard
Drive Carrier from Chassis
Release button
2
The Quantum NDX NAS Tower features hot-swappable hard drives,
which permit the exchange of hard drives, without powering down the
system
Page 30

Chapter 4: Chassis Setup and Maintenance
Replacing a Hard Drive
18 Quantum NDX NAS Tower User’s Guide
Removing Hard Drive
Carriers
1 Open the door on the front of the tower to expose the 4 hot swap
hard drives.
2 Press th
e release button on the front of the drive carrier. This will
cause the drive carrier handle to pop outward.
3 Usi
ng the drive carrier handle, gently pull the drive carrier out of the
chassis.
WARNING: Enterprise level hard disk drives are recommended for use
in the Quantum NDX NAS Tower.
Figure 5 Chassis Drive Carrier
Drive Carrier
The drives are mounted in drive trays to simplify their installation and
removal from the chassis. These trays also help promote proper airflow
for the drive bays.
WARNING: Except for short periods of time (swapping hard drives),
do not operate the server with the chassis drive bays
empty.
Page 31
Chapter 4: Chassis Setup and Maintenance
Replacing a Hard Drive
Quantum NDX NAS Tower User’s Guide 19
Installing the Hard
Drive into Hard Drive
Carrier
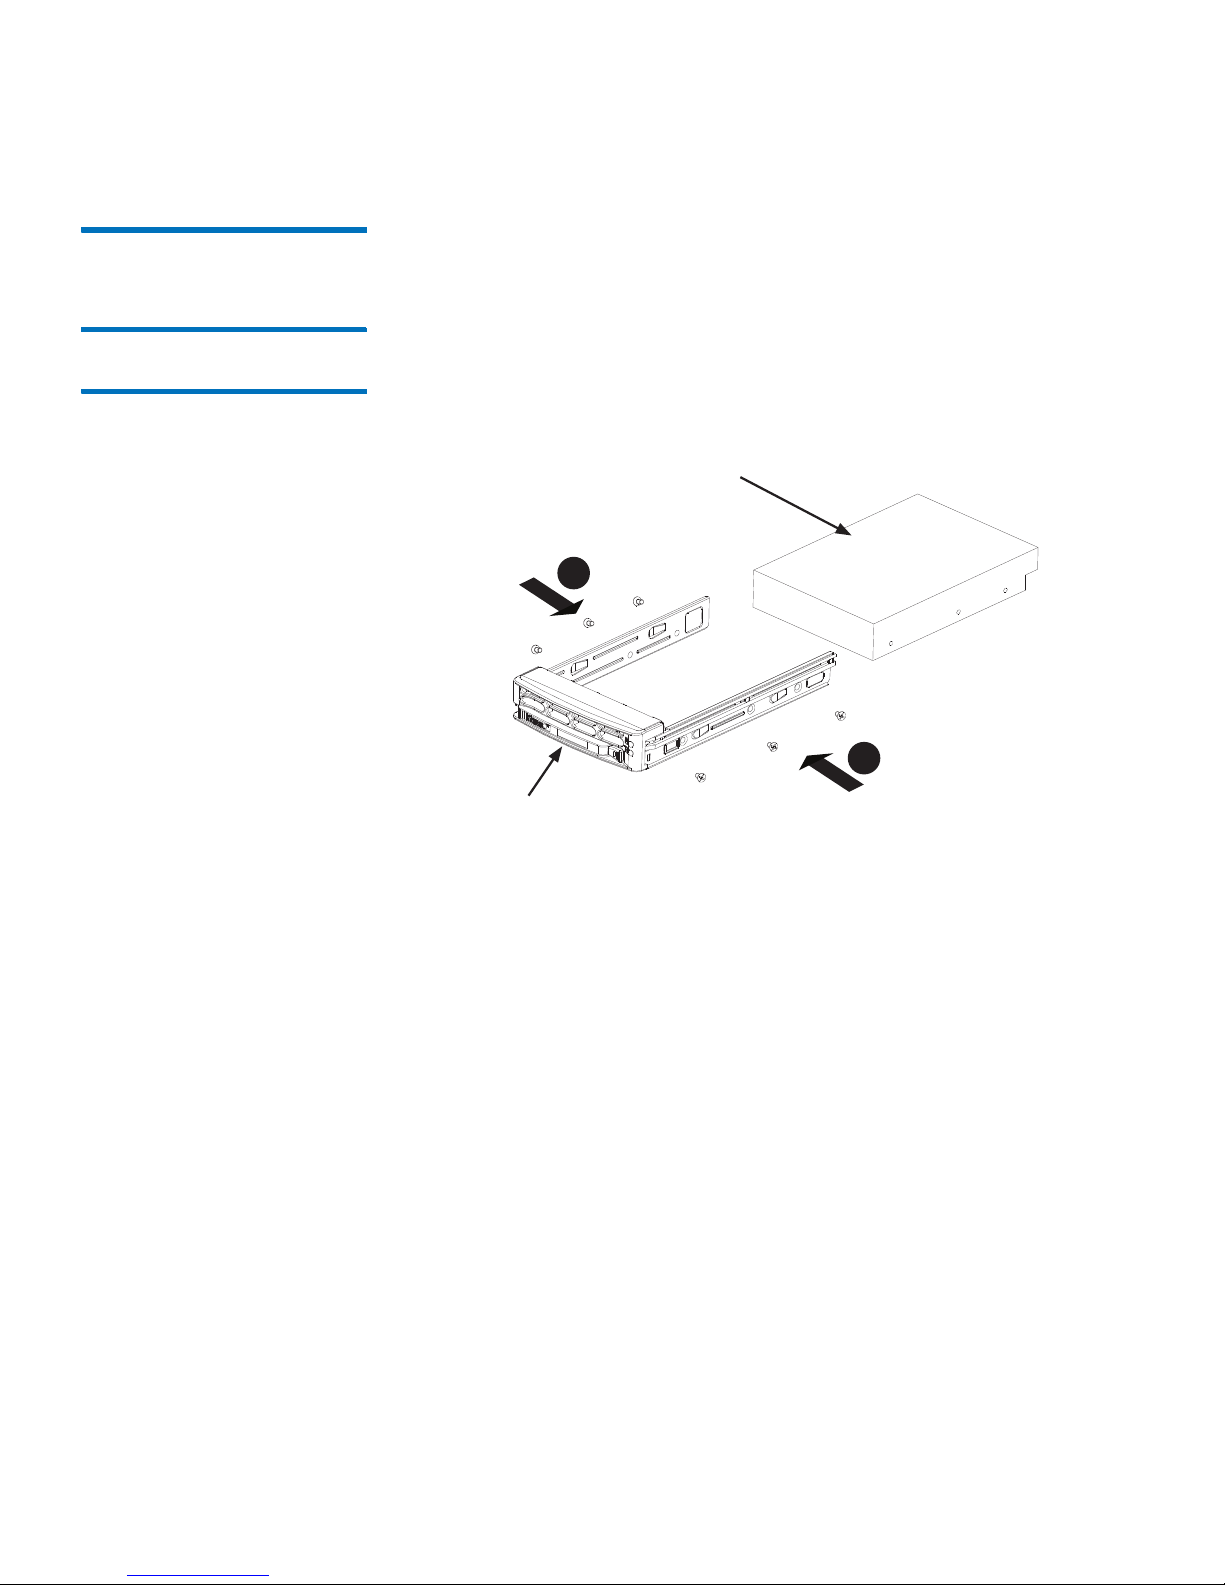
1 Remove the two screws securing the hard drive to the drive carrier
and remove the hard drive. Place the hard drive carrier on a flat
surface such as a desk, table or work bench.
Figure 6 Removing Hard Drive
Drive Carrier
Hard Drive
4
4
2 Slide the hard drive into the carrier with the printed circuit board
side facing 2. down.
3 Care
fully align the mounting holes in both the drive carrier and the
hard drive.3.
4 Secure the hard drive to
the carrier using six screws.
5 Replace
the drive carrier into the chassis. Make sure to close the
drive carrier handle to lock the drive carrier into place.
Page 32

Chapter 4: Chassis Setup and Maintenance
Installing a Peripheral Drive
20 Quantum NDX NAS Tower User’s Guide
Figure 7 Replacing Hard Drive
in Chassis
5
Installing a Peripheral Drive
Quantum NDX Towers have peripheral drive bays, in which an optional
drive may be installed. This may be a CD-ROM, DVD-ROM, RDX or other
device.Use the following procedure to install a peripheral drive:
Adding or Replacing a
Peripheral Drive
1 Disconnect the chassis from any power source.
2 Remove the chassis
cover.
Page 33

Chapter 4: Chassis Setup and Maintenance
Installing a Peripheral Drive
Quantum NDX NAS Tower User’s Guide 21
3 Unplug the power and data cables from the motherboard and/or
backplane.
4 If you are adding a new peripheral drive:.
Remove the mini-bezel (grate) from the dr
ive bay The bezel can be
removed by pulling out the hard drive beneath the drive bay, then
pulling the mini-bezel forward.
If you are replacing a peripheral drive:
Locate the locking tab at the rear (
left hand side when viewed from
the front) of the drive. Push the tab toward the drive, and push the
drive unit out the front of the chassis.
5 Push t
he new drive unit into the slot, until the tab locks into place.
6 Rec
onnect the data and power cables.
7 Replace
the chassis cover, reconnect the power source and power
up the system.
Figure 8 Installing the
Peripheral Drive
5
Page 34

Chapter 4: Chassis Setup and Maintenance
Installing Add-on or Expansion Cards
22 Quantum NDX NAS Tower User’s Guide
Installing Add-on or Expansion Cards
Figure 9 Installing Add-on or
Expansion Cards
Add-on/Expansion
Card Slots
Remove Screws
Add-on Card/Expansion
Slot Setup
The NDX Tower includes a single PCI-e slot. Follow these instructions for
installing a PCI-e card.
1 Disconne
ct the power supply, set the chassis on a flat surface, and
open the chassis cover.
2 Remove th
e screws holding the cover in place for each add-on/
expansion card slot you want to use. Keep this screw for later use.
3 Conne
ct the add-on card to the mother board.
4 Secure the car
d to the chassis using the card's L-bracket and the
screw previously removed.
Page 35
Chapter 4: Chassis Setup and Maintenance
Removing the Fan Duct and System Fan
Quantum NDX NAS Tower User’s Guide 23
Removing the Fan Duct and System Fan
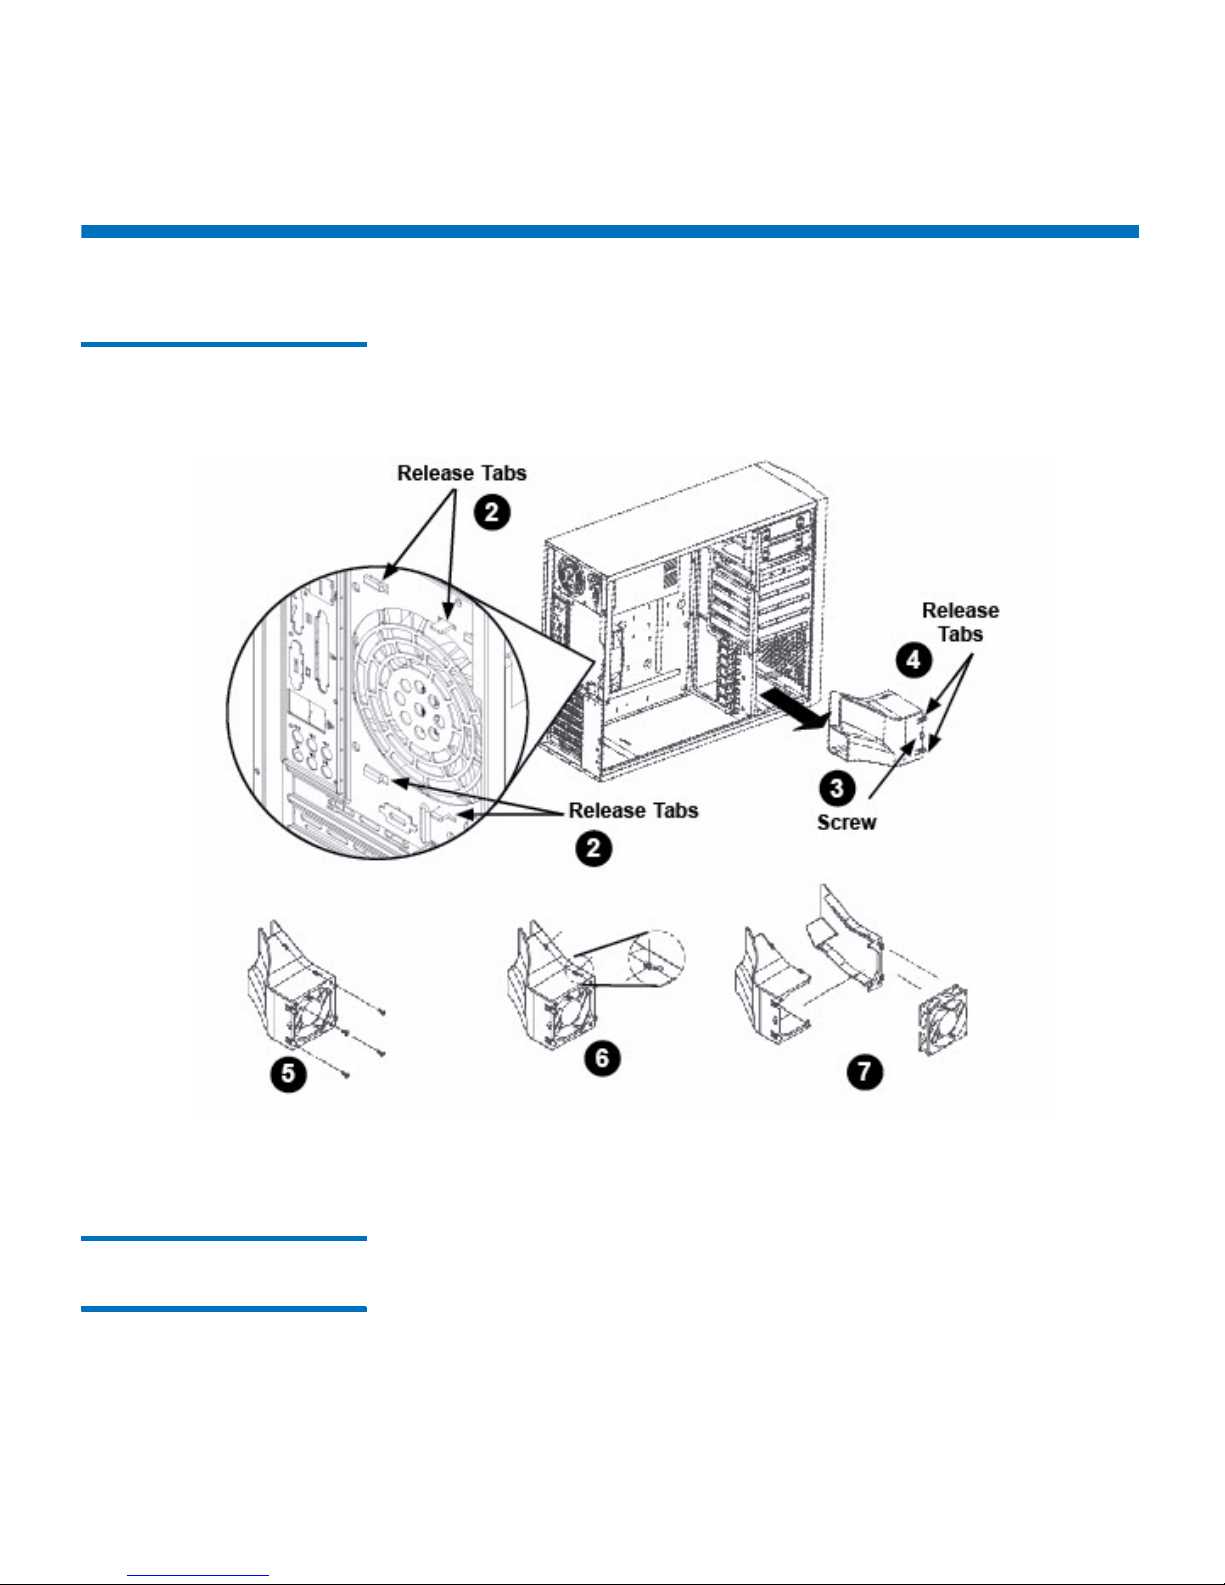
Figure 10 Replacing the Fan
Shroud
The fan duct concentrates airflow to maximize fan efficiency.
Removing the Fan Duct
and System Fan
1 Disconnect the chassis from any power source.
2 Remove the screw securing the fan duct
to the chassis.
3 Press down
the release tabs on the fan duct as shown and pull the
fan duct out from its location in the chassis.
Page 36

Chapter 4: Chassis Setup and Maintenance
Checking the Server's Air Flow
24 Quantum NDX NAS Tower User’s Guide
4 Remove the four screws at the front of the fan duct that hold the
fan in place.Then release the two fasteners along the side of the fan
duct.
5 Separate the fan duct into two pieces remove the fan
6 Add a new fan of the same type.
Checking the Server's Air Flow
1 Make sure there are no objects to obstruct airflow in and out of the
server. In addition, if you are using a front bezel, make sure the
bezel's filter is replaced periodically.
2 Do not operate the server without drives or drive trays in the drive
bays. Use only recommended server parts.
3 Make sure no wires or foreign objects obstruct air flow through the
chassis.Pull all excess cabling out of the airflow path or use shorter
cables.
4 The control panel LEDs inform you of system status. See “Chapter 3:
System Interface” for details on the LEDs and the control panel
buttons.
5 In most cases, the chassis power supply and fans are pre-installed. If
you need to install fans continue to the Systems Fan section of this
chapter. If the chassis will be installed into a rack, continue to the
next chapter for rack installation instructions.
Power Supply
Contact Quantum technical support for a replacement power supply if
there is an issue (see the contact information in the Preface).
Page 37
Chapter 4: Chassis Setup and Maintenance
Power Supply
Quantum NDX NAS Tower User’s Guide 25
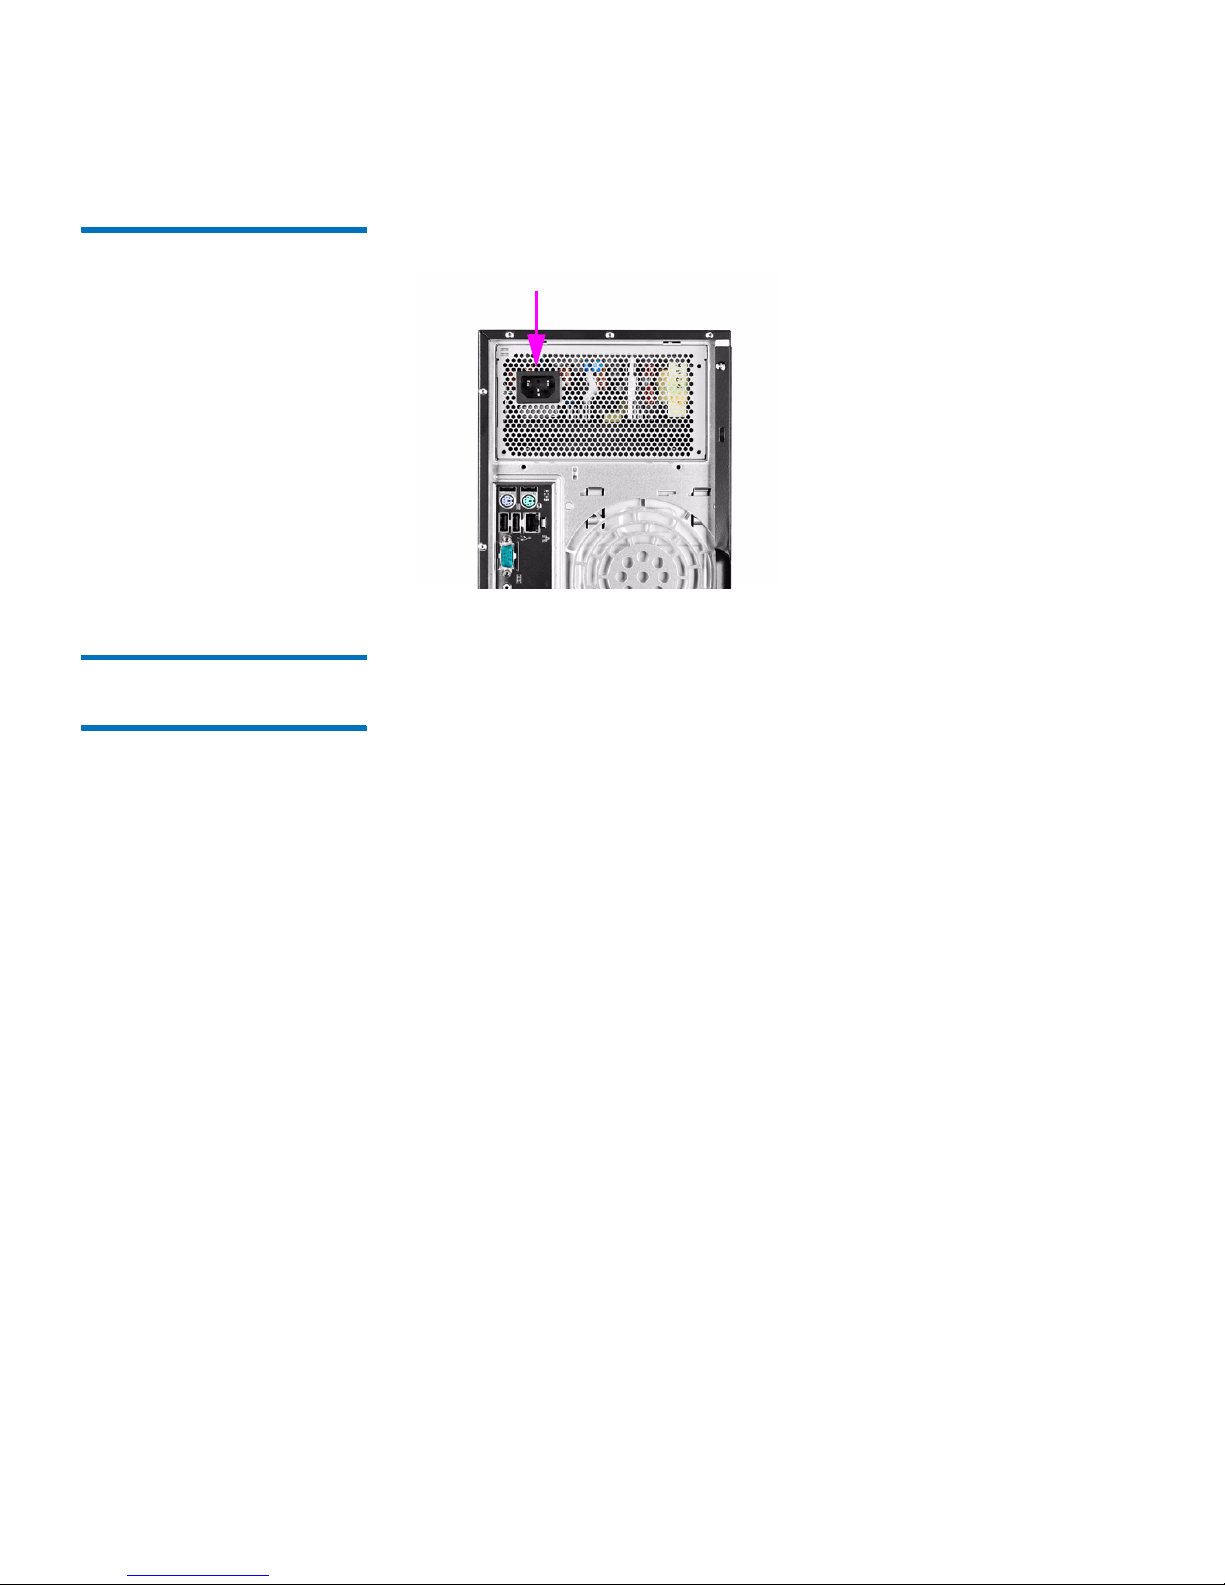
Figure 11 Removing the Power
Supply
Power supply
Changing the Power
Supply
1 Disconnect the chassis from any power source.
2 Remove the screws securing
the power supply to the chassis, which
are located on the rear of the chassis.
3 Pull the power supply out
of the chassis.
4 Change the failed power module with the
same model.
5 Push t
he new power supply module into the power bay until you
hear a click.
6 Plug the AC power
cord back into the module and power up the
server.
Page 38

Chapter 4: Chassis Setup and Maintenance
Power Supply
26 Quantum NDX NAS Tower User’s Guide
Page 39

Quantum NDX NAS Tower User’s Guide 27
Appendix A
Power Supply Specifications
This appendix lists power supply specifications for your chassis system.
Rated AC Voltage 100 - 240V
50 - 60Hz
10 Amp
DC Output 5V + 3.3V . 160W
12V + 5V + 3.3V . 430W
+5V standby 2 Amp
+12V 30 Amp
+5V 26 Amp
+3.3V 30 Amp
-12V 1 Amp
Page 40

:
28 Quantum NDX NAS Tower User’s Guide
 Loading...