


/72+DOI+HLJKW7DSH'ULYH
/72
8VHU·V*XLGH8VHU·V*XLGH8VHU·V*XLGH8VHU·V*XLGH8VHU·V*XLGH8VHU·V*XLGH

Quantum LTO-4 Half-Height Tape Drive User’s Guide, P/N 20020140-001, November 2007.
Product of USA.
Quantum Corporation provides this publication “as is” without warranty of any kind, either express or
implied, including but not limited to the implied warranties of merchantability or fitness for a particular
purpose. Quantum Corporation may revise this publication from time to time without notice.
COPYRIGHT STATEMENT
Copyright 2007 by Quantum Corporation. All rights reserved.
Your right to copy this manual is limited by copyright law. Making copies or adaptations without prior
written authorization of Quantum Corporation is prohibited by law and constitutes a punishable violation of
the law.
TRADEMARK STATEMENT
Quantum and the Quantum logo are registered trademarks of Quantum Corporation.
Other trademarks may be mentioned herein which belong to other companies.

Contents
Preface viii
Chapter 1 Introduction 1
Overview............................................................................................................. 1
Drive Models...................................................................................................... 2
Internal ......................................................................................................... 2
Tabletop ....................................................................................................... 2
Features ............................................................................................................... 3
Chapter 2 Installation Procedures 5
Before Installing the LTO-4 Half-Height Tape Drive .................................. 6
Handling Precautions and Installation Guidelines ............................... 6
Preinstallation Requirements.................................................................... 7
Unpacking and Inspecting the Drive....................................................... 7
Installing the Internal LTO-4 Half-Height Tape Drive ................................ 8
Mounting the Internal Tape Drive ........................................................... 9
Connecting the Internal Drive Interface and DC Power Cables........ 10
Restarting the Internal Tape Drive System........................................... 11
Installing the Tabletop LTO-4 Half-Height Tape Drive............................. 12
Connecting the Tabletop Drive Interface and AC Power Cables ...... 12
LTO-4 Half-Height Tape Drive User’s Guide iii

Restarting the Tabletop Drive System ................................................... 13
Installing the LTO Driver Software...............................................................14
Registering the LTO-4 Half-Height Tape Drive ..........................................14
Chapter 3 Operation 15
Understanding the Front Panel Display....................................................... 15
Using LTO Tape Cartridges ........................................................................... 18
Loading a Tape Cartridge........................................................................ 18
Unloading a Tape Cartridge ................................................................... 18
Write Protecting a Tape Cartridge ......................................................... 18
Tape Cartridge Care and Maintenance ................................................. 19
Cleaning the Tape Drive .................................................................................20
Performing an Emergency Cartridge Eject...................................................22
Chapter 4 Theory 23
Track Layout..................................................................................................... 23
Recording Method ...........................................................................................25
Data Buffer ........................................................................................................ 25
Data Integrity.................................................................................................... 25
Error-correction Code (ECC)...................................................................26
Servo-tracking Faults ............................................................................... 27
Data Compression............................................................................................27
Data Compression Considerations.........................................................28
Intelligent Data Compression ................................................................. 29
Chapter 5 Specifications 31
Physical Specifications ....................................................................................32
Power Specifications........................................................................................ 34
Drive Performance Specifications.................................................................. 35
Environmental Requirements ........................................................................37
Injected Noise Specifications..........................................................................38
Reliability Specifications ................................................................................. 38
Mean Time Between Failures..................................................................39
Mean Time to Replace.............................................................................. 39
LTO Cartridge Specifications ......................................................................... 39
Environmental Considerations............................................................... 39
LTO-4 Half-Height Tape Drive User’s Guide iv

Cartridge Memory....................................................................................40
Cartridge Reliability ................................................................................. 40
Chapter 6 Troubleshooting Guide 41
Installation Best Practices ............................................................................... 41
Following SCSI Best Practices................................................................. 41
Using a Serial-attached SCSI Host Bus Adapter ..................................41
HBA Preinstallation Checks.................................................................... 42
Troubleshooting Suggestions.........................................................................42
Computer Does Not Start ........................................................................ 42
Computer Hardware Does Not Recognize the Tape Drive................ 43
Computer Software Does Not Recognized the Tape Drive................ 48
Drive Does Not Load the Tape Cartridge............................................. 50
Drive Does Not Eject the Tape Cartridge.............................................. 52
Slow Backup Operations ......................................................................... 54
Failed Operations TapeAlert Messages................................................. 56
Appendix A Installation Checklists 63
Internal LTO-4 Half-Height Tape Drive Quick Start ................................. 64
Tabletop LTO-4 Half-Height Tape Drive Quick Start ................................ 65
Appendix B Disposal of Electrical & Electronic Equipment 66
Appendix C Regulatory Compliances 67
Safety Compliances.......................................................................................... 68
Electromagnetic Compatibility (EMC) Compliances ................................. 69
Index 71
LTO-4 Half-Height Tape Drive User’s Guide v

Figures
Figure 1 Internal LTO-4 Half-Height Tape Drive ................................... 2
Figure 2 Acceptable Mounting Orientation............................................. 9
Figure 3 Internal Tape Drive Mounting Holes...................................... 10
Figure 4 Internal Drive Interface and Power Connectors.................... 11
Figure 5 Tabletop Drive Interface and Power Cable Connectors....... 13
Figure 6 Front Panel Display ................................................................... 16
Figure 7 Ultrium Tape Cartridge Write-Protect Switch....................... 19
Figure 8 Layout of the Tracks on LTO Ultrium Tapes......................... 24
Figure 9 LTO-4 Half-Height Tape Drive Dimensions.......................... 33
LTO-4 Half-Height Tape Drive User’s Guide vi

Tables
Table 1 Performance Features and Capabilities .................................... 3
Table 2 Front Panel Display Indications............................................... 16
Table 3 Physical Specifications............................................................... 32
Table 4 Voltage and Current Specifications......................................... 34
Table 5 Power Dissipation ...................................................................... 34
Table 6 Drive Performance Specifications............................................ 35
Table 7 Environmental Requirements .................................................. 37
Table 8 Reliability Specifications ........................................................... 38
Table 9 Environmental Tolerances ........................................................ 40
LTO-4 Half-Height Tape Drive User’s Guide vii

Preface
Audience
Purpose
Document Organization
This guide is written for users of the Quantum LTO-4 Half-Height Tape
Drive.
This guide provides information about the LTO-4 Half-Height Tape Drive
including:
• Installing the drive
• Basic drive operations
• Maintenance
• Specifications
• Troubleshooting
This guide is organized as follows:
• Chapter 1,
technologies, and summarizes the drive’s key features.
• Chapter 2,
unpacking tips, and installation instructions.
• Chapter 3,
drive.
Introduction, provides an overview of LTO and Ultrium
Installation Procedures, describes handling precautions,
Operation, describes the operation and maintenance of the
LTO-4 Half-Height Tape Drive User’s Guide viii

Preface
• Chapter 4, Theory, describes the theory of operation behind the drive,
including the technology used in various drive components.
Notational Conventions
• Chapter 5,
• Chapter 6,
Specifications, provides drive and cartridge specifications.
Troubleshooting Guide provides troubleshooting
procedures you can follow if you encounter a problem with your
drive.
• Appendix A,
Installation Checklists, provides abbreviated quick-start
checklists for users who are already familiar with the installation
procedures.
• Appendix B, Disposal of Electrical & Electronic Equipment
, provides
instructions for proper disposal of unwanted electrical and electronic
equipment.
• Appendix C,
Regulatory Compliances, identifies drive compliance
with safety and EMC regulations.
This guide also has an index.
This guide uses the following conventions:
Note: Notes emphasize important information related to the main
topic.
Tech Tip: Tech Tips provide technical information which may be
helpful in performing the procedure.
Caution: Cautions indicate potential hazards to equipment and are
included to prevent damage to equipment.
Warning: Warnings indicate potential hazards to personal safety and
are included to prevent injury.
LTO-4 Half-Height Tape Drive User’s Guide ix

Preface
Related Documents
The following subsection identifies the primary documents that are
related to the LTO-4 Half-Height Tape Drive.
Standards Conformance
The Small Computer System Interface is described in standards that
include several versions and a number of individual documents. The
original Small Computer System Interface Standard, X3.131-1986, is
referred to as SCSI-1. SCSI-1 was revised, resulting in the Small
Computer System Interface – 2 (X3.131-1994), referred to as SCSI-2. The
set of SCSI-3 standards are collectively referred to as SCSI-3. The
applicable ANSI standards are as follows:
• INCITS Technical Committee T10 (SCSI Storage Interfaces)
Standards:
• SCSI Architecture Model – 2 (SAM-2) INCITS 366-2003
• SCSI Architecture Model – 3 (SAM-3) INCITS 402-2005
• SCSI Architecture Model – 4 (SAM-4) in development
• Automation/Drive Interface – Commands (ADC) INCITS 403-
2005
• Automation/Drive Interface Commands (ADC-2) in
development
0
• Automation/Drive Interface – Transport Protocol (ADT) INCITS
406-2005
• Automation/Drive Interface – Transport Protocol – 2 (ADT-2) in
development
• Fibre Channel Protocol for SCSI (FCP) INCITS 269-1996
• Fibre Channel Protocol for SCSI, Second Version - 2 (FCP-2)
INCITS 350-2003
• Fibre Channel Protocol for SCSI, Third Version - 3 (FCP-3)
INCITS 416-2006
• Fibre Channel Protocol for SCSI, Fourth Version - 4 (FCP-3) in
development
• SCSI-3 Medium Changer Commands (SMC) INCITS 314-1998
• SCSI Media Changer Commands – 2 (SMC-2) INCITS 382-2004
LTO-4 Half-Height Tape Drive User’s Guide x

Preface
• SCSI Media Changer Commands – 3 (SMC-3) in development
• SCSI Parallel Interface – 3 (SPI-3) INCITS 336-2000
• SCSI Parallel Interface-4 (SPI-4) INCITS 362-2002
• SCSI Parallel Interface-5 (SPI-5) INCITS 367-2003
• SCSI-3 Primary Commands (SPC) INCITS 301-1997
• SCSI Primary Commands – 2 (SPC-2) INCITS 351-2001
• SCSI Primary Commands – 3 (SPC-3) INCITS 408-2005
• SCSI Primary Commands – 4 (SPC-4) in development
• SCSI-3 Stream Commands (SSC) INCITS 335-2000
• SCSI Stream Commands – 2 (SSC-2) INCITS 380-2003
• SCSI Stream Commands – 3 (SSC-3) in development
• Serial Attached SCSI – (SAS) INCITS 376-2003
• Serial Attached SCSI – 1.1 (SAS-1.1) INCITS 417-2006
• Serial Attached SCSI – 2 (SAS-2) in development
• INCITS Technical Committee T11 (Device Level Interfaces) Standards
• Fibre Channel Arbitrated Loop (FC-AL-2) Amendment 1 INCITS
332.1999/AM1-2003Fibre Channel Generic Services-4 (FC-GS-4)
INCITS 387-2004
• Fibre Channel Generic Services-5 (FC-GS-5) in development
• Fibre Channel Generic Services-6 (FC-GS-6) in development
• Fibre Channel - Link Services (FC-LS) in development
Note: The term “SCSI” is used wherever it is not necessary to
distinguish between the versions of SCSI.
LTO-4 Half-Height Tape Drive User’s Guide xi

Preface
Contacts
Quantum company contacts are listed below.
Quantum Corporate Headquarters
To order documentation on the LTO-4 Half-Height Tape Drive or other
products contact:
Quantum Corporation
P.O. Box 57100
Irvine, CA 92619-7100
(949) 856-7800
(800) 284-5101
Technical Publications
To comment on existing documentation send e-mail to:
doc-comments@quantum.com
Quantum Home Page 0
Visit the Quantum home page at:
0
0
http://www.quantum.com
Customer Support 0
Quantum Global Services provides 24-hour support that can be reached
at:
North/South America: (949) 725-2100 or (800) 284-5101
Asia/Pacific Rim: (International Code) + 61 7 3839 0988
Europe/Middle East/Africa: (International Code) + 44 (0) 1256 848748
Send faxes for Global Services to:
North/South America: (949) 725-2176
Asia/Pacific Rim: (International Code) + 61 7 3839 0955
Europe/Middle East/Africa: (International Code) + 44 (0) 1256 848777
LTO-4 Half-Height Tape Drive User’s Guide xii

Send e-mail for Global Services to:
Asia/Pacific Rim: apachelp@quantum.com
Europe/Middle East/Africa: eurohelp@quantum.com
Visit our website:
www.quantum.com/support
Preface
LTO-4 Half-Height Tape Drive User’s Guide xiii

Overview
Chapter 1
1Introduction
This chapter provides an introductory overview of the Quantum LTO-4
Half-Height Tape Drive. Topics include:
• Overview
• Drive Models
• Features
The Quantum LTO-4 Half-Height Tape Drive is a high-performance 16channel tape drive that complies with the LTO interchange specifications.
The drive is suited for mid-range to high-end servers, mainframe
systems, and tape library automation systems.
The LTO-4 Half-Height Tape Drive uses Ultrium data cartridges. Its
capacity is maximized using intelligent data compression. The drive has a
native capacity of 800 Gbytes (1,600 Gbytes assuming 2:1 data
compression).
LTO-4 Half-Height Tape Drive User’s Guide 1
Drive Models
Chapter 1 Introduction
Drive Models
The LTO-4 Half-Height Tape Drive has a 5¼-inch half-height form factor
with automatic electromechanical cartridge soft load. It is available in two
models:
• Internal
• Tabletop
Internal 1
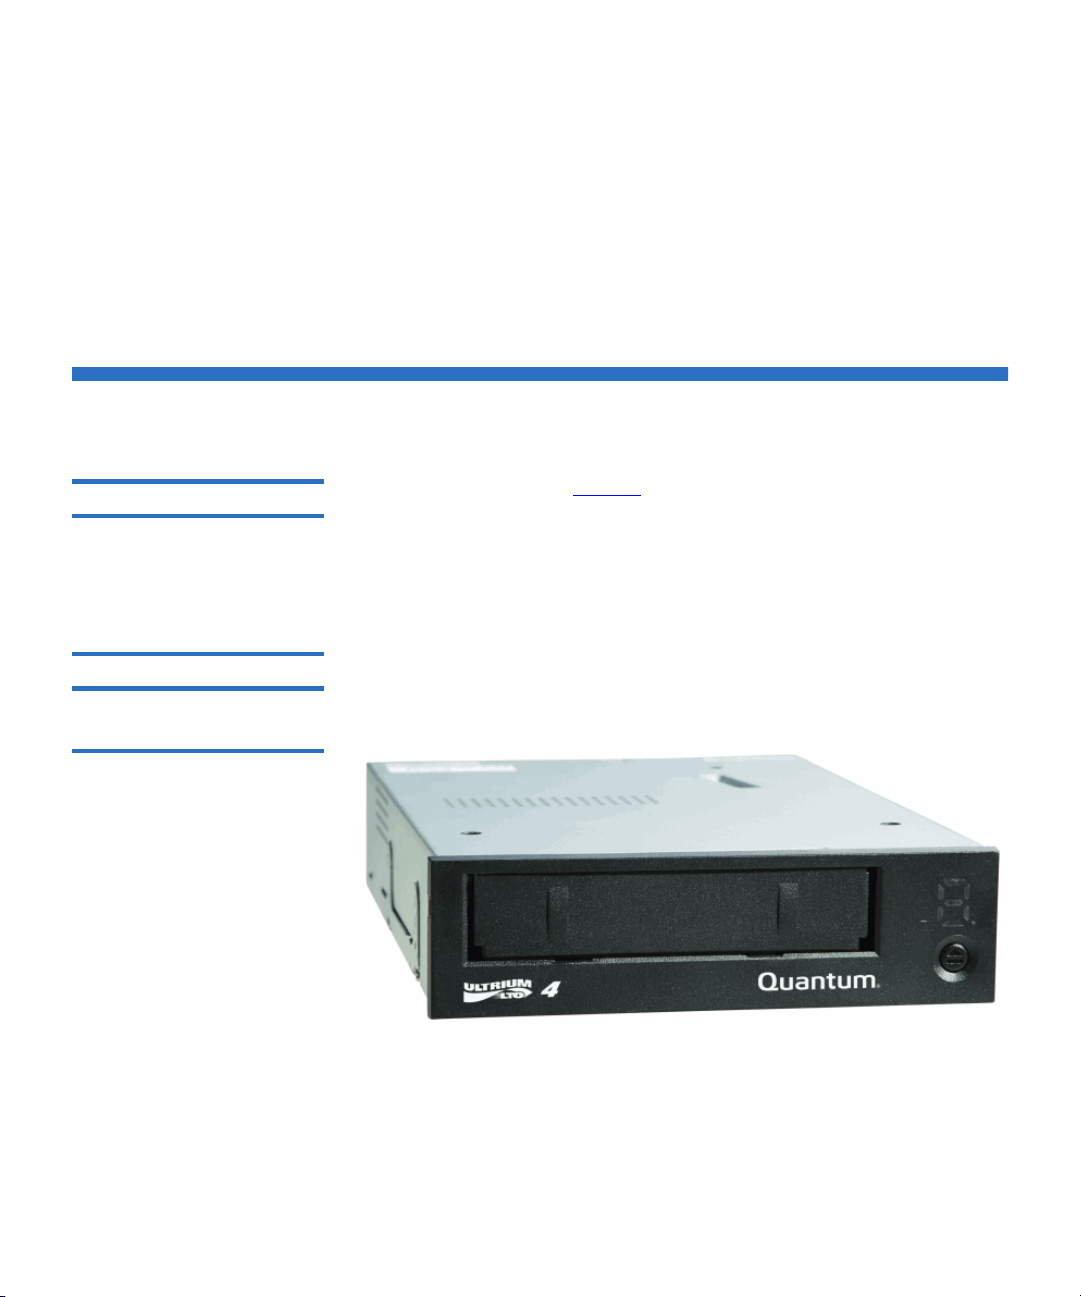
Tabletop 1
Figure 1 Internal LTO-4 HalfHeight Tape Drive
The internal model (see figure 1) is a 5¼-inch drive that you can install
inside the drive bay of a:
• Computer workstation or server system
• Quantum rackmount drive enclosure
The tabletop model is a 5¼-inch drive that is already mounted inside a
stand-alone external drive enclosure with a built-in power supply.
LTO-4 Half-Height Tape Drive User’s Guide 2

Features
Chapter 1 Introduction
Features
Table 1 describes the key performance features and capabilities of the
LTO-4 Half-Height Tape Drive.
Table 1 Performance Features
and Capabilities
Feature Description
Cartridge memory Stores pertinent information about the
media to enable fast cartridge loading
Chassis Shock damped and isolated
Data buffering 128 Mbytes for high performance
Head positioner Patented proprietary mechanism for
increased data integrity
Intelligent data
compression
Interface Serial-attached SCSI (SAS)
LSI circuitry Custom designed for fast, efficient data
Native data transfer rate Up to 120 Mbytes per second
Read channel Third generation for increased maturity
RISC processors Provide fast, efficient data processing
Analyzes compression factors before
recording to maximize performance and
capacity
processing
and data integrity
SmartVerify Includes two levels of ECC for extra data
safety and error protection
Supported platforms A wide variety of Windows and UNIX
systems
TapeAlert Monitors and reports drive performance
Tape picking Enhanced implementation for increased
reliability
LTO-4 Half-Height Tape Drive User’s Guide 3

Chapter 1 Introduction
Features
Feature Description
Variable-speed transfer Variable speeds for matching with the host
to:
• Optimize data transfers
• Shorten backup times
• Increase reliability
LTO-4 Half-Height Tape Drive User’s Guide 4

Chapter 2
2Installation Procedures
This chapter provides detailed installation instructions for both the
internal and tabletop models of the Quantum LTO-4 Half-Height Tape
Drive, including:
• Before Installing the LTO-4 Half-Height Tape Drive
• Handling Precautions and Installation Guidelines
• Preinstallation Requirements on page 7
• Unpacking and Inspecting the
• Detailed procedures for:
• Installing the Internal LTO-4 Half-Height Tape Drive
• Installing the Tabletop LTO-4 Half-Height Tape Drive
• Installing the LTO Driver Software
required
• Registering the LTO-4 Half-Height Tape Drive
Optionally, experienced users who are familiar with installing the LTO-4
Half-Height Tape Drive can refer to the quick-start checklists in
appendix A
installation instructions, with references to the corresponding detailed
procedures in this chapter.
on page 63 of this guide. Each checklist provides abbreviated
Drive on page 7
on page 14, optional/when
, which includes:
on page 8
on page 12
on page 14
LTO-4 Half-Height Tape Drive User’s Guide 5

Chapter 2 Installation Procedures
Before Installing the LTO-4 Half-Height Tape Drive
Before Installing the LTO-4 Half-Height Tape Drive
Handling Precautions and Installation Guidelines 2
Always observe the following precautions and guidelines when handling
and installing LTO-4 Half-Height Tape Drives:
• Internal, at all times
• Tabletop, when removed from its free-standing enclosure
Handling Precautions
• Internal drives have exposed
components that are sensitive to static
electricity. To reduce the possibility of
damage from static discharge, the
drives are packaged in a protective
antistatic bag. Do not remove the drive
from the antistatic bag until you are
ready to install it.
• Wear an ESD-preventive grounding
wrist strap or observe similar ESD
precautions when working with the
drive. Be sure the wrist strap makes
good skin contact. Do not remove the
wrist strap until you finish working
with the drive.
Also, avoid contact between the drive,
other equipment, and clothing. The
wrist strap only protects the equipment
from ESD voltages on the body; ESD
voltages on clothing can still cause
damage.
• Before removing the drive from the
antistatic bag, touch a grounded metal
surface to discharge any static
electricity buildup from your body.
(continued)
LTO-4 Half-Height Tape Drive User’s Guide 6

Chapter 2 Installation Procedures
Before Installing the LTO-4 Half-Height Tape Drive
Preinstallation Requirements 2
Handling Precautions
(continued)
• Handle the drive by its sides rather
than by the top cover to reduce the risk
of dropping the drive or damaging it
during installation.
• Either lay the drive on a nonconductive
surface or put it back inside the
protective antistatic bag to reduce the
chance of damage from static discharge
Installation Guidelines
Due to the high speed of the LTO-4 HalfHeight Tape Drive, do not connect more
than one LTO-4 drive to the same channel
on a host SCSI adapter.
Before installing the LTO-4 Half-Height Tape Drive, make sure you have:
• A serial SCSI host bus adapter (HBA) installed and properly
configured in the host computer
• Interface components, either:
• 7-pin 1x SATA style interface cable for an internal drive
• 26-pin SFF-8088 mini-SAS style interface cable for a tabletop
drive
• Backup application software that supports the tape drive. For a list of
the backup software applications that have been tested with the LTO4 Half-Height Tape Drive, please visit our website at:
Unpacking and Inspecting the Drive 2
www.quantum.com/support
Although each LTO-4 Half-Height Tape Drive is inspected and carefully
packaged at the factory, damage can occur:
• In shipment
• When being unpacked
LTO-4 Half-Height Tape Drive User’s Guide 7

Chapter 2 Installation Procedures
Installing the Internal LTO-4 Half-Height Tape Drive
Observe the handling precautions listed in Handling Precautions and
Installation Guidelines and carefully unpack and inspect the LTO-4 Half-
Height Tape Drive as follows:
1 Visually inspect the shipping container and notify your carrier
immediately of any damage.
2 Place the shipping container on a flat, clean, stable surface and
carefully remove the contents.
3 Visually inspect the LTO-4 Half-Height Tape Drive and notify your
Quantum representative immediately of any damage.
4 Always save the shipping container and packing materials for any
future reshipment.
Installing the Internal LTO-4 Half-Height Tape Drive
To install the internal LTO-4 Half-Height Tape Drive, complete the
following procedures in the order presented:
1 M
ounting the Internal Tape Drive
2 Connecting the Internal Drive Interface and DC Power Cables on
page 10
3 Restarting the Internal
4 Installing the LTO Driver Software
5 Registering the LTO-4 Half-Height Tape Drive
Tape Drive System on page 11
on page 14, if required
on page 14
LTO-4 Half-Height Tape Drive User’s Guide 8
Chapter 2 Installation Procedures
YES YES YES NO
Installing the Internal LTO-4 Half-Height Tape Drive
Mounting the Internal Tape Drive 2
Figure 2 Acceptable Mounting
Orientation
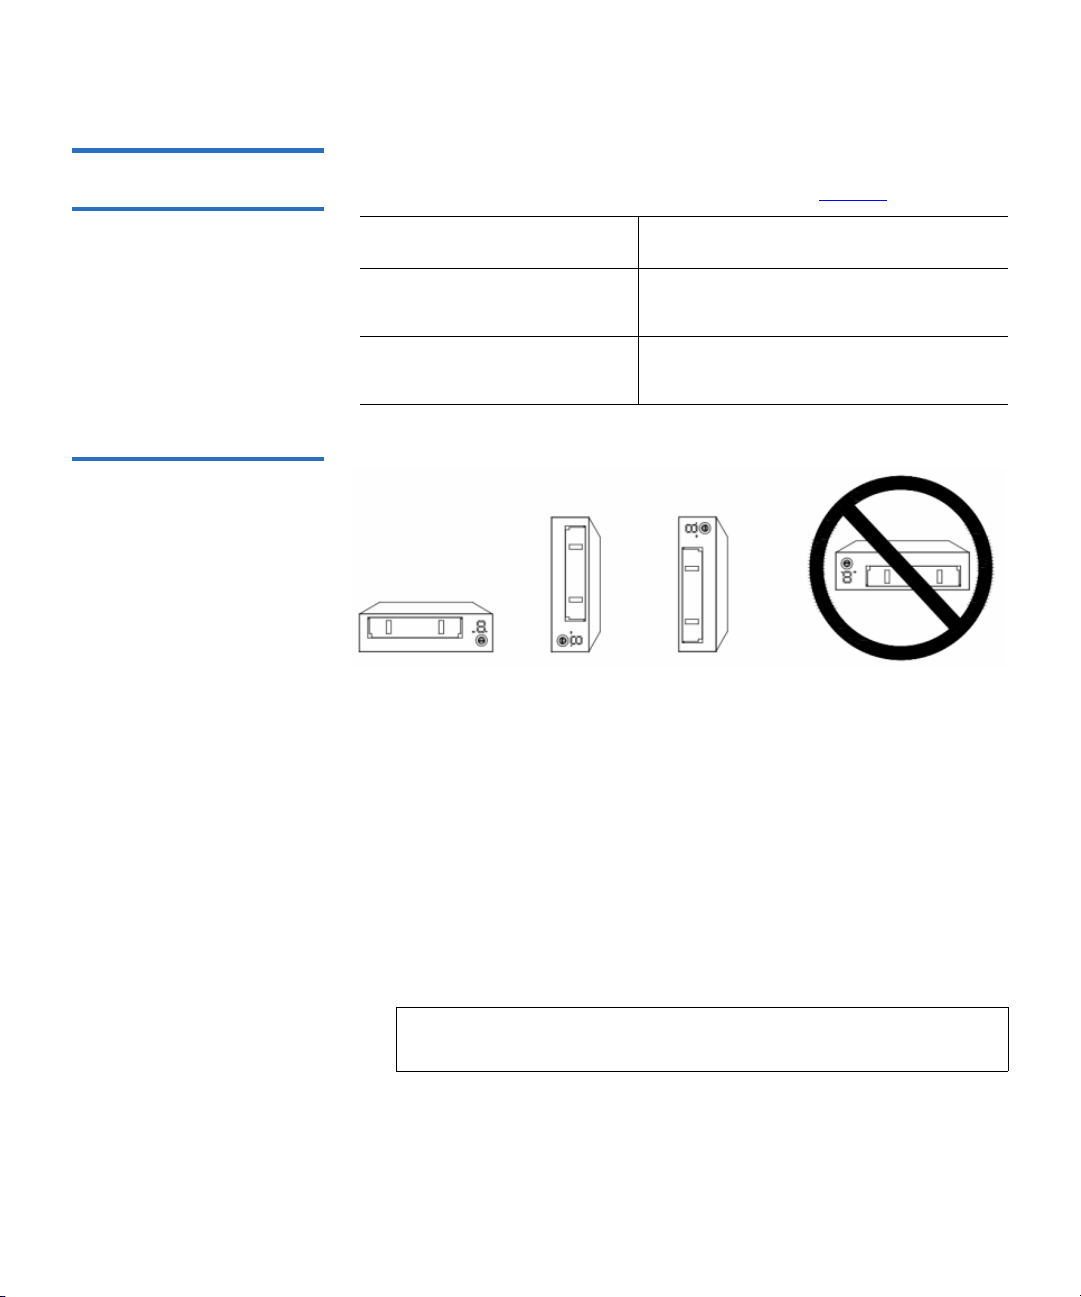
You can mount the internal LTO-4 Half-Height Tape Drive either
horizontally or vertically, but not upside down (see figure 2
).
IF you mount the drive . . . THEN the . . .
horizontally, base of the drive must be within 15
degrees of horizontal.
vertically, side of the drive should be within 5
degrees of horizontal.
Mount the drive in a 5.25-inch, half-height drive bay as follows:
1 As required:
a Save and close your open files and terminate all running
applications.
b Shut down the workstation or server system.
c Disconnect the system AC power cord from the facility AC
power receptacle.
2 Remove the cover from the workstation or server system.
Note: See your computer manufacturer’s instructions for the
proper procedures to remove the cover.
3 Select an available 5.25-inch half-height bay and, if required, remove
the bay cover.
LTO-4 Half-Height Tape Drive User’s Guide 9
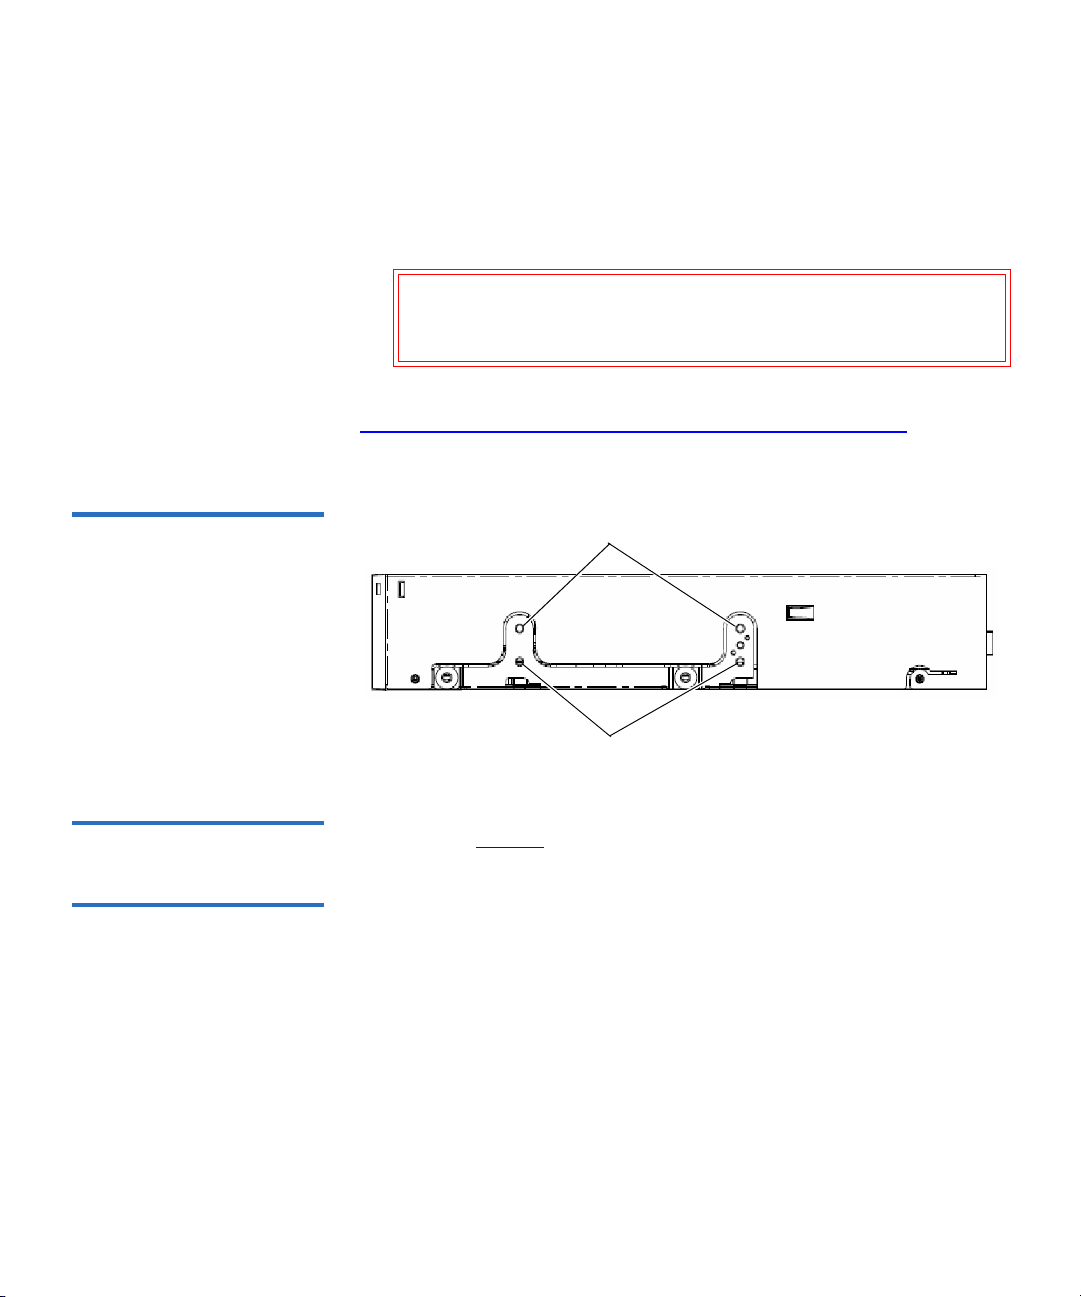
Figure 3 Internal Tape Drive
Lower mounting holes
Upper mounting holes
Mounting Holes
Chapter 2 Installation Procedures
Installing the Internal LTO-4 Half-Height Tape Drive
4 Position the drive in the bay and align either the upper or lower
mounting holes—whichever is appropriate—with the holes in the
chassis (see figure 3).
5 Secure the drive using two M3.0 X 5 metric screws on each side.
Caution: Using screws longer than 5 mm can damage the drive.
Do not use screws longer than 5 mm to secure the
internal LTO-4 Half-Height Tape Drive.
After mounting the internal LTO-4 Half-Height Tape Drive, proceed to
C
onnecting the Internal Drive Interface and DC Power Cables in the
following subsection.
Connecting the Internal Drive Interface and DC Power Cables 2
As shown in figure 4, the rear panel of the internal LTO-4 Half-Height
Tape Drive has connectors for:
• A 7-pin 1x SATA style interface cable
• A serial library interface cable
• The internal drive DC power cable
Connect the interface and DC power cables to the internal drive as
follows:
1 Verify that the system is shut down and the AC power cord is
disconnected from the facility AC power receptacle.
2 Attach the internal SAS interface cable to the 7-pin 1x SATA style SAS
connector on the back of the drive.
LTO-4 Half-Height Tape Drive User’s Guide 10

Figure 4 Internal Drive
Serial library port
DC power connector 7-pin 1x SATA style SAS connector
Interface and Power
Connectors
Chapter 2 Installation Procedures
Installing the Internal LTO-4 Half-Height Tape Drive
3 If you are installing the internal LTO-4 Half-Height Tape Drive in a
tape library system, connect the RS-422 serial interface cable to the
serial library port on the back of the drive. (The serial library port is
not used in workstation or server systems.)
4 Connect the internal drive DC power cable to the DC power
connector on the back of the drive.
Restarting the Internal Tape Drive System 2
5 Reinstall the system cover.
6 Reconnect the system AC power cord to the facility AC power
receptacle.
After connecting the interface and DC power cables, proceed to
Restarting the Internal
Tape Drive System in the following subsection.
After connecting the internal drive interface and DC power cables:
1 Restart the workstation or server system.
2 Refer to the operating procedures in chapter 3
to verify that the
internal LTO-4 Half-Height Tape Drive comes on and completes the
Power On Self Test (POST) functions.
3 As required, proceed to either:
• Installing the LTO Driver Software
• Registering the LTO-4 Half-Height Tape Drive
on page 14
on page 14
LTO-4 Half-Height Tape Drive User’s Guide 11

Chapter 2 Installation Procedures
Installing the Tabletop LTO-4 Half-Height Tape Drive
Installing the Tabletop LTO-4 Half-Height Tape Drive
The tabletop LTO-4 Half-Height Tape Drive is a compact external drive
that connects to the host computer through an external serial-attached
SCSI (SAS) port.
Do not attempt to install the LTO-4 Half-Height Tape Drive until you
have reviewed Handling Precautions and Installation Guidelines
page 6.
To install the tabletop LTO-4 Half-Height Tape Drive, complete the
following procedures in the order presented:
1 C
onnecting the Tabletop Drive Interface and AC Power Cables on
page 12
2 C
onnecting the Tabletop Drive Interface and AC Power Cables on
page 12
3 R
estarting the Tabletop Drive System on page 13
on
Connecting the Tabletop Drive Interface and AC Power Cables 2
4 Installing the LTO Driver Software
5 Registering the LTO-4 Half-Height Tape Drive
As shown in figure 5, the rear panel of the tabletop LTO-4 Half-Height
Tape Drive has connectors for:
• A 26-pin SFF-8088 mini-SAS style interface cable
•The AC power cable
Connect the interface and AC power cables to the tabletop drive as
follows:
1 As required:
a Save and close your open files and terminate all running
applications.
b Shut down the workstation or server system.
c Disconnect the system AC power cord from the facility AC
power receptacle.
on page 14, if required
on page 14
LTO-4 Half-Height Tape Drive User’s Guide 12
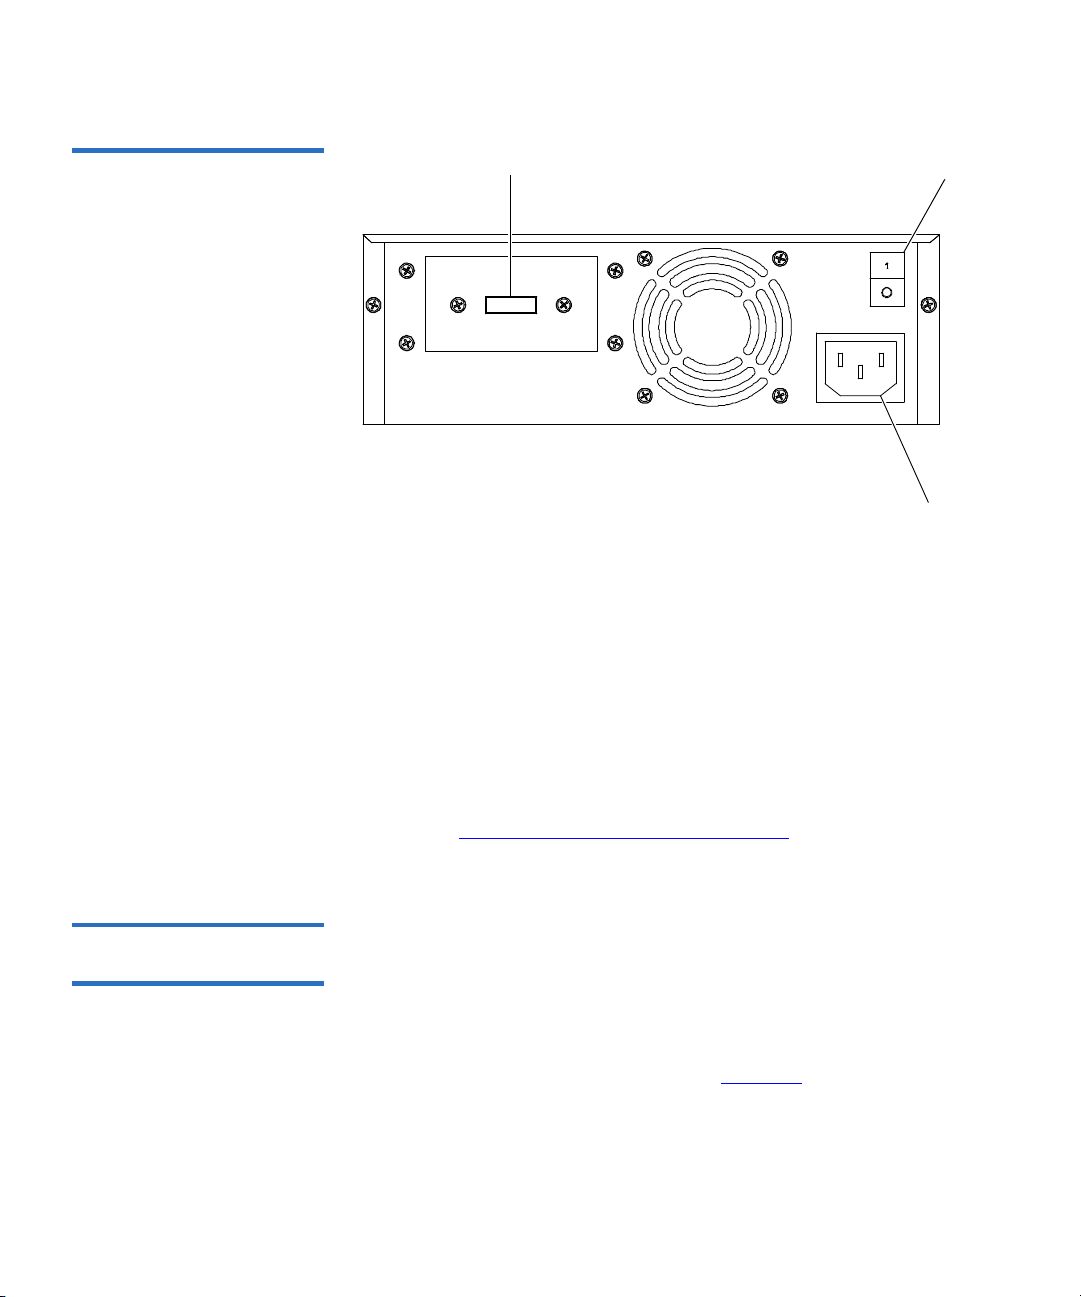
Figure 5 Tabletop Drive
26-pin SFF-8088 mini-SAS connector
AC power switch
AC power connector
Interface and Power Cable
Connectors
Chapter 2 Installation Procedures
Installing the Tabletop LTO-4 Half-Height Tape Drive
2 Attach the external SAS interface cable to the 26-pin SFF-8088 mini-
SAS connector on the back of the drive.
3 Verify that the tabletop LTO-4 Half-Height Tape Drive AC power
switch is set to the off position, and connect the AC power cord to the
power connector on the back of the drive.
4 Connect the drive AC power cord to the facility AC power receptacle.
5 Reconnect the workstation or server system AC power cord to the
facility AC power receptacle.
After connecting the tabletop drive interface and AC power cables,
proceed to R
estarting the Tabletop Drive System in the following
subsection.
Restarting the Tabletop Drive System 2
After connecting the tabletop drive interface and AC power cables:
1 Set the tabletop LTO-4 Half-Height Tape Drive power switch to the
on position.
2 Restart the workstation or server system.
3 Refer to the operating procedures in chapter 3
to verify that the
tabletop LTO-4 Half-Height Tape Drive comes on and completes the
Power On Self Test (POST) functions.
LTO-4 Half-Height Tape Drive User’s Guide 13

As required, proceed to either:
• Installing the LTO Driver Software
• Registering the LTO-4 Half-Height Tape Drive
Installing the LTO Driver Software
Chapter 2 Installation Procedures
Installing the LTO Driver Software
If you intend to use the LTO-4 Half-Height Tape Drive with the
Microsoft
2003, Windows XP
appropriate version of the LTO driver software. (See the Downloads page
for LTO-4 drivers under Standalone Tape Drives on the Quantum
support website at www.quantum.com/support
Note: The LTO driver software is not necessary with commercial
®
native backup applet on a Windows 2000, Windows Server®
backup application software.
®
, or Windows Vista operating system, install the
Registering the LTO-4 Half-Height Tape Drive
After installing the LTO-4 Half-Height Tape Drive, be sure to register it
via the Quantum website at:
www.quantum.com/registration
Registering the drive ensures that you will receive the latest technical
information about the drive, as well as other product, service, and
support information.
.)
LTO-4 Half-Height Tape Drive User’s Guide 14

Chapter 3
3Operation
This chapter describes how to operate the LTO-4 Half-Height Tape Drive.
Topics covered in this chapter are:
• Understanding the Front Panel Displa
• Using LTO Tape Cartridges on page 18
• Cleaning the Tape Drive
• Performing an Emergency
on page 20
Cartridge Eject on page 22
Understanding the Front Panel Display
As shown in figure 6, to reflect the operating condition of the drive, the
LTO-4 Half-Height Tape Drive front panel display has:
• A seven-segment LED display that provides a single character code
for status, diagnostic, and maintenance functions
• An LED dot display that augments the seven-segment LED
• A two-color (amber/green) status LED
The on/steady, on/flashing, or off condition of the front panel LEDs
indicate the various drive conditions as shown in table 2
y
.
LTO-4 Half-Height Tape Drive User’s Guide 15

Figure 6 Front Panel Display
Seven-segment LED
LED dot
Two-color status LED
Chapter 3 Operation
Understanding the Front Panel Display
Table 2 Front Panel Display
Indications
Seven-
Drive Condition
segment
LED LED Dot
Two-color
Status LED
Powered off Blank Off Off
Powered on Blank Off Green
Initializing/power-on
self-tests underway
Successful initialization/
power-on self-tests
Active/busy or loading or
unloading a cartridge
Ready with cartridge
Post
Flashing Amber
pattern
Blank On for 3
Green
seconds
Blank Off Flashing
green
Blank Off Green
loaded
Write-protected cartridge
loaded
Downloading or updating
firmware
Running diagnostics Function-
P Off Flashing
amber
F Flashing Flashing
amber
Flashing Amber
dependent
Cleaning required C On Flashing
amber
Cleaning operation in
progress
Expired cleaning cartridge
detected
LTO-4 Half-Height Tape Drive User’s Guide 16
C Flashing Flashing
green
7 Off Flashing
amber

Chapter 3 Operation
Understanding the Front Panel Display
Seven-
Drive Condition
segment
LED LED Dot
Two-color
Status LED
Temperature fault 1 Off Flashing
amber
Power fault 2 Off Flashing
amber
Firmware fault 3 Off Flashing
amber
Firmware/hardware fault 4 Off Flashing
amber
Hardware fault 5 Off Flashing
amber
Media or hardware fault 6 Off Flashing
amber
Media fault 7 Off Flashing
amber
Interface fault 8 Off Flashing
amber
Degraded operation A Off Flashing
amber
Cartridge load or unload
failure
Maintenance mode dump
Failure-
Off Flashing
dependent
Blank Flashing Off
amber
available
LTO-4 Half-Height Tape Drive User’s Guide 17

Using LTO Tape Cartridges
Chapter 3 Operation
Using LTO Tape Cartridges
Loading a Tape Cartridge 3
Unloading a Tape Cartridge 3
Write Protecting a Tape Cartridge 3
To load an Ultrium tape cartridge into the LTO-4 Half-Height Tape Drive,
gently insert the cartridge into the slot and then either:
• Push the cartridge further into the drive until the drive senses the
cartridge and automatically completes the load operation.
• Use a library or host command to complete the load operation.
To unload an Ultrium tape cartridge from the LTO-4 Half-Height Tape
Drive, either:
• Use a library or host command to unload the tape.
• Press the Eject button on the front panel of the drive.
Caution: After you press the Eject button, several minutes can
elapse before the drive ejects the cartridge. Do not
power down the tape drive or the host computer until
the drive has completely ejected the cartridge.
Ultrium tape cartridges have a sliding write-protect switch at the rightrear corner as shown in figure 7
.
Sliding the write-protect
switch toward the . . . Enables data to be . . .
center of the cartridge
(the Locked position),
corner of the cartridge
(the Unlocked position),
LTO-4 Half-Height Tape Drive User’s Guide 18
read from the cartridge, but not written to
it. (This is the write-protected position.)
both read from and written to the
cartridge. (This is the write-enabled
position.)

Figure 7 Ultrium Tape
Write protect switch (unlocked)
Unlocked
Locked
Front
Cartridge Write-Protect Switch
Chapter 3 Operation
Using LTO Tape Cartridges
Tape Cartridge Care and Maintenance 3
Observe the following precautions to protect the data on your Ultrium
tape cartridges:
Always:
• Remove the cartridge from the drive when not in use
and store it in its protective case.
• Avoid dropping the cartridge. This can damage
components inside the cartridge, possibly rendering
the tape unusable. If you drop a tape cartridge, open
the cartridge door and make sure that the leader pin
is in the correct position.
• Re-tension a dropped cartridge before using.
• Keep the cartridge away from:
• Direct sunlight and heat sources, such as
radiators, heaters, or warm air ducts.
• Sources of electromagnetic fields, such as
telephones, computer monitors, dictation
equipment, mechanical or printing calculators,
motors, magnetic tools, and bulk erasers.
LTO-4 Half-Height Tape Drive User’s Guide 19

Chapter 3 Operation
Cleaning the Tape Drive
Do not:
• Expose the cartridge to dirt, dust or moisture.
• Touch the tape media within the cartridge.
• Bulk erase Ultrium tape cartridges. LTO tape
cartridges have prewritten servo patterns that
cannot be reformatted by the tape drive. A bulk
erase operation would make them unusable.
• Use tape cartridges outside the specified operating
conditions: 10
humidity.
If a tape cartridge has been exposed to conditions
outside the specified range, recondition the tape
before using in the operating environment by
exposing it to the operating environment for a time
equal to or greater than the time it was outside the
operating environment, up to a maximum of 24
hours. Then re-tension the tape to stabilize the tape
pack for better performance.
o
C to 40o C, 20% to 80% relative
Cleaning the Tape Drive
Excessive tape debris or other material can accumulate on the tape heads
if the drive is:
• Used with non-approved media
• Operated in a hot, dusty environment
When this happens, the drive can:
• Experience excessive errors while reading or writing
• Display the letter “C” on the seven-segment LED, illuminate the
amber status LED continuously, and flash the LED dot during
operation
This means that the drive needs to be cleaned.
The LTO cleaning cartridge has the same dimensions as the tape cartridge
and contains an LTO Cartridge Memory (LTO-CM), but is loaded with
LTO-4 Half-Height Tape Drive User’s Guide 20

Chapter 3 Operation
Cleaning the Tape Drive
cleaning media instead of recording media. Always keep the LTO
cleaning cartridge in its protective case when not in use.
Procedure
To clean the LTO-4 Half-Height Tape Drive:
1 Load an LTO cleaning cartridge into the tape drive.
2 Observe that the seven-segment LED displays the letter “C” and both
the LED dot and the green status LED are flashing during the
cleaning process.
Note: If the LTO-4 Half-Height Tape Drive does not recognize
the cartridge as an LTO cleaning cartridge, the drive stops
the cleaning process and ejects the cartridge.
3 After the cleaning process completes, depending on the drive
configuration, either:
a The drive automatically ejects the LTO cleaning cartridge, or
b You must press the Eject button to eject the LTO cleaning
cartridge.
4 Write the date on the cartridge label for future reference.
Each time you use the LTO cleaning cartridge, the cleaning media
advances to a new, unused section. After approximately 50 cleanings, all
of the media will be used up and the LTO-4 Half-Height Tape Drive:
• Displays the number “7” on the seven-segment LED
• Turns off the LED dot
• Flashes the amber status LED
• Ejects the LTO cleaning cartridge
Always discard used-up LTO cleaning cartridges.
Note: If the letter “C” and flashing amber status LED reappears
continuously within 24 hours after a cleaning cycle, perform
the cleaning procedure again. If, after three cleaning cycles in a
72-hour period, the condition persists, contact Quantum
Technical Support.
LTO-4 Half-Height Tape Drive User’s Guide 21

Performing an Emergency Cartridge Eject
Performing an Emergency Cartridge Eject
If the LTO-4 Half-Height Tape Drive stops communicating with the host
computer, use the following procedure eject a cartridge (if necessary).
Caution: When you perform an emergency cartridge eject, any data
in the drive or host buffers will not be written to the tape
and the tape record may not be correctly terminated with
an end-of-data mark. If the end-of-data mark is not
written to the tape, you will not be able to append any
data to that tape unless you overwrite the existing data on
the tape.
To perform an emergency cartridge eject, hold down the Eject button
between 5 to 15 seconds, and then release it. The tape drive firmware
ignores all outstanding SCSI commands and ejects the tape.
If the emergency cartridge eject procedure does not eject the cartridge
from the drive, see Drive Does Not Eject the Tape Cartridge
Chapter 3 Operation
on page 77.
LTO-4 Half-Height Tape Drive User’s Guide 22

Chapter 4
4Theory
This chapter describes operational theories used in the LTO-4 HalfHeight Tape Drive.
The topics covered in this chapter are:
• Track Layout
• Recording Method on page 25
• Data Buffer
• Data Integrity
• Data Compression
on page 25
on page 25
on page 27
Track Layout
With the LTO-4 Half-Height Tape Drive, there are 704 data tracks on the
LTO tape, numbered 0 through 703. Data track 703 is the track closest to
the bottom edge of the tape (the reference edge).
The area between adjacent servo bands is a data band. There are 4 data
bands, each of which includes 176 data tracks. The data bands are
numbered 2, 0, 1, 3. Data band 2 is closest to the bottom edge of the tape.
LTO-4 Half-Height Tape Drive User’s Guide 23
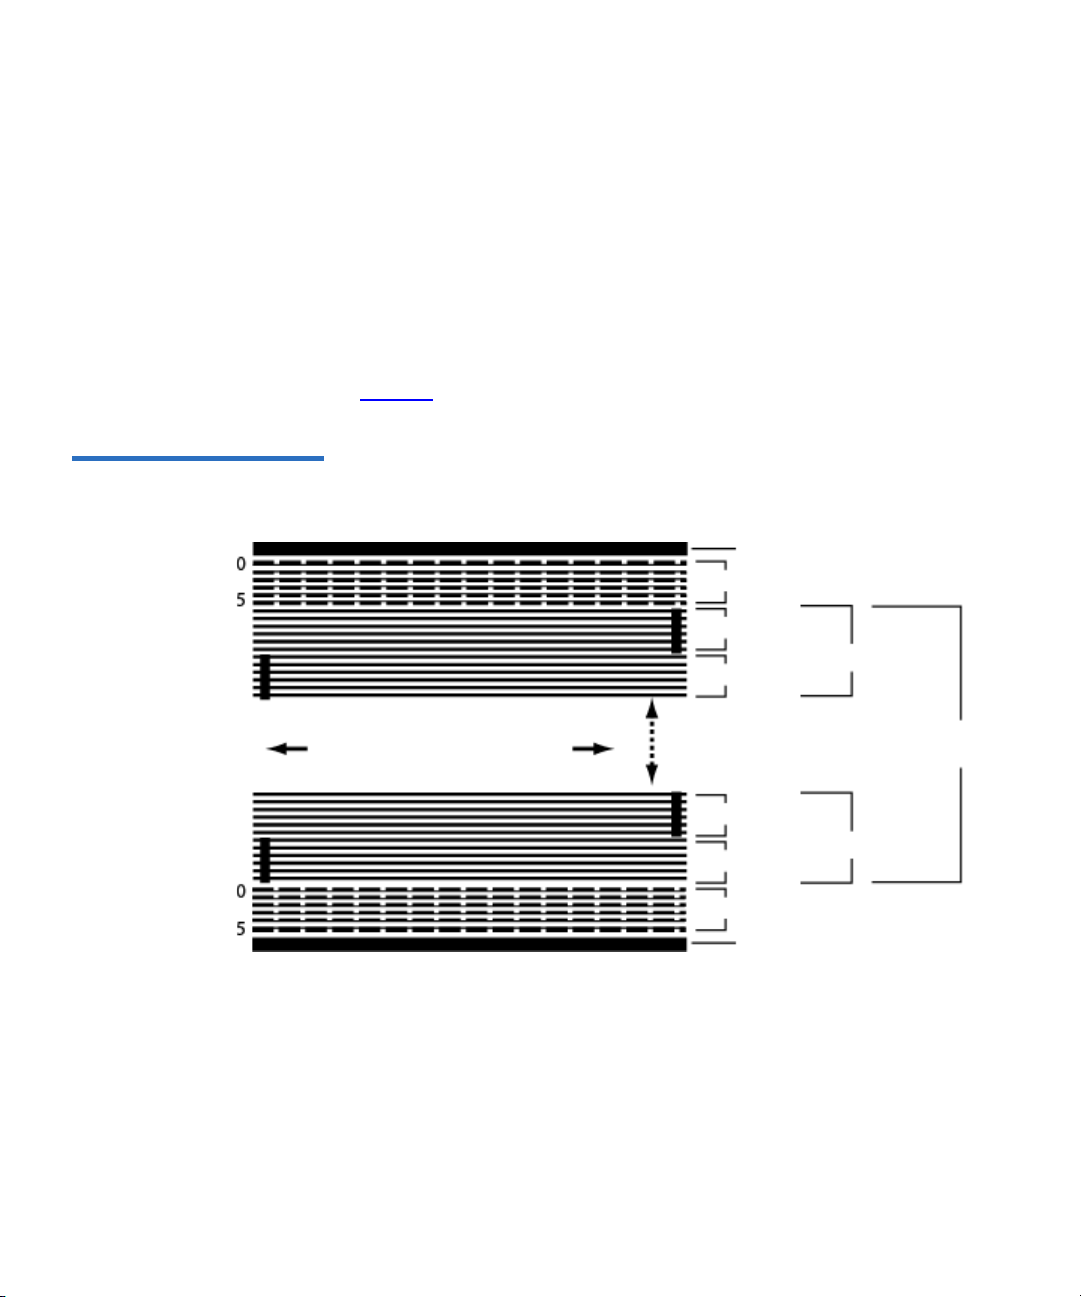
Chapter 4 Theory
Tape edge
Even # wrap
Servo band
Odd # wrap
Tape edge
Even # wrap
Servo band
Odd # wrap
Sub-band 0
Sub-band 15
Sub-bands 1 through 14
(not shown)
Beginning of tape (BOT)
End of tape (EOT)
Data Band
Track Layout
A track group is a set of tracks that is recorded concurrently. The sets of
11 data tracks in a data band are data sub-bands. There are 16 data subbands per data band. The data tracks are accessed in a serpentine manner.
A wrap is a track group recorded in the physical forward or physical
reverse direction. The wraps are recorded in a serpentine fashion starting
in data band 0. The tape contains 56 track groups, 28 written in the
forward direction and 28 written in the reverse direction. Even-numbered
wraps are recorded in the forward direction (BOT to EOT), and oddnumbered wraps are recorded in the reverse direction (EOT to BOT).
Figure 8 Layout of the Tracks
on LTO Ultrium Tapes
Figure 8
shows the layout of data on an LTO tape.
LTO-4 Half-Height Tape Drive User’s Guide 24

Recording Method
Data Buffer
Chapter 4 Theory
Recording Method
The LTO-4 Half-Height Tape Drive records data using write-equalized
(0,13/11) Run Length Limited (RLL) code. RLL (0,13/11) Data bits are
defined as follows:
•
ONE is represented by a flux transition at the center of a bit-cell.
•
ZERO is represented by no flux transition in the bit-cell.
In its default configuration, the LTO-4 Half-Height Tape Drive has a 128Mbyte buffer. The buffer controller has a burst transfer rate of 320
Mbytes/sec., and utilizes bank switching to achieve a maximum average
bandwidth of nearly 240 Mbytes/sec. The high bandwidth is needed to
support look-aside data compression in the case of compressible data
being transferred from the SCSI.
Data Integrity
The mechanical and electrical design of the drive ensures that drive
performance does not degrade over time. Changes in head alignment,
head wear, component drift, and other factors are minimized to ensure
that data integrity and interchange capability are not compromised. The
drive also incorporates adaptive Finite Impulse Response (FIR) filters that
modify the equalization of each read channel dynamically to compensate
for many of those changes.
The error rate of the LTO-4 Half-Height Tape Drive is less than 1 hard
error in 10
LTO-4 Half-Height Tape Drive User’s Guide 25
17
bits. The undetectable error rate is 1 in 1027 bits read.

Chapter 4 Theory
Data Integrity
Error-correction Code (ECC) 4
The use of Cyclic Redundancy Checking (CRC), two-level orthogonal
Error Correction Coding (ECC) provides a very low probability of
encountering a hard error. During the read process, ECC correction is
performed on the fly without affecting tape streaming.
There are two levels of Error Correction Coding (ECC). These two levels
are orthogonal — that is, an ECC codeword at one level intersects ECC
codewords at the other level just once, which means there will be only
one common symbol between them. The two levels are called C1 and C2.
C1 ECC
As data is written to memory from the data processing unit, the DMA/
ECC interface generates C1 ECC bytes and writes them to memory.
As data is written to tape, the C1 ECC is checked and an interrupt
generated if there is an error. The C1 ECC read from memory is the ECC
that is written to tape.
When data is read from tape and stored into memory, C1 ECC is checked
and:
• If the C1 ECC is good, the “Valid” bit for the codeword pair is set.
• Otherwise, a pointer to the invalid codeword pair is passed to the C1
ECC correction engine.
4
• If the C1 ECC correction engine can correct the error, then the
corrected bytes are written to memory, and the Valid bit is set.
• Otherwise, the Valid bit is left cleared.
As data is read from memory to the data processor for decompression,
the C1 ECC is again checked and an interrupt generated if it is not correct.
C2 ECC
C2 ECC involves three distinct operations:
1
Encoding: Generating C2 ECC bytes from data bytes (performed by
ECC coprocessor hardware).
2
Decoding: Generating ECC syndromes from data and ECC bytes,
testing for all-zeroes (performed by ECC coprocessor hardware).
LTO-4 Half-Height Tape Drive User’s Guide 26
4

Chapter 4 Theory
Data Compression
3 Correction: Generating corrected data from syndromes.
The correction depends on the number and types of errors involved:
• For one known C1 codeword pair in error in a subdata set (C2
codeword), the operation is performed by the ECC coprocessor
hardware.
• For two or more known C1 codeword pairs in error, the matrix is
computed by firmware and the correction is performed by
hardware.
• For one or more unknown C1 codeword pairs, syndromes are
generated by hardware, error location is computed by firmware,
the matrix is computed by firmware and the correction is
performed by hardware.
Servo-tracking Faults 4
Data Compression
During a write operation, if the servo system detects an error that may
result in adjacent data tracks being overwritten, the write operation is
aborted. The write operation will not continue until the correct servo
tracking is re-established.
Typical data streams of text, graphics, software code, or other forms of
data contain repeated information of some sort, whether it is at the text
level where you can readily recognize regular repetitions of a single
word, or at the binary level where the repetitions are in bits or bytes.
Although most data is unique and random, the binary level data exhibits
patterns of various sizes that repeat with varying degrees of regularity.
Storage efficiency is increased if the redundancies or repetition in the
data are removed before the data is recorded to tape. Data compression
technology significantly reduces or eliminates redundancies in data
before recording the information to tape. This increases the amount of
data that can be stored on a finite medium and increases the overall
storage efficiency of the system.
With data compression, the redundant information in a data stream is
identified and represented by codewords or symbols that allow the same
LTO-4 Half-Height Tape Drive User’s Guide 27

Chapter 4 Theory
Data Compression
data to be recorded in a fewer number of bits. These codewords or
symbols point back to the original data string, using fewer characters to
represent the strings. Because these smaller symbols are substituted for
the longer strings of data, more data can be stored in the same physical
space.
Some important benefits result from data compression in tape drives:
• The same amount of information can be stored on a smaller length of
tape.
• More data can be stored on a given length of tape.
• Performance can more closely parallel to that of high-transfer-rate
computers.
• More information can be transferred in the same time interval.
Data Compression Considerations 4
In an effective data-compression method, several factors are important:
• The amount of compression, which is measured by the compression
ratio. This ratio compares the amount of uncompressed data to the
amount of compressed data. It is obtained by dividing the size of the
uncompressed data by the size of the compressed data.
• The speed with which data is compressed and decompressed relative
to the host transfer rate.
• The types of data to be compressed.
• The data integrity of the compressed data.
The amount of compression possible in a data stream depends on factors
such as:
• Data pattern
• Compression algorithm
• Pattern repetition length
• Pattern repetition frequency
• Object size (block of information to be compressed)
• Starting pattern chosen
LTO-4 Half-Height Tape Drive User’s Guide 28

Chapter 4 Theory
Data Compression
The transfer rate depends on factors such as:
• Compression ratio
•Drive buffer size
• Host computer input/output (I/O) speed
• Effective disc speeds of the host computer
• Record lengths that the host computer transmits
Data compression algorithms can be tailored to provide maximum
compression for specific types of data. Because varying types of data are
encountered in normal day-to-day operating circumstances, however, an
effective data compression method for a tape drive must serve various
data types. Additionally, the data compression method must adapt to
different data types, automatically providing optimum handling for all
types of data.
Intelligent Data Compression 4
The compressed capacity of the tape is maximized through the use of
intelligent data compression. The intelligent data compression hardware
determines the compressibility of each record. If the size of the record is
larger after a compression attempt than the native (uncompressed) size,
then the record is written in its native form.
The intelligent data compression utilizes two compression schemes:
• Scheme-1 is a LZ1-based compression scheme using a history buffer
to achieve data compression.
• Scheme-2 is a pass-through compression scheme designed to pass
uncompressible data through with minimal expansion.
There are three specific requirements for compliance with the LTO
specification.
• The output data stream must be decompressible following LTO rules
to create the input sequence of records and file marks perfectly.
• An LTO compressed data stream may not contain any of the eight
reserved control symbols.
• While control symbols allow switching to Scheme 2, this should
never be used by operational software because this capability is only
for diagnostic and testing purposes.
LTO-4 Half-Height Tape Drive User’s Guide 29

Chapter 4 Theory
Data Compression
Software data compression should never be used because the built-in
intelligent data compression of the LTO-4 Half-Height Tape Drive is
much more efficient than software data compression.
The LTO-4 Half-Height Tape Drive uses a derivative of ALDC-2 lossless
data compression that includes additional control codes for intelligent
data compression.
LTO-4 Half-Height Tape Drive User’s Guide 30

Chapter 5
5Specifications
This chapter provides technical specifications for the LTO-4 Half-Height
Tape Drive.
The topics covered in this chapter are:
• Physical Specifications
• Power Specifications on page 34
• Drive Performance Specifications
• Environmental Requirements
• Injected Noise Specifications
• Reliability Specifications
• LTO Cartridge Specifications
LTO-4 Half-Height Tape Drive User’s Guide 31
on page 38
on page 35
on page 37
on page 38
on page 39

Physical Specifications
Table 3 lists the physical specifications of the LTO-4 Half-Height Tape
Drive, which is shown in figure 9
Table 3 Physical
Specifications
Chapter 5 Specifications
Physical Specifications
.
Internal Drive
Specification
Height 1.63 inches
(41.3 mm)
Width 5.76 inches
(146.30)
Length 8.56 inches
(217.50 mm)
(Max. to end of connector)
Weight 3.66 lbs.
(1.66 kg)
1.70 inches
(43.1 mm)
5.87 inches
(149.10 mm)
8.76 inches
(222.57 mm)
(Max. to end of connector)
3.72 lbs.
(1.69) kg)
Tabletop DriveWithout Bezel With Bezel
2.60 inches
66.2 mm)
8.35 inches
(212.13 mm)
10.73 inches
(272.49 mm)
8.00 lb.
(3.63 kg)
LTO-4 Half-Height Tape Drive User’s Guide 32

Figure 9 LTO-4 Half-Height
TO CARTRIDGE CENTER
FROM SIDE MOUNTING SURFACE
TO CARTRIDGE CENTER
FROM BOTTOM MOUNTING SURFACE
Tape Drive Dimensions
Chapter 5 Specifications
Physical Specifications
LTO-4 Half-Height Tape Drive User’s Guide 33

Power Specifications
The tabletop LTO-4 Half-Height Tape Drive has a built-in 90-260 VAC
(47-63 Hz) automatic switching power supply.
Maximum voltage and power specifications for the internal LTO-4 HalfHeight Tape Drive is listed in table 4
for other SCSI drives unless otherwise noted.
Chapter 5 Specifications
Power Specifications
. Specifications are the same as those
Table 4 Voltage and Current
Specifications
Table 5 Power Dissipation
Specification +12 VDC +5 VDC
DC Voltage Tolerance 12.00 ± 10% 5.00 ± 5%
Non-operating max
voltage
Max operating current
Continuous:
Peak:
Standby current (max) 0.45 amps RMS 1.50 amps RMS*
Ripple (peak-to-peak) <
* RMS parameters measured at the power connector using a true RMS
digital meter.
Power Specification Dissipation
Max Standby Power 12.5 watts RMS*
14 Volts peak 7 Volts peak
0.8 amps RMS
2.3 amps RMS
(1 sec max)
100 mV < 100 mV
4.1 amps max RMS*
4.1 amps max RMS*
Max Continuous Operating Power 31 watts RMS*
LTO-4 Half-Height Tape Drive User’s Guide 34

Power Specification Dissipation
Max Peak Operating Power 36 watts RMS (1 sec max)
* RMS parameters measured at the power connector using a true RMS
digital meter.
Drive Performance Specifications
Table 6 lists the performance specifications of the LTO-4 Half-Height
Tape Drive.
Chapter 5 Specifications
Drive Performance Specifications
Table 6 Drive Performance
Specifications
Specification Value
Average data access time
(650-m tape) from BOW
(beginning of wrap)
Average rewind time
(650-m tape)
Max rewind time
(650-m tape)
Capacity
LTO Ultrium 4 (680 m)
Cartridge unload time 25 seconds
Error recovery Read-after-write Reed Solomon
Flux density 13250 cells per mm
60 seconds
>
51 seconds
<
120 seconds
800 Gbytes (native)
ECC (2 levels)
LTO-4 Half-Height Tape Drive User’s Guide 35

Drive Performance Specifications
Specification Value
Head configuration 2 bumps
16 thin-film write heads per bump
16 MR read heads per bump
2 MR servo heads per bump
Chapter 5 Specifications
Maximum data access time
120 seconds
(650-m tape) from BOW
Maximum rewind time
<
115 seconds
(650-m tape)
Recording density 6,760 RLL-encoded ONEs per mm
Recording format Ultrium 16-channel (U-416)
Recording method 0, 13/11 RLL
Recording undetectable errors Less than 1 in 10
Recording unrecoverable errors Less than 1 in 10
Synchronous transfer rate
160 Mbytes per sec max
27
data bits
17
data bits
(burst)
Tape drive type LTO (Ultrium)
Tape speed Up to 6.07 meters per second
Track density 70 tracks per mm
Transfer rate (sustained) 120 Mbytes/second (max, native)
LTO-4 Half-Height Tape Drive User’s Guide 36

Environmental Requirements
Table 7 lists the environmental specifications of the LTO-4 Half-Height
Tape Drive.
Table 7 Environmental
Requirements
Specification Operational Nonoperational
Chapter 5 Specifications
Environmental Requirements
Acoustic level idling
(A-wt sum)
Acoustic level operational
(A-wt sum)
Airflow requirements Internal: 9 CFM (front to back) N/A
Altitude max 10,000 feet MSL
Humidity gradient 10% per hour 10% per hour
Relative humidity 20% to 80% non-condensing 10% to 95% non-condensing
Shock (1/2 sine wave) 10 Gs peak, 11 msec 40 Gs peak, 11 msec
Temperature +50° to +104°F
Thermal gradient 11°C per hour (10-40°C) 11°C per hour (10-40°C)
Vibration (sweep test) 0.005 inches DA (5-43 Hz)
52 dBA maximum 5.0 LwA Bels —
57 dBA maximum 5.5 LwA Bels —
40,000 feet (power off)
(at 25°C)
–40° to +149°F
(+10° to + 40°C)
0.50 G peak (43–1000 Hz)
sweep rate 5-1000Hz;
1.0 octave per minute
(–40° to + 66°C)
0.1 inches (5-–15Hz)
1.0 G (15–500 Hz)
1.0 octave per minute
LTO-4 Half-Height Tape Drive User’s Guide 37

Injected Noise Specifications
The internal drive operates without degradation of error rates with 100
mV of noise injected between the chassis and 0 V at the power connector
at any frequency between 45 Hz and 20 MHz.
Reliability Specifications
The LTO-4 Half-Height Tape Drive is designed for maximum reliability
and data integrity. Table 8
Chapter 5 Specifications
Injected Noise Specifications
lists the reliability specifications.
Table 8 Reliability
Specifications
Specification Description
Cartridge load/eject 100,000 cartridge load/eject cycles (no thread)
Error recovery and
control
Mean time between
failures (MTBF)
Mean time to replace
(MTTR)
Nonrecoverable error
rate
• Error correction code techniques
(C1 and C2 ECC)
• Read-after-write (RAW)
• Error monitoring and reporting (error log)
•Retry on
300,000 hours MTBF at 100% duty cycle:
power applied and tape moving continuously
(tabletop drive; 50,000 hours at full load and
25°C)
Less than 30 minutes
Less than 1 in 10
17
bits
LTO-4 Half-Height Tape Drive User’s Guide 38

Chapter 5 Specifications
LTO Cartridge Specifications
Mean Time Between Failures 5
Mean Time to Replace 5
The mean time between failures (MTBF) for the internal drive is specified
at 300,000 hours minimum. This specification includes all power-on and
operational time but excludes maintenance periods. Operational time is
assumed to be 100% of the power-on time. Operational time is the time
the tape is loaded.
The MTBF for the tabletop drive power supply is 50,000 hours with the
unit operated at full load and 25°C.
Note: The MTBF rating does not represent any particular drive, but
is derived from a large database of test samples. Actual rates
may vary from unit to unit.
The mean time to replace (MTTR) is the average time required by a
qualified service technician to diagnose a defective drive and to install a
replacement drive. The MTTR for LTO products is less than 0.5 hour (30
minutes).
The Quantum LTO drives are field-replaceable units. If a problem occurs
with a subassembly or component in the drive, you should replace the
entire unit. Return the drive to the factory in its original packaging.
Contact your distributor, dealer, your computer system company or your
Quantum sales representative to arrange the return.
LTO Cartridge Specifications
Environmental Considerations 5
LTO-4 Half-Height Tape Drive User’s Guide 39
Table 9 lists the basic environmental tolerances for LTO Ultrium
cartridges.

Chapter 5 Specifications
LTO Cartridge Specifications
Table 9 Environmental
Tolerances
Cartridge Memory 5
Specification Value
Maximum localized temperature-
Greater than 52°C
permanent tape damage
Operating temperature 10°C to 40°C
Relative humidity 10% to 80% storage,
20% to 80% operating
Wet bulb temperature 26° C max
If during storage and/or transportation a cartridge has been exposed to
conditions outside the specified values, it must be conditioned before use
in the operating environment. The conditioning shall be exposure to the
operating environment for a time equal to, or greater than, the time away
from the operating environment, up to a maximum of 24 hours. There
shall be no deposit of moisture anywhere on or in the cartridge.
The stray magnetic field at any point on the tape shall not exceed 4000
A/m.
Each Ultrium 1, 2, and 3 cartridge has 4 Kbytes of nonvolatile memory:
• 3 Kbytes are used to store tape-directory and hardware specific
information.
• 1 Kbyte is available for application and OEM use.
Each Ultrium 4 cartridge has 8 Kbytes of nonvolatile memory:
• To store tape-directory and hardware specific information.
• For application and OEM use.
The cartridge memory is powered, read, and written to via a radiofrequency link.
Cartridge Reliability 5
LTO-4 Half-Height Tape Drive User’s Guide 40
After 5,000 load/eject cycles, replace the cartridge to insure data
integrity.

This chapter provides best-practice installation guidelines for getting the
most out of your LTO-4 Half-Height Tape Drive and troubleshooting
information you can use to identify and resolve tape drive problems.
Topics covered in this chapter are:
• Installation Best Practices
• Troubleshooting Suggestions on page 42
Installation Best Practices
Chapter 6
6Troubleshooting Guide
Following SCSI Best Practices 6
Using a Serial-attached SCSI Host Bus Adapter 6
LTO-4 Half-Height Tape Drive User’s Guide 41
Always follow SCSI best practices when installing an LTO-4 Half-Height
Tape Drive to ensure trouble-free installation and operation.
To achieve the very best performance from your LTO-4 Half-Height Tape
Drive and optimize your backup operations, always attach the drive to a
serial-attached SCSI controller that supports 3 GBytes per sec. per port
transfer rate.

Chapter 6 Troubleshooting Guide
Troubleshooting Suggestions
HBA Preinstallation Checks 6
Before installing the HBA, check and record your current system
configuration. For example:
In the . . . operating
system,
Windows 2000 1 Double-clicking
UNIX/Linux Viewing the boot log text file.
Refer to your operating system documentation for specific information
on reviewing your system configuration.
After installing the SCSI HBA, restart the system. Then, ensure that the
operating system recognizes the HBA and that there are no conflicts with
other adapters.
You can find information on any currently
installed SCSI HBA by . . .
Administrative Tools in
the Control Panel
2 Clicking
Manager
3 Clicking the SCSI host adapters listed
4 Clicking
tab
Computer Management > Device
Properties to view the Resources
Troubleshooting Suggestions
Computer Does Not Start 6
LTO-4 Half-Height Tape Drive User’s Guide 42
If the computer started and operated properly before installing a SCSI
HBA and the LTO-4 Half-Height Tape Drive, but does not start now:
1 Remove the SCSI HBA.

Chapter 6 Troubleshooting Guide
Troubleshooting Suggestions
2 Restart the system.
IF the system . . . THEN . . .
starts normally, there is a problem with the SCSI HBA.
1 Make sure that the SCSI HBA:
• Is compatible with system
• Does not have burnt
components
Reinstall the SCSI HBA in a different
PCI slot and restart the computer.
still does not start, contact Technical Support.
Computer Hardware Does Not Recognize the Tape Drive 6
If the computer starts normally but does not recognize the tape drive:
1 Restart the system and check whether the SCSI controller is
recognized at system startup. You should see messages similar to:
SCSI Adapter Manufacturer SCSI BOIS xxxxxxx
CHA: SCSI ID #, SCSI Device Name
SCSI ID #, SCSI Device Name”
IF the SCSI controller is . . .
during system startup, THEN . . .
recognized proceed to step 2 to determine
whether the tape drive is
recognized when the SCSI
controller scans for devices.
not recognized contact Technical Support.
2 If the SCSI controller is recognized during system startup, restart the
system to determine whether the tape drive is recognized when the
SCSI controller scans for devices. You should see messages similar to:
Bus Target Lun Device
0 0 0 Quantum ULTRIUM 4
LTO-4 Half-Height Tape Drive User’s Guide 43

Chapter 6 Troubleshooting Guide
Troubleshooting Suggestions
IF the tape drive is . . .
during system startup, THEN . . .
recognized the problem has been resolved.
not recognized proceed to step 3 to determine whether
the tape drive is receiving power.
3 If the tape drive is not recognized when the SCSI controller scans for
devices, check the green status LED on the LTO-4 Half-Height Tape
Drive front panel to make sure the drive is receiving power.
IF the green status LED is . . . THEN . . .
off, proceed to step 4 to check the
power connections to the tape
drive.
on, proceed to step 5 to determine
whether the drive passed the
Power On Self Test functions.
4 If the green status LED is off, check the power connections to the tape
drive.
For the internal tape drive:
a Shut down the system, remove the cover, and re-seat the DC
power cable connector on tape drive.
b Restart the system and check the green status LED.
.
LTO-4 Half-Height Tape Drive User’s Guide 44

Chapter 6 Troubleshooting Guide
Troubleshooting Suggestions
IF the green status LED is . . . THEN . . .
off, shut down the system, replace
the power connector attached
to the tape drive with one from
a known working device such
as a CD-ROM, and restart the
system.
If the green status LED:
• Comes on, then resolve the
problem with the DC power
cable/connector.
• Remains off, then contact
Technical Support to resolve
the possible problem with
the tape drive.
on, repeat step 2 of this procedure
to confirm that re-seating the
DC power cable to the tape
drive solved the problem and
the tape drive is recognized
during system startup.
If the tape drive is:
• Recognized during the SCSI
controller scan, then the
problem is resolved.
Reinstall the computer cover.
• Still not recognized, then
proceed to step 5 to
determine whether the drive
passed the Power On Self
Test functions.
LTO-4 Half-Height Tape Drive User’s Guide 45

Chapter 6 Troubleshooting Guide
Troubleshooting Suggestions
For the tabletop tape drive:
a Set the drive AC power switch to the off position and re-seat the
AC power cord connector.
b Set the drive AC power switch to the on position and check the
green status LED.
IF the green status LED is . . . THEN . . .
off, set the drive AC power switch
to the off position, replace the
AC power cable with one from
a known working device, and
reset the AC power switch to
the on position.
If the green status LED:
• Comes on, then resolve the
problem with the AC power
cable/connector.
• Remains off, then contact
Technical Support to resolve
the possible problem with
the tape drive.
on, repeat step 2 of this procedure
to confirm that re-seating or
replacing the AC power cable
solved the problem and the
tape drive is recognized during
system startup.
If the tape drive is:
• Recognized during the SCSI
controller scan, then the
problem is resolved.
• Still not recognized, then
proceed to step 5 to
determine whether the drive
passed the Power On Self
Test functions.
LTO-4 Half-Height Tape Drive User’s Guide 46

Chapter 6 Troubleshooting Guide
Troubleshooting Suggestions
5 If the green status LED is on, but the tape drive is not recognized
during the SCSI controller scan, use the front panel LEDs to
determine whether the drive passes the Power on Self Test (POST)
functions. (See table 2
on page 16.)
IF the LEDs show that
the tape drive . . . the
POST functions, THEN . . .
fails contact Technical Support to resolve
the possible problem with the tape
drive.
passes proceed to step 6 to check for possible
SCSI problems.
6 If the front panel LEDs indicate that the drive has passed the POST
functions, check the SCSI bus connections.
For the internal tape drive:
a Shut down the system.
b Verify that there are no SCSI ID conflicts between the tape drive
and other SCSI devices.
c Check the SCSI cable for bent pins.
d If possible, replace the SCSI cable with one from another SCSI
controller bus chain.
e If checks a
through d do not reveal a problem, contact Technical
Support to resolve the possible problem with the tape drive.
For the tabletop tape drive:
a Shut down the system and cycle the tape drive AC power switch
through its Off/On positions.
b Verify that there is no SCSI ID conflict between the tape drive
and other SCSI devices.
c Check the SCSI cable for bent pins.
d If possible, replace the SCSI cable with one from another SCSI
controller bus chain.
e If checks a
through d do not reveal a problem, contact Technical
Support to resolve the possible problem with the tape drive.
LTO-4 Half-Height Tape Drive User’s Guide 47

Chapter 6 Troubleshooting Guide
Troubleshooting Suggestions
Computer Software Does Not Recognized the Tape Drive 6
Depending on your operating system environment, refer to the following
subsections for troubleshooting guidelines if the LTO-4 Half-Height Tape
drive is recognized by the system hardware at startup, but not by the
operating system or applications.
Windows Operating System Environments
When a tape drive is installed in a Windows operating system
environment, Windows displays a message on the screen if it does not
have a driver in place for the tape drive.
IF the tape drive is for use in . . . THEN you . . .
an ISV application, can click the
Cancel button to
clear the message.
When the ISV backup software
application is running, the
application invokes its own
drivers to run the tape drive.
a native Windows operating
system backup utility,
must install the proper driver for
the tape drive.
6
Red Hat Linux Operating System Environments
The tape driver for Red Hat Linux, called st, is included as part of the Red
Hat Linux operating system.
When Red Hat Linux starts, the operating system recognizes the tape
drive and automatically configures it as a device in the
is the first tape device in the
/dev/st0 or /dev/nst0.
LTO-4 Half-Height Tape Drive User’s Guide 48
/dev directory, the tape drive is known as:
/dev directory. If it
6

Chapter 6 Troubleshooting Guide
Troubleshooting Suggestions
There are various ways to view the log files to see whether Linux
recognizes the tape drive:
• One method is to open a terminal window and issue the following
command from the root directory:
dmesg | grep SCSI
This command produces an output similar to:
(scsi0)<Adaptec AHA-294XX Ultra2 SCSI host adapter> found at PCI 0/16/0
• Another method might be to use the command:
cat /proc/scsi/scsi
This command produces an output similar to:
Host: scsi0 Channel: 0 Id:6 Lun:00
Vendor: Quantum Model: ULTRIUM 3 Rev: 1897
Type: Sequential-Access ANSI SCSI revision 04
• You can also use a text editor to view the messages in the file /var/log/
and look for tape drive entries.
• Sometimes a system can have multiple tape device names in the
/dev
directory and will not know which st number to use. To view the st
device number for your attached tape drive, use the command:
dmesg | grep tape
This command produces an output similar to:
Detected SCSI tape st0 and scsi0 . . .
LTO-4 Half-Height Tape Drive User’s Guide 49

Chapter 6 Troubleshooting Guide
Troubleshooting Suggestions
Drive Does Not Load the Tape Cartridge 6
If you cannot load a tape cartridge into the LTO-4 Half-Height Tape
Drive:
1 Verify that the tape drive green status LED is on and that all other
LEDs are off.
IF the green
status LED is . . .
AND other LEDs
are . . . THEN . . .
off, off, refer to the procedures
for troubleshooting
power problems under
Computer Hardware
Does Not Recognize the
Tape Drive on page 43 to
determine why the
green status LED is not
on.
on, on or flashing, see table
on page 15 to
determine whether the
other LED activity is
normal or abnormal.
Then proceed to step 2 of
this procedure.
If the amber status LED
is flashing and the
seven-segment LED
displays the number “4”
or “5” to indicate a
possible Power On Self
Test error, contact
Technical Support to
resolve the possible
problem with the tape
drive.
on, off, skip to step 3 of this
procedure.
LTO-4 Half-Height Tape Drive User’s Guide 50

Chapter 6 Troubleshooting Guide
Troubleshooting Suggestions
2 If other LEDs are on, reset the tape drive by either:
• Pressing and holding the cartridge eject button on the front panel
for more than 5 seconds and releasing it (both internal and
tabletop drives),
• Or by cycling the drive AC power switch off and on (tabletop
tape drive only).
3 Verify that the tape drive passes the Power On Self Test by viewing
LED activity. All LEDs should be off for approximately 20 to 30
seconds after the tape drive resets.
If the amber status LED is flashing and the seven-segment LED
displays the number “4” or “5” to indicate a possible Power On Self
Test error, contact Technical Support to resolve the possible problem
with the tape drive.
4 If the green status LED is on, all the other LEDs are off, and you still
cannot load a tape cartridge into the tape drive, examine the tape and
the inside of the tape drive.
• Verify that:
• There are no tape labels interfering with tape insertion.
• Tape labels are only on proper tape surfaces, and that labels
are flat and not curled.
• The tape drive opening is free of debris and tape labels.
• The tape pin and tape are fully within the cartridge.
• If you are inserting a cleaning cartridge, verify that the cleaning
tape:
• Is valid. The tape drive ejects unsupported cleaning tapes.
• Has not expired. See table 2
on page 16 for Expired cleaning
cartridge detected.
5 Attempt to insert a different tape cartridge.
6 If a tape still cannot be inserted into the tape drive, contact Technical
Support to resolve the possible problem with the tape drive.
LTO-4 Half-Height Tape Drive User’s Guide 51

Chapter 6 Troubleshooting Guide
Troubleshooting Suggestions
Drive Does Not Eject the Tape Cartridge 6
If you cannot eject a tape cartridge from the LTO-4 Half-Height Tape
Drive:
1 Verify that the green status
IF the green
status LED is . . .
LED is on and that all other LEDs are off.
AND other LEDs
are . . . THEN . . .
off, off, refer to the procedures
for troubleshooting
power problems under
Computer Hardware
Does Not Recognize the
Tape Drive on page 43 to
determine why the
green status LED is not
on.
on, on or flashing, see table 2
on page 16 to
determine whether the
other LED activity is
normal or abnormal.
Then proceed to step 2 of
this procedure.
If the amber status LED
is flashing and the
seven-segment LED
displays the number “4”
or “5” to indicate a
possible Power On Self
Test error, contact
Technical Support to
resolve the possible
problem with the tape
drive.
on, off, skip to step 3 of this
procedure.
LTO-4 Half-Height Tape Drive User’s Guide 52

Chapter 6 Troubleshooting Guide
Troubleshooting Suggestions
2 If other LEDs are on, reset the tape drive by either:
• Pressing and holding the cartridge eject button on the front panel
for more than 5 seconds and releasing it (both internal and
tabletop drives)
• Cycling the drive AC power switch off and on (tabletop tape
drive only)
3 With the green status LED on and all other LEDs off, press the
cartridge eject button on the front panel.
IF . . . THEN . . .
the green status LED flashes,
with no other LED indicators
on,
you see a message similar to:
You cannot eject the cartridge
because the tape drive is in use.
Wait until the operation is complete
before ejecting the cartridge. The
backup software may still have the
tape drive in prevent mode so that
the cartridge cannot be ejected.
Use the backup software
commands to eject the tape.
wait for the tape to eject
(normally takes from 2 to 3
minutes).
• If the tape ejects, and the
green status LED stops
flashing, the problem has
been resolved.
• If the tape does not eject, and
there are no other LED
indications, contact Technical
Support to resolve the
possible problem with the
tape drive.
use the mt offline command to
eject the tape.
Note: In UNIX/Linux
environments, the
message may not
appear, even though
the operating system
prevents the drive from
ejecting the tape. Use
the
mt offline command
anyway.
LTO-4 Half-Height Tape Drive User’s Guide 53

Chapter 6 Troubleshooting Guide
Troubleshooting Suggestions
IF . . . THEN . . .
Slow Backup Operations 6
the amber status
indicate a hardware error,
LED flashes to
the cartridge might be
physically jammed inside the
drive. Contact Technical
Support to resolve the possible
problem with the tape drive.
Many factors can make backups appear to be slow. To achieve the highest
possible transfer rate, the LTO-4 Half-Height Tape Drive:
• MUST be attached to a SCSI controller capable of a minimum of 80
Mbytes per sec., and
• MUST NOT share the same SCSI bus as another active SCSI device
such as hard drives.
1 Verify that the tape drive is attached to a SCSI controller. You can do
this by:
• Watching the system the startup process
• Examining the system startup log files
IF the tape drive is . . .
to a SCSI controller, THEN . . .
attached proceed to step 2 of this
procedure to determine
whether the tape drive shares
the SCSI bus with another
active SCSI device.
not attached attach the tape drive to a SCSI
controller to achieve the best
possible hardware performance
for the best possible transfer
rate.
LTO-4 Half-Height Tape Drive User’s Guide 54

Chapter 6 Troubleshooting Guide
Troubleshooting Suggestions
2 If the tape drive is attached to a SCSI controller, verify that it does not
share the SCSI bus with another active SCSI device by:
•Checking:
• Windows Device Manager
• Unix/Linux logs
• Monitoring the SCSI controller activity during system startup.
IF the tape drive . . . THEN . . .
shares the SCSI bus with
other SCSI devices that are
active when tape backups are
reconfigure the SCSI setup to
make the tape drive the only
active device on the SCSI bus.
performed,
is the only active device on
the SCSI bus
proceed to step 3 of this
procedure to determine
whether the method of
performing tape backups is a
factor.
3 The method of performing tape backups can be a factor in slow
backup operations. Data sent to the tape drive over a network
connection and delays in data transfer over a network connection can
cause backups to slow down.
To determine whether the method of performing tape backups is a
factor:
a Use the tape diagnostic software to perform a write/read test.
Caution: The read/write test will overwrite any data on the
tape. Always use a new/blank or “scratch”
cartridge for diagnostic read/write tests.
The diagnostic write/read test evaluates the connection between
the tape drive and the SCSI controller and removes the network
data transfer and the backup software from the performance
evaluation.
LTO-4 Half-Height Tape Drive User’s Guide 55

Chapter 6 Troubleshooting Guide
Troubleshooting Suggestions
b When the test finishes, determine the megabytes per second data
transfer rate to verify that the tape drive is performing at an
acceptable rate.
IF you believe that the read/
write transfer rate is . . . THEN . . .
too slow, use the tape diagnostic
software to perform a trace
buffer retrieval.
Send the diagnostic output
file to Technical Support for
evaluation of the SCSI bus
condition.
Failed Operations TapeAlert Messages 6
acceptable, but backups still
seem to be slow,
it might be attributed to the
number of files and the
average size of the backup
files.
These factors can have a
significant effect on the
backup performance.
Backups where the average
file size is less than 200
Kbytes, for example, are
slower than backups where
the average file size is greater
than 200 Kbytes.
Obtain backup log files to
determine number of files
and average file size.
The LTO-4 Half-Height Tape Drive supports the TapeAlert standard, and
issues the appropriate alert messages in response to operational error
conditions. You can view TapeAlert messages either directly, on the
system screen, or in the log file of your backup application. Note,
however, that some operational error conditions can cause more than one
TapeAlert message.
LTO-4 Half-Height Tape Drive User’s Guide 56

Chapter 6 Troubleshooting Guide
Troubleshooting Suggestions
The following subsections provide troubleshooting guidelines for dealing
with the most common TapeAlert error conditions.
Backup Failure TapeAlert Messages
A number of problems can cause a backup operation to fail.
This TapeAlert message . . . Signifies . . .
The operation has stopped because
an error has occurred while reading
or writing data which the drive cannot
correct.
that a media error occurred
during a read or write operation.
Proceed to step 1 of the following
procedure.
The tape is from a faulty batch or the
tape drive is faulty.
or:
The tape is damaged or the drive is
faulty. Call the tape drive supplier
helpline.
that a media error occurred
during a read or write operation.
These messages frequently
appear in addition to the “
operation has stopped because...
message. In this case, proceed to
step 1 of the following procedure.
Otherwise, repeat the backup
operation with a known good
tape and proceed to step 1 of the
following procedure if the
problem persists.
6
The
”
1 Retry the backup operation if you make any changes are made to the
SCSI cabling, or if you unplug and reconnect any SCSI cables
2 If the problem persists, remove the data tape, insert a cleaning
cartridge to clean the tape drive (see Cleaning the Tape Drive
on
page 20).
3 After the tape drive ejects the cleaning cartridge, reload the data tape
and retry the backup operation.
LTO-4 Half-Height Tape Drive User’s Guide 57

Chapter 6 Troubleshooting Guide
Troubleshooting Suggestions
4 If the problem persists, use the tape diagnostic software to perform a
write/read test with 4 Gbytes of data.
Caution: The write/read test will overwrite any data on the
tape. Always use a new/blank or “scratch” cartridge
for diagnostic write/read tests.
IF the diagnostic test . . . THEN . . .
completes normally, retry the backup operation
using the same new/blank or
“scratch” tape that you used for
the diagnostic write/read test.
If the backup retry:
• Succeeds, discard the
original data tape. The
problem is resolved.
• Fails, repeat steps 3 and 4 of
this procedure to clean the
tape drive a second time and
proceed to step 6.
fails, repeat steps 3 and 4 of this
procedure to clean the tape
drive a second time and
proceed to step 6.
5 Retry the backup operation. If the backup retry:
• Succeeds, the problem is resolved.
• Fails, contact Technical Support to resolve the possible problem
with the tape drive.
LTO-4 Half-Height Tape Drive User’s Guide 58

Chapter 6 Troubleshooting Guide
Troubleshooting Suggestions
Write-Protected TapeAlert Messages 6
Write-protected TapeAlert messages can appear in response to:
• Actual write-protected tape cartridges
• Defective tape cartridges
• Cartridges of a type that appear to be write protected
This TapeAlert message . . . Signifies . . .
You are trying to write to a writeprotected cartridge. Remove the
write-protection or use another
tape.
The memory in the tape cartridge
has failed, which reduces
performance. Do not use the
cartridge for further backup
operations.
and/or:
You have loaded a cartridge of a
type that is read-only in this drive.
The cartridge will appear as writeprotected.
that you are trying to write to a
tape cartridge that is actually
write protected.
1 Eject the tape cartridge
from the drive.
2 Set the cartridge write-
protect switch to the
unlocked (read-enabled)
position (see figure 7
on
page 19).
3 Retry the backup operation.
you are trying to write to a tape
cartridge that is either defective
(failed Cartridge Memory chip),
or the wrong type.
Retry the backup operation
using a known good cartridge
of the proper type.
If the problem persists, contact
Technical Support to resolve
the possible problem with the
tape drive.
Overwrite protection is set to
<setting>. Click OK to overwrite the
media or insert new media that can
be overwritten.
a software-related problem.
Refer to the documentation for
your backup software for
information on the overwrite
and append settings.
LTO-4 Half-Height Tape Drive User’s Guide 59

Chapter 6 Troubleshooting Guide
Troubleshooting Suggestions
Hardware Failure TapeAlert Messages 6
Hardware failure TapeAlert messages are descriptive and
straightforward.
This TapeAlert message . . . Signifies . . .
The tape drive has a hardware fault:
1. Eject the tape or magazine.
2. Reset the drive.
3. Restart the operation.
a tape drive hardware failure.
Or:
The tape drive has a hardware fault:
1. Turn the tape drive off and then on
again.
2. Restart the operation.
3. If the problem persists, call the tape
drive supplier helpline.
1 Press the cartridge eject button on the front panel to eject the tape
cartridge.
2 Cycle the tape drive power to the off then on position:
For the internal LTO-4 Half-Height Tape Drive:
a Terminate all running applications.
b Shut down the workstation or server system.
c Restart the system.
For the tabletop LTO-4 Half-Height Tape Drive, use the AC power
on/off switch on the back panel to cycle the drive power to the off
then on position.
LTO-4 Half-Height Tape Drive User’s Guide 60

Chapter 6 Troubleshooting Guide
Troubleshooting Suggestions
3 Check the tape drive front panel LED indicators to determine the
operational condition of the drive (see table 2
on page 16).
This LED indication . . . Signifies . . .
• Green status LED on steady
and:
the normal operational
configuration. The problem is
resolved.
• All others off
• Amber status LED flashing a hardware failure condition.
Contact Technical Support to
resolve the possible problem
with the tape drive.
•Amber status
LED flashing
and:
• Seven-segment LED
displaying a number
a failed Power On Self Test
function.
Contact Technical Support to
resolve the possible problem
with the tape drive.
Tape Cleaning TapeAlert Messages
Tape cleaning TapeAlert messages indicate problems when you insert a
cleaning cartridge into the LTO-4 Half-Height Tape Drive. Like hardware
failure TapeAlert messages, tape cleaning TapeAlert messages are
descriptive and straightforward.
6
This TapeAlert message . . . Signifies . . .
The last cleaning cartridge used in
the tape drive has worn out:
1. Discard the worn out cleaning
cartridge.
2. Wait for the current operation to
finish.
3. Then use a new cleaning cartridge.
LTO-4 Half-Height Tape Drive User’s Guide 61
that the cleaning cartridge is used
up. Discard it.
See Cleaning the Tape Drive
on
page 20 and use a new or still
functional LTO cleaning cartridge
to clean the tape drive.

Chapter 6 Troubleshooting Guide
Troubleshooting Suggestions
This TapeAlert message . . . Signifies . . .
The last cleaning cartridge used in
the tape drive was an invalid type:
1. Do not use this cleaning cartridge
in this drive.
2. Wait for the current operation to
finish.
3. Then use a valid cleaning
cartridge.
The tape drive needs cleaning:
1. If the operation has stopped, eject
the tape and clean the drive.
2. If the operation has not stopped,
wait for it to finish and then clean
the drive.
3. Check the tape drive users manual
for device specific cleaning
instructions.
the tape drive does not recognize
the cleaning tape as being of a
valid type.
See Cleaning the Tape Drive
on
page 20 and use a valid LTO-type
cleaning cartridge to clean the
tape drive.
the tape drive has issued a
message to the backup software
to instruct you to clean the tape
drive.
See Cleaning the Tape Drive
on
page 20.
LTO-4 Half-Height Tape Drive User’s Guide 62

Appendix A
AInstallation Checklists
Use the following quick-start checklists to get your tape drive up and
running as quickly as possible:
• Internal LTO-4 Half-Height Tape Drive Quick Start
• Tabletop LTO-4 Half-Height Tape Drive Quick Start
LTO-4 Half-Height Tape Drive User’s Guide 63

Appendix A Installation Checklists
Internal LTO-4 Half-Height Tape Drive Quick Start
Internal LTO-4 Half-Height Tape Drive Quick Start
Use the following quick-start procedure to install the internal LTO-4
Half-Height Tape Drive. Print this page and check each step as you
complete it. If you need more information about a step, see the sebsection
referenced in the step.
1 Unpack the contents of your drive package, and check for damaged items.
See Unpacking and Inspecting the
2 Turn off your computer, remove its covers and power cable, and select a mounting
bay for the drive.
See M
ounting the Internal Tape Drive on page 9.
3 Connect a serial-attached SCSI (SAS) interface cable to the drive.
See C
onnecting the Internal Drive Interface and DC Power Cables on page 10.
4 Connect a serial cable, if installing the tape drive in a tape library system.
See C
onnecting the Internal Drive Interface and DC Power Cables on page 10.
5 Connect a DC power cable to the drive.
See C
onnecting the Internal Drive Interface and DC Power Cables on page 10.
6 Replace the computer covers and AC power cable, turn on the computer, and
verify that the internal tape drive is operating properly.
7 Register your tape drive.
See Registering the LTO-4 Half-Height Tape Drive
Drive on page 7.
on page 14.
LTO-4 Half-Height Tape Drive User’s Guide 64

Appendix A Installation Checklists
Tabletop LTO-4 Half-Height Tape Drive Quick Start
Tabletop LTO-4 Half-Height Tape Drive Quick Start
Use the following quick-start procedure to install tabletop LTO-4 HalfHeight Tape Drive. Print this page and check each step as you complete
it. If you need more information about a step, see the subsection
referenced in the step.
1 Unpack the contents of your drive package, and check for damaged items.
See Unpacking and Inspecting the
2 Connect a serial-attached SCSI (SAS) interface cable to the drive.
See C
onnecting the Internal Drive Interface and DC Power Cables on page 10.
3 Connect a power cable to the drive.
See C
onnecting the Tabletop Drive Interface and AC Power Cables on page 12.
4 • Turn on the computer
• Turn on the tabletop tape drive
• Verify that the tabletop tape drive is operating properly.
5 Register your tape drive.
Registering the LTO-4 Half-Height Tape Drive
Drive on page 7.
on page 14.
LTO-4 Half-Height Tape Drive User’s Guide 65

Appendix B
BDisposal of Electrical & Electronic
Equipment
This symbol on the LTO-4 Half-Height Tape Drive or
on its packaging indicates that the tape drive should not
be disposed of with your other waste materials. Instead,
it should be submitted to a designated collection point
for the recycling of electrical and electronic equipment.
The separate collection and recycling of your waste
equipment at the time of disposal helps conserve
natural resources and ensures that the equipment is
recycled in a manner that protects human health and the environment.
For more information about properly disposing of your waste equipment
for recycling, please visit our website at qcare.quantum.com
your local government authority, your household waste disposal service,
or the business from which you purchased the product.
LTO-4 Half-Height Tape Drive User’s Guide 66
or contact

Appendix C
CRegulatory Compliances
This appendix identifies the he LTO-4 Half-Height Tape Drive regulatory
compliances. The topics include:
• Safety Compliances
• Electromagnetic Compatibility (EMC) Compliances on page 69
LTO-4 Half-Height Tape Drive User’s Guide 67

Safety Compliances
The LTO-4 Half-Height Tape Drives are safety compliant with the
following regulatory codes in the countries indicated:
Country Regulatory Organization Compliant to:
Appendix C Regulatory Compliances
Safety Compliances
Canada Canadian Standards Association
(CSA)
EU member nations Comité Europèen de Normalisation
Electrotechnique – the European
Committee for Electrotechnical
Standardization (CENELEC)
IECEE member
nations*
Israel SII CB Scheme
Taiwan BSMI BSMI certification,
United States Underwriters Laboratories (UL) UL/CSA 60950-1
* IECEE member nations include: Argentina, Austria, Australia, Belgium, Brazil,
Canada, China (PR), Czech Republic, Denmark, Finland, France, Germany, Hungary,
India, Ireland, Israel, Italy, Japan, (South) Korea, Montenegro, Netherlands, Norway,
Poland, Russian Federation, Serbia, Singapore, Slovakia, Slovenia, South Africa, Spain,
Switzerland, Turkey, United Kingdom, and USA.
International Electrotechnical
Commission on Electrical
Equipment (IECEE) for Mutual
Recognition of Test Certificates for
Electrical Equipment “CB Scheme”
UL/CSA 60950-1
EN 60950-1, 1st edition
CB Scheme per IEC
60950-1 with details
and exceptions for each
member country
CNS 14336
LTO-4 Half-Height Tape Drive User’s Guide 68

Appendix C Regulatory Compliances
Electromagnetic Compatibility (EMC) Compliances
Electromagnetic Compatibility (EMC) Compliances
The LTO-4 Half-Height Tape Drives are EMC compliant with the
following regulatory organizations and codes in the countries indicated:
Country Regulatory Organization Compliant to:
Australia Australian Communications and
Media Authority (ACMA)
Canada Industry Canada Digital Apparatus
- Interference-Causing Equipment
Standard
(ICES-003)
EU member nations CE Emissions per CISPR
Israel SII CISPR 22 and CISPR 24
Japan Voluntary Control Council for
Interface (VCCI)
New Zealand Australian Communications and
Media Authority (ACMA)
South Korea MIC CISPR 22 and CISPR 24
Taiwan Bureau of Commodity Inspection
and Quarantine (BSMI)
AS/NZS 3548 (same as
CISPR 22)
ICES-003 Digital
Apparatus
22, EN55022 and
Immunity per CISPR
24, EN55024
VCCI
AS/NZS 3548 (same as
CISPR 22)
BSMI EMC
certification, CNS
14338
United States Federal Communications
Commission (FCC)
LTO-4 Half-Height Tape Drive User’s Guide 69
Title 47: Code of
Federal Regulations,
Part 15, Subpart B
(47CFR15B),

Appendix C Regulatory Compliances
Electromagnetic Compatibility (EMC) Compliances
Note: Use the LTO-4 Half-Height Tape Drive only in equipment
where the combination has been determined to be suitable by
an appropriate certification organization (for example,
Underwriters Laboratories Inc. or the Canadian Standards
Association in North America).
Also consider the following safety points:
• Install the drive in an enclosure that limits the user’s access to live
parts, gives adequate system stability and provides the necessary
grounding for the drive.
• Provide the correct voltages (+5 VDC and +12 VDC) based on the
regulation applied—Extra Low Voltage (SEC) for UL and CSA, and
Safety Extra Low Voltage for BSI and VDE (if applicable).
LTO-4 Half-Height Tape Drive User’s Guide 70

Index
B
backup/restore problems 56
best practices 41
C
cartridge memory, description 3
cartridges
care and maintenance
ejecting
18
loading 18
specifications
troubleshooting
unloading 18
write-protecting
cautions, internal drives
chassis, description 3
39
19
50
18
6
D
data buffer 25
data buffering, description
data compression
considerations
description 3
intelligent
data integrity
error-correction code 26
servo-tracking faults
data transfer rate
description
variable-speed
drive performance specifications
28
29
25
3
4
3
27
E
ejecting a cartridge 18
environmental requirements
error-correction code
37
26
F
features 3
35
front panel display 15
G
guidelines, handling and
installation 6
H
handling precautions 6
head positioner, description
I
injected noise 38
inspecting the drive 7
installation guidelines
installation instructions
internal drives
preinstallation requirements
tabletop drives
installing the LTO driver 14
7
8
12
3
7
LTO-4 Half-Height Tape Drive User’s Guide 71

intelligent data compression
description
interface, description 3
internal drives
guidelines and cautions
installation instructions 8
mounting
quick-start checklist
registering 14
3
9
29
6
64
L
layout of track 23
loading a cartridge
LSI circuitry, description 3
18
M
mean time between failures 39
method of recording
mounting, internal drives 9
25
N
native data transfer rate, description
3
O
overview 1
P
physical specifications 32
platforms, supported
power specifications
preinstallation requirements 7
3
34
Q
quick-start checklist
internal drives
tabletop drives 65
64
R
read channel, description 3
recording method
registering tape drive 14
regulatory compliance
reliability
RISC processor, description 3
38
25
67
S
servo-tracking faults 27
slow backups
SmartVeirfy, description 3
specifications
drive performance
environmental requirements 37
injected noise
LTO cartridge
mean time between failures 39
physical
power
regulatory compliance 67
reliability
supported platforms 3
54
35
38
39
32
34
38
T
tabletop drives
installation instructions
quick-start checklist 65
tape drive
registering
troubleshooting 50
tape picking, description
TapeAlert
description
messages
track layout
troubleshooting 42
backup/restore problems
computer boots but does not
recognize tape drive 43
slow backups
tape drive not recognized by
operating system or
application 48
tape drives and cartridges
tape will not eject from drive 52
TapeAlert messages
14
3
60
23
54
12
3
60
U
unloading a cartridge 18
unpacking the drive 7
V
variable-speed data transfer,
description 4
56
50
LTO-4 Half-Height Tape Drive User’s Guide 72

W
write-protecting a cartridge 18
LTO-4 Half-Height Tape Drive User’s Guide 73
 Loading...