

Page 1

Quantum|A TL PowerStor L500
Series
Tape Library
User’s Guide
6321100-03
Ver.3, Rel. 0
Page 2

Quantum|ATL PowerStor L500 Series Library User’s Guide
Printed in the USA.
Quantum|ATL provides this publication “as is” without warranty of any kind, either express or implied,
including but not limited to the implied warranties of merchantability or fitness for a particular purpose.
Quantum|ATL may revise this publication from time to time without notice.
COPYRIGHT STATEMENT
Copyright 2001 by Quantum|ATL. All rights reserved.
Your ri ght to copy this manual is limited by copyright law. Making copies or adaptations without prior
written authorization of Quantum|ATL is prohibited by law and constitutes a punishable violation of the
law.
TRADEMARK STATEMENT
Prism Library Architecture, IntelliGrip, and WebAdmin are all trademarks of Quantum|ATL.
Other trademarks may be mentioned herein which belong to other companies.
, 6321100-03, Ver. 3, Rel. 0, February 2001.
6207947-06cP 60
Page 3

Contents
Contents
Preface xi
Chapter 1 Library Description 1
L500 Library Configurations.................................................................1
Overview...........................................................................................1
Cabinet...............................................................................................2
Element Numbering Convention..................................................4
Features....................................................................................................5
Library Components..............................................................................6
Front Panel........................................................................................6
Back Panel.........................................................................................7
Bar Code Reader (Optional)...........................................................8
Cartridge Handling Mechanism (CHM)......................................8
Tape Drives.............................................................. ......... ................9
Drive Mounting Description........................................................10
Dual 7-Cartridge Magazines........................................................12
Operator Control Panel.................................................................13
Chapter 2 Installing the L500 Series Library 15
Selecting an Installation Location ......................................................15
Floor Space............................................................... .......................16
Overhead Clearance ......................................................................17
Surface Strength and Inclination .................................................17
Power and Grounding ..................................................................17
Power Cord.....................................................................................17
Environmental Specifications.......................................................18
Receiving the Library.................................. ......... ................................18
Quantum|ATL PowerStor L500 Series Tape Library User’s Guide iii
Page 4

Contents
Unpacking the Library............................................. ............................19
Connecting the Tape Library..............................................................22
Running the Power-On-Self-Test (POST)..........................................24
Configuring the Tape Library.............................................................25
Viewing SCSI IDs...........................................................................26
Changing SCSI ID Settings...........................................................26
Changing the Library Card SCSI ID Setting..............................27
Operating the Tape Library ................................................................27
Inserting a Cartridge......................................................................28
Removing a Cartridge from a Magazine....................................31
Using the Cleaning Cartridge ......................................................32
Chapter 3 Operator Control Panel 33
OCP Functions ......................................................................................34
Overview.........................................................................................34
Status ......................................................................................................39
Eject/Unlock .........................................................................................43
Opening the Library Doors...........................................................44
Closing the Library Doors ............................................................44
Unloading a Cartridge......................................................... ......... .44
Removing the Magazine...............................................................45
Installing the Magazine.............................................. ......... ..........46
Load........................................................................................................48
Loading a Cartridge.......................................................................49
SCSI ID...................................................................................................50
Viewing the SCSI IDs ....................................................................52
Setting a SCSI ID ............................................................................52
Mode.......................................................................................................53
Viewing a Mode ................................................................... ......... .55
Setting a Mode................................................................................56
Information............................................................................................56
Code Update..........................................................................................58
Viewing the Drive Microcode Revision Level...........................59
Installing New Drive Microcode via Cartridge.........................59
Tests........................................................................................................59
iv Quantum|ATL PowerStor L500 Series Tape Library User’s Guide
Page 5

Contents
Chapter 4 SCSI Interface 61
General SCSI Bus Operation...............................................................61
Data Transfer..................................................................................61
Initiator/Target Operation...........................................................62
SCSI IDs and Logical Unit Numbers (LUNs) ............................62
Unit Attention Condition..............................................................62
Behavior Around Power-On and SCSI Bus Reset.....................63
Other SCSI Functionality..............................................................63
Bus Phases.......................................................................................63
Attention Signal Response............................................................64
Status Phase....................................................................................64
Bus Free...........................................................................................65
Bus Parity Errors............................................................................65
Chapter 5 Troubleshooting Guidelines 67
Proper OCP Operation ........................................................................67
Avoiding Basic Problems ....................................................................68
Operation Failure...........................................................................69
Power Problems .............................................................................69
Appendix A Library Specifications 71
Physical Specifications..................................................................72
Performance Specifications...........................................................72
Power Specifications......................................................................72
Environmental Specifications.......................................................73
Operating Vibration and Shock Specifications..........................74
Non-operating Vibration and Shock Specifications..................76
Electromagnetic Interference (EMI) Susceptibility ...................78
ESD Failure Level Limits..............................................................79
Power Distributed Harmonics.....................................................80
Acoustic Noise Emissions.............................................................80
Reliability Factors.................................................................................81
Quantum|ATL PowerStor L500 Series Tape Library User’s Guide v
Page 6

Contents
Appendix B OCP Error Messages and Error Definitions 83
Appendix C Regulatory Statements 95
FCC STATEMENT................................................................................95
INDUSTRY CANADA (DIGITAL APPARATUS) Interference-
Causing Equipment Standard ICES-003 Issue 2........................96
Glossary 99
Index 103
vi Quantum|ATL PowerStor L500 Series Tape Library User’s Guide
Page 7

Figures
Figures
Figure 1 PowerStor L500 Series Library (Tower)...........................2
Figure 2 Tower Configurations........................................................3
Figure 3 Rack Mount Configuration................................................3
Figure 4 L500 Cartridge Array .........................................................4
Figure 5 Library Front Panel (Rack-Mount)...................................7
Figure 6 Back Panel............................................................................7
Figure 7 Bar Code Reader .................................................................8
Figure 8 Cartridge Handling Mechanism.......................................9
Figure 9 Bezel-Free Tape Drive......................................................10
Figure 10 Drive Bracket Assembly ..................................................11
Figure 11 Library Magazine..............................................................12
Figure 12 Operator Control Panel....................................................13
Figure 13 Floor Space Requirements (Tower Library)..................16
Figure 14 Rack Space Requirements (Rack Mount Library)........16
Figure 15 Removing the Accessories Boxes....................................20
Figure 16 Removing the Library from the Shipping Carton........21
Figure 17 Tape Library Rear Panel Cable Connectors..................22
Figure 18 Sample SCSI Cable Connection......................................23
Figure 19 Front Panel (rack mount).................................................25
Figure 20 Cartridge Write-Protect Switch ......................................29
Figure 21 Inserting a Cartridge ........................................................30
Quantum|ATL PowerStor L500 Series Tape Library User’s Guide vii
Page 8

Figures
Figure 22 Removing a Cartridge from the Magazine ...................31
Figure 23 OCP.....................................................................................34
Figure 24 Tape Library (One Magazine Installed).........................48
Figure 25 Opening the Cartridge Door...........................................68
viii Quantum|ATL PowerStor L500 Series Tape Library User’s Guide
Page 9

Tables
Tables
Table 1 POST Pass/Error Messages.............................................24
Table 2 SCSI ID Default Setting....................................................26
Table 3 OCP LCD Menu Structure...............................................35
Table 4 OCP Button Descriptions.................................................38
Table 5 Status Options...................................................................40
Table 6 Eject/Unlock Options ......................................................43
Table 7 SCSI ID Options................................................................51
Table 8 Mode Options ....................................................................54
Table 9 Information Messages......................................................57
Table 10 Code Update Messages....................................................58
Table 11 Test Options.......................................................................60
Table 12 Physical Specifications .....................................................72
Table 13 Power Specifications.........................................................72
Table 14 Environmental Specifications .........................................73
Table 15 Vibration Specifications (Operating) .............................74
Table 16 Shock Specifications (Operating)....................................75
Table 17 Vibration Specifications (Non- operating)....................76
Table 18 Shock Specifications (Non-operating) ...........................77
Table 19 Conducted Emission Limits............................................78
Table 20 Radiated Emissions (30 MHz to 1000 MHz).................78
Table 21 ESD Failure Level Limits.................................................79
Table 22 Nominal Acoustic Noise Emissions...............................80
Quantum|ATL PowerStor L500 Series Tape Library User’s Guide ix
Page 10

Tables
Table 23 Acoustic Noise Emissions for German Declaration
Law......................................................................................81
Table 24 OCP Error Messages .........................................................83
Table 25 Library Error Definitions.................................................86
x Quantum|ATL PowerStor L500 Series Tape Library User’s Guide
Page 11

Preface
This manual introduces the Quantum|ATL PowerStor L500 Series
library and describes library operat ions, configurati on, cal ibration,
servicing, and basic troubleshooting
Audience
Purpose
Document
Organization
This manual is written for library operators and field service
engineers.
This manual provides information about the L500 Series library
including:
• Installing the library
• Basic library operations
• Operator commands
• Service commands
• Troubleshooting
This manual is organized as follows:
• Chapter 1,
library components.
• Chapter 2,
information to install, configure, and operate the tape library.
Library Description, describes each of the major
Installing the L500 Series Library, contains
• Chapter 3,
structure and descriptions of all control panel buttons and
functions.
Quantum|ATL PowerStor L500 Series Tape Library User’s Guide xi
Operator Control Panel, provides an overall menu
Page 12

Preface
• Chapter 4, SCSI Interface, details the SCSI Protocol features for
the tape library.
Notational
Conventions
• Chapter 5,
Trouble shooting Guid elines, provides basic
troubleshooting guidelines for the tape library.
• Appendix ,
Library Specifications, provides all library
specifications and requirements.
• Appendix ,
OCP Error Messages and Error Definitions,
provides a description of al l error mess ages and r ecommen ded
operator actions.
• Appendix ,
Regulatory Statements, provides FCC and EC
regulatory information.
A glossary and index are included to help you locate information
in this gu ide.
This manual uses the following conventions:
Caution: Cautions indicate potential hazards to equipment
and are included to prevent damage to equipment.
Note: Notes emphasize important information related to the
main topic.
Warning: Warnings indicate potential hazards to personal
safety and are included to prevent injury
xii Quantum|ATL PowerStor L500 Series Tape Library User’s Guide
.
Page 13

Preface
This manual uses the following:
• Right side of the library — Refers to the right side as you face
the component being described.
• Left side of the library — Refers to the left side as you face the
component being described.
Related
Documents
SCSI-2
Specification
Documents related to the L500 Series library are shown below:
PowerStor L500 Series Documentation
Document
Number Title Description
6321102-xx
6322617-xx
ATL PowerStor L500
Series Library
Unpacking Instructions
PowerStor Rack Mount
Installation Instructions
Contains information
necessary to receive and
unpack the library
Contains information on the
installation of the rack mount
kit
The SCSI-2 communications specification is the proposed
American National Standard for information systems, dated
March 9, 1990. Copies may be obtained from:
Global Engineering Documents
15 Inverness Way, East
Englewood, CO 80112
(800) 854-7179 or (303) 397-2740
Quantum|ATL PowerStor L500 Series Tape Library User’s Guide x ii i
Page 14

Preface
Contacts
Quantum|ATL company contacts are listed below.
Quantum|ATL Corporate Headquarters
To order documentation on the L500 Series or other products
contact:
Quantum|ATL
141 Innovation Drive
Irvine, CA 92612-5872
(949) 856-7800
(800) 284-5101
Technical Publications
To comment on this document, contact:
atl-docs@atlp.com
To request copies of this document, contact:
helpdesk@atlp.com
World Wide Web
Visit the Quantum|ATL home page at:
http:\\www.atlp.com
Help
Quantum|ATL Customer Support provides a 24-hour help desk
that can be reached at:
Locally (949) 477-7924
Inside the USA (800) 284-5101
Outside the USA (International Code*) + 1 + (949)
477-7924
xiv Quantum|ATL PowerStor L500 Series Tape Library User’s Guide
Page 15

Preface
Send faxes for Quantum|ATL Customer Support to:
Locally (949) 477-7940
Inside the USA (949) 477-7940
Outside the USA (International Code*) + 1 + (949)
477-7940
Send e-mail for Quantum|ATL Customer Support to:
helpdesk@atlp.com
* The international code differs depending on which country the
call is placed from. Some international codes are shown below:
Country International Code + 1 + Customer Support Number
Australia 0011 + 1
Canada 011 + 1
China (PRC) 00 + 1
France 00 + 1
Germany 00 + 1
Ireland 00 + 1
Italy 00 + 1
Japan 001 + 1
Mexico 00 + 1
Spain 07 + 1
Sweden 009 + 1
Switzerland 00 + 1
United
Kingdom
00 + 1
+ 949 - 477-7924
+ 949 - 477-7924
+ 949 - 477-7924
+ 949 - 477-7924
+ 949 - 477-7924
+ 949 - 477-7924
+ 949 - 477-7924
+ 949 - 477-7924
+ 949 - 477-7924
+ 949 - 477-7924
+ 949 - 477-7924
+ 949 - 477-7924
+ 949 - 477-7924
Quantum|ATL PowerStor L500 Series Tape Library User’s Guide xv
Page 16

Preface
xvi Quantum|ATL PowerStor L500 Series Tape Library User’s Guide
Page 17

Chapter 1
Library Description
This chapter provides an overall description of the PowerStor L500
Series library. The chapter consists of these sections:
• Library configurations
• Features and benefits
• Library components
L500 Library Configurations
Overview
1
The L500 Series library (see figure 1
library utilizing from one to three tape drives.
1
1
) is a 14-cartridge, multi-mode
The library is a high-performance, high-capacity, streaming
cartridge tape product designed for use on midrange and high-end
computing systems.
Quantum|ATL PowerStor L500 Series Tape Library User’s Guide 1
Page 18

Chapter 1 Library Description
L500 Library Configurations
Figure 1 PowerStor
L500 Series Library
(Tower)
Operator Control
Panel (OCP)
Full magazine
Access door
Cabinet
1
The library is available in a rack-mount or towe r configuration (s ee
figure 2
and figure 3).
The cabinet houses all other components of the library. It has two
doors on the front panel for accessing each magazine. The tape
drive’s SCSI ports, power receptacle, and power switch ar e located
on the back panel (see figure 6
2 Quantum|ATL PowerStor L500 Series Tape Library User’s Guide
).
Page 19
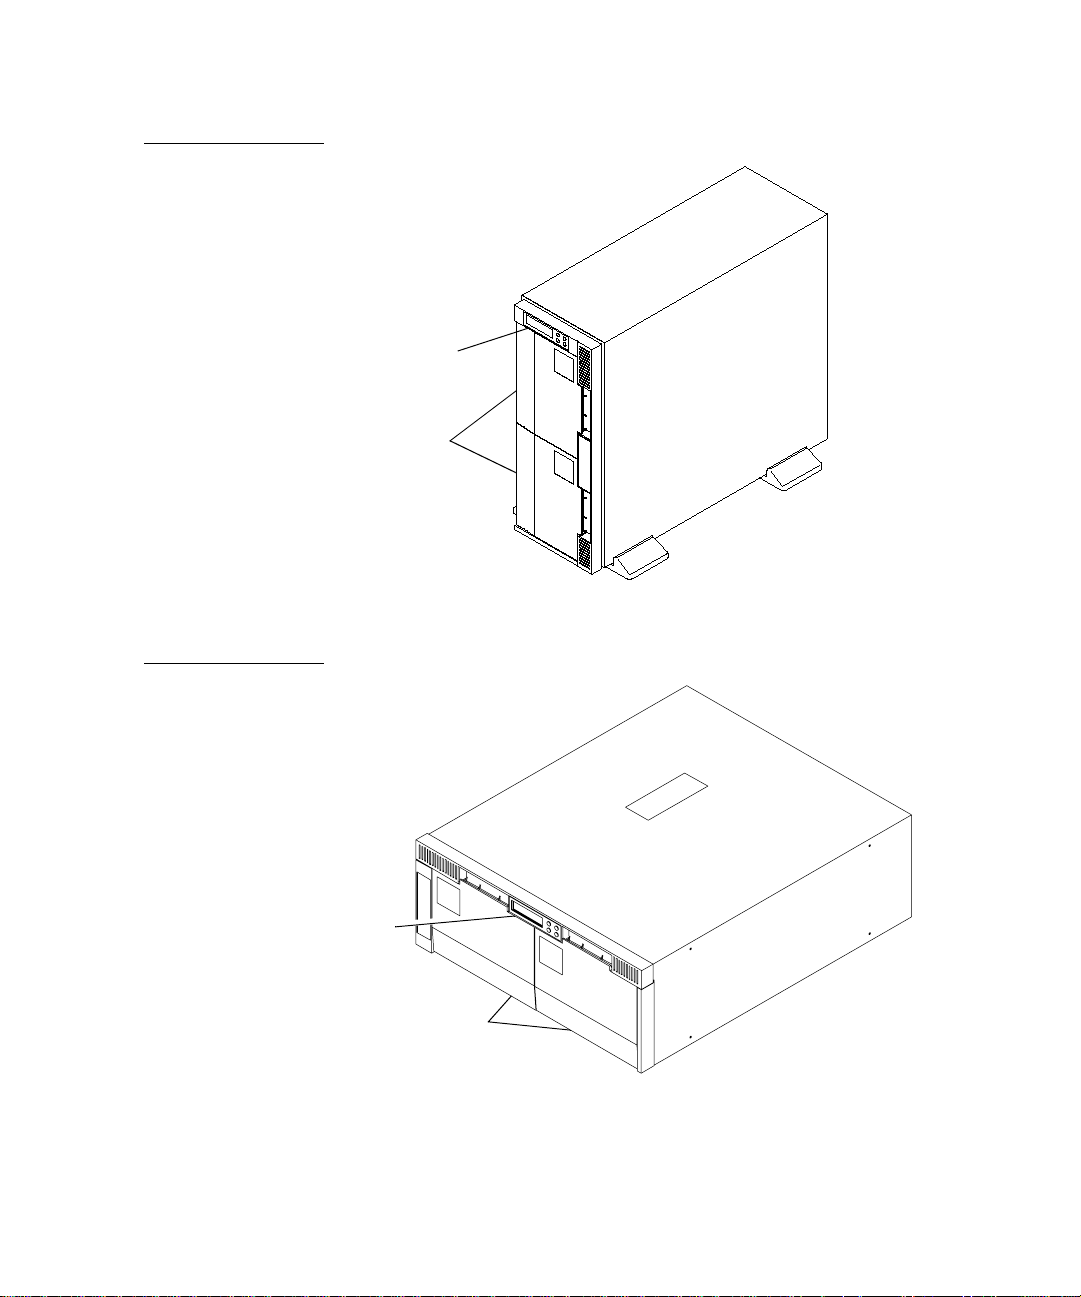
Figure 2 Tower
Configurations
Chapter 1 Library Description
L500 Library Configurati on s
OCP
Magazine
access
doors
Figure 3 Rack Mount
Configuration
OCP
Magazine
access
doors
(Requires the ATL Pow erSt or Rack Mount Kit)
Quantum|ATL PowerStor L500 Series Tape Library User’s Guide 3
Page 20
Chapter 1 Library Description
L500 Library Configurations
Element Numbering Convention
Figure 4 L500
Cartridge Array
The storage array includes:
• Two 7-cartridge magazines
1
• Up to 3 tape drives
The cartridge array is shown in figure 4
Cartridge 0
Cartridge 1
Cartridge 2
Cartridge 3
Cartridge 4
Cartridge 5
Cartridge 6
.
Magazine 0
Cartridge 7
Cartridge 8
Cartridge 9
Cartridge 10
Cartridge 11
Cartridge 12
Cartridge 13
4 Quantum|ATL PowerStor L500 Series Tape Library User’s Guide
Magazine 1
Page 21

Chapter 1 Library Description
Features
Features
The L500 Series library provides the following features:
• Automatic tape operations
• Library status display via the OCP
•
Tape drive status and activity
•
Tape drive error status
•
Magazine slot status
•
Loaded tape cartridge conditions
• Mode control
•
Library: automatic random access to all cartridges
•
Autoloader: sequential access to cartridges in a single cycle
•
Autoloader: sequential access to cartridges in circular
cycles
• User selection of cartridges to be loaded into the tape drive
• SCSI ID selection via the Operator Control Panel (OCP)
1
• Library and tape drive microcode updates via the SCSI bus or
cartridge
• OCP display of device microcode and hardware revision
numbers
• User directed tests for the library
• Embedded diagnostic software displays status for head
cleaning, library operation, and tape drive operations.
Quantum|ATL PowerStor L500 Series Tape Library User’s Guide 5
Page 22

Chapter 1 Library Description
Library Components
Library Components
The L500 Series library consists of these major components
• Front panel
• Back panel
• Bar code reader (optional)
• Cartridge Handling Mechanism (CHM)
• Up to three tape drives
• Two 7-cartridge magazines
• Operator Control Panel
Front Panel
1
The front panel of the library has three main components:
• OCP
• Magazine 0 library door
• Magazine 1 library door
1
Operator Control Panel
The OCP consists of an LCD and four push-buttons (PREVIOUS,
SELECT, NEXT, and ENTER). It displays up to two lines of
characters, containing both messages and field codes. For more
informat ion on the OCP, see Chapter 3, “
Library Doors
Operator Control Panel.”
Each library door on the L500 Series provides access to a
7-cartridge capacity magazine. The magazine to the left in the rackmount version (top magazine in the tower version) is magazine 0.
The magazine to the right in the rack-mount version (the bottom
magazine in the tower version) is magazine 1 (see figure 5
6 Quantum|ATL PowerStor L500 Series Tape Library User’s Guide
1
1
).
Page 23
Chapter 1 Library Description
Library Component s
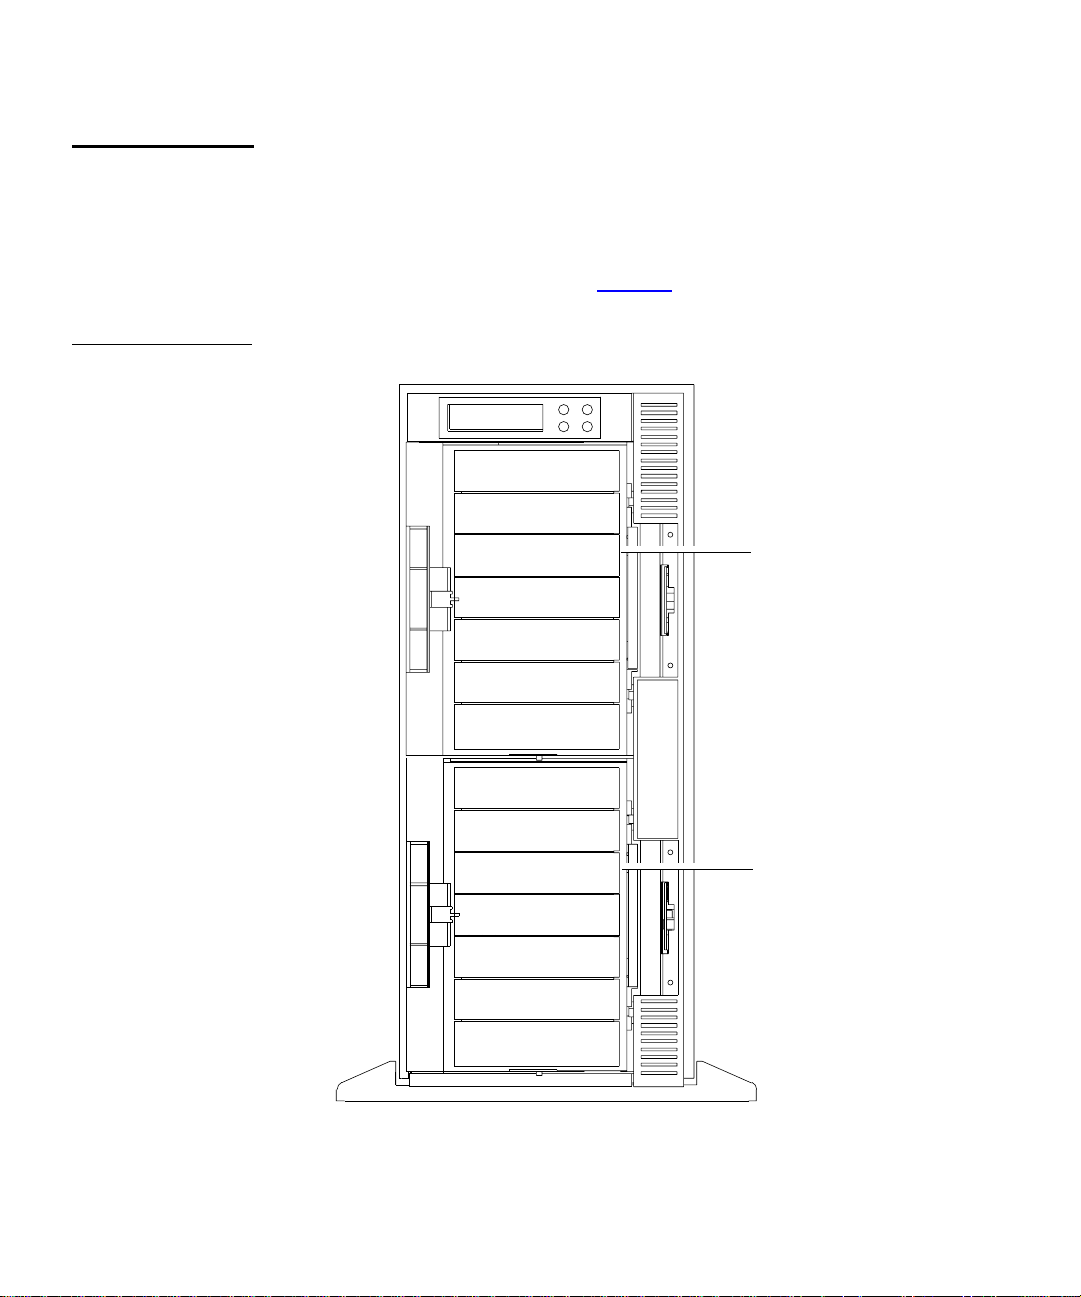
Figure 5 Library F ront
Panel (Rack-Mount)
Back Panel
OCP
Magazine 0 door Magazine 1 door
1
The back panel of the library (see figure 6
components:
• Power supply
• Power switch
• Power receptacle
• SCSI ports
• Fan guards
) contains these
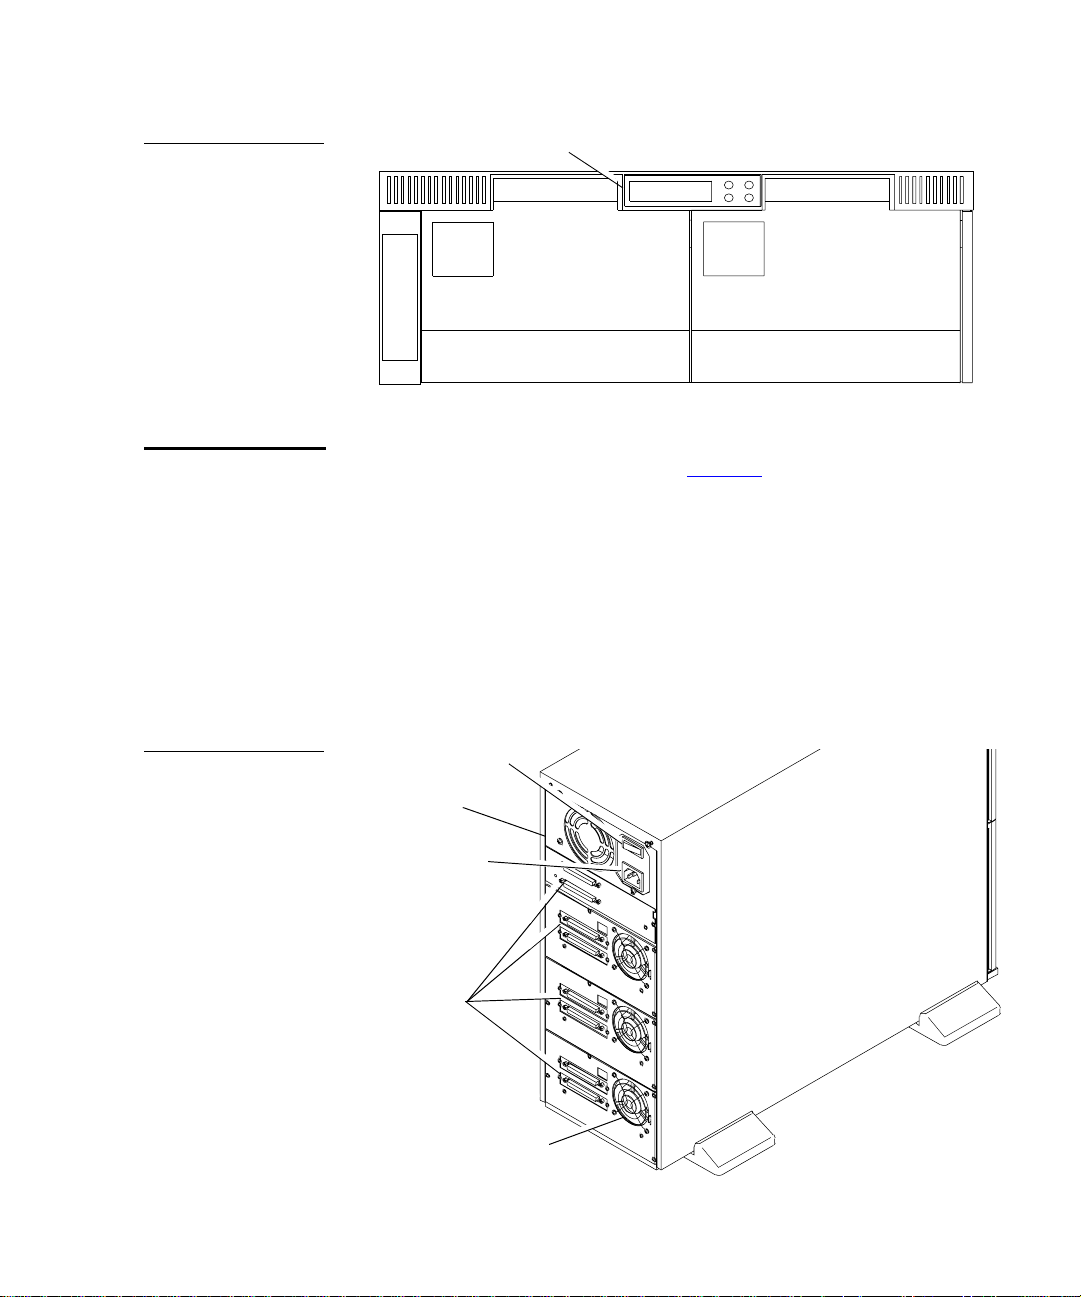
Figure 6 Back Panel
Power switch
Power
supply
Power
receptacle
SCSI
ports
Fan guards
Quantum|ATL PowerStor L500 Series Tape Library User’s Guide 7
Page 24
Chapter 1 Library Description
Library Components
Bar Code Reader (Optional)
Figure 7 Bar Code
Reader
An optional feature on the L500 Series library is a bar code reader
1
(see figure 7
). Residing on top of the cartridge array, the bar code
reader performs cartridge inventories in less than three minutes.
The bar code reader assembly is mounted above magazine 0
(tower version) or to the left of magazine 0 (rack mount version).
The reader’s scan head communicates with the loader controller on
an RS-422 communications link. During a cartridge inventory, the
scan head illuminates and reads the bar code labels on the
cartridges and transmits the r esults over the serial communications
link to the loader controller.
Cartridge Handling Mechanism (CHM)
The Cartridge Handling Mechanism (CHM) is a compact bi-
1
directional roller system that enable s simple hori zontal movem ent
between cartridge bins and tape drives (see figure 8
8 Quantum|ATL PowerStor L500 Series Tape Library User’s Guide
).
Page 25

Figure 8 Cartridge
Handling Mechanism
Chapter 1 Library Description
Library Component s
CHM
Tape drive
Tape Drives
Cartridges are inserted or removed from the front of a magazine,
while the CHM picks and places cartridges from the rear of a
magazine.
The CHM contains sensors that monitor cartridge location, gripper
location and timing information. These sensors al low the library to
operate as a random access system that provides direct, quick
access to any cartridge in either magazine.
1
The tape drives in the L500 Series library are bezel-free and have
contoured handles. This enables each drive to fit comfortably into
the compact bays of the library.
The library uses an electronic motor-driven ejection system which
automates the tape ejection procedure.
Quantum|ATL PowerStor L500 Series Tape Library User’s Guide 9
Page 26
Chapter 1 Library Description
Library Components
Figure 9 Bezel-Free
Tape Drive
Handle
motor
assembly
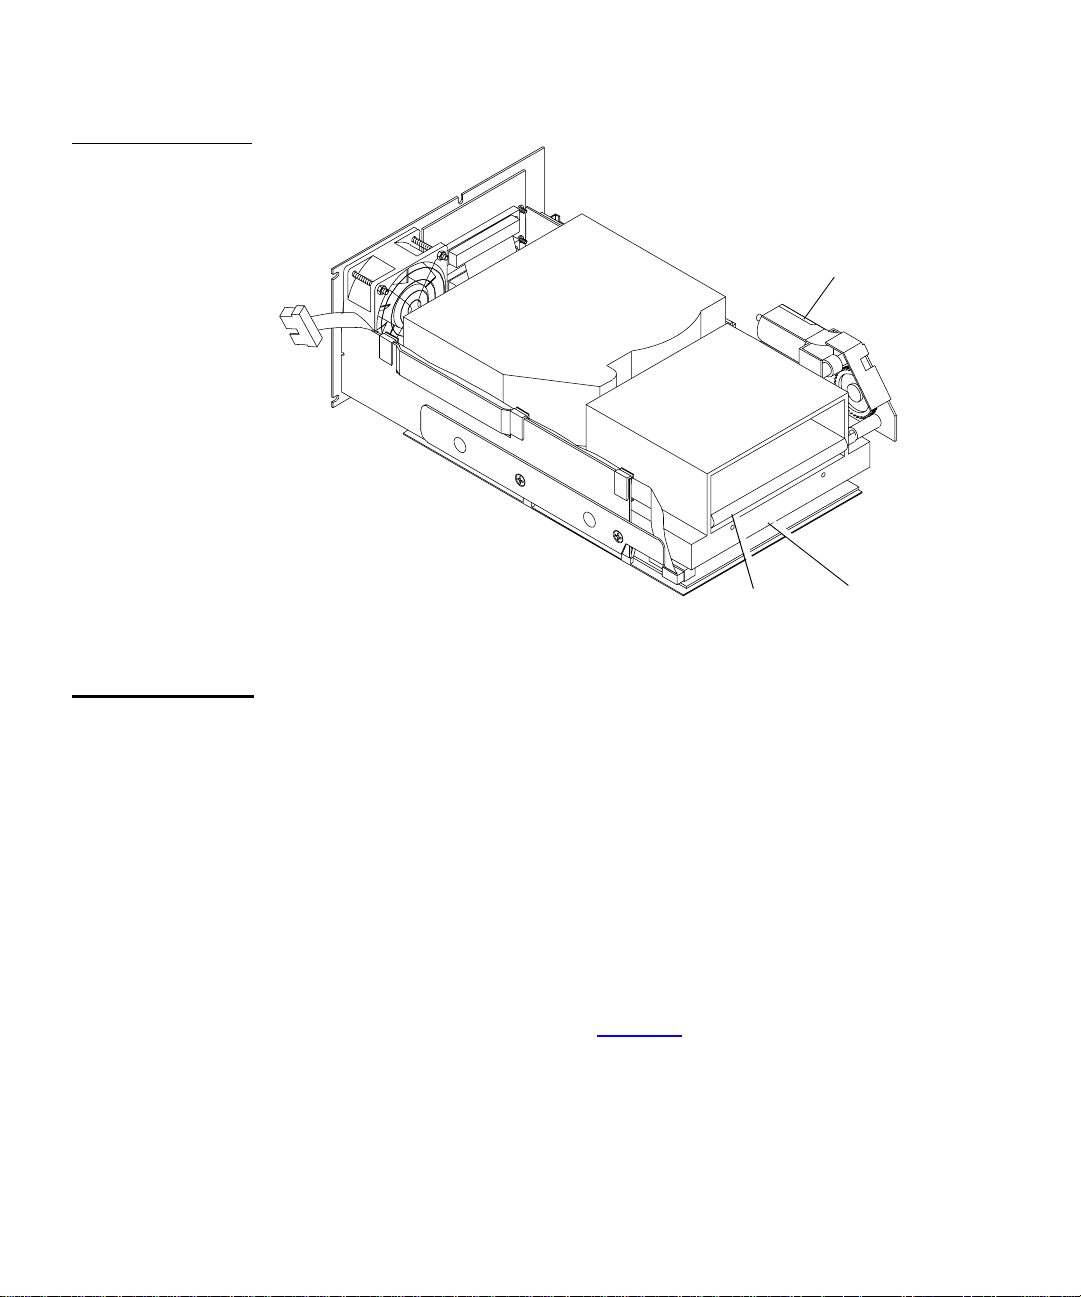
Drive Mounting Description
Contoured
handle
The tape drive is installed in the library using a drive bracket
1
assembly. Four mounting screws secure the drive to the bracket.
The mounting bracket components are:
• Fan assembly
• Loader controller cable
• SCSI interface cable and bulkhead connector
• Handle motor assembly and extender board
• Positioning slides
Replacement tape drives for L500 libraries are pre-assembled with
the drive bracket assembly (see figure 10
).
Bezel-free
front
10 Quantum|ATL PowerStor L500 Series Tape Library User’s Guide
Page 27
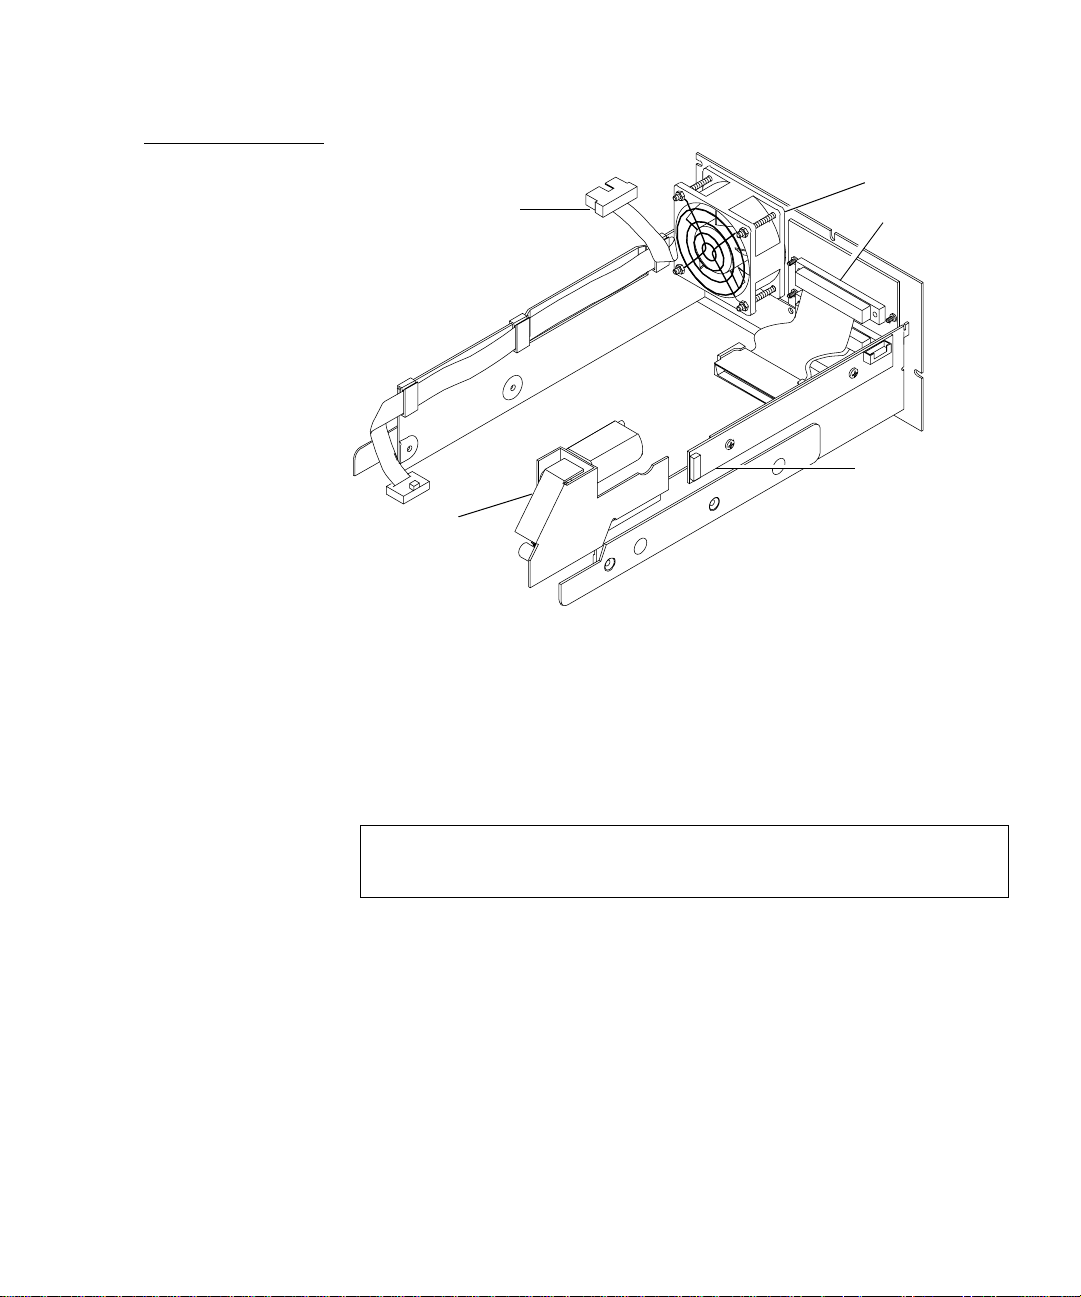
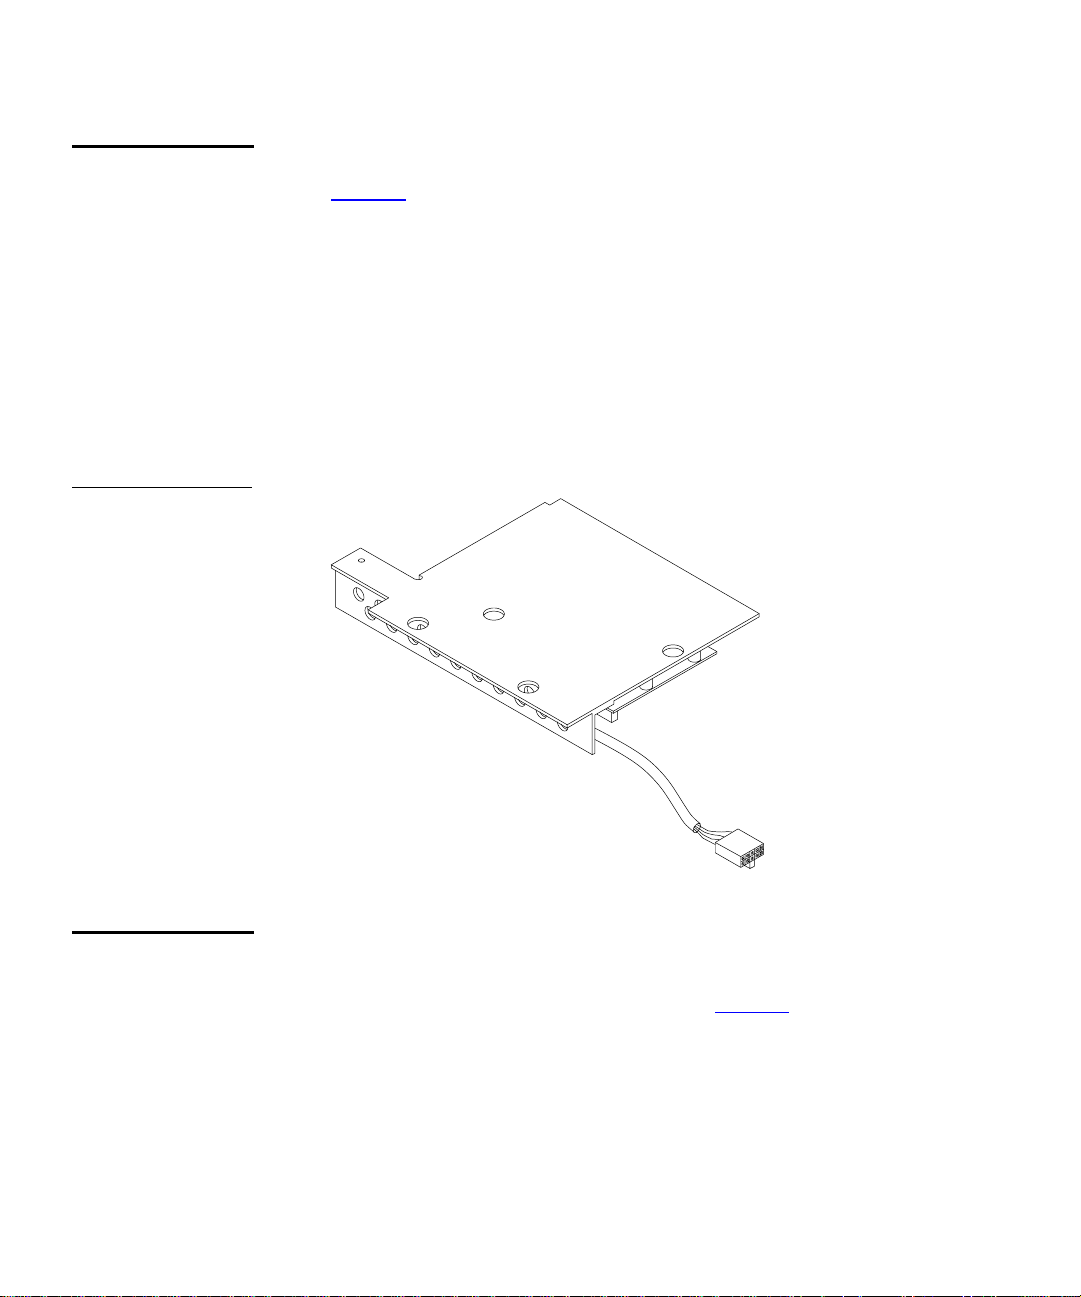
Figure 10 Drive
Bracket Assembly
Loader controller cable
Handle motor
assembly
Chapter 1 Library Description
Library Component s
Fan assembly
SCSI cable
and connector
Positioning slide
Supported Tape Cartridges
Tape cartridges reside within two removable 7-cartridge
magazines, accessible through individual doors at the front of the
unit. The library will operate with one or both magazines in place.
Note:
Both access doors must be closed during system
operation.
The L500 Series library can write and read 2.6, 6.0, 10.0, 15.0 or 20.0
GB tape formats for 100% compatibility with earlier drives.
Quantum|ATL PowerStor L500 Series Tape Library User’s Guide 11
1
Page 28
Chapter 1 Library Description
Library Components
Dual 7-Cartridge Magazines
Figure 11 Library
Magazine
The library includes two 7-cartridge tape magazines (see figure 11
1
One slot in one of the magazines can be used to accommodate a
cleaning cartridge. The magazine can also be removed and used
for off-site storage.
Each magazine is keyed to prevent improper cartridge insertions.
Once inserted, each cartridge is locked in place by a small metal
tab. To remove a cartridge, simply push it until you hear a click,
then release it. The cartridge will be partially ejected, making it
easy to remove.
Note:
The magazine should be removed when loading or
unloading tape cartridges. A hinged handle is located on
the side of the magazine to aid in removal and storage
outside of the library.
Caution:
Do not press on the metal retaining tabs after
inserting a cartridge in a magazine.
Library CHM
picks cartridges
Cartridges are
locked into place
Manually insert
and remove
cartridges from
the front
0
1
2
from the back of
the magazine
).
3
4
5
6
12 Quantum|ATL PowerStor L500 Series Tape Library User’s Guide
Hinged handle
Page 29

Chapter 1 Library Description
Library Component s
Operator Control Panel
Figure 12 Operator
Control Panel
The OCP is the operator interface of the L500 library. It consists of:
1
• LED display
• Four push-buttons
The OCP (see figure 12
) is mounted behind the library bezel and
attached to the ribbon cable connector.
PREVIOUS SELECT
LCD
ENTERNEXT
The LCD displays two lines of characters. The message content of
either line can contain a mixture of text messages and field codes.
Use the OCP to configure and operate the library or access library
information.
Use the OCP to:
• View tape drive status and activity
• View error mess ages
• Check magazine slot status
• Check drive and loader controller configuration
• Lock or unlock the magazine doors
• Control how the library accesses cartridges
• Set the SCSI ID
See Chapter 3, “
Operator Control Panel,” for more information on
the OCP.
Quantum|ATL PowerStor L500 Series Tape Library User’s Guide 13
Page 30

Chapter 1 Library Description
Library Components
14 Quantum|ATL PowerStor L500 Series Tape Library User’s Guide
Page 31

Chapter 2
Installing the L500 Series Library
This chapter contains information nee ded to install, c onfig ur e, and
operate the L500 Series library. The installation procedure is
divided into the following general tasks:
• Selecting an installation location
• Receiving the library
• Unpacking the library
• Connecting the tape library
• Running the Power-On Self-Test (POST)
• Configuring the tape library
• Operating the tape library
2
Selecting an Installation Location
When selecting an installation location for the library, consider the
following:
• Floor space
• Overhead clearance
• Installation surface strength and inclination
• Power and grounding
• Environmental specifications
Quantum|ATL PowerStor L500 Series Tape Library User’s Guide 15
2
Page 32

Chapter 2 Installing the L500 Series Library
Selecting an Installation Location
Floor Space
Figure 13 Floor
Space Requirements
(Tower Library)
2
Figure 13
shows the floor space requirements for setting up and
operating the stand-alone library.
11 inches
(27 cm)
Back
20 inches
(51 cm)
Front
Figure 14 shows the rack space requirements for setting up and
operating the rack mount library.
Figure 14 Rack
Space Requirements
18 inches
(45 cm)
(Rack Mount Library)
Back
20 inches
(51 cm)
Front
16 Quantum|ATL PowerStor L500 Series Tape Library User’s Guide
Page 33

Chapter 2 Installing the L500 Series Library
Selecting an Installation Location
Overhead Clearance
Surface Strength and Inclination
Power and Grounding
Power Cord
The height of the stand-alone library is 18 inches (46 cm). The
2
height of the rack mount library is 7 inches (18 cm).
T o r emove and replac e the library enclosure, you need an over head
clearance slightly greater than the height of the library.
Place the library and rack on a clean, level surface. If the library
2
will be placed on a desk or table, make sure it is sturdy enough to
support the library’s weight (76 lbs/35 kg).
The electrical ratings for the library are 110 - 120/200 - 240 VAC,
2
50 Hz - 60 Hz, 1.6 A - 0.8 A, 140 W - 200 W.
2
A 110/120 VAC power cord is supplied with your unit. If your
country/locale does not use 110/120 VAC, refer to the criteria
listed below for parameters.
Warning:
Do not attempt to modify or use an external 1 10 - 120
VAC power cord for 220 - 240 VAC input power.
Modifying the power cord can cause personal injury
and severe equipment damage.
The power cord used with this equipment must meet the following
criteria:
• The power cord should be a minimum of 18/3 AWG, 60
°C,
Type SJT or SVT.
• UL and CSA Certified cordage rated for use at 250 VAC with a
current rating that is at least 125% of the current rating of the
product. In Europe, the cordage must have the HAR mark.
• The plug must be terminated in a grounding-type male plug
designed for use in your country. It must also have marks
showing certification by an agency acceptable in the country.
Quantum|ATL PowerStor L500 Series Tape Library User’s Guide 17
Page 34

Chapter 2 Installing the L500 Series Library
Receiving the Library
• The connector at the product end must be an IEC320 C13 (type
CEE-22) female connector.
• The cord length must not exceed 14.5 feet (4.5 meters).
Environmental Specifications
The installation location should meet the following environmental
2
specifications.
• Temperature: 50
• Relative humidity: 20% to 80% non condensing
• Humidity gradient: 10% per hour
• Dry bulb (ambient) temperature: 50
• Wet bulb (dew point) temperature: 77
• Temperature gradient: 19.8
• Temperature shock: 18
• Altitude: -500 to 30,000 feet (-150 to 9100 meters)
•
Air: free of airborne contaminates; e.g., dust, paper particles
Receiving the Library
When receiving the library from the shipper, unpack the unit as
close to the installation location as possible.
°F to 104°F (10°C to 40°C)
°F to 104°F (10°C to 40°C)
°F (25°C)
°F (11°C) per hour acros s t he range
°F (10°C) over two minutes
2
Inspect the shipping pallet and carton for damage that may have
occurred during shipment. Report any damage to the shipper
immediately.
18 Quantum|ATL PowerStor L500 Series Tape Library User’s Guide
Page 35

Chapter 2 Installing the L500 Series Library
Unpacking the Library
Unpacking the Library
Warning:
Caution:
The unpacking instructions vary depending upon whether you
ordered a stand-alone or rack mount library. If you received a
stand-alone library, you should have only one shipping carton.
Refer to the PowerStor L500 Unpacking Instructions, PN 6321102,
included with the library.
If you ordered a rack mount library, you should have two shipping
cartons. The large carton contains the library, and the smaller
carton contains the PowerStor Rack Mount Installation Kit.
2
The library weighs up to 76 lbs (35 kg) when fully
loaded. Two people should perform any steps that
involve lifting or guiding the library. Use safe
practices when lifting or guiding the library.
If you are installing the rack mount version of the
library, be sure to use Quantum|ATL’s PowerStor
Rack Mount Installation kit. This kit provides the
necessary support brackets and other hardware for
properly mounting the library.
Install the rack mount kit in the rack, referring to the PowerStor
Rack Mount Guide, PN 6322617, provided with the rack mount kit.
Caution:
The library weighs 76 lbs (35 kg). Two people should
perform any procedure that involves lifting or
moving the library.
1
Open the top of the shipping carton by carefully cutting the
packing tape.
2
Remove the two accessories boxes from the carton (see
figure 15). One box is empty. The other box contains the
accessories kit.
Quantum|ATL PowerStor L500 Series Tape Library User’s Guide 19
Page 36

Chapter 2 Installing the L500 Series Library
Unpacking the Library
3
Remove the packing foam from the top of the library (see
figure 16
4
With two people lif ting the library, re move it from the shippi ng
carton.
5
Remove the library from the shipping bag.
6
Place the library in the installa tion location. If it is a rack mount
library, place it in the rack.
Figure 15 Removing
the Accessories
Boxes
Accessories
).
20 Quantum|ATL PowerStor L500 Series Tape Library User’s Guide
Page 37

Figure 16 Removing
the Library from the
Shipping Carton
Chapter 2 Installing the L500 Series Library
Unpacking the Library
Packing foam
Shipping bag
Library
The library is now unpacked.
Caution: Do not attempt to open the front doors of the library
when the library is turned off. These doors open only
when the unit is turned on.
Quantum|ATL PowerStor L500 Series Tape Library User’s Guide 21
Page 38

Chapter 2 Installing the L500 Series Library
Connecting the Tape Library
Connecting the Tape Library
Complete the following procedure to connect the power cord and
SCSI signal cables to the tape library. Figure 17
panel lay out for a three-drive configuration.
Caution: Verify that the library card uses the same type of
SCSI bus as the drives. For example, connecting a
single-ended (SE) SCSI library to a differential (DIFF)
SCSI adapter will cause a host system malfunction.
Figure 17 Tape
Library Rear Panel
Cable Connectors
Power switch and
power connector
Library card
SCSI ID 0
to host
2
shows the rear
Library card
SCSI ID 0
to drives
Drive 2
SCSI ID 3
Drive 0
SCSI ID 1
Drive 1
SCSI ID 2
22 Quantum|ATL PowerStor L500 Series Tape Library User’s Guide
Page 39

Chapter 2 Installing the L500 Series Library
Connecting the Tape Library
To connect the tape library:
1
Verify that the power switch is in the off position.
2
Connect one end of the SCSI cable to the SCSI cable connector
on the library card, which is accessible from the back of the
tape library.
3
Verify that the SCSI bus is terminated properly.
Depending on the system configuration, the SCSI bus initiates
at the host, connects to the library controller, and then to any
other SCSI devices on the bus. It terminates at the last SCSI
device on the bus. SCSI cabling connections are shown in
figure 18
.
Figure 18 Sample
SCSI Cable
Connection
Library
Host
SCSI cables
Next SCSI device or terminator
4
Install the SCSI cables and tighten the screws to secure all
Library card (SCSI ID 0)
Drive 2 (SCSI ID 3)
Drive 0 (SCSI ID 1)
Drive 1 (SCSI ID 2)
cables.
5
Connect the power cord to the power connector on the back of
the tape library (figure 17
6
Connect the other end of the power cord to the AC power
).
source.
Quantum|ATL PowerStor L500 Series Tape Library User’s Guide 23
Page 40

Chapter 2 Installing the L500 Series Library
Running the Power-On-Self-Test (POST)
Running the Power-On-Self-Test (POST)
To verify proper system installation:
1
Turn on the tape library. The POST begins automatically.
Table 1 POST Pass/
Error Messages
Table 1
pass or fail messages associated with these tests.
POST Test - Description Pass Message Error Message
ROM EDC - Flash ROM EDC
test
Micro RAM - Micr opr ocessor
Local RAM test
UART - QUART test
Other
lists the tests that are run during POST, and displays the
DLTstor POST
1 EDC
DLTstor POST
2 Micro RAM
DLTstor POST
3 UART
DLTstor POST
4 Other
2
POST Error
in ROM EDC
POST Error
in Micro RAM
POST Error
in UART
POST Error
in Other
Next, the drives and the library are initialized. The OCP
displays:
Library Idle
Library Init
Library Idle
The OCP buttons are not active until the OCP displays
Library Idle
.
If all the POST tests complete successfully and the drives and
library are initialized, t he library is ready for operati on.
2
If the tests do not complete, run the POST again. Turn the
power off, wait 10 seconds, then turn the power back on. If the
tests still do not comp lete, the library needs service.
24 Quantum|ATL PowerStor L500 Series Tape Library User’s Guide
Page 41

Chapter 2 Installing the L500 Series Library
Configuring the Tape Library
Configuring the Tape Library
This section describes how to configure the library. Configuration
consists of verifying SCSI ID settings for the library and all drives.
Figure 19
tape library. Verify all SCSI IDs using the OCP. If necessary, change
the IDs (see Changing SCSI ID Settings
Figure 19 Front Panel
(rack mount)
shows the location of the OCP on the front panel of the
OCP
Magazine 0 Door
(Slots 0 - 6
2
).
PREVIOUS SELECT
LCD
ENTERNEXT
Magazine 1 Door
)
(Slots 7 - 13
)
The system uses SCSI IDs to identify or address devices, such as
the library card and the t ape drives, on the SCSI bus.If the library is
one of multiple SCSI devices on the bus, use a SCSI ID that is
unique from any other device or system ID on the SCSI bus.
Table 2
lists the default SCSI IDs. Figure 17 on page 22 shows
physical SCSI device locations.
Quantum|ATL PowerStor L500 Series Tape Library User’s Guide 25
Page 42

Chapter 2 Installing the L500 Series Library
Configuring the Tape Library
Table 2 SCSI ID
Default Setting
Viewing SCSI IDs
SCSI ID Device
0 Library controlle r
1Drive 0
2Drive 1
3Drive 2
Caution:
The library recognizes tape drive identification by
physical position in the tape library.
2
Use the OCP to view the current SCSI ID settings:
1
2
Press
Press
SELECT
to enter the
NEXT
until
SCSI ID?
SCSI ID
is displayed.
menu.
displayed.
3
Press
ENTER
to view all SCSI IDs.
View ID?
is
4
If the SCSI IDs listed are correct for the system configuration,
press
SELECT
to return to the main menu. Otherwise, proceed
to the next set of instructions to change drive SCSI ID settings.
Changing SCSI ID Settings
To change the current SCSI ID settings for a drive:
2
1
2
3
4
Press
Press
Press
Press
NEXT
ENTER
NEXT
ENTER
Set ID?
.
Set ID? Drive 0?
.
or
PREVIOUS
is displayed.
until the desired drive is displayed.
when the desired drive is displayed. The SCSI ID
is displayed.
selections (0 through 15) are displayed.
5
Press
NEXT
or
PREVIOUS
until the desired SCSI ID is
displayed.
26 Quantum|ATL PowerStor L500 Series Tape Library User’s Guide
Page 43

6
Press
changed.
ENTER
Chapter 2 Installing the L500 Series Library
Operating the Tape Library
. The desired drive and SCSI ID setting is then
Changing the Library Card SCSI ID Setting
Note:
The SCSI ID change takes about 10 seconds to
complete. No other library activity should occur at
this time.
7
Repeat Steps 1 through 4 to verify the new SCSI ID. If the SCSI
IDs listed are now correct for the system configuration, press
SELECT
to return to the main menu. Otherwis e, proceed t o the
next set of instructions to change the library SCSI ID setting.
To change the current SCSI ID for the library card:
2
1
2
Press
Press
.
NEXT
ENTER
Set ID? Library?
is displayed.
and the SCSI ID selections (starting with 0 and
continuing on through 15) are displayed.
3
Press
4
Press
5
To verify, refer to Viewing SCSI IDs on page 26
6
Press
or
NEXT
ENTER
SELECT
PREVIOUS
to select the SCSI ID to be changed.
when the desired library SCSI ID is displayed.
to return to the main menu.
Note:
Host power must be recycled for any library SCSI ID
changes to take affect; however, library power does not
have to be cycled if the changes were made via the OCP.
Operating the Tape Library
The magazine slots are labeled 0 through 6 (magazine 0) and 7
through 13 (magazine 1). The left magazine in the rack mount
Quantum|ATL PowerStor L500 Series Tape Library User’s Guide 27
2
Page 44

Chapter 2 Installing the L500 Series Library
Operating the Tape Library
version (top magazine in the tower version) is magazine 0. The
right magazine in the rack mount version (the b ottom ma gazi ne in
the tower version) is magazine 1 (see figure 19
).
Caution:
Caution:
Caution:
Note:
Use slot 0 when performing a microcode update; use slot 13
when using the optional AutoClean mode. The cleaning tape
should be stored in slot 13.
Note:
Insert and remove all cartridges at the front of the magazine.
Do not press on the metal tabs on the inside edge of
the magazine slots when a tape cartridge is present.
Never apply labels to the top, bottom, or sides of tape
cartridges. Doing so can cause cartridge jams in the
tape library. Use the space on the front of the
cartridge for labels.
Never attempt to manually move the CHM; damage
to the library could occur. If the CHM must be
moved, recycle power and wait until
Idle
is displayed on the OCP. The CHM will then
Library
be in its home position.
Inserting a Cartridge
28 Quantum|ATL PowerStor L500 Series Tape Library User’s Guide
To insert a cartridge into a magazine:
2
1
Verify that all library SCSI library activity has stopped
Library Idle
(
2
To open the magazine door, using the OCP:
a
Press
SELECT
b
Press
NEXT
c
Press
NEXT
should be displayed on the OCP).
until
Eject Cartridge?
.
Unlock Doors?
.
EJECT/UNLOCK?
is displayed.
is displayed.
is displayed.
Page 45
Chapter 2 Installing the L500 Series Library
Operating the Tape Library
d
e
Note:
Press
ENTER
Press
ENTER
This activity can take up to three minutes if the
Are you sure?
.
Open Doors!
.
is displayed.
is displayed.
cartridge is to be removed fr om the drive and the end
of data is at the end of the ta pe spool . Press any other
button to stop the operation.
3
Open the door using the handle.
Note:
Door Unlocked!
is always displayed when the
door is unlocked. The only way library operation will
be restored is to open and close one or both doors.
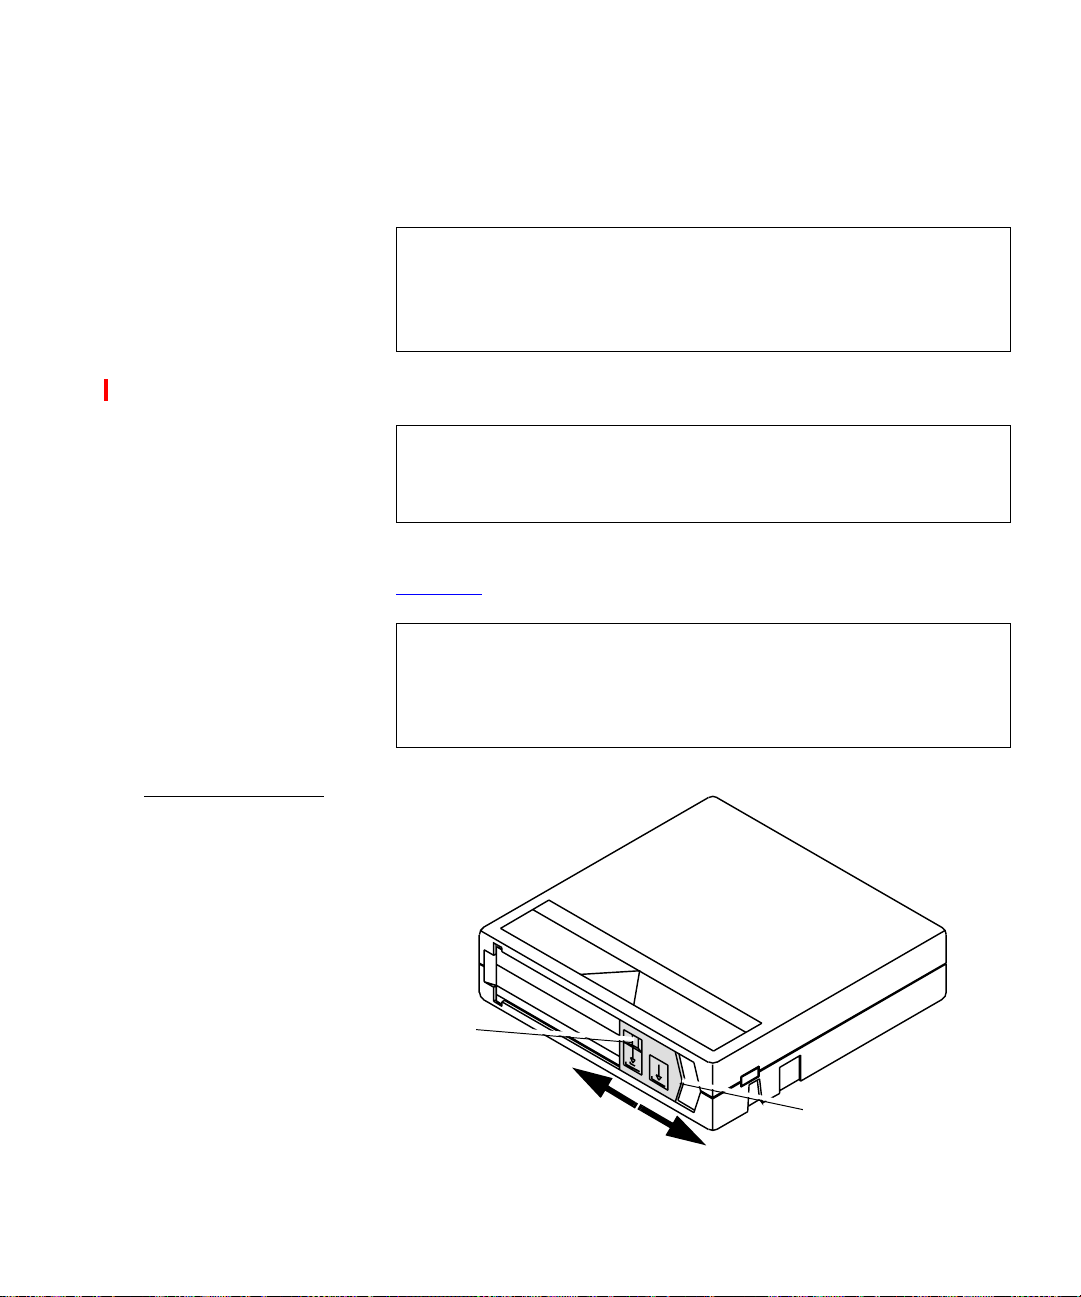
4
Set the write-protect switch to the desired position (see
figure 20
Note:
).
The tape is write-protected if the orange indicator is
visible.
The tape is write-enabled if the orange indicator is
not visible.
Figure 20 Cartridge
Write-Protect Switch
Orange
indicator
Write
Protected
Write
Enabled
Quantum|ATL PowerStor L500 Series Tape Library User’s Guide 29
Write
Protect
Switch
Page 46

Chapter 2 Installing the L500 Series Library
Operating the Tape Library
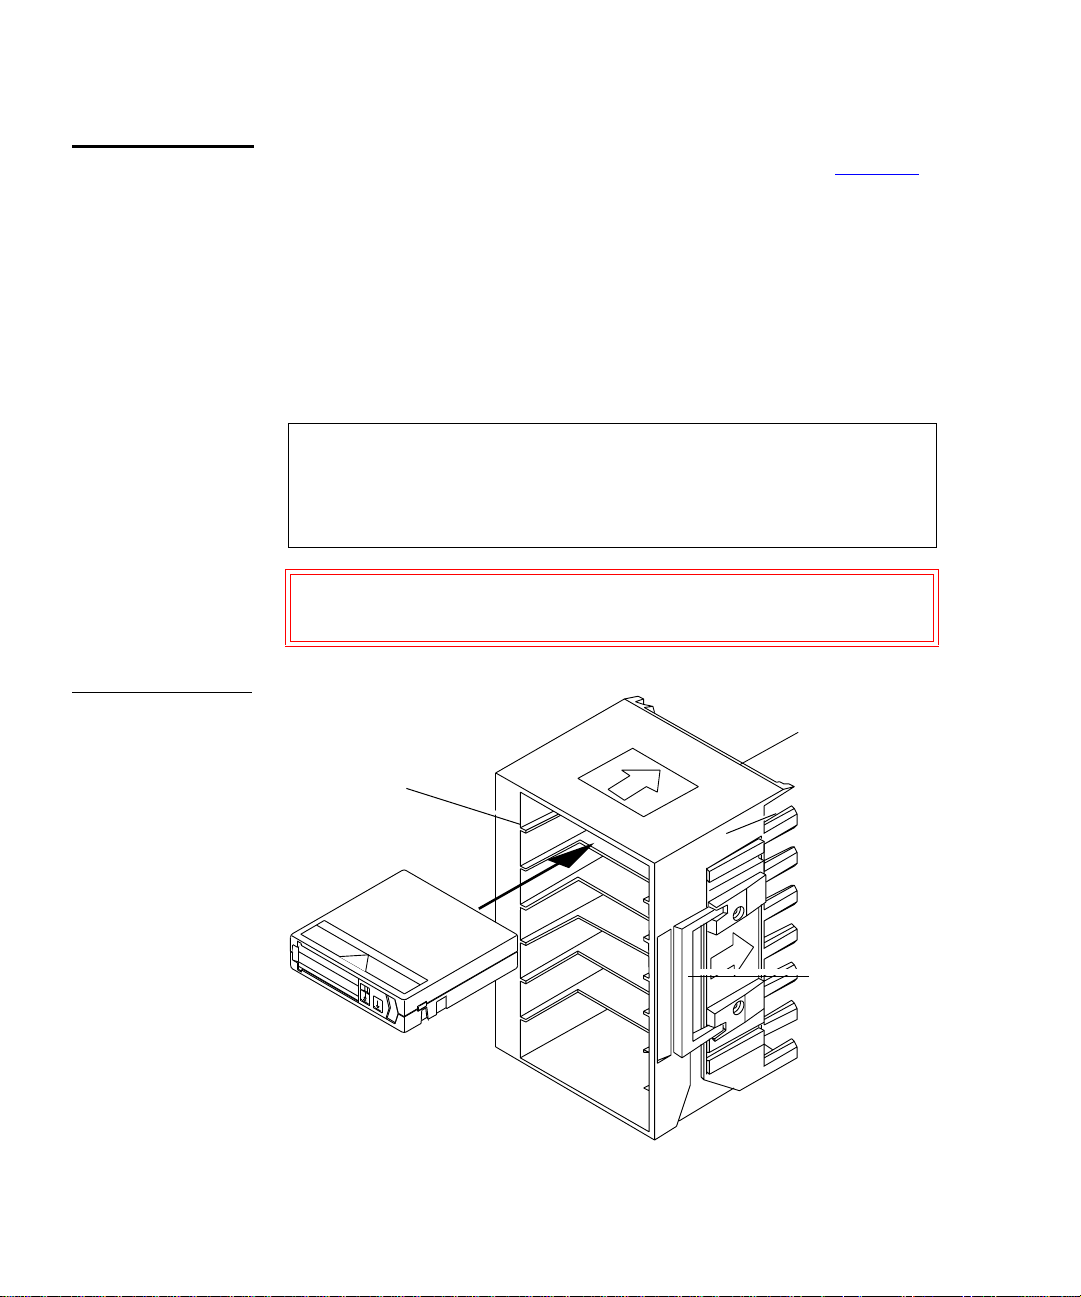
5
Orient the cartridge as shown in figure 21. The write-protect
switch is on the right side of the cartridge, facing you.
6
Insert the cartridge into the magazine by pushing it into the
slot until it latches. A small metal retaining tab pops out at the
opening of the magazine slot, holding the cartridge in place
(see figure 21
).
Figure 21 Inserting a
Cartridge
Caution:
Back of magazine
7
Insert the magazine into the library.
8
Close the magazine door by pushing the door until it latches.
Do not press the metal tab manually.
Write-protect switch
Metal tab
The door will lock automatically after approximately five
seconds.
9
The library then executes a scan magazine function.
Upon completion,
Eject/Unlock
? is displayed. If the
optional bar code reader is present, it reads the cartridge bar
code labels.
30 Quantum|ATL PowerStor L500 Series Tape Library User’s Guide
Page 47

Chapter 2 Installing the L500 Series Library
Operating the Tape Library
Removing a Cartridge from a Magazine
Figure 22 Removing a
Cartridge from the
Magazine
To remove a cartridge from the magazine:
2
1
Press in on the cartridge until it stops and you hear a click.
2
Release the cartridge. The slot has a spring-release action and
will partially eject the cartridge for ease of removal.
Caution:
When a cartridge is inserted in a magazine slot, a
metal retaining tab pops up from the front edge of
the slot to retain the cartridge. Do not press on the
metal retaining ta b. Always use the pr ess-and-re lease
technique to remove cartridges from the magazine
(see figure 22
Back of magazine
).
1
Push
2
Release
Front of magazine
Quantum|ATL PowerStor L500 Series Tape Library User’s Guide 31
3
Pull
Page 48

Chapter 2 Installing the L500 Series Library
Operating the Tape Library
Using the Cleaning Cartridge
If the tape drive detects a failur e during the ca libration r outine or if
2
an unrecoverable hard er ror occurs while either writing or r eadin g
Note:
Cln
is displayed.
Use slot 13 for storing the cleaning cartridge and when
setting the AutoClean Mode to
Cln
message indicates that the drive head may be
Yes
.
a tape,
• The
contaminated and in need of cleaning.
• Repeated
Cln
messages with different data cartridges indicate
a failure that may require drive replacement.
Cln
• If
appears on the display when a particular cartridge is
used, it may be a media problem. Replace the tape cartridge.
Note:
Always use the cleaning cartridge to clean the drive. Do
not use cleaning solvents or attempt to service the tape
drive head.
The cleaning cartridge can be used 20 times. When the drive
detects that a cleaning cartridge has expired, the drive r ewinds and
unloads the cartridge. If the cleaning routine is run on a cleaning
cartridge that has not expired,
the tape rewinds and unloads. The
Cln
is cleared from the OCP after
Cln
message is cleared when
the tape drive successfully completes a cartridge calibration
routine after a retry.
To limit use of a cleaning cartridge:
• Avoid touching leaders and media with bare fingers. Oils and
grease from the skin are especially damaging and may cause a
failure requiring drive replacement
• Maintain a clean work area for any tape product to help ensur e
drive reliability
• Select a site away from line printers, cardboard boxes or other
sources of dust and debris
• Follow the handling and storage guidelines supplied with each
cartridge
32 Quantum|ATL PowerStor L500 Series Tape Library User’s Guide
Page 49

Chapter 3
Basic Library Operations
This chapter describes the overall menu structure of the Operator
Control Panel (OCP). The following functions are described:
• Library status
• Eject/unlock
• Load
• SCSI ID
• Mode
• Information
• Code update
• Tests
3
Caution: Before executing a menu function command fr om the
OCP, verify that there is no SCSI bus activity to the
tape library or drives. Executing commands via the
OCP and SCSI bus simultaneously may result in
operation failure and/or drive unavailability.
Quantum|ATL PowerStor L500 Series Tape Library User’s Guide 33
Page 50

Chapter 3 Basic Library Operations
OCP Functions
OCP Functions
The OCP, located on the front panel of the library, controls all local
functions.
The OCP consists of an LED display and four push-buttons:
•
•
•
•
The LED display displays two lines of characters. Either line can
contain a mixture of messages and/or fi eld codes. Fig ur e 23
the OCP buttons.; table 3
LED display.
Figure 23 OCP
Previous
—advance through each option
Next
Select
—enter and execute commands in the current option
Enter
LED display
3
—return to a previous option
—return to the main menu options
shows
describes the menu structur e for the OCP
PREVIOUS SELECT
NE XT
34 Quantum|ATL PowerStor L500 Series Tape Library User’s Guide
ENTER
Page 51

Chapter 3 Basic Library Operations
OCP Functions
Table 3 OCP LCD
Menu Struct ure
OCP Main Menu OCP Submenus
•
STATUS?
EJECT/UNLOCK?
(Pre-v34
firmware)
EJECT/UNLOCK?
(v34+ firmware)
Library Init/Active/Idle
•
Slot Status 0-13
slots)
•
Drv 0, Drv 1, Drv 2
drive status)
•
Eject Cartridge?
from a drive
•
Eject Drive?
drive and returns it to its respective slot (if
a drive has a cartridge in it)
•
Unlock Door?
tape is ejected from each drive and
returned to its respective magazine slot)
•
Eject Cartridge?
from drive if cartridge is present. If
cartridge is not present,
is displayed.
•
Eject Drive?
the drive and returns it to its slot (if the
drive is loaded and
SetUnloadCart
(at POST)
(displays status of all
(displays tape
unloads cartridge
ejects cartridge from each
unlocks the door after the
unloads cartridge
Drive is Empty
ejects
the cartridge from
Mode/
is enabled)
•
Unlock Door
after the cartridge is ejected from the drive
(if Mode/SetUnloadCart is enabled), or
without ejecting the cartridge from the
drive (if Mode/SetUnloadCart is disabled)
•
LOAD?
Quantum|ATL PowerStor L500 Series Tape Library User’s Guide 35
Load Slot # To Drive #?
cartridge from selected slot
•
From Slot #
selected slot)
unlocks the door either
loads
(loads cartridge from
Page 52

Chapter 3 Basic Library Operations
OCP Functions
OCP Main Menu OCP Submenus
SCSI ID?
Mode?
*
NOTE: Requires
V34+ firmware
View ID
•
IDs).
Set Drive ID
•
Set Lib ID
•
Random
•
magazine slot
Sequential
•
to high magazine slot once
Sequential Circ
•
from low to high magazine slot repeatedly
Autoload Cart (Y/N)
•
SeqCirc
EnableBarcode (Y/N)
•
AutoClean (Y/N)
•
SetUnloadCart* (Y/N)
•
unload tape drives and return cartridges to
respective bins when
command is given. Y (enable) is the
default. If disabled (N), cartridge is left in
tape drive when
command is given.
(displays drive and library SCSI
(sets drive SCSI ID)
(sets library SCSI ID)
loads any cartridge from any
autoloads cartridge from low
autoloads cartridge
(enable for
modes)
enable to
Unlock Door?
Unlock Door?
Seq/
36 Quantum|ATL PowerStor L500 Series Tape Library User’s Guide
Page 53

Chapter 3 Basic Library Operations
OCP Main Menu OCP Submenus
OCP Functions
INFORMATION?
CODE UPDATE
Loader HW Rev
•
decimal)
Loader FW Rev
•
decimal)
Loader Mech Rev
•
decimal)
Library HW Rev
•
decimal)
Library FW Rev
•
decimal)
Drive # FW Rev
•
level in hex)
Loader Life Cycle Count
•
completion of loader 1 POST)
Current Cycles
•
POST)
Drive #
Update Drive
code update tape into a drive)
(starts the code update process)
(device rev level in
(firmware rev level in
(loader rev in
(device rev level in
(firmware rev level in
(drive firmware rev
(from completion of
(installs microcode from
(count from
•
TESTS
Elevator Test
• Load/Unload Test
• Long Ld/Unload Test
Quantum|ATL PowerStor L500 Series Tape Library User’s Guide 37
Page 54

Chapter 3 Basic Library Operations
OCP Functions
Table 4 OCP Button
Descriptions
OCP Button Description
PREVIOUS
NEXT
SELECT
Commands the library to:
•
Cycle backward within the main menu options
•
Cycle backward within a submenu
Press repeatedly to return to the desired display.
Commands the library to:
•
Proceed to the next main menu option
•
Proceed to the next submenu option
Press repeatedly to cycle forward through the
desired displays.
Commands the library to:
•
Advance through the main menu options:
STATUS?, EJECT/UNLOCK?, LOAD?,
SCSI ID?, MODE?, INFORMATION?,
CODE UPDATE?, and TEST?
Press the Select button repeatedly to reach the
option.
•
Escape out of a submenu and return to the
main menu
ENTER
38 Quantum|ATL PowerStor L500 Series Tape Library User’s Guide
Commands the library to:
•
Enter an OCP main menu or submenu option
•
Execute a command
Page 55

Chapter 3 Basic Library Operations
Status
Status
STATUS?
The
option displays tape drive and magazine slot status.
When the system is first powered on, it conducts a power-on selftest (POST). Upon completion of the POST, the drives and the
library are initialized.
At this time, the OCP main menu
STATUS?
options are described
as “Library” options. The OCP buttons are not active during
initialization. The following mes sages are displayed:
• Library Init
• Library Active
• Library Idle
If either status message,
Library init
Library Active
or
,
appears on the LCD, the library is in the process of completing an
activity. Wait until
Library Idle
appears before entering any
commands.
Press
Note: The
to obtain status.
NEXT
STATUS?
option gives status information only and
there are no commands to be issued; therefore the
ENTER button is not functional.
3
Table 5
lists possible
STATUS?
options and their respective
messages.
Quantum|ATL PowerStor L500 Series Tape Library User’s Guide 39
Page 56

Chapter 3 Basic Library Operations
Status
Table 5 Status
Options
Option Description Message Note
Slot Status
Drv 0-Drv 2
Displays
status of all
magazine
slots.
Displays tape
drive status
including
tape drive
error
conditions
and cartridge
conditions.
Cartridge Status:
0 6 7 13
where:
= cartridge present
= cartridge in drive 0, 1, or 2
2
10
-
m
t
Status:
= empty slot (dash)
= missing
= in transit (cartridge in
CHM)
• Empty
InFlux
•
Cln
•
• Code Update
(drive is becoming ready)
(cleaning required)
(updating firmware)
• Calibrating
• Unloading
COMP
- If the
last read or
write operation
was data
compressed,
COMP
is
displayed in
addition to the
status
message.
a
Loading
•
Cleaning
•
Erasing
•
Writing
•
Reading
•
Seeking
•
Rewinding
•
Idle
•
40 Quantum|ATL PowerStor L500 Series Tape Library User’s Guide
Page 57

Chapter 3 Basic Library Operations
Option Description Message Note
Status
Drv 0-Drv 2
Slot
0123...13
Bar code:
___*
Displays tape
drive status
including
tape drive
error
conditions
and cartridge
conditions.
Displays
specific slot
status.
Error:
Hardware Error
•
Comm Error
•
Library Error
•
in Drive #
Empty
Full
In transit
Missing
CLN - If the
tape drive head
requires
cleaning, CLN
is displayed in
addition to the
status message.
If applicable,
the second line
of this message
displays a bar
code label
entry.
a.
a. When using an unrecorded tape, the tape drive defaults to native tape density if a write from the
beginning of tape (BOT) is executed.
If you execute a write from the beginning of tape (BOT) when using an unrecorded tape, the
tape drive defaults to native tape density.
If you execute a write from the BOT when u sing a recorded tape, all pre-recorded data (and density changes) are lost.
from the BOT.
Quantum|ATL PowerStor L500 Series Tape Library User’s Guide 41
This includes density changes because they are established when writing
Page 58

Chapter 3 Basic Library Operations
Eject/Unlock
Eject/Unlock
EJECT/UNLOCK?
The
cartridge from the tape drive.
Caution: Do not press
until the backup or other tape operations are st opped
at the host; pressing these buttons while other
operations are executing may result in operation or
drive failure.
Table 6
lists possible
messages.
Table 6 Eject/Unlock
Options
Option Description Message Notes
Eject
Cartridge?
Unlock
Doors?
Unloads the cartridge
from the tape drive and
reports on drive status
Ejects any cartridge that
is in a drive then unlocks
the library doors
option unlocks the library door and ejects a
PREVIOUS, NEXT, SELECT
EJECT/UNLOCK?
Eject Drive #?
Drv # to Slot #?
options and their r espective
The Eject function
unloads the cartridge
from the tape drive.
Library Idle
Drive Empty
The library door is
unlocked.
Open Doors!
or
ENTER
3
Doors Unlocked!
42 Quantum|ATL PowerStor L500 Series Tape Library User’s Guide
Page 59

Opening the Library Doors
3
Caution:
Never force the library door open. Wait until the
Open Doors!
the libra ry locking mechanism has completed the
unlocking activity.
To open the library doors:
Chapter 3 Basic Library Operations
Eject/Unlock
message is displayed to verify that
Closing the Library Doors
1
2
3
4
5
Press
Press
Press
Press
Press
SELECT
NEXT
NEXT
ENTER
ENTER
Eject/Unlock? i
.
Eject Cartridge?
.
Unlock Doors?
.
Are you sure?
.
to answer Yes.
s displayed.
is displayed.
is displayed.
is displayed.
The loader removes all cartridges from each drive and displays
Open Doors!
This activity can take up to three minutes if a
rewind from end of tape is required.
The library doors are now unlocked.
To close the library doors, push each door closed until it latches.
3
The door will lock automatically after approximately five seconds.
The library executes a scan magazine function.
Upon completion,
EJECT/UNLOCK?
is displayed. If the optional
bar code reader is present, the cartridge labels are read.
Unloading a Cartridge from the Tape Drive
To unload a cartridge from the tape drive:
3
1
Press
SELECT
2
Press
NEXT
Quantum|ATL PowerStor L500 Series Tape Library User’s Guide 43
Eject Cartridge?
.
EJECT/UNLOCK?
until
is displayed.
is displayed.
Page 60

Chapter 3 Basic Library Operations
Eject/Unlock
3
Press
ENTER
Eject Cartridge? Eject Drive 0?
.
displayed.
4
Press
ENTER
. One of the following messages is displayed:
• Drive is Empty
• Drive NOT Present
• Eject to Slot 0?
Drive is Empty
If
Drive NOT Present
or
is displayed,
there is no cartridge to unload in drive 0.
5
Press
. The system searches for a cartridge in the next
NEXT
drive.
6
Repeat steps 4 and 5 until the desired drive is displayed.
7
Eject to Slot 0?
If
slot destination for the cartridge, press
is displayed, and slot 0 is the correct
ENTER
to unload the
cartridge.
If slot 0 is not the correct slot destination, press
NEXT
correct slot is displayed. During the unloading process, the
following occurs:
•
The CHM moves to the drive.
Unload
is displayed.
is
until the
•
The cartridge is removed from the drive by the CHM.
Unload
•
The CHM moves to the displayed slot position and inserts
the cartridge into the magazine.
•
After the cartridge is unloaded,
is displayed.
Unload
Library Idle
displayed.
8
Press
SELECT
Magazine Removal
44 Quantum|ATL PowerStor L500 Series Tape Library User’s Guide
3
To remove a magazine from the tape library:
1
Press
SELECT
2
Press
NEXT
to return to the main menu.
Eject/Unlock?
until
Eject Cartridge?
.
is displayed.
is displayed.
is displayed.
is
Page 61

Chapter 3 Basic Library Operations
Eject/Unlock
3
Press
NEXT
4
Press
ENTER
5
Confirm that the tape drive is idle.
6
Press
ENTER
Caution:
Unlock Doors?
.
Are you sure?
.
to answer Yes.
is displayed.
is displayed.
Open Doors!
is displayed.
Never force the magazine doors open. Wait unt il
Open Doors!
is displayed to verify that the
library locking mechanism has completed the
unlocking activity.
7
Open one or both library doors.
8
Grasp the magazine and pull it out of the library.
9
To close the library doors, push each door closed until it
latches. The doors will lock automatically after approximately
five seconds.
The tape library then executes a Scan Magazine function. Upon
completion,
Eject/Unlock?
is displayed.
If the optional bar code reader is present, the cartridge labels
are read.
Installing a Magazine
To remove or insert a cartridge in a magazine, see Loading a
Cartridge on page 48.
To install a magazine into the tape library:
3
1
Press
SELECT
2
Press
NEXT
3
Press
NEXT
4
Press
ENTER
5
Confirm that the tape drive is idle.
6
Press
ENTER.
Quantum|ATL PowerStor L500 Series Tape Library User’s Guide 45
Eject Cartridge?
.
Unlock Doors?
.
.
EJECT/UNLOCK?
until
Are you sure?
Open Doors!
is displayed.
is displayed.
is displayed.
is displayed.
is displayed.
Page 62

Chapter 3 Basic Library Operations
Eject/Unlock
.
Figure 24 Tape
Library (One
Magazine Installed)
Caution:
Do not force the library doors open. Wait until
Open Doors!
is displayed to verify that the
library locking mechanism has completed the
unlocking activity.
7
Open one or both library doors.
8
Position the magazine with the handle on the side opposite of
the library door hinge.
9
Push on the front edges of the magazine and slide it fully into
the magazine bay.
Note:
Do not push on the cartridges when inserting the
magazine into the library.
Loaded magazine
46 Quantum|ATL PowerStor L500 Series Tape Library User’s Guide
Page 63

Chapter 3 Basic Library Operations
Loading a Cartridge
10
To close the library door, push the door closed until it latches.
The door will lock automatically after approximately five
seconds.
The library executes a scan magazine function. Upon
completion,
Eject/Unlock?
is displayed. If the optional bar
code reader is present, labels are read.
Note:
Loading a Cartridge
LOAD?
The
drive.
You can activate the library via the SCSI bus, or via the OCP.
If the tape drive does not contain a cartridge, the
loads a cartridge from the user’s selected slot.
To load a cartridge from a magazine slot into a drive:
1
Press
2
Press Enter.
You can operate the library with one or both magazines
installed. If one magazi ne is insta lled, it ma y occup y eit her
magazine bay. However, both library doors must be close d
during library operation.
option controls the loading of any cartridge into a tape
SELECT
Load Slot 0?
until
LOAD?
LOAD?
is displayed.
is displayed.
option
3
Press
ENTER
Slot 0? To Drive 0?
to load a cartridge from slot 0 into a drive.
is displayed.
To load the slot 0 cartridge into a different drive, press
Load
NEXT
until the desired drive number is displayed.
3
Press
ENTER
To load the cartridge into drive 0, press
To load the cartridge into a different drive, press
Load Slot x? To Drive 0?
.
ENTER
is displayed.
.
until
NEXT
the desired drive is displayed.
Quantum|ATL PowerStor L500 Series Tape Library User’s Guide 47
Page 64

Chapter 3 Basic Library Operations
Loading a Cartridge
4
Press
5
One of the following messages is displayed:
• Drive 0 is Full
ENTER
.
A cartridge is already installed in the drive. To continue,
select an empty drive using
NEXT
or
PREVIOUS
or unload
the cartridge from the full drive (see Unloading a Cartridge
from the Tape Drive on page 43). Perform the load function
again.
• Slot x is Empty
There is no cartridge available in the selected slot. To
continue, select a slot that contains the cartridge using
NEXT
or
PREVIOUS
, or insert a cartridge into the empty
slot.
• LOADING or UNLOADING
CALIBRATING COMP
or
The library is in the process of completing an activity.
When the activity is completed,
Library Idle
is
displayed.
• IDLE COMP
The load function is complete.
Depending on the message displayed, take the appropriate
action.
6
During the loading process, the following occurs:
a
The CHM moves to the selected slot.
b
The cartridge is removed from the magazine and placed in
the CHM.
c
The CHM moves to the displayed drive position and
LOAD
is displayed.
inserts the cartridge into the drive.
LOAD
LOAD
is displayed.
is displayed.
d
After the cart ridge is inse rte d into t he driv e,
is displayed.
e
After the cartridge is fully loaded a nd at BO T (beginning of
tape),
48 Quantum|ATL PowerStor L500 Series Tape Library User’s Guide
Library Idle
is displayed.
CALIBRATION
Page 65

7
Press
SELECT
Chapter 3 Basic Library Operations
SCSI ID
to return to the main menu.
SCSI ID
SCSI ID?
The
option displays the SCSI ID for all devices and
allows existing SCSI IDs to be changed.
Make sure all devices on the same SCSI bus have diff er ent SCSI ID
assignments. SCSI ID defaults are as follows:
• Drive 2 = SCSI ID 3
• Drive 0 = SCSI ID 1
• Drive 1 = SCSI ID 2
• Library controller = SCSI ID 0
Table 7
lists possible SCSI ID options and their respective
messages.
Note:
When changing a SCSI ID, wait at least 30 seconds be fore
checking the ID. The CHM may not show the changed
ID until the tape drive has been reset.
3
Quantum|ATL PowerStor L500 Series Tape Library User’s Guide 49
Page 66

Chapter 3 Basic Library Operations
SCSI ID
Table 7 SCSI ID
Options
Option Description Message Note
View
ID?
Set ID?
Lists all SCSI IDs
for the tape library
and drives.
Allows the user to
select a device and
change the SCSI ID
setting.
Lib 0
Drv0 1
Drv1 2
Drv2 N/A
Set ID?
Set ID?
Library?
Set ID?
Library? ##?
Set ID?
Drive#?
Set ID?
Drive#? ##?
This example shows the Library
SCSI ID = 0, Drive 0 SCSI ID = 1, and
Drive 1 SCSI ID = 2; Drive 2 is not
available in the system.
The system is set to change the drive
ID
Displays the library is to be changed
Selects the library and SCSI ID to be
changed
Displays the drive to be changed
Selects the drive and SCSI ID to be
changed
EEROM is maintained through power cycles. SCSI ID information
that is stored in non-volatile RAM is saved until you manually
change it. SCSI IDs do not automatically revert to their defaults.
Viewing the SCSI IDs
50 Quantum|ATL PowerStor L500 Series Tape Library User’s Guide
To view the status of the library and drive SCSI IDs:
3
1
2
Press
Press
SELECT
.
NEXT
View ID?
until
SCSI ID?
is displayed.
is displayed.
Page 67

3
Press
ENTER
. The SCSI IDs for the tape library and associated
drives are displayed.
4
Press
SELECT
Chapter 3 Basic Library Operations
SCSI ID
to return to the main menu.
Setting a SCSI ID
3
To change an existing drive or library SCSI ID:
1
Press
SELECT
2
Press
NEXT
3
Press
NEXT
4
Press
ENTER
5
Press
ENTER
0? 0?
6
Press
NEXT
7
Press
NEXT
8
Press
ENTER
9
If the SCSI ID information on the OCP is correct, press
10
Proceed through each device using
11
Press
ENTER
12
T o change the library contr oller SCSI ID, press
Library?
13
Press
ENTER.
View ID?
.
Set ID?
.
.
to change the drive 0 SCSI ID.
is displayed.
to continue without changing the drive 0 SCSI ID.
until the desired drive is displayed.
Set ID? Drive x? 0?
.
to execute any changes.
is displayed.
SCSI ID?
until
is displayed.
is displayed.
Set ID? Drive 0?
Set ID? Library? 0?
is displayed.
is displayed.
is displayed.
or
NEXT
is displayed.
Set ID? Drive
ENTER
PREVIOUS
NEXT
.
Set ID?
.
.
14
Press
NEXT
or
PREVIOUS
until the desired SCSI ID address is
displayed.
15
Press
ENTER
to assign the new SCSI ID address.
Set ID?
is
displayed.
16
Press
SELECT
17
Cycle power at the host to activate the new SCSI ID in the
to return to the main menu.
system.
Quantum|ATL PowerStor L500 Series Tape Library User’s Guide 51
Page 68

Chapter 3 Basic Library Operations
Mode
Mode
MODE?
The
The
ENTER
other modes to “Not Selected.” The Enter button also toggles the
“Yes” and “No” options.
Table 8
Warning: The optional bar code reader contains a Class 1 LED.
Table 8 Mode
Options
Option Description Message
Random
This command causes the library to automatically load any
cartridge from any magazine in the load cycle.
option controls how the library accesses cartridges.
button executes the “Selected” mode and toggles all
lists the Mode options and their respective messages.
Do not look at the LED for extended periods of time;
prolonged exposure may be harmful to the eyes.
Selected
NOT
Selected
3
Sequential
52 Quantum|ATL PowerStor L500 Series Tape Library User’s Guide
This command instructs the tape library to behave as an
autoloader. Ca rtridges are loaded sequentially fr om the lowest
magazine address and the lowest loaded slot position in that
magazine.
The loading and unloading of cartridges sequentially
progresses to the last cartridge and then the tape library stops.
To re-initiate this process either load a cartridge into the drive
via the OCP or via a SCSI Command.
This command works in conjunction with the
command.
Cart
Note:
The
Sequential
is configured with a single drive.
mode is functional only if the library
Autoload
Selected
NOT
Selected
Page 69

Chapter 3 Basic Library Operations
Option Description Message
Mode
Sequential
Circ
Autoload
Cart
Enable
Barcode
(optional)
Primarily designed for testing purposes, this command
instructs the tape library to behave as an autoloader.
Cartridges are loaded sequentially from the lowest magazine
address and the lowest loaded slot position in that magazine.
The loading and unloading of cartridges sequentially
progresses to the last cartridge and then the tape library
restarts the sequential loading sequence again from the first
available slot.
This command works in conjunction with the
command.
Cart
Note:
This command functions only in conjunction with
or
Sequential Circ
library starts loading cartridges following an open/close door
operation pe r
mode.
The library must be either in the
Circ
When enabled, the optional bar code reader scans the
cartridge bar code labels on power up and when the doors are
closed. The bar code labels are read via the OCP Status display
or a SCSI
The Sequential mode is functional only if the library is
configured with a single drive.
. Upon issuance of this command, the
Sequential
mode for
Autoload Cart
Read Element
or
Sequential Circular
Sequential
mode to be functional.
status command.
Autoload
Sequential
or
Sequential
Not
Selected
Selected
N
Y
N
Y
AutoClean
(optional)
To use, (a) press
sure doors are closed.
When enabled, the library automatically cleans drives when
required.
The time that a SCSI
complete increases from approximately 20 seconds to 60
seconds because the library must wait until calibration is
complete. If cleaning is required, the typical time increases to a
maximum of 10 minutes while the drive is cleaned.
To use, (a) load the cleaning tape in slot 13, (b) press ENTER to
enable
AutoClean: Y
Quantum|ATL PowerStor L500 Series Tape Library User’s Guide 53
ENTER
to Enable Bar Code: Y, and (b) make
Move Media
.
command takes to
N
Y
Page 70

Chapter 3 Basic Library Operations
Mode
Viewing a Mode
Setting a Mode
3
To view the current tape library modes:
1
Press
SELECT
2
3
Press
Press
ENTER.
NEXT
A
repeatedly. The status of the
Sequential Circ
4
Continue pressing
Barcode,
5
Press
SELECT
3
To set the current tape library modes:
1
Press
SELECT
2
Press
ENTER
3
Press
NEXT
and
.
repeatedly. Each mode option and status is
MODE?
until
Random Selected
modes are displayed.
NEXT
AutoClean
to return to the main menu.
MODE?
until
Random Selected
displayed. The following modes are displayed:
• Sequential NOT Selected
is displayed.
message is displayed.
Sequential
Autoload Cartridge, Enable
.
and
modes are displayed.
is displayed
is displayed.
• Sequential Circ NOT Selected
• Autoload Cart: N
• Enable Barcode: N
• Autoclean: N
4
Press
ENTER
The
ENTER
all other modes to
For example, if you toggle the
Random
the
toggled to
to toggle the mode options.
button executes the
Selected
NOT Selected
Sequential
Sequential Circ
and
NOT Selected.
The
.
mode to
modes are automatically
ENTER
button also toggles
each of the Y and N options.
5
Press
SELECT
54 Quantum|ATL PowerStor L500 Series Tape Library User’s Guide
to return to the main menu.
mode and toggles
Selected
,
Page 71

Chapter 3 Basic Library Operations
Information
Information
Table 9 Information
Messages
INFORMATION?
The
option displays device revision nu mber,
software revisi on number, tape library cycle count and loader err or
count.
Table 9
lists possible Information messages.
Information Type Message Note
Ldr Hw Rev ## .
Ldr Fw Rev ## .
Ldr Mech Rev ## .
Lib Hw Rev ## .
Lib Fw Rev ## .
Device hardware revision level
in decimal
Device firmware revision level
in decimal
Device mechanical revision level
in decimal
Library hardware revision level
in decimal
Library firmware revision level
in decimal
3
Drive 0 Fw
Rev
## h or
NOT
Drive firmware revision level in
hex
Present
Drive 1 Rev ## h or
NOT
Drive firmware revision level in
hex
Present
Drive 2 Rev ## h or
NOT
Drive firmware revision level in
hex
Present
Quantum|ATL PowerStor L500 Series Tape Library User’s Guide 55
Page 72

Chapter 3 Basic Library Operations
Code Update
Information Type Message Note
Code Update
Total Cycle
(Library
Life Cycle
## .
This count starts from the
completion of the library’s first
POST.
Count)
Current
## .
Cycles
Ldr Err: ## .
where the (.) signifies that the revision level is in decimal format; and
where the (h) signifies that the revision level is in hex format.
T= Test and V= Release
CODE UPDATE?
The
option shows each tape drive and installs
This count starts from the
completion of the library’s most
recent POST.
Loader error count
new microcode for a tape drive via cartridge.
3
Code Update
messages.
Displays installed
drive microcode
revision level
Table 10 Code
Update Messages
Table 10
Option Message Note
Update
Drive #
lists possible
Update Drive 0
Update Drive 1- NOT
Present
Update Drive 2 - NOT
Present
56 Quantum|ATL PowerStor L500 Series Tape Library User’s Guide
Page 73

Chapter 3 Basic Library Operations
Tests
Viewing the Drive Microcode Revision Level
Installing New Drive Microcode via Cartri dge
Tests
(.) T = Test
V = Release
(h) T = Test
V = Release
Signifies that the
revision level is in
decimal format
Signifies that the
revision level is in hex
format.
Vie w the Informati on option of the OCP to ob tain driv e mi crocode
revision levels. (See Information
on page 55.)
3
For detailed microcode update procedur es, contact Quantum|ATL
Customer Support.
3
TESTS?
The
option controls the library in ternal self-test functions.
3
Use the following guidelines to move through the Tests option:
• If
PREVIOUS
or
is pressed during a test, the next
NEXT
message test is displayed along with an appropriate message,
A Test is Active
“
.” When the original test is complete the
next test will start.
•
ENTER
provides access to the
TESTS?
option. If
ENTER
is
pressed during a test in progress, it will be terminated. Press
ENTER
to restart a test from the beginning, after the
termination process completes.
Table 11
Quantum|ATL PowerStor L500 Series Tape Library User’s Guide 57
lists possible
TESTS?
options.
Page 74

Chapter 3 Basic Library Operations
Tests
Table 11 Test Options
Option Description Message Note
Elevator
Test
Load/
Unload
Test
Long Ld/
Unload
Test
If
Note:
ENTER
If
If
an appropriate message, “
next selected test starts.
Tests the tape library
CHM function. This is
a one cycle test.
Tests seq u ential loads
and unloads cartridges
into the tape drive. This
is a one cycle test.
Tests randomly loads
and unloads cartridges
into the tape drive
continuously until
stopped by the
operator.
is pressed while a test is in progress, it will terminate.
ENTER
NEXT
is pressed during a terminated test, the test restarts from the beginning.
or
PREVIOUS
ACTIVE
or
ABORTED
ACTIVE
or
ABORTED
ACTIVE
or
The CHM is positioned to each
available data transfer element (drive)
or data storage element (magazine slot).
If a magazine is not present, the CHM
cannot be positioned to those slots. This
test is functionally equivalent to SCSI
Position to Element commands.
This test unloads any cartridge in the
drive, inserts a cartridge in the drive,
and replaces the cartridges in their
slots. The drive is left empty.
This test loads and unloads the drive
with cartridges from random slots.
ABORTED
is pressed during a test, the next message t est is displ ayed along with
<test name> Active
” When the original test is completed the
58 Quantum|ATL PowerStor L500 Series Tape Library User’s Guide
Page 75

Chapter 4
SCSI Interface
This chapter details the SCSI protocol features for the L500 Series
library. These features include:
• General SCSI bus operation
• SCSI message system
General SCSI Bus Operation
This section discusses general SCSI bus operation.
Note:
The SCSI specification refers to tape libraries as
“medium changers.”
4
4
Data Transfer
Note:
4
The L500 Series library supports asynchronous and synchronous
data transfers. The product has differential- and single-ended
versions. Odd parity is generated during all information transfer
phases where the device writes data to the SCSI bus, and checked
during all information transfer phases where data is read from the
bus. Parity checking can be disabled.
Quantum|ATL PowerStor L500 Series Tape Library User’s Guide 61
Tape drive commands are not discussed in this manual
but can be found in the SCSI Interface chapter of the
specific product manual.
Page 76

Chapter 4 SCSI Interface
General SCSI Bus Operation
Disconnects from the SCSI bus are done on operations that take
significant amounts of time such as Move Media commands. This
allows other devices to access the bus. This disconnecting is
configurable by use of the Disconnect-Reconnect Mode Parameters
page.
Initiator/Target Operation
SCSI IDs and Logical Unit Numbers (LUNs)
The library does not act as an initiator on the SCSI bus. Therefore,
4
the device does not:
• Generate unsolicited interrupts to the host
• Initiate its own SCSI commands
• Assert bus reset
The library has one logical unit. The library always appears as
LUN 0.
4
If the LUN specified in the Identify message is invalid, the library
accepts the Command Descriptor Block (CDB). Unsupported
LUNS are handled in one of three ways:
• If the command is Inquiry, the target returns the Inquiry data
with the peripheral qualifier set to 011, indicating that the
target does not support the LUN in question.
• If the command is Request Sense, the target returns sense da ta.
The sense key is Illegal Request with an additional sense code
of Invalid Logical Unit Number.
• For any other command, the target terminates the Check
Condition status, and generates the above sense data.
Unit Attention Condition
Queued Unit Attentions are implemented on this device, and are
4
maintained separately for each Initiator. Unit Attentions are
created in the following circumstances:
• Power on
• Bus reset
62 Quantum|ATL PowerStor L500 Series Tape Library User’s Guide
Page 77

Chapter 4 SCSI Interface
General SCSI Bus Operation
• Bus device reset message
• Media may have changed asynchronously
• Another initiator changed the mode parameters
It is not unusual for a firmware (microcode) update to complete
two queued Unit Attentions. The firmware has a limited number
of Unit Attention buffers. If an initiator does not clear queued Unit
Attentions, the library stops generating new Unit Attentions for
that Initiator-LUN (I-L) combination at some point, but existing
ones are left queued.
Behavior Around Power-On and SCSI Bus Reset
Other SCSI Functionality
Bus Phases
All device SCSI lines go to high impedance when the library is
powered off.
4
The library does not generate any spurious signals on the SCSI bus
at power-on.
Within 5 seconds of power on, and within 250 milliseconds
(typically under 4 ms) after a Bus Reset, the library responds to
SCSI bus selections and returns appropriate, normal, responses.
T a pe motion commands ar e returned with Check Condition status,
Sense Key Not Ready, until the media has been made ready.
The Hard Bus Reset option is implemented.
The library recognizes multiple bus resets in succession and bus
resets of arbitrarily long duration. It recov ers within the time limits
specified above, following the last bus reset.
Linked commands and untagged queuing are supported.
4
4
The library conforms to the bus state transition table shown in the
SCSI-2 standard, “Phase Sequences.” The information in the
following sections also applies.
Quantum|ATL PowerStor L500 Series Tape Library User’s Guide 63
Page 78

Chapter 4 SCSI Interface
General SCSI Bus Operation
Attention Signal Response
Status Phase
The library responds to an ATN condition at least at every phase
4
transition, as long as the initiator sets the ATN bit before the target
un-asserts the REQ for the last byte of the previous phase.
Generally ATN is recognized immediately by the library, and it
changes the bus phase to Message Out.
4
The library enters the status phase just once per command, unless
the initiator requests a retry. The only exception is during error
cases when the device goes immediately to bus free, as defined in
the SCSI-2 standard.
Possible status bytes that the library may return are as follows:
• Good (00): This status indicates the library successfully
completed the command.
• Check Condition (02): A contingent allegiance condition
occurred. The Request Sense command should be sent
following this status to determine the nature of the event.
• Busy (08): The target is busy. This status is returned whenever
the device is unable to accept a command from an otherwise
acceptable initiator. Th e initiator should reissue the command
at a later time.
• Intermediate Good (10h): This status is returned instead of
Good status for commands issued with the LINK bit set.
Following the return of this status, the library proceeds to the
Command phase for the transfer of the next linked command.
• Reservation Conflict (18h): This status is returned by the
library whenever a SCSI device attempts to access the library
when it has been reserved for another initiator with a Reserve
Unit command.
• Command Terminated (22h): This status is returned for a
command that was terminated by a “Terminate I/O Process”
message. This status also indicates that a contingent allegiance
condition has occurred.
64 Quantum|ATL PowerStor L500 Series Tape Library User’s Guide
Page 79

Chapter 4 SCSI Interface
General SCSI Bus Operation
The Test Unit Ready command is used to determine whether the
library would accept, for exam ple, a Move Medium or a P osition to
Element command without returning Check Condition status.
Bus Free
Bus Parity Errors
4
There are several situations when the device may go to Bus Free
unexpectedly, as defined in the SCSI-2 standard (see sections 4.1.1
and 4.3):
• An internal hardware or firmware fault that makes it unsafe for
the device to continue operation without a full reset (similar to
a power-up reset)
• ATN asserted or bus parity error detected during non-tape
data transfers
4
Bus parity errors (i.e. single bit errors) are very serious because
they imply the possibility of undetected double-bit errors on the
bus, which most likely would result in undetected d ata corruption.
On properly configured SCSI buses, parity errors should be
extremely rare. If any are detected, they should be addressed
quickly by improving the configuration of the SCSI bus. A well
configured SCSI system in a normal environment should be
virtually free of bus parity errors.
Bus parity errors cause the library to either retry the operation, go
to Status phase, or go to bus free and prepare Sense Data (see
section 6.1.1 in the SCSI-2 specification). Retrying of parity errors
during Data Out Phase when writing is normally not done, but can
be enabled by changing the EnaParErrRetry parameter in the VU
EEROM Mode Page. This feature is disabled by default due to
negative impacts on device performance (also, the data stream on
writes cannot be pipelined).
Quantum|ATL PowerStor L500 Series Tape Library User’s Guide 65
Page 80

Chapter 4 SCSI Interface
General SCSI Bus Operation
66 Quantum|ATL PowerStor L500 Series Tape Library User’s Guide
Page 81

Chapter 5
Troubleshooting Guidelines
This chapter provides troubleshooting procedures for the L500
Series library including:
• Proper OCP operation
• Basic problems
• Operation failure
• Error conditions
• Power problems
Proper OCP Operation
Chapter 5 provides detailed Operator Control Panel (OCP)
informat ion. Note the following:
5
5
• Do not execute a menu function from the OCP when
commands are being issued to the drive or library via the SCSI
bus. Ensure there is no SCSI bus activity to the tape library or
the drives. Doing so can result in operation failure or drive
unavailability.
• Do not press the
until backup or other tape operations are stopped at the
terminal. Doing so can result in operation failure or drive
unavailability.
Quantum|ATL PowerStor L500 Series Tape Library User’s Guide 67
SELECT, PREVIOUS, NEXT,
or
ENTER
buttons
Page 82
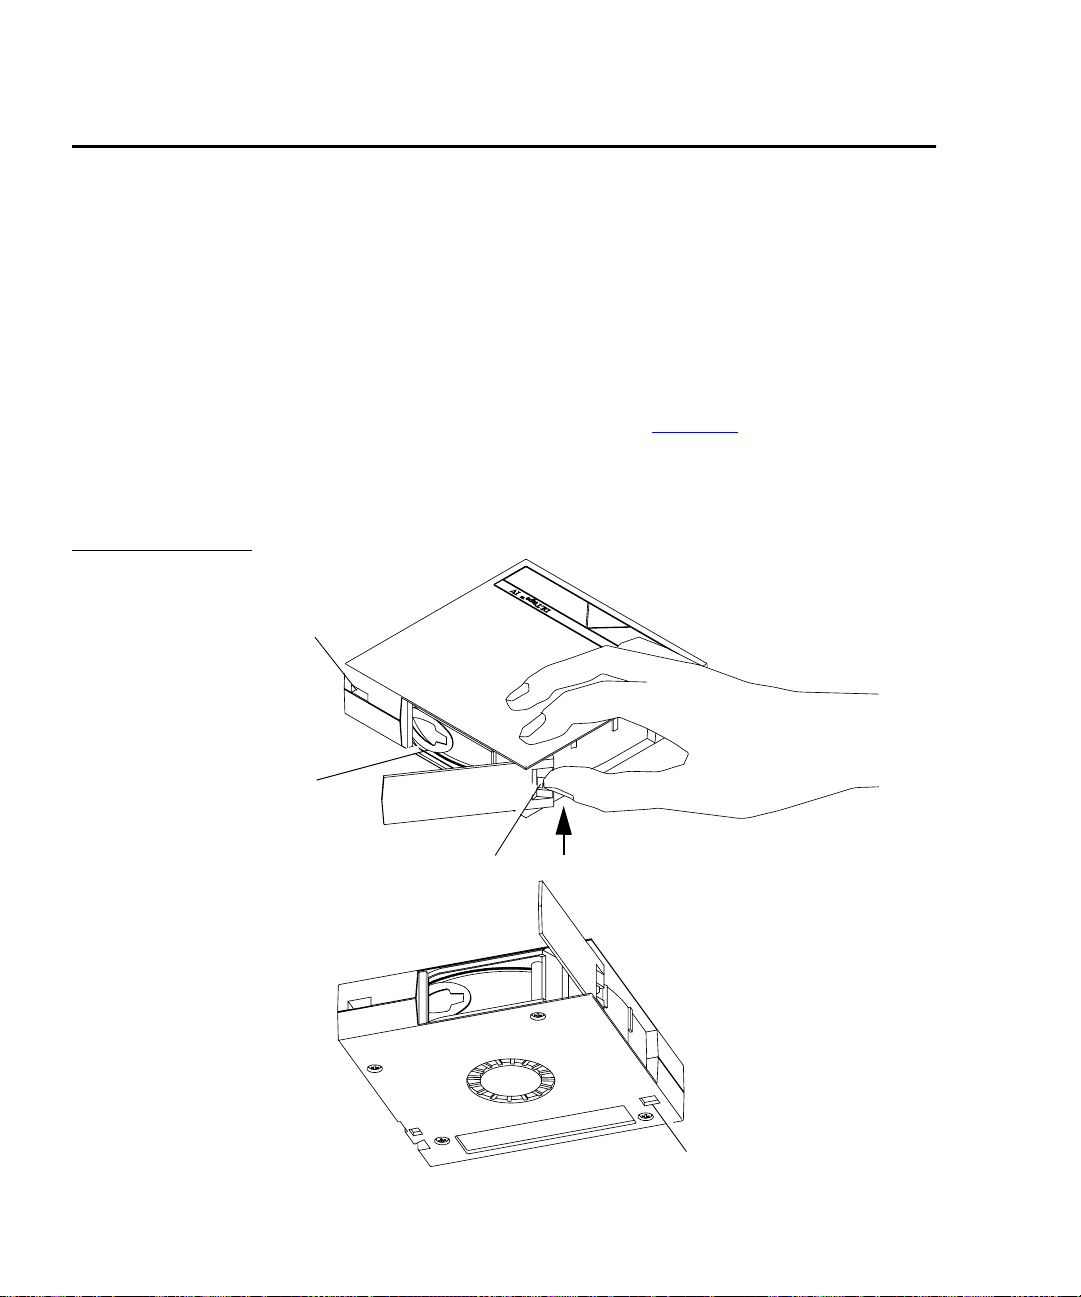
Chapter 5 Troubleshooting Guidelines
Avoiding Basic Probl em s
Avoiding Basic Problems
Follow these guidelines when you operate the tape li brary to avoid
problems:
• Do not touch the exposed magnetic tape. If the tape leader is
not in the correct position, use a new cartridge.
• Check the tape leader in the cartridge by lifting the cartridge
latch that opens the door, exposing the leader. Be sure the
leader is in the position shown in figure 25
• Be sure the receiver is fully closed and the current slot is correc t
for the starting cartridge.
Figure 25 Open ing
the Cartridge Door
Reel
lock
5
.
Tape
leader
Door release
latch
Reel lock
68 Quantum|ATL PowerStor L500 Series Tape Library User’s Guide
Page 83

Chapter 5 Troubleshooting Guidelines
Avoiding Basic Problems
Operation Failure
Power Problems
5
Some manual operations, if performed incorrectly, may cause write
operations to fail. For example:
• Loading any write-protected cartridges when executing write
operations
• Selecting the incorrect cartridge slot from which to initialize
operations
If an error occurs, read the display to help determine the problem.
Call your Quantum|ATL Customer Support representative.
5
If the OCP is not on, or your system does not recognize the library:
• Ensure that the power cord is firmly attached to both the
library and the power outlet.
• Verify with your system manager that the tape library
configuration is correct.
Quantum|ATL PowerStor L500 Series Tape Library User’s Guide 69
Page 84

Chapter 5 Troubleshooting Guidelines
Avoiding Basic Probl em s
70 Quantum|ATL PowerStor L500 Series Tape Library User’s Guide
Page 85

Appendix A
Library Specifications
This chapter provides the following about the L500 Series library:
• Physical specifications
• Performance specifications
• Power specifications
• Environmental specifications
• Vibration and shock specifications
• Electromagnetic interference (EMI) susceptibility
• ESD failure level limits
• Power distributed harmonics
• Acoustic noise emissions
• Regulatory requirements
• Drive reliability factors
Quantum|ATL PowerStor L500 Series Tape Library User’s Guide 71
Page 86

Physical Specifications
Table 12 Physical
Specifications
Performance Specifications
Table 12
5
tower versions of the library.
Description Rack-Mount Tower
Height 7.0 inches (178 mm) 18.0 inches (457 mm)
Width 17.75 inches (450 mm) 10.5 inches (267 mm)
Length 20.0 inches (508 mm) 20.0 inches (508 mm)
Weight (loaded with
3 drives)
provides physical specifications for the rack-mount and
70 pounds (32 kg) 76 pounds (35 kg)
Performance specifications for the library ar e dependent upon data
5
type, SCSI bus limitations and the system configuration. For drive
performance specifications, refer to the specific tape drive product
manual.
Power Specifications
Table 13 Power
Specifications
72 Quantum|ATL PowerStor L500 Series Tape Library User’s Guide
5
Table 13
Description Range
Voltage 100-120 / 200-240 VAC
Frequency 50 Hz to 60 Hz
Amperage 1.6 A to 0.8 A
Power Consumption 140 W to 200 W (average running)
provides power specifications for the L500 series library.
Page 87

Environmental Specifications
The L500 library performs well in a normal temperature and
5
humidity controlled office environment. Table 14
provides
environmental specifications for the library.
Table 14 Environmen
tal Specifications
Operating
Temperature 10°C to 40°C (50°F to 104°F)
Relative humidity 20% to 80% noncondensing
Humidity gradient 10%/hour
Dry bulb temperature 10°C to 40°C (50°F to 104°F)
Wet bulb temperature 25°C (77°F)
Temperature gradient 11°C/hour (19.8° F/hour) across the range
Temperature shock 10°C (18° F) over two minutes
Altitude -150 m to 9100 m (-500 ft. to 30,000 ft.)
Power-On (No tape in unit/unpacked for 72 hours)
Relative humidity 10% to 90% non condensing
Humidity gradient 10%/hour
Temperature gradient 15°C/hour (27°F/hour) across the range
Temperature shock 15°C (27°F) over two minutes
Non-Operating
Temperature -40°C to 66°C (-40°F to 151°F)
Relative humidity 10% to 95% non condensing
Humidity gradient 10%/hour
Dry bulb temperature -40°C to 66°C (-40 to 150.8°F)
Quantum|ATL PowerStor L500 Series Tape Library User’s Guide 73
Page 88

Wet bulb temperature 46°C (115F)
Temperature gradient 20°C/hour with 5°C margin (36°F/hour
with a 9°F margin) across the range
Temperature shock 15°C with 5°C margin (27°F with a 9°F
margin) over two min.
Shipping
Relative humidity 10% to 95% non condensing
Humidity gradient 10%/hour
Dry bulb temperature -40°C to 66°C (-40°F to 151°F)
Wet bulb temperature 46°C (115°F)
Temperature gradient 25°C/hour with 5°C margin (45°F/hour
with a 9°F margin) across the range
Operating Vibration and Shock Specifications
Table 15 Vibration
Specifications
(Operating)
Temperature shock 15°C with 5°C margin (27°F with 9°F
margin) over two min.
Table 15 provides operating vibration specifications for the libr ary;
Table 16
provides operating shock specifications.
5
Operating
V ibr a t io n Type Sine Sweep
Frequency range 5-500-5 Hz Upward and downward
sweep
Acceleration level 0.25 G
0.010" DA
Operati ng (overstress)
Between 22.14 Hz and 500 Hz
Between 5 Hz and 22.14 Hz
(crossover)
74 Quantum|ATL PowerStor L500 Series Tape Library User’s Guide
Page 89

Application X, Y, and Z axes Sweep rate; 1 octave per
minute
V ibr a t io n Type Sine Sweep
Frequency range 5-500-5 Hz Upward and downward
sweep
Table 16 Shock
Specifications
(Operating)
Acceleration level 0.50 G
0.010" DA
Between 31.2 Hz and 500 Hz
Between 5 Hz and 31.2 Hz
(crossover)
Application Vertical
axis(top/
Sweep rate; 1 octave per
minute
bottom)
Operating
Pulse shape 1/2 sine pulse
Peak acceleration 5 G
Duration 10 ms
Application X, Y, and Z axes, once in each a x is
Quantum|ATL PowerStor L500 Series Tape Library User’s Guide 75
Page 90

Non-operating Vibration and Shock Specifications
Table 17 Vibration
Specifications (Nonoperating)
Table 17 provides non-operating vibration specifications for the
library; Table 18
provides non-operating shock specifications.
5
Note:
Non operating specifications do not include tape
cartridge or magazine components.
Non-operating (un-packaged)
V ibr ation Type Sine Sweep
Frequency range 1 0-500-10 Hz Upward and downwar d
sweep
Acceleration level 1 G 10-500-10 Hz
Application X, Y, and Z axes Sweep rate; 1/2 octave per
min.
Vibration type Random vibration
Frequency range 10-500 Hz, X, Y, and Z axes
V ib r a tion levels 2 G(rms)
PSD envelope 0.008 G
X, Y, and Z axes
in
2
/Hz
Nonoperating (packaged)
Vibration type Random vibration
Frequency range 5 to 300 Hz, vertical (Z); 5 to 200 Hz horizontal
(X, Y)
Vibration levels 1.0 G(rms) in X, Y, and Z axes
76 Quantum|ATL PowerStor L500 Series Tape Library User’s Guide
Page 91

Table 18 Shock
Specifications (Nonoperating)
Nonoperating (unpackaged)
Pulse shape ½ sine pulse
Peak acceleration 75 G
Duration 2 ms
Application X, Y, and Z axes once on two side faces and
bottom
Nonoperating (repetitive/ packaged)
Excitation type Synchronous vertical motion; 1 in excursion
Shock (bounce)
14,200 total
cycles
Application Half cycles each in X and Y orientations; 7100
cycles in the X orientation, 7100 cycles in the Y
orientation
Non-operating (drop/packaged)
Test type Drop shock
Drop height 18 inch
Application 10 drops total; 3 edges, 1 corner
Quantum|ATL PowerStor L500 Series Tape Library User’s Guide 77
Page 92

Electromagnetic Interference (EMI) Susceptibility
Table 19 Conducted
Emission Limits
Emission standards and limits are as follows:
5
EMI Emissions
• FCC Part 15B, Class A(US/Canada)
• EN55022, Class A/EN50082-1 (CE Mark)
• VCCI, Class A (Japan)
• AS/NZS 3548, Class A (Australia/New Zealand)
Conducted Emissions
Table 19
Frequency Range =
0.15 to 30 MHz
0.15 to 0.050 79 66
0.50 to 30 73 60
lists the conducted emission limits.
Limits dB
Quasipeak Average
5
5
Radiated Emissions
Table 20
lists the limits of radiated interfer ence field str ength, in the
frequency range from 30 MHz to 1000 MHz at a test distance of 10
meters, for Class A equipment.
Table 20 Radiated
Emissions (30 MHz to
1000 MHz)
78 Quantum|ATL PowerStor L500 Series Tape Library User’s Guide
Frequency Range = 30 MHz to
1000 MHz
30 MHz to 230 MHz 40
230 MHz to 1000 MHz 47
Quasi-Peak Limit dB (uV/m)
@ 10 meters
5
Page 93

Radiated Susceptibility
The radiated susceptibility limits for high frequency electric fields,
26 MHz to 1000 MHz, are:
• 3 V/m (rms) 80% modulated 1 kHz
• No errors, no screen distortion. S/W recoverable errors
• No hardware failure
The transient voltage is the actual peak voltage above the normal
AC voltage from the power source.
The voltage limits for power and data cables are:
• 2 kV S/W recoverable errors
• No hardware failures
The power cable voltage limits are:
• 2.0 kV common mode (no errors allowed)
• 1.0 kV differ ent ial mode ( S/W recoverable errors, no hardwar e
failure)
5
ESD Failure Level Limits
T abl e 21 ESD Failure
Level Limit s
Table 21
5
areas.
Failure
Type Equipment
Hard Office To 12 kV No operator intervention (soft
Hardware Office To 15 kV No component damage -
Quantum|ATL PowerStor L500 Series Tape Library User’s Guide 79
lists the ESD failure leve l limits for normal operator access
Failure
Level Allowable Errors
recoverable allowed)
operator intervention allowed
(soft/hard errors allowed)
Page 94

Power Distributed Harmonics
Acoustic Noise Emissions
Table 22 Nominal
Acoustic Noise
Emissions
Acoustics - Declared Values per ISO9296 and ISO 7779/EN27779
Product
Idle Operate
TH6WF-ZZ 5.5 5.7 5.9 48 49 51
Current values for specific configurations are available from Quantum|ATL representatives.
1B = 10 dBA.
The library meets EN61000-4-3 and JEIDA power line emission
5
requirements.
Table 22
and Table 23 list the acoustic noise emission levels.
5
Sound Power Level Sound Pressure Level
LwAd B LpAm, dBA (bystander position)
(Streaming)
Operate
(Loading)
Idle Operate
(Streaming)
Operate
(Loading)
80 Quantum|ATL PowerStor L500 Series Tape Library User’s Guide
Page 95

Reliability Factors
Table 23 Acoustic
Noise Emissions for
German Declaration
Law
Schallemissionswerte - VorläufigeWerteangaben nach ISO 9296 und ISO 7779/DIN EN27779:
Schalleistungspegel Schalldruckpegel
Gerfdt
Leerauf Betrieb
TH6WF-ZZ 5.5 5.7 5.9 48 49 51
Aktuelle W erte für Ausrüstungsstufen sind über die Quantum|ATL Equipment Vertretungen
erhältlich.
1 B = 10 dBA
LwAd B LpAm, dBA (Zuschauerpositionen)
(Streaming)
Betrieb
(Loading)
Leerauf Betrieb
(Streaming)
Betrieb
(Loading)
Reliability Factors
The mean interval between failur es of the lib rary unit, less the tape
drives, is:
• 185,000 Power-On Hours (POH) Mean Time Between Failures
(MTBF),
or
• 1,000,000 Mean Load/Unload Cycles Between Failures
(MCBF),
5
where a failure is charged against one or the other, but not both.
Quantum|ATL does not warrant that predicted mean interval
between failures is representative of any particular unit installed
for customer use. Actual figures vary from unit to unit.
Quantum|ATL PowerStor L500 Series Tape Library User’s Guide 81
Page 96

Reliability Factors
82 Quantum|ATL PowerStor L500 Series Tape Library User’s Guide
Page 97

Appendix B
OCP Error Messages and Error Definitions
Table 24 lists the OCP Error messages, descriptions, and
recommended operator actions.
Table 24 OCP Error
Messages
OCP Display Description
Drive Stuck
in Flux
Cartridge
Fault Door
Unlocked
Remove Cart
from CHM
This indicates that the
drive power during
initialization exceeded
the timeout allowed for
that operation. The
drive was still in the
“Flux” state when the
timeout occurred.
The initial scan of the
magazine slots and the
tape drives indicates
that there are more
cartridges in the system
than there are slots to
store them.
This indicates that the
unit detected either too
many cartridges in the
system or a homeless
cartridge was found in
the CHM.
Recommended
Operator Action
Unload drive and retry
the operation. If the
operation fails again,
contact an authorized
field service engineer.
Remove excess
cartridges.
Remove excess
cartridges and restart.
Quantum|ATL PowerStor L500 Series Tape Library User’s Guide 83
Page 98

Recommended
OCP Display Description
Operator Action
Drv x In
Flux or Drv
x HwError or
Doors
Unlocked
LDR ERR: <x>
or DLC ERR:
<x>
DRIVE
ERROR!
Cleaning
FAILED
These error messages
appear when the OCP is
used to initiate a system
test routine. Each
message indicates a
reason why the test can
not be initiated.
The error code was
returned by the loader
process. Error code
descriptions are listed
in “Library Error
Definitions” on page
-86.
An e rror occured
communicating with
the tape drive(s).
The attempted cleaning
cycle failed.
Correct problem and
retry.
Check for a valid
cleaning cartridge in
the required slot and
that the cleaning
cartridge has not
expired.
CLN slot
Empty
CLN Tape
Expired
84 Quantum|ATL PowerStor L500 Series Tape Library User’s Guide
A cleaning cartridge
was not found in the
required slot (highest
numbered slot in unit).
The cleaning cycle was
not completed because
the cleaning cartridge
has expired.
Insert cleaning
cartridge in the highest
numbered slot in the
unit and retry the
operation.
Replace the cleaning
cartridge.
Page 99

OCP Display Description
Recommended
Operator Action
NOT a CLN
Tape
CUP FAILED!
CUP Timeout
Ldr/Drv
Timeout In
Retry
Loader
Timeout In
Retry
Prepos
Timeout In
Retry
The cartridge in the
cleaning slot is not a
cleaning cartridge.
The requested Code
Update operation failed
and the unit timed out
during the code update
process.
The command aborted
after the maximum
number of retries was
exceeded.
The command aborted
after maximum number
of retries was exceeded.
The command aborted
after maximum number
of retries was exceeded
trying to preposition the
CHM.
Insert a cleaning
cartridge in the
cleaning slot.
Retry the operation. If
the operation fails
again, contact an
authorized field
service engineer.
Cycle the library
power and try the
operation again. If the
operation fails again,
contact an authorized
field service engineer.
Cycle the library
power and try the
operation again. If the
operation fails again,
contact an authorized
field service engineer.
Cycle the library
power and try the
operation again. If the
operation fails again,
contact an authorized
field service engineer.
** Ldr Err
<xx> ***
Attention
Needed
Quantum|ATL PowerStor L500 Series Tape Library User’s Guide 85
An error code xx was
returned from the
loader . If the command
was severe, the doors
will unlock and
“Attention Needed” is
appended to the error
message.
See “Library Er ror
Definitions” on page
-86 for a description of
error codes and the
appropriate actions.
Page 100

Table 25 lists the error code, error type, and descriptions.
Table 25 Library
Error Definitions
Error Code Error Type Description
80H This status indicates no error has
occurred.
81H Fatal Invalid command error. This error
indicates that the loader received an
undefined command or an invalid
parameter to a command.
82H Fatal Undefined error code.
83H Fatal Undefined error code.
84H Not Fatal A cartridge is in transit a fter a reset or
power up. This error will occur
whenever a power-cycle or reset occurs
during a move. The loader controller
will insure that the cartridge is fully
loaded into the CHM and will then
proceed with power-on self-test.
The library controller will be responsible
for initiating the CHM to move the
cartridge either to its home location, if
known, or to the drive before issuing the
EXTENDED SCAN MAGAZINE
command.
85H Fatal Did not find pusher home p os i ti o n
during mechanical initialization.
86H Fatal Did not find PUSHPOS 1 during
mechanical initialization .
87H Fatal Timed-out while moving a cartridge into
or out of the CHM dur ing mechanical
initialization.
86 Quantum|ATL PowerStor L500 Series Tape Library User’s Guide
 Loading...