

Page 1

*R9DXOWIRU:LQGRZV
*R9DXOWIRU:LQGRZV
*R9DXOW
5SERS'UIDE5SERS'UIDE5SERS'UIDE5SERS'UIDE5SERS'UIDE5SERS'UIDE5SERS'UIDE
Page 2

GoVault™ for Windows User’s Guide, P/N 20013264-001, June 2007
Product of USA.
Quantum Corporation provides this publication “as is” without warranty of any kind, either express or implied,
including but not limited to the implied warranties of merchantability or fitness for a particular purpose. Quantum
Corporation may revise this publication from time to time without notice.
COPYRIGHT STATEMENT
Copyright 2007 by Quantum Corporation. All rights reserved.
Your right to copy this manual is limited by copyright law. Making copies or adaptations without prior written
authorization of Quantum Corporation is prohibited by law and constitutes a punishable violation of the law.
TRADEMARK STATEMENT
Quantum and the Quantum logo are registered trademarks and GoVault is a trademeak of Quantum Corporation.
Other trademarks may be mentioned herein which belong to other companies.
Page 3
Contents
Chapter 1 Introduction 1
Overview............................................................................................................. 1
Product Description........................................................................................... 2
GoVault Docks ............................................................................................ 3
GoVault Cartridges .................................................................................... 3
GoVault System Application Software.................................................... 4
Backup Application Software ................................................................... 4
GoVault Firmware...................................................................................... 4
Operational Features ......................................................................................... 5
Drive Properties Context........................................................................... 5
Backup Application Interface ................................................................... 5
Chapter 2 Installation Procedures 6
System Requirements........................................................................................ 7
Cartridge Handling Precautions ..................................................................... 8
Unpacking and Inspection Procedures........................................................... 8
Installing the Internal GoVault Dock.............................................................. 9
GoVault™ for Windows User’s Guide iii
Page 4

Contents
Installing the SATA Card ..........................................................................9
Installing the Internal GoVault Dock..................................................... 10
Installing the External GoVault Tabletop Dock .......................................... 15
Installing the GoVault System Application Software................................. 16
Determining Which System Application Applet to Use..................... 17
Installing the GoVault System Application Software ......................... 17
Installing the Backup Application Software ................................................ 23
Registering GoVault ........................................................................................ 23
Chapter 3 Operation 24
Understanding the Activity LED Indicator Display................................... 25
Inserting and Ejecting Cartridges.................................................................. 26
Inserting Cartridges.................................................................................. 26
Ejecting Cartridges ................................................................................... 27
Attaching Labels to Cartridges ...................................................................... 31
Write Protecting Cartridges............................................................................ 32
Changing the Volume Label of Cartridges .................................................. 33
Reformatting Cartridges ................................................................................. 33
Accessing GoVault System Application Software Features ...................... 34
Using Cartridge Password Protection .......................................................... 37
About Cartridge Password Protection .................................................. 37
Setting Cartridge Password Protection ................................................. 38
Entering the Cartridge Password........................................................... 39
Changing the Cartridge Password......................................................... 41
Performing a Security Erase Cartridge Function ................................. 42
Checking the GoVault Dock and Cartridge Status ..................................... 44
Dock Status ................................................................................................ 45
Cartridge Status ........................................................................................ 46
Updating the GoVault Firmware................................................................... 47
Handling Operational Fault Conditions....................................................... 49
Abnormal Hardware Conditions ........................................................... 50
SMART Threshold Detection.................................................................. 51
Chapter 4 Specifications 52
Physical Specifications .................................................................................... 53
Power Specifications........................................................................................ 55
Performance Specifications............................................................................. 57
Reliability Specifications ................................................................................. 58
GoVault™ for Windows User’s Guide iv
Page 5

Contents
Environmental Specifications......................................................................... 59
Interface Compliance Specifications ............................................................. 60
Appendix A Changing the Bezel 62
Parts and Tools Required................................................................................ 62
Procedure ..........................................................................................................63
Appendix B Configuring Windows for DMA Data Transfer Mode 66
About Data Transfer Modes........................................................................... 66
Determining Your Motherboard Configuration.......................................... 67
Changing the Transfer Mode ......................................................................... 69
Appendix C Environmental and Disposal Compliances 73
Environmental Compliance............................................................................ 73
Disposal of Electrical and Electronic Equipment........................................ 74
Appendix D Regulatory Compliances 75
Safety Standard Compliances ........................................................................76
Electromagnetic Compatibility (EMC) Compliances ................................. 77
Regulatory Agency Certifications ................................................................. 78
Canadian Standards Association (CSA)................................................ 79
International Electrotechnical Commission (IEC)................................ 79
GoVault™ for Windows User’s Guide v
Page 6

Figures
Figure 1 GoVault Docks.............................................................................. 2
Figure 2 Ruggedized Disk Cartridge........................................................ 4
Figure 3 Installing the SATA Card.......................................................... 10
Figure 4 Installing and Securing the Internal GoVault Dock.............. 11
Figure 5 Connecting the SATA Data Cable to the Dock ...................... 12
Figure 6 Connecting the SATA Data Cable to the SATA Card........... 12
Figure 7 Connecting the SATA Power Cable to the Dock................... 13
Figure 8 Connecting the SATA Power Cable to the PC ....................... 13
Figure 9 Successful Configuration Display............................................ 14
Figure 10 GoVault Tabletop Rear Panel................................................... 15
Figure 11 GoVault Setup Wizard .............................................................. 18
Figure 12 License Agreement Dialog........................................................ 19
Figure 13 Select Installation Folder Dialog.............................................. 20
Figure 14 Confirm Installation Dialog ..................................................... 21
Figure 15 Installation Complete Display.................................................. 22
Figure 16 Inserting a Cartridge.................................................................. 27
Figure 17 Manual Cartridge Eject Hole.................................................... 30
GoVault™ for Windows User’s Guide vi
Page 7

Figures
Figure 18 Cartridge Label Locations......................................................... 31
Figure 19 Cartridge Write Protect Switch ................................................ 32
Figure 20 GoVault System Application Software Menu........................ 35
Figure 21 GoVault Properties Dialog........................................................ 36
Figure 22 Set Cartridge Password Dialog ................................................ 38
Figure 23 Enter Cartridge Password Dialog ............................................ 39
Figure 24 Incorrect Password Eject Message ........................................... 40
Figure 25 Change Cartridge Password Dialog........................................ 41
Figure 26 Removing Cartridge Password Protection............................. 42
Figure 27 Security Erase Cartridge Dialog............................................... 43
Figure 28 GoVault Status Display .............................................................45
Figure 29 GoVault Firmware Update Dialog........................................... 48
Figure 30 Ready to Commence Firmware Update Message .................48
Figure 31 Firmware Update Complete Message..................................... 49
Figure 32 GoVault Internal Dock Dimensions ........................................ 54
Figure 33 GoVault Tabletop Dock Dimensions....................................... 54
Figure 34 Parts and Tools Required .......................................................... 63
Figure 35 Removing the Side Brackets ..................................................... 63
Figure 36 Releasing the Bezel Clips........................................................... 64
Figure 37 Removing the 5.25-inch Bezel................................................... 64
Figure 38 Installing the 3.5-inch Bezel ...................................................... 65
Figure 39 Device Manager View Menu .................................................... 67
Figure 40 Devices by Connection Listing.................................................68
Figure 41 GoVault Properties Dialog........................................................ 69
Figure 42 IDE Channel Properties Advanced Settings Tab................... 70
Figure 43 Changing the Transfer Mode.................................................... 71
Figure 44 DMA Mode Configured ............................................................ 72
GoVault™ for Windows User’s Guide vii
Page 8

Tables
Table 1 Activity LED Indicator Display Definitions........................... 25
Table 2 Resolving Abnormal Hardware Conditions .......................... 51
Table 3 Physical Specifications............................................................... 53
Table 4 Voltage and Current Specifications......................................... 55
Table 5 Performance Specifications....................................................... 57
Table 6 Reliability Specifications ........................................................... 58
Table 7 Environmental Specifications................................................... 59
Table 8 Interface Compliance Specifications........................................ 60
Table 9 Safety Standards......................................................................... 76
Table 10 Electromagnetic Compatibility (EMC) Regulations.............. 77
Table 11 Regulatory Agencies.................................................................. 78
GoVault™ for Windows User’s Guide viii
Page 9

Preface
Audience
Purpose
Document Organization
This guide was written for users of the Quantum GoVault™ for Windows
dock and cartridge disk drive.
This guide provides the following information about the GoVault disk
drive:
• Unpacking and installation instructions
• Basic operating procedures
• Specifications
This guide is organized as follows:
• Chapter 1,
drive, and summarizes the drive’s key operational features.
• Chapter 2,
unpacking tips, and installation instructions for the GoVault disk
drive.
• Chapter 3,
and deal with operating fault conditions.
Introduction, provides an overview of the GoVault disk
Installation Procedures, provides handling precautions,
Operation, describes how to use the GoVault disk drive
GoVault™ for Windows User’s Guide ix
Page 10
• Chapter 4, Specifications, provides detailed GoVault dock and
cartridge specifications.
Preface
Notational Conventions
• Appendix A,
Changing the Bezel, provides instructions for changing
the internal GoVault dock to fit in a 3.5-inch drive bay.
• Appendix B,
Configuring Windows for DMA Data Transfer Mode,
provides instructions for configuringWindows to use direct memory
access (DMA) transfer speeds to improve GoVault performance if
you do not install the GoVault system application software.
• Appendix C, Environmental and Disposal Compliances
, identifies
GoVault environmental compliances and provides instructions for
proper disposal of unwanted electrical and electronic equipment.
• Appendix D,
Regulatory Compliances, identifies the GoVault
compliance with safety and EMC regulations.
This guide uses the following conventions:
Note: Notes emphasize important information related to the main
topic.
Tech Tip: Tech Tips provide technical information which may be
helpful in performing the procedure.
Caution: Cautions indicate potential hazards to equipment and are
included to prevent damage to equipment.
Warning: Warnings indicate potential hazards to personal safety and
are included to prevent injury.
Contacts
GoVault™ for Windows User’s Guide x
The following subsections identify the Quantum company contacts.
Page 11

Preface
Quantum Corporate Headquarters 0
To order documentation on GoVault Tabletop or other products, contact:
Quantum Corporation
P.O. Box 57100
Irvine, CA 92619-7100
(949) 856-7800
(800) 284-5101
Technical Publications 0
To comment on existing documentation send e-mail to:
doc-comments@quantum.com
Quantum Home Page 0
Visit the Quantum home page at:
www.quantum.com
Getting More Information or
Help
More information about this product is available on the Service and
Support website at www.quantum.com/support
. The Service and
Support website contains a collection of information, including answers
to frequently asked questions (FAQs). You can also access software,
firmware, and drivers through this site.
For further assistance, or if training is desired, contact Quantum:
Quantum Technical Assistance Center in the USA: 800-284-5101
For additional contact information: www.quantum.com/support
To open a Service Request:: www.quantum.com/esupport
For the most up-to-date information on Quantum Global Services, please
visit: www.quantum.com/support
GoVault™ for Windows User’s Guide xi
Page 12

Preface
GoVault™ for Windows User’s Guide xii
Page 13

Chapter 1
1Introduction
This chapter provides an introductory overview of the Quantum
GoVault™ for Windows dock and cartridge disk drive. Topics include:
Overview
• Overview
• Product Description
• Operational Features
The GoVault drive is an easy-to-use, cost-effective, high-performance
removable-disk data protection device for the following Microsoft
Windows-based workstation and server systems:
• Windows 2000 (Professional and Server), SP 4 and later
• Windows 2003 (32- and 64-bit, Standard and Server)
• Windows XP (32- and 64-bit)
• Windows Vista (all editions)
on page 1
on page 2
on page 5
®
GoVault™ for Windows User’s Guide 1
Page 14
Product Description
Internal
External
As shown in figure 1, GoVault is available in two models:
• Internal—Mounts in a 3.5- or 5.25-inch bay of your computer
• External (GoVault Tabletop)—Is already mounted inside a
The following subsections provide a brief description of each GoVault
component:
• Hardware components:
• Software components:
Chapter 1 Introduction
Product Description
workstation or server system
standalone enclosure
•GoVault docks
•GoVault cartridges
• GoVault system application software
• Backup application software
• GoVault firmware
Figure 1 GoVault Docks
GoVault™ for Windows User’s Guide 2
Page 15

Chapter 1 Introduction
Product Description
GoVault Docks 1
Each GoVault dock provides:
• The electromechanical load and unload (eject) mechanisms for the
removable disk cartridge
• A Serial ATA (SATA) I/O port for interfacing with the removable
disk cartridge
• A green activity LED indicator
• Instant availability of the cartridge to the host workstation or server
system
Additionally, each:
. . . GoVault dock Provides . . .
internal • A SATA I/O port for interfacing with the
host workstation or server system
• A DC power connector that accepts +12 VDC
and +5 VDC from the workstation or server
system power supply
external (Tabletop) • A Mini-B type USB port for interfacing with
the host workstation or server system
• A DC power jack that accepts +12 VDC from
a 115/230 VAC power adapter/converter
GoVault Cartridges 1
GoVault removable Ruggedized Disk Cartridges (see figure 2) are
currently available in capacities from 40 to 160 Gbytes. The cartridges are
all read/write compatible, interchangeable, and can be used with any
GoVault dock.
Each GoVault cartridge:
• Is a removable disk that can withstand a 1-meter drop to a hard
surface and has a robust SATA connector that is rated for 5,000
matings with the GoVault dock.
• Provides safe data storage for up to 10 years, under proper storage
conditions.
GoVault™ for Windows User’s Guide 3
Page 16
Figure 2 Ruggedized Disk
Rear viewFront view
Write-protect switch
Cartridge
Chapter 1 Introduction
Product Description
• Has a write-protect switch to guard against accidental data
overwrite.
• Is preformatted for the Microsoft New Technology File System
(NTFS).
GoVault System Application Software 1
Backup Application Software 1
GoVault Firmware 1
The highly recommended GoVault system application software provides
tools that you can use to:
• Download updated firmware to the GoVault dock
• Set cartridge passwords to protect data on the cartridges
• See warning messages about the fan, or if the operating temperature
or voltages are out of range (internal dock only)
• View operating statistics about the GoVault dock and individual
cartridges
• Determine if a Self-Monitoring Analysis and Reporting Technology
(SMART) threshold is set on the cartridge
• Reformat GoVault cartridges with the FAT32 file system
With each GoVault for Windows, Quantum provides robust backup
application software that simplifies the automation and management of
data backup and recovery operations.
GoVault firmware resides on the GoVault dock and provides the
functional/operational interface between the GoVault cartridge and the
host workstation or server operating system.
GoVault™ for Windows User’s Guide 4
Page 17

Chapter 1 Introduction
Operational Features
The GoVault firmware:
• Implements Small Computer System Interface (SCSI) Block
Commands (SBC-2) device server
• Translates SATA-based ATAPI block commands/status response to
SATA-based ATA commands on the SATA drive interface
• Handles the:
• Write-protect feature of the GoVault cartridge
• GoVault dock activity LED indicator
• GoVault disk drive operating states
•Manages the:
• Lock mechanism for the GoVault cartridge to prevent accidental
data loss and enhance drive longevity by assuring that an orderly
cache flush and shutdown are applied to the drive before each
cartridge eject operation
• Timeout/standby modes for the GoVault dock electronics to
extend product life and maximize the Mean Time Between
Failure (MTBF)
Operational Features
Drive Properties Context 1
Backup Application Interface 1
GoVault™ for Windows User’s Guide 5
GoVault for Windows provides its own operational properties and
context support under the Windows operating system. See chapter 2
information about installing the GoVault system application software,
and chapter 3
Most backup applications that can mount removable media disk-type
devices can access GoVault for Windows. For the current list of
Quantum- or vendor-tested compatible backup applications, visit the
Quantum website at:
www.quantum.com/ServiceandSupport/CompatibilityGuides/Index.aspx
for information about using GoVault.
for
Page 18

Chapter 2
2Installation Procedures
This chapter provides instructions for installing the GoVault™ for
Windows dock and cartridge disk drive, including:
• System Requirements
• C
artridge Handling Precautions on page 8
• Unpacking and Inspection Procedures
• Installing the Internal
• I
nstalling the External GoVault Tabletop Dock on page 15
• I
nstalling the GoVault System Application Software on page 16
• Installing the Backup Application Software
• R
egistering GoVault on page 23
on page 7
on page 8
GoVault Dock on page 9
on page 23
GoVault™ for Windows User’s Guide 6
Page 19

System Requirements
Before installing GoVault for Windows, make sure that your workstation
or server system meets the following hardware and software
requirements:
• Hardware:
•CPU, either:
• CD-ROM drive
• 2 Mbytes of hard disk storage for the GoVault system application
• For the internal GoVault dock:
Chapter 2 Installation Procedures
System Requirements
• Intel Pentium 4 or above
• AMD K6 or above
software
• One available 3.5- or 5.25-inch internal drive bay
• A SATA-compliant interface provided by either a SATAequipped motherboard or a SATA-compliant host bus
adapter PCI card
• For the external GoVault Tabletop dock, one available USB port
• One of the following operating systems:
• Windows 2000 (Professional and Server), SP4 or later
• Windows 2003 (32- and 64-bit, Standard and Server)
• Windows XP (32- and 64-bit)
• Windows Vista (all editions)
GoVault™ for Windows User’s Guide 7
Page 20

Cartridge Handling Precautions
Always observe the following guidelines and precautions when handling
GoVault cartridges:
• Store cartridges:
• Between 20° C and 30° C at 20% to 40% relative humidity
(noncondensing)
• Away from magnetic and electric fields
• Do not expose cartridges to:
• Extreme temperature changes, such as 20° C per hour
• Corrosive gases
•Liquids
• Excessive dust and particles
• Do not stack cartridges such that the bottom cartridges are under
compressive stress.
Chapter 2 Installation Procedures
Cartridge Handling Precautions
• Do not attempt to open cartridges. They are tamper-evident
assemblies. Tampering with a cartridge will void the warranty and
could permanently damage the hard disk drive.
• Do not drop cartridges where nonoperational specifications might be
exceeded.
Unpacking and Inspection Procedures
Carefully unpack and inspect the GoVault dock as follows:
1 Visually inspect the shipping container and notify your carrier
immediately of any damage.
2 Place the shipping container on a flat, clean, stable surface, and
carefully remove the contents.
GoVault™ for Windows User’s Guide 8
Page 21

3 Visually inspect the GoVault dock and notify your Quantum
representative immediately of any damage.
4 Always save the shipping container and packing materials for any
future use.
Installing the Internal GoVault Dock
To install the internal GoVault dock and cartridge disk drive, complete
the following procedures in the order presented:
Chapter 2 Installation Procedures
Installing the Internal GoVault Dock
Installing the SATA Card 2
• Installing the SATA Card
• Installing the
If your workstation or server system does not already have either a
SATA-equipped motherboard or a SATA-compliant host bus adapter PCI
card, you should follow the procedures provided by the manufacturer of
the SATA card and your computer reference manual.
If the procedures presented in this subsection do not appear to be
appropriate for your workstation or server system, stop the installation
attempt and seek assistance from the appropriate hardware
manufacturer.
Note: This procedure is only necessary if your workstation or server
system does not already have a SATA-equipped motherboard
or a SATA-compliant host bus adapter PCI card installed.
Procedure
1 As required:
a Save and close your open files and terminate all running
applications.
Internal GoVault Dock
, if required
2
b Shut down the workstation or server system.
c Disconnect the AC power cord from the facility AC power
receptacle.
GoVault™ for Windows User’s Guide 9
Page 22
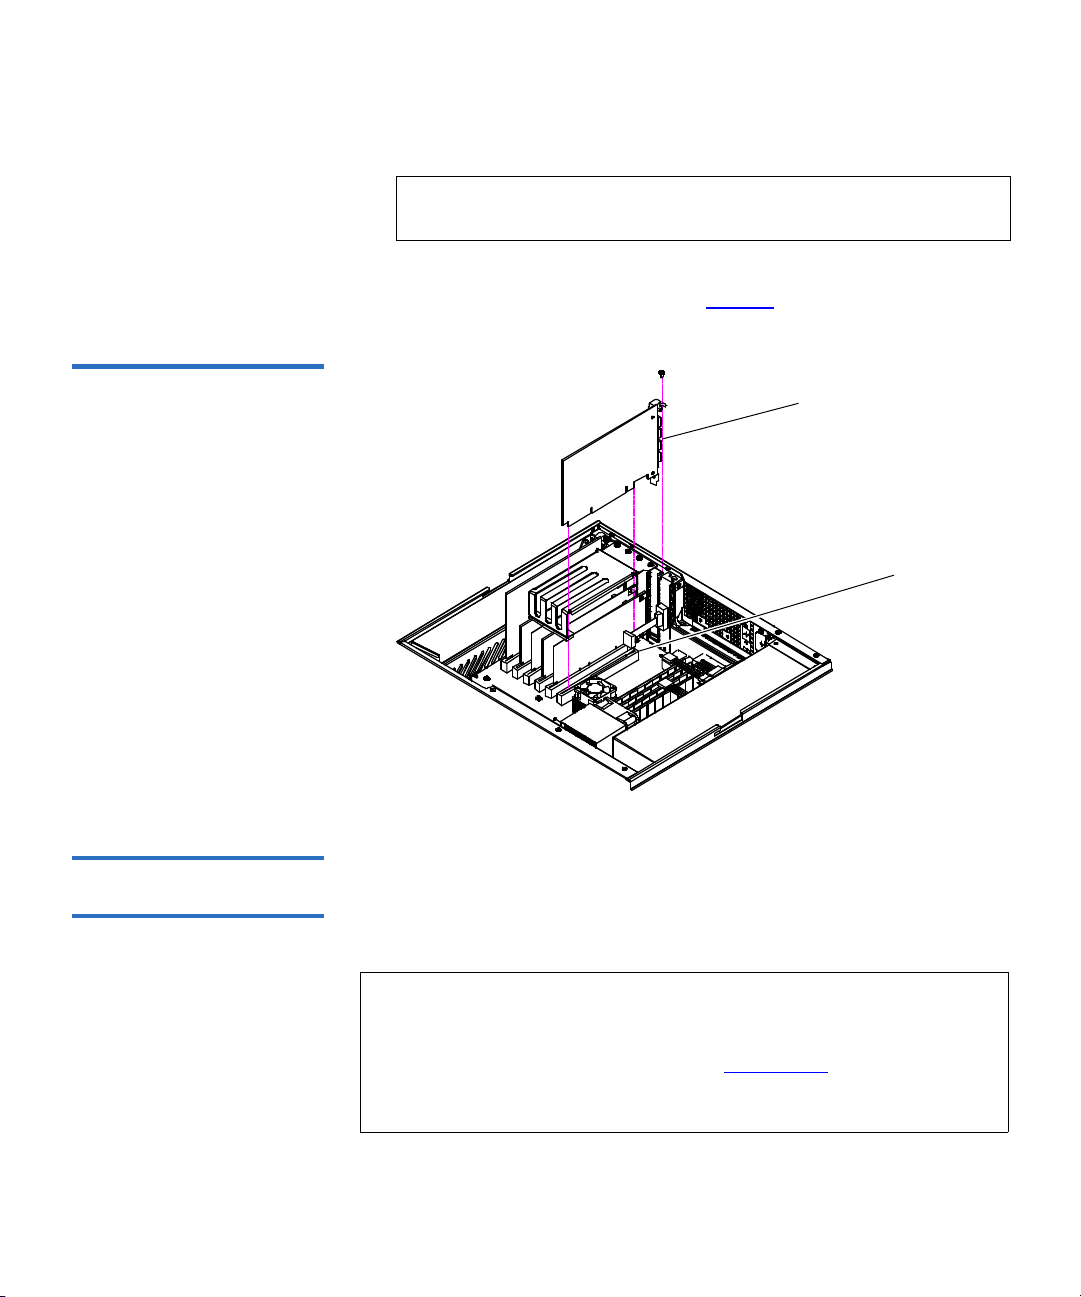
Figure 3 Installing the SATA
PCI slot
SATA card
Card
Chapter 2 Installation Procedures
Installing the Internal GoVault Dock
2 Remove the cover from the workstation or server system.
Note: See your computer manufacturer’s instructions for the
proper procedures to remove the cover.
3 Install the SATA card in an available PCI slot, and secure the card to
the computer using one screw (see figure 3
).
Installing the Internal
GoVault Dock 2
After you have installed the SATA card, or if your computer workstation
or server system already has either a SATA-equipped motherboard or a
SATA-compliant host bus adapter PCI card, use the following procedure
to install the internal GoVault dock.
Note: The standard configuration of the internal GoVault dock
includes side brackets and a 5.25-inch bezel for installation in a
5.25-inch drive bay. If you need to install the dock in a 3.5-inch
drive bay, use the procedure in appendix A
on page 62 to
remove the side brackets and change the bezel before
installing the internal GoVault dock.
GoVault™ for Windows User’s Guide 10
Page 23
Chapter 2 Installation Procedures
Internal GoVault dock
Installing the Internal GoVault Dock
1 If you have just installed a SATA card, then you already have shut
down the workstation or server system and removed the cover. In
this case, skip to step 4 of this procedure.
If your computer workstation or server system already had either a
SATA-equipped motherboard or a SATA-compliant host bus adapter
PCI card, then proceed to step 2 of this procedure.
2 As required:
a Save and close your open files and terminate all running
applications.
b Shut down the workstation or server system.
c Disconnect the AC power cord from the facility AC power
receptacle.
3 Remove the cover from the workstation or server system.
Note: See your computer manufacturer’s instructions for the
proper procedures to remove the cover.
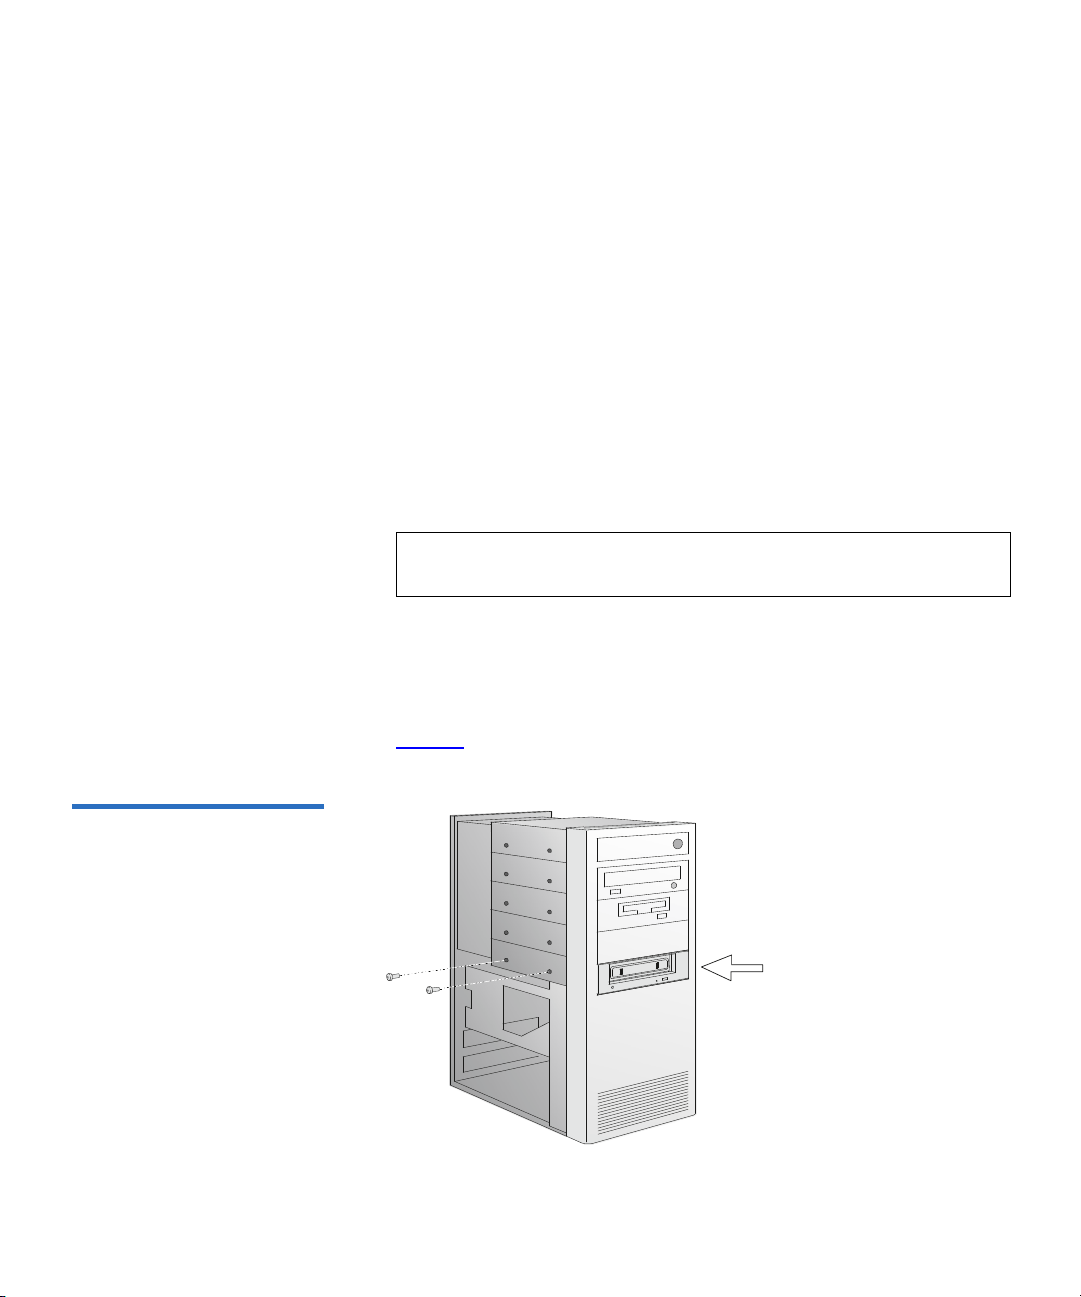
4 Select an available internal drive bay and, if required, remove the bay
cover.
5 Slide the internal GoVault dock into the bay and secure it to the
computer chassis with two mounting screws on each side (see
figure 4
Figure 4 Installing and
Securing the Internal GoVault
Dock
GoVault™ for Windows User’s Guide 11
).
Page 24
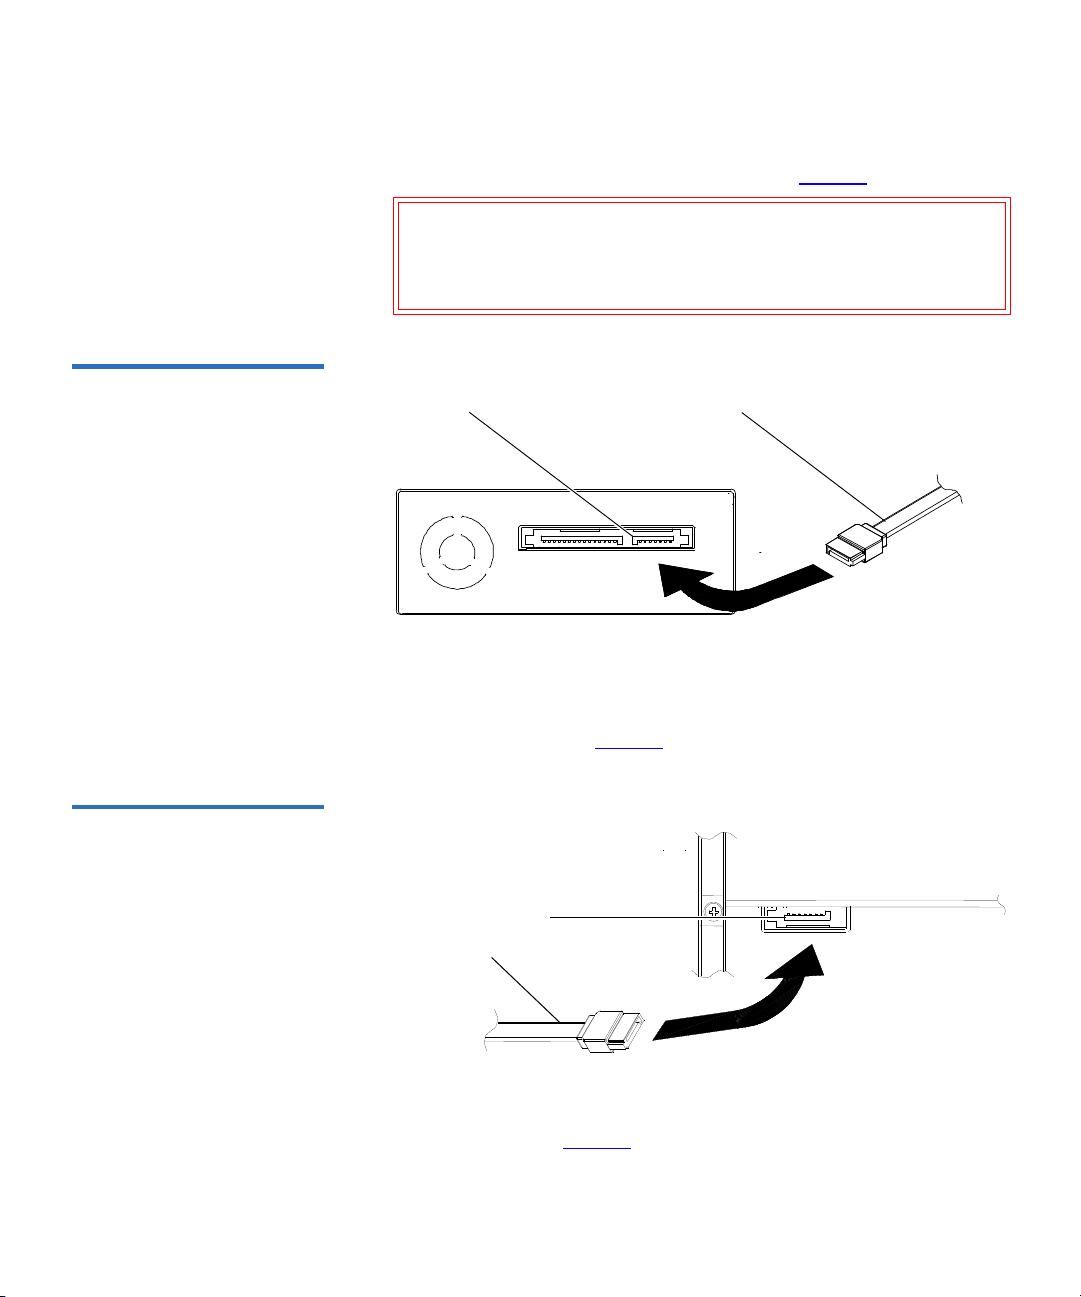
Figure 5 Connecting the SATA
SATA data connector SATA data cable
SATA card data connector
SATA data cable
Data Cable to the Dock
Chapter 2 Installation Procedures
Installing the Internal GoVault Dock
6 Connect one end of the SATA data cable to the SATA data connector
on the back of the internal GoVault dock (see figure 5
).
Caution: Do not force SATA connections. SATA connectors are
designed to fit one way only. If you encounter any
difficulty in making the SATA cable connection, rotate
the cable and try again.
Figure 6 Connecting the SATA
Data Cable to the SATA Card
GoVault™ for Windows User’s Guide 12
7 Carefully route the SATA data cable from the internal GoVault dock
and connect the other end to either the SATA-equipped motherboard
or the SATA card (see figure 6
).
8 Connect the drive end of the SATA power supply conversion adapter
cable to the SATA power connector on the back of the internal
GoVault dock (see figure 7
).
Page 25
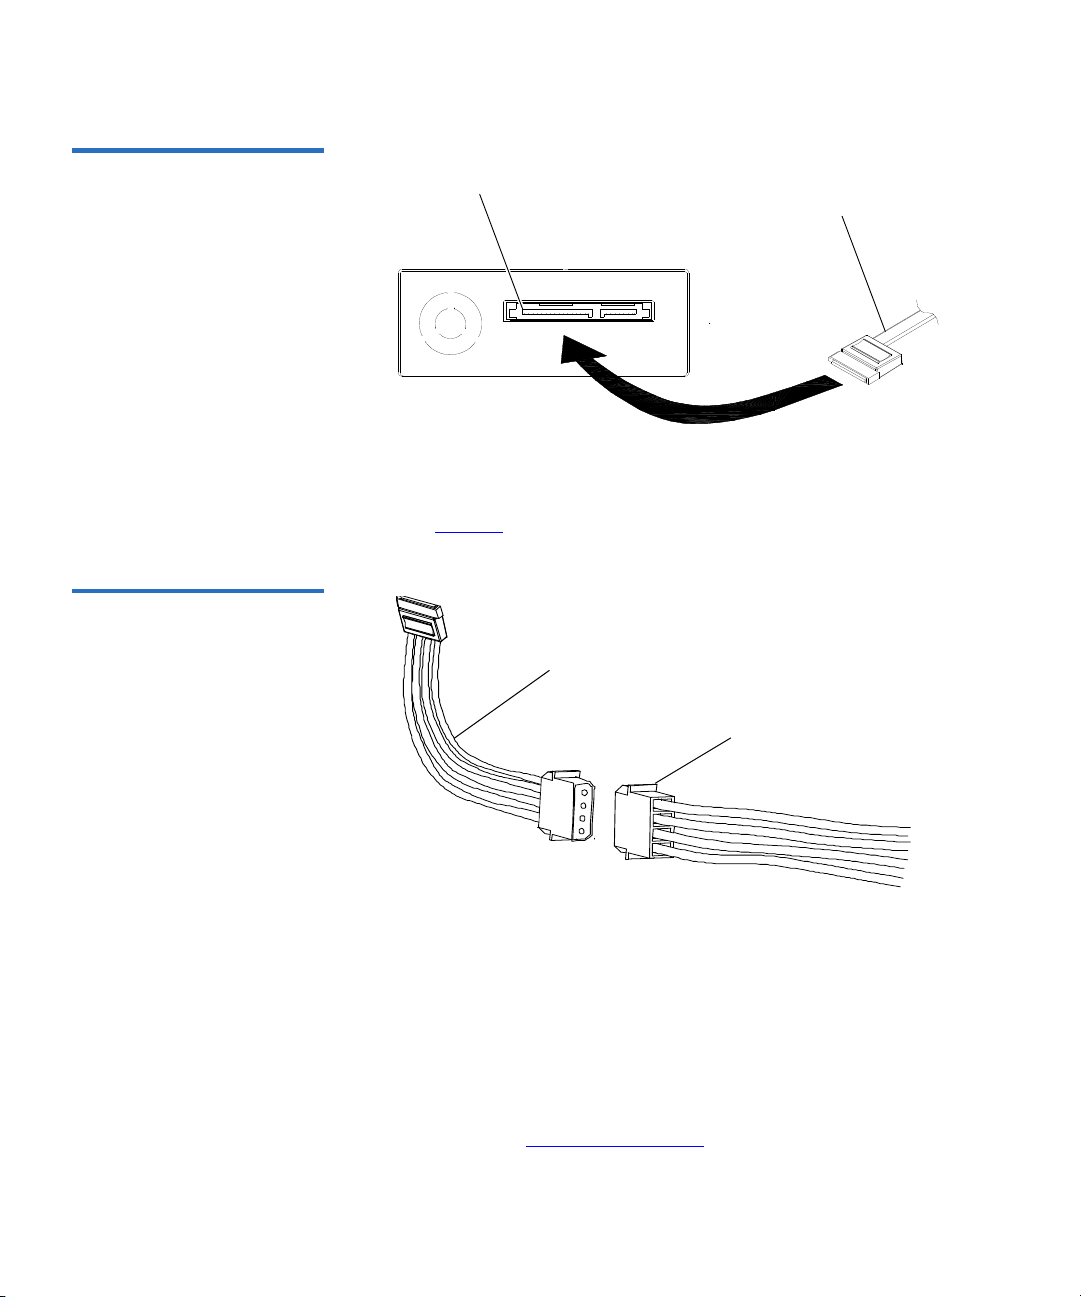
Figure 7 Connecting the SATA
SATA power connector
SATA power supply
conversion adapter cable
SATA power supply
conversion adapter cable
Computer power harness connector
Power Cable to the Dock
Figure 8 Connecting the SATA
Power Cable to the PC
Chapter 2 Installation Procedures
Installing the Internal GoVault Dock
9 Connect the power supply end of the of the SATA power supply
conversion adapter cable to the computer power harness connector
(see figure 8
).
10 Reinstall the system cover and reconnect the AC power cord to the
facility AC power receptacle.
11 Restart the workstation or server system.
12 Verify that the LED on the front panel of the GoVault dock
illuminates when the system starts.
13 Insert a GoVault cartridge into the dock and verify that the front
panel activity LED indicator signifies a successful cartridge load
operation (see Inserting Cartridges
GoVault™ for Windows User’s Guide 13
on page 21).
Page 26

Chapter 2 Installation Procedures
GoVault
Installing the Internal GoVault Dock
14 Use Windows My Computer to verify successful GoVault installation
and configuration (see figure 9
).
15 Perform a number of file copy operations to and from the GoVault
cartridge to verify the disk write/read functions.
16 If you are going to install both the GoVault system application
software and the backup application software, then proceed to
I
nstalling the GoVault System Application Software in the next
subsection.
If you are not going to install the GoVault system application
software, then skip to Installing the Backup Application Software
on
page 23.
Note: If you do not install the GoVault system application
software, the Windows operating system might assign the
low-speed Programmed I/O (PIO) mode for GoVault data
transfer operations. Use the procedures in appendix B,
Configuring Windows for DMA Data Transfer Mode, on
page 66 to determine if this is the case and, if necessary,
configure the operating system to use the high-speed
Direct Memory Access (DMA) mode for GoVault data
transfer operations.
Figure 9 Successful
Configuration Display
GoVault™ for Windows User’s Guide 14
Page 27
Chapter 2 Installation Procedures
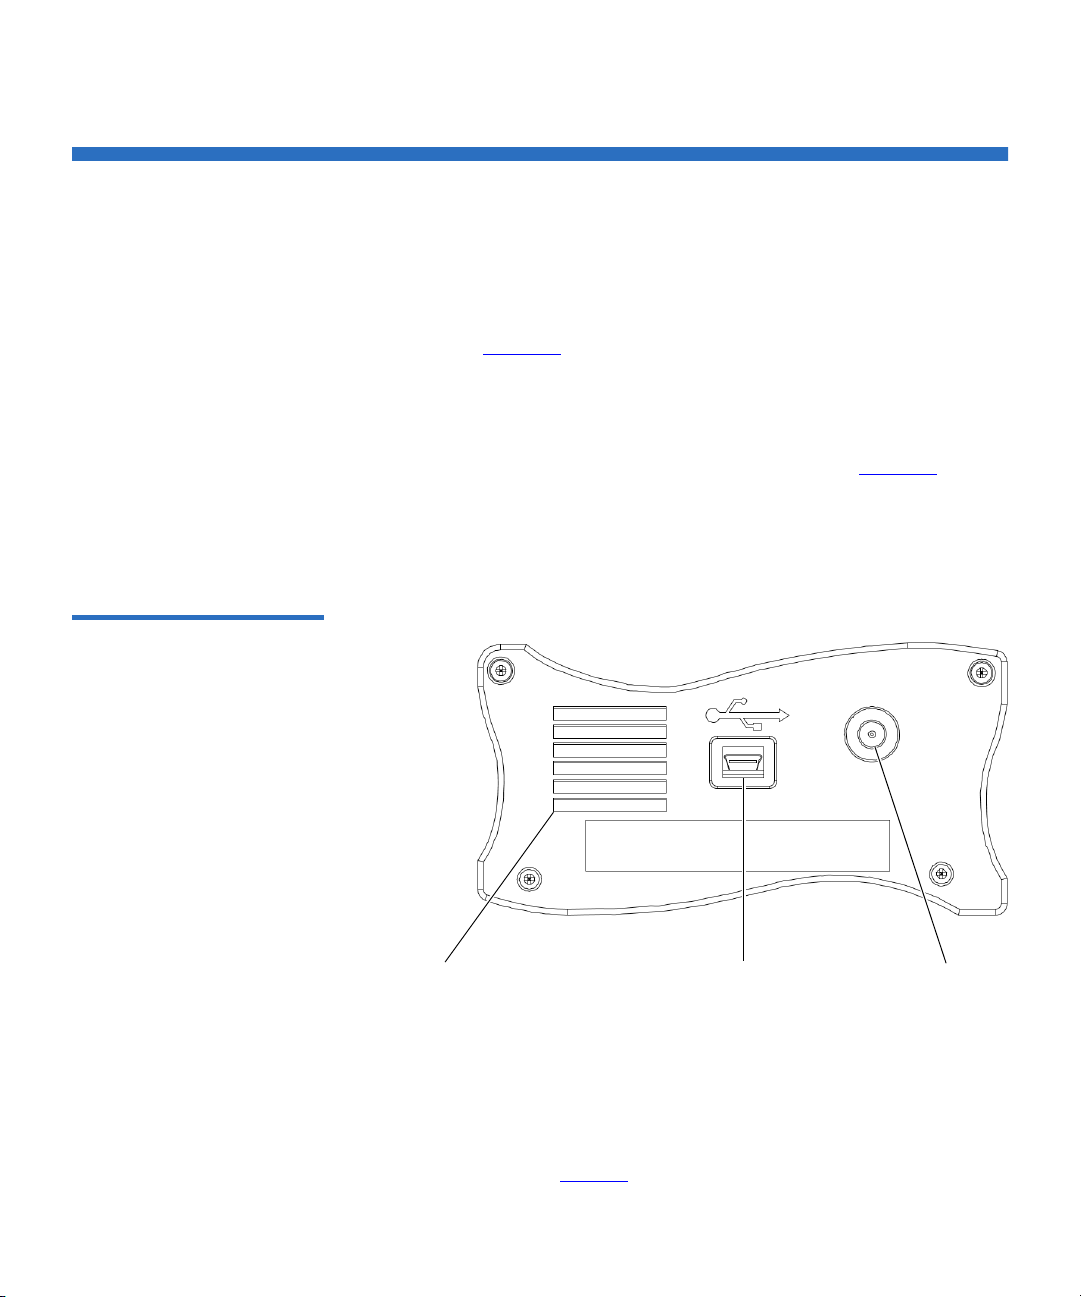
Air vents Mini-B USB port DC power jack
Installing the External GoVault Tabletop Dock
Installing the External GoVault Tabletop Dock
Install the external GoVault Tabletop dock and cartridge as follows:
1 Connect the drive-end (Mini-B) connector of the USB interface cable
to the Mini-B USB port on the rear panel of the GoVault Tabletop
dock (see figure 10
2 Connect the DC power output plug of the power adapter/converter
to the DC power jack on the rear panel of the dock.
3 Carefully position the dock in a secure location that provides
adequate circulation for the rear panel air vents (see figure 10
4 Plug the power adapter/converter into a 115/230 VAC facility power
receptacle and verify that the LED on the front panel of the GoVault
Tabletop dock illuminates.
Figure 10 GoVault Tabletop
Rear Panel
).
).
5 Connect the system-end (standard) connector of the USB interface
cable to an available USB port on your workstation or server system
and verify that the system launches the
that finds and configures the device driver, assigns a drive letter, and
enables read/write access.
6 Use Windows
My Computer to verify successful GoVault Tabletop
configuration (see figure 9
GoVault™ for Windows User’s Guide 15
Found New Hardware wizard
).
Page 28

Chapter 2 Installation Procedures
Installing the GoVault System Application Software
7 Insert a GoVault cartridge into the dock and verify that the front
panel activity LED indicator signifies a successful cartridge load
operation (see Inserting Cartridges
8 Perform a number of file copy operations to and from the GoVault
cartridge to verify the disk write/read functions.
9 If you are going to install both the GoVault system application
software and the backup application software, then proceed to
I
nstalling the GoVault System Application Software in the next
subsection.
If you are not going to install the GoVault system application
software, then skip to Installing the Backup Application Software
page 23..
Note: If you do not install the GoVault system application
software, the Windows operating system might assign the
low-speed Programmed I/O (PIO) mode for GoVault data
transfer operations. Use the procedures in appendix B,
Configuring Windows for DMA Data Transfer Mode, on
page 66 to determine if this is the case and, if necessary,
configure the operating system to use the high-speed
Direct Memory Access (DMA) mode for GoVault data
transfer operations.
on page 21).
on
Installing the GoVault System Application Software
After installing the GoVault dock and cartridge disk drive and verifying
that your operating system recognizes the drive, use one of the three
system application applets on the GoVault Resource CD to install the
GoVault system application software.
Each applet provides an installation package that corresponds to one of
the three types of supported operating systems:
•
x64
• x86
• IA64
GoVault™ for Windows User’s Guide 16
Page 29

Chapter 2 Installation Procedures
Installing the GoVault System Application Software
To install the GoVault system application software:
1 First, you need to determine which system application applet to use.
Determining Which System Application Applet to Use 2
Installing the GoVault
System Application
Software 2
2 Then, see Installing the GoVault System Application Software
for the
detailed software installation instructions.
To find out which system application applet you need to use:
1 From the
Start menu on your PC, right click My Computer.
2 Select Properties.
3 On the General tab, under the System heading, look for the words x64
Edition
.
THEN use the . . .
IF . . .
you see
x64 Edition,x64
you do not see
x64 Edition,x86
system application applet
the system is a 64-bit Itanium, IA64
After determining which system application applet you need to use,
install the GoVault system application software on your workstation or
server system as follows:
1 Insert the GoVault Resource CD into the CD-ROM drive.
2 Browse the CD contents to find the
SetupGoVault.msi file for the
appropriate system application applet.
3 Double-click the
Wizard (see figure 11
4 Click
GoVault™ for Windows User’s Guide 17
Next to continue and display the License Agreement dialog (see
figure 12
).
SetupGoVault.msi file to launch the GoVault Setup
).
Page 30

Figure 11 GoVault Setup
Wizard
Chapter 2 Installation Procedures
Installing the GoVault System Application Software
GoVault™ for Windows User’s Guide 18
Page 31

Figure 12 License Agreement
Dialog
Chapter 2 Installation Procedures
Installing the GoVault System Application Software
5 Read the License Agreement, select I Agree, and click Next to continue
and display the
GoVault™ for Windows User’s Guide 19
Select Installation Folder dialog (see figure 13).
Page 32

Figure 13 Select Installation
Folder Dialog
Chapter 2 Installation Procedures
Installing the GoVault System Application Software
6 Use the Select Installation Folder dialog to specify the location where
you want to install the GoVault system application software.
7 The default location is shown in figure 13
different location, click
Browse and navigate to the file location that
. If you want to specify a
you want.
8 Click
GoVault™ for Windows User’s Guide 20
Next to continue and display the Confirm Installation dialog (see
figure 14
).
Page 33

Figure 14 Confirm Installation
Dialog
Chapter 2 Installation Procedures
Installing the GoVault System Application Software
9 Click Next to start the installation.
10 Appearance of the
Installation Complete display signifies a successful
installation of the GoVault system application software (see
figure 15
11 As prompted, click
GoVault™ for Windows User’s Guide 21
).
Close to exit the GoVault Setup Wizard.
Page 34

Figure 15 Installation Complete
Display
Chapter 2 Installation Procedures
Installing the GoVault System Application Software
12 Remove the GoVault Resource CD from the CD-ROM drive.
13 Verify successful installation of the GoVault system application
software by right-clicking the GoVault drive letter and seeing the
Password
and GoVault Help options on the menu display
Set
14 If you are going to install the included backup application, or another
backup application, proceed to Installing the Backup Application
Software in the following subsection.
If you are not going to install a backup application, skip to
R
egistering GoVault.
GoVault™ for Windows User’s Guide 22
Page 35

Installing the Backup Application Software
Installing the Backup Application Software
GoVault for Windows includes a robust backup application. After you
have installed the GoVault dock and cartridge hardware and the GoVault
system application software:
THEN refer to the installation
IF you want to install . . .
instructions provided . . .
Chapter 2 Installation Procedures
the included backup application
software,
some other backup application
software,
Before installing any other backup application software, check the
Compatibility Guide on the Quantum website to verify that it is
compatible with GoVault:
After installing the backup application software, proceed to Registering
GoVault in the following subsection.
Registering GoVault
After installing GoVault for Windows, register it via the Quantum
website at:
Registering GoVault for Windows ensures that you will receive the latest
technical information about the drive, as well as other product, service,
and support information.
on the included backup CD.
by the other backup application
software supplier.
www.quantum.com/ServiceandSupport/CompatibilityGuides/Index.aspx
www.quantum.com/registration
GoVault™ for Windows User’s Guide 23
Page 36

Chapter 3
3Operation
This chapter describes how to use the GoVault™ for Windows dock and
cartridge disk drive, including:
This chapter describes how to use GoVault™ Tabletop. Topics include:
• Understanding the Activity LED Indicator Display
• Inserting and Ejecting Cartridges
• Attaching Labels to Cartridges
• Changing the Volume Label of Cartridges
• Reformatting Cartridges
• Accessing GoVault System Application Software Features
• Using Cartridge Password Protection
• Checking the GoVault Dock and Cartridge Status
• Updating the GoVault Firmware
• Handling Operational Fault Conditions
on page 33
on page 26
on page 31
on page 33
on page 37
on page 47
on page 49
on page 25
on page 44
, which are:
GoVault™ for Windows User’s Guide 24
Page 37

Understanding the Activity LED Indicator Display
Understanding the Activity LED Indicator Display
The on/off or flashing condition of the green activity LED indicator on
the front panel of the GoVault dock displays the various status
Table 1 Activity LED Indicator
Display Definitions
conditions, as shown in table 1
When the LED . . . It means that the GoVault dock . . .
is off, is not functioning properly, or there is no
.
power to the dock.
Chapter 3 Operation
is on continuously,
and not flashing,
is flashing on slowly,
approximately once
per second,
is flashing on quickly,
approximately once
per second,
is flashing on quickly,
approximately two
times per second,
is flashing on quickly,
approximately four
times per second,
is functioning correctly and either:
• There is no cartridge in the dock.
• A cartridge load operation has completed
and there is a cartridge in the dock.
is performing one of the following
operations:
• Data transfer
• Cartridge security erase
or encountered a cartridge medium error
condition, such as an incompatible file
format, device communication problem, and
so on.
firmware update is in progress.
is unloading a cartridge.
temperature or voltage is out of range
(internal dock only).
GoVault™ for Windows User’s Guide 25
Page 38

Chapter 3 Operation
Inserting and Ejecting Cartridges
When the LED . . . It means that the GoVault dock . . .
is flashing on very
quickly,
approximately eight
times per second,
Inserting and Ejecting Cartridges
You can insert and eject GoVault cartridges without shutting down the
workstation or server system.
Inserting Cartridges 3
Procedure
1 Verify that the activity LED indicator is on continuously, and not
flashing, to signify that the GoVault dock is functioning correctly.
Caution: Do not insert a cartridge when the activity LED
indicator is either off or flashing. Doing so might
require a manual eject procedure to remove the
cartridge.
encountered an unrecoverable hardware
error, such as a Power On Self-Test (POST)
failure.
2 Carefully slide the cartridge into the GoVault dock until you feel a
slight resistance as the cartridge engages the internal mechanical
load/eject mechanism (see figure 16
Note: The GoVault dock has an internal alignment tab that
engages a matching alignment slot on the upper-right side
of the cartridge. This design feature makes it impossible to
insert the cartridge either upside-down or backwards.
If you feel any mechanical resistance as you slide the cartridge into
the dock, stop and make sure the cartridge is oriented properly, with
the connector to the rear and the alignment slot to the upper-right.
3 Firmly push the cartridge the rest of the way into the dock.
GoVault™ for Windows User’s Guide 26
).
Page 39

Figure 16 Inserting a Cartridge
Alignment slot
Chapter 3 Operation
Inserting and Ejecting Cartridges
4 Verify that the front panel activity LED flashes on and off as the
operating system accesses the cartridge.
Ejecting Cartridges 3
Eject a cartridge from the GoVault dock by either:
• Pressing the front panel cartridge eject button (see Power Cartridge
Eject Procedure)
• Using the Windows software eject function (see Software Cartridge
Eject Procedure), or your backup application software
If neither of those procedures ejects the cartridge, and you must remove
the cartridge from the dock, you could also:
• Force an emergency cartridge eject by pressing and holding the front
panel cartridge eject button (see Emergency Cartridge Eject
Procedure)
• Use the front panel manual cartridge eject hole (see M
anual Cartridge
Eject Procedure)
Power Cartridge Eject Procedure
1 Verify that the font panel activity LED indicator is not flashing, which
would signify that the cartridge is being accessed.
Caution: Ejecting the cartridge while it is being accessed can
result in a loss of data.
3
GoVault™ for Windows User’s Guide 27
Page 40

Chapter 3 Operation
Inserting and Ejecting Cartridges
2 Press and hold the front panel cartridge eject button for a second or
longer, and watch the activity LED to confirm that the cartridge eject
operation is underway:
This LED indication . . . Signifies . . .
continuous fast flashing a normal cartridge eject operation,
which can take up to ten seconds to
complete.
five flashes and then stop that either the backup application
software or the operating system
inhibited the cartridge eject operation.
In this case, see Software Cartridge
Eject Procedure in the following
subsection, or refer to the
documentation for your backup
application software.
3 Remove the cartridge from the dock after the eject operation
completes and store it in its protective case.
Software Cartridge Eject Procedure
Use Windows to perform the cartridge eject function as follows:
1 Verify that the font panel activity LED indicator is not flashing, which
would signify that the cartridge is being accessed.
Caution: Ejecting the cartridge while it is being accessed can
result in a loss of data.
2 Right-click the
Computer
GoVault icon in either Windows Explorer or the My
window to display the GoVault menu (see figure 14 on
page 30).
3 Click
Eject to eject the cartridge.
4 Remove the cartridge from the dock after the eject operation
completes and store it in its protective case.
GoVault™ for Windows User’s Guide 28
3
Page 41

Chapter 3 Operation
Inserting and Ejecting Cartridges
Emergency Cartridge Eject Procedure 3
Caution: Avoid using this procedure. Ejecting a cartridge in this
manner can result in a loss of data and directory
corruption.
If neither the power nor software cartridge eject procedure is successful,
and you absolutely must have the cartridge ejected from the dock:
1 Verify that the font panel activity LED indicator is not flashing, which
would signify that the cartridge is being accessed.
Caution: Ejecting the cartridge while it is being accessed can
result in a loss of data.
2 Press and hold the front panel cartridge eject button until the
cartridge ejects. This could take from fifteen to thirty seconds or
more.
Disregard any displayed error messages.
Note: If the cartridge still does not eject, remove power from the
GoVault by either shutting down your workstation or
server system (internal GoVault dock), or unplugging the
power adapter/converter from the DC power jack on the
rear panel of the external GoVault Tabletop dock and use
the manual cartridge eject procedure (see M
anual
Cartridge Eject Procedure).
3 Remove the cartridge from the dock after the eject operation
completes.
4 Restart your workstation or server system to reset the GoVault dock
firmware.
5 Before using the cartridge again, verify the integrity of its directory
and file system as follows:
a Insert the cartridge into the GoVault dock.
b Use the Windows chkdsk
command or a third-party utility to
check the cartridge file system.
c If the integrity check fails, reformat the cartridge before using it
again (see Reformatting Cartridges
on page 33).
GoVault™ for Windows User’s Guide 29
Page 42

Figure 17 Manual Cartridge
Manual cartridge eject hole
Eject Hole
Chapter 3 Operation
Inserting and Ejecting Cartridges
Manual Cartridge Eject Procedure 3
In case of a power loss or other unusual situation that prevents a normal
power or software cartridge eject operation, you can manually eject the
cartridge from the GoVault dock by straightening a large paper clip and
inserting it into the front panel manual cartridge eject hole (see figure 17
Do not use a pencil or other breakable items.
Caution: Do not use the manual cartridge eject procedure while
power is applied to the GoVault dock. Data can be lost or
corrupted if you eject the cartridge while power is applied
to the dock.
).
GoVault™ for Windows User’s Guide 30
Page 43

Attaching Labels to Cartridges
Vents
Label locations
GoVault cartridges have two designated areas for attaching labels—one
on the front and one on the top, as shown in figure 18
protective plastic cartridge case has an area for attaching a label
Caution: Use only Quantum labels on GoVault cartridges. Other
labels can cause a cartridge to jam in the GoVault dock.
Figure 18 Cartridge Label
Locations
Chapter 3 Operation
Attaching Labels to Cartridges
. Additionally, the
.
Caution: Do not block the vents when attaching labels to the front
of GoVault cartridges.
GoVault™ for Windows User’s Guide 31
Page 44

Write Protecting Cartridges
Write-protect switch
(shown in the unlocked position)
GoVault cartridges have a two-position write-protect switch that enables
and disables write access to the disk (see figure 19
In this position . . . The write function is . . .
unlocked enabled.
locked disabled (write protected).
Chapter 3 Operation
Write Protecting Cartridges
):
Data can be both written to and read from the
cartridge.
Data can be read from the cartridge, but not
written to it.
Note: The Windows operating system
displays an error message if you try
writing to a write-protected cartridge.
The default configuration of the write-protect switch on GoVault
cartridges is the unlocked (write-enabled) position.
Figure 19 Cartridge Write
Protect Switch
Note: On Windows 2000 systems, you cannot use the write-protect
function on GoVault cartridges that are formatted with the
New Technology File System (NTFS).
Accessing a write-protected NTSF cartridge on a Windows
2000 system produces an error message indicating that the
drive is not accessible, and you will not be able to read any
data from the cartridge.
GoVault™ for Windows User’s Guide 32
Page 45

Changing the Volume Label of Cartridges
Changing the Volume Label of Cartridges
Under Windows 2003, Windows XP, and Windows Vista, you can change
the volume label (name) of GoVault cartridges as you would any other
disk drive by:
Chapter 3 Operation
1 Right-clicking the GoVault drive letter in the Windows
or
Explorer display.
2 Selecting either:
•
Rename on the menu display and typing a new volume name on
the
•
Properties on the menu display, and typing a new volume in the
name field of the
Reformatting Cartridges
Caution: Reformatting a cartridge destroys all of the data on the
You can reformat GoVault cartridges as you would any other disk drive
by:
1 Right-clicking the GoVault drive letter in the Windows
or
Explorer display.
My Computer
My Computer or Explorer display.
General tab dialog.
cartridge.
My Computer
2 Selecting
cartridge:
• Capacity
• File system
•Volume label
• Format options
GoVault™ for Windows User’s Guide 33
Format on the menu display and specifying the new
Page 46

Chapter 3 Operation
Accessing GoVault System Application Software Features
The GoVault system application software can format the cartridge with
the NTFS or FAT32 file system.
Note: If you have installed the GoVault system application software,
you can format a FAT32 file system larger than 32 Gbytes,
however the maximum file size (not volume size) is 4 Gbytes. If
you format a cartridge with the FAT32 file system, you must
take care that the backup file does not exceed 4 Gbytes or your
backup software will report an error.
Accessing GoVault System Application Software Features
The GoVault features described in the following subsections are only
available if you have installed the GoVault system application software
(see Installing the GoVault System Application Software
on page 12).
To access the GoVault system application software features:
1 Right-click the GoVault icon in the Windows
Explorer display to view the GoVault system application software
menu (see figure 20
Note: If you have not installed the GoVault system application
software, right-clicking the GoVault icon displays the
standard Windows menu for removable-media disk
drives.
).
My Computer or
GoVault™ for Windows User’s Guide 34
Page 47

Figure 20 GoVault System
Application Software Menu
Chapter 3 Operation
Accessing GoVault System Application Software Features
2 On the GoVault system application software menu:
Selecting . . . Displays . . .
Explore
Open
Search...
Set Password
GoVault Help
Scan for viruses...
Format...
Eject
the standard Windows Explorer window with an
expanded GoVault drive display.
the standard Windows File Open window with an
expanded GoVault drive display.
the standard Windows File Search window with
the GoVault drive displayed in the
Look in: list
box.
the GoVault Set Cartridge Password dialog that
you can use to configure password protection for
cartridges (see Using Cartridge Password
Protection in the following subsection).
the online help for the GoVault system application
software.
the standard scan screen for your installed
antivirus software application.
the standard Windows Format Local Disk dialog
for the GoVault drive.
nothing, but initiates a software cartridge eject
operation.
GoVault™ for Windows User’s Guide 35
Page 48

Accessing GoVault System Application Software Features
Selecting . . . Displays . . .
Chapter 3 Operation
Figure 21 GoVault Properties
Dialog
Rename
Properties
the standard Windows Explorer window with the
GoVault drive name highlighted for the file
rename function.
the standard Windows local disk Properties dialog
for the GoVault drive (see figure 21
), with
extensions to support the following GoVault
features:
• Dock and cartridge status checking (see
Checking the GoVault Dock and Cartridge
Status on page 44).
• Firmware updating (see Updating the GoVault
Firmware on page 47).
GoVault™ for Windows User’s Guide 36
Page 49

Using Cartridge Password Protection
The GoVault system application software provides cartridge password
protection features that you can use to:
• Create and use a unique password for each GoVault cartridge
• Change the password or remove password protection for a cartridge
• Perform a Security Erase Cartridge function to reuse the cartridge if
you forget or lose the password
Chapter 3 Operation
Using Cartridge Password Protection
About Cartridge Password Protection 3
Before setting up password protection for your GoVault cartridges,
carefully consider the following issues:
• If you set a password for a cartridge, you will have to type the
password each time you insert the cartridge into the dock.
• You might want to use a cartridge password if the data stored on the
cartridge is sensitive to you and you don’t want the data to be seen by
others. But if you are certain the cartridge will always be in your
possession, you might not want to use a password.
• There is no possible data recovery from a forgotten or lost cartridge
password.
Caution: If you forget or lose a cartridge password, you will not
be able to access or retrieve any of the data on the
cartridge. The data will be lost. There is no recovery
from a forgotten or lost cartridge password.
Though the data will be lost, you can perform a Security Erase
Cartridge function and reformat the cartridge so it can be reused.
Always record cartridge passwords and store them in a safe, secure
location.
GoVault™ for Windows User’s Guide 37
Page 50

Chapter 3 Operation
Using Cartridge Password Protection
Setting Cartridge Password Protection 3
Figure 22 Set Cartridge
Password Dialog
To set password protection for a GoVault cartridge:
1 Create the password that you want, using the following
requirements:
• From 6 to 16 case-sensitive characters
• No spaces, symbols, or special characters
2 Record the password and store it in a safe, secure location.
3 Insert a write-enabled cartridge into the GoVault dock.
4 Right-click the GoVault icon in the Windows
Explorer display to view the GoVault system application software
menu (see figure 20 on page 35
5 Select
Set Password from the menu to display the Set Cartridge
Password
dialog (see figure 22).
).
My Computer or
GoVault™ for Windows User’s Guide 38
Page 51

Chapter 3 Operation
Using Cartridge Password Protection
6 As prompted, type the cartridge password in the New Password text
box.
Note: The password fields are case-sensitive. Also, always
record cartridge passwords and store them in a safe,
secure location.
Entering the Cartridge Password 3
Figure 23 Enter Cartridge
Password Dialog
7 Type the password again in the
8 Click
OK to assign the password to the GoVault cartridge and close
the
Set Cartridge Password dialog.
Confirm Password text box.
When you insert a password-protected cartridge into the GoVault dock,
the GoVault system application software displays the
Password
dialog (see figure 23).
Enter Cartridge
GoVault™ for Windows User’s Guide 39
Page 52

Chapter 3 Operation
Using Cartridge Password Protection
1 As prompted, type the cartridge password in the Password text box.
Figure 24 Incorrect Password
Eject Message
2 Click
OK to close the Enter Cartridge Password dialog and access the
GoVault cartridge.
3 If you entered an incorrect password, an error message asks you to
try again.
4 Click
5 As prompted, type the cartridge password in the
6 Click
OK to redisplay the Enter Cartridge Password dialog (see
figure 23
).
Password text box.
OK to close the Enter Cartridge Password dialog and access the
GoVault cartridge.
7 If you entered a second incorrect password, a second error message
asks you to try again. Repeat steps 4, 5, and 6.
8 If you enter a third incorrect password, the GoVault system
application software terminates the password entry routine and
displays an error message indicating that you must now eject and
reinsert the cartridge to proceed (see figure 24
).
9 As prompted, click Eject to eject the cartridge.
10 Reinsert the cartridge into the GoVault dock to redisplay the
Cartridge Password
dialog (see figure 23).
Enter
11 Repeat the password entry procedure, beginning with step 1.
GoVault™ for Windows User’s Guide 40
Page 53

Chapter 3 Operation
Using Cartridge Password Protection
Changing the Cartridge Password 3
Figure 25 Change Cartridge
Password Dialog
To change the current password of a password-protected cartridge:
1 Eject and reinsert the cartridge to redisplay the
Password
dialog (see figure 23 in the preceding subsection).
2 As prompted, type the current cartridge password in the
Enter Cartridge
Password
text box.
3 Select the
4 Click
figure 25
Change Password checkbox.
OK to display the Change Cartridge Password dialog (see
).
5 Create the new password that you want, using the following
requirements:
• From 6 to 16 case-sensitive characters
• No spaces, symbols, or special characters
6 Record the password and store it in a safe, secure location.
GoVault™ for Windows User’s Guide 41
Page 54

Chapter 3 Operation
Using Cartridge Password Protection
7 As prompted, type the new cartridge password in the New Password
text box.
Figure 26 Removing Cartridge
Password Protection
Performing a Security Erase Cartridge Function3
8 Type the password again in the
9 Click
OK to assign the new password to the GoVault cartridge and
close the
Change Cartridge Password dialog.
Confirm Password text box.
To remove password protection from a cartridge:
1 Insert, or eject and reinsert the password-protected cartridge to
redisplay the
Enter Cartridge Password dialog (see figure 23 on
page 39).
2 As prompted, type the cartridge password in the
3 Select the
4 Click
figure 25
5 Select the
6 Verify that the
Change Password checkbox.
OK to display the Change Cartridge Password dialog (see
).
Remove password protection checkbox.
New Password and Confirm Password text boxes are
Password text box.
both blank.
7 Click
OK to remove password protection from the cartridge and close
the
Change Cartridge Password dialog.
The Security Erase Cartridge function erases all of the data on a cartridge.
Then, after completing the Security Erase Cartridge function, you will
have to reformat the cartridge. This is the only way to reuse a passwordprotected cartridge if the password has been forgotten or lost.
Note: The Security Erase Cartridge function only restores the
cartridge for reuse. There is no recovery function for the data
on a password-protected cartridge with a forgotten or lost
password.
GoVault™ for Windows User’s Guide 42
Page 55

Chapter 3 Operation
Using Cartridge Password Protection
If you cannot access a password-protected cartridge because of a
forgotten or lost password, perform the Security Erase Cartridge function
as follows:
1 Close all applications running on the workstation or server system,
especially:
• Applications that might try to access the GoVault cartridge
Figure 27 Security Erase
Cartridge Dialog
• File managers, such as
My Computer or Explorer
Note: Depending on the size of the cartridge, the Security Erase
Cartridge function could take anywhere from 30 minutes
to 2 hours or more.
2 Insert, or eject and reinsert the password-protected cartridge to
redisplay the
Enter Cartridge Password dialog (see figure 23 on
page 39).
3 Click the
dialog (see figure 27
Security Erase button to display the Security Erase Cartridge
).
GoVault™ for Windows User’s Guide 43
Page 56

Checking the GoVault Dock and Cartridge Status
4 On the Security Erase Cartridge dialog:
Chapter 3 Operation
a Click
Cancel if you want to quit without erasing any of the data
on the cartridge.
You will not be able to click
Cancel after you begin the Security
Erase Cartridge function.
b Click
5 Click
Start Erase to display a deleting-all-files warning message.
OK on the deleting-all-files warning message to begin the
Security Erase Cartridge function.
6 Monitor the progress of the Security Erase Cartridge function.
7 Click
OK when the erase function completes.
8 Reformat the cartridge (see Reformatting Cartridges
Checking the GoVault Dock and Cartridge Status
The GoVault application system software keeps operational statistics and
current status information about the GoVault dock and cartridges. You
can view this information on the
dialog (see figure 28
), as follows:
Status tab of the GoVault Properties
on page 33).
1 Right-click the GoVault icon in the Windows
Explorer display to view the GoVault system application software
menu (see figure 20 on page 35
2 Click
3 Click the
GoVault™ for Windows User’s Guide 44
Properties to display the GoVault Properties dialog (see
figure 21 on page 36
Status tab on the GoVault Properties dialog to view the
GoVault
Status display (see figure 28).
).
).
My Computer or
Page 57

Figure 28 GoVault Status
Display
Chapter 3 Operation
Checking the GoVault Dock and Cartridge Status
Dock Status 3
As shown in figure 28, the GoVault system application software displays
operational statistics and status information about the GoVault dock on
the left side of the display, under the
Dock heading. The displayed dock
information includes:
• The vendor, product name, and serial number of the GoVault dock,
as well as the revision level of its firmware and its interface (SATA
for the internal dock, USB for the external dock)
• The total number emergency eject and of cartridge load operations
that have been performed since the dock was installed
• The total hours of operation for the GoVault dock
GoVault™ for Windows User’s Guide 45
Page 58

Chapter 3 Operation
Checking the GoVault Dock and Cartridge Status
For the internal dock (SATA interface), the displayed information also
includes:
• The total hours of operation for the fan.
• The operational status of the voltage, temperature, and fan. If there is
a problem, the displayed status changes from
Handling Operational Fault Conditions
Normal to Problem (see
on page 49).
Cartridge Status 3
As shown in figure 28, the GoVault system application software displays
operational statistics and status information about the GoVault cartridges
on the right side of the display, under the
Cartridge heading. The
displayed cartridge information includes:
• Whether a cartridge is currently loaded or not:
•
Present signifies that there is a cartridge in the dock, and the
displayed status information is for the loaded cartridge.
•
Previous signifies that there is no cartridge in the dock, and the
displayed status information is for the last cartridge that was
loaded.
• Whether the cartridge password protection feature is enabled.
• If the cartridge is write protected.
• An indication if the cartridge has detected a Self-Monitoring Analysis
Reporting Technology (SMART) threshold fault (see SMART
Threshold Detection on page 51).
• The capacity and serial number of the cartridge.
• The total number of Gbytes that have been written to the cartridge
and read from the cartridge.
• The total number of times that the cartridge has been loaded into a
GoVault dock, and the total operating hours (
Power on hours) of the
cartridge.
Note: The statistics that are cumulative over the life of the
cartridge (Gbytes written/read, load count, and power on
hours) are all stored on the cartridge, and will revert to
zero as a result of a Security Erase Cartridge operation.
GoVault™ for Windows User’s Guide 46
Page 59

Updating the GoVault Firmware
Check and update the firmware on the GoVault dock as follows:
1 Use the procedure in Checking the GoVault Dock and Cartridge
Status to view the GoVault Status display (see figure 28).
Chapter 3 Operation
Updating the GoVault Firmware
2 Note the
column on the
Revision level shown for the GoVault dock in the Dock
Status display.
3 To determine the most-recent revision level of the GoVault firmware,
use your Internet connection to open the Quantum web page at:
http://www.quantum.com/ServiceandSupport/
SoftwareandDocumentationDownloads/GoVault/Index.aspx#Firmware
4 Compare the most-recent revision of the GoVault firmware on the
Quantum website with the version that is installed on your dock:
a If they are the same, then there is no need to proceed with the
firmware update procedure.
b If the firmware on the Quantum website is a later version than
the firmware installed on your dock, then download the newer
firmware file, saving it to a location on your local system startup
hard drive. This is usually drive C.
5 Insert a write-enabled cartridge into the GoVault dock.
6 Click
7 Click
Update Firmware on the Status display to view the Firmware
Update
dialog (see figure 29).
Browse for Firmware File and navigate to the new firmware file
you downloaded and saved in step 4-b of this procedure.
8 With the new firmware file displayed in the
field, click
Start Update.
Enter Firmware Filename
9 As prompted by the
(see figure 30
), close all open applications that might try to
Ready to commence firmware update message
communicate with the GoVault drive, including:
• Any third-party backup software
•Windows
Explorer
• My Computer
GoVault™ for Windows User’s Guide 47
Page 60

Figure 29 GoVault Firmware
Update Dialog
Figure 30 Ready to
Commence Firmware Update
Message
Chapter 3 Operation
Updating the GoVault Firmware
10 Click OK to begin the firmware update.
11 When the firmware update operation completes, the GoVault system
application software prompts you to restart the system (see
figure 31
12 As prompted, click
GoVault™ for Windows User’s Guide 48
).
OK to restart the workstation or server system.
Page 61

Figure 31 Firmware Update
Complete Message
Chapter 3 Operation
Handling Operational Fault Conditions
13 To verify that the GoVault dock firmware was successfully updated:
a Right-click the GoVault icon in the Windows
Explorer display to view the GoVault system application software
menu (see figure 20 on page 35
b Click
c Click the
d Verify that the
Properties to display the GoVault Properties dialog (see
figure 21 on page 36
Status tab on the GoVault Properties dialog to display
the GoVault
Status dialog (see figure 28 on page 45).
).
Revision field displays the updated firmware
revision.
Handling Operational Fault Conditions
The following subsections provide guidelines for dealing with GoVault
fault conditions, including:
• Abnormal Hardware Conditions
• Internal dock voltage problems
• Internal dock temperature problems
My Computer or
).
, which are:
• Internal dock fan problems
Note: The abnormal hardware conditions apply to the internal
GoVault dock. They are neither detected nor reported by the
external GoVault Tabletop dock.
• SMART Threshold Detection
GoVault™ for Windows User’s Guide 49
Page 62

Chapter 3 Operation
Handling Operational Fault Conditions
Abnormal Hardware Conditions 3
The GoVault system application software samples three operational
aspects of the internal GoVault dock and cartridge disk drive once a
minute:
•Voltage
•Temperature
•Fan
When it detects that the internal dock temperature, voltage, or fan
operation is abnormal, the GoVault system application software:
• Displays a temperature, voltage, or fan warning message.
• Posts a message in the Windows Application Event log. (Open the
Windows Event Viewer to see this message.)
If the hardware condition remains abnormal for two minutes, the
GoVault system application software:
• Flashes the activity LED indicator on the internal GoVault dock
quickly at approximately four time per second.
• Ejects the cartridge
• Displays a cartridge eject message
If you reinsert a cartridge while the abnormal temperature condition
persists, the GoVault system application software will eject the cartridge
after one minute.
If the hardware condition persists, the GoVault system application
software continues posting messages to the Windows Application Event
log at five-minute intervals.
When the hardware condition returns to normal and remains there for
five minutes, the GoVault system application software:
• Posts a message to the Windows Application Event log indicating
that the hardware operation has returned to normal
• Displays a message that the abnormal hardware condition has
cleared
Table 2
lists the steps you should take to resolve abnormal hardware
conditions.
GoVault™ for Windows User’s Guide 50
Page 63

Chapter 3 Operation
Handling Operational Fault Conditions
Table 2 Resolving Abnormal
Hardware Conditions
SMART Threshold Detection 3
IF a . . . problem occurs, THEN . . .
voltage shut down the computer and contact the
computer manufacturer for instructions
and diagnosis.
temperature check and make sure that the internal
GoVault dock fan is operational and the
exhaust air flow is not restricted or
blocked.
fan contact Quantum Technical Support for
diagnosis instructions.
Note: After the activity LED indicator begins flashing to signify an
abnormal hardware condition, it will not return to normal until
you shut down and restart the workstation or server system.
The GoVault system application software monitors the currently installed
cartridge for detection of a Self-Monitoring Analysis and Reporting
Technology (SMART) threshold once a minute. When it detects a SMART
threshold fault, the GoVault system application software displays a
SMART fault warning and:
• Posts a message in the Windows Application Event log
• Updates the GoVault Properties, setting the
(see figure 28
on page 45)
SMART set status to Yes
Contact Quantum Technical Support for diagnosis instructions.
GoVault™ for Windows User’s Guide 51
Page 64

Chapter 4
4Specifications
This chapter provides GoVault™ for Windows dock and cartridge disk
drive technical specifications, including:
• Physical Specifications
• Power Specifications
• Performance Specifications
• Reliability Specifications
• Environmental Specifications
• Interface Compliance Specifications
on page 53
on page 55
on page 57
on page 58
on page 59
on page 60
GoVault™ for Windows User’s Guide 52
Page 65

Chapter 4 Specifications
Physical Specifications
Physical Specifications 4
Table 3 lists the GoVault physical specifications (see figure 32 and
figure 33
).
Table 3 Physical
Specifications
Specification Value
Internal
Dock
Height 41.3 mm (1.63 in.) 41.3 mm (1.63 in.)
Width 101.6 mm (4.00 in.) 146.0 mm (5.75 in.)
Length 166.5 mm (6.56 in.) 166.5 mm (6.56 in.)
Weight N/A 500 g (17.6 oz.)
Tabletop
Dock
Height 117.5 mm (4.63 in.) 63.3 mm (2.49 in.)
Width 63.3 mm (2.49 in.) 117.5 mm (4.63 in.)
Length 182.5 mm (7.19 in.) 182.5 mm (7.19 in.)
Weight 907 g (2.00 lb.)
Cartridge Height 24.5 mm (1.05 in.)
Bay Installation Configuration
3.5-inch 5.25-inch
Standing Profile
Side Horizontal
Width 85.0 mm (3.37 in.)
Length 112.0 mm (4.40 in.)
Weight 158.8 g (5.6 oz.)
GoVault™ for Windows User’s Guide 53
Page 66

Figure 32 GoVault Internal
Dock Dimensions
Chapter 4 Specifications
Physical Specifications
Figure 33 GoVault Tabletop
Dock Dimensions
GoVault™ for Windows User’s Guide 54
Page 67

Power Specifications
The internal GoVault dock is powered by +5 VDC and +12 VDC from the
internal power supply of the host workstation or server system.
The external GoVault Tabletop dock is powered by an AC-to-DC power
adapter/converter that provides +12 VDC. The power adapter/converter
plugs into a standard 115/230 VAC facility power receptacle. A twometer, 24-AWG cord applies the +12 VDC output to the GoVault dock
through a rear panel 2.0-mm surface-mount power jack.
Chapter 4 Specifications
Power Specifications
Table 4 Voltage and Current
Specifications
Table 4
Internal
Dock
lists the power specifications associated with the GoVault docks.
Specification Value
+5 VDC +12 VDC
DC voltage tolerance +5.0 VDC ±5% +12.0 VDC ±10%
Non-operating
maximum
Maximum operating
current:
•Idle
• Continuous 1.2 Amps 0.3 Amps
Ripple, peak-to-peak 100 mAmps 100 mAmps
+5.5 VDC +28.0 VDC
0.8 Amps N/A
GoVault™ for Windows User’s Guide 55
Page 68

Chapter 4 Specifications
Power Specifications
Specification Value
Tabletop
Dock
Input voltage (60 Hz) 115/230 VAC ± 10%
DC voltage tolerance +12.0 VDC ± 10%
Non-operating
+28 VDC
maximum
Maximum operating
current:
•Idle
0.30 Amps (with cartridge
inserted)
0.11 Amps (without cartridge)
• Continuous 0.50 Amps (with cartridge
inserted)
Ripple, peak-to-peak 100 mAmps
GoVault™ for Windows User’s Guide 56
Page 69

Performance Specifications
Table 5 lists the GoVault performance specifications.
Chapter 4 Specifications
Performance Specifications
Table 5 Performance
Specifications
Specification Value
Capacity A function of the installed
cartridge: 40, 80, 120, or 160
Gbytes
Data transfer rates • 26 Mbytes/second, typical
• 34 Mbytes/second,
maximum/peak
Seek rates:
• Minimum (1 track) 1.0 msec. read, 1.5 msec. write
• Average 12.5 msec. read, 14.5 msec. write
• Maximum 22 msec. read, 24 msec. write
Latency 5.56 msec., average
Spindle speed 5400 RPM
Start time 3.5 sec.
Stop time, including eject 3.0 sec.
GoVault™ for Windows User’s Guide 57
Page 70

Reliability Specifications
Table 6 lists the GoVault reliability specifications.
Chapter 4 Specifications
Reliability Specifications
Table 6 Reliability
Specifications
Specification Value
Load/unload cycles 5,000 (dock and cartridge)
Dock service life 5 years at 2.75 load/unload cycles per day
MTBF Internal dock, 375,000 hours
Tabletop dock, 300,000 hours
Cartridge, 330,000 hours
Cartridge archive life > 10 years
Unrecoverable data rate 1 error in 10
14
GoVault™ for Windows User’s Guide 58
Page 71

Environmental Specifications
Table 7 lists the GoVault environmental specifications.
Chapter 4 Specifications
Environmental Specifications
Table 7 Environmental
Specifications
Specification Value
Temperature:
• Operating 50° F to 104° F (10° C to 40° C)
• Nonoperating Dock, –40° F to 140° F (–40°C to 60° C)
Cartridge, 68° F to 86° F (20° C to 30° C)
Relative humidity:
• Operating 20% to 80% (noncondensing)
• Nonoperating Dock, 10% to 95% (noncondensing)
Cartridge, 20% to 40% (noncondensing)
GoVault™ for Windows User’s Guide 59
Page 72

Interface Compliance Specifications
Table 8 lists the GoVault interface compliance specifications.
Chapter 4 Specifications
Interface Compliance Specifications
Table 8 Interface Compliance
Specifications
Interface Specification Compliances
SCSI-2
SCSI-3
• SCSI-2 Small Computer System Interface – 2 (SCSI-
2) ANSI/INCITS 131-1994
• SCSI Architecture Model – 2 (SAM-2) ANSI/
INCITS 366-2003
• SCSI Primary Commands – 2 (SPC-2) ANSI/
INCITS 351-2001
• SCSI Block Commands – 2 (SBC-2) draft standard
rev. 16, ANSI/INCITS Project T10/1417-D
• SCSI Architecture Model – 3 (SAM-3) approved
standard ANSI/INCITS Project T10/1561-D
• SCSI Primary Commands – 3 (SPC-3) draft
standard rev. 23, ANSI/INCITS Project T10/1416-D
• SCSI-3 Block Commands (SBC) ANSI/INCITS 3061998
GoVault™ for Windows User’s Guide 60
Page 73

Interface Compliance Specifications
Interface Specification Compliances
Chapter 4 Specifications
SATA
USB 2.0
• AT Attachment with Packet Interface – 6 (ATAPI-6)
ANSI/INCITS 361-2002.
• AT Attachment with Packet Interface – 7, Volume 1,
Register Delivered Command Set, Logical Register
Set (ATAPI-7 V1) draft standard ANSI/INCITS
Project T13/1532D
• AT Attachment with Packet Interface – 7, Volume 3,
Serial Transport Protocols and Physical
Interconnect (ATAPI-7 V3) draft standard ANSI/
INCITS Project T13/1532D
• Serial ATA: High Speed Serialized AT Attachment,
Revision 1.0a, Serial ATA Workgroup, 7 January
2003.
• Serial ATA 1.0a Errata, Serial ATA Workgroup,
December 20, 2004.
• Serial ATA II: Extensions to Serial ATA 1.0a,
Revision 1.2, Serial ATA Workgroup, 27 August
2004.
• Serial ATA II: Extension to Serial ATA 1.0a Errata,
Serial ATA Workgroup, January 17, 2005
• Universal Serial Bus Specification, version 2.0, April
27, 2000
GoVault™ for Windows User’s Guide 61
Page 74

The standard configuration of the internal GoVault™ dock includes side
brackets and a 5.25-inch bezel for installation in a 5.25-inch drive bay. If
you need to install the dock in a 3.5-inch drive bay, use the procedure in
this appendix for removing the side brackets and changing the bezel.
Parts and Tools Required
Appendix A
AChanging the Bezel
Make sure you have the following parts and tools before you attempt to
change the GoVault 5.25-inch bezel (see figure 34
• A 3.5-inch GoVault bezel assembly
• A blunt dowel no larger than 0.12 inches in diameter. A wooden or
plastic stick is ideal.
• A small Phillips screwdriver
GoVault™ for Windows User’s Guide 62
):
Page 75

Figure 34 Parts and Tools
Required
Procedure
Appendix A Changing the Bezel
Procedure
To change the GoVault bezel:
1 Remove the two screws that attach each side bracket to the GoVault
dock (see figure 35
2 Remove the side brackets store them in a safe place.
Figure 35 Removing the Side
Brackets
3 Carefully insert the dowel into each of the four access holes (two on
the upper-front sides, two on the bottom) to release the bezel clips
while applying a slight outward force on the bezel (see figure 36
GoVault™ for Windows User’s Guide 63
).
).
Page 76

Figure 36 Releasing the Bezel
Clips
Figure 37 Removing the 5.25inch Bezel
Appendix A Changing the Bezel
Procedure
4 Make sure that the bezel release is even across all surfaces, and
carefully remove the bezel in a straight, outward motion (see
figure 37
), and store it in a safe place.
Caution: Do not force the bezel. It should slide off easily.
5 Set the chassis up-right, and carefully align all four clips of the 3.5-
inch bezel with the access holes.
6 Verify that cartridge manual eject button is aligned with the through-
hole on the bezel, and carefully push down on the bezel assembly
with slow, even pressure across all surfaces until the clips snap the
bezel into place (see figure 38
).
7 With the 3.5-inch bezel in place, you can now install the GoVault
dock in a 3.5-inch drive bay.
GoVault™ for Windows User’s Guide 64
Page 77

Figure 38 Installing the 3.5-
inch Bezel
Appendix A Changing the Bezel
Procedure
GoVault™ for Windows User’s Guide 65
Page 78

Appendix B
BConfiguring Windows for
DMA Data Transfer Mode
If you are not going to install the GoVault system application software,
use the procedures in this appendix to determine the hardware
configuration of the motherboard in your workstation or server system
and, if necessary, configure the operating system to use the high-speed
Direct Memory Access (DMA) mode for GoVault data transfer
operations.
About Data Transfer Modes
By default, depending on the hardware configuration of the motherboard
in your workstation or server system, if you do not install the GoVault
system application software, the Windows operating system might assign
the low-speed Programmed I/O (PIO) mode for GoVault data transfer
operations. This can happen if all of the following conditions are true for
your system:
1 The operating system is a Microsoft Windows environment, which is
true.
2 The workstation or server system has never had a GoVault installed
previously.
GoVault™ for Windows User’s Guide 66
Page 79

Appendix B Configuring Windows for DMA Data Transfer Mode
Determining Your Motherboard Configuration
3 The GoVault device server is connected to the system by an Intel or
an Intel-compliant motherboard with either an Intel or an Intelcompliant ICH5, ICH6, or ICH7 I/O Controller Hub.
To make sure that your system uses the high-speed DMA mode for data
transfer operations:
1 First, use the procedure in Determining Your Motherboard
Configuration to see if it uses an ICH5, ICH6, or ICH7 I/O Controller
Hub.
2 Then, if it does, use the procedure in Changing the Transfer Mode
page 69 to configure high-speed DMA mode for your GoVault data
transfer operations.
Determining Your Motherboard Configuration
To find out if the motherboard in your workstation or server system uses
an Intel or Intel-compliant ICH5, ICH6, or ICH7 I/O Controller Hub:
1 Open a
2 On the
display your system devices by connection type.
Figure 39 Device Manager
View Menu
Device Manager window.
View menu, click Devices by connection (see figure 39) to
on
GoVault™ for Windows User’s Guide 67
Page 80

Figure 40 Devices by
Connection Listing
Appendix B Configuring Windows for DMA Data Transfer Mode
Determining Your Motherboard Configuration
3 Sequentially expand the following device categories, in the order
presented, looking for a
a
ACPI Uniprocessor PC or ACPI Multiprocessor PC
QUANTUM GoVault listing (see figure 40):
b Microsoft ACPI-Compliant System
c PCI Bus
d Intel(R) XXXXX Ultra ATA Storage Controllers or Intel(R) XXXXX
Serial ATA Storage Controllers
e Primary IDE Channel
f Secondary IDE Channel
1 If you do not see QUANTUM GoVault listed as either an Intel(R) XXXXX
Serial ATA Storage Controller
Controller
, then the GoVault device server is connected to the system
or an Intel(R) XXXXX Ultra ATA Storage
by an I/O Controller Hub with DMA already configured as the data
transfer mode. In this case you do not have to change the mode. Close
the
Device Manager window and enjoy your GoVault installation.
If you do see
Serial ATA Storage Controller
Controller
GoVault™ for Windows User’s Guide 68
QUANTUM GoVault listed as either an Intel(R) XXXXX
or an Intel(R) XXXXX Ultra ATA Storage
, then it is true that the GoVault device server is connected
Page 81

Appendix B Configuring Windows for DMA Data Transfer Mode
to the system by an Intel or an Intel-compliant motherboard with
either an Intel or an Intel-compliant ICH5, ICH6, or ICH7 I/O
Controller Hub. In this case, PIO is configured as the data transfer
mode, and you should use the procedure in Changing the Transfer
Mode to configure high-speed DMA mode for your GoVault data
transfer operations. Do not close the
Changing the Transfer Mode
If the procedure in Determining Your Motherboard Configuration
indicated that PIO is the GoVault data transfer mode, change it to DMA
mode as follows:
Changing the Transfer Mode
Device Manager window.
Figure 41 GoVault Properties
Dialog
1 Right-click
select
Properties to display the QUANTUM GoVault Properties dialog
(see figure 41
QUANTUM GoVault in the Device Manager window and
).
GoVault™ for Windows User’s Guide 69
Page 82

Appendix B Configuring Windows for DMA Data Transfer Mode
Changing the Transfer Mode
2 Note the indicated Location: value, which might show Location 1 (1)
or
Location 0 (0) on your workstation or server system. You will need
this information later in step 6 of this procedure.
Figure 42 IDE Channel
Properties Advanced Settings
Ta b
3 Click
4 In the
OK to close the QUANTUM GoVault Properties dialog.
Device Manager window right click the IDE Channel listing
under which QUANTUM GoVault is shown—either the
Channel
the appropriate
5 Open the
or Secondary IDE Channel—and select Properties to display
IDE Channel Properties dialog.
Advanced Settings tab to view the device type and mode
information for the two channel devices (see figure 42
Primary IDE
).
6 Recall the Location: value from the QUANTUM GoVault Properties
dialog that you noted in step 2 of this procedure:
A Location: value of . . . Means GoVault is attached as . . .
Location 0 (0) Device 0
Location 1 (1) Device 1
GoVault™ for Windows User’s Guide 70
Page 83

Appendix B Configuring Windows for DMA Data Transfer Mode
Changing the Transfer Mode
In the examples shown, GoVault is attached as Device 1 and the
Transfer Mode is PIA Only.
Figure 43 Changing the
Transfer Mode
7 To change the transfer mode, select
Mode
list box (see figure 43).
DMA if available from the Transfer
8 Click OK to close the IDE Channel Properties dialog.
9 To implement the change:
a Save and close your open files and terminate all running
applications.
b Restart the workstation or server system.
10 When the system restarts, verify that DMA is configured as the
GoVault transfer mode (see figure 44
) as follows:
a Repeat steps 1 through 3 of Determining Your Motherboard
Configuration on page 67 to find the QUANTUM GoVault listing
in
Device Manager.
GoVault™ for Windows User’s Guide 71
Page 84

Figure 44 DMA Mode
Configured
Appendix B Configuring Windows for DMA Data Transfer Mode
Changing the Transfer Mode
b In the Device Manager window right-click the IDE Channel listing
under which QUANTUM GoVault is shown and select
to display the appropriate
c Open the
Advanced Settings tab to verify that DMA is configured
IDE Channel Properties dialog.
as the GoVault transfer mode as shown in figure 42
Properties
.
Note: Windows 2000 might only show Ultra DMA Mode. This is not a
problem, as GoVault will operate in all UDMA data transfer
modes
GoVault™ for Windows User’s Guide 72
Page 85

CEnvironmental and Disposal Compliances
Environmental Compliance
Quantum is committed to providing quality products in an
environmentally sound manner and to comply with all applicable
environmental laws, rules and regulations.
This product was designed, manufactured and made available with
consideration to worldwide laws, rules and regulations applicable to the
product and the electronics industry including the European Union
Directives 2002/95/EC & 2002/96/EC (RoHS and WEEE).
Appendix C
For further information on Quantum’s Environmental Compliance and
Global Citizenship, please visit our website at:
qcare.quantum.com
GoVault™ for Windows User’s Guide 73
Page 86

Appendix C Environmental and Disposal Compliances
Disposal of Electrical and Electronic Equipment
Disposal of Electrical and Electronic Equipment
This symbol on the GoVault™ dock or on its packaging
indicates that the components should not be disposed
of with your other waste materials. Instead, they should
be submitted to a designated collection point for the
recycling of electrical and electronic equipment. The
separate collection and recycling of your waste
equipment at the time of disposal helps conserve
natural resources and ensures that the equipment is
recycled in a manner that protects human health and the environment.
For more information about properly disposing of your waste equipment
for recycling, please visit our website at qcare.quantum.com
your local government authority, your household waste disposal service,
or the business from which you purchased the product.
or contact
GoVault™ for Windows User’s Guide 74
Page 87

Appendix D
DRegulatory Compliances
This appendix identifies the GoVault™ regulatory compliances. The
topics include:
• Safety Standard Compliances
• Electromagnetic Compatibility (EMC) Compliances
• Regulatory Agency Certifications
on page 76
on page 78
on page 77
GoVault™ for Windows User’s Guide 75
Page 88

Appendix D Regulatory Compliances
Safety Standard Compliances
Safety Standard Compliances
GoVault drives comply with the safety standards listed in table 9.
Table 9 Safety Standards
Country Regulatory Organization Compliant to:
Canada Canadian Standards Association (CSA) UL/CSA 60950-1
EU member nations Comité Europèen de Normalisation
Electrotechnique – the European
Committee for Electrotechnical
Standardization (CENELEC)
Germany Bauart EN 60950-1, 2001
IECEE* member nations IECEE* International Electrotechnical
Commission on Electrical Equipment
(IECEE) for Mutual Recognition of Test
Certificates for Electrical Equipment
“CB Scheme”
Taiwan BSMI BSMI certification, CNS 14336
United States Nationally Recognized Testing
Laboratory (NRTL)
* IECEE member nations include: Argentina, Austria, Australia, Belgium, Brazil, Canada, China (PR),
Czech Republic, Denmark, Finland, France, Germany, Hungary, India, Ireland, Israel, Italy, Japan,
(South) Korea, Montenegro, Netherlands, Norway, Poland, Russian Federation, Serbia, Singapore,
Slovakia, Slovenia, South Africa, Spain, Switzerland, Turkey, United Kingdom, and USA.
EN 60950-1, 1st edition
CB Scheme per IEC 60950-1 with
details and exceptions for each
member country
UL/CSA 60950-1
GoVault™ for Windows User’s Guide 76
Page 89

Appendix D Regulatory Compliances
Electromagnetic Compatibility (EMC) Compliances
Electromagnetic Compatibility (EMC) Compliances
GoVault drives comply with the EMC regulations listed in table 10.
Table 10 Electromagnetic
Compatibility (EMC)
Regulations
Country Regulatory Organization Compliant to:
Canada Industry Canada Digital Apparatus -
Interference-Causing Equipment
Standard
(ICES-003)
EU member nations CE Emissions per CISPR 22,
Japan Voluntary Control Council for Interface
(VCCI)
South Korea MIC CISPR 22 and CISPR 24
Taiwan Bureau of Commodity Inspection and
Quarantine (BSMI)
United States Federal Communications Commission
(FCC)
Note: Use the internal GoVault dock only in equipment where the
combination has been determined to be suitable by an
appropriate certification organization (for example,
Underwriters Laboratories Inc. or the Canadian Standards
Association in North America).
ICES-003 Digital Apparatus
EN55022 and Immunity per
CISPR 24, EN55024
VCCI
BSMI EMC certification, CNS
14338
Title 47: Code of Federal
Regulations, Part 15, Subpart B
(47CFR15B),
GoVault™ for Windows User’s Guide 77
Page 90

You should also consider the following safety points:
• Install the drive in an enclosure that limits the user’s access to live
parts, gives adequate system stability and provides the necessary
grounding for the drive.
• Provide the correct voltages (+5 VDC and +12 VDC) based on the
regulation applied—Extra Low Voltage (SEC) for UL and CSA, and
Safety Extra Low Voltage for BSI and VDE (if applicable).
Regulatory Agency Certifications
GoVault is certified by the regulatory agencies and organizations listed in
table 11
.
Appendix D Regulatory Compliances
Regulatory Agency Certifications
Table 11 Regulatory Agencies
Certification Country Mart/Cert#
BSMI Taiwan Mark & D33102 Emissions &
Safety
cCSAus Canada & US Mark &
LR56637
CE Europe Mark Immunity &
C-Tick
(requires CE
report)
FCC US Mark Immunity &
Nemko Norway Mark Safety
VCCI Japan Mark Emissions
* = combined CSA and UL is acceptable under C-UL-US.
Australia Mark & N1132 Emissions
Safety
Emissions &
Safety
Emissions
GoVault™ for Windows User’s Guide 78
Page 91

Appendix D Regulatory Compliances
Regulatory Agency Certifications
Canadian Standards Association (CSA) 4
International Electrotechnical Commission (IEC) 4
GoVault is certified under the CSA’s Component Recognition Program
(CSA Standard C22.2 NO 950).
GoVault is classified for safety standards of the International Standard
IEC 950, European Standard EN 60950 by GS and Bauart license.
GoVault™ for Windows User’s Guide 79
 Loading...