

Page 1

TM
FastStor
Racking or De-racking the Autoloader
You can convert your FastStor 2 autoloader from a desktop to a rackmount configuration or from a
rackmount to a desktop configuration.
Contents
Page Topic
1 What’s in the Box?
1 Tools Required
2 Converting from Desktop to Rackmount
5 Converting from Rackmount to Desktop
6 Contacting ADIC
2
What’s in the Box?
The following items are included in the rackmount kit:
Description Quantity
Phillips screws 10
Clip nuts 10
L-brackets; right side and left side
Rail assembly; right side and left side 2
2
Tools Required
The following tools are required to work with the rackmount kit:
Description Quantity
Small flat blade screwdriver 1
# 2 Phillips head screwdriver
© May 2005, ADIC®
ADIC, Scalar, and SNC are registered trademarks of Advanced Digital
Information Corporation. All other product, company, or service names
mentioned herein are the property of their respective owners.
1
6-00519-01 Rev B
Page 2
Converting from Desktop to Rackmount
When converting a desktop autoloader to a rackmounted unit, you must install the rail assembly onto the
rack, attach the L-brackets to the autoloader, and then install the autoloader into the rack.
Before you begin, review the following guidelines:
• For continued safe operation, the recommended maximum internal ambient temperature of the rack
should not exceed 104
• While installing a rackmounted unit, do not block or otherwise restrict airflow to the front or rear
vents.
• To maintain rack stability, consider the mechanical loading of the rack to ensure a low center of
gravity.
• Before installing a unit into a rack, consider the overall loading of the branch circuit supplying power
to the rack.
• Ensure that a reliable grounding path is maintained in rack system. This unit is intended to be
connected to earth ground.
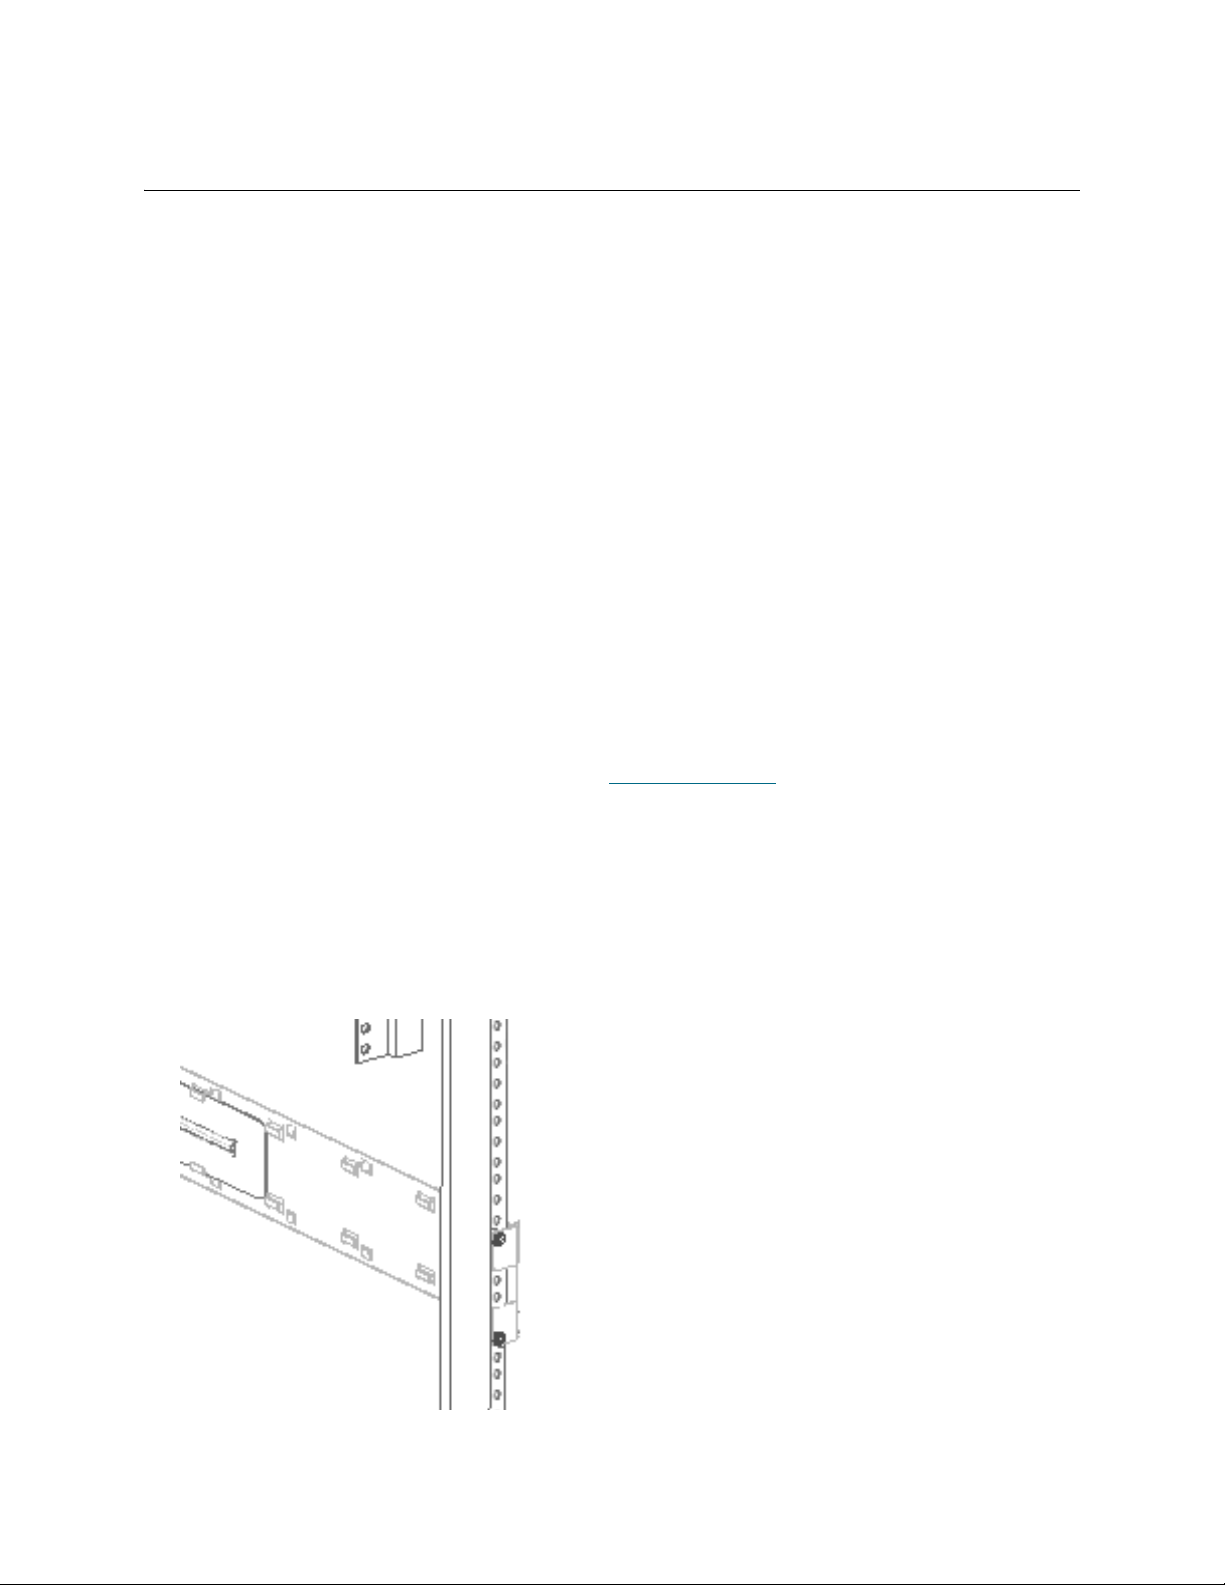
Installing the Rail Assemblies to the Rack
The rackmount kit contains two rail assemblies that you mount to your rack.
1 Open the shipping carton, remove the rail assemblies and associated hardware.
°F (40°C).
Verify that you have all the components listed in What’s in the Box?
2 If you have non-threaded racks, slide four clip nuts onto the rack where you are installing the rails (two
on the front and two on the back of the rack). If you have pre-threaded racks, skip this step.
3 Position the rail assemblies to your rack, matching the holes on the front and back of the rails with the
holes on your rack.
4 Using a # 2 Phillips head screwdriver, attach the rail assemblies to your rack with four Phillips screws
(two screws on the front and two on the back of the rack) or with the appropriate screws for your rack.
Note the front of the rack illustrated in the following figure.
2 FastStor 2 Installing or Removing a Barcode Reader
Page 3

Installing the L-Brackets to the Autoloader
The rackmount kit contains two front L-brackets that must be installed to the autoloader before you can
rackmount it.
1 Turn off the autoloader and then remove the SCSI cable(s) and power cable from the rear of the
autoloader.
2 Using a small flat blade screwdriver, remove the front two screws that secure the right side and left side
of the autoloader cover.
3 Save the screws for step 5.
4 Position the L-brackets to the side of the autoloader as shown in the following figure by matching the
holes on the brackets to the holes on each side of the autoloader cover. Using the following figure, verify
that the hole on the front flange is placed at the top.
5 Using a small flat blade screwdriver, attach the L-brackets the autoloader with the screws from step 2.
Installing the Autoloader to the Rack
Once you attach the L-brackets to your autoloader, you can slide the autoloader into the rails.
1 If you have a non-threaded rack, slide two clip nuts onto the rack where you are installing the
autoloader. If you have a pre-threaded rack, skip this step.
2 Position the autoloader in the rack by sliding it into the rail assembly and matching the holes in the rack
with the holes on the L-brackets.
FastStor 2 Installing or Removing a Barcode Reader 3
Page 4

Make certain that the restraint tabs at the rear of the rail assembly slide into the back of the autoloader
and that the L-bracket is fully seated against the front flange of the rack.
3 Using a # 2 Phillips head screwdriver, attach the L-brackets on each side of the autoloader to the rack
with the two remaining Phillips screws, or with the appropriate screws for your rack.
4 Reconnect the SCSI cable(s) and power cord to your autoloader. Refer to the FastStor 2 User’s Guide.
Your autoloader is now ready for use as a rackmounted unit.
4 FastStor 2 Installing or Removing a Barcode Reader
Page 5

Converting from Rackmount to Desktop
When converting a rackmounted autoloader to a desktop unit, you must first remove the unit from the
rackmount assembly and then remove the L-brackets from the autoloader.
1 Turn off the autoloader and remove the SCSI cable(s) and power cord from the rear of the autoloader.
2 Using a # 2 Phillips head screwdriver, remove the screws that secure the L-brackets to the rack.
Store the screws in a secure location.
3 Slide the autoloader out of the rack and set it on a cleared, flat work surface.
4 Using a # 2 Phillips head screwdriver, remove the rail assemblies by removing the screws and clip nuts
(if applicable) that secure them to the rack.
Store the screws and clip nuts (if applicable) in a secure location.
5 Using a small flat blade screwdriver, remove the screws that secure the L-brackets to the front of the
autoloader (two on each side).
Store the L-brackets in a secure location.
FastStor 2 Installing or Removing a Barcode Reader 5
Page 6

6 Re-install the screws (from step 5) back into the front right and left side of the autoloader to secure the
autoloader cover.
7 Reconnect the SCSI cable(s) and the power cord to your autoloader. Refer to the FastStor 2 User’s
Guide.
Your autoloader is now ready for use as a desktop unit. Store the screws, L-brackets, clip nuts (if
applicable), and rail assemblies in a secure location in case you want to rackmount your autoloader
again.
Contacting ADIC
If problems cannot be solved with the aid of this document or if training is desired, contact the ADIC
Technical Assistance Center (ATAC).
In the USA: 800-827-3822
In Europe and Japan: 00-800-9999-3822
For other contact numbers: www.adic.com/contact
To open a Service Request online: www.adic.com/techsup
6 FastStor 2 Installing or Removing a Barcode Reader
 Loading...