

Page 1

m
™
FastStor 2
User’s Guide
ADVANCED DIGITAL INFORMATION CORPORATION
www.adic.co
Page 2

Copyright © 2003-2005 ADIC
®
The information contained in this document is subject to change without notice.
This document contains proprietary information which is protected by copyright. All rights are reserved. No part of this
document may be photocopied, reproduced, or translated to another language without prior written consent of ADIC.
ADIC shall not be liable for errors contained herein or for incidental or consequential damages (including lost profits) in
connection with the furnishing, performance or use of this material whether based on warranty, contract, or other legal
theory.
All trademarks within this document are the property of their respective owners.
Copyright © 2003-2005 ADIC Europe
TM
All rights reserved. No part of this document may be copied or reproduced in any form or by any means, without prior
written permission of ADIC Europe, ZAC des Basses Auges, 1 rue Alfred de Vigny, 78112 Fourqueux, France.
ADIC Europe assumes no responsibility for any errors that may appear in this document, and retains the right to make
changes to these specifications and descriptions at any time, without notice.
This publication may describe designs for which patents are pending, or have been granted. By publishing this
information, ADIC Europe conveys no license under any patent or any other right.
ADIC Europe makes no representation or warranty with respect to the contents of this document and specifically
disclaims any implied warranties of merchantability or fitness for any particular purpose. Further, ADIC Europe reserves
the right to revise or change this publication without obligation on the part of ADIC Europe to notify any person or
organization of such revision of change.
Every effort has been made to acknowledge trademarks and their owners. Trademarked names are used solely for
identification or exemplary purposes: any omissions are unintentional.
ADIC is a registered trademark and ADIC Europe is a trademark of Advanced Digital Information Corporation.
ADIC USA
11431 Willows Road NE
Redmond, Washington
98052-4952
Tel.: 1-800-336-1233
Fax: 1-425-881-2296
ADIC Europe
ZAC des Basses Auges
1, rue Alfred de Vigny
78112 Fourqueux, France
Tel.: 33-0-1-30-87-53-00
Fax: 33-0-1-30-87-53-01
ADIC-Germany GmbH&Co.KG
Eschenstraße 3
89558 Böhmenkirch
Germany
Tel: 49-0-7332-83-0
Fax: 49-0-7332-83-135
Published: June 2005 Document Number:6-00515-04 Rev A
Page 3

Contents
1 About This Guide and Your Product 1
Product Safety Statements . . . . . . . . . . . . . . . . . . . . . . . . . . . . . . . . . . . . . . . . . . . . . . . . . . . . . . . . . . . 1
Product Model Number . . . . . . . . . . . . . . . . . . . . . . . . . . . . . . . . . . . . . . . . . . . . . . . . . . . . . . . . . . . . . . 1
Explanation of Symbols and Notes . . . . . . . . . . . . . . . . . . . . . . . . . . . . . . . . . . . . . . . . . . . . . . . . . . . . . 1
Other Documents you Might Need . . . . . . . . . . . . . . . . . . . . . . . . . . . . . . . . . . . . . . . . . . . . . . . . . . . . . 2
Getting More Information or Help . . . . . . . . . . . . . . . . . . . . . . . . . . . . . . . . . . . . . . . . . . . . . . . . . . . . . . 2
2 Description 3
Features . . . . . . . . . . . . . . . . . . . . . . . . . . . . . . . . . . . . . . . . . . . . . . . . . . . . . . . . . . . . . . . . . . . . . . . . . 3
Switches and Indicators. . . . . . . . . . . . . . . . . . . . . . . . . . . . . . . . . . . . . . . . . . . . . . . . . . . . . . . . . . . . . . 4
Front Panel . . . . . . . . . . . . . . . . . . . . . . . . . . . . . . . . . . . . . . . . . . . . . . . . . . . . . . . . . . . . . . . . . . . . 4
Rear Panel. . . . . . . . . . . . . . . . . . . . . . . . . . . . . . . . . . . . . . . . . . . . . . . . . . . . . . . . . . . . . . . . . . . . . 4
3 Getting Started 5
Unpacking and Inspecting. . . . . . . . . . . . . . . . . . . . . . . . . . . . . . . . . . . . . . . . . . . . . . . . . . . . . . . . . . . . 5
Checking the Accessories . . . . . . . . . . . . . . . . . . . . . . . . . . . . . . . . . . . . . . . . . . . . . . . . . . . . . . . . . 5
Unpacking the Autoloader . . . . . . . . . . . . . . . . . . . . . . . . . . . . . . . . . . . . . . . . . . . . . . . . . . . . . . . . . 5
Installing the Barcode Reader. . . . . . . . . . . . . . . . . . . . . . . . . . . . . . . . . . . . . . . . . . . . . . . . . . . . . . . . . 6
Choosing an Installation Location . . . . . . . . . . . . . . . . . . . . . . . . . . . . . . . . . . . . . . . . . . . . . . . . . . . . . . 8
Preparing the Host System . . . . . . . . . . . . . . . . . . . . . . . . . . . . . . . . . . . . . . . . . . . . . . . . . . . . . . . . . . . 9
SCSI Host System Adapter and Connection Guidelines. . . . . . . . . . . . . . . . . . . . . . . . . . . . . . . . . . 9
Autoloader SCSI Connections. . . . . . . . . . . . . . . . . . . . . . . . . . . . . . . . . . . . . . . . . . . . . . . . . . . . . . . . . 9
Connecting SCSI and Power Cables. . . . . . . . . . . . . . . . . . . . . . . . . . . . . . . . . . . . . . . . . . . . . . . . . 9
Connecting More than one Autoloader . . . . . . . . . . . . . . . . . . . . . . . . . . . . . . . . . . . . . . . . . . . . . . 10
4 Operating the Autoloader 11
Operator Panel . . . . . . . . . . . . . . . . . . . . . . . . . . . . . . . . . . . . . . . . . . . . . . . . . . . . . . . . . . . . . . . . . . . 11
LCD Screen. . . . . . . . . . . . . . . . . . . . . . . . . . . . . . . . . . . . . . . . . . . . . . . . . . . . . . . . . . . . . . . . . . . 11
LED Indicators. . . . . . . . . . . . . . . . . . . . . . . . . . . . . . . . . . . . . . . . . . . . . . . . . . . . . . . . . . . . . . . . . 12
Control Buttons . . . . . . . . . . . . . . . . . . . . . . . . . . . . . . . . . . . . . . . . . . . . . . . . . . . . . . . . . . . . . . . . 12
Understanding the Menu Structure . . . . . . . . . . . . . . . . . . . . . . . . . . . . . . . . . . . . . . . . . . . . . . . . . 13
Powering on the Autoloader . . . . . . . . . . . . . . . . . . . . . . . . . . . . . . . . . . . . . . . . . . . . . . . . . . . . . . . . . 13
Configuring the Barcode Reader. . . . . . . . . . . . . . . . . . . . . . . . . . . . . . . . . . . . . . . . . . . . . . . . . . . . . . 14
FastStor 2 User’s Guide iii
Page 4

Configuring the Remote Management Unit . . . . . . . . . . . . . . . . . . . . . . . . . . . . . . . . . . . . . . . . . . . . . . 14
Working with Data Cartridges . . . . . . . . . . . . . . . . . . . . . . . . . . . . . . . . . . . . . . . . . . . . . . . . . . . . . . . . 15
Write-Protecting Cartridges . . . . . . . . . . . . . . . . . . . . . . . . . . . . . . . . . . . . . . . . . . . . . . . . . . . . . . . 15
Importing Cartridges . . . . . . . . . . . . . . . . . . . . . . . . . . . . . . . . . . . . . . . . . . . . . . . . . . . . . . . . . . . . 16
Exporting Cartridges . . . . . . . . . . . . . . . . . . . . . . . . . . . . . . . . . . . . . . . . . . . . . . . . . . . . . . . . . . . . 17
Using Bulk Exchange . . . . . . . . . . . . . . . . . . . . . . . . . . . . . . . . . . . . . . . . . . . . . . . . . . . . . . . . . . . 17
Loading Cartridges . . . . . . . . . . . . . . . . . . . . . . . . . . . . . . . . . . . . . . . . . . . . . . . . . . . . . . . . . . . . . 17
Unloading Cartridges. . . . . . . . . . . . . . . . . . . . . . . . . . . . . . . . . . . . . . . . . . . . . . . . . . . . . . . . . . . . 18
Re-Inventorying Cartridges . . . . . . . . . . . . . . . . . . . . . . . . . . . . . . . . . . . . . . . . . . . . . . . . . . . . . . . 18
Maintaining Cartridges. . . . . . . . . . . . . . . . . . . . . . . . . . . . . . . . . . . . . . . . . . . . . . . . . . . . . . . . . . . 18
Cleaning the Tape Drive . . . . . . . . . . . . . . . . . . . . . . . . . . . . . . . . . . . . . . . . . . . . . . . . . . . . . . . . . . . . 19
5 Managing the Autoloader 21
Resetting the Autoloader. . . . . . . . . . . . . . . . . . . . . . . . . . . . . . . . . . . . . . . . . . . . . . . . . . . . . . . . . . . . 21
Viewing or Changing the SCSI IDs . . . . . . . . . . . . . . . . . . . . . . . . . . . . . . . . . . . . . . . . . . . . . . . . . . . . 21
Viewing or Changing the Autoloader SCSI ID. . . . . . . . . . . . . . . . . . . . . . . . . . . . . . . . . . . . . . . . . 22
Viewing or Changing the Tape Drive SCSI ID. . . . . . . . . . . . . . . . . . . . . . . . . . . . . . . . . . . . . . . . . 22
Autoloader Operating Modes. . . . . . . . . . . . . . . . . . . . . . . . . . . . . . . . . . . . . . . . . . . . . . . . . . . . . . . . . 22
Random Mode. . . . . . . . . . . . . . . . . . . . . . . . . . . . . . . . . . . . . . . . . . . . . . . . . . . . . . . . . . . . . . . . . 23
Sequential Mode . . . . . . . . . . . . . . . . . . . . . . . . . . . . . . . . . . . . . . . . . . . . . . . . . . . . . . . . . . . . . . . 23
Loop Mode On/Off. . . . . . . . . . . . . . . . . . . . . . . . . . . . . . . . . . . . . . . . . . . . . . . . . . . . . . . . . . . . 23
Autoload Mode On/Off . . . . . . . . . . . . . . . . . . . . . . . . . . . . . . . . . . . . . . . . . . . . . . . . . . . . . . . . 23
Updating Firmware . . . . . . . . . . . . . . . . . . . . . . . . . . . . . . . . . . . . . . . . . . . . . . . . . . . . . . . . . . . . . . . . 24
Using a Firmware Upgrade Tape . . . . . . . . . . . . . . . . . . . . . . . . . . . . . . . . . . . . . . . . . . . . . . . . . . 24
Using the Serial Port . . . . . . . . . . . . . . . . . . . . . . . . . . . . . . . . . . . . . . . . . . . . . . . . . . . . . . . . . . . . 25
Performing System Test . . . . . . . . . . . . . . . . . . . . . . . . . . . . . . . . . . . . . . . . . . . . . . . . . . . . . . . . . . . . 25
Retrieving Information . . . . . . . . . . . . . . . . . . . . . . . . . . . . . . . . . . . . . . . . . . . . . . . . . . . . . . . . . . . . . . 26
Viewing Error Logs . . . . . . . . . . . . . . . . . . . . . . . . . . . . . . . . . . . . . . . . . . . . . . . . . . . . . . . . . . . . . 26
Displaying Cycle Count . . . . . . . . . . . . . . . . . . . . . . . . . . . . . . . . . . . . . . . . . . . . . . . . . . . . . . . . . . 26
Displaying Product Version . . . . . . . . . . . . . . . . . . . . . . . . . . . . . . . . . . . . . . . . . . . . . . . . . . . . . . . 26
Viewing Serial Numbers . . . . . . . . . . . . . . . . . . . . . . . . . . . . . . . . . . . . . . . . . . . . . . . . . . . . . . . . . 27
Displaying the Autoloader Serial Number. . . . . . . . . . . . . . . . . . . . . . . . . . . . . . . . . . . . . . . . . . 27
Displaying the Drive Serial Number . . . . . . . . . . . . . . . . . . . . . . . . . . . . . . . . . . . . . . . . . . . . . . 27
Viewing Firmware Levels. . . . . . . . . . . . . . . . . . . . . . . . . . . . . . . . . . . . . . . . . . . . . . . . . . . . . . . . . 27
Displaying Autoloader Firmware Version . . . . . . . . . . . . . . . . . . . . . . . . . . . . . . . . . . . . . . . . . . 27
Displaying Drive Firmware Version. . . . . . . . . . . . . . . . . . . . . . . . . . . . . . . . . . . . . . . . . . . . . . . 27
6 Using the Remote Management Unit 29
Overview . . . . . . . . . . . . . . . . . . . . . . . . . . . . . . . . . . . . . . . . . . . . . . . . . . . . . . . . . . . . . . . . . . . . . . . . 29
Logging In . . . . . . . . . . . . . . . . . . . . . . . . . . . . . . . . . . . . . . . . . . . . . . . . . . . . . . . . . . . . . . . . . . . . . . . 30
Saving and Restoring Vital Product Data on the RMU . . . . . . . . . . . . . . . . . . . . . . . . . . . . . . . . . . . . . 30
Checking the Quick Status . . . . . . . . . . . . . . . . . . . . . . . . . . . . . . . . . . . . . . . . . . . . . . . . . . . . . . . . . . 31
Using the RMU Information Pages . . . . . . . . . . . . . . . . . . . . . . . . . . . . . . . . . . . . . . . . . . . . . . . . . . . . 31
Using the RMU Status Pages . . . . . . . . . . . . . . . . . . . . . . . . . . . . . . . . . . . . . . . . . . . . . . . . . . . . . . . . 32
Using the RMU Configuration Pages. . . . . . . . . . . . . . . . . . . . . . . . . . . . . . . . . . . . . . . . . . . . . . . . . . . 33
Configuring the Device . . . . . . . . . . . . . . . . . . . . . . . . . . . . . . . . . . . . . . . . . . . . . . . . . . . . . . . . . . 33
Configuring the Network . . . . . . . . . . . . . . . . . . . . . . . . . . . . . . . . . . . . . . . . . . . . . . . . . . . . . . . . . 34
Configuring the User . . . . . . . . . . . . . . . . . . . . . . . . . . . . . . . . . . . . . . . . . . . . . . . . . . . . . . . . . . . . 34
Configuring the Real Time Clock. . . . . . . . . . . . . . . . . . . . . . . . . . . . . . . . . . . . . . . . . . . . . . . . . . . 35
Configuring the Log . . . . . . . . . . . . . . . . . . . . . . . . . . . . . . . . . . . . . . . . . . . . . . . . . . . . . . . . . . . . . 35
Configuring Event Notification . . . . . . . . . . . . . . . . . . . . . . . . . . . . . . . . . . . . . . . . . . . . . . . . . . . . . 35
iv Contents
Page 5

Resetting the Configuration. . . . . . . . . . . . . . . . . . . . . . . . . . . . . . . . . . . . . . . . . . . . . . . . . . . . . . . 36
Using the RMU Maintenance Pages . . . . . . . . . . . . . . . . . . . . . . . . . . . . . . . . . . . . . . . . . . . . . . . . . . . 36
Running Operations. . . . . . . . . . . . . . . . . . . . . . . . . . . . . . . . . . . . . . . . . . . . . . . . . . . . . . . . . . . . . 36
Running the General Diagnostic Test . . . . . . . . . . . . . . . . . . . . . . . . . . . . . . . . . . . . . . . . . . . . . . . 36
Running the Advanced Diagnostic Tests. . . . . . . . . . . . . . . . . . . . . . . . . . . . . . . . . . . . . . . . . . . . . 37
Updating Firmware . . . . . . . . . . . . . . . . . . . . . . . . . . . . . . . . . . . . . . . . . . . . . . . . . . . . . . . . . . . . . 37
Resetting the Autoloader. . . . . . . . . . . . . . . . . . . . . . . . . . . . . . . . . . . . . . . . . . . . . . . . . . . . . . . . . 37
Accessing Log Files. . . . . . . . . . . . . . . . . . . . . . . . . . . . . . . . . . . . . . . . . . . . . . . . . . . . . . . . . . . . . . . . 37
7 Troubleshooting and Diagnostics 39
Installation Issues . . . . . . . . . . . . . . . . . . . . . . . . . . . . . . . . . . . . . . . . . . . . . . . . . . . . . . . . . . . . . . . . . 39
Troubleshooting Matrix . . . . . . . . . . . . . . . . . . . . . . . . . . . . . . . . . . . . . . . . . . . . . . . . . . . . . . . . . . . . . 40
Removing Cartridges Lodged in Slots. . . . . . . . . . . . . . . . . . . . . . . . . . . . . . . . . . . . . . . . . . . . . . . . . . 45
Viewing Autoloader Error Codes. . . . . . . . . . . . . . . . . . . . . . . . . . . . . . . . . . . . . . . . . . . . . . . . . . . . . . 47
Understanding Error Messages. . . . . . . . . . . . . . . . . . . . . . . . . . . . . . . . . . . . . . . . . . . . . . . . . . . . 47
Viewing Error Logs . . . . . . . . . . . . . . . . . . . . . . . . . . . . . . . . . . . . . . . . . . . . . . . . . . . . . . . . . . . . . 47
Resolving Errors . . . . . . . . . . . . . . . . . . . . . . . . . . . . . . . . . . . . . . . . . . . . . . . . . . . . . . . . . . . . . . . 47
Getting Help. . . . . . . . . . . . . . . . . . . . . . . . . . . . . . . . . . . . . . . . . . . . . . . . . . . . . . . . . . . . . . . . . . . . . . 58
8 Specifications 59
Physical. . . . . . . . . . . . . . . . . . . . . . . . . . . . . . . . . . . . . . . . . . . . . . . . . . . . . . . . . . . . . . . . . . . . . . . . . 59
Capacity. . . . . . . . . . . . . . . . . . . . . . . . . . . . . . . . . . . . . . . . . . . . . . . . . . . . . . . . . . . . . . . . . . . . . . . . . 59
Environment . . . . . . . . . . . . . . . . . . . . . . . . . . . . . . . . . . . . . . . . . . . . . . . . . . . . . . . . . . . . . . . . . . . . . 60
Tape Drive. . . . . . . . . . . . . . . . . . . . . . . . . . . . . . . . . . . . . . . . . . . . . . . . . . . . . . . . . . . . . . . . . . . . . . . 60
Media. . . . . . . . . . . . . . . . . . . . . . . . . . . . . . . . . . . . . . . . . . . . . . . . . . . . . . . . . . . . . . . . . . . . . . . . . . . 61
FastStor 2 User’s Guide v
Page 6

vi Contents
Page 7

About This Guide and Your Product
This guide contains information and instructions necessary for the normal operation and management of
the FastStor 2. This guide is intended for anyone inte rested in learning abou t or anyone that needs to know
how to install, configure, and operate the FastStor 2.
Note
Be sure to read all operating instructions in this manual and in the System, Safety, and
Regulatory Information Guide before operating this product.
Product Safety Statements
This product is designed for processing magnetic tape cartridges. Any other application is not considered
the intended use. ADIC will not be held liable for damage arising from unauthorized use of the product. The
user assumes all risk in this aspect.
This unit is engineered and manufactured to meet all safety and regulatory requirements. Be aware that
improper use may result in bodily injury, damage to the equipment, or interference with other equipment.
WARNING
BEFORE POWERING ON OR USING THIS EQUIPMENT, READ THE SYSTEM,
SAFETY, AND REGULATORY INFORMATION GUIDE. KEEP THE GUIDE FOR
FUTURE REFERENCE.
Product Model Number
The product model number is as follows: FastStor 2.1
Explanation of Symbols and Notes
The following symbols appear throughout this document to highlight important information.
WARNING
FastStor 2 User’s Guide 1
INDICATES A POTENTIALLY HAZARDOUS SITUATION WHICH, IF NOT
AVOIDED, COULD RESULT IN DEATH OR BODILY INJURY.
Page 8

CAUTION
Indicates a situation that may cause possible damage to equipment, loss of
data, or interference with other equipment.
Note
Indicates important information that helps you make better use of your system.
Other Documents you Might Need
The following document is available for this product. It can be found at www.adic.com/manuals:
• FastStor 2 User’s Guide (6-00515-xx)
Note
Getting More Information or Help
More information about this product is available on the Customer Service Center website at
www.adic.com/csc
frequently asked questions (FAQs). You can also access software, firmware, and drivers through this site.
For further assistance, or if training is desired, contact ADIC:
Release Notes are also available for this product. The Relea se Notes describe changes
to your system or firmware since the last release, provide compatibility information, and
discuss any known issues and workarounds. The Release Notes can be found at
www.adic.com/manuals
. The Customer Service Center contains a collection of information, including answers to
.
In the USA: 800-827-3822
In Europe and Japan: 00-800-9999-3822
For additional contact information: www.adic.com/contact
To open a Service Request: www.adic.com/techsup
2 About This Guide and Your Product
Page 9

Description
Your autoloader provides automated data storage, archival, backup, and retrieval for a range of systems
from desktop workstations to small office local area networks to storage area networks. The standard
product is designed for use in a general office en viro nment, and has a fully finished appearance for use on
a desktop; however, it can be installed easily into a rack.
The autoloader contains one drive and 8 fixed storage locations for tape media. Th ere is a single slo t door
located on the front of the autoloader for inserting and removing tapes. A carousel mechanism is used to
move tape within the autoloader, and a robotic p icker is used to either move a tape from the carousel to the
drive, or from the carousel to the media access door. There is an operator panel located on the front of the
unit for operator interface. The unit is also equipped with a Remote Management Unit (RMU), which
provides remote autoloader operation through a web browser.
It is compatible with most operating systems and environments that suppor t the SCSI interface, but requires
either direct support from the operating system or a compatible backup app lication to take full advantage of
its many features. For specific information about your autol oader, including autoloader capacity, drive
information, and physical size, see Specifications
Features
Your autoloader has the following features:
• Multi-function Operator Panel—The autoloader operator panel consists of four LEDs, four
buttons, and an LCD screen. The operator panel provides everything you need to monitor
autoloader status and to control all of its functions.
on page 59.
• Remote Management Access—With the RMU you can connect to your a utoloader over Ethernet
and use your web browser to manage operations. All available functions are accessible without the
need of a dedicated or separate software.
• Cleaning Cartridge—Although the cleaning cartridge can occupy a cartridge storage slot in the
autoloader (facilitating automated cleaning cycles), manual insertion of a cleaning cartridge is
permitted by importing the cleaning cartridge through the operator panel.
• Cartridge Pre-Check—Whenever you power up your autoloader, it will scan the cartridge storage
slots and the drive and then build a log of valid cartridge locations.
• Reverse Cartridge Protection—The import/export cartridge storage slot is designed to prevent
the cartridges from being inserted incorrec tly.
• Built-in Diagnostics—Your autoloader includes diagnostic firmwa re that tells you when drive head
cleaning is required, reports diagnostic results, and drive operating status.
• Barcode Reader—The barcode reader delivers instant media verification and inventory.
FastStor 2 User’s Guide 3
Page 10
• Rackmount Ready—The available rackmount kit enables you to rackmount your autolo ader in 2U
of rack space.
• Independent SCSI Buses—The autoloader and the tape drive each include independent Small
Computer System Interface (SCSI) controllers. Each supports independent sets of SCSI messages
and commands. The autoloader and the enclosed tape drive use a wide, low-voltage differential
(LVD) SCSI interface.
• Bulk Cartridge Exchange—This option enables a user to sequentially import or expo rt a complete
set of cartridges.
Switches and Indicators
The following topic illustrates the front, rear, and other operation components for your autoloader.
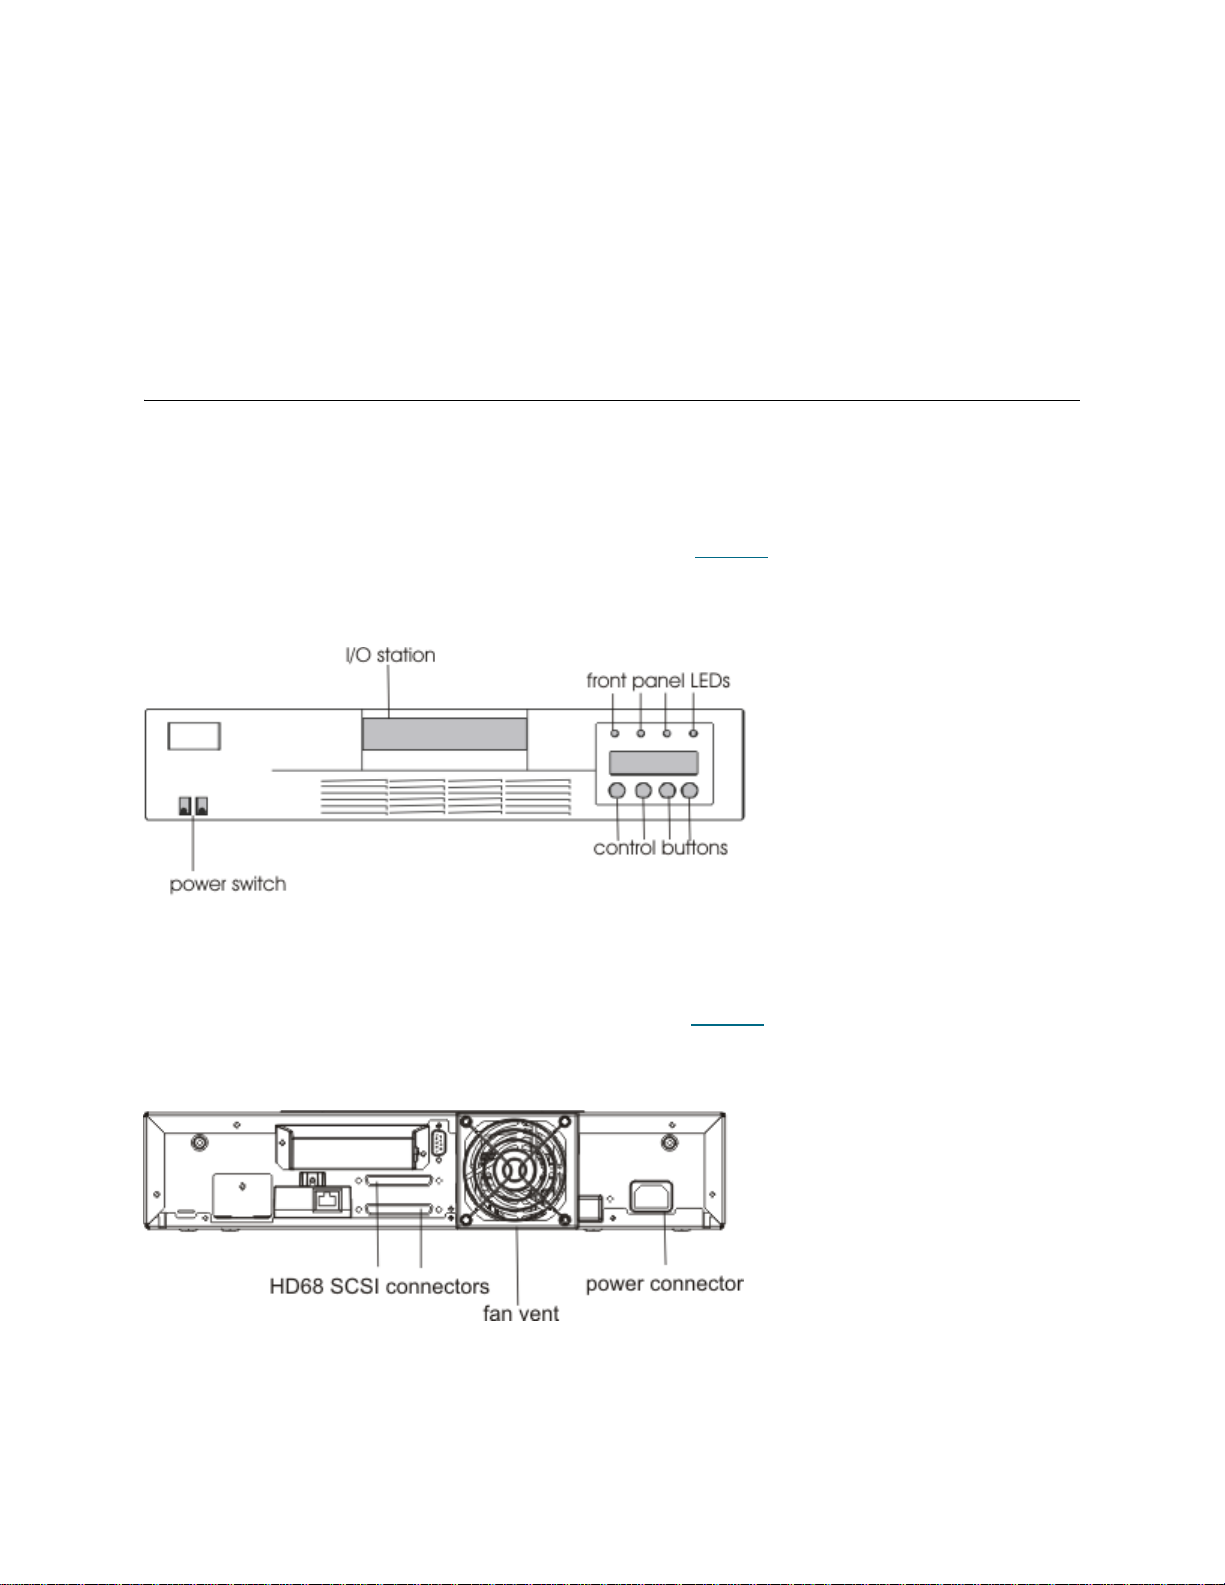
Front Panel
Familiarize yourself with the front panel components shown in Figure 1.
Figure 1 Autoloader Front Panel
Rear Panel
Familiarize yourself with the rear panel components shown in Figure 2.
Figure 2 Autoloader Rear Panel
4 Description
Page 11

Getting St arted
This section describes how to install and set up your autoloader.
Unpacking and Inspecting
Before you begin, clear a desk or table so that you can unpack the autoloader.
CAUTION:
If the room in which you are working differs from the temperatur e in
which the autoloader was shipped or stored by 30° F (15° C) or more,
let the autoloader acclimate to the surrounding environment for at
least 12 hours before opening the shipping carton.
Checking the Accessories
The autoloader equipment box includes the following items:
• 1 US power cord
• 1 European power cord
• 1 SCSI Ultra 2 LVD Multimode Terminator
• Barcode Reader assembly
Unpacking the Autoloader
Follow the directions below to unpack the autoloader.
1 Clear a table or desk so that you have room to unpack the autoloader.
2 Inspect the shipping box for damage. If you notice any damage, report it to the shipping company
immediately.
3 Open the shipping box and remove the accessories package. Set the accessories package aside for
now.
4 Lift the autoloader and padding out of the box and place it on the work surface, top facing up.
CAUTION:
FastStor 2 User’s Guide 5
Do not set the autoloader on its end or side.
Page 12
5 Carefully remove the shipping padding from the left and right sides of the a utoloader. Then remove the
bag from the autoloader.
NOTE:
Save the packing materials in case you need to move or ship the
autoloader in the future.
Installing the Barcode Reader
CAUTION:
Mount the barcode reader on the rear panel of the autoloader.
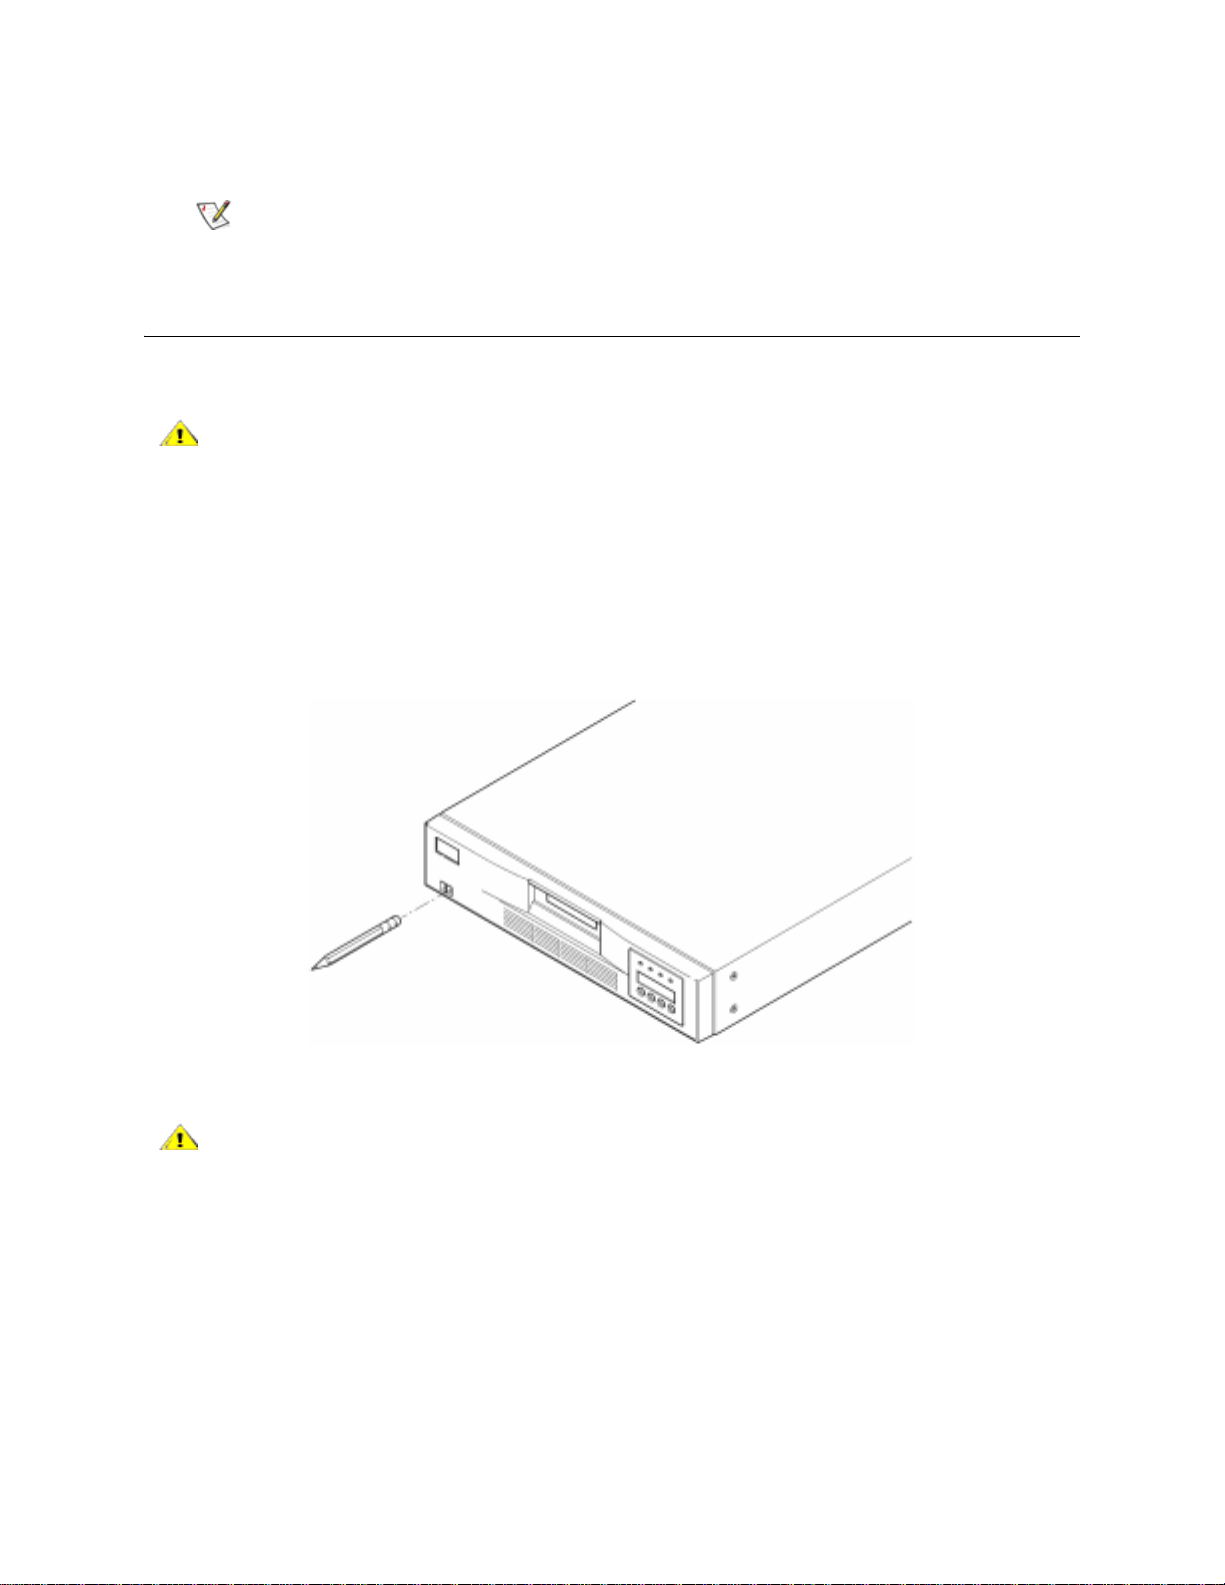
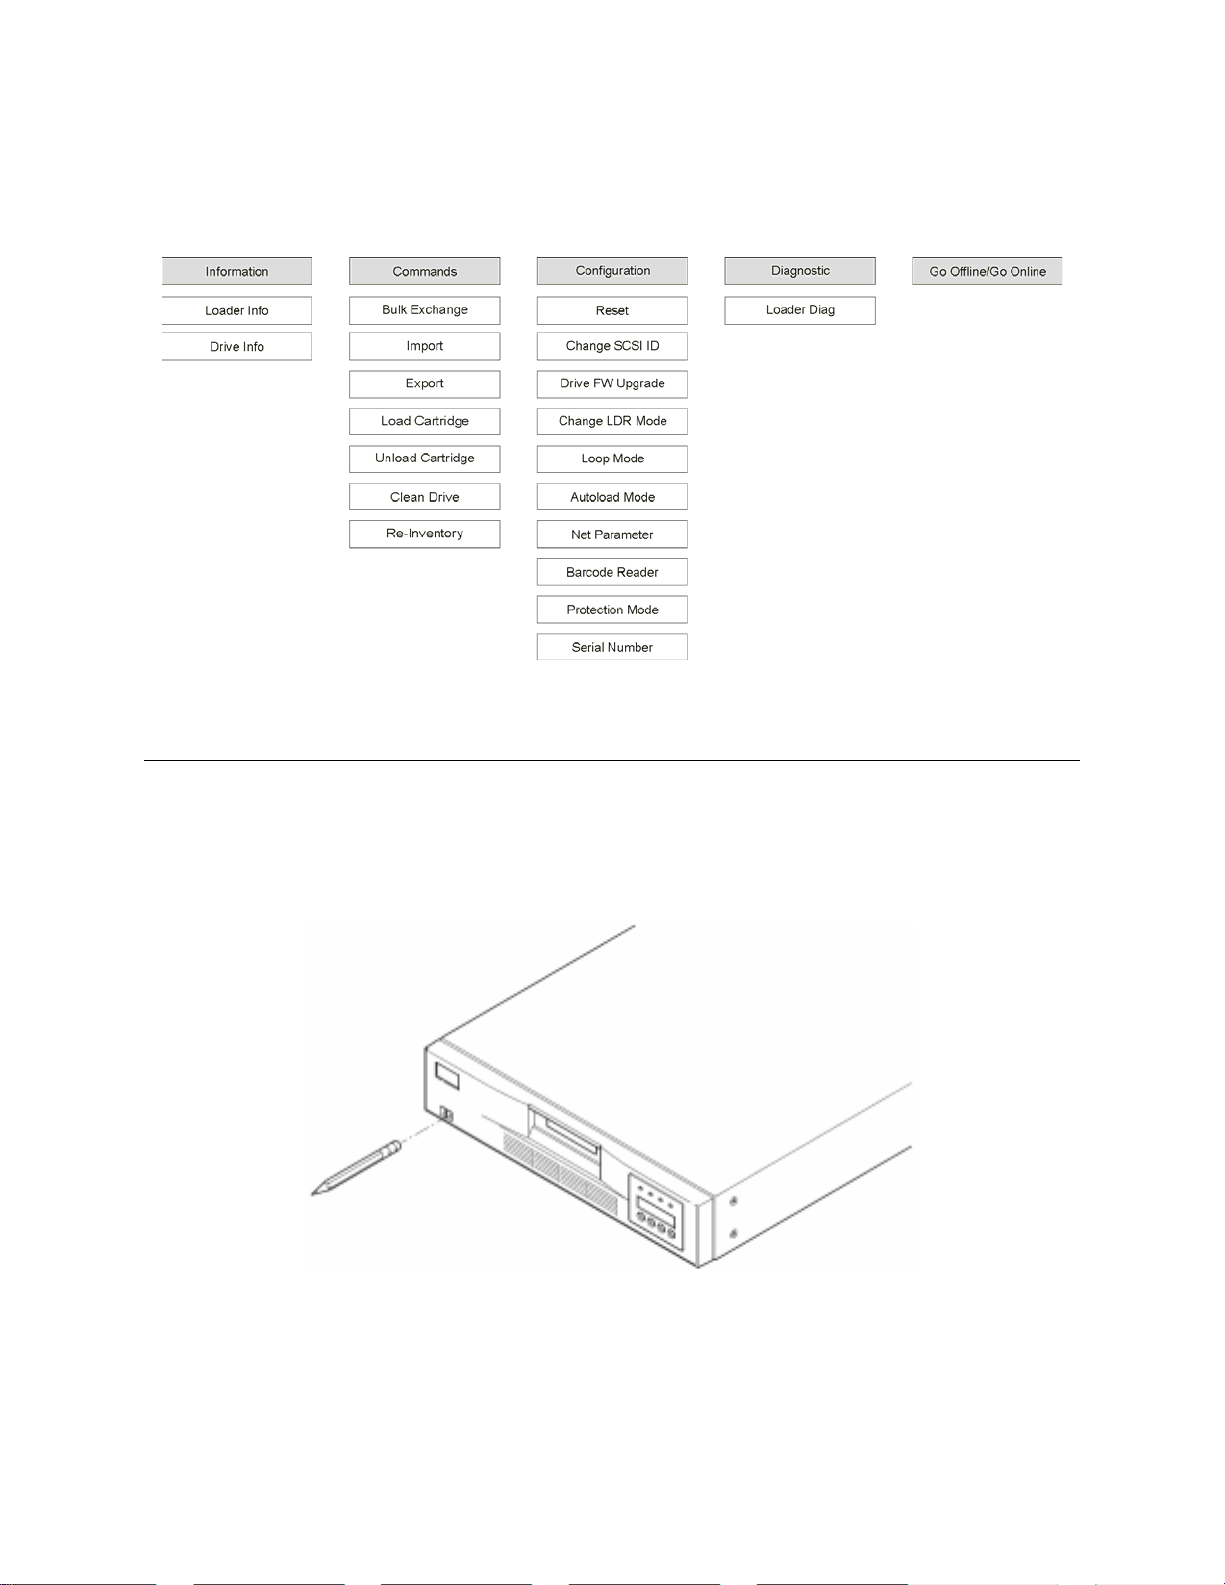
1 If you are installing the barcode reader into a previously installed and configured autoloader and the
autoloader power is on, power it off as follows:
a. Use the tip of a pen to press the OFF switch as shown below:
To avoid electrostatic discharge damage to the unit, touch the
autoloader’s metal case or rear panel before installing the barcode
reader.
CAUTION:
b. Unplug the power cord from the outlet.
c. Unplu g the powe r co rd from the rear pa n el of th e au to loa d er.
d. Disconnect the SCSI cables from the rear panel of the autoloader.
6 Getting Started
Pressing the OFF switch stops th e autoloader from funct ioning, but it
does not remove power from the autoloader. To remove power, you
must disconnect the power cord from the power source.
Page 13
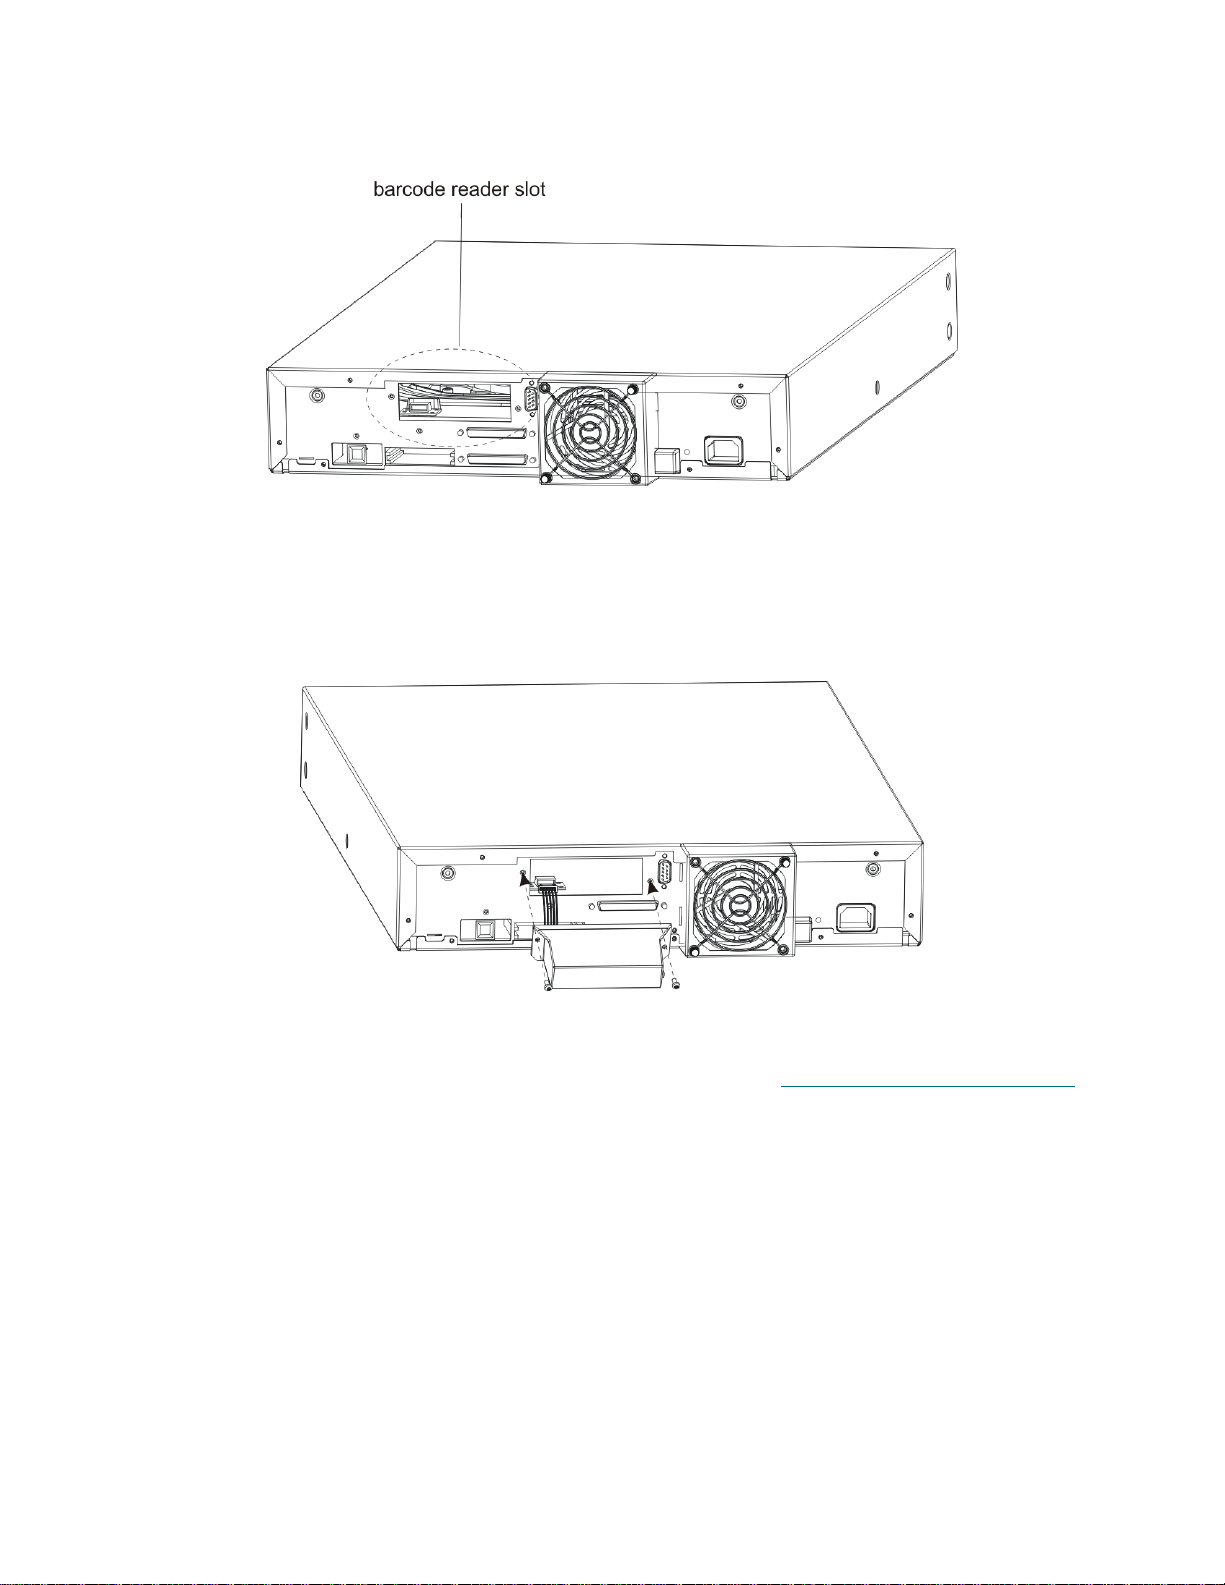
2 Remove the cover plate from barcode reader slot on the rear panel. Save the screws. Save and store
the cover plate; you may use this plate later after removing the barcode reader.
3 Orient the barcode reader before the slot. Ther e is only one correct orientation. Check whether the holes
align.
4 Connect the cable to the barcode controller outlet.
5 Attach the barcode reader with the screws that you removed from the cover plate.
.
6 If you have installed the barcode reader into a previously installed and configured autoloader and you
want to restore power, power it on as follows. Otherwise continue to Choosing an Installation Location
on page 8.
a. Reconnect the SCSI cables to the rear panel of the autoloader.
b. Plug the power cord into the outlet.
c. Plug the power cord into the rear panel of the autoloader.
d. Use the tip of a pen to press the ON switch.
7 Check the LCD display to make sure the autoloader is receiving power. If it is not, check the power
connections and your power source. During the Power-On Self Test (POST), all four LEDs are
illuminated briefly, followed by just the Ready/Activity LED flashing. When the initialization sequence is
complete, the LCD screen displays the main menu.
FastStor 2 User’s Guide 7
Page 14

Choosing an Installation Location
Choose an installation location that meets the criteria in Table 1. See Specifications on page 59 for more
information about autoloader specifications.
NOTE:
Table 1 Location Criteria
Requirement Criteria
Standalone requirements Select a location that is flat, sturdy, level, and close to a host
Room temperature 10-35º C (50-95º F)
Power source AC power voltage: 100-127 VAC; 200-240 VAC
Weight 26 lbs (12 kg)
If you are installing the autoloader in a rack, follow the instructions in the
rackmount kit before continuing to Autoloader SCSI Connections
9.
system server. Do not place th e autoloader on th e floor or other
carpeted surfaces.
CAUTION: Do not place the autoloader on its side or
upside down or stack items that weigh more than 5 KG
(11.02 lbs) on top of the autoloader.
Line frequency: 50-60 Hz.
NOTE: Locate the AC outlet near the autoloader. The AC
power cord is the product's main AC disconnect device and
must be easily accessible at all times.
on page
Air quality Minimal sources of particulate contamin ation. A void areas near
frequently used doors and walkways, stacks of supplies that
collect dust, printers, and smoke-filled rooms.
CAUTION: Excessive dust and debris can damage
tapes and tape drives.
Humidity 20-80% RH
Clearance Back Minimum of 15.4 cm (6 inches)
Front Minimum of 30.8 cm (12 inches)
Sides Minimum of 5.08 cm (2 inches)
8 Getting Started
Page 15

Preparing the Host System
At this point you need to refer to your software installation guide for instructions on installing the backup/
controlling software for the autoloader onto the host system. Read through the SCSI Host System Adapter
and Connection Guidelines before installing the software.
SCSI Host System Adapter and Connection Guidelines
If necessary, install a SCSI host system adapter, software, and compatible driver(s). Re fer to th e m anu als
for the host system and SCSI host system adapter for detailed instructions. In addition, follow these ge neral
guidelines:
• Make sure that your backup application supports the SCSI host system adapter.
Depending on the server configuration, you may need to change the SCSI IDs of the autoloader
(see Viewing or Changing the SCSI IDs).
• Make sure that the host server system has an open expansion slot.
• If the host server system is connected to a network, check with the system administrator before
turning off power.
• Use proper procedures to prevent electrostatic discharge (ESD). Use wrist-grounding straps and
anti-static mats when handling internal components.
NOTE:
The LVD host system bus adapter is recommended. A single ended SCSI host
system bus adapter does work, but can severely degrade performa nce. Also, if
there are any SE devices on the same SCSI bus, the entire SCSI bus
negotiates down to SE speed and can severely degrade performance.
Autoloader SCSI Connections
The autoloader incorporates a wide SCSI-2, Low-Voltage Differential (LVD) SCSI bus, but may also be
attached to a Single-Ended (SE) SCSI bus. Make sure your SCSI host system adapter or controller sup ports
these standards. If you connect the autoloader to the SE SCSI bus or if there are SE devices attached to
the same SCSI bus, the autoloader's performance is limited to the maximum data transfer speed and
maximum cable lengths of the SE bus.
The autoloader is NOT compatible with a standard differential (Diff) or High-Voltage Differential (HVD) SCSI
bus. The autoloader is compatible with a narrow (50-pin) SCSI bus using a 68-pin to 50-pin adapter that
terminates the unused 18 pins. These adapters are sometimes labeled high-byte termination.
Connecting SCSI and Power Cables
The following describes how to connect the SCSI and power cables.
NOTE:
The autoloader is an Ultra-2 Wide device. Only use cables and terminators
specified for Ultra-2 use or labeled as MultiMode.
1 Shut down and turn off the selected server. Turn off all attached devices, such as printers and other
SCSI devices. Remove the power cables from the server and all attached accessories.
CAUTION:
FastStor 2 User’s Guide 9
Failure to remove the power cables from these devices could
result in damage to the autoloader.
Page 16

2 Attach one end of the SCSI cable to one of the connectors on the rear panel of the autoloader.
3 Attach the other end of the SCSI cable to the connec tor on the SCSI h ost system bus adapter or to the
connector on the previous device on the SCSI bus.
NOTE:
4 Do one of the following:
• If the autoloader is the last or only device on the SCSI bus, attach the terminator to the
remaining SCSI connector on the rear panel of the autoloader.
• Otherwise, attach the cable to the next device on th e SCSI bus. Make sure tha t the last device
on the SCSI bus is properly terminated.
5 Power on the autoloader as follows:
a. Plug the power cord into the outlet.
b. Plug the power cord into the rear panel of the autoloader.
c. Use the tip of a pen to press the ON switch.
6 Check the LCD display to make sure the autoloader is receiving power. If it is not, check the power
connections and your power source. During the Power-On Self Test (POST), all four LEDs are
illuminated briefly, followed by just the Ready/Activity LED flashing. When the initialization sequence is
complete, the LCD screen displays the main menu.
7 Turn on any other devices you turned off earlier, and then turn on the server.
If the SCSI cable does not fit the connector on your SCSI host system
adapter , you either have an incompatible SCSI host system adapter or you
need to purchase a cable adapter , or a dif ferent cable. Cont act your service
representative or your SCSI host system adapter manufacturer for
information.
8 Verify the connection between the autoloader and host system by making sure that the host server
system's operating system recognizes the autoloader:
• In Windows 2000™: Settings -> Control Panel -> System -> Hardware -> Device Manager ->
Tape Drive and/or Media Changer
• In Windows 2003™: Settings -> Control Panel -> System -> Hardware -> Device Manager ->
Tape Drive and/or Media Changer
For more information on verifying the connection of SCSI devices, consult the operating system
documentation.
Connecting More than one Autoloader
If you are connecting more than one autoloader on the same SCSI channel, connect each unit to the
previous unit with an additional shielded interface cable. It does not matter which SCSI connecto r on each
autoloader you connect the interface cable to. Each SCSI ID comes predefined with each autoloader. Make
sure that you configure each autoloader unit with its unique drive SCSI ID and autoloader ID. Your
autoloaders will not function properly if they have the same SCSI IDs. See Viewing or Changing the SCSI
IDs. Also, ensure that you terminate the last device in the chain.
10 Getting Started
Page 17
Operating the Autoloader
This topic discusses how to operate the autoloader com po nen ts.
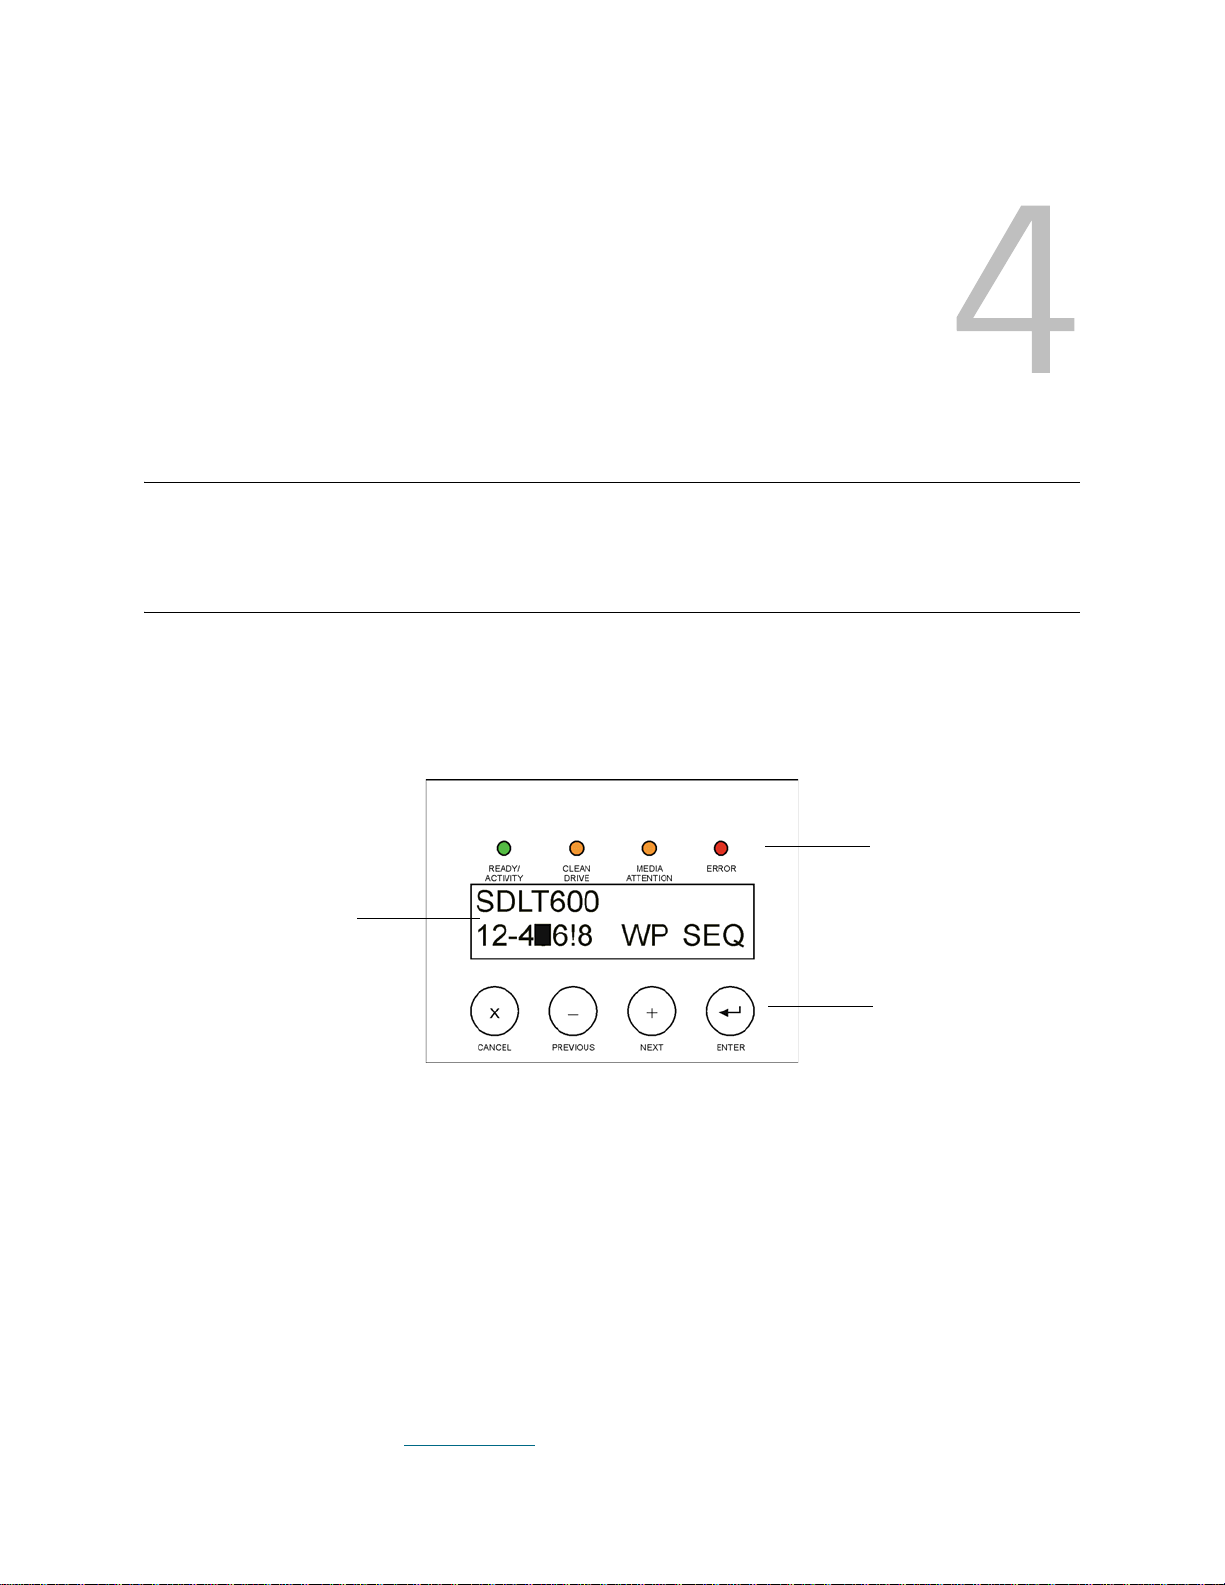
Operator Panel
The operator panel consists of a liquid crystal display (LCD) screen, four LEDs, and four buttons. The
operator panel provides everything you need to monitor autoloade r status and to control all of its functions.
Figure 3 Operator Control Panel
LEDs
LCD screen
buttons
LCD Screen
The display defaults to the main menu. The main menu consists of the autoloa der status on the top line and
the current cartridge inventory on the second line. The autoloader status line indicates the current operation.
The cartridge inventory indicates the status of cartridge slots as follows:
• Full slots are indicated by the slot number.
• Empty slots are indicated by a dash (-).
• If a cartridge is currently loaded in the drive, the display altern ates the number of the home position
for that cartridge with a black block.
• An exclamation point (!) indicates that the autoloader has identified a cartridge that is either an
invalid type or has had a media-related error. The Media Attention LED indicator is also illuminated
in this case. Refer to LED Indicators
FastStor 2 User’s Guide 11
on page 12 for more information.
Page 18

NOTE:
“SEQ” appears when the autoloader is in sequential mode.
“WP” appears when a write-protected cartridge is loaded into the tape drive.
LED Indicators
The operator panel includes four LED indicators that provide a variety of information as detailed in the
following table.
Table 2 LED Indicators
LED Color Description
Ready/Activity Green Illuminated when power is on. Blinking whenever there is
tape drive or autoloader robotics activity.
Clean Drive Amber Illuminated when the tape drive has determined that a
cleaning cartridge should be used (see Cleaning the Tape
Drive on page 19). Additional cle aning of the t ape drive is
not necessary.
Media Attention Amber Illuminated if the tape drive has detected a cartridge or
tape fault. Recommended action is to export the cartridge
from the autoloader . Doing so turns off the LED (see
Exporting Cartridges
causes these symptoms repeatedly , that cartridge may be
defective. For more information, see the following
sections of Table 4
Media
on page 41 and Media Attention LED Issues on
page 43.
on page 17). If a particular cartridge
, Troubleshooting Table:
Error Red Illuminated if an unrecoverable tape drive or autoloader
error occurs. A corresponding error message appears on
the LCD screen (see Viewing Autoloader Error Codes
page 47).
on
Control Buttons
The operator panel includes four b uttons that provide access to all operations and information menus. Table
3 on page 12 describes each control button function.
Table 3 Control Buttons
Button Description
Cancel Cancels the current menu option and returns to the previous menu
level or main menu.
Previous Selects the previous item or value in the currently displayed menu.
Next Selects the next item or value in the currently displayed menu.
Enter Executes the current menu or selects the current option displayed on
the LCD panel.
12 Operating the Autoloader
Page 19
Understanding the Menu Structure
The following graphic depicts the autoloader menu structure.
Figure 4 Operator Panel Menu Structure
Powering on the Autoloader
1 Plug the power cord into the outlet.
2 Plug the power cord into the rear panel of the autoloader.
3 Use the tip of a pen to press the ON switch as shown below:
4 Check the LCD display to make sure the autoloader is receiving power. If it is not, check the power
connections and your power source. During the Power-On Self Test (POST), all four LEDs are
illuminated briefly, followed by just the Ready/Activity LED flashing. When the initialization sequence is
complete, the LCD screen displays the main menu.
FastStor 2 User’s Guide 13
Page 20

Configuring the Barcode Reader
If you have just installed a barcode reader, use the operator panel to configure it.
1 From the main menu, press + or – until Go offline appears. Press ENTER.
1 Press + or – until Configuration appears. Press ENTER.
2 Press + or – until Barcode Reader OFF appears. Press ENTER.
3 Press + or – until BCR CHANGE TO: ON appears. Press ENTER.
The Enable BCR message appears on the operator panel. Then the barcode reader scans all slots.
After the barcode reader is enabled, the autoloader and the host system sense its presence.
Operationally, the barcode reader is contro lle d by th e ho st so ftware.
Configuring the Remote Management Unit
Before you configure the RMU, obtain a valid IP address from your system administrator and use an
Ethernet cable to connect the Ethernet port on the back of the RMU to an Ethernet port on a working
network.
In order for the RMU to function properly, the system running your web browser must be set to accept
cookies.
1 Press + or – until Go offline appears. Press ENTER.
2 Press + or – until Configuration appears. Press ENTER.
3 Press + or – until Net Parameters appears. Press ENTER.
4 Press + or – until Network OFF appears. Press ENTER.
5 Press + to change the display to Network CHANGE TO: ON. Press ENTER.
6 Press + or – until DHCP OFF appears.
• If you are using DHCP, press ENTER. Press + or – until DHCP CHANGE TO: ON appears.
Press ENTER. Press CANCEL to move back up the menu tree.You are pr ompted to cycle po wer.
For information, refer to Pow er ing on th e Aut olo ad e r
• If you are not using DHCP, continue with step 7 on page 4-14
7 Press + or – until IP Address appears. Press ENTER.
The cursor defaults to the first digit of the default IP address “000.0 00 .0 0 0”.
8 Configure each digit of the IP address:
• Press ENTER to retain the “0”
• Press + to increment the digit
•Press – to decrement the digit.
When the IP address is correct, press ENTER. If your Ethernet network does not require a network
gateway or network mask, continue with step 11 on page 4-15
9 If your Ethernet network requires a network gateway, press + or – until GATEWAY ADDRESS appears.
on page 13. Exit this procedure.
.
.
• Press ENTER. The cursor defaults to the first digit of the default gateway address
“000.000.000”.
• Configure each digit of the gateway addres s :
14 Operating the Autoloader
Page 21

• Press ENTER to retain the “0”
• Press + to increment the digit
•Press – to decrement the digit.
When the gateway address is correct, press ENTER.
10 If your Ethernet network requires a network mask, press + or – until NETMASK appears.
• Press ENTER. The cursor defaults to the first digit of the default subnet address “000.000.000”.
• Configure each digit of the network mask:
• Press ENTER to retain the “0”
• Press + to increment the digit
•Press – to decrement the digit.
When the network mask is correct, press ENTER.
11 Press CANCEL to move b ack up the menu tree.You are prompted to cycle power. For information, refer
to Powering on the Autoloader
The new settings cannot be used until the power is cycled.
on page 13.
Working with Data Cartridges
The following describes how to work with your data cartridges. For specific information about allowed
autoloader data cartridges, see Specifications
on page 59.
Write-Protecting Cartridges
All cartridges have a write-protect switch to prevent accidental erasure or overwriting of data. Before loading
a cartridge into the autoloader, make sure the write- protect switch on the fron t of the cartridge is po sitioned
as desired. Slide the switch to the right to write-protect the cartridge.
• For Super DLTtape II cartridges, an orange rectangle is visible wh en the cartridge is writeprotected. See Figure 5
Slide the switch to the left to allow the autoloader to write updates to the tape.
• The write-protect switch displays a black void when the cartridge permits overwriting and erasure.
NOTE:
When a write-protected cartridge is loaded into the drive, a WP appears on the
bottom line of the LCD screen next to the inventory information. This message
appears until the cartridge is unloaded from the drive.
for the location of the switch on a Super DLTtape II data cartridge.
FastStor 2 User’s Guide 15
Page 22
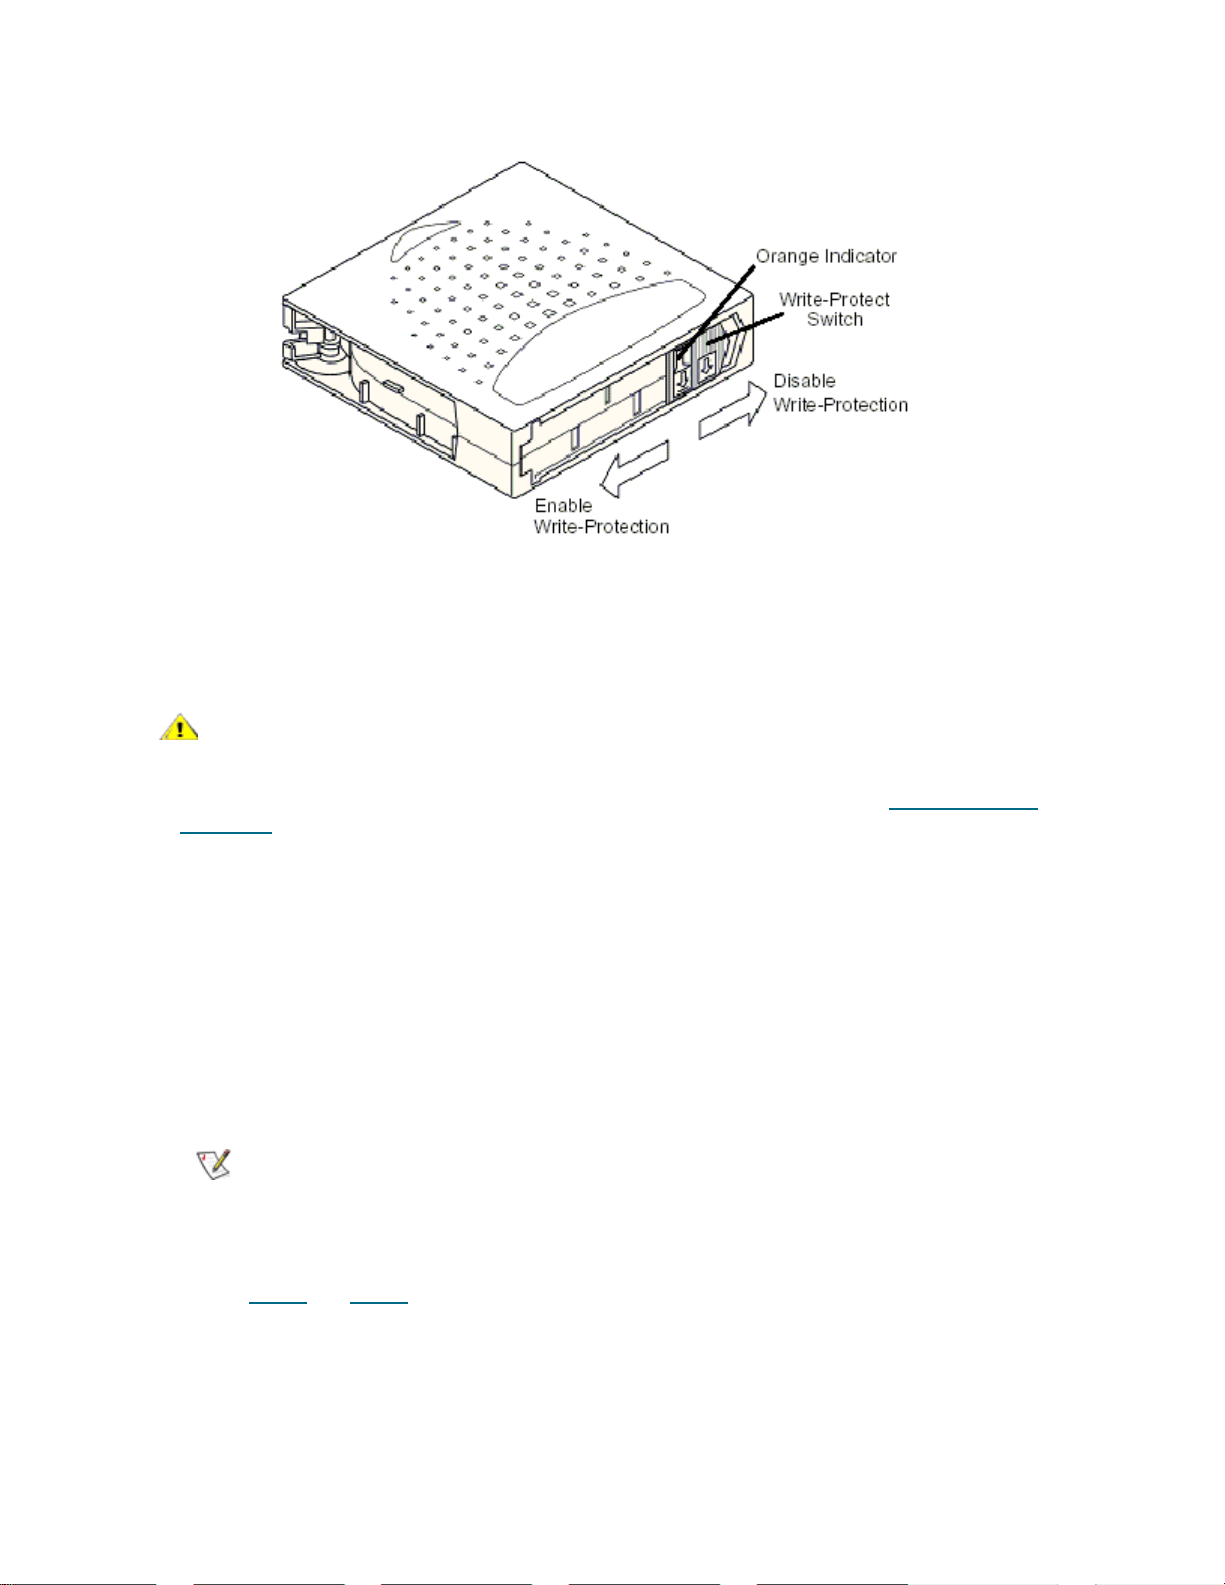
Figure 5 Write-Protect Switch on a Super DLTtape II Cartridge
Importing Cartridges
This option commands the autoloader to import a cartridge into a specific empty slot on the carousel.
CAUTION:
1 Make sure the write-protect switch is set as desired for each data cartridge (see Write-Protecting
Cartridges on page 15).
2 Press + or – until Go offline appears. Press ENTER.
3 Press + or – until Commands appears.
4 Press ENTER to access the available options.
5 Press + or – until Import appears. Press ENTER.
6 Press + or – until the desired slot number appears, and press ENTER.
You are not given the option to import a cartridge to an occupied slot.
7 When Insert Cartridge appears and the mail slot opens, inse rt the desired da ta cartri dge into the mail
slot so that the write-protect switch is facing out from the autoloader.
NOTE:
Performing an import or export of media during a data backup may
result in adverse results, which could include backup failure or other
errors.
If you are using the operator panel to clean the drive, import the cleaning
cartridge only when the operator panel requests it. You may keep a
cleaning cartridge in the autoloader if the backup sof tware can manage the
drive cleaning.
8 Repeat Step 6
are done importing cartridges.
9 Verify that the operator panel shows that the desired slots have cartridges installed.
16 Operating the Autoloader
and Step 7 as needed for any additional cartridges, and then pr ess CANCEL when you
Page 23

Exporting Cartridges
This option moves a cartridge from a specific slot to the mail slot.
CAUTION:
1 Press + or – until Go offline appears. Press ENTER.
2 Press + or – until Commands appears. Press ENTER.
3 Press + or – until Export appears. Press ENTER.
4 Press + or – until the desired slot number appears. Press ENTER. You are not given the option to export
from an empty slot, and you cannot export directly from the drive.
5 When Remove Cartridge appears and the cartridge is ejected through the mail slot, remove the
exported cartridge from the autoloader, and press ENTER.
6 Repeat Step 4
7 Press CANCEL when you are done exporting cartridges.
8 Make sure the operator panel indicates that the desired slots contain cartridges.
Performing an import or export of media during a data backup may
result in adverse results, which could include backup failure or other
errors.
and Step 5 as needed for any additional cartridges.
Using Bulk Exchange
This option enables a user to import or export a complete set of cartridges. The bulk exchange operation
starts with slot 1 and cycles through all 8 slots, exporting cartridges that are present. The user has an
opportunity to insert a new cartridge before pressing the ENTER key.
1 Press + or – until Go offline appears. Press ENTER.
2 Press + or – until Commands appears. Press ENTER.
3 Press + or – until Bulk Exchange appears. Press ENTER.
The door opens. If there is a cartridge is Slot 1, it is exported. You are prompted to remove the cartridge.
Insert a replacement cartridge if desired.
4 Press ENTER.
The door opens. If there is a cartridge is Slot 2, it is exported. You are prompted to remove the cartridge.
Insert a replacement cartridge if desired.
This process repeats for slots 3 through 8.
Loading Cartridges
This option loads a cartridge from the autoloader slots into the tape drive.
1 Press + or – until Go offline appears. Press ENTER.
2 Press + or – until Commands appears. Press ENTER.
3 Press + or – until Load Cartridge appears.
4 Press ENTER to select.
5 Press + or – until the desired slot number appears, and press ENTER. The slot number you select
indicates the cartridge to be loaded into the tape drive.
FastStor 2 User’s Guide 17
Page 24

NOTE:
While cartridges are loading, status messages appear on the operator panel. When the operation is
complete, Drive Stopped appears.
6 Repeat for all cartridges you want to load (up to 8 cartridges).
Only slot numbers that contain cartridges are displayed.
Unloading Cartridges
This option unloads the cartridge from the tape dr ive into its or igin al slo t.
1 Press + or – until Go offline appears. Press ENTER.
2 Press + or – until Commands appears.
3 Press ENTER to select.
4 Press + or – until Unload Cartridge appears.
5 Press ENTER to unload the cartridge from the tape drive.
When the cartridge is unloading, status messages appear on the operator panel. When the operation
is complete, Drive Empty appears.
6 Repeat for all cartridges you want to unload.
Re-Inventorying Cartridges
This option analyzes the slots and drives in the autoloader.
NOTE:
1 Press + or – until Go offline appears. Press ENTER.
1 Press + or – until Commands appears.
2 Press ENTER to access the available options.
3 Press + or – until Re-inventory appears.
4 Press ENTER.
The autoloader then checks the drive and each cartridge slot for the presence of a tape in order to update
the inventory information.
This command is only needed if the inventory in the autoloader is dif feren t than
the inventory displayed on the operator panel.
Maintaining Cartridges
To ensure the longest possible life for all of your cartridges, follow these guidelines:
• Post procedures that describe proper media handling.
• Ensure that anyone who handles tape has been properly trained to handle it.
• Do not drop or strike a cartridge. Excessive shock can damage the internal co ntents of the cartridge,
or the cartridge case itself, making that cartridge unusable.
• Do not expose your cartridges to direct sunlight or sour ces o f heat, includ ing porta ble heater s and
heating ducts.
• Do not stack cartridges more than five high.
18 Operating the Autoloader
Page 25

• For temperature and humidity ranges for Super DLTtape II cartridg es, refer to Table 24 on page 61.
• If a cartridge has been exposed to temperatures outside the ranges specified above, stabilize the
cartridge at room temperature for the same amount of time it was exp osed to extreme temperatures
or 24 hours, whichever is less.
• Do not place cartridges near sources of electromagnetic energy or strong ma gnetic fields, su ch as
computer monitors, electric motors, speakers, or X-ray equipment. Exposure to electromagnetic
energy or magnetic fields can destroy data and the embed ded servo code, written on the med ia by
the cartridge manufacturer, rendering the cartridge unusable.
• Place identification labels only in the designated slot on the cartridge.
• If you ship a cartridge, ship it in its original or better packaging.
• Do not insert damaged cartridges into the drive.
• Do not touch the tape or tape leader.
• Do not degauss a cartridge that you intend to reuse.
Cleaning the Tape Drive
When the Clean Drive LED is on, the a utoloader's tape drive needs to b e cleaned. Cleaning times can range
from a few seconds to a few minutes during which time the Ready LED blinks. Use only authorized cleaning
cartridges in the autoloader.
NOTE:
1 Press + or – until Go offline appears. Press ENTER.
1 Press + or – until Commands appears.
2 Press ENTER.
3 Press + or – until Clean Drive appears, and then press ENTER.
4 If the carousel is full, the operator panel displays th e No slot free for transfer message. Press CANCEL
repeatedly until the main menu is displayed. Export a cartridge to make room for the cleaning cartridge.
See Exporting Cartridges
5 Insert the cleaning cartridge into the autoloader mail slot. During the clea ning process, which can ta ke
several minutes, the operator panel displays the Drive Cleaning message.
6 When tape drive cleaning is complete, the Clean Drive LED indicator turns off (if previously on) and the
autoloader unloads and exports the cleaning cartridge. Remove the cleaning cartridge, and press
ENTER when the operator panel prompts you to do so.
If you are using the operator panel commands to clean the drive, import the
cleaning cartridge only after you have se lected Clean Drive. If you would like to
keep a cleaning cartridge in the autoloader, the ba ckup so ftware must manage
drive cleaning.
on page 17 for instructions then return to Step 1 to clean the tape drive.
CAUTION:
If the cartridge is not a valid cleaning car tridge, the o perator p anel
displays the Invalid Tape message and the cartridge will be
exported.
NOTE:
FastStor 2 User’s Guide 19
If the Clean Drive or Media Attention LED indicators illuminate when you
insert another cartridge immediately after cleaning, then see Table 4
page 40.
on
Page 26

7 If you had to remove a data cartridge to import the cleaning cartridge, import the tape to its origin al slot.
See Importing Cartridges
on page 16 for more information.
20 Operating the Autoloader
Page 27

Managing the Autoloader
This section discusses managing the autoloader, including resetting the autoloader, setting SCSI IDs,
setting the autoloader mode, and updating firmware. You can also use the System Test (see Performing
System Test on page 25) and the information retrieval tool (see Retrieving Information on page 26) to
manage the autoloader.
Resetting the Autoloader
This option resets the autoloader robotics and the tape drive within the autoloader, forces a new cartridge
inventory, and clears any current error condition.
NOTE:
1 Press + or – until Go offline appears. Press ENTER.
2 Press + or – until Configuration appears.
3 Press ENTER to select.
4 Press + or – until Reset appears.
5 Press ENTER to reset the autoloader.
After initialization, the autoloader returns to normal operation and displays the main menu.
This option is primarily used if the autoloader is in an error state. However, any
backups that have not been verified as complete should be considered lost.
Viewing or Changing the SCSI IDs
Use this option to view or change the SCSI IDs used by the au toloader. The autoloader occupies two SCSI
IDs, one ID is assigned to the autoloader and the second ID is assigned to the tape drive.
The default SCSI ID for the autoloader's SCSI controller is 0. The default SCSI ID fo r the tape drive is 5.
You only need to change a SCSI ID if there is another device, or devices, already assigned to these IDs.
NOTE:
If you changed the SCSI ID, you may also need to cycle power on the host
system and reconfigure your backup software before you can use the
autoloader. Consult your hardware and software manuals for more information.
FastStor 2 User’s Guide 21
Page 28

Viewing or Changing the Autoloader SCSI ID
NOTE:
Use the following procedure to view or to modify the autoloader SCSI ID.
1 Press + or – until Go offline appears. Press ENTER.
2 Press + or – until Configuration appears.
3 Press ENTER to select.
4 Press + or – until Change SCSI ID appears.
5 Press ENTER to select.
6 Press + or – until Loader appears on the operator panel and then press ENTER to select.
7 Press + or – until the desired SCSI ID is displayed. Press ENTER. Press CANCEL to view only.
The Cycle Power for New SCSI ID message appears if you have made a change.
8 Turn off the autoloader. After a few seconds, turn it back on again.
The selected SCSI ID is now in effect.
This feature is not present for the LTO version of the FastStor 2.
Viewing or Changing the Tape Drive SCSI ID
Use the following procedure to view or to modify the tape drive SCSI ID.
1 Press + or – until Go offline appears. Press ENTER.
2 Press + or – until Configuration appears.
3 Press ENTER to select.
4 Press + or – until Change SCSI ID appears.
5 Press ENTER to select.
6 Press + or – until Drive appears on the operator panel.
7 Press ENTER to select.
8 Press + or – until the desired SCSI ID is displayed, and then press ENTER. Press CANCEL to view only.
The Cycle Power for New SCSI ID message appears if you have made a change.
9 Turn off the autoloader, and then after a few seconds, turn it back on again.
The selected SCSI ID is now in effect.
Autoloader Operating Modes
The autoloader has operational modes that affect how the autoloader loads ta pes into the drive.The
operating mode is set based on whether you have automation software controlling cartridges in the
autoloader or if you are manually loading and unloading cartridges using the autoloader operator panel
controls.
The autoloader always operates in autodetect mode. In autodetect, the au toloader automatically assume s
you are not using automation software to control cartridge or drive activity. This mode is called sequential
mode. If the autoloader detects that the automation softwa re is controlling tape drive activity, it automatically
switches to random mode.
22 Managing the Autoloader
Page 29

NOTE:
“SEQ” appears next to the front panel inventory when the autoloader is in
sequential mode. Nothing appears when the autoloader is in random mode.
Random Mode
This is the mode of operation when a backup software application is being used. In random mode, the
autoloader does not automatically load tapes into the drive. Instead it waits for commands from the software.
Your backup software must support autoloaders, which often requires the additional installation of an
autoloader/library software module.
Sequential Mode
Sequential mode is useful when a software application is not available. In sequential mode, the autoloader
automatically unloads and loads tapes from the drive. The operator determines the first tape to load by
loading the desired tape into the tape drive using the autoloader operator panel controls (see Loading
Cartridges for instructions). When the first tape is full or unloaded for any reason, the autoloader
automatically removes the tape from the drive, puts it in its original slot, then loads the n ext available higher
numbered slot. To further determine how you want tapes loaded into the autoloader's tape drive while in
sequential mode, you can view or set loop and autoload options from the autoloader front panel, but only
while in sequential mode.
Loop Mode On/Off
This option turns loop mode on or off, and is only available when in sequential mode. When loop mode is
on, after the autoloader has cycled through all available cartridges, it then reloads the original first cartridge
in the sequence. If loop mode is turned off and the last cartridge has been unloaded, the a utoloader stops
loading cartridges until you manually load another cartridge.
CAUTION:
1 Press + or – until Go offline appears. Press ENTER.
2 Press + or – until Configuration appears.
3 Press ENTER to select.
4 Press + or - until Loop Mode appears.
The second line on the LCD screen indicates the current status, either “On” or “Off.”
5 Press ENTER.
The operator panel indicates whether you are about to turn loop mode on or off.
6 Press ENTER to accept the change to lo op mode, or pr ess CANCEL to exit and not save the changes.
Use caution when choosing loop mode. This mode makes it possible
to overwrite data previously written on cartridges.
Autoload Mode On/Off
This option turns autoload mode on or off, and is only available when in sequential mode. When autoload
mode is on, the autoloader automatically loads the cartridge from the lowest numbered full slot into the tape
drive when the system is first turned on (first cartridge only). When autoload mode is off, you must load
cartridges into the drive manually. This function is only applicable when you power up the system.
1 Press + or – until Go offline appears. Press ENTER.
2 Press + or – until Configuration appears.
3 Press ENTER to select.
FastStor 2 User’s Guide 23
Page 30

4 Press + or – until Autoload Mode appears.
The second line on the LCD screen indicates the current status, either “On” or “Off.”
5 Press ENTER. The operator panel indicates whether you are about to turn autoload mode on or off.
6 Press ENTER to accept the change to autoload mode, or press CANCEL to exit and not save the
changes.
Updating Firmware
You can update both drive and autoload er firmware. (The term “autoloader firmware” includes both the SCSI
controller firmware and the robotics controller firmware.) To update firmware by means of the RMU, refer to
Updating Firmware
Using a Firmware Upgrade Tape
This option performs a firmware code update to the drive using a firmware upgrade tape previously created
using a separate procedure.
on page 37.
NOTE:
1 Press + or – until Go offline appears. Press ENTER.
2 Press + or – until Configuration appears.
3 Press ENTER to select.
4 Press + or – until DRIVE FW UPGRADE FROM FMR TAPE appear s, and then press ENTER to select.
5 If the carousel is full, do the following:
• When the operator panel displays the No slot free for transfer message, press CANCEL
repeatedly until the main menu is displayed.
• Export a cartridge to make room for the firmware upd ate cartridge (see Exporting Cartridges
6 If the carousel is not full, do the following:
• The autoloader selects the first available slot and prompts you to insert the code update tape.
7 Insert the firmware upgrade tape into the mail slot.
8 During the firmware update, which can take several minutes, the Drive SW update busy... message
appears. When firmware update is complete, the autoload er resets, then unloads and exports th e code
update cartridge. Remove the code update cartridge and press ENTER when the operator panel
prompts you to do so.
This code update operation assumes that the upgrade t ap e is impor ted as part
of this procedure. Do not import the firmware update cartridge before starting
this procedure.
on
page 17 for instructions), and then return to step 1 to update the firmware.
9 If you exported a data cartridge to make room for the code update cartridge, be sure to import the
cartridge to its original slot.
See Importing Cartridges
NOTE:
24 Managing the Autoloader
After a firmware update, the firmware revision displayed on the operator
panel is not updated until the autoloader is power cycled.
on page 16 for instructions.
Page 31

Using the Serial Port
1 With the autoloader running, connect a null modem cable fr om the service compu ter serial (COM) port
to the autoloader serial port.
2 Turn on the service terminal.
3 Start up HyperTerminal on the service computer.
4 In the New Connection dialog box enter “FS2” for the name and click OK.
5 In the Connect To dialog box, for the Connect using field select the COM Port number th at you have
chosen and click OK.
6 In the COM Properties dialog select the following values:
• Bits per second: 38400
• Data bits: 8
• Parity: none
• Stop bits: 1
• Flow Control: none
7 Click OK.
8 Press ENTER. After establishing a connection, TSmonitor starts automatically.
NOTE:
9 Log on as administrator. The command is “lgi”. The user name is “admin”. The password is “secure”.
10 Type “lfw”.
11 You are prompted to click Transfer > Send.
12 Browse to the appropriate firmware file. The file extensio n is “FBI”. Make sure that the selected pro tocol
is XMODEM. Click Send.
The autoloader resets automatically after the firmware has been loaded.
If the autoloader has been switched offline by operator panel activity, manually
restore the autoloader to an online state. You may also need to log off from a
previous logon. To do so, type “lgo”.
Performing System Test
System Test cycles the autoloader through the process of loading, calibrating, and unloading all ca rtridges
in the carousel.
Running a system test verifies the basic operational soundness of the autoloader and tape drive. All regular
backup or restore operations are suspended while a system test is in progress.
1 Press + or – until Go offline appears. Press ENTER.
2 Press + or – Diagnostic appears. Press ENTER to select.
3 Press + or – until Loader Diag appears. Press ENTER to select.
4 System Test appears. Press ENTER to select.
5 Select Cycles appears. Press + or – to select from 270, 540, 1080, or Endless.
6 Press ENTER to begin the test.
Messages are posted that report the progress of the tests being run.
FastStor 2 User’s Guide 25
Page 32

7 Press CANCEL to end the test.
Retrieving Information
The Information menu provides access to information about the autoloader cycle count, recent events that
occurred on the autoloader, and to the firmware level.
Viewing Error Logs
This option provides access to the autoloader errors and events (see Viewing Autoloader Error Codes on
page 47 for a description of error codes).
1 Press + or – until Go offline appears. Press ENTER.
2 Press + or – Information appears. Press ENTER to access the available options.
3 Press + or – until Loader Info appears. Press ENTER to access the available options.
4 Press + or – until Error Log appears.
5 Press ENTER to access logged errors.
NOTE:
6 Press + or – to display each error in the log. Press ENTER to access additional information about the
error.
7 Press CANCEL when done.
Refer to Viewing Autoloader Error Codes
numbers generated in the log.
The most recent entry is number 0 and older entries are ne gative number s.
on page 47 for descriptions of the possible autoloader error
Displaying Cycle Count
This option displays the total system cycle count, which increments each time a tape is loaded into the drive
or exported from the autoloader.
1 Press + or – until Go offline appears. Press ENTER.
2 Press + or – Information appears. Press ENTER to access the available options.
3 Press + or – until Loader Info appears. Press ENTER to access the available options.
4 Press + or – until Cycle Count appears.
The operator panel displays the total cycle count.
5 Press CANCEL when done.
Displaying Product Version
This option displays the overall product versio n of the au to lo ad er .
1 Press + or – until Go offline appears. Press ENTER.
2 Press + or – Information appears. Press ENTER to access the available options.
3 Press + or – until Drive Info appears. Press ENTER to access the available options.
4 Press + or – until Product Rev appears. The operator panel displays the product version.
26 Managing the Autoloader
Page 33

5 Press CANCEL when done.
Viewing Serial Numbers
At any time, you can display the serial number for the overall product or for the drive.
Displaying the Autoloader Serial Number
This option displays the serial number of the autoloader.
1 Press + or – until Go offline appears. Press ENTER.
2 Press + or – Information appears. Press ENTER to access the available options.
3 Press + or – until Loader Info appears. Press ENTER to access the available options.
4 Press + or – until Serial Number appears. The operator panel displays the serial number.
5 Press CANCEL when done.
Displaying the Drive Serial Number
This option displays the serial number of the drive.
1 Press + or – until Go offline appears. Press ENTER.
2 Press + or – Information appears. Press ENTER to access the available options.
3 Press + or – until Drive Info appears. Press ENTER to access the available options.
4 Press + or – until Serial Number appears. The operator panel displays the serial number.
5 Press CANCEL when done.
Viewing Firmware Levels
At any time, you can display the current versions of firmware for the overall product as well as for the drive.
Displaying Autoloader Firmware Version
This option displays the version of the firmware currently installed on the autoloader.
1 Press + or – until Go offline appears. Press ENTER.
2 Press + or – Information appears.. Press ENTER to access the available options.
3 Press + or – until Loader Info appears. Press ENTER to access the available options.
4 Press + or – until Firmware Rev appears. The operator panel displays the revision of the firmware
currently installed in the autoloader.
5 Press CANCEL when done.
Displaying Drive Firmware Version
This option displays the version of the firmware currently installed on the drive.
1 Press + or – until Go offline appears. Press ENTER.
2 Press + or – Information appears. Press ENTER to access the available options.
3 Press + or – until Drive Info appears. Press ENTER to access the available options.
4 Press + or – until Firmware Rev appears. The operator panel displays the revision of the firmware
currently installed in the autoloader.
FastStor 2 User’s Guide 27
Page 34

5 Press CANCEL when done.
28 Managing the Autoloader
Page 35

Using the Remote Management Unit
This section discusses using the remote management unit (RMU) interface. The RMU comes preinstalled
in your autoloader. Before it can be used, though, you must configure it. Refer to Configuring the Remote
Management Unit on page 14.
Overview
You can manage your autoloader remotely over an IP network by means of a web browser. All available
functions are accessible without the need of a de dic at ed ser ver or se pa ra te soft wa re . The op er a tor pan e l
Commands menu is not accessible by means of the RMU, but much of the functionality available under
Commands can be found in the RMU Maintenance page.
NOTE:
RMU functionality is as follows:
• Configure the autoloader, drive, and media
• Reset, save, and reload the configuration
• Display autoloader, drive, and media status
• Configure the logs and traces
• Display logs and traces
• Administer passwords
• Set the time and date
• Configure event notification
• Reset the autoloader
• Run autoloader operations
• Perform diagnostic tests
• Update autoloader and drive firmware
If the RMU is in operation, you only have access to the operator panel
Information menu. In order to go offline and manage the autoloader by means
of the operator panel, you have to log off the RMU.
In addition to these functions, the RMU interface offers help pages and support information.
FastStor 2 User’s Guide 29
Page 36

Logging In
The RMU supports three levels of user account:
User Class Standard User Administrators Service
Account Level
Users who need
general
Description
Default Password
Best practice is to change the default password immediately after you log in the first time, and periodically
thereafter.
User tasks are assigned to one or more of the three user profiles:
Functionality Standard User Administrators Service
Information Menu X X X
Status Menu X X X
Configuration Menu N.A. X X
Maintenance Menu w/out
Advanced Diagnostics
configuration and
status information of
the autoloader
std001 adm001 ser001
N.A. X N.A.
123
Users who
manage backups
and maintain the
autoloader from a
remote location
Engineers who use
the RMU as a tool
for troubleshooting
and analyzing
exceptional
situations remotely
Maintenance Menu w/
Advanced Diagnostics
Log Menu N.A. X X
N.A. N.A. X
Saving and Restoring Vital Product Data on the RMU
The vital product data (VPD) consists of the following pieces of information:
•SCSI ID
• Operating mode
• SCSI drive speed
• Barcode reader enablement status
• Unit serial number
VPD values can be saved on the RMU. Saving this information on the RMU makes it easy to restore the
VPD in case the unit is ever damaged.
If any VPD parameters change after the unit is set up, click SAVE on the RESET page available through
the RMU Configuration page. Always save the most current values.
30 Using the Remote Management Unit
Page 37

NOTE:
The operator panel Configuration menu presents an option to reset, but not
an option to save.
Checking the Quick Status
A table containing an array of basic status information appears on the right side of the RMU display. This
Quick Status table appears on all RMU pages.The follo wing pieces of information are displayed in the Quick
Status table:
Label Description
Name The name of the autoloader
Status The overall status of the autoloader by icon
Lock A lock to show the administrator is in the process of making
configuration changes. Valid values for "Loader Lock" are None, RMU,
SCSI, OCP and MONITOR. OCP is the term used for operator panel.
Cartridge in drive The slot number of the tape currently mounted in the tape drive
Drive Status Indicates by icon the overall status of the tape drive. The green "ok" icon
indicates that the autoloader is fully operational and that no user
intervention is required. The orange/yellow question mark indicates that
user intervention is necessary but that the autoloader is still operational.
The red cross indicates that user interven tio n is req uir ed an d that th e
autoloader is not operational
Drive Activity The current activity of the tape drive
Robotic Action The current activity of the autoloader’s robotics
Time The total amount of time the autoloader has been in operation
Drive Error Code The code of the last error that occurred. Clicking on this code takes the
user to a description of the code
Using the RMU Information Pages
These information pages display general information about the autoloader or the drive. These pages are
accessible by all user account levels. No changes can be made by the user.
The following pieces of information are reported for the autoloader:
Label Description
Serial number The serial number of the unit
Temperature The current operating temperature of the unit
Product ID FastStor 2.1
Controller firmware
revision
The version number of the robotics controller firmware
Firmware CRC The firmware’s cyclic redundancy check code
FastStor 2 User’s Guide 31
Page 38

Label Description
Bootcode firmware
revision
Firmware build date The date is displayed in the format MM-DD-YYYY
Number of firmware
updates
Number of power ups The number of times the autoloader has been powered on
Barcode reader Indicates whether or not the barcode reader functionality has been
IP address The IP address is displayed in the format xxx.xxx.xxx.xxx
MAC address The media access control number, a unique number for each piece of
The following pieces of information are reported for the drive:
Label Description
Vendor ID The drive vendor’s ID number
Product ID The drive’s product ID number
The build number of the firmware bootcode
The number of times the firmware has been updated
enabled
hardware
Serial number The drive’s serial number
Product revision The drive’s product revision number
Firmware revision The drive’s firmware revision number
Data compression Indicates whether or not data compression has been turned on
Interface type SCSI
SCSI ID The drive’s current SCSI ID
Speed Selection The drive’s current speed
Temperature The drive’s current operating temperature
Drive Cooling Request N.A.
Using the RMU Status Pages
These information pages show the general status of the autoloader or the media. These pages are
accessible by all user account levels. No changes can be made by the user.
The following pieces of information are reported for the autoloader:
Label Description
Status Good, Warning, or Error
Cartridge in operation The number of the cartridge currently in operation
32 Using the Remote Management Unit
Page 39

Label Description
Number of load-unload cycles Number of load and unload cycles
Operation time Time since first start.
Current drive status Current status of the drive
Current drive activity Current activity of the drive
Current robotic action Number of retries
Barcode reader enabled Yes or No
The following pieces of information are displayed for the media:
Label Description
Slot number The home slot number, 1-8
Status Good, Warning, or Error
In drive The drive number, if any.
Barcode The barcode number
Write-protected Yes or No
Using the RMU Configuration Pages
CAUTION:
Only administrators and service personnel have access to the RMU Configuration page. The following
parameters can be set by means of the Configuration page:
•Device
•Network
• User
• Real Time Clock
•Log
• Event Notification
• Reset
NOTE:
The Configuration pages of the RMU interface pre sent device specific
settings to be selected or specified. Changes take effect only after a
device reset.
The RMU Configuration page functionality is not the same as the functio nality
available by means of the operator panel Configuration menu. Refer to
Understanding the Menu Structure
on page 13.
Configuring the Device
The following parameters can be configured for the device:
FastStor 2 User’s Guide 33
Page 40

Label Description
Loader SCSI ID Select the SCSI ID for the autoloader.
NOTE: This feature is not available for the LTO version of the FastStor 2.
Drive SCSI ID Select the SCSI ID for the drive.
Autoloader mode Select the mode for the autoloader. Refer to Autoloader Operating Modes
on page 22.
Barcode reader enabled Select Yes or No.
Configuring the Network
The following parameters can be configured for the network:
Label Description
DHCP address If DHCP mode is selected, the manual entries are disabled and are not used
Hostname Specify a hostname.
IP address Specify an IP Address in xxx.xxx.xxx.xxx format
Network Mask Specify a network mask in (xxx.xxx.xxx.xxx) format.
Gateway
Address
NOTE:
Specify the gateway address in (xxx.xxx.xxx.xxx) format.
After submitting the new information, you are asked to confirm the change.
Configuring the User
The following parameters can be configured for the user:
Label Description
Access level There are three user account levels available in the system.
Access level name The name for each user account level can be changed. The
names entered here are used on the login screen. The currently
logged in user account level name is displayed at the bottom of
the left banner on each page
Password The password for each user account level can be changed. In
order to change the password for the selected password remove
the **** that are the default and type in a new password.
When changing the access level name, a new password has to
be entered for the new access level. It can be the old password
or a completely new one, but the password must be entered.
Repeat password This entry must match the previous entry.
OCP access pin enabled An optional operator panel access pin code is used to control
access to the operator panel.
34 Using the Remote Management Unit
Page 41

OCP access pin code Four digits.
Repeat OCP access pin code This entry must match the previous entry.
Support name
Support phone Specify the phone number to dial in case of a support request.
Support email Specify the email address to cont act in case of a support req uest.
Specify the name that is displayed in the support page as contact
point.
Configuring the Real Time Clock
The following parameters can be configured for the real time clock (RTC):
Label Description
Time standard or 24 h & the month or day listed first
Date DD-MM-YYYY
Configuring the Log
The following parameters can be configured for the log:
Label Description
Trace Log Mode Error and trace logs can be enabled or disabled through
filtering options. Because the filters apply during log entries in
the database and are not retrieve filters, events that have
been filtered out are permanently unretrievable. Choices are
“off,” “on,” and “stop trace at first error.”
Trace Level Only the service level user can configure the trace level.
Trace Filter Only the service level user can configure the trace filter
options.
Configuring Event Notification
The following parameters can be configured for event notification:
Label Description
Notify errors Specify whether or not notifications of errors are to be e-mailed to
users.
Notify warnings
To email address Specify the e-mail address used to which to send notification s of
Email domain The domain name to use. The autoloader itself creates the correct
Specify whether or not notifications of warn ings a re to be e-maile d
to users.
errors or warnings. Use the format user@domain.domain_type.
email address from using this domain name as the from e-mail
address.
FastStor 2 User’s Guide 35
Page 42

SMTP server address IP address of the SMTP server used to send mail.
Resetting the Configuration
The following parameters can be reset:
Label Description
Restore factory defaults Press Reset to restore the factory defaults. Power cycle the
unit after the reset is completed.
Using the RMU Maintenance Pages
Only administrators and service personnel have access to the RMU Maintenance page. The following
parameters can be set by means of the Maintenance page:
• Operations
• General diagnostic
• Advanced diagnostic
•Firmware
• Reset
Running Operations
The Operations page allows users at the system administrator level to run the following predefined
operations:
• Reinitialize library controller
• Perform inventory scan
• Load cartridge into drive
• Unload cartridge from drive
• Import to slot
• Export from slot
• Perform clean process
• Perform drive upgrade
• Bulk exchange
These same operations can be selected by usin g the operator panel. De pending on the operation selected,
a slot number may also be required. All available slots are either enabled or disabled according to the
inventory status of the media. Click Execute to start th e selected operation. There is no stop button to sto p
the selected operation. Wait for the operation to complete and then check the status.
Running the General Diagnostic Test
The General Dia gnostic page allows users at the system administrator level to run the system test. To run
system tests, select the number of test cycles and click Execute. To cancel a test before its normal
completion, click Stop.
36 Using the Remote Management Unit
Page 43

Running the Advanced Diagnostic Tests
The Advanced Diagnostic page allows users at the service level to run the following predefined
operations:
• Load/Unload test
• Belt test
• Slider test
• Gripper test
• Picker test
•Door Test
To run system tests, select the number of test cycles and click Execute. To cancel a test before its normal
completion, click Stop.
Updating Firmware
Use the RMU Firmware page to support network-based firmware upgrades for the autoloader. Select the
appropriate file from a PC or network-attached server. Click Update to upload the file to the autoloader.
There is no way to back up the current firmware file, so be su re you have access to older firmware revisions.
Resetting the Autoloader
The Reset page is used to perform an autoloader reset. During an autoloader reset the connection to the
autoloader can be lost. If this happens, reload the RMU page manually.
Accessing Log Files
The RMU Logs page displays log entries for the system or for th e drive. The log entries are browsable. You
can specify the number of entries per page and the en try start nu mber. Log entri es can also be sto red to a
file. Trace logs can be deleted from the system. Refer to Viewing Autoloader Error Codes
descriptions of the possible autoloader error numbers generated in the log.
on page 47 for
FastStor 2 User’s Guide 37
Page 44

38 Using the Remote Management Unit
Page 45

T roubleshooting and Diagnostics
This section contains information on troubleshooting and diagnosing your autoloader.
Installation Issues
Problems encountered during the installation of the autoloader are usually caused by improper SCSI bu s
configuration, application software configuration errors, or by an incorrectly configured operat ing system. If
the application software that you are using is not communicating with the autoloader after installation, check
the following:
• SCSI ID—The autoloader uses one SCSI ID for the tape drive and one SCSI ID for the autoloader
robotics. Depending on other devices attached to the same SCSI bus and their SCSI IDs, you may
need to change the SCSI ID of the autoloader or tape drive before you can use the autoloader.
Review the manuals for the other devices on the SCSI bus or your operating system to determine
which SCSI IDs are currently in use. See Viewing or Changing the SCSI IDs
instructions about changing the autoload er SC SI IDs.
• SCSI Cabling—Verify that all SCSI cables are securely connected at both ends. Check the length
and integrity of your SCSI cabling. The total length of all cables connected to a SCSI bus must not
exceed 19 feet (6 meters) for a SCSI-1 SE bus, 10 feet (3 meters) for a Fast SCSI (Narrow or Wide)
or an Ultra SCSI (Narrow or Wide) SE bus, 40 feet (12 meters) fo r an LVD bus with multiple devices,
or 82 feet (25 meters) for an LVD bus with a single device. The length of the internal SCSI cabling
inside the autoloader is 2 feet (60 cm). This length must be included in any calculations of cable
length.
on page 21 for
• Termination—If the autoloader is the only SCSI device—other than the SCSI host system
adapter—on the selected SCSI bus, it must be term inated. Likewise, if the autoloader is physically
the last SCSI device on the SCSI bus, it must be terminated. Only the devices physically at the
beginning and end of the SCSI bus should be terminated. Refer to the manua ls supplied with other
devices on the SCSI bus for information on enabling or disabling termination on those devices. To
terminate the autoloader, locate the terminator in the accessories package and press it firmly into
either of the two SCSI connectors on the rear panel of the autoloader. Secure the termina tor by
tightening the finger-screws until snug. The supplied terminator is "dual mode" and works on both
Low-Voltage Differential (LVD) and Single Ended (SE) SCSI buses. Check all SCSI and power
connections and confirm that the unit is attached to a valid SCSI SE or LVD bus.
• Compatibility—Ensure that the autoloader is compa tible w ith the SCSI ho st syste m adapt er and
backup application you plan to use. For a list of compatible SCSI adapters and application software,
check with your SCSI host system adapter manufacturer, backup application vendor, or contact
your service representative (refer to Getting Help
FastStor 2 User’s Guide 39
on page 58).
Page 46

NOTE:
• Backup Application Installation—Refer to the documentation included with your backup
application for instructions on how to verify proper installation. Most backup software packages
require an additional module to communicate with the autoloader robotics.
ADIC recommends LVD components. A single ended SCSI host
system bus adapter can work, but severely degr ad es per fo rm a nce.
Also, if there are any SE devices on the same SCSI bus, the entire
SCSI bus negotiates down to SE speed and severely degrades
performance.
NOTE:
• Device Driver Installation—Make sure that the proper device driver, if applicable, is installed for
the autoloader. Contact your service representative for more information.
Many backup applications use their own drivers for the autoloader and
drive. Before installing a driver, make sure it is not in conflict with the
software.
Troubleshooting Matrix
Table 4 on page 40 describes troubleshooting problems and solutions encountered with the autoloader
power source, tape media, cleaning equipment, and SCSI commands.
Table 4 Troubleshooting Table
Problem Solution
Power
Autoloader does not power on • Check all power cord connections.
• Make sure the power switch on the front panel is in the ON
position.
• Make sure there is power to the outlet. T ry an ot he r
working outlet.
• Replace the power cord.
• C on ta ct yo ur serv ice re pr e s enta tive.
No display messages appear • Make sure the power cord is connected.
• Make sure the power switch is on.
• Power cycle the autoloader.
• Download autoloader firmware.
• C on ta ct yo ur serv ice re pr e s enta tive.
40 Troubleshooting and Diagnostics
Page 47

Table 4 Troubleshooting Table
Problem Solution
Tape Movement
Tape lodged in drive • Power cycle the autoloader, allow it to complete
initialization, which in rare cases can take as long as 10
minutes, and then retry unloading the tape using the
autoloader operator panel controls.
• Allow the tape drive to complete all operations. This may
take as long as ten minutes if you reset or cycle power on
the autoloader while the cartridge is positioned at the
physical end of the media.
• Make sure that the backup software is not reserving the
slot or preventing the tape drive from ejecting the
cartridge. The backup software needs to cancel the
reservation and any hold it has on the tape drive.
• Temporarily disconnecting the autoloader from the host
server system eliminates the host system and its software
as a problem source.
• C on ta ct yo ur serv ice re pr e s enta tive.
Tape lodged in storage slot • See Removing Cartridges Lodged in Slots
Media
Media barcode labels are not
being read
• Make sure the barcode labels are applied in the correct
orientation on the cartridge.
• Make sure the barcode reader cable is fully seated in the
receptacle on the autoloader.
• If problem continues, contact your service representative.
Cleaning or data cartridge
incompatible with drive
• Make sure you are using cleaning and data cartridges that
are compatible with the drive. The autoloa der
automatically unloads incompatible cartridges to their
original slots, the Media Attention LED flashes, and an
exclamation point (!) appears in the inventory display for
the indicated slot number.
on page 45.
FastStor 2 User’s Guide 41
Page 48

Table 4 Troubleshooting Table
Problem Solution
Cannot write to or read from
tape
SCSI ID
Changed drive SCSI ID, but the
host server system does not
recognize the new ID
• Make sure that the cartridge is write enabled (move the
write-protect switch to the enabled position).
• Make sure that the cartridge has not been written using an
incompatible format.
• Make sure that the cartridge is an acceptable format for
your drive type (see Specifications
on page 59).
• Make sure that the cartridge has not been exposed to
harsh environmental or electrical conditions and is not
physically damaged in any way.
• Many backup applications do not read or write to
cartridges that were created using a different backup
application. In this case, you may have to perform an
erase, format, or label operation on the cartridge.
• Make sure you understand any data protection or
overwrite protection schemes that your backup
application may be using, which could prevent you from
writing to a given cartridge.
• R etr y the oper at i on with a dif fer e nt, kno wn go o d ta pe .
• Clean the tape drive. See Cleaning the Tape Drive
on
page 19.
• Make sure that all SCSI devices on the same bus have
unique ID numbers.
• If the SCSI bus is narrow (50-pin) only SCSI IDs 0 through
7 are available.
• Make sure that you cycle power on the autoloader after
changing the SCSI ID.
• R eboot the host server system.
42 Troubleshooting and Diagnostics
Page 49

Table 4 Troubleshooting Table
Problem Solution
Autoloader Performance
The autoloader is not efficiently
backing up data
Cleaning
• Check the network bandwidth from the host system. If you
are backing up data over a network, consider comparing
to a local-only backup.
• Make sure the autoloader and tape drive are on their own
SCSI bus and not daisy-chained to another tape drive or
to the hard drive being backed up.
• Make sure the autoloader is connected to an LVD SCSI
bus and there are no SE devices on the same bus,
because this causes the entire bus to negotiate down to
SE speed.
• Clean the tape drive. See Cleaning the Tape Drive
on
page 19 for instructions.
• Try a new cartridge. A marginal cartridge can cause
performance problems due to bad spots on the tape
requiring retries.
• Backing up compressed data lowers performance.
• Check the size of the files. Small file size can impact
performance.
• Confirm that the backup application is utilizing block sizes
of at least 32KB, preferably 64KB. Refer to the backup
application documentation for details.
Cannot load the cleaning
cartridge
• Make sure you are using an allowed cleaning cartridges
(see Specifications
on page 59).
• C on ta ct yo ur serv ice re pr e s enta tive.
Media Attention LED Issues
Contamination by loose debris • Avoid contamination by ensuring that the autoloader is
installed in a clean, contamination-free environment.
Cartridges should be stored vertically in their plastic
cases. Continue cleaning the tape drive as needed.
Contamination by head staining
(Caused by adhesion of
chemicals that are present in
the tape media to the head
surface)
• One or two passes with a cleaning cartridge should
resolve the Media Attention LED caused by normal head
staining. If a cleaning cartridge is unsuccessful in
resolving a cleaning light after 3 or more attempts, the
cleaning cartridge may be contaminated and should NOT
be used in another drive.
Non-acclimated media • A cartridge should be acclimated for at least 24 hours
before being used, particularly if it has been stored at a
substantially different temperature or level of humidity
than the autoloader.
Cleaning cartridge is
incompatible
• Make sure you are using an allowed cleaning cartridges
(see Specifications
on page 59).
FastStor 2 User’s Guide 43
Page 50

Table 4 Troubleshooting Table
Problem Solution
Expired cleaning cartridge • Verify the number of cleanings per cleaning tape for your
media type (see Specifications
on page 59).
Bad/defective/contaminated
media
Errors Displayed on Front Panel
“!” in autoloader operator panel
inventory display
There is an error code on the
LCD display
Device Not Detected on SCSI Bus
• If the Media Attention LED is cleared and the drive has
been cleaned, and then immediately reappe ars each time
a particular cartridge is reloaded, that cartri dge should be
suspected as being defective, if it is not an invalid cleaning
cartridge.
• If this occurs, export the cartridge and load a
known good cartridge. In some cases, a
cartridge can be worn out, have a defective
cartridge memory, or have been formatted as a
Firmware Upgrade Tape.
• Any cartridge that is suspected of being
defective or contaminated should NOT be
reused in any drive.
• See Operating the Autoloader
on page 11 for more
information.
• Look up the error code, try to resolve the failure, and
power cycle (see Viewing Autoloader Error Codes
on
page 47).
Connected to a high voltage
differential SCSI bus/host
system adapter
SCSI Errors
Connected to a high voltage
differential SCSI bus/host
system adapter
• At ta ch devic e to a LVD SCS I host system adapter/bus.
• SCSI cable length exceeded, use shorter cable, or
remove other devices from the bus. Device not properly
terminated (see Installation Issues
on page 39).
• Power on device before powering on the host system.
• Check that the device has been powered on and is not in
an error state.
• At ta ch devic e to a LVD SCS I host system adapter/bus.
• SCSI cable length exceeded, use shorter cable, or
remove other devices from the bus (see Installation Issues
on page 39).
• Device not properly terminated.
44 Troubleshooting and Diagnostics
Page 51

Table 4 Troubleshooting Table
Problem Solution
SCSI ID
Changed drive SCSI ID, but the
host server system does not
recognize the new ID
• Make sure that all SCSI devices on the same bus have
unique ID numbers.
• If the SCSI bus is narrow (50-pin) only SCSI IDs 0 through
7 are available.
• Make sure that you cycle power on the autoloader after
changing the SCSI ID.
• R eboot the host server system.
Removing Cartridges Lodged in Slots
If the autoloader experiences a severe mechanical problem or if you need to remove cartridges because of
a power failure or other circumstance in which the autoloader is unable to export the cartridges in the
carousel, follow these steps.
NOTE:
1 Power off the autoloader as follows:
a. Use the tip of a pen to press the OFF.
CAUTION:
Contact your support representative if a cartridge is lodged in the drive.
Pressing the OFF switch stops th e autoloader from funct ioning, but it
does not remove power from the autoloader. To remove power, you
must disconnect the power cord from the power source.
b. Unplug the power cord from the outlet.
c. Unplu g the powe r co rd from the rear pa n el of th e au to loa d er.
d. Disconnect the SCSI cables from the rear panel of the autoloader.
2 If the autoloader is rackmounted, use a screwdriver to remove the screws that secure the mounting
brackets from both sides of the autoloader and remove the autoloader from the rack.
3 Place the autoloader on a cleared work space.
4 Loosen the thumbscrews on the fan housing and remove the fan housing by gently pulling it straight
back from the rear panel.
5 Remove the five screws on the back and the screws on each side of the autoloader cover.
6 Remove the autoloader cover by lifting it from the back and easing it out from under the front panel
display cover.
7 Lift the cartridge carrier, with each cartridge you want to remove, straight up from the autoloader.
NOTE:
To remove the carrier directly in front of the mail slot, gently rotate the
carousel counterclockwise by moving the belt or carriers until the carrier is
no longer in front of the mail slot.
FastStor 2 User’s Guide 45
Page 52

8 On each carrier, carefully pull the cartridge lock lever away from the carrier, allowing the cartridge to
slide out of the carrier.
9 After removing the cartridges from the desired carriers, reinstall each carrier on the autoloader belt.
• Make sure that the rollers on the bottom of the carrier are aligned in the carrier tracks.
• Make sure that the belt posts beneath each carrier are inserted into the proper autoloa der belt
loop.
NOTE:
There are unused loops on the belt. The proper belt loops have an extra
bump on the outside of the loop.
10 Ensure the carrier is properly installed on the belt by gently pressing on the top o f the carrier and sliding
it back and forth. If it is properly attached to the belt, it should not move. If it does, reinstall the carrier.
11 Replace the top cover of the autoloader and reinstall the cover screws and mounting brackets.
46 Troubleshooting and Diagnostics
Page 53

Viewing Autoloader Error Codes
If an error occurs during operation of the autoloader, the autoloader stops the current operation, displays
an error code on the operator panel, and recor ds the error code in an error log. The er ror log has a storage
capacity of 64 entries and is organized as a circular buffer. The ol dest entries ar e deleted at overflow. This
error code is accessible by means of the operator control panel, RMU, and the serial port.
Understanding Error Messages
The error message that is displayed on the operator panel consists of the event seque nce number, the main
error code, the error subcode, and a timestamp.
sequence number
ERROR! -1
Code: BB 95
code subcode
Error events are sequenced from 0 downward. The designation “-1” for example, indicates the 2nd event.
Error codes break out as shown below:
• Code: BB - Drive unload timeout
• Subcode: 95 - Drive unload operation terminated unsuccessful
See Tables 4
See Table 19
through 18 for explanations of erro r co de s.
for explanations of error subcodes.
Viewing Error Logs
You can view error logs and events either on the operator panel or the RMU.
• To view the error log on the operator panel, see Viewing Error Logs
• To view the error log on the RMU, see Accessing Log Files
on page 37.
on page 26.
Resolving Errors
Unless otherwise noted in the following tables, attempt to resolve the error by cycling power on the
autoloader and retrying the last operation. If the error persists, cont act your service represent ative (refer to
Getting Help
on page 58).
FastStor 2 User’s Guide 47
Page 54

Table 5 Not Ready Error Codes
Error Code Details and Description
01H Unit becoming ready by scanning magazines, etc.
02H Manual intervention required.
03H Cause not reportable.
04H Firmware upgrade in process.
05H Front door is open.
06H Working on another SCSI command.
07H Cleaning cartridge installed.
08H Loader is in sequential mode.
09H Loader is offline.
0A-0FH Reserved.
Table 6 Unit Attention Error Codes
Error Code Details and Description
10H Power on or reset occurred.
11H Media may have changed.
12H Media removal prevented.
13H Invalid cartridge.
14H Not ready to transition.
15H Mode parameters changed.
16H Microcode has changed.
17H Door was open and was closed again.
18H SCSI bus type changed to SE.
19H SCSI bus type changed to LVD.
1AH Invalid cleaning cartridge.
1BH Invalid upgrade tape.
1CH Cleaning requested.
1DH-1FH Reserved.
Table 7 Recovered Error Codes
Error Code Details and Description
20H Error log overflow.
21H SCSI parity error.
48 Troubleshooting and Diagnostics
Page 55

Table 7 Recovered Error Codes (Continued)
Error Code Details and Description
22H-2FH Reserved.
Table 8 Hardware Error Codes
Error Code Details and Description
30H Media not present.
31H POST soft failure.
32H Loader communications timeout.
33H Loader communications UART error or buffer overflow.
34H Bad status returned from loader.
35H Unexpected status from test.
36H Cartridge has no home.
37H Tape drive handle problem.
38H No cartridge in drive during unload.
39H Loader mechanism problem after retries.
3AH Timeout moving cartridge.
3BH Reserved.
3CH Could not unlock door after retries.
3DH Error during scanning.
3EH Could not lock door after retries.
3FH Une xpected door open.
40H Did not find all expected slots during elevator movement.
41H Cartridge already in drive during cartridge loading.
42H Slot empty during cartrid ge loadin g.
43H Cleaning tape expired.
44H Cleaning failed.
45H-4FH Reserved.
Table 9 Illegal Request Error Codes
Error Code Details and Description
50H No slot free for transfer.
51H All slots empty.
FastStor 2 User’s Guide 49
Page 56

Table 9 Illegal Request Error Codes (Continued)
Error Code Details and Description
52H Parameter length error.
53H SCSI invalid opcode.
54H Invalid element address.
55H Invalid field in CDB.
56H Invalid mode on write buffer.
57H Invalid drive specified.
58H Invalid test number at diagnostic.
59H Invalid offset on write buffer.
5AH Invalid size on write buffer.
5BH Bad controller image checksum.
5CH Invalid LUN
5DH Parameter list error: invalid field.
5EH Parameter list error: parameter not supported.
5FH Parameter value invalid.
60H Saving parameters not supported.
61H Cleaning slot empty.
62H Cleaning slot doesn’t have cleaning tape.
63H SCSI invalid ID message.
64H Media load/eject failure.
65H Destination element full.
66H Source slot or drive empty.
67H Unrecognized loader command.
68H Wrong header length.
69H Bad sequence number.
6AH Wrong checksum.
6BH Command unspecified.
6CH Configuration problem: no bar code reader installed.
6DH Flash image does not fit boot code.
6EH Medium removal prevented by drive.
6FH Firmware image contains wrong personality.
50 Troubleshooting and Diagnostics
Page 57

Table 10 Aborted Command Error Codes
Error Code Details and Description
70H SCSI message error.
71H SCSI parity error.
72H SCSI invalid message.
73H SCSI overlapped command attempt.
74H-79H Reserved.
Table 11 Additional Error Codes
Error Code Details and Description
7AH-7DH Reserved.
7EH Reservation conflict status.
7FH Reserved.
Table 12 Robotic Control Error Control
Error Code Description Details
81H Invalid command error This error indicates that the robotics have received an invalid
command issued by the library controller. A communication
failure or non-matching autoloader code.
82H Device status not
suitable to execute this
command
If the robotics are busy, some commands cannot be executed
at the same time. This error indicates a probable violation.
This is not an error condition, but does result in busy being
reported to the host system for the requested SCSI command.
83H Inventory not valid The cartridge inventory is not valid because of manual
changes or previous fatal errors. Update the inventory using
appropriate Set Slot Status commands.
84H Source element not
The transport source element is empty.
ready
85H Destination element not
The destination element is full.
ready
86H User has attempted to
access the door while
Finish importing or exporting a cartridge. Then retry the
operation.
media removal is
prevented
87H A robotic command has
Use the Configuration/Reset command to reset the unit.
timed out
88H Communications error
during loop-back
FastStor 2 User’s Guide 51
Cycle power on the autoloader and attempt the operation
again. If the error recurs, contact your service representative
(refer to Getting Help
on page 58).
Page 58

Table 12 Robotic Control Error Control (Continued)
Error Code Description Details
89H Timeout detected by
the autoloader on BHC
testing
8FH No error after
autoloader recovery
Cycle power on the autoloader and attempt the operation
again. If the error recurs, contact your service representative
(refer to Getting Help
on page 58).
Cycle power on the autoloader and attempt the operation
again. If the error recurs, contact your service representative
(refer to Getting Help
on page 58).
Table 13 Function Errors
Error Code Description Details
90H Mechanical initialization
failure
Use Configuration > Reset to reset the unit. If the error
recurs, contact your service representative (refer to
Getting Help
on page 58).
91H Inventory scan failure Use Commands > Reinventory to perform an inventory
rescan.
92H Preposition failed Use Diagnostics > Loader Diagnostics > Library
Verify. If the error recurs, contact your service
representative (refer to Getting Help
on page 58).
93H Cartridge mount error Use Diagnostics > Loader Diagnostics > Library
Verify. If the error recurs, contact your service
representative (refer to Getting Help
on page 58).
94H Cartridge dismount error Use Diagnostics > Loader Diagnos tics > Library
Verify. If the error recurs, contact your service
representative (refer to Getting Help
on page 58).
95H Import error Use Diagnostics > Loader Diagnostics > Library
Verify. If the error recurs, contact your service
representative (refer to Getting Help
on page 58).
96H Export error Use Diagnostics > Loader Diagnostics > Library
Verify. If the error recurs, contact your service
representative (refer to Getting Help
on page 58).
97H-9FH Reserved. Not Applicable.
Table 14 Low Level Axis Error Codes
Error Code Description Details
A0H Belt axis error An error occurred during cartridge carrier movement
(position not found).
A1H Slider axis error Transport slider unable to reach estimated position.
A2H Gripper position error Gripper unable to reach position.
A3H Cartridge pick error Missing cartridge during pick operation of gripper.
52 Troubleshooting and Diagnostics
Page 59

Table 14 Low Level Axis Error Codes (Continued)
A4H Door function error Slider door in front bezel not in the requested position
during device operation.
A5H Fan Error Autoloader processor detected a fan error.
Table 15 Electronic Hardware Error Codes
Error Code Description Details
B0H ROM error Cycle power on the autoloader and attempt the
operation again. If the error recurs, contact your
service representative (refer to Getting Help
on page
58).
B1H RAM error. Cycle power on the autoloader and attempt the
operation again. If the error recurs, contact your
service representative (refer to Getting Help
on page
58).
B2H NVRAM error Cycle power on the autoloader and attempt the
operation again. If the error recurs, contact your
service representative (refer to Getting Help
on page
58).
B5H Display error Cycle power on the autoloader and attempt the
operation again. If the error recurs, contact your
service representative (refer to Getting Help
on page
58).
B6H Memory error Cycle power on the autoloader and attempt the
operation again. If the error recurs, contact your
service representative (refer to Getting Help
on page
58).
B7H Timeout on autoloader
command
Cycle power on the autoloader and attempt the
operation again. If the error recurs, contact your
service representative (refer to Getting Help
on page
58).
B8H Barcode error Use Commands > Re-inventory to perform an
inventory rescan.
If the problem recurs, replace the barcode reader.
B9H Da tabase er ro r Contact your service representative (refer to Getting
Help on page 58).
Table 16 Drive Error Codes
Error Code Description Details
BAH Drive load timeout Cycle power on the autoloader. Verify that the fan is
operational. If the error recurs, contact your service
representative (refer to Getting Help
FastStor 2 User’s Guide 53
on page 58).
Page 60

Table 16 Drive Error Codes (Continued)
BBH Drive unload timeout Cycle power on the autoloader. Verify that the fan is
operational. If the error recurs, contact your service
representative (refer to Getting Help
on page 58).
BCH Over temperature
problem
Cycle power on the autoloader. Verify that the fa n is
operational. If the error recurs, contact your service
representative (refer to Getting Help
on page 58).
BDH No connection to drive Cycle power on the autoloader and attempt the operation
again. If the error recurs, contact your service
BEH Generic drive response
error
BFH Drive broken, needs
repair
representative (refer to Getting Help
Cycle power on the autoloader and attempt the operation
again. If the error recurs, contact your service
representative (refer to Getting Help
Cycle power on the autoloader and attempt the operation
again. If the error recurs, contact your service
representative (refer to Getting Help
on page 58).
on page 58).
on page 58).
Table 17 Barcode Error Codes
Error Code Description Details
C0H The Library Verify reports that the
autoloader has detected different
reading results for a single barcode
Check barcode labels. Use
Commands > Re-inventory to
perform an inventory rescan.
label.
C1H-CFH Reserved. Not Applicable.
Table 18 Network Error Codes
Error
Code
Description Details
D0H Error at network initialization Check the cable connection and the network
configuration, then retry the operation . If no t
successful, contact your service
representative (refer to Getting Help
on page
58).
D1H Telnet server error Check the cable connection and then power
cycle the unit. If the problem recurs, contact
your service representative (refer to Getting
Help on page 58).
D2H Web server error Check the cable connection and then power
cycle the unit. If the problem recurs, contact
your service representative (refer to Getting
Help on page 58).
D3H RMU EEPROM access error Check the RMU connectivity and then power
cycle the unit. If the problem recurs, contact
your service representative (refer to Getting
Help on page 58).
54 Troubleshooting and Diagnostics
Page 61

Table 18 Network Error Codes (Continued)
Error
Code
Description Details
D4H No RMU found Check the RMU connectivity and then power
cycle the unit. If the problem recurs, contact
your service representative (refer to Getting
Help on page 58).
D5H Error in write data to RMU EEPROM Check the RMU connectivity and then power
cycle the unit. If the problem recurs, contact
your service representative (refer to Getting
Help on page 58).
Table 19 Subcode Descriptions
Error Code Details and Description
00H No error.
01H Communication timeout.
02H Length expired before expected character got.
03H Any other kind of drive error.
10H Start pattern missing.
11H Sequence enumeration error.
12h Packet length error.
13H Checksum mismatch.
14H End pattern missing.
15H Drive busy -- command rejected.
16H General drive error.
17H Byte stuffing error.
18H Command negative acknowledged.
21H Carrier state error.
22H Repetitions error. Number of repetitions reached.
23H Move to slot position repetitions error. Number of repetitions at move to slot reached.
24H Move to eject position repetitions error. Number of repetitions at move to eject position
reached.
25H Belt start error. Start of belt motor unsuccessful.
26H Belt backward start error.Start of belt motor unsuccessful.
27H Belt home error. Home carrier at move to home position not found.
28H Unexpected belt home error. Unexpected home carrier detected at belt movement.
29H Belt door stop error. Belt stopped by door opening.
FastStor 2 User’s Guide 55
Page 62

Table 19 Subcode Descriptions (Continued)
Error Code Details and Description
2AH Belt position error at move to carrier 1 (home slot).
2BH Belt position error at move to carrier 2.
2CH Belt position error at move to carrier 3.
2DH Belt position error at move to carrier 4.
2EH Belt position error at move to carrier 5.
2FH Belt position error at move to carrier 6.
30H Belt position error at move to carrier 7.
31H Belt position error at move to carrier 8.
32H Belt position error at move to carrier 9 (o pt ion a l ).
33H Belt position error at move to carrier 10 (optional).
35H Gripper start error.Start of gripper motor unsuccessful.
36H Gripper open error. Gripper open position not reached.
37H Gripper close error. Gripper close position not reached.
38H Gripper hold error. Gripper hold/closed position not reached.
39H Gripper unexpected closed erro r. Gripper closed although a cartri dg e should be the r e.
40H Slider start error. Start of slider motor unsuccessful.
41H Slider home error. Slider home position not reached.
42H Slider forward positioning error. Slider position in forward direction not reached.
43H Slider complex forward positioning error. Slider position in a complex forward movement
not reached.
44H Slider backward positioning error. Slider position in backward direction not reached.
45H Slider complex backward positioning error. Slider position in a complex backward
movement not reached.
46H Slider lost steps at forward movement.
47H Slider lost steps at complex forward movement.
48H Slider lost steps at backward movement.
49H Slider lost steps at complex backward movement.
4AH Wrong slider start position at forward movement.
4BH Wrong slider start position at complex forward movement.
4CH Wrong slider start position at backward movement.
4DH Wrong slider start position at complex backward movement.
4EH Error in slider adaption.
56 Troubleshooting and Diagnostics
Page 63

Table 19 Subcode Descriptions (Continued)
Error Code Details and Description
50H Door open error. Door open position not reached.
52H Door repetitions error. Door close repetitions reached.
60H Axis initialization error. Initialization of all axis not successful.
61H Carrier position error.
70H Unknown cartridge error.
71H Door close error at import/export.
72H Wrong source carrier state.
73H Wrong destination carrier state.
74H Multiple carrier state.
75H Expected cartridge in transit not foun d.
76H Unexpected cartridge in transit found.
79H Door error (door not closed) after import, cartridge already imported.
81H Drive wakeup failed.
88H Error accessing the slot status in system database.
90H Robotic load operation could not reach the cartridge present position.
91H No drive activity after the load operation.
92H Timeout while loading cartridge.
93H No drive activity after the unload operation.
94H Timeout while unloading cartridge.
95H Drive unload operation terminated unsuccessful.
96H Robot could not detect an ejected cartridge at unload oper ation.
97H No slot was free at robotic unload operation.
FastStor 2 User’s Guide 57
Page 64

Getting Help
Before calling ADIC Technical Assistance Center (ATAC), follow these steps - so that you can take full
advantage of your call:
• Review all documentation carefully.
• Be prepared to explain whether the software or hardware has worked properly at anytime in the
past. Have you changed anything recently?
• Pinpoint the exact location of your problem, if possible. Note the steps that led to the problem. Are
you able to duplicate the same problem or is it a one-time occurrence?
• Note any error messages displayed on your PC screen or file server. Write down the exact error
message.
• If at all possible, call while at your computer, with the autoloader installed and turned on.
• If running on a network, have all relevant information available (for example, type, version #,
network hardware, etc.).
• Be prepared to provide:
• Your name and your company's name
• Model number
• Serial number of the autoloader (obtained from the rear panel of the unit)
• Serial number for the Firmware Revision of Autoloader and Drive, accessed using the
autoloader's Information menu (see Viewing Firmware Levels
)
• Software version numbers
• Device driver information
• Host system application name and version
• Hardware configuration, including firmware versions, date, and number
• Type of PC, DOS version, clock speed, RAM, network type, network version, and any
special boards installed
• A brief description of the problem
• Where you purchased your autoloade r
Having this information available when you call for customer assistance enables the ADIC Technical
Assistance Center personnel to resolve your problem in the most efficient manner possible.
58 Troubleshooting and Diagnostics
Page 65

Specifications
Use the following information to learn more about the physical requ irements necessary to use and store the
autoloader, the capacity capabilities necessary to operate the autoloader, the environmental requirements
necessary to operate the autoloader, and the oper ational require ments and media re quirements for pro per
use of the tape drive.
Physical
Table 20 provides the physical requirements necessary to use and store your autoloader.
Table 20 Physical Specifications
Characteristic Product Alone Packaged
Height 8.8 cm (3.5 in.) 20.3 cm (8.0 in.)
Width 42.2 cm (16.6 in.) 60 cm (23.6 in.)
Depth 61.7 cm (24.3 in.) 74.2 cm (29.2 in.)
Weight 9.5 kg (21.0 lb) 13.2 kg (29.0 lb)
Capacity
Table 21 provides the capacity specifications for your autoloader with an SDLT-600 tape drive.
Table 21 SDLT-600 Autoloader Specifications
Characteristic Specification
Drive type 1 Quantum SDLT 600 drive
Maximum storage capacity Native: 2400 GB (assuming 8 cartridges)
Compressed: 4800 GB (assuming 8 cartridges and 2:1
compression)
Maximum data transfer rate Native: 36 MBps
Compressed: 72 MBps
FastStor 2 User’s Guide 59
Page 66

Table 21 SDLT-600 Autoloader Specifications
Characteristic Specification
Number of slots 8
MTBF 250,000 hours
Interface LVD Ultra SCSI, 68-pin HD connector
Environment
Table 22 provides the environmental requirements necessary to operate your autoloader.
Table 22 Environmental Specifications
Characteristic Specification
Temperature
Operating 10º to 40ºC (50º to 104ºF)
Non-operating -40º to 66ºC (-40º to 151ºF)
Recommended operating temperature 20º to 30º C (68º to 86º F)
Temperature shock immunity - maximum rate of
change
Humidity
Operating 20% to 80% RH non-condensing
Non-operating 10% to 95% RH non-condensing
Altitude
Operating -152.4 to 9144m (-500 to 30,000 ft)
10º C per hour (50º F)
Tape Drive
Table 23 provides the requirements necessary to operate your autoloader configured with an SDLT-600
tape drive.
Table 23 SDLT-600 Tape Drive Specifications
Description SDLT-600
Read/write transfer rate: maximum sustained Non-compressed mode:36 MBps
Compressed (2:1 typical): 72 MBps
Burst transfer rate 160 MBps
Average access time 79 seconds
Loading time to BOT (for previously written
tape)
60 Specifications
12 seconds
Page 67

Table 23 SDLT-600 Tape Drive Specifications
Description SDLT-600
Unloading time from BOT 12 seconds
MTBF 250,000 hours
Interface type LVD Ultra-2 SCSI
Media
Regarding media, observe these genera l rules:
• Use only drive-appropriate formatted cartridges. Formatted cartridges contain embedded servo
code, written on the media, during the cartridge man ufacturing process. Car tridges cannot be b ulk
erased or degaussed.
• Clean the tape drive when the Clean Drive LED is illuminated. Be sure to use only drive-appropriate
cleaning cartridges.
Table 24
Table 24 Super DLTtape II Media Specification s
Characteristic Super DLTtape II Media
Super DLTtape II format
capacity
Basic description Advanced metal powder
Tape length 630m (2,066 ft)
Cartridge dimensions 104.1 x 104.1 x 25.4 mm
Shelf life 30 years minimum @ 20° C, 40% RH (non-condensing)
Cartridge life 1,000,000 passes (approximately 2000 full backup or restore
Cleaning 20 uses
provides the media requirements necessary to use the SDLT-600 tape drive.
300 GB (non-compressed)
600 GB (2:1 typical compression)
(4.1 x 4.1 x 1.0 in.)
operations)
FastStor 2 User’s Guide 61
Page 68

62 Specifications
Page 69

Index
A
abnormal display 28
adapter and connection guidelines
overview 24
SCSI host system 24
ADIC
contacting 2
altitude requirement 61
ATAC
contacting 57
audience
intended 1
autoload mode on/off 39
autoloader
connecting multiple 24
features 17
managing 37
multi-function 17
operating 27
operating modes 38
operator panel 27
overview 17
performance issues 49
resetting 37
B
barcode reader 17
built-in diagnostics 17
buttons
cancel 29
enter 29
next 29
previous 29
C
cancel button 29
capacity requirement 59
capacity specifications 59
cartridge pre-check 17
cartridges
exporting 32
importing 31
loading 32
maintaining 34
re-inventory 35
removing stuck 51
unloading 32
working with 31
write-protecting 33
changing
autoloader SCSI ID 37
tape drive SCSI ID 38
checking the accessories 21
circular mode on/off 39
cleaning
cartridge 17
issues 47
tape drive 35
cleaning issues 49
Configuration menu
changing autoloader SCSI IDs 37
changing tape drive SCSI ID 38
resetting autoloader 37
connecting
multiple autoloaders 23, 24
SCSI connectors and power cables 22
connecting the autoloader
power cables 22
SCSI connectors 22
contacting
ADIC 2
contacting ATAC 57
control buttons
cancel 29
enter 29
next 29
previous 29
Customer Service Center
website 2
customer support
ATAC 56
contacting 57
FastStor 2 User’s Guide 65
Page 70

D
G
data cartridges
exporting 32
importing 31
loading 32
maintaining 34
re-inventory 35
removing stuck 51
unloading 32
working with 31
write-protecting 33
depth requirement 59
description 17
Diagnostics menu
running System Test 41
displaying cycle count 41
documents
additional 2
latest versions 2
release notes 2
E
enter button 29
environmental requirements
altitude 61
humidity 61
overview 61
temperature 61
vibration 61
environmental specifications 61
error codes 53
errors on front panel 50
event logs
viewing 42
viewing error codes 53
exporting cartridges 32
F
features
barcode ready 17
built-in diagnostics 17
cartridge pre-check 17
cleaning cartridge 17
multi-function operator panel 17
overview 17
rackmount ready 17
reverse cartridge protection 17
firmware
updating 40
front panel
control buttons 29
description 18
errors 50
getting help
contact support 56
getting started 21
H
hardware
capacity requirements 59
environmental requirements 61
media requirements 63
optional 25
physical requirements 59
requirements 59
tape drive requirements 61
height requirement 59
help
contacting ADIC 2
Customer Service Center 2
Service Requests 2
host system preparation 24
humidity requirement 61
I
importing cartridges 31
Information menu
displaying cycle count 41
using 41
viewing event logs 42
installation
location criteria 22
overview 22
installation issues
autoloader 45
backup application installation 46
compatibility 46
device driver installation 46
SCSI Cabling 45
SCSI ID 45
termination 45
installing optional hardware 25
intended use
statement 1
L
LED indicators 28
loading cartridges 32
M
maintaining cartridges 34
managing the autoloader 37
media
attention LED issues 49
66 Index
Page 71

issues 47
requirements 63
specifications 63
menus
Configuration 37, 38
Diagnostics 41
Information 41, 42
understanding structure 29
model number
product 1
multi-function operator panel 17
multiple autoloaders 23, 24
N
next button 29
normal display 27
O
operating modes
autoload mode on/off 39
circular mode on/off 39
overview 38
random 39
sequential 39
operating overview 27
operator panel
abnormal display 28
cancel button 29
control buttons 29
enter button 29
LCD screen 27
LED indicators 27, 28
next button 29
normal display 27
overview 27
previous button 29
optional hardware
barcode reader 25
overview 25
rackmount kit 25
P
physical specifications
depth 59
height 59
overview 59
weight 59
width 59
power
issues 46
powering on the autoloader 30
preparing
host system 24
SCSI connection guidelines 24
previous button 29
R
rackmount 17
random mode 39
rear panel 18
re-inventory of cartridges 35
release notes
location 2
removing stuck cartri dges from slots 51
requirements
capacity 59
environmental 61
media 63
overview 59
physical 59
tape drive 61
resetting the autoloader 37
retrieving information 41
reverse cartridge protection 17
running System Test 41
S
safety
intended use 1
statements 1
symbols and notes 1
System, Safety, and Regulatory Information
Guide 1
SCSI bus issues 50
SCSI connectors
connecting the autoloader 22
SCSI errors 50
SCSI host system
adapter and connection guidelines 24
overview 24
SCSI IDs
autoloader 37
issues 48, 51
tape drive 38
sequential mode
autoload mode on/off 39
circular mode on/off 39
overview 39
Service Requests
opening 2
specifications
capacity 59
environmental 61
media 63
overview 59
physical 59
stuck cartridges
removing 51
switches and indicators
FastStor 2 User’s Guide 67
Page 72

front panel 18
overview 18
rear panel 18
symbols and notes
explained 1
System Test
Diagnostics menu 41
running 41
using 41
T
tape drive
cleaning 35
overview 61
requirements 61
specifications 61
tape movement issues 47
tapes
exporting 32
importing 31
loading 32
maintaining 34
media requirements 63
re-inventory 35
removing stuck 51
unloading 32
working with 31
write-protecting 33
technical specifications 59
temperature requirement 61
training
contact ADIC 2
troubleshooting and diagnostics
matrix 46
overview 45
troubleshooting issues
autoloader performance 49
cleaning 49
device not detected on SCSI bus 50
errors displayed on front panel 50
media 47
media attention LED issues 49
power 46
removing stuck cartridges 51
SCSI errors 50
SCSI ID 48, 51
tape movement 47
U
unloading cartridges 32
unpacking and inspecting
accessories 21
overview 21
updating firmware
overview 40
V
vibration requirement 61
viewing
autoloader error codes 53
event logs 42
W
website
Customer Service Center 2
weight requirement 59
width requirement 59
working with data cartridges 31
write-protecting cartridges 33
A
adapter and connection guidelines
overview
SCSI host system
ADIC
contacting
Advanced diagnostic
Maintenance window
altitude requirement
ATAC
contacting
audience
intended
autoload mode on/off
autoloader
connecting multiple
features
managing
multi-function
operating
operating modes
operator panel
overview
performance issues
resetting
. . . . . . . . . . . . . . . . . . . . . . . . . . . . . 9
. . . . . . . . . . . . . . . . . . . . . 9
. . . . . . . . . . . . . . . . . . . . . . . . . . . 2
. . . . . . . . . . . . . . . . . . 37
. . . . . . . . . . . . . . . . . . . . . 60
. . . . . . . . . . . . . . . . . . . . . . . . . . 58
. . . . . . . . . . . . . . . . . . . . . . . . . . . . . 1
. . . . . . . . . . . . . . . . . . . . 23
. . . . . . . . . . . . . . . . . . . 10
. . . . . . . . . . . . . . . . . . . . . . . . . . . . . 3
. . . . . . . . . . . . . . . . . . . . . . . . . . . 21
. . . . . . . . . . . . . . . . . . . . . . . . . 3
. . . . . . . . . . . . . . . . . . . . . . . . . . . 11
. . . . . . . . . . . . . . . . . . . . . 22
. . . . . . . . . . . . . . . . . . . . . . . 11
. . . . . . . . . . . . . . . . . . . . . . . . . . . . . 3
. . . . . . . . . . . . . . . . . . . 43
. . . . . . . . . . . . . . . . . . . . . . . . . . . . 21
B
barcode reader . . . . . . . . . . . . . . . . . . . . . . . . . . 3
built-in diagnostics
buttons
cancel
. . . . . . . . . . . . . . . . . . . . . . . . . . . . . 12
enter
. . . . . . . . . . . . . . . . . . . . . . . . . . . . . . . 12
next
. . . . . . . . . . . . . . . . . . . . . . . . . . . . . . . 12
previous
. . . . . . . . . . . . . . . . . . . . . . . 3
. . . . . . . . . . . . . . . . . . . . . . . . . . . . 12
C
cancel button . . . . . . . . . . . . . . . . . . . . . . . . . . . 12
capacity requirement
. . . . . . . . . . . . . . . . . . . . . 59
68 Index
Page 73

capacity specifications . . . . . . . . . . . . . . . . . . . .59
cartridge pre-check
cartridges
exporting
importing
loading
maintaining
re-inventory
removing lodged
unloading
working with
write-protecting
changing
autoloader SCSI ID
tape drive SCSI ID
checking the accessories
cleaning
cartridge
issues
tape drive
cleaning issues
Configuration
Reset
Windows
Configuration menu
changing autoloader SCSI IDs
changing tape drive SCSI ID
resetting autoloader
connecting
multiple autoloaders
SCSI connectors and power cables
connecting the autoloader
power cables
SCSI connectors
contacting
ADIC
contacting ATAC
control buttons
cancel
enter
next
previous
Customer Service Center
website
customer support
ATAC
contacting
. . . . . . . . . . . . . . . . . . . . . . . . . . . . . 17
. . . . . . . . . . . . . . . . . . . . . . . . . . . . 3
. . . . . . . . . . . . . . . . . . . . . . . . . . . . . 41
. . . . . . . . . . . . . . . . . . . . . . . . . . . . . . 36
. . . . . . . . . . . . . . . . . . . . . . . . . . . 33
. . . . . . . . . . . . . . . . . . . . . . . . . . . . . . . 2
. . . . . . . . . . . . . . . . . . . . . . . . . . . . . 12
. . . . . . . . . . . . . . . . . . . . . . . . . . . . . . 12
. . . . . . . . . . . . . . . . . . . . . . . . . . . . . . . 12
. . . . . . . . . . . . . . . . . . . . . . . . . . . . 12
. . . . . . . . . . . . . . . . . . . . . . . . . . . . . 2
. . . . . . . . . . . . . . . . . . . . . . . . . . . . . . 58
. . . . . . . . . . . . . . . . . . . . . . . .3
. . . . . . . . . . . . . . . . . . . . . . . . . . . 17
. . . . . . . . . . . . . . . . . . . . . . . . . . . 16
. . . . . . . . . . . . . . . . . . . . . . . . . 18
. . . . . . . . . . . . . . . . . . . . . . . . . 18
. . . . . . . . . . . . . . . . . . . . . 45
. . . . . . . . . . . . . . . . . . . . . . . . . . . 17
. . . . . . . . . . . . . . . . . . . . . . . . . 15
. . . . . . . . . . . . . . . . . . . . . . 15
. . . . . . . . . . . . . . . . . . . 21
. . . . . . . . . . . . . . . . . . . . 22
. . . . . . . . . . . . . . . . . . .5
. . . . . . . . . . . . . . . . . . . . . . . . . . . 19
. . . . . . . . . . . . . . . . . . . . . . . . . .43
. . . . . . . . . . 21
. . . . . . . . . . . . 22
. . . . . . . . . . . . . . . . . . . 21
. . . . . . . . . . . . . . . . 9, 10
. . . . . . . 9
. . . . . . . . . . . . . . . . . . . . . . . . . 9
. . . . . . . . . . . . . . . . . . . . . . 9
. . . . . . . . . . . . . . . . . . . . . . . . .58
. . . . . . . . . . . . . . . . . . . . . . . . . . 58
D
data cartridges
exporting
importing
loading
maintaining
re-inventory
removing lodged
. . . . . . . . . . . . . . . . . . . . . . . . . . . 17
. . . . . . . . . . . . . . . . . . . . . . . . . . . 16
. . . . . . . . . . . . . . . . . . . . . . . . . . . . . 17
. . . . . . . . . . . . . . . . . . . . . . . . . 18
. . . . . . . . . . . . . . . . . . . . . . . . . 18
. . . . . . . . . . . . . . . . . . . . . 45
unloading
working with
write-protecting
depth requirement
description
Device
Configuration window
Diagnostic, Advanced
Maintenance window
Diagnostic, General
Maintenance window
Diagnostics menu
running System Test
displaying cycle count
documents
additional
latest versions
release notes
. . . . . . . . . . . . . . . . . . . . . . . . . . .17
. . . . . . . . . . . . . . . . . . . . . . . . .15
. . . . . . . . . . . . . . . . . . . . . . .15
. . . . . . . . . . . . . . . . . . . . . . .59
. . . . . . . . . . . . . . . . . . . . . . . . . . . . . .3
. . . . . . . . . . . . . . . . . .33
. . . . . . . . . . . . . . . . . .37
. . . . . . . . . . . . . . . . . .36
. . . . . . . . . . . . . . . . . . .25
. . . . . . . . . . . . . . . . . . . .26
. . . . . . . . . . . . . . . . . . . . . . . . . . . . .2
. . . . . . . . . . . . . . . . . . . . . . . . .2
. . . . . . . . . . . . . . . . . . . . . . . . .2
E
enter button . . . . . . . . . . . . . . . . . . . . . . . . . . . .12
environmental requirements
altitude
humidity
overview
temperature
environmental specifications
error codes
errors on front panel
event logs
viewing
viewing error codes
Event notification
Configuration window
exporting cartridges
. . . . . . . . . . . . . . . . . . . . . . . . . . . . .60
. . . . . . . . . . . . . . . . . . . . . . . . . . . . .60
. . . . . . . . . . . . . . . . . . . . . . . . . . . .60
. . . . . . . . . . . . . . . . . . . . . . . . . .60
. . . . . . . . . . . . . . .60
. . . . . . . . . . . . . . . . . . . . . . . . . . . . .47
. . . . . . . . . . . . . . . . . . . . . .44
. . . . . . . . . . . . . . . . . . . . . . . . . . . . .26
. . . . . . . . . . . . . . . . . . . .47
. . . . . . . . . . . . . . . . . .35
. . . . . . . . . . . . . . . . . . . . . .17
F
features
barcode ready
built-in diagnostics
cartridge pre-check
cleaning cartridge
multi-function operator panel
overview
rackmount ready
reverse cartridge protection
Firmware
Maintenance window
firmware
updating
front panel
control buttons
description
errors
. . . . . . . . . . . . . . . . . . . . . . . . . . . . . . .44
. . . . . . . . . . . . . . . . . . . . . . . . .3
. . . . . . . . . . . . . . . . . . . . .3
. . . . . . . . . . . . . . . . . . . . .3
. . . . . . . . . . . . . . . . . . . . . .3
. . . . . . . . . . . . .3
. . . . . . . . . . . . . . . . . . . . . . . . . . . . .3
. . . . . . . . . . . . . . . . . . . . . . .4
. . . . . . . . . . . . . .3
. . . . . . . . . . . . . . . . . .37
. . . . . . . . . . . . . . . . . . . . . . . . . . . .24
. . . . . . . . . . . . . . . . . . . . . . .12
. . . . . . . . . . . . . . . . . . . . . . . . . . . .4
FastStor 2 User’s Guide 69
Page 74

G
M
General diagnostic
Maintenance window
getting help
contact support
getting started
. . . . . . . . . . . . . . . . . . . . . . . . . . . .5
. . . . . . . . . . . . . . . . . . 36
. . . . . . . . . . . . . . . . . . . . . . 58
H
hardware
capacity requirements
environmental requirements
media requirements
physical requirements
requirements
tape drive requirements
height requirement
help
contacting ADIC
Customer Service Center
Service Requests
host system preparation
humidity requirement
. . . . . . . . . . . . . . . . . . . . . . . . 59
. . . . . . . . . . . . . . . . . 59
. . . . . . . . . . . . 60
. . . . . . . . . . . . . . . . . . . 61
. . . . . . . . . . . . . . . . . 59
. . . . . . . . . . . . . . . . 60
. . . . . . . . . . . . . . . . . . . . . . .59
. . . . . . . . . . . . . . . . . . . . . . 2
. . . . . . . . . . . . . . . 2
. . . . . . . . . . . . . . . . . . . . . 2
. . . . . . . . . . . . . . . . . . . .9
. . . . . . . . . . . . . . . . . . . . .60
I
importing cartridges . . . . . . . . . . . . . . . . . . . . . .16
Information menu
displaying cycle count
using
. . . . . . . . . . . . . . . . . . . . . . . . . . . . . . 26
viewing event logs
installation
location criteria
overview
installation issues
autoloader
backup application installation
compatibility
device driver installation
SCSI Cabling
SCSI ID
termination
intended use
statement
. . . . . . . . . . . . . . . . . . . . . . . . . . . . 8
. . . . . . . . . . . . . . . . . . . . . . . . . . 39
. . . . . . . . . . . . . . . . . . . . . . . . . 39
. . . . . . . . . . . . . . . . . . . . . . . . 39
. . . . . . . . . . . . . . . . . . . . . . . . . . . . 39
. . . . . . . . . . . . . . . . . . . . . . . . . . 39
. . . . . . . . . . . . . . . . . . . . . . . . . . . . 1
. . . . . . . . . . . . . . . . . 26
. . . . . . . . . . . . . . . . . . . . 26
. . . . . . . . . . . . . . . . . . . . . . . 8
. . . . . . . . . . . 40
. . . . . . . . . . . . . . . 40
L
LED indicators . . . . . . . . . . . . . . . . . . . . . . . . . .12
loading cartridges
lodged cartridges
removing
Log
Configuration window
Logs
. . . . . . . . . . . . . . . . . . . . . . . . . . . . . . . . . .37
. . . . . . . . . . . . . . . . . . . . . . . .17
. . . . . . . . . . . . . . . . . . . . . . . . . . . 45
. . . . . . . . . . . . . . . . . 35
maintaining cartridges . . . . . . . . . . . . . . . . . . . . 18
Maintenance
Windows
managing the autoloader
media
attention LED issues
issues
requirements
specifications
menus
Configuration
Diagnostics
Information
understanding structure
model number
product
multi-function operator panel
multiple autoloaders
. . . . . . . . . . . . . . . . . . . . . . . . . . . 36
. . . . . . . . . . . . . . . . . 21
. . . . . . . . . . . . . . . . . . 43
. . . . . . . . . . . . . . . . . . . . . . . . . . . . . . 41
. . . . . . . . . . . . . . . . . . . . . . . . 61
. . . . . . . . . . . . . . . . . . . . . . . . 61
. . . . . . . . . . . . . . . . . . . . . 21, 22
. . . . . . . . . . . . . . . . . . . . . . . . . 25
. . . . . . . . . . . . . . . . . . . . . . . . . . 26
. . . . . . . . . . . . . . . . 13
. . . . . . . . . . . . . . . . . . . . . . . . . . . . . . 1
. . . . . . . . . . . . . . . 3
. . . . . . . . . . . . . . . . . . . 9, 10
N
Network
Configuration window
next button
normal display
. . . . . . . . . . . . . . . . . . . . . . . . . . . . 12
. . . . . . . . . . . . . . . . . . . . . . . . . . 11
. . . . . . . . . . . . . . . . . 34
O
OCP. See operator panel.
operating modes
autoload mode on/off
overview
random
sequential
operating overview
Operations
Maintenance window
operator panel
cancel button
control buttons
enter button
LCD screen
LED indicators
next button
normal display
overview
previous button
. . . . . . . . . . . . . . . . . . . . . . . . . . . . 22
. . . . . . . . . . . . . . . . . . . . . . . . . . . . . 23
. . . . . . . . . . . . . . . . . . . . . . . . . . 23
. . . . . . . . . . . . . . . . . . . . . . . . 12
. . . . . . . . . . . . . . . . . . . . . . . . . 12
. . . . . . . . . . . . . . . . . . . . . . . . . 11
. . . . . . . . . . . . . . . . . . . . . . . . . . 12
. . . . . . . . . . . . . . . . . . . . . . . . . . . . 11
. . . . . . . . . . . . . . . . . . 23
. . . . . . . . . . . . . . . . . . . . . . 11
. . . . . . . . . . . . . . . . . . 36
. . . . . . . . . . . . . . . . . . . . . . . 12
. . . . . . . . . . . . . . . . . . . . 11, 12
. . . . . . . . . . . . . . . . . . . . . . . 11
. . . . . . . . . . . . . . . . . . . . . . 12
P
physical specifications
depth
. . . . . . . . . . . . . . . . . . . . . . . . . . . . . . 59
height
. . . . . . . . . . . . . . . . . . . . . . . . . . . . . . 59
overview
weight
. . . . . . . . . . . . . . . . . . . . . . . . . . . . 59
. . . . . . . . . . . . . . . . . . . . . . . . . . . . . 59
70 Index
Page 75

width . . . . . . . . . . . . . . . . . . . . . . . . . . . . . . 59
power
issues
. . . . . . . . . . . . . . . . . . . . . . . . . . . . . 40
powering on the autoloader
preparing
host system
SCSI connection guidelines
previous button
. . . . . . . . . . . . . . . . . . . . . . . . . . 9
. . . . . . . . . . . . . . . . . . . . . . . . . .12
. . . . . . . . . . . . . . . .13
. . . . . . . . . . . . . 9
R
rackmount . . . . . . . . . . . . . . . . . . . . . . . . . . . . . . .4
random mode
re-inventory of cartridges
rear panel
release notes
location
removing lodged cartridges from slots
requirements
capacity
environmental
media
overview
physical
tape drive
Reset
Configuration window
Maintenance window
resetting the autoloader
retrieving information
reverse cartridge protection
RMU
. . . . . . . . . . . . . . . . . . . . . . . . . . . . . . . . . .29
Overview
Saved data
user accounts
Vital product data
RTC
Configuration window
. . . . . . . . . . . . . . . . . . . . . . . . . . .23
. . . . . . . . . . . . . . . . . .18
. . . . . . . . . . . . . . . . . . . . . . . . . . . . . . .4
. . . . . . . . . . . . . . . . . . . . . . . . . . . . . 2
. . . . . . . .45
. . . . . . . . . . . . . . . . . . . . . . . . . . . . 59
. . . . . . . . . . . . . . . . . . . . . . . 60
. . . . . . . . . . . . . . . . . . . . . . . . . . . . . . 61
. . . . . . . . . . . . . . . . . . . . . . . . . . . 59
. . . . . . . . . . . . . . . . . . . . . . . . . . . . 59
. . . . . . . . . . . . . . . . . . . . . . . . . . . 60
. . . . . . . . . . . . . . . . . 36
. . . . . . . . . . . . . . . . . . 37
. . . . . . . . . . . . . . . . . . .21
. . . . . . . . . . . . . . . . . . . . .26
. . . . . . . . . . . . . . . . .3
. . . . . . . . . . . . . . . . . . . . . . . . . . . 29
. . . . . . . . . . . . . . . . . . . . . . . . . 30
. . . . . . . . . . . . . . . . . . . . . . . 30
. . . . . . . . . . . . . . . . . . . . 30
. . . . . . . . . . . . . . . . . 35
S
safety
intended use
statements
symbols and notes
System, Safety, and Regulatory Information
Guide
SCSI bus issues
SCSI connectors
connecting the autoloader
SCSI errors
SCSI host system
adapter and connection guidelines
overview
SCSI IDs
autoloader
issues
. . . . . . . . . . . . . . . . . . . . . . . . . 1
. . . . . . . . . . . . . . . . . . . . . . . . . . . 1
. . . . . . . . . . . . . . . . . . . . 1
. . . . . . . . . . . . . . . . . . . . . . . . . . . . 1
. . . . . . . . . . . . . . . . . . . . . . . . .44
. . . . . . . . . . . . . . . 9
. . . . . . . . . . . . . . . . . . . . . . . . . . . . .44
. . . . . . . . 9
. . . . . . . . . . . . . . . . . . . . . . . . . . . . 9
. . . . . . . . . . . . . . . . . . . . . . . . . . 21
. . . . . . . . . . . . . . . . . . . . . . . . . . 42, 45
tape drive
sequential mode
autoload mode on/off
overview
serial port
Service Requests
opening
specifications
capacity
environmental
media
overview
physical
switches and indicators
front panel
overview
rear panel
symbols and notes
explained
System Test
Diagnostics menu
using
. . . . . . . . . . . . . . . . . . . . . . . . . . .22
. . . . . . . . . . . . . . . . . .23
. . . . . . . . . . . . . . . . . . . . . . . . . . . .23
. . . . . . . . . . . . . . . . . . . . . . . . . . . . . .25
. . . . . . . . . . . . . . . . . . . . . . . . . . . . . .2
. . . . . . . . . . . . . . . . . . . . . . . . . . . . .59
. . . . . . . . . . . . . . . . . . . . . . . .60
. . . . . . . . . . . . . . . . . . . . . . . . . . . . . .61
. . . . . . . . . . . . . . . . . . . . . . . . . . . .59
. . . . . . . . . . . . . . . . . . . . . . . . . . . . .59
. . . . . . . . . . . . . . . . . . . . . . . . . . . .4
. . . . . . . . . . . . . . . . . . . . . . . . . . . . .4
. . . . . . . . . . . . . . . . . . . . . . . . . . . .4
. . . . . . . . . . . . . . . . . . . . . . . . . . . . .1
. . . . . . . . . . . . . . . . . . . . .25
. . . . . . . . . . . . . . . . . . . . . . . . . . . . . . .25
T
tape drive
cleaning
overview
requirements
specifications
tape movement issues
tapes
exporting
importing
loading
maintaining
media requirements
re-inventory
removing lodged
unloading
working with
write-protecting
technical specifications
temperature requirement
training
contact ADIC
troubleshooting and diagnostics
matrix
overview
troubleshooting issues
autoloader performance
cleaning
device not detected on SCSI bus
errors displayed on front panel
media
media attention LED issues
power
. . . . . . . . . . . . . . . . . . . . . . . . . . . . .19
. . . . . . . . . . . . . . . . . . . . . . . . . . . .60
. . . . . . . . . . . . . . . . . . . . . . . . .60
. . . . . . . . . . . . . . . . . . . . . . . .60
. . . . . . . . . . . . . . . . . . . .41
. . . . . . . . . . . . . . . . . . . . . . . . . . . .17
. . . . . . . . . . . . . . . . . . . . . . . . . . . .16
. . . . . . . . . . . . . . . . . . . . . . . . . . . . .17
. . . . . . . . . . . . . . . . . . . . . . . . . .18
. . . . . . . . . . . . . . . . . . .61
. . . . . . . . . . . . . . . . . . . . . . . . . .18
. . . . . . . . . . . . . . . . . . . . . .45
. . . . . . . . . . . . . . . . . . . . . . . . . . .17
. . . . . . . . . . . . . . . . . . . . . . . . .15
. . . . . . . . . . . . . . . . . . . . . . .15
. . . . . . . . . . . . . . . . . . .59
. . . . . . . . . . . . . . . . . .60
. . . . . . . . . . . . . . . . . . . . . . . . . .2
. . . . . . . . . . . . . . . . . . . . . . . . . . . . . .40
. . . . . . . . . . . . . . . . . . . . . . . . . . . .39
. . . . . . . . . . . . . . . .43
. . . . . . . . . . . . . . . . . . . . . . . . . . . . .43
. . . . . . . . . . . . . . . . . . . . . . . . . . . . . .41
. . . . . . . . . . . . . . . . . . . . . . . . . . . . . .40
. . . . . . . . .44
. . . . . . . . . . .44
. . . . . . . . . . . . .43
FastStor 2 User’s Guide 71
Page 76

removing lodged cartridges . . . . . . . . . . . . . 45
SCSI errors
SCSI ID
tape movement
. . . . . . . . . . . . . . . . . . . . . . . . . 44
. . . . . . . . . . . . . . . . . . . . . . . . . 42, 45
. . . . . . . . . . . . . . . . . . . . . . 41
U
unloading cartridges . . . . . . . . . . . . . . . . . . . . . .17
unpacking and inspecting
accessories
overview
updating firmware
overview
User
Configuration window
. . . . . . . . . . . . . . . . . . . . . . . . . . 5
. . . . . . . . . . . . . . . . . . . . . . . . . . . . 5
. . . . . . . . . . . . . . . . . . . . . . . . . . . 24
. . . . . . . . . . . . . . . . . 34
V
viewing
autoloader error codes
event logs
Vital product data
RMU
. . . . . . . . . . . . . . . . . . . . . . . . . . 26
. . . . . . . . . . . . . . . . . . . . . . . . . . . . . . 30
. . . . . . . . . . . . . . . . 47
W
website
Customer Service Center
weight requirement
width requirement
working with data cartridges
write-protecting cartridges
. . . . . . . . . . . . . . . . . . . . . . .59
. . . . . . . . . . . . . . . . . . . . . . . .59
. . . . . . . . . . . . . . . . .15
. . . . . . . . . . . . . . . 2
. . . . . . . . . . . . . . . .15
72 Index
 Loading...