

Page 1

FastStor
®
1 Installation and User Guide
Advanced Digital Information Corporation
Page 2

Copyright © 2005 ADIC
The information contained in this document is subject to change without notice.
This document contains proprietary information which is protected by copyright. All rights are
reserved. No part of this document may be reproduced, modified, distributed, or translated to
another language without prior written consent of ADIC.
ADIC USA
11431 Willows Road NE
Redmond, Washington
98052-4952
Tel.: 1-800-336-1233
Fax: 1-425-881-2296
This document may describe designs for which patents are pending, or have been granted. By
publishing this information, ADIC conveys no license under any patent or any other right.
ADIC shall not be liable for errors contained herein or for incidental or consequential damages
(including lost profits) in connection with the furnishing, performance or use of this material
whether based on warranty, contract, or other legal theory. ADIC makes no representation or
warranty with respect to the contents of this document and specifically disclaims any implied
warranties of merchantability or fitness for any particular purpose. Further, ADIC reserves the
right to revise or change this document without obligation on the part of ADIC to notify any
person or organization of such revision of change.
Every effort has been made to acknowledge trademarks and their owners. All trademarks within
this document are the property of their respective owners. Trademarked names are used solely
for identification or exemplary purposes, and any omissions are unintentional. ADIC is a
registered trademark of Advanced Digital Information Corporation.
Published: October 2005 Document Number: 6-01513-01 Rev A
Page 3

Table of Contents
1 About This Guide................................................................................1
2 General Information............................................................................ 3
Models..................................................................................................4
Capacity.....................................................................................4
Data Transfer Rates...................................................................4
Product Description...............................................................................4
Front Panel.................................................................................5
Rear Panel.................................................................................6
3 Installation...........................................................................................9
Performing the Installation....................................................................9
4 Operation and Configuration ........................................................... 20
System Power-On...............................................................................20
Front Panel Display Modes.................................................................23
Menus......................................................................................23
Dialogs.....................................................................................25
Messages.................................................................................27
Status and Information.............................................................27
Main Menu..........................................................................................28
Setup Menu ........................................................................................29
FastStor 1 setup....................................................................... 29
SCSI Setup ..............................................................................29
Remote Management setup.....................................................30
View Data Menu..................................................................................30
FastStor 1 Info..........................................................................31
Drive Info..................................................................................32
Remote Management Information............................................32
Statistics...................................................................................32
Utilities Menu ......................................................................................33
The Maintenance Menus..........................................................33
The Diagnostics Menu .............................................................33
Set Password...........................................................................34
Cartridge Handling..............................................................................34
Cartridge Slot Numbers............................................................34
Moving Cartridges to and from the Drive..................................34
Magazine Handling.............................................................................35
Removing the Magazine from the Unit.....................................35
Inserting Cartridges into the Magazine.....................................37
Removing Cartridges from the Magazine.................................37
Inserting a Magazine into the Unit............................................38
Manual/Emergency Release of Magazines..............................39
Standby Functionality..........................................................................40
5 Remote Management........................................................................41
FastStor 1 Installation and User Guide i
Page 4

Remote Management Configuration...................................................41
Quick Start Instructions............................................................41
Enabling the RMI Without Rebooting.......................................41
Remote Management Web Pages......................................................42
Information Boxes....................................................................42
FastStor 1 Start Page...............................................................43
Status Page .............................................................................44
Settings Pages.........................................................................45
Command Page.......................................................................45
Maintenance Pages .................................................................46
6 Maintenance ...................................................................................... 48
Using the Cleaning Cartridge..............................................................48
Running an Installed Cleaning Cartridge..................................48
Removing the Cleaning Cartridge............................................49
Installing Firmware Upgrades.............................................................49
Loader Firmware Upgrade via SCSI ........................................49
Loader Firmware Upgrade via Web .........................................50
Drive Firmware upgrade via SCSI............................................51
Possible Upgrade Problems.....................................................52
Embedded Diagnostics............................................................52
Reinstalling the Transport Lock ..........................................................52
Transport Lock Installation Procedure......................................52
7 Troubleshooting ...............................................................................54
How to Take Memory Dumps of the Loader .......................................54
How to Take Memory Dumps of the Drive..........................................54
Hardware checking.............................................................................54
Software checking ..............................................................................55
Verifying Recent Changes..................................................................55
Troubleshooting matrix .......................................................................56
The Error Screen...............................................................................61
Error Codes ........................................................................................63
Appendix A – Specifications................................................................65
A.1. Mechanical Dimensions and Weight........................................65
A.2. Power Requirements................................................................66
A.3. Vibration Specifications............................................................67
A.4. Mechanical Shock Specifications.............................................68
A.5. Drop.........................................................................................68
A.6. Climatic Specifications.............................................................69
A.7. Noise Specification...................................................................69
A.8. Product Reliability ....................................................................69
Appendix B – Safety and regulatory information...............................70
B.1 Safety Approvals......................................................................70
B.2 EMC Approvals........................................................................70
B.3 Conformity Declarations...........................................................71
B.4 Safety Precautions...................................................................71
ii FastStor 1 Installation and User Guide
Page 5

List of Figures and Tables
Figure 2.1 Overview of ADIC FastStor 1............................................................3
Table 2-1 Data Storage Capacity...............................................................4
Table 2-2 Data Transfer Rates...................................................................4
Figure 2.2 Front panel of the FastStor 1.............................................................5
Figure 2.5 Rear panel of the FastStor 1.............................................................6
Figure 3.1 Rack Mounting kit............................................................................11
Figure 3.2 Rack mount rail...............................................................................12
Figure 3.3 Mounting the Rack mounting kit to a rack .......................................13
Figure 3.4 Rack mounting kit mounted in rack.................................................13
Figure 3.5 Slide the FastStor 1 in from the front...............................................14
Figure 3.6 Fasten the front of the FastStor 1 to the rack..................................14
Figure 3.7 Fasten the rear of the FastStor 1 to the rails...................................14
Figure 3.8 Power switch, fuse holder and power cord connection ...................15
Figure 3.9 Magazine lock marked with red plastic tab......................................16
Figure 3.10 SCSI cable and SCSI terminator connection.................................18
Figure 3.11 Positioning of barcode label for LTO cartridges. ...........................19
Figure 4.1 Power-on Screen ............................................................................20
Figure 4.2 Snapshot while running Inventory...................................................20
Figure 4.3 The Default screen..........................................................................21
Table 4-1 Robot Operation Statuses................................................................21
Table 4-2 Drive Operation Statuses.................................................................22
Figure 4.4 Standard Menu Layout....................................................................23
Figure 4.5 The Complete Menu Tree ...............................................................24
Figure 4.6 Standard Dialog Layout...................................................................25
Figure 4.7 Dialog layout, entering discrete values............................................25
Figure 4.8 Slot dialog layout.............................................................................26
Figure 4.9 Predefined options, shown one at the time. ....................................26
Figure 4.10 A default screen............................................................................27
Figure 4.11 Load to Drive.................................................................................34
Figure 4.12 Unload From Drive........................................................................35
Figure 4.13 Empty Drive Message...................................................................35
Figure 4.14 Removing magazine......................................................................36
Figure 4.15 Magazine eject..............................................................................36
Figure 4.16 Removing the magazine from the loader.......................................37
Figure 4.17 Gently push the cartridge into the magazine slot ..........................37
Figure 4.18 Push the release knob towards the cartridge to eject....................38
Figure 4.19 Cartridge position after manual release from
magazine slot............................................................................................38
Figure 4.20 Push magazine until it clicks into place.........................................39
Figure 4.21 Pointing out hole used to insert release tool..................................39
Figure 4.22 Magazine release tool in use.........................................................40
Figure 5.1 Navigation Menu.............................................................................42
Figure 5.2 Remote Management Start Page....................................................43
Figure 5.3 Remote Management Status Page.................................................44
Figure 5.4 Remote Management Command Page...........................................46
Figure 6.1 Transport lock marked with red plastic tab.....................................52
FastStor 1 Installation and User Guide iii
Page 6

Figure 7.1 Error Code Page.............................................................................61
Figure 7.2 Example of detailed information......................................................61
Figure 7.3 Example of further detailed information...........................................61
Figure 7.4 Example of action............................................................................62
Figure 7.5 Warning message concerning reboot..............................................62
Table A - 1 FastStor 1 Mechanical Dimensions and Weight.......................65
Table A - 2 FastStor 1 Power Requirements..............................................66
Table A - 3 FastStor 1 sine sweep levels ...................................................67
Table A - 4 FastStor 1 random vibration levels ...........................................67
Table A - 5 FastStor 1 mechanical shock levels.........................................68
Table A - 6 FastStor 1 drop test..................................................................68
Table A - 7 FastStor 1 temperature specification........................................69
Table A - 8 FastStor 1 humidity specification..............................................69
Table A - 9 FastStor 1 altitude specification ..............................................69
Table A - 10 FastStor 1 noise specification..................................................69
iv FastStor 1 Installation and User Guide
Page 7

1 About This Guide
This guide describes how to install and use the ADIC FastStor 1 with an LTO tape
drive. It is intended for use by anyone who installs, uses and maintains the device.
Chapter 2: General Information provides a product description of the FastStor 1.
Chapter 3: Installation describes how to install the device.
Chapter 4: Operating and Configuration describes how to use the local interface,
how to configure the device, and how to handle the cartridges and
magazines.
Chapter 5: Remote Management describes the functionality of the Remote
Management via Ethernet.
Chapter 6: Maintenance describes cleaning and upgrading procedures, and how
to prepare the FastStor 1 for shipping.
Chapter 7: Troubleshooting lists possible areas to investigate if you are having
problems with the FastStor 1.
Appendix A: Specifications provides the specification data for the ADIC FastStor 1.
Related Publications
• ADIC FastStor 1, SCSI Interface Functional Specifications provides the
SCSI interface specification for the ADIC FastStor 1. (ADIC part number 601512-01)
FastStor 1 Installation and User Guide 1
Page 8

2 FastStor 1 Installation and User Guide
Page 9
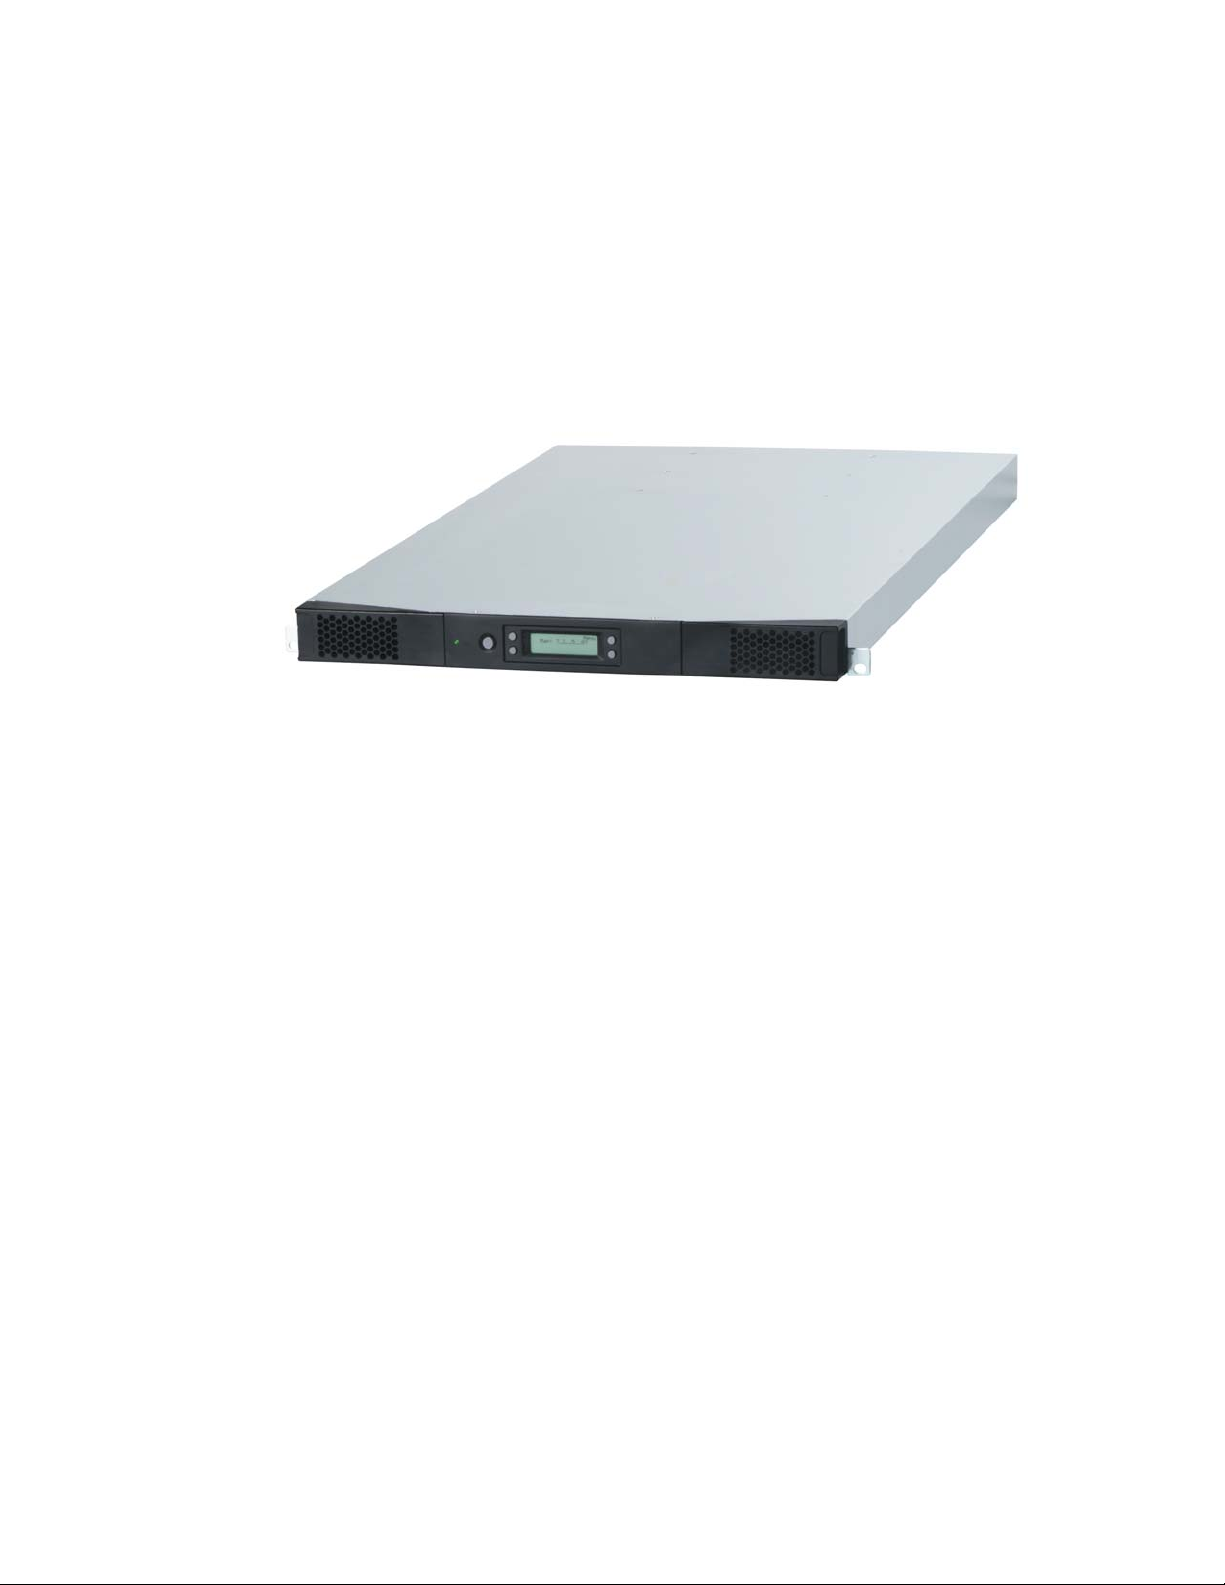
2 General Information
ADIC FastStor 1 is a compact tape cartridge loader designed for secure, reliable,
unattended system backup. The loader can be mounted in a 19” rack. Its height is
1U.
The loader is equipped with oneLTO tape drive and has room for 8 cartridges in
two 4-cartridge magazines.
Figure 2.1 Overview of ADIC FastStor 1
The entire system is under host control via an industry-standard SCSI interface. Its
robotic tape handling is both rugged and simple for utmost reliability.
The key features of the FastStor 1 include:
• Two removable cartridge magazines, each with space for four cartridges
• Integrated Barcode Reader
• Magazine release under system control
• Low Voltage Differential (LVD) / Single-Ended (SE) SCSI Interface
• On-board Diagnostics
• Remote management
• Operator interface with front panel display and four control buttons
• Standby functionality
FastStor 1 Installation and User Guide 3
Page 10

*** IMPORTANT ***
Review the READ ME FIRST caution at the beginning of
Chapter 3 before you power up the unit for the first time.
Models
For additional specification information for this model, refer to Appendix A.
Capacity
FastStor 1 Model Cartridge
ADIC FastStor 1
LTO2
Table 2-1 Data Storage Capacity
Data Transfer Rates
FastStor 1 Model Maximum Sustained
LTO2 24MB/s
Cartridge
Capacity
(Native)
200GB 400GB 1.6TB 3.2TB
Table 2-2 Data Transfer Rates
Capacity
(Comp 2:1)
Rate, Native
86.4GB/hr
Magazine
Capacity
(Native)
Maximum Sustained
Rate, Compressed
Magazine
Capacity
(Comp 2:1)
48MB/s
172.8GB/hr
Product Description
The FastStor 1 has several features designed to increase the product’s ease of
use and utility, such as:
• Two removable magazines allow easy management of data sets or archival
storage. For the FastStor 1 each magazine has room for four cartridges.
• A menu-driven operator control panel interface with backlit LCD provides
easy control for configuration and diagnostic activities.
• An Ethernet connection allows management by an operator with a standard
web browser on a remote computer. The remote operator can do most of
4 FastStor 1 Installation and User Guide
Page 11
the operations that can be done through the front panel, such as monitoring
the loader’s status and downloading statistical and diagnostic information.
For information on the installed tape drive, see the tape drive manuals referred to
in Chapter 1.
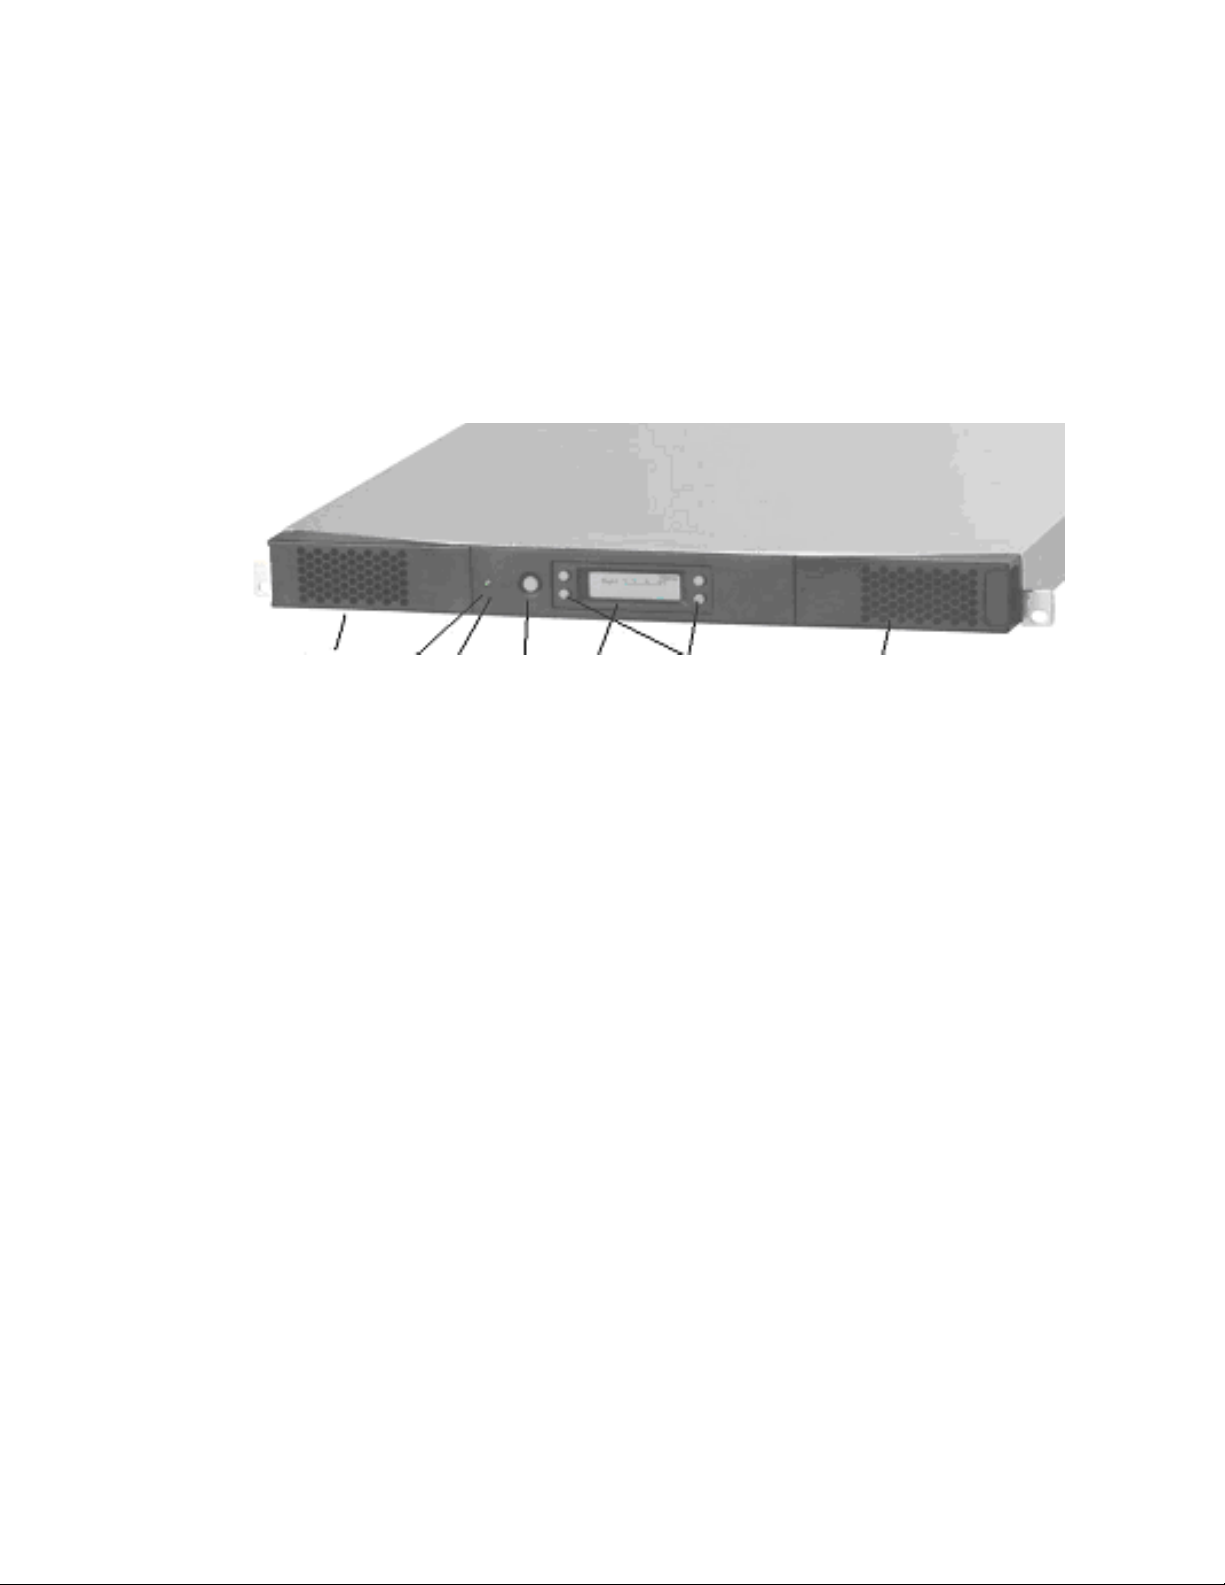
Front Panel
The Front Panel includes the User Control Panel with LCD display, four Control
Buttons, two LED indicators and a Standby switch. The bezels of the two
magazines are also visible from the front.
Magazine
front bezel
LED
indicators
Standby
switch
Figure 2.2 Front panel of the FastStor 1
LCD
display
Control buttons Magazine
front
bezel
LCD – liquid crystal display
The display is a backlit 122 x 32, dot-matrix graphical display that can show four
lines of 20 characters.
In various modes of operation, the display panel screens and control buttons allow
you to do the following:
• Enter settings for FastStor 1 configuration
• Issue operational commands
• View FastStor 1 status and information
• Test FastStor 1 functionality
Control Buttons
The labels for the four control buttons are displayed in the corners of the LCD. All
buttons have “soft labeling” for different modes of operation (i.e., the functions and
labels of the buttons change during different activities). The actual soft label for
each button for any activity is always visible on the display.
FastStor 1 Installation and User Guide 5
Page 12
LED Indicators
The two LED indicators are green and amber. They indicate the FastStor 1 activity
as follows:
• Green LED on: The FastStor 1 is either running or ready for operation.
• Green LED blinking: Short blinks followed by long intervals indicate that the
loader is in low power standby mode.
• Amber LED on: Fault LED; the FastStor 1 has encountered an electrical or
mechanical failure.
• Both LED’s off: The FastStor 1 is offline. This is the case while the loader is
initializing after power-on, and when a magazine is removed.
Standby Switch
A switch on the front panel provides a Loader Standby. If the switch is pushed
when the loader is active, the loader completes the current operation and then
goes offline and enters standby mode. See Standby Functionality for more details.
Magazine Front Bezel
The front bezel of the magazines is visible from the front. All magazine handling is
described in detail in Magazine Handling.
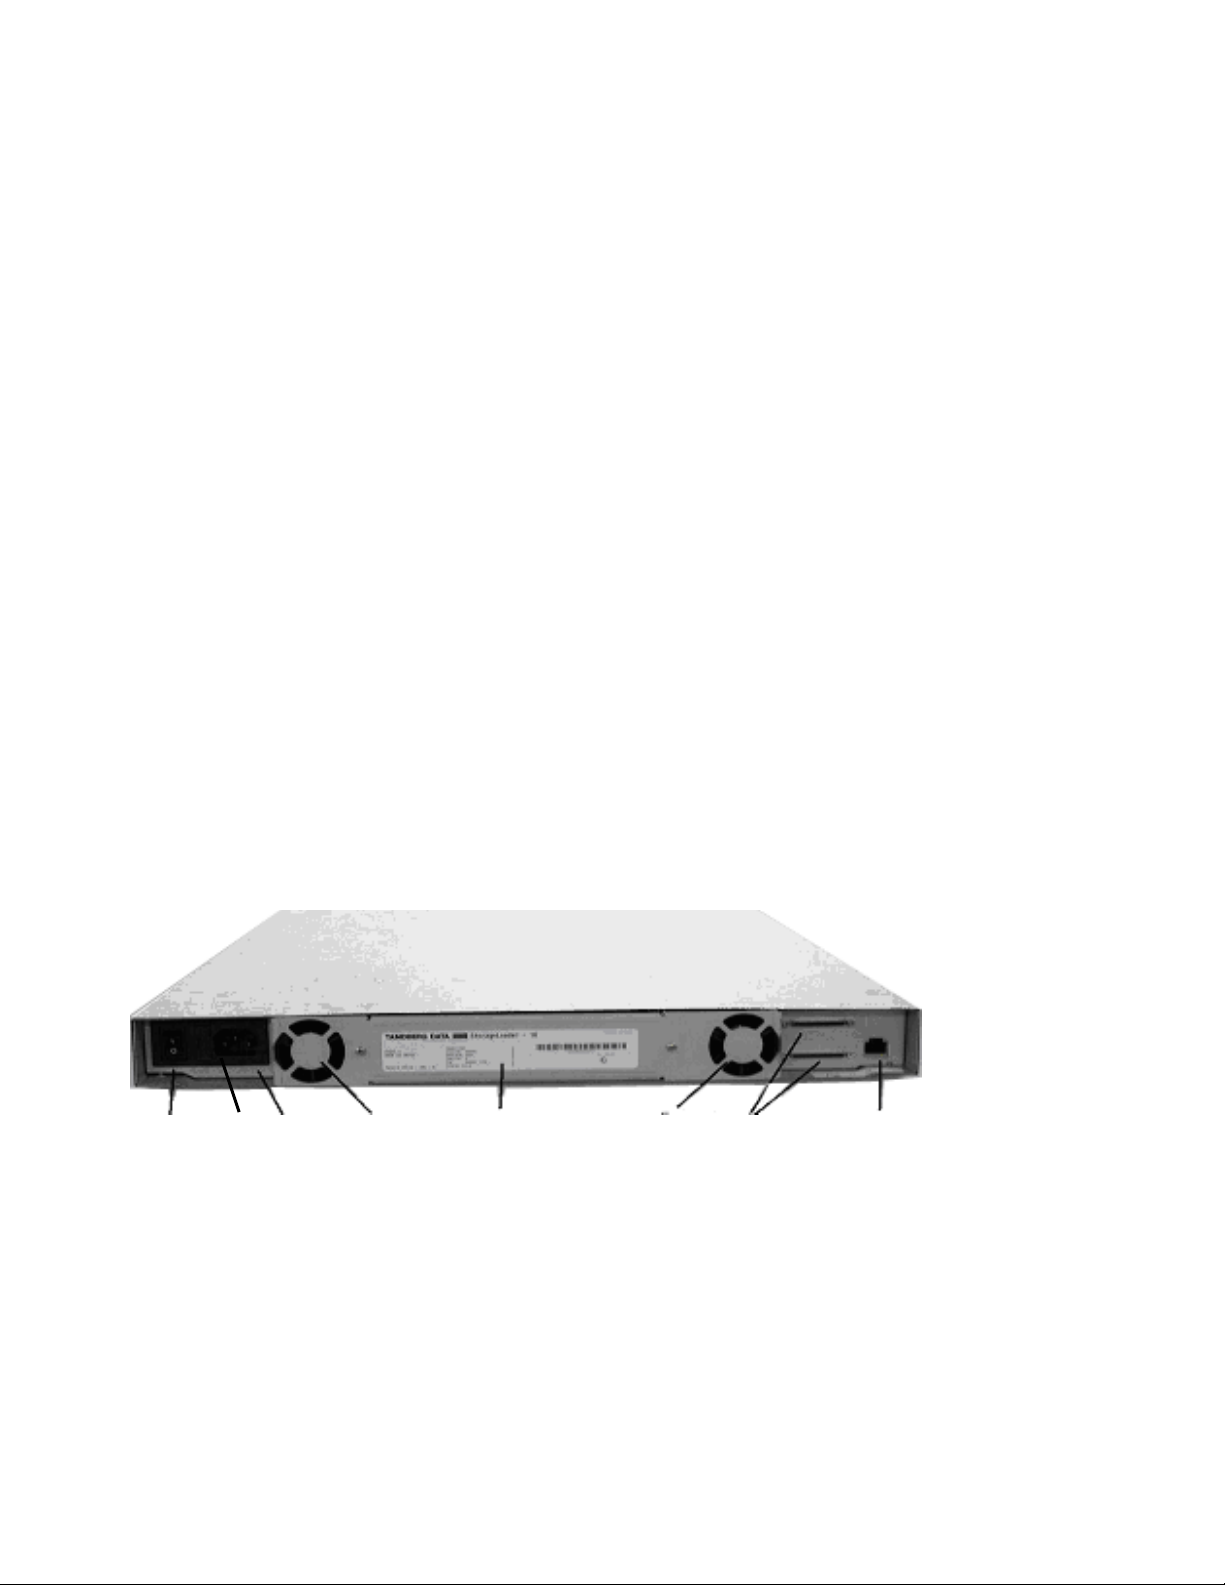
Rear Panel
The figure below shows the rear panel of the FastStor 1.
Power
switch
Fuse Power cord
connection
Figure 2.5 Rear panel of the FastStor 1
Fan Back panel
cover plate
Fan SCSI
connectors
Ethernet
port
Two Integrated Cooling Fans
The rear panel contains two forced-air cooling fans, which draw air inward through
the front and expel it out in the back. The fans start whenever the drive is operating
or when the internal temperature in the FastStor 1 gets too high.
6 FastStor 1 Installation and User Guide
Page 13

Main Power Switch/ Fuse/Power cord connection
The main power switch is found on the rear of the loader on the power supply
bracket. The power switch, the fuse holder (with a 250V 2A (H) fuse) and the AC
power cord connection are combined in one common unit.
SCSI Interface Connectors
The FastStor 1 has two shielded 68-pin VHDCI SCSI connectors on the rear panel.
The connectors are used for connecting the tape drive and the FastStor 1 to a
SCSI bus. These connectors can link to the following:
• A shielded male VHDCI SCSI cable
• A shielded male VHDCI SCSI terminator
Ethernet Port
This port is for the Remote Management system and allows you to connect the
FastStor 1 to a 10/100 BaseT Ethernet network.
FastStor 1 Installation and User Guide 7
Page 14

8 FastStor 1 Installation and User Guide
Page 15

3 Installation
This chapter provides step-by-step instructions on how to properly prepare and
install the ADIC FastStor 1.
READ ME FIRST
CAUTION! !
YOU MUST REMOVE THE ROBOT TRANSPORT LOCK
WHEN POWERING UP THE UNIT FOR THE FIRST TIME
OR IT WILL NOT OPERATE.
SEE THE PROCEDURE ON THE FOLLOWING PAGES.
Performing the Installation
To install the FastStor 1, complete the following steps.
Step 1. Unpacking the FastStor 1
Carefully unpack the unit from the shipping container. Save the container and
packing materials in case you need to transport the FastStor 1 in the future. The
packaging is specifically designed for the loader to ensure it is not damaged during
transportation.
Review the contents of the shipping container to be sure that all parts were
included in the shipment. A standard package for the FastStor 1 consists of the
following items:
• A factory-assembled FastStor 1 unit containing two cartridge magazines.
• A Standard Accessory Kit containing:
- 1 Warranty/Registration Card
- Rack Mount Hardware Kit
- 2 Line Power Cords: one for USA/Japan and one for European
power outlets
- 1 VHDCI SCSI Interface Cable
- 1 68-pin VHDCI LVD/SE SCSI Terminator
- 1 Ethernet cable
- Tool for Emergency Magazine Release
- Media barcode label kit (contains media labels and cleaning
FastStor 1 Installation and User Guide 9
Page 16

cartridge labels)
There may be variations of this list.
Note: The FastStor 1 contains no cartridges before shipment.
Step 2. Installing the FastStor 1 in a Rack
The FastStor 1 is designed for use in a 19” rack system using 1U of rack space.
The length of the power cord and the SCSI cable may restrict the placement.
Attention: The FastStor 1 is designed to operate in a horizontal position. Do not
attempt to operate the FastStor 1 in any other position than horizontally. Also make
sure that:
• The airflow around the front and back of the FastStor 1 is not obstructed.
• There is a minimum of 60cm free space in front of the unit to allow the
operator to safely remove the magazines.
• The display and operator controls are easily accessed.
• The FastStor 1 is away from the floor and in a clean environment with
temperatures within specifications. See Appendix A.
The Rack Mounting Kit includes the following items:
• Rail Left Assembly
• Rail Right Assembly
• Screw M6x12 (6 pieces)
• Screw M5x8 (2 pieces)
Recommended mounting tools:
• Folding rule or tape measure
• Screwdriver
• 7 mm open-end wrench
Note: The rails are mounted to the loader during transportation. Before mounting
the rails into the rack, dismount the rails from the loader and remove the spacers
between the rails and the loader.
10 FastStor 1 Installation and User Guide
Page 17
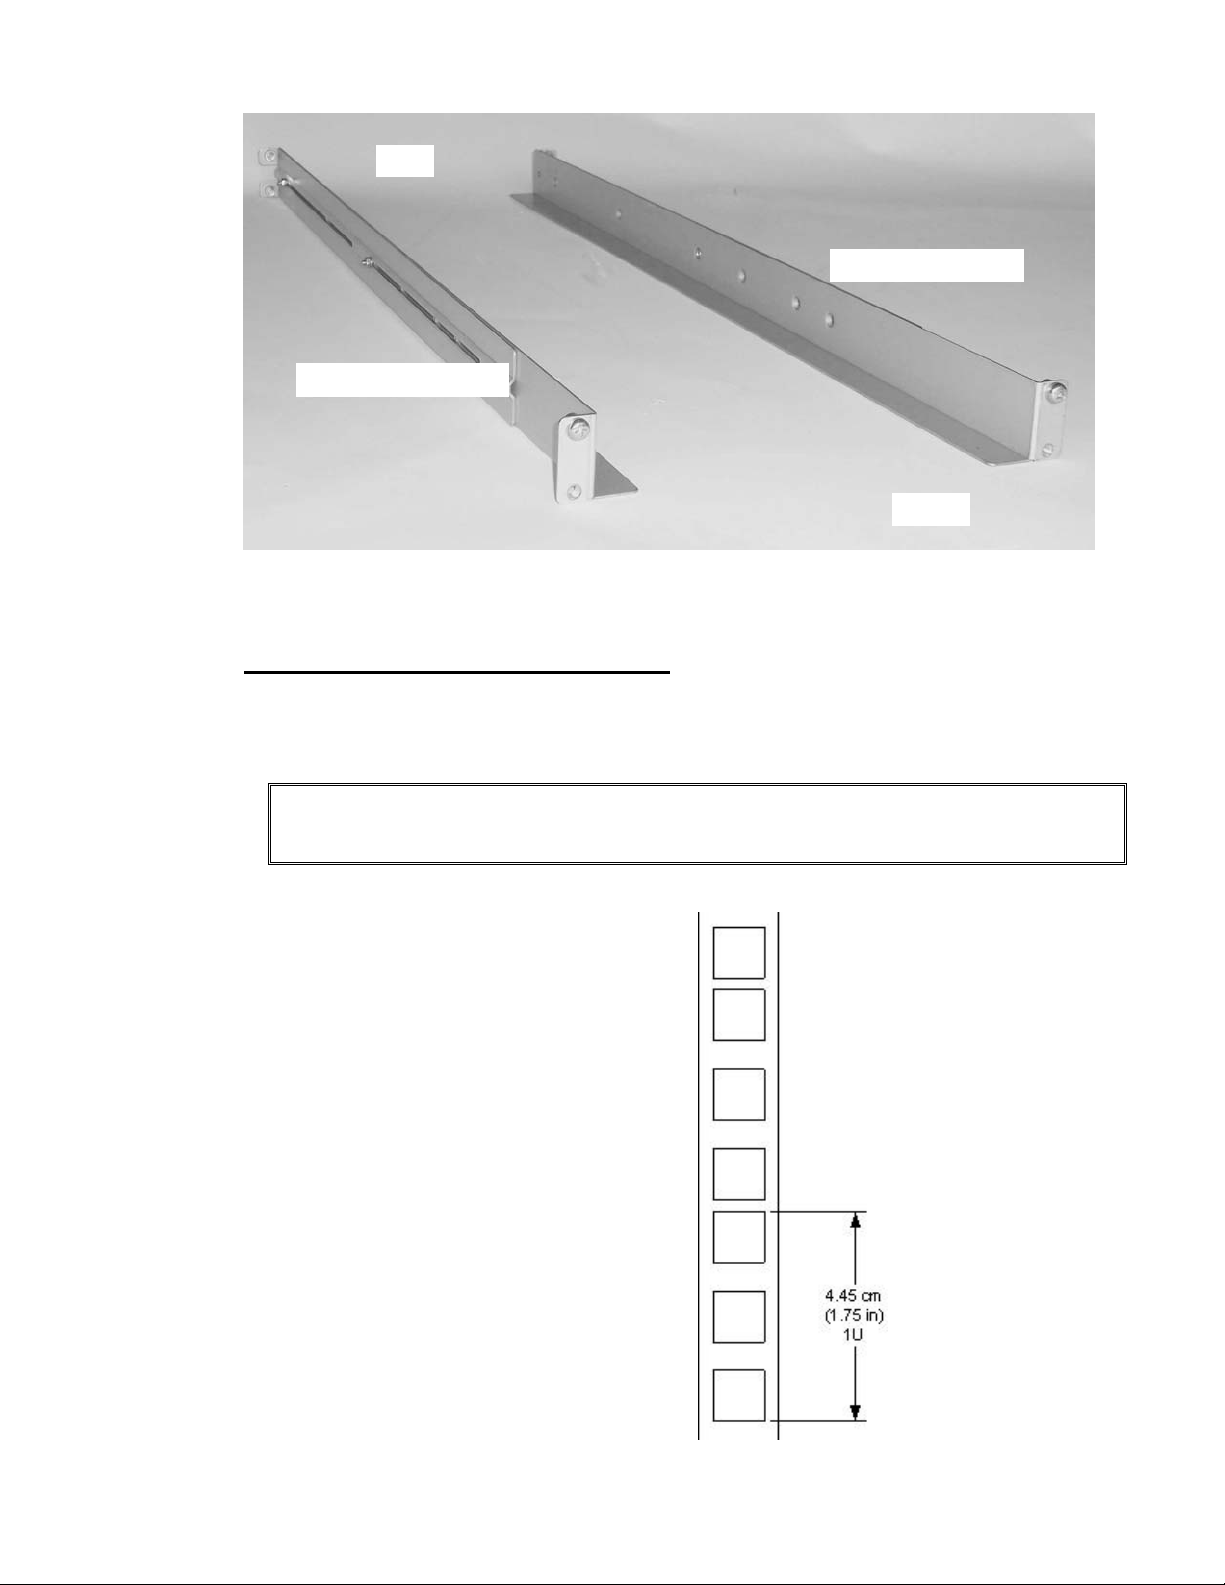
Back
Rail Right Assembly
Rail Left Assembly
Front
Figure 3.1 Rack Mounting kit
Installing the Rack Mounting Kit
• Determine the proper position of the rails in the rack.
Caution: Consider rack stability when deciding where to place the FastStor 1.
Hazardous conditions can result from uneven mechanical loading of a rack.
The FastStor 1 uses 1U of vertical
rack space. The rails must be
installed in a full U position (The
bottom of the rails must be aligned
with the bottom of a U). See figure
3.2.
FastStor 1 Installation and User Guide 11
Page 18

Figure 3.2 Rack mount rail
Installing the “Rail Left Assembly”
1. Measure the length between the rear rack mount rails and the front rack
mount rails. If the measurement is shorter than the FastStor 1, move the two
sets of screws M4x12, washers and nuts shown in Figure 3.3.
2. Adjust the “Rail Left Assembly” to fit the measurement in step 1.
3. Use a 7 mm open-end wrench together with the screwdriver to tighten the
two M4x12 screws to fix the rail length.
Note: Using more than two screws increases the stability of the Rack
Mounting Kit.
4. Place the “Rail Left Assembly” on the left side of the rack, between the rear
rack mount rail and the front rack mount rail.
5. Mount the “Rail Left Assembly” at the desired height using one M6x12 screw
in front (upper hole in rail only) and two M6x12 screws at the backside. See
figure 3.4.
12 FastStor 1 Installation and User Guide
Page 19

Installing the “Rail Right Assembly”
On the right side of the rack, follow the “Rail Left Assembly” instructions,
substituting “right” where “left” is referenced.
Use these holes
if rack depth is
equal or longer
than the
Rear Rack
Mount Rail
Step 5
(Screw
M6x12)
Step 1
FastStor 1
Step 1
Holes
used if rack
depth is shorter
than the
FastStor 1
to be
Step 3
(Screw M4x12,
nut and washer)
Figure 3.3 Mounting the Rack mounting kit to a rack
Figure 3.4 shows step 5 in the
description:
Rack mounting kit mounted in
rack with one screw M6x12 in
upper hole on both left and
right side.
On the rear side two screws
must be used on both left and
right side.
Step 2
Front Rack Mount Rail
Step 5
(Screw M6x12)
A total of six screws are used
to install the rack mounting kit
to the rack.
FastStor 1 Installation and User Guide 13
Figure 3.4 Rack mounting kit mounted in rack
Page 20
Mounting the FastStor 1 to the Rack
Make sure all the screws in the Rack Mounting Kit are tightened properly before
installing the FastStor 1 in the rack.
Slide the FastStor 1 on the rails from the front of the rack, as shown in figure 3.5.
Then fix the FastStor 1 using one M6x12 screw in front of the rack on both left and
right side (see figure 3.6) and one M5x8 on the backside of the Rack Mounting Kit
on both left and right side (see figure 3.7).
Figure 3.5 Slide the FastStor 1 in from
the front
Use one M5x8 screw on both left
and right side (M5-thread) to
fasten the FastStor 1 to the rails’
backside.
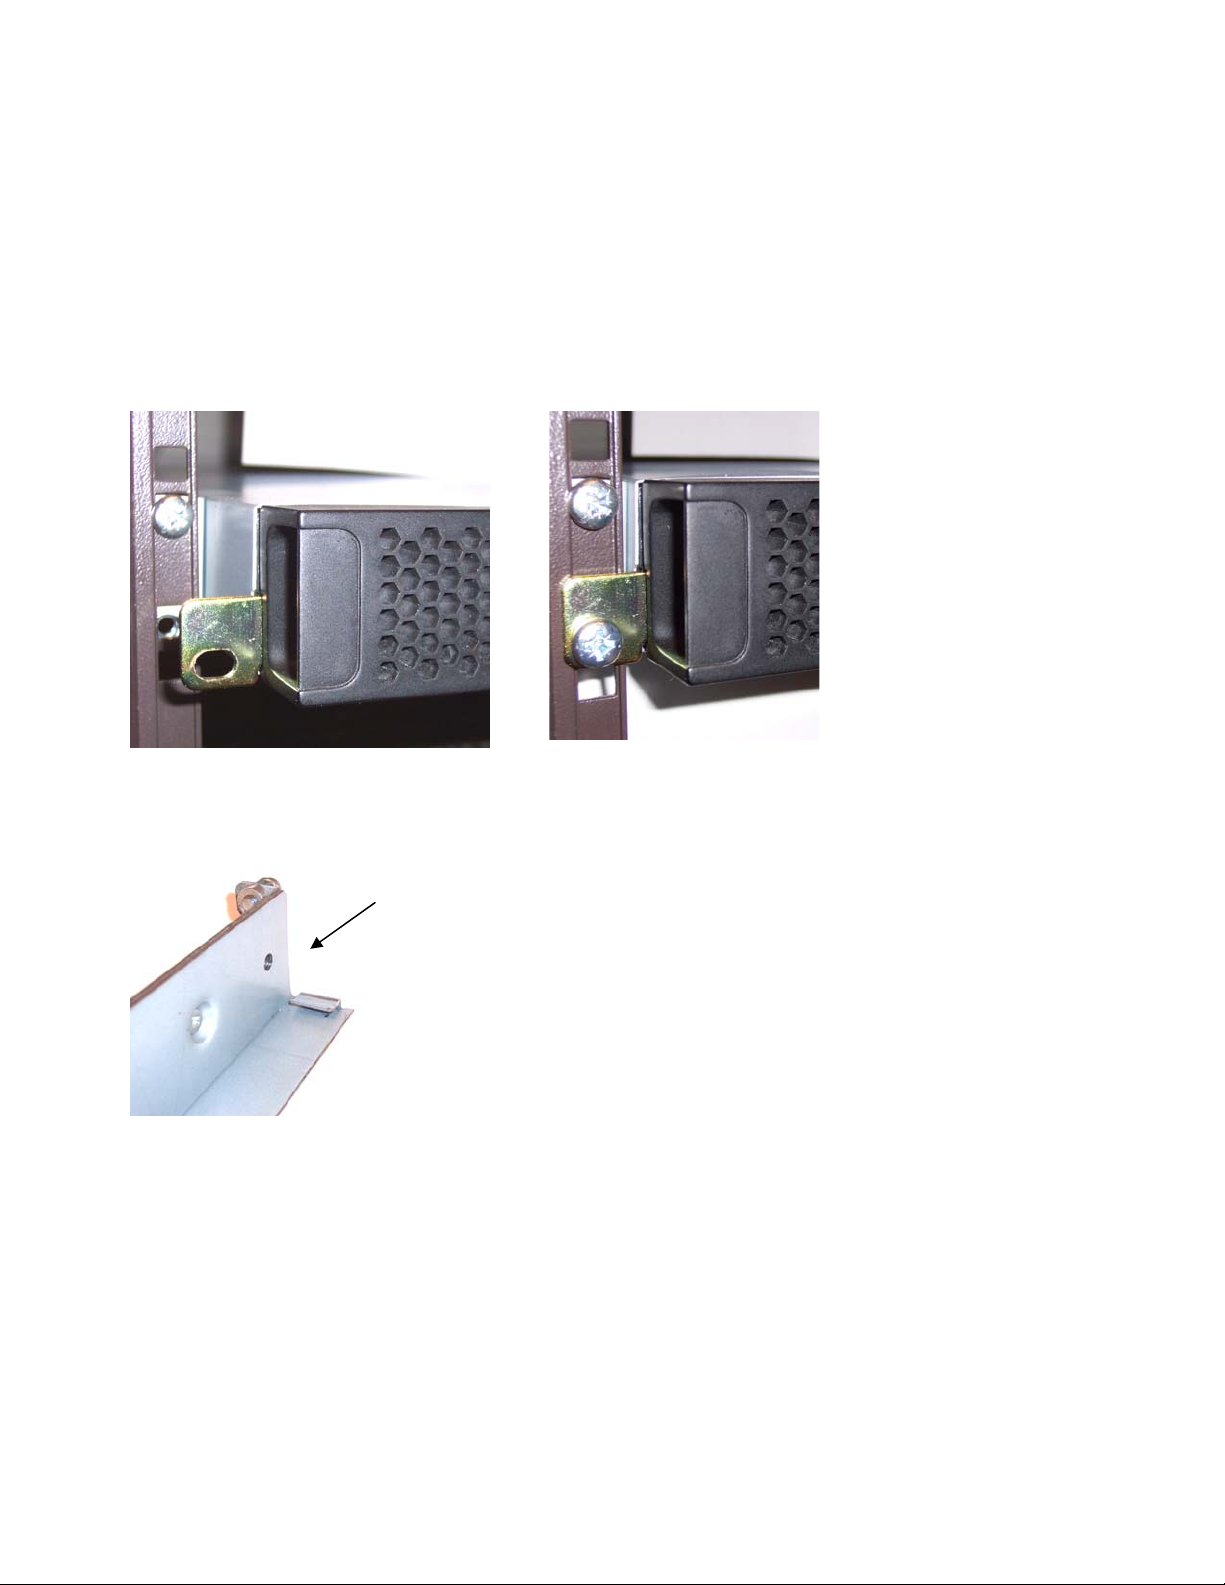
Figure 3.6 Fasten the front of the
FastStor 1 to the rack
Figure 3.7 Fasten the rear of the FastStor 1 to the rails.
How to dismount the FastStor 1 from the rack
Make sure you have disconnected all cables before you start dismounting the
FastStor 1 from the rack.
Unscrew the M5x8 screws at the back of the rack mounting kit. (See figure 3.7)
Unscrew the M6x12 screw at the front of the rack. Note that you only unscrew the
lowest screw. (See figures 3.5 and 3.6)
14 FastStor 1 Installation and User Guide
Page 21

Slide the FastStor 1 gently out of the rack. Note that the FastStor 1’s weight is 32
pounds.
Step 3. Connecting Power Cable
Before connecting the FastStor 1 to your host computer system, you should run the
unit’s self-diagnostic test. This preparation requires power to the FastStor 1. Follow
these steps to perform this test:
1. Use the power cables from the accessories included in the shipment. Make
sure you select the power cord suited for your power system.
2. Plug the power cable into the rear of the FastStor 1 (see figure 3.8). Plug
the other end of the cable into a properly grounded electrical outlet.
Note: Reliable grounding depends on grounding in the AC electrical outlet in which
the FastStor 1’s power cable is connected. For security, a 250V 2A (H) fuse is
located near the power switch.
3. Turn on the FastStor 1 by
switching the Power
Switch to “I”.
If the transport lock is
present, the loader will
detect this and instruct the
user to remove it. See
next step.
Figure 3.8 Power switch, fuse holder and
power cord connection
FastStor 1 Installation and User Guide 15
Page 22

Step 4. Removing the Transport Lock
Figure 3.9 Magazine lock marked with red plastic tab
The robot mechanism is protected from damage during shipment with a
screw holding the robotics in a locked position.
This locking screw is marked with a red plastic tab protruding between the
right magazine and the front panel assembly.
This locking screw must be removed before the FastStor 1 can operate
normally.
The locking screw will be detected when the FastStor 1 is powered on. The display
will show a message indicating the locking screw has been detected. The display
will instruct the user to remove the magazine to gain access to the locking screw.
Remove the screw and reinsert the magazine. The loader will now continue its
power-on sequence. See next step.
To release the magazine manually or perform an emergency release, see
Manual/Emergency Release of Magazines.
Note: Keep the locking screw in a safe place. You will need it to lock the robot if
you need to return your FastStor 1 for service or repair.
Important: The warranty does not cover damage to the loader if shipped without
the locking screw properly installed. See Reinstalling the Transport Lock for
instructions on how to re-install the transport lock.
Step 5. Running Power-On Self-test
After the transport lock is removed, the loader will continue running its power-on
self-test and doing an inventory of its cartridges.
The word “Idle” and the cartridge map will appear on the default display screen. If
the self-diagnostics and the inventory sequence are successfully completed, the
green LED illuminates. The FastStor 1 is now ready to be installed in the system.
If a problem occurs during the power-on sequence, the FastStor 1 displays an error
message on the display. Refer to Error! Reference source not found. to learn the
16 FastStor 1 Installation and User Guide
Page 23

procedures for resolving the problem.
Step 6. Setting the SCSI Address
The SCSI address is a unique address that identifies the unit connected to the
SCSI bus. The FastStor 1 uses two SCSI addresses or ID’s. One is for the loader
robotics controller, and the other is for the tape drive. The SCSI addresses can be
configured through the operator buttons and the display on the front panel. In most
cases the default addresses can be used. The default SCSI address for the
FastStor 1 robotics is 4, and the tape drive has SCSI address set to 5.
To set the SCSI addresses for the FastStor 1 and the built-in tape drive, refer to
SCSI Setup for more information. You may also wish to reserve a magazine slot for
a cleaning cartridge, and set a security password at this time. After some settings
are changed, the FastStor 1 and the drive may require rebooting.
Step 7. Connecting the SCSI Bus Cable
Guidelines before connecting the SCSI cable:
A) Before the SCSI bus cable is connected to the FastStor 1, turn the FastStor
1 power switch off.
B) Make sure your host system is in a state where a new SCSI device can be
safely connected to the SCSI bus.
C) Do not exceed SCSI bus length restrictions.
1. Add the length of all external and internal SCSI cables on the bus.
2. Add 80 cm (31.5 inch) for the internal cable length in the FastStor 1.
3. The maximum allowed length of an LVD SCSI bus is 12 m (39 ft) if the
number of SCSI devices exceeds two.
4. For an SE SCSI bus, be very careful regarding bus length. The normal
combination has an SE bus transfer speed of 160 Mbytes/s with a
maximum bus length of 3 m (9.8ft) and up to 4 SCSI devices connected.
If your SE system operates with a different transfer speed or has more
than 4 SCSI devices, we refer to the actual SCSI standard for complete
bus length restrictions.
D) Before the FastStor 1 is powered on and the system is restarted, make sure
the SCSI bus is properly terminated. If the FastStor 1 terminates the SCSI
bus, ADIC recommends connecting the terminator from the accessory kit
box on the lower SCSI connector on the back plane. See Figure 3.10.
To connect the SCSI bus cable:
1. On the rear of the FastStor 1, attach the device connector of the SCSI cable
to the upper SCSI connector. See Figure 3.10.
FastStor 1 Installation and User Guide 17
Page 24

2. Secure the cable with the thumbscrews on the connector.
3. Connect the other end of the SCSI cable to the appropriate SCSI adapter on
your system, and fasten it with the thumbscrews.
4. If the FastStor 1 is the last device on the SCSI bus, install a SCSI bus
terminator to the free SCSI connector on the FastStor 1. Make sure the
terminator is of the correct type for your SCSI system.
5. It is possible to daisy chain several SCSI devices on the SCSI bus. If you do
so, the terminator must be connected to the last device on the bus. Note
that there are limitations to the SCSI cable length.
Figure 3.10 SCSI cable and SCSI terminator connection
Step 8. Connecting the Ethernet Connector
To connect the FastStor 1 to the Ethernet, use the provided cable from the
accessory kit box.
1. Insert one end of the cable into the FastStor 1 Ethernet port. Push until it
snaps into place. The open port in Figure 3.10 is for Ethernet connection.
2. Connect the other end to a normal 10/100 BaseT Ethernet outlet.
The Ethernet-based Remote management system is described in
Management.
Remote
Step 9. Restarting Your System
ADIC recommends that all external SCSI devices, including the FastStor 1, are
powered on before the computer system is re-started. After restarting your system,
including the FastStor 1, the FastStor 1 runs a power up self-test (described in
Step 5). When the display reports that the FastStor 1 is in the “Idle“ state and the
green LED is on, the FastStor 1 is ready for further configuration and operation
(described in Operation and Configuration).
Note: The tape drive needs up to 40 seconds after power on until it’s active on the
SCSI bus. You should turn on the power at least 40 seconds before the computer
18 FastStor 1 Installation and User Guide
Page 25

system is started.
Step 10. BCR: Labeling cartridges
Your loader is equipped with a barcode reader. If you want to use this functionality,
you must attach barcode labels to the cartridges.
Note: You must use FastStor 1-specific barcode labels to ensure reliable
functionality of the barcode reader.
Cartridge labels must be oriented on the cartridges as shown in the figure below
with the locking mechanism to the left.
Figure 3.11 Positioning of barcode label for LTO cartridges.
FastStor 1 Installation and User Guide 19
Page 26

4 Operation and Configuration
The Local User Interface (LUI) consists of a small LCD panel capable of displaying
four lines of 20 characters each, and four control buttons, one near each corner of
the display. The buttons have soft labels in the corners of the display. The figure
below shows the power-on screen on the panel.
Figure 4.1 Power-on Screen
System Power-On
With mechanical installation and electrical connection complete, turn on the AC
power switch. At power-on, for the first few seconds the unit performs a sequence
of diagnostic tests called Power-On Self Tests (POST). POST also includes a loopback test of the robot cabling. As the tests complete, the control panel displays a
sign-on message. See Figure 4.1.
After the POST sequence completes successfully, the loader will respond to SCSI
selections. Then the system starts a series of initialization functions, a process that
consists of robot calibration operation and cartridge inventory of magazines and
drive. If the barcode reader is enabled, the barcode labels on the cartridges will be
read when running inventory.
During these operations the loader continuously shows the map status on the
screen. See Figure 4.2. The status of all magazine slots and the drive are initially
unknown, and a ”?” is displayed for each slot. As the robot searches the magazine
slots for cartridges during inventory, the display is updated.
Cartridge
Inventory
Status
Taking Inventory
Map: ?????_7_
Figure 4.2 Snapshot while running Inventory
After the unit has completed the initialization processes, the Default screen
appears and the loader is ready for SCSI commands. See Figure 4.3
20 FastStor 1 Installation and User Guide
Page 27

The map of the cartridges has the following symbols:
1. A “?” when status is unknown and Inventory is still running.
2. A number indicates a slot occupied by a cartridge. (Figure 2.3 shows how
the cartridge slots are numbered in the magazines.)
3. An underscore line indicates an empty slot.
4. ”C” indicates that a Cleaning Cartridge occupies the slot.
The line below the map on the default screen gives the drive status. The drive
status displayed is drive dependent.
Robot operation status
Menu button
Soft Label
Line 2
Idle Menu
Map: __3_5_7_
Drive Empty
Figure 4.3 The Default screen
The robot operation status has the following options:
1 Idle The loader is idle
2 Fetching The loader is moving a cartridge from a magazine slot or
from the drive to the robot.
3 Stowing The loader is moving a cartridge from the robot to a
magazine slot or to the drive.
4 Moving The loader is moving the robot.
Table 4-1 Robot Operation Statuses
FastStor 1 Installation and User Guide 21
Page 28

The Drive Status line (line 3) can show the following statuses:
1 Drive Empty There is no cartridge in the drive.
2 Drive Loaded A cartridge is loaded.
3 Drive Idle A cartridge is loaded and the drive is
ready to use it.
Drive Rewinding The drive is rewinding the tape
4
Drive Seeking The drive is searching for specific data
5
on the tape.
Drive Reading The drive is reading data for transfer to
6
a host via the SCSI interface.
Drive Writing The drive is writing data received from
7
a host to the tape.
Drive Erasing The drive is erasing data from parts of
8
or the whole of the tape.
Drive Cleaning A cleaning tape has been inserted into
9
the drive, and the drive is using it to
clean the relevant mechanical parts.
Drive Loading A tape has been inserted into the drive.
10
The drive is in the process of
mechanically loading the tape.
Drive Unloading The drive is in the process of
11
mechanically unloading the tape.
Drive Update Ready The drive has completed an internal
12
update.
Drive Updating The drive is in the process of an
13
internal firmware update.
14
Drive Calibrating A data tape has been inserted and
loaded into the drive. The drive is in the
process of measuring its physical
properties.
Table 4-2 Drive Operation Statuses
22 FastStor 1 Installation and User Guide
Page 29

Front Panel Display Modes
The front panel displays three types of screens for different purposes: menus,
dialogs and messages.
Menus
The major contributor is the MENU. It is used to select operations to perform by
enabling the operator to navigate a menu tree using the control buttons.
Due to the size of the display, only one menu item is shown at a time. See Figure
4.4 for a standard menu layout, and Figure 4.5 for a complete menu tree.
▲ EXIT
Menu Entry.
▼ SELECT
Figure 4.4 Standard Menu Layout
The two arrows on the left are used to show the next (down arrow) and previous
(up arrow) entries on the current menu level.
The Exit button on the right is used to ascend to the menu level above, while the
Select button is used to descend to the submenu designated by the Menu Text, or
to activate the function selected if the Menu Entry describes a function.
FastStor 1 Installation and User Guide 23
Page 30

Figure 4.5 The Complete Menu Tree
24 FastStor 1 Installation and User Guide
Page 31

Dialogs
A dialog is a screen type used to get detailed input from the operator, such as a
SCSI ID, name, or password. See Figure 4.6.
▲ Ok
Main Dialog text
Dialog Entry value
▼ 4
Figure 4.6 Standard Dialog Layout.
The dialogs come in several forms, but there are only a few main types.
Dialogs, Discrete Values
The dialog in Figure 4.7 is used to enter discrete values. It handles one character
or digit at a time. The digit or character being manipulated is said to be in focus.
The digit or character in focus is shown in inverse video. As the character map on
the screen used restricts the flexibility of the inverse display of the character, some
digits and characters appear distorted when inverted. For example, the “0” digit
appears as an open rectangle when inverted.
The Up and Down arrows on the left are used to increment (up arrow) or
decrement (down arrow) the value of the character or digit in focus. If increment is
selected and the value of the character of digit in focus is at its highest legal value,
it wraps to its lowest legal value, and vice versa.
▲ Ok
Fixed IP address
00.000.000.000
▼ 4
Figure 4.7 Dialog layout, entering discrete values
The Right arrow (on the right side) is used to shift the focus one place to the right.
If the focus is already at the rightmost position, the focus wraps to the leftmost
position.
The Ok button is used to accept the value displayed.
If the value was changed, the selected and original values will then be displayed as
messages. The operator may then accept or reject the change.
The discrete value type of dialog does a running check of the validity of what the
user enters, and changes it if needed.
Examples: If the value “0” or “1” is selected in the Fixed IP address dialog above,
the user is allowed to select values between “0” and “9” as the next
FastStor 1 Installation and User Guide 25
Page 32

two digits. (The maximum value allowed in this dialog is “255” within
each group.) If, however, “2” is selected, only values between “0” and
”5” are available in the second digit. If a value between “0” and “4” is
selected for the second digit, “0” to “9” is available for the third, but if
“5” is selected for the second digit, only “0” to “5” is available for the
third one.
Or
the user selects the value “199” in one group in the above dialog,
then presses the “Next Digit” button until the “1” in “199” is selected,
and increments it to “2,” so the group shows “299.” Since this is an
illegal value, when the user selects the “Next Digit” or the Ok to leave
the group, the value is changed to “255” and the focus is repositioned
to the “2” in the first position of the group.
Dialogs, Predefined Options
The second form of dialog allows the operator to select between a predefined set
of options, which can be shown on-screen simultaneously, as when selecting a
magazine slot number, see Figure 4.8.
To select a cartridge and move it from a magazine slot to the drive or vice versa, a
slightly different dialog is used:
Ok Cancel
Load to drive
From Slot: 135
3 4
Figure 4.8 Slot dialog layout.
Here, the right and left arrows select the digit to load from. Ok accepts the cartridge
selected, and Cancel aborts the operation.
Figure 4.9 shows the third form, where the operator can select predefined options
that can be shown only one at a time.
Ok Cancel
Barcode scan
Enabled
3 4
Figure 4.9 Predefined options, shown one at the time.
Here, the user can scroll through a set of options one at a time by using the left
and right arrow buttons. Only one option is shown at a time. In the example above,
the user can select either “Enabled” or “Disabled” mode.
This kind of menu also has a Cancel function.
26 FastStor 1 Installation and User Guide
Page 33

Messages
Messages can inform the operator about situations that arise during operation,
such as error conditions and situations where a process requires operator approval
or intervention to continue.
An example of the latter is when the loader detects a wrong magazine type. The
loader will eject that magazine and show the message “Left (or right) magazine is
the wrong type”. This message is removed by inserting a correct type magazine.
Status and Information
Some of the menus, dialogs and messages provide status and information in the
form of one or two-word messages that appear within the display.
An example is the default screen shown in Figure 4.10. It has a navigation button
Menu, but it displays the cartridge map (Map: __3_5_7_ ) as the major menu text
and the robot’s and drive’s status (Idle, Empty).
Idle Menu
Map: __3_5_7_
Drive empty
Figure 4.10 A default screen.
Another example is the message displayed while a diagnostics self-test is running.
This message shows the progress of the self-test in the form of a loop counter, and
also shows the robot status.
FastStor 1 Installation and User Guide 27
Page 34

Main Men u
The Main menu contains a set of frequently used functions and links to a set of sub
menus.
Item name Description
Load to Drive Loads a cartridge from a selected magazine slot into the
drive. When Select is pressed on this menu item, a
magazine slot selection dialog is displayed. The operator
must scroll to the wanted slot and press Ok to start the
operation. The progress of the operation is displayed, and
when the loader part of the operation is completed, the main
menu is displayed. The loader must be idle to make this
function selectable.
See “
To load a cartridge to the drive: for more details
Unload from
Drive
Eject
Magazine
Setup Selects the loader and drive setup functions. The loader
Unloads a cartridge from the drive and stores it in a selected
magazine slot. When Select is pressed on this menu item, a
magazine slot selection dialog is displayed. The operator
has to scroll to the wanted destination slot and press Ok to
start the operation. The progress of the operation is
displayed, and when the operation is completed the main
menu is displayed. The loader must be idle to make this
function selectable.
See “
To unload a cartridge from drive: for more details.
Ejects one or both of the two magazines. When Select is
pressed on this item, a magazine selection menu is
displayed. The operator has to choose left, right or both
magazines and press Ok to start the operation. The
progress of the operation is displayed, and when the
operation is complete a status message informs the
operator that one or both magazines are not in place. The
loader must be idle to make this function selectable.
See “
Magazine Handling” for more details.
must be idle to make this function selectable.
See “
Setup Menu” for more details.
View Data Selects the access to loader and drive system data. This is
the only menu entry that is selectable when the loader is not
idle.
See “
View Data Menu” for more details.
Utilities Selects a set of the loader and drive maintenance and
diagnostic functions. The loader must be idle to make this
entry selectable.
See “
Utilities Menu” for more details.
The Main menu can be selected even if the loader is not in the idle state. While in
the main menu, the loader will accept and execute SCSI commands. When any of
28 FastStor 1 Installation and User Guide
Page 35

the main menu entries except the View Data entry is selected, the loader will go to
its busy state, and SCSI commands will be terminated with Check Condition and
Not Ready status.
Setup Menu
To enter this menu, scroll to the Setup item in the Main Menu and press the Select
button. The loader enters the busy state when this menu is selected.
Item name Description
FastStor 1 setup This menu item gives access to the FastStor 1 setup
menu.
SCSI setup This menu item gives access to the SCSI bus setup
menu. Both the FastStor 1 and the Drive SCSI bus
setup are available here.
Remote
Management
setup
This menu item gives access to the Remote
Management setup menu. It allows the operator to
enable, disable and configure the Loader Web
interface.
FastStor 1 setup
The number of selectable values for each FastStor 1 setting are listed in the
following table.
Item name Legal values. Default value
Cleaning Slot Legal Slot ID 1..8 or 0 = not
selected.
Barcode scan* Enabled, Disabled Enabled
Audible Alarm Enabled, Disabled Disabled
Set Language English English
* The barcode of the cartridge in each occupied magazine slot and in the drive (if any) will be
scanned during the Inventory process.
0 = not selected
SCSI Setup
The SCSI setup menu allows selecting SCSI addresses for both the loader and its
internal drive. In addition, the SCSI Bus Parity can be enabled or disabled.
Because of the SCSI protocol, the values selected take effect only after the next
reset of the loader and drive.
FastStor 1 Installation and User Guide 29
Page 36

Item name Legal values. Default value
Loader SCSI ID Legal SCSI ID: 00..15 04
Drive SCSI ID Legal SCSI ID: 00..15 05
Loader Parity Enabled, Disabled Disabled
Loader
Personality
LTO: FastStor 1
FastStor 1
Remote Management setup
The Remote management setup menu allows enabling, configuration and access
control to the loader via the loader’s Remote Management Web interface. The
loader may either obtain an IP address, the network mask, and default gateway
from a DHCP server, or they can be set manually.
Item name Legal values. Default value
IP Address
assignment
Static IP address * Legal IP address range:
Network mask * Legal IP address range:
Default Gateway * Legal IP address range:
Static mode, DHCP mode DHCP mode
255.255.255.255
000.000.000.000 to
255.255.255.255
255.255.255.255
000.000.000.000 to
255.255.255.255
255.255.255.255
000.000.000.000 to
255.255.255.255
Remote Management access control
* Used only while the IP address assignment is in Static mode.
This menu gives access to dialogs that enables
remote management and remote FW upgrading of
the Loader (see table below).
Remote Management Access Control
Item name Legal values. Default value
Allow Remote
Management
Allow Remote FW
download
Allowed, Not allowed Allowed
Allowed, Not allowed Not allowed
View Data Menu
To enter this menu, scroll to the View Data item in the main menu and press the
30 FastStor 1 Installation and User Guide
Page 37

Select button. The loader will remain in its ready state when this menu is selected.
The View Data menu contains the values assigned during device setup (see Setup
Menu), and also statistical data related to the drive and the robotics. The view-only
fields display data that can be changed from the Setup menu only. If you select the
Change button and the robot is idle, a dialog appears where the value may be
changed. This requires entering a password if the Loader Password system is
enabled.
Item name Description
FastStor 1 info This menu item gives access to the FastStor 1 view
menu.
SCSI info This menu item gives access to the SCSI bus view
menu. Both the FastStor 1 and the Drive SCSI bus
parameters are available here.
Remote
Management info
Statistics This menu item gives access to the loader’s view
This menu gives access to the Selected IP addresses
and masks. This menu also shows the MAC address
of the unit.
menus internal count and statistics values.
FastStor 1 Info
An overview of the possible values for each FastStor 1 setting is listed in the
following table.
Item name Legal values. Default value
Cleaning Slot Defined cleaning slot,
Disabled
Barcode Reader Enabled, Disabled Enabled if installed, else
Loader Serial No. Loader Serial number. --Loader FW
revision
Loader Vendor ID Current Inquiry Vendor Id “ADIC”
FastStor 1 FW id and
revision
Disabled
Disabled
xx.yy
Loader Product
ID
Loader SCSI ID SCSI Id 0 to SCSI Id 15 SCSI ID = 4
Loader Parity Disabled, Enabled Enabled
Loader Slots
State
Loader
personality
Audible Alarm Enabled, Disabled Disabled
FastStor 1 Installation and User Guide 31
Current HW/FW Product Id AT3200-1R LTO2
View status for each loader
slot
FastStor 1 FastStor 1
Not applicable
Page 38

Drive Info
The different drive types used in the FastStor 1 might not provide all the
information listed below. If an unavailable entry is selected, the string “Data
Unavailable” is displayed.
Item name Legal values Default value
Drive Product ID Drive Inquiry Product Id Drive dependent
Drive Vendor ID Drive Inquiry Vendor Id Drive dependent
Drive FW
Revision
Drive Serial No. Drive Serial Number Drive dependent
Drive SCSI Id SCSI Id 0 to SCSI Id 15 SCSI ID = 5
Drive Firmware Revision Drive dependent
Remote Management Information
The Remote Management (RMM) setup is shown in the choices listed below. This
menu tree is the place to find the currently allocated dynamic IP address, default
gateway and network mask when running in DHCP mode. The loader’s MAC
address is also shown here.
Item name Legal values Default value
IP address mode Static mode, DHCP mode DHCP mode
Static IP address 0.0.0.0 to 255.255.255.255 0.0.0.0
Static netmask 0.0.0.0 to 255.255.255.255 0.0.0.0
Static default
gateway
Dynamic IP
address
0.0.0.0 to 255.255.255.255 0.0.0.0
0.0.0.0 to 255.255.255.255 Not applicable
Dynamic netmask 0.0.0.0 to 255.255.255.255 Not applicable
Dynamic default
gateway
MAC-address Value is fixed Value is fixed
0.0.0.0 to 255.255.255.255 Not applicable
Statistics
Item name Description
Fetch Statistics When selected, the operator can scroll through the
fetch count and fetch retries for the drive and all
magazine slots.
32 FastStor 1 Installation and User Guide
Page 39

Stow Statistics When selected, the operator can scroll through the stow
count and stow retries for the drive and all magazine
slots.
Power On Time Displays Power On Hours for the loader
Time since
clean
If available from the drive, this entry displays the
number of hours since the drive was last cleaned.
Utilities Menu
Option Description
Maintenance Displays a set of maintenance functions
Diagnostics Displays a list of exercise test programs
Access control Set Password
The Maintenance Menus
Item name Description
Prepare to Ship When selected, the robotics are positioned for installing
the locking screw.
The right magazine is ejected to facilitate the
installation.
The left magazine is also ejected if it contains one or
more cartridges. The loader cannot be safely shipped
with cartridges in the magazines
This option must be executed before the loader is
prepared for transport by inserting the Locking Pin.
(See
Performing the Installation and Reinstalling the
Transport Lock
Clean Drive Performs a drive clean, provided a slot is reserved for a
cleaning tape and a cleaning tape is present
Restore default Sets the loader settings to their factory default values.
Clear Web
Password
Reboot Performs a hard reset of the loader.
Deletes the web passwords. This is useful when the
password is lost.
.)
The Diagnostics Menu
Item name Description
System test Starts a test where cartridges are moved randomly
between magazine slots and between the drive and
the magazines.
Move medium
test
Starts a test where cartridges are moved randomly
between magazine slots. The drive is excluded.
FastStor 1 Installation and User Guide 33
Page 40

Drive test Starts a drive self test. (Only when supported by the
installed tape drive.)
Hardware test Runs a test of the loader hardware, including the
Loader internal cabling.
Set Password
Item name Description
Set Password Allows the operator to set a four-digit password
protection for the menu system. The default password
is <0000>, meaning the password is disabled.
WARNING: If you set a password, make sure you do not forget it. If you do, it can only be
cleared with assistance from ADIC technical support or by a qualified service technician.
Cartridge Handling
Cartridge Slot Numbers
The cartridge slots have been given numbers as follows:
Left magazine: Slot 1, Slot 2, Slot 3 and Slot 4 (lowest number closest to the front)
Right magazine: Slot 5, Slot 6, Slot 7 and Slot 8 (lowest number closest to the
front)
Moving Cartridges to and from the Drive
The normal operations of the unit are controlled by the host software application.
When you must load or unload a specific cartridge using the control buttons on the
front panel, do the following:
To load a cartridge to the drive:
1. From the default display press the menu button and select Load to Drive from
the main menu. A screen picture like Figure 4.11 will be displayed. The
selected cartridge’s barcode is displayed in the bottom line.
Ok Cancel
Load to drive
From Slot: 135
3 4
Figure 4.11 Load to Drive
2. Select the slot number of your choice. The system ignores empty slots. Press
the 4 button to increment and the 3 button to decrement.
3. Press the Ok button.
34 FastStor 1 Installation and User Guide
Page 41

The robot removes the cartridge from the selected magazine slot and moves it
to the drive.
To unload a cartridge from drive:
1. From the default display, press the menu button and select Unload from Drive
from the main menu. A screen similar to Figure 4.12 displays the available
slots.
Ok Cancel
Unload from drive
To Slot: 24678
3 4
Figure 4.12 Unload From Drive
2. Select the cartridge slot number of your choice. Press the 4 button to
increment and the 3 button to decrement.
3. Press the Ok button.
The robot removes the cartridge from the drive and moves it to the selected
magazine slot.
If the drive is empty, a screen similar to the following figure appears.
No cartridge in
the drive to
unload
OK
Figure 4.13 Empty Drive Message
Magazine Handling
You must remove the magazine from the unit in order to insert or remove
cartridges. When inserting cartridges, be sure the slot you intend to use is not
already reserved by the software application for a cartridge in the drive. The best
way to avoid conflicts is to unload the cartridge from the drive; either through your
software application or by using the Unload from drive option in the main menu.
Removing the Magazine from the Unit
The following illustration shows the correct way to remove the magazine from its
bay.
Note: You cannot remove the magazine if the unit is password protected or locked
by host software through a Prevent Medium Removal SCSI command.
Before you can remove a magazine, the loader must be idle. When the loader is
idle, press the Menu button and select the Eject Magazine option from the Main
FastStor 1 Installation and User Guide 35
Page 42

Menu.
The following screen, Figure 4.14, appears, identifying the magazine:
▲ Exit
Eject both mags.
▼ Select
Figure 4.14 Removing magazine
Scroll to the correct magazine (Both, Left or Right magazine) and press Select.
The selected magazine will pop out 2 to 3 cm, See next figure.
The display will show a message telling that the magazine or magazines is/are
ejected. If only one magazine is ejected, the display indicates a button to push to
eject the other magazine.
Figure 4.15 Magazine eject
With one hand, grip the handle on the outer side of the magazine bezel and hold
the other hand under the magazine. Pull the magazine carefully out and keep it in
level with the loader. Use the hand under the magazine to prevent the back of the
magazine to fall down when it leaves the magazine bay. See the following
illustration.
36 FastStor 1 Installation and User Guide
Page 43

Figure 4.16 Removing the magazine from the loader
Inserting Cartridges into the Magazine
When inserting cartridges, the access door of the cartridge must face the
magazine. Push it carefully into the magazine until it locks in place. The rear side
of the cartridge with the Write Protect switch and the barcode label must face out.
Make sure the cartridges latch properly.
Figure 4.17 Gently push the cartridge into the magazine slot
Removing Cartridges from the Magazine
Press the cartridge release tab towards the cartridge until the cartridge is released.
The cartridge slot is spring loaded, so it is important to prevent the cartridge from
popping all the way out. If the cartridge falls down, it might be damaged and data
FastStor 1 Installation and User Guide 37
Page 44

could be lost. Pull the cartridge carefully out of the magazine slot.
Figure 4.18 Push the release knob
towards the cartridge to eject
Figure 4.19 Cartridge position after
manual release from magazine slot
Inserting a Magazine into the Unit
The right and left magazines are mirrored and can only be inserted into the correct
left or right magazine bay. See Figure 4.20.
1. Enter the back of the magazine into the correct magazine bay. Make sure it
is in level with the loader.
2. Slide the magazine carefully in until the eject spring engages.
3. Push the magazine further in against the spring until the magazine is
latched.
38 FastStor 1 Installation and User Guide
Page 45

Figure 4.20 Push magazine until it clicks into place
Manual/Emergency Release of Magazines
In failure situations (either in the loader itself, a power loss, or situations where you
need to manually release the magazines), a manual/emergency release is
available. To activate the emergency magazine feature, you must use the special
magazine release tool that is part of the accessory kit shipped together with the
FastStor 1. This tool must be inserted through the hole marked in Figure 4.21.
Note: The manual eject must only be used when power is turned off.
Insert the release tool in
hole four from the center
Figure 4.21 Pointing out hole used to insert release tool
FastStor 1 Installation and User Guide 39
Page 46

Figure 4.22 shows the
release tool inserted into
the correct hole on the
right hand side magazine
bezel.
Figure 4.22 Magazine release tool in use
Standby Functionality
On the front panel a standby button is available.
To activate Standby mode, press the button for a minimum of 2 seconds. The
FastStor 1 will enter a standby mode in a controlled manner. The following takes
place before the FastStor 1 goes into standby mode:
1. Finish any FastStor 1 activity.
2. Controlled aborting of tape drive activity; buffered data is flushed to tape;
cartridge is unloaded from drive but not ejected.
3. The display is turned off.
4. No FastStor 1 activity is allowed until the standby button is pressed again.
5. While in standby mode, the attached server/host can see the two SCSI
devices in the FastStor 1, but the SCSI status will be “not ready.”
6. The green LED on the front will blink with short blinks- long intervals.
7. To leave the standby mode, press the standby button for 2 second. The
FastStor 1 will then restart and perform a full inventory.
40 FastStor 1 Installation and User Guide
Page 47

5 Remote Management
In order to facilitate Remote Management, the FastStor 1 is equipped with an
Ethernet interface and a built in web server. The Remote Management Interface
(RMI) can be accessed with a standard web browser, such as Internet Explorer,
Mozilla or Opera.
Remote Management Configuration
In order to start the FastStor 1 Remote Management Interface, the FastStor 1
must obtain a valid IP address. By default, the FastStor 1 connects to a DHCP
server to dynamically configure its network interface. If a DHCP server is
available, the loader will get an IP address automatically after booting.
If no DHCP server is available, select Static mode and enter a legal IP-address,
netmask and default gateway with the buttons. In the browser’s address field,
enter the IP address of your FastStor 1. See Remote Management setup for
details.
Quick Start Instructions
The following is intended to help you get a new FastStor 1 online as quickly as
possible. If you need to enable the RMI to perform a memory dump of a faulty
FastStor 1, please see Enabling the RMI Without Rebooting instead.
1. Connect the FastStor 1 to the network and reboot it.
2. From the front panel, check the dynamic IP address by accessing Menu
→View data → Remote man. info → Dyn IP Addr. state.
2.1. If the response is a valid IP address, the remote management interface
is ready and can be accessed at the URL http://IP-address/, e.g.
http://192.168.0.5/.
2.2. If the response is 0.0.0.0, enable remote management from the front
panel by setting Menu → Setup → Remote management → Access
control → Allow remote management to “Allowed.” Check the network
cable and the DHCP server and reboot.
Enabling the RMI Without Rebooting
1. Connect the FastStor 1 to the network.
2. Configure network:
If you want to use a static IP address, use the front panel to enter a valid
static IP configuration, see Remote Management setup.
If you want to configure the network subsystem dynamically, from the
front panel set Menu → Setup → Remote management → Set IP
FastStor 1 Installation and User Guide 41
Page 48

Addr. mode to DHCP mode.
3. Via the front panel, first set Setup → Remote management → Access
control → Allow remote man. to “Not allowed” and select “OK.” Then set
the same value to “Allowed” and select “OK.” This will restart the networking
subsystem. Obtaining a new IP address may take some time if the FastStor
1 is in DHCP mode.
4. Check the IP address via the front panel by accessing either View Data →
Remote man. info → Sta IP Addr. state or View Data → Remote man.
info → Dyn IP Addr. state, depending on whether the FastStor 1 is in static
or dynamic IP address mode.
Remote Management Web Pages
Most of the operations you can perform from the front panel can also be
performed remotely using Web Administration. The Remote Management
interface provides access to loader and drive status and statistical operation
information.
The Web pages include a
navigation menu making it
easy to use, see Figure 5.1.
Status
Settings
Personalization
Network
SCSI-ID
Cleaning options
Command
Maintenance
Diagnostics
Debugging
FW upgrade
Figure 5.1 Navigation Menu
Information Boxes
All the Remote Management web pages show FastStor 1 and drive information.
This information includes:
• FastStor 1 information containing model, serial number, firmware
version, cumulative power-on time and present activity of the loader.
• Drive information containing technology, serial number, firmware version
and activity
42 FastStor 1 Installation and User Guide
Page 49

FastStor 1 Start Page
After successfully connecting to the FastStor 1 from your browser, you will see
the FastStor 1 Start page, Figure 5.2. This contains:
• Select language
for user-interface.
1. The language used last time will come up as the default language at
start-up.
2. The default language is English.
• Log in
to use Remote Management. The system has two levels of login.
By default the passwords are blank. (That is, type in the user ID and
leave the password field blank.) To secure your system, change both
passwords under Settings > Personalization, the first time you use
Remote Management.
1. The user ID Administrator has full access to the Remote Management
pages.
2. The user ID Operator has limited access to the Remote Management,
and cannot access the Settings and Maintenance pages.
Figure 5.2 Remote Management Start Page
Note: FastStor 1 network traffic is not encrypted, so anyone with physical
access to the network path will be able to access the information with a packet
sniffer. Passwords, however, are encrypted. It is not possible to reach the
FastStor 1 Installation and User Guide 43
Page 50

plaintext password, but it is possible to sniff “the challenge key” and use it to
gain access. The system is therefore not safer than the network it is using.
If you need high security, make sure packets to and from the FastStor 1 do not
leave the secure network, and employ separate encryption when traffic
traverses unsecured networks.
Status Page
The FastStor 1 Status page looks like the figure below.
Figure 5.3 Remote Management Status Page
The figure provides an updated status of drives, robotics and cartridges using
color-coding and symbols.
The Drive and Robot statuses are shown as a green (OK), yellow (Warning) or
red (Error) dot. If you click on the text, additional information appears in a popup window.
The cartridge locations are shown with rectangles in the slots or the drive. The
status codes are:
• Black
• Grey
• Blue
• Yellow
• Red
Empty slot, no cartridge present
Cartridge present
Cleaning cartridge in the slot
Warning
Error
44 FastStor 1 Installation and User Guide
Page 51

If you click on a slot, additional cartridge information is shown in a pop-up
window. This information includes the cartridge barcode (if label and barcode
reader are installed) and the error code.
Settings Pages
You can change the FastStor 1 configuration on the setting pages. These pages
can be accessed only by someone who is logged in as Administrator.
Personalization
On this page you can change the Remote Management passwords. To secure
your system, change both the passwords the first time you use the system. It is
possible to clear the remote management passwords via the front panel. Please
see The Maintenance Menus.
Here you may also turn on email event notification. When event notification is
enabled, the FastStor 1 sends warnings and errors by email to the recipient’s email address.
Network
On this page it is possible to change the IP configuration. See details in Remote
Management setup. The new configuration will take effect at next system reset.
Warning: Please verify that the chosen settings are correct and consistent
before resetting the loader. Any mistakes must be corrected via the front panel.
SCSI-ID
On this page it is possible to change the SCSI-ID on your drive and loader. See
details in SCSI Setup.
Cleaning Options
By defining a cleaning slot, the FastStor 1 regards the cartridge in this slot as
the cleaning cartridge unless:
1. another cartridge has previously been designated a cleaning
cartridge by the drive, or
2. the loader contains a cartridge with a barcode label indicating it is
a cleaning cartridge.
Command Page
On this page it is possible to move cartridges between magazine slots and the
drive. All cartridges in the FastStor 1 can be found in a pull-down list sorted by
location. The other pull-down list shows the empty locations where it is possible
to move the cartridge.
FastStor 1 Installation and User Guide 45
Page 52

Figure 5.4 Remote Management Command Page
Maintenance Pages
On these pages it is possible to select predefined tests and actions to check the
FastStor 1’s reliability. In addition it is possible to upgrade the loader's firmware
over TCP/IP.
Diagnostics
• Clean the drive by importing a cleaning cartridge.
• If you choose Identify loader, the front panel display light toggles on and
off for 15 seconds. This makes it easy to verify that you are connected to
the correct loader if several loaders are stacked.
• Test robotics by moving cartridges.
• Test robotics without moving cartridges.
Debugging
• Memory dump downloads a snapshot of the loader’s system memory to
a file that can be sent to ADIC service for diagnostic purposes.
• Memory dump drive downloads a snapshot of the drive’s system memory
to a file that can be sent to ADIC service for diagnostic purposes.
• Perform a system reset.
• Media log displays a log of all cartridge movements and a map of the
46 FastStor 1 Installation and User Guide
Page 53

current cartridge locations.
FW Upgrade
Upgrade the loader's firmware by uploading a binary file. The loader must be
configured to allow remote firmware upgrade. This configuration is done by
using the front panel interface (Menu → Setup → Remote management →
Access control → Allow rem. FW.upg.).
FastStor 1 Installation and User Guide 47
Page 54

6 Maintenance
Using the Cleaning Cartridge
The cleaning cartridge is similar in size and shape to the regular LTO data
cartridge. Place a cleaning cartridge barcode label on the cartridge before using
it.
Important: This label has a six-digit ID, where the three first digits are “CLN”.
A cleaning occurs whenever a cleaning cartridge is loaded into the drive. Before
cleaning, you must install the cartridge into the magazine correctly. The
cleaning cartridge may be inserted in any magazine slot.
NOTE: The only absolute authority on cleaning tapes is the drive. The drive
starts a cleaning operation whenever a tape recognized as a cleaning
tape is inserted. The loader cannot, by itself, recognize a cleaning tape.
It may be mislead by a wrong label on a data tape, by a data tape
inserted in a designated cleaning slot, or by the operator.
Running an Installed Cleaning Cartridge
1. Install a cleaning cartridge into a magazine slot in the loader. If a
cleaning slot is defined, this slot should be used.
2. Select Clean Drive from the Maintenance section of the Utilities
menu. This causes the loader to search for a cleaning cartridge in the
following sequence:
a. A cartridge reported to be a cleaning cartridge by the drive
b. A cartridge with a barcode label indicating it is a cleaning cartridge
c. A cartridge in the slot defined as the cleaning slot
If all of the above fail, the loader displays a dialog asking the operator
for the slot from which to fetch the cleaning cartridge.
3. While the cleaning operation is on-going, the display shows the drive
status “Drive Cleaning”. After the operation completes, the cartridge is
automatically moved back to the slot from which it was fetched.
If a data tape is erroneously inserted via the loader “Clean Now” menu,
this is detected by the loader when the drive identifies it as a noncleaning tape. The cartridge is returned to its original slot and an error
message is displayed.
Some drive families and types have means of checking if the cleaning
cartridge is expired. If an expired cleaning cartridge is inserted in such a
drive, this is detected by the loader and an error message is displayed
after the tape has been returned to its original slot.
48 FastStor 1 Installation and User Guide
Page 55

Note: All cleaning cartridges wear out. If the drive does not support
expiration detection, the operator must keep track of cleaning
cycles manually and discard expired cartridges.
Note: Pressing the standby button while the drive is cleaning will not
abort the cleaning operation in the drive. However the cleaning
cartridge is left loaded in the drive. When the loader is brought out
of standby mode, the drive is reset as part of the initialization
process. The drive will re-discover the cleaning cartridge and run
another cleaning sequence. The cleaning cartridge is left in the
drive and must be unloaded by the operator by using the unload
command from the front panel menu.
Removing the Cleaning Cartridge
1. Determine whether a cartridge is loaded into the drive. If so, unload it.
2. Remove the magazine with the cleaning cartridge from the unit.
3. Remove the cleaning cartridge from the magazine.
4. Insert any desired data cartridge into the slot vacated by the cleaning
cartridge.
Note: The cleaning slot must be disabled (set to 0) in the Setup menu
to make use of a data cartridge in this slot.
5. Insert the magazine into the unit.
Installing Firmware Upgrades
The loader firmware can be upgraded via the SCSI interface or the web
interface. The drive firmware can be upgraded via the SCSI interface.
Loader Firmware Upgrade via SCSI
A suitable utility program, FlashIt, and the latest firmware image file, can be
downloaded from the ADIC web site
available for Windows XP, Windows 2000/2003, and Windows NT.
Note: Read this entire procedure before you perform an upgrade.
1. Copy the FlashIt utility on your computer or server where the loader is
connected.
http://www.adic.com/. The program is
2. Make sure the computer has detected the loader. (Look for “Medium
changers” in the “Device Manager”: Right click "My Computer" – “Manage” –
“Device Manager”).
3. Most Windows operating systems may require that all backup services
started by the backup software application be stopped before the FlashIt
utility is started.
FastStor 1 Installation and User Guide 49
Page 56

4. If a Windows driver is loaded for the Medium changer in question, it will
block the SCSI port for the flashing utility and FlashIt will not see the drive.
Cure: Disable the device. (Select and disable the Medium changer in the
Device Manager: "My Computer" – “Manage” – “Device Manager”).
5. Start the FlashIt utility and follow the instructions in the program.
6. As the Download Utility begins data transfer,
the FastStor 1 displays this message:
7. When the firmware image file has been
downloaded, the loader checks the integrity of
the firmware image while displaying this
message:
8. Once the code is approved, the loader starts
the erase and reprogram operation while
displaying this message:
During the Erase part of the reprogramming
cycle, the amber LED lights to warn against
interference. The erase operation takes less
than 20 seconds.
During the Programming part of the
reprogramming cycle, the green LED flashes in
addition to the amber LED remaining lit. The
programming operation takes less than one
minute.
Flash Firmware
SCSI Update:
Transferring Data
Flash Firmware
SCSI Update:
Checking ECC
Flash Firmware
SCSI Update
Reprogramming
Do not interfere!
9. When reprogramming is completed, the loader
does a normal reboot. Due to the reboot, the
FlashIt utility could display an error message,
which should be ignored.
If the firmware upgrade operation fails during step 8 due to a power shutdown
or similar occurrence, the loader may require service.
To verify that the firmware version in the loader is correct, enter the View Data
menu from the front panel. Select the “FastStor 1 Info” and from there the
“Loader FW Revision” entry to see the revision number.
Loader Firmware Upgrade via Web
The loader firmware can be upgraded via remote management.
1. Log into the Remote Management web page.
50 FastStor 1 Installation and User Guide
Page 57

2. In the left menu, click on Maintenance and then "FW Upgrade"
3. Click on the "I accept upgrade firmware" button
4. Select the new binary FW file that loader is to be upgraded with by
clicking on the "Browse..." button
5. Click on the "Upgrade" button. The upgrade process has now started.
6. The Remote Interface is, after uploading the file, stalled. The progress of
the upgrade can be observed on the front panel.
7. Front panel: Flash Firmware / RMM Update / Preparing (This message is
displaying for 5 - 10 seconds)
8. Front panel: Flash Firmware / RMM Update / Checking ECC (This
message is displaying for 1 - 2 minutes)
9. Front panel: Flash Firmware / DACI Update / Reprogramming / Do Not
Interfere! (this message is displaying for 20 - 30 seconds.)
10. The Front panel’s green backlight is turned off - a reset of the loader is
taking place.
The firmware revision is displayed on the remote management pages. It can
also be viewed from the front panel menu.
Drive Firmware upgrade via SCSI
A suitable utility program, FlashIt, and the latest firmware image file, can be
downloaded from the ADIC web site http://www.adic.com/. The program is
available for Windows XP, Windows 2000/2003, and Windows NT.
Note: Read this entire procedure before you perform an upgrade.
1. Copy the FlashIt utility on your computer or server where the loader is
connected.
2. Make sure the computer has detected the tape drive. (Look for “Tape drives”
in the “Device Manager”: Right click "My Computer" – “Manage” – “Device
Manager”)
3. Most Windows operating systems may require that all backup services
started by the backup software application be stopped before the FlashIt
utility is started.
4. If a Windows driver is loaded for the tape drive in question, it will block the
SCSI port for the flashing utility and FlashIt will not see the drive. Cure:
Disable the device. (Select and disable the tape drive in the Device
Manager: "My Computer" – “Manage” – “Device Manager”).
5. The appropriate firmware file must be located in the same directory as the
FastStor 1 Installation and User Guide 51
Page 58

FlashIt utility.
6. Start the FlashIt utility and follow the instructions in the program.
To verify that the firmware version in the tape drive is correct, enter the View
Data menu from the front panel. Select the “Drive Info” and from there the
“Drive FW Revision” entry to see the revision number.
Possible Upgrade Problems
If a power loss or a failure occurs during code download and ECC Checking,
the original firmware might be intact. It is possible to restart the firmware
upgrade procedure. However, if the failure occurs during flash erase or
programming, the firmware will be corrupted and a special procedure must be
used to load a new code. Contact your Technical Support Representative for
assistance.
Embedded Diagnostics
The FastStor 1 includes two levels of diagnostics:
• The Power-On Self Test (POST) — Performs several verification and
memory tests when you power on the unit.
• User Diagnostics — Selectable from the front panel
Reinstalling the Transport Lock
Before the
FastStor 1 is
shipped over a
distance, the
transport lock
must be installed.
The transport lock
prevents damage
to the robotics
during transport
and handling.
Figure 6.1 Transport lock marked with
Note: Damage to
the robotics during
shipping will not
be covered by
warranty unless
the transport lock
is installed.
red plastic tab
Transport Lock Installation Procedure
To insert the locking screw, do the following:
52 FastStor 1 Installation and User Guide
Page 59

1. If there is a cartridge in the drive, unload the drive first.
2. When the loader is powered on and idle, push the Menu button and go to
the Prepare to Ship menu entry (see The Maintenance Menus).
3. If there are any cartridges in the magazines, the loader will eject those
magazines and a descriptive message will be shown. Empty the
magazines and put the magazines back in place.
4. If the magazines are empty, only the right magazine will be ejected and a
descriptive message will be shown.
5. Turn the main power off at the back of the loader.
6. Remove the magazine and insert the locking screw. The red plastic tab
shall protrude from the front of the loader.
Insert the magazine and push it in until it locks in place.
FastStor 1 Installation and User Guide 53
Page 60

7 Troubleshooting
How to Take Memory Dumps of the Loader
1. Log in to the remote management interface as Administrator.
2. Navigate to Maintenance → Debugging.
3. Click “Memory dump”.
4. Select “Save to disk” in the file download dialog box.
5. Use a zip utility to compress the downloaded memory image.
6. Send the zipped memory image as an email attachment to technical
support.
Note that the memory image contains the passwords for the FastStor 1. If you
do not want to compromise them, clear them first by changing them to nothing
or some harmless value, see Settings Pages or The Maintenance Menus.
How to Take Memory Dumps of the Drive
1. Log in to the remote management interface as Administrator.
2. Navigate to Maintenance → Debugging.
3. Click "Memory dump (drive)".
4. Select "Save to disk" in the file download dialog box.
5. Use a zip utility to compress the downloaded memory image.
6. Send the zipped memory image as an email attachment to technical
support.
Hardware checking
a. The autoloader uses one SCSI ID for the tape drive and one for the
autoloader robotics. Verify that the loader SCSI ID and the drive SCSI
ID are set to unique SCSI IDs that are not used by any other SCSI
device on the same bus. Depending on other devices attached to the
same SCSI bus and their SCSI IDs, you may need to change the SCSI
ID of the tape drive or autoloader before you can use the autoloader.
b. Verify that the system recognizes the tape drive and the loader during
54 FastStor 1 Installation and User Guide
Page 61

the boot process.
c. Verify that the SCSI host adapter recognizes the tape drive and the
loader during its initialization.
d. Verify that the status on the loader’s front panel interface is OK.
e. Verify that the power cable is inserted correctly.
f. Verify that the SCSI cables are properly connected at both ends. Check
that the cables are not damaged, and verify the lengths of your SCSI
cabling. The length of the internal SCSI cabling inside the loader is
85cm. This length must be included in any calculation of cable length.
g. Verify that the SCSI bus is properly terminated. Only the devices
physically at the beginning and end of the cable must be terminated.
Software checking
1. Verify that the operating system does not report a problem during the
boot.
2. Verify that the driver for the SCSI host adapter is present and loaded
properly.
3. Verify that the correct Drivers have been installed properly – if
applicable.
4. Verify that the Backup software does not report any error messages
when loading.
5. If any problem occurs, reinstall the Backup Application Software and
check that both the loader and the tape drive are recognized.
Verifying Recent Changes
If the autoloader has been installed previously and operating correctly but is
now incurring a problem, verify any recent changes to the system to ensure that
these changes are not causing the problem. Try the following:
i. If the system configuration has changed: Remove the change to see if it
affected the loader.
ii. If an operating system corrective patch has been installed: Remove it to
see if it affected the loader.
iii. If a SCSI device has been added: Check for SCSI ID conflicts.
FastStor 1 Installation and User Guide 55
Page 62

iv. If a SCSI device has been added: Check if the SCSI termination has
been properly set.
Troubleshooting matrix
The table below describes different problem situations and suggested actions to
try to resolve the problem.
PROBLEM SOLUTION
Power
Autoloader does not power on • Check the power cord connection.
• Make sure the power switch on the rear panel is in the ON
position.
• Make sure there is power to the outlet. Try another working
outlet.
• Replace the power cord.
• Make sure the fuse located beside the power connector on
the rear panel is not blown. Replace fuse if blown (a spare
fuse is located behind the fuse door).
• Remove the back panel cover plate and verify that all
cables are connected properly.
• Replace the FRU power supply.
• Contact your service representative.
The display is dead
The front panel does not display
information but the back light on
the front panel is on
Cartridge movement
Loader does not take inventory • Make sure the transport screw is removed.
Cartridge stuck in drive • Power cycle the loader by turning off and on the main
• Power cycle the loader by turning off and on the main
power switch on the rear of the loader.
• Verify that the fans starts at power on and then stops after
a few seconds.
• Check the power cord connection.
• Make sure the power switch on the rear panel is in the ON
position.
• Make sure there is power to the outlet. Try another working
outlet.
• Replace the power cord.
• Make sure the fuse located beside the power connector on
the rear panel is not blown. Replace fuse if blown (a spare
fuse is located behind the fuse door).
• Remove the back panel cover plate and verify that all
cables are connected properly.
• Replace the FRU power supply.
• Contact your service representative.
• Power cycle the loader by turning off and on the main
power switch on the rear of the loader.
• Verify that the fans starts at power on and then stops after
a few seconds.
• Contact your service representative.
• Make sure both magazines are in their locked position.
• Look up the error code and follow the instructions in the
“suggested action” column.
• Contact your service representative.
power switch on the rear of the loader. Allow both the
loader and the drive to complete initialization (which in rare
cases can take as long as 10 minutes,) and then retry
56 FastStor 1 Installation and User Guide
Page 63

unloading the tape using the autoloader operator panel
controls.
• Make sure the backup software is not reserving the slot or
preventing the tape drive from ejecting the cartridge. The
backup software needs to cancel the reservation and any
hold it has on the tape drive.
• Temporarily disconnecting the autoloader from the host
server system eliminates the host system and its software
as a problem source.
• Remove drive FRU from the drive bay. Connect power to
the drive either by connecting it to the loader’s power
supply or to an external power supply. Try to eject the
cartridge by pushing the drive’s eject button.
• Follow the drive’s emergency eject procedure to remove
the cartridge from the drive.
• Replace the drive FRU.
• Contact your service representative.
Cartridge stuck in magazine • Remove the magazine using the front panel interface.
Manually remove the cartridge from the magazine slot.
• Contact your service representative.
Cartridge stuck in robotics • Power cycle the loader by turning off and on the main
power switch on the rear of the loader.
• Look up the error code, follow the instructions in the
“suggested action” column.
• Contact your service representative.
Failed to move cartridges • Look up the error code (1101-1109, 1201-1209), and then
follow the instructions in the “suggested action” column.
• Contact your service representative.
Failed to insert cartridge into
drive
Media
Media barcode labels • Make sure the barcode labels are applied in the correct
Data cartridge incompatible with
drive
Cannot write to or read from
tape
Check failing media for pin damage (buckling pin).
Hold the cartridge in your hand with the Write Protect Switch
to your left and orientation arrow pointing away from you. On
the right side all the way in front is a small door that can be
opened by sliding a door against you. Inside the cartridge
you should see a metal pin. The pin should be parallel with
the cartridge front and is held in place by two metal grippers
at each end (top and bottom of the cartridge). The media
should be attached to this pin, and you should see only the
top and bottom part of the pin. If the pin is missing, loose or
damaged, the tape will be damaged and rejected from the
drive.
orientation on the cartridge. See the section called
“Labelling cartridges” in the User and Installation Guide’s
“Performing the Installation” chapter.
• Make sure there are no wrinkles on the label.
• Make sure FastStor-specific labels are used.
• If all of the above are OK, replace the label with a new one.
• If the problem continues, contact your service
representative.
• Make sure you are using a data cartridges that is
compatible with the drive. See the tape drive’s reference
manuals for details.
• The software backup application detects if an incompatible
data cartridge is used, and communicates this to the user.
• Remove the cartridge from the loader.
• Make sure the cartridge is write enabled (move the writeprotect switch to the enabled position).
FastStor 1 Installation and User Guide 57
Page 64

SCSI problems
Changed drive or loader SCSI
ID, but the host server system
does not recognize the new ID
The tape drive responds on the
SCSI bus to the host, but the
loader does not respond
The tape loader responds on
the SCSI bus to the host, but
the tape drive does not respond
• Make sure the cartridge has not been written using an
incompatible format.
• Make sure the cartridge is an acceptable format for your
drive type. See the tape drive’s reference manuals for
details.
• Make sure the cartridge has not been exposed to harsh
environmental or electrical conditions and is not physically
damaged in any way.
• Many backup applications do not read or write to cartridges
that were created using a different backup application. In
this case, you might have to perform an erase, format, or
label operation on the cartridge.
• Make sure you understand any data protection or overwrite
protection schemes your backup application might be
using, which could prevent you from writing to a given
cartridge.
• Retry the operation with a different, known good tape.
• Clean the tape drive. See the section called “Using the
Cleaning Cartridge” in the User and Installation Guide’s
“Maintenance” chapter.
• Make sure all SCSI devices on the same bus have unique
ID numbers.
• If the SCSI bus is narrow (50-pin) only SCSI IDs 0 through
7 are available.
• Make sure you reboot the autoloader after changing the
SCSI ID.
• Reboot the host server system.
•Verify that a SCSI terminator is attached to both the last and
first SCSI device on the SCSI bus.
• Verify the SCSI cables are connected to the rear of the
loader. See the section called “Connecting the SCSI Bus
Cable” in the “Installation” chapter.
• Make sure the correct host controller card is installed.
• Verify that the SCSI cables are not damaged, and that the
total SCSI cable length is not exceeding the maximum
required length.
• Verify that the loader SCSI ID and the drive SCSI ID are set
to unique SCSI IDs that are not used by any other SCSI
device on the same bus.
• Verify that the host application and the device drivers are
installed with the most resent patches to support the loader
• Reboot the loader by turning power off from the rear of the
loader, and then on.
• Reboot the host system when the loader has completed its
power on sequence.
• Contact your service representative.
• Verify that a SCSI terminator is attached to both the last
and first SCSI device on the SCSI bus.
• Verify that the SCSI cables are connected to the rear of the
loader. See the section called “Connecting the SCSI Bus
Cable” in the “Installation” chapter.
• Make sure the correct host controller card is installed.
• Verify that the SCSI cables are not damaged, and that the
total SCSI cable length is not exceeding the maximum
required length.
• Verify that the loader SCSI ID and the drive SCSI ID are set
to unique SCSI IDs that are not used by any other SCSI
58 FastStor 1 Installation and User Guide
Page 65

device on the same bus.
• Verify that the host application and the device drivers are
installed with the most resent patches to support the tape
drive
• Issue a system reset from the front panel or remote
management
• Remove the back panel cover plate on the loader and
verify that the cables are properly connected to the drive.
• Reboot the loader by turning power off from the rear of the
loader, and then on.
• Reboot the host system when the loader has completed its
power on sequence..
• Contact your service representative.
Autoloader Performance
The autoloader is not efficiently
backing up data
Cleaning
Cannot load the cleaning
Cartridge
Write or read issues
Contaminated head
Non-acclimated media
Cleaning cartridge is
Incompatible
Expired cleaning cartridge Verify the number of cleanings per cleaning tape for your
Bad/defective/contaminated
media
• Check the network bandwidth from the host system. If you
are backing up data over a network, consider comparing to
a local-only backup.
• Make sure the autoloader and tape drive are on their own
SCSI bus and not daisy-chained to another tape drive or to
the hard drive being backed up.
• Verify that the host application and the device drivers are
installed with the most resent patches to support the tape
drive and the loader.
• Connect the autoloader to an LVD SCSI bus and make
sure there are no SE devices on the same bus, because
this causes the entire bus to negotiate down to SE speed.
• Clean the tape drive. See the section called “Using the
Cleaning Cartridge” in the “Maintenance” chapter.
• Try a new cartridge. A marginal cartridge can cause
performance problems due to bad spots on the tape,
requiring retries.
• Backing up compressed data lowers performance.
• Check the size of the files. Small file size can impact
performance.
• Make sure there is no cartridge present in the drive before
you load a cleaning cartridge.
• Make sure the cleaning cartridge is not expired.
• Contact your service representative.
Avoid contamination by ensuring that the autoloader is
installed in a clean, contamination-free environment.
Cartridges should be stored vertically in their plastic cases.
Continue cleaning the tape drive as needed.
If a cleaning cartridge is not successful in resolving the
problem after 3 or more attempts, the cleaning cartridge may
be contaminated and should not be used in another drive.
A cartridge should be acclimated for at least 24 hours before
being used, particularly if it has been stored at a
substantially different temperature or level of humidity than
the autoloader.
Make sure you are using an allowed cleaning cartridges
media type
• If the write/read errors persist and the drive has been
cleaned, that cartridge should be suspected as being
defective, if it is not an invalid cleaning cartridge.
FastStor 1 Installation and User Guide 59
Page 66

• If this occurs, export the cartridge and load a known good
cartridge. In some cases, a cartridge can be worn out,
have a defective cartridge memory, or have been formatted
as a Firmware Upgrade Tape.
• Any cartridge you suspect is defective or contaminated
should NOT be reused in any drive.
LED error messages
Amber LED on • When the amber LED is on, the loader has encountered an
electrical or mechanical failure. An error message displays
on the front panel (and RMI). Refer to the error codes for
details.
Errors Displayed on Front Panel
There is an error code on the
LCD display
There is an error code on the
RMI
Remote Management
The unit does not respond on
the RMI
Forgot password
Forgot password on RMI • The RMI password can be cleared from the front panel
Forgot password on FPI • Look up the RMI IP address from the front panel menu
• Look up the error code and try to resolve the failure.
• Power cycle the loader by turning off and on the main
power switch on the rear of the loader.
• Contact your service representative.
• Look up the error code and try to resolve the failure.
• Power cycle the loader by turning off and on the main
power switch on the rear of the loader.
• Contact your service representative.
• Verify that the Ethernet cable is connected to the correct
hub
• Verify the Ethernet settings via the front panel. See user
and installation guide, chapter “Remote management” for
details.
• Reboot the loader by issuing a system reset. Wait at least
30 seconds for the RMI to initialize.
• Power cycle the loader by turning off and on the main
power switch on the rear of the loader. Wait at least 30
seconds for the RMI to initialize.
• Contact your service representative.
interface. See the user and installation guide for details
(see figure “The complete menu tree”).
(view data menu).
• Connect the RMI interface and perform a memory dump of
the loader (see user and installation guide for details).
• Send the memdump to your Service representative. The
FPI password can be decoded from the memdump by
using a special SW.
60 FastStor 1 Installation and User Guide
Page 67

The Error Screen
When the FastStor 1 detects an error condition, the red/amber Fault LED is
illuminated and one of the error screens appears on the front panel. Figure 7.1
illustrates how the FastStor 1 reports error conditions on the front panel display:
Error : 1109–6A0133
Failed to stow
at slot 9 (Drive)
Details Actions
Figure 7.1 Error Code Page
The top line shows an Error code in the following format: XXXX-YYRRVV
The XXXX is the error number, while the YY is the internal loader error code.
The RRVV is the FW revision numbers, where RR is the major revision and VV
is the minor revision.
The next two lines give more detailed error information. There are two option
buttons, “Details” and “Actions”. Pressing the Details button gives access to a
multi-page error description text. Pressing Action gives access to a set of
actions that can be taken to recover from the error. An example of pressing
“Details” and continuing with pressing “More” is shown in figures 7.2 and 7.3.
Reboot the Loader
and retry the
operation.
More Back
Figure 7.2 Example of detailed information
If the problem
persists please call
technical support.
Back
Figure 7.3 Example of further detailed information
In this example, pressing “Back” twice takes you back to the Error Code Page
(figure 7.1) where you can press “Actions” to go to the Actions menu. Figure 7.4
FastStor 1 Installation and User Guide 61
Page 68

shows an example of pressing “Actions”. Pressing the buttons next to the
up/down arrows on the screen gives you access to other action options.
▲ Exit
Reboot
▼ Select
Figure 7.4 Example of action
In figure 7.4, you have been prompted to reboot the Loader. Pressing “Select”
will result in the warning message shown in figure 7.5. Press “Ok” to execute
the reboot.
You are about to
reboot the loader
AND the drive !
Cancel Ok
Figure 7.5 Warning message concerning reboot
When an error condition occurs, identify the problem using the displayed error
codes and follow the suggested actions. The error codes are listed in the next
section.
62 FastStor 1 Installation and User Guide
Page 69

Error Codes
The error codes are listed in numerical sequence by their Fault Symptom Code
(FSC) in the tables that follow. If a persistent error condition prompts you to call
your Technical Support representative, be sure to supply the code information
to help identify the problem.
Error
Code
01ZZ Diagnostic
0200 Initialization of
1001 Failed moving
11011108
Display
Message
number ZZ
failed.
the robotics
failed.
the robotics.
Failed to stow at
slot 01 .. 08
Description Suggested Action Most likely cause
(for guidance
only)
The diagnostics
number ZZ
failed.
The robotics
failed to
complete the
calibration or the
inventory
sequence.
The robotics
was not able to
move.
The robotics is
not able to stow
the cartridge to
the magazine
Reboot the loader and retry the
operation.
1. Reboot the loader and retry the
operation.
2. Verify that the magazines are
locked.
3. Turn off the loader and try to
remove the magazines by using
the emergency eject pin.
4. Contact your service
representative.
Reboot the loader and retry the
operation.
1. Reboot the loader and retry the
operation.
2. Remove the magazine if
possible. Remove all cartridges.
3. Verify that the cartridge is not
damaged.
4. Insert empty magazines.
5. Power cycle the loader.
6. Retry the operation.
7. Retry the operation with a new
magazine.
(This error code is
reserved for
future use)
Cartridge
blocked, faulty
robotics
Cartridge
blocked, faulty
robotics
Defect robotics,
defect magazine,
defect cartridge
1109 Failed to stow at
slot 09
1201
1208
1209 Failed to fetch at
Failed to fetch at
slot 01 .. 08
slot 09
Failed to insert
cartridge in drive
The robotics is
not able to fetch
the requested
cartridge from
the magazine
Failed to eject
cartridge from
drive
1. Reboot the loader and retry the
operation.
2. If failure persists, insert the
cartridge into a magazine slot,
remove the magazine and verify
that the cartridge is not damaged.
1. Reboot the loader and retry the
operation.
2. Remove the magazine if
possible. Remove all cartridges.
3. Verify that the cartridge is not
damaged.
4. Insert empty magazines.
5. Power cycle the loader.
6. Retry the operation.
7. Retry the operation with a new
magazine
1. Reboot the loader and retry the
operation.
2. Try to eject the cartridge from
Defect robotics,
defect magazine,
defect cartridge
Defect drive or
robotics. Defect
cartridge.
FastStor 1 Installation and User Guide 63
Page 70

the drive via the front panel menu.
3.Remove the drive FRU. Connect
power to drive and push the
drive’s eject button. If this fails,
remove cartridge by following the
drive’s emergency eject
procedure.
2000 Drive not found Communication
error between
the loader and
the drive.
2001 Drive hardware
fault detected.
The drive has
reported a
hardware fault.
1. Reboot the loader and retry the
operation.
2. Remove back-panel cover plate
and check the SCSI cabling and
the ADI cabling.
Reboot the loader and retry the
operation. If the problem persists
replace the drive.
SCSI and signal
cables, power
cables; defective
power supply;
defective drive.
Defective drive
64 FastStor 1 Installation and User Guide
Page 71

Appendix A – Specifications
A.1. Mechanical Dimensions and Weight
The ADIC FastStor 1 is designed as a rack mount unit. The FastStor 1 can also
be used as a tabletop unit.
Dimensions:
Length
Width
Height
Weight 14.6 kg (32.2 lb) without cartridges
Table A - 1 FastStor 1 Mechanical Dimensions and Weight
740 mm (29.13 in) ±0.5 mm from front rail to rear of unit
446.6 mm (17.58 in) ±0.5 mm
43.8 (1.72 in) ±0.4 mm
FastStor 1 Installation and User Guide 65
Page 72

A.2. Power Requirements
Input voltage 90 VAC – 264VAC
Input Frequency 47 Hz – 63 Hz
Inrush Current (Cold Start) Less than 30 A, 115VAC
Less than 60 A, 230 VAC
Power consumption average 35W
Power consumption peak* 70W*
* Maximum peak length, less than 10ms
Table A - 2 FastStor 1 Power Requirements
66 FastStor 1 Installation and User Guide
Page 73

A.3. Vibration Specifications
Sinusoidal sweep
Sweep Rates 1 octave/minute
Axes X, Y and Z
Duration 2 hours
Frequency Range
(Hz)
5 24.2 0.01 in p-p Operating
(Storage)
Transport 5 200 0.5g
Table A - 3 FastStor 1 sine sweep levels
24.2 500 0.3g
5 27.1 0.02 in p-p Non-Operating
27.1 500 0.75g
Level
Random
Crest factor 3
Axes X, Y, Z
Duration
Frequency
Operating
Total
Non Operating/Storage
Total
Transport 5 0.03
8 0.03
40 0.003
45 0.01
70 0.01
200 0.001
Total level 1.03g
30 min/axis
(Hz)
5 2.0E-5
17 3.0E-4
150 3.0E-4
200 8.0E-5
500 8.0E-5
0.27g
rms
5 2.3E-3
500 2.3E-3
1.07g
rms
rms
Level (g2/Hz)
Table A - 4 FastStor 1 random vibration levels
FastStor 1 Installation and User Guide 67
Page 74

A.4. Mechanical Shock Specifications
Mechanical Bump/Shock
Axes X, Y, Z
Directions Positive and negative
Pulse interval 3 seconds
Pulse
shape
Operating Half sine 5ms 3g 1000
Storage (X,Z) Half sine 8ms 20g 3
Storage (Y) Half sine 8ms 15g 3
Table A - 5 FastStor 1 mechanical shock levels
Pulse
duration
Pulse
Level
Pulses/axis/direction
A.5. Drop
Drop test
Standard ASTM D-4169
Drop sequence 10 drops, 1 corner, 3 edges, 6 faces
Drop height 30 inches
Table A - 6 FastStor 1 drop test
68 FastStor 1 Installation and User Guide
Page 75

A.6. Climatic Specifications
Temperature
Operating Range
Gradient
Non-Operating Range
Gradient
Table A - 7 FastStor 1 temperature specification
+10°C to +35°C
10°C/hour
-35°C to +60°C
20°C/hour
Installing the equipment in a closed or multi-unit rack assembly, the operating
ambient temperature of the rack environment may be greater than room
ambient.
Humidity
Operating Range 20%Rh to 80%Rh
Gradient 10%Rh/hour
Non-Operating Range 10%Rh to 90%Rh
Gradient 20%Rh /hour
Table A - 8 FastStor 1 humidity specification
Altitude
Operating Range -500 to 10000 ft
Non-Operating Range -500 to 40000 ft
Table A - 9 FastStor 1 altitude specification
A.7. Noise Specification
Acoustic
Idle (LwA) 60 dBA
Operating (LwA) 65 dBA
Table A - 10 FastStor 1 noise specification
A.8. Product Reliability
MTBF: 250.000 hours for FastStor 1 electronics
MSBF: 250.000 Mean cartridge swaps between failures
FastStor 1 Installation and User Guide 69
Page 76

Appendix B – Safety and regulatory
information
B.1 Safety Approvals
This product complies with the following safety standards:
Europe
EN60950-1:2001
USA
UL60950-1:2003, First Edition
Canada
CSA C22.2 No. 60950-1-3 1
CB report
IEC 60950-1:2001
B.2 EMC Approvals
This product complies with the following EMC standards:
Europe
EN55022: 1998 +A1: 2000 +A2:2003, Class A
Warning: This is a class A product. In a domestic environment this product may
cause radio interference in which case the user may be required to take adequate
measures.
EN61000-3-2: 2000
EN61000-3-3: 1995 +A1:2001
EN55024:1998 +A1: 2001 +A2:2003
EN61000-6-2: 2001
USA
FCC part 15, Class A
Note: This equipment has been tested and found to comply with the limits for a Class
A digital device, pursuant to Part 15 of the FCC Rules. These limits are designed to
provide reasonable protection against harmful interference when the equipment is
operated in a commercial environment. This equipment generates, uses, and can
radiate radio frequency energy and, if not installed and used in accordance with the
instruction manual, may cause harmful interference to radio communications.
Operation of this equipment in a residential area is likely to cause harmful
interference in which case the user will be required to correct the interference at his
own expense.
Japan
VCCI, Class A
st
Edition April 1,2003
70 FastStor 1 Installation and User Guide
Page 77

Translation:
This is a Class A product based on the standard of the Voluntary Control Council for
Interference by Information Technology Equipment (VCCI). If this equipment is used
in a domestic environment, radio interference may occur, in which case, the user may
be required to take corrective actions.
Canada
ICES-003
This Class A digital apparatus complies with the Canadian ICES-03.
Cet appareil numérique de la classe A (ou classe B, si ainsi indiqué sur l’étiquette
d’enregistration) est conforme á la norme NMB-003 du Canada.
B.3 Conformity Declarations
Europe
CE
Marking by the CE symbol indicates compliance of this system to the applicable
Country Directives of the European Union, including the EMC directive
(89/336/EEC) and the Low Voltage Directive (73/23/EEC). A ‘Declaration of
Conformity’ in accordance with the applicable directives has been issued for this
product.
Australia/New Zealand
C-Tick, Class A
Marking by the C-Tick symbol indicates compliance of this system to the Australian
EMC standard AS/NZS 3548: 1995:’ Information Technological Equipment’. A
‘Declaration of Conformity’ in accordance with the applicable standard has been
issued for this product.
B.4 Safety Precautions
ALL SERVICE ACTIONS APPROPRIATE TO END-USERS ARE DESCRIBED IN THE
PRODUCT DOCUMENTATION. ALL OTHER SERVICING SHOULD BE REFERRED TO
AN ADIC-AUTHORIZED SERVICE TECHNICIAN.
FastStor 1 Installation and User Guide 71
Page 78

NEVER PULL MORE THAN ONE COMPONENT OUT OF THE RACK AT A TIME. DOING
SO CAN CAUSE THE RACK TO TIP OVER, WHICH COULD CAUSE BODILY INJURY.
Maschinenlärminformations-Verordnung 3. GPSGV: Der höchste Schalldruckpegel
beträgt 70 db(A) oder weniger gemäß EN ISO 7779, falls nicht anders gekennzeichnet
oder spezifiziert.
72 FastStor 1 Installation and User Guide
 Loading...