

Page 1

Administrative Tasks
VolServ Version 5.2
November 2003
6-01003-01 Rev A
Page 2

Trademark Notice
AMASS, DataMgr, EMASS, FileServ, and VolServ are either trademarks or registered
trademarks of ADIC, Advanced Digital Information Corporation. DAS is a trademark of
Grau, an ADIC subsidiary. All other product names and identifications are trademarks or
registered trademarks of their respective manufacturers.
Copyright Notice
© 1996-2003 ADIC®. All rights reserved. This document is the property of ADIC. No part
of this document may be reproduced, transmitted, transcribed, stored in a retrieval system,
or translated into any language or computer language in any form or by any means,
electronic, mechanical, magnetic, optical, chemical, manual, or otherwise, without the
express written permission of:
ADIC USA
Tel.: +1 303-705-3900
Fax: +1-303-792-2465
ATAC: 1-800-827-3822
http://www.adic.com
ADIC Europe
ZAC des Basses Auges
1, rue Alfred de Vigny
78112 Fourqueux, France
Tel.: +33.1.3087.5300
Fax: +33.1.3087.5301
ADIC Germany Beteiligungs
GmbH, KG
Eschenstraße 3
D-89558 Böhmenkirch, Germany
Tel:+00.800.9999.3822
U.S. Government Rights Restricted
Use, duplication, or disclosure of either the software or documentation is subject to
restrictions set forth by the U.S. Government in FAR 52.227-19(c)(2) and subparagraph
(c)(1)(ii) of the Rights in Technical Data and Computer Software clause at DFARS 52.2277013 and/or in similar or following clauses in the FAR, DoD, or NASA FAR Supplement.
Technical Assistance
ADIC Technical Assistance Center:
• In the USA and Canada, call 1-800-827-3822
• Outside the USA or Canada, call 303-874-0188 or toll-free 00800-9999-3822.
• Send e-mail to: support@adic.com
Documentation
Although the material contained herein has been carefully reviewed, ADIC does not
warrant it to be free of errors or omissions. We reserve the right to make corrections,
updates, revisions, or changes to the information contained herein.
• Send e-mail to: techdocs@adic.com
Page 3

READER COMMENT FORM
ADIC includes this Form in an effort to provide the best possible documentation to our
customers. Please take a few moments to mail or FAX your response to:
ADIC USA
Tel.: +1 303-705-3900
Fax: +1-303-792-2465
ATAC: 1-800-827-3822
http://www.adic.com
ADIC Europe
ZAC des Basses Auges
1, rue Alfred de Vigny
78112 Fourqueux, France
Tel.: +33.1.3087.5300
Fax: +33.1.3087.5301
ADIC Germany Beteiligungs
GmbH, KG
Eschenstraße 3
D-89558 Böhmenkirch, Germany
Tel:+00.800.9999.3822
Question Circle One
Information was complete. Agree Disagree
Information was easy to find. Agree Disagree
Information was easy to follow. Agree Disagree
Is there anything you especially like or dislike about the organization, presentation,
or writing in this manual?______________________________________________
___________________________________________________________________
___________________________________________________________________
___________________________________________________________________
_____________________________________________________________________
Book Title Document Number
Customer Name Telephone
E-mail Address
Company Name
Address
City, State, Zip
Page 4

NOTES
Page 5

Administrative Tasks
Preface
Purpose of This Book . . . . . . . . . . . . . . . . . . . . . . . . . . . . . . . . . . . . . . . . . . . . . . . . P-3
Who Should Read This Book . . . . . . . . . . . . . . . . . . . . . . . . . . . . . . . . . . . . . . . . . P-3
How This Book is Organized . . . . . . . . . . . . . . . . . . . . . . . . . . . . . . . . . . . . . . . . . P-3
Conventions . . . . . . . . . . . . . . . . . . . . . . . . . . . . . . . . . . . . . . . . . . . . . . . . . . . . . . . P-4
Books . . . . . . . . . . . . . . . . . . . . . . . . . . . . . . . . . . . . . . . . . . . . . . . . . . . . . . . . . . . . . P-5
Online Books . . . . . . . . . . . . . . . . . . . . . . . . . . . . . . . . . . . . . . . . . . . . . . . . . . . . P-5
Related Publications . . . . . . . . . . . . . . . . . . . . . . . . . . . . . . . . . . . . . . . . . . . . . P-6
Contact Publications Department . . . . . . . . . . . . . . . . . . . . . . . . . . . . . . . . . . P-6
Secured Web Site . . . . . . . . . . . . . . . . . . . . . . . . . . . . . . . . . . . . . . . . . . . . . . . . P-6
Getting Started 1
Command Access . . . . . . . . . . . . . . . . . . . . . . . . . . . . . . . . . . . . . . . . . . . . . . . . . . . .1-3
CLI and API Access Control . . . . . . . . . . . . . . . . . . . . . . . . . . . . . . . . . . . . . . . .1-3
GUI Access Control . . . . . . . . . . . . . . . . . . . . . . . . . . . . . . . . . . . . . . . . . . . . . . .1-6
Environment Management . . . . . . . . . . . . . . . . . . . . . . . . . . . . . . . . . . . . . . . . . . .1-12
Control Access . . . . . . . . . . . . . . . . . . . . . . . . . . . . . . . . . . . . . . . . . . . . . . . . . .1-13
Software Protection . . . . . . . . . . . . . . . . . . . . . . . . . . . . . . . . . . . . . . . . . . . . . .1-15
System Logging . . . . . . . . . . . . . . . . . . . . . . . . . . . . . . . . . . . . . . . . . . . . . . . . .1-16
Configuration Environment . . . . . . . . . . . . . . . . . . . . . . . . . . . . . . . . . . . . . . .1-17
Library Defaults . . . . . . . . . . . . . . . . . . . . . . . . . . . . . . . . . . . . . . . . . . . . . . . . .1-18
Archive Dispatcher . . . . . . . . . . . . . . . . . . . . . . . . . . . . . . . . . . . . . . . . . . . . . .1-19
GUI Environment . . . . . . . . . . . . . . . . . . . . . . . . . . . . . . . . . . . . . . . . . . . . . . . .1-20
Process Server Defaults . . . . . . . . . . . . . . . . . . . . . . . . . . . . . . . . . . . . . . . . . . .1-21
VolServ Defaults . . . . . . . . . . . . . . . . . . . . . . . . . . . . . . . . . . . . . . . . . . . . . . . .1-21
6-01003-01 Rev A Contents i
Page 6

Administrative Tasks
CiReply Environment . . . . . . . . . . . . . . . . . . . . . . . . . . . . . . . . . . . . . . . . . . . .1-22
Archive Defaults . . . . . . . . . . . . . . . . . . . . . . . . . . . . . . . . . . . . . . . . . . . . . . . .1-23
Configuration Logging . . . . . . . . . . . . . . . . . . . . . . . . . . . . . . . . . . . . . . . . . . .1-24
Installation . . . . . . . . . . . . . . . . . . . . . . . . . . . . . . . . . . . . . . . . . . . . . . . . . . . . .1-25
VolServ Database . . . . . . . . . . . . . . . . . . . . . . . . . . . . . . . . . . . . . . . . . . . . . . . .1-25
TCP/IP Interface . . . . . . . . . . . . . . . . . . . . . . . . . . . . . . . . . . . . . . . . . . . . . . . .1-25
printers.
config Files . . . . . . . . . . . . . . . . . . . . . . . . . . . . . . . . . . . . . . . . . . . . . . . . . . . . . . . .1-27
Other .config Files . . . . . . . . . . . . . . . . . . . . . . . . . . . . . . . . . . . . . . . . . . . . . . .1-27
Start-up and Shutdown 2
Start-Up Equipment . . . . . . . . . . . . . . . . . . . . . . . . . . . . . . . . . . . . . . . . . . . . . . . . . .2-3
Start-Up VolServ . . . . . . . . . . . . . . . . . . . . . . . . . . . . . . . . . . . . . . . . . . . . . . . . .2-3
Start the System Console . . . . . . . . . . . . . . . . . . . . . . . . . . . . . . . . . . . . . . . . . . .2-5
Recovery Processing . . . . . . . . . . . . . . . . . . . . . . . . . . . . . . . . . . . . . . . . . . . . . .2-6
Backup VolServ . . . . . . . . . . . . . . . . . . . . . . . . . . . . . . . . . . . . . . . . . . . . . . . . . .2-6
Shutdown Software . . . . . . . . . . . . . . . . . . . . . . . . . . . . . . . . . . . . . . . . . . . . . . . . . .2-7
Shutdown System Console . . . . . . . . . . . . . . . . . . . . . . . . . . . . . . . . . . . . . . . . .2-7
Shutdown VolServ . . . . . . . . . . . . . . . . . . . . . . . . . . . . . . . . . . . . . . . . . . . . . . . .2-8
Gracefully Terminate VolServ . . . . . . . . . . . . . . . . . . . . . . . . . . . . . . . . . . . . . .2-9
Initial Configuration 3
Configure an Archive . . . . . . . . . . . . . . . . . . . . . . . . . . . . . . . . . . . . . . . . . . . . . . . .3-3
Configure an Automated Archive . . . . . . . . . . . . . . . . . . . . . . . . . . . . . . . . . .3-4
Auto Check-in . . . . . . . . . . . . . . . . . . . . . . . . . . . . . . . . . . . . . . . . . . . . . . . . . . . .3-9
Auto Import . . . . . . . . . . . . . . . . . . . . . . . . . . . . . . . . . . . . . . . . . . . . . . . . . . . .3-12
ii Contents 6-01003-01 Rev A
Page 7

Administrative Tasks
Configure a Manual Archive . . . . . . . . . . . . . . . . . . . . . . . . . . . . . . . . . . . . . .3-15
Media Type . . . . . . . . . . . . . . . . . . . . . . . . . . . . . . . . . . . . . . . . . . . . . . . . . . . . .3-16
Register Archive with VolServ . . . . . . . . . . . . . . . . . . . . . . . . . . . . . . . . . . . . . . .3-18
Define a Media Type . . . . . . . . . . . . . . . . . . . . . . . . . . . . . . . . . . . . . . . . . . . .3-18
Create a Media Class . . . . . . . . . . . . . . . . . . . . . . . . . . . . . . . . . . . . . . . . . . . . . . .3-19
Media Class Name . . . . . . . . . . . . . . . . . . . . . . . . . . . . . . . . . . . . . . . . . . . . . . .3-20
Media Type . . . . . . . . . . . . . . . . . . . . . . . . . . . . . . . . . . . . . . . . . . . . . . . . . . . . .3-20
Class Capacity . . . . . . . . . . . . . . . . . . . . . . . . . . . . . . . . . . . . . . . . . . . . . . . . . .3-20
Mountable By Class . . . . . . . . . . . . . . . . . . . . . . . . . . . . . . . . . . . . . . . . . . . . . .3-22
High Mark Notification . . . . . . . . . . . . . . . . . . . . . . . . . . . . . . . . . . . . . . . . . . .3-22
Use Callbacks and Callback Information . . . . . . . . . . . . . . . . . . . . . . . . . . . .3-23
Create an Archive Media Class . . . . . . . . . . . . . . . . . . . . . . . . . . . . . . . . . . . . . . .3-24
Archive Class Percentage . . . . . . . . . . . . . . . . . . . . . . . . . . . . . . . . . . . . . . . . .3-24
Action Mode, Low Mark, High Mark . . . . . . . . . . . . . . . . . . . . . . . . . . . . . . .3-26
Migration Priority and Archive . . . . . . . . . . . . . . . . . . . . . . . . . . . . . . . . . . . .3-31
Preferred Media Placement . . . . . . . . . . . . . . . . . . . . . . . . . . . . . . . . . . . . . . .3-31
Create a Drive . . . . . . . . . . . . . . . . . . . . . . . . . . . . . . . . . . . . . . . . . . . . . . . . . . . . .3-32
Associate a Drive with an Archive . . . . . . . . . . . . . . . . . . . . . . . . . . . . . . . . .3-33
Define a Label Pattern . . . . . . . . . . . . . . . . . . . . . . . . . . . . . . . . . . . . . . . . . . .3-34
Add Media to an Archive . . . . . . . . . . . . . . . . . . . . . . . . . . . . . . . . . . . . . . . .3-35
Normal Operations 4
Overview . . . . . . . . . . . . . . . . . . . . . . . . . . . . . . . . . . . . . . . . . . . . . . . . . . . . . . . . . . .4-4
Backup . . . . . . . . . . . . . . . . . . . . . . . . . . . . . . . . . . . . . . . . . . . . . . . . . . . . . . . . . .4-4
Command Priorities . . . . . . . . . . . . . . . . . . . . . . . . . . . . . . . . . . . . . . . . . . . . . . . . .4-5
Command Cancellation . . . . . . . . . . . . . . . . . . . . . . . . . . . . . . . . . . . . . . . . . . .4-5
6-01003-01 Rev A Contents iii
Page 8

Administrative Tasks
Archive Management . . . . . . . . . . . . . . . . . . . . . . . . . . . . . . . . . . . . . . . . . . . . . . . .4-6
Configure/ Reconfigure an Archive . . . . . . . . . . . . . . . . . . . . . . . . . . . . . . . .4-6
Delete an Archive . . . . . . . . . . . . . . . . . . . . . . . . . . . . . . . . . . . . . . . . . . . . . . . .4-6
Change Archive Parameters . . . . . . . . . . . . . . . . . . . . . . . . . . . . . . . . . . . . . . .4-7
Vary Archive . . . . . . . . . . . . . . . . . . . . . . . . . . . . . . . . . . . . . . . . . . . . . . . . . . . .4-7
Vary Archive Component . . . . . . . . . . . . . . . . . . . . . . . . . . . . . . . . . . . . . . . . .4-8
Redefine a Media Type . . . . . . . . . . . . . . . . . . . . . . . . . . . . . . . . . . . . . . . . . . .4-8
Create/Modify/ Delete a Media Class . . . . . . . . . . . . . . . . . . . . . . . . . . . . . . .4-9
Create/Modify an Archive Media Class . . . . . . . . . . . . . . . . . . . . . . . . . . . . .4-9
Delete an Archive Media Class . . . . . . . . . . . . . . . . . . . . . . . . . . . . . . . . . . . .4-10
Define Media Migration Policy . . . . . . . . . . . . . . . . . . . . . . . . . . . . . . . . . . . .4-10
Modify Media Migration Policy . . . . . . . . . . . . . . . . . . . . . . . . . . . . . . . . . . .4-12
Add Archive to Existing Installation . . . . . . . . . . . . . . . . . . . . . . . . . . . . . . .4-14
Audit an Archive . . . . . . . . . . . . . . . . . . . . . . . . . . . . . . . . . . . . . . . . . . . . . . . .4-14
Drive Management . . . . . . . . . . . . . . . . . . . . . . . . . . . . . . . . . . . . . . . . . . . . . . . . .4-16
Create and Associate a Drive . . . . . . . . . . . . . . . . . . . . . . . . . . . . . . . . . . . . .4-16
Disassociate and Delete a Drive . . . . . . . . . . . . . . . . . . . . . . . . . . . . . . . . . . .4-16
Create or Modify a Drive Pool . . . . . . . . . . . . . . . . . . . . . . . . . . . . . . . . . . . .4-17
Delete a Drive Pool . . . . . . . . . . . . . . . . . . . . . . . . . . . . . . . . . . . . . . . . . . . . . .4-18
Mount Media on a Drive . . . . . . . . . . . . . . . . . . . . . . . . . . . . . . . . . . . . . . . . .4-18
Dismount Media from a Drive . . . . . . . . . . . . . . . . . . . . . . . . . . . . . . . . . . . .4-21
Intransit Media (Mount) . . . . . . . . . . . . . . . . . . . . . . . . . . . . . . . . . . . . . . . . . .4-22
Lock a Drive . . . . . . . . . . . . . . . . . . . . . . . . . . . . . . . . . . . . . . . . . . . . . . . . . . . .4-22
Unlock a Drive . . . . . . . . . . . . . . . . . . . . . . . . . . . . . . . . . . . . . . . . . . . . . . . . . .4-22
Vary Drive . . . . . . . . . . . . . . . . . . . . . . . . . . . . . . . . . . . . . . . . . . . . . . . . . . . . .4-22
Media Management . . . . . . . . . . . . . . . . . . . . . . . . . . . . . . . . . . . . . . . . . . . . . . . . .4-24
Enter Unknown Media into an Archive . . . . . . . . . . . . . . . . . . . . . . . . . . . .4-24
Enter Known Media into an Archive . . . . . . . . . . . . . . . . . . . . . . . . . . . . . . .4-29
iv Contents 6-01003-01 Rev A
Page 9

Administrative Tasks
Remove Media from an Archive . . . . . . . . . . . . . . . . . . . . . . . . . . . . . . . . . . .4-31
Clear Eject List Entries . . . . . . . . . . . . . . . . . . . . . . . . . . . . . . . . . . . . . . . . . . .4-33
Move Media to Another Archive . . . . . . . . . . . . . . . . . . . . . . . . . . . . . . . . . .4-34
Intransit Media (Move) . . . . . . . . . . . . . . . . . . . . . . . . . . . . . . . . . . . . . . . . . . .4-34
Modify Media Criteria . . . . . . . . . . . . . . . . . . . . . . . . . . . . . . . . . . . . . . . . . . .4-34
Define a Media Type . . . . . . . . . . . . . . . . . . . . . . . . . . . . . . . . . . . . . . . . . . . .4-35
Reclassify Media . . . . . . . . . . . . . . . . . . . . . . . . . . . . . . . . . . . . . . . . . . . . . . . .4-36
Define or Delete a Label Pattern . . . . . . . . . . . . . . . . . . . . . . . . . . . . . . . . . . .4-37
Reprint a Media Label . . . . . . . . . . . . . . . . . . . . . . . . . . . . . . . . . . . . . . . . . . .4-37
System Reports . . . . . . . . . . . . . . . . . . . . . . . . . . . . . . . . . . . . . . . . . . . . . . . . . . . . .4-39
Query Archive . . . . . . . . . . . . . . . . . . . . . . . . . . . . . . . . . . . . . . . . . . . . . . . . . .4-39
Query Drive . . . . . . . . . . . . . . . . . . . . . . . . . . . . . . . . . . . . . . . . . . . . . . . . . . . .4-42
Query Drive Pool . . . . . . . . . . . . . . . . . . . . . . . . . . . . . . . . . . . . . . . . . . . . . . .4-44
Query Mount . . . . . . . . . . . . . . . . . . . . . . . . . . . . . . . . . . . . . . . . . . . . . . . . . . .4-46
Query Media . . . . . . . . . . . . . . . . . . . . . . . . . . . . . . . . . . . . . . . . . . . . . . . . . . .4-46
Query Media Location . . . . . . . . . . . . . . . . . . . . . . . . . . . . . . . . . . . . . . . . . . .4-49
Query Intransit Media . . . . . . . . . . . . . . . . . . . . . . . . . . . . . . . . . . . . . . . . . . .4-51
Query Media Class . . . . . . . . . . . . . . . . . . . . . . . . . . . . . . . . . . . . . . . . . . . . . .4-52
Query Media Type . . . . . . . . . . . . . . . . . . . . . . . . . . . . . . . . . . . . . . . . . . . . . .4-57
Query Request . . . . . . . . . . . . . . . . . . . . . . . . . . . . . . . . . . . . . . . . . . . . . . . . . .4-58
Query Connect . . . . . . . . . . . . . . . . . . . . . . . . . . . . . . . . . . . . . . . . . . . . . . . . . .4-59
CIient Operations . . . . . . . . . . . . . . . . . . . . . . . . . . . . . . . . . . . . . . . . . . . . . . . . . . .4-61
Connect . . . . . . . . . . . . . . . . . . . . . . . . . . . . . . . . . . . . . . . . . . . . . . . . . . . . . . . .4-61
Disconnect . . . . . . . . . . . . . . . . . . . . . . . . . . . . . . . . . . . . . . . . . . . . . . . . . . . . .4-61
Multimount Media . . . . . . . . . . . . . . . . . . . . . . . . . . . . . . . . . . . . . . . . . . . . . .4-61
6-01003-01 Rev A Contents v
Page 10

Administrative Tasks
Archive Operations 5
Automated Archive Operations . . . . . . . . . . . . . . . . . . . . . . . . . . . . . . . . . . . . . . .5-3
Enter Media . . . . . . . . . . . . . . . . . . . . . . . . . . . . . . . . . . . . . . . . . . . . . . . . . . . . . .5-4
Eject Media . . . . . . . . . . . . . . . . . . . . . . . . . . . . . . . . . . . . . . . . . . . . . . . . . . . . . .5-6
Audit . . . . . . . . . . . . . . . . . . . . . . . . . . . . . . . . . . . . . . . . . . . . . . . . . . . . . . . . . . .5-7
Unsolicited Enter Operation . . . . . . . . . . . . . . . . . . . . . . . . . . . . . . . . . . . . . .5-10
Manual Archive Operations . . . . . . . . . . . . . . . . . . . . . . . . . . . . . . . . . . . . . . . . . .5-11
Enter Media . . . . . . . . . . . . . . . . . . . . . . . . . . . . . . . . . . . . . . . . . . . . . . . . . . . . .5-11
Eject Media . . . . . . . . . . . . . . . . . . . . . . . . . . . . . . . . . . . . . . . . . . . . . . . . . . . . .5-12
Mount Media . . . . . . . . . . . . . . . . . . . . . . . . . . . . . . . . . . . . . . . . . . . . . . . . . . .5-12
Dismount Media . . . . . . . . . . . . . . . . . . . . . . . . . . . . . . . . . . . . . . . . . . . . . . . .5-12
Audit . . . . . . . . . . . . . . . . . . . . . . . . . . . . . . . . . . . . . . . . . . . . . . . . . . . . . . . . . .5-12
Reprint Label . . . . . . . . . . . . . . . . . . . . . . . . . . . . . . . . . . . . . . . . . . . . . . . . . . .5-13
Troubleshoot 6
Troubleshoot Resources . . . . . . . . . . . . . . . . . . . . . . . . . . . . . . . . . . . . . . . . . . . . . .6-3
User Environment . . . . . . . . . . . . . . . . . . . . . . . . . . . . . . . . . . . . . . . . . . . . . . . . . . .6-5
Initialization/Configuration . . . . . . . . . . . . . . . . . . . . . . . . . . . . . . . . . . . . . . . . . .6-9
Archive Specific Issues . . . . . . . . . . . . . . . . . . . . . . . . . . . . . . . . . . . . . . . . . . . . . .6-13
General Database Issues . . . . . . . . . . . . . . . . . . . . . . . . . . . . . . . . . . . . . . . . . . . . .6-15
Printer Issues . . . . . . . . . . . . . . . . . . . . . . . . . . . . . . . . . . . . . . . . . . . . . . . . . . . . . .6-16
vi Contents 6-01003-01 Rev A
Page 11

Preface
Purpose of This Book . . . . . . . . . . . . . . . . . . . . . . .P-3
Who Should Read This Book . . . . . . . . . . . . . . . .P-3
How This Book is Organized . . . . . . . . . . . . . . . .P-3
Conventions . . . . . . . . . . . . . . . . . . . . . . . . . . . . . .P-4
Books . . . . . . . . . . . . . . . . . . . . . . . . . . . . . . . . . . . .P-5
Online Books . . . . . . . . . . . . . . . . . . . . . . . . . . .P-5
Related Publications . . . . . . . . . . . . . . . . . . . .P-6
Contact Publications Department . . . . . . . . .P-6
Secured Web Site . . . . . . . . . . . . . . . . . . . . . . .P-7
P
Preface
Page 12

Administrative Tasks
NOTES
P-2 Preface 6-01003-01 Rev A
Page 13

Administrative Tasks
Preface
Purpose of This Book
Who Should Read This Book
How This Book is Organized
This book describes the management tasks used to operate
VolServ.
This book is written for the system administrator who is
operating and troubleshooting VolServ.
It assumes the administrator has a strong familiarity with:
• UNIX operating systems
• Applications running in their site environment
This book contains the following chapters:
Chapter 1: Getting Started — Introduces the document and it’s
conventions. Also contains general software installation information.
Chapter 2: Start-up and Shutdown — A discussion of VolServ
system operation pertaining to equipment and software start-up and
shutdown
.
Chapter 3: Initial configuration —
system operations pertaining to initial software and site-dependant
parameter definition.
Chapter 4: Normal Operations — A discussion of normal
VolServ system operations including environment management,
archive management, drive management, media management,
system queries, and database maintenance.
Chapter 5: Archive Operations — A discussion of the VolServ
Archive Operator and applicable capabilities.
6-01003-01 Rev A Preface P-3
A discussion of VolServ
Page 14
Administrative Tasks
Chapter 6: Troubleshoot — Troubleshooting tips for VolServ
software problems.
Conventions
The conventions used throughout the VolServ technical books
are listed below:
Convention Example
Screen text, file names, program names, and
commands are in Courier font.
The root prompt is shown as a number
symbol.
What you should type in is shown in Courier
bold font.
Site-specific variables are in a Times italics
font.
A backward slash ( \ ) denotes the input is
continued onto the next line; the printed page
is just not wide enough to accommodate the
line.
Pressing <Return> after each command is
assumed.
Request to add a new volume:
Volume group will be “20”
Volume position will be “A123”.
# su root
vsarchiveqry
tar -xvf tapedevicename
#
remsh nodename -n dd if=/dev \
/tapedevicename/bs=20b | tar xvfb \
- 20
(You should type the entire command witho ut
the backward slash.)
A menu name with an arrow refers to a
sequence of menus.
P-4 Preface 6-01003-01 Rev A
Config-->MediaType-->Redefine
Page 15

Administrative Tasks
Preface
Books
The books described below are part of the technical
documentation set, and are shipped on CD along with the
VolServ software:
Overview
Provides an ov erview of VolServ . Co ntains a
glossary.
Installing VolServ
Describes server requirements, installation
instructions, troubleshooting procedures,
and configuration parameters.
Using the VolServ GUI
Describes how to perform system
administrative tasks using th e graphical user
interface.
API Guide
Provides a list of API functions.
Administrative Tasks
Describes how to perform system
administrative tasks using VolServ
commands.
Command Reference
Contains a list of VolServ commands
Error Messages
Provides corrective action f or system log
errors.
Quick Reference Card
Summarizes commands.
Online Books
The documentation CD contains VolServ book files and
requires the Adobe® Acrobat® Reader to view the
accompanying electronic documentation. The Reader allows
you to view and navigate the electronic documentation files yet
preserves the page design and graphics from the printed books.
6-01003-01 Rev A Preface P-5
Page 16
Administrative Tasks
Related Publications
Related Publications Description
“Release Notes” For each version of VolServ, the “Release Notes” contain:
“Product Alerts” Informs customers of technical problems and solutions.
“Product Bulletins” Conveys technical information—not problems—to
The publications described in the table below are created and
distributed on an as-needed basis.
• Summary of enhancements
• Describes:
- Fixed problems
- Known problems
- Installation and configuration issues
•Lists:
- Operating system patches
- System requirements
customers.
Contact Publications Department
Secured Web Site
To make corrections or to comment on VolServ publications,
please contact Software Technical Publications at our e-mail
address: techdocs@adic.com.
To receive access to the secured site on our home page
containing technical product information (Release Notes,
Product Alerts, Product Bulletins, FAQs), visit
http://partners.adic.com/ and follow the password request
procedure. In return, ADIC will send you instructions and a
password.
P-6 Preface 6-01003-01 Rev A
Page 17

Command Access . . . . . . . . . . . . . . . . . . . . . . . . . . 1-3
CLI and API Access Control . . . . . . . . . . . . . . 1-3
GUI Access Control . . . . . . . . . . . . . . . . . . . . . 1-6
Environment Management . . . . . . . . . . . . . . . . .1-12
1
Control Access . . . . . . . . . . . . . . . . . . . . . . . .1-13
Software Protection . . . . . . . . . . . . . . . . . . . . 1-15
System Logging . . . . . . . . . . . . . . . . . . . . . . .1-16
Configuration Environment . . . . . . . . . . . . . 1-18
Library Defaults . . . . . . . . . . . . . . . . . . . . . . . 1-19
Archive Dispatcher . . . . . . . . . . . . . . . . . . . . 1-20
GUI Environment . . . . . . . . . . . . . . . . . . . . . . 1-21
Process Server Defaults . . . . . . . . . . . . . . . . .1-22
VolServ Defaults . . . . . . . . . . . . . . . . . . . . . . 1-23
CiReply Environment . . . . . . . . . . . . . . . . . .1-23
Archive Defaults . . . . . . . . . . . . . . . . . . . . . . 1-24
Configuration Logging . . . . . . . . . . . . . . . . . 1-27
Installation . . . . . . . . . . . . . . . . . . . . . . . . . . . 1-27
VolServ Database . . . . . . . . . . . . . . . . . . . . . . 1-28
TCP/IP Interface . . . . . . . . . . . . . . . . . . . . . . 1-28
printers.config Files . . . . . . . . . . . . . . . . . . . . . . . 1-29
Other .config Files . . . . . . . . . . . . . . . . . . . . . 1-29
Getting Started
Getting
Started
Page 18

Administrative Tasks
Roadmap
Topic
General software access information 1
Hardware and software start-up 2
Site-specific configuration of archives and drives 3
Daily operations 4
Archive operation and configuration 5
Troubleshooting tips and solutions 6
Refer To
Chapter
1-2 Getting Started 6-01003-01 Rev A
Page 19

Administrative Tasks
Command Access
CLI and API Access Control
After VolServ is installed, the VolServ System Administrator
(SA) configures the VolServ environment to control Command
Line Interface (CLI), Application Program Interface (API), and
Graphical User Interface (GUI) access to the VolServ system.
The following sections provide a recommended plan for
controlling access to specific VolServ software commands.
The commands available to any application via CLI or API are
controlled by the command.config file, which is located in
the directory $VS_DIR/config. There are entries in the
command.config file for each command available over the
CLI or API. The SA can control access to individual commands
by editing the command.config file and commenting out the
command not authorized. Individual commands can also be
disallowed by using the GUI Client Commands windo w. Refer
to the Using the VolServ GUI or the appropriate VolServ
software manual.
A client application is a hardware/software package performing
data management service for the user or as an intermediary to
other client programs. Although the CLI may be used, client
applications primarily interact with VolServ through the API.
Each client application generates volume server requests
through the API for selected VolServ software commands.
Getting Started
6-01003-01 Rev A Getting Started 1-3
Page 20

Administrative Tasks
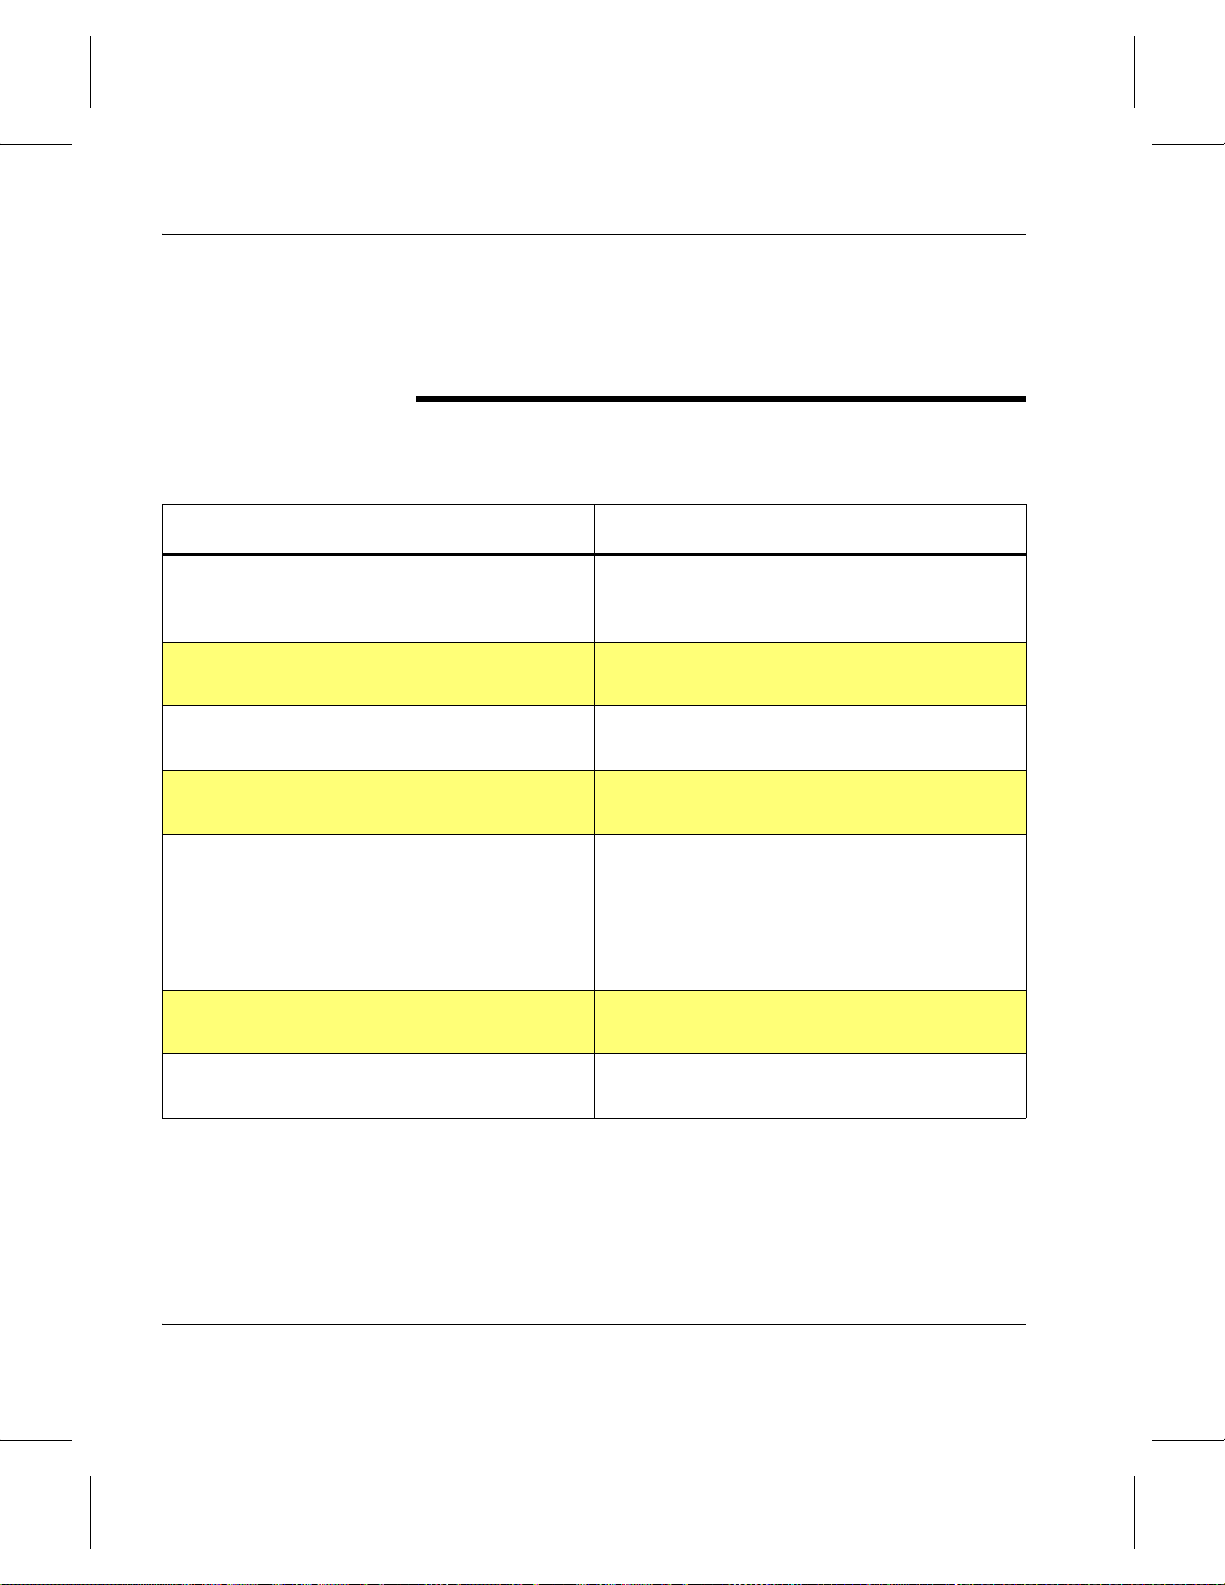
The commands available to a client application are sho wn in the
following table.
Capability Description
Media Operations
Import Media Inserts media into the system and update the VolServ
database with the new media identifiers.
Export Media Removes media from the system and any knowledge of the
media identifier from the VolServ database.
Check-in Media Logically checks media into the VolServ system that were
checked out.
Check-out Media Checks media out of an archive.
Clear Eject Removes the specified media from the archive’ s Eject list.
Mount Media Mounts a medium into a drive.
Multimount Media Allows multiple mount requests for multiple drives.
Dismount Media Dismounts a medium from a drive.
Modify Media Allows the addition of media statistics, manufacturer, and
batch information to be associated with a medium or media.
Move Media Moves media from one archive to another.
Reclassify Media Changes the media class group name of a medium or med ia.
Administration
Audit Performs an archive inventory verification.
Connect Allows request status to be routed to a different location
using the enterprise identifier for location.
Disconnect Removes the location established by the connect command.
Vary Archive Changes the state of the archive from On-Line, Off-Line, or
Diagnostic.
1-4 Getting Started 6-01003-01 Rev A
Page 21
Administrative Tasks
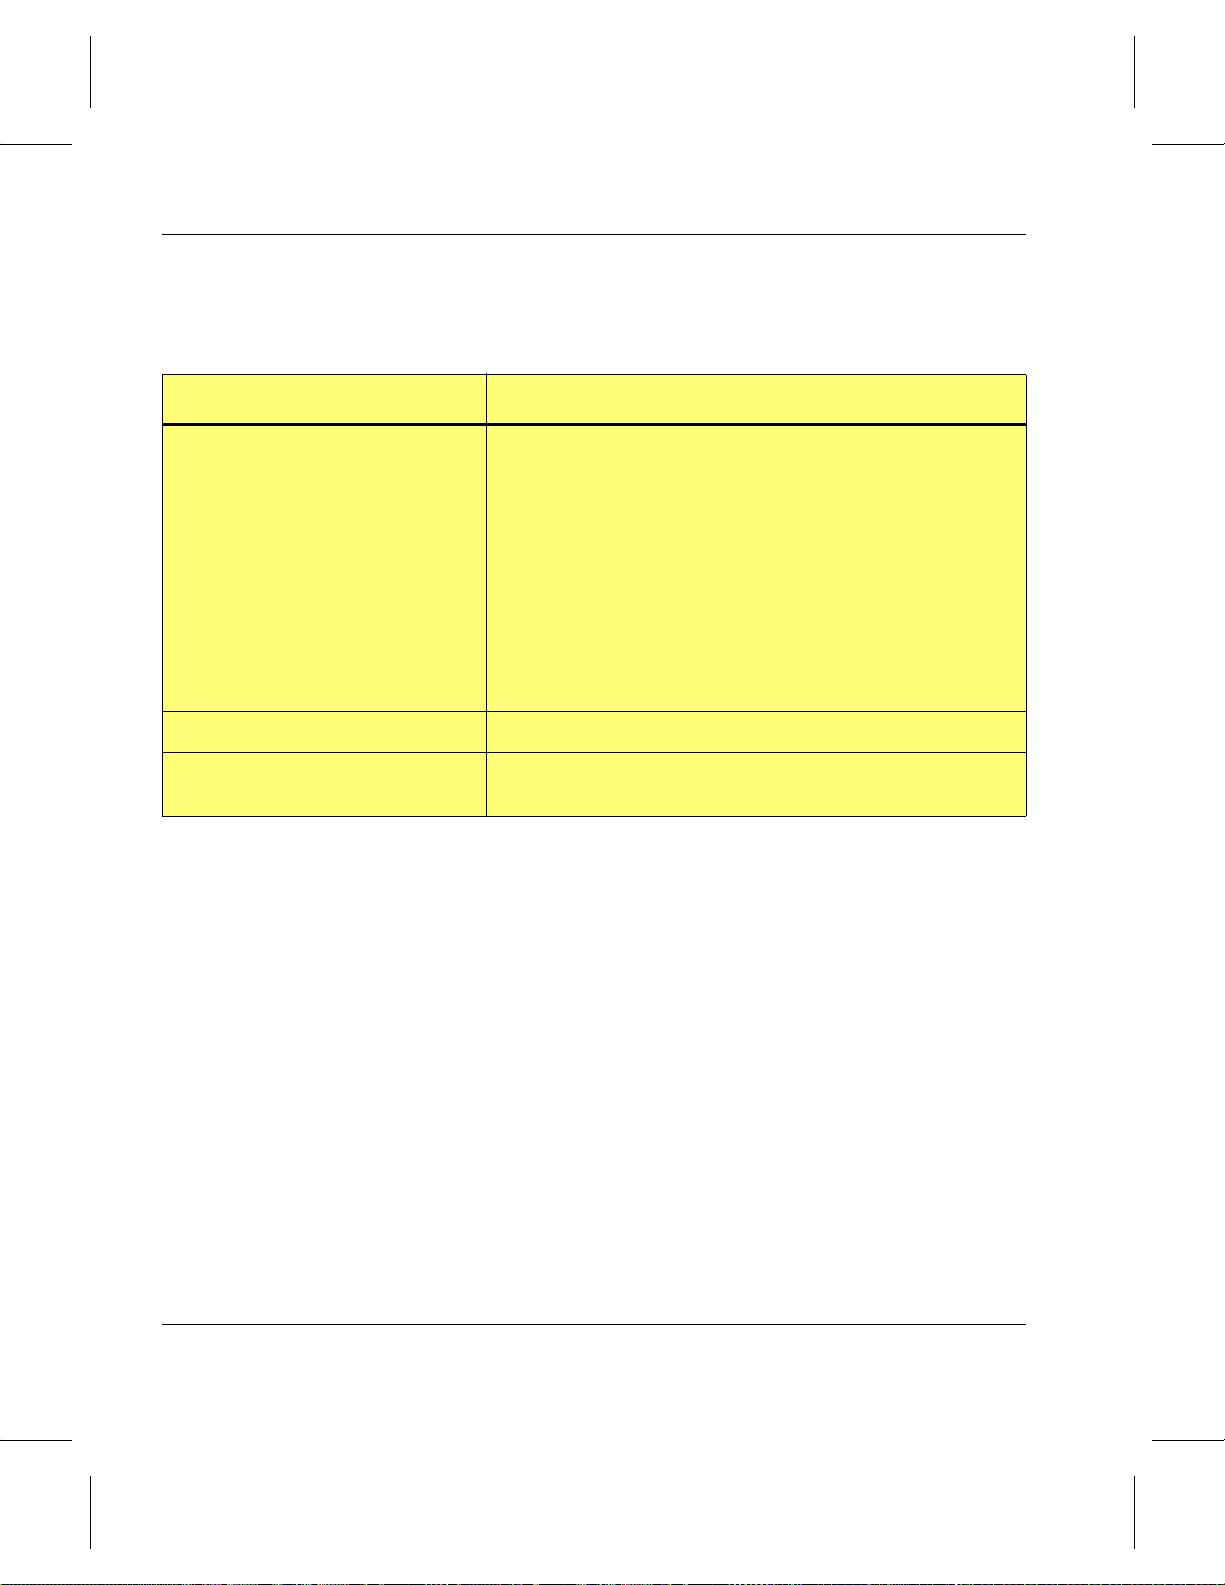
Capability Description
Vary Drive Changes the state of the archive from On-Line, Off-Line,
Diagnostic, or On-Line/Clear.
Cancel Request Cancels requests based on request identifier.
Reprioritize Request Changes the priority level of a request.
Lock Drive Obtains exclusive use of one or more drives.
Unlock Drive Releases exclusive use of one or more drives.
Configure
Create Drive Pool Associates a group of drive types having the same
characteristics with a logical group name.
Modify Drive Pool Changes the parameters associated with a drive pool.
Delete Drive Pool Removes a drive pool from the system.
Create Media Class Creates a Media Class in the VolServ system.
Getting Started
Modify Media Class Modifies a Media Class’ parameters.
Delete Media Class Removes a Media Class from the VolServ system.
Create Archive Media Class Associates a Media Class with an archive.
Modify Archive Media Class Modifies the parameters associated with an archive Media
Class.
Delete Archive Media Class Removes an archive Media Class from the VolServ system.
Queries
Query Archive Repor t showing information about an archive.
Query Drive Report showing information about a drive or drives.
Query Driv e Pool Report showing inf ormation about a specified drive pool or all
drive pools known to the VolServ system.
Query Mount Report showing information about drives that could be used
in a subsequent mount of a specified medium .
6-01003-01 Rev A Getting Started 1-5
Page 22

Administrative Tasks
Capability Description
Query Media Report showing the attributes of one or more specified
media.
Query Intransit Media Report showing information about media that are in the
Intransit state.
Query Media Class Report showing the attributes of a specified Media Class or
all Media Class known to the VolServ system.
Query Media Type Report showing the attributes of one or more media types.
Query Request Report showing inform ation about a specified request.
Query Connect Report showing enterprise connection information.
The client application permissions can be changed at any time.
To make the changes effective, VolServ must be cycled.
GUI Access Control
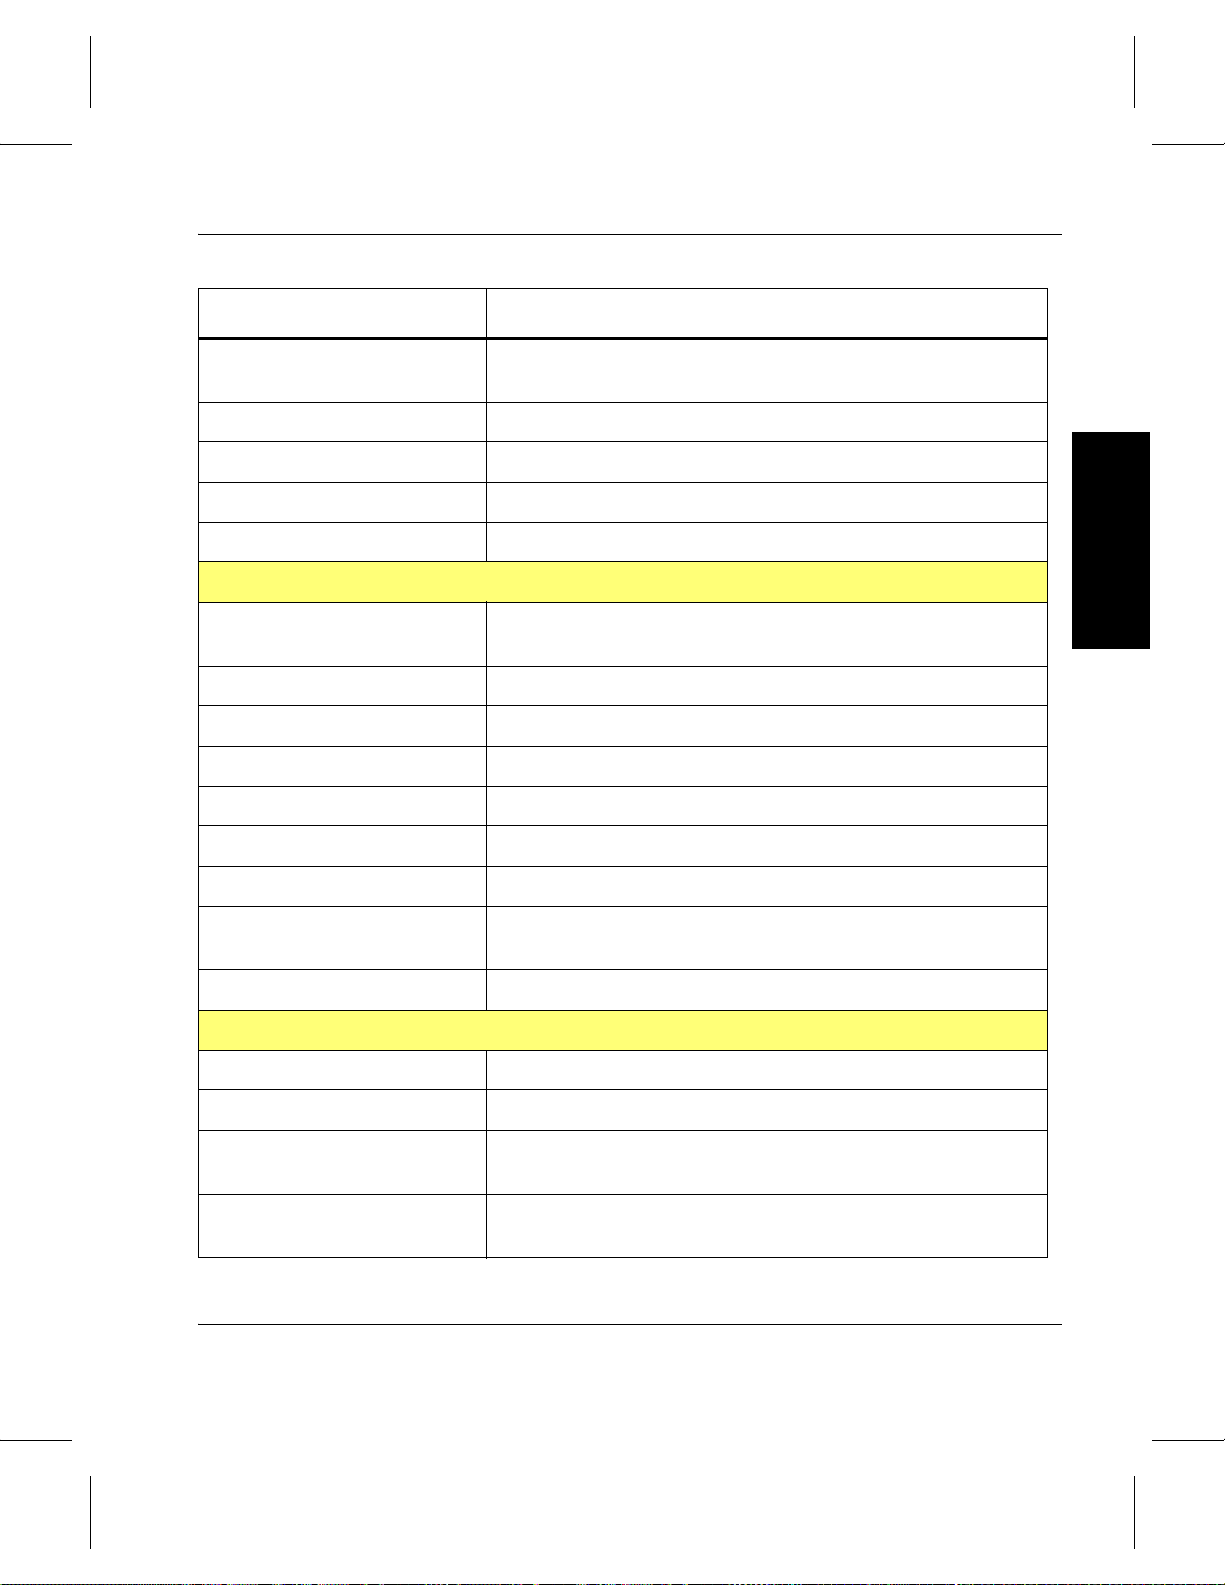
The commands available via the GUI are controlled by the
operator.config file, which is located in the
$VS_DIR/config directory. There are entries in the
operator.config file for each command available through
the GUI. The SA can control access to individual GUI
commands by editing the operator.config file and
commenting out the command not authorized. Individual
commands can also be disallowed by using the GUI Operator
Commands window. Refer to Using the VolServ GUI or the
appropriate VolServ software manual.
Although the CLI can be used, the System Operator (SO)
primarily uses the GUI to access VolServ software commands.
The SO may have the same privileges as the SA or a subset of
the privileges as determined by the SA.
1-6 Getting Started 6-01003-01 Rev A
Page 23
Administrative Tasks
Separate access for the SA and SO is maintained through the
use of group permissions. If the SO’s user ID is defined in the
vsadmin group, the SO will have GUI access to the commands
defined by the SA in the operator.config file and the SO
will have CLI access to the commands def ined b y the SA in the
command.config file.
The following table shows the commands available to the SA
and the recommended commands for a SO.
Capability Description SA SO
Media Operations
Getting Started
Import Media Inserts media into the system
and updates the VolServ
database with the new media
identifiers.
Export Media Removes media from the
system and any knowledge of
the media identifier from the
VolServ database.
Check-in Media Logically checks media into the
VolServ system that were
checked out.
Check-out Media Checks media out of the
VolServ system.
Manual Eject Updates the VolServ database
for problem or jammed media
physically removed from the
VolServ system.
Clear Eject Removes the specified media
from the archive’s Eject list.
Mount Media Mounts a medium or media into
a drive.
XX
X
XX
XX
XX
XX
XX
6-01003-01 Rev A Getting Started 1-7
Page 24
Administrative Tasks
Capability Description SA SO
Dismount Media Dismounts a medium from a
drive.
Modify Media Allows the addition of media
statistics, manufacturer, and
batch information to be
associated with a medium or
media.
Move Media Moves media from one archive
to another.
Reclassify Media Changes the Media Class
name of a medium or media.
Administration
Change Archive
Parameters
Performs an archive inventory
verification.
Vary Archive Changes the state of the
archive from On-Line, Off-Line,
or Diagnostic.
Vary Archive
Component
Changes the state of an archiv e
component from On-Line,
Off-Line, or Diagnostic.
XX
XX
XX
XX
XX
XX
XX
Vary Drive Changes the state of the
XX
archive from On-Line, Off-Line,
Diagnostic, or On-Line/Clear.
Cancel Request Cancels requests based on
XX
request identifier.
Reprioritize
Request
Unlock Drive Releases exclusive use of one
Changes the priority level of a
request.
XX
XX
or more drives.
Reprint Media
Label
1-8 Getting Started 6-01003-01 Rev A
Reprints media label for a
specific medium or media.
XX
Page 25
Administrative Tasks
Capability Description SA SO
Configure
Configure Archive Adds an archive to the VolServ
system.
Create Drive Adds a drive to the VolServ
system.
Associate Drive Associates a drive with an
archive.
Disassociate Drive Disassociates a drive from an
archive.
Delete Drive Removes drive from the
VolServ system.
Create Drive Pool Associates a group of drives
types having the same
characteristics with a logical
group name.
Modify Drive Pool Changes the parameters
associated with a drive pool.
Delete Drive Pool Removes a drive pool from the
system.
Create Media
Class
Creates a Media Class in the
VolServ system.
X
X
Getting Started
X
X
X
X
X
X
X
Modify Media Class Modifies a Media Class’
X
parameters.
Delete Media Class Removes a Media Class from
X
the VolServ system.
Create Archive
Media Class
Modify Archive
Media Class
Associates a Media Class with
an archive.
Modifies the parameters
associated with an archive
X
X
Media Class.
6-01003-01 Rev A Getting Started 1-9
Page 26
Administrative Tasks
Capability Description SA SO
Delete Archive
Media Class
Removes an archive Media
Class from the VolServ system.
Define Media Type Defines a me dia type to be
used within the VolServ system.
Define Label
Pattern
Adds a label pattern to the
VolServ system.
Queries
Query Archive Report showing information
about an archive.
Query Drive Report showing information
about a drive or drives.
Query Drive Pool Report showing information
about a specified drive pool or
all drive pools known to the
VolServ system.
Query Mount Report showing information
about drives that could be used
in a subsequent mount of a
specified medium.
X
XX
XX
XX
XX
XX
XX
Query Media
Location
Report showing where a
specific medium or media are
XX
located in the VolServ system.
Query Media Report sho wing the attributes of
XX
one or more specified media.
Query Intransit
Media
Report showing information
about media that are in the
XX
Intransit state.
Query Media Class Report showing the attributes of
XX
a specified Media Class or all
Media Classes known to the
VolServ system.
1-10 Getting Started 6-01003-01 Rev A
Page 27
Administrative Tasks
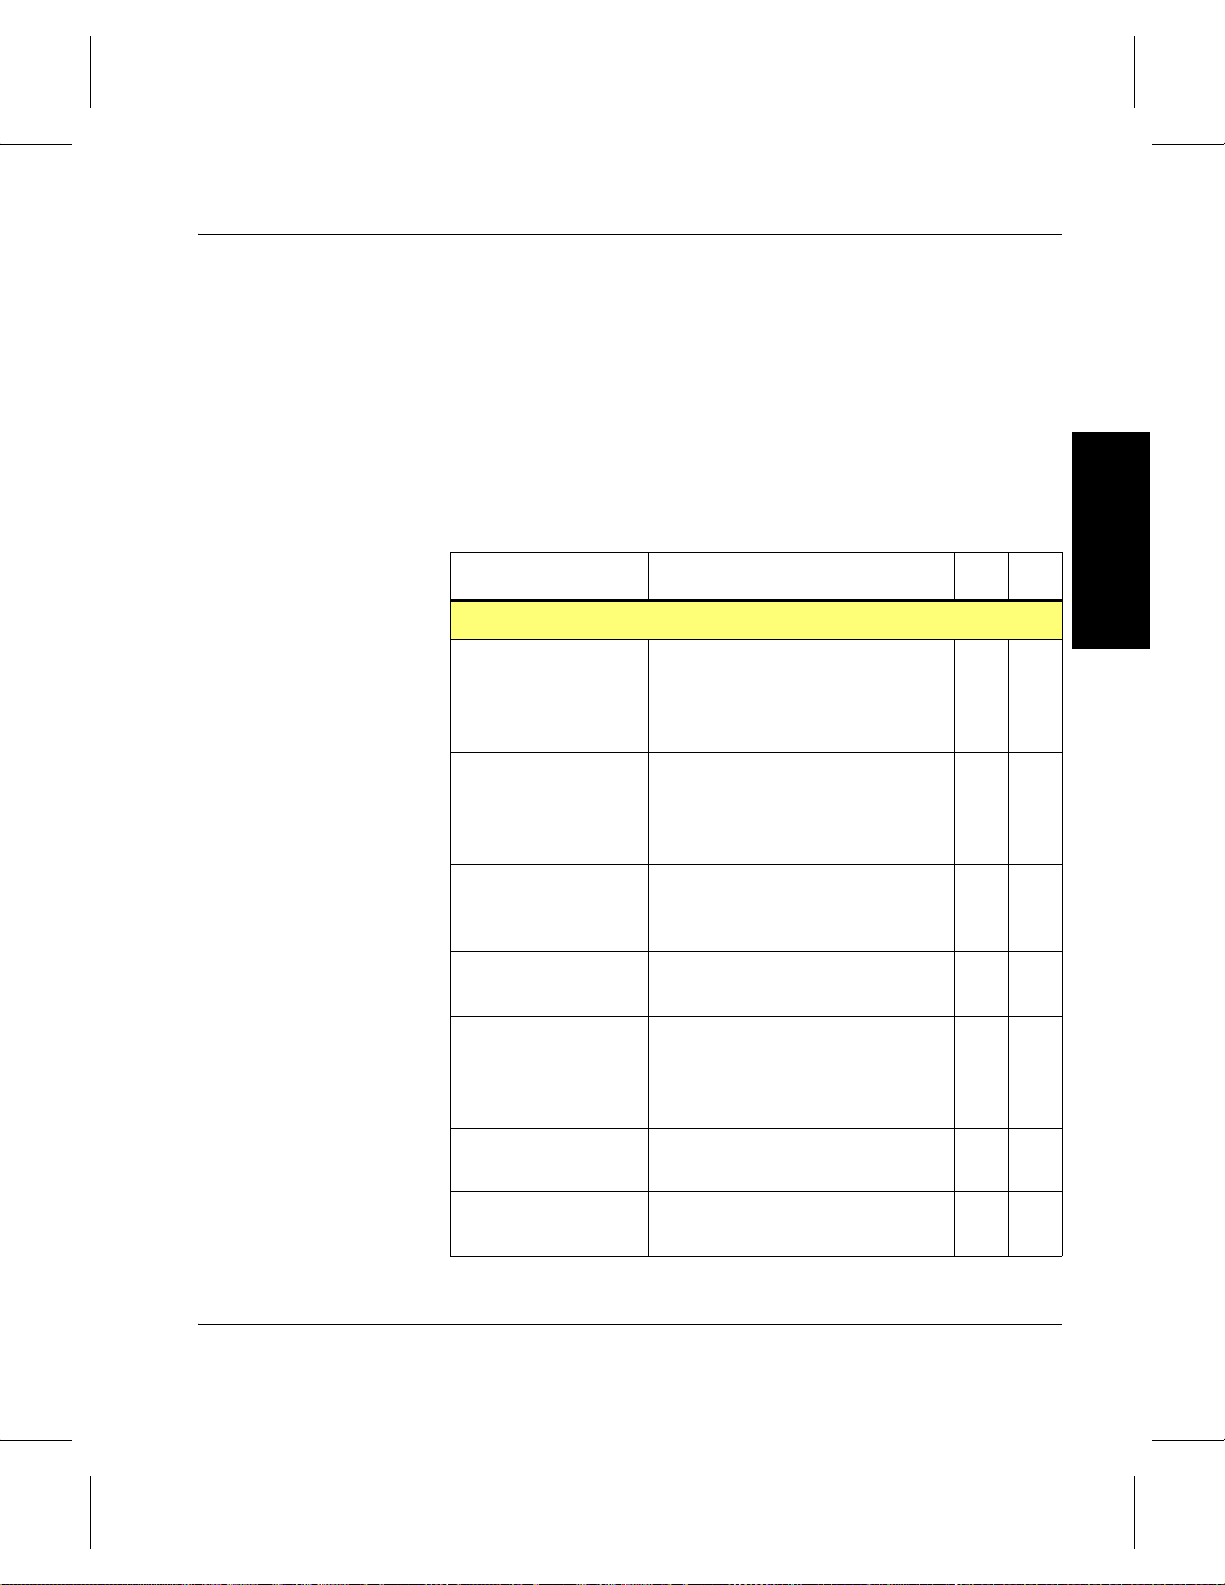
Capability Description SA SO
Query Media T ype Report sho wing the attributes of
one or more media types.
Query Request Report showing information
about a specified request.
Query Connect Report showing enterprise
connection information.
XX
XX
Getting Started
XX
6-01003-01 Rev A Getting Started 1-11
Page 28

Administrative Tasks
Environment Management
VolServ uses global variables that help define the system
environment. These v ariables are located in the *.config f iles
located in the $VS_DIR/config directory. The VS_DIR
environment variable contains VolServ home directory and is
defined during installation. These files include:
• command.config
• operator.config
• console.config
• console_locations.config
•envvar.config
• label_printers.config
• printers.config
• process.config
• servers.config
The environment v a riables contained in the *.config files are
edited by the SA to customize the software for a particular site
using a text editor. Default values containing embedded spaces
must be enclosed within double quotes. For example,
This value has embedded spaces: “4 2 6”
This value does not: 421
VolServ must be cycled when
*.config files are modified.
Upon restart, a service utility is called by various
processes/routines to establish the environment variable values
within the VolServ environment.
1-12 Getting Started 6-01003-01 Rev A
Page 29

Administrative Tasks
To cycle VolServ, use volserv -t; for information, see
“Gracefully Terminate VolServ” on page 2-9. Also use the
volserv command; for information, see “Start-Up VolServ” on
page 2-3.
Control Access
These two files are used to control access to CLI, API, and GUI
commands. For information about these files, see “CLI and API
Access Control” on page 1-3 and see “GUI Access Control” on
page 1-6.
console.config File Messages are generated by VolServ to notify the user or SA of
VolServ software’s actions. Messages are displayed in response
to a command or when certain events occur.
Note
This file does not affect t he envvar.config file variable
SYSLOG_DISK_LEVEL
The console.config file, located in the $VS_DIR/config
directory, allows various system log messages to be saved to a
particular file. The log messages that are saved are based on
priority levels (i.e., trace, debug, error, etc.) set in the
console.config file. By default, all log files are located in
the $VS_DIR/logs directory. If the log file specified in the
console.config file does not exist, it is automatically
created.
Getting Started
The priority levels and formats used for system log messages
are described in the VolServ Error Messages book.
console_locations. config File
The
console_locations.config file located in the
$VS_DIR/config directory is a reference file for console
names; e.g., Workstation:0 used in the VolServ system.
6-01003-01 Rev A Getting Started 1-13
Page 30

Administrative Tasks
Workstation entries in this file are accessible when using the
Change Archive Parameters command. Refer to the
appropriate VolServ software manual. Clicking the right mouse
button when using the Change Archiv e Parameters command
displays the console names contained in this file, allowing one
to be selected and automatically entered as the location for the
archive Console.
Any console not in this file can still be accessed, b ut it does not
appear when the right mouse button is clicked.
envvar.config File The envvar.config file contains variables that control
general VolServ activities. Refer to text contained in the
envvar.config file for more detailed information. The
variables in this file are grouped into the following categories:
Variable Description
Software Protection Established at the time of system
installation.
System Logging Modified as required for site
logging levels.
Configuration Environment Modified as required for de leting
an archive.
Library Defaults Default for query processing.
Archive Dispatcher Modified as required for archive
communications.
GUI Environment Established at the time of system
installation.
Process Server Default Modified as required for software
communications.
VolServ Defaults Modified as required for software
activation and termination.
1-14 Getting Started 6-01003-01 Rev A
Page 31

Administrative Tasks
CiReply Environment Established at the time of system
installation.
Archive Defaults Modified as required for each
archive (robotic and manual).
Configuration Logging Modified as required for
debugging of interfaces.
Installation Established at the time of system
installation.
VolServ Dat abase Established at the time of system
installation.
Software Protection
The software protection variables contained in the following
tables allow VolServ and associated archives to operate. These
variables should not be modified unless directed by ADIC
Technical Assistance Center (ATAC) personnel. VolServ must
be cycled for the changes to become effective.
Variable Name Default Description
VOLSERV_LICENSE_STRING Unique text string Allows VolServ software to run.
<ARCTYPE>_LICENSE_STRING Unique text string Allows VolServ software to run
with a specific archive type.
Getting Started
6-01003-01 Rev A Getting Started 1-15
Page 32

Administrative Tasks
System Logging
The following table illustrates the variables that can be
modified, as required, to choose logging levels for each site.
VolServ must be cycled for the changes to become effective.
Variable Name Default Description
NUM_LOG_DAYS 3 The maximum number of days of log files that
are saved by the movelog.sh script.
LOG_BACKUP_TIME 6 The number of hours between log backup
attempts.
VS_LOG_SIZE 5120 The size, in kilobytes, above which the VolServ
log files are saved and truncated by the
movelog.sh script.
SYSLOG_DISK_LEVEL 7 Two purposes:
All messages between this level and zero are
automatically routed to the file vslogfile. All
messages that are not routed elsewhere are
sent to this file. Used to catch messages that
are generated before routing has been
established. This is the first filter of messages,
it overrides the settings in console.config.
No messages with a greater level value are
able to be routed else where . Used as an upper
limit to reduce message traffic.
Upper limit for the level of syslog messages that are generated for each software function.
LIB_SYSLOG_LEVEL 6 Library Scheduler
LIBMAN_SYSLOG_LEVEL 6 Library Manager
ARCDISP_SYSLOG_LEVEL 6 Archive Display
ARCMAN_SYSLOG_LEVEL 6 Archive Manager.
VSWIN_SYSLOG_LEVEL 6 VolServ Administration GUI
CONSOLE_SYSLOG_LEVEL 6 Archive Console
CIREPLY_SYSLOG_LEVEL 6 Client Interface Reply (CiReply)
CIREQUEST_SYSLOG_LEVEL 6 Client Interface Request (CiRequest)
1-16 Getting Started 6-01003-01 Rev A
Page 33

Administrative Tasks
Variable Name Default Description
PROCSERV_SYSLOG_LEVEL 6 Process Server
MONITOR_SYSLOG_LEVEL 6 Monitor
ARCMAN_CAPACITY_DELTA 10 The difference between this value and the full
capacity of an archive is used as an alarm
zone that notifies the operator that the archive
is close to becoming full. (This parameter is
based on type, not class). A syslog message is
generated to indicate the absolute capacity of
an archive is imminent. The message is a level
critical message and is generated each time
the fill level for the archive is incremented until
the fill level is decreased.
QUERYCOMP_SYSLOG_LEVEL 6 QueryComp utility
Getting Started
Configuration Environment
Variable Name Default Description
DELETE_ARCHIVE_WITH_
MEDIA
The following table illustrates the variables that can be
modified, as required, to delete archiv es. VolServ must be
cycled for the changes to become effective..
N This value is used when deleting an
archive. The correct values are:
N - Do not delete the archive if media are in
it.
Y - Delete the archive even if media is in it.
6-01003-01 Rev A Getting Started 1-17
Page 34

Administrative Tasks
Variable Name Default Description
DELETE_ARCHIVE_MEDIA_ACTI
ONSTATE
Library Defaults
The query process variables shown below can be modified, as
required. These variables should not be modified unless
directed by ATAC personnel. VolServ must be cycled for the
changes to become effective.
Library Scheduler
Variable Name
INTRANSIT This value is used when deleting an
archive and when DELETE
_ARCHIVE_WITH_MEDIA is Y. The correct
values are:
INTRANSIT - Place any media in the
archive to be deleted into the intransit
state.
EXPORT - Export any media that remain in
the archive to be deleted.
If DELETE_ARCHIVE_WITH
_MEDIA is N, then this environment
variable is not used.
Default Description
LIB_MAX_TASKS 5 The maximum number of query r equests
that may be spawned consecutively.
Others are queued until this parameter
value falls below this number. Adjust this
parameter based on the numb er of queries
normally used at one time.
LIB_ALARM_TIME 60 Number of seconds between each internal
alarm. The alarm is for internal
housekeeping. It checks for inactive
processes. Each inactive process that is
encountered is terminated.
LIB_INTERFACE_TIME 60 Number of seconds this process waits to
receive expected status over IPC . Increase
if IPC traffic is extremely heavy.
1-18 Getting Started 6-01003-01 Rev A
Page 35

Administrative Tasks
Library Scheduler
Variable Name
LIB_IPC_WAIT_TIME 5 Number of seconds this process pauses
LIB_IPC_RETRIES 30 Maximum number of times this process
Library Manager Variables
LIBMAN_INTERFACE_TIME 60 Number of seconds this process waits to
LIBMAN_IPC_WAIT_TIME 5 Number of seconds this process pauses
LIBMAN_IPC_RETRIES 30 Maximum number of times this process
Default Description
between attempts to send inf ormation over
IPC. Increase this parameter if IPC traffic is
extremely heavy.
attempts to send information over IPC.
Increase if IPC traffic is extremely heavy.
receive expected status over IPC . Increase
if IPC traffic is extremely heavy.
between attempts to send inf ormation over
IPC. Increase this parameter if IPC traffic is
extremely heavy.
attempts to send information over IPC.
Increase if IPC traffic is extremely heavy.
Getting Started
Archive Dispatcher
The following table lists the variables that can be modified, as
required, to modify archive communication times. VolServ
must be cycled for the changes to become effective.
Variable Name Default Description
ARCDISP_IPC_RETRIES 10 The number of retries that the archive
dispatcher tries to connect to the VolServ
process before failing.
6-01003-01 Rev A Getting Started 1-19
Page 36

Administrative Tasks
Variable Name Default Description
ARCDISP_IPC_WAIT_
TIME
GUI Environment
The GUI environment variables in the following table can be
modified, as required, to define specif ic GUI parameters. These
1 The amount of time in seconds between
each retry that the archiv e dispatcher waits
before trying to connect to the VolServ
process. Increase this value if syslog
message V360 with an error of 9 is
received.
variables should not be modified unless directed by ATAC
personnel. VolServ must be cycled for the changes to become
effective.
Variable Name Default Description
VS_DEF_PRIORITY 15 The request priority for operations that do
not have a v ariab le priority scale fo r setting
the priority.
VS_MAX_LIST_LENGTH 1000 The maximum number of items that can
populate the media list for a media filter. If
more than this number are selected, the
filter search fails and asks for a more
narrow description of the media IDs
required.
VS_MAX_TEXT_LENGTH 20000 The maximum number of characters
allowed to fill a status window. Once
reached, the status messages are
removed in FIFO order. If this number is
too large, system performance is
degraded.
VSWIN_IPC_RETRIES 3 The number of times vsadm attempts to
connect over IPC.
VSWIN_IPC_RETRY_TIME 180 Number of seconds vsadm attempts to
reconnect to processes over IPC after a
connection to those processes is lost.
1-20 Getting Started 6-01003-01 Rev A
Page 37

Variable Name Default Description
Administrative Tasks
XAPPLRESDIR default path
(identified by
$VS_DIR/default
s)
VSRPT_PAGE_LENGTH 0 The page length for the query report in
Process Server Defaults
The following table sho ws the vari ables that can be modified, as
required, to change the software communications. VolServ must
The path to the defaults for all of the GUI
windows is defined by this variable. If this
variable is not set, the defaults must be put
in the /usr/lib/X11/app-defaults
directory.
vsadm. If set to 0, no page breaks and
subsequent page headers are inserted.
Typical page length is 66.
be cycled for the changes to become effective.
Variable Name Default Description
PROCSERV_TIMEOUT_VALUE 4 Number of seconds this process pauses
between attempts to communicate with the
processes initiated by bringing up or
terminating VolServ. Increase if the processing
speed of the system is extremely slow.
Getting Started
VolServ Defaults
The following table sho ws the vari ables that can be modified, as
required, to change the time associated with activating and
terminating VolServ. VolServ must be cycled for the changes to
become effective.
Variable Name Default Description
VOLSERV_START_TIMEOUT 600 Timeout, in seconds, to wait for VolServ to start.
VOLSERV_QUIT_TIMEOUT 300 Timeout, in seconds, to wait for VolServ to
terminate immediately.
6-01003-01 Rev A Getting Started 1-21
Page 38

Administrative Tasks
Variable Name Default Description
VOLSERV_TERM_TIMEOUT 600 Timeout, in seconds, to wait for VolServ to
terminate gracefully.
CiReply Environment
The following table sho ws the vari ables that can be modified, as
required, to change the time associated client, status, and RPC
commands. These variables should not be modified unless
directed by ATAC personnel. VolServ must be cycled for the
changes to become effective.
Variable Name Default Description
CIREPLY_RETRY_INTERVAL 120 Wait interval in seconds for trying to
re-send status.
CIREPLY_MAX_RETRY 1 The number of times to retry before
giving up on a client. An infinite number
of retries can be commanded b y setting
this value to -1.
CIREPLY_RPC_TIMEOUT 5 The RPC timeout value.
CIREPLY_RPC_RETRY 1 The number of RPC retries allowed.
CIREPLY_COMMANDS_TO_
RETRY
ENTERPRISE_ROUND_
SCHEDULING
4 The maximum number of commands to
attempt within one try interval.
Y The type of scheduling for sending
status/callbacks to enterprises. Answ er
Y or N. For round robin scheduling,
answer Y. For first received first
scheduled, answer N.
1-22 Getting Started 6-01003-01 Rev A
Page 39

Administrative Tasks
Archive Defaults
This table shows the variables associated with each type of
archive supported by VolServ. Only those variables associated
with the site’s archive configuration should be modified.
VolServ must be cycled for the changes to become effective.
Variable Name Default Description
AMTask Environment Variables
ARCHIVE_CMD_WAIT_TIME 600 Maximum wait time in seconds to wait f or q ueued
primitives.
CLM_DISMOUNT_RETRIES 3 The maximum wait time in seconds for queued
primitives.
CLM_DISMOUNT_RETRIES 3 The number of times a dismount is retried to
allow the CLM to finish moving the medium from
the recorder to the CLM bin. VolServ waits for the
amount of time specified in
CLM_DISMOUNT_WAIT_TIME before retrying.
This is only valid for a DataTower archive.
CLM_DISMOUNT_WAIT_TIME 1 The number of seconds to wait on a dismount
move retry to allow the CLM to finish moving the
medium from the recorder to the CLM bin before
retrying the dismount move. Recommended time
is 0 seconds. This is valid for a Tower system.
Getting Started
TowerAMTask Environment Variables
CAS_MEDIA_PAD_SIZE 0 Tower media ID pad. Used if V olServ is
interfaced with a Cray tpdaemon and using
media identifiers longer than 6 characters.
The default value is based on the total number of
characters in the medium identifier - 6. (e.g
mediaID = LOT0008, 7 characters -6 = 1)
CRITICAL_PROCESSING 1 Determines wh ether or not to continue
processing when tower hardw are errors are
received.
0-DO NOT 1-DO
TOWER_MAX_WAIT_TIME 15 Maximum wait time in seconds for nonqueued
primitives.
6-01003-01 Rev A Getting Started 1-23
Page 40

Administrative Tasks
Variable Name Default Description
SiloAMTask Environment Variables
SILO_MAX_WAIT_TIME 10 Maximum time in seconds for non queued
primitives.
DRIVE_MAX_ERROR_COUNT 1 Number of errors encounter ed b y a drive bef ore a
message is logged.
AMLAMTask Environment Variables
AML_MAX_WAIT_TIME 30 Maximum wait time in seconds to wait for
nonqueued primitives.
AML_MOUNT_RETRIES 1 The number of retries that the archive tries to
connect to the VolServ process before failing.
Retries are only performed if the following are
used: mount by drive pool, Media Class, media
list, or multiple media.
Configuration Logging
The following table shows the variables that can be modified as
required for debugging software interfaces. To enable these
variables, remove the comment line indicators from the
applicable variable. VolServ must be recycled for the changes to
become effective.
Variable Name Default Description
CONFIG_SYSLOG_LEVEL 6 All messages between this level and zero
are written to CONFIG_SYSLOG_FILE.
CONFIG_SYSLOG_FILE MACRO/VS_DIR/
logs/vsconfig
log
1-24 Getting Started 6-01003-01 Rev A
Syslog file of messages pertaining to
mounts, dismounts, and varies.
Page 41

Administrative Tasks
Installation
This table shows the system variables that are to be established
at the time of the system installation. Use the VolServ
installation script for this purpose.
Tip
As a general rule, do not modify these v ariable s unless the system
is completely reinitialized and reinstalled.
Variable Name Default Description
VS_ADMIN vsadm VolServ administrator identifiers
VS_GROUP vsadmin Primary group files. Any user associated with
this group will be able to perform operator
functions.
VolServ Database
The following table shows the VolServ database variables that
are to be established at the time of the system installation. Use
the VolServ installation script for this purpose. As a general
rule, do not modify these variables unless the system is
completely reinitialized and reinstalled.
Getting Started
Variable Name Default Description
DatabaseName voldb The VolSer v database name.
RetryLimit 3 Number of data base retries.
TCP/IP Interface
This table shows the variables that control some aspects of the
TCP/IP interface to VolServ. As a general rule, do not modify
these variables.
6-01003-01 Rev A Getting Started 1-25
Page 42

Administrative Tasks
Variable Name Default Description
TCPIP_CONNECT_WAIT_TIME 1 Number of times to try to connect to a socket
over TCP/IP.
TCPIP_CONNECT_RETRIES 5 Amount of time in seconds to wait between
retries to connect to a socket over TCP/IP.
1-26 Getting Started 6-01003-01 Rev A
Page 43

Administrative Tasks
printers. config Files
The label_printers.config file located in the $VS_DIR/config
directory is used as a reference file for the label printers in the
VolServ system. The printer name and type of printer are
entered in this file; e.g., ps1 postscript.The label printers must
be contained in this file to be accessed by VolServ.
The printers.config f ile located in the $VS_DIR/config
directory is used as a reference file for all the printers used in
the VolServ system; e.g., lp1, bc1, ps1, etc.
Maintaining this file ensures all printer names are accessible to
the Printer pop-up window. Refer to the appropriate VolServ
Software Manual. By placing the cursor in the Printer Name
entry box and clicking the right mouse button, a pull-down
menu containing all printer names will be displayed allowing
one to be selected and automatically entered.
Any printer not entered in the printers.config file can still
be accessed, but its name is not shown in the Printer pop-up
window.
Getting Started
Other .config Files
Caution
Do not modify these files unless directed by ATAC personnel.
The process.config and servers.config files located in
the
$VS_DIR/config directory defines the resident VolServ
processes and the arguments the processes use. These processes
are necessary for VolServ operations.
6-01003-01 Rev A Getting Started 1-27
Page 44

Administrative Tasks
NOTES
1-28 Getting Started 6-01003-01 Rev A
Page 45

Start-Up Equipment . . . . . . . . . . . . . . . . . . . . . . . . 2-3
Start-Up VolServ . . . . . . . . . . . . . . . . . . . . . . .2-3
Start the System Console . . . . . . . . . . . . . . . . . 2-5
Recovery Processing . . . . . . . . . . . . . . . . . . . . 2-6
Backup VolServ . . . . . . . . . . . . . . . . . . . . . . . . 2-6
Shutdown Software . . . . . . . . . . . . . . . . . . . . . . . . 2-7
Shutdown System Console . . . . . . . . . . . . . . . 2-7
Shutdown VolServ . . . . . . . . . . . . . . . . . . . . . . 2-8
Gracefully Terminate VolServ . . . . . . . . . . . . 2-9
2
Start-up and
Shutdown
Start-up and
Shutdown
Page 46

Adiministrative Tasks
Roadmap
Topic
General software installation information 1
Hardware and software start-up 2
Site-specific configuration of archives/drive. 3
Daily operations 4
Archive operation and configuration 5
Troubleshooting tips and solutions 6
Refer To
Chapter
2-2 Start-up and Shutdown 6-01003-01 Rev A
Page 47

Adiministrative Tasks
Start-Up Equipment
Start-Up VolServ
This chapter contains information to power-up the hardware
components of a VolServ system and information and
procedures to start-up and shutdown VolServ.
Perform start-up of all equipment in accordance with the
appropriate host computer, archi ve, and tape dri ve manufacturer
manuals.
There is no required sequence of power application for the
hardware components of the VolServ system with one
exception; power must be applied to the ER90 transport units
before power is applied to the ER90 electronic units.
Archive configuration can be performed from the Volume
Server System Console without VolServ running. Note,
however, that VolServ software initialization terminates if an
archive is being reconfigured when VolServ software
initialization is begun.
The user initializing VolServ must have root or vsadm
privileges.
Start-up and
Shutdown
Step 1. Login as vsadm, either remotely or locally, on the
VolServ host computer.
Note
Remote login requires that the en vironment wh ere
the command is executed be properly set up as
described in the Installing VolServ book for the
appropriate host platform.
Step 2. Type volserv or volserv -s at the command line.
hostname% volserv
6-01003-01 Rev A Start-up and Shutdown 2-3
Page 48

Adiministrative Tasks
The volserv command starts VolServ in the
multiuser mode. Client interface commands are
accepted after initialization completes. Commands
received prior to initialization completion are failed
and the error, ERR_SOFTWARE_NOT_READY, is
returned.
hostname% volserv -s
The volserv -s command starts VolServ in the
single-user mode. Only commands from the vswin
module are accepted. Client interface commands are
refused and the error,
ERR_NOT_ACCEPTING_COMMANDS, is returned.
Successful VolServ software start-up is indicated by
the display of the Volume Server SysLog Console.
The Volume Server SysLog Console displays on the location
specified in the console.config file. The console.config
file also specifies which logging levels are displayed on the
Volume Server Syslog Console.
2-4 Start-up and Shutdown 6-01003-01 Rev A
Page 49

Adiministrative Tasks
After an archive is configured, its archive Console displays at
the location specified during the configuration process. If no
archives are configured, no archive Console is displayed. Each
VolServ Archive Operator position is indicated by the presence
of this display.
The figure shown below is an example of an AML
archive Console.
Start-up and
Shutdown
Start the System Console
This procedure is performed to allow the Volume Server
System console window to display.
Step 1. Type vswin & and press <RETURN> to display
the Volume Server System console:
hostname% vswin &
6-01003-01 Rev A Start-up and Shutdown 2-5
Page 50

Adiministrative Tasks
Or, use the -d option of the vswin command to
display the Volume Server System console on a
workstation other than that identified by the
DISPLAY environment variable:
hostname% vswin -d consolename:0 &
After a moment, the Volume Server System console
appears as shown in the following screen display:
Recovery Processing
Recovery processing is performed automatically during
initialization. Recovery processing is initiated for any
commands that were not complete when VolServ last
terminated. Incomplete commands are not automatically
reissued. These commands are failed and an error message
(ERR_COMMAND_IN_UNKNOWN_STATE) is sent to the
originating client process.
Backup VolServ
2-6 Start-up and Shutdown 6-01003-01 Rev A
VolServ is backed up using standard UNIX backup procedures.
Page 51

Adiministrative Tasks
Shutdown Software
Shutdown System Console
This section provides the proper sequence of procedures to
perform when all or part of the software and equipment is to be
shutdown.
Note
To bring down all Volume Server System consoles, this
procedure must be run for each console.
A Volume Server System console need not be brought down
before shutting down VolServ. However, unless VolServ is
active, the only operation available via the Volume Server
System console is archive configuration.
This procedure must be performed from the workstation where
the Volume Server System console is displayed.
Step 1. Select Exit from the Options pull-down menu in the
upper left corner of the Volume Server System
console window.
Start-up and
Shutdown
6-01003-01 Rev A Start-up and Shutdown 2-7
Page 52

Adiministrative Tasks
Step 2. A Question box appears that contains the question
“OK to exit vswin?”..
Step 3. Click the OK button in the Question box. The
Question box and the Volume Server System
console windows close.
Shutdown VolServ
Two ways exist to bring down VolServ: gracefully and
immediately.
A graceful shutdown terminates VolServ after all command
processing ceases. Executing commands that are in a state that
allows them to be cancelled are aborted. Executing commands
that cannot be cancelled are allowed to process to completion.
Client requests received after termination processing be gins and
all pending requests are failed.
An immediate shutdown results in the immediate termination of
VolServ, without waiting for any command processing to
complete and without cancelling any commands. Any
commands executing at the time of termination must be cleaned
up when VolServ software is restarted. VolServ software
automatically performs recovery processing during the start-up
processing as discussed in “Recovery Processing” on Page 2-6.
Note
Do not attempt to bring down VolServ while an archive is being
configured or reconfigured.
2-8 Start-up and Shutdown 6-01003-01 Rev A
Page 53

Adiministrative Tasks
Make sure that an archive is not being reconfigured before an
attempt is made to bring down VolServ. VolServ aborts a
termination request if an archive is being reconfigured.
The Volume Server System console is not brought down by
this procedure. The console display can remain in place
throughout a VolServ software termination and restart. When
VolServ is terminated, the only operation available via the
Volume Server System console is the configure/reconfigure
archive operation.
Gracefully Terminate VolServ
Step 1. Login as vsadm or as root.
Step 2. Send a warning message to all users to inform them
of an impending VolServ software shutdown.
It is recommended that the message specify the time
when VolServ will be shutdown.
Step 3. Issue volserv -t from the command line at or
later than the time specified in the earlier warning
message.
Note
New client interface commands are not accepted after
the termination sequence starts.
% volserv -t
Start-up and
Shutdown
6-01003-01 Rev A Start-up and Shutdown 2-9
Page 54

Adiministrative Tasks
Step 4. Enter y to continue with shutdown.
VolServ Version 5.2 for #### (#.#) -Copyright (c) 1992 - 2001 - ADIC, Inc.
Initiating VolServ shutdown
Are you sure you wish to continue? (y/<n>) y
Setup environment variables ok
4
Shutting down VolServ system processes..Done
System processes shut down ok
Shutting down VolServ servers...........Done
Servers shut down ok
Shutting down VolServ process server.... Done
Process server shut down ok
VolServ shut down completed
The Volume Server SysLog Console and each
archive Console disappear from the terminals on
which they are displayed.
Step 5. Logout as vsadm.
2-10 Start-up and Shutdown 6-01003-01 Rev A
Page 55

NOTES
Adiministrative Tasks
Start-up and
Shutdown
6-01003-01 Rev A Start-up and Shutdown 2-11
Page 56

Adiministrative Tasks
NOTES
2-12 Start-up and Shutdown 6-01003-01 Rev A
Page 57

Configure an Archive . . . . . . . . . . . . . . . . . . . . . . 3-3
Configure an Automated Archive . . . . . . . . .3-4
Auto Check-in . . . . . . . . . . . . . . . . . . . . . . . . . 3-10
Auto Import . . . . . . . . . . . . . . . . . . . . . . . . . . 3-12
Configure a Manual Archive . . . . . . . . . . . . 3-15
Media Type . . . . . . . . . . . . . . . . . . . . . . . . . . .3-17
Register Archive with VolServ . . . . . . . . . . . . . . 3-18
Define a Media Type . . . . . . . . . . . . . . . . . . . 3-18
Create a Media Class . . . . . . . . . . . . . . . . . . . . . .3-19
3
Initial
Media Class Name . . . . . . . . . . . . . . . . . . . . . 3-20
Media Type . . . . . . . . . . . . . . . . . . . . . . . . . . .3-20
Class Capacity . . . . . . . . . . . . . . . . . . . . . . . . 3-20
Mountable By Class . . . . . . . . . . . . . . . . . . . . 3-22
High Mark Notification . . . . . . . . . . . . . . . . . 3-22
Use Callbacks and Callback Information . .3-23
Create an Archive Media Class . . . . . . . . . . . . .3-24
Archive Class Percentage . . . . . . . . . . . . . . . 3-24
Action Mode, Low Mark, High Mark . . . . . 3-26
Migration Priority and Archive . . . . . . . . . .3-31
Preferred Media Placement . . . . . . . . . . . . . 3-31
Create a Drive . . . . . . . . . . . . . . . . . . . . . . . . . . . .3-32
Associate a Drive with an Archive . . . . . . . 3-33
Define a Label Pattern . . . . . . . . . . . . . . . . . . 3-34
Add Media to an Archive . . . . . . . . . . . . . . .3-34
Configuration
Initial
Configuration
Page 58

Administrative Tasks
Roadmap
Topic
General software installation information 1
Hardware and software start-up 2
Site-specific configuration of archives and drives 3
Daily operations 4
Archive operation and configuration 5
Troubleshooting tips and solutions 6
Refer To
Chapter
3-2 Initial Configuration 6-01003-01 Rev A
Page 59

Administrative Tasks
Configure an Archive
A VolServ system includes VolServ, archives, drives, and
media. After VolServ is installed, the site-specific configuration
of archives, dri ves, and media must be input into VolServ before
normal VolServ operations can begin.
The following list identifies the actions to perform that
configure a VolServ system.
• Configure the archives to be supported.
• Define the necessary Media Classes.
• Associate the defined Media Classes with the appropriate
configured archives.
• Define the drives to be used in the configured archives.
• Associate the drives with the appropriate archives.
• Define label patterns.
• Print media labels, if appropriate.
• Add media to the configured archives.
Note
VolServ does not have to be running to configure an archive.
Before VolServ software can manage archive operations, the
software must have access to specific parameters pertaining to
each managed archive. This is performed via the Configure
Archive command.
Managed archives are either automated or manual. An
automated archive uses a mechanical robot to perform media
movement operations. A manual archive requires human
intervention to perform media movement operations.
6-01003-01 Rev A Initial Configuration 3-3
Initial
Configuration
Page 60

Administrative Tasks
Automated archives supported by VolServ include the
DataTower archive; the StorageTek ACS archive; the AML/2,
AML/E, and AML/J archive; and the ADIC Scalar 100, Scalar
1000, and Scalar 10K archives.
The manual archives supported by VolServ include the
DataShelf archive and the Stage archive.
Some of the configuration parameters required by VolServ are
archive-type dependent and are identified in the appropriate
section of the Using the VolServ GUI manual. The archive
parameters common to multiple archive types are discussed in
this chapter.
Except for the AML/E archive, configuration parameters can
only be input to VolServ via the Graphical User Interface
(GUI). An interactive script is executed to perform AML/E
archive configuration.
Configure an Automated Archive
Basic automated archive parameters include the archi ve type, an
archive name, the display host for the archive Console, the
archive mode, and the media type supported.
Archive Type The archive type parameter identifies the type of archive being
configured and enables VolServ to execute appropriate
archive-type specific logic. The valid archive types are
displayed on the Configure Archive window. The user selects
the appropriate type for the archive being configured.
Archive Name The archive name parameter is a user-specified name by which
the archive is known to the user. Valid archive names may
contain up to 16 characters, including spaces. Leading and
trailing spaces are not permitted.
3-4 Initial Configuration 6-01003-01 Rev A
Page 61

Administrative Tasks
Archive Console Display Host
This parameter determines where the archive Console displays.
After an archive is configured and registered with VolServ , the
archive Console displays at the specified location, refer to the
Start-up and Shutdown chapter for an example of an archive
Console. This archive Console example is for an AML/E
archive. All archive Console displays are similar.
The archive Console alerts the VolServ Archive Operator (AO)
when human intervention is required for media movement
operations. For example, the Check-out Media, Export Media,
and Move Media operations require that a medium or media be
ejected (physically removed) from an archi v e. The Mo ve Media
operation further requires that the ejected medium or media be
entered into another archive. Also, the Mount Media operation
can require that a medium be ejected from one archive and
entered into another archive for mounting on a specific drive.
Archive Mode The archive mode parameter indicates whether a human is
available to perform media eject and enter operations for the
archive. There are two archive mode settings: attended and
unattended.
Attended
The archive mode attended option indicates that a human is
available to perform media eject and enter operations prompted
by the archive Console.
Unattended
If the archive mode unattended option is selected, VolServ
software fails commands that require human intervention to
move media out of or into an archive. These commands are the
Check-out Media, Export Media , Move Media, and (sometimes)
Mount Media associated commands.
6-01003-01 Rev A Initial Configuration 3-5
Initial
Configuration
Page 62

Administrative Tasks
The Move Media and Mount Media associated commands
provide an override parameter that allo ws the user to pre vent the
failing of the command when the Archive Mode unattended
option is selected. When this override parameter is specified,
media movement requiring human intervention is queued until a
human completes the media movement request.
Media Type VolServ supports both system-defined (default) and
user-defined media types. The system-defined media types, and
the archives supported by the system-defined media types, are
discussed in the VolServ Overview book. User-defined media
types are not supported in automated archives.
After the supported media type is specified, capacity is
automatically calculated. Media type specific information is
entered next. This information includes action mode, low mark,
high mark, auto check-in, and auto import.
Capacity The capacity of an automated archive is automatically
calculated for each supported media type by VolServ.
Action Mode The action mode parameter specifies what action, if any,
VolServ initiates when the number of media of the specified
media type reaches the calculated high mark threshold or drops
to the calculated low mark threshold. There are three action
mode settings: none, notify, and migrate.
3-6 Initial Configuration 6-01003-01 Rev A
Page 63

Administrative Tasks
None
Notify
When the action mode none option is specified, VolServ
initiates no automatic action when the number of media of the
specified media type reaches the calculated high mark
threshold. Howev e r, when the number of media of the specified
media type reaches the archive capacity minus the
ARCMAN_CAPACITY_DELTA (default is 10) value, VolServ
software generates notification to the Volume Server SysLog
Console.
When the action mode notify option is specified, VolServ
generates notification to both the Volume Server SysLog
Console and archive Console when the number of media of the
specified media type reaches the calculated high mark threshold
or drops to the calculated low mark threshold.
It is the responsibility of the VolServ System Administrator
(SA) or VolServ System Operator (SO) to take whatever action
is appropriate in response to the notification.
If the number of media has reached the calculated media-type
high threshold, the SA or SO selects media for removal from
the archive.
If the number of media has dropped to the calculated
media-type low threshold, the SA, SO, or AO may import
additional media into the archive.
Migrate
When the action mode migrate option is specified, VolServ
automatically initiates migration of media out of the archive
when the number of media of the specified media type reaches
the calculated high mark threshold.
VolServ continues to mark media for migration until the number
of unmarked media reaches the calculated low mark threshold
for the specified media type.
6-01003-01 Rev A Initial Configuration 3-7
Initial
Configuration
Page 64

Administrative Tasks
The selection of media for migration is dependent on both
Media Classes and media types. Refer to VolServ: Introduction,
60023A for additional information on media class migration.
Also refer to Media Type Migration on page 3-29.
Media type migration occurs only if the Media Class to which
the media selected for migration belong is associated with both
the source and destination archives. Archive media class
association is covered in see “Create an Archive Media Class”
on page 3-24.
Low Mark The lo w mark parameter is a user-spec ified percentage . VolServ
software applies the low mark percentage to the archive
media-type capacity to calculate a media-type specific low
mark threshold.
Any integer value between 0 and 100, inclusive, can be
specified as the low mark percentage. The specified low mark
percentage cannot be greater than the specified high mark
percentage.
When the notify action mode option is specified, VolServ
software generates a message to both the Volume Server
SysLog Console and archive Console when the number of
media of the specified media type drops to the calculated low
mark threshold.
When the migrate action mode option is specified, VolServ
software marks media for migration out of the archive until the
number of unmarked media drops to the calculated low mark
threshold.
3-8 Initial Configuration 6-01003-01 Rev A
Page 65

Administrative Tasks
High Mark The high mark parameter is a user-specified percentage.
VolServ software applies the high mark percentage to the
archive media-type capacity to calculate a media-type specif i c
high mark threshold.
Any integer value between 0 and 100, inclusive, can be
specified as the high mark percentage. The specified high mark
percentage cannot be less than the specified low mark
percentage.
When the notify action mode option is specified, VolServ
software generates a message to both the Volume Server
SysLog Console and archive Console when the number of
media of the specified media type reaches the calculated high
mark threshold.
When the migrate action mode option is specified, VolServ
software automatically begins marking media for migration out
of the archive when the number of media of the specified media
type reaches the calculated low mark threshold.
Auto Check-in
The VolServ system provides the capability to check media out
of the system. This functionality is similar to checking a book
out of a public library. Although checked-out media are
physically located outside the control of the VolServ system,
VolServ maintains information on these media and identifies
them as checked-out.
If the VolServ system detects the physical presence of a medium
that is identified as checked-out, VolServ either initiates the
physical ejection of the medium from the VolServ system or
automatically checks the medium into the VolServ system.
There are three operations that can detect the physical presence
of checked-out media: audit, unsolicited media enter, and enter.
6-01003-01 Rev A Initial Configuration 3-9
Initial
Configuration
Page 66

Administrative Tasks
Auto Check-in During Audit
An archive audit is executed to synchronize the information in
the VolServ database with the actual media contents of a
specified archive.
When an archive audit is performed, the archive control
software reports the media contents of the archive to VolServ.
When the archive audit detects the physical presence of media
that are shown as checked-out by VolServ, the setting of the
auto check-in parameter determines the action taken by
VolServ.
• If the auto check-in option is enabled, VolServ
automatically checks the located media into the VolServ
system. These media remain in the Media Class to which
they were associated when checked-out.
• If the auto check-in option is not enabled, VolServ initiates
the ejection of the media from the VolServ system by
placing the media on the archive eject list. In the DataTower,
the media thus found are also moved to the eject port.
Auto Check-in
DataTower Archive Only
During Unsolicited
Media Enter
The DataTower archive supports the unsolicited media enter
operation. An unsolicited media enter operation is performed
without VolServ system GUI interaction.
During an unsolicited media enter operation, media are placed
in the DataTower load port, followed by pushing a b utton abo ve
the load port. The archive robot reads the media labels and
sends the media identifiers to VolServ. If an y of the media in the
load port are shown as checked-out by VolServ, the setting of
the auto check-in parameter determines the action taken by
VolServ.
3-10 Initial Configuration 6-01003-01 Rev A
Page 67

Administrative Tasks
• If the auto check-in option is enabled, checked-out media
are automatically checked in to the VolServ system. The
automatically checked-in media remain in the Media Class
to which they were associated when they were checked-out.
• If the auto check-in option is not enabled, VolServ leaves
the checked-out media in the load port.
Auto Check-in During Enter
All archives support the enter operation. An enter operation is
performed via interaction of the AO with the appropriate
archive Console. For more information about the enter
operation, refer to see “Enter Media” on page 5-4.
When the AO performs an enter operation on automated
archives, the archive robot reads the media labels and sends the
media identifiers to VolServ. If any of the media in the load port
are shown as checked-out by VolServ, the setting of the auto
check-in parameter determines the action taken by VolServ.
• If the auto check-in option is enabled, checked-out media
are automatically checked in to the VolServ system. The
automatically checked-in media remain in the Media Class
to which they were associated when they were checked-out.
• If the auto check-in option is not enabled, VolServ performs
actions that depend on the archive type. VolServ software:
- leaves the check-out media in the load port without
placing them on the eject list (DataTower archive)
- moves the media into the archive and places them on
the eject list (AML/E, AML/2, AML/J, or StorageTek
ACS Product Family archives)
Initial
Configuration
6-01003-01 Rev A Initial Configuration 3-11
Page 68

Administrative Tasks
Auto Import
Auto Import During Audit
During either an archive audit, unsolicited media enter, or enter
operation, the VolServ system may detect the physical presence
of media that are unknown to the VolServ system.
The auto import parameter specifies what action VolServ
initiates when an unknown medium is detected within a
controlled archive.
When the auto import option is enabled, the target Media Class,
manufacturer name, and batch identifier to be assigned to the
automatically imported media must be specified.
An archive audit is executed to synchronize the information in
the VolServ database with the actual media contents of a
specified archive.
When an archive audit is performed, the archive control
software reports the media contents of the archive to VolServ.
When the archive audit detects the physical presence of media
that are unknown by VolServ or are in the intransit state, the
setting of the auto import parameter determines the action taken
by VolServ. Refer to the Glossary for a definition of intransit
state.
• If the auto import option is enabled, VolServ automatically
imports unknown media into the VolServ system. The
automatically imported media are assigned the auto import
target Media Class, manufacturer name, and batch identif ier
specified during archive configuration or reconfiguration.
3-12 Initial Configuration 6-01003-01 Rev A
Page 69

Administrative Tasks
• If the auto import option is enabled, VolServ automatically
enters intransit media (refer to the glossary).
Note
Unknown media located in the DataTower archive during an
audit operation are moved to the eject port.
• If the auto import option is not enabled, VolServ initiates the
ejection of the unknown media from the VolServ system by
placing the media on the archive eject list. In the DataTower,
the media thus found are also moved to the eject port.
Auto Import During Unsolicited Media Enter
The DataTower archive supports the unsolicited enter of media
into DataT o wer archiv e. An unsolicited media enter operation is
performed without VolServ system GUI interaction.
During an unsolicited media enter operation, media are placed
in the DataTower load port, followed by pushing a b utton abo ve
the load port. The archive robot reads the media labels and
sends the media identifiers to VolServ. If an y of the media in the
entry port are unknown to VolServ or are in the intransit state,
the setting of the auto import parameter determines the action
taken by VolServ.
• If the auto import option is enabled, VolServ automatically
imports the unknown or intransit media into the VolServ
system. The automatically imported media are assigned the
target Media Class, manufacturer name, and batch identifier
specified during archive configuration or reconfiguration.
• If the auto import option is enabled, VolServ automatically
enters intransit media (refer to the glossary) if the subject
DataTower archive contains the target media class.
Initial
Configuration
• If the auto import option is not enabled, VolServ leaves the
unknown media in the load port.
6-01003-01 Rev A Initial Configuration 3-13
Page 70

Administrative Tasks
When an intransit medium (due to an incomplete mount
command) is imported or entered, VolServ software attempts to
complete the mount.
Auto Import During Enter
All archives support the enter operation. An enter operation is
performed via interaction of the AO with the appropriate
archive Console. For more information about the enter
operation, refer to “Enter Media” on Page 5-4.
When the AO performs an enter operation on automated
archives, the archive robot reads the media labels and sends the
media identifiers to VolServ. If any of the media in the entry
port are unknown to VolServ or are in the intransit state, the
setting of the auto import parameter determines the action taken
by VolServ.
• If the auto import option is enabled, unknown media are
automatically imported in to the VolServ system. The
automatically imported media are assigned the target Media
Class, manufacturer name, and batch identifier specified
during archive configuration or reconfiguration.
• If the auto import option is enabled, VolServ automatically
enters intransit media (refer to the glossary) if the subject
archive contains the target media class.
• If the auto import option is not enabled, VolServ performs
actions that depend on the archive type. VolServ software:
- Leaves the subject media in the load port without
placing them on the eject list (DataTower archive)
- moves the subject media into the archive and places
them on the eject list (AML/E, AML/2, AML/J, or
StorageTek ACS Product Family archives)
3-14 Initial Configuration 6-01003-01 Rev A
Page 71

Administrative Tasks
When an intransit medium (due to an incomplete mount
command) is imported or entered, VolServ software attempts to
complete the mount.
Configure a Manual Archive
VolServ supports two manual archives: the DataShelf archive
and the Stage archive.
Configuring a manual archive is identical to configuring an
automated archive with the following exceptions.
Fill Mode When media are added to a DataShelf archive, VolServ must
assign an empty storage bin for each new media.
To minimize database access activity, VolServ software caches
information about an entire shelf of bins in memory . As long as
an available bin exists in the cached shelf, VolServ software
assigns storage bins from the cached shelf to new media.
When no additional bins are available in the cached shelf,
VolServ software writes the cached information about the shelf
to the database and scans the shelves in the DataShelf archive
sequentially until another shelf with an available storage bin is
located.
Two algorithms are available to determine where VolServ
begins its scan for a shelf with an available storage bin. These
algorithms, called fill modes, are wrap and first fill.
Initial
Configuration
Shelves within a DataShelf archive are numbered within Row.
For example, if a DataShelf archive has three rows with four
shelves per row, the shelves are labeled sequentially as follows:
Row 1 Shelf 1, …, Row 1 Shelf4, Row 2 Shelf 1, … Row 2
Shelf 4, Row 3 Shelf 1, …, Row 3 Shelf 4.
6-01003-01 Rev A Initial Configuration 3-15
Page 72

Administrative Tasks
First Fill
Wrap
Media Type
When the first fill mode option is specified, VolServ always
begins its scan for a shelf with available storage bins with the
first shelf in the archive, i.e. Row 1 Shelf 1.
When the wrap fill mode is specified, VolServ software begins
its scan for a shelf with an available storage bin with the shelf
immediately after the shelf just filled. For example, if the last
assigned bin was in Row 2 Shelf 3, the next shelf scanned is
Row 2 Shelf 4.
If VolServ does not find an available storage bin by the time it
has scanned the last physical shelf in the archive (Row 3 Shelf
4), the search for an available storage bin wraps to the first
physical shelf in the archive (Row 1 Shelf 1). VolServ software
continues scanning the shelves sequentially until a shelf with an
available storage bin is found.
The manual archives support up to 16 user -defined media types
in addition to the system-defined media types that are supported
by the automated archives.
A user-defined media type must be defined to the VolServ
system (refer to “Define a Media Type” on page 3-18) before it
can be specified as a supported media type for a manual archiv e.
Capacity The capacity of a Stage archive is entered during the
configuration of the archiv e. The capacity of a Shelf archiv e can
be modified by reconfiguring the archive.
DataShelf archive capacity is a calculated value based on the
number of shelves configured.
Auto Check-in The auto check-in functionality is not supported for manual
archives.
3-16 Initial Configuration 6-01003-01 Rev A
Page 73

Administrative Tasks
Auto Import The auto import functionality is not supported for manual
archives.
6-01003-01 Rev A Initial Configuration 3-17
Initial
Configuration
Page 74

Administrative Tasks
Register Archive with VolServ
Define a Media Type
After an archive is successfully configured, it must be re gistered
with VolServ. This is done via two methods:
Cycle VolServ; for information see “Gracefully Terminate
VolServ” on page 2-9 and see “Start-Up VolServ” on page 2-3.
Perform an archive reconfiguration without changing any
archive parameters. Refer to the Using the VolServ GUI manual
for specific information concerning this method.
When the default media types supported by VolServ software
are not sufficient, a new media type may be defined and
registered with VolServ using the
Media Type…/Define GUI window.
VolServ software acquires media type parameters via the GUI.
Basic media type parameters consist of the media type name,
number of sides, and capacity in megabytes.
Note
Media types cannot be deleted. They may be defined or redefined.
Once specified, newly defined media types may be selected
during configuration of a manual archive. The list of media
types allowed for automated archiv e configuration is controlled
by VolServ software.
3-18 Initial Configuration 6-01003-01 Rev A
Page 75

Administrative Tasks
Create a Media Class
After an archive is successfully configured and registered with
VolServ, at least one Media Class must be created. Media
Classes are created using the Create Media Class command.
Media Classes provide logical organization of media into
smaller groups. For more information about Media Classes,
refer to the VolServ Overview manual.
Media Classes are central building blocks to media class and
media type migration processes. They are also used by one of
the optional forms of the Mount Media command.
Note
VolServ has to be running to create a Media Class.
• VolServ software acquires media class parameters via the
GUI and API. Basic Media Class parameters consist of the
class name, media type used, class capacity, mountable by
class option, high mark, notification comment, use
callbacks option, and callback information.
• Media Classes have several important characteristics:
• When a medium is entered into an archive, it is also entered
into a Media Class. The medium can be in one, and only
one, Media Class.
• Once a medium in entered into a group, it can only be
moved into another group by the Reclassify Media
command or a Mount Media command with the reclassify
option selected.
• Only one media type can exist within a group.
• Media Classes can be associated with more than one
archive.
6-01003-01 Rev A Initial Configuration 3-19
Initial
Configuration
Page 76

Administrative Tasks
• A Media Class is an integral part of the media migration
philosophy. When media type migration or media class
migration occur, media must stay within the same media
class.
Basic Media Class parameters include the Media Class name,
media type, class capacity, mountable by class, high mark,
notification comment, and use callbacks and callback
information.
Media Class Name
Media Type
Class Capacity
The Media Class name parameter is a user-specified name by
which the Media Class is known to the user. Valid Media Class
names may contain up to 16 characters, including spaces.
Leading and trailing spaces are not permitted.
The media type parameter identifies the type of media used in
the Media Class. As noted before, only one media type can be
specified for a Media Class.
Media Classes are designed to be associated with multiple
archives. Media migration cannot occur unless a media class
spans at least two archives. However, a media class can be
wholly associated with one archive.
Therefore, plan Media Class capacities to cover the expected
size of the archives configured earlier. See the following page
for an example of two media classes associated with two
archives.
3-20 Initial Configuration 6-01003-01 Rev A
Page 77

Administrative Tasks
Automated
Library
Blank Media
Class
Media Class
Manual
Library
No software restriction is placed on the media class capacity.
Class capacity can exceed the total combined capacity of all
archives, or can be as small as one.
Although not necessary , there are two restrictions that should be
applied to Media Class capacities when media migration is
planned:
• Total capacity should equal the amount of bins in the
archives
• There should be no Media Class overlap
As an example, refer to the illustration shown above. Suppose
the Automated Archive and Manual Archi ve ha ve 100 and 1000
bins, respectively. The Blank Media Class and the Media Class
capacities should total 1100.
Also, the Blank Media Classes should have a capacity less than
the Automated Archive capacity. The remaining Automated
Archive bins can then be associated with the Media Class
capacity.
6-01003-01 Rev A Initial Configuration 3-21
Initial
Configuration
Page 78

Administrative Tasks
Mountable By Class
Selecting the mountable by class option sets a flag for the
subject Media Class. This flag is used by the Mount Media
command.
The Mount Media command provides four ways in which
media may be selected for mounting. These are:
• Mount by media identifier
• Mount by media list
• Mount by media class
• Mount by criteria
VolServ software supports the mount by media class method for
the subject Media Class only if the mountable by class option is
selected. When not selected, the Mount Media command
cannot use the mount by media class option for the subject
Media Class. Refer to “Mount Media on a Drive” on page 4-18
for more information.
High Mark Notification
The media class high mark indicates a capacity break point that
is calculated as a percentage of class capacity. After the high
mark capacity is reached, a notification is logged and displayed
on the Volume Server SysLog Console.
Note
The notification is displayed at the “alert” level in the system log.
When entered, a notification comment accompanies the syslog
message. The syslog message occurs each time media are added
to the media class. No more media may be entered into the
media class when class capacity is reached, regardless of which
archive it is associated with.
3-22 Initial Configuration 6-01003-01 Rev A
Page 79

Administrative Tasks
Syslog notification messages stop whenever the amount of
media drops below the high mark. This can be achieved by
ejecting media, using the Reclassify Media command to move
media into another media class, or raising the class capacity
using the Modify Media Class command.
Use Callbacks and Callback Information
VolServ can generate unsolicited status messages called media
class callbacks. When enabled during media class
configuration, media class callbacks are returned to client
software after certain commands affect any medium within the
media class. These commands are:
• Import Media
• Export Media
• Check-in Media
• Check-out Media
• Mount Media
• Dismount Media
• Reclassify Media
• ENTER (from the archive Console)
• EJECT (from the archive Console)
When the use callbacks option is enabled, the destination of
media class callbacks can be directed to either a specific RPC
address or to an Internet address associated with a specific
client at its Enterprise ID location. No Enterprise ID location
exists until a client establishes an enterprise using the Connect
command. Refer to “Connect” on page 4-61.
Initial
Configuration
For further information refer to the VSCMD_Connect
commands in the MSTM-V21-010-API Programmer’s Guide
6-01003-01 Rev A Initial Configuration 3-23
.
Page 80

Administrative Tasks
Create an Archive Media Class
Archive Class Percentage
After a media class is successfully configured and registered
with VolServ, it must be associated with one or more archives.
This association is referred to as an archive media class.
Archive media classes are created using the Create Archive
Media Class command.
VolServ software acquires archive media class parameters via
the GUI and API. Basic archive media class parameters consist
of archive name, media class name, archive class percentage,
action mode, high mark, low mark, migration priority,
migration archive, and preferred media placement.
See the following subsections for detailed discussions
concerning the archive class percentage, action mode, high
mark, low mark, migration priority, migration archive, and
preferred media placement.
A percentage of the media class capacity can be associated with
an archive based on this parameter. Refer to the Using the
VolServ GUI book and note that the entry method uses a slide
bar. As the slide is moved, the actual quantity of media to be
associated with the archive is displayed in a text area just abo v e
the slide bar. Note that the quantity will not e xceed the lesser of:
• The amount of bins in the archive
• The amount of unassociated media remaining in the Media
Class
3-24 Initial Configuration 6-01003-01 Rev A
Page 81

Administrative Tasks
Use the figure shown below. Assume that the Automated
Archive has a capacity of 100 bins and Media Class Group A
has a capacity of 200. Also assume that Media Class Group A is
associated with the Automated Archive and Manual Archive.
When the Media Class Group A archive class percentage slide
bar is moved from 0 percent to 100 percent, the actual quantity
displayed above the slide bar increases. When the 50 percent
level is reached, the quantity remains at 100, regardless of the
other 100 media remaining in the Media Class Group A.
Automated
Library
Blank Media
Class Group
Media Class Group A
Media Class Group B
Manual
Library
As a further example, assume that the Manual Archive has a
capacity of 1000. When the Media Class Group A archive class
percentage slide is moved from 0percent toward 100 percent,
the actual quantity displayed above the slide bar will increase.
When the 10 percent level is reached, the quantity will stop
incrementing and remain at 100, regardless of the other 900
slots remaining in the Manual Archive.
Initial
Configuration
6-01003-01 Rev A Initial Configuration 3-25
Page 82

Administrative Tasks
Although not enforced by VolServ software, there is one
restriction that should be applied to archive class percentage
when media migration is planned. This restriction is there
should be no Media Class overlap. Using the figure in “Archive
Class Percentage” on page 3-24, the capacity of the Automated
Archive should equal the total capacity of the Blank Media
Class Group and portions of Media Class Groups A and B that
are associated with the Automated Archive.
Action Mode, Low Mark, High Mark
The specification of action mode, low mark, and high mark is
made for each archive media class, as well as for each media
type in a configured archive. As suggested by low mark and
high mark, action may or may not be triggered when the amount
of media in an archive media class reaches a calculated low
mark or high mark threshold.
The SA can choose action modes of none, notify, or migrate.
Depending on the action mode option selected, either no
notification, or migration of media from one archive to another
occurs when the archive media class high mark threshold is
reached.
During some operations, media are removed from an archive.
When this occurs, the media removed from an archive may
cause an archive media class fill level to reach its low mark
threshold. If the notify action mode is selected, a notification is
sent to the Volume Server SysLog Console and appropriate
archive Console.
A few operations result in adding media to a n archi ve and result
in exceeding the high mark threshold for the archive media
class fill level. When the fill level reaches the high mark
threshold and:
• The notify action mode is selected, a notification is sent to
the Volume Server SysLog Console.
3-26 Initial Configuration 6-01003-01 Rev A
Page 83

Administrative Tasks
• The migrate action mode is selected, media within an
archive media class are subject to migration to another
archive associated with the same media class. Migration
continues until the low mark is reached, provided that
enough space exists in the destination archiv e media class to
accept the migrated media. Notification is also sent to the
Volume Server SysLog Console.
At this point, it is important to describe the media class
migration and media type migration processes.
Media Class Migration
Media class migration is a process directed by VolServ
software. The process begins if a media class migrate action
mode was selected during archive media class creation and the
media class fill level reaches the media class high mark
threshold.
Several operations can cause a Media Class fill level to exceed
its high mark threshold. Some of these are import, reclassify, or
bulk loading operations.
When media class migration starts, VolServ software places
media from the source media class on its archive eject list. The
quantity of eject list entries equals the difference between the
actual fill lev e l that triggered the process minu s the media class
low mark threshold. The archive Console display EJECT
button of the source archive is then highlighted.
The media selected for ejection are those with the oldest access
date. This value correlates to the last time the medium was
entered, mounted, or dismounted.
When a medium is ejected by the AO, the migration archive
enter list is appended with that same medium. The archive
Console display ENTER button of the migrations archive is
highlighted.
Initial
Configuration
6-01003-01 Rev A Initial Configuration 3-27
Page 84

Administrative Tasks
After media class migration starts, migration continues until
one of the following occur:
• The media class fill lev e l reaches th e media class low mark.
• The AO removes the media from the Eject list. Such media
enter the intransit state.
Note
No media are accepted by the destination archive when its
absolute capacity is reached.
There are two reasons for removing such media from the source
archive Eject list. One is that the destination archive media fill
level may reach the destination archive high mark when media
are entered as a result of migration. If media are entered into the
destination archive and its high mark is exceeded, media type
migration begins for that archive (unless the destination
archive’s action mode migrate option is not selected).
Note
No media are accepted by the destination archive when the
destination media class capacity is reached.
Another reason to remove media from the source archive eject
list is when the destination archive media class f ill le v el reaches
the destination archive media class high mark. Otherwise,
media class migration from the destination archive to some
other archive may be triggered. No media are accepted by the
destination archive media class when its absolute capacity is
reached.
Note that the archive media class high mark and low mark are
used to determine when to start and halt media class migration.
These marks apply only to an archive media class fill level and
is designated during archive media class creation.
3-28 Initial Configuration 6-01003-01 Rev A
Page 85

Administrative Tasks
During archive configuration, a different set of high and low
marks are entered. These marks are used to determine when to
start and stop media type migration. Refer to “High Mark” on
page 3-9 and “Low Mark” on page 3-8. Both sets of marks are
independent from each other.
Media Type Migration
As described earlier (Refer to “Migrate” on page 3-7), media
are migrated to another archive once a media type fill level
reaches the media type high mark because of media entry. The
media type high mark is distinct from the media class high
mark.
Each medium selected for media type migration must conserve
its media class. Although media type migration causes media to
be migrated to another archive, each selected medium must also
remain in its present media class. Furthermore, a medium is not
migrated unless its media class migrate action mode is selected.
When these two preconditions exist, that medium can be
migrated via the media type migration process.
After media type migration starts, the number of media required
to reach the media type low mark is calculated. This value is
equal to the difference between the media type fill level
threshold minus the media type low mark threshold. The
amount of media of that media type present on the Eject list is
also subtracted from the media type fill level.
Next, the archiv e media class with the highest migration priority
is first selected for migration. Refer to “Migration Priority and
Archive” on page 3-31. If the selected archive media class fill
level is below its low mark threshold, the archive media class
with the next highest priority is selected. VolServ software then
places media from the source archive media class on the archi v e
eject list. The source archive Console display EJECT b utton is
then highlighted.
Initial
Configuration
6-01003-01 Rev A Initial Configuration 3-29
Page 86

Administrative Tasks
If the media type low mark threshold is not reached after the
first iteration, the process continues by selecting the next
eligible archive media class and testing its fill level. If the
subject archive media class f ill le vel is abov e its lo w mark, some
of its media is placed on the source archive eject list.
When the AO ejects a medium from the source archive, the
destination archive enter list is appended with that same
medium. Then the destination archive Console display ENTER
button is highlighted.
Media type migration continues until one of the following
occurs:
• The media type fill level reaches the media type low mark
threshold.
• All archive media classes are exhausted of their supply of
eligible media (that is, all of their low marks are reached).
• The AO removes the media from the eject list.
The reasons for discontinuing media type migration are the
same as for media class migration.
Intransit Media (Migrate)
During migration, media that are ejected from the source
archive but not entered in the target archive are placed in the
intransit state. This state indicates that media are known by
VolServ software but are not actually resident in an archive.
3-30 Initial Configuration 6-01003-01 Rev A
Page 87

Administrative Tasks
Migration Priority and Archive
Preferred Media Placement
When the archive media class action mode migrate option is
selected, a migration priority is assigned to the archive media
class. This value is used only during media type migration.
When media type migration begins, media from the highest
priority archive media class are first moved to the source
archive Eject list. If additional media must be ejected to meet
the media type low mark, the media class with the next highest
migration priority is chosen for processing.
The migration archive is the target archive for all media ejected
because media class migration or media type migration. As a
medium or media are removed from the source archive for the
purpose of migration, the destination archive (or migration
archive) Console ENTER button is highlighted.
When preferred media placement entries (DataShelf archive
only) are defined for a Media Class, VolServ directs placement
of media entered into that media class to a particular area in an
archive.
When a medium is entered into an archive for any reason
(import, checkin, move, migrate) or dismounted from a drive,
VolServ software checks if its media class is configured for
preferred placement. If it is, VolServ software directs placement
to a specific area in the archive. Note that preferred placement
values override the archive fill mode made during archive
configuration.
Initial
Configuration
Entries in this field are four integers, separated by commas. Its
form is #,#,#,#. The entries stand for row, column, shelf, and
bin.
The primary use of preferred placement is to ensure that media
in a particular media class are placed near a system resource,
such as drives.
6-01003-01 Rev A Initial Configuration 3-31
Page 88

Administrative Tasks
Create a Drive
After all archives at a site are successfully configured and
registered with VolServ, at least one drive must be defined and
associated with an archive.
Note
VolServ has to be running to define a drive.
The Create Dri ve command is used to define a dri ve; four dri v e
statistics are associated with it. These are the usage count,
current usage time, total usage time, and error count. These
built-in statistics are provided by VolServ software, but only the
usage count is automatically updated by VolServ software.
Usage count indicates the number of times that media are
mounted to a drive.
VolServ clients are responsible for keeping the other three
statistics values updated. It is recommended that they be def ined
as follows:
• Current usage time indicates read/write operation time in
seconds since the latest preventive maintenance
• Total usage time indicates the read/write operation time in
seconds since the drive definition
• Error count indicates the number of read/write errors
All statistics are initialized to zero when a drive is def ined. Two
of these statistics are cleared when a drive is v aried to an on-line
state. Refer to “Vary Drive” on page 4-22.
Drive definition is performed via the GUI. Its parameters
consist of the drive ID and media type that the drive supports.
After a drive is def ined, it cannot be changed. It must be deleted
and defined again.
3-32 Initial Configuration 6-01003-01 Rev A
Page 89

Administrative Tasks
Drives can be defined before the creation of media classes.
However, they ultimately must be associated with an archive
before they can be used to mount media.
Associate a Drive with an Archive
After all drives are successfully defined, they must be
associated with an archive before they can be used to mount
media. The Associate Drive command is used to associate a
drive with an archive.
Drive association parameters are acquired by VolServ software
via the GUI. Basic association parameters consist of associate
drive, associate with archive, and CLM/DriveSlot (automated
archive only). The associate drive entry must match a drive ID
entered during drive def inition. The associate with archiv e entry
must match an archive name entered during archive
configuration.
When a drive is associated with an automated archive, the
physical location of the drive must also be specified. This
information is contained in the CLM/DriveSlot entry and
describes the media hand-off location between the robot and the
drive. Entries in this field are four integers, separated by
commas, with the form #,#,#,# for the following archives:
• DataShelf archive
Initial
Configuration
• DataTower archive
• StorageTek ACS product family archives
Entries have the form Dc##010101 for the AML archives. The
“c” character relates to the media type used by the drive. The
“##” characters refer to a logical mapping of the drive slot XYZ
position and is used by the AML archives.
6-01003-01 Rev A Initial Configuration 3-33
Page 90

Administrative Tasks
Entries have the form d#t#l0 for the SCSI drives. The first #
indicates the element address of the drive in the library and the
second # indicates the SCSI target id of the drive.
Entries match the drive name s that are conf igured for the Scalar
DLC drives, for example, PDR256.
When the CLM/Drive Slot entry is made, only those drive slots
that interface to installed drives and are not associated are
available for selection.
After a drive is associated with an archi ve, its parameters cannot
be changed. It must be disassociated and associated again to
change any parameter. Drive parameters can be viewed using
the Query Drive command.
Define a Label Pattern
The Import Media command has an option that allo ws barcode
labels to be printed. Using previously-defined label patterns
allow generation of unique, sequential media identifiers to be
used during import and also to be directed to a barcode label
printer.
VolServ software acquires label pattern information only via the
GUI Define Label Pattern window. Basic parameters consist
of label pattern name and label pattern definition. After a label
pattern is defined, its cannot be changed. It must be deleted and
defined again.
Label patterns can be defined at any time that VolServ is
running. However, a label pattern must be unique and must be
defined before printing a label with that particular pattern.
3-34 Initial Configuration 6-01003-01 Rev A
Page 91

Administrative Tasks
Add Media to an Archive
After at least one archive media class is successfully
configured, media can be entered into an archive. In fact,
normal operations cannot begin until media are entered into an
archive.
Note
VolServ has to be running to add media to an archive.
Four basic methods are used to add media to most automated
archives. These methods use the Import Media command
(refer to “Import Media into an Archive” on page 4-24),the bulk
load operation (refer to “Bulk Load Media” on page 4-27), the
unsolicited enter operation (refer to “Unsolicited Entry of
Known Media” on page 4-30), and the enter operation (refer to
“Enter Media” on page 5-4).
To enter media into a DataShelf or Stage archive, only the
Import Media command can be used.
When importing media into an archive, media labels must be
affix ed to them. Refer to “Reprint a Media Label” on page 4-37
for more information. Also refer to “Import Media into an
Archive” on page 4-24.
The Import Media command is the preferred method to use
when entering relatively few media into an automated archive.
The bulk loading method is preferred if there are a relatively
large amounts of media to be entered. For specific automated
archives, the enter or unsolicited enter operations are allowed
by VolServ.
6-01003-01 Rev A Initial Configuration 3-35
Initial
Configuration
Page 92

Administrative Tasks
NOTES
3-36 Initial Configuration 6-01003-01 Rev A
Page 93

Overview . . . . . . . . . . . . . . . . . . . . . . . . . . . . . . . . .4-4
Command Priorities . . . . . . . . . . . . . . . . . . . . . . . 4-5
Archive Management . . . . . . . . . . . . . . . . . . . . . . 4-6
Configure/ Reconfigure an Archive . . . . . . . 4-6
Delete an Archive . . . . . . . . . . . . . . . . . . . . . . . 4-6
Change Archive Parameters . . . . . . . . . . . . . .4-7
Vary Archive . . . . . . . . . . . . . . . . . . . . . . . . . . . 4-7
Vary Archive Component . . . . . . . . . . . . . . . . 4-8
Redefine a Media Type . . . . . . . . . . . . . . . . . . 4-8
4
Normal
Create/Modify/ Delete a Media Class . . . . . 4-9
Create/Modify an Archive Media Class . . .4-9
Delete an Archive Media Class . . . . . . . . . . 4-10
Define Media Migration Policy . . . . . . . . . .4-10
Modify Media Migration Policy . . . . . . . . . 4-12
Add Archive to Existing Installation . . . . . 4-14
Audit an Archive . . . . . . . . . . . . . . . . . . . . . . 4-14
Drive Management . . . . . . . . . . . . . . . . . . . . . . . 4-16
Create and Associate a Drive . . . . . . . . . . . .4-16
Disassociate and Delete a Drive . . . . . . . . . . 4-16
Create or Modify a Drive Pool . . . . . . . . . . . 4-17
Delete a Drive Pool . . . . . . . . . . . . . . . . . . . .4-18
Mount Media on a Drive . . . . . . . . . . . . . . . . 4-18
Dismount Media from a Drive . . . . . . . . . . .4-21
Intransit Media (Mount) . . . . . . . . . . . . . . . . 4-22
Lock a Drive . . . . . . . . . . . . . . . . . . . . . . . . . .4-22
Unlock a Drive . . . . . . . . . . . . . . . . . . . . . . . . 4-22
Vary Drive . . . . . . . . . . . . . . . . . . . . . . . . . . . .4-22
Operations
Normal Operations
Page 94

Administrative Tasks
Media Management . . . . . . . . . . . . . . . . . . . . . . .4-24
Enter Unknown Media into an Archive . . . 4-24
Enter Known Media into an Archive . . . . . 4-29
Remove Media from an Archive . . . . . . . . . 4-31
Clear Eject List Entries . . . . . . . . . . . . . . . . . . 4-33
Move Media to Another Archive . . . . . . . . . 4-34
Intransit Media (Move) . . . . . . . . . . . . . . . . . 4-34
Modify Media Criteria . . . . . . . . . . . . . . . . . 4-34
Define a Media Type . . . . . . . . . . . . . . . . . . . 4-35
Reclassify Media . . . . . . . . . . . . . . . . . . . . . . . 4-36
Define or Delete a Label Pattern . . . . . . . . . 4-37
Reprint a Media Label . . . . . . . . . . . . . . . . . . 4-37
System Reports . . . . . . . . . . . . . . . . . . . . . . . . . . . 4-39
Query Archive . . . . . . . . . . . . . . . . . . . . . . . . 4-39
Query Drive . . . . . . . . . . . . . . . . . . . . . . . . . .4-42
Query Drive Pool . . . . . . . . . . . . . . . . . . . . . .4-44
Query Mount . . . . . . . . . . . . . . . . . . . . . . . . .4-46
Query Media . . . . . . . . . . . . . . . . . . . . . . . . . .4-47
Query Media Location . . . . . . . . . . . . . . . . . . 4-50
Query Intransit Media . . . . . . . . . . . . . . . . . .4-51
Query Media Class . . . . . . . . . . . . . . . . . . . . . 4-52
Query Media Type . . . . . . . . . . . . . . . . . . . . .4-57
Query Request . . . . . . . . . . . . . . . . . . . . . . . . 4-57
Query Connect . . . . . . . . . . . . . . . . . . . . . . . . 4-59
Disconnect . . . . . . . . . . . . . . . . . . . . . . . . . . . .4-63
Multimount Media . . . . . . . . . . . . . . . . . . . . . 4-63
4-2 Normal Operations 6-01003-01 Rev A
Page 95

CIient Operations . . . . . . . . . . . . . . . . . . . . . . . . .4-61
Connect . . . . . . . . . . . . . . . . . . . . . . . . . . . . . .4-61
Disconnect . . . . . . . . . . . . . . . . . . . . . . . . . . . .4-61
Multimount Media . . . . . . . . . . . . . . . . . . . . . 4-61
Roadmap
Administrative Tasks
Topic
General software installation information 1
Hardware and software start-up 2
Site-specific configuration of archives and drive. 3
Daily operations 4
Archive operation and configuration 5
Troubleshooting tips and solutions 6
Refer To
Chapter
6-01003-01 Rev A Normal Operations 4-3
Normal Operation
Page 96

Administrative Tasks
Overview
Backup
Normal operations are functions performed on a daily basis.
Some of functions are routine while others may require making
modifications to the existing site configuration, changing
privileges for a client application or VolServ System Operator
(SO), or responding to a client application request. This chapter
describes these and other operations that are performed on a
daily basis.
VolServ is backed up using standard UNIX backup procedures.
4-4 Normal Operations 6-01003-01 Rev A
Page 97

Administrative Tasks
Command Priorities
All VolServ commands are executed as they are sent. However,
a command queue keeps track of commands that arrive when
VolServ resources are busy.
Note that each command is associated with an execution
priority that ranges from 0 to 32 (high to low). The default
priority for each command is 15. Unless changed by a client, all
commands have a priority of 15. Commands with equal priority
are executed in a first-come first-served order.
To expedite a particular command in the queue when VolServ
resources are busy, the reprioritize request command is used.
When a command priority is changed to a higher value (that is,
numerically smaller), its position in the queue is moved closer
to first place.
Commands can be reprioritized via the GUI and API. The
reprioritize request parameters are the reprioritize request
identifier and new priority. The new priority replaces the
previous command priority in VolServ execution queue.
Command Cancellation
6-01003-01 Rev A Normal Operations 4-5
Any command in VolServ command queue, except the
dismount command, can be cancelled. Commands can be
cancelled via the GUI and API. The only cancel request
parameter is the cancel request identifier. When executed, the
command is removed from VolServ command queue.
Normal Operation
Page 98

Administrative Tasks
Archive Management
Configure/ Reconfigure an Archive
Delete an Archive
All archive management operations can be performed via the
GUI except where noted.
An archive can be configured or reconfigured at any time. The
Configure Archive command is used to create an archive
definition and is covered in the initial configuration section of
this manual. Refer to “Configure an Archive” on page 3-3 for a
description of archive configuration.
The Reconfigure Archive command allows modification of
most parameters entered during archive configuration. One
exception is the media type entry that is input when an archive
is configured. Modifying the media type could affect the
archive media classes associated with an archive.
If a specific archive is no longer needed, the Delete Archive
command permits removal of an archi ve from a VolServ system.
An archive can be deleted easily because it contains no media,
but it can also be removed if media are contained in it.
The ability to delete an archive with media in it depends on the
value of the DELETE_ARCHIVE_WITH_MEDIA environment
variable. When set to N, any archive containing media can be
deleted. When set to Y, the value of the
DELETE_ARCHIVE_MEDIA_ACTIONSTATE environment
variable determines how media are to be handled when a
populated archive is deleted.
Refer to the table in “Configuration En vironment” on page 1-17
for information about these environment variables.
4-6 Normal Operations 6-01003-01 Rev A
Page 99

Administrative Tasks
Change Archive Parameters
The change archive parameters command allows changing two
archive parameters without requiring that the archive become
unavailable. These parameters are the archi ve mode and archi v e
console display host.
The archive mode attended option is usually selected. When the
AO or any other attendant is not available to perform media
handling, the archive mode can be changed to unattended.
However, this change can affect the behavior of the move
media, mount media, checkin media, checkout media, import
media, and export media associated commands, as well as the
media migration process.
Whenever necessary, the archive console display host can be
changed without requiring archive reconfiguration.
The change archive parameters include the change archi v e, ne w
mode, new console display host, and priority. The priority is
used to determine the command location in VolServ command
queue.
Vary Archive
During maintenance operations, it is necessary to make
equipment unavailable for use. The vary archive command is
used to disable or enable an entire archive. It can also be used to
enable local manual control of an archive.
Archives can be in one of four states: on-line, off-line,
diagnostic, and unavailable. The on-line,
off-line, and diagnostic states are entered by human
intervention. The on-line state is the normal operational
state. All archive equipment is inoperable and usually awaiting
maintenance during the off-line state. The diagnostic
state is used to allow local manual control of an archive. This
mode is generally used during archive troubleshooting.
6-01003-01 Rev A Normal Operations 4-7
Normal Operation
Page 100

Administrative Tasks
The unavailable state is a derived state. It is reserved for
lower lev el equipment and is automatically entered when higher
level equipment goes into the off-line state or is moved
into the diagnostic state. That is, this state applies to
archive components when the archive is moved to the
off-line or diagnostic states.
The vary archive command is available via the GUI, CLI,
and API. The vary archiv e parameters are the vary archive, new
state, and priority. The priority is used to determine the
command location in VolServ command queue.
Vary Archive Component
Redefine a Media Type
At times during maintenance operations, it is necessary to make
specific components unavailable for use. The vary archive
component command is used to disable portions of an archive.
Like an archive, archive components can be in one of four
states: on-line, off-line, diagnostic, and
unavailable. The definition of these states are the same as
for the vary archive command.
The vary archive component parameters are the vary
archive, new state, and priority. The priority is
used to determine the command location in VolServ command
queue.
All parameters of an existing media type can be modified using
the redefine media type command. For more information, refer
to “Define a Media Type” on page 3-18 for a description of
media type definition.
4-8 Normal Operations 6-01003-01 Rev A
 Loading...