

Page 1

!! WARNING -- DANGEROUS HIGH VOLTAGE !!
The Omicron Flash/Video Ring light contains dangerous high
voltages within. For professional use only. Do not disassemble
this equipment. In the event of physical damage immediately
disconnect power and return the unit to Quantum for repair.
Omicron3 Flash/Video Ring Light – OM3
Flash / Video Operation
●TTL or Manual flash controlled by CoPilot
● Video light for cameras with video capture
1.0 Introduction
Omicron3 Flash/Video Ring Light provides both flash and continuous video
lighting for ideal illumination. Designed specifically for 35mm SLR type still and
video cameras, it is also adaptable to other camera types.
Omicron3‘s “chromatically correct” light spectrum emanates from 80 critically
color-balanced LEDs. Colored LEDs mixed with white LEDs fill in the spectral
gaps characteristic of white-only LED lights.
Omicron3 interfaces with Quantum CoPliot full coordination with Nikon or Canon
camera systems, in TTL or manual modes.
Important : The firmware updates below may be required for Flash / Video
Simultaneous Operation:
CoPilot:
Canon cameras
CoPilot QF91C Version 1.06 or later, no update required.
Nikon cameras
CoPilot QF91N Version 1.06 or later, no update required.
Visit www.qtm.com to download the latest CoPilot firmware and click Support,
Updates and Conversions
2.0 Overview
The Quantum Omicron 3 (OM3) Flash/Video Ring Light for flash/video operation
consists of:
OM3 - Ring Light with removable lens for holding color gels
CQ2 - Flash cable for connecting OM3 to Quantum Turbo battery pack.
OM3 can be powered by all Quantum Turbo batteries.
CQ8, CCQ8 cables may also be used with OM3
FW20 - Sync Cord manual flash trigger from camera.
FW31 - Din cable for connecting to Quantum CoPilot QF91 for TTL/Man
Operation.
Page 2
2.1 Additional Accessories
Connect the OM3 to a
Quantum CoPilot using a
FW31 cable.
Note : The CoPilot does not
require a battery when
connected to the OM3
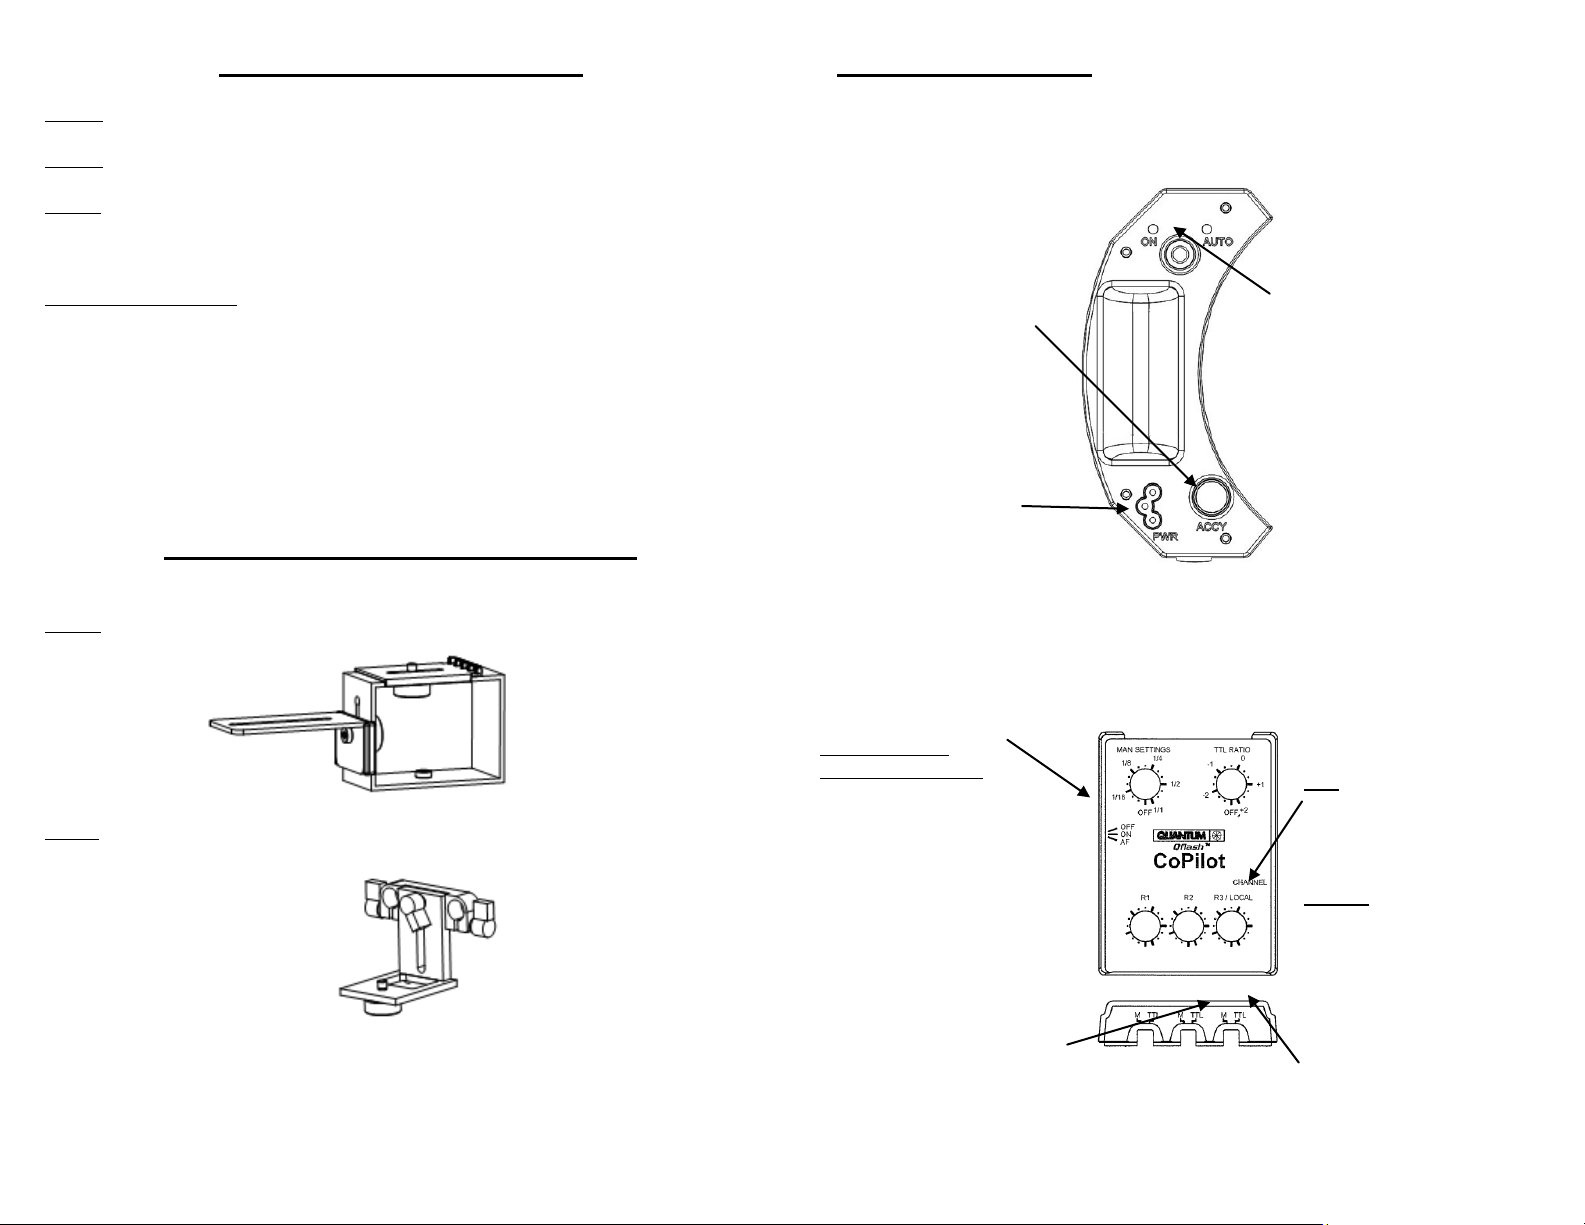
The “ON” indicator on
OM3 should blink once
per second. The OM3 is
ready to operate.
If the “ON” indicator blinks
three times per second, it
indicates the High Voltage
is not available. Check the
Turbo battery pack
operation.
Connect the flash cable from
Turbo battery pack to OM3.
Turn on the power of Turbo
battery pack.
Exposure Adjustment
TTL
The exposure can be
adjusted from -27 stops to
+2 stops.
Manual
Exposure can be adjusted
from 1/32+ of the shutter
speed to 1/1(full shutter
speed).
When the CoPilot is set to
Manual mode, exposure is
determined using the
shutter speed.
When the CoPilot is set to TTL mode, the
camera uses its’ own internal metering
system to determine the proper exposure.
Choose AF for
Auto Focus assist.
The OM3 will turn on in
video mode during low
light situations when the
camera requires
assistance in focusing.
Qf91N – For TTL control of Omicron by Nikon cameras.
Qf91C – For TTL control of Omicron by Canon cameras.
QF51 – 20 ft. extension cable.
Extension cable connects the CoPilot to the OM3 for off camera TTL lighting.
434 / 435 Sync Cords
The CoPIlot has an internal radio that is compatible with the Quantum
FreeXWire radio system.
To use another radio system connect the 434/435 sync cords to the camera PC,
or use a hot shoe adapter from your camera manufacturer that includes a PC
nipple.
3.0 Mounting & Power Accessories
3.1 Mounting
QF29 – for under camera mounting
OM42 – for twin rail mounting
3.2 Power
Any TURBO battery
4.0 Flash operation
4.1 Connections
4.2 Flash Modes
Two modes of flash operation are available, TTL and manual. Flash output can
be adjusted in both modes using the Local switch located on top of the CoPilot.
Page 3

The “ON” indicator on OM3
should blink once per
second. The OM3 is ready
to operate.
If the “ON” indicator blink
sthree times per second, it
indicates the High Voltage is
not available. Check the
Turbo battery pack
operation.
Connect the flash cable from
Turbo battery pack to OM3.
Turn on the power of Turbo
battery pack.
Video On
Press the push button once
and the ON light will stay on
steady.
Video Off
Press and hold the push
button for 2 seconds. The
ON light will turn off and the
OM3 light will gradually dim.
Adjust the light intensity
Turn the intensity knob
clockwise to increase the
light intensity, countclockwise to decrease the
light intensity.
Set light output level
Stand at the maximum distance you intend to shoot at
and set the intensity knob to 100%. Your minimum
shooting distance will be one half of your maximum.
Turn ON ATL
While aiming at your subject, push the power button once.
The “AUTO” indicator lights.
Turn OFF the ATL
Push the push button once or adjust the light intensity knob,
the “AUTO” indicator will turn off and “ON” indicator is on.
5.0 Video Operation
5.1 Connections
5.2 Video ON / OFF
5.3 Automatic Lighting Track (ALT) Operation
Automatic Lighting Track (ALT) Operation will keep the illumination on the
subject constant when the distance between the subject and OM3 Ring Light
changes. It will automatically decrease the light output level when the OM3 Ring
Light is close to the subject. It will automatically increase the light output level
when moving the OM3 Ring Light away from the subject.
Turn OM3 ON
Press the push button once and the ON light will stay on steady. Aim the OM3 at your
subject.
Indications
If the “AUTO” indicator is blinking fast, you are too lose to your subject and you need to
move away.
If the “AUTO” indicator is blinking slowly, you are too far from your subject and you need
to move closer.
Page 4

6.0 Customer service
Having any trouble I using your Quantum product? We are here to help. Mail,
call, fax, or email our Service Department:
Service department
Quantum Instruments
10 Commerce Drive
Hauppauge, NY 11788
Tel: (631) 656-7400 Fax: (631) 656-7410
Website: www.qtm.com
Troubleshooting tips are available at www.qtm.com, Support, Customer
Support, FAQ. If you suspect a malfunction or require adjustment, return the
unit to us with an accurate description of the problem. Please be sure your
problem is not caused by improper operating procedure or malfunctions in your
other equipment. Send all equipment carefully packaged and insured to our
address above.
An estimate of repair cost on out-of-warranty merchandise may be forwarded if
you desire.
Normal repair time is 10 – 15 days. Paying by check will delay the repair until
the check clears (up to 15 days). For expedited service, contact our Service
Department.
Summary:
Ship via UPS, Parcel Post, or other carrier, insured.
Give a clear, detailed description of the problem.
Give your mailing address and daytime phone number, fax #, and/or email.
For warranty repairs include a copy of the receipt.
Note: Please do not e-mail your credit card information.
Limited Warranty
Quantum products have a 1 year limited warranty. Please refer to the Limited
Warranty card for complete details, conditions, and terms.
Quantum Instruments Inc.
10 Commerce Drive, Hauppauge NY 11788-3968 USA
Tel: 1-631-656-7400 Fax: 1-631-656-7410
www.qtm.com
P711
 Loading...