

Page 1

3URGXFW0DQXDO 3URGXFW0DQXDO3URGXFW0DQXDO 3URGXFW0DQXDO
7DSH'ULYH
7DSH'ULYH
6'/7$
$
Page 2

SDLT 600A Product Manual, 81-81487-01 A01, December 2005, Made in USA.
Quantum Corporation provides this publication “as is” without warranty of any kind, either express or implied,
including but not limited to the implied warranties of merchantability or fitness for a particular purpose. Quantum
Corporation may revise this publication from time to time without notice.
COPYRIGHT STATEMENT
Copyright 2005 by Quantum Corporation. All rights reserved.
Your right to copy this manual is limited by copyright law. Making copies or adaptations without prior written
authorization of Quantum Corporation is prohibited by law and constitutes a punishable violation of the law.
TRADEMARK ST AT EMENT
Quantum, DLT, DLTtape, the Quantum logo, and DLTtape logo are all registered trademarks of Quantum
Corporation. SDLT, and Super DLTtape are trademarks of Quantum Corporation.
Other trademarks may be mentioned herein which belong to other companies.
Page 3

Contents
Preface xiii
Chapter 1 Introduction 1
Overview ...........................................................................................................................1
Product Features...............................................................................................................3
Chapter 2 Installing Your Tape Drive 4
Warranty Note.................................................................................................................. 4
Safety, Handling, and ESD Protection ..........................................................................5
Safety Precautions..................................................................................................... 5
Handling.....................................................................................................................6
Electrostatic Discharge Protection..........................................................................7
Pre-Installation Guidelines .............................................................................................8
Installing the Tape Drive.................................................................................................8
Secure the Rackmount Tape Drive into a Rack.....................................................8
Connect the Power to the Tabletop Tape Drive..................................................10
Connecting the SDLT 600A to the Network Port ...............................................11
SDLT 600A Product Manual iii
Page 4

Contents
Tape Drive Remote Management ................................................................................12
Starting the Remote Management Web Pages.................................................... 12
Setup Menu.............................................................................................................. 14
Changing the Password .........................................................................................18
SDLT 600A Client/FTP Client ..............................................................................19
Configuring the Tape Drive.......................................................................................... 20
Windows Configuration ........................................................................................ 21
Multiuser Connection.............................................................................................24
Linux Configuration ............................................................................................... 26
Mac OS X Configuration ........................................................................................ 27
Chapter 3 Using Your Tape Drive 30
Front Panel Controls and LEDs.................................................................................... 31
Formatting Media Cartridges....................................................................................... 34
Updating the Firmware................................................................................................. 34
Updating the Tape Drive Firmware..................................................................... 34
Updating the Server................................................................................................ 35
Rebooting the Tape Drive...................................................................................... 36
Error Log ..................................................................................................................37
FTP Transfers ..................................................................................................................38
FTP Client Tool........................................................................................................38
SDLT 600A Client Tab............................................................................................39
Resume on transfer ................................................................................................. 41
Contextual Menu.....................................................................................................44
Partial restore........................................................................................................... 49
Configuration Tab................................................................................................... 57
List of Servers Management.................................................................................. 58
Multiuser Connection.............................................................................................59
System and MXF files .............................................................................................60
Supported FTP Commands ................................................................................... 61
Standard Commands (RFC959)............................................................................. 61
SITE Commands...................................................................................................... 70
Standard FTP Client................................................................................................77
C-API.........................................................................................................................77
Java Plug-In.............................................................................................................. 77
Acquiring the Java Plug-in ....................................................................................77
Certificate of Security ............................................................................................. 78
SDLT 600A Product Manual iv
Page 5

Contents
Cleaning the Tape Mechanism.....................................................................................78
Occasional Cleaning of Tape Head ...................................................................... 78
When to Use the Cleaning Tape............................................................................ 79
Life Expectancy of the Cleaning Tape..................................................................79
Compatibility of the Cleaning Tape .....................................................................79
Loading the Cleaning Tape Into a Tabletop Tape Drive................................... 79
Troubleshooting.............................................................................................................. 80
Power-On Self-Test ................................................................................................. 80
POST Troubleshooting ........................................................................................... 82
Over Temperature Condition................................................................................ 83
Frequently Asked Questions................................................................................. 83
Appendix A SDLT 600A Tape Drive Specifications 84
Tape Drive Technology .................................................................................................84
Gigabit Ethernet (GigE) Interface ......................................................................... 84
Material Exchange Format (MXF) Aware............................................................84
Laser Guided Magnetic Recording.......................................................................85
Pivoting Optical Servo............................................................................................85
Magneto Resistive Cluster Heads.........................................................................85
Advanced Partial Response Maximum Likelihood ...........................................85
Advanced Metal Powder Media...........................................................................85
Positive Engagement Tape Leader Buckling Mechanism................................. 86
Modular Design..............................................................................................................86
Data Control Module..............................................................................................87
Tape Control Module ............................................................................................. 88
Front Panel Module ................................................................................................89
Electronic Interface Module................................................................................... 89
Super DLTtape II Data Cartridge .........................................................................90
Product Specifications ................................................................................................... 90
Positive Engagement Tape Leader Buckling Mechanism................................. 91
Functional Specifications............................................................................................... 91
Performance Data....................................................................................................91
Shock and Vibration Specifications ......................................................................93
Current and Power Requirements........................................................................ 95
SDLT 600A Tape Drive Recording Method ........................................................ 99
Environmental Specifications.......................................................................................99
Air Flow Requirements ..........................................................................................99
Temperature and Humidity ................................................................................100
Storage and Shipment........................................................................................... 100
Altitude................................................................................................................... 101
SDLT 600A Product Manual v
Page 6

Contents
Recording Media Specifications.................................................................................101
Media Structure..................................................................................................... 102
Physical Data Cartridge .......................................................................................103
Media Shipping, Operating, and Storage Specifications.................................103
Appendix B Super DLTtape II Data Cartridges 105
Recognizing Quantum Super DLTtape I and II Data Cartridges.......................... 105
Data Cartridge Handling Guidelines ........................................................................106
Data Cartridge Inspection Procedure........................................................................108
Data Cartridge Write-protect Switch.........................................................................112
Loading a Data Cartridge............................................................................................114
Unloading a Data Cartridge .......................................................................................115
Appendix C Regulatory Compliance 117
Safety Regulations........................................................................................................118
Safety Certifications..............................................................................................118
Electromagnetic Field Specifications......................................................................... 118
Electromagnetic Emissions .................................................................................. 118
Electromagnetic Interference Susceptibility...................................................... 118
Immunity and ESD Limits...................................................................................119
Acoustic Noise Emissions ........................................................................................... 120
Environmental Compliance........................................................................................121
Disposal of Electrical and Electronic Equipment ....................................................121
Glossary 122
SDLT 600A Product Manual vi
Page 7

Figures
Figure 1 SDLT 600A Tape Drive ..............................................................................2
Figure 2 Install the Rackmount SDLT 600A...........................................................9
Figure 3 Connect the Power Cable .......................................................................... 9
Figure 4 Power on the Rackmount Tape Drive....................................................10
Figure 5 Powering On the Tape Drive ..................................................................11
Figure 6 Connecting to the Network Port (Tabletop Tape Drive Shown)....... 12
Figure 7 Start Window.............................................................................................13
Figure 8 Login Window ..........................................................................................14
Figure 9 SDLT 600A Main Page .............................................................................14
Figure 10 Setup Window........................................................................................... 18
Figure 11 Change Password .....................................................................................18
Figure 12 SDLT 600A/FTP Client............................................................................19
Figure 13 IP Configuration Options ........................................................................ 20
Figure 14 Local Area Connection Properties..........................................................21
Figure 15 Internet Protocol (TCP/IP) Properties...................................................22
Figure 16 Start Window.............................................................................................23
Figure 17 Login Window ..........................................................................................23
SDLT 600A Product Manual vii
Page 8

Figures
Figure 18 Setup Window........................................................................................... 25
Figure 19 Mac OS X System Network .....................................................................27
Figure 20 Mac OS X System Ethernet Network.....................................................28
Figure 21 Mac OS X IP Address Settings................................................................29
Figure 22 SDLT 600A Tape Drive Front Panel.......................................................31
Figure 23 Media Formatting..................................................................................... 34
Figure 24 Tape Drive Update ...................................................................................35
Figure 25 Tape Drive Update Progress Bar............................................................ 35
Figure 26 Server Update............................................................................................ 36
Figure 27 Server Update Progress Bar ....................................................................36
Figure 28 Reboot in Progress....................................................................................36
Figure 29 Save Changes.............................................................................................37
Figure 30 Restart Confirmation................................................................................ 37
Figure 31 FTP Error Log............................................................................................ 37
Figure 32 Java Virtual Machine Plug-in..................................................................38
Figure 33 FTP Error Pop-Up..................................................................................... 38
Figure 34 SDLT 600A Client Tab..............................................................................39
Figure 35 Download Progression Progress Bar ..................................................... 40
Figure 36 Site to Site Transfer Pop-up Window ....................................................41
Figure 37 File Exist Pop-up Window....................................................................... 41
Figure 38 Transfer in progress Pop-up Window...................................................42
Figure 39 Transfer error Pop-up Window.............................................................. 42
Figure 40 MXF Files and Metadata..........................................................................43
Figure 41 Additional Metadata Columns...............................................................44
Figure 42 Audio Essence Metadata .........................................................................44
Figure 43 Contextual Menu ...................................................................................... 45
Figure 44 Renaming Files or Folders.......................................................................45
Figure 45 Delete Pop-up Window ........................................................................... 46
Figure 46 Retrieving Files from the Trash Folder..................................................46
SDLT 600A Product Manual viii
Page 9

Figures
Figure 47 Moving Pop-up Window.........................................................................47
Figure 48 Moving Pop-up Window — Destination Folder..................................47
Figure 49 Create Folder Pop-up Window...............................................................48
Figure 50 MXF Information of D10 PAL Essence.................................................. 49
Figure 51 MXF Information of DV NTSC Essence ................................................49
Figure 52 Partial Restore OP1A Pop-up Window ................................................. 50
Figure 53 Partial Restore OPATOM Pop-up Window..........................................51
Figure 54 Partial Restore Successful Pop-up Window .........................................51
Figure 55 Partial File List...........................................................................................52
Figure 56 Partial File List in OPATOM................................................................... 52
Figure 57 Download Progression Dialog................................................................53
Figure 58 Create Header Pop-up Window............................................................. 54
Figure 59 Metadata Header — Virtual File ............................................................54
Figure 60 Transfer in Progress.................................................................................. 54
Figure 61 Erase Tape Pop-up Window ...................................................................55
Figure 62 Eject Tape Pop-up Window..................................................................... 55
Figure 63 Eject Tape Error Pop-up Window..........................................................55
Figure 64 Tape Pop-up Information........................................................................56
Figure 65 Information on Software Licenses Pop-up Window ........................... 57
Figure 66 Configuration Tab Display......................................................................58
Figure 67 FTP Error Pop-Up..................................................................................... 59
Figure 68 FTP Error Pop-Up Window ....................................................................59
Figure 69 Certificate of Security...............................................................................78
Figure 70 SDLT 600A Tape Drive Front Panel LEDs............................................82
Figure 71 SDLT 600A Tape Drive Modular Design ..............................................87
Figure 72 Multiple Layers Comprise Super DLTtape II Media.........................102
Figure 73 Super DLTtape II Data Cartridge......................................................... 103
Figure 74 Super DLTtape II Media Shipping Limits........................................... 103
Figure 75 Super DLTtape II Data Cartridge......................................................... 106
SDLT 600A Product Manual ix
Page 10

Figures
Figure 76 Bottom View of Super DLTtape II Data Cartridge ............................109
Figure 77 Super DLTtape II Data Cartridge Reel Locks..................................... 110
Figure 78 Opening the Super DLTtape II Data Cartridge Door ........................ 110
Figure 79 Problems to Look for Inside the Data Cartridge Door...................... 111
Figure 80 Write-Protect Switch on Super DLTtape II Data Cartridge.............. 112
Figure 81 Loading a Super DLTtape II Data Cartridge ...................................... 115
SDLT 600A Product Manual x
Page 11

Tables
Table 1 System Defaults.........................................................................................15
Table 2 Front Panel Elements................................................................................32
Table 3 Standard Commands (RFC959)..............................................................62
Table 4 RFC775 Commands..................................................................................69
Table 5 SITE Commands ....................................................................................... 70
Table 6 Commands Not Normalized (Internet Draft)....................................... 76
Table 7 LED Lighting Pattern During Power-On Self-Test (POST) ................ 81
Table 8 Troubleshooting Chart.............................................................................83
Table 9 SDLT 600A Tape Drive Performance Data ...........................................91
Table 10 Non-operating Shock Specifications (Unpackaged)............................ 93
Table 11 Non-Operating Shock Specifications (Packaged, Drop) ..................... 93
Table 12 Non-Operating Vibration Specifications (Unpackaged).....................93
Table 13 Non-Operating Vibration Specifications (Packaged)..........................94
Table 14 Operating Shock and Vibration Specifications..................................... 94
Table 15 Current Requirements — SCSI Interface...............................................96
Table 16 Power Requirements — SCSI Interface .................................................98
Table 17 Temperature and Humidity Specification ..........................................100
SDLT 600A Product Manual xi
Page 12

Tables
Table 18 Tape Drive Storage and Shipment Specifications.............................. 100
Table 19 Super DLTtape II Media Specifications...............................................101
Table 20 Super DLTtape II Media Operating Limits.........................................104
Table 21 Super DLTtape II Media Storage Limits.............................................. 104
Table 22 Write-Protect Switch Positions .............................................................113
Table 23 EMI Regulations and Certifications.....................................................119
Table 24 Acoustic Noise Emissions, Nominal....................................................120
SDLT 600A Product Manual xii
Page 13

Preface
This document serves as an easy-to-use information source and product
catalog to familiarize Quantum customers and systems professionals
with the SDLT 600A tape drive. The SDLT 600A tape drive is an extension
of the Digital Linear Tape (DLT
Audience The primary audience for this document consists of end users installing
and using the tape drive.
Purpose This document provides information on the SDLT 600A tape drive
including:
®
) product family.
• Product description
• Installation instructions
• Operation instructions
• Tape usage and care
• Regulatory compliance and statements
SDLT 600A Product Manual xiii
Page 14

Document Organization This document is organized as follows:
Preface
• Chapter 1, Introduction
, provides an overview of the tape drive and
product features.
• Chapter 2, Installing Your Tape Drive
, includes information on
warranty, safety, handling, and ESD precautions, pre-installation
guidelines, and installation procedures.
• Chapter 3,
Using Your Tape Drive, provides information that you
need to use the tape drive, including front panel controls, loading the
applet, updating the firmware and software, viewing the error log,
rebooting, supported FTP commands, POST, cleaning the tape drive,
and general troubleshooting guidelines.
• Appendix A,
SDLT 600A Tape Drive Specifications, provides
product, functional, environmental, and recording media
specifications.
• Appendix B,
Super DLTtape II Data Cartridges, provides information
on recognizing, handling, inspecting, write-protecting, loading, and
unloading cartridges.
• Appendix C,
Regulatory Compliance, provides electromagnetic field
specifications, acoustic noise emissions, and environmental
compliance
This document concludes with a glossary and a detailed index.
Notational Conventions This document uses the following conventions:
Note: Notes emphasize important information related to the main
topic.
Caution: Cautions indicate potential hazards to equipment and are
included to prevent damage to equipment.
Warning: Warnings indicate potential hazards to personal safety and
are included to prevent injury.
This document uses the following:
SDLT 600A Product Manual xiv
Page 15

• Right side of the tape drive — Refers to the right side as you face the
component being described.
• Left side of the tape drive — Refers to the left side as you face the
component being described.
• Power cycle — Means to turn the tape drive or system on, then turn
them off (or off, then on).
• Dimensions in figures — All dimensions are shown with no units
specified (Inches understood unless otherwise specified).
Related Documents The following documents are related to the SDLT 600A tape drive:
Document No. Document Title Document Description
81-81488-xx SDLT 600A Quick Start
Guide
Contacts Quantum company contacts are listed below.
Quantum Corporate Headquarters
To order documentation on this or other Quantum products, contact:
Quantum Corporation
141 Innovation
Irvine, CA 92617
(949) 856-7800
(800) 284-5101
Technical Publications
To comment on existing documentation send e-mail to:
doc-comments@quantum.com
Provides “quick” instructions
on how to install and run the
tape drive
0
0
SDLT 600A Product Manual xv
Page 16

Preface
Quantum Home Page 0
Visit the Quantum home page at:
http://www.quantum.com
Customer Support 0
The Quantum Customer Support Department provides a 24-hour help
desk that can be reached at:
North/South America: (949) 725-2100 or (800) 284-5101
Asia/Pacific Rim: (International Code) + 61 7 3839 0988
Europe/Middle East/Africa: (International Code) + 44 (0) 1256 848748
Send faxes for the Customer Support Department to:
North/South America: (949) 725-2176
Asia/Pacific Rim: (International Code) + 61 7 3839 0955
Europe/Middle East/Africa: (International Code) + 44 (0) 1256 848777
Send e-mail for the Customer Support Department to:
North/South America: http://www.quantum.com/am/service_support/
Index.aspx
Asia/Pacific Rim: apachelp@quantum.com
Europe/Middle East/Africa: eurohelp@quantum.com
Software License The SDLT 600A uses edtFTPj 1.4.5 Java API which is under the GNU
Lesser General Public License (LGPL) and hence can be freely used in
commercial or non-commercial products.
It should be noted, however, that under the LGPL, edtFTPj must be used
as a library and not directly incorporated into codebase.
• edtFTPj Web site: www.enterprisedt.com/products/edtftpj/
overview.html
• GNU Lesser General Public License: www.gnu.org/licenses/
lgpl.html
SDLT 600A Product Manual xvi
Page 17

Chapter 1
1Introduction
This chapter describes the features of the Quantum SDLT 600A tape drive
and covers the following topics:
• Overview
• Product Features
describes a basic overview of the tape drive.
lists product features of the tape drive.
Overview 1
The Quantum SDLT 600A is an extension to the family of DLT products
with video professionals in mind. Using the built-in FTP client in
conjunction with a standard Web browser, Material Exchange Format
(MXF) files can be stored and retrieved. A Gigabit Ethernet (GigE)
interface allows this drive to be quickly connected and accessed on your
network.
The SDLT 600A is ideal for serving a full range of video applications;
from hand-carrying video content out to a truck for live production to
facility-wide, long-term, secure archive.
The tape drive provides 300 Gigabyte (GB) of storage capacity with a
transfer speed of 36 Megabyte per second (MB/sec) native. This allows
for over 6 hours of HD (high definition) and over 25 hours of SD
(standard definition) storage on a single cartridge.
SDLT 600A Product Manual 1
Page 18
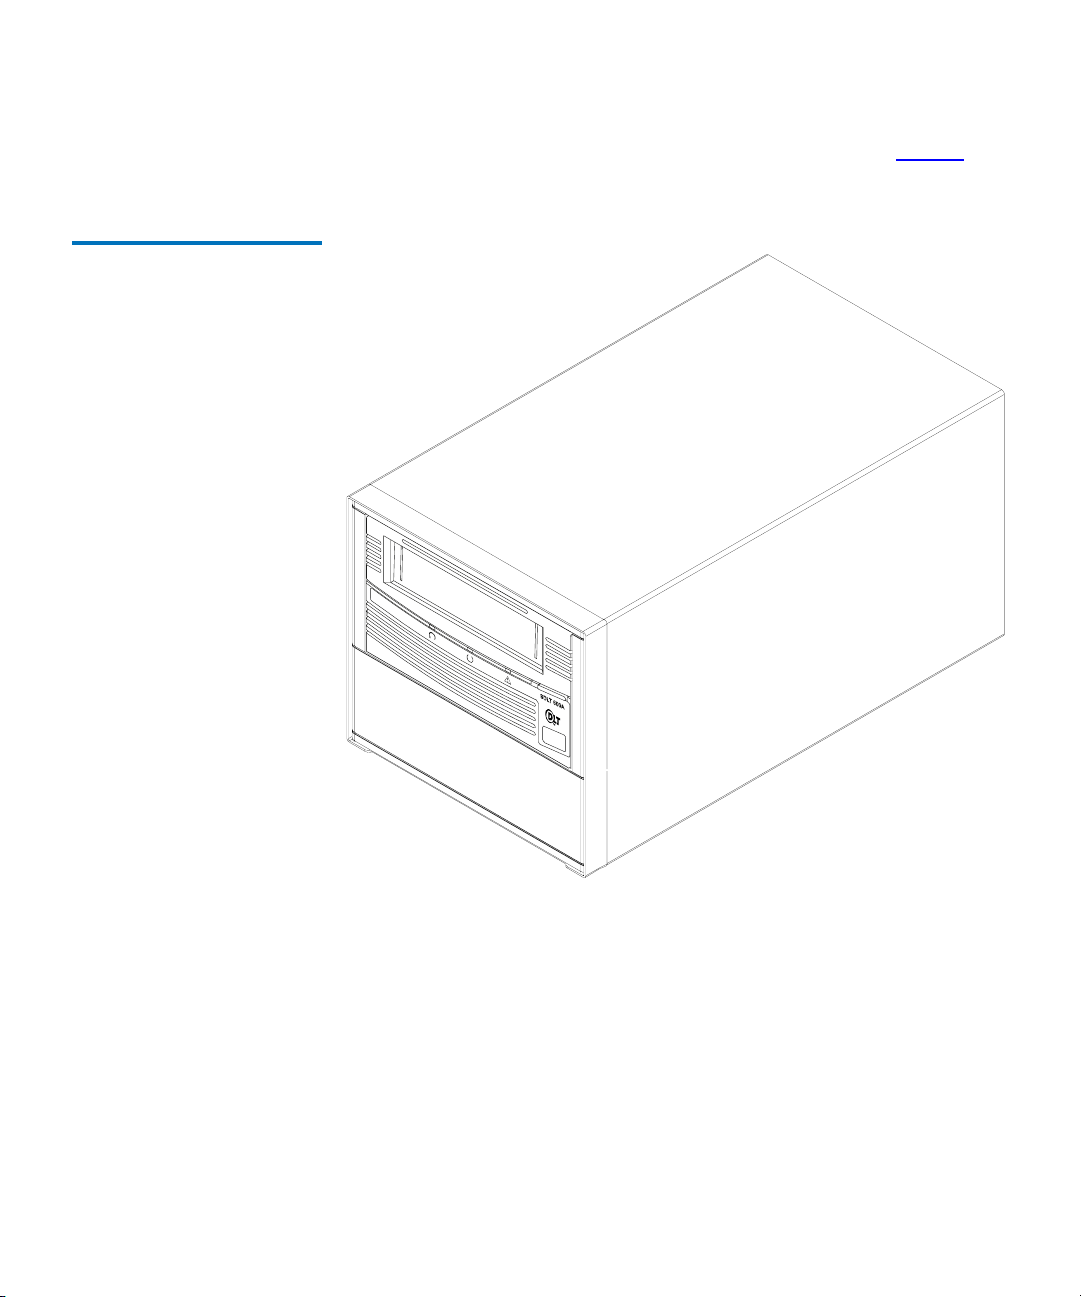
Figure 1 SDLT 600A
Tape Drive
Chapter 1 Introduction
Overview
The SDLT 600A is available in either a tabletop (as shown in figure 1) or
rackmount unit.
SDLT 600A Product Manual 2
Page 19

Chapter 1 Introduction
Product Features
Product Features 1
The SDLT 600A tape drive offers the following product features:
• Convergent technology — the benefits of file-based data tape storage
and the accessibility of video tape
• Built-in Gigabit Ethernet (GigE) interface
• Access to metadata and clip content by timecode-indexed in and out
points through a web-based interface.
• The tape drive provides 300 Gigabyte (GB) of storage capacity with a
transfer speed of 36 Megabyte per second (MB/sec) native. This
allows for over 6 hours of HD (high definition) and over 25 hours of
SD (standard definition) storage on a single cartridge.
• A streaming tape drive that uses half-inch wide Super Digital Linear
Tape (Super DLTtape II) media.
• A standard 5.25-inch full-height form factor to simplify integration
into system and tape library solutions.
• iTalk (and Pocket DLTSage iTalk)—Infrared (wireless) interface that
provides a remote testing base allowing customers and integrators to
access system diagnostic information from the front of the tape drive.
• For more information on the SDLT tape products and other product
information, go to www.dlttape.com/Home.htm
This Web page provides information that is constantly updated as
needed. Refer to this Web site often to obtain the most current
information.
SDLT 600A Product Manual 3
.
Page 20

Chapter 2
2Installing Your Tape Drive
This chapter describes how to install the SDLT 600A tape drive. This
includes installation instructions, power and signal cabling descriptions,
and operating instructions. This chapter also includes information on
configuring and connecting the tape drive into a system.
This chapter covers the following topics:
• Warranty Note follow so that you do not void your warranty.
• Safety, Handling, and ESD Protection
safeguards to use when working with the tape drive.
• Pre-Installation Guidelines
installing the tape drive.
provides a general reminder of certain precautions to
describes appropriate
describes proper steps to take before
W arranty Note 2
See the warranty before installing your tape drive. Certain actions taken
during installation could void the warranty if not properly conducted.
Generally, the Limited Product and Limited Repair Warranties are
contingent upon proper use in the application for which the product is
intended; and do not cover the product if you perform any of the
following actions:
SDLT 600A Product Manual 4
Page 21

Chapter 2 Installing Your Tape Drive
Safety, Handling, and ESD Protection
• Modify the product without the manufacturer’s written approval.
• Subject the product to unusual physical, environmental, or electrical
stress, including damage caused by handling or shipping in
unapproved containers or packaging.
• Disturb any warranty labels, or the integrity of the product in any
other way.
• Remove or damage the serial number label to the extent that
warranty status of the product cannot be determined.
Safety, Handling, and ESD Protection 2
Inappropriate or careless handling of SDLT 600A tape drives may result
in damage to the product. Follow the precautions and directions to
prevent damaging the tape drive. In addition, follow the steps in Pre-
Installation Guidelines to ensure that you have the correct hardware for
your system configuration.
Safety Precautions 2 For your safety, follow all safety procedures described here and in other
sections of the manual.
1 Power off the system before installing or removing the tape drive to
prevent the possibility of electrical shock or damage to the tape drive.
Unplug the unit that contains—or is to contain—the tape drive from
AC power to provide an added measure of safety.
2 Read, understand, and observe all label warnings.
3 The Pivoting Optical Servo (POS) uses a Class I laser product. This
laser product complies with 29 CFR 1200 and 29 CFR 1910 as
applicable on the date of manufacture.
Warning: If you open the tape drive chassis, you may become
exposed to invisible laser emission which could be
harmful if you are directly exposed to the beam.
SDLT 600A Product Manual 5
Page 22

Chapter 2 Installing Your Tape Drive
Safety, Handling, and ESD Protection
Handling 2 Damage to the tape drive can occur as the result of careless handling,
vibration, shock, or electrostatic discharge (ESD). For more details about
ESD, see Electrostatic Discharge Protection
.
Caution: Always handle the SDLT 600A tape drive with care to
avoid damage to the precision internal components. Hold
the rackmount tape drive the sides or the tabletop tape
drive by the bottom. Never hold either tape drive by
inserting fingers into the receiver area on the front of the
tape drive. Damage to the receiver area may occur if you
lift or carry it in this manner.
Follow these guidelines to avoid damage to the tape drive:
• Always observe prescribed ESD precautions.
• Keep the external tape drive in its anti-static bag until ready to install.
• Always use a properly fitted wrist strap or other suitable ESD
protection when handling the tape drive.
• Hold the tape drive only by its sides.
• Do not bump, jar, or drop the tape drive. Use care when transporting
the tape drive.
• Always handle the tape drive carefully and gently. A drop of ¼ inch
onto a bench or desktop may damage a tape drive.
• Never place the tape drive so that it rests on its front bezel. Always
gently place the tape drive flat, bottom side down, on an appropriate
ESD-protected work surface to avoid the tape drive being
accidentally knocked over.
• Do not pack other materials with the tape drive in its anti-static bag.
• Place the tape drive in the anti-static bag before placing it in a
shipping container.
• Do not stack objects on the tape drive.
• Do not expose the tape drive to moisture.
• Do not place foreign objects inside the tape drive’s receiver area.
SDLT 600A Product Manual 6
Page 23

Chapter 2 Installing Your Tape Drive
Safety, Handling, and ESD Protection
Electrostatic Discharge Protection
Several electrical components of the SDLT 600A tape drive are sensitive
2
to static electricity and electrostatic discharge (ESD). Even a static
buildup or discharge that is too slight to feel can be sufficient to destroy
or degrade a component’s operation.
To minimize the possibility of ESD-related damage to the system, the
drive’s manufacturer strongly recommends using both a workstation
anti-static mat and an ESD wrist strap. When correctly installed and
properly used, these devices reduce the buildup of static electricity that
might harm the system.
Observe the following precautions to avoid ESD-related problems:
• Leave the tape drive in its anti-static bag until you are ready to install
it in the system.
• Always use a properly fitted and grounded wrist strap or other
suitable ESD protection when handling the tape drive and observe
proper ESD grounding techniques.
• Hold the tape drive only by its sides.
• Place the tape drive on a properly grounded anti-static work surface
pad when it is out of its protective anti-static bag.
• Do not use the bag as a substitute for the work surface anti-static pad.
The outside surface of the bag may not have the same anti-static
properties as the inside surface. It could actually increase the
possibility of ESD problems.
• Do not remove covers to use any test equipment to check components
on the PCBAs. There are no user-serviceable components on the tape
drive.
SDLT 600A Product Manual 7
Page 24

Chapter 2 Installing Your Tape Drive
Pre-Installation Guidelines
Pre-Installation Guidelines 2
Before you begin, check the contents of the box and record the applicable
numbers and confirm software and operating system compatibility.
Check the tape drive to be certain it is operating properly before installing
it in a system.
1 Unpack and review the contents of the box for any physical damage.
If you find damaged items, contact your tape drive provider.
2 Record the model and serial number of the tape drive. These
numbers provide specific information about the tape drive and will
be very helpful if you must contact technical support. You can find
these numbers on the bottom of the tape drive enclosure.
The Model Number/Serial Number:
3 Make sure that the host computer is functioning properly and is
prepared for a network.
Installing the Tape Drive 2
The SDLT 600A tape drive is available in a rackmount version or a
tabletop version; for rackmount installation procedures, see Secure the
Rackmount Tape Drive into a Rack and for tabletop installation
procedures, see Connect the Power to the Tabletop Tape Drive
Secure the Rackmount Tape Drive into a Rack
SDLT 600A Product Manual 8
This section describes how to secure the rackmount tape drive into a rack.
2
Note: If you are installing a tabletop tape drive, proceed to Connect
the Power to the Tabletop Tape Drive.
1 Slide the rackmount tape drive into the equipment rack.
2 Secure the unit to the rack with the thumbscrews. See figure 2
.
.
Page 25
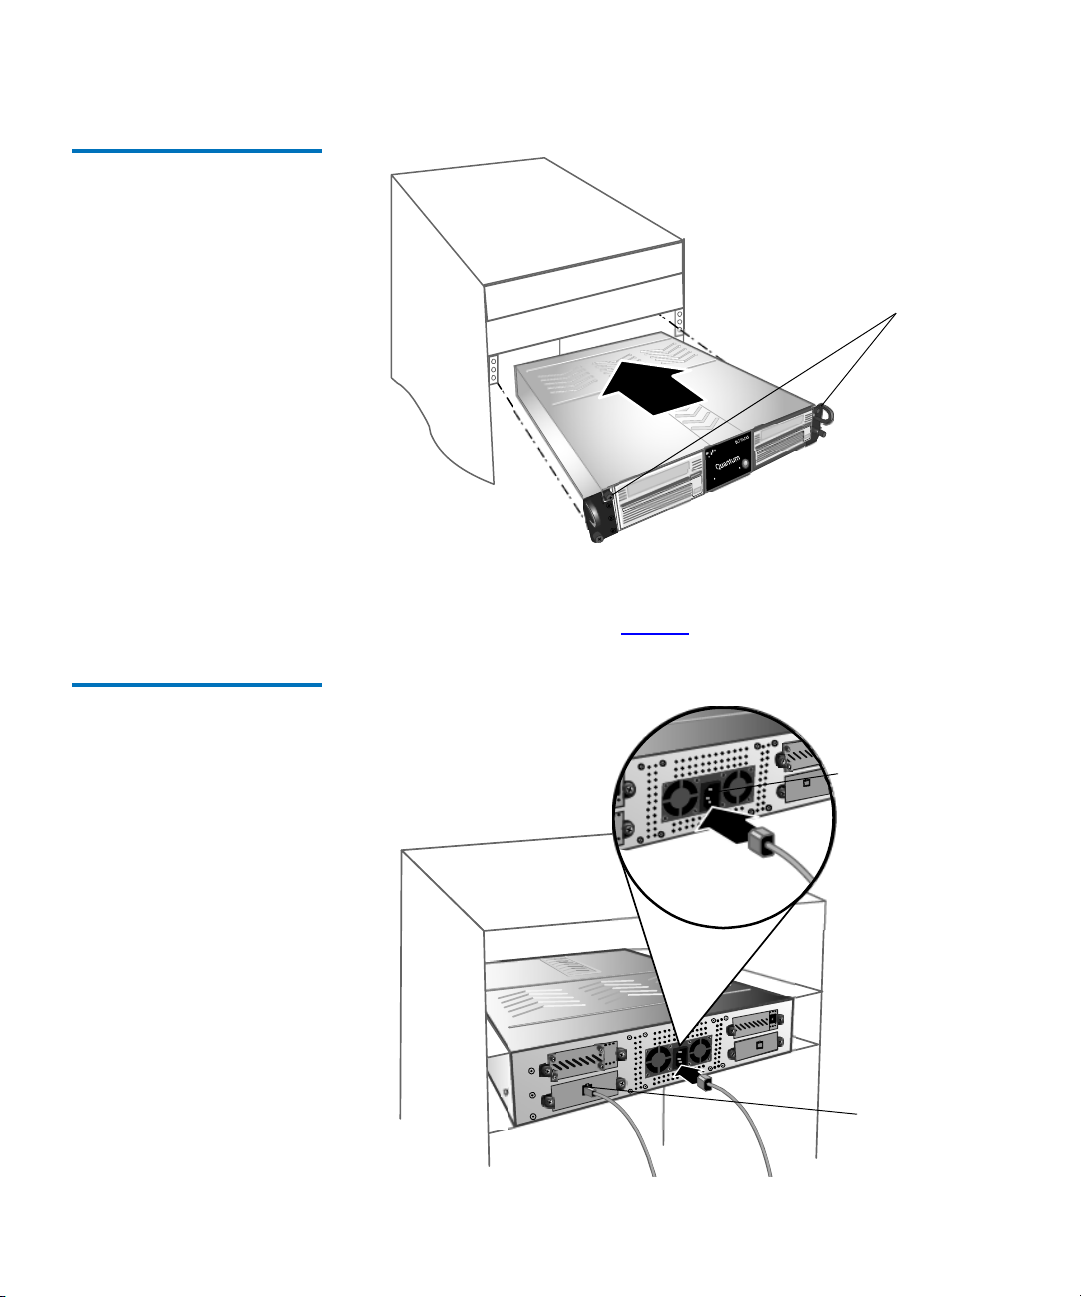
Figure 2 Install the
Rackmount SDLT 600A
Chapter 2 Installing Your Tape Drive
Installing the Tape Drive
Thumbscrews
3 Connect one end of the power cord to the power cord connector on
the rear of the rackmount tape drive and the other end of the power
cord to an AC outlet. See figure 3
.
Figure 3 Connect the Power
Cable
Power cord
connector
Network port
SDLT 600A Product Manual 9
Page 26
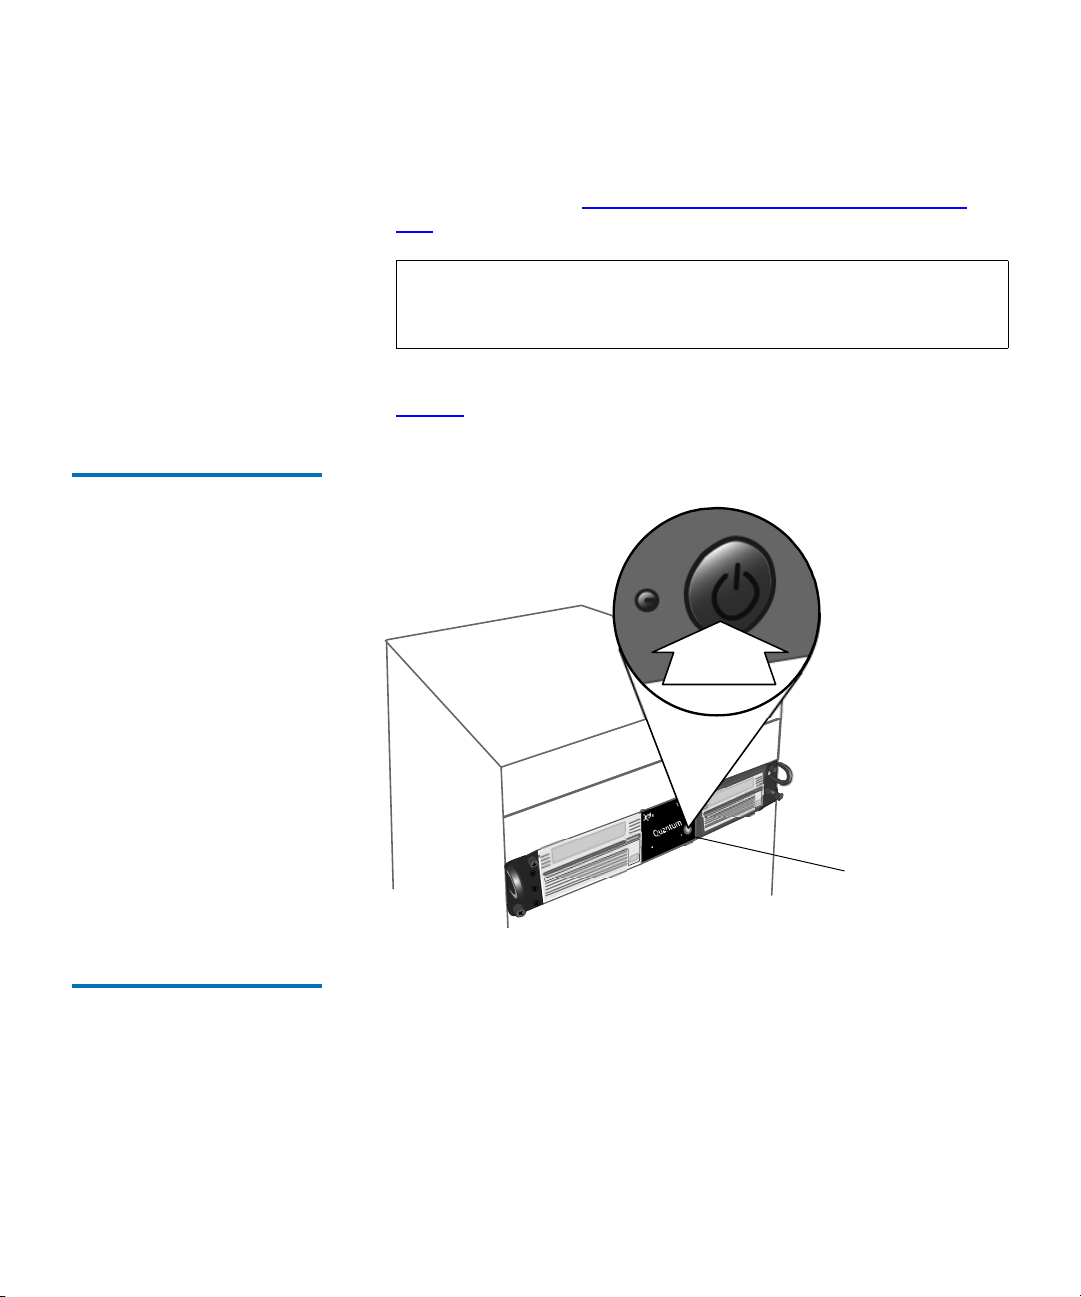
Figure 4 Power on the
Rackmount Tape Drive
Chapter 2 Installing Your Tape Drive
Installing the Tape Drive
4 Connect one end of an Ethernet cable to the network port located on
the rear of the tape drive and connect the other end to a network
switch or router (see Connecting the SDLT 600A to the Network
Port).
Note: The GigE network port is backward compatible with
100BaseT and 10BaseT networks. To get the full
performance of the drive, use GigE networks.
5 Power on the tape drive using the switch on the front panel (see
figure 4
).
Power button
Connect the Power to the Tabletop Tape Drive
The tabletop tape drive power supply has an auto-sensing feature; it
2
requires no adjustment or switch setting changes for different AC
sources.
1 Attach the power cable to the tape drive.
2 Connect one end of the AC cord into the power connector on the rear
of the tape drive; connect the other end of the cord to the AC outlet.
SDLT 600A Product Manual 10
Page 27
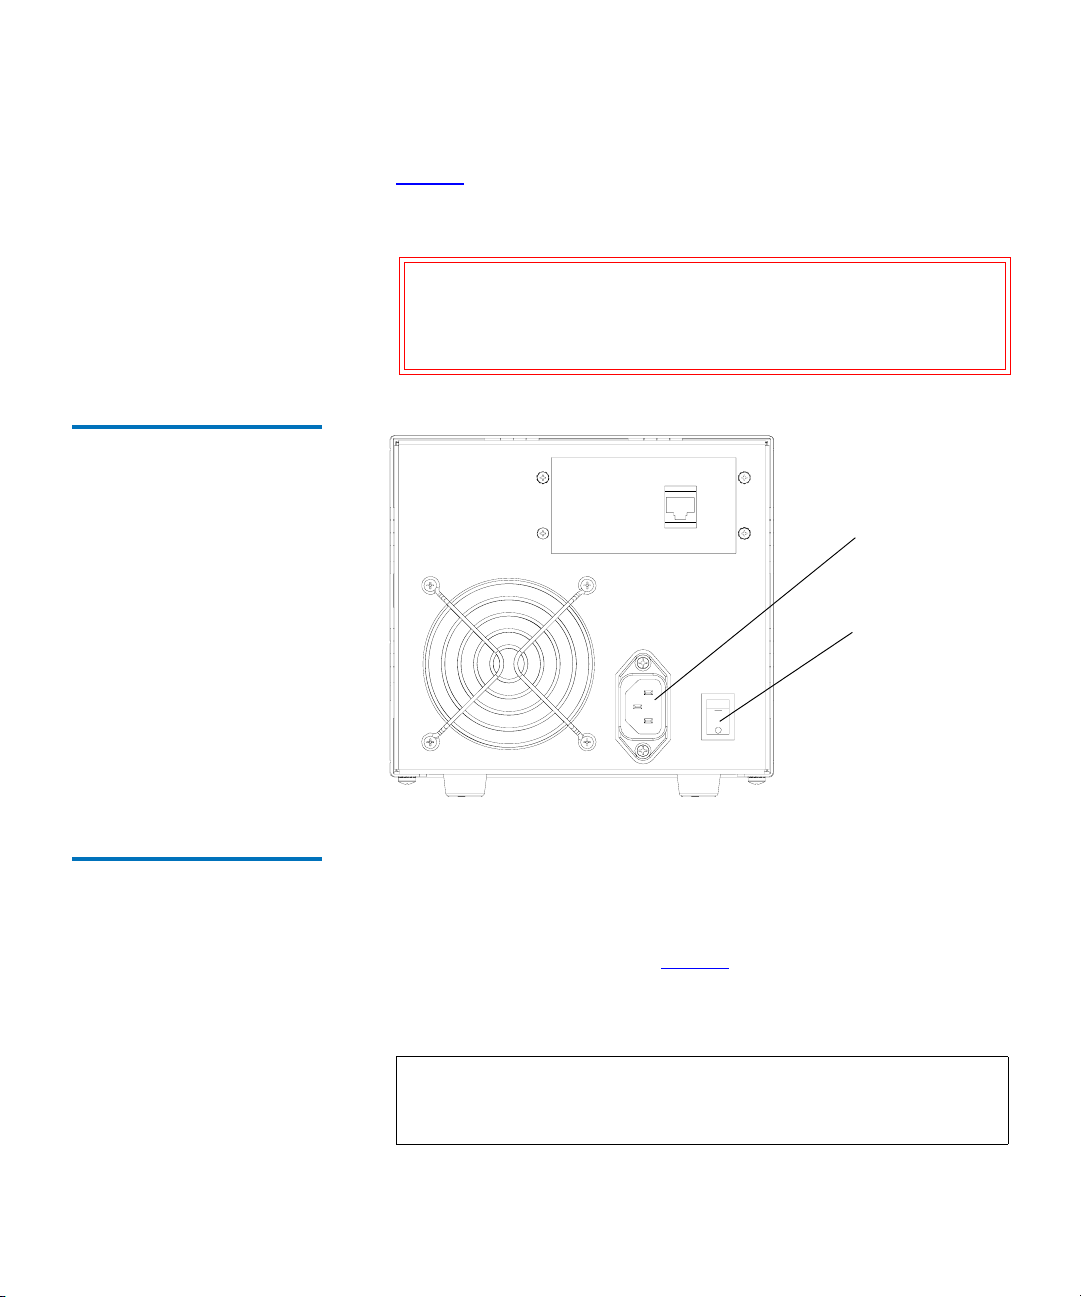
Figure 5 Powering On the Tape
Drive
Chapter 2 Installing Your Tape Drive
Installing the Tape Drive
3 Power on the tape drive using the switch on the rear panel (see
figure 5
).
4 Upon completion, proceed to the next section to confirm the
installation.
Caution: Quantum recommends the use of an uninterruptible
power supply (UPS). If power is interrupted while
the drive is operating, all changes to an inserted
cartridge will be lost.
Power connector
On/off switch
Connecting the SDLT 600A to the Network Port
To connect to the network port:
2
1 Connect one end of an Ethernet cable to the network port located on
the rear of the SDLT 600A tape drive and connect the other end to a
network switch or router (see figure 6
).
The drive may be connected directly to a computer host network
port; no external network is necessary.
Note: The GigE network port is backward compatible with
100BaseT and 10BaseT networks. To get the full
performance of the drive, use GigE networks.
SDLT 600A Product Manual 11
Page 28
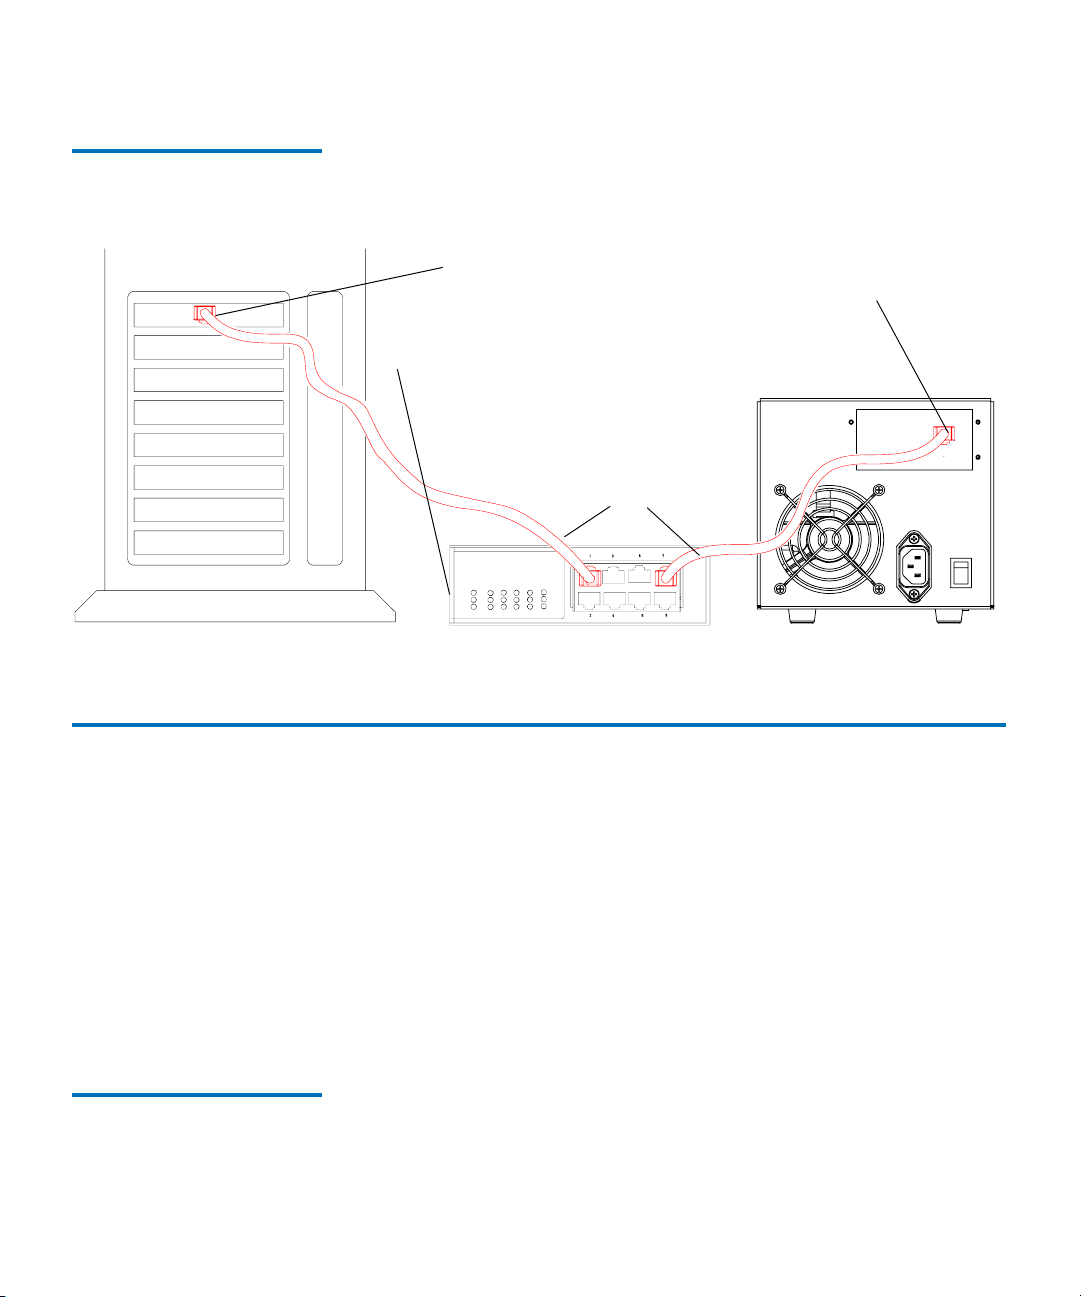
Figure 6 Connecting to the
Network Port (Tabletop Tape
Drive Shown)
Router
Chapter 2 Installing Your Tape Drive
Tape Drive Remote Management
Host network port
Note:
The GigE network port is backward compatible with
100BaseT and 10BaseT networks. To get the full
performance of the drive, use gigabit Ethernet networks.
Optionally, the tape drive may be
directly connected to the host
network port.
Ethernet cables
Network port
Tape Drive Remote Management 2
The SDLT 600A utilizes a Web-based interface which allows you to
configure and manage the system from a remote workstation on the same
network. The tape drive is managed through the Web pages (accessible
using Internet browser software installed on the host computer) and can
be used to do the following operations:
• Set and configure IP addresses
• Change password
• Update tape drive and server firmware.
Starting the Remote Management Web Pages
SDLT 600A Product Manual 12
The SDLT 600A main page is available by entering the drive’s product IP
2
address (or URL) in the address bar of a Web browser.
Page 29
Chapter 2 Installing Your Tape Drive
Tape Drive Remote Management
1 Type in the IP address of the drive (http://10.10.10.10) in the address
line of the browser.
Figure 7 Start Window
2 From the Start window, select
Login (see figure 16).
Select
Login
3 When prompted for a password (see figure 17), enter admin.
SDLT 600A Product Manual 13
Page 30

Figure 8 Login Window
Figure 9 SDLT 600A Main
Page
Chapter 2 Installing Your Tape Drive
Tape Drive Remote Management
Enter
password
Once the correct password is entered the SDLT 600A Management
menu options are fully populated as shown in figure 9
.
• Save all changes — saves any setup modification information.
•
Restore all previous values — restores the previous setup
information.
Setup Menu 2 From the SDLT 600A main page, you can access to the Setup menu (on the
left side of the desktop) to manage the network options. These options are
described below.
Note: The values shown in the figures that follow are samples and
may not represent the current values set in the SDLT 600A.
SDLT 600A Product Manual 14
Page 31
Table 1 System Defaults
Chapter 2 Installing Your Tape Drive
Tape Drive Remote Management
Name Password/Setting
Static IP address 10.10.10.10
Netmask 255.255.255.0
Main login admin
Username root
Default password password
Use DHCP 2
Check this box to enable DHCP.
If enabled, the SDLT 600A attempts to get its network configuration from
a DHCP server when it boots. If the device fails to connect to the network,
the predefined default values are used.
Hostname
Enter a name for the tape drive (the default is SDLT600A). This can be a
user friendly name. This appears as part of the IQN and will also be
passed to the DHCP Server for dynamic DNS updates. For more
information, contact your network administrator.
Note: When installing multiple drives, be sure each tape drive has a
unique IP address and host name.
IP address
For a manual IP address configuration (DHCP disabled), enter a valid IP
address here according to the network configuration. For more
information, contact your network administrator.
Note: The IP address MUST be unique; it cannot be in use by another
device on the network. Select an IP address that is appropriate
for your network environment.
2
2
SDLT 600A Product Manual 15
Page 32

Chapter 2 Installing Your Tape Drive
Tape Drive Remote Management
Netmask 2
Enter the subnet mask for your particular network here. It is advisable to
enter a fallback subnet mask when using DHCP in case the DHCP server
is unavailable. For more information, contact your network
administrator.
Broadcast address
Enter the broadcast address for your particular network here. It is
advisable to enter a fallback broadcast address here when using DHCP
just in case the DHCP server is unavailable. For more information,
contact your network administrator.
Default gateway
You can enter the IP address of the default gateway for your particular
network. Enter a default gateway only if you wish to connect from a
network. For more information, contact your network administrator or
see other third-party technical references for more details.
NTP server
Network Time Protocol (NTP) is any device that responds to NTP time
requests and synchronizes the clocks of computers (clients or servers)
over a network. Enter a NTP server address.
You can set the NTP server IP address in the SDLT 600A Setup page. This
is required to synchronize the SDLT 600A tape drive on a network.
For example, the NTP server stamps its date and time metadata when a
new file is stored on a SDLT 600A cartridge.
2
2
2
Note: Make sure your PC’s clock is accurate. Use a standard time
utility to match the atomic clock value. See www.
bin/view/Servers/WebHome.
To set the IP:
1 Connect the NTP time server to your network.
2 Set the NTP server IP address in the SDLT 600A Setup page.
SDLT 600A Product Manual 16
ntp.isc.org/
Page 33

Chapter 2 Installing Your Tape Drive
Tape Drive Remote Management
SNMP manager 2
A Simple Network Management Protocol (SNMP) Manager or SNMP
Service is an application that performs the operational roles of generating
requests to modify and retrieve management information, and receiving
the requested information and trap-event reports that are generated by
the SNMP agent. Enter an SNMP address.
Timeout FTP session
You can set the FTP session timeout (when the session ends) in the
SDLT 600A Setup page. Enter a timeout between 0 to 15 minutes. The
default value is 5 minutes.
New Root’s password
The password for root user connection can be set in the Quantum Setup
page using the New Root's password. The default login for root user
connection is root and password is Quantum. After setting it, and click
Update, the SDLT 600A must reboot to change the password.
Web interface enabled
If you have a valid administrator password, checking this option will
allow you to access the management functions within the server using the
Web browser interface.
Note: In order to use this function at least one of the management
interface options must be enabled.
2
2
2
Telnet interface enabled
If you have a valid administrator password, checking this option will
allow you to access the management functions within the server using a
command-line (telnet) interface.
Note: In order to use this function at least one of the management
interface options must be enabled.
SDLT 600A Product Manual 17
2
Page 34

Figure 10 Setup Window
Chapter 2 Installing Your Tape Drive
Tape Drive Remote Management
Changing the Password 2 In the SDLT 600A main page, you can access the Change password menu
(on the left side) to change the password of the
Figure 11 Change Password
SDLT 600A Product Manual 18
SDLT 600A main page.
Page 35

Chapter 2 Installing Your Tape Drive
Tape Drive Remote Management
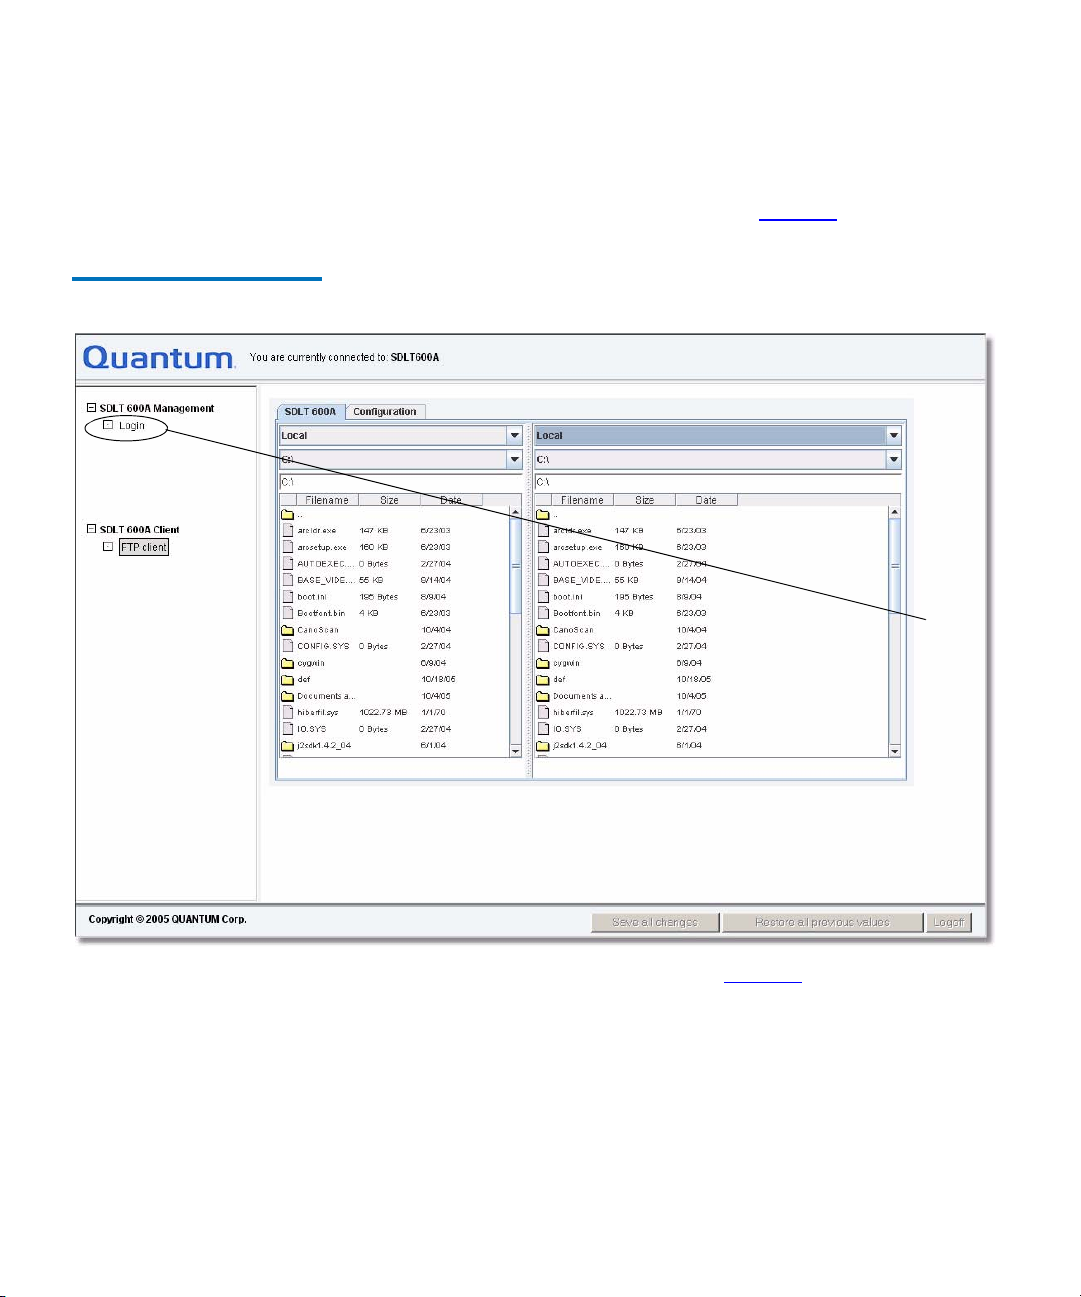
SDLT 600A Client/FTP Client
Figure 12 SDLT 600A/FTP
Client
The SDLT 600A Client/FTP client allows you to transfer files to and from
2
the tape drive, partially restore MXF files, and view the MXF metadata.
In the
SDLT 600A main page, click SDLT 600A Client/FTP client.
Select
FTP client
SDLT 600A Product Manual 19
Page 36

Chapter 2 Installing Your Tape Drive
Configuring the Tape Drive
Configuring the Tape Drive 2
There are several options available when configuring the SDLT 600A
within your network. Select the best solution based on the diagram
presented in figure 13
.
Figure 13 IP Configuration
Options
Leave SDLT 600A
on 10.10.10.10
Configure PC to IP
10.10.10.1
yes
To
configure
IP
Is
SDLT 600A
on it's own
network?
Configure
SDLT 600A for
DHCP
no
yes
Open PC's
network
properties
Is PC
configured
for DHCP?
no
Obtain valid IP and
netmask for
SDLT 600A
from network admin
Configure
SDLT 600A as
advised
done
SDLT 600A Product Manual 20
Page 37

Windows Configuration 2
Chapter 2 Installing Your Tape Drive
Configuring the Tape Drive
1 The host IP configuration may have to be modified to communicate
with the drive.
The factory default IP address for the SDLT 600A is set to 10.10.10.10.
Figure 14 Local Area
Connection Properties
2 Go to
3 Go to
Network Connections and click the LAN icon.
Internet Protocol (TCP/IP) connection and click Properties (see
figure 14
).
Select the TCP/IP
connection
4 In the General dialogue box (see figure 15), select the radio button
“Use the following IP address”.
• In the IP address box, enter 10.10.10.1
• In the Subnet mask box, enter 255.255.255.0
5 Click
SDLT 600A Product Manual 21
OK.
Page 38

Chapter 2 Installing Your Tape Drive
Configuring the Tape Drive
Figure 15 Internet Protocol
(TCP/IP) Properties
Enter the IP address and
Subnet mask
6 Launch a Web browser (Internet Explorer, Netscape, or Firefox).
Note: For Linux — Configure using the following:
ifconfig eth0:1 10.10.10.1
For Macintosh — Configure using System Preferences,
Built-In Ethernet, and Manually 10.10.10.10.
Depending upon your present configuration, the drive may not be
initially recognized by the network. You may need to add a network
interface to use the drive temporarily or to configure it.
7 Type in the IP address of the drive (http://10.10.10.10) in the address
line of the browser.
8 From the Start window, select
SDLT 600A Product Manual 22
Login (see figure 16).
Page 39

Figure 16 Start Window
Chapter 2 Installing Your Tape Drive
Configuring the Tape Drive
Select
Login
9 When prompted for a password (see figure 17), enter admin.
Figure 17 Login Window
Enter
password
Once the correct password is entered the SDLT 600A Management
menu options are fully populated.
SDLT 600A Product Manual 23
Page 40

Chapter 2 Installing Your Tape Drive
Configuring the Tape Drive
Multiuser Connection 2 The system allows six users to be logged on to the root. All other users are
considered guests. The root user can operate all the features of the
SDLT 600A, while the guest user can only read the cartridge directory
(table of contents).
Note: If you require additional assistance when changing IP settings,
you may need to consult either your network administrator or
an authority on IP policies and standards.
Warning: Any change of the IP address could result in the loss of the
device; always double-check that the IP number is entered
correctly.
10 For network configuration settings, go to the
sub menu
Setup (see figure 18).
11 Set your IP address and subnet mask or select
save all changes, then restart your computer.
SDL T 600A manage ment
DHCP. Click update,
SDLT 600A Product Manual 24
Page 41

Figure 18 Setup Window
Chapter 2 Installing Your Tape Drive
Configuring the Tape Drive
Setup menu
IP address
NTP server
SDLT 600A Product Manual 25
Page 42

Chapter 2 Installing Your Tape Drive
Linux Configuration 2 The following is a sample Linux configuration.
[user@host ~]$ su -l
Password:
[root@host ~]# ftp 10.10.10.10
ftp: connect: Connection timed out
ftp> quit
[root@host ~]# ifconfig eth0:1 10.10.10.1 up
[root@host ~]# ftp 10.10.10.10
Connected to 10.10.10.10.
220---------- Welcome to SDLT 600A ---------220-You are user number 1 of 1 allowed.
220-Local time is now 00:52. Server port: 21.
220 You will be disconnected after 15 minutes of
inactivity.
500 This security scheme is not implemented
500 This security scheme is not implemented
KERBEROS_V4 rejected as an authentication type
Name (10.10.10.10:root):
331 User root OK. Password required
Password: *****
230-This server supports FXP transfers
230 OK. Current directory is /
Remote system type is UNIX.
Using binary mode to transfer files.
ftp> quit
[root@host ~]# telnet 10.10.10.10
Trying 10.10.10.10...
Connected to 10.10.10.10 (10.10.10.10).
Escape character is '^]'.
SDLT 600A Interface
Password: *****
0 SDLT 600A Management ->
1 SDLT 600A Client ->
r Restore all previous values
s Save all changes
b Reboot
q Logoff
Enter option: q
Configuring the Tape Drive
SDLT 600A Product Manual 26
Page 43
Connection closed by foreign host.
[root@host ~]# ifconfig eth0:1 down
[root@host ~]#
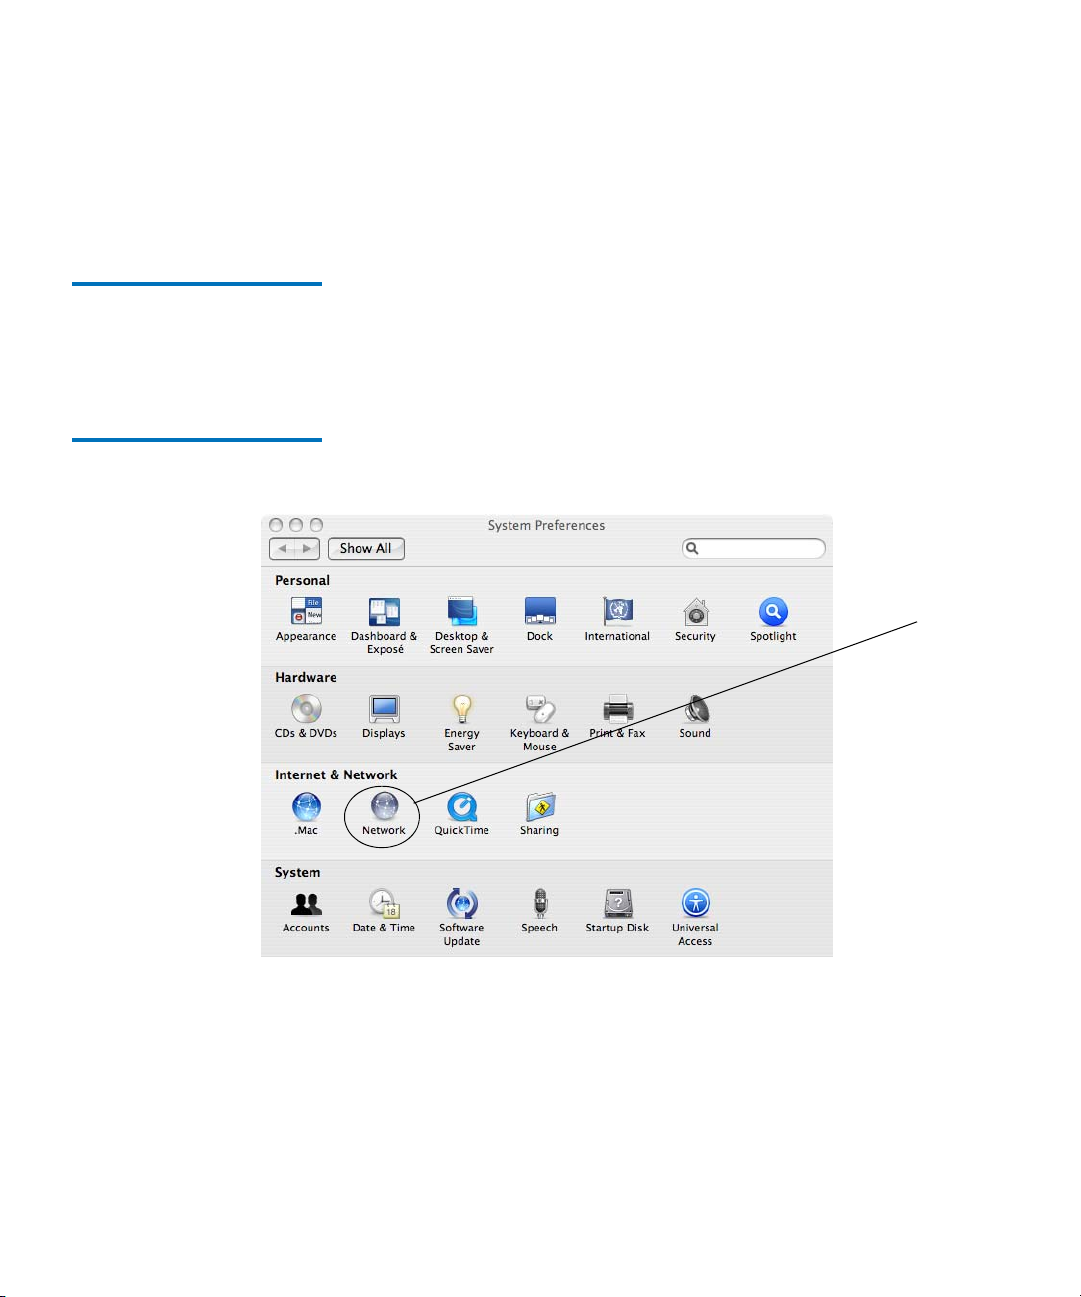
Mac OS X Configuration 2 Set an IP address:
Chapter 2 Installing Your Tape Drive
Configuring the Tape Drive
Figure 19 Mac OS X System
Network
1 From the blue Apple menu, select
2 Select
Network.
System Preferences.
Network
SDLT 600A Product Manual 27
Page 44

Figure 20 Mac OS X System
Ethernet Network
Chapter 2 Installing Your Tape Drive
Configuring the Tape Drive
3 Highlight the Built-in Ethernet item and then select the Configure
button.
Network
SDLT 600A Product Manual 28
Page 45

Figure 21 Mac OS X IP
Address Settings
Chapter 2 Installing Your Tape Drive
Configuring the Tape Drive
4 Select the Manually in the Configuration IPv4 drop-down box and
enter the IP address in the
IP Address dialogue box.
IP address settings
SDLT 600A Product Manual 29
Page 46

Chapter 3
3Using Your Tape Drive
This chapter describes how to use your SDLT 600A tape drive to make a
trial back-up, clean the tape mechanism, as well as other useful
information. This chapter also includes information on the LEDs and
buttons on the front panel of the system.
This chapter covers the following topics:
• Front Panel Controls and LEDs
front panel controls and LEDs.
• Formatting Media Cartridges
use the tape drive, including front panel controls, loading the applet,
updating the firmware and software, viewing the error log, and drive
rebooting
• FTP Transfers
commands
• Cleaning the Tape Mechanism
• Troubleshooting
applet, and general troubleshooting guidelines.
SDLT 600A Product Manual 30
describes the file transfer procedures and FTP client
describes the POST, over temperature condition,
describes the functionality of the
provides information that you need to
describes the cleaning the tape drive
Page 47

Chapter 3 Using Your Tape Drive
Front Panel Controls and LEDs
Front Panel Controls and LEDs 3
All controls and LEDs are on the tape drive’s front panel. See figure 22 for
details. Use these controls and LEDs to operate the tape drive and
monitor the SDLT 600A tape drive’s activities. Table 2
and LED functionality.
Figure 22 SDLT 600A Tape
Drive Front Panel
describe control
Green/Orange LED
(Cartridge Status)
Green LED
(Drive Status)
Yellow LED
(Cleaning Required)
Eject Button
iTalk Port
On the SDLT 600A tape drive, the leftmost LED is dual color (green/
orange) This LED is the density indicator. When you insert a Super
DLTtape II data cartridge, this LED illuminates green.
Table 2
SDLT 600A Product Manual 31
summarizes these combinations.
Page 48

Table 2 Front Panel
Elements
Chapter 3 Using Your Tape Drive
Front Panel Controls and LEDs
LED/Button/
Port Title
All LEDs All LEDs illuminate
Color/
Symbol Action Explanation
SDLT 600A tape drive reset
briefly and then
illuminate in sequence
until the reset completes
No LED No LEDs illuminate No data cartridge is inserted
Cartridge Status
Green Remains OnSuper DLTtape II data cartridge ejected
LED
Remains OnBlank Super DLTtape II data cartridge inserted
Remains OnSDLT 600A tape drive formatted Super DLTtape II
data cartridge inserted
Cartridge Status
Orange On/Off Incorrect cartridge inserted.
LED
Green
Flashing
The tape drive is in use. This includes functions such
as:
• The tape is moving.
• The tape drive is calibrating, reading, writing, or
rewinding the tape.
Drive Status LED
• The tape drive is loading, unloading, or rewinding.
On The tape drive is idle. There may or may not be a data
cartridge in the tape drive.
Off The tape drive has not been powered on or is not
plugged into a power source.
SDLT 600A Product Manual 32
Page 49
Chapter 3 Using Your Tape Drive
Front Panel Controls and LEDs
LED/Button/
Port Title
Cleaning
Required LED
Eject Button Press Use the
Infrared
Communication
Port
Note: Whenever the tape drive resets, all LEDs illuminate briefly and then illuminate in sequence
until the reset completes. Whenever the tape drive encounters an error, all LEDs flash together.
Color/
Symbol Action Explanation
Yellow On Cleaning is required. See Front Panel Controls and
LEDs for cleaning information.
!
Off Cleaning is not required.
Eject button to eject the tape data cartridge
from the tape drive. When you press the button, the
tape drive completes any active writing of data to the
tape, then ejects the data cartridge.
See the applicable data cartridge appendix for detailed
data cartridge handling procedures.
This infrared port, also known as iTalk, provides a
wireless remote testing base for customers and
integrators to access system diagnostic information.
See your Quantum sales representative for more
information.
SDLT 600A Product Manual 33
Page 50

Chapter 3 Using Your Tape Drive
Formatting Media Cartridges
Formatting Media Cartridges 3
1 Insert the SDLTtape II cartridge into the tape drive.
Warning: When formatting with the SDLT 600A tape drive, all
existing data on the media cartridge will be
overwritten.
2 When the tape drive recognizes an unformatted media cartridge, a
prompt appears, click
Figure 23 Media Formatting
Yes.
Note: Always remove the data cartridge from the drive prior to
powering down the unit. This updates any change to that the
file system stored on the tape is consistent and that the tape in
the tape path is not damaged when the unit is powered up.
Updating the Firmware 3
Updating the Tape Drive Firmware
SDLT 600A Product Manual 34
From the SDLT 600A main page, you can access the Tape Drive update
3
menu (on the left side) to change the firmware of the tape drive.
Note: The tape drive update procedure completes after the update
file is uploaded. There is no confirmation of your choice.
To acquire the firmware, go to the software download page at
www.quantum.com.
http://
Page 51

Figure 24 Tape Drive Update
Figure 25 Tape Drive Update
Progress Bar
Chapter 3 Using Your Tape Drive
Updating the Firmware
During the update, the following progress bar appears:
Updating the Server 3 From the SDL T 600A main p age, you can access the Server update menu
(on the left side) to change the firmware of the FTP and HTTP server
board.
Note: There is no confirmation of your choice.
To acquire the firmware, go to the software download page at
www.quantum.com.
SDLT 600A Product Manual 35
http://
Page 52

Figure 26 Server Update
Figure 27 Server Update
Progress Bar
Chapter 3 Using Your Tape Drive
Updating the Firmware
Locate the following file to update:
SDLT600A.server<version>.firmware
During the update, the following progress bar appears:
Rebooting the Tape Drive 3 A system reset is available through a reboot command on the SDLT 600A
main page.
Note: Always remove the tape before turning off the SDLT 600A.
To reboot:
1 Click
Figure 28 Reboot in
Progress
SDLT 600A Product Manual 36
Reboot on the left side of the page.
Page 53
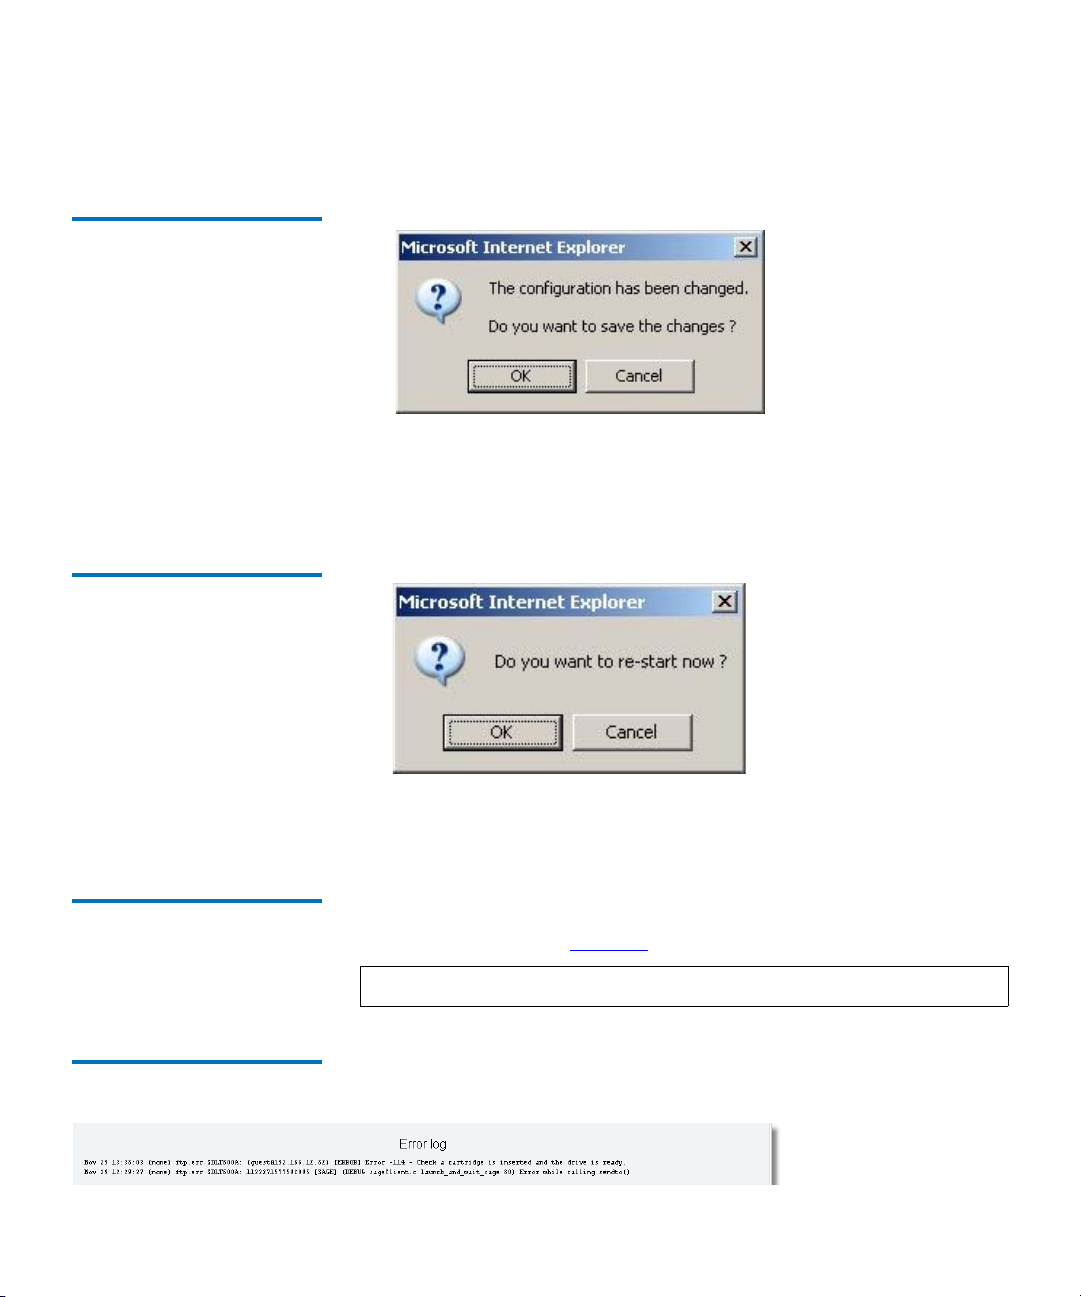
Figure 29 Save Changes
Figure 30 Restart
Confirmation
Chapter 3 Using Your Tape Drive
Updating the Firmware
This will launch a configuration confirmation pop-up window.
2 Click OK.
A restart confirmation pop-up window appears.
3 Click OK.
Error Log 3 From the SDL T 600A main page, you can access the Error log menu as well
(a sample log shown in figure 31
).
Note: The Error log is available for HTTP Web pages only.
Figure 31 FTP Error Log
SDLT 600A Product Manual 37
Page 54

Chapter 3 Using Your Tape Drive
FTP Transfers
FTP Transfers 3
FTP Client Tool 3 The FTP Client Tool is the GUI of the applet, composed of two views,
which allows you to select from the corresponding tabs:
•
SDLT 600A Client — Main view allows you to explore local and
remote systems and make transfers
•
Configuration — Shows a list of servers and the specifications of the
FTP communication within the application
When selecting the FTP client, the Java Virtual Machine is first loaded
(see figure 32
Figure 32 Java Virtual Machine
Plug-in
).
If the cartridge is not inserted, the following pop-up window appears (see
figure 33
Figure 33 FTP Error Pop-Up
SDLT 600A Product Manual 38
).
Page 55

Chapter 3 Using Your Tape Drive
FTP Transfers
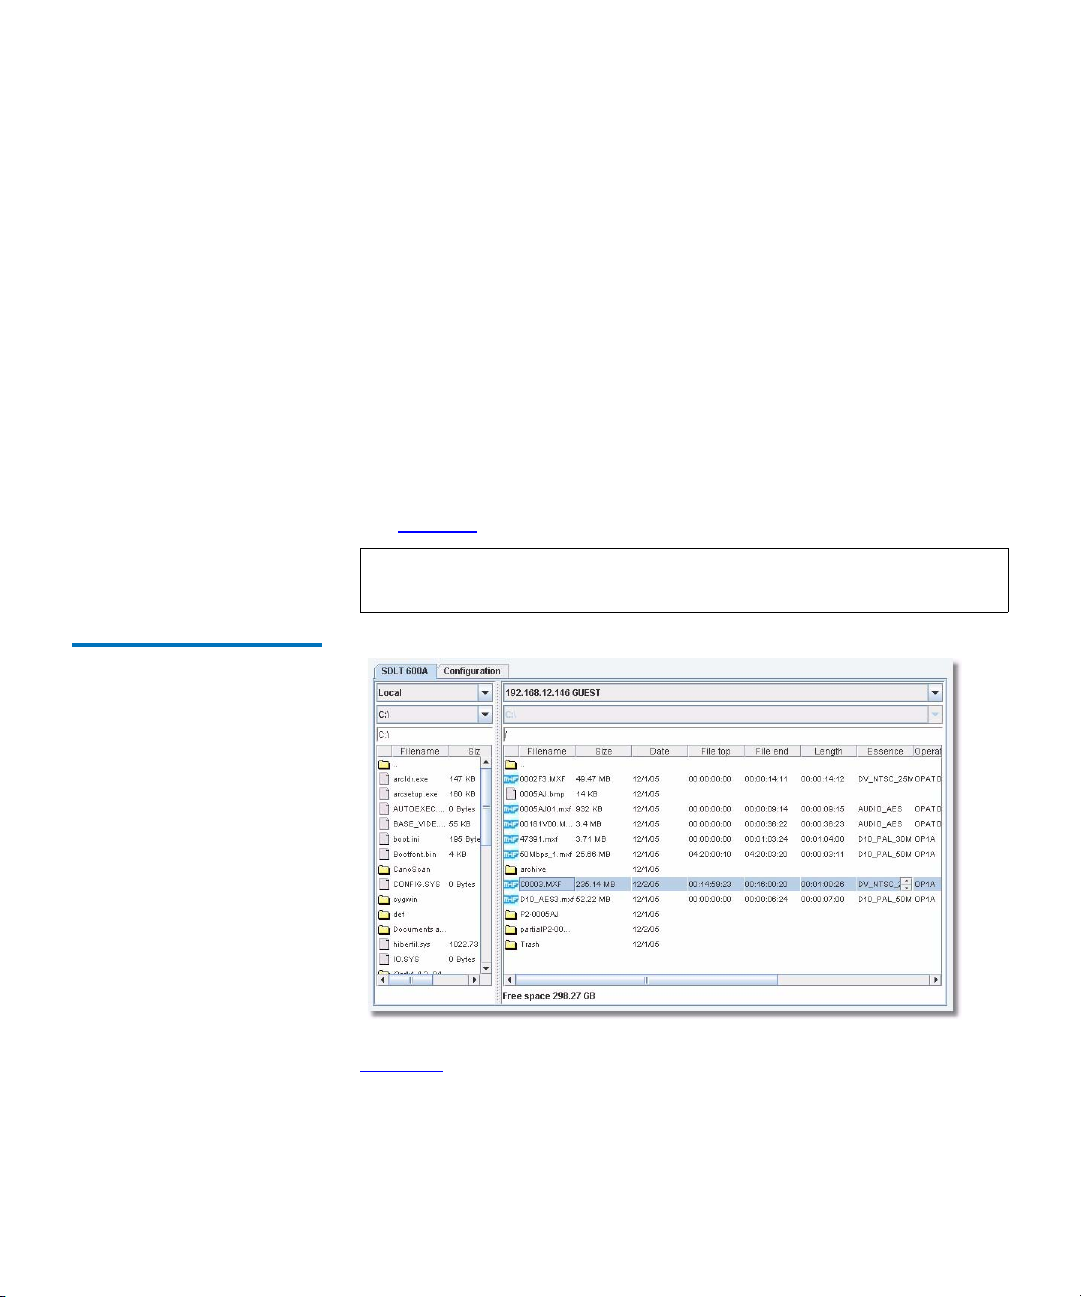
SDLT 600A Client Tab 3 SDLT 600A Client is the main tab view with a standard FTP client
interface, providing two file panes.
Figure 34 SDLT 600A Client
Tab
Server
Drive
Address bar
Panes
On the top of each pane, there are three text zones:
• The first zone allows you to select the system or server.
• The second zone allows you to select the drive (only available on
Local).
• The third zone displays the currently navigated path and allows you
to type the path within the address bar.
The panes can be local view or remote view and you can interact with the
system as follows
• double-click a folder to expand it to view the enclosed folders and
files;
• double-click a folder at the top followed by dots to go back toward
the parent folder;
• click an item (file or folder) to select it;
SDLT 600A Product Manual 39
Page 56

Chapter 3 Using Your Tape Drive
FTP Transfers
•use Ctrl for non-continuous and Shift for continuous item selection;
• drag a marquee around the items from a non selected item to a other
item to select a group of items;
Figure 35 Download
Progression Progress Bar
• right-click an selected item to see the
Contextual menu, and
• click the column headings to change the sorting order.
Transfer
To transfer files, select one or more items in one pane, then drag and drop
to the other pane. You can transfer files within folders of the same pane
for remote site pane (e.g. into the SDLT 600A ftp server or into another ftp
server).
File transfers can be to or from any connected hard drive, SDLT 600A
drive, as well as tape to tape (between two servers).
Note: The transfer destination is always the path indicated in the
address bar.
Once a transfer is initiated, the bars show the transfer progress—when
the indicator is moving back and forth, the tape is seeking, and once data
copying actually begins the bar shows the progress.
3
Note: When you perform a transfer between two remote servers
(operation called
Server to server or File eXchange Protocol
(FXP), data is transferred directly from/to the source remote
server to/from the target remote server, without routing this
data through the client’s workstation. The client has no
indication of the exact progression.
SDLT 600A Product Manual 40
Page 57

Chapter 3 Using Your Tape Drive
FTP Transfers
Figure 36 Site to Site Transfer
Pop-up Window
Resume on transfer 3 When you transfer a file, if there is already a file with the same name in
the destination, there is a conflict and the following pop-up window
appears:
Figure 37 File Exist Pop-up
Window
• Overwrite/Overwrite all — Erases the file already on the target and
copies the new file in its place.
Note: When you overwrite a file, it is not erased from the tape,
because the tape drive appends only (unless the file to
overwrite is the last file stored on the tape).
•
Resume/Resume all — Restarts the transfer exactly at the byte where
the previous transfer had been stopped. This is useful when the file is
not completely transferred (in case of a disconnection during the
transfer).
SDLT 600A supports only Resume on store operation.
SDLT 600A Product Manual 41
Page 58
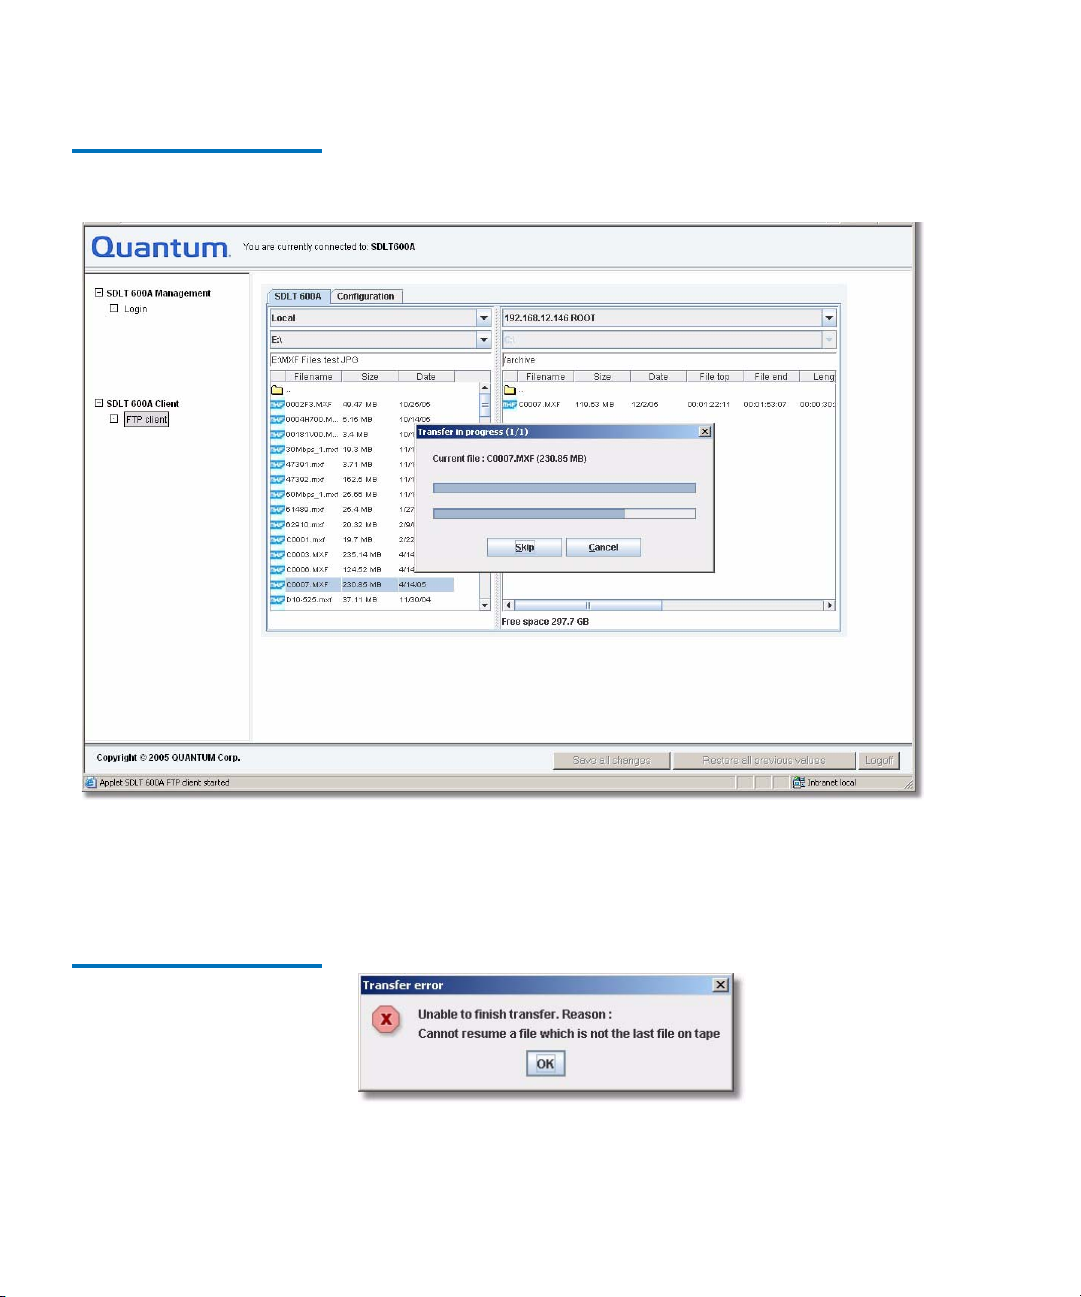
Figure 38 Transfer in progress
Pop-up Window
Chapter 3 Using Your Tape Drive
FTP Transfers
The Resume operation is valid only if no other store has been completed
since the interrupted transfer, in which case, the following pop-up
window appears:
Figure 39 Transfer error Popup Window
SDLT 600A Product Manual 42
Page 59
Chapter 3 Using Your Tape Drive
FTP Transfers
• Skip/Skip all— Continues the transfer for other selected files without
overwriting the specified file(s). The source files must be selected
(highlighted in blue) prior to attempting the drag and drop
procedure. Dropped files always go into the dir ectory shown in the addr ess
bar—you cannot drop files into a directory folder (even though it will
highlight, the files will not go into the directory). If you accidentally
release files in the window where you started, always select
Skip All
in the pop-up dialogue.
Figure 40 MXF Files and
Metadata
Information within the Panes
In addition to the information about a file (size, date, and so forth),
metadata information relative to the MXF files (file top, file end, essence,
and so forth) in provided within the pane.
The figure 40
shows the metadata columns of the MXF files.
Note: You can sort the display order of the metadata in columns of
the
Configuration tab.
3
Figure 41 shows additional metadata columns which can be viewed by
moving the slider at the bottom of the pane to the right.
SDLT 600A Product Manual 43
Page 60

Figure 41 Additional Metadata
Columns
Figure 42 Audio Essence
Metadata
Chapter 3 Using Your Tape Drive
FTP Transfers
Each MXF file’s metadata may contain information for several essence
types (e.g. video essence, audio essence) and you can display the
associated metadata by clicking the selector within the
as indicated in figure 41
and figure 42.
Essence column,
Contextual Menu 3 A Contextual menu allows you to control operations on the selected
items. This menu appears when you right-click within the pane or on an
icon.
The zone on top of the Contextual menu (see figure 43
) is for standard
operations available on all systems (local, standard server, application,
and so forth). The other two zones present operations that are only
available on the Application (MXF operations, Tape operations).
SDLT 600A Product Manual 44
Page 61

Figure 43 Contextual Menu
Chapter 3 Using Your Tape Drive
FTP Transfers
Standard operations
MXF operations
Tape operations
Standard Operations 3
• From the Contextual menu, the Rename selection allows to rename
the selected folder. Enter the new name (see figure 44
).
Figure 44 Renaming Files or
Folders
• From the Contextual menu, the Delete selection opens a pop-up
window (see figure 45
) to confirm the deletion of files. Once the
deletion is confirmed, the deleted file or folder is moved into the
Trash folder. The Trash folder is a system folder located at the root of
the file system (i.e.
/Trash). It cannot be deleted.
Deleting an MXF file erases all its associated files; all the virtual files
resulting from a partial restore or create header commands.
Deleting a folder will delete all the files within the folder as well as
any subfolders and their corresponding files. Folders are not stored
in the Trash, and therefore cannot be “undeleted”. However, files
within a discarded folder are deleted and remain in the Trash.
SDLT 600A Product Manual 45
Page 62
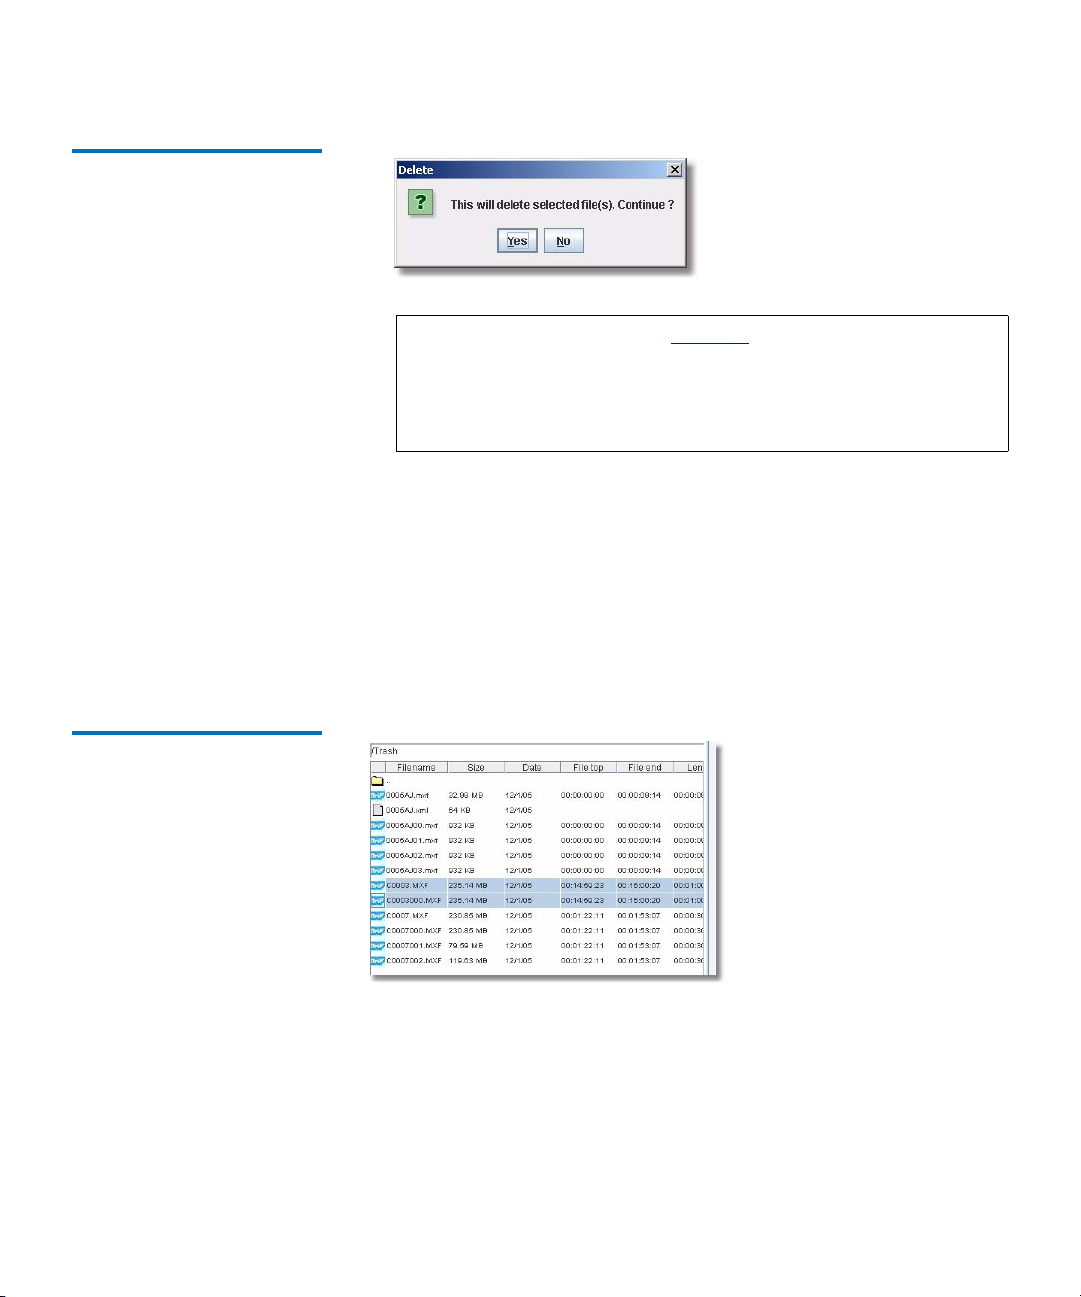
Figure 45 Delete Pop-up
Window
Chapter 3 Using Your Tape Drive
FTP Transfers
Note: The Trash folder (see figure 46) shows the list of files that
you have deleted. When you delete a file, it is not entirely
deleted from the tape, but rather, it is moved to the Trash
folder. Therefore, it is possible to “undelete” files from the
Trash, by moving the file back to its original location.
When a file is deleted and the same file is already located in the
Trash, the second instance of file is renamed with
<filename>xyz.extension. xyz starting to 000.
Since the maximum number of characters of the filename is 100, if the
deleted filename is 97 characters long, the second instance of file is
renamed with <truncated filename>xyz.extension. xyz starting to 000
(<truncated filename> means the last three characters of the filename
are truncated).
Figure 46 Retrieving Files
from the Trash Folder
SDLT 600A Product Manual 46
Page 63
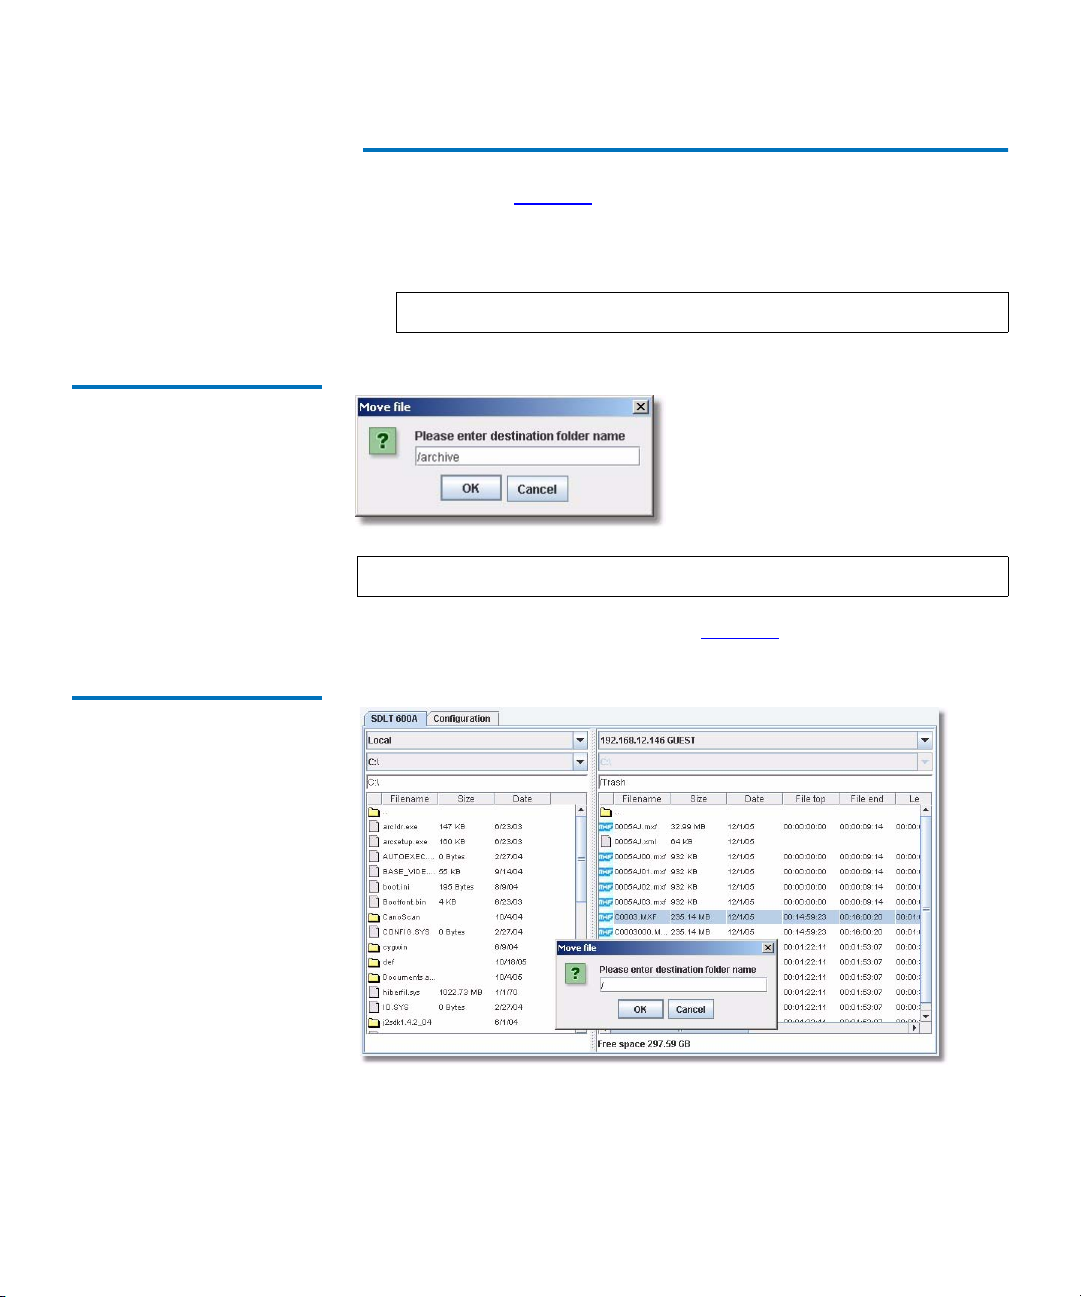
Figure 47 Moving Pop-up
Window
Chapter 3 Using Your Tape Drive
FTP Transfers
• From the Contextual menu, the Move selection opens a pop-up
window (see figure 47
) to specify the destination of the file or folder.
The Move selection supports an absolute pathname, that is, you can
enter a full pathname in the dialog box to set the destination of the
file or folder.
Note: The Trash folder cannot be moved.
Note: This operation can be useful to undelete a file.
Enter the destination folder name (see figure 48).
Figure 48 Moving Pop-up
Window — Destination Folder
SDLT 600A Product Manual 47
Page 64

Figure 49 Create Folder Popup Window
Chapter 3 Using Your Tape Drive
FTP Transfers
• From the Contextual menu, the Create Folder selection opens a pop-
up window (see figure 49
) to specify the new folder. The Create
Folder selection supports an absolute pathname, that is, you can enter
a full pathname in the dialog box to set the destination of the file or
folder.
• From the Contextual menu, the MXF properties selection (see
figure 50
) opens a pop-up window showing metadata of all MXF files
selected:
• Filename
• Filesize
• Last modification date
•Starting time code
•Ending time code
• Duration in time codes
• Video essence type(s)
• Number of video frames
• MXF Operational pattern
• MXF Unique Media Identifier (UMID)
•Owner
•Group
Note: Multiple file selection is supported.
SDLT 600A Product Manual 48
Page 65

Figure 50 MXF Information of
D10 PAL Essence
Figure 51 MXF Information of
DV NTSC Essence
Chapter 3 Using Your Tape Drive
FTP Transfers
Note: The SDLT 600A supports different video essences (see
figure 51
) and MXF operational patterns.
•From the Contextual menu, the Partial restore… selection opens a
pop-up window to do a
partial restore of a selected MXF file.
Partial restore 3 Partial restore allows you to get a part of an MXF AV file (subclip access
by timecode) stored on the tape, that can be defined by the
code
and Ending time code or Starting time code and Number of frames.
Starting time
The Partial restore feature is currently only supported for MXF OP1A and
OPATOM operational patterns and only with Iframe-only video essences.
Partial restore of other video essences is not frame accurate. The Partial
SDLT 600A Product Manual 49
Page 66

Chapter 3 Using Your Tape Drive
FTP Transfers
restore procedure for OP1A and OPATOM MXF files differs slightly from
other the partial restore operations due to the fact that OP1A has only one
video essence and one audio essence embedded into a single file, while
OPATOM is composed of a directory containing at least one video file
and several audio files and possibly other directories such as Video,
Audio, Clip, Icon, Thumbnails, etc. The operational differences between
the Partial restore operation of OP1A and OPATOM is that the procedure
for OP1A defines the destination file and the procedure for OPATOM
defines the destination directory. At the time of this publishing, the
applet has support for OP1A and OPATOM operational patterns
procedures only. Other operational patterns procedures are planned on
future firmware releases.
Figure 52 Partial Restore
OP1A Pop-up Window
Partial Restore of MXF OP1A
The Destination file name is the name of the virtual file.
When you click OK, the Partial restore command creates a corresponding
file within the application. The file is referred to as a
virtual file as it
contains no data but is actually a directory entry which points to the
designated subclip in the original file.
Note: The .mxf extension is a required part of the destination file
but will not be added automatically. Add the extension
name,
to the file name within the
Destination file name box.
3
SDLT 600A Product Manual 50
Page 67

Figure 53 Partial Restore
OPATOM Pop-up Window
Chapter 3 Using Your Tape Drive
FTP Transfers
Partial Restore of MXF OP ATOM 3
The Destination file name is the name of the directory where the virtual
files will be stored. There is one virtual file per AV source file.
Note that in this case, the Destination field defines the directory where
the OPATOM subdirectories and files will be created. When you click
and then
Quit in the Partial Restore dialog, the virtual files are created
OK,
when the OPATOM or video audio MXF files are complete.
Once the virtual file is created, a pop-up window displays.
Figure 54 Partial Restore
Successful Pop-up Window
When you click OK, the complete partial restore list displays.
Once the partial restore has been successfully completed, the virtual
file(s) are listed in the directory. Since there is only one virtual file for
OP1A but several for OPATOM, when OPATOM virtual files are listed in
the directory, they appear within subdirectories as shown in figure 55
SDLT 600A Product Manual 51
.
Page 68

Figure 55 Partial File List
Chapter 3 Using Your Tape Drive
FTP Transfers
In OPATOM, all of the files are organized the same as on a P2 Solid State
Media (SSM) Card in a directory, which contains the clip metadata
directory, video essence directory, and the audio essence directory. The
clip directory contains a clip metadata virtual file which stores the clip
structural and descriptive metadata and is located under the
file name
directory.
Destination
The Video directory contains the video virtual file and is located under
the Destination file name directory. The Audio directory contains all
audio virtual file files and is located under the Destination file name
directory.
Figure 56 Partial File List in
OPATOM
Figure 56
shows the resulting subdirectories created from the OPATOM
partial restore operation (i.e. this is what would be seen if you doubleclicked the folder identified as partialP2-0005AJ in figure 55
).
The result of the partial restore command is a virtual file. This file must be
retrieved to be completed on the local hard disk.
SDLT 600A Product Manual 52
Page 69

Figure 57 Download
Progression Dialog
Chapter 3 Using Your Tape Drive
FTP Transfers
Retrieve a Virtual File 3
After a successfully completed partial restore (for both OP1A and
OPATOM), you can retrieve the virtual file to the local hard disk.
Note: The destination of the virtual must be set to the local hard disk.
Once the file is transferred, a MXF-compliant file is saved to your local
disk (see figure 57
).
When the file is transferred, an MXF-compliant file is saved to your local
disk.
• From the Contextual menu, the Create Header selection opens a pop-
up window (see figure 58
) to create an MXF header metadata file. The
Create Header selection supports an absolute pathname, that is, you
can enter a full pathname in the dialog box to set the destination of
the file or folder.This action is used to extract any MXF file’s header
metadata into a separate file. This separate file is user specified to
contain binary or XML data as configured (see SDLT 600A options
on
page 61). Select the MXF file for which metadata is to be extracted
and then select the
Create Header item from the Contextual menu.
The result of this command is a virtual file.
SDLT 600A Product Manual 53
Page 70

Figure 58 Create Header Popup Window
Figure 59 Metadata Header —
Virtual File
Chapter 3 Using Your Tape Drive
FTP Transfers
Choose the appropriate extension as configured (see figure 59).
This file must be retrieved to be completed on the local hard disk. This file
can be in text format (xml) or binary format depending on the setup
option (see SDLT 600A options
on page 61). Once the file is transferred,
the MXF header file is saved to your local disk.
Figure 60 Transfer in Progress
SDLT 600A Product Manual 54
Page 71

Figure 61 Erase Tape Pop-up
Window
Chapter 3 Using Your Tape Drive
FTP Transfers
Tape Operations 3
•From the Contextual menu, click Erase tape. This will open a pop-up
window (see figure 61
) to erase the entire tape after your
confirmation.
Warning: All existing data on the media cartridge will be
overwritten and all existing data on the file system
will be overwritten when you click
Erase tape.
•From the Contextual menu, click Eject tape. This will open a pop-up
window (see figure 62
) to eject the loaded tape.
Figure 62 Eject Tape Pop-up
Window
Note: You cannot eject the tape without root privileges (see
figure 63
Figure 63 Eject Tape Error
Pop-up Window
SDLT 600A Product Manual 55
).
Page 72

Chapter 3 Using Your Tape Drive
FTP Transfers
•From the Contextual menu, click Tape info.... This will open a pop-up
information window (figure 64
) to give information about the tape
identifier and how space is utilized on the tape as follows.
•
Media ID — This ID is linked to the cartridge generated after the
first initialization. The ID never reset.
•
Tape space — This indicates the total space used on the tape and
the total free space available on it (the native capacity after an
erase operation is 300 GB).
EMAM space — This indicates the total number of entries used in
•
the file system and the total free space available in the file system.
•
Files inventory — This indicates the number of entries in the file
system for each file type; MXF files, non MXF files, directories,
deleted files, virtual files (virtual files are created by a partial
restore command or by a create header command: virtual file
exist only into the file system and are not stored on tape). The
number of directories takes into account the two system folders:
/ and /Trash.
Figure 64 Tape Pop-up
Information
•From the Contextual menu, click Licenses information… opens a pop-
up window about product version and licenses of SDLT 600A server
and of Java FTP client. The first version number into Information on
server is the version of the server firmware.
SDLT 600A Product Manual 56
Page 73
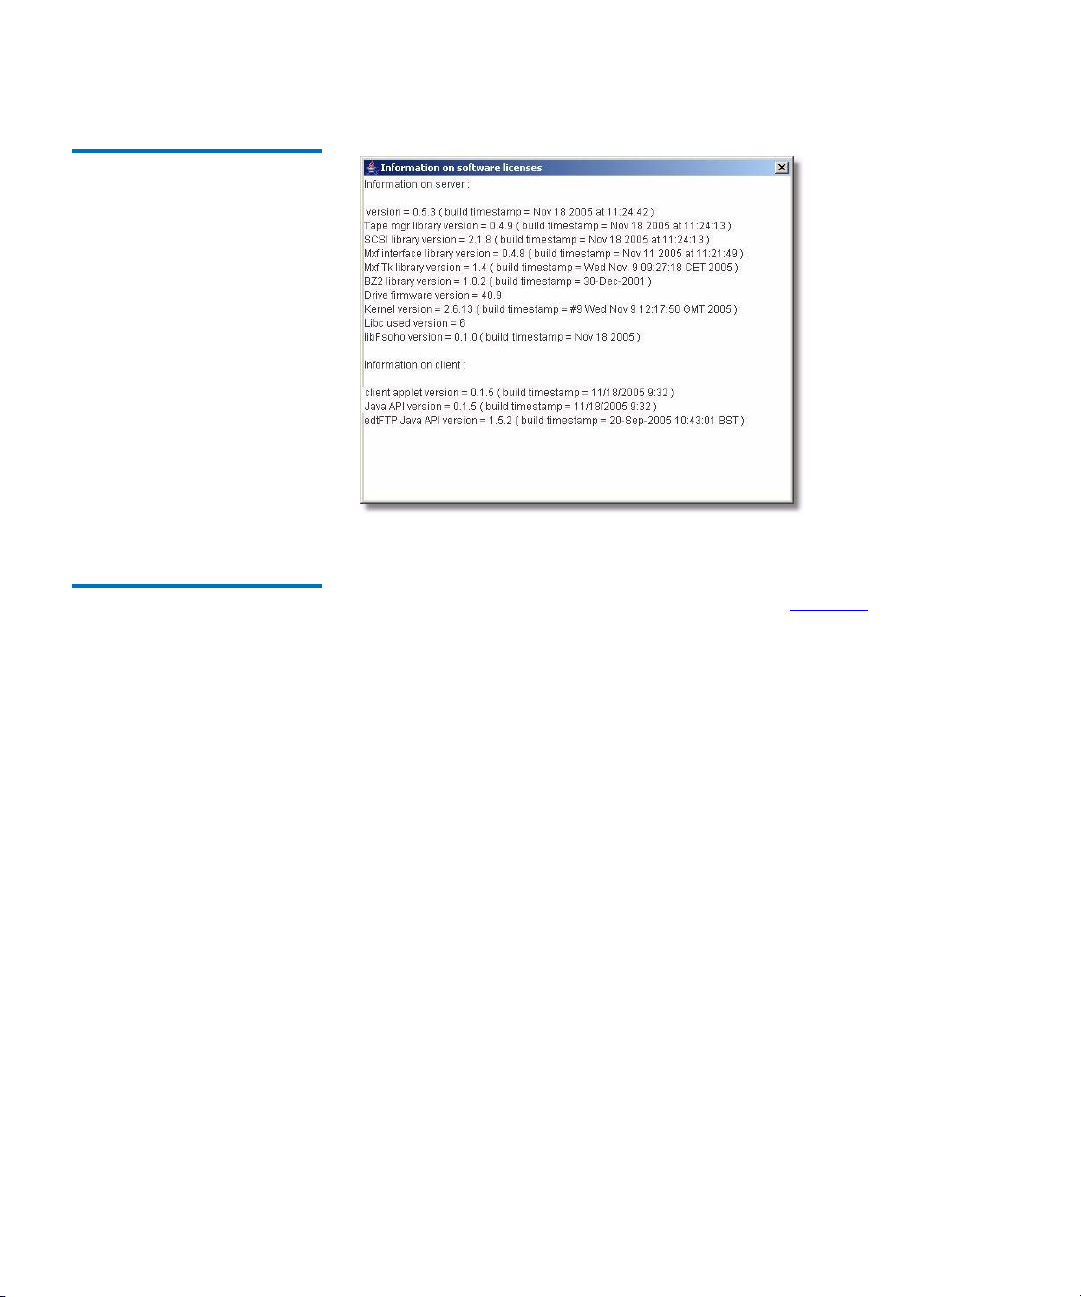
Chapter 3 Using Your Tape Drive
FTP Transfers
Figure 65 Information on
Software Licenses Pop-up
Window
Configuration Tab 3 The Configuration tab contains four sections (see figure 66). The left
section allows you to manage the list of servers. The other three sections
are only available when you are using the application:
• Top — Default options for FTP connections
•Center —
Columns to show
•Right — File data to extract.
SDLT 600A Product Manual 57
Page 74
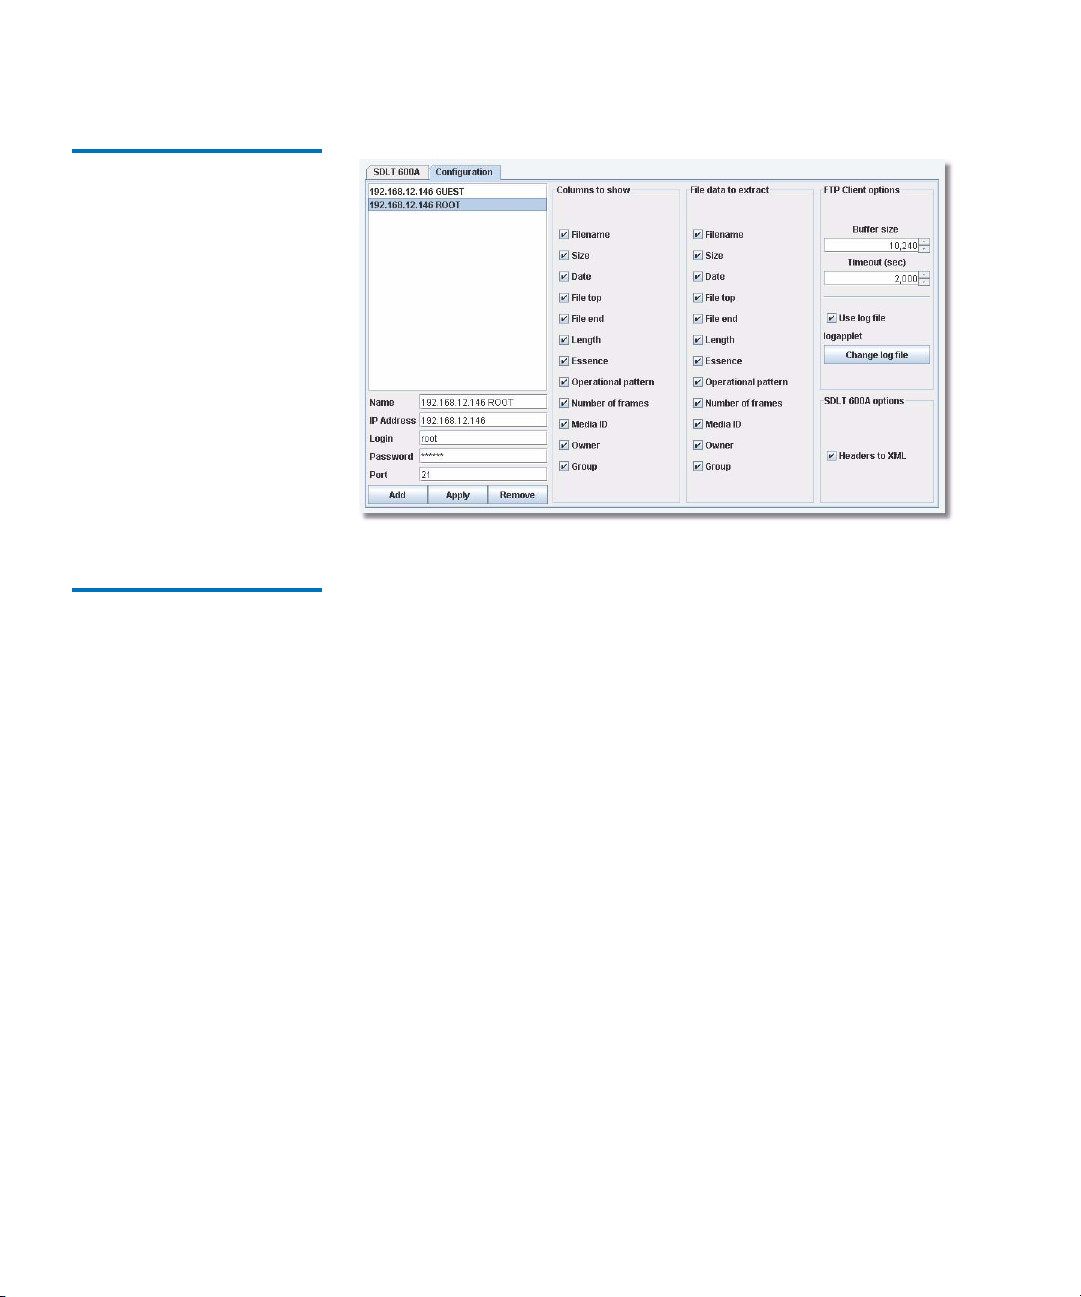
Figure 66 Configuration Tab
Display
Chapter 3 Using Your Tape Drive
FTP Transfers
List of Servers Management
While loading, the applet prompts you for the login and password to
3
connect to the FTP server.
Root User Connection
3
The default login for root user connection is root and password is
Quantum. This server is the first added in the list of servers. The password
for root user connection can be set in the Quantum Setup page using the
New root's password. After setting it, and click
Update, the SDLT 600A
must reboot to change the password.
Guest User Connection
3
The default login for guest user connection is guest and password is
guest. The password for guest user cannot be set in the Quantum Setup
page.
SDLT 600A Product Manual 58
Page 75
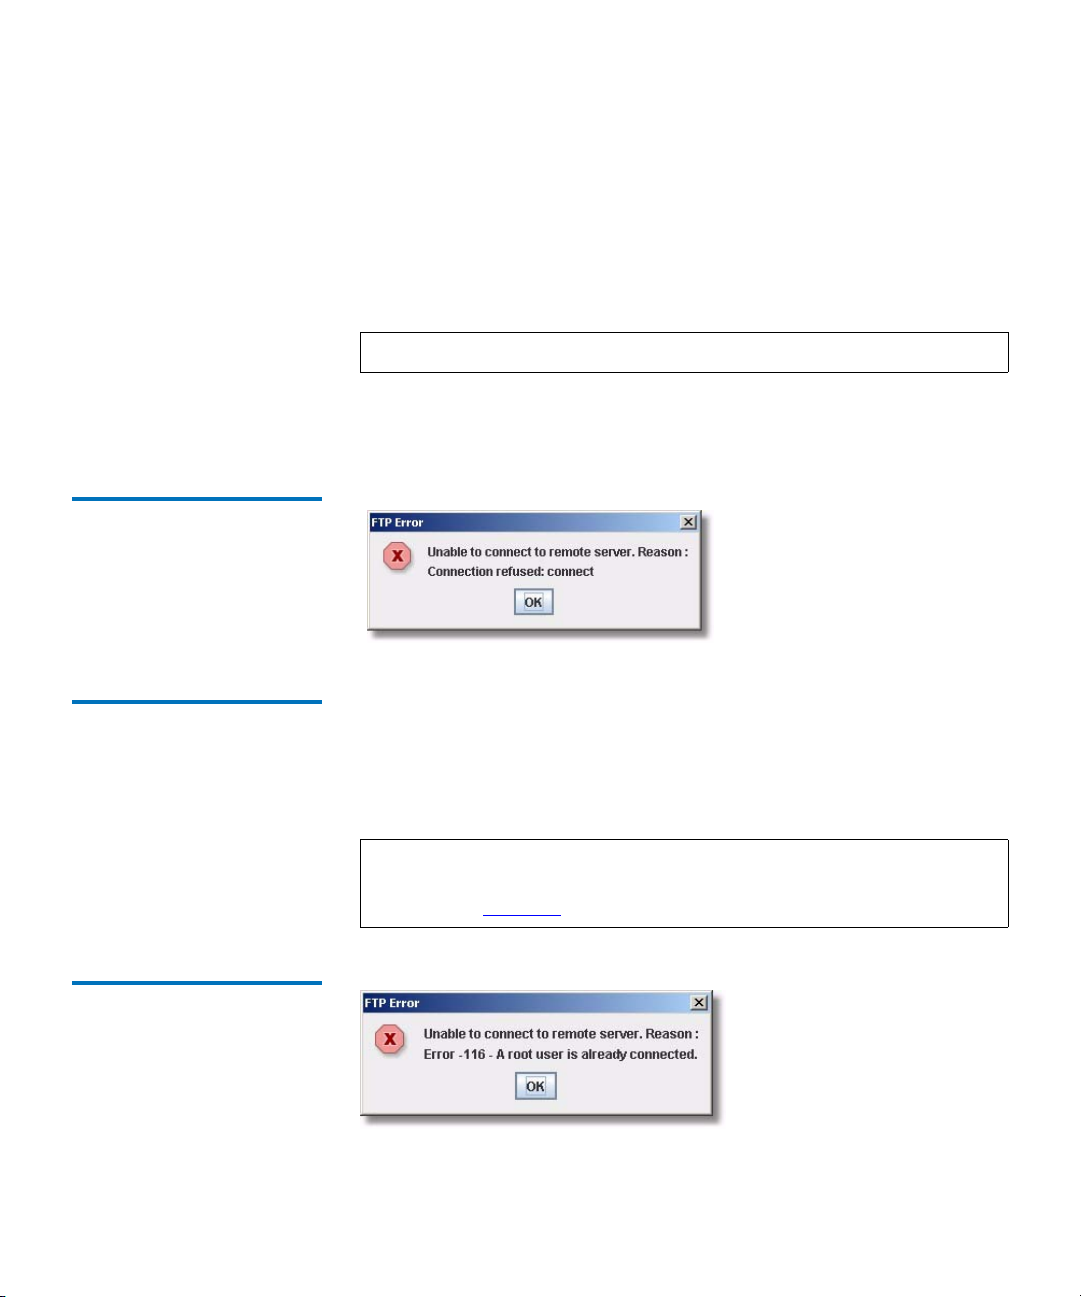
Chapter 3 Using Your Tape Drive
FTP Transfers
Prior to Connecting to A New Server 3
Before connecting to a new server, you need to update the list with its
information: its IP address, login and password; then click
remove a server of the list, select it and click
Remove.
Add. To
Within the
SDLT 600A client tab, choose the name of the server you want
in the combo box on the top of a pane.
Note: Your list of servers is saved locally on your computer.
If a remote server cannot be connected, the following pop-up window
appears.
Figure 67 FTP Error Pop-Up
Multiuser Connection 3 The system allows six users to be logged on at a time to the SDLT600A;
although six users may be logged on, only one single root user at a time.
All other users are considered guests. The root user can operate all the
features of the SDLT 600A, while the guest user can only read the
cartridge directory (file system table of contents).
Note: If a root user is already connected, and you try to connect as a
root, you will have the following FTP error pop-up window
(see figure 68
).
Figure 68 FTP Error Pop-Up
Window
SDLT 600A Product Manual 59
Page 76

Chapter 3 Using Your Tape Drive
FTP Transfers
System and MXF files 3 The application is designed to connect and to transfer MXF files (see
figure 66
).
Columns to show
These checkboxes specify what you want to see in the columns of the
panes (
SDL T 600A client tab) in the list of files.
Note: You can dynamically change the order of the columns in the
pane using the mouse by simply moving one column to
another place.
File data to extract
These checkboxes specify what information you want to extract when
you select
MXF properties on the MXF files. You can click MXF properties
in the Contextual menu.
FTP Client Options
You can set two connection specifications:
•
Buffer size — Specifies the size in bytes of the buffers used by the
applet to send or receive data on the network.
10240 bytes is selected
by default.
3
3
3
Note: This option has no effect on other servers not using this
application.
The optimal file size is
10240 bytes, but you may also have to
configure the settings on your network card to forward blocks of
10240 bytes on the network. Ensuring that these two settings are set is
the only way to have the best transfer rate.
Timeout (sec) — Specifies the timeout of the FTP client session in
•
seconds. Session will be disconnected after the timeout occurs. Unit is
second. 180 seconds is selected by default.
SDLT 600A Product Manual 60
Page 77

Chapter 3 Using Your Tape Drive
FTP Transfers
SDLT 600A options 3
Headers to XML — Allows you to retrieve the header files of MXF files in
the XML text format (default) or in MXF binary format.
Supported FTP Commands
Standard Commands (RFC959)
The following FTP commands are supported:
3
• Standard commands (RFC959):
MKD
, MODE, NLST, NOOP, PASS, PASV, PORT, PWD, QUIT, REST,
RETR
, RMD, RNFR, RNTO, SITE, STOR, STRU, SYST, TYPE, and USER
ABOR, CDUP, CWD, DELE, HELP, LIST,
• Commands (RFC775): XCUP, XCWD, XMKD, XPWD, and XRMD
• SITE commands: DELE, EJECT, ERASE, ESSTYP, FREE, FSIZ, FTYP,
HELP
, HDR2XML, HEADER, IDLE, MEID, MXFNFO, PARTIAL, REFH, TC,
TIME
, and VERSION
• Commands not normalized (INTERNET DRAFT): FEAT, SIZE, MDTM,
MLST
, and MLSD
The following standard commands are supported:
3
SDLT 600A Product Manual 61
Page 78

Table 3 Standard Commands
(RFC959)
Chapter 3 Using Your Tape Drive
FTP Transfers
Command
ABOR
Syntax abor <CRLF>
Parameters N/A
Purpose aborts a file transfer (STOR or RETR).
Command
ACCT
Syntax acct <CRLF>
Parameters N/A
Purpose not implemented.
Command
ALLO
Syntax allo <SP> <decimal-integer> [<SP> R <SP> <decimal-integer> ] <CRLF>
Parameters N/A
Purpose not implemented.
Command
APPE
Syntax appe <SP> <pathname> <CRLF>
Parameters N/A
Purpose not implemented
Command
CDUP
Syntax cdup <CRLF>
Parameters N/A
Purpose equivalent to "cwd .."
Command
CWD
Syntax cwd <SP> <pathname> <CRLF>
Parameters - <pathname>: an existing relative or absolute directory.
Purpose This command allows the user to work with a different directory.
SDLT 600A Product Manual 62
Page 79

Chapter 3 Using Your Tape Drive
FTP Transfers
Command DELE (*)
Syntax dele <SP> <pathname> <CRLF>
Parameters <pathname>: an existing relative or absolute pathname.
Purpose This command allows the user to send a file to the Trash. RMD must be used instead of
DELE to delete a directory.
Command
HELP
Syntax help [ <SP> <command> ] <CRLF>
Parameters <command>: a FTP command.
Purpose Without parameters, this command lists in alphabetic order the standard commands.
When <command> is a valid standard command, HELP provides the syntax of
<command>.
Command
LIST
Syntax list [<SP> <options>] [<SP> <pathname>] <CRLF>
Parameters • <options>: same format as ls UNIX command. '-a' and '-l' are currently supported. If no
options, it is equivalent to a "ls -l" UNIX command.
• <pathname>: the directory or the filename that will be listed. A null argument implies
the current working directory.
Purpose This command lists directory or file contents the same way the UNIX command 'ls -l'
does.
Contents will be sent to the passive DTP.
TYPE must be previously set to ASCII by the client.
Command
MKD (*)
Syntax mkd <SP> <pathname> <CRLF>
Parameters <pathname>: a relative or absolute pathname.
Purpose This command causes the directory specified in the pathname to be created as a directory.
Command
MODE
Syntax mode <SP> <mode-code> <CRLF>
Parameters <mode-code>: transfer mode. Only 'S' (Stream) is supported.
Purpose This command allows the client to change the transfer mode. The only available transfer
mode is Stream ('S').
SDLT 600A Product Manual 63
Page 80

Chapter 3 Using Your Tape Drive
FTP Transfers
Command
NLST
Syntax nlst [<SP> <options>] [<SP> <pathname>] <CRLF>
Parameters • <options>: same format as ls UNIX command. '-a' and '-l' are currently supported. If no
options, it is equivalent to a "ls" UNIX command.
• <pathname>: the directory or the filename that will be listed. A null argument implies
the current working directory.
Purpose This command lists directory or file contents the same way the UNIX command "ls" does.
Contents will be sent to the passive DTP.
TYPE must be previously set to ASCII by the client.
Command
NOOP
Syntax noop <CRLF>
Parameters N/A
Purpose This command does not affect any parameters or previously entered commands.
It specifies no action other than that the server send an OK reply.
Command
PASS
Syntax pass <SP> <string> <CRLF>
Parameters <string>: the user's password.
Purpose This command must be immediately preceded by the USER command.
Any attempt to use this command when connected will be refused.
Command
PASV
Syntax pasv <CRLF>
Parameters N/A
Purpose This command requests the server-DTP to "listen" on a data port (which is not its default
data port) and to wait for a connection rather than initiate one upon receipt of a transfer
command.
The response to this command includes the host and port address this server is listening
on.
SDLT 600A Product Manual 64
Page 81

Chapter 3 Using Your Tape Drive
FTP Transfers
Command
PORT
Syntax port <SP> <host-port> <CRLF>
Parameters - <host-port>: the concatenation of a 32-bit IP address and a 16-bit TCP port address.
<host-port> ::= <host-number>,<port-number>
<host-number> ::= <number>,<number>,<number>,<number>
<port-number> ::= <number>,<number>
<number> ::= any decimal integer 1 through 255
Purpose This command changes the default data port value.
Command
PWD
Syntax pwd <CRLF>
Parameters N/A
Purpose This command causes the name of the current working directory to be returned in the
reply.
Command
QUIT
Syntax quit <CRLF>
Parameters N/A
Purpose This command closes the control connection opened with the sequence USER+PASS, if a
file transfer is not in progress.
If file transfer is in progress, the client should send an ABOR command before a QUIT.
Command
REIN
Syntax rein <CRLF>
Parameters N/A
Purpose not implemented
Command
REST
Syntax rest <SP> <marker> <CRLF>
Parameters <marker>: offset in the file (in bytes) at which the transfer will be restarted.
Purpose This command is useful to restart an interrupted transfer.
It gives to the server the byte position in the file at which the transfer will restart.
It must be immediately followed by a STOR or RETR command which shall cause file
transfer to resume.
SDLT 600A Product Manual 65
Page 82

Chapter 3 Using Your Tape Drive
FTP Transfers
Command RETR (*)
Syntax retr <SP> <pathname> <CRLF>
Parameters <pathname>: an existing relative or absolute pathname.
Purpose This command causes the server-DTP to transfer a copy of the file, specified in the
pathname, to the server DTP at the other end of the data connection.
Command
RMD (*)
Syntax rmd <SP> <pathname> <CRLF>
Parameters <pathname>: an existing relative or absolute directory.
Purpose This command allows the user to remove a directory from the file system. It cannot be
used in the following cases:
• remove Trash or Root
• remove a file
• remove a directory which contains data.
Command
RNFR
Syntax rnfr <SP> <pathname> <CRLF>
Parameters <pathname>: an existing relative or absolute directory.
Purpose This command specifies the old pathname of the file which is to be renamed.
This command must be immediately followed by a RNTO command specifying the new
file pathname.
Command
RNTO (*)
Syntax rnto <SP> <pathname> <CRLF>
Parameters <pathname>: a relative or absolute directory that does not exist yet.
Purpose This command specifies the new pathname of the file specified in the immediately
preceding RNFR command.
Together the two commands cause a file to be renamed. Can be used to move a file.
Command
SITE
Syntax site <SP> <command> [ <some optional arguments...> ] <CRLF>
Parameters <some optional arguments...>: see each SITE command for details.
Purpose This command is used to implement custom FTP commands.
SDLT 600A Product Manual 66
Page 83

Chapter 3 Using Your Tape Drive
FTP Transfers
Command
SMNT
Syntax smnt <SP> <pathname> <CRLF>
Parameters N/A
Purpose not implemented.
Command
STAT
Syntax stat [<SP> <pathname>] <CRLF>
Parameters N/A
Purpose not implemented.
Command
STOR (*)
Syntax stor <SP> <pathname> <CRLF>
Parameters <pathname>: an existing relative or absolute pathname.
Purpose This command causes the server-DTP to accept the data transferred via the data
connection and to store the data as a file at the server site.
If the file specified in the pathname exists at the server site, then its contents shall be
replaced by the data being transferred.
A new file is created at the server site if the file specified in the pathname does not already
exist.
Command
STOU
Syntax stou <SP> <CRLF>
Parameters N/A
Purpose not implemented.
Command
STRU
Syntax stru <SP> <structure-code> <CRLF>
Parameters <structure-code>: file structure. Only 'F' (File) is supported.
Purpose This command allows the client to change the file structure.
The only available transfer mode is 'File' ('F').
SDLT 600A Product Manual 67
Page 84

Chapter 3 Using Your Tape Drive
FTP Transfers
Command
SYST
Syntax syst <CRLF>
Parameters N/A
Purpose This command is used to find out the type of operating system at the server.
Its successful answer is "UNIX Type : L8”.
Command
TYPE
Syntax type <SP> <type-code> <CRLF>
Parameters - <type-code> ::= A [<sp> <form-code>]
| E [<sp> <form-code>]
| I
| L <sp> <byte-size>
<form-code> ::= N | T | C
Purpose changes data Representation and Storage type.
Supported types: 'A'(ASCII), and 'I' or 'L 8' (8-bit binary).
Command
USER
Syntax user <SP> <string> <CRLF>
Parameters <string> : user name.
Purpose This command allows the client to be identified by the server.
It will be the first command transmitted by the user after the control connections are
made.
It must be immediately followed by the PASS command. The command sequence
USER+PASS is necessary to access to the server file system.
Any attempt to use this command when connected will be refused.
Note: (*) = Commands requiring the ROOT privilege.
SDLT 600A Product Manual 68
Page 85

Table 4 RFC775 Commands
Chapter 3 Using Your Tape Drive
FTP Transfers
Command
XCUP
Syntax
Parameters
Purpose see
Command
CDUP
XCWD
Syntax
Parameters
Purpose see
CWD
Command XMKD (*)
Syntax
Parameters
Purpose see
Command
MKD
XPWD
Syntax
Parameters
Purpose see
PWD
Command XRMD (*)
Syntax
Parameters
Purpose see
Note:
SDLT 600A Product Manual 69
(*) = Commands requiring the ROOT privilege.
RMD
Page 86

SITE Commands 3
Table 5 SITE Commands
Chapter 3 Using Your Tape Drive
FTP Transfers
Command
CHMOD
Syntax site chmod <SP> <mode> <SP> <arg> <CRLF>
Parameters N/A
Purpose not implemented.
Command
DELE (*)
Syntax site dele <SP> <pathname> <CRLF>
Parameters <pathname>: an existing relative or absolute pathname.
Purpose This command definitively erases a file or a directory in the file system.
The targets that cannot be deleted are:
• a directory which contains data
•Trash
• Root
Command
EJECT (*)
Syntax site eject <CRLF>
Parameters N/A
Purpose This command ejects the cartridge.
Command
ERASE (*)
Syntax site erase <CRLF>
Parameters N/A
Purpose This command erases the EMAM. It also creates two directories on the tape: a root and a
Trash.
SDLT 600A Product Manual 70
Page 87

Chapter 3 Using Your Tape Drive
FTP Transfers
Command
ESSTYP
Syntax site esstyp <SP> <pathname> <CRLF>
Parameters <pathname>: an existing relative or absolute MXF file name or directory.
Purpose This command sends to the user-PI the type of the essence(s) contained in the MXF file
specified in the pathname.
If the pathname is a directory, the command will do it for all the MXF files contained in
the directory.
Command
FREE
Syntax site free <CRLF>
Parameters N/A.
Purpose This command returns some useful information about Tape Space, eMAM space, and a
file inventory.
Command
FSIZ
Syntax site fsiz <SP> <pathname> <CRLF>
Parameters <pathname>: an existing relative or absolute MXF file name or directory.
Purpose This command sends to the user-PI the number of frames contained in the MXF file
specified in the pathname.
If the pathname is a directory, the command will do it for all the MXF files contained in
the directory.
Command
FTYP
Syntax site ftyp <SP> <pathname> <CRLF>
Parameters <pathname>: an existing relative or absolute MXF file name or directory.
Purpose This command sends to the user-PI the operational pattern of the MXF file specified in
the pathname.
If the pathname is a directory, the command will do it for all the MXF files contained in
the directory.
SDLT 600A Product Manual 71
Page 88

Chapter 3 Using Your Tape Drive
FTP Transfers
Command
HELP
Syntax site help [ <SP> <command> ] <CRLF>
Parameters <command>: a FTP SITE command.
Purpose Without parameters, this command lists in alphabetic order the implemented SITE
commands.
When <command> is a valid SITE command, HELP provides the syntax of <command>.
Command
HDR2XML
Syntax site hdr2xml <SP> <switch> <CRLF>
Parameters <switch> : a string that can be equal to ‘on’ or ‘off’ (case insensitive).
Purpose Enable (switch=’on’) or disable (switch=’off’) XML mode for MXF header files. Side
effects in XML mode:
- RETR: the header files are generated in XML before being sent to the client.
Command
HEADER (*)
Syntax site header ["]<in-filename>["] <SP> ["]<out-filename>["] <CRLF>
Parameters • <in-filename>: a relative or absolute pathname of a MXF file. The user must use
<”source name”> if there is space in that name.
• <out-filename>: the desired relative or absolute header path name. It must be located
in an existing folder. The user must use <”source name”> if there is space in that name.
Purpose This command extracts the header of a MXF file and creates a corresponding entry in the
file system.
Command
IDLE
Syntax site idle <SP> <time> <CRLF>
Parameters <time>: timeout value in seconds.
Purpose This command changes the default value of the idle time.
If the server does not detect any activity of a client for <time> seconds, it disconnects it.
SDLT 600A Product Manual 72
Page 89

Chapter 3 Using Your Tape Drive
FTP Transfers
Command
MEID
Syntax site meid [<SP> <pathname> ]<CRLF>
Parameters <pathname>: an existing relative or absolute MXF file name or directory.
Purpose This command sends to the user-PI the UMID of the MXF file specified in the pathname.
If <pathname> is a directory, the command will do it for all the MXF files contained in
the directory.
Without parameter, this command returns the cartridge media ID to the user-PI.
Command
MXFNFO
Syntax site mxfnfo <SP> <pathname> <CRLF>
Parameters <pathname>: an existing relative or absolute MXF file name or directory.
Purpose This command sends to the user-PI a list of information relative of the MXF file specified
in the pathname:
• operational pattern (FTYP)
•number of frames (FSIZ)
• UMID (MEID)
• essence(s) type (ESSTYP)
•timecodes (TC)
If <pathname> is a directory, the command will do it for all the MXF files contained in
the directory.
It will also add the name of the file at the beginning of the list.
SDLT 600A Product Manual 73
Page 90

Chapter 3 Using Your Tape Drive
FTP Transfers
Command PARTIAL (*)
Syntax site partial <SP> <tcin> <SP> <tcout or number of frames> <SP> ["]<in-filename>["]
<SP> ["]<out-filename>["] <CRLF>
Parameters • <Tcin>: time code XX:XX:XX:XX
• <Tcout>: time code XX:XX:XX:XX or a number of frame 0 to 2147483647.
• <in-filename>: a file name in the current folder or a path/filename. The user must use
<”source name”> if there is space in that name.
• <out-filename>: a file name in the current folder or a path/filename. Except in case of
OPATOM file, in this case the output must be an existing folder. The user must use
<”output name”> if there is space in that name.
Purpose Create partial MXF file(s).
Expected results:
• Source is one OP1A file:
A file named <output name> is created in the current folder or in the target folder if
specified in <output name>.
• Source is one file of a complete OPATOM P2 set of files:
A folder named CONTENTS/ is created in the folder <output name>, this folder will be
composed of three subfolder:
• AUDIO/ that contain MXF audio files.
• VIDEO/ that contain MXF video file.
• CLIP/ that contain the XML file.
The target files will have the same names than there corresponding sources.
• Source is one file of an OPATOM set of files:
A folder named <output name> is created that contain targeted files, all with the same
names than there corresponding sources.
Command
STAT
Syntax site stat [<SP> <pathname>] <CRLF>
Parameters N/A.
Purpose not implemented.
SDLT 600A Product Manual 74
Page 91

Chapter 3 Using Your Tape Drive
FTP Transfers
Command
TC
Syntax site tc <SP> <pathname> <CRLF>
Parameters <pathname>: an existing relative or absolute MXF file name or directory.
Purpose This command sends to the user-PI the Timecodes of the MXF file specified in the
pathname.
If the pathname is a directory, the command will do it for all the MXF files contained in
the directory.
Command
TIME
Syntax site time <CRLF>
Parameters N/A.
Purpose This command sends to the user-PI the current date and time of the system.
Command
VERSION
Syntax site version <CRLF>
Parameters N/A.
Purpose This command sends to the user-PI the following list of versions:
• Server Version and build date
• Tape manager library version and build date
• SCSI library version and build date
• Mxf interface library version and build date
• MxfTk library version and build date
• BZ2 library version and build date
• Drive firmware version
• Kernel version and build date
•Libc used
• libFSDLT 600A version and build date
Note: (*) = Commands requiring the ROOT privilege.
SDLT 600A Product Manual 75
Page 92

Table 6 Commands Not
Normalized (Internet Draft)
Chapter 3 Using Your Tape Drive
FTP Transfers
Command
FEAT
Syntax feat <CRLF>
Parameters N/A.
Purpose This command lists all the supported extended commands.
The server currently supports only two extended commands (both from the draft "draftietf-ftpext-mlst-16.txt"): 'SIZE' and 'REST STREAM'.
Command
SIZE
Syntax size <SP> <pathname> <CRLF>
Parameters N/A.
Purpose This command is used to obtain the transfer size of a file from the server-FTP process.
This size is the exact number of bytes that would be sent over the data connection if that
file were transmitted in BINARY mode.
A SIZE command on a directory will fail.
Command
MDTM
Syntax mdtm <SP> <pathname> <CRLF>
Parameters N/A.
Purpose not implemented.
Command
MLST
Syntax mlst [<SP> <pathname>] <CRLF>
Parameters N/A.
Purpose not implemented.
Command
MLSD
Syntax mlsd [<SP> <pathname>] <CRLF>
Parameters N/A.
Purpose not implemented.
SDLT 600A Product Manual 76
Page 93

Chapter 3 Using Your Tape Drive
FTP Transfers
Standard FTP Client 3 To take full advantage of the SDLT 600A tape drive capabilities, you must
have an FTP client that allows you to send SITE commands. See
Supported FTP Commands
on page 61 for more information.
C-API 3 The SDLT 600A has an API for easy integration into third-party
applications. The API_SDLT 600A is a DLL that integrates into standard
FTP clients with all standard FTP commands. Additionally, there are
extended FTP commands designed especially dedicated for the Quantum
SDLT 600A drive.
So the API_SDLT 600A contains four files:
API_SDLT 600A.dll,
•
•
API_SDLT 600A.lib,
•
API_SDLT 600A.h, and
•
libcurl.dll.
The API_SDLT 600A was developed in C l and built with Microsoft
Visual C++ 6.0. It uses the
libcurl library which is also in C and built with
Microsoft Visual C++ 6.0.
Java Plug-In 3 The only software required on your system is the Java Plug-in. The Java
Plug-in is the virtual machine software that allows the execution of Java
applets. The Java Plug-is available at www.java.com
.
Note: If the screen appears grey in color, this indicates that the Java
Virtual Machine has not been loaded. See Acquiring the Java
Plug-in.
Acquiring the Java Plug-in 3 The applet needs the Java Virtual Machine to run. This is a plug-in called
Java Plug-in and is provided by Sun Microsystems.
The applet will install immediately. When you load the applet for the first
time, a pop-up window may ask you to download and install the Java
plug-in, if you need that plug-in you can just follow the instructions on
the screen or go to www.java.com
SDLT 600A Product Manual 77
to download it.
Page 94
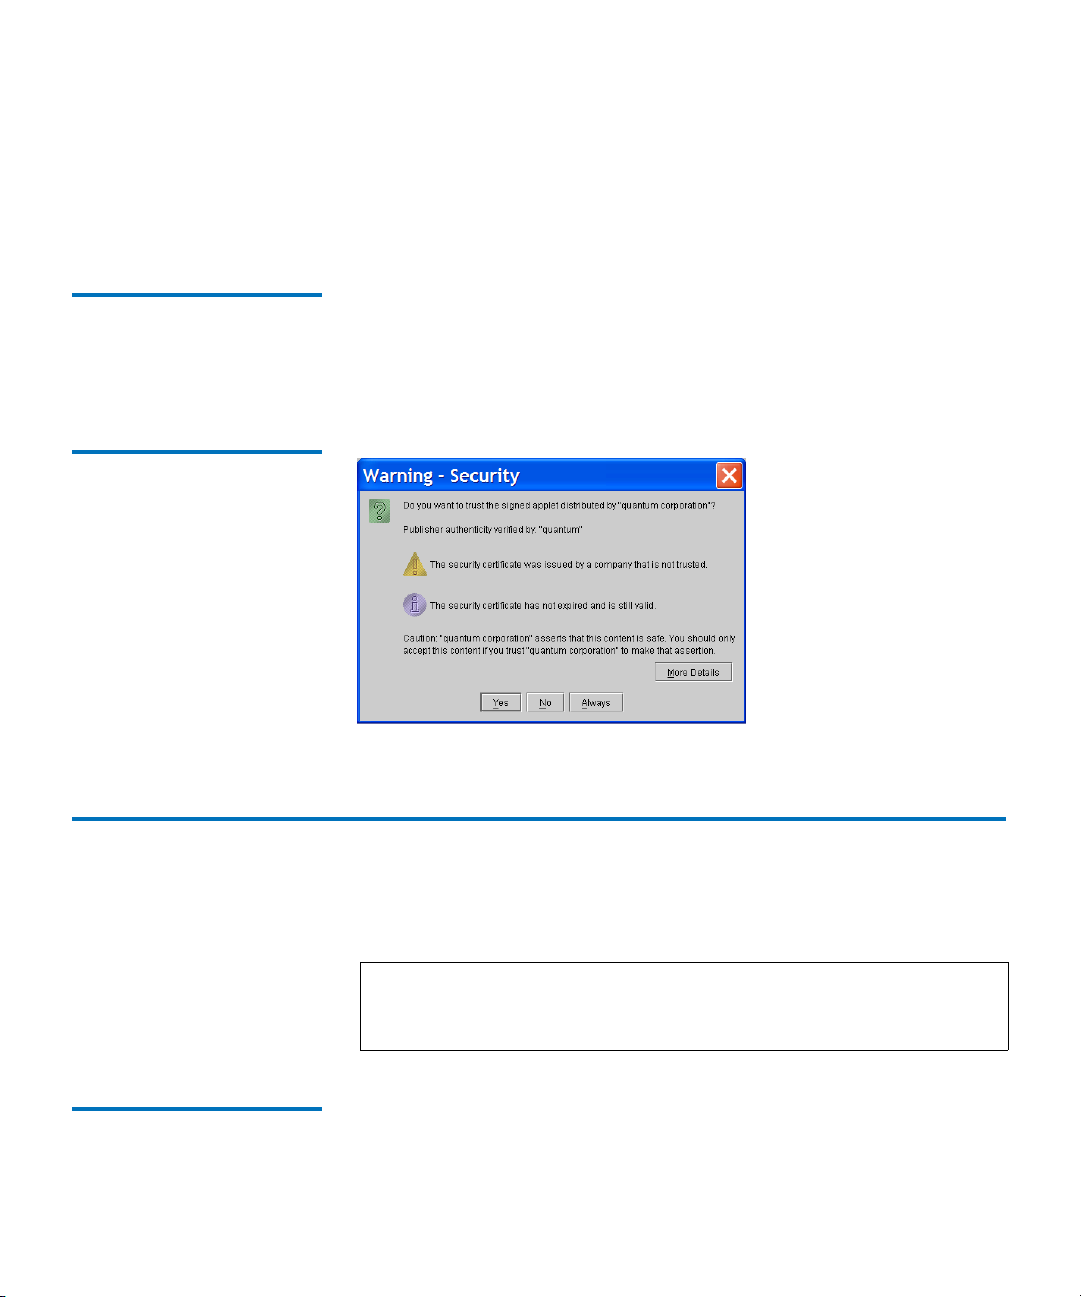
Chapter 3 Using Your Tape Drive
Cleaning the Tape Mechanism
If you have Java Plug-in version 1.5 or later or the Java Runtime
Environment
not need to download new software. The plug-in should activate on your
Web browser automatically once installed.
Certificate of Security 3 Since the applet reaches the local directories of your computer, a
certificate of security is required. When the applet is loaded, the
Plug-in
certificate of security.
Figure 69 Certificate of Security
version 1.5 or later installed on your computer, you should
displays a pop-up window prompting you to accept our
Java
Cleaning the Tape Mechanism 3
This section discusses the tape drive cleaning tape, maintenance
considerations, and important compatibility issues.
Note: When the yellow LED is lit, use the SDLT CleaningTape to
clean the unit. Do not clean the tape drive unless the tape drive
specifically indicates cleaning is necessary.
Occasional Cleaning of Tape Head
SDLT 600A Product Manual 78
SDLT 600A tape drives occasionally require preventive cleaning. The
3
amount of ambient pollution and particulates in the environment, to a
large degree, dictates the cleaning frequency.
Page 95

Chapter 3 Using Your Tape Drive
Cleaning the Tape Mechanism
Clean your tape drive only when cleaning is necessary. The yellow alert
LED located on the front bezel of the tape drive notify you if you need to
clean the tape drive; the location of this LED (and other front bezel LEDs)
is shown in figure 22
on page 31.
Clean the SDLT 600A tape drive with the SDLT CleaningTape.
Caution: Use ONLY the SDLT CleaningTape. Other cleaning tapes
are incompatible with the SDLT 600A tape drive heads.
When to Use the Cleaning Tape
Life Expectancy of the Cleaning Tape
Compatibility of the Cleaning Tape
Loading the Cleaning Tape Into a Tabletop Tape Drive
The SDLT 600A tape drive uses a built-in tape cleaning algorithm in
3
conjunction with a
cleaning tape. The SDLT CleaningTape is packaged in a
plastic case, and is light gray in color.
A yellow LED located on the front bezel of the SDLT 600A tape drive
indicates when cleaning is needed; figure 22
on page 31 shows the
location of this LED (and other front bezel LEDs).
Each SDLT CleaningTape is good for 20 uses. Use one of the labels that is
3
supplied with the tape to track the number of uses. If the cleaning LED
stays lit after you clean the drive, the tape life has expired. Acquire a new
tape and repeat the cleaning process.
The SDLT CleaningTape is intended for use in SDLT 600A tape drives
3
Alternatively stated, the SDLT CleaningTape only cleans the SDLT MRC
heads.
Follow these steps to load an SDLT CleaningTape into an SDLT 600A
3
tape drive:
1 Insert the cleaning tape, with the Front Slide Label Slot facing
outward, into the tape drive until the tape drive engages with the
cleaning tape and begins to take up the cleaning media. The green
Drive Status LED flashes and the cleaning cycle begins automatically.
SDLT 600A Product Manual 79
Page 96

Chapter 3 Using Your Tape Drive
Troubleshooting
2 When the cleaning cycle completes, the cleaning tape automatically
ejects from the tape drive and the yellow alert LED turns off.
Note: On the last cleaning, the cleaning tape will not eject. Use
the
Eject button on the front of the tape drive to eject the
expired cleaning tape and dispose of the cleaning tape.
3 Remove the cleaning tape, place it back into its plastic case, and mark
the label after each cleaning.
Troubleshooting 3
The following subsections provide troubleshooting information that
might be helpful should the system fail its Power-On Self-Test (POST).
See the data cartridge appendices in this document (Super DLTtape II
Data Cartridges on page 105) for complete visual inspection instructions
for Super DLTtape II data cartridges.
The Web site www.dlttape.com
SDLT systems.
Power-On Self-Test 3 The SDLT 600A tape drive performs a Power-On Self-Test (POST) each
time the tape drive is powered on. POST normally completes in 10 to 15
seconds—when a data cartridge is not in the tape drive— when the unit is
powered on. However, if a data cartridge is in the tape drive when the
unit is powered on, POST duration is longer, depending on how much
tape in the data cartridge may be loaded in the tape drive.
Table 7
turned on. See figure 70
front panel.
SDLT 600A Product Manual 80
provides the sequence of operation to expect when power is
to help familiarize yourself with the LEDs on the
also includes valuable information about
Page 97

Chapter 3 Using Your Tape Drive
Troubleshooting
Table 7 LED Lighting Pattern
During Power-On Self-Test
(POST)
Stage What You Observe
1 (Power
All LEDs illuminate for approximately one second.
On)
2 The LEDs flash on, then off in a progressing pattern from
left to right. Stages 1 and 2 generally complete within
approximately five seconds.
3 The right LEDs remain off, the left LED illuminates
steadily, and the middle LED flashes until POST
completes. This stage typically lasts for 5 to 10 seconds.
4 When POST is complete, the middle LED stops flashing
and remains illuminated; the left LED turns off, and right
LED remains off.
POST
Failure
Note: If a data cartridge is in place when power is turned on, all
If POST fails, the middle and right LEDs illuminate
steadily and the left LED flashes.
stages remain the same except stage 3. It may take a
considerably longer time for stage 3 to complete due to tape
rewind and searching operations that occur during that stage.
SDLT 600A Product Manual 81
Page 98

Figure 70 SDLT 600A Tape
Drive Front Panel LEDs
Green/Orange LED
(Cartridge Status)
Green LED
(Drive Status)
Yellow LED
(Cleaning Required)
Chapter 3 Using Your Tape Drive
Troubleshooting
POST Troubleshooting 3 Table 8 provides troubleshooting tips that you will find useful in the
event that your tape drive fails its POST.
If, after attempting the recommended actions listed in the table, the
problem still exists or recurs, a hardware failure may be the cause.
Contact your service representative.
SDLT 600A Product Manual 82
Page 99

Chapter 3 Using Your Tape Drive
Table 8 Troubleshooting Chart
If… Then… You should…
Troubleshooting
System does not recognize the
tape drive.
The tape drive does not power
on.
Over Temperature Condition
3
Host computer may not be
configured to recognize the
Configure system to recognize
the tape drive’s ID.
network.
Network/IP parameters may
not be correct.
Configure network/IP
parameters.
Network cable may be loose. Ensure that the network cable is
fully seated at each connector
end.
No power is reaching the tape
drive.
Check the tape drive’s power
cable connection at the back of
the system.
The tape drive has a thermal sensor located in the tape path. This sensor,
which is used to accurately monitor the air temperature in the tape path,
issues a TapeAlert warning at 47 degrees C, and detects an overtemp
condition when the temperature in the tape path reaches 50 degrees C.
When the tape path temperature sensor detects an overtemp condition,
the tape rewinds, unloads, and ejects from the tape drive. (As long as the
tape drive is not mounted in a tape automation library, the tape ejects.)
If the tape drive is mounted in a tape automation library, the data
cartridge rewinds to BOT and unbuckles in preparation for unloading,
but does not automatically eject.
Frequently Asked Questions
SDLT 600A Product Manual 83
For the latest FAQs, see http://www.quantum.com/Products/
3
TapeDrives/DLT/Index.aspx.
Page 100

Appendix A
3SDLT 600A Tape Drive
Specifications
This chapter describes the technology behind the drive as well as the
various specifications that apply to the Quantum SDLT 600A tape drive.
Tape Drive Technology 3
The SDLT 600A tape drive incorporates various new state-of-the-art
technologies that contribute to the SDLT architecture. Some of these ideas
are trademarked, others are patented. The following subsections
introduce the important technologies that together, comprise the
SDLT 600A tape drive.
Gigabit Ethernet (GigE) Interface
Material Exchange Format (MXF) Aware
SDLT 600A Product Manual 84
A Gigabit Ethernet interface allows the drive to be quickly connected and
3
accessed on your network.
A client applet can be used store and retrieve MXF files to (and from)
3
tape.
 Loading...