


SuperLoader™ Slide Rail Kit Installation
Quick Start Guide
This Quick Start Guide contains a
sequence of steps recommended for
unpacking and installing a slide rail kit
for the SuperLoader.
For additional information, visit
www.quantum.com, refer to the
Quantum Superloader Automated
Tape Library User Manual
a PDF (portable document format)
file on the enclosed CD, or contact
Quantum Technical Support and
Customer Service by calling
1-800-284-5101.
Note: Adobe® Acrobat®
Reader is required to view
and print PDF documents.
To download a free copy of
Adobe Acrobat Reader, go to
www.adobe.com.
installed as
Step 1: Unpack the Slide Rail Kit
a. Look for markings on the shipping carton that indicate the top. If necessary,
position the carton so that it is top-side up.
b. Using scissors, a utility knife, or other appropriate tool, carefully cut the packing
tape along the length and ends of the carton. Fold open the carton flaps.
c. Remove the following from the carton:
• Plastic bag containing instructions and warranty information
• Slide rail shelf (#70-60583-00)
• Slide rail hardware kit
Step 2: Prepare Parts and Tools
a. Make sure you have the following parts:
• One shelf assembly with slides attached (#70-60583-00)
• Two rack-mounting brackets (#74-60674-00)
• Four rear-mounting slide brackets (two short, two long)
• 12 pan-head PHILLIPS® screws (10-32 x .38)
• Four pan-head PHILLIPS screws (10-32 x .25)
• Four locking nuts (10-32)
• Six threaded flat plates (10-32)
Note: Clips, nuts, and attachment screws are not provided. Due to possible
differences in cabinet design, you must use cabinet-specic hardware
components.
b. Make sure you have the following tools:
• #2 PHILLIPS screwdriver
Step 3: Install the Slide Rail
Caution: If the SuperLoader shelf assembly is extended, make sure that you
always use a cabinet anti-tip device if one is provided with the cabinet.
a. Identify the correct mounting holes on the vertical rail, making sure that the holes
are all on the same level.
SuperLoader Slide Rail Kit Installation Quick Start Guide
Page 2
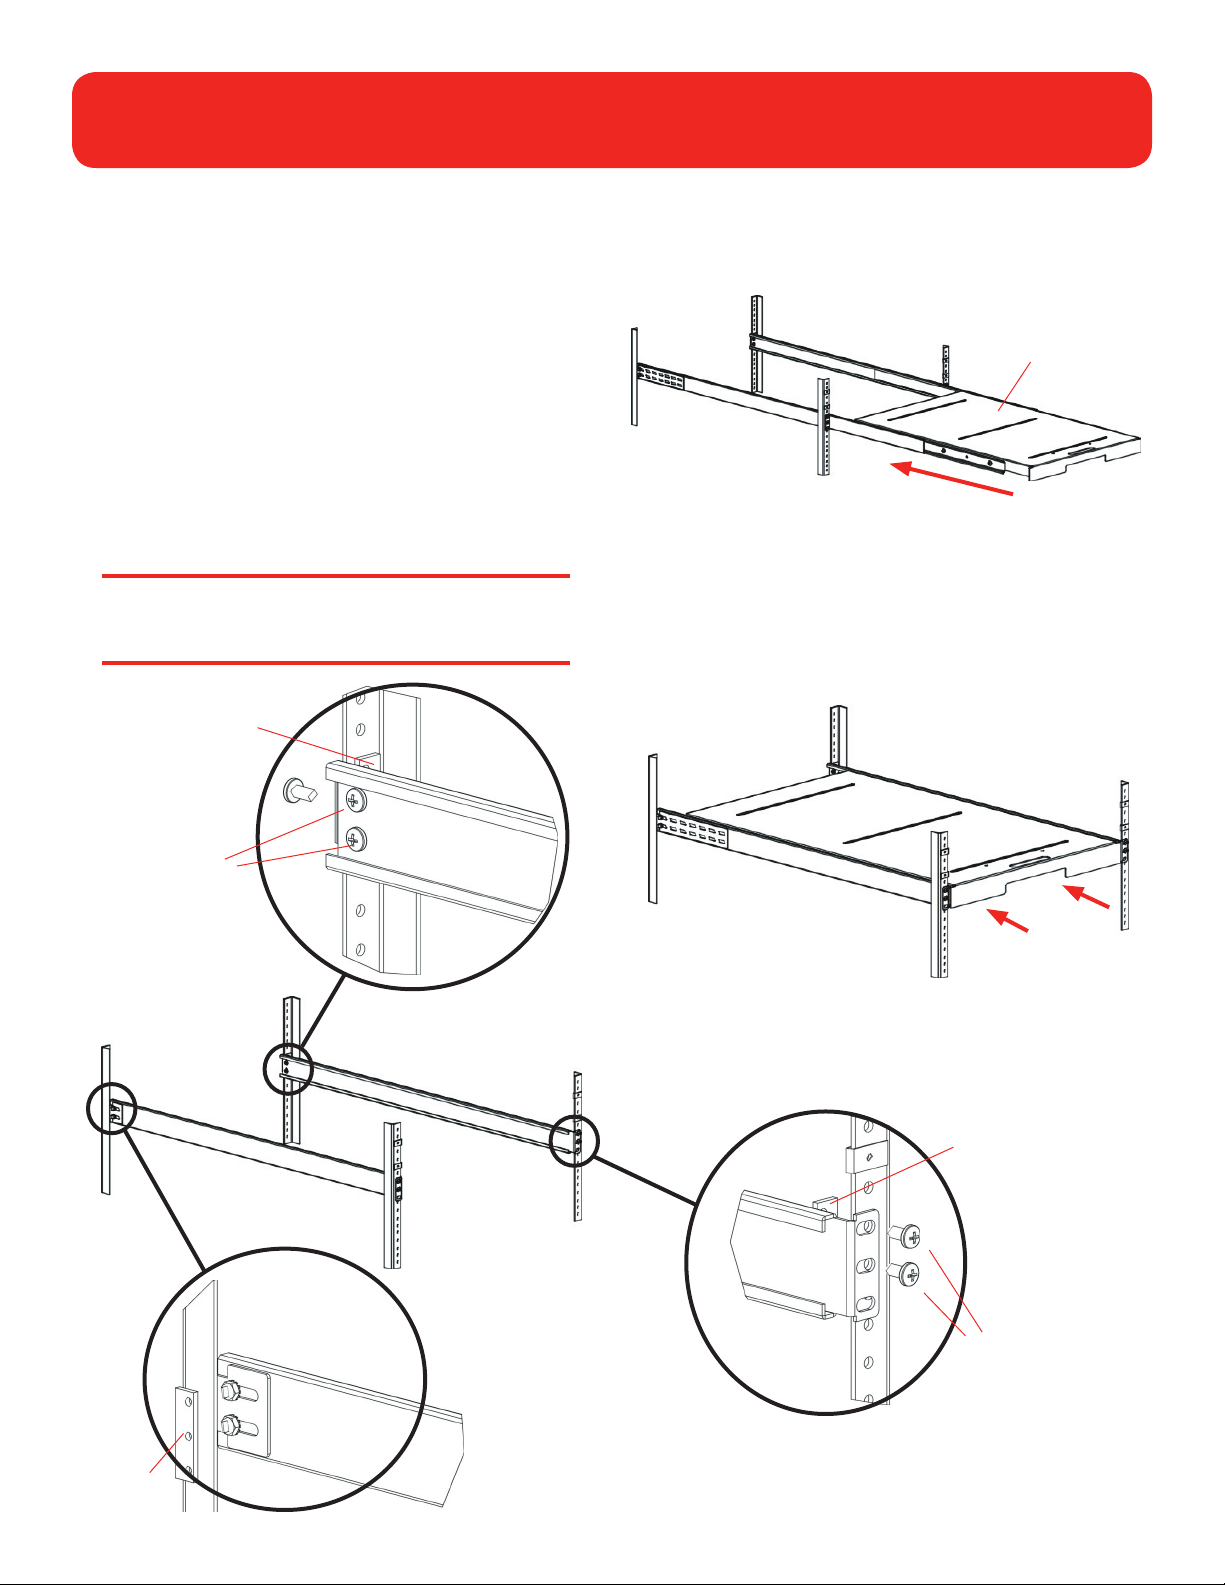
b. Separate the outer pieces of the slides from the shelf
assembly. The slides are made up of three telescoping pieces.
If you pull on the outer slide, the pieces extend, making the
slide longer.
c. From the front, mount the outer pieces of the slides into the
cabinet (per previously located holes) using the screws and
threaded plates. To do this:
(1) Select the long or short rear-mounting slide brackets,
depending on the rail-to-rail spacing in the side of the
cabinet.
(2) Secure the rear-mounting brackets to the slide using the
screws and nuts or the treaded flat plate.
Note: Do not fully tighten the mounting screws. This
allows for adjustment while inserting the shelf assembly
into the mounted slides.
Threaded flat plate
d. Attach the shelf assembly to the slide rails. To do this, extend
the slide rails on both sides and then attach the shelf to the
rails.
Shelf
e. After inserting the shelf onto the rails, slide the shelf slowly
in and out of the cabinet a few times (to make sure it moves
freely) and then tighten all slide screws.
f. Push the shelf all the way into the cabinet in preparation for
the next step.
0.38-inch
screws
Threaded flat plate
0.38-inch
screws
Threaded
flat plate

SuperLoader Slide Rail Kit Installation Quick Start Guide
Page 3
Warning: To avoid injury or equipment damage, it is
recommended that two persons lift the SuperLoader
and place it on the slide rail shelf.
g. With the help of a second person, place the SuperLoader on
the shelf. Push the SuperLoader to the back of the shelf.
h. At the back of the cabinet, attach the SuperLoader to the
shelf using the two brackets (#74-60674-00), four short pan
head screws (#10-32 x 0.25), and four long pan head screws
(#10-32 x 0.38) as follows:
Note: Make sure that you use the 0.25-inch screws in the
vertical holes, not the 0.38-inch screws. Use the 0.38-inch
screws in the horizontal holes.
(1) Line up the vertical screw holes on a bracket with the
vertical screw holes on one of the rear corners of the
SuperLoader. Using two short pan head screws, secure
the bracket to the SuperLoader.
(2) Repeat the previous step to attach a bracket to the other
side of the SuperLoader.
(3) Using the long pan head screws, attach both brackets to
the shelf using the horizontal screw holes.
i. At the front of the cabinet, install 4 clip nuts (provided with
the cabinet) so that they are level with the screw holes (two
per side) in the SuperLoader mounting flanges.
j. Use four cabinet attachment screws (provided with the
cabinet) to lock the SuperLoader in place in the cabinet.
Attachment
screws
Bracket
Vertical screws
(10-32 x 0.25-inch)
Horizontal screws
(10-32 x 0.38-inch)

SuperLoader Slide Rail Kit Installation Quick Start Guide
Page 4
For more information,
visit our Web site at
www.quantum.com
United States of America
Quantum Corporation
Storage Solutions Group
141 Innovation Drive
Irvine, CA 92612
U.S.A.
phone 949.856.7800
Europe
7 Lindenwood
Chineham Business Park
Basingstoke, RG24 8QY
United Kingdom
phone +44 1256 818300
fax +44 1256 848700
Asia Pacific
Level 3
200 Creek Street
Brisbane, Qld 4000
Australia
phone +61 7 3839 0950
fax +61 7 3839 0955
fax 949.856.7799
© 2004 Quantum Corporation. All rights reserved. DLTtape, the DLTtape logo, Quantum, the Quantum logo, SuperDLTtape, the Super DLTtape logo, and SuperLoader are trademarks of
Quantum Corporation registered in the U.S.A. and other countries. Products mentioned herein are for identification purposes only and may be registered trademarks or trademarks of their
respective companies. All other brand names or trademarks are the property of their respective owners.
81-81267-01 A01 Rev. August 2004
6207947-07cN 01
 Loading...