

Page 1

SNMP Integration
Guide
6311658-07
Ver. 7, Rel. 0
Page 2

SNMP Integration Guide, 6311658-07, Ver. 7, Rel. 0, December 2003. Made in USA.
Quantum Corporation provides this publication “as is” without warranty of any kind, either express or
implied, including but not limited to the implied warranties of merchantability or fitness for a particular
purpose. Quantum Corporation may revise this publication from time to time without notice.
COPYRIGHT STATEMENT
Copyright 2003 by Quantum Corporation. All rights reserved.
Your right to copy this manual is limited by copyright law. Making copies or adaptations without prior
written authorization of Quantum Corporation is prohibited by law and constitutes a punishable violation of
the law.
TRADEMARK STATEMENT
Prism Storage Architecture is a trademark of Quantum Corporation. Other trademarks may be mentioned
herein which belong to other companies.
6207947-06cP 29
Page 3

Contents
Preface ix
Chapter 1 Unicenter TND on Windows NT/2000 1
Overview............................................................................................................. 1
System Requirements on Windows NT/2000 ............................................... 2
Level of Security.......................................................................................... 2
Activating SNMP Traps .................................................................................... 3
Pre-Installation Steps......................................................................................... 4
Installing the SNMP Integration Software ..................................................... 5
Setting Up Unicenter TND ...............................................................................8
Following Up: Testing the Library Icon........................................................ 10
Uninstalling SNMP Integration Software .................................................... 11
Uninstalling Software from Windows NT 4.0...................................... 11
Uninstalling Software from Windows 2000.......................................... 12
Troubleshooting ............................................................................................. 12
SNMP Integration Guide iii
Page 4

Chapter 2 OpenView NNM on Windows NT/2000 13
Overview ...........................................................................................................13
System Requirements on Windows NT/2000..............................................14
Level of Security........................................................................................14
Installing SNMP Integration Software ..........................................................15
Installing Software from a CD.................................................................15
Duplicate IP Addresses ...................................................................................17
Setting Up OpenView NNM ..........................................................................18
Changing Symbol Type............................................................................19
Configuring Status Source .......................................................................20
Configuring Object Attributes.................................................................21
Following Up: Testing the Library Icon........................................................22
Uninstalling Library Integration Software ...................................................23
Uninstalling Software from Windows NT 4.0 ......................................23
Uninstalling Software from Windows 2000 ..........................................24
Troubleshooting................................................................................................24
Chapter 3 OpenView NNM on Solaris 25
Overview ...........................................................................................................25
System Requirements on Solaris....................................................................26
Level of Security........................................................................................26
Installing SNMP Integration Software ..........................................................26
Installing Software from a CD.................................................................27
Installation Output Script ........................................................................27
Duplicate IP Addresses ...................................................................................28
Setting Up OpenView NNM ..........................................................................28
Configuring Object Attributes.................................................................29
Following Up: Testing the Library Icon........................................................31
Uninstalling Library Integration Software ...................................................31
Uninstalling Software...............................................................................32
Troubleshooting................................................................................................32
Appendix A Configuring the SNMP Management Web Page 33
PX720..................................................................................................................33
P-Series and M-Series ......................................................................................35
DX-Series ...........................................................................................................37
iv SNMP Integration Guide
Page 5

Glossary 39
Index 43
SNMP Integration Guide v
Page 6

vi SNMP Integration Guide
Page 7

Figures
Figure 1 Component Activation Flags Tab .............................................. 3
Figure 2 Server Preferences Tab ................................................................4
Figure 3 SNMP Integration Installation Dialog Box ............................... 5
Figure 4 Welcome Dialog Box.................................................................... 6
Figure 5 Software License Agreement Dialog Box.................................. 6
Figure 6 Update TND Repository Information Dialog Box................... 7
Figure 7 Setup Complete Dialog Box........................................................ 8
Figure 8 2-D Map ......................................................................................... 9
Figure 9 SNMP Integration Installation Dialog Box ............................. 15
Figure 10 Welcome Dialog Box.................................................................. 16
Figure 11 Software License Agreement Dialog Box................................ 16
Figure 12 Setup Complete Dialog Box...................................................... 17
Figure 13 Subnet Map ................................................................................. 19
Figure 14 Change Symbol Type Dialog Box ............................................20
Figure 15 Symbol Properties Dialog Box.................................................. 21
Figure 16 Object Properties Dialog Box.................................................... 21
Figure 17 Attributes Dialog Box ................................................................ 22
SNMP Integration Guide vii
Page 8

Figure 18 Subnet Map - Truncated View..................................................29
Figure 19 Object Properties Window ........................................................30
Figure 20 Object Attributes Window.........................................................30
Figure 21 PX720 SNMP Configuration Section........................................34
Figure 22 SNMP Configuration Page........................................................36
Figure 23 DX-Series SNMP Page................................................................38
viii SNMP Integration Guide
Page 9

Preface
This manual describes how to use the SNMP Integration Kit to integrate
Quantum Libraries and DX-Series Enhanced Data Protection Systems
with the following third party network management software packages:
• Unicenter Network and Systems Management
Unicenter TND) of Computer Associates
Windows NT
•OpenView
(HP), supported on Windows NT, Windows 2000, and Sun Solaris
environments
Supported libraries include:
• M-Series (M1500, M1800, and M2500) equipped with MC300
®
and Windows® 2000
®
Network Node Manager™ (NNM) of Hewlett Packard
®
™
3.0 (appears as
(CA), supported on
• P-Series (P4000, P7000, P2000, and P3000) equipped with MC350
• DX-Series (DX30 and DX100)
• PX720
Throughout this document, “library”refers to all supported products.
SNMP Integration Guide ix
Page 10

Audience The intended audience for this manual is network system administrators.
Purpose The following topics are covered for each third party network
management software integration:
• System requirements, includes the hardware and software
components that are required to be installed and to run properly.
• Pre-installation steps for the SNMP software
• Installing the SNMP software from a CD or from the internet.
• Setting up third party management software after installation
• Configuring the management console Web pages
• Testing the library icon
• Troubleshooting
• Removing library integration software
Document
Organization
The manual is organized as follows:
• Chapter 1, Unicenter TND on Windows NT/2000
system requirements and installation of Unicenter TND on a
Windows platform.
• Chapter 2, OpenView NNM on Windows NT/2000
system requirements and installation of OpenView NNM on a
Windows platform.
• Chapter 3, OpenView NNM on Solaris
requirements and installation of OpenView NNM on a Solaris
platform.
• Appendix A, Configuring the SNMP Management Web Page
describes how to configure the SNMP Management Web page.
This document concludes with a glossary and an index.
x SNMP Integration Guide
, describes the
, describes the
, describes the system
,
Page 11

Notational
Conventions
This manual uses the following conventions:
Note: Notes emphasize important information related to the main
topic.
Related
Documents
Documents related to the SNMP integration software are shown below:
Quantum Documentation
Document No. Document Title Document Description
6311631 MC300 Prism
Management Card
User’s Guide
This manual provides
server management
instructions for the MC300
Prism Management Card
for M-Series libraries.
6473025 MC350 Prism
Management Card
User’s Guide
This manual provides
server management
instructions for the MC350
Prism Management Card
for P-Series libraries.
6444601 PX720 User’s Guide This guide contains sections
on installation, operation,
and diagnostic software.
6513501 DX-Series User’s
Guide
This guide contains sections
on installation, operation,
and diagnostic software.
Refer to the appropriate product manuals for information about your
tape drive and cartridges.
SNMP Integration Guide xi
Page 12

Contacts Quantum company contacts are listed below.
Quantum Corporate Headquarters
To order documentation on Quantum products contact:
Quantum Corporation
P.O. Box 57100
Irvine, CA 92619-7100
(949) 856-7800
(800) 284-5101
Technical Publications
To comment on existing documentation send e-mail to:
doc-comments@quantum.com
Quantum Home Page 0
Visit the Quantum home page at:
http://www.quantum.com
Customer Support 0
0
0
The Quantum Customer Support Department provides a 24-hour help
desk that can be reached at:
North/South America: (949) 725-2100 or
Asia/Pacific Rim: (International Code)
Europe/Middle East/Africa: (International Code)
xii SNMP Integration Guide
(800) 284-5101
+61 7 3839 0988
+44 (0) 1256 848748
Page 13

Send faxes for the Customer Support Department to:
North/South America: (949) 725-2176
Asia/Pacific Rim: (International Code)
+61 7 3839 0955
Europe/Middle East/Africa: (International Code)
+44 (0) 1256 848777
Send e-mail for the Customer Support Department to:
North/South America: www.quantum.com/askaquestion
Asia/Pacific Rim: apachelp@quantum.com
Europe/Middle East/Africa: eurohelp@quantum.com
SNMP Integration Guide xiii
Page 14

xiv SNMP Integration Guide
Page 15

Chapter 1
1Unicenter TND on
Windows NT/2000
Overview 1
Computer Associates (CA)
allowing network administrators to graphically view their networks and
the nodes attached to the network. This allows the network administrator
to assess the health of these devices, as well as take corrective action if
necessary.
In order for Quantum Libraries to display as actual library icons in the
network management software, you must install the SNMP Integration
Kit.
The SNMP Integration with Unicenter TND will:
• Install the Quantum Library MIB file
• Install the Quantum Library icon files
• Create an Quantum Library class
• Update the message map and action tables
SNMP Integration Guide 1
Unicenter TND is a network management tool
Page 16

Chapter 1 Unicenter TND on Windows NT/2000
System Requirements on Windows NT/2000
SNMP integration with Unicenter TND consists of the following tasks:
• Installing the SNMP Integration Software
• Setting Up Unicenter TND
• Following Up: Testing the Library Icon
System Requirements on Windows NT/2000 1
The SNMP integration with Unicenter TND on NT/2000 requires the
following hardware and software components to run properly. These
include:
• Microsoft Windows 2000 or Windows NT
installed and running
• Hard disk drive with at least 10 MB of available space
• CD-ROM drive
• Internet browser: Microsoft
Netscape
®
Communicator version 4.7x
®
Internet Explorer version 5.0 or 5.5, or
(server or workstation),
• SNMP and SNMP trap services active and running
• Unicenter TNG Framework version 2.1 or higher installed with
SNMP traps activated (see Activating SNMP Traps
)
Level of Security 1 In Unicenter TNG Framework 2.1, the level of security required to
integrate the library is the same level of security required to install and
operate Unicenter TND. This is typically the System Administrator (sa)
level. The security entry is case sensitive.
In Unicenter TNG Framework 2.4 or higher, the level of security required
to integrate the library is the same level of security required to install and
operate Unicenter TND. This is typically the user name and password for
logging into the computer network.
Note: Before beginning, verify that SNMP service is running (see
Start/Control Panel/Services).
2 SNMP Integration Guide
Page 17

Chapter 1 Unicenter TND on Windows NT/2000
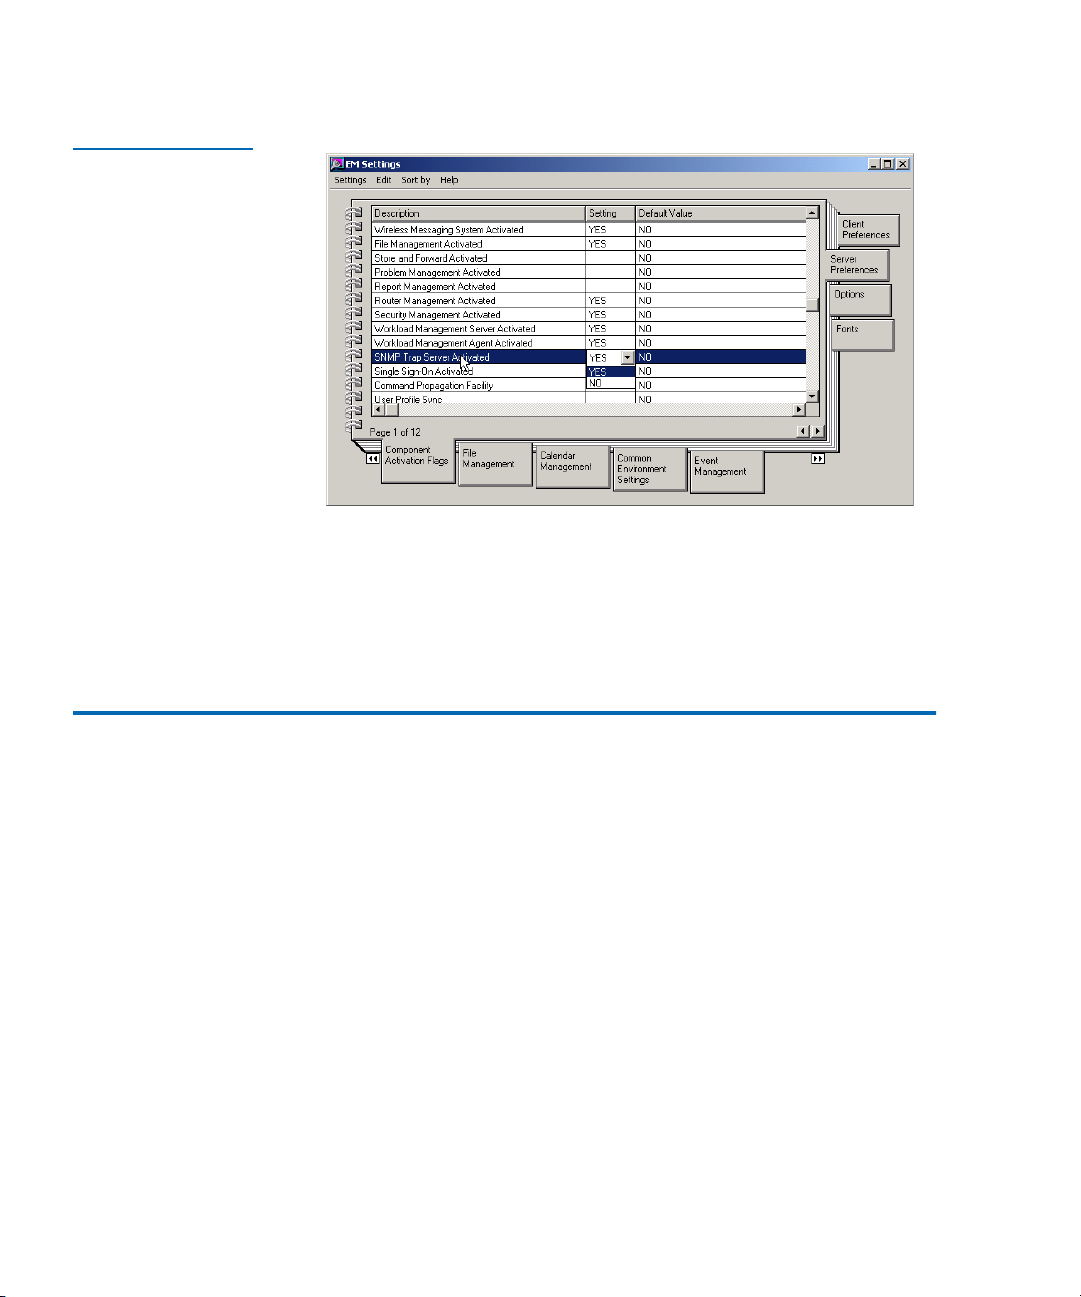
Activating SNMP Traps
Activating SNMP Traps 1
To activate the SNMP traps:
1 Click Start and select Programs/Unicenter TND/Enterprise
Figure 1 Component
Activation Flags Tab
Management/EM Classics/Windows NT/Configuration
2 Click Settings icon.
The
EM Settings dialog box appears with the Component Activation
Flags
tab activated (see figure 1).
.
3 Change the Setting to Yes for the SNMP Trap Server Activated flag.
4 Select the Server Preferences tab (see figure 2).
SNMP Integration Guide 3
Page 18
Chapter 1 Unicenter TND on Windows NT/2000
Pre-Installation Steps
Figure 2 Server
Preferences Tab
5 Set preference to Yes for SNMP Trap Server Activated.
6 Exit the Unicenter TND Settings dialog box.
7 Reboot the PC for the changes to take effect.
Pre-Installation Steps 1
Before installing the SNMP integration software, edit the
c:\winnt\system32\drivers\etc\hosts file and add the library node(s):
<IP Address> <Library Name>
<Library Name> is derived from the library name and the domain name
specified in the
management Web page.
For example, if the library name is BLD5 and the domain is
mycompany.eng, the library name in the /etc/hosts file will be
BLD5.mycompany.eng.
4 SNMP Integration Guide
Network Configuration section of your library’s
Page 19

Chapter 1 Unicenter TND on Windows NT/2000
Installing the SNMP Integration Software
Installing the SNMP Integration Software 1
You can install the SNMP integration software by downloading it or by
installing it from a CD. Download the integration software from the
Quantum Customer Support Web site at:
www.quantum.com/softwaredownloads
Note: Install Unicenter TND before installing the integration
software. If Unicenter TND is not installed, the integration
procedure will abort.
To install the SNMP integration software from a CD:
1 Insert the SNMP Integration CD into the CD-ROM drive of the
computer that contains the Unicenter TND software.
If Autoplay is enabled, Windows automatically displays the Library
SNMP Integration Installation screen (see figure 3
allows you to perform Unicenter TND Integration or HP OpenView
NNM Integration.
). This screen
Figure 3 SNMP
Integration Installation
Dialog Box
2
Click CA Unicenter TND Integration.
The
Welcome dialog box displays (see figure 4).
SNMP Integration Guide 5
Page 20

Chapter 1 Unicenter TND on Windows NT/2000
Installing the SNMP Integration Software
Figure 4 Welcome
Dialog Box
3
Click Next on the Welcome dialog box.
The
Software License Agreement dialog box displays (see figure 5).
Figure 5 Software
License Agreement
Dialog Box
Read the Software License Agreement.
4
5 Click Yes to indicate that you accept the terms of this agreement.
The
Update TND Repository Information dialog box displays (see
figure 6
).
Note: If you click No on the Software License Agreement dialog
box, the wizard program terminates.
6 SNMP Integration Guide
Page 21

Figure 6 Update TND
Repository Information
Dialog Box
Chapter 1 Unicenter TND on Windows NT/2000
Installing the SNMP Integration Software
Note: Depending on the version of Unicenter TNG Framework
you are using, the information in the text boxes may vary.
In version 2.1, the repository name should be entered in
the form
name should be entered in the form
NAME portion should be the name of the host computer.
NAME_TNGDB. In version 2.4, the repository
UNIDB_NAM E. The
6 Enter the SQL server into the Repository box.
7 Enter sa for System Administrator in the Username box.
8 Leave the Password and Confirm Password boxes blank if Unicenter
TND was installed without using a password.
To return settings in this dialog box to their previously saved values,
click
Reset. To exit the dialog box without saving any changes, click
Cancel.
Note: If Unicenter TND was installed using a password, the
same password should be used in this step.
9 Click OK to save your settings.
The
Setup Complete dialog box displays (see figure 7).
SNMP Integration Guide 7
Page 22

Chapter 1 Unicenter TND on Windows NT/2000
Setting Up Unicenter TND
Figure 7 Setup
Complete Dialog Box
To display the readme.txt file, select the Yes, I want to view the
10
readme.txt
11 Click Finish.
check box.
Your library is now integrated with the Unicenter TND software.
Setting Up Unicenter TND 1
After installing the integration software, set up the Unicenter TND by
reclassifying the library node. To set up Unicenter TND:
1 On the start menu under Programs:
a Select Unicenter TND
b Select Worldview
Click on 2-D Map
c
The 2-D Map displays (see figure 8).
8 SNMP Integration Guide
Page 23

Figure 8 2-D Map
Chapter 1 Unicenter TND on Windows NT/2000
Setting Up Unicenter TND
2
In the 2-D Map, navigate to the network where the library devices are
located.
3 Right-click on the object (library) and select delete.
The object is removed from the submap.
SNMP Integration Guide 9
Page 24

Chapter 1 Unicenter TND on Windows NT/2000
Following Up: Testing the Library Icon
4
From a DOS prompt:
• for an M-Series or P-Series, type:
dscvrone
-i <PMC IP Address> -h ATLLIB
• for a DX30 type:
dscvrone
-i <PMC IP Address> -h DX30
• for a DX100 type:
dscvrone
-i <PMC IP Address> -h DX100
• for a PX720 type:
dscvrone
5 Press <Enter>.
-i <PMC IP Address> -h PX720
This command discovers the library and inserts it into the map.
Note: For Unicenter TNG Framework 2.1, the object will appear
in the existing segment. For Unicenter TNG Framework
2.4, the object may appear in another segment. To place the
object in the appropriate segment, refer to the Unicenter
TND documentation.
The library icon will appear in the map. The color and shape of the
icon reflects the health of the library. This allows the network
administrator to take corrective action if necessary.
Configure the SNMP subsystem of your library (see appendix A
).
Following Up: Testing the Library Icon 1
To test the library icon:
Note: Prior to conducting this test, verify that no library processes
are running.
1 Open a 2D-map in Unicenter TND.
2 Navigate to the submap where the reclassified library node resides.
10 SNMP Integration Guide
Page 25

Chapter 1 Unicenter TND on Windows NT/2000
Uninstalling SNMP Integration Software
3
Take the library offline.
After a few moments, the library icon turns red indicating that the
library is unavailable.
4 Put the library on-line.
5 Verify that the library Home page displays by right-clicking the
library icon.
Once the library achieves the on-line state as observed on the library,
the library icon on the 2D-map turns green indicating the library is
available.
• M-Series, P-Series, and PX720 may take up to 20 minutes to
achieve an on-line state
• DX-Series will immediately accomplish an on-line state
Testing is now complete.
Uninstalling SNMP Integration Software 1
This section explains how to uninstall the library integration software
from your computer.
Uninstalling
Software from
Windows NT 4.0 1
To remove the library integration software using Windows NT 4.0:
1 Log into Windows NT with Administrator privileges.
2 Click Start, then point to Settings.
3 Click Control Panel.
Windows NT opens the
4 Double-click the Add/Remove Programs icon.
5 On the Install/Uninstall tab, select Quantum SNMP Integration with CA
Unicenter
6 Click Add/Remove.
7 Click Yes.
from the list of software that can be automatically removed.
Control Panel dialog box.
SNMP Integration Guide 11
Page 26

Chapter 1 Unicenter TND on Windows NT/2000
Troubleshooting
When the library integration software has been removed from your
computer, Windows NT displays the message,
completed
8 Click OK.
.
Uninstall successfully
Uninstalling
Software from
Windows 2000 1
To remove the library integration software using Windows 2000:
1 Log into Windows 2000 with Administrator privileges.
2 Click Start, then point to Settings.
3 Click Control Panel.
4 Double-click the Add/Remove Programs icon.
5 Select Quantum SNMP Integration with CA Unicenter from the list of
currently installed programs.
6 Click Change/Remove.
7 Click Yes.
Troubleshooting 1
The following troubleshooting information contains possible problems
and resolutions for Unicenter TND.
Problem: The “dscvrone” command did not perform as expected
(library was not discovered correctly). 1
Resolution: This problem may occur if you have added an SNMP
community name through the Community Management section of the
SNMP Configuration web page for your library. The community name
must also be defined in Unicenter TND. Refer to the Unicenter TND
documentation for information on how to use community names.
Note: If the community name is placed in Unplaced Objects, delete it
before running the
12 SNMP Integration Guide
dscvrone command.
Page 27

Chapter 2
2OpenView NNM on
Windows NT/2000
Overview 2
OpenView Network Node Manager (NNM) is one of the leading system
monitoring tools for the Windows NT and 2000 platforms. This network
management tool allows network administrators to graphically view
their networks and the nodes attached to the network. This allows the
system administrator to assess the health of these devices and take
corrective action if necessary.
In order for Quantum Libraries to display as actual library icons in the
network management software, you must install the SNMP Integration
Kit. The SNMP Integration Kit will:
• Load the Quantum Library MIB file
•Update the
• Copy the icon file
• Copy the symbol registration file
• Copy the application registration file
• Update the Events Table
oid_to_sym file for the Quantum Library object
SNMP Integration Guide 13
Page 28

Chapter 2 OpenView NNM on Windows NT/2000
System Requirements on Windows NT/2000
SNMP integration with OpenView NNM consists of the following tasks:
• Installing SNMP Integration Software
• Setting Up OpenView NNM
System Requirements on Windows NT/2000 2
The SNMP integration with OpenView NNM on NT/2000 requires the
following hardware and software components to run properly. These
include:
• Microsoft Windows NT or Windows 2000 (server or workstation),
installed and running
• Hard disk drive with at least 10 MB of available space
• CD-ROM drive
• Internet browser: Internet Explorer version 5.0 or 5.5, or Netscape
Communicator version 4.7x
• SNMP and SNMP trap service active and running
• OpenView NNM version 6.1 or above installed with SNMP traps
activated
Level of Security 2 The level of security required to integrate the library is the same level of
security required to install and operate OpenView NNM. This is typically
System Administrator (sa) level. The security entry is case sensitive.
Note: Before beginning, verify that SNMP service is running. To
verify, go to
14 SNMP Integration Guide
Start/Control Panel/Services.
Page 29

Chapter 2 OpenView NNM on Windows NT/2000
Installing SNMP Integration Software
Installing SNMP Integration Software 2
You may download the integration software from the Quantum
Customer Support Web site at
install it from the CD.
Note: Install OpenView NNM before installing the integration
software. If OpenView NNM is not installed, the integration
procedure will abort.
www.quantum.com/softwaredownloads or
Installing Software
from a CD 2
Figure 9 SNMP
Integration Installation
Dialog Box
To install the integration software from a CD:
1 Close the OpenView NNM application.
2 Insert the SNMP Integration CD into the CD-ROM drive of the
computer where the OpenView NNM software is installed.
If Autoplay is enabled, Windows automatically displays a dialog box
allowing you to select
NNM Integration
for installation (see figure 9).
CA Unicenter TND Integration or HP Openview
3
Click HP Openview Integration. The Welcome dialog box displays (see
figure 10
).
SNMP Integration Guide 15
Page 30

Chapter 2 OpenView NNM on Windows NT/2000
Installing SNMP Integration Software
Figure 10 Welcome
Dialog Box
4
Click Next on the Welcome dialog box.
The
Software License Agreement dialog box displays (see figure 11).
Figure 11 Software
License Agreement
Dialog Box
Read the Software License Agreement.
5
6 Click Yes on this dialog box to indicate that you accept the terms of
this agreement.
The
Setup Complete dialog box appears (see figure 12).
Note: If you click No on the Software License Agreement dialog
box, the wizard program terminates.
16 SNMP Integration Guide
Page 31

Figure 12 Setup
Complete Dialog Box
Chapter 2 OpenView NNM on Windows NT/2000
Duplicate IP Addresses
7 To display the readme.txt file, select the Yes, I want to view the
readme.txt
8 Click Finish.
9 Your library is now integrated with the OpenView NNM software.
check box.
Duplicate IP Addresses 2
As a final step in the SNMP integration with HP OpenView NNM, an
entry needs to be added to the HP OpenView nodiscover file. This entry
is necessary to ensure that the IP address of the second Ethernet port on
the PMC is not detected as a duplicate IP address when more than one
PMC is attached to a network. Before powering on the library containing
the PMC, perform the duplicate IP addresses procedure.
SNMP Integration Guide 17
Page 32

Chapter 2 OpenView NNM on Windows NT/2000
Setting Up OpenView NNM
To create duplicate IP addresses:
1 Determine the IP address of the PMC Ethernet port.
If the IP address of the PMC Ethernet port attached to the network
begins with anything other than the number 10, the IP address of the
second port is 10.0.0.254. Otherwise, the IP address of the second
Ethernet port is 192.168.0.254.
2 Create an ASCII file. Name and place it as follows:P
\HP Openview\NNM\conf\netmon.nodiscover
3 Add a line to the file containing only the IP address determined in
step 1
of this section.
For example, if the IP address of the second Ethernet port is
determined to be 10.0.0.254, then add the following line to the file:
10.0.0.254 #MC300 private network address.
Setting Up OpenView NNM 2
After the SNMP integration software is installed, set up OpenView NNM.
To set up OpenView NNM:
1 If OpenView NNM is running, shutdown, and restart OpenView
NNM. If OpenView NNM is not running, start OpenView NNM.
2 Navigate to the network where the library devices are located (see
figure 13
).
18 SNMP Integration Guide
Page 33

Figure 13 Subnet
Map
Chapter 2 OpenView NNM on Windows NT/2000
Setting Up OpenView NNM
The library node should display as an Quantum Library icon.
Changing Symbol
Type 2
If the library node does not display as an Quantum Library icon, change
the symbol type. To change the symbol type:
1 Right-click on the library object and select Change Symbol Type from
the pop-up menu.
The
Change Symbol Type dialog box displays (see figure 14).
SNMP Integration Guide 19
Page 34

Chapter 2 OpenView NNM on Windows NT/2000
Setting Up OpenView NNM
Figure 14 Change
Symbol Type Dialog
Box
2 Select Device in Symbol Classes and select the Quantum Library
symbol in
3 Click OK.
4 The Quantum Library node should change to an Quantum Library
Symbol Subclasses for Class Device (see figure 14).
icon. Once your icon displays properly, proceed with configuring the
status source and configuring the object attributes.
Configuring Status
Source 2
20 SNMP Integration Guide
To configure the status source:
1 Select the Quantum Library icon and right-click. Select Symbol
Properties from the pop-up menu.
Symbol Properties dialog box displays (see figure 15).
The
Page 35

Figure 15 Symbol
Properties Dialog Box
Chapter 2 OpenView NNM on Windows NT/2000
Setting Up OpenView NNM
Configuring
Object Attributes 2
Figure 16 Object
Properties Dialog Box
2
Change the status source to Object and click OK.
To configure library attributes:
1 Select the Quantum Library icon and right-click. Select Object
Properties
The
from the pop-up menu.
Object Properties dialog box displays (see figure 16).
SNMP Integration Guide 21
Page 36

Chapter 2 OpenView NNM on Windows NT/2000
Following Up: Testing the Library Icon
2
Select General Attributes and click Edit Attributes.
The
Attributes dialog box displays (see figure 17).
Figure 17 Attributes
Dialog Box
3 The attribute isHTTPSupported should be set to True. If not, select the
attribute to change the setting.
4 Click OK.
Your attributes are configured. The library icon will appear in the
map. The color and/or shape of the icon reflects the health of the
library. This allows the network administrator to take corrective
action if necessary.
Configure the SNMP subsystem of your library (see appendix A
).
Following Up: Testing the Library Icon 2
To test the library icon:
1 Turn library offline.
22 SNMP Integration Guide
Page 37

Chapter 2 OpenView NNM on Windows NT/2000
Uninstalling Library Integration Software
The Unavailable Trap Event dialog box displays the following
message:
to an unavailable state
2 Click Close. The library icon turns red.
3 Turn the library on-line.
Library_Name; The storage library has changed from an available
.
Once the library achieves the on-line state as observed on the library
front panel, the library icon on OpenView NNM map turns green
indicating the library is available.
• M-Series, P-Series, and PX720 may take up to 20 minutes to
achieve an on-line state
• DX-Series will immediately accomplish an on-line state
Testing is now complete.
Uninstalling Library Integration Software 2
Uninstalling
Software from
Windows NT 4.0 2
This section explains how to uninstall the library integration software
from your computer.
To remove the library integration software using Windows NT 4.0:
1 Log into Windows NT with Administrator privileges.
2 Click Start, then point to Settings.
3 Click Control Panel. Windows NT opens the Control Panel dialog box.
4 Double-click the Add/Remove Programs icon.
5 On the Install/Uninstall tab, select HP OpenView Integration from the
list of software that can be automatically removed.
6 Click Add/Remove.
7 Click Yes. When the library integration software has been removed
from your computer, Windows NT displays the message:
successfully completed.
8
Click OK.
SNMP Integration Guide 23
Uninstall
Page 38

Chapter 2 OpenView NNM on Windows NT/2000
Troubleshooting
Uninstalling
Software from
Windows 2000 2
To remove the library integration software using Windows 2000:
1 Log into Windows 2000 with Administrator privileges.
2 Click Start, then point to Settings.
3 Click Control Panel.
4 Double-click the Add/Remove Programs icon.
5 Select HP OpenView Integration from the list of currently installed
programs.
6 Click Change/Remove.
7 Click Yes.
T roubleshooting 2
The following troubleshooting information contains possible problems
and resolutions for OpenView NNM.
Problem: After rebooting the system, the library object reverts to the
generic device symbol. 2
Resolution: Reclassify the object (see Changing Symbol Type
Problem: Double-clicking the library object causes the object status
source to change to “symbol”. 2
Resolution: Change the source back to object (see Configuring Status
Source on page 20).
Problem: Library object color changes to blue. 2
Resolution: This does not impact library integration and no action is
necessary. When the library changes condition, the color will change
appropriately.
24 SNMP Integration Guide
on page 19).
Page 39

Chapter 3
3OpenView NNM on Solaris
Overview 3
OpenView Network Node Manager (NNM) is one of the leading system
monitoring tools for the Solaris platform. This network management tool
allows network administrators to graphically view their networks and
the nodes attached to the network. This allows the network administrator
to assess the health of these devices, as well as take corrective action if
necessary.
In order for Quantum Libraries to display as actual library icons in the
network management software, you must install the files included with
the SNMP Integration Kit. The SNMP Integration Kit will:
• Load the Quantum Library MIB file
•Update the oid_to_sym and oid_to_type files for the Quantum
Library object
• Copy the icon files
• Copy the symbol registration file
• Update the Events Table
SNMP Integration Guide 25
Page 40

Chapter 3 OpenView NNM on Solaris
System Requirements on Solaris
SNMP integration with OpenView NNM consists of the following tasks:
• Installing SNMP Integration Software
• Setting Up OpenView NNM
System Requirements on Solaris 3
The SNMP integration with OpenView NNM on Solaris requires the
following hardware and software components to run properly:
• Sun or UNIX workstation with Sun Solaris 2.6, 2.7, or 2.8
• 10 MB free space on one hard disk drive
• CD-ROM drive
• SNMP and SNMP trap service is active and running
• OpenView NNM on Solaris installed with SNMP traps activated
Level of Security 3 The level of security required to integrate the library is “root.”
Installing SNMP Integration Software 3
You may download the integration software from the Quantum
Customer Support Web site at
install it from the CD.
Note: Install OpenView NNM before installing the integration
software. If OpenView NNM is not installed, the integration
procedure will abort.
26 SNMP Integration Guide
www.quantum.com/softwaredownloads or
Page 41

Chapter 3 OpenView NNM on Solaris
Installing SNMP Integration Software
Installing Software
from a CD 3
Installation Output
Script 3
To install the integration software from a CD:
1 Close OpenView NNM.
2 Insert the SNMP Integration CD into the CD-ROM drive of the
computer where the OpenView NNM software is installed.
3 Mount the CD-ROM drive if it is not already mounted. Assuming
that the CD-ROM drive is mounted at
/cdrom/cdrom1, run the
following commands:
#cd /cdrom/cdrom1
#cd HPOpenview/solaris
#./install
Once you have run the install command, the following output displays:
This installation script will install SNMP library integration for HP OpenView
V1.0.2. Please close NNM before running this script. To Continue, press “C”.
To Cancel, press any key.
Sta rting installation...
Checking installation file...
Closing processes...
Loading MIB...
Saving files...
Current versions of files to be modified are saved in /tmp/ATLLIB
Updating oid_to_sym...
Updating oid_to_type...
Copying icon files...
Copying Symbol registration file...
Loading Events Table...
Restarting processes...
Quantum SNMP integration installation complete. Please restart NNM.
Your library is now integrated with OpenView NNM software.
SNMP Integration Guide 27
Page 42

Chapter 3 OpenView NNM on Solaris
Duplicate IP Addresses
Duplicate IP Addresses 3
As a final step in the SNMP integration with HP OpenView NNM, an
entry needs to be added the HP OpenView nodiscover file. This entry is
necessary to ensure that the IP address of the second Ethernet port on the
PMC is not detected as a duplicate IP address when more than one PMC
is attached to a network. Before powering on the library containing the
PMC, perform the duplicate IP addresses procedure.
To create duplicate IP addresses:
1 Determine the IP address of the PMC Ethernet port.
If the IP address of the PMC Ethernet port attached to the network
begins with anything other than the number 10, the IP address of the
second port is
Ethernet port is
2 Create an ASCII file. Name and place it as follows:
$OV_CONF/netmon.noDiscover
3 Add a line to the file containing only the IP address determined in
step 1
of this section.
10.0.0.254. Otherwise, the IP address of the second
192.168.0.254.
For example, if the IP address of the second Ethernet port is
determined to be
10.0.0.254 #MC300 private network address.
10.0.0.254, then add the following line to the file:
Setting Up OpenView NNM 3
After the SNMP integration software is installed, set up OpenView NNM.
To set up OpenView NNM:
1 If OpenView NNM is running, shutdown and restart OpenView
NNM.
If OpenView NNM is not running, start OpenView NNM. To run
OpenView NNM, type:
#opt/OV/bin/ovstart
#opt/OV/bin/ovw
28 SNMP Integration Guide
Page 43

Figure 18 Subnet
Map - Truncated View
Chapter 3 OpenView NNM on Solaris
Setting Up OpenView NNM
2
Navigate to the network where the library devices are located (see
figure 18
).
Configuring
Object Attributes 3
The library node should display as an Quantum Library icon.
To configure object attributes:
1 Click Edit on the menu and select Object Properties.
The
Object Properties window displays (see figure 19).
SNMP Integration Guide 29
Page 44

Chapter 3 OpenView NNM on Solaris
Setting Up OpenView NNM
Figure 19 Object
Properties Window
2
Select General Attributes and click View/Modify Object Attributes.
The
Figure 20 Object
Attributes Window
Attributes window displays (see figure 20).
Click True for the isHTTPSupported attribute.
3
4 Click OK.
Your attributes are now configured.
Configure the SNMP subsystem of your library (see appendix A
30 SNMP Integration Guide
).
Page 45

Chapter 3 OpenView NNM on Solaris
Following Up: Testing the Library Icon
Following Up: Testing the Library Icon 3
To test the library icon:
Note: Prior to conducting this test, verify that no library processes
are running.
1 Turn the library off.
The
Unavailable Trap Event window displays the following message:
Library_Name; Library has changed from available to unavailable.
2 Click Close.
The library icon turns red.
3 Turn the library on.
Once the library achieves the on-line state as observed on the library
front panel, the library icon on the OpenView NNM map turns green
indicating the library is available.
• M-Series, PX-Series, and PX720 may take up to 20 minutes to
achieve an on-line state
• DX-Series will immediately accomplish an on-line state
Testing is now complete.
Uninstalling Library Integration Software 3
This section explains how to uninstall the library integration software
from your computer.
SNMP Integration Guide 31
Page 46

Chapter 3 OpenView NNM on Solaris
Troubleshooting
Uninstalling
Software 3
Mount the CD-ROM drive if it is not already mounted. Assuming that the
CD-ROM drive is mounted at
commands:
#cd /cdrom/cdrom1
#cd HPOpenview/solaris
# ./uninstall
/cdrom/cdrom1, run the following
T roubleshooting 3
The following troubleshooting information contains possible problems
and resolutions for OpenView NNM.
Problem: Library object color changes to blue. 3
Resolution: This does not impact library integration and no action is
necessary. When the library changes condition, the color will change
appropriately.
32 SNMP Integration Guide
Page 47

Appendix A
AConfiguring the SNMP
Management Web Page
This section describes how to configure the SNMP Management Web
Page in Unicenter TND and OpenView NNM.
PX720 1
To configure the SNMP Management Web Page in Unicenter TND or
OpenView NNM:
1 Access the Library Home Page and configure the SNMP page.
• In Unicenter TND, from the
icon and click on
• In OpenView NNM, select the library node, click on
select
Web Browser, Server Home Page. The default browser
launches and displays the
2 A password dialog box displays.
Enter your administrator or operator user name and password and
click
OK.
3 Click on Setup, then Events.
The Events page displays (see figure 22
SNMP Integration Guide 33
Library Home page from the pop-up menu.
2-D Map, right-click on the library
Too ls and
Library Home page.
)..
Page 48

Appendix A Configuring the SNMP Management Web Page
PX720
4 Scroll down to the SNMP section of the Events page (see figure 22).
Figure 21 PX720
SNMP Configuration
Section
5 In the Generate SNMP Trap on these Event Types section, make the
following changes:
a Enable traps as desired.
All traps may be enabled.
6 Click
34 SNMP Integration Guide
Save to save your changes.
Page 49

Appendix A Configuring the SNMP Management Web Page
P-Series and M-Series
7 In the Trap Destination section, enter the IP address where Unicenter
TND or OpenView NNM is running.
Note: At least one trap destination must be specified.
SNMP integration is complete.
P-Series and M-Series 1
To configure the SNMP Management Web Page in Unicenter TND or
OpenView NNM:
1 Access the Library Home Page and configure the SNMP page.
• In Unicenter TND, from the
icon and click on
Library Home page from the pop-up menu.
• In OpenView NNM, select the library node, click on
select
Web Browser, Server Home Page. The default browser
launches and displays the
2 On the
Configuration
Library Home page, in the navigation bar click on SNMP
in the ALERT SNMP section.
2-D Map, right-click on the library
Too ls and
Library Home page.
A password dialog box displays.
3 Enter your administrator or operator user name and password and
click
OK.
The
SNMP Configuration page displays (see figure 22).
SNMP Integration Guide 35
Page 50

Appendix A Configuring the SNMP Management Web Page
P-Series and M-Series
Figure 22 SNMP
Configuration Page
4 In the View/Change SNMP Configuration section, make the following
changes:
a In the
Library Name box, enter the library name.
Note: The library name must not contain any spaces.
b In the
c Enable
Location box, enter the library’s location.
Available Traps and Unavailable Traps.
d Enable other traps as desired.
36 SNMP Integration Guide
Page 51

Appendix A Configuring the SNMP Management Web Page
DX-Series
e In the Trap Destination field, enter the IP address where the
OpenView NNM is running.
Note: At least one trap destination must be specified.
5 Click
Apply to save your changes.
SNMP integration with OpenView NNM is complete.
DX-Series 1
To configure the SNMP Management Web Page in Unicenter TND or
OpenView NNM:
1 Access the Library Home Page and configure the SNMP page.
• In Unicenter TND, from the
icon and click on
Library Home page from the pop-up menu.
• In OpenView NNM, select the library node, click on
select
Web Browser, Server Home Page.
2 A password dialog box displays.
Enter your administrator or operator user name and password and
click
OK.
The Home page displays.
3 Click on
Remote Alerts, then SNMP.
2-D Map, right-click on the library
Too ls and
The SNMP page displays (see figure 23
SNMP Integration Guide 37
)..
Page 52

Appendix A Configuring the SNMP Management Web Page
DX-Series
Figure 23 DX-Series
SNMP Page
4 In the Trap Selection section, make the following changes:
a Enable
Library Available and Library Unavailable traps.
b Enable other traps as desired.
c Click
5 In the
Apply to save your changes.
Trap Destination field, enter the IP address where Unicenter
TND or OpenView NNM is running.
Note: At least one trap destination must be specified.
6 With the
Send in the Tes t S N M P section.
Information trap is enabled, test the SNMP trap by clicking
SNMP integration is complete.
38 SNMP Integration Guide
Page 53

Glossary
A Autoplay A Windows option that provides a software response to
hardware actions initiated by the user on the machine, such as the
appearance of SNMP integration installation screens.
B banner frame The Web browser frame that extends across the top
of the screen. It displays the corporate logo and software name.
C Cancel button. Discards changes to the properties and attributes of
a page or dialog box and closes it.
community name An SNMP community name is the assigned
name of a logical management domain on a network. The
community name is used as a selector by the agent to specify the
access to local or remote management information and the context
of the management information. The names “public” and
“private” are common default community names.
D default gateway The default gateway is the IP address of the
system through which IP packets will be routed if the system at the
source address cannot communicate directly with the system at the
destination address.
SNMP Integration Guide 39
Page 54

domain In the Internet, a part of the naming hierarchy identifying
a network or subnet. Syntactically, a domain name consists of a
sequence of names (labels) separated by periods (dots).
EEthernet A local-area network protocol using high-speed
communications at 10, 100, or 1000 megabits per second.
F frame A distinct and separate section of a Web page, commonly
divided into a banner frame, a navigation frame, and a
management frame. The banner frame commonly displays title
information. The navigation frame commonly displays headings
which are linked to informational pages that display in the
management frame.
H hostname The name of the server computer to which the library is
attached.
I IP address. The IP (Internet Protocol) address for the system. This
is a 32-bit binary numeric address written as four decimal numbers
separated by periods. For example, the binary address
11001111.11010011.11100000.00111011 is written as 207.211.224.59.
K key A field used to sort data in database management systems.
L LAN Local Area Network. A network that connects computers
that are close to each other, usually in the same building, linked by
a cable.
logical view A logical, or hierarchical, representation of the library
that shows the tape drives, storage bins, and load ports together
with their partition owners.
M Management Console Web-based interface that allows authorized
staff to configure and manage all storage options from behind a
firewall or remotely from anywhere on the Internet.
management frame The Web browser frame on the right of the
screen which displays the active page.
40 SNMP Integration Guide
Page 55

MIB Management Information Base. A hierarchical collection of
objects that can be accessed via an SNMP management protocol.
N navigation frame The Web browser frame on the left of the screen
which displays a list of the Management Console Web pages.
Node A device with a direct point of access to a network.
O offline Ready for communication with a diagnostic computer.
OK button Commits changes made to a dialog box and closes it.
online Ready for communications with a host.
P page properties The display and configuration attributes of a
page.
partition A division of a disk or storage area. A library partition is
a “virtual library” consisting of a designated portion of a larger
physical library.
physical view A graphical representation of the library that shows
the tape drives, storage bins, and load ports together with their
partition owners.
PMC Prism Management Card
R reboot The process of restarting a computer so the operating
system is reloaded.
Reset button Returns the values in a dialog box to the default, or
previously saved, values.
restart The process of restarting a computer without reloading the
operating system.
SSNMP Simple Network Management Protocol. The Internet
standard protocol that provides network management service.
SNMP works by sending messages, called protocol data units
(PDUs), to different parts of a network. SNMP-compliant devices,
called agents, store data about themselves in Management
SNMP Integration Guide 41
Page 56

Information Bases (MIBs) and return this data to the SNMP
requesters.
Status Icon The status icon is located on the Home Page. It
indicates the library status by the background color of the icon.
Ttrap A program interrupt, usually caused by some exceptional
situation in the user program. In most cases, the user performs
some action, then returns control to the program.
U URL Uniform Resource Locator. A server address used by clients,
such as Web browsers, to access information over the network
using HTTP and other protocols.
W Web browser A client application that renders HTML code in a
Graphical User Interface (GUI) and uses HTTP and other Internet
protocols to communicate with Web servers. For example,
Netscape Navigator and Internet Explorer are Web browsers.
42 SNMP Integration Guide
Page 57

Index
I
Integration software installation
OpenView NNM 15
Unicenter TND
Internet browser
Microsoft Internet Explorer
IP Addresses
5
17
L
Level of Security
OpenView NNM
Levels of security
Unicenter TND
14
2
M
Microsoft 2
Microsoft Internet Explorer 2
O
OpenView NNM
setup 18
system requirements
Windows 2000
2
Windows NT 14
14
14
P
Pre-Installation 4
R
Repository name 7
S
Security levels 2
SNMP Integration Guide 43
Page 58

SNMP traps
activating
Software License Agreement
OpenView NNM
Unicenter TND
System requirements
OpenView NNM with Solaris
OpenView NNM with Windows
Unicenter TND with Windows
3
NT/2000 14
NT/2000
2
16
6
26
T
Testing
library icon 10
Troubleshooting
OpenView NNM on Solaris
OpenView NNM on Windows 24
SNMP Integration
12
32
U
Unicenter TND
settings (Window)
setup 8
system requirements (Windows)
Uninstalling Library Integration
Software 11
44 SNMP Integration Guide
3
2
 Loading...