

Page 1

User's Guide User's GuideUser's Guide User's Guide
StorNext
StorNext
®
3.0
6-01658-01
Page 2

StorNext User’s Guide, 6-01658-01, Ver. A, Rel. 3.0, March 2007, Made in USA.
Quantum Corporation provides this publication “as is” without warranty of any kind, either express or implied,
including but not limited to the implied warranties of merchantability or fitness for a particular purpose. Quantum
Corporation may revise this publication from time to time without notice.
COPYRIGHT STATEMENT
Copyright 2007 by Quantum Corporation. All rights reserved.
StorNext copyright (c) 1991-2007 Advanced Digital Information Corporation (ADIC), Redmond, WA, USA. All rights
reserved.
Your right to copy this manual is limited by copyright law. Making copies or adaptations without prior written
authorization of Quantum Corporation is prohibited by law and constitutes a punishable violation of the law.
TRADEMARK STATEMENT
Quantum, DLT, DLTtape, the Quantum logo, and the DLTtape logo are all registered trademarks of Quantum
Corporation.
SDLT and Super DLTtape are trademarks of Quantum Corporation.
Other trademarks may be mentioned herein which belong to other companies.
Page 3

Contents
Chapter 1 Introduction 1
About StorNext File System...................................................................... 1
About StorNext Storage Manager............................................................ 1
About Distributed LAN Clients ............................................................... 2
Purpose of This Guide....................................................................................... 3
How This Guide is Organized ......................................................................... 3
Notes, Cautions, and Warnings....................................................................... 4
Document Conventions .................................................................................... 5
Chapter 2 StorNext GUI Overview 6
Accessing the StorNext GUI............................................................................. 6
The StorNext Home Page ................................................................................. 9
System Monitors ......................................................................................... 9
StorNext Home Page Drop-Down Menus ............................................ 13
StorNext System Status............................................................................ 16
StorNext Server Status ............................................................................. 17
Home and Help Links.............................................................................. 17
Application Link....................................................................................... 18
The SNFS and SNSM Home Pages................................................................ 18
The SNFS Home Page .............................................................................. 19
SNFS Home Page Drop-Down Menus .................................................. 19
StorNext User’s Guide i
Page 4

The SNSM Home Page...............................................................21
SNSM Home Page Drop-Down Menus...................................21
The Configuration Wizard................................................................24
Chapter 3 SNFS-Only GUI Overview 27
Accessing the SNFS GUI...................................................................27
The SNFS Home Page........................................................................29
The File System Monitor............................................................29
Drop-down Menus and Options ..............................................31
Shortcut Menu Options..............................................................33
Home and Help Links................................................................34
StorNext Server Status ...............................................................34
The SNFS Configuration Wizard.....................................................35
Chapter 4 Common StorNext Tasks 37
Entering the StorNext License..........................................................37
Entering a License String in the .dat File.................................44
Controlling User Access....................................................................45
Changing the Admin Password ...............................................46
Adding a New User....................................................................48
Modifying an Existing User ......................................................50
Deleting an Existing User ..........................................................51
Starting and Stopping StorNext Components ...............................51
Accessing StorNext Logs ..................................................................53
Scheduling StorNext Events.............................................................56
Viewing a Schedule ....................................................................57
Adding a New Schedule............................................................58
Modifying an Existing Schedule...............................................61
Deleting an Existing Schedule ..................................................62
Resetting a Schedule...................................................................63
Setting Up E-mail Notification.........................................................64
Cancelling SNSM Requests ..............................................................69
ii StorNext User’s Guide
Page 5

Chapter 5 Backing Up StorNext 71
Types of StorNext Software Backups............................................................ 71
Setting up Email Notification For Backup ............................................72
Performing a StorNext Software Backup ..................................................... 73
Managing the Backup Policy.......................................................................... 74
Chapter 6 Managing the File System 77
Working With File Systems............................................................................77
Adding a File System ............................................................................... 78
Creating a File System From SNFS ........................................................ 86
Modifying a File System .......................................................................... 88
Deleting a File System.............................................................................. 89
Managing File System Operations ................................................................ 90
Disk Device Labeling ............................................................................... 90
Making Global Changes .......................................................................... 95
Working with the fsnameservers File.................................................... 99
Making or Unmaking a File System..................................................... 100
Starting and Stopping the File System................................................. 102
Mounting or Unmounting a File System............................................. 103
Working With Disks ......................................................................................104
Adding Disks........................................................................................... 104
Deleting Disks ......................................................................................... 106
Defragmenting a Disk ............................................................................ 107
Working With Stripe Groups ....................................................................... 107
Adding a Stripe Group .......................................................................... 108
Modifying a Stripe Group .....................................................................112
Deleting a Stripe Group.........................................................................115
Working With Affinities ...............................................................................115
Adding an Affinity ................................................................................. 116
Adding an Affinity Through SNSM .................................................... 122
Setting the Affinity in a Directory ........................................................124
Modifying an Affinity ............................................................................ 126
Deleting an Affinity................................................................................ 127
File System Configuration Restrictions ............................................... 128
Performing a Metadata Dump.....................................................................128
Using the SNSM File System Functions ..................................................... 129
Storing Files .............................................................................................130
Changing a File Version.........................................................................132
Recovering a File..................................................................................... 133
Recovering a Directory .......................................................................... 134
StorNext User’s Guide iii
Page 6

Retrieving a File ........................................................................135
Retrieving a Directory..............................................................136
Freeing Disk Blocks ..................................................................137
Moving Files to New Media....................................................139
Modifying a File’s Attributes ..................................................140
Understanding Dynamic Resource Allocation............................141
About File System Expansion .................................................141
About Stripe Group Movement..............................................142
Expansion and Movement Steps ............................................142
Checking the File System................................................................143
Performing File System Expansion ...............................................145
Performing Stripe Group Movement............................................152
Launching the Movement Wizard .........................................153
Completing Metadata Stripe Group Movement ..................161
Reusing a Stripe Group After a Move ...................................162
Chapter 7 Managing Libraries 163
Adding a Library..............................................................................164
Starting the Add Library Wizard ...........................................164
Adding a SCSI Library.............................................................167
Adding an ACSLS Network Library......................................171
Adding a DAS Network Library ............................................172
Adding a Vault Library............................................................176
Modifying a Library ........................................................................177
Deleting a Library ............................................................................178
Auditing a Library ...........................................................................179
Changing the Library State.............................................................181
Chapter 8 Managing Drives and Disks 182
Working with Tape Drives .............................................................182
Adding a Tape Drive................................................................183
Modifying a Tape Drive...........................................................189
Deleting a Tape Drive ..............................................................190
Changing a Drive State ............................................................191
Cleaning a Tape Drive..............................................................192
Working with Drive Pools..............................................................193
Adding a Drive Pool.................................................................193
Modifying a Drive Pool ...........................................................195
iv StorNext User’s Guide
Page 7

Deleting a Drive Pool ...............................................................197
Managing Disk Space ......................................................................198
Changing Watermark Parameters.................................................199
Chapter 9 Managing Media 201
Adding Media to a Configured Library ..................................................... 201
Adding a Vault........................................................................................207
Removing and Moving Media ..................................................................... 210
Removing Media.....................................................................................210
Moving Media......................................................................................... 215
Using the SNSM Media Functions .............................................................. 218
Moving Media Manually.......................................................................219
Mounting and Dismounting Media..................................................... 221
Adding Media Types to a Policy Class................................................ 222
Removing Media From the Storage Manager .................................... 223
Moving Blank Media.............................................................................. 224
Transcribing Media ................................................................................225
Changing Media Attributes...................................................................227
Reclassifying a Media Class Grouping................................................228
Cleaning Media....................................................................................... 230
Cancelling the Eject Media Process......................................................231
Chapter 10 Managing Storage Disks 232
Storage Disk Deduplication..........................................................................233
Adding a Storage Disk .................................................................................. 234
Modifying a Storage Disk ............................................................................. 238
Deleting a Storage Disk................................................................................. 239
Changing a Storage Disk State.....................................................................240
Cleaning a Storage Disk................................................................................ 242
Chapter 11 Data Migration Management 244
Policy Classes and Relationships................................................................. 245
Stub Files .................................................................................................. 245
Disk-to-Disk Relocation ......................................................................... 246
StorNext User’s Guide v
Page 8

Adding a Storage Policy..................................................................246
Adding a Policy Class Through SNSM Without a Relation
Point.....................................................................................253
Adding a Relation Point to a Policy Class.............................258
Modifying a Policy Class ................................................................260
Deleting a Policy Class ....................................................................260
Adding Media to a Policy Class.....................................................262
Applying a Policy Class ..................................................................263
Chapter 12 StorNext Reports 264
SNFS Reports.............................................................................265
The Backup Information Report ....................................................266
The Drive State Information Report..............................................267
The File Information Report...........................................................269
The Library Information Report ....................................................272
The Library Space Used Report .....................................................274
The Media Information Report ......................................................275
The Media Class Information Report............................................280
The Policy Class Information Report ............................................283
The Relation Information Report...................................................286
The Request Information Report ...................................................288
The Scheduler Information Report................................................289
The Storage Disk Information Report...........................................291
The Directory Affinity Report........................................................294
The File System Statistics Report...................................................297
The Stripe Group Statistics Report................................................299
The File System Client Report........................................................301
The File System LAN Client Report..............................................305
Chapter 13 Service Management 308
Using Health Check.........................................................................308
Running a Health Check..........................................................309
Viewing the Health Check History ........................................309
Viewing the Health Check Results.........................................311
vi StorNext User’s Guide
Page 9

Using State Capture.......................................................................................312
Capturing the Current System State ....................................................312
Downloading a Previous System Capture..........................................313
Deleting a Previous System Capture ................................................... 314
Using the System Status Tool....................................................................... 314
Chapter 14 Customer Assistance 319
Quantum Technical Assistance Center.......................................................319
Appendix A HA Failover 320
Appendix B Using The Command Line Interface 322
Labeling Disk Devices................................................................................... 323
Modifying Global Settings............................................................................ 324
Making a File System .................................................................................... 326
Starting and Stopping SNFS......................................................................... 327
Unmounting or Mounting a File System.................................................... 328
Creating a File System Server....................................................................... 329
Adding a File System Client......................................................................... 331
Configuring a Stripe Group..........................................................................332
Adding an Affinity ........................................................................................333
Creating a Disk-to-Disk Policy Class .......................................................... 335
Modifying a Disk-to-Disk Policy Class................................................ 336
Manual Disk-to-Disk Relocation .......................................................... 336
Enabling Stub File Support........................................................................... 337
Managing Storage Disks with Deduplication Enabled ............................ 338
Adding a Dedup Sdisk........................................................................... 338
Modifying a Dedup Sdisk...................................................................... 338
Deleting a Dedup Sdisk .........................................................................338
Obtaining Dedup Sdisk Information ................................................... 339
Obtaining Distributed LAN Client Information ....................................... 340
The proxy Command ............................................................................. 340
The proxy long Command ....................................................................340
The proxy who Command .................................................................... 341
Using the Dynamic Resource Allocation Feature .....................................341
Checking the File System....................................................................... 342
StorNext User’s Guide vii
Page 10

Adding a Stripe Group Without Moving..............................342
Adding and Moving a Data Stripe Group ............................343
Moving a Metadata/Journal Stripe Group...........................344
Appendix C RAS Messages 347
Media and Drive RAS Messages....................................................347
SNFS RAS Messages........................................................................361
Other RAS Messages .......................................................................371
viii StorNext User’s Guide
Page 11
Figures
Figure 1 StorNext Login Window ............................................................. 7
Figure 2 StorNext Home Page ................................................................... 8
Figure 3 File System Monitor................................................................... 10
Figure 4 Library Monitor.......................................................................... 11
Figure 5 Storage Disk Monitor................................................................. 12
Figure 6 Service - System Status screen.................................................. 17
Figure 7 Application Link ........................................................................ 18
Figure 8 SNFS Home Page ....................................................................... 19
Figure 9 SNSM Menu................................................................................ 22
Figure 10 StorNext Configuration Wizard............................................... 25
Figure 11 Config Menu Options................................................................ 26
Figure 12 StorNext File System Login Window...................................... 28
Figure 13 SNFS Home Page ....................................................................... 29
Figure 14 File System Monitor................................................................... 30
Figure 15 File System Menus ..................................................................... 31
Figure 16 Start/Stop SNFS Screen............................................................. 34
Figure 17 Complete Start/Stop SNFS Screen .......................................... 35
StorNext User’s Guide ix
Page 12

Figure 18 SNFS Configuration Wizard Screen ..........................36
Figure 19 Enter License Introduction Screen .............................39
Figure 20 Quantum License Agreement.....................................40
Figure 21 Enter License Strings Screen.......................................41
Figure 22 Complete Enter License Screen (Temporary)...........42
Figure 23 License Reminder .........................................................42
Figure 24 Complete Enter License Screen (Permanent) ...........44
Figure 25 License String Example ...............................................45
Figure 26 User Access Control Screen ........................................46
Figure 27 <Modify User Screen ...................................................47
Figure 28 Add New User Screen ................................................48
Figure 29 Modify User Screen......................................................50
Figure 30 Start/Stop StorNext Screen.........................................52
Figure 31 Complete Start/Stop StorNext Task Screen .............53
Figure 32 Select Log Screen ..........................................................54
Figure 33 Select File Screen...........................................................55
Figure 34 Log File Example..........................................................56
Figure 35 Feature Schedules Screen ............................................58
Figure 36 Feature Schedules Screen 2 .........................................59
Figure 37 Add Feature Schedules Screen ...................................60
Figure 38 Configure E-mail Notification Screen .......................65
Figure 39 Configure SMTP E-mail Screen..................................66
Figure 40 Configure E-mail Addresses Screen ..........................67
Figure 41 Complete E-mail Configuration Screen ....................68
Figure 42 Cancel Request Screen .................................................69
Figure 43 Backup StorNext Screen ..............................................73
Figure 44 Complete Backup Task Screen ...................................74
Figure 45 Backup Policy Screen...................................................75
Figure 46 File System - Introduction Screen ..............................78
x StorNext User’s Guide
Page 13

Figure 47 Add New File System Screen ................................................... 79
Figure 48 Directory Browser Window...................................................... 80
Figure 49 Select Directory Window .......................................................... 80
Figure 50 Disk Settings Screen...................................................................81
Figure 51 Customize Stripe Group Screen ............................................... 83
Figure 52 Label Help Screen....................................................................... 84
Figure 53 Complete FIle System Task Screen .......................................... 86
Figure 54 Configure File System Screen................................................... 87
Figure 55 Label Disk Device Screen .......................................................... 91
Figure 56 VTOC Message ........................................................................... 92
Figure 57 Labeling Warning....................................................................... 92
Figure 58 Explorer User Prompt................................................................ 93
Figure 59 Data Loss Warning..................................................................... 93
Figure 60 Unlabel Warning ........................................................................94
Figure 61 Modify Global Settings Screen ................................................. 96
Figure 62 Make File System Screen......................................................... 101
Figure 63 Start or Stop File System Screen............................................. 102
Figure 64 Mount or Unmount File System Screen ................................ 103
Figure 65 Manage Disks Screen ............................................................... 105
Figure 66 Add Disk Screen....................................................................... 105
Figure 67 Configure Stripe Group Screen .............................................. 109
Figure 68 Add Stripe Group Screen ........................................................110
Figure 69 Modify Stripe Group Screen................................................... 113
Figure 70 Add Affinity Introduction Screen.......................................... 117
Figure 71 Add Affinity Screen ................................................................. 118
Figure 72 Select Directory Screen ............................................................119
Figure 73 Assign Affinity Screen............................................................. 120
Figure 74 Exclusive Stripe Group Screen ............................................... 121
Figure 75 Complete Add Affinity Task Screen...................................... 122
StorNext User’s Guide xi
Page 14

Figure 76 Add, Modify, or Delete Affinities Screen................123
Figure 77 Add Affinity Screen ...................................................123
Figure 78 Set Affinity Screen......................................................125
Figure 79 Set Affinity Screen......................................................125
Figure 80 Modify Affinity Screen ..............................................126
Figure 81 Metadata Dump of File System Screen ...................129
Figure 82 Store Files Screen........................................................130
Figure 83 Optional Store Parameters Screen............................131
Figure 84 Change File Version Screen ......................................132
Figure 85 Recover Files Screen...................................................133
Figure 86 StorNext Recoverable Files Screen...........................134
Figure 87 Recover Directory Screen ..........................................135
Figure 88 Retrieve Files Screen ..................................................136
Figure 89 Retrieve Directory Screen..........................................137
Figure 90 Free Disk Blocks Screen.............................................138
Figure 91 Move Files to New Media Screen.............................139
Figure 92 Modify File Attributes Screen...................................140
Figure 93 Check File System Screen..........................................143
Figure 94 Check File System Status Screen ..............................145
Figure 95 File System Expansion Introduction Screen ...........147
Figure 96 Check File System Reminder....................................147
Figure 97 Data Stripe Group Selection Screen.........................148
Figure 98 Metadump Warning ..................................................149
Figure 99 New Data Stripe Group Screen ................................150
Figure 100 Complete File System Task Screen ..........................151
Figure 101 Move Stripe Group Screen........................................154
Figure 102 Move Stripe Group Introduction Screen.................155
Figure 103 Move Options Screen.................................................156
Figure 104 Data Stripe Group Move Screen...............................157
xii StorNext User’s Guide
Page 15

Figure 105 No Writable Stripe Groups Warning.................................... 157
Figure 106 Destination Stripe Group Too Small Warning..................... 158
Figure 107 Metadata Stripe Group Message............................................ 158
Figure 108 Metadata/Journal Move Screen............................................. 159
Figure 109 Complete Stripe Group Move Screen.................................... 160
Figure 110 Process Initiated Status Screen ...............................................161
Figure 111 Stripe Group Move Status Screen .......................................... 162
Figure 112 Library Introduction Screen.................................................... 165
Figure 113 Library Type Screen ................................................................. 166
Figure 114 Library Name Screen ............................................................... 167
Figure 115 Media Types Screen ................................................................. 168
Figure 116 SCSI Device Screen................................................................... 169
Figure 117 Complete Add Library Task Screen ...................................... 170
Figure 118 ACSLS Library Name Screen..................................................171
Figure 119 DAS Configuration Screen......................................................172
Figure 120 DAS Library Name Screen...................................................... 173
Figure 121 DAS Media Types Screen........................................................ 174
Figure 122 DAS 2 Library Name Screen................................................... 175
Figure 123 Vault Library Name Screen .................................................... 176
Figure 124 Configure Library Screen........................................................177
Figure 125 Modify SCSI Library Screen.................................................... 178
Figure 126 Audit Library Screen................................................................ 180
Figure 127 Change Library State Screen................................................... 181
Figure 128 Tape Drive Introduction Screen ............................................. 183
Figure 129 Associated Library Screen.......................................................184
Figure 130 Hardware Devices Screen ....................................................... 185
Figure 131 Complete Add Drive Task Screen.......................................... 186
Figure 132 Match Devices with Slots Screen............................................187
Figure 133 Tape Drive Mapping Help Screen ......................................... 188
StorNext User’s Guide xiii
Page 16

Figure 134 Configure Drives Screen............................................189
Figure 135 Modify Drive Screen ..................................................190
Figure 136 Delete Warning Window ..........................................191
Figure 137 Change Drive State Screen........................................191
Figure 138 Clean Drive Screen.....................................................192
Figure 139 Configure Drive Pools Screen...................................194
Figure 140 Add New Drive Pool Screen.....................................194
Figure 141 Warning Message Window.......................................195
Figure 142 Modify Drive Pool Screen .........................................196
Figure 143 Restart Message Window..........................................196
Figure 144 Delete Warning Message...........................................197
Figure 145 Manage Disk Space Screen........................................198
Figure 146 Change Watermark Parameters Screen...................200
Figure 147 Add Media - Introduction Screen ............................202
Figure 148 Associated Library Screen.........................................203
Figure 149 Associated Library Screen 2......................................204
Figure 150 Select Mailbox Screen ................................................205
Figure 151 Complete Add Media Task Screen ..........................206
Figure 152 Select Media Type Screen..........................................207
Figure 153 Add Media IDs Screen...............................................208
Figure 154 Create New Media ID Screen ...................................209
Figure 155 Remove or Move Media Screen................................210
Figure 156 Select Media Screen....................................................211
Figure 157 StorNext Media Browser Screen ..............................212
Figure 158 Complete Remove/Move Media Task Screen .......213
Figure 159 Library Operator Interface Screen ...........................214
Figure 160 LOI Eject Screen..........................................................214
Figure 161 Select Destination Library Screen ............................216
Figure 162 Library Operator Interface Screen ...........................217
xiv StorNext User’s Guide
Page 17

Figure 163 LOI Enter Screen....................................................................... 218
Figure 164 Move Files to New Media Screen........................................... 219
Figure 165 Media Browser Screen ............................................................. 220
Figure 166 Mount Media Screen................................................................221
Figure 167 Dismount Media Screen .......................................................... 222
Figure 168 Add Media Screen....................................................................223
Figure 169 Remove Media From SNSM Screen....................................... 224
Figure 170 Move Blank Media Screen....................................................... 225
Figure 171 Transcribe Media Screen ......................................................... 226
Figure 172 Change Media Attributes Screen ........................................... 227
Figure 173 Reclassify Media Screen .......................................................... 228
Figure 174 Media Class Browser Window............................................... 229
Figure 175 Clean Media Screen.................................................................. 230
Figure 176 Cancel Eject Process Screen..................................................... 231
Figure 177 Configure Storage Disk Screen............................................... 234
Figure 178 Add Storage Disk - Introduction Screen ............................... 235
Figure 179 Add Storage Disk Screen.........................................................236
Figure 180 Complete Storage Disk Screen ............................................... 237
Figure 181 Modify Storage Disk Screen.................................................... 238
Figure 182 Delete Warning Message......................................................... 240
Figure 183 Change Storage Disk State Screen ......................................... 241
Figure 184 Clean Storage Disk Screen....................................................... 242
Figure 185 Storage Policy Introduction Screen........................................ 247
Figure 186 Policy Class and Directory Screen ......................................... 248
Figure 187 Directory Browser Window.................................................... 249
Figure 188 Relocation Policy Selection Screen......................................... 250
Figure 189 Store, Truncate, and Relocate Times Screen......................... 251
Figure 190 Number of File Copies and Media Type Screen .................. 252
Figure 191 Complete Storage Policy Task Screen ................................... 253
StorNext User’s Guide xv
Page 18

Figure 192 Manage Policy Classes Screen..................................254
Figure 193 Add Policy Class Screen............................................254
Figure 194 Modify Parameters Screen ........................................255
Figure 195 Manage Policy Class Relationships Screen.............258
Figure 196 Add Relationship Screen...........................................259
Figure 197 Directory Browser Window......................................259
Figure 198 Remove Relationships Screen...................................261
Figure 199 Add Media Screen......................................................262
Figure 200 Backup Information Report ......................................266
Figure 201 Drive States Report Screen........................................268
Figure 202 Drive State Information Report................................269
Figure 203 Files Report Screen .....................................................270
Figure 204 StorNext File Browser Screen ...................................271
Figure 205 FIle Information Report.............................................272
Figure 206 Libraries Report Screen .............................................273
Figure 207 Library Information Report ......................................274
Figure 208 Library Space Used Report .......................................275
Figure 209 Media Report Screen..................................................277
Figure 210 Media Browser screen................................................278
Figure 211 Media Information Report ........................................279
Figure 212 Detailed Media Information Report........................280
Figure 213 Media Class Report Screen .......................................281
Figure 214 Media Class Information Report..............................282
Figure 215 Policy Classes Report Screen ....................................285
Figure 216 Policy Class Information Report ..............................286
Figure 217 Directory/Policy Class Relationships Report
Screen.................................................................................................287
Figure 218 Relation Information Report.....................................288
Figure 219 Request Report Screen...............................................289
xvi StorNext User’s Guide
Page 19

Figure 220 Scheduler Report Screen..........................................................290
Figure 221 Scheduler Information Report................................................ 291
Figure 222 Storage Disk Report Screen..................................................... 293
Figure 223 Storage Disk Information Report ........................................... 294
Figure 224 Affinities Report Screen........................................................... 295
Figure 225 Directory Browser Screen........................................................296
Figure 226 Directory Affinity Report ........................................................296
Figure 227 File System Report Screen....................................................... 298
Figure 228 File System Statistics Report ................................................... 299
Figure 229 Stripe Groups Report Screen .................................................. 300
Figure 230 Stripe Group Statistics Report ................................................ 301
Figure 231 File System Client Report Screen ........................................... 303
Figure 232 File System Client Report........................................................ 304
Figure 233 File System Distributed LAN Client Statistics Report
Screen............................................................................................................... 306
Figure 234 File System LAN Client Report.............................................. 307
Figure 235 Health Check Tests Screen...................................................... 309
Figure 236 Health Check History Screen.................................................. 310
Figure 237 Health Check Results Screen ..................................................311
Figure 238 Capture System State Screen ..................................................312
Figure 239 Download Capture File Screen............................................... 313
Figure 240 Service - System Status Screen................................................ 315
Figure 241 RAS Ticket Details Screen ....................................................... 316
Figure 242 Recommended Actions Screen...............................................318
Appendix Figures
Figure 1 No Media Found RAS..............................................................348
Figure 2 Possible Drive/Media Mount Discrepancy RAS................. 349
Figure 3 Tape Drive Alerts RAS part 1 ................................................. 350
StorNext User’s Guide xvii
Page 20

Figure 4 Tape Drive Alerts RAS part 2 ...................................351
Figure 5 Tape Drive Alerts RAS part 3 ...................................352
Figure 6 Drive Reported Drive Error RAS .............................353
Figure 7 Cleaning of Drive Failed RAS...................................354
Figure 8 Wrong Firmware Level/Invalid Drive Type
RAS.....................................................................................................354
Figure 9 Drive Removed RAS..................................................355
Figure 10 Tape Drive -Configuration Failed RAS...................355
Figure 11 Tape Drive - Reported Media Error RAS................356
Figure 12 Cleaning Media Expired RAS...................................356
Figure 13 No Cleaning Media Available RAS .........................357
Figure 14 Media Suspect Threshold Count Exceeded RAS...357
Figure 15 Media Format Failure RAS .......................................358
Figure 16 Invalid Media Label Detected RAS..........................359
Figure 17 Media Not Found RAS ..............................................360
Figure 18 Duplicate Physical Media Found RAS....................360
Figure 19 Storage Disk Taken Offline RAS ..............................361
Figure 20 Configuration Not Supported RAS .........................362
Figure 21 Label Validation Failure RAS ...................................362
Figure 22 Connection Rejected RAS..........................................363
Figure 23 File System Failover RAS ..........................................363
Figure 24 I/O Error RAS.............................................................364
Figure 25 Journaling Error Detected RAS ................................364
Figure 26 SNFS License Required RAS.....................................365
Figure 27 SNFS License Failure RAS.........................................365
Figure 28 LUN Mapping Changed RAS...................................366
Figure 29 Communication Failure RAS....................................366
Figure 30 Metadata Inconsistency Detected RAS ...................367
Figure 31 Bad File System Metadata Dump RAS....................367
xviii StorNext User’s Guide
Page 21

Figure 32 Metadata Dump Failure RAS ................................................. 368
Figure 33 File Processing Failure RAS .................................................... 368
Figure 34 Missing LUNs RAS ..................................................................369
Figure 35 Disk Space Allocation Failure RAS........................................369
Figure 36 System Resource Failure RAS................................................. 370
Figure 37 Shutdown Error RAS ...............................................................370
Figure 38 Initialization Failure RAS........................................................ 371
Figure 39 Checksum Error RAS...............................................................372
Figure 40 Troubleshooting the StorNext Software RAS.......................373
Figure 41 Closing Service Tickets RAS................................................... 374
Figure 42 Analyzing Service Tickets RAS .............................................. 375
Figure 43 Viewing Service Tickets RAS.................................................. 376
Figure 44 Vault Failure RAS..................................................................... 376
Figure 45 Robotics - Not Ready RAS ......................................................377
Figure 46 Robotics - Move Failure RAS..................................................378
Figure 47 Robotics - Wrong Firmware Level/Invalid Library Type
RAS................................................................................................................... 379
Figure 48 Backup Failed RAS................................................................... 380
Figure 49 Backup Errors RAS................................................................... 381
Figure 50 Configuration Violations RAS................................................382
Figure 51 Invalid Configuration RAS ..................................................... 383
Figure 52 Downloading a System State Capture RAS.......................... 383
Figure 53 Capturing a System State RAS ............................................... 384
StorNext User’s Guide xix
Page 22

xx StorNext User’s Guide
Page 23
Chapter 1
1Introduction
StorNext is data management software that enables customers to
complete projects faster and confidently store more data at a lower cost.
Used in the world's most demanding environments, StorNext is the
standard for high performance shared workflow operations and multitier
archives. StorNext consists of two components: StorNext File System
(SNFS), a high performance data sharing software, and StorNext Storage
Manager (SNSM), the intelligent, policy-based data mover.
About StorNext File System 1
About StorNext Storage Manager 1
StorNext User’s Guide 1
StorNext File System streamlines processes and facilitates faster job
completion by enabling multiple business applications to work from a
single, consolidated data set. Using SNFS, applications running on
different operating systems (Windows, Linux, UNIX, HPUX, AIX, and
Mac OS X) can simultaneously access and modify files on a common,
high-speed SAN storage pool. This centralized storage solution
eliminates slow LAN-based file transfers between workstations and
dramatically reduces delays caused by single-client failures. With SNFS,
any server can access files and pick up processing requirements of a
failed system to continue operations.
StorNext Storage Manager enhances the StorNext solution by reducing
the cost of long term data retention, without sacrificing accessibility.
SNSM sits on top of SNFS and utilizes intelligent data movers to
transparently locate data on multiple tiers of storage. This enables
customers to store more files at a lower cost, without having to
Page 24

Chapter 1 Introduction
reconfigure applications to retrieve data from disparate locations.
Instead, applications continue to access files normally and SNSM
automatically handles data access – regardless of where the file resides.
As data movement occurs, SNSM also performs a variety of data
protection services to guarantee that data is safeguarded both on site and
off site.
About Distributed LAN Clients 1
StorNext supports distributed LAN clients. Unlike a traditional StorNext
SAN client, a distributed LAN client does not connect directly to
StorNext via fibre channel or iSCSI, but rather across a LAN through a
gateway system called a distributed LAN server. The distributed LAN
server is itself a directly connected StorNext client, but it processes
requests from distributed LAN clients in addition to running
applications. Any number of distributed LAN clients can connect to
multiple distributed LAN servers.
Besides the obvious cost-savings benefit of using distributed LAN clients,
there will be performance improvements as well.
Distributed LAN clients must be licensed in the same way as StorNext
SAN clients. When you request your permanent StorNext license, you
will need to specify the number of distributed LAN clients you plan to
use. Naturally, you can always purchase additional distributed LAN
client licenses as your needs expand. For more information about
StorNext licensing, see Entering the StorNext License
on page 37.
StorNext provides distributed LAN client information via the status
monitors on the StorNext home page, SNSM home page, and SNFS home
page. More detailed information is available through the Clients Report
and the Distributed LAN Client Performance Report. For more
information about StorNext reports, see StorNext Report
s on page 264.
Before you can fully use distributed LAN clients, you must first configure
a distributed LAN server and distributed LAN clients as described in the
StorNext Installation Guide.
StorNext User’s Guide 2
Page 25

Purpose of This Guide
This guide is intended to assist StorNext users perform day-to-day tasks
with the software. This guide also describes how to generate reports.
Quantum recommends using the graphical user interface to accomplish
tasks, but an appendix provides alternative procedures for users who
wish to perform those tasks via the command line interface.
How This Guide is Organized
This guide contains the following chapters:
Chapter 1 Introduction
Purpose of This Guide
• Chapter 1,
• Chapter 2, StorNext GUI Overview
• Chapter 3, SNFS-Only GUI Overview
• Chapter 4, Common StorNext Tasks
• Chapter 5, Backing Up StorNext
• Chapter 6, Managing the File System
• Chapter 7, Managing Libraries
• Chapter 8, Managing Drives and Disks
• Chapter 9, Managing Media
• Chapter 10, Managing Storage Disks
• Chapter 11, Data Migration Management
• Chapter 12, StorNext Reports
• Chapter 13, Service Management
• Chapter 14, Customer Assistance
• Appendix A, HA Failover
• Appendix B, Using The Command Line Interface
Introduction
StorNext User’s Guide 3
Page 26

• Appendix B, RAS Messages
Notes, Cautions, and Warnings
The following table describes important information about Notes,
Cautions, and Warnings used throughout this guide.
Description Definition Consequences
Chapter 1 Introduction
Notes, Cautions, and Warnings
Note: Indicates important
information that helps
you make better use of
the software.
Caution: Advises you to take or
avoid a specified action.
Warning: Advises you to take or
avoid a specified action.
No hazardous or
damaging consequences.
Failure to take or avoid
this action could result
in loss of data.
Failure to take or avoid
this action could result
in physical harm to the
user or hardware.
StorNext User’s Guide 4
Page 27

Document Conventions
This guide uses the following document conventions to help you
recognize different types of information.
Conventions Examples
Chapter 1 Introduction
Document Conventions
For all UNIX-based
commands, the # prompt is
implied, although it is not
shown.
For all UNIX-based
commands, words in italic are
variables and should be
replaced with user-defined
values.
TSM_control stop
is the same as
# TSM_control stop
cvaffinity <filename>
where <filename> is a
variable and should be
replaced with a user-defined
value.
StorNext User’s Guide 5
Page 28
Chapter 2
2StorNext GUI Overview
This section describes how to access and navigate through the StorNext
GUI, which includes both SNFS and SNSM. If you purchased SNFS only,
refer to SNFS-Only GUI Overview
This chapter includes the following topics:
.
• Accessing the StorNext GUI
• The StorNext Home Page
• The SNFS and SNSM Home Pages
• The Configuration Wizard
Note: StorNext supports internationalization for the name space of
the file system. This support is fully UTF-8 compliant. It is up
to the individual client to set the proper UTF-8 locale.
Accessing the StorNext GUI
The StorNext GUI is browser-based and can be remotely accessed from
any machine with access to the StorNext server.
StorNext User’s Guide 6
Page 29
Chapter 2 StorNext GUI Overview
Accessing the StorNext GUI
Use this procedure to access the StorNext GUI.
1 Open a Web browser.
Note: StorNext-supported browsers are:
• Internet Explorer 5.5, 6 and 7
• Netscape 7.x
• Mozilla 1.0 and later
• FireFox 1.5 and later or 2.0 and later
To ensure proper browser operation, all monitors must be set to
display at a minimum resolution of 1073 x 768. If you use a popup
blocker, be sure to enable pop-ups in order to ensure that the StorNext
Configuration Wizard functions properly.
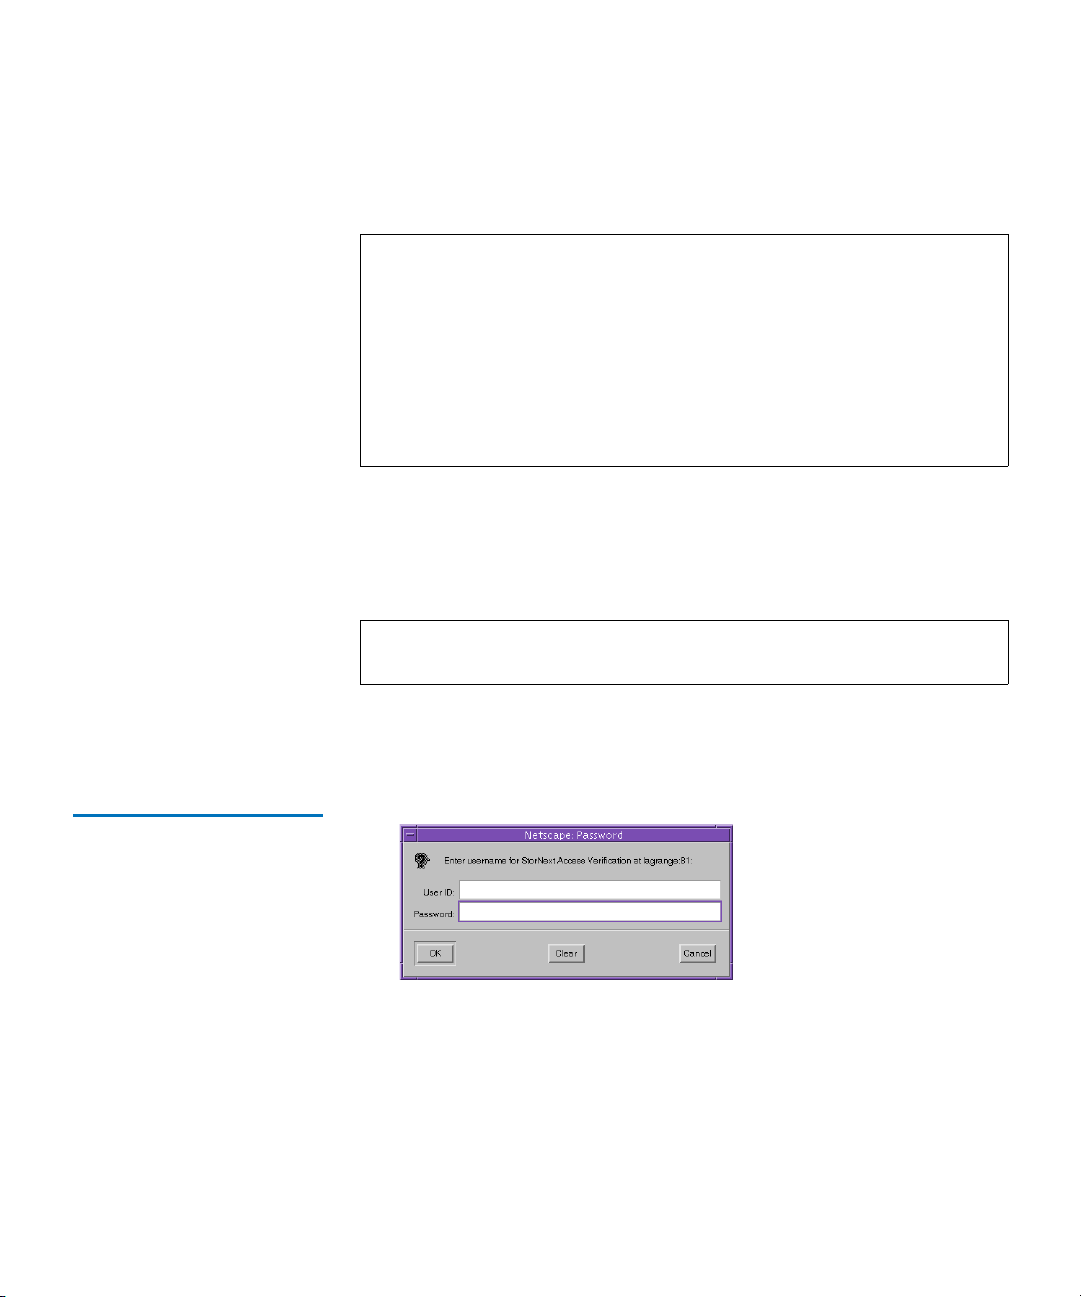
2 In the browser’s Address field, type the full address of the machine
and its port number, and then press Enter. For example: http://
<machine name>:<port number>. Use the name of the machine and
port number you copied when you installed the StorNext software.
Note: Typically, the port number is 81. If port 81 is in use, use the
next unused port number. (I.e., 82, 83, etc.)
After you enter the machine name and port number, the following
window appears:
Figure 1 StorNext Login
Window
3 In the User ID field, type admin and press TAB.
4 In the Password field, type admin and click OK.
The initial StorNext GUI appears. A message asks you to start nonrunning components.
5 Click OK to start the StorNext components. The StorNext GUI
launches.
StorNext User’s Guide 7
Page 30
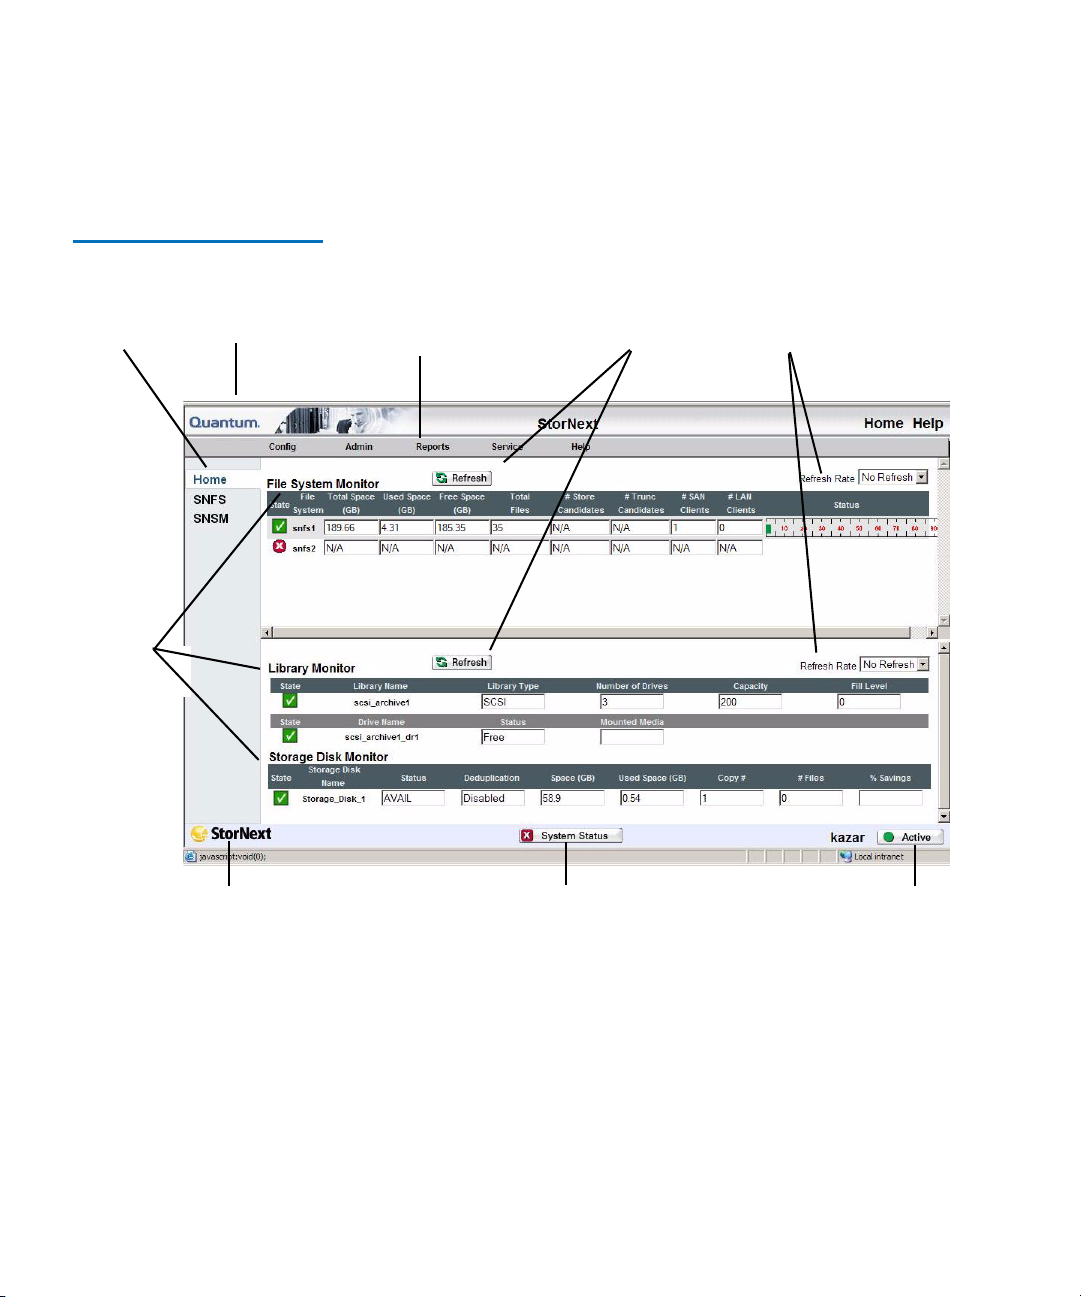
Figure 2 StorNext Home Page
Ref
Syst
StorNext Syst
Chapter 2 StorNext GUI Overview
Accessing the StorNext GUI
The following illustration shows the main components of the
StorNext Home Page.
Component
Navigation
em
Monitors
Link to
Quantum
Drop-down
Menu Options
resh
Buttons
Mo nit o r R efr e s h
Rate Options
StorNext User’s Guide 8
Application
Link
em Status
StorNext Server Status
Page 31

The StorNext Home Page
On the home page you will find the following:
• Link to the Quantum Home Page - Click the link for information
about Quantum
• System Monitors
• StorNext Home Page Drop-Down Menus
• StorNext System Status
• StorNext Server Status
• Home and Help Links
• Application Link
Chapter 2 StorNext GUI Overview
The StorNext Home Page
System Monitors 2
The StorNext Home Page displays three system monitors that are used to
monitor the state of the StorNext system:
• The File System Monitor
• The Library Monitor
• The Storage Disk Monitor
Use these monitors to view current statistics of managed or unmanaged
file systems and configured libraries and/or drives, including file system,
library, and drive information.
The File System Monitor and Library Monitor have a Refresh button that
allows you to manually update (refresh) the information shown in the
monitor. You can also select a rate from the Refresh Rate list to
automatically refresh at the selected interval:
•No Refresh
• 30 seconds
• 1 minute
• 2 minutes
• 5 minutes
• 10 minutes
StorNext User’s Guide 9
Page 32

Figure 3 File System Monitor
Chapter 2 StorNext GUI Overview
The StorNext Home Page
The File System Monitor 2
The File System Monitor enables you to view statistics on each configured
file system. When you open a browser to access StorNext, the File System
Monitor appears at the top of the browser window.
The File System Monitor provides the following information:
• Refresh: Click this button to manually refresh the File System
Monitor.
• Refresh Rate: Set the File System Monitor to automatically refresh
with this drop down menu. Options range from No Refresh to every
10 Minutes.
• State: A green checkbox indicates the file system is mounted and
active, a red “x” indicates the file system is not active or not mounted
• File System: The name of the file system. (You might see more than
one file system being monitored, depending upon how your
StorNext system is configured). This pane is scrollable to
accommodate numerous file systems.
• Total Space (GB): Total space (in GB) for the file system
• Used Space (GB): Currently used space (in GB) for the file system
• Free Space (GB): Amount of free space (in GB) for the file system
• Total Files: Number of files on the file system
• #Store Candidates: Number of files selected for storage to secondary
media
• #Trunc Candidates: Number of files that have been stored and meet
the criteria to become a truncation candidate
StorNext User’s Guide 10
Page 33

Chapter 2 StorNext GUI Overview
The StorNext Home Page
Note: The #Store Candidates and # Trunc Candidates fields show
“N/A” for a non-managed file system. For a managed file
system, if these fields show “refresh,” click the Refresh button
to retrieve current information for these fields.
• # SAN Clients: The number of StorNext SAN clients (connected via
fibre channel or iSCSI) for which you are licensed
• # LAN Clients: The number of StorNext distributed LAN clients for
which you are licensed. For more information about distributed LAN
clients, see About
Distributed LAN Clients on page 2.
• Status: The status shows the system status (usage) in percent in
addition to low and high watermark settings. The low watermark
specifies the level of used disk space that is acceptable to end
overflow processing. The high watermark specifies the level of used
disk space that initiates overflow processing. In the above example,
the system usage is less than 10% with 75% set as the low watermark
and 85% set as the high watermark. (High and low watermarks do
not apply to non-managed file systems.)
Note: Overflow processing occurs when the system processes
beyond the set watermark limitations.
The Library Monitor
The Library Monitor enables you to view library and drive information
on each library. When you open a browser to access StorNext, the Library
Monitor appears below the File System Monitor.
Figure 4 Library Monitor
The Library Monitor provides the following information:
• Refresh: Click this button to manually refresh the Library Monitor
StorNext User’s Guide 11
2
Page 34

Chapter 2 StorNext GUI Overview
The StorNext Home Page
• Refresh Rate: Set the Library Monitor refresh rate with this drop
down menu. Options range from No Refresh to every 10 Minutes.
• State: A green checkbox indicates the library is online, a red “x”
indicates the library is offline
• Library Name: Displays the name of the library
• Library Type: Indicates the library type: SCSI, Vault, or Network
• Number of Drives: Specifies the number of drives that are
configured for the library
• Capacity: Total number of media slots in the library
• Fill Level: Number of media in the archive
• Drive Name: Name (or label) of configured drive (or drives) for the
library
• Status: Indicates if the drive is free, in use, failed, delayed, or
cleaning.
• Mounted Media: Media ID of the media currently mounted in the
drive
• Compression: Indicates whether compression is enabled
The Storage Disk Monitor
The Storage Disk monitor allows you to view configured storage disk
information. When you open a browser to access StorNext, the Storage
Disk Monitor appears below the Library Monitor.
Figure 5 Storage Disk Monitor
The Storage Disk Monitor provides the following information:
• State: A green checkbox indicates the storage disk is online, a red “x”
indicates the storage disk is offline or online-pending. The onlinepending state is for storage disks that are deduplication enabled. A
deduplication-enabled storage disk is put into an online-pending
StorNext User’s Guide 12
2
Page 35

Chapter 2 StorNext GUI Overview
The StorNext Home Page
state during blockpool verification because this process could take a
long time to complete, depending on the blockpool size. Storage
disks in the online-pending state are not used for store operations.
• Storage Disk Name: Name of the storage disk
• Deduplication: Indicates if deduplication is enabled for the storage
disk. (This field appears only on 32 bit and 64 bit Linux systems.)
• Space (GB): Total amount of space (in gigabytes) on the storage disk.
This amount includes space reserved by StorNext.
• Used Space (GB): Space (in gigabytes) used on the storage disk
• Copy #: The copy number that may be stored on that media
• # Files: Total number of files on the storage disk
• % Savings: If deduplication is enabled, this field indicates the
amount of savings achieved through deduplication. (This field
appears only on 32 bit and 64 bit Linux systems.)
StorNext Home Page Drop-Down Menus 2
The following drop-down menu options located in the grey bar near the
top of the home page provide access to StorNext configuration,
administration, and reporting options:
• Config Menu Options
• Admin Menu Options
• Reports Menu Options
• Service Menu Options
• Help Menu Options
Config Menu Options 2
The following Config menu options launch the Configuration Wizard
and let you perform individual Configuration Wizard tasks:
• Config Wizard: Launches the configuration wizard
StorNext User’s Guide 13
Page 36

Chapter 2 StorNext GUI Overview
The StorNext Home Page
• Enter License: Enter StorNext license information
• Add File System: Add a file system to your environment
• Add Library: Add a library or vault
• Add Tape Drive: Add tape drive
• Add Media: Add media
• Add Storage Disk: Add a storage disk
• Add Storage Policy: Add a storage policy and a directory relation
point to a file system
• E-Mail Notification: Configure e-mail notifications for System Status
Tickets, Backup information, and Policy Class alerts
• Add Affinity: Add an affinity to a file system
Note: For more information about the StorNext Configuration
Wizard, see Chapter 11,
Data Migration Management.
Admin Menu Options
The following Admin menu options enable you to control StorNext’s
day-to-day operations:
• Access StorNext Logs: Access logs of StorNext operations
• User Access Control: Control user access to StorNext tasks
• Download Client Software: Download SNFS client software. (This
procedure is described in the StorNext Installation Guide.)
• Library Operator Interface: Enter or eject media from the Library
Operator Interface
• Remove/Move Media: Remove media from a library or move media
from one library to another
• Run Backup: Run a backup of StorNext software
• Schedule Events: Schedule file system events including Clean Info,
Clean Versions, Full Backup, Partial Backup, and Rebuild Policy
• Start/Stop StorNext: Start or stop the StorNext components
StorNext User’s Guide 14
2
Page 37

Chapter 2 StorNext GUI Overview
The StorNext Home Page
Reports Menu Options 2
The following Reports menu options allow you to view StorNext reports:
• SNFS: View the following SNFS reports:
• Affinities: View the existing affinities for a selected directory in
the file system.
• File Systems: View file system statistics including active clients,
space, size, disks, and stripe groups.
• Stripe Groups: View statistics for the stripe group, such as space,
affinities, and current statuses.
• Clients: View statistics for StorNext clients, including the
number of SAN clients and distributed LAN clients, and client
performance.
• LAN Client Performance: View information about distributed
LAN clients and servers, including read and write speed.
• Backups: View a report of StorNext backups
• Drives: View tape drive information
• Files: View file information
• Libraries: View libraries information
• Library Space: View information about used library space
• Media: View media information
• Media Classes: View media classes information
• Policy Classes: View policy class information
• Relations: View directory/policy class relationship information
• Requests: View request information
• Scheduler: View scheduler information
• Storage Disk: View storage disk information
Note: Detailed descriptions of the Report menu options are located
in Chapter 12,
StorNext User’s Guide 15
StorNext Reports.
Page 38

Chapter 2 StorNext GUI Overview
The StorNext Home Page
Service Menu Options 2
The following Service menu options help you monitor and capture
system status information:
• Health Check: Perform one or more health checks on StorNext and
view recent health check results
• State Capture: Obtain and preserve detailed information about the
current StorNext system state
• System Status: View tickets indicating faults as reports by the
StorNext system
StorNext System Status 2
Help Menu Options
The following Help menu options provide access to StorNext
documentation, Quantum contact information, and detailed information
about the version of StorNext you are using:
• Online Help: Provides a listing of StorNext online help topics that
can be viewed in a separate browser window. (You can access this
same topics list by clicking the Help icon in the upper right corner of
the screen.)
• Documentation: Provides access to the StorNext documentation set.
(Clicking Help in the upper right corner of the screen displays this
same page.)
• Support: Allows you to access Quantum and Technical Support
information
• About: Provides detailed information about your version of StorNext
and the system on which it is running
The StorNext System Status button located at the bottom center of the
StorNext Home Page appears only when there are open service tickets.
This same information is always available by selecting System Status
from the Service menu.
2
Click the System Status button to view a list of tickets indicating faults
reported by the system. The Service - System Status screen appears.
StorNext User’s Guide 16
Page 39

Figure 6 Service - System
Status screen
Chapter 2 StorNext GUI Overview
The StorNext Home Page
StorNext Server Status 2
Home and Help Links 2
The StorNext Server Status button is located at the bottom right of the
StorNext Home Page. This button displays one of three statuses for the
file systems residing on the server:
• Active: All configured file systems are active
• Warning: One or more of the configured file systems have not been
mounted or started
• Stopped: The storage manager or the file system manager is stopped
Clicking the StorNext Server Status button displays the Start/Stop screen,
which enables you to either start or stop StorNext. For more information
about starting or stopping StorNext, see Starting and Stopping StorNext
Components on page 51.
In the upper right corner of the screen are Home and Help links. Clicking
Home returns you immediately to the StorNext home page regardless of
your current location.
Clicking Help displays a list of current StorNext documentation in pdf
format. You can open a particular guide or document by clicking its link.
StorNext User’s Guide 17
Page 40

Chapter 2 StorNext GUI Overview
The SNFS and SNSM Home Pages
Application Link 2
Figure 7 Application Link
The StorNext application link is located at the bottom left of the StorNext
Home Page. Click this link to view information about StorNext.
The SNFS and SNSM Home Pages
The Navigation Pane on the left side of the screen contains links to the
SNFS and SNSM home pages along with a Home button to return to the
main StorNext Home Page.
• The SNFS Home Page
specific tasks. The SNFS Home Page contains several drop-down
menus: Config, Admin, and Reports.
• The SNSM Home Page
administrative storage manager tasks. The SNSM Home Page
contains several drop-down menus: File, Media, Admin, and
Reports.
StorNext User’s Guide 18
- In SNFS mode, you perform file system-
- In SNSM mode, you perform
Page 41

Chapter 2 StorNext GUI Overview
The SNFS and SNSM Home Pages
The SNFS Home Page 2
Figure 8 SNFS Home Page
The SNFS Home Page contains the following components:
• Drop-down menus that enable you to perform file system-specific
administration tasks
• A file system monitor
• System and server status indicators
Note: The figure shows the SNFS Home Page as it appears when it is
part of the full StorNext application. The interface for the
SNFS standalone application looks slightly different, but has
many of the same major features.
SNFS Home Page DropDown Menus 2
Use the drop-down menus on the SNFS home page as you would from
the StorNext Home Page when performing file system-specific
administration tasks.
• The SNFS Config Menu
• The SNFS Admin Menu
• The SNFS Reports Menu
StorNext User’s Guide 19
Page 42

Chapter 2 StorNext GUI Overview
The SNFS and SNSM Home Pages
• The SNFS Help Menu
Note: You must unmount and stop the file system before using most
of the options listed in this section. See Chapter 4,
Common
StorNext Tasks for more information.
The SNFS Config Menu 2
The following options on the SNFS Config menu allow you to add and
modify file system configuration files:
• File Systems: Add or delete a file system
• Globals: Modify global settings
• Affinities: Add, modify, or delete an affinity from file systems
• Disks: Add or delete a disk to a file system
• Stripe Groups: Add, modify, or delete a stripe group from a file
system
Caution: Deleting a disk or stripe group requires a remake of the file
system and destroys all data on the file system when the
task is run.
The SNFS Admin Menu
The following options on the SNFS Admin menu help you manage dayto-day operations of the active file systems:
• Make File System: Make a file system
Caution: Making a file system or making/labeling disk devices
destroys all data on the disk on which the task is run.
• Start/Stop File System: Start or stop a file system
• Mount/Unmount: Mount or unmount a file system
• Label Disk Devices: Label disk drives
StorNext User’s Guide 20
2
Page 43

Chapter 2 StorNext GUI Overview
The SNFS and SNSM Home Pages
• Set Affinities: Create a directory in the file system to the affinity
• Metadata Dump: Generate a Metadata dump of a file system
• Check File System: Run a check on your file system before
expanding the file system or migrating a stripe group.
• Expand File System: Add new stripe groups to your file system.
• Move Stripe Group: Move data or metadata from one source stripe
group to one or more destination stripe groups.
The SNSM Home Page 2
The SNFS Reports Menu
The options on the SNFS Reports menu allow you to view all SNFS
reports. These are the same reports described in Reports Menu Options
on page 15.
The SNFS Help Menu
The options on the SNFS Help menu provide access to StorNext
documentation, Quantum contact information, and detailed information
about the version of StorNext you are using. The SNFS Help menu
options are the same as the ones described in Help Menu Options
on
page 16.
The SNSM Home Page contains a Library Monitor and these drop-down
menu options:
• The SNSM File Menu
• The SNSM Media Menu
• The SNSM Admin Menu
• The SNSM Reports Menu
2
2
• The SNSM Help Menu
Use the drop-down menus on this home page as you would from the
SNSM Home Page DropDown Menus 2
StorNext User’s Guide 21
StorNext Home Page when performing Storage Manager-specific
administration tasks.
Page 44

Figure 9 SNSM Menu
Chapter 2 StorNext GUI Overview
The SNFS and SNSM Home Pages
The SNSM File Menu 2
The following SNSM File menu options allow you to manage file data
and directories:
• Store: Store files to a storage medium
• Version: Show the version(s) of files stored on storage medium
• Recover File: Recover deleted files
• Recover Directory: Recursively recover deleted directories
• Retrieve File: Retrieve truncated files from a storage medium
• Retrieve Directory: Recursively retrieve truncated directories from a
storage medium
• Free Disk Blocks: Truncate files
• Move: Move files from one media to another
• Attributes: Change file attributes
StorNext User’s Guide 22
Page 45

Chapter 2 StorNext GUI Overview
The SNFS and SNSM Home Pages
The SNSM Media Menu 2
The following SNSM Media menu options help you manage media and
libraries:
• Library: Perform media movement tasks within a library (Manual
Move, Mount, and Dismount)
• Add: Add media to a policy class
• Remove: Remove media from StorNext
• Move Blank: Associate blank media with a policy class
• Transcribe: Transcribe (copy) media
• Attributes: Change the media’s state or attributes
• Reclassify: Reclassify a media to a new media class
• Clean: Clean a media by policy class, file system, or media identifier
The SNSM Admin Menu
The following SNSM Admin menu options allow you to perform
administration tasks:
• Library: Perform library tasks such as Config Library, Audit Library,
Library State, and Cancel Eject
• Drive: Perform drive tasks such as Config Drive, Change Drive State,
and Clean Drive
• Storage Disk: Perform storage disks tasks such as Config Storage
Disk, Change Storage Disk State, and Clean Storage Disk
• Disk Space: Perform an immediate file system storage or truncation
policy
• Policy Class: Add, modify, or delete a policy class
• Backup: Configure backup procedure parameters
• Relation: Add or remove directory relation points to a policy class
• Water Mark Parameter: Set water mark parameters (for more
information about watermarks, see Status—page 11)
• Config Drive Pool: Add, modify, or delete drive pools
• Cancel Request: Cancel requested operations
2
StorNext User’s Guide 23
Page 46

Chapter 2 StorNext GUI Overview
The Configuration Wizard
The SNSM Reports Menu 2
The options on the SNSM Reports menu allow you to view all SNFS
reports. These are the same reports described in Reports Menu Options
on page 15.
The SNSM Help Menu
The options on the SNSM Help menu provide access to StorNext
documentation, Quantum contact information, and detailed information
about the version of StorNext you are using. The SNSM Help menu
options are the same as the ones described in Help Menu Options
page 16.
The Configuration Wizard
StorNext includes a Configuration Wizard that guides you through the
process of setting up your StorNext system. The wizard includes tasks
you would typically perform when you are first configuring your system.
The Configuration Wizard appears automatically when you launch
StorNext for the first time. If you do not finish performing all the tasks,
the wizard reappears whenever you return to the StorNext home page so
you can resume completing tasks where you left off. For example, if you
complete tasks 1 through 5, the next time the StorNext wizard appears
you will be ready to complete task 6.
2
on
If you have not completed all the wizard tasks and do not want the
wizard to appear the next time you access the StorNext home page, select
the Don’t Show CW Again option.
StorNext User’s Guide 24
Page 47

Figure 10 StorNext
Configuration Wizard
Chapter 2 StorNext GUI Overview
The Configuration Wizard
You can display the Configuration Wizard at any time by selecting
Configuration Wizard from the StorNext home page’s Config menu. If
you have completed all of the tasks, each task will be marked as
Complete. If you have not completed all tasks, the ones you finished will
be marked Complete and the wizard will be ready for you to begin the
next uncompleted task.
You can perform any of the Configuration Wizard’s tasks separately
rather than through the wizard. Each of these tasks is selectable from the
StorNext home page’s Config menu.
The initial Configuration Wizard screen has a Reset button that allows
you to start at the beginning of the wizard.
StorNext User’s Guide 25
Page 48

Figure 11 Config Menu Options
Chapter 2 StorNext GUI Overview
The Configuration Wizard
Each of the Configuration Wizard’s tasks are described in detail
elsewhere in this guide:
• Step 1: Enter License (See Entering the StorNext License
• Step 2: Add File System (See Adding a File System
• Step 3: Add Library (See Adding a Library
on page 164)
• Step 4: Add Tape Drive (See Adding a Tape Drive
on page 37)
on page 78)
on page 183)
• Step 5: Add Media (See Adding Media to a Configured Library
page 201)
• Step 6: Add Storage Disks (See A
dding a Storage Disk on page 234)
• Step 7: Add Storage Policy (See Adding Media to a Policy Class
page 262)
• Step 8: Email Notification (See Setting Up E-mail Notification
on
page 64)
on
on
StorNext User’s Guide 26
Page 49

Chapter 3
3SNFS-Only GUI Overview
The SNFS GUI is browser-based and can be accessed remotely from any
machine with access to the local network and the SNFS server. This
chapter describes how to access and navigate through the SNFS-only
GUI. If you purchased StorNext, refer to StorNext GUI Overview
page 6.
This chapter includes the following topics:
on
• Accessing the SNFS
• T
he SNFS Home Page
• The SNFS Configuration Wizard
GUI
Accessing the SNFS GUI
Use the following procedure to access the SNFS GUI.
1 Open a Web browser.
StorNext User’s Guide 27
Page 50

Chapter 3 SNFS-Only GUI Overview
Accessing the SNFS GUI
Note: Supported browsers are:
• Internet Explorer 5.5, 6 and 7
• Netscape 7.x
• Mozilla 1.0 and later
• FireFox 1.5 and later, or 2.0 and later
To ensure proper browser operation, all monitors must be set to
display at a minimum resolution of 1074 x 768.
2 In the browser’s Address field, type the full address of the machine
and its port number, and then press Enter. For example: http://
<machine name>:<port number>. Use the name of the machine and
port number you copied when you installed the StorNext software.
Note: Typically, the port number is 81. If port 81 is in use, use the
next unused port number. (I.e., 82, 83, etc.)
After you enter the machine name and port number, the following
screen appears.
Figure 12 StorNext File System
Login Window
3 In the User ID field, type admin and press TAB.
4 In the Password field, type admin and click OK.
Note: For information on changing your password or setting up
additional users, refer to the StorNext Installation Guide.
The initial StorNext GUI appears.
StorNext User’s Guide 28
Page 51

The SNFS Home Page
The SNFS home page contains the following components:
• A link to the Quantum Home Page
• The File System Monitor
• Drop-down Menus and Options
• Shortcut Menu Options
• Home and Help Links
• StorNext Server Status
Chapter 3 SNFS-Only GUI Overview
The SNFS Home Page
Figure 13 SNFS Home Page
The File System Monitor3
Link to
Quantum Menus FS Monitor Help
Shortcut
Menu
Options
StorNext Server Status
The File System Monitor enables you to view statistics on each configured
file system. When you open a browser to access StorNext, the File System
Monitor appears at the top of the browser window.
StorNext User’s Guide 29
Page 52

Figure 14 File System Monitor
Chapter 3 SNFS-Only GUI Overview
The SNFS Home Page
The File System Monitor has a Refresh button that allows you to
manually update (refresh) the information shown in the monitor. You can
also select a rate from the Refresh Rate list to automatically refresh at the
selected interval:
•No Refresh
• 30 seconds
• 1 minute
• 2 minutes
• 5 minutes
• 10 minutes
The File System Monitor provides the following information:
• Refresh: Click this button to manually refresh the File System
Monitor.
• Refresh Rate: Set the File System Monitor to automatically refresh
with this drop down menu. Options range from No Refresh to every
10 Minutes.
• State: A green checkbox indicates the file system is mounted and
started, a red “x” indicates the file system is not active or not
mounted
• File System: The name of the file system (you may see more than one
file system being monitored, depending upon how your StorNext
system is configured). This pane is scrollable to accommodate
numerous file systems.
• Total Space (GB): Total space (in GB) for the file system
• Used Space (GB): Currently used space (in GB) for the file system
• Free Space (GB): Amount of free space (in GB) for the file system
• Total Files: Number of files on the file system
StorNext User’s Guide 30
Page 53

Chapter 3 SNFS-Only GUI Overview
The SNFS Home Page
• #Store Candidates: Number of files selected for storage to secondary
media. This field does not apply to SNFS-only configurations.
• #Trunc Candidates: Number of files that haves been stored and
meets the criteria to become a truncation candidate
• # Clients: The number of StorNext clients (connected via fibre
channel or iSCSI) for which you are licensed
• # Distributed LAN Clients: The number of StorNext distributed
LAN clients for which you are licensed. For more information about
distributed LAN clients, see About
Distributed LAN Clients on
page 2.
• Status: The status shows the system status (usage) in percentage.
Drop-down Menus and Options 3
Figure 15 File System Menus
The following drop-down menus are located in the grey bar towards the
top of the home page and are used to access SNFS configuration,
administration, and reporting options:
• The Config Menu
• The Admin Menu
• The Reports Menu
• The Help Menu
The Config Menu 3
The following Config menu options enable you to add and modify file
systems:
• File Systems: Add or delete a file system
• Globals: Modify global settings
• Disks: Add or delete a disk to a file system
StorNext User’s Guide 31
Page 54

Chapter 3 SNFS-Only GUI Overview
The SNFS Home Page
• Stripe Groups: Add, modify, or delete a stripe group from a file
system
• Affinities: Add, modify, or delete an affinity from file systems
Note: Detailed descriptions of the Config menu options are located
in Chapter 6,
Managing the File System.
The Admin Menu
The following Admin menu options enable you to control day-to-day
operations of active file systems:
• Make File System: Make a file system
• Start/Stop File System: Start or stop a file system
• Mount/Unmount: Mount or unmount a file system
• Label Disk Devices: Label disk drives
• Set Affinities: Create a relation point in the file system to the affinity
Caution: Making a file system or making/labeling disk devices
destroys all data on the disk on which the task is run.
Note: Detailed descriptions of the Admin menu options are located
in Chapter 6,
Managing the File System.
The Reports Menu
The following Reports menu options let you view file system reports:
3
3
• Affinities: View the Affinities report
• File Systems: View the File Systems report
• Stripe Groups: View the Stripe Groups report
Note: Detailed descriptions of the Report menu options are located
in Chapter 12,
StorNext User’s Guide 32
StorNext Reports.
Page 55

Chapter 3 SNFS-Only GUI Overview
The SNFS Home Page
The Help Menu 3
The Help menu provides you with access to StorNext reference material
such as this user’s guide, the installation guide, and other useful
documents.
Shortcut Menu Options 3
The SNFS Shortcut Menu on the left side of the SNFS home page contains
options that let you perform the following Configuration and
Administrative tasks:
•Config
• Configuration Wizard: Launch the Configuration Wizard. For
more information about the Configuration Wizard, see The SNFS
Configuration Wizard on page 35.
• Add Affinity: Add an affinity and directory to a file system. For
more information about adding an affinity, see Adding an
Affinity on page 116.
• Add File System: Add a file system. For more information about
adding a file system, see Adding a File System
on page 78.
• Enter License: Enter your StorNext license information. For more
information about entering a license, see Entering the StorNext
License on page 37.
• User Access Control: Add, modify, or delete the level of user
access. For more information about user access control, see
C
ontrolling User Access on page 45.
•Admin
• Access StorNext Logs: View logs for SNFS, the Server System,
and the StorNext Web Server. For more information about
accessing logs, see Accessing StorNext Logs
on page 53.
• Download Client Software: Download the SNFS client software
for a specific operating system. For more information about
downloading client software, see the StorNext Installation Guide.
• Start/Stop StorNext: Start or Stop StorNext Software. For more
information about starting and stopping StorNext, see S
torNext
Server Status on page 34.
StorNext User’s Guide 33
Page 56

Chapter 3 SNFS-Only GUI Overview
The SNFS Home Page
Home and Help Links 3
StorNext Server Status 3
Figure 16 Start/Stop SNFS
Screen
In the upper right corner of the screen are Home and Help links. Clicking
Home returns you immediately to the StorNext home page regardless of
your current location.
Clicking Help displays a list of current StorNext documentation in pdf
format. You can open a particular guide or document by clicking its link.
The StorNext Server Status button is located at the bottom right of the
SNFS Home Page. This button displays one of three statuses for the file
systems residing on the server:
• Active: All configured file systems are active
• Warning: One or more of the configured file systems have not been
mounted or started
• Stopped: The storage manager or the file system manager is stopped
When you click the Server Status button, the Start/Stop SNFS screen
appears.
1 On the Start/Stop SNFS screen, select Start or Stop to manually start
or stop the StorNext File System.
2 Select Enable or Disable to enable or disable the feature that
automatically starts SNFS upon reboot. Your selection will be
reflected the next time you reboot.
StorNext User’s Guide 34
Page 57

Figure 17 Complete Start/Stop
SNFS Screen
Chapter 3 SNFS-Only GUI Overview
The SNFS Configuration Wizard
3 Do one of the following:
•Click Cancel to exit the Start/Stop SNFS screen without saving
•Click Next to save your changes and proceed. The Complete
Start/Stop SNFS screen appears.
4 On the Complete Start/Stop SNFS screen, do one of the following:
•Click Cancel to exit the Complete Start/Stop SNFS screen
without saving
•Click Back to return to the Start/Stop SNFS screen
•Click Next to proceed. A status window appears
5 If you clicked Next, click Close when the status window displays
Success.
The SNFS Configuration Wizard
SNFS includes a Configuration Wizard that guides you through the steps
necessary to obtain a StorNext license and create a file system. You can
StorNext User’s Guide 35
Page 58

Figure 18 SNFS Configuration
Wizard Screen
Chapter 3 SNFS-Only GUI Overview
The SNFS Configuration Wizard
complete these steps at any time, and the wizard will resume at the
remaining step you if you do not finish completing both tasks. If desired,
you can select the option Don’t Show CW Again to prevent the wizard
from automatically appearing the next time you launch StorNext.
Alternatively, you can complete the two tasks without launching the
Configuration Wizard by clicking the shortcuts Enter License or Add File
System.
Access the Configuration Wizard by clicking the Configuration Wizard
shortcut on the home page. The first screen of the Configuration Wizard
appears.
For more information about completing the two Configuration Wizard
tasks, see Entering the StorNext License
on page 37, andAdding a File
System on page 78.
StorNext User’s Guide 36
Page 59

Chapter 4
4Common StorNext Tasks
This chapter provides instructions on performing the following StorNext
and SNFS tasks:
• Entering the StorNext License
• Controlling User Access
• Starting and Stopping StorNext Components
• Accessing StorNext Logs
• Scheduling StorNext Events
• Setting Up E-mail Notification
• Cancelling SNSM Requests
Entering the StorNext License
Use the Enter License wizard to enter a permanent license string. You can
also proceed using the 30-day temporary license that comes with
StorNext. You must have a permanent or temporary license to configure
or use StorNext.
StorNext User’s Guide 37
Page 60

Chapter 4 Common StorNext Tasks
Entering the StorNext License
Note: If you use the temporary license, be sure to obtain a permanent
license from Quantum before the 30-day temporary license
expires.
To obtain a permanent license, you must contact the Quantum Technical
Assistance Center at licenses@Quantum.com
and give them the following
information:
• The serial number from your product CD or box.
• The number of StorNext SAN clients and distributed LAN clients you
want to support.
• The StorNext server identification number. You can find this number
on the Configuration Wizard’s Enter License String screen.
Alternatively, you can obtain a license by going to www.Quantum.com/
swlicense and providing the required information.
After the Quantum Technical Assistance Center receives the above
information, a representative will send you a license string. Enter this
license screen on the Enter License String screen to use StorNext with
your permanent license.
If you use the temporary license, allow sufficient time for the Quantum
Technical Assistance Center to receive your information and send your
license string before the 30-day limit expires.
1 From the StorNext home page, choose Enter License from the Config
menu. The Enter License - Introduction screen appears.
StorNext User’s Guide 38
Page 61

Figure 19 Enter License
Introduction Screen
Chapter 4 Common StorNext Tasks
Entering the StorNext License
2 Click Next to continue. The Quantum license agreement appears.
You must accept the license agreement in order to continue with the
licensing process.
StorNext User’s Guide 39
Page 62

Figure 20 Quantum License
Agreement
Chapter 4 Common StorNext Tasks
Entering the StorNext License
StorNext User’s Guide 40
Page 63

Figure 21 Enter License
Strings Screen
Chapter 4 Common StorNext Tasks
Entering the StorNext License
3 Read the license agreement and then click Accept. The Enter License
Strings screen appears. This screen summarizes the information you
must send to licenses@Quantum.com
in order to receive the license
string you enter on this screen.
4 If you want to proceed using a temporary license for SAN clients or
distributed LAN clients, select the option Generate 30 day temporary
license. To enter a permanent license, proceed to step 8—page 43.
StorNext User’s Guide 41
Page 64

Figure 22 Complete Enter
License Screen (Temporary)
Chapter 4 Common StorNext Tasks
Entering the StorNext License
5 After selecting Generate 30 day temporary license, click Next to
continue. The Complete Enter License screen appears.
6 On the Complete Enter License screen, click Next to complete the
task, or Back to make changes. When you click Next, a message
reminds you to contact the Quantum Technical Assistance Center
within 30 days to receive your permanent license string.
Figure 23 License Reminder
StorNext User’s Guide 42
Page 65

Chapter 4 Common StorNext Tasks
Entering the StorNext License
7 Click OK to close the message box.
8 In order to receive your permanent StorNext license you must email
to licenses@quantum.com
Enter License Strings screen (figure 21
the following information, as listed on the
on page 41):
• The StorNext serial number from the StorNext box or CD.
• The total number of StorNext SAN clients (if any) you want to
license for your system. This is the total number of client
machines that are connected to a StorNext server through a fibre
channel or iSCSI interface.
• The StorNext server ID displayed on the screen. (In the figure, the
ID is 15F268AFA2.)
• The total number of distributed LAN clients (if any) you want to
license for your system. This is the total number of distributed
LAN clients connected to StorNext via a distributed LAN server.
For more information about distributed LAN clients, see About
Distributed LAN Clients on page 2.
9 Quantum will email you a license string for SAN clients. If you are
using distributed LAN clients, they will also send you a separate
license string for distributed LAN client usage. When you receive the
license strings, copy and paste them into the License String field on
the Enter License Strings screen (figure 21
on page 41).
Click Next to continue. The Complete Enter License screen appears.
StorNext User’s Guide 43
Page 66

Figure 24 Complete Enter
License Screen (Permanent)
Chapter 4 Common StorNext Tasks
Entering the StorNext License
10 Review the information on the screen, and then click Next to
continue, or Back to make changes.
11 After the status screen informs you that the operation was completed
successfully, click Finish.
Entering a License String in the .dat File 4
Alternatively, when you receive your license string via email, you can
copy and paste the license string into the /usr/adic/DSM/config/license.dat
file instead of using the Enter License Strings screen. Updating this file
enables StorNext to automatically detect the license string when the
Configuration Wizard runs.
Here is an example of a StorNext license file with the license string
entered (below License Authorization String). This is an example only.
Do not enter the license screen shown.
StorNext User’s Guide 44
Page 67

Figure 25 License String
Example
Controlling User Access
Chapter 4 Common StorNext Tasks
Controlling User Access
This section describes the following User Access Control options:
• Changing the Admin Password
• Adding a New User
• Modifying an Existing User
• Deleting an Existing User
StorNext User’s Guide 45
Page 68

Chapter 4 Common StorNext Tasks
Controlling User Access
Changing the Admin Password 4
Figure 26 User Access Control
Screen
Use this procedure to change the admin password.
1 From the StorNext Home Page choose User Access Control from the
Admin menu. The User Access Control screen appears.
StorNext User’s Guide 46
Page 69

Figure 27 <Modify User Screen
Chapter 4 Common StorNext Tasks
Controlling User Access
2 From the User Access Control screen, select Admin in the User List
and click Modify. The Modify User “admin” screen appears.
3 Enter your new password.
4 Confirm the new password by entering it again, and then click OK.
5 Click OK when the Status Screen displays Success.
StorNext User’s Guide 47
Page 70

Chapter 4 Common StorNext Tasks
Controlling User Access
Adding a New User 4
Figure 28 Add New User
Screen
Use this procedure to add a new StorNext user.
1 From the User Access Control screen, click Add. The Add New User
Screen appears.
StorNext User’s Guide 48
Page 71

Chapter 4 Common StorNext Tasks
Controlling User Access
2 In the Enter User Name field, type the name the new user will enter
at the User ID field when he or she logs on to StorNext.
3 In the Enter Password field, type the password the new user will
enter when logging on to StorNext.
4 In the Re-enter Password field, retype the password you entered at
the previous field.
5 Select the type of access the user will have:
• Admin Defaults: Enables access to the entire StorNext system
including SNFS Advanced Functions, SNSM Advanced
Functions, StorNext Home Functions, and StorNext Reports
• Operator Defaults: Enables access to most of the StorNext Home
Functions and StorNext Reports
• General User Defaults: Enables access to most of the StorNext
Reports
Each of the above selections auto-populates the screen to correspond
with your selection, but you can customize access by clicking on
specific items for the user.
6 To simplify assigning access permissions, you can click Select All or
Deselect All for each category. For example, to grant permission to
most StorNext reports, click Select All and then deselect the reports
for which you do not want to grant permission.
7 When you are satisfied with the permissions you have assigned, click
OK.
8 Click OK when the Status screen displays Success. The User Access
Control screen shows the new user you just added.
9 Click Cancel to close the window.
StorNext User’s Guide 49
Page 72

Chapter 4 Common StorNext Tasks
Controlling User Access
Modifying an Existing User 4
Figure 29 Modify User Screen
Use this procedure to modify an existing user’s StorNext access.
1 From the User Access Control screen, select a name (other than
“admin”) from the User List and click Modify. The Modify User
screen appears with the user’s name displayed in the header.
StorNext User’s Guide 50
Page 73

Chapter 4 Common StorNext Tasks
Starting and Stopping StorNext Components
2 Change the user’s password or modify permissions as described in
Adding a New User
3 Click Close when the Status screen displays Success.
Note: If there is only one administrator, you can modify only the
password. A sole administrator has full access
permissions, and you cannot modify these permissions.
, and then click OK.
Deleting an Existing User 4
Use this procedure to delete an existing StorNext user.
1 From the User Access Control screen, select a name from the User
List and click Delete.
2 When asked to confirm that you want to delete the user, click OK to
proceed or Cancel to abort.
3 If you click OK, click Close when the Status screen displays Success.
Note: If there is only one administrator, you will not be allowed
to delete the administrator.
Starting and Stopping StorNext Components
There are two ways to start or stop the StorNext applications, SNFS and
SNSM:
• By using the Admin menu’s Start/Stop StorNext option
• By clicking the Server Status button located at the lower right corner
of the StorNext home page
The following procedure describes to start/stop StorNext components
using either of these methods.
StorNext User’s Guide 51
Page 74

Figure 30 Start/Stop StorNext
Screen
Chapter 4 Common StorNext Tasks
Starting and Stopping StorNext Components
1 From the StorNext Home Page select Start/Stop StorNext from the
Admin menu. Alternatively, click the Server Status button in the
lower right corner of the screen. (This button displays the server’s
current status, such as Active.) The Start/Stop StorNext screen
appears.
2 Select either the Start or Stop option.
3 Select the items you want to start or stop:
• All Components
• StorNext File System
• StorNext Storage Manager
Note: The current status (Started, Stopped, or Warning) is
shown next to each StorNext application. A Warning
status indicates one of your configured file systems is
either not mounted or has not been started.
StorNext User’s Guide 52
Page 75

Figure 31 Complete Start/Stop
StorNext Task Screen
Chapter 4 Common StorNext Tasks
Accessing StorNext Logs
4 Select either Enable or Disable to enable or disable the feature that
automatically starts StorNext at boot time. (Your selection on this
screen will be reflected during the next reboot.)
5 Click Next. The Complete Start/Stop StorNext Task screen appears
6 Click Next. A status screen appears.
7 Click Finish when the status screen shows Success. The StorNext
Server Status in the lower right corner of the screen now displays
Stopped, Warning or Active, depending on your action.
Accessing StorNext Logs
You can access and view any of the following types of logs:
StorNext User’s Guide 53
Page 76

Figure 32 Select Log Screen
Chapter 4 Common StorNext Tasks
Accessing StorNext Logs
• SNFS Logs: Logs about each configured file system
• StorNext Database Logs: Logs that track changes to the internal
database
• SNSM - File Manager Logs: Logs that track storage errors, etc. of the
Storage Manager
• SNSM - Library Manager Logs: Logs that track library events and
status
• Server System Logs: Logs that record system messages
• StorNext Web Server Logs: Various logs related to the web server
Use the following procedure to access the StorNext log files. The process
is the same regardless of the type of log you are viewing.
1 From the StorNext home page, select Access StorNext Logs from the
Admin menu. The Select Log screen appears.
StorNext User’s Guide 54
Page 77

Figure 33 Select File Screen
Chapter 4 Common StorNext Tasks
Accessing StorNext Logs
2 Select the type of log you wish to view, and then click Next. The
Select File screen appears.
3 Select the log file you wish to view, and then click one of the
following:
• Delete: Delete the selected log file
• Mail: E-mail the selected log file to Quantum support
• Show: Show the selected log file in a separate window
4 If you clicked Show, the selected log file appears in a separate
window. Click one of the following to navigate around the displayed
log file:
• Next Page to view the log’s next page
• Previous Page to view the previous page
• Top to move to the beginning of the log
• End to move to the end of the log
StorNext User’s Guide 55
Page 78

Figure 34 Log File Example
Chapter 4 Common StorNext Tasks
Scheduling StorNext Events
• Cancel to close the window
5 When you are finished viewing logs, click Cancel to close the Select
File window.
Scheduling StorNext Events
StorNext events are tasks that are scheduled to run automatically based
on a specified schedule. The following events can be scheduled:
• Clean Info: This scheduled background and removes from StorNext
knowledge of media.
• Clean Versions: This scheduled event cleans old, inactive versions of
files.
StorNext User’s Guide 56
Page 79

Chapter 4 Common StorNext Tasks
Scheduling StorNext Events
• Full Backup: By default, a full backup is run once a week to back up
the entire database, configuration files, and the file system metadata
dump file.
• Partial Backup: By default, a partial backup is run on all other days
of the week that the full backup is not run. This backup includes
database journals, configuration files, and file system journal files.
• Rebuild Policy: This scheduled event rebuilds the internal candidate
lists (for storing, truncation, and relocation) by scanning the file
system for files that need to be stored.
Note: The Scheduler does not dynamically update when dates and
times are changed significantly from the current setting. You
must reboot the system for the Scheduler to pick up the
changes.
Each of these events initially has a default schedule, but you can
configure the schedules to suit your system needs.
Viewing a Schedule 4
The procedure for viewing an event's existing schedule is the same
regardless of the event type.
1 From the StorNext Home Page, select Schedule Events from the
Admin menu. The Feature Schedules screen appears.
2 Select an event type:
•Clean Info
• Clean Versions
•Full Backup
•Partial Backup
• Rebuild Policy
3 Click Configure. The Feature Schedules screen displays the selected
event type and any existing schedules.
4 Click Close when you are finished viewing the schedule. (You can
also click Back to return to the previous screen.)
StorNext User’s Guide 57
Page 80

Chapter 4 Common StorNext Tasks
Scheduling StorNext Events
Adding a New Schedule 4
Figure 35 Feature Schedules
Screen
Use the following procedure to schedule StorNext events. The procedure
for adding a new schedule for an event is the same regardless of the event
type.
1 From the StorNext Home Page, select Schedule Events from the
Admin menu. The Feature Schedules screen appears.
2 Select the type of event you want to schedule:
•Clean Info
• Clean Versions
•Full Backup
•Partial Backup
• Rebuild Policy
StorNext User’s Guide 58
Page 81

Figure 36 Feature Schedules
Screen 2
Chapter 4 Common StorNext Tasks
Scheduling StorNext Events
3 Click Configure. The Feature Schedules screen displays the selected
event type and any existing schedules.
StorNext User’s Guide 59
Page 82

Figure 37 Add Feature
Schedules Screen
Chapter 4 Common StorNext Tasks
Scheduling StorNext Events
4 Click Add. The Add Feature Schedules screen appears.
5 In the Name field, enter a name for the new schedule.
6 Select either Days of the Week or Days of the Month.
•If you selected Days of the Week, select the days on which you
want the event to run. To select multiple days, hold down the
CTRL key when you select subsequent days.
•If you selected Days of the Month, select the calendar dates on
which you want the event to run. To select multiple dates, hold
down the CTRL key when you select subsequent dates.
7 At the Run Time field, specify the time of day you want the event to
begin.
8 At the Start Window field, specify the window in which you want
the StorNext Scheduler to start the event. The Scheduler attempts to
begin the event within the specified Start Window time (e.g, 30
minutes). If the event cannot begin at that time, the Scheduler tries
again during the next cycle.
StorNext User’s Guide 60
Page 83

Chapter 4 Common StorNext Tasks
Scheduling StorNext Events
9 Do one of the following:
•Click Apply to save your entry and create the new schedule.
When the Status screen displays Success, click Close.
•Click Cancel to exit the screen without saving your entries. The
Feature Schedules window closes.
•Click Back to return to the previous screen. (When you click Back
you lose anything you entered on the Add screen.)
10 On the first Feature Schedule screen, click one of the following:
• Back: Go back to the previous screen
• Add: Add a new schedule
• Modify: Change an existing schedule
• Delete: Delete an existing schedule
• Reset: Reset the schedule to the default settings
• Close: Close the window
Modifying an Existing Schedule 4
The procedure for modifying an existing schedule for an event is the
same regardless of the event type.
1 From the StorNext Home Page, select Schedule Events from the
Admin menu. The Feature Schedules screen appears.
2 Select an event type:
•Clean Info
• Clean Versions
•Full Backup
•Partial Backup
• Rebuild Policy
3 Click Configure. The Feature Schedules screen displays the selected
event type and any existing schedules.
4 Select the schedule you want to change, and then click Modify.
5 In the Name field, view or change the name for the new schedule.
StorNext User’s Guide 61
Page 84

Chapter 4 Common StorNext Tasks
Scheduling StorNext Events
6 Select either Days of the Week or Days of the Month.
•If you selected Days of the Week, view or change the days on
which you want the event to run. To select multiple days, hold
down the CTRL key when you select subsequent days.
•If you selected Days of the Month, view or change the calendar
dates on which you want the event to run. To select multiple
dates, hold down the CTRL key when you select subsequent
dates.
7 At the Run Time field, view or change the time of day you want the
event to begin.
8 At the Start Window field, view or change the window in which you
want the StorNext Scheduler to start the event. The Scheduler
attempts to begin the event within the specified Start Window time
(e.g, 30 minutes). If the event cannot begin at that time, the Scheduler
tries again during the next cycle.
9 Do one of the following:
•Click Apply to save your changes and modify the new schedule.
When the Status screen displays Success, click Close.
•Click Cancel to exit the screen without saving your changes. The
Feature Schedules window closes.
•Click Back to return to the previous screen. (When you click Back
you lose any changes you made on the Modify screen.)
Deleting an Existing Schedule 4
The procedure for deleting an existing schedule for an event is the same
regardless of the event type. For every event type except Partial Backup
you must have at least one schedule, so you will not be allowed to delete
a solitary schedule.
1 From the StorNext Home Page, select Schedule Events from the
Admin menu. The Feature Schedules screen appears.
2 Select an event type:
•Clean Info
• Clean Versions
•Full Backup
•Partial Backup
StorNext User’s Guide 62
Page 85

Chapter 4 Common StorNext Tasks
Scheduling StorNext Events
• Rebuild Policy
3 Click Configure. The Feature Schedules screen displays the selected
event type and any existing schedules.
4 Select the schedule you want to change, and then click Delete.
Caution: After you click Delete you will NOT be asked to
confirm that you want to delete the schedule. DO
NOT click Delete unless you are absolutely certain
you want to delete the schedule.
5 When the Status screen displays Success, click Close.
6 Do one of the following:
•Click Cancel to exit the screen. The Feature Schedules window
closes.
•Click Back to return to the previous screen.
Resetting a Schedule 4
The Reset function deletes ALL existing schedules for an event type and
creates one schedule that uses default values. The procedure for resetting
schedules for an event is the same regardless of the event type.
1 From the StorNext Home Page, select Schedule Events from the
Admin menu. The Feature Schedules screen appears.
2 Select an event type:
•Clean Info
• Clean Versions
•Full Backup
•Partial Backup
• Rebuild Policy
3 Click Configure. The Feature Schedules screen displays the selected
event type and any existing schedules.
4 Click Reset.
5 When prompted, confirm that you want to delete all existing
schedules and create a single schedule that uses default values: click
Yes to proceed or No to abort.
StorNext User’s Guide 63
Page 86

6 Do one of the following:
•Click Cancel to exit the screen. The Feature Schedules window
closes.
•Click Back to return to the previous screen.
Setting Up E-mail Notification
The E-mail Notification feature allows you to specify parties who should
be contacted when system alerts occur. You can specify e-mail recipients,
alert levels, and information about your e-mail configuration.
Email notification is also an important part of the StorNext backup
process. When you select the Backup option on the Configure Email
Address screen (see figure 40
completed backup is emailed to the address you specify. This email
contains the following important information:
Chapter 4 Common StorNext Tasks
Setting Up E-mail Notification
on page 67,) key information about a
• The required media for restoring from a complete set
• Names of configured storage disks or deduplication storage disks
• Any CVFS configuration files for file systems that are not data
migration-enabled are appended to the email
Note: Before configuring e-mail notification, make sure your SMTP
server is configured.
StorNext User’s Guide 64
Page 87

Figure 38 Configure E-mail
Notification Screen
Chapter 4 Common StorNext Tasks
Setting Up E-mail Notification
1 From the StorNext home page, choose E-mail Notification from the
Admin menu. The Configure E-mail Notification Introduction
screen appears.
StorNext User’s Guide 65
Page 88

Figure 39 Configure SMTP Email Screen
Chapter 4 Common StorNext Tasks
Setting Up E-mail Notification
2 On the Configure E-mail Notification Introduction screen, review
your current e-mail settings (if any) and then click Next to continue.
The Configure SMTP E-mail screen appears.
3 On the Configure SMTP E-mail screen, enter the fields related to
your e-mail system configuration:
• SMTP Server: Enter the identification for the server that stores
and processes your e-mail account information.This might be a
valid server name or an IP address.
• Authentication: If your e-mail provider requires a password
upon sign on, select the Password option. Otherwise, select
None.
• Account: Enter a valid e-mail account for outgoing e-mail
messages.
• Password: Enter the e-mail account’s sign-on password, if
required.
StorNext User’s Guide 66
Page 89

Figure 40 Configure E-mail
Addresses Screen
Chapter 4 Common StorNext Tasks
Setting Up E-mail Notification
• Sender Address: Enter the e-mail address for the entity sending
alert messages to recipients.
• Send Test E-mail to: Enter an e-mail address to which you can
send test messages in order to confirm successful configuration.
4 Click Next to continue. The Configure E-mail Addresses screen
appears.
5 On the Configure E-mail Addresses screen, add e-mail recipients by
entering the following fields:
• E-mail: Enter the e-mail address of the person who should
receive e-mail alerts.
• Backups: Select this option to receive e-mail after a backup has
occurred on your system.
• Service Tickets: Select this option to receive e-mail when a
service ticket for your system is generated. Notifications for
service tickets will be sent for events at the specified alert level
and higher. You must specify an alert level.
StorNext User’s Guide 67
Page 90

Figure 41 Complete E-mail
Configuration Screen
Chapter 4 Common StorNext Tasks
Setting Up E-mail Notification
• Policy Class: Select this option to receive e-mail about policy
class. You must specify a policy class.
• Notify Quantum on Service Ticket: Select this option to
automatically send the Quantum Technical Assistance Center a
message when a service ticket is generated.
6 Click Add to add to the list of e-mail recipients the e-mail recipient
whose information you just entered. Or, select a previously added email recipient from the list and click Delete to remove that recipient.
7 If necessary, add additional e-mail recipients by repeating steps 4 and
5. Click Next to continue. The Complete E-mail Configuration
screen appears.
8 Review your selections and do one of the following:
•Click Back to change information you entered, or add or remove
another e-mail recipient.
•Click Next to continue.
StorNext User’s Guide 68
Page 91

9 When the Status screen informs you that your e-mail notifications
were successfully processed, click Close.
Cancelling SNSM Requests
If your system includes StorNext Storage Manager, the Cancel Request
option (accessible from the SNSM home page’s Admin menu,) allows you
to cancel a pending mount request that has not yet been executed by the
system. On the Cancel Request screen you can view and select one or
more requests, which are listed according to request ID and request type.
1 From the SNSM home page, choose Cancel Request from the Admin
menu. The Cancel Request screen appears.
Figure 42 Cancel Request
Screen
Chapter 4 Common StorNext Tasks
Cancelling SNSM Requests
2 Select from the Select Request ID list the pending requests you want
to cancel. If desired, you can click Select All to select all requests.
3 Click Apply to continue.
StorNext User’s Guide 69
Page 92

Chapter 4 Common StorNext Tasks
Cancelling SNSM Requests
4 When the Status screen informs you that the selected requests have
been successfully cancelled, click OK. The requests you selected are
now removed from the list on the Cancel Request screen.
StorNext User’s Guide 70
Page 93

5Backing Up StorNext
This chapter provides instructions on backup up the StorNext software.
This chapter covers these topics:
• Types of StorNext Software Backups
• Performing a StorNext Software Backup
• Managing the Backup Policy
Types of StorNext Software Backups
Chapter 5
There are two types of StorNext software backup: Full and Partial. By
default, a full backup runs once a week, and partial backups are
scheduled to run on all other days of the week that the full backup is not
run. If you would like to change the backup schedule, see Managing the
Backup Policy on page 74.
A Full Backup includes:
• The StorNext database
• Configuration files
• File system metadata dump file (after journal files are applied)
A Partial Backup includes:
StorNext User’s Guide 71
Page 94

Chapter 5 Backing Up StorNext
Types of StorNext Software Backups
• StorNext database journals
• Configuration files
• File system journal files
Note: These backups DO NOT back up user data. This procedure
backs up only StorNext-related system files.
Setting up Email Notification For Backup 5
Before you run a StorNext backup, be sure to set up email notification as
described in Setting Up E-mail Notification
on page 64.
Email notification is an important part of the StorNext backup process.
When you select the Backup option on the Configure Email Address
screen (see figure 40
on page 67,) key information about a completed
backup is emailed to the address you specify. This email contains the
following important information:
• The required media for restoring from a complete set
• Names of configured storage disks or deduplication storage disks
• Any CVFS configuration files for file systems that are not data
migration-enabled are appended to the email
StorNext User’s Guide 72
Page 95

Performing a StorNext Software Backup
Performing a StorNext Software Backup
Use the following procedure to manually run a StorNext backup.
1 From the StorNext home page select Run Backup from the Admin
menu. The Backup StorNext screen appears.
Figure 43 Backup StorNext
Screen
Chapter 5 Backing Up StorNext
StorNext User’s Guide 73
Page 96

Figure 44 Complete Backup
Task Screen
Chapter 5 Backing Up StorNext
Managing the Backup Policy
2 Select the type of backup you want run (Full or Partial,) and then
click Next. The Complete Backup Task screen appears.
3 Click Next to start the backup.
4 Click Finish when the Status screen displays success.
Managing the Backup Policy
The Backups option on the SNSM home page’s Admin menu allows you
to manage your backup policy by setting the media type for each copy.
You can also specify the maximum of file versions to maintain, and also
indicate where backups reside on your managed file system.
StorNext User’s Guide 74
Page 97

Figure 45 Backup Policy
Screen
Chapter 5 Backing Up StorNext
Managing the Backup Policy
1 From the SNSM home page, choose Backups from the Admin menu.
The Backup Policy screen appears.
2 Enter the following information:
• File Copy 1 - 4: For each copy number (1 - 4,) select the media
type. Only the media types applicable to your configuration are
selectable.
• Max Backup Sets: If desired, specify the maximum number of
backup sets you want to create.
• Drivepool to Use: Select the location where backups should
reside on your managed file system.
• Checksum Generation: Select this option if you want to generate
a checksum.
• Checksum Validation: Select this option to enable checksum
validation.
• Managed File System to use for Backup: Select the name of the
file system to use for the backup.
3 Click Apply to save and apply the backup policy.
StorNext User’s Guide 75
Page 98

Chapter 5 Backing Up StorNext
Managing the Backup Policy
4 After the Status screen informs you that the operation was
performed successfully, click OK.
StorNext User’s Guide 76
Page 99

Chapter 6
6Managing the File System
This chapter describes how to manage file systems by performing these
major configuration and administration tasks:
• W
orking With File Systems
• Managing File System Operations
• Working With Disks
• Working With Stripe Groups
• Working With Affinities
• Using the SNSM File System Functions
• Understanding Dynamic Resource Allocation
• Performing File System Expansion
• Performing Stripe Group Movement
Working With File Systems
This section includes the following file-system related tasks:
• Adding a File System
• Creating a File System From SNFS
StorNext User’s Guide 77
Page 100

Chapter 6 Managing the File System
Working With File Systems
• Modifying a File System
• Deleting a File System
Note: This section describes how to create, modify, expand, and
delete a file system and using the GUI. For instructions on
using the CLI to accomplish the same tasks, see Using The
Command Line Interface.
Adding a File System 6
Figure 46 File System Introduction Screen
The following procedure describes how to create an empty file system.
The number of file systems you can add is limited only by the number of
disks available for configuration.
1 From the StorNext home page, choose Add File System from the
Admin menu. The File System - Introduction screen displays both
configured file systems and disks available for configuration.
StorNext User’s Guide 78
 Loading...