


Product name:IEEE802.16e WiMAX CardBus
Model name:WC510
Brand name:QMI
Quanta WiMAX Connection
Manager
Quanta Computer Inc.
http://www.quantatw.com/
User Guide
Version 1.01

Quanta Computer Inc.
http://www.quantatw.com/
Contents
1. Introduction...........................................................................................................................................4
2. Hardware installation............................................................................................................................4
3. Driver installation and un-installation...................................................................................................5
3.1. Un-install the previous WiMAX NDIS Driver.............................................................................5
3.2. Install WiMAX NDIS Driver.......................................................................................................6
4. WiMAX Utility installation ..................................................................................................................9
4.1. .NET Framwork 2.0......................................................................................................................9
4.2. WinPcap Library installation........................................................................................................9
4.3. Quanta WiMAX Connection Manager installation....................................................................11
5. Configure the WiMAX Card by Quanta WiMAX Connection Manager............................................13
5.1. Use Quanta WiMAX Connection Manager to setup WiMAX connection without security
configuration.................................................................................................................................................13
5.2. Use Quanta WiMAX Connection Manager to setup WiMAX connection with security
configuration.................................................................................................................................................21
6. Appendix.............................................................................................................................................30
6.1. Use Quanta Config File Editor to setup configuration file parameters......................................30
6.2. Configuration File Parameters....................................................................................................31
6.3. Setup WCM network configuration to static IP address.............................................................35
Page 2

Revision History
Version Release Date Description
1.00 07/04/2007 1st User Guide Release
1.01 08/02/2007 Update some pictutes
Quanta Computer Inc.
http://www.quantatw.com/
Page 3
Quanta Computer Inc.
http://www.quantatw.com/
1. Introduction
The CardBus of WiMAX Connection Manager supports IEEE 802.16e-2005 state of the art Scalable
OFDMA based Technology. It provides users a seamless broadband wireless access, video streaming at home,
office or on the move. To protect information transmitting through wireless network, standard security Sublayer
PKMv2 EAP based user authorization/authentication and AES for data encryption are supported.
Easy-to-use Windows XP-based utility provide the graphic user interface is for system/link status,
configuration and firmware upgrade.
The following chapters we will show you how to install from hardware to software step by step
Hardware Installation
NDIS Driver Installation and Old driver un-installation (for previous version)
Windows Utility Installation
.Net Framework 2.0
WinPcap Library
Quanta Wimax Connection Manager
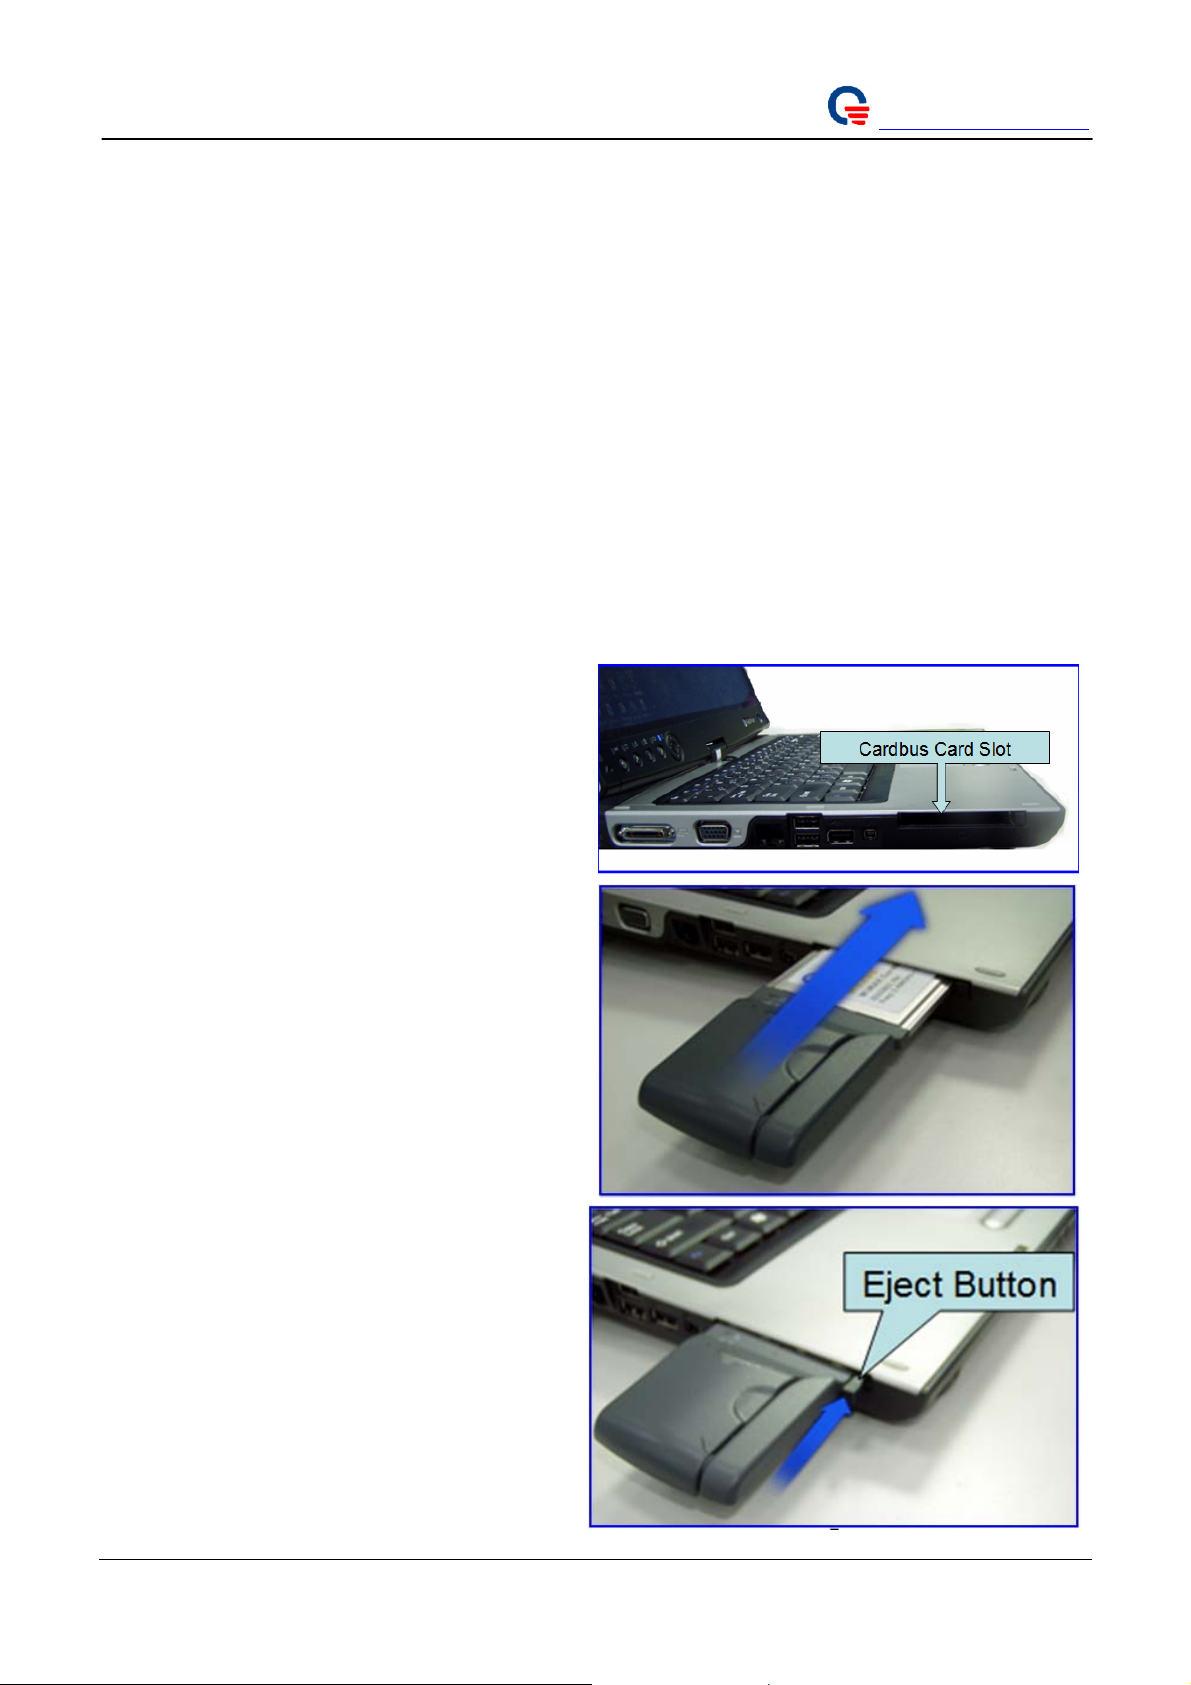
2. Hardware installation
1. Locate the available CardBus card slot on your
Laptop.
2. Then insert the CardBus Subscriber into the
CardBus card slot.
3. Remove method: To remove the CardBus
Subscriber, Please press the Eject Button of the
CardBus card slot. To make it stretch out. Then,
push the Eject Button and the CardBus
Subscriber will slide out slightly. And pull it out
of the slot.
Page 4
3. Driver installation and un-installation
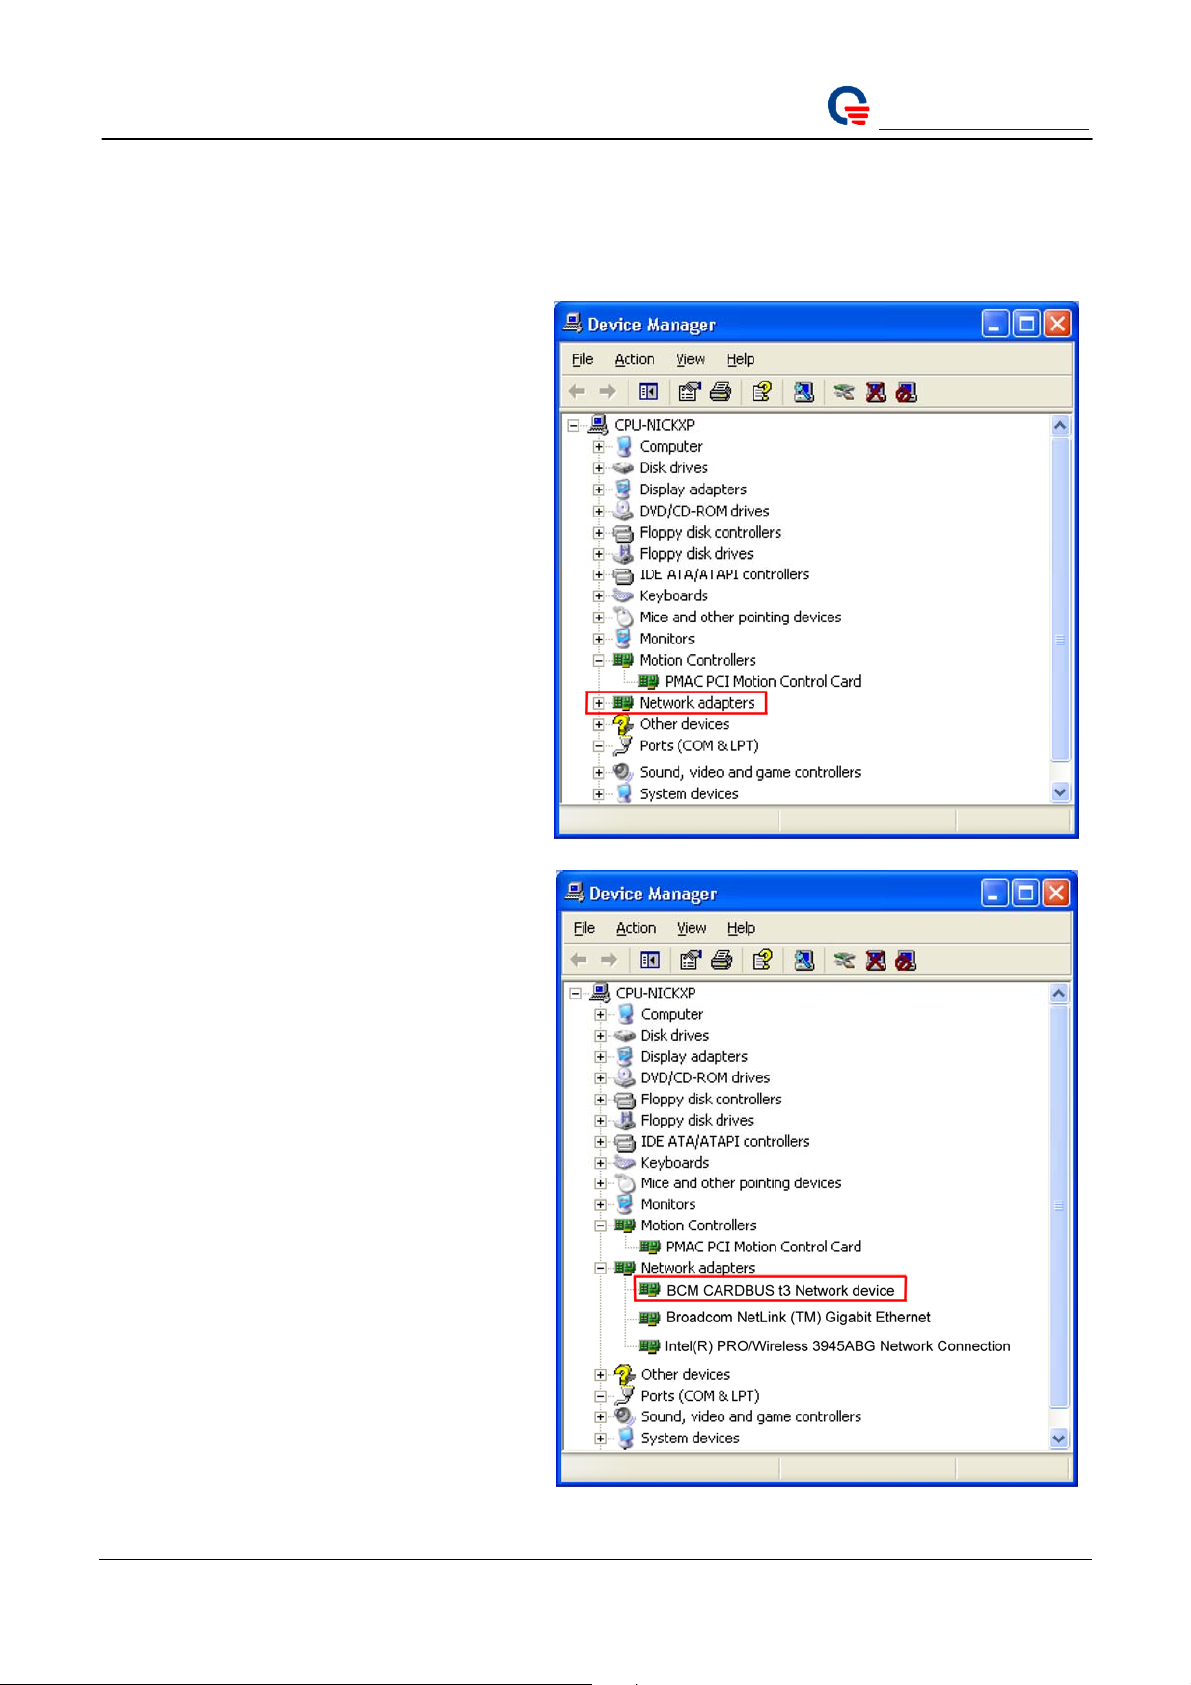
3.1. Un-install the previous WiMAX NDIS Driver
1. You have to plug the WiMAX Connection
Manager card into your laptop before
unload the old WiMAX NDIS driver.
2. Right-click on “My Computer”, in the
Start menu, and choose “Properties”
3. On the “Hardware” tab, choose “Device
Manager”
4. Expand the “Network Adapters”entry
Quanta Computer Inc.
http://www.quantatw.com/
5. Right-click on “BCM CARDBUS t3
Network device”and select “Uninstall”.
6. Choose “OK” to confirm the device
removal.
7. The old WiMAX NDIS driver has been
removed.
Page 5
3.2. Install WiMAX NDIS Driver
1. Please, un-install your previous WiMAX
NDIS driver before you install the new
WiMAX NDIS driver (reference: Chapter
3.1 ).
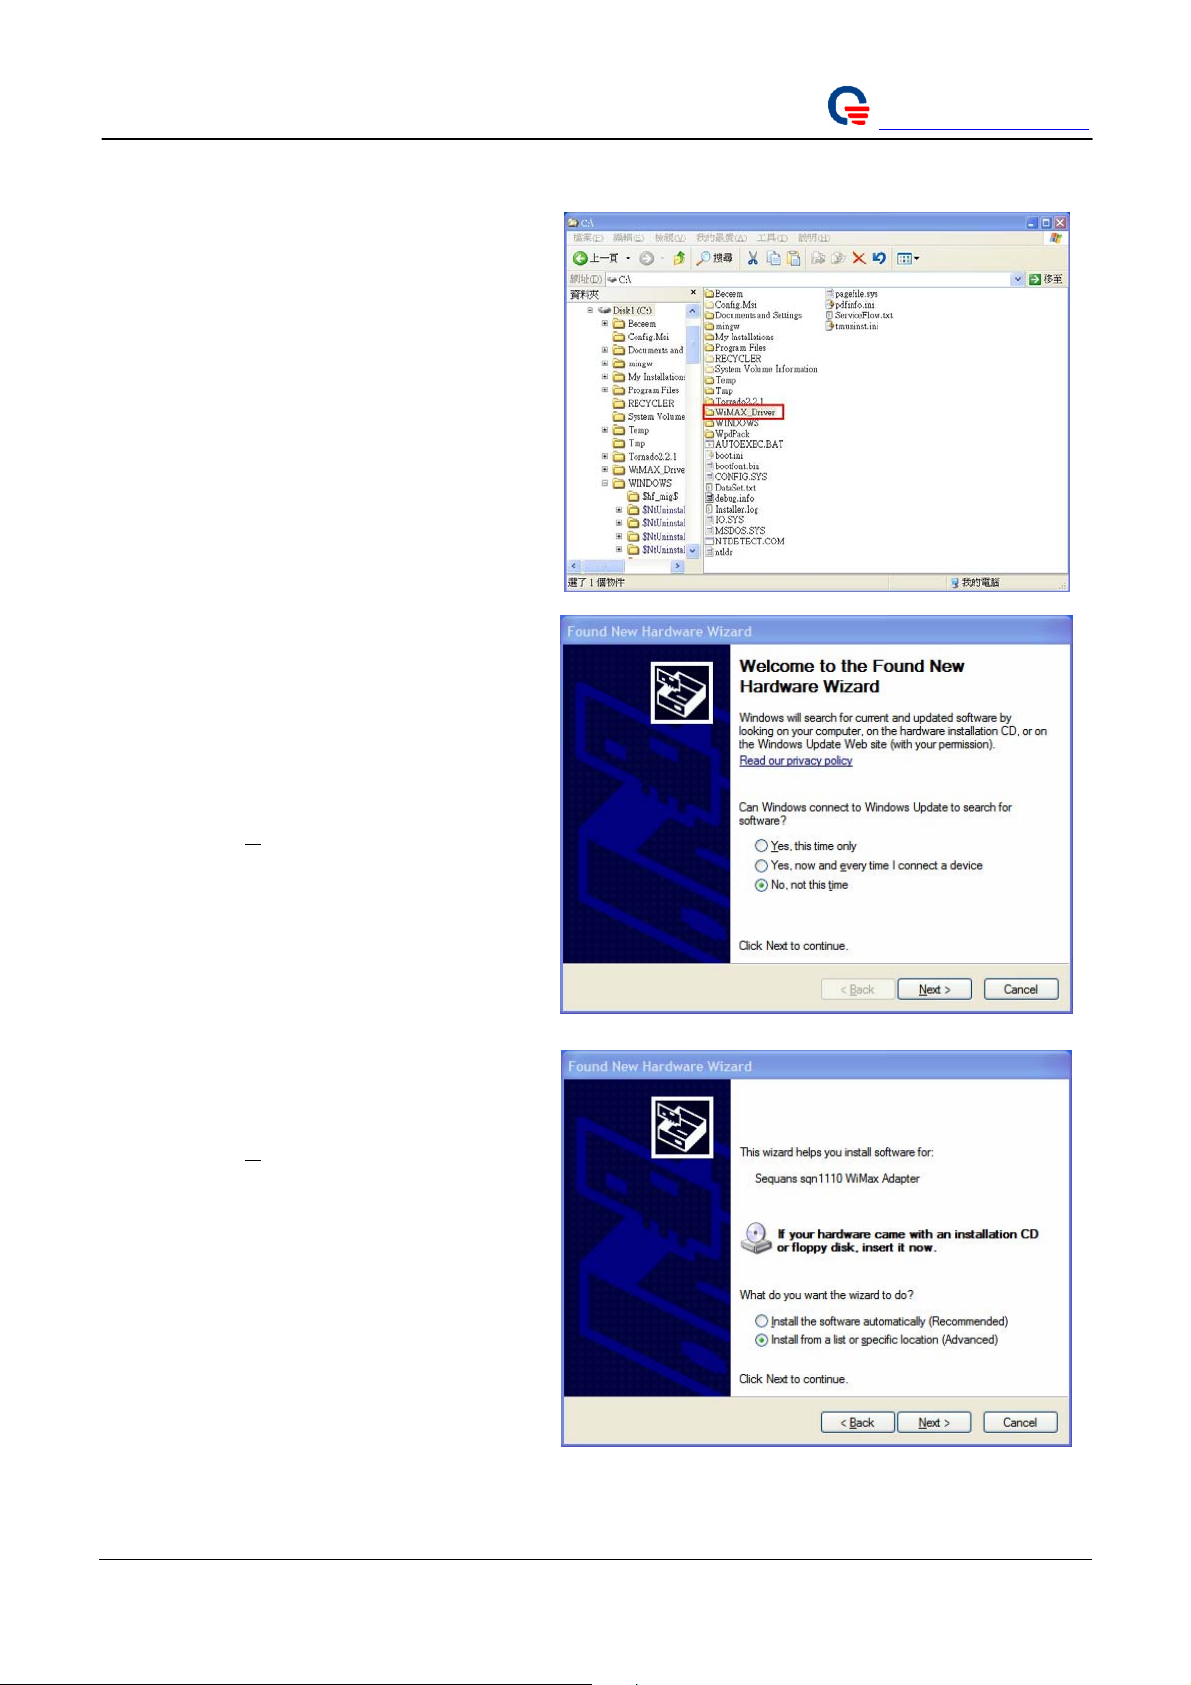
2. Please, use WinRAR to decompress the
WiMAX_Driver.rar to your C disk.
3. It will create a WiMAX_Driver folder in
your C disk (C:\ WiMAX_Driver).
Quanta Computer Inc.
http://www.quantatw.com/
4. When first connect the CardBus Subscriber
to your laptop, the operating system
(Windows XP) will detect a new device and
start the “Found New Hardware Wizard”
automatically.
5. Please select the “No, not this time” option
6. Click the “
Next >” button to continue the
installation.
7. Please select the “Install from a list or
specific location (Advanced)” option.
8. Click the “
installation.
Next >” button to continue the
Page 6
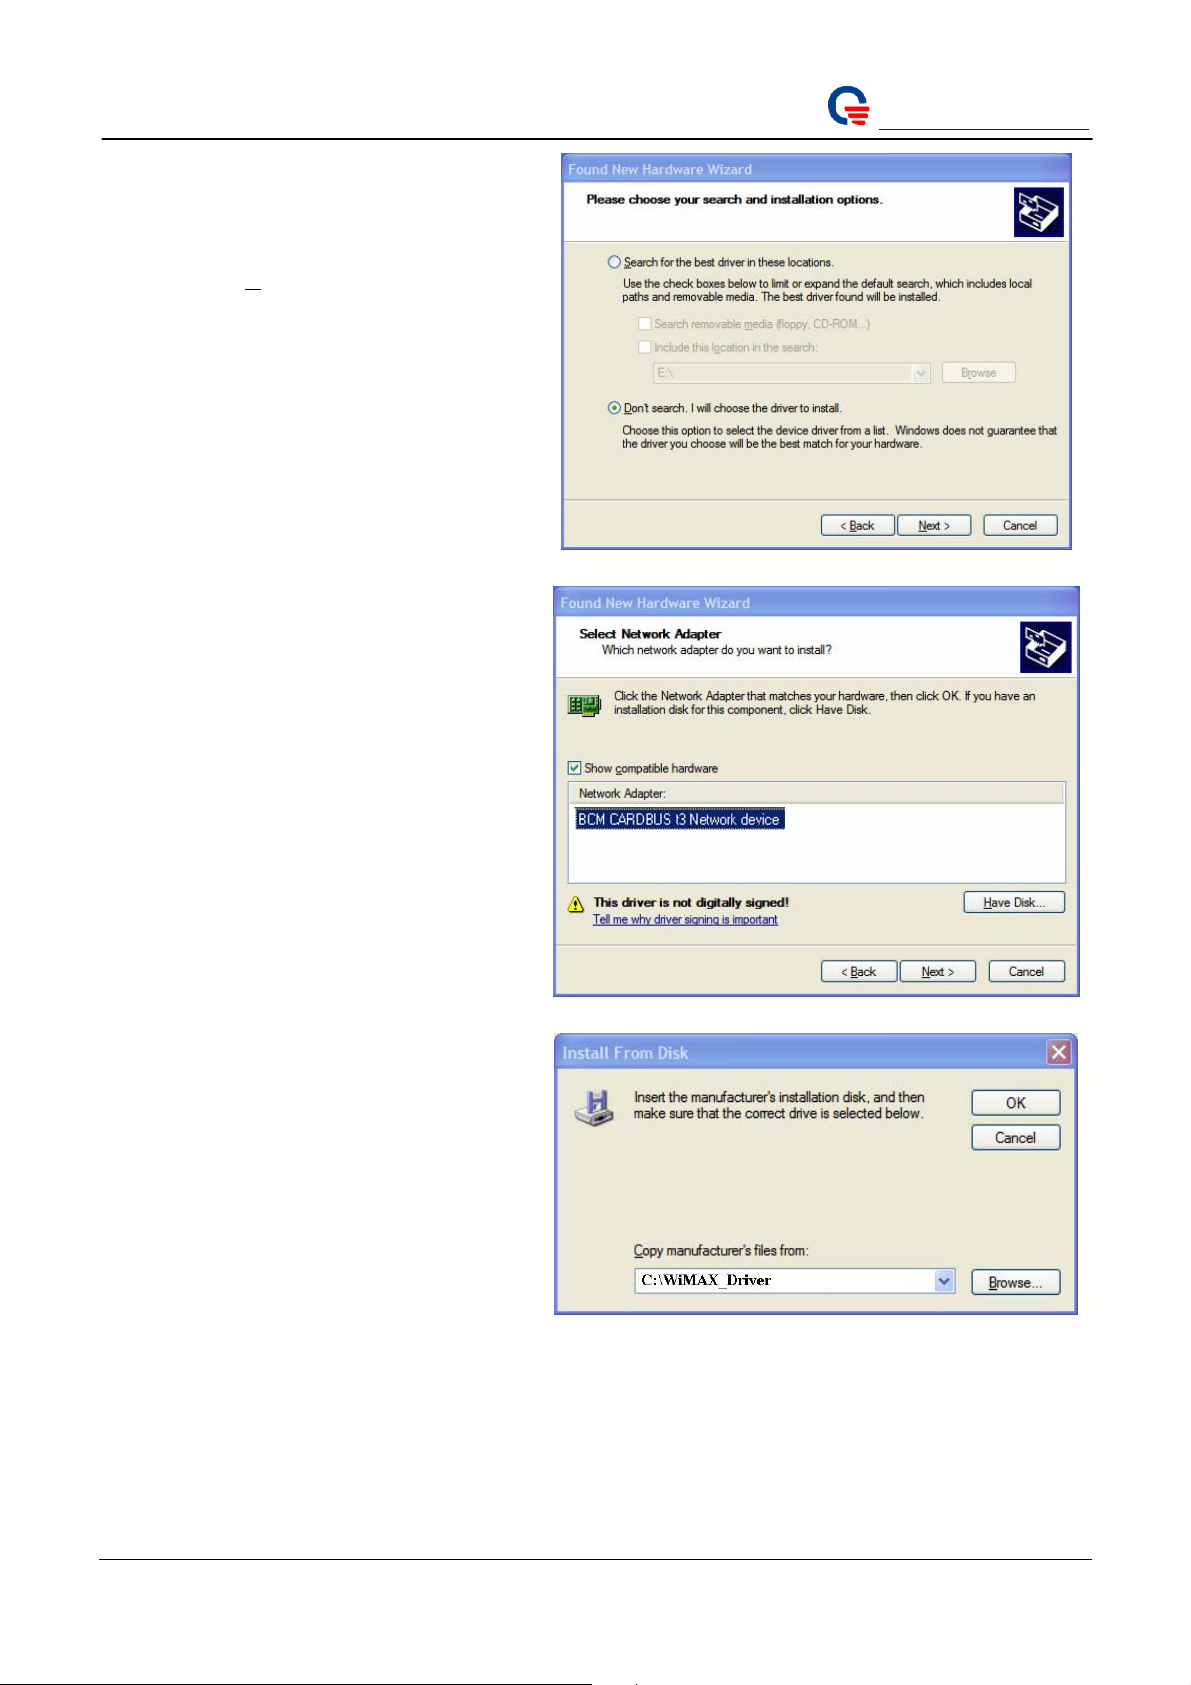
9. When prompt to choose your search and
installation options, select “Don’t search. I
will choose the driver to install.” option.
Quanta Computer Inc.
http://www.quantatw.com/
10. Click the “
Next >” button to continue the
installation.
11. Please click the “Have Disk…” button to
continue the installation.
12. Select C:\ WiMAX_Driver from
pull-down menu and click the ‘OK’ button
to continue the installation
Page 7
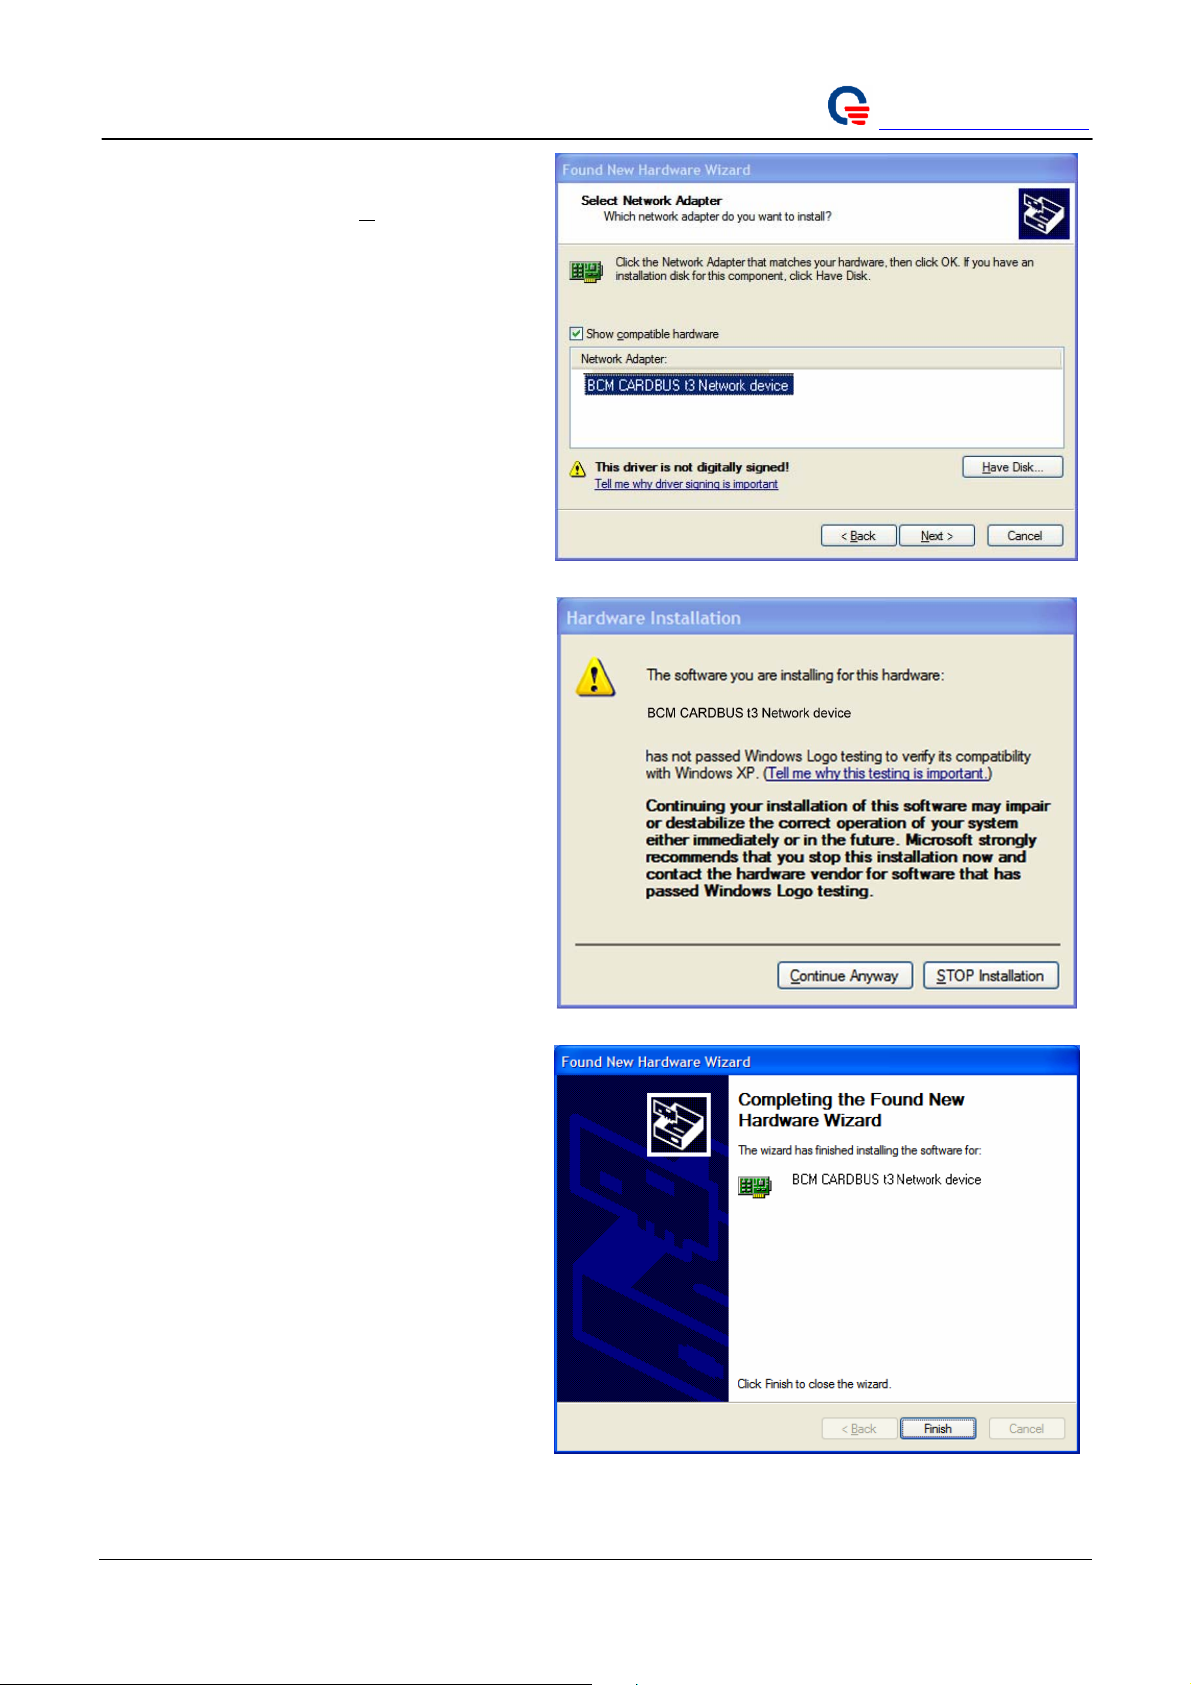
13. Windows XP has found the driver in this
directory. Please click “
Next >” button to
install the driver.
14. Please click on “Continue Anyway” button.
Quanta Computer Inc.
http://www.quantatw.com/
15. Please click the “Finish” button to complete
the installation.
Page 8
Quanta Computer Inc.
http://www.quantatw.com/
4. WiMAX Utility installation
4.1. .NET Framwork 2.0
In order to run Quanta WiMAX Connection Manager (WCM), the .NET Framework Version 2.0 (or higher)
must be installed. The .NET Framework 2.0 is already installed on many Windows XP computers. If you see a
Windows error message that begins ‘This application has failed to start because the application configuration is
incorrect. …’ as soon as you try running the WCM, it’s very likely that you do not have the .NET 2.0
framework installed on your computer.
To obtain the Framework, go to the Microsoft Download Center (
search for “.NET Framework Version 2.0 Redistributable Package (x86)”, and follow the installation
instructions given by Microsoft.
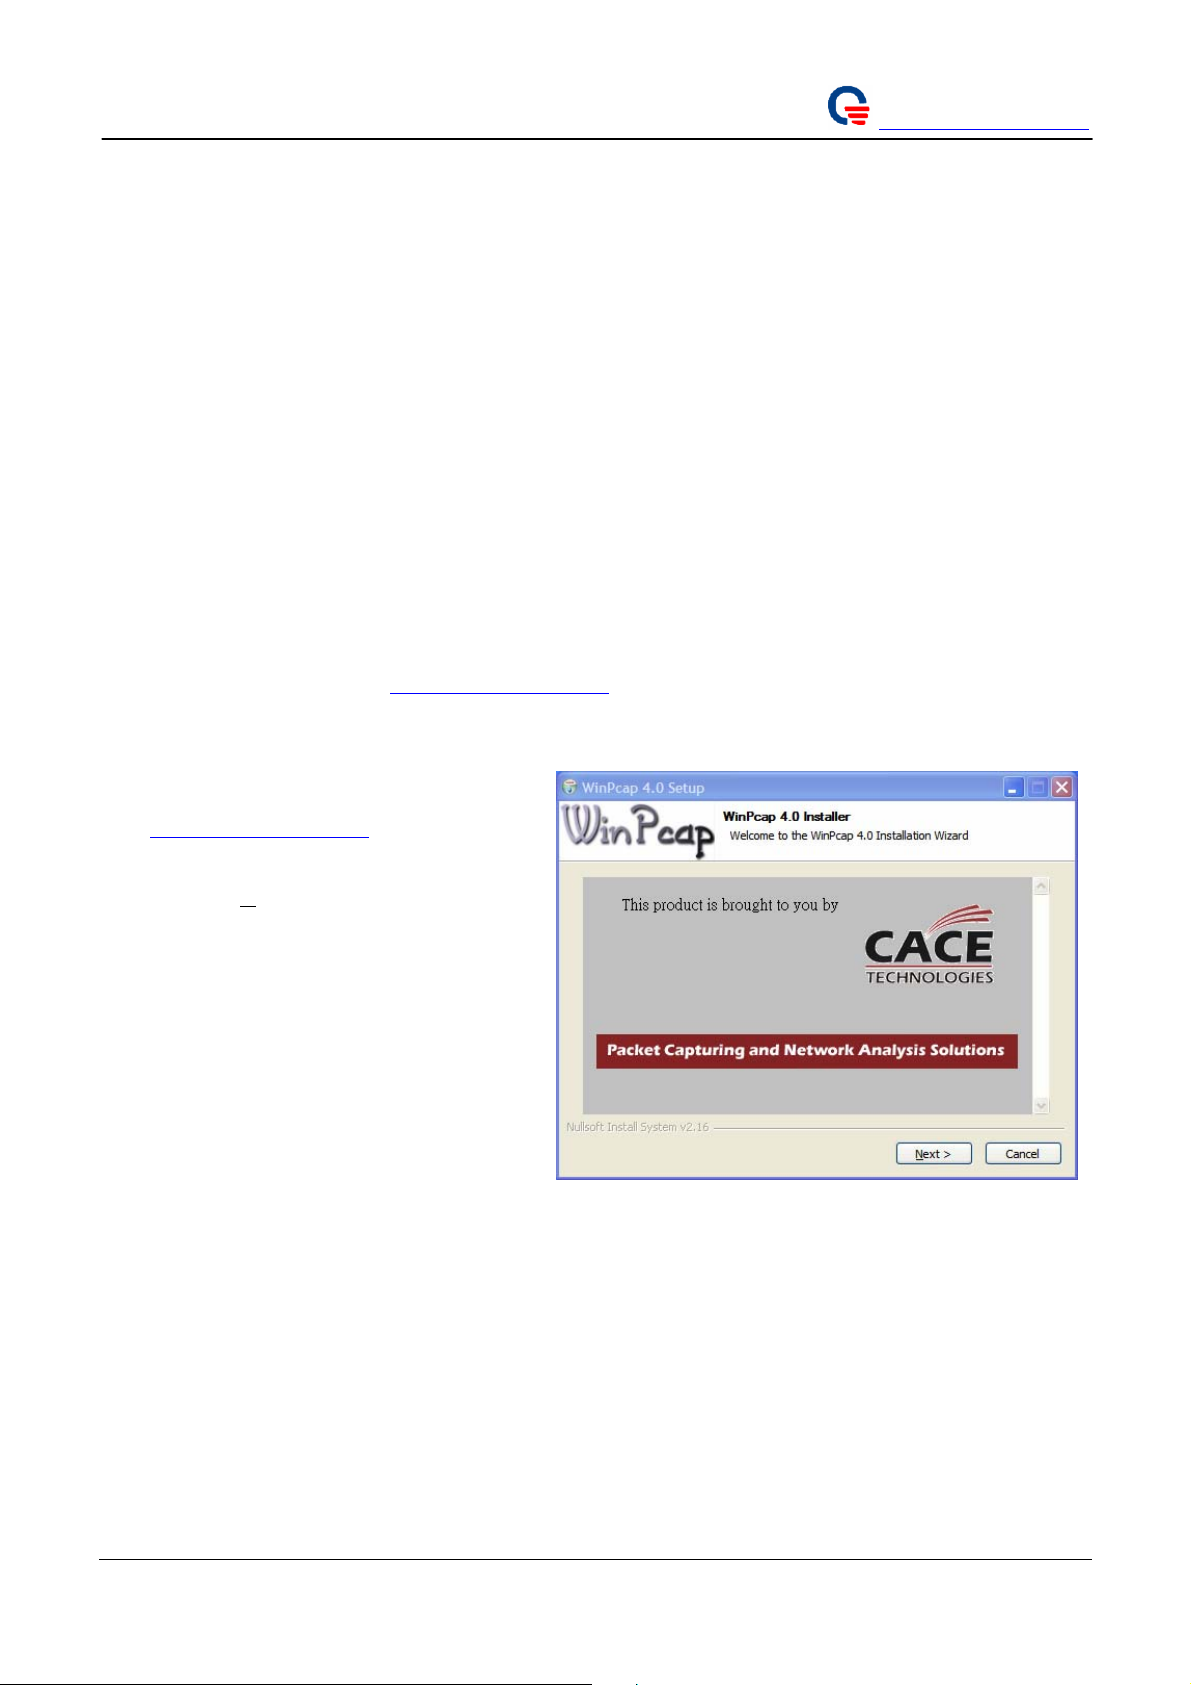
4.2. WinPcap Library installation
In order to run the Quanta WCM with EAP authentication, the WinPcap package must be installed on your
computer. WinPcap is already installed on many Windows XP computers. If you see a Windows error message
stating that the “wpcap.dll” file could not be found, you will need to install WinPCAP.
To obtain WinPCAP, go to
the “WinPcap auto-installer (driver + DLLs)”, and run this installer. You do not need to install the
WinDump package.
http://www.winpcap.org/, click on “Get WinPcap” on the left frame, download
http://www.microsoft.com/downloads/),
1. Download “ WinPcap_4_0.exe” from
http://www.winpcap.org/.
2. Please execute “WinPcap_4_0.exe”, and
click the “
Next >” button.
Page 9
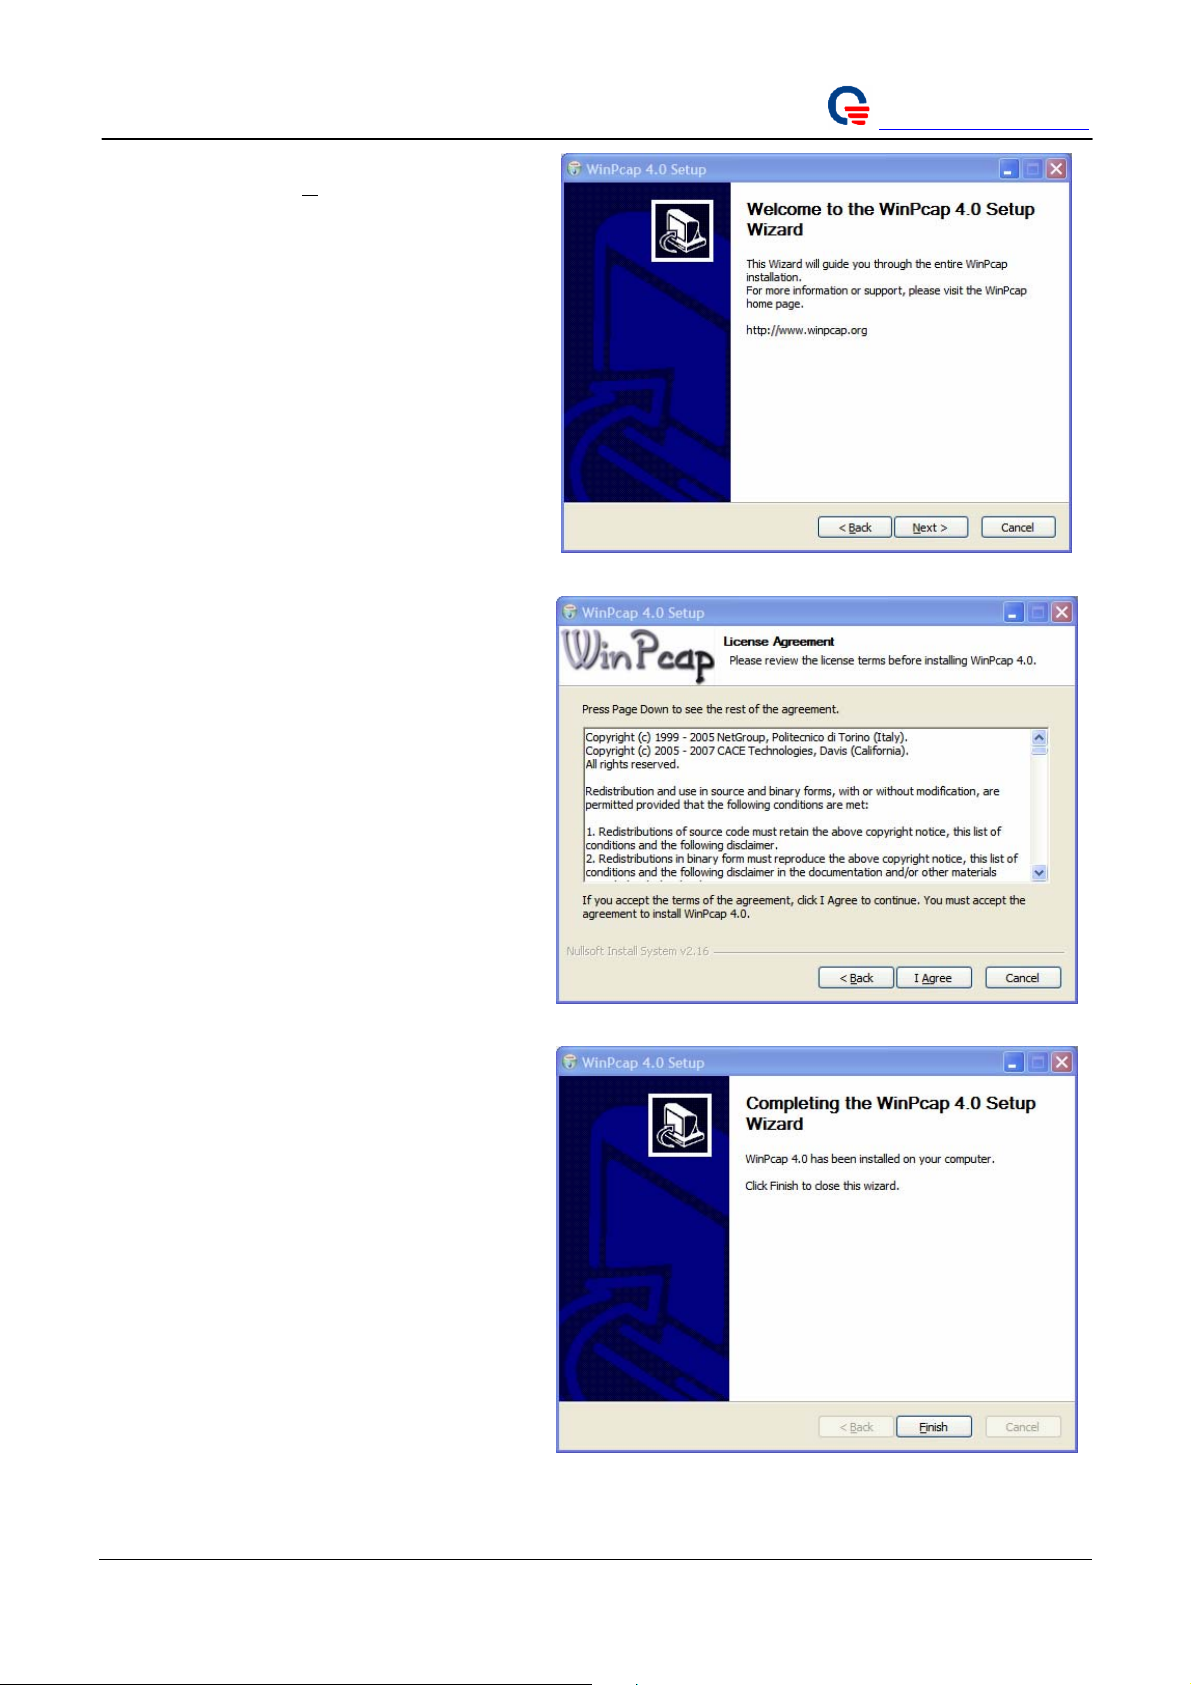
3. Please click the “Next >” button.
4. Please click the “I Agree” button.
Quanta Computer Inc.
http://www.quantatw.com/
5. Please click the “Finish” button to complete
the WinPcap library installation.
Page 10
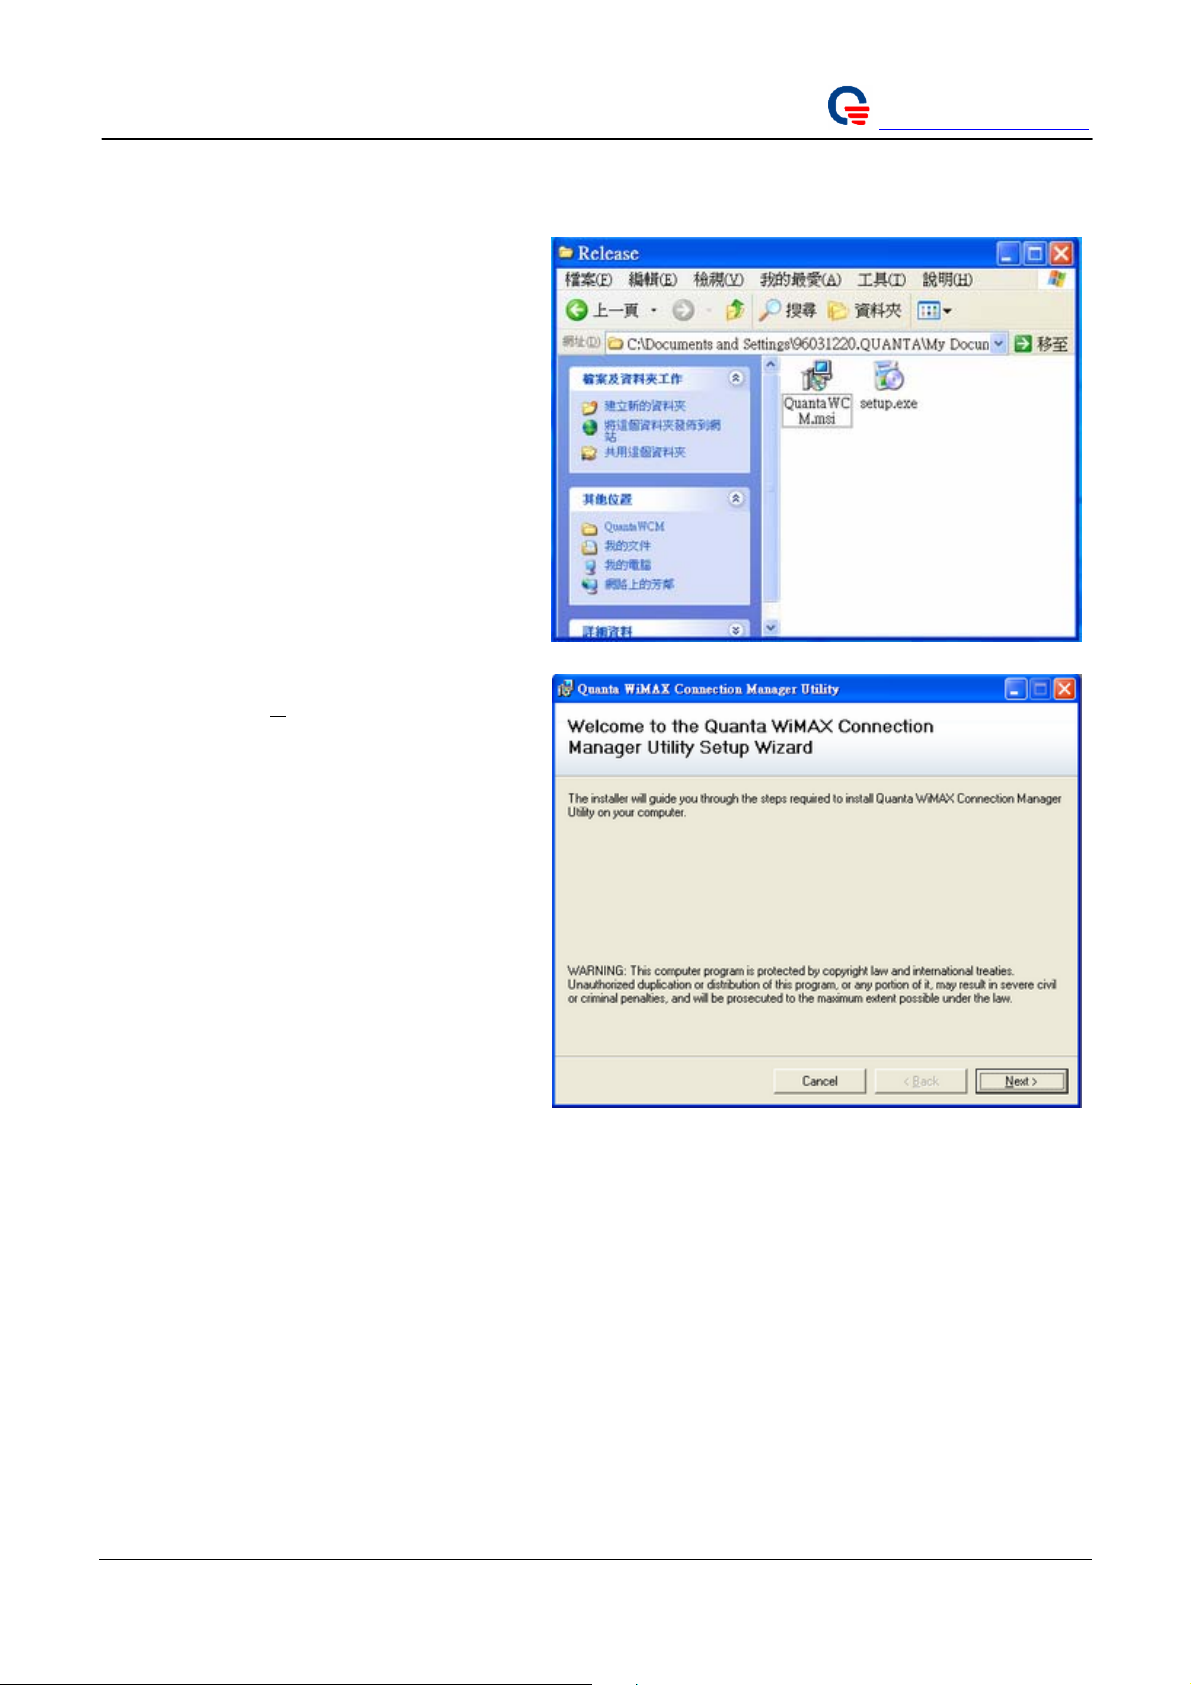
4.3. Quanta WiMAX Connection Manager installation
1. Please, use WinRAR to decompress the
“QuantaWCM Installer.rar” to your laptop.
2. Then enter “QuantaWCM Installer/” folder
and execute “setup.exe” to install Quanta
WCM.
Quanta Computer Inc.
http://www.quantatw.com/
3. Please click “
Next >” button.
Page 11
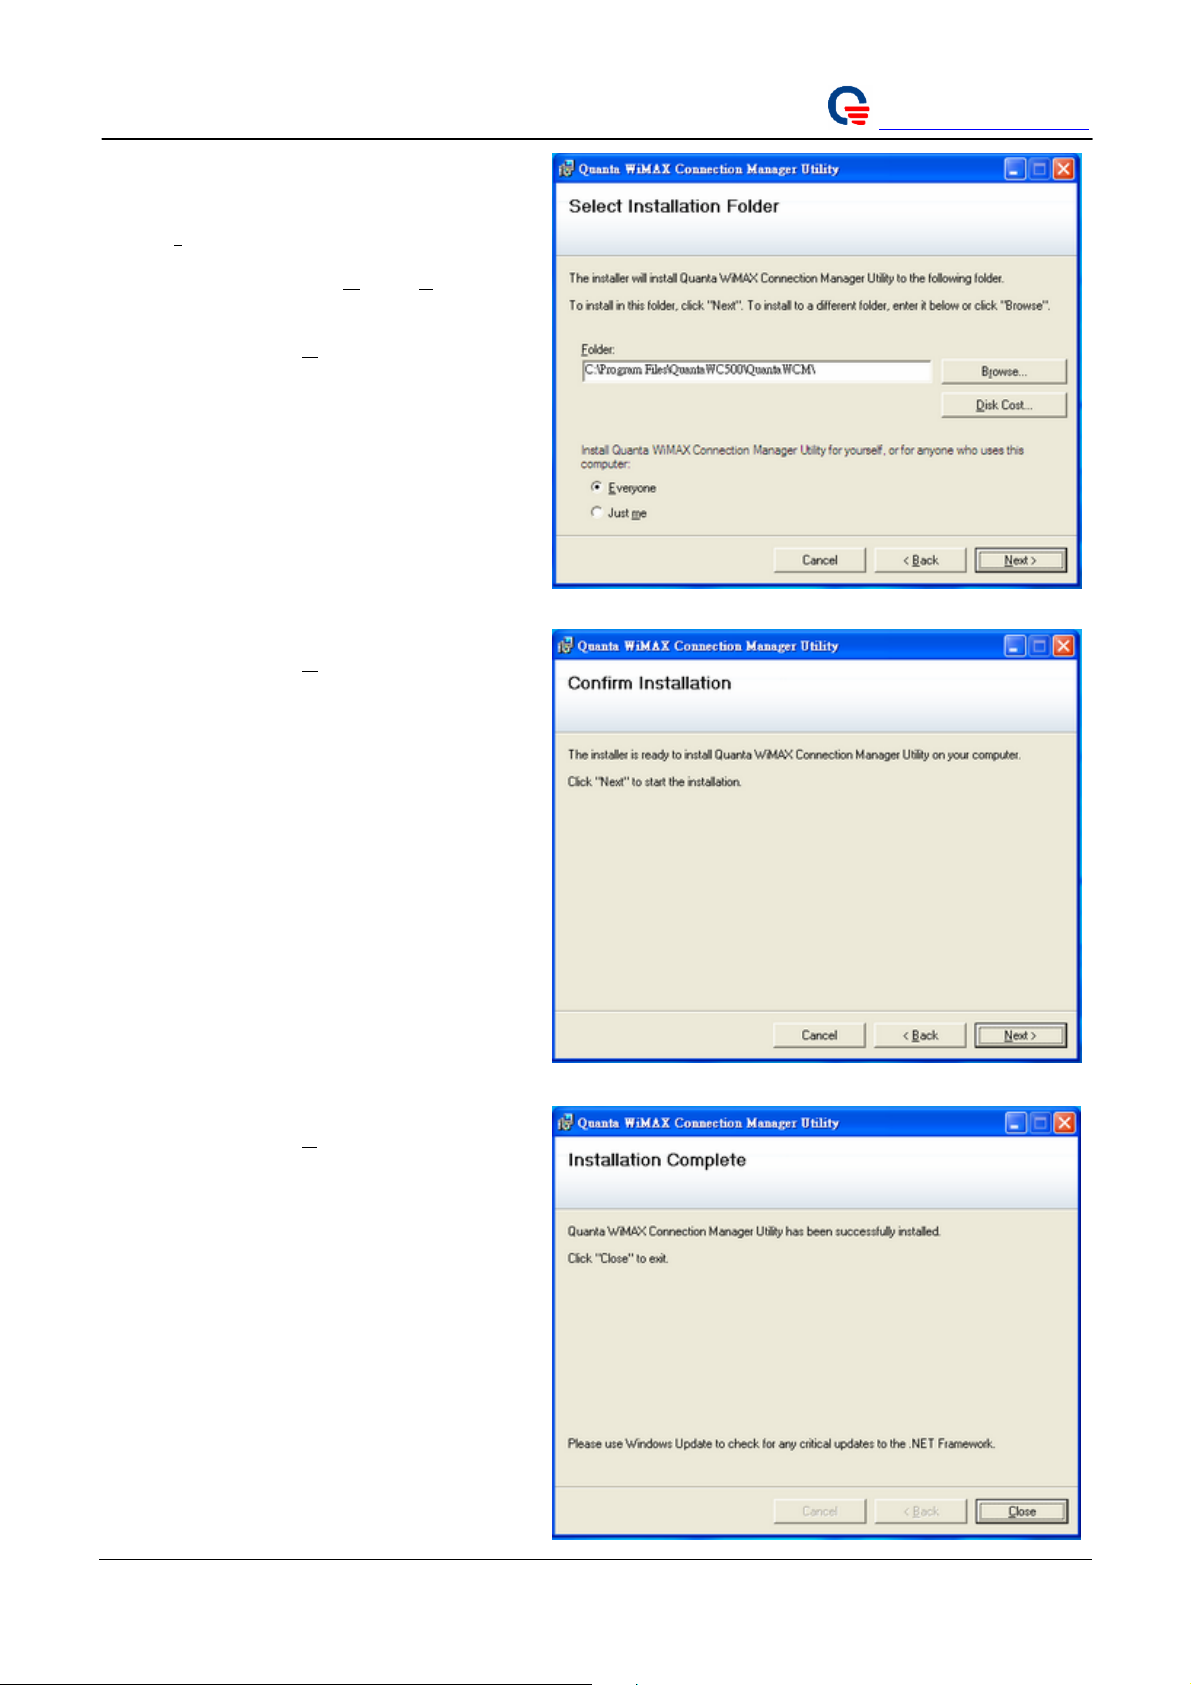
4. If you want to install the utility to a
different folder, you can click the
“B
rowse…” button.
Quanta Computer Inc.
http://www.quantatw.com/
5. You can choose “Just
change who can use the utility.
6. Please click the “
Next >” button to keep
going on.
7. Please click the “
Next >” button to install
the utility.
me” or “Everyone” to
8. Please click the “Close” button to complete
the installation.
Page 12

Quanta Computer Inc.
http://www.quantatw.com/
9. You can start to use the utility, “Quanta
WCM” to setup and configure the WiMAX
subscriber (WCM).
After finished Quanta WCM installation, if Quanta WiMAX card was inserted and power on, you can
double click the “QuantaWCM” icon to lunch the WCM . Before first running the WCM, it’s necessary to
configure firmware configuration file, such that it could make it effect on your system.
You can double click the “Quanta Configuration File Editor” icon to modify the related parameters, such
as bandwidth, center frequency. Once you lunch the Quanta WCM, it will automatically connect to BS with
strongest signal and provide you service. Please, refer to chapter
configuration file parameters.
6.2 to get detail information about the
5. Configure the WiMAX Card by Quanta WiMAX Connection
Manager
5.1. Use Quanta WiMAX Connection Manager to setup WiMAX
connection without security configuration
1. Please, double click the “QuantaWCM”
icon to lunch the WCM.
Page 13

2. Please, click “Option” on the Menu to setup
the WiMAX configuration.
Quanta Computer Inc.
http://www.quantatw.com/
3. You can choose the “Enable MAC
management message logging” option to
active/de-active MAC message log to file.
Page 14

4. Please, click “Network Search” tab to setup
WiMAX configuration (Frequency,
Bandwidth, etc.)
Quanta Computer Inc.
http://www.quantatw.com/
5. You can setup “Bandwidth”, “Selection
Mode”, and “Center Frequencies”.
6. Please, click the “OK” button to complete
the networking setting.
Page 15

7. Click the “Authentication” tab.
8. Please, don’t click the “Enable
authentication” option. (We disable the
PKMv2-EAP feature)
Quanta Computer Inc.
http://www.quantatw.com/
9. When you click the “Security” tab, you can
not modify any configuration. Because, you
disable authentication feature.
Page 16

10. Please, click the “Advance” tab and don’t
modify any configuration for this current
software.
Quanta Computer Inc.
http://www.quantatw.com/
11. Then click the “OK” button to complete the
Networking setting.
Page 17

12. Now, we come back the Quanta WCM
General window and click the “Search”
button to start network searching.
Quanta Computer Inc.
http://www.quantatw.com/
Page 18

13. If it finds a BS, it will automatically
connect to this BS.
Quanta Computer Inc.
http://www.quantatw.com/
14. Please, click the “Stats” to display WiMAX
information.
Page 19

15. Please, click the “TCP/IP” tabe to display
your networking information.
Quanta Computer Inc.
http://www.quantatw.com/
16. Please, click the “Device” tab to display
WiMAX device information.
Page 20

17. Please, click the “Debug” tab to display
WiMAX debugging messages
Quanta Computer Inc.
http://www.quantatw.com/
5.2. Use Quanta WiMAX Connection Manager to setup WiMAX
connection with security configuration
1. Please, double click the “QuantaWCM”
icon to lunch the WCM.
Page 21

2. Please, click “Option” on the Menu to setup
the WiMAX configuration.
Quanta Computer Inc.
http://www.quantatw.com/
3. You can choose the “Enable MAC
management message logging” option to
active/de-active MAC message log to file.
Page 22

4. Please, click “Network Search” tab to setup
WiMAX configuration (Frequency,
Bandwidth, etc.)
Quanta Computer Inc.
http://www.quantatw.com/
5. You can setup “Bandwidth”, “Selection
Mode”, and “Center Frequencies”.
6. Please, click the “OK” button to complete
the networking setting.
Page 23

7. Click the “Authentication” tab.
8. Please, click the “Enable authentication”
option. (We enable the PKMv2-EAP
feature)
Quanta Computer Inc.
http://www.quantatw.com/
9. Please, click the “Security” tab to setup
your authenticated configuration.
Page 24

10. Please, click the “Advance” tab and don’t
modify any configuration for this current
software.
Quanta Computer Inc.
http://www.quantatw.com/
11. Then click the “OK” button to complete the
Networking setting.
Page 25

12. Now, we come back the Quanta WCM
General window and click the “Search”
button to start network searching.
Quanta Computer Inc.
http://www.quantatw.com/
Page 26

13. If it finds a BS, it will automatically
connect to this BS.
Quanta Computer Inc.
http://www.quantatw.com/
14. Please, click the “Stats” to display WiMAX
information.
Page 27

15. Please, click the “TCP/IP” tabe to display
your networking information.
Quanta Computer Inc.
http://www.quantatw.com/
16. Please, click the “Device” tab to display
WiMAX device information.
Page 28

17. Please, click the “Debug” tab to display
WiMAX debugging messages
Quanta Computer Inc.
http://www.quantatw.com/
Page 29

Quanta Computer Inc.
http://www.quantatw.com/
6. Appendix
6.1. Use Quanta Config File Editor to setup configuration file
parameters
1. Please, double click the “Quanta Config
File Editor” icon to lunch the Config File
Editor.
2. Click the “File” on the Menu, and click
“Open” to open a configuration file.
Page 30

3. Please, open the
“C:\WINDOWS\system32\drivers\
macxvi.cfg” configuration file and click
“Open” button.
4. You can modify the configuration
parameters after you load macxvi.cfg
finished.
5. Please, refer to next chapter that descript
configuration parameters what you can
modify.
Quanta Computer Inc.
http://www.quantatw.com/
6. Please, click the “File” and select “Save” or
“Save as” to save your modified.
6.2. Configuration File Parameters
The following table shows configuration parameters as found in Config File Version 17. You can use
“Quanta Config File Editor” utility to edit the “C:\WINDOWS\system32\drivers\ macxvi.cfg”
configuration file.
Parameter Description Comment
Configuration File Version This parameter is changed whenever a
parameter is added or dropped. In other words
this defines the config file template version.
Center Frequency 0: Enable scanning
Non Zero: specific center frequency in MHz.
Page 31
A configuration file is
matched to a specific
firmware release.
Example: Center Frequency
= 2545.75 (should be a
multiple of 0.25 MHz)

Quanta Computer Inc.
http://www.quantatw.com/
Please check with Beceem
communications to find out
supported center frequencies
for a given solution.
Band A Scan 1: Band-A is scanned
Band B Scan 1: Band-B is scanned
When a fixed frequency is
configured, this parameter
shouldn’t be configured.
Band C Scan 1: Band-C is scanned
Rtps Enable 0: Disable Rtps
1: Enable Rtps
nRtps Enable 0: Disable nRtps
1: Enable nRtps
eRtps Enable 0: Disable eRtps
1: Enable eRtps
Ugs Enable 0: Disable Ugs
1: Enable Ugs
Handoff Enable
0: Disable Hand Off
1: Enable Hand Off
HandoffThreshold
HO Reserved #1
HO Reserved #2
HO Reserved #3
HO Reserved #4
OL Power Control Enable
0: Disable Open Loop Power Control
1: Enable Open Loop Power Control
OffsetSS
UL AMC - Tx Power
Report
PC Reserved #2
PC Reserved #3
PC Reserved #4
PKMv2 Enable
0: Disable PKMv2
1: Enable PKMv2
PKMv2 Reserved #1
PKMv2 Reserved #2
PKMv2 Reserved #3
PKMv2 Reserved #4
IdleMode Enable 0: Disable Idle Mode
1: Enable Idle Mode
Idle Mode timer Idle Mode timer value in seconds
Idle Mode Options
IDLE Mode Reserved #2
IDLE Mode Reserved #3
IDLE Mode Reserved #4
ARQ Enable 0: Disable ARQ
1: Enable ARQ
Page 32

Quanta Computer Inc.
http://www.quantatw.com/
ArqType
ARQ Reserved #1
ARQ Reserved #2
ARQ Reserved #3
ARQ Reserved #4
MacParameter 0: Broadcast CID value 0xffff
1: Broadcast CID value 0xfeff
UL PRBS 0: UL PRBS seed encoded to 0.
1: UL PRBS based on frame number
Random FA Select
Harq Enable 0: Disable HARQ
1: Enable HARQ
Compressed Map Enable 0: Disable Compressed Map
1: Enable Compressed Map
Default DIUC This value is set as the preferred DIUC setting
in the unicast ranging request to the BS
EEPROM Start 0x20001000: For MII interface
0x10000200: For all other interface
Customize Each byte of this parameter has a special
meaning. It is organized as
<Byte3>< Byte2><Byte1><Byte0>
Byte3: 00 Full MAC mode selected
03 VSG mode selected
Byte2: Interface type
Byte1: Controls MAC/PHY layer functions
Byte0: Reserved
Firmware Options Bit 0 : Skip link down request bit:
Bit 0 set to 0: enable link down notification
and authentication during resync
Bit 0 set to 1: The firmware doesn’t honor the
LINK DOWN request from the driver.
Similarly, the firmware does not wait for the
LINK UP request to start re-entry.
Please note that firmware waits for the
LINKUP request from the driver to start the
network entry after boot up even if this bit is
set
Bit 1: Control MAC management message
logging.
Bit 1 set to 0: Enable MAC management
message logging.
Bit 1 set to 1: Disable MAC management
message logging.
Bandwidth 5000000: 5 MHz
7000000: 7 MHz
8750000: 8.75 MHz
10000000: 10 MHz
ShutDown Timer Value Shutdown value in terms of frames
Example:
Customize = 0x03000100
Example:
Bandwidth = 10000000
EncrSupport 0: Disable Encryption
1: Enable Encryption
Page 33

Quanta Computer Inc.
http://www.quantatw.com/
NumOfSAId
RadioParameter [3:0] = 2, always
[7:4] is Band Select
[15:8] is a board type that should be zero
unless specified by Beceem otherwise.
Radio Parameter is obvious
when Center Frequency is
non-zero and is a don’t care
in such a case
For example:
0x22: For MS120 units supporting Board
Type 2.3 to 2.4G
0x32: For MS120 units supporting Board
Type 2.5 to 2.7G
0x42: For MS120 units supporting Board
Type 3.4 to 3.6G
For BCS200, Band Select is a don’t care.
PhyParameter1 This parameter decides the number of DL, UL
symbols
and TTG value.
0xFFFFFFFF: This is a special value. It
Example:
for 26 DL, 21 UL, TTG =
105.71us, program as
0x21091a15
forces Use of
values as defined in firmware for a given
Bandwidth selection.
Other values can be configured as follows
PhyParameter1 e.g. 0xccccbbaa
cccc = [31:16] 80 * Value of TTG in us
bb = [15:08] Number of DL symbols
aa = [07:00] Number of UL symbols
PhyParameter2
PhyParameter3
m_u32TestOptions
MaxMACDataperDLFrame
MaxMACDataperULFrame
Corr2MacFlags This parameter consists of a bit map for
enabling/disabling Corrigendum-2 updates.
This should
be 0 unless testing for Corrigendum-2.
Bit 0: ARQ
Bit 1: Encryption
Bit 2: HARQ
Bit 3: HO
Bit 4: Idle Mode
Bit 5: Sleep Mode
Bit 6: MBS
Bit 7: MIB
Bit 8: MIMO
Bit 9:
Bit 10: Network Entry
Bit 11:
Bit 12: RLC – NE
Bit 13: Security
Bit 14 Signaling/DSx
Bit 15: RLC-Other
Page 34

Quanta Computer Inc.
http://www.quantatw.com/
Corr2PhyFlags This parameter is currently not used. It is a
placeholder for a bit map for
enabling/disabling Corrigendum-2 updates in
PHY. This should be 0 unless testing for
Corrigendum-2.
6.3. Setup WCM network configuration to static IP address
1. Plugin WCM card to your Laptop.
2. Setup WCM with a static IP address as the
below procedures.
3. Open Windows Start menu.
4. Open Control Panel.
5. Classic view: Open Network Connections
Category view: Select Network and
Internet Connections, and then Network
Connections.
6. Double-click on your active LAN or
Internet connection.
7. Click Properties.
8. In the General tab, highlight the Internet
Protocol (TCP/IP) item, and click
Properties.
9. In the General tab, click “Use the following
IP address” and input as below:
- IP address: The static IP address you want to assign to
computer (192.168.0.200)
- Subnet mask: 255.255.255.0
- Default gateway: skip.
10. In “Use the following DNS server
addresses”, skip.
11. Click OK.
This opens the Local Area Connections Properties window
12. Click OK to close each window.
Page 35

FCC STATEMENT FOR PORTABLE DEVICE
Federal Communication Commission Interference Statement
This equipment has been tested and found to comply with the limits for a Class B digital
device, pursuant to Part 15 of the FCC Rules. These limits are designed to provide
reasonable protection against harmful interference in a residential installation. This
equipment generates uses and can radiate radio frequency energy and, if not installed
and used in accordance with the instructions, may cause harmful interference to radio
communications. However, there is no guarantee that interference will not occur in a
particular installation. If this equipment does cause harmful interference to radio or
television reception, which can be determined by turning the equipment off and on, the
user is encouraged to try to correct the interference by one of the following measures:
- Reorient or relocate the receiving antenna.
- Increase the separation between the equipment and receiver.
- Connect the equipment into an outlet on a circuit different from that to which the
receiver is connected.
- Consult the dealer or an experienced radio/TV technician for help.
FCC Caution: Any changes or modifications not expressly approved by the party
responsible for compliance could void the user's authority to operate this equipment.
This device complies with Part 15 of the FCC Rules. Operation is subject to the following
two conditions:
(1) This device may not cause harmful interference, and
(2) This device must accept any interference received, including interference that may
cause undesired operation.
IMPORTANT NOTE:
FCC Radiation Exposure Statement:
This equipment complies with FCC radiation exposure limits set forth for an uncontrolled
environment. End users must follow the specific operating instructions for satisfying RF
exposure compliance. To maintain compliance with FCC RF exposure compliance
requirements, please follow operation instruction as documented in this manual.
This transmitter must not be co-located or operating in conjunction with any other
antenna or transmitter.

CE STATEMENT FOR PORTABLE DEVICE
This device complies with the essential requirements of the R&TTE Directive 1999/5/EC.
The following test methods have been applied in order to prove presumption of
conformity with the essential requirements of the R&TTE Directive 1999/5/EC
EN 60950-1: 2001
Safety of Information Technology Equipment
EN 301 489-1 V1.6.1: (2005-09)
Electromagnetic compatibility and Radio Spectrum Matters (ERM); ElectroMagnetic
Compatibility (EMC) standard for radio equipment and services; Part 1: Common
technical Requirements
EN 301 489-4 V1.3.1: (2002-08)
Electromagnetic compatibility and radio spectrum matters (ERM); Electromagnetic
compatibility (EMC) standard for radio equipment and services; Part 4: Specific
conditions for fixed radio links and ancillary equipment and services
EN50392: (2004-01)
Generic standard to demonstrate the compliance of electronic and electrical
apparatus with the basic restrictions related to human exposure to electromagnetic
fields (0 Hz - 300 GHz)
ETSI EN 302 326-2 V1.2.2: (2007-06)
Fixed Radio Systems; Multipoint Equipment and Antennas; Part 2: Harmonized EN
covering the essential requirements of article 3.2 of the R&TTE Directive for Digital
Multipoint Radio Equipment
ETSI EN 302 326-3 V1.2.2: (2007-06)
Fixed Radio Systems; Multipoint Equipment and Antennas; Part 3: Harmonized EN
covering the essential requirements of article 3.2 of the R&TTE Directive for Multipoint
Radio Antennas

Česky
[Czech]
Dansk
[Danish]
Deutsch
[German]
Eesti
[Estonian]
English
Español
[Spanish]
Ελληνική
[Greek]
[Jméno výrobce] tímto prohlašuje, že tento [typ zařízení] je ve shodě se
základními požadavky a dalšími příslušnými ustanoveními směrnice 1999/5/ES.
Undertegnede [fabrikantens navn] erklærer herved, at følgende udstyr
[udstyrets typebetegnelse] overholder de væsentlige krav og øvrige relevante
krav i direktiv 1999/5/EF.
Hiermit erklärt [Name des Herstellers], dass sich das Gerät [Gerätetyp] in
Übereinstimmung mit den grundlegenden Anforderungen und den übrigen
einschlägigen Bestimmungen der Richtlinie 1999/5/EG befindet.
Käesolevaga kinnitab [tootja nimi = name of manufacturer] seadme [seadme
tüüp = type of equipment] vastavust direktiivi 1999/5/EÜ põhinõuetele ja
nimetatud direktiivist tulenevatele teistele asjakohastele sätetele.
Hereby, [name of manufacturer], declares that this [type of equipment] is in
compliance with the essential requirements and other relevant provisions of
Directive 1999/5/EC.
Por medio de la presente [nombre del fabricante] declara que el [clase de
equipo] cumple con los requisitos esenciales y cualesquiera otras disposiciones
aplicables o exigibles de la Directiva 1999/5/CE.
ΜΕ ΤΗΝ ΠΑΡΟΥΣΑ [name of manufacturer] ΔΗΛΩΝΕΙ ΟΤΙ [type of equipment]
ΣΥΜΜΟΡΦΩΝΕΤΑΙ ΠΡΟΣ ΤΙΣ ΟΥΣΙΩΔΕΙΣ ΑΠΑΙΤΗΣΕΙΣ ΚΑΙ ΤΙΣ ΛΟΙΠΕΣ ΣΧΕΤΙΚΕΣ
ΔΙΑΤΑΞΕΙΣ ΤΗΣ ΟΔΗΓΙΑΣ 1999/5/ΕΚ.
Français
[French]
Italiano
[Italian]
Latviski
[Latvian]
Lietuvių
[Lithuanian]
Nederlands
[Dutch]
Malti
[Maltese]
Magyar
[Hungarian]
Par la présente [nom du fabricant] déclare que l'appareil [type d'appareil] est
conforme aux exigences essentielles et aux autres dispositions pertinentes de la
directive 1999/5/CE.
Con la presente [nome del costruttore] dichiara che questo [tipo di
apparecchio] è conforme ai requisiti essenziali ed alle altre disposizioni pertinenti
stabilite dalla direttiva 1999/5/CE.
Ar šo [name of manufacturer / izgatavotāja nosaukums] deklarē, ka [type of
equipment / iekārtas tips] atbilst Direktīvas 1999/5/EK būtiskajām prasībām un
citiem ar to saistītajiem noteikumiem.
Šiuo [manufacturer name] deklaruoja, kad šis [equipment type] atitinka esminius
reikalavimus ir kitas 1999/5/EB Direktyvos nuostatas.
Hierbij verklaart [naam van de fabrikant] dat het toestel [type van toestel] in
overeenstemming is met de essentiële eisen en de andere relevante
bepalingen van richtlijn 1999/5/EG.
Hawnhekk, [isem tal-manifattur], jiddikjara li dan [il-mudel tal-prodott]
jikkonforma mal-ħtiġijiet essenzjali u ma provvedimenti oħrajn relevanti li hemm
fid-Dirrettiva 1999/5/EC.
Alulírott, [gyártó neve] nyilatkozom, hogy a [... típus] megfelel a vonatkozó
alapvetõ követelményeknek és az 1999/5/EC irányelv egyéb elõírásainak.
Polski
[Polish]
Português
[Portuguese]
Niniejszym [nazwa producenta] oświadcza, że [nazwa wyrobu] jest zgodny z
zasadniczymi wymogami oraz pozostałymi stosownymi postanowieniami
Dyrektywy 1999/5/EC.
[Nome do fabricante] declara que este [tipo de equipamento] está conforme
com os requisitos essenciais e outras disposições da Directiva 1999/5/CE.

Slovensko
[Slovenian]
[Ime proizvajalca] izjavlja, da je ta [tip opreme] v skladu z bistvenimi zahtevami
in ostalimi relevantnimi določili direktive 1999/5/ES.
Slovensky
[Slovak]
Suomi
[Finnish]
Svenska
[Swedish]
[Meno výrobcu] týmto vyhlasuje, že [typ zariadenia] spĺňa základné požiadavky
a všetky príslušné ustanovenia Smernice 1999/5/ES.
[Valmistaja = manufacturer] vakuuttaa täten että [type of equipment = laitteen
tyyppimerkintä] tyyppinen laite on direktiivin 1999/5/EY oleellisten vaatimusten ja
sitä koskevien direktiivin muiden ehtojen mukainen.
Härmed intygar [företag] att denna [utrustningstyp] står I överensstämmelse
med de väsentliga egenskapskrav och övriga relevanta bestämmelser som
framgår av direktiv 1999/5/EG.
 Loading...