

Page 1

Book One
Quick Start Guide
BA-PD-V1-10-US-EN-170315_Draft.indd 1 15.02.2017 18:21:08
Page 2

BA-PD-V1-10-US-EN-170315_Draft.indd 2 15.02.2017 18:21:08
Page 3

Welcome to Porsche Design!
Get to know your new Porsche Design Book One.
BA-PD-V1-10-US-EN-170315_Draft.indd 3 15.02.2017 18:21:08
Page 4

Table of contents
1. Information About This Quick Start Guide 5
2. Device Description 6
2.1 Controls 6
2.2 Ports 10
2.3 Other technical specifications 13
2.4 Accessories – stylus 14
2.5 Package contents 15
3. First Steps 16
3.1 Modes of use for the 2-in-1 laptop 16
3.2 Charging the 2-in-1 laptop 18
3.3 Setting up the 2-in-1 laptop 18
4. Core Basic Functions 20
4.1 Switching your 2-in-1 laptop on and off 20
4.2 Start screen 21
4.3 Switching on WiFi 24
4.4 Resetting your 2-in-1 laptop 24
5. In the Event of Technical Issues or Defects 25
6. Warranty 26
7. Certificate of Conformity 27
7.1 Federal Communication Commission
Interference Statement 27
7.2 Industry Canada statement 29
8. Copyright and trademarks 33
4
BA-PD-V1-10-US-EN-170315_Draft.indd 4 15.02.2017 18:21:08
Page 5

1. Information About This Quick Start Guide
The Quick Start Guide is there to help you during the initial
setup of your new 2-in-1 laptop. Along with that, it also
provides information about the device’s basic features and
functions.
Please read the user’s manual to find out more about the
device’s features, functions, and options as well as get tips
on how to work productively and creatively with the device.
You can download and read the user’s manual at
www.porsche-design-computing.com . This requires that
you be connected to the Internet.
It is important that you read the safety instructions in the
enclosed brochure before using your new 2-in-1 laptop.
This contains all key safety information on your device.
The online user’s manual, the enclosed Quick Start Guide,
and the companion brochure "Important Safety and Legal
Information" are an integral part of the product.
Please read all three documents carefully. They contain
important information in regard to safety, use, and disposal
of the device.
Please keep these documents in a safe place and pass them
on in full to the new owner if the device changes hands.
5
BA-PD-V1-10-US-EN-170315_Draft.indd 5 15.02.2017 18:21:08
Page 6
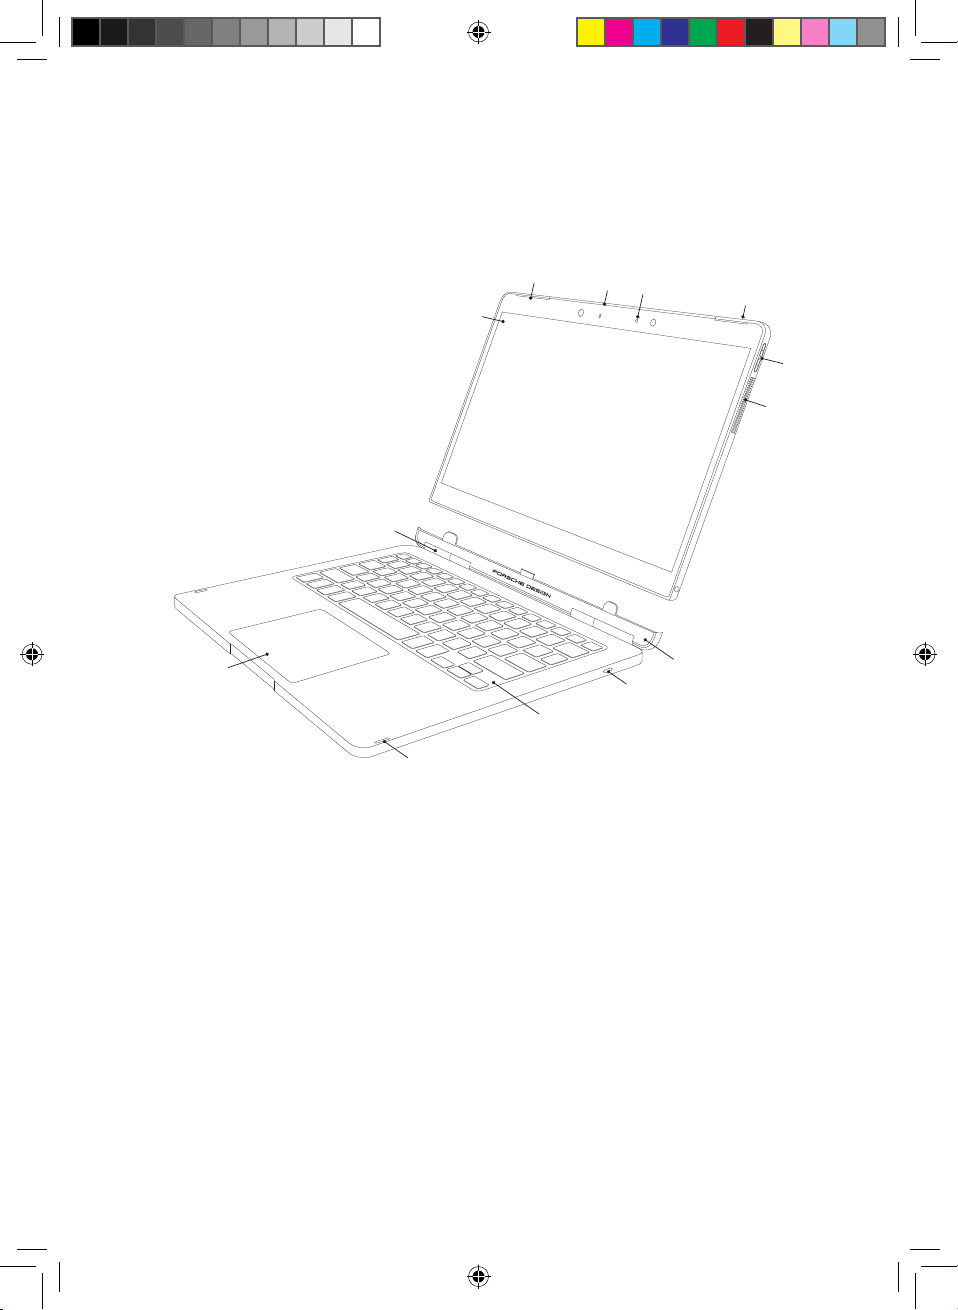
2. Device Description
2.1 Controls
13
2
1
3
4
5
6
7
12
10
11
8
9
1 Touch screen
The 13.3" QHD-IPS display delivers a resolution of 3200 x
1800 pixels at a 16:9 aspect ratio.
The touch screen displays your chosen content (films,
documents, websites, etc.) and also allows you to precisely
control and select apps, move items on the display, and
use your fingers to zoom in or out on content on the
screen.
For more information, see "Input Options" – "Using the
Touch Screen" in the user’s manual.
6
BA-PD-V1-10-US-EN-170315_Draft.indd 6 15.02.2017 18:21:09
Page 7

2 Stereo speakers
The 2 x 2 W stereo speakers are located in the upper left
and right corners of the tablet. They direct the sound straight
to the user to deliver impressive, top-rate sound quality.
3 Antenna cover
The modified material property of the antenna cover
ensures proper and efficient operation of the dual-band
WiFi and Bluetooth
®
module.
4 Front camera
The high-resolution front camera with built-in microphone is
used to take photos at a resolution of up to 5 MP (2592 x
1944 pixels), shoot videos in HD quality (1080p) with a 16:9
aspect ratio, and video chat online.
The camera is on if the illuminated LED on the left is white.
The camera features an infrared LED for facial recognition.
This allows you to log in on Windows without entering a
password using the "Windows Hello" feature.
For more information, see "Windows Hello" in the user’s manual.
5 On/off button
Press the on/off button to turn on your 2-in-1 laptop.
You can also use this button to place your device in
standby mode and wake it up when you want to resume
working on it.
7
BA-PD-V1-10-US-EN-170315_Draft.indd 7 15.02.2017 18:21:09
Page 8
6 Volume control
Press the "+" and "-" volume control buttons to increase
and lower the sound volume.
7 Ventilation slots
The ventilation slots help cool the device by providing for
optimum heat transfer to ensure reliable operation.
WARNING
Do not cover these openings by placing the device on
unsuitable surfaces, such as on a bed, couch, or carpet.
Having a constant flow of air will help reduce the risk of fire.
8 Tablet dock
The tablet dock features guide pins and a tablet connector
used to attach and detach the keyboard to and from the
tablet unit of the 2-in-1 laptop. This allows you to switch from
laptop to tablet mode or vice versa.
9 Unlock button
Press the unlock button to separate the tablet unit from the
keyboard.
A low-pitched clicking sound is played and a white, open
padlock icon appears in the lower corner of the tablet
to indicate that the tablet has been unlocked from the
keyboard. When you hear the acoustic signal, you can
remove the tablet unit.
For more information, see "Modes of Use" in the user’s manual.
8
BA-PD-V1-10-US-EN-170315_Draft.indd 8 15.02.2017 18:21:09
Page 9

10 Keyboard
The keyboard is used to enter information on your 2-in-1
laptop.
For more information, see "Input Options" – "Using the
Keyboard" in the user’s manual.
11 Tabs
Tabs are placed on both sides of the keyboard to protect
the display from mechanical damage when it is resting on
the keyboard.
12 Touchpad
The touch-sensitive touchpad is used in place of a mouse. It
offers both a left- and right-click function and also supports
Windows 10 gesture control.
For more information, see "Input Options" – "Using the
Touchpad" in the user’s manual.
13 Hinge
The unique hinge mechanism enables the tablet to be
rotated 360°. This allows you to operate the 2-in-1
convertible laptop at any angle between 0° and 360° in
various modes (laptop | tent | presentation).
9
BA-PD-V1-10-US-EN-170315_Draft.indd 9 15.02.2017 18:21:09
Page 10
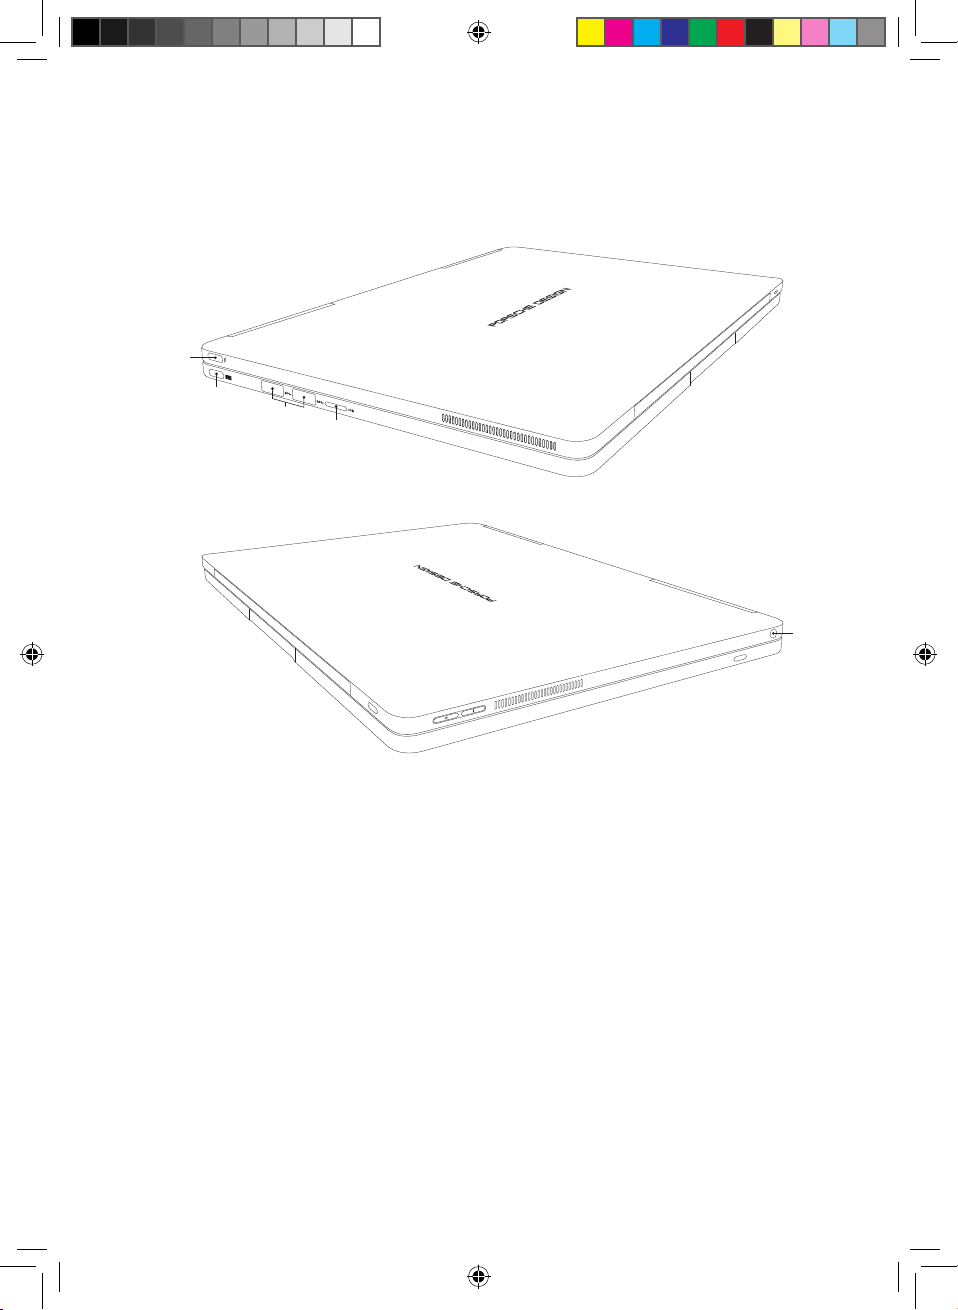
2.2 Ports
A
B
C
D
A USB Type-C™ port with USB 3.1 (Gen 2) and
Thunderbolt 3
This universal interface allows you to connect a variety of
USB peripheral devices (e.g., a mouse, printer, external
hard drive, Ethernet adapter, smartphone, etc.). It provides
for ultra-fast data transfer rates of up to 10 Gbps with the
USB 3.1 (Gen 1) standard and up to 40 Gbps with the
Thunderbolt 3 standard.
E
10
BA-PD-V1-10-US-EN-170315_Draft.indd 10 15.02.2017 18:21:11
Page 11

ADVICE
i
The data transfer rate depends directly on the equipment
used (cable | adapter, etc.).
The Thunderbolt 3 standard also supports DisplayPort for
use in audio and video transmission via cable.
ADVICE
i
The USB Type-C
™
to HDMI® adapter included with the
laptop is connected here.
For more information, see "Connecting Other Devices" in the
user’s manual.
Thanks to its support for Thunderbolt 3, the port, in
combination with the enclosed USB Type-C
™
power
adapter, provides a fast charge function and also supports
the USB Power Delivery standard.
For more information, see "Charging the 2-in-1 Laptop" in the
user’s manual.
B USB Type-C
™
port with USB 3.1
This universal interface allows you to connect a variety of
USB peripheral devices (e.g., a mouse, printer, external hard
drive, Ethernet adapter, smartphone, etc.). It provides for fast
data transfer rates of up to 5 Gbps.
For more information, see "Connecting Other Devices" in
the user’s manual.
11
BA-PD-V1-10-US-EN-170315_Draft.indd 11 15.02.2017 18:21:11
Page 12

In combination with the enclosed USB Type-C™ power
adapter, the port provides a charging function.
For more information, see "Charging the 2-in-1 Laptop" in
the user’s manual.
C USB 3.0 Type A
The two full-size USB 3.0 ports allow you to connect a
variety of USB peripheral devices (e.g., a mouse, printer,
external hard drive, Ethernet adapter, smartphone, etc.).
For more information, see "Connecting Other Devices" in the
user’s manual.
D Memory card slot
In combination with microSD-HC/XC cards (available
separately), the memory card slot is used to transfer data
or for providing additional external memory (up to 512 GB).
E Audio port
The 3.5 mm audio port is a bidirectional interface (audio
in/mic in). This is where you connect an audio device
(e.g., speakers, headphones, etc.) to play music or a
headset equipped with a microphone to take part in phone
conferences.
12
BA-PD-V1-10-US-EN-170315_Draft.indd 12 15.02.2017 18:21:11
Page 13

2.3 Other technical specifications
Operating system Windows® 10 Pro
Processor Intel
®
Core™ i7-7500U
(4M Cache, up to 3.50 GHz)
RAM 16 GB LPDDR3
Storage capacity 512 GB Intel
GPU Intel
®
HD Graphics 620
®
SSD (PCIe)
Network Dual-band WiFi |
Bluetooth
®
4.1 |
Wireless Display
WiFi frequencies 802.11 abgn+ac 2.4 | 5 GHz*
Battery Li-Polymer (70 Wh)** |
charging via USB Type-C™
Dimensions (W x H x D) ~ 311.4 x 226.5 x 15.9 mm
Weight ~ 1600 g
Operation and storage Temperature range 5° C to 30° C
Relative humidity 30 % to 70 %
* 5G Band 1 is for indoor use only
** The user cannot simply exchange the product’s battery by themselves. | Refer to the
detailed user’s manual for technical specifications on the power adapter.
13
BA-PD-V1-10-US-EN-170315_Draft.indd 13 15.02.2017 18:21:11
Page 14

2.4 Accessories – stylus
1
The sleek, classic stylus combines a natural writing
experience with the benefits of digital connectivity. The
stylus can be used in any app that supports freehand
input (for example, apps for drawing, Word, PowerPoint,
OneNote, and many others).
For more information, see "Input Options" – "Using the
Stylus" in the user’s manual.
2 3 4
1 Pen tip
The pressure-sensitive pen tip is used to write and draw on
the display. Touch the display with the pen tip. The display
recognizes the stylus automatically.
2 Function key
The function key enables you to access the context menus
in apps that support Microsoft Inking.
ADVICE
i
If Microsoft Inking is not supported, the pre-assigned
functions of the function key may vary.
14
BA-PD-V1-10-US-EN-170315_Draft.indd 14 15.02.2017 18:21:13
Page 15

3 Delete key
The delete key enables convenient erasing of drawings and
notes from the display.
4 Removable cap
Unscrew the cap and insert the AAAA battery with the
positive side in the direction of the pen tip. The stylus is
ready to use once the battery has been inserted.
2.5 Package contents
• Porsche Design Book One
• USB Type-C™ to HDMI
®
adapter (up to Ultra HD video
quality)
• USB Type-C™ power adapter (100 V – 240 V)
• Stylus
• AAAA battery
• Cleaning cloth
• Quick Start Guide
• "Important Safety and Legal Information" brochure
Please check the package contents to ensure nothing is
missing or damaged. To do so, take all of the components
listed above out of the box. Remove all packaging material,
including the protective film.
If you discover the device is damaged or parts are missing,
please contact your retailer or customer service immediately.
15
BA-PD-V1-10-US-EN-170315_Draft.indd 15 15.02.2017 18:21:13
Page 16

3. First Steps
You will now learn about the basic functions of your new
2-in-1 laptop.
3.1 Modes of use for the 2-in-1 laptop
You can operate your 2-in-1 laptop in tablet or laptop mode.
Laptop mode
This is the standard mode as
delivered. The tablet unit is
connected to the keyboard via
the tablet dock.
The tablet unit features a
special hinge that allows it to
be rotated 360° along its
x-axis. As a result, the
convertible laptop can be
adjusted to any angle for use
in presentation and tent
mode.
Tent mode
In this mode, you can watch
HD films and videos in
comfort.
16
BA-PD-V1-10-US-EN-170315_Draft.indd 16 15.02.2017 18:21:15
Page 17

Presentation mode
In this mode, you can
display the contents of
the screen to other people
where alternative options
are unavailable (for example,
output devices such as a
monitor or projector).
Tablet mode
The detachable function of
the 2-in-1 laptop allows you
to remove the tablet unit.
A low-pitched clicking sound
is played and a white, open
padlock icon appears in the
lower corner of the tablet
to indicate that the tablet
has been unlocked from the
keyboard. When you hear
the acoustic signal, you can
remove the tablet unit.
ADVICE
i
You can only detach the
tablet unit if the keyboard is
adequately charged.
17
BA-PD-V1-10-US-EN-170315_Draft.indd 17 15.02.2017 18:21:18
Page 18

3.2 Charging the 2-in-1 laptop
In the first step, fully charge your 2-in-1 laptop.
1. Plug in the UBS connector of the enclosed power adapter
into one of the USB Type-C
2. Now connect the power adapter to an outlet.
ADVICE
i
Once the power adapter is connected to a power source,
the LED on the power adapter’s USB connector will light
up and appear blue.
™
ports on the device.
3.3 Setting up the 2-in-1 laptop
You can now customize the settings of your 2-in-1 laptop.
You can change any of the settings and preferences you
configure now in the future.
For more information, see "Setting Up and Customizing
Your 2-in-1 Laptop" in the user’s manual.
1. Press the on/off button for approximately two to three
seconds to switch on the 2-in-1 laptop.
2. Windows now boots up and guides you through the
setup process. Go step-by-step through the setup
assistant to configure your 2-in-1 laptop.
ADVICE
i
During the setup process, you will be prompted to sign
in with your Microsoft account. If you do not yet have a
Microsoft account, please set one up at this point.
18
BA-PD-V1-10-US-EN-170315_Draft.indd 18 15.02.2017 18:21:18
Page 19

3. Once you have fully completed the setup process, your
device will be configured according to the settings you
made and is ready for use. This process may take a
while. Be patient and do not turn off the device until
the configuration process is complete.
4. Once your device is ready for use after the setup process
is complete, you will be shown the lock screen. Drag
the lock screen on the touch display upwards with your
fingertip to unlock the screen.
ADVICE
i
If your device is password-protected, you must then enter
the password. For more information on securing your
device, see "Protecting Your Personal Data" in the user’s
manual.
19
BA-PD-V1-10-US-EN-170315_Draft.indd 19 15.02.2017 18:21:18
Page 20

4. Core Basic Functions
You will now learn about the core basic functions of your
new 2-in-1 laptop.
4.1 Switching your 2-in-1 laptop on and off
Press the on/off button for approximately two to three
seconds to switch on your device.
Briefly press this button to place your device in standby
mode and wake it up when you want to resume working
on it.
To switch off your device, open the Start menu by clicking
the Windows icon on the touch display (tablet mode) or
by pressing the Windows button on the keyboard (laptop
mode). Tap and click "Power" in the Start menu and then
"Shut down" to power down your device.
20
BA-PD-V1-10-US-EN-170315_Draft.indd 20 15.02.2017 18:21:18
Page 21

4.2 Start screen
The icons located in the task bar on the start screen allow you
to access a number of functions (including start menu [A | B]):
Windows icon
Use the Windows icon to open and close the start menu
[A | B] (also on the keyboard).
From the start menu, you can access any of the installed
apps and utility programs. The start menu is divided into
two panels:
A: "Classic" view of navigation bar
To access a list of all installed apps arranged in alphabetical
order, drag the navigation bar upwards or tap “All Apps” in
the bottom left of the navigation bar.
B: Customizable app panel
You can arrange your apps and favorites as live tiles in the
preferred order here.
21
BA-PD-V1-10-US-EN-170315_Draft.indd 21 15.02.2017 18:21:19
Page 22

Cortana
Cortana is your (voice-activated) personal digital assistant.
It reminds you of pending tasks and appointments and
gives useful hints and tips.
Task View
Press this icon to enable the Task View that shows all
open programs including the "+ New Desktop" button for
creating virtual desktops.
Microsoft Edge
Press this icon to open the Internet browser.
Folder icon
Press this icon to open Windows Explorer.
Microsoft Store
Press this icon to open Microsoft Store, where you can
download additional apps.
ADVICE
i
Some apps must be purchased.
Battery level indicator
This indicates the device’s battery level.
22
BA-PD-V1-10-US-EN-170315_Draft.indd 22 15.02.2017 18:21:19
Page 23

Volume control
Use the volume control slider to adjust the volume to the
desired level.
Memo icon
Press this icon to open the Info Center.
The Info Center is a bar with quick links to some of the
important functions of the device that you can either
display or hide (e.g., "All settings", etc.).
ADVICE
i
To open the Info Center, swipe your finger from the right
edge of the screen towards the center of the screen.
23
BA-PD-V1-10-US-EN-170315_Draft.indd 23 15.02.2017 18:21:19
Page 24

4.3 Switching on WiFi
WiFi must be enabled; for example, to access online
content. To enable WiFi, proceed as follows:
1. Select "All Settings" in the Info Center.
2. Click "Network & Internet" in the settings menu.
3. Select "Wi-Fi" on the left in the next screen.
4. Move the slider for WiFi from "Off" to "On".
5. Now select the network that you wish to connect
to from the list of available networks shown on the
screen.
6. Enter the network key (password) if necessary.
7. Now confirm the "Connect" option. Your device will
now connect to the selected network.
4.4 Resetting your 2-in-1 laptop
If your device freezes and no longer responds, you can
restart it. Press and hold down the on/off switch for at least
ten seconds until your device switches off. Wait for about
20 seconds and then turn your device on normally.
24
BA-PD-V1-10-US-EN-170315_Draft.indd 24 15.02.2017 18:21:19
Page 25

5. In the Event of Technical Issues or Defects
Please enter the following information below in case this
should be required:
Serial number _____________________________
Purchase date _____________________________
Place of purchase _____________________________
Keep your proof of purchase.
If your device is faulty or defective, please feel free to
contact customer service at www.porsche-designcomputing.com and arrange to be called back at a time
that works best for you.
In order for us to provide you with fast, optimum support,
please keep the aforementioned information required to
identify the device ready at hand. If at all possible, make note
of any error messages that are related to the issue and have
your device switched on before contacting customer service.
Go to www.porsche-design-computing.com and open
the "Support" section for the latest news and information,
useful tips, and available drivers and downloads.
You will also find full and complete information about the
warranty for your 2-in-1 laptop.
25
BA-PD-V1-10-US-EN-170315_Draft.indd 25 15.02.2017 18:21:19
Page 26

6. Warranty
26
BA-PD-V1-10-US-EN-170315_Draft.indd 26 15.02.2017 18:21:19
Page 27

7. Certificate of Conformity
7.1 Federal Communication Commission
Interference Statement
This device complies with Part 15 of the FCC Rules.
Operation is subject to the following two conditions:
1. This device may not cause harmful interference.
2. This device must accept any interference received,
including interference that may cause undesired operation.
This equipment has been tested and found to comply with
the limits for a Class B digital device, pursuant to Part 15
of the FCC Rules. These limits are designed to provide
reasonable protection against harmful interference in a
residential installation. This equipment generates, uses
and can radiate radio frequency energy and, if not installed
and used in accordance with the instructions, may cause
harmful interference to radio communications. However,
there is no guarantee that interference will not occur in a
particular installation. If this equipment does cause harmful
interference to radio or television reception, which can be
determined by turning the equipment off and on, the user is
encouraged to try to correct the interference by one of the
following measures:
• Reorient or relocate the receiving antenna.
• Increase the separation between the equipment and
receiver.
27
BA-PD-V1-10-US-EN-170315_Draft.indd 27 15.02.2017 18:21:19
Page 28

• Connect the equipment into an outlet on a circuit
different from that to which the receiver is connected.
• Consult the dealer or an experienced radio/TV
technician for help.
FCC Caution:
Any changes or modifications not expressly approved by
the party responsible for compliance could void the user's
authority to operate this equipment.
This transmitter must not be co-located or operating in
conjunction with any other antenna or transmitter.
Radiation Exposure Statement:
This device meets the government’s requirements for
exposure to radio waves.
This device is designed and manufactured not to exceed
the emission limits for exposure to radio frequency (RF)
energy set by the Federal Communications Commission of
the U.S. Government.
The exposure standard for wireless device employs a unit
of measurement known as the Specific Absorption Rate,
or SAR. The SAR limit set by the FCC is 1.6W/kg. *Tests
for SAR are conducted using standard operating positions
accepted by the FCC with the device transmitting at its
highest certified power level in all tested frequency bands.
28
BA-PD-V1-10-US-EN-170315_Draft.indd 28 15.02.2017 18:21:19
Page 29

Note:
The country code selection is for non-US model only and
is not available to all US model. Per FCC regulation, all
WiFi product marketed in US must fixed to US operation
channels only.
7.2 Industry Canada statement
1. This device complies with Industry Canada licenseexempt RSS standard(s). Operation is subject to the
following two conditions:
1) this device may not cause interference, and
2) this device must accept any interference, including
interference that may cause undesired operation of
the device.
1. Le présent appareil est conforme aux CNR d'Industrie
Canada applicables aux appareils radio exempts
de licence. L'exploitation est autorisée aux deux
conditions suivantes:
1) l'appareil ne doit pas produire de brouillage, et
2) l'utilisateur de l'appareil doit accepter tout brouillage
radioélectrique subi, même si le brouillage est
susceptible d'en compromettre le fonctionnement.
2. This Class B digital apparatus complies with Canadian
ICES-003.
2. Cet appareil numérique de la classe B est conforme à
la norme NMB-003 du Canada.
29
BA-PD-V1-10-US-EN-170315_Draft.indd 29 15.02.2017 18:21:19
Page 30

3. This device complies with RSS-310 of Industry
Canada. Operation is subject to the condition that this
device does not cause harmful interference.
3. Cet appareil est conforme à la norme RSS-310
d'Industrie Canada. L'opération est soumise à la
condition que cet appareil ne provoque aucune
interférence nuisible.
4. This device and its antenna(s) must not be co-located
or operating in conjunction with any other antenna or
transmitter, except tested built-in radios.
4. Cet appareil et son antenne ne doivent pas être situés
ou fonctionner en conjonction avec une autre antenne
ou un autre émetteur, exception faites des radios
intégrées qui ont été testées.
5. The County Code Selection feature is disabled for
products marketed in the US/ Canada.
5. La fonction de sélection de l'indicatif du pays est
désactivée pour les produits commercialisés aux
États-Unis et au Canada.
Radiation Exposure Statement:
The product comply with the Canada portable RF exposure
limit set forth for an uncontrolled environment and are safe for
intended operation as described in this manual. The further
RF exposure reduction can be achieved if the product can be
kept as far as possible from the user body or set the device
to lower output power if such function is available.
30
BA-PD-V1-10-US-EN-170315_Draft.indd 30 15.02.2017 18:21:19
Page 31

Déclaration d'exposition aux radiations:
Le produit est conforme aux limites d'exposition pour les
appareils portables RF pour les Etats-Unis et le Canada
établies pour un environnement non contrôlé.
Le produit est sûr pour un fonctionnement tel que décrit
dans ce manuel. La réduction aux expositions RF peut être
augmentée si l'appareil peut être conservé aussi loin que
possible du corps de l'utilisateur ou que le dispositif est
réglé sur la puissance de sortie la plus faible si une telle
fonction est disponible.
Caution:
1) the device for operation in the band 5150-5250 MHz
is only for indoor use to reduce the potential for harmful
interference to co-channel mobile satellite systems;
2) the maximum antenna gain permitted for devices in the
bands 5250-5350 MHz and 5470-5725 MHz shall
comply with the e.i.r.p. limit; and
3) the maximum antenna gain permitted for devices in
the band 5725-5825 MHz shall comply with the e.i.r.p.
limits specified for point-to-point and non point-to
point operation as appropriate.
4) the worst-case tilt angle(s) necessary to remain
compliant with the e.i.r.p. elevation mask requirement
set forth in Section 6.2.2(3) shall be clearly indicated.
31
BA-PD-V1-10-US-EN-170315_Draft.indd 31 15.02.2017 18:21:19
Page 32

5) Users should also be advised that high-power radars
are allocated as primary users (i.e. priority users) of
the bands 5250-5350 MHz and 5650-5850 MHz and
that these radars could cause interference and/or
damage to LE-LAN devices.
Avertissement:
1) les dispositifs fonctionnant dans la bande 5150
5250 MHz sont réservés uniquement pour une
utilisation à l’intérieur afin de réduire les risques de
brouillage préjudiciable aux systèmes de satellites
mobiles utilisant les mêmes canaux;
2) le gain maximal d’antenne permis pour les dispositifs
utilisant les bandes 5250-5350 MHz et 5470-5725 MHz
doit se conformer à la limite de p.i.r.e.;
3) le gain maximal d’antenne permis (pour les dispositifs
utilisant la bande 5725-5825 MHz) doit se conformer à
la limite de p.i.r.e. spécifiée pour l’exploitation point à
point et non point à point, selon le cas.
4) les pires angles d’inclinaison nécessaires pour rester
conforme à l’exigence de la p.i.r.e. applicable au
masque d’élévation, et énoncée à la section 6.2.2 3),
doivent être clairement indiqués.
5) De plus, les utilisateurs devraient aussi être avisés que
les utilisateurs de radars de haute puissance sont
désignés utilisateurs principaux (c.-à-d., qu’ils ont la
priorité) pour les bandes 5250-5350 MHz et 5650
5850 MHz et que ces radars pourraient causer du
brouillage et/ou des dommages aux dispositifs LAN-EL.
32
BA-PD-V1-10-US-EN-170315_Draft.indd 32 15.02.2017 18:21:19
Page 33

8. Copyright and trademarks
Porsche Design is a trademark of Dr. Ing. H. F. Porsche
Aktiengesellschaft.
Microsoft and Windows 10 are registered trademarks or
trademarks of the Microsoft Corporation in the U.S. and/or
in other countries.
Intel, Intel Logo, Intel Inside, Intel Core and Core Inside are
trademarks of the Intel Corporation in the United States
and/or other countries.
The Bluetooth word mark and logos are registered
trademarks owned by Bluetooth SIG, Inc. and any use of
such marks is under license. Other trademarks and names
are the property of their respective owners.
HDMI, the HDMI logo, and the High-Definition Multimedia
Interface are trademarks or registered trademarks of HDMI
Licensing, LLC in the U.S. and/or in other countries.
Realtek is a registered trademark of Realtek Semiconductor
Corporation. Other trademarks and names are the property
of their respective owners.
Copyright © 2017. All rights reserved. Some product or
company names mentioned elsewhere may be brand names
or trade names of the respective proprietor.
33
BA-PD-V1-10-US-EN-170315_Draft.indd 33 15.02.2017 18:21:19
Page 34

This document contains the technical specifications
and product information current at the time of printing.
All information found in this document, including URLs
and links to websites, is subject to change without prior
notification.
Individual content may vary from region to region or based
on the device specifications/software from your device.
Please note the proprietary notice pursuant to DIN ISO
16016. Copyright law prohibits the copying, utilization, and
distribution of the content of this document (illustrations,
reference documents, etc.), as a whole or in part, without
the permission of the copyright holder.
34
BA-PD-V1-10-US-EN-170315_Draft.indd 34 15.02.2017 18:21:19
Page 35

35
BA-PD-V1-10-US-EN-170315_Draft.indd 35 15.02.2017 18:21:19
Page 36

The manufacturer hereby confirms that the Porsche Design Book One radio equipment
type complies with UL-Certification. You can find the full version of the UL Declaration of
Conformity online at: www.porsche-design-computing.com
BA-PD-V1-10-US-EN-170315
BA-PD-V1-10-US-EN-170315_Draft.indd 36 15.02.2017 18:21:20
Page 37

BA-PD-V1-10-US-EN-170315_Draft.indd 37 15.02.2017 18:21:20
Page 38

BA-PD-V1-10-US-EN-170315_Draft.indd 38 15.02.2017 18:21:20
 Loading...