

Page 1

7” PDA User’s Guide
7”
PDA
User’s Guide
Product name: MID
Model name:
QV1
1
Page 2

7” PDA User’s Guide
1. Introduction
This User’s Guide provides detailed information to assist you in operating your 7” PDA. Basic setup and
software application procedures using the Microsoft Windows CE (WinCE) operating system are also
provided.
1.1 Safety Information
General Warnings:
• Only use the 5V power supply provided in the packaging.
• Keep this product away from water, humidity and moisture to prevent damage and the possibility
of fire or electric shock.
• Do not apply excessive pressure on the display screen.
• Handle product with care and avoid trauma to the product.
• Only use the touch pen provided in the packaging and avoid using other tools which may
damage the surface of the screen.
• Avoid excessive movement of the tablet while it is docked in the Docking Station.
• Use care when rotating the camera lens.
FCC Warning: This product generates, uses, and can emit radio frequency energy and has not
been tested for compliance within the limits of computing devices pursuant to subpart J of part 15 of
FCC rules, which are designed to provide reasonable protection against radio frequency interference.
Operation of this equipment in other environments may cause interference with radio
communications, in which case, the user, at his or her own expense, will be required to take
whatever measures may be required to correct this interference. If this equipment does cause
harmful interference to radio or television reception, which can be determined by turning the
equipment off and on, the user is encouraged to try to correct the interference by one or the following
measures:
• Reorient or relocate the receiving antenna.
• Increase the separation between the equipment and receiver.
• Connect the equipment into an outlet on a circuit different from that to which the box is
connected.
Important: One Federal Court has held that unauthorized recording of copyrighted TV programs is
an infringement of US copyright laws. Certain Canadian programs may also be copyrighted and any
unauthorized recording in whole or in part may be in violation of these rights.
2
Page 3

1.2 Table of Contents
1 Introduction ..........................................................................................................................2
1.1 Safety Information..........................................................................................................2
1.2 Table of Contents...........................................................................................................3
1.3 Overview........................................................................................................................4
1.4 Specifications.................................................................................................................5
1.5 Package Content Checklist............................................................................................5
2 Getting Started .....................................................................................................................6
3 Basic Operations..................................................................................................................7
3.1 Turning the device on/off................................................................................................7
3.2 Setting the Date and Time..............................................................................................8
3.3 Taking Photos with the Swivel Digital Camera...............................................................8
3.4 Orientation of the Windows Desktop ............................................................................10
3.5 Memory Card...............................................................................................................10
3.6 Touch Pen Hints - Left and Right clicks........................................................................10
3.7 Docking Station - Audio and USB ................................................................................11
3.8 Software Keyboard.......................................................................................................12
3.9 Connecting to the network and other devices...............................................................13
• Making a wireless connection to a wireless hub.......................................................13
• Making a Bluetooth connection to another Bluetooth device....................................15
3.10 Internet Browser, Email, MSN messenger, Media Player and Word .............................17
3.11 Remote PC Connection................................................................................................18
3.12 Battery - Recharging, Status, Power Management and Screen Saver..........................23
3.13 Recalibrating the Touch Panel .....................................................................................25
3.14 The Reset Button.........................................................................................................27
4 Reference............................................................................................................................28
4.1 Troubleshooting Guide.................................................................................................28
4.2 CE statement ………………………………………………………………………………… 28
4.3 FCC statement ………………………………………………………………………………. 31
3
Page 4

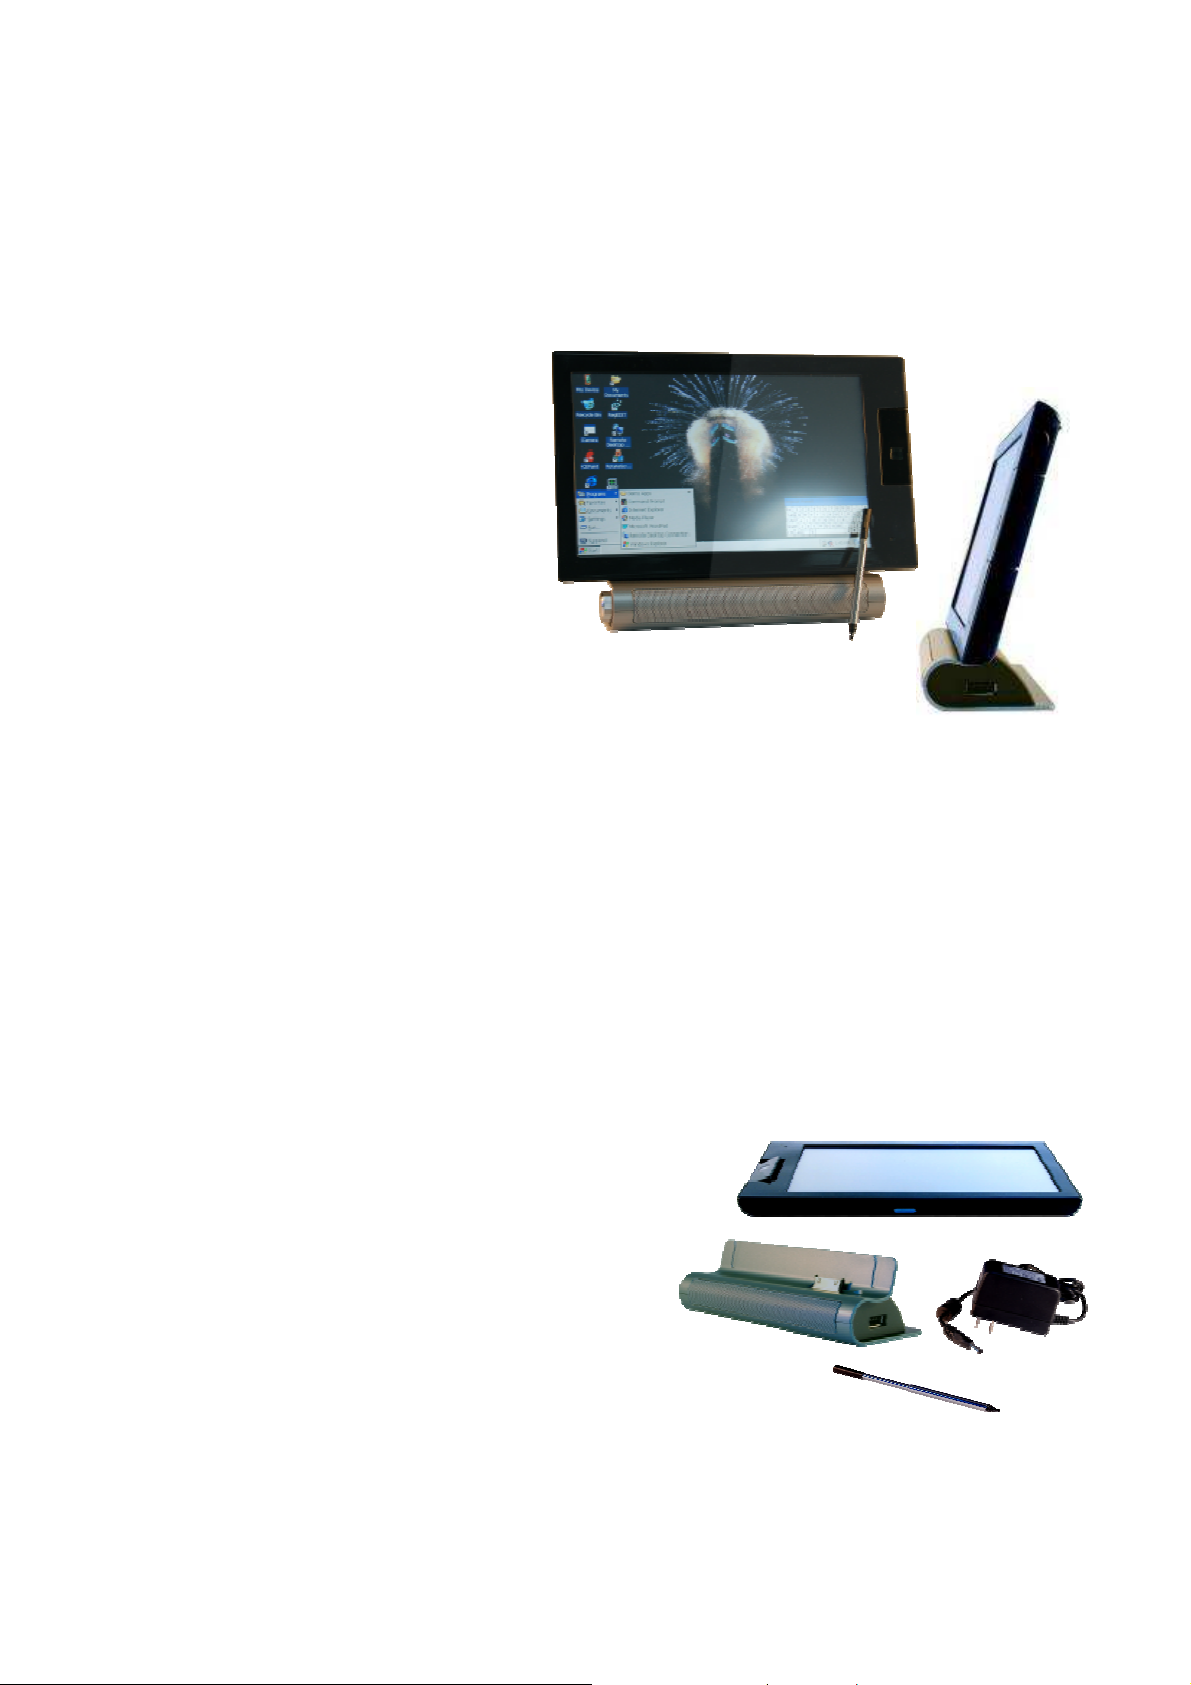
1.3 Overview
The 7” PDA has been designed as a mobile internet device allowing convenient portability
and timely internet access in addition to basic PC services. This product comes preinstalled with the WinCE 6.0 operating system which provides a Windows user interface. A
touch pen along with the touch panel allow you to navigate the desktop. A software based
keyboard is provided but the tablet can also be supplemented with a USB keyboard and
mouse when attached to the docking station.
Basic Tablet Description
4
Page 5
1.4 Specifications
ARM926, 400MHz CPU
Freescale i.MX27 + 13783
7” Touch Panel Screen (800x480)
Mobile DDR 128MB
NAND flash 128MB
Video codec, VGA@30fps
WiFi and Bluetooth support
Battery: 10.8 Whr
Power Adapter: 5V, 2.5A
Tablet dimensions: 188.3x113x12.9 mm (w x l x h)
Tablet Weight: 343g
Docking Station with two USB 2.0 connectors, internal stereo speakers, line-in/line-out, volume
control
OS: Win CE6.0
Swivel Camera 0.3/1.3M (180 degree rotation)
Application features: Internet Browsing, MSN Chatting, Web based email, Word Pad, Media
Player
* Designs and Specifications are subject to change without notice.
1.5 Package Content Checklist
Check the package contents with items listed below:
Tablet
Docking Station
Universal 5-V 2.5 A Power Adapter
Touch Pen
User’s Manual (not pictured)
5
Page 6
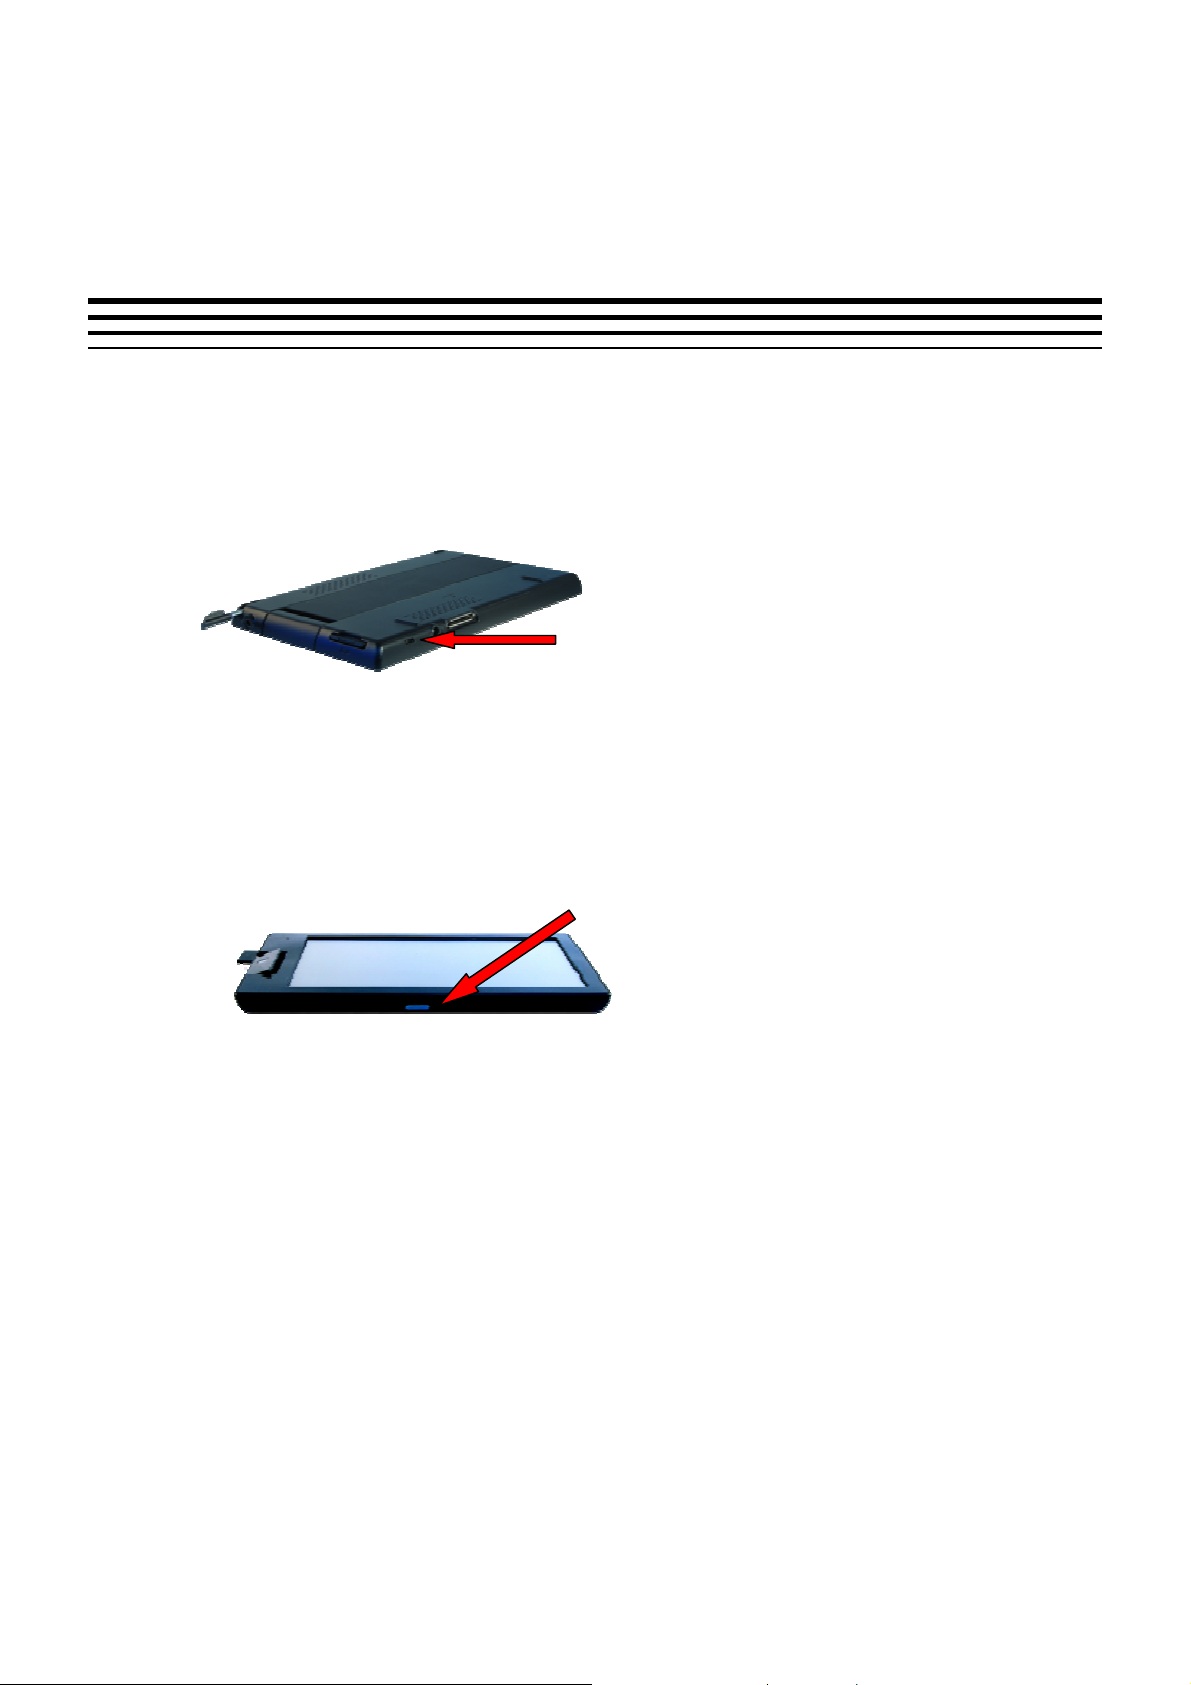
2 Getting Started
On/Off button
These steps describe how to power-on your tablet out of the box.
1) Before using the tablet for the first time, you must unlock the “Safety Lock” using the touch pen.
The “Safety Lock” is located on the bottom of the tablet.
2) Then press the On/Off button that is located on top of the device (note that you have to keep the
button depressed for about 1 second). If your tablet boots to Windows you may begin using
your tablet PC.
Safety Lock
3) If your tablet does not boot initially, you will have to charge the battery by attaching the power
adaptor cable to the power connector at the bottom of the tablet. Attach the other end of the
power adaptor to an electrical wall socket.
After you attach the power adaptor, the tablet will automatically boot up with the Win CE desktop
appearing on the screen. You may begin using your tablet.
4) When not in use, simply press the on/off button on top of the tablet for 3 seconds to suspend
operations. The tablet Windows environment can be quickly revived by depressing the on/off
button again for at least 1 second.
6
Page 7
3 Basic Operations
This chapter will describe basic operations for the tablet.
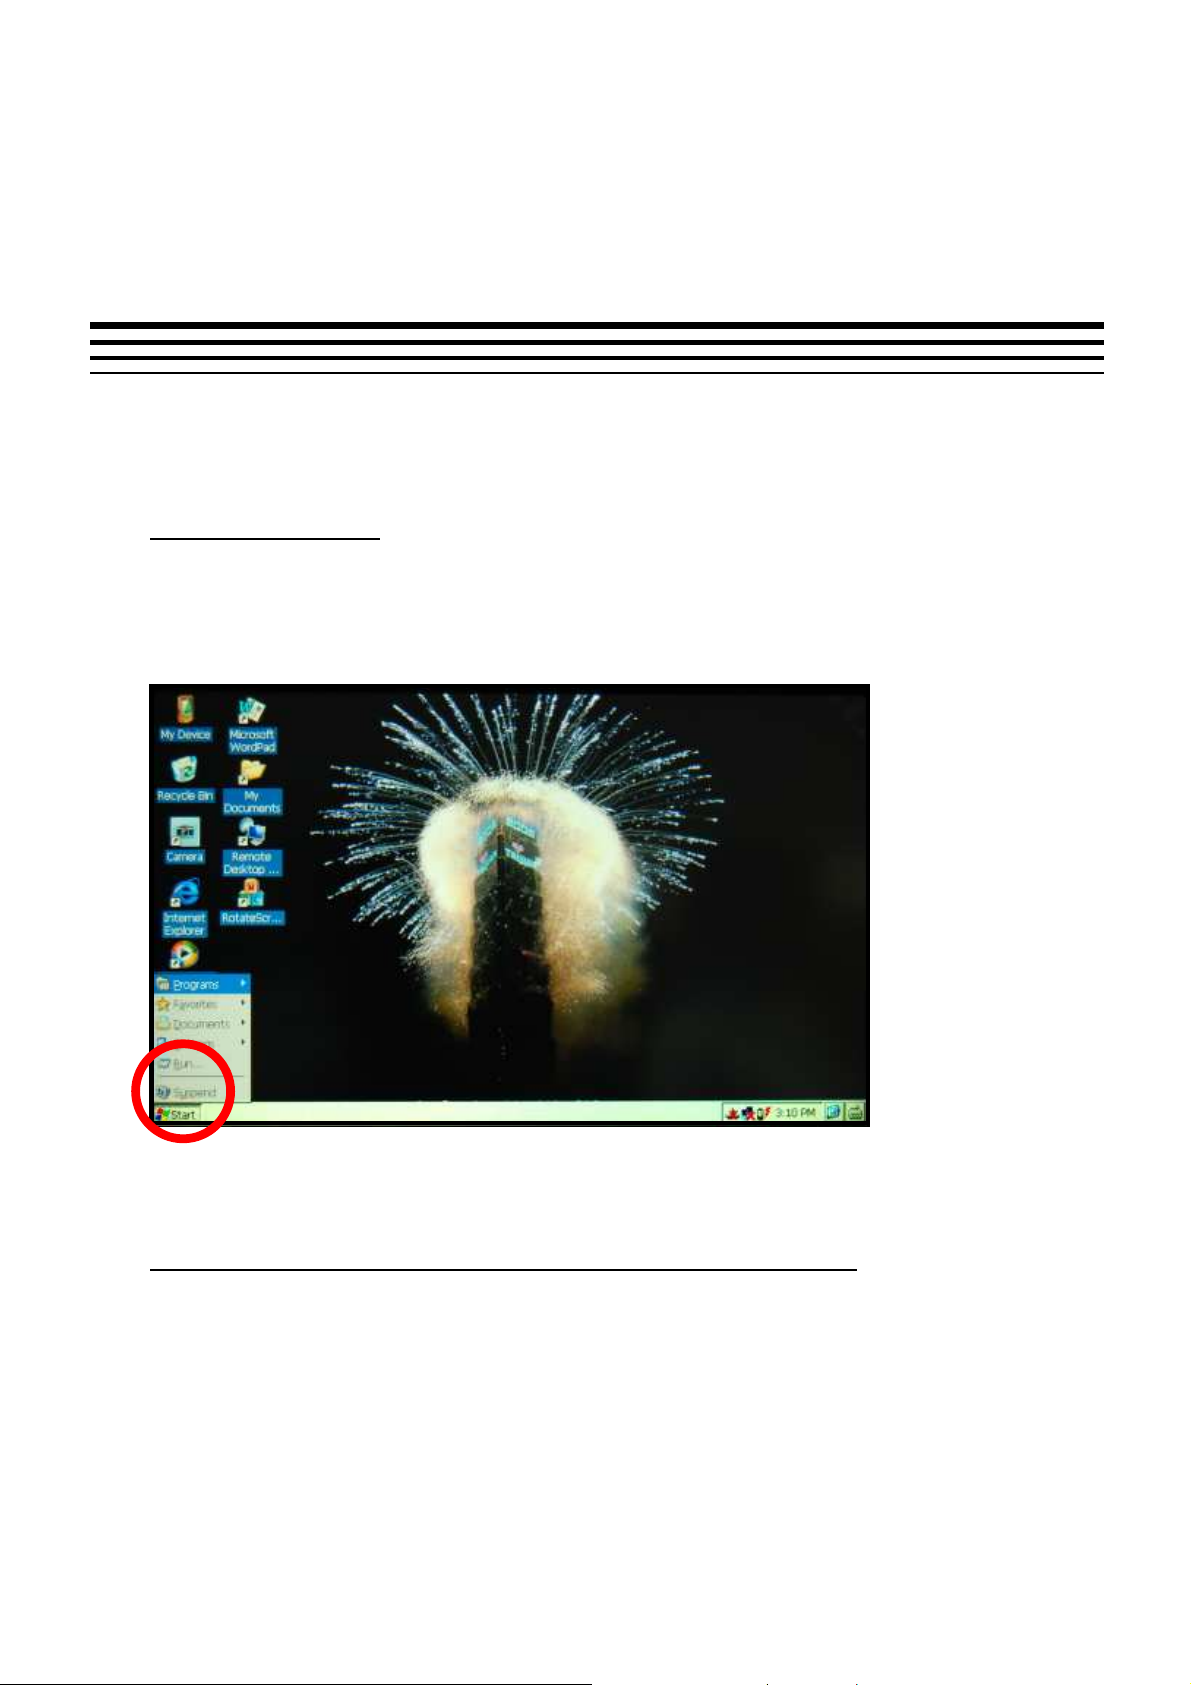
3.1 Turning the device on/off (Suspend/Power)
To enter Suspend Mode
As mentioned, you must depress the On/Off button at the top of the tablet for 3 seconds and then
release to enter the Suspend mode (the screen will go blank) . You may also choose the “Suspend”
option from the Start Button located on the desktop at the lower left corner of the screen (Start
Button -> Suspend). The “Suspend” mode is the normal operating state when not in use.
To resume from suspend mode, simply press the On/Off button on top of the tablet for at least 1
second to refresh the Windows desktop.
Power off your tablet PC completely to reset Manufacturer Default Settings
As mentioned, this tablet PC was designed to stay in the “Suspend” mode when not in use.
However, you can choose to power down completely by toggling the “Safety Lock” to the lock
position but this constitutes a hardware reset and all of your previous settings such as the date/time
will be set back to manufacturer defaults.
7
Page 8
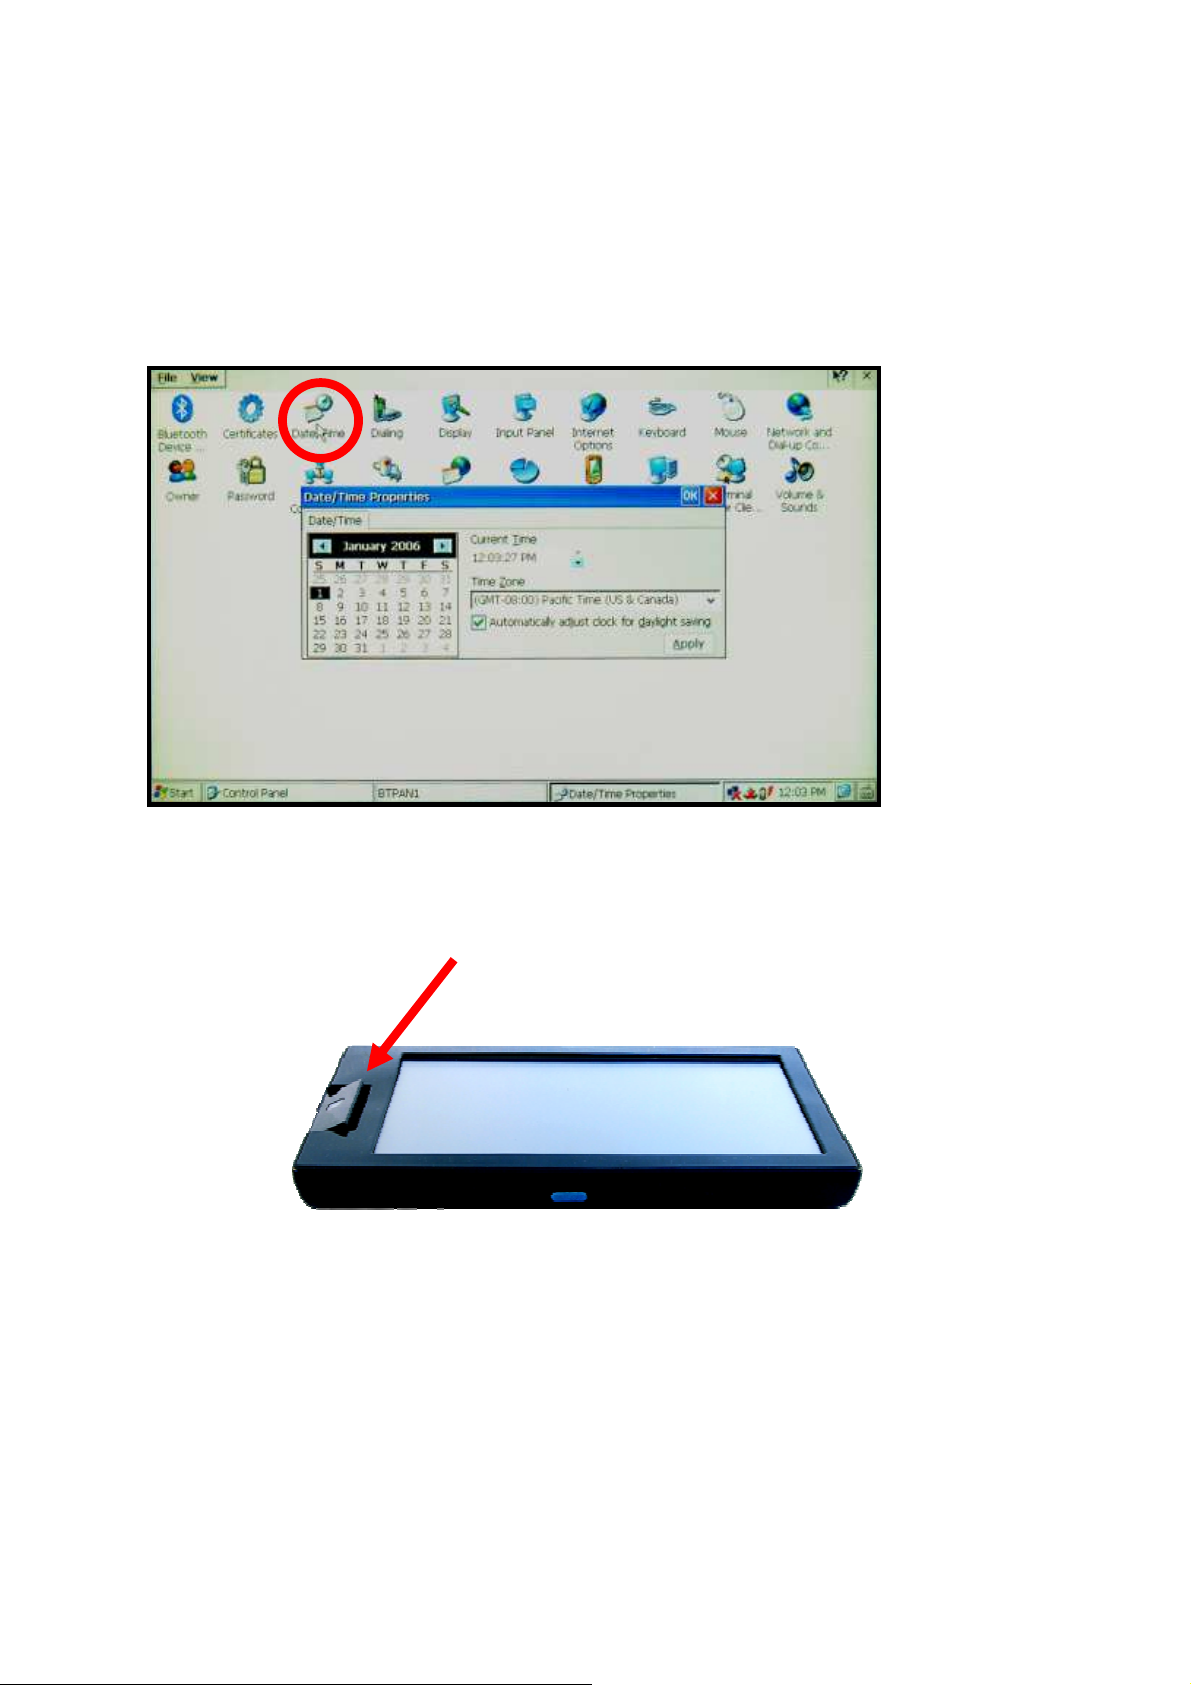
3.2 Setting the Date and Time
To set the date and time, go to Start Button Settings Control PanelDate/Time. When the
Date/Time Properties windows displays, use your touch pen to adjust the date/time accordingly.
3.3 Taking Photos with the Swivel Digital Camera
This tablet features a 180˚ Swivel Digital Camera that you can rotate from front to back.
8
Page 9
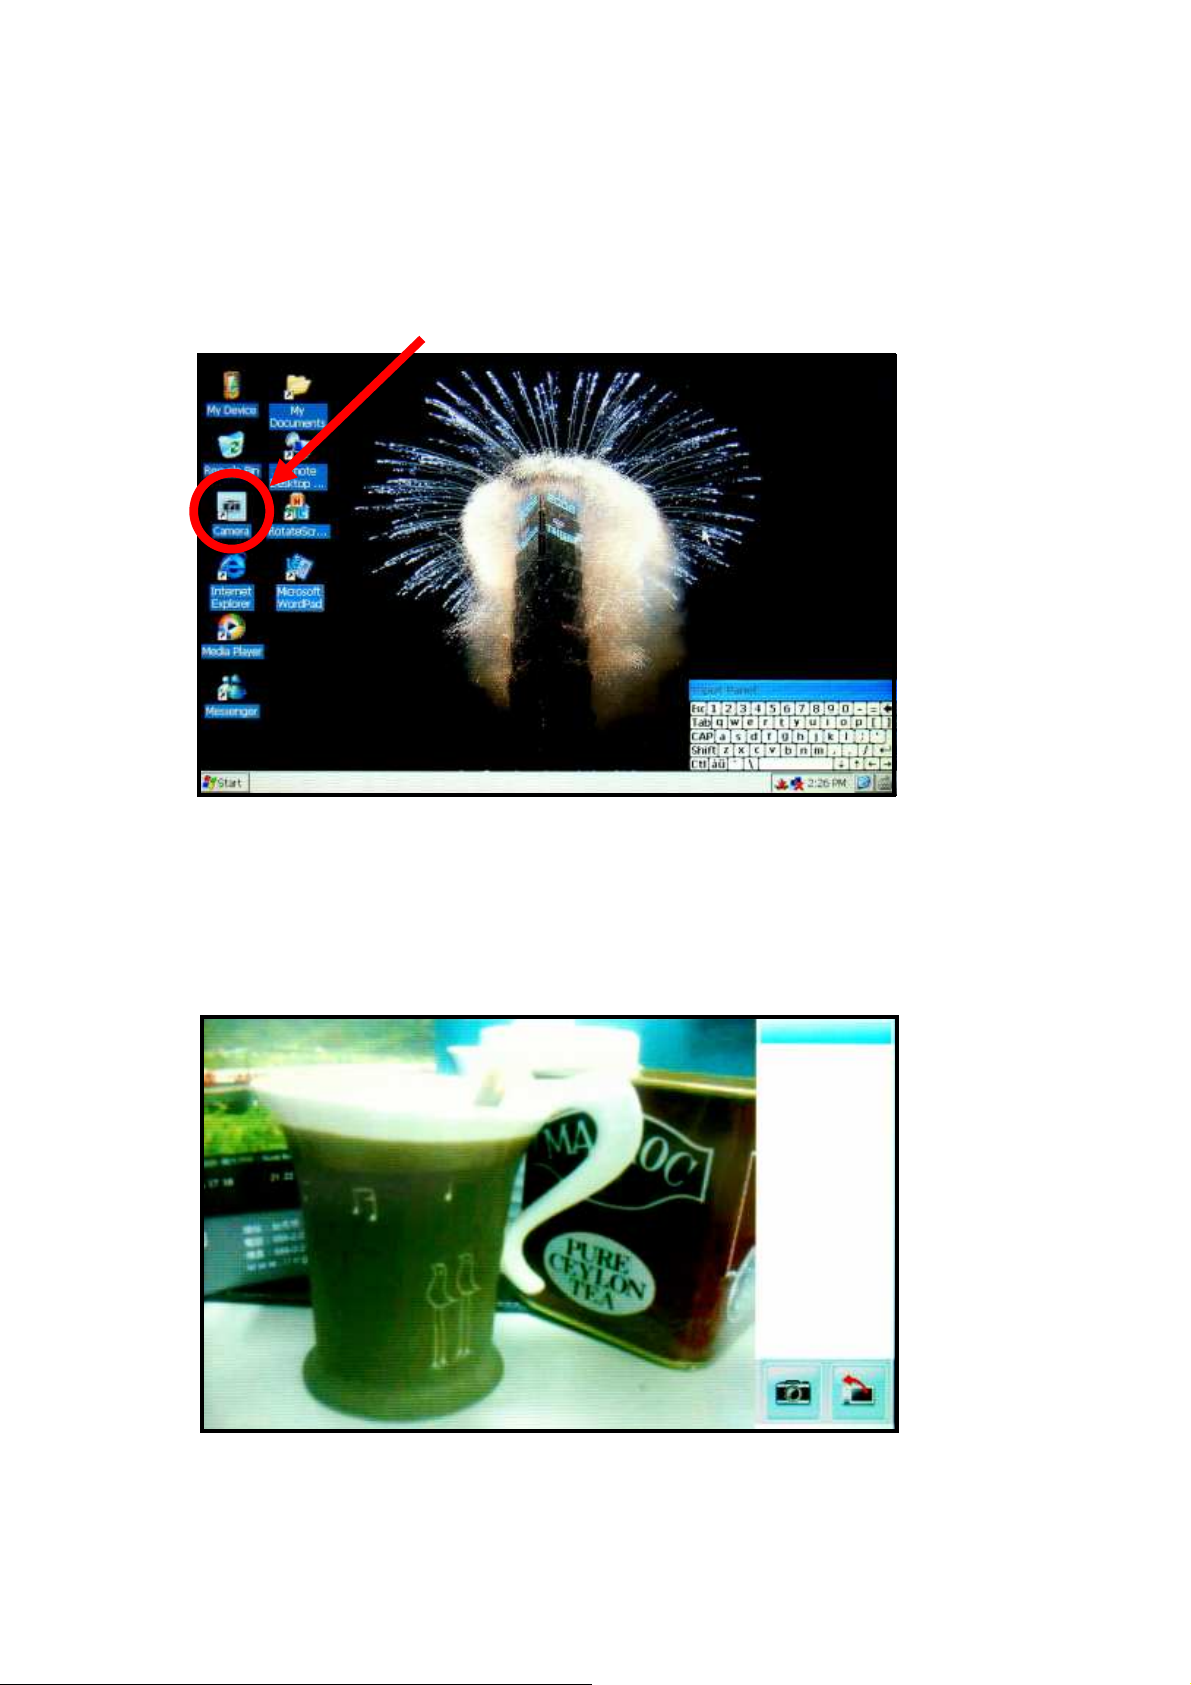
a. To use the camera, double-click the “Camera” icon on the desktop to start-up the camera
application program. This application can also be started from the “Start” button (Start Button
ProgramsDemo AppsCamera).
b. The application will open in “preview mode”, displaying what the camera lens is currently
capturing. Click the “Camera” icon in the lower right corner to take a picture. After the first
picture you take in a session, the application will popup a subwindow to allow you to choose a
location to store your picture. Subsequent pictures taken during that session are stored to the
same location. Click the “Return” icon (icon with red arrow) in the lower right corner to exit the
application program.
9
Page 10
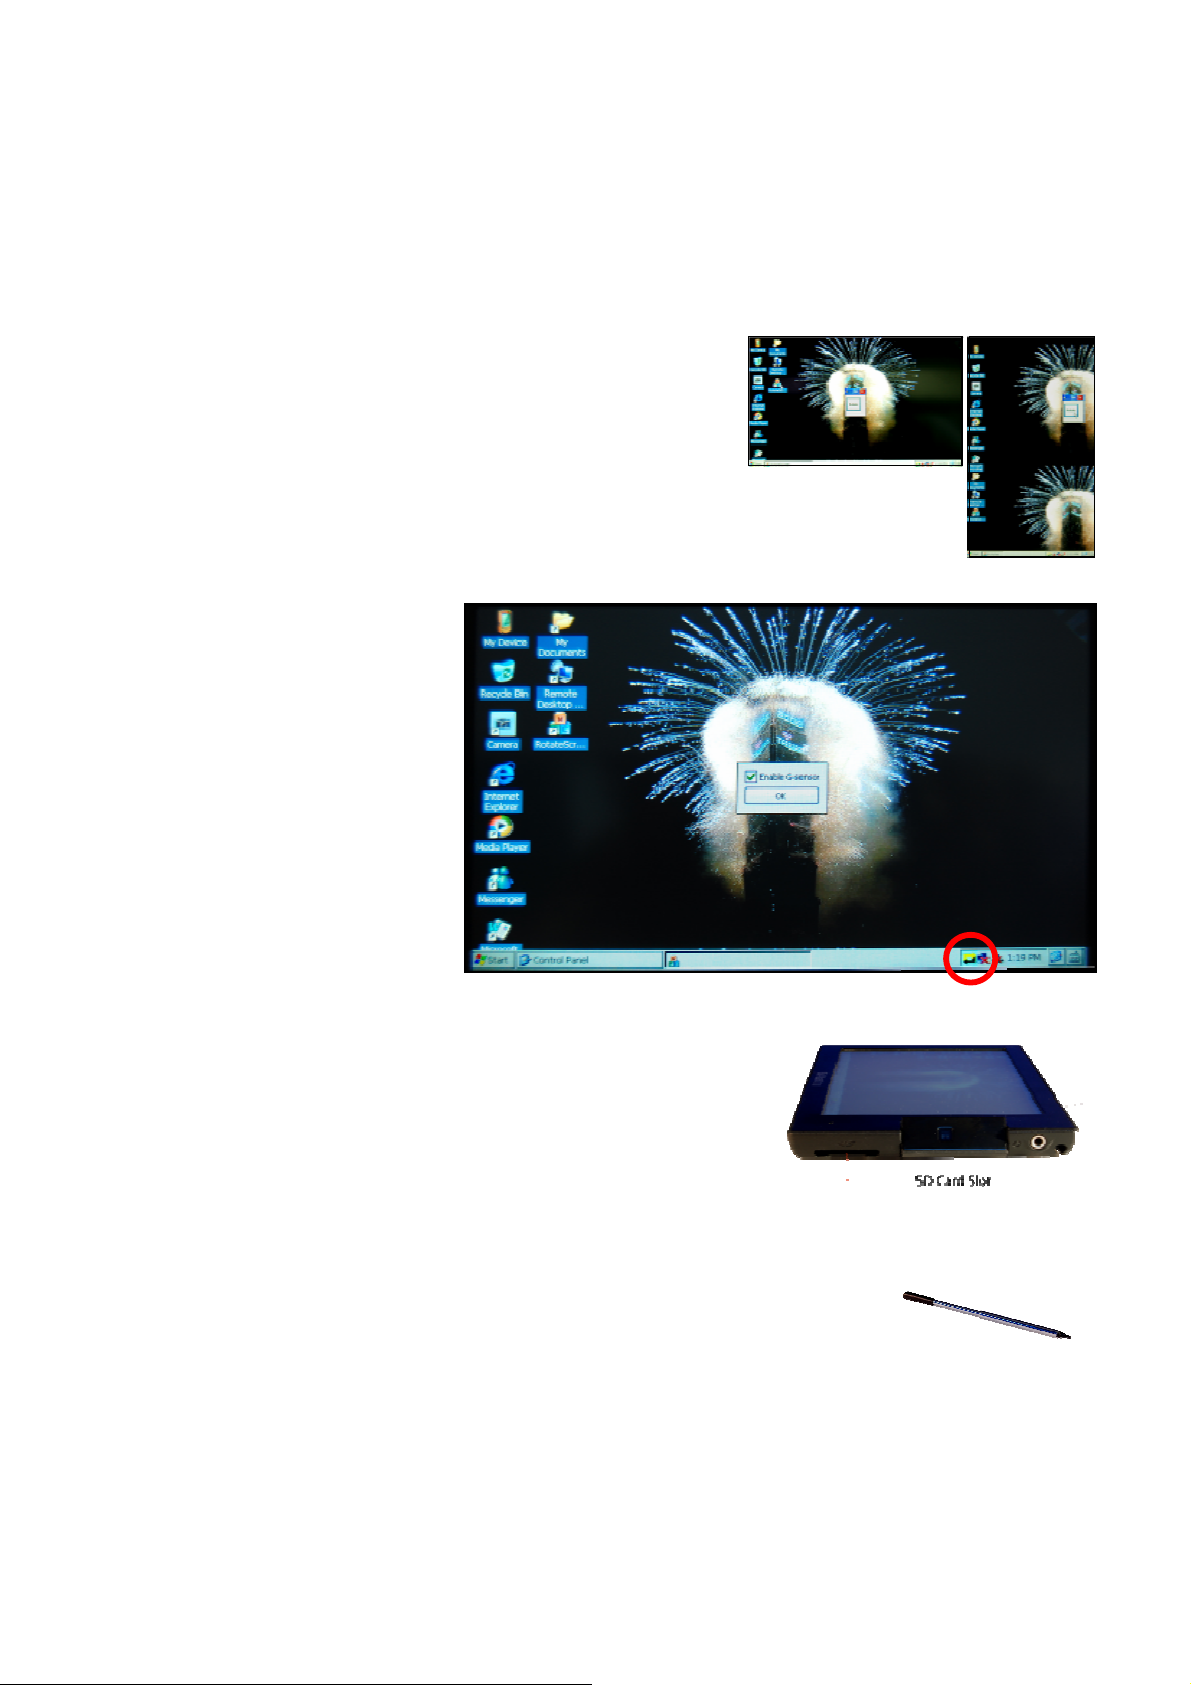
3.4 Orientation of the Windows Desktop
The Windows desktop will automatically reorient to a
horizontal or vertical landscape depending on how you are
holding the tablet. If you rotate the tablet, you will notice the
Windows desktop immediately adjusting to the plane which
you are holding the tablet in. You can also use the Rotate
Screen application program whose icon is located on the
desktop (RotateScr). When the Rotate popup window
appears, click the Rotate button and the desktop will reorient
90˚in a counter-clockwise direction.
You can choose to disable the
auto-reorient feature by
clicking on the G-sensor icon in
the system tray (lower right
corner as shown). A G-sensor
popup window will appear and
you simple need to uncheck
the box to disable the feature.
3.5 Memory card
This product supports the SD memory card format. To access
the contents of your card, click on the desktop icon “My Device”
and then click on “SD Memory”. The SD card can only fit into the
slot in one way so do not use excessive force. Although you can
insert and remove the SD card at anytime, it is recommended
that you take care not to do so while any applications are running.
3.6 Touch Pen Hint – Left and Right clicks
When using the touch pen, you can simulate left and right clicks. A left click
is simply tapping once on a line or an icon. A right click is simulated by
using your touch pen and pressing until a right click action is executed (e.g.
in the file manager, right clicking on a file causes a drop down menu to
appear).
10
Page 11

3.7 Docking Station – Audio and USB facilities
This tablet comes with a docking station, which is used to dock your tablet in an upright position to
allow hands-free convenience. The power adaptor must be attached to the docking station to
allow the tablet to use the USB ports and speakers on the docking station.
When you are connecting the tablet to the docking station, use the two knobs on the back of the
tablet and the inverted guides on the docking station to guide the tablet onto the docking station.
Make sure you accurately and gently lower tablet connector onto the docking connector on the
docking station in order to prevent damage to both connectors.
11
Page 12

There are two LED indicators embedded into the docking station and can be viewed through the
mesh plate. The left LED illuminates to green when the docking station is connected to the power
adaptor. The right LED illuminates when the tablet is attached – it illuminates to red when the tablet
battery is recharging and it illuminates to green when the battery is fully charged.
The Docking Station offers two USB 2.0 ports for such devices as flash drives, keyboards, mice etc.
It can even support USB 2.0 hubs that allow you connect more than two USB devices at the same
time. The docking station also has a volume control button, embedded speakers along with line
in/out jacks (if you choose to use auxiliary external speakers).
When the tablet is docked and you wish to use earphones, you must attach the earphones to the
line-out jack behind the docking the station (the earphone jack on the tablet is disabled while the
tablet is docked).
3.8 Software keyboard
This tablet provides a virtual software keyboard that allows you to type characters as you would a
normal keyboard. You can access the keyboard by clicking on the “Pen” icon (sometimes seen as a
keyboard icon) located in the far lower right corner – a pull up menu will appear with three options;
Large Keyboard (LargeKB) as shown below, Small Keyboard (Keyboard) and Hide Keyboard (Hide
Input Panel).
12
Page 13

3.9 Connecting to the Network and other devices using the Wireless facilities
Making a wireless connection to a wireless hub.
a. To connect the Wireless facility on the tablet to a local network (wireless hub), you must first
locate the network icon in the system tray (at the bottom right corner of the desktop as shown).
It will initially have a red “X” indicating that there is currently no network connection. Double
click on the icon.
b. The Window labeled “SDIO86861” will
appear. Click the “Wireless Information” tab.
On this tab, the rectangular box in the middle
of the window will list all available wireless
hubs in your vicinity (you may have to wait a
few seconds while the device scans your
local environment). In the example to the
right, the only available wireless hub is
named “United”.
c. After identifying the local wireless hub you
want to connect to, click on the line (in the
box) to highlight that name and then click the
“Connect” button.
13
Page 14

d. On your very first connection to a hub, a “Wireless
Network Properties” window will appear. A basic
connection to a simple network hub is shown in the
example to the right – most of the information will
already be populated when this screen displays.
Also note the boxes that are checked and those that
are not checked. Press OK.
You will be returned to the original “SDIO86861”
Window and the tablet will attempt to connect to the
wireless hub automatically.
Note: The wireless environment you are accessing
maybe be part of a corporate or public network –
these networks may have certain characteristics that
require further configuration such as an Encryption
method (e.g. WEP), a “Network key” or IEEE 802.1
authentication. If so, contact the network
administrator for further assistance.
e. At the “SDIO86861” Window, the device will
attempt to connect to the wireless hub. The
status of the connection attempt will display
next to the “Status” label. If your connection is
successful, it will display “Connected to
<name of hub>”. The “Signal Strength” label
will indicate the strength of the signal – Low,
Very Good, Excellent. Also notice the
“Connected Icon” next to the “United” label in
the center box. If the signal is low or you have
intermittent connection problems, you may
have to move closer to the wireless hub..
Note: The message to the right is just a warning
message you may get while you are attempting to
connect to a wireless hub. No action is necessary
other than to tap the OK button.
14
Page 15

Making a Bluetooth connection to another Bluetooth device.
a. Bluetooth connections can allow you to transfer files between two devices that have Bluetooth
facilities. The Bluetooth facilities on the tablet PC are located at Start ButtonSettingsControl
PanelBluetooth Device.
After you click on the Bluetooth icon as show below, a “Bluetooth Manager” Window will display.
If you click the “Scan Device” button, all of the Bluetooth devices in the vicinity will be listed. In
the example below, the tablet PC has found a Motorola Cell Phone (all three devices listed are
from a single cell phone) with its Bluetooth facilities enabled.
Highlight one line in the “Untrusted” devices box and then click the left-to-right arrow (). Do the
same for the other items listed for the same device.
b. The tablet will then ask you if you want to authenticate with the other device. If you type yes, you
will be asked for a pin number that you will most likely need to also validate on the other device.
If you type No, there is no pin verification required.
15
Page 16

c. You may now transfer files from the other device to your tablet PC. When the file arrives, you will
be prompted to accept the file into the default directory as shown below.
16
Page 17

3.10 Internet Browsing, Email, MSN Messenger, Media Player, Word
This tablet PC comes with preloaded software to:
Browse the Internet (Internet Explorer)
Email (Using Internet Explorer and web based email such as hotmail, yahoo etc.)
Chat (MSN Messenger)
Playback Video and Audio (Media Player)
Write (Word Pad)
These programs may be found directly on the desktop as shown below.
These applications can also be accessed from the Start Button (Start Button Programs).
17
Page 18

3.11 Remote PC Connection
This tablet PC has the ability to connect to your home desktop PC from anywhere on the world wide
web and serve as a remote workstation allowing you access to all of your files and applications that
you would normally have at your disposal from your personal desktop at home.
In other words, you can be in a different country and bring up your home PC desktop on your tablet
PC as if you were at home. The only requirement is that your home PC is turned on and connected
to a network.
How to setup up your home PC (Windows XP example) for a “Remote Workstation”.
a. First you have to obtain the IP address of your home PC. This is done by going to a DOS
Command Prompt window and typing in “ipconfig /all”. In the example below, the address is
“192.168.1.19”
18
Page 19

b. Make sure your home PC can accept a
remote connection. On your home PC rightclick on “My Computer” and then select the
“Properties” item. When the “System
Properties” window displays, click on the
“Remote” tab. Make sure the box next to
“Allow users to connect remotely to this
computer” is checked.
c. Finally check to make sure that your
Windows firewall is already set up to allow
remote connections.
Go to Control PanelWindows Firewall. On
the “Windows Firewall” window press the
“Exceptions” tab. Make sure that the
“Remote Desktop” box is checked.
19
Page 20

d. Setup a User account on your home PC. You must set up a User Account with a Password that
you can use on your tablet PC to connect to your home PC. Right click on “My Computer” on
your home PC and select the “Manage” item. The “Computer Management” window will appear
as shown below. Double click on “Local Users and Groups” and then click on “Users”.
If you right-click on the empty space in the area below the user Names (under the “Administrator”
line in the example below), you will get a drop down menu. Click on “New User”.
e. In the “New User” window, fill in the blanks and press “Create”. You will use the User name and
password later when you connect to your home PC from the tablet.
20
Page 21

Remote connection from your tablet PC.
a. First, you must make sure your tablet is connected to a network. On your tablet PC, go to Start
ButtonProgramsRemote Desktop Connection. When the Remote Desktop Connection
window appears, type in your home PC IP address that you obtained earlier. Press “Connect”.
b.
On the “Remote Desktop Connection” window, type in your User Name and Password of your
home PC.
21
Page 22

c.
When you make your connection to your home PC, your tablet PC will display your home PC
screen with a tab at the top of the tablet indicating your home PC IP address.
22
Page 23

3.12 The Battery – Recharging, Status, Power Management and Screen Saver.
Charging the battery
The tablet battery can be charged in two ways. The first way is to connect the power supply directly
to the tablet. The second way is to connect the power supply to the Docking Station and dock the
tablet onto the station. When charging the tablet on the docking station, the right-LED behind the
docking station mesh plate will illuminate red when recharging and change to green when charging is
complete.
Note that the tablet must either be booted up or in suspend mode for the tablet battery to recharge.
The battery will NOT recharge if the tablet is powered down (Safety Lock toggled to lock position).
You can view the status of the battery charge on the “Power Properties Window” (below) by clicking
on the Battery icon located in the System Tray (lower right corner as shown). You can also go to
Start Button Settings Control Panel Power.
Power Management
Under the “Schemes” tab of the Power Properties Window (above) you can find Power Saving
modes to preserve the battery charge when the tablet enters a User Idle, System Idle, or
Suspend state. These power saving modes occur after the tablet has not been in use for a
configured amount of time.
The User Idle state dims the screen after a configured duration of idleness.
The System Idle state blanks the screen after a configured duration of idleness. Simply
tapping on the screen will refresh the display.
The Suspend state shuts down all power but that which is needed to preserve the present
environment in memory. You must depress the on/off button at the top of the tablet for 1 second
to revive the system. This is the most energy conserving of the three modes.
23
Page 24

Note: After you resume from the suspend state, you may have to reestablish the wireless
network connection.
There is also a Screen Saver mode which can be configured from the “Display Properties”
window (below). You can access this window by going to Start Button Settings Control
Panel Display. Click on the “Backlight” tab.
Here you can configure Screen Saver mode (screen blanks out) based on the amount of time
the tablet is idle.
24
Page 25

3.13 Recalibrating the Touch Panel
After an extended period of use, it may seem that your touch panel does not track your touch pen
accurately. In other words, there may be a slight offset between where you touch with your pen and
the actual placement on the screen. This is because touch panels occasionally need to be
recalibrated.
a. First you need to connect the tablet to the Docking Station and attach a USB keyboard. Then
go to Start Button SettingsControl PanelStylus
b. After you click on the Stylus icon, the Stylus Properties window will display as below. To
recalibrate the touch screen, click the “Calibration” tab.
Note: The Double-Tap tab allows you to adjust the sensitivity to the double-tap speed at which
you are accustomed.
25
Page 26

c. Click on the “Recalibrate” button.
d. When the screen below appears, follow the directions and tap the middle of the cross with your
touch pen. As the cross moves to a new position, tap again at the center of the cross. When you
are done with the final position, the screen will prompt you to Press Enter on your USB keyboard
to accept the new settings.
26
Page 27

3.14 The Reset Button
The tablet PC comes with a Reset Button. Pressing the Reset button with your touch pen will cause
the Tablet to perform a hardware reboot. Note that all of your previous settings will be reset (i.e.
date/time).
27
Page 28

4 Reference
This section lists common problems and ways to troubleshoot.
4.1 Troubleshooting Guide
If you are experiencing problems with the tablet hardware or software, see Table 1 for possible
solutions.
Table 1. Troubleshooting the Tablet PC
Symptom Solution
Make sure the “Safety Lock” on the bottom of the tablet is toggled to the Unlock position.
If the tablet is operating stand-alone, the battery charge may be low. Attach the power
No power to the
Tablet
adaptor and charge the battery.
If the tablet is using the power adaptor or is plugged into the docking station, make sure that
all cables are secure (especially to the wall socket). Make sure the wall socket is “hot” by
testing other working accessories on that wall socket.
If you have external speakers, make sure that the audio cables are secure between the tablet
and the docking station.
No audio from
the docking
station.
Touch Panel is
not tracking the
touch pen
accurately.
Cannot connect
to the wireless
hub after
resuming from
suspend mode
Make sure that the system volume has not been turned down. Go to Start Button->Settings-
>Control Panel->Volume and Sounds
Make sure that the volume adjustment knob on the Docking Station is not turned all the way
down.
Recalibrate the touch screen. See the “Recalibration” section.
Delete the connection by bringing up the SDIO86861 Window by clicking on the Network icon
in the system tray. Highlight the line that has your wireless hub name by clicking once on the
hub name and press the “Advanced” button. In the “Preferred Networks” box, highlight the
name of the wireless hub (click once) and then press the “Delete” key. Then hit OK. You will
be returned to the SDIO86861 Windows where the tablet will again scan for your wireless
hub where you can attempt the connection again.
4.2 CE Statement Guide
Europe – EU Declaration of Conformity
28
Page 29

This device complies with the essential requirements of the R&TTE Directive 1999/5/EC. The following test methods
have been applied in order to prove presumption of conformity with the essential requirements of the R&TTE
Directive 1999/5/EC:
- EN60950-1:2006
Safety of Information Technology Equipment
-
- EN 300 328 V1.7.1: (2006-10)
- Electromagnetic compatibility and Radio spectrum Matters (ERM); Wideband Transmission systems; Data
transmission equipment operating in the 2,4 GHz ISM band and using spread spectrum modulation techniques;
Harmonized EN covering essential requirements under article 3.2 of the R&TTE Directive
EN 301 489-1 V1.6.1: (2005-09)
Electromagnetic compatibility and Radio Spectrum Matters (ERM); ElectroMagnetic Compatibility (EMC)
standard for radio equipment and services; Part 1: Common technical requirements
- EN 301 489-17 V1.2.1 (2002-08)
- Electromagnetic compatibility and Radio spectrum Matters (ERM); ElectroMagnetic Compatibility (EMC)
standard for radio equipment and services; Part 17: Specific conditions for 2,4 GHz wideband transmission
systems and 5 GHz high performance RLAN equipment
This device is a 2.4 GHz wideband transmission system (transceiver), intended for use in all EU member states and
EFTA countries, except in France and Italy where restrictive use applies.
In Italy the end-user should apply for a license at the national spectrum authorities in order to obtain authorization to
use the device for setting up outdoor radio links and/or for supplying public access to telecommunications and/or
network services.
This device may not be used for setting up outdoor radio links in France and in some areas the RF output power may
be limited to 10 mW EIRP in the frequency range of 2454 – 2483.5 MHz. For detailed information the end-user
should contact the national spectrum authority in France.
Č
[Czech]
Dansk
[Danish]
Deutsch
[German]
0560
esky
[Jméno výrobce] tímto prohlašuje, že tento [typ zařízení] je ve shodě se základními požadavky a
dalšími příslušnými ustanoveními směrnice 1999/5/ES.
Undertegnede [fabrikantens navn] erklærer herved, at følgende udstyr [udstyrets
typebetegnelse] overholder de væsentlige krav og øvrige relevante krav i direktiv 1999/5/EF.
Hiermit erklärt [Name des Herstellers], dass sich das Gerät [Gerätetyp] in Übereinstimmung
mit den grundlegenden Anforderungen und den übrigen einschlägigen Bestimmungen der
29
Page 30

Richtlinie 1999/5/EG befindet.
Eesti
[Estonian]
Käesolevaga kinnitab [tootja nimi = name of manufacturer] seadme [seadme tüüp = type of
equipment] vastavust direktiivi 1999/5/EÜ põhinõuetele ja nimetatud direktiivist tulenevatele
teistele asjakohastele sätetele.
English Hereby, [name of manufacturer], declares that this [type of equipment] is in compliance with the
essential requirements and other relevant provisions of Directive 1999/5/EC.
Español
[Spanish]
Por medio de la presente [nombre del fabricante] declara que el [clase de equipo] cumple con
los requisitos esenciales y cualesquiera otras disposiciones aplicables o exigibles de la Directiva
1999/5/CE.
Ελληνική
[Greek]
Français
[French]
Italiano
[Italian]
Latviski
[Latvian]
ΜΕ ΤΗΝ ΠΑΡΟΥΣΑ
[name of manufacturer]
∆ΗΛΩΝΕΙ ΟΤΙ
[type of equipment]
ΣΥΜΜΟΡΦΩΝΕΤΑΙ ΠΡΟΣ ΤΙΣ ΟΥΣΙΩ∆ΕΙΣ ΑΠΑΙΤΗΣΕΙΣ ΚΑΙ ΤΙΣ ΛΟΙΠΕΣ ΣΧΕΤΙΚΕΣ
∆ΙΑΤΑΞΕΙΣ ΤΗΣ Ο∆ΗΓΙΑΣ
1999/5/ΕΚ.
Par la présente [nom du fabricant] déclare que l'appareil [type d'appareil] est conforme aux
exigences essentielles et aux autres dispositions pertinentes de la directive 1999/5/CE.
Con la presente [nome del costruttore] dichiara che questo [tipo di apparecchio] è conforme ai
requisiti essenziali ed alle altre disposizioni pertinenti stabilite dalla direttiva 1999/5/CE.
Ar šo [name of manufacturer / izgatavotāja nosaukums] deklarē, ka [type of equipment /
iekārtas tips] atbilst Direktīvas 1999/5/EK būtiskajām prasībām un citiem ar to saistītajiem
noteikumiem.
Lietuvių
[Lithuanian]
Nederlands
[Dutch]
Malti
[Maltese]
Magyar
[Hungarian]
Polski
[Polish]
Português
[Portuguese]
Slovensko
[Slovenian]
Slovensky
[Slovak]
Suomi
[Finnish]
Šiuo [manufacturer name] deklaruoja, kad šis [equipment type] atitinka esminius reikalavimus
ir kitas 1999/5/EB Direktyvos nuostatas.
Hierbij verklaart [naam van de fabrikant] dat het toestel [type van toestel] in overeenstemming
is met de essentiële eisen en de andere relevante bepalingen van richtlijn 1999/5/EG.
Hawnhekk, [isem tal-manifattur], jiddikjara li dan [il-mudel tal-prodott] jikkonforma mal-
ħtiġ
ijiet essenzjali u ma provvedimenti oħrajn relevanti li hemm fid-Dirrettiva 1999/5/EC.
Alulírott, [gyártó neve] nyilatkozom, hogy a [... típus] megfelel a vonatkozó alapvetõ
követelményeknek és az 1999/5/EC irányelv egyéb elõírásainak.
Niniejszym [nazwa producenta] oświadcza, że [nazwa wyrobu] jest zgodny z zasadniczymi
wymogami oraz pozostałymi stosownymi postanowieniami Dyrektywy 1999/5/EC.
[Nome do fabricante] declara que este [tipo de equipamento] está conforme com os requisitos
essenciais e outras disposições da Directiva 1999/5/CE.
[Ime proizvajalca] izjavlja, da je ta [tip opreme] v skladu z bistvenimi zahtevami in ostalimi
relevantnimi določili direktive 1999/5/ES.
[Meno výrobcu] týmto vyhlasuje, že [typ zariadenia] spĺňa základné požiadavky a všetky
príslušné ustanovenia Smernice 1999/5/ES.
[Valmistaja = manufacturer] vakuuttaa täten että [type of equipment = laitteen tyyppimerkintä]
tyyppinen laite on direktiivin 1999/5/EY oleellisten vaatimusten ja sitä koskevien direktiivin
muiden ehtojen mukainen.
Svenska
[Swedish]
Härmed intygar [företag] att denna [utrustningstyp] står I överensstämmelse med de väsentliga
egenskapskrav och övriga relevanta bestämmelser som framgår av direktiv 1999/5/EG.
30
Page 31

4.3 FCC Statement Guide
Federal Communication Commission Interference Statement
This equipment has been tested and found to comply with the limits for a Class B digital device, pursuant to
Part 15 of the FCC Rules. These limits are designed to provide reasonable protection against harmful
interference in a residential installation. This equipment generates, uses and can radiate radio frequency
energy and, if not installed and used in accordance with the instructions, may cause harmful interference to
radio communications. However, there is no guarantee that interference will not occur in a particular
installation. If this equipment does cause harmful interference to radio or television reception, which can be
determined by turning the equipment off and on, the user is encouraged to try to correct the interference by
one of the following measures:
- Reorient or relocate the receiving antenna.
- Increase the separation between the equipment and receiver.
- Connect the equipment into an outlet on a circuit different from that
to which the receiver is connected.
- Consult the dealer or an experienced radio/TV technician for help.
FCC Caution: Any changes or modifications not expressly approved by the party responsible for compliance
could void the user's authority to operate this equipment.
This device complies with Part 15 of the FCC Rules. Operation is subject to the following two conditions: (1)
This device may not cause harmful interference, and (2) this device must accept any interference received,
including interference that may cause undesired operation.
IMPORTANT NOTE:
Radiation Exposure Statement:
This equipment complies with FCC radiation exposure limits set forth for an uncontrolled environment. End
users must follow the specific operating instructions for satisfying RF exposure compliance. To maintain
compliance with FCC RF exposure compliance requirements, please follow operation instruction as
documented in this manual.
This transmitter must not be co-located or operating in conjunction with any other antenna or transmitter.
The availability of some specific channels and/or operational frequency bands are country dependent and are
firmware programmed at the factory to match the intended destination. The firmware setting is not accessible
by the end user.
31
 Loading...