

Page 1

Devon IT Terminal
Operating System
(DeTOS)
Administration
Manual
Ceptor Edition
Page 2

Notes, Cautions, and Warnings
NOTE:
A NOTE indicates important information that helps you make better use of your
computer.
CAUTION: A CAUTION indicates potential damage to hardware or loss of data
if instructions are not followed.
WARNING: A WARNING indicates a potential for property damage, personal
injury, or death.
______________
Information in this publication is subject to change without notice.
© 2013 Devon IT All rights reserved.
2013 - 10 Ceptor (Model TC3A) Rev. A01
Page 3

Federal Communications Commission (FCC) Statement
You are cautioned that changes or modifications not expressly approved by the part
responsible for compliance could void the user’s authority to operate the equipment.
This equipment has been tested and found to comply with the limits for a Class B
digital device, pursuant to part 15 of the FCC rules. These limits are designed to
provide reasonable protection against harmful interference in a residential
installation.
This equipment generates uses and can radiate radio frequency energy and, if not
installed and used in accordance with the instructions, may cause harmful
interference to radio communications. However, there is no guarantee that
interference will not occur in a particular installation.
If this equipment does cause harmful interference to radio or television reception,
which can be determined by turning the equipment off and on, the user is
encouraged to try to correct the interference by one or more of the following
measures:
-Reorient or relocate the receiving antenna.
-Increase the separation between the equipment and receiver.
-Connect the equipment into an outlet on a circuit different from that to
which the receiver is connected.
-Consult the dealer or an experienced radio/TV technician for help.
This device complies with part 15 of the FCC Rules. Operation is subject to the
following two conditions:
1) this device may not cause interference and
2) this device must accept any interference, including interference that may cause
undesired operation of the device.
FCC RF Radiation Exposure Statement:
This equipment complies with FCC radiation exposure limits set forth for an
uncontrolled environment.
End users must follow the specific operating instructions for satisfying RF exposure
compliance.
This transmitter must not be co-located or operating in conjunction with any other
antenna or transmitter.
This equipment should be installed and operated with a minimum distance of 20
centimeters between the radiator and your body.
Page 4

Page 5

Contents
Introduction ....................................................................................5
What is DeTOS?....................................................................................... 5
DeTOS Features ...................................................................................... 5
DeTOS Installation ................................................................................... 6
First Boot Wizard ...................................................................................... 6
Getting Started ...............................................................................7
Control Panel ............................................................................................ 9
Network Tools ........................................................................................ 10
Echo Agent System Information ............................................................. 11
Persistence ............................................................................................. 13
System Settings ........................................................................... 14
Display Settings ...................................................................................... 14
Contents | 3
Page 6

Input/Time .............................................................................................. 15
Local Storage ......................................................................................... 16
Management .......................................................................................... 17
Network Settings .................................................................................... 20
Sounds ................................................................................................... 21
USB Permissions.................................................................................... 21
Advanced Options ....................................................................... 22
Export Config .......................................................................................... 22
Manage Packages .................................................................................. 23
Connections ................................................................................. 27
AnyConnect VPN.................................................................................... 28
Citrix ICA ................................................................................................ 29
VMware Horizon View ............................................................................ 34
4 | Contents
RDP ................................................................ ................................ ........ 36
X11 Connection ...................................................................................... 41
XenAppView ........................................................................................... 43
Page 7

1
1
Introduction
What is DeTOS?
Devon IT Terminal Operating System (DeTOS) is an embedded Thin Client
Operating System designed to be simple, secure, and centrally manageable.
DeTOS can be used to access hosted desktops using Microsoft Remote Desktop
Services, VMware Horizon View, Citrix XenApp or XenDesktop, web-based
applications, and more.
DeTOS Features
Simple-
the DeTOS intuitive web based control panel. The same control panel can
be used either locally from the thin client or remotely from the
management software.
Modern-
protocols including Citric ICA Client, RDP, or VMware Horizon View.
Centrally Managed-
using Devon IT Echo Management Console.
Configuring a session out of the box is quick and painless using
DeTOS can connect to hosted desktops using the industry’s best
DeTOS-based terminals can be centrally managed
Echo is shipped as a virtual appliance, so it is easy to set up.
Echo can automatically discover and inventory the thin clients on your
network.
Echo has the concept of a default profile. Using a default profile,
additional thin clients are automatically configured when you plug them
into your network.
Echo allows individual profiles for different users, including specific
Connections, Thin Client Settings, Passwords, and Customizable Desktop
Icons.
Introduction | 5
Page 8

Echo allows you to update the thin client’s embedded OS. Updates can be
scheduled to happen outside of production hours, for example over the
weekend.
DeTOS Installation
No installation is required for customers who have purchased DeTOS based thin
clients from Devon IT. Your thin client already contains a factory installed
DeTOS operating system. A USB re-flash utility is available if you need to
reinstall the operating system at any point in the future.
First Boot Wizard
The first time your terminal boots up, you will be taken through a first boot
wizard. This wizard can help you to configure a variety of settings in order to
better utilize your terminal. It is advised that you are familiar with the material
in this guide as well as the Echo Administration Guide to best utilize the first
boot wizard.
.
6 | Introduction
Page 9
2
Getting Started
To get started, do the following:
Check that your thin client is connected to the network.
If you have set up a management server in your network, check that the
thin client was able to contact the management server and is in managed
mode.
Create a desktop shortcut to allow thin client users to get connected to a
remote server. (See Chapter 6, “Connections,” for more information.)
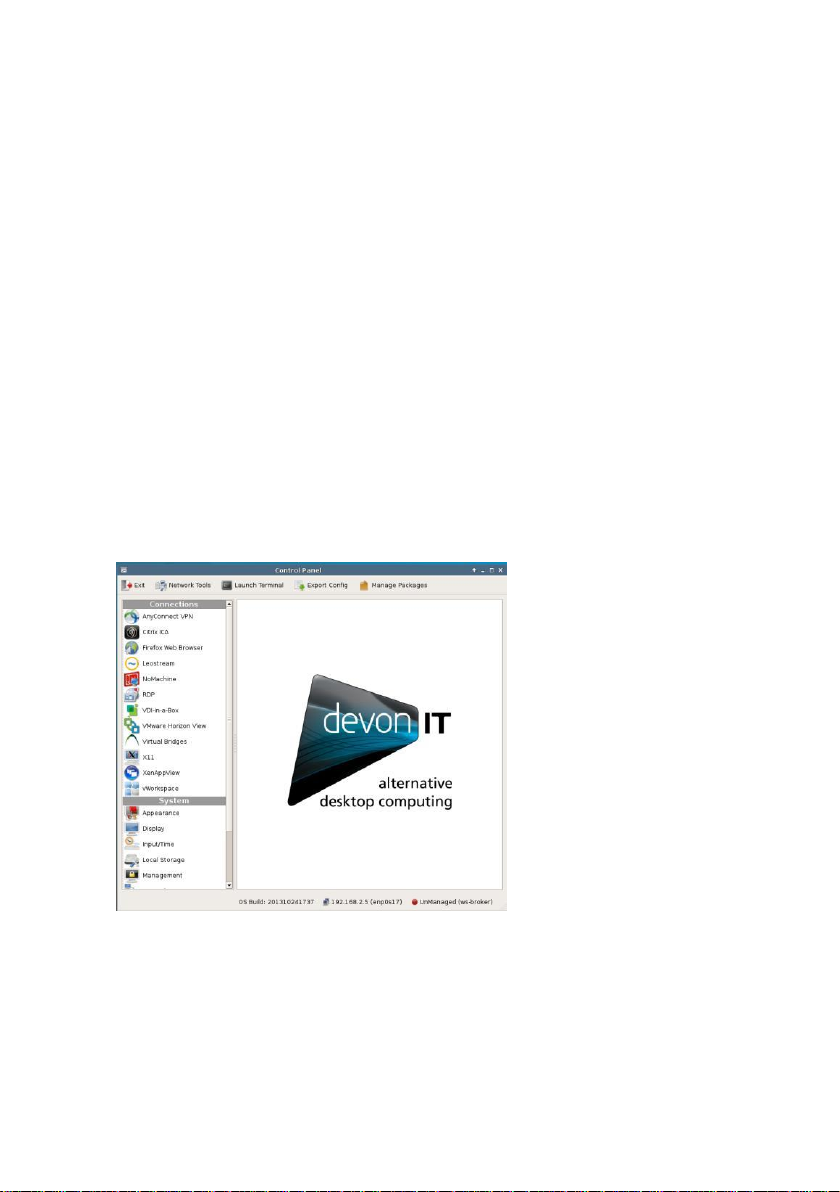
To check the network connection status, click the
Control Panel
.
DeTOS
button and then select
2
Along the bottom of the
messages include the DeTOS build number, the terminal's current IP address,
and a Thin Client Management Connection Indicator.
Control Panel
is a row of status messages. These
Getting Started | 7
Page 10
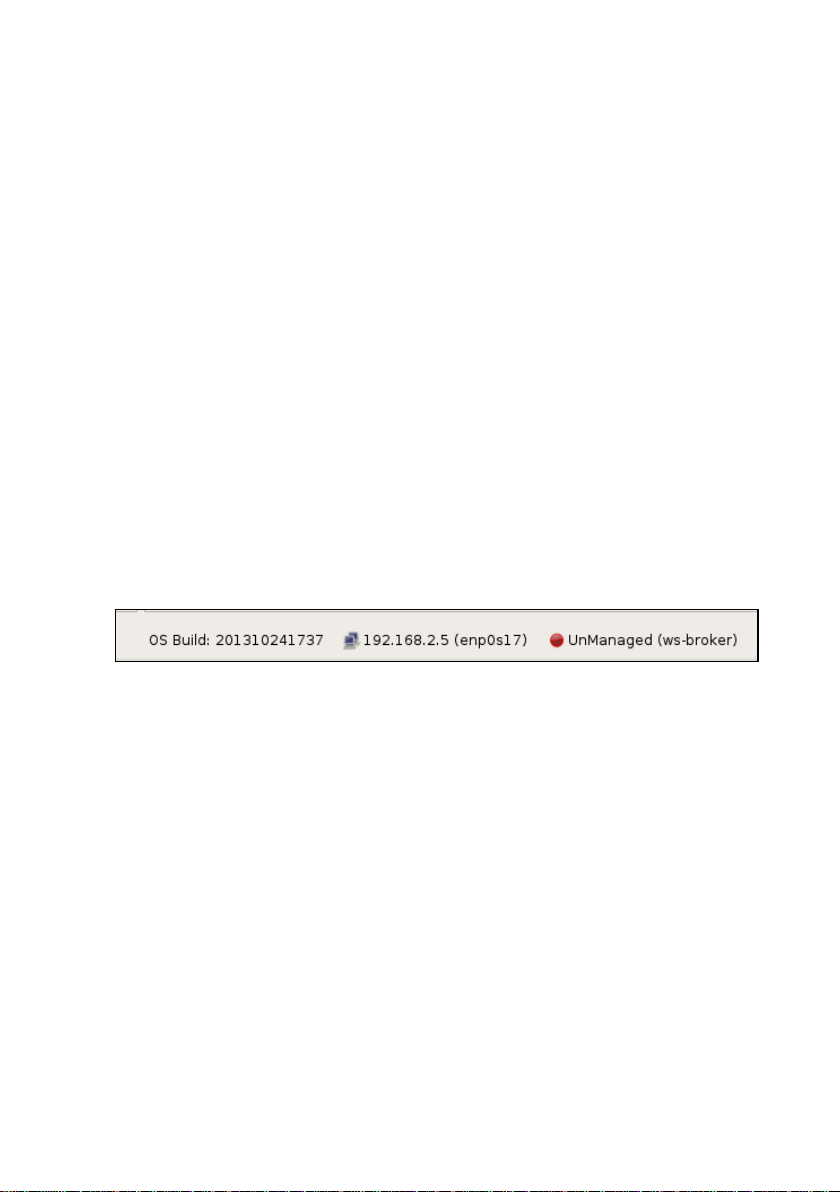
DeTOS default factory setting is DHCP. If you have a DHCP server on your
network, the status bar should show the leased IP address. If you want the thin
client to use a fixed IP address please refer to this guide's network section. A
message of
never established in the first place. This may be related to a loose or faulty
network cable. It may also be an indication of DHCP issues. If you need to
troubleshoot a network issue, please refer to the network diagnostic section
below.
Along with the IP address, the
whether your thin client is in managed or unmanaged (stand alone) mode. By
default, DeTOS based terminals try to locate a management server. If a
management server is found, the terminal switches to managed mode, where it
“pulls” its configuration from the management server. If not, it will stay in
standalone/unmanaged mode and use its local configuration.
The
on the DeTOS version and the build date, using the following format: 7.x.x
(YY.MM.DD)
no ip address
Control Panel
will appear if network connectivity is lost or was
Control Panel
status area also shows the OS build. This is a string based
status section also shows you
Management Server Splash Screen
During bootup, if the terminal cannot make contact with a Management Server,
then a black splash screen will appear just prior to the DeTOS desktop loading.
This screen contains the Devon IT logo and displays a message saying,
Attempting to connect to Management Server
screen will be displayed until successful contact is made with a management
server, the cancel button is pressed, or the specified timeout (30 seconds by
default) is reached.
The
Management
configure the behavior of this splash screen. Configuration options include:
Setting the terminal to
Specifying a different management server address
Adjusting the timeout value
Enabling or disabling the splash screen
section, found under the
Managed
or
Control Panel
Unmanaged
Cancel
button
. The splash
, allows you to
modes.
8 | Getting Started
Page 11

Management Server Indicator
Once you are on the DeTOS Desktop, the Echo Agent running on your terminal
will continue to periodically contact a Management Server named
on your local area network. When successful, the Management
Indicator
Otherwise, the icon will change to a red circle and the status will say
Unmanaged
accessible on your LAN. Also be sure to check your DNS server to verify that
an entry for
management server.
box found along the bottom of the
. In this case, verify that your management server is online and
ws-broker
exists and points to the IP address of your
Control Panel
ws-broker
Server
will read
Managed
Control Panel
The
Control Panel
settings on your thin client.
Connection Settings -
servers utilizing several types of protocols. The RDP client uses the RDP
protocol and allows you to connect to Microsoft Windows Terminal
Servers. The Citrix ICA client is used to establish connections to Citrix
Presentation and XenApp servers. The VMware Horizon View client
allows you to connect to a VMware Horizon View server, which in turn,
provides the end-user with their own virtual desktop session.
System Settings -
date/time configurations for your terminal. Also under the System section
is the ability to set an administrative password for the control panel and
change the local storage mode.
is the local tool for configuring
Your terminal has the ability to connect to remote
These are the display, sound, keyboard, mouse, and
Connection and System
.
Getting Started | 9
Page 12
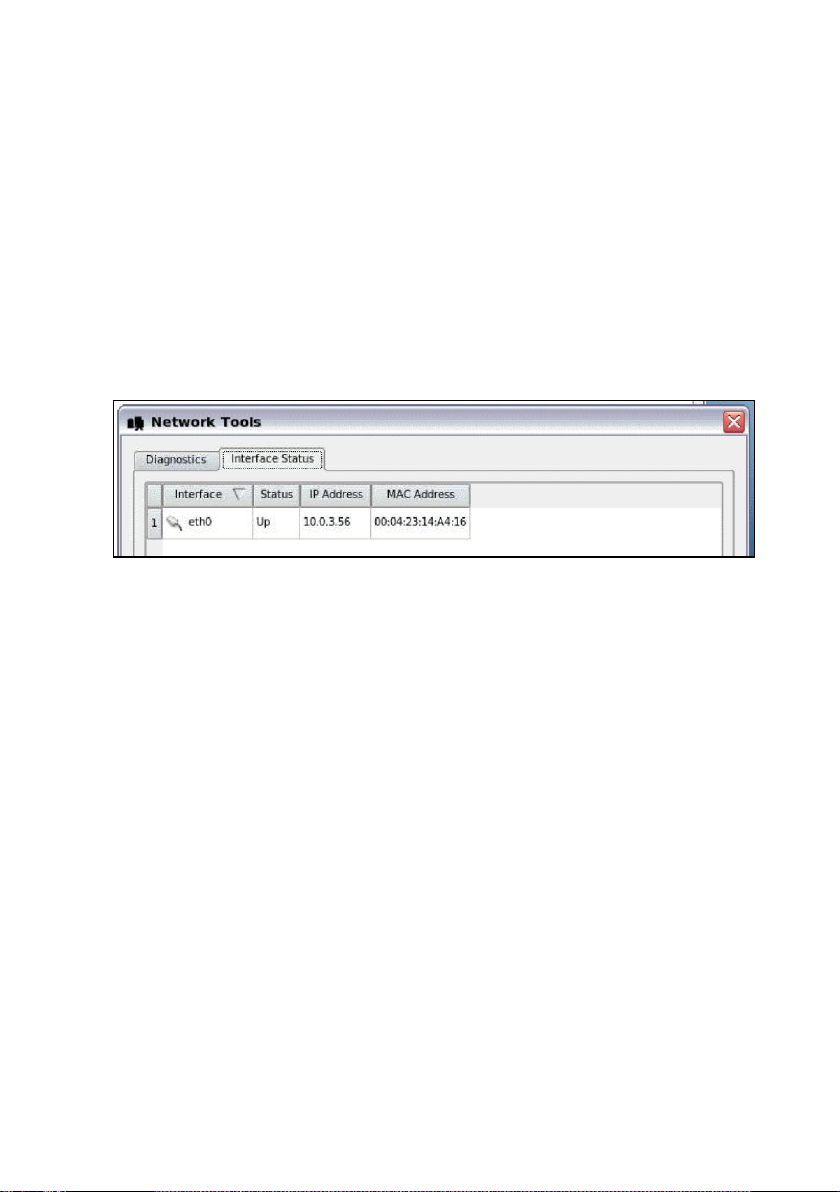
Network Tools
The toolbar along the top of the
Network Tools
provides you with current network status and useful diagnostic programs.
. Clicking this button will open a separate, smaller window that
Interface Status
Click the
view the IP address that is currently assigned to this terminal. The MAC
Address for this machine is also reported on this screen.
Interface Status
Diagnostics
If you are experiencing difficulty connecting to servers on certain segments of
your LAN, then you may want to use the ping command to verify you are
reaching specific servers and/or gateways on the subnet in question. To use
ping:
1. Select the
2. In the
to test against and then press the
Diagnostics
Host Address field, type in the IP address or website you want
Control Panel
tab along the top of the
tab from the
window contains a button named
Network Tools
Ping
button.
Network Tools
window.
window to
10 | Getting Started
Page 13

3. If there is an error in the delivery to the destination, the ping
command displays an error message. Otherwise, replies will
continuously display for each packet successfully sent and received.
4. Press the
Stop
button to terminate the ping loop.
Echo Agent System Information
Echo Management- Displays the current status and information of the Echo
Management server to which your thin client is connected.
Management Status-Displays when the thin client is being managed by
an Echo server.
Management Server-Displays the current address of the Echo server.
Change Management Server-Allows you to change the Echo server.
UUID-Displays the current UUID assigned to the terminal.
Network Information-This displays information about the current network connection.
IP Address-Displays the current IP address assigned to the thin client.
MAC Address-Displays the current MAC address assigned to the thin
client.
Hostname-Displays the name assigned to the thin client.
Network Tools-Allows you to run diagnostics test with the network
connection and to check on the current status of the network connection.
System Information-Displays information about the operating system and the thin
client.
Getting Started | 11
Page 14
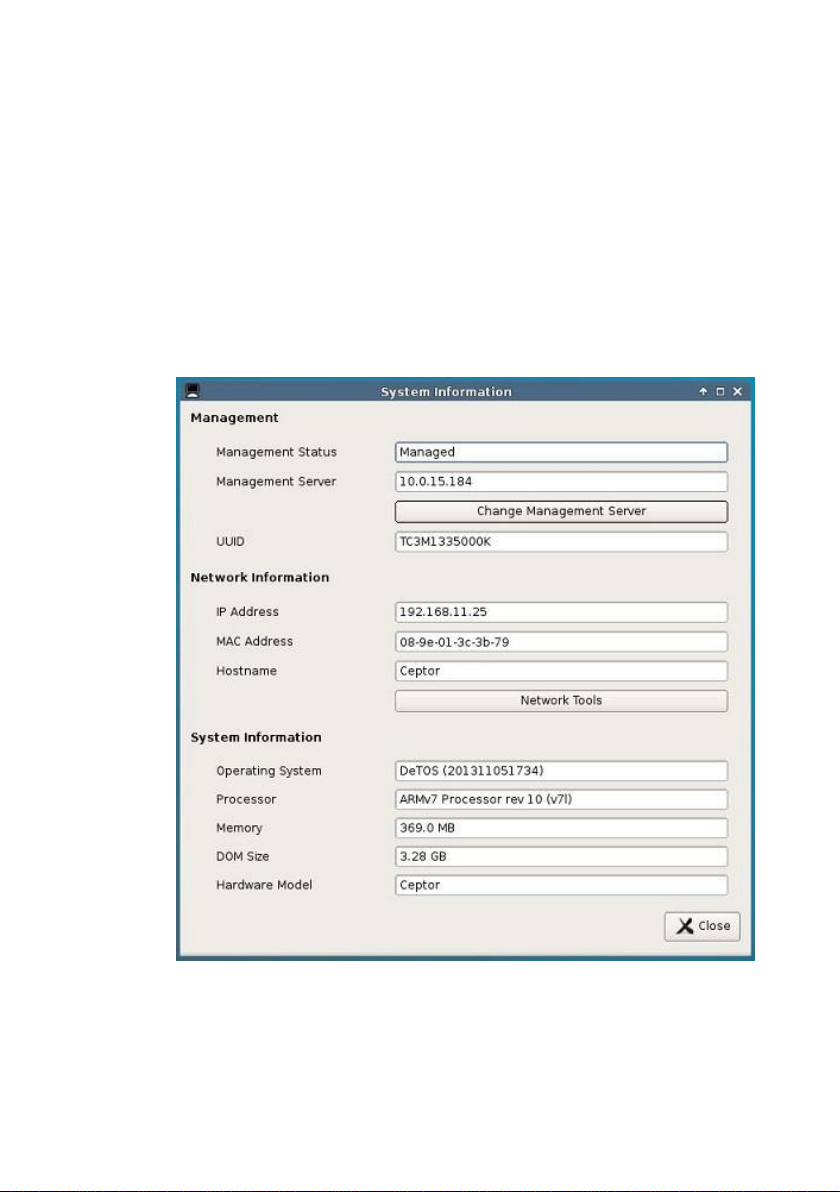
Operating System-Displays the name of the image or operating system
that is in use.
Processor-Displays the processor that the thin client is using.
Memory-Displays the total internal memory of the thin client.
DOM Size-Displays the total storage capacity size of the thin client.
Hardware Model-Displays the name of the thin client in use.
12 | Getting Started
Page 15

Persistence
Persistence, within the scope of thin client computing, refers to the continuing
existence of connections and settings after a terminal has been rebooted.
Upon completion of the first boot wizard, a snapshot of the thin client is taken
and saved in a data partition for basic settings. All of the connections, settings,
and network settings assigned during the first boot wizard will be saved to the
Echo server once this snapshot is taken and they will persist and carry over after
a reboot.
After this point, only changes made to your Network Settings will persist if
changed through the DeTOS control panel. In order to alter your settings after
this point, either the changes will have to be applied through the Echo console,
or you must click
DeTOS control panel. In order to change or add connections, the changes must
be pushed down by Echo.
Take Snapshot
in the
Local Storage Settings
section of the
Getting Started| 13
Page 16

3
3
System Settings
Display Settings
This section describes the display options available for a single monitor attached
to a terminal.
From the DeTOS desktop, select
Click the
System Settings
Display
icon on the left-hand side of the
.
DeTOSControl Panel
Control Panel
.
, under
Screen Resolution-
the optimal settings for your monitor.
14 | System Settings
Your screen resolution is set to automatically detect
Page 17

Color Depth-
Enable Screen Blanking-
values for screen blanking and suspend time.
Once you are finished, press the
The Ceptor supports a color depth of 24 bit.
Checking this box will reveal two timeout
Apply
button for the changes to take effect.
Input/Time
This section allows you to configure keyboard, mouse, and time settings for the
terminal.
From the DeTOS Desktop, select
Select the
under
.
Input/Time
System
.
icon on the left-hand side of the
DeTOSControl Panel
Control Panel
.
Locale-
will, upon reboot, adjust the system locale and translate the user interface
of the local DeTOS desktop to the selected language.
Keyboard-US
keyboard input will alter the keyboard mapping immediately after
selecting
Left-Handed Mouse-
mouse and need to invert the right and left mouse buttons.
English is the default locale setting. Switching to a new locale
is the default keyboard input setting. Switching to a new
Apply.
Select this checkbox if you are using a left-handed
System Settings | 15
Page 18

Time Zone-
first and then by city. Select the appropriate time zone for your location.
Timeserver-
service in order to keep its date and time in sync. By default, this is
enabled and set to Ubuntu's timeserver.
Press the
changed immediately, but changes to system locale will require a reboot.
Apply
The time zone options are organized geographically by region
Defining a timeserver allows the terminal to query an NTP
button for the changes to take effect. Most settings will be
Local Storage
The
Local Storage
choose one of two options pertaining to persistence.
From the DeTOS Desktop, select
Click the
Control Panel
section of the
Local Storage Settings
under
Control Panel
System
.
allows the administrator to
DeTOSControl Panel
icon on the left-hand side of the
.
Clear Local Storage-
stored in local or snapshot storage. Be sure to reboot the thin client after
you pressed this button.
Take Snapshot-
press this button to capture the thin client’s current settings configuration.
Be sure to reboot the terminal after you pressed this button.
16 | System Settings
Press this button to clear-out all settings currently
While running in a
Snapshot Storage
mode, you may
Page 19

Management
Management Server Configuration
During bootup, if the thin client cannot make contact with a Management Server,
then a white splash screen will appear just prior to the DeTOS desktop loading.
This screen contains a message saying
Management Server
contact is made with a management server, the cancel button is pressed, or the
specified timeout (30 seconds by default) is reached. The
Configuration
along with other management server options.
From the DeTOS Desktop, select
Click the
under
screen allows you to configure the behavior of this splash screen,
Management
System
. The splash screen will be displayed until successful
icon on the left-hand side of the
.
Attempting to connect to
Management Server
DeTOSControl Panel
.
Control Panel
Managed/Unmanaged-
mode and will attempt to make contact with a management server. You
have the option of severing all communications with a management server
by selecting the
thin client for this to take effect.
Unmanaged
By default, the thin client is set to
radio button. Press
Apply
and reboot the
Managed
System Settings | 17
Page 20

NOTE:
The purpose of the splash screen feature is to gracefully handle network latency
that may occur during the thin client’s first contact with a management server during
bootup. This feature becomes vital in the case where you have a management server
applying connections to the thin client that are configured to Autostart on bootup.
Server Address-
contact with a management server named
specify a different hostname or IP address for your management server.
Splash Screen – Timeout-
the splash screen appears on the screen before it times-out and loads the
DeTOS Desktop. Enter a value of 0 to bypass the screen altogether.
Splash Screen – Allow Cancel-A Cancel
splash screen that allows the user to abort the timeout delay. Uncheck
this box to hide the cancel button and force the user to wait the required
amount of time.
While in managed mode, the thin client will maintain
ws-broker.
Use this field to adjust the number of seconds
button is provided on the
Use this field to
Agent Password
A system Password can be set to restrict access to the
To set the Password:
Select
DeTOSControl Panel.
Click the
under
Select the plus
18 | System Settings
Management
System
.
[+]
to open the
icon on the left-hand side of the
Agent Password
Control Panel
section of this screen.
.
Control Panel
Page 21

NOTE:
Once a system password is set, the user will be prompted for the password when
they attempt to open the
Control Panel
. If the
Cancel
button is pressed or a user
incorrectly types the password, then the
Control Panel
will open in a read-only mode. A
small padlock icon will also appear along the bottom of the
Control Panel
window,
indicating that edits are not allowed. Keep your password safe!
Enter a password in the password field and re-enter it to confirm your
password.
Press the
Apply
button to save your password.
Security Restrictions
The Security Restrictions tab allows administrators to enable or disable the
ability of users to take screenshots by using the Print Screen button on their
keyboards. By default, this option is enabled. To disable screenshots, uncheck
the box next to Allow Screenshots and click Apply.
System Settings | 19
Page 22

Network Settings
By default, the thin client attempts to contact a DHCP server on your network
during bootup. If you have a DHCP server on your network, then the thin client
will acquire an IP address automatically and no further network configuration is
required on your part. However, there are additional options available.
Thin clients capable of connecting to wireless networks will still default to a
wired connection if available. To change the network for your connection:
1
From the DeTOS Desktop, select
2
Select the
Panel
3
Select the desired connection from the
Networks
4
Click
If you wish to use a wireless network, a
beneath the
1
Select the authentication method used on your network from the
Authentication
2
Depending on the authentication method selected, you may have to enter
additional information into the fields that appear.
3
When all the required fields have been filled, click
Alternatively, you can now access the connections available to you by utilizing
the
Network
1
Right click on the
desktop.
2
Select the network desired from the list of available networks that is
displayed.
3
Enter your password into the
4
Click OK to connect.
Network Settings
under
System
section.
Apply
.
Networks
tray icon. To connect using the tray icon:
.
section. To further configure a wireless connection:
dropdown menu
Network
DeTOS Control Panel
icon on the left-hand side of the
Networks
Wireless Network
tray icon in the lower left corner of the
Password
field in the popup that appears.
dropdown menu in the
Apply
.
Control
section is located
.
20 | System Settings
Page 23

Sounds
This section allows you to adjust the master volume level for the terminal.
From the DeTOS Desktop, select
Click the
System
Left-click and drag the bar left or right to decrease or increase the volume.
Press the
automatically.
Sound
.
Apply
icon on the left-hand side of the
button to save. Your changes will take place
DeTOSControl Panel
Control Panel
.
under
USB Permissions
This section allows you to adjust what USB capabilities the user of the device is
able to access. Any type of device that has a check mark next to it is authorized
to be used. To disable a device, uncheck the box to the left of the type of device
desired and then click
Apply
.
System Settings | 21
Page 24

4
4
Advanced Options
Export Config
If you are working with a Devon IT Support Analyst to troubleshoot a problem
on your terminal, you may be asked to send your terminal's
can easily export your own
1. Plug a USB flash drive into the terminal.
2.
Click the button found along the top of the
Config
.
3. The process only takes a few seconds. Once it is finished you will receive a
message saying the export is finished and you may remove the flash drive.
Config
file by following these steps:
Control Panel
Config
named
file. You
Export
4. A file named
contains important diagnostic information that can be analyzed by Devon
IT Support and will help troubleshoot and solve issues you may be
experiencing.
22 | Advanced Options
DeTOSConfig
.tar will now exist on the flash drive. This file
Page 25

Manage Packages
NOTE:
In order for newly added packages to take effect, or for packages to be
effectrively enabled, disabled, or removed, you must first reboot your terminal.
In the upper toolbar of the DeTOS Control Panel is a button that says
Packages
enable or disable individual update packages that may be made available, as
well as customization packages.
These packages will be in a squashfs file type and can be provided by Devon IT.
There are two methods of locating the files to be added to the list of available
packages. They can be added locally using the
added from a remote location by clicking the
To add an update package locally:
which opens the DeTOS Package Manager. This tool can be used to
1. Click on the
Add File
Add File
Add URL
button in the DeTOS Package Manager.
button, or they can be
button.
Manage
Advanced Options | 23
Page 26

2. Navigate to the location of the update package on your system or USB
key and select
Open
.
The package you have selected will now appear in the DeTOS Package Manager
menu. In order to add a package that is not locally stored:
1. Click on the
2. Enter the complete URL for the location of the update package, using
either FTP or HTTP protocol.
Add URL
button in the DeTOS Package Manager.
24 | Advanced Options
Page 27

3. If necessary, enter the
Username
and
Password
needed to access the
location where the file is held.
4. Click Ok.
The package will now appear in the DeTOS Package Manager menu.
Advanced Options | 25
Page 28

Newly added update packages will default to the
Package Manager, clicking the checkbox next to a file in the table under the
Enabled
to this status require a reboot before they will take effect.
In order to completely remove a package:
column will toggle it between being enabled or disabled. Any changes
1. Select the file you wish to remove from the table.
2. Click the
3. A prompt will appear to ensure that this is what you want to do. Click
Confirm
Remove
to continue, or
button.
Cancel
to back out of the process.
Enabled
status. In the DeTOS
Once you have clicked
to become permanent, the terminal will need to be rebooted.
Confirm
, the package has been deleted. For this change
26 | Advanced Options
Page 29

5
5
Connections
Adding New Connections
Connections can be created on Ceptor units in two different ways. The primary
way is through the First Boot Wizard, which gives you the opportunity to set up
Citrix ICA, RDP, or VMware Horizon View connections that are accessible as
soon as the wizard is completed. Another way is to push them down to a unit
using the Echo Management Console. For more details on how to do this,
please consult the Echo Administration Guide.
The following sections will provide some details and explanations about what to
expect when creating a new connection for these various protocols
Connections| 27
Page 30

AnyConnect VPN
AnyConnect VPN allows the user to connect to a Virtual Private Network
provided they have the correct credentials.
There are three fields required to set your AnyConnect VPN up:
Host-
This field requires the server IP address where your VPN
connection exists.
Username
this field.
Group
- Enter the domain name associated with your username. For
example,
- Enter the username that has permission to access the VPN in
/ACCOUNTING
or
yourcompanyname.com
28 | Connections
Page 31

Citrix ICA
The Citrix Receiver client in DeTOS allows you to connect to Citrix XenApp
Servers (formerly known as Presentation Server). This Citrix client also
contains the necessary plug-in used for connecting to XenDesktop via the thin
client's local web browser.
The Connection Section
The first section displayed for a Citrix ICA session is
panel will already be expanded for you.
Connection
. This form
Server Location-
Protocol-
Server. There are two methods for connecting to your Citrix Server:
Select the appropriate protocol needed to connect to your Citrix
Type in the IP address or hostname of your Citrix server.
Server-To connect to the desktop of your Citrix Server, click the radio
button called Server.
Connections| 29
Page 32

Published Application-To connect to a published application on your
Citrix Server, select the radio button called Published Application.
Browse for Name-
click the
the list. Click the down arrow on the
name or published application name.
Browse
Mark the checkbox called
button once. This will contact the server and populate
The Options Section
Browse for Name. Then
Name
list and select your server
Window Size-
display in.
Select the type of window you want your ICA session to
Full screen-The ICA session will take up the entire display.
Fixed Size-You may select fixed sized windows, such as 640x480,
800x600, and 1024-x768.
Percentage Based-You may select a size based on the percentage of
available desktop display, such as 25%, 50%, and 75%.
30 | Connections
Page 33

Seamless-When using the Published Application feature, you can select
Seamless mode to launch Windows applications like Notepad directly on
DeTOS, without using the Citrix Window.
Windows Colors-
and
24-bit
.
Sound Quality-
Citrix SLR (Speed Screen Latency Reduction) Options-
following two options are usually only needed when high latency is
occurring or poor bandwidth conditions exist.
Color depth options are
Adjust the sound from
16 colors, 256 colors, 16-bit
Low, Medium
, or
High Quality
Enabling the
Mouse Click Feedback-The mouse cursor will change to an hourglass as
soon as a user performs a mouse click on an event and will wait for a
response from the server before it changes back.
Local Text Echo-This option allows a user to see the character they type
into their session on the screen, without this key press hitting the actual
server at that time.
Encryption-
connecting to this Citrix Server.
Autostart-
time the thin client completes its boot procedure.
Auto Restart-
connection.
Select the appropriate level of encryption to be used when
Enable this checkbox to automatically launch this session each
Select
Yes
or
Prompt
to automatically restart the
Yes-Once the session is terminated, the session will automatically restart.
There is no way for the end-user to stop it from occurring every time it
closes.
Prompt-Once the session is terminated, the user will receive a YES/NO
prompt asking them if they wish to reconnect to the session.
Use data compression-
resources are not a concern, data compression can be used to decrease the
amount of data that must be sent across the network.
Use disk cache for bitmaps-
local disk cache on the client device.
In an environment where system and client
Allows graphical objects to be stored in the
,
.
Connections| 31
Page 34

The Firewall Settings Section
Use alternative address for firewall connection-
you need the ICA session to connect to the Citrix server's external IP
address. The external address for the server is specified as the alternate
address.
Proxy Settings-
choose the appropriate type from the
of the proxy server and port number in the
Port
fields, respectively.
If your Citrix environment utilizes a proxy server, then
Proxy Type field
Mark this checkbox if
. Enter the address
Proxy Address
The User Log On Section
and
Proxy
User Name-
optional field.
Domain-
32 | Connections
Specify the name of a user account to log on as. This is an
Specify the domain to log on to. This is an optional field.
Page 35

The Application Section
Application-
be automatically launched when the connection is made. This is an
optional field.
Working Directory-
application.
Specifies the path of the application on the Citrix server to
Specifies the working directory used for the
Connections| 33
Page 36

VMware Horizon View
The VMware Horizon View client allows you to connect to a VMware server,
which in turn, provides the end-user with their own virtual desktop session. The
following section describes the basic steps for configuring the View Client in
DeTOS.
Server Address-
Horizon View Broker.
Credentials-
wish to log on as.
Domain-
Desktop Name-
same desktop, then you may consider entering its name into this field. If
you choose to leave the field empty, then the user will be prompted to
select an available desktop at the time they connect to the VMware
Horizon View server.
Specifies the domain to log on to.
Enter the Hostname or IP address of your VMware
Specify the User Name and Password of a user account you
If the user of this thin client should always connect to the
34 | Connections
Page 37

Protocol
server using the RDP or PCOIP protocol.
Desktop Layout
setup.
Autostart:
after the thin client completes its boot procedure.
Auto Restart:
connection.
: Choose whether to connect to your VMware Horizon View
: Choose the desktop option that best suits your display
-Enable this checkbox to automatically launch this session
Select
Yes-Once the session is terminated, the session will automatically restart.
There is no way for the user to stop it from occurring.
Prompt-Once the session is terminated, the user will receive a YES/NO
prompt asking them if they wish to reconnect to the session.
Yes
or
Prompt
to automatically restart the
Troubleshooting Tips for VMware Horizon View Connection
If you set your session to full screen but the display covers only a fraction
of the entire screen, then your allocated RAM for the virtual desktop may
need to be set a little higher.
If certain features like foreign keymaps, CD-ROM, OR USB stick are not
passing through to the virtual desktop session, check if your VM is at the
correct version. You can download the latest agent software executables
at VMware's website at: http://www.vmware.com/downloads.
If you plan to use USB flash drives within your session, it is best to use
sticks formatted in FAT or NTFS. Long delays sometimes occur when
using flash drives formatted in FAT32. Other USB troubleshooting tips
can be found at the following VMware site:
http://kb.vmware.com/kb/1026991.
Connections| 35
Page 38

RDP
The General Section
The first section displayed for an RDP session, is named General. This form
panel will already be expanded for you.
Server Name-
Terminal Server.
Port-
User Name-
optional.
Domain-
Enter the port number used in this connection.
Enter the hostname or IP address of the Windows
Specifies the name of a user account to log in as. This is
Specifies the domain to log on to.
36 | Connections
Page 39

The Display Section
Operate in full screen mode
display and will not allow minimization.
Operate in maximized window mode
session in a window within DeTOS. You will be able to maximize and
minimize this window if you want.
Use specified screen size
window, specified by the dimensions chosen in the dropdown list below.
You can ONLY minimize this window, the fixed size is the MAX size
allowed.
Color depth for this connection
RDP session.
-The RDP session will take up your entire
-This option will display the RDP
-The RDP session will launch in a fixed sized
-Select the desired color depth for this
Connections| 37
Page 40

The Local Resources Section
Sound Redirection Options
redirect to the local thin client. If you do not want sound to be sent to the
local device, then select either the
on the remote thin client
device
(selected by default).
Enable Printer Redirection
printer attached the local terminal.
Enable Client Drive Mapping
locally into the terminal and access the contents of the drive via the RDP
session.
-By default, sound from the server will
Do not play sound
radio buttons below
-Mark this checkbox to redirect printing to a
-Allows the user plug USB Flash Drives
or Lea
Redirect sound to local
ve sound
38 | Connections
Page 41

The Start a Program Section
Program path and filename
Terminal server to be automatically launched when the connection is
made. This will launch the application in a window within DeTOS, not
RDP.
Working Directory-
application.
Specifies the working directory used for the
-Specifies the path of the application on the
The Performance Section
Connection Speed-
connection options in this dropdown box, associated behaviors in the
checkboxes below will be selected or deselected accordingly.
Specifies the RDP Experience. As you change
Connections| 39
Page 42

Disable cursor from blinking-
disabled during the RDP session.
Enable window manager's key bindings-
grab all keyboard input when it is in focus.
Attach to the console of the server-
console of the server (requires Windows Server 2003 or newer).
Enable RemoteFX-
to enhance the visual quality of the session.
Enables RemoteFX for this RDP connection in order
Indicates that cursor blinking should be
By default RDP attempts to
The session will connect to the
The Options Section
Enable compression of the RDP DataStream-
system and client resources are not capable, data compression can be used
to decrease the amount of data that must be sent across the network.
Autostart-
the thin client completes its boot procedure.
Auto Restart-
connection.
Enable this checkbox to automatically launch this session after
Select
Yes
or
Prompt
to automatically restart the
Yes-Once the session is terminated, the session will automatically restart.
There is no way for the user to stop it from occurring.
Prompt-Once the session is terminated, the user will receive a YES/NO
prompt asking them if they wish to reconnect to the session.
In an environment where
40 | Connections
Page 43

X11 Connection
The X11 client allows you to connect to an X11 server, which provides the user
with their own virtual desktop session. The following section describes the
basic steps for configuring the X11 connection in DeTOS.
Session Type-
connection.
Server Address-
Credentials-
wish to log on as.
Application-
launching a single application within DeTOS, using the X11 connection.
This is only available when choosing the
Resolution-
screen to various fixed resolutions.
Autostart-
the thin client completes its boot procedure.
Choose from the single
Specify which IP address is the X11 server.
Specify the User Name and Password of a user account you
This is the file path of the application if you are planning on
Choose the resolution for your connection, ranging from full
Enable this checkbox to automatically launch this session after
SSH App
SSH App
type or the
session type.
XDMCP
Connections| 41
Page 44

NOTE:
Not all of these fields will be available to you if you chose
XDMCP
as the
Session
Type
. You will not be required to supply credentials and there will be no application line.
By default,
SSH App
is the
Session Type
.
Auto Restart-
connection.
Yes-Once the session is terminated, the session will automatically restart.
There is no way for the user to stop it from occurring.
Prompt-Once the session is terminated, the user will receive a YES/NO
prompt asking them if they wish to reconnect to the session.
Select
Yes
or
Prompt
to automatically restart the
42 | Connections
Page 45

XenAppView
There are three fields required to set your XenAppView connection up:
Server Address-
Username
connection in this field.
Group
- Enter the domain name associated with your username. For
example,
Autostart-
the thin client completes its boot procedure.
Auto Restart-
connection.
Yes-Once the session is terminated, the session will automatically restart.
There is no way for the user to stop it from occurring.
Prompt-Once the session is terminated, the user will receive a YES/NO
prompt asking them if they wish to reconnect to the session.
This field requires the IP address of your XenServer.
- Enter the username that has permission use a XenAppView
/ACCOUNTING
Enable this checkbox to automatically launch this session after
Select
Yes
or
yourcompanyname.com
or
Prompt
to automatically restart the
Connections| 43
 Loading...