

Page 1

Maintaining Y our
Gateway M275
This chapter provides basic information about maint aining
your convertible tablet PC hardware and software. Read
this chapter to learn how to:
■ Care for your convertible tablet PC
■ Protect your convertible tablet PC from viruses
■ Manage hard drive space
■ Back up files
■ Clean your convertible tablet PC
13
229
Page 2

Chapter 13: Maintain ing Your Gateway M275
Caring for your convertible
tablet PC
To extend the life of your convertible tablet PC:
■ Be careful not to bump or drop your convertible tablet PC, and do not put
any objects on top of it. The case, although strong, is not made to support
extra weight.
■ When transporting your convertible tablet PC, we recommend that you
put it in a carrying case.
■ Keep diskettes, modular drives, and your c onvertible tablet PC away from
magnetic fields. Magnetic fields can erase data on both diskettes and hard
drives.
■ Never turn off your convertible tablet PC when the hard drive light is on
because data on the hard drive could be lost or corrupted.
■ Avoid subjecting your convertible tablet PC to extreme temperature
changes. The case and LC D pan el can beco me bri tt le and ea sy to bre ak in
cold temperatures and can melt or warp in high temperatures. Damage due
to either extreme is not covered by your w arranty. As a general rule, your
convertible tablet PC is safest at temperatures that are c omfortable for you.
■ Keep all liquids away from your convertible tablet PC. When spilled onto
computer components, almost any liquid can result in extremely expensive
repairs that are not covered under your warranty.
■ Avoid dusty or dirty work environments. Dust and dirt can clog the
internal mechanisms.
■ Do not block the ventilation fan.
■ When storing your convertible tablet PC for an extended period of time,
unplug AC power and remove the battery after discharging it partway.
Display screen
■ Use only your convertible tablet PC’s pen on the display. Do not write on
the surface with an ink pen or pencil.
■ Nothing heavier than your writing hand should be placed on top of the
display.
230
www.gateway.com
Page 3

Pen
Caring for your convertibl e tablet PC
■ Protect the display surface from unnecessary contact by turning the screen
so it is in the notebook orientation and closing it when transporting the
Gateway convertible tablet PC. For more information, see “Converting the
display from notebook to tablet mode” on page 39.
■ Never spray or pour liquids directly on the display surface.
■ Avoid prolonged exposure to direct sunlight.
■ Use a soft fabric to wipe away dust and fingerprints. Dampen the cloth
with water but never spray anything directly on the surface. If liquid
collects around the edges, wipe it up immediately.
■ Always store the pen in the Gateway convertible tablet PC’s pen holder
when not in use. For more information, see “Right Side” on page 5.
■ Store extra pens horizontally in a box or d rawer.
■ Pens should not be stored vertically on the tip because constant tip pressure
can affect pen-s creen interaction.
■ The pen has electronics in it, so it should not be exposed to or immersed
in liquids.
Replacing the pen point
Normal use wears down the pen’s point, so the pen ships with extra points
and a replacement tool. To use the tool, grasp the old point with the ring and
pull. Insert a new point and apply slight pressure to set it in place.
www.gateway.com
231
Page 4

Chapter 13: Maintain ing Your Gateway M275
Maintenance schedule
Use the following table to set up a regular maintenance schedule.
Maintenance task Monthly When needed See...
Check for virus es X X page 233
Manage hard drive space X page 236
Clean up hard drives X X page 237
Scan hard drive for errors X X page 238
Defragment hard drive X X page 240
Back up files X X page 242
Recalibrate the battery X page 170
Clean convertible table t PC case X page 244
Clean keyboard X page 245
Clean convertible tablet PC
screen
Clean mouse X page 245
X page 245
232
www.gateway.com
Page 5
Protecting your converti ble tablet PC from virus es
Protecting your convertible
tablet PC from viruses
A virus is a program th at attaches itself to a f ile on a computer, then spreads
from one computer to another. Viruses can damage data or cause your
convertible tablet PC to malfunction. Some viruses go undetected for a period
of time because they a re activated on a certain da te.
Protect your convertible tablet PC from a virus by:
■ Using the Norton
on diskettes, attached to e-mail messages, or downloaded from the
Internet.
■ Checking all programs for viruses before installing them.
■ Disabling macros on suspicious Microsoft Word and Excel files. These
programs will warn you if a document that you are opening contains a
macro that might have a virus .
■ Periodically updating the Norton AntiVirus program to protect agai nst the
latest viruses.
®
AntiViru s pro gram t o chec k fil es and p rogra ms t hat are
Help and
Support
For more information about protecting your convertible
tablet PC against viruses, click/tap Start, then click/tap
Help and Support.
Type the keyword viruses in the Search box
, then click/tap the arrow.
www.gateway.com
233
Page 6
Chapter 13: Maintain ing Your Gateway M275
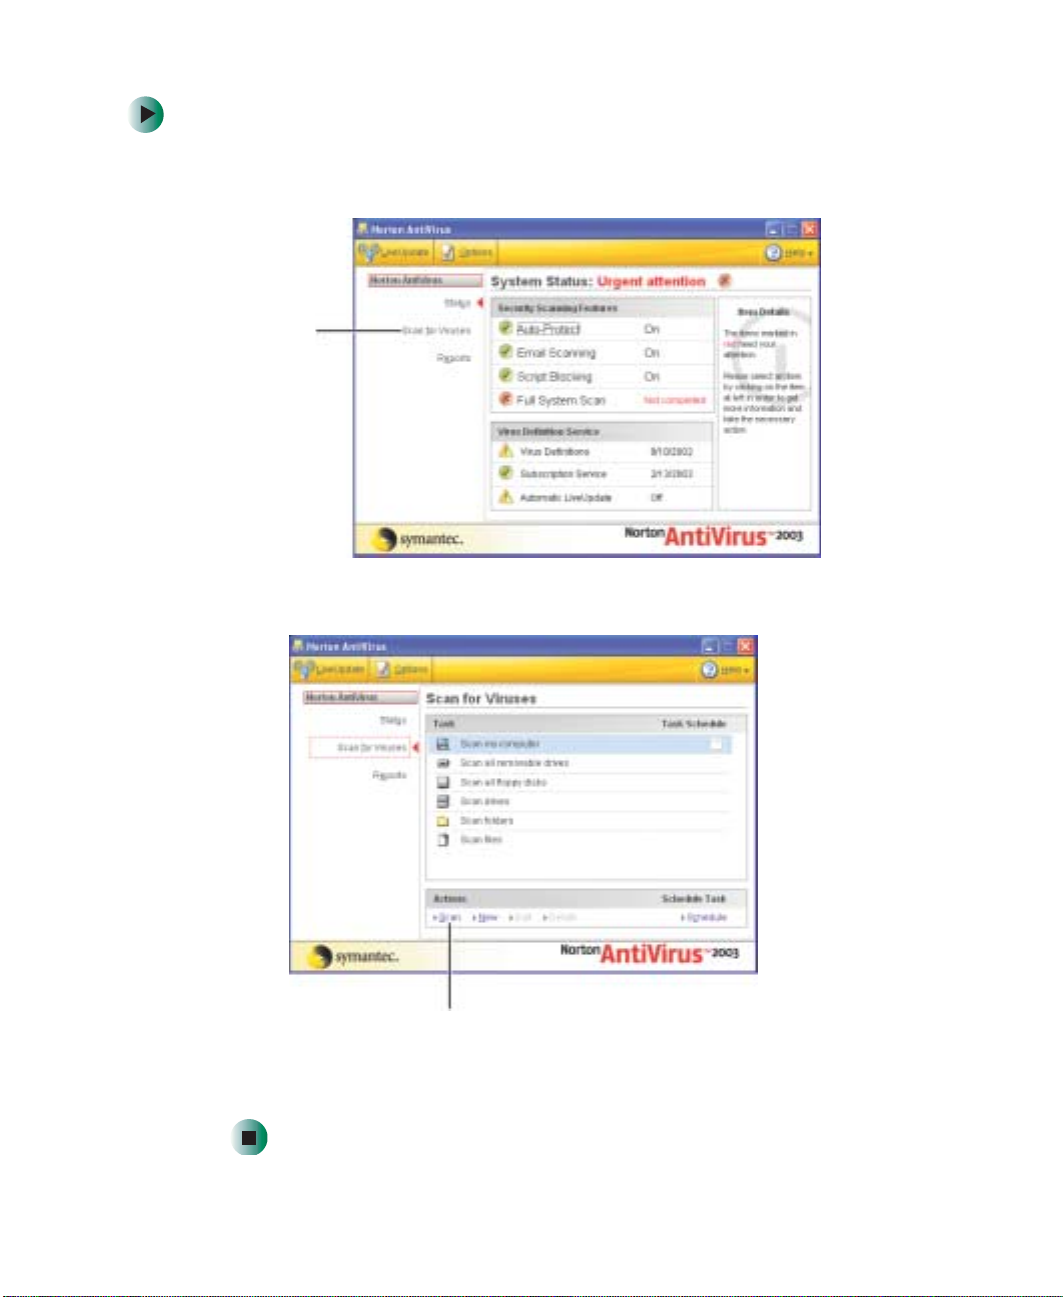
To scan for virus es:
1 Click/Tap Start, All Programs, Norton AntiVirus, then click/tap Norton
AntiVirus 2003
Scan for
viruses
. Norton AntiVirus opens.
2 Click/Tap Scan for Viruses.
234
Scan
3 Click/Tap the type of scan you want to make in the Scan for Viruses area,
then under Actions, click/tap
www.gateway.com
Scan.
Page 7

Protecting your converti ble tablet PC from virus es
To remove a v irus:
1 If Norton AntiVirus finds a virus, follow all on-screen instructions to
remove the virus.
2 Turn off your convertible tablet PC and leave it off for at least 30 sec onds.
3 Turn on your convertible tablet PC and rescan for the virus.
To update Norton AntiVirus:
1 Make sure that you are connected to the Internet.
2 Click/Tap Start, All Programs, Norton AntiVirus, then click/tap LiveUpdate -
Norton AntiVirus
. The LiveUpdate wizard opens.
3 Follow the on-screen instructions to update your Norton AntiVirus
program with the latest virus protection files.
4 When the program has finished, click/tap Finish.
www.gateway.com
235
Page 8
Chapter 13: Maintain ing Your Gateway M275
Managing hard drive space
Windows provides several utilities you can use to manage your hard drive.
Checking hard drive space
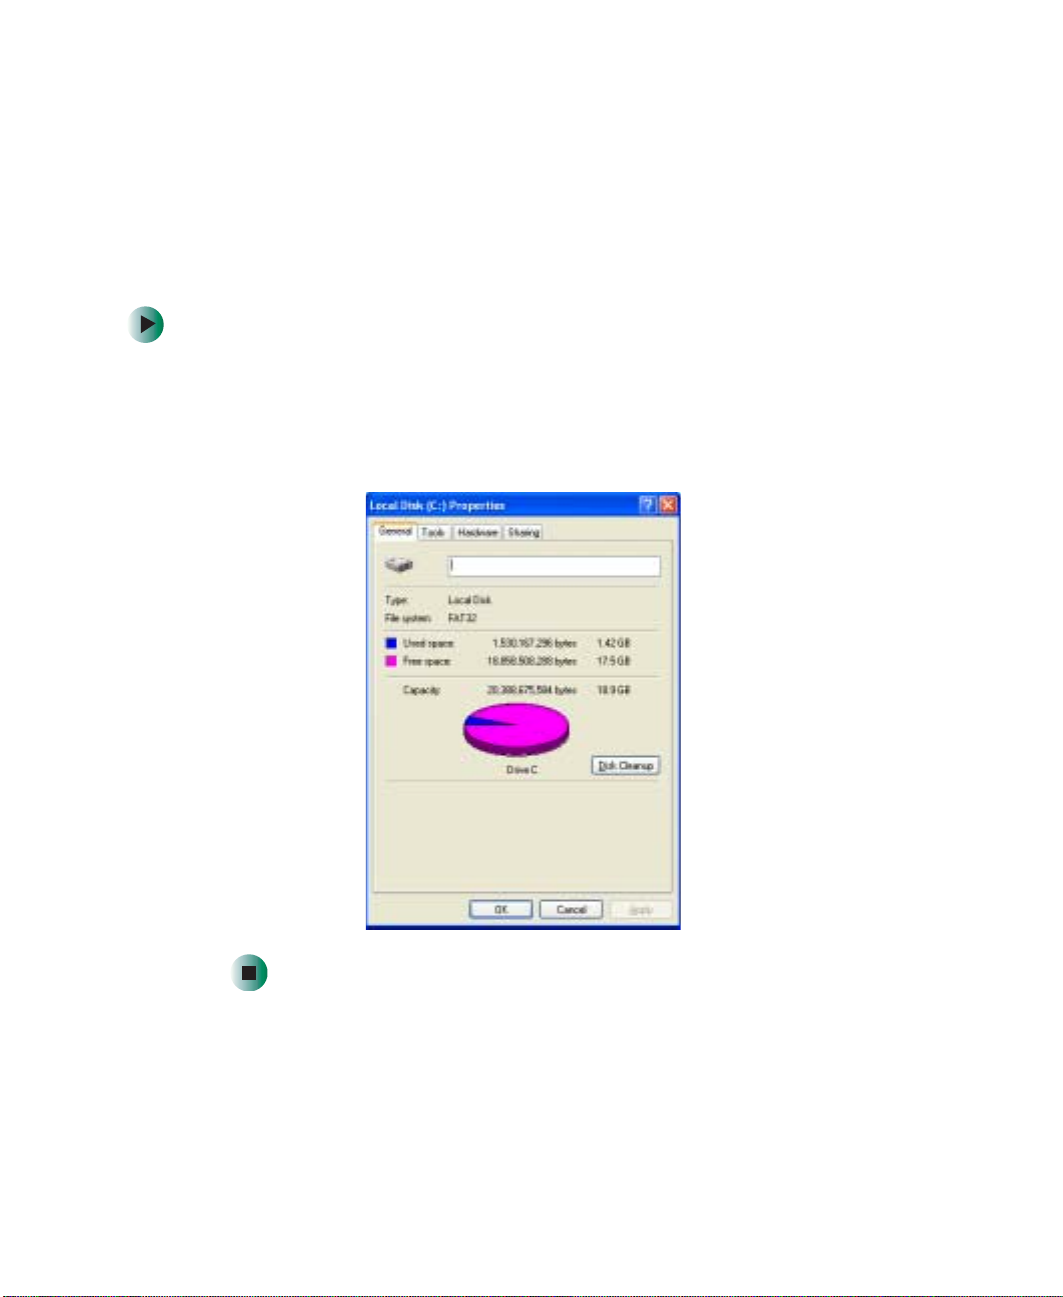
To check hard drive space:
1 Click/Tap Start, then click/tap My Computer. The My Computer window
opens.
2 Right-click/Button-tap the drive that you want to check for available file
space, then click/tap
Properties. Drive space information appears.
236
www.gateway.com
Page 9
Managing hard drive spa ce
Using Disk Cleanup
Delete unnecessary files, such as temporary Windows files, to free hard drive
space.
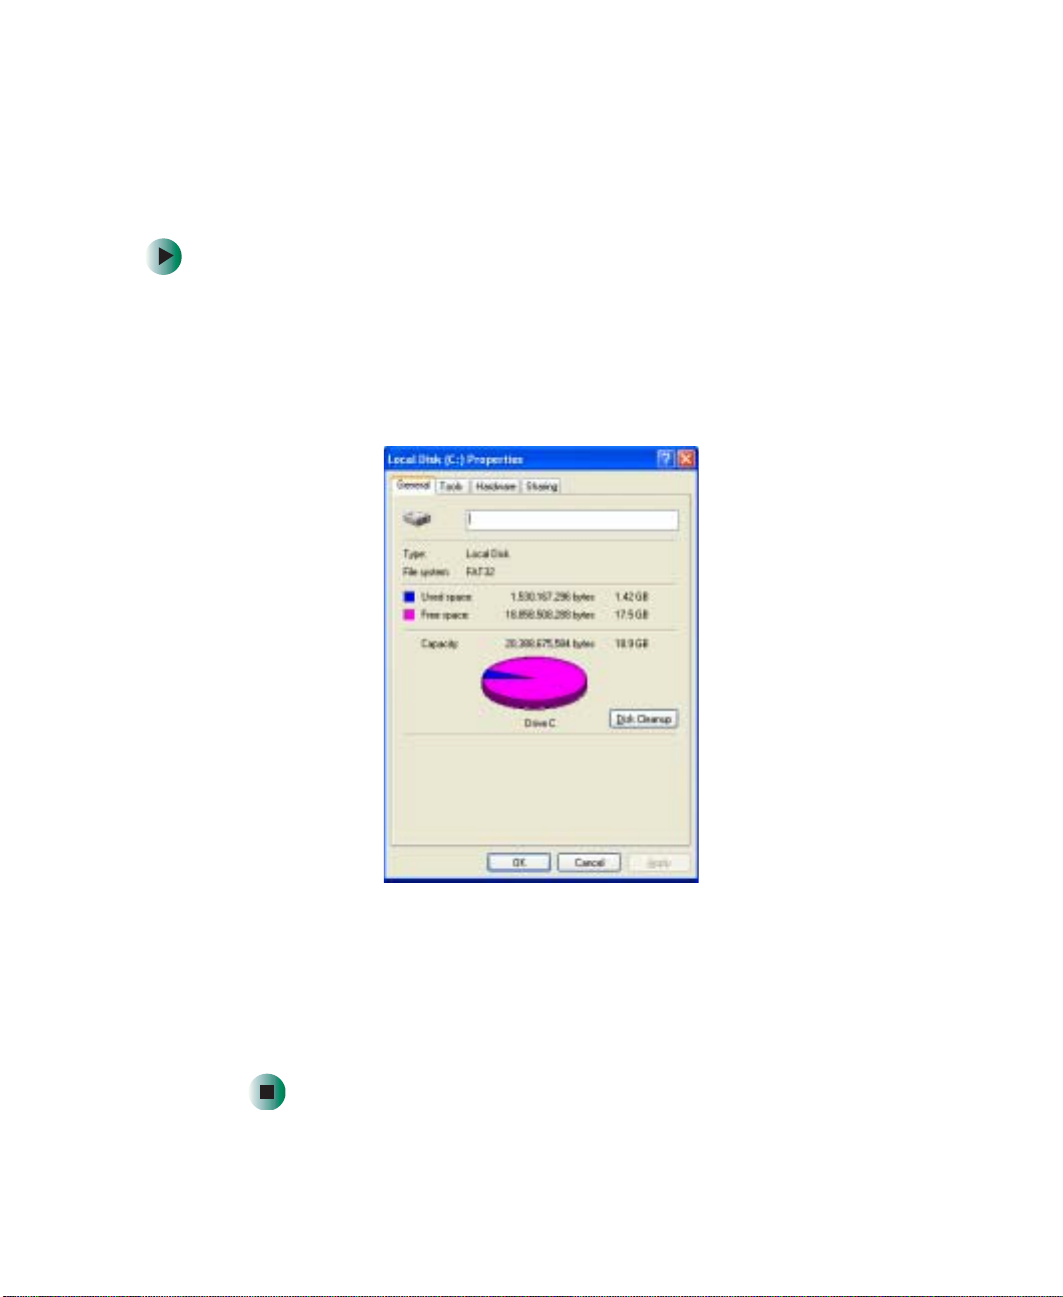
To use the Windows Dis k Cleanup program:
1 Click/Tap Start, then click/tap My Computer. The My Computer window
opens.
2 Right-click/Button-tap the hard drive that you want to delete files from,
for example Local Disk (C:), then click/tap
box opens at the General tab.
Properties. The Properties dialog
3 Click/Tap Disk Cleanup. The Di sk Cleanup dialog box opens.
4 Make sure that the check box beside each file type you want to delete is
selected. For more information about file types you can delete, read the
descriptions in the Disk Clea nup dialog box.
5 Click/Tap OK, then click/tap Yes.
www.gateway.com
237
Page 10

Chapter 13: Maintain ing Your Gateway M275
Help and
Support
For more information about keeping the hard drive space
free of unnecessary files, click/tap Start, then click/tap
Help and Support.
Type the keyword disk cleanup in the Search box
, then click/tap the arrow.
Checking the hard drive for errors
The Error-checking program examines the hard drive for physical flaws and file
and folder problems. This program corrects file and folder problems and marks
flawed areas on the hard drive so Windows does not use them.
If you use your convertible tablet PC several hours every day, yo u probably want
to run Error-checking once a week. If you use your convertible tablet PC less
frequently, once a month may be adequate. Also use Error-checking if you
encounter hard drive problems.
To check the hard drive for errors:
1 Click/Tap Start, then click/tap My Computer. The My Computer window
opens.
2 Right-click/Button-tap the hard drive that you want to check for errors,
for example Local Disk (C:), then click/tap
box opens.
Properties. The Properties dialog
238
www.gateway.com
Page 11
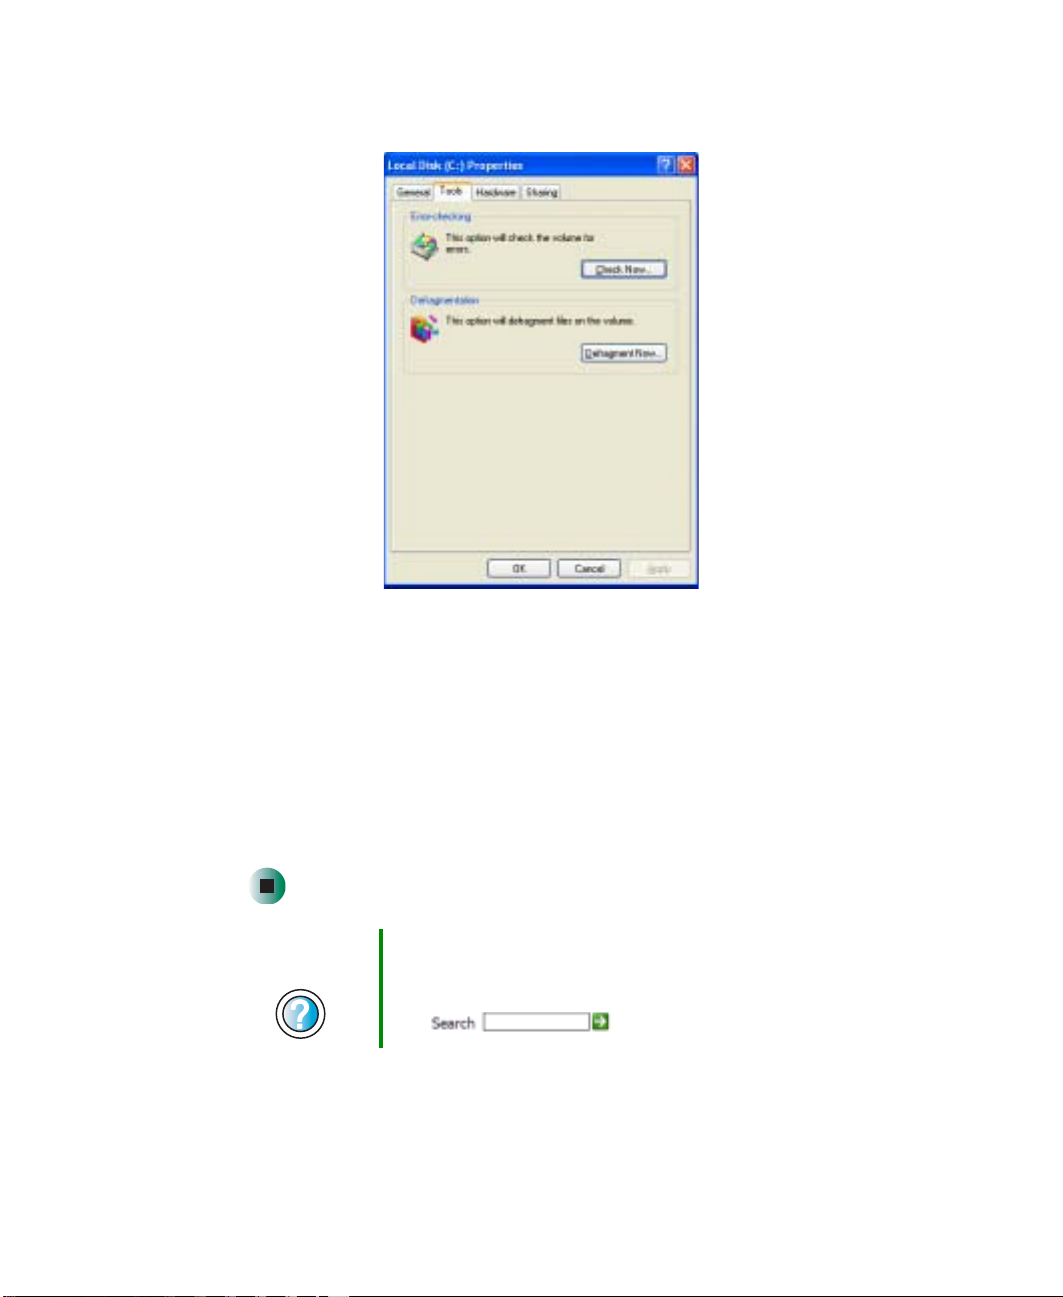
3 Click/Tap the Tools ta b.
4 Click/Tap Check Now.
Managing hard drive spa ce
5 Click/Tap the o pti ons you want to use, t hen c lick/t ap Start. For h elp, press
F1. Windows checks the drive for errors. This process may take several
minutes. After Windows has finished checking the drive for errors, it
provides a summary of the problems that it found.
6 Correct any problems that are found by following the on-screen
instructions.
7 Click/Tap OK.
Help and
Support
For more information about checking the hard drive for
errors, click/tap Start, then click/tap Help and Support.
Type t he keyword checking for disk errors in the Search
box , then click/tap the arrow.
www.gateway.com
239
Page 12

Chapter 13: Maintain ing Your Gateway M275
Defragmenting the hard drive
When working with files, sometimes Windows divides the file information into
pieces and stores them in different places on the hard drive. This is called
fragmentation, and it is normal. In order for your convertible tablet PC to use
a file, Windows must search for the pieces of the file and put them back
together. This process slows the hard drive performance.
The Disk Defragmenter program organizes the data on the drive so ea ch file is
stored as one unit rather than as multiple pieces scattered across different areas
of the drive. Defragmenting the information stored on the drive can improve
hard drive performance.
While the Disk Defragmenter program is running, do not use your keyboard
or mouse because using them may continuously stop and restart the
defragmenting process. Also, if you are connected to a network, log off before
starting Disk Defragmenter. Network communication may stop the
defragmentation process and cause it to start over.
To defragment the hard drive:
1 Click/Tap Start, then click/tap My Computer. The My Computer window
opens.
240
2 Right-click/Button-tap the hard drive that you want to defragment, for
example Local Disk (C:), then click/tap
opens.
www.gateway.com
Properties. The Properties dialog box
Page 13

3 Click/Tap the Tools ta b.
4 Click/Tap Defragment Now.
Managing hard drive spa ce
5 If Disk Defragmenter does not start automatically, click/tap Defragment or
Start.
Disk Defragmenter shows its progress on the computer display. When
finished, Disk Defragmenter asks if you want to quit the program.
6 Click/Tap Close or Yes, then click/tap the X in the top-right corner to close
the Di sk Defragment er window.
Help and
Support
For more information about defra gm en ting the hard drive,
click/tap Start, then click/tap Help and Support.
Type the keyword defragmenting in the Search box
, then click/tap the arrow.
www.gateway.com
241
Page 14

Chapter 13: Maintain ing Your Gateway M275
Backing up files
Backing up files and removing them from the hard drive frees space for new
files on the hard drive. It also protects you from losing important information
if the hard drive fails or you accidentally delete files.
You should back up your files regularly to a writable CD (if you have a
recordable drive) or to diskettes (if you have a diskette drive). Use a backup
device, such as a record able drive or Zip drive, to do a co mplete hard drive
backup. For more information, see “Creating CDs using Nero Express” on
page 136. If you do not have a high-capacity backup device and you want to
purchase one, you can contact Gateway’s Add-on Sales department or visit the
Accessories Store at accessories.gateway.com
.
Help and
Support
For more information about backing up files, click/tap
Start, then click/tap Help and Support.
Type the keyword saving files in the Search box
, then click/tap the arrow.
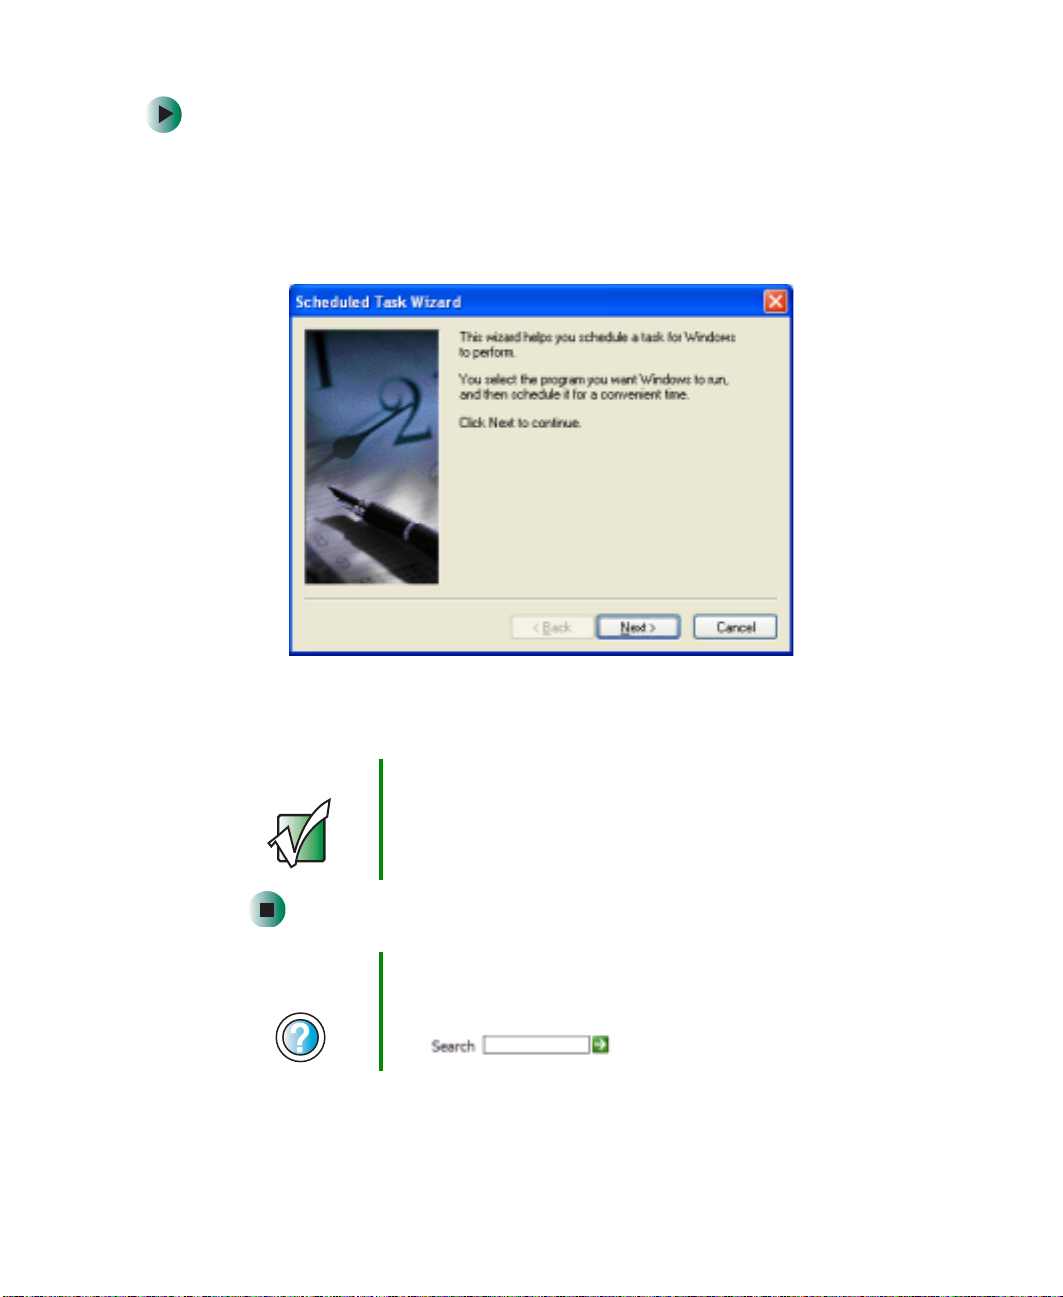
Using the Scheduled Task Wizard
The Scheduled Task Wizard lets you schedule maintenance tasks such as
running Disk Defragmenter and Error-checking.
242
www.gateway.com
Page 15
Managing hard drive spa ce
To start the Scheduled Task Wizard:
1 Click/Tap Start, All Programs, Accessories, System Tools, then click/tap
Scheduled Tasks. The Scheduled Tasks window opens.
2 Double-click/Double-tap the Add Scheduled Task icon. The Scheduled Task
Wiz ard op en s.
3 Click/Tap Next, then click/tap the task or program you want to schedule
and follow the on-screen instructions to customize the task.
Important Your convertible tablet PC must be on during scheduled
tasks. If your convertible tablet PC is off, scheduled tasks
will not run.
Help and
Support
For more information about using the Scheduled Tasks
Wizard, click/tap Start, then click/tap Help and Support.
Type the ke yword Scheduled T ask Wizard in the Search
box , then click/tap the arrow.
www.gateway.com
243
Page 16

Chapter 13: Maintain ing Your Gateway M275
Cleaning your convertible
tablet PC
Keeping your convertible tablet PC clean and t he vents free from dust helps
keep your convertible tablet PC performing at its best. Y ou may want to gather
these items and put together a convertible tablet PC cleaning kit:
■ A soft, lint-free cloth
■ An aerosol can of air that has a narrow, straw-like extension
■ Isopropyl alcohol
■ Cotton swabs
■ A CD or DVD drive cleaning kit
Cleaning the exterior
Warning When you shut down you r convertible tabletPC, the power
turns off, but some electri cal current still flows thro ugh your
converti ble table t P C. To avoid po ssible in jury from
electrical shock, unpl ug the po wer co rd and mo dem ca ble
from the wall outlets.
Always turn off your convertible tablet PC and other peripherals, then remove
the main and optional secondary batteries before cleaning any components.
Use a damp, lint-free cloth to clean your convertible tablet PC and o ther parts
of your convertible tablet PC. Do not use abrasive or solvent cleaners because
they can damage the finish on components.
Your convertible tablet PC is cooled by air circulated through the vents on the
case, so keep the vents free of dust. With your convertible tablet PC turned off
and unplugged, brush the dust away from th e vents with a damp cloth. Be
careful not to drip any water into the vents. Do not attempt to clean dust from
the inside of your convertible tablet PC.
244
www.gateway.com
Page 17

Cleaning your convertibl e tablet PC
Cleaning the keyboard
You should clean the keyboard occasionally by using an aerosol can of air with
a narrow, straw-like e xtension to remove dust and lint trapped under the keys.
If you spill liquid on the keyboard, turn off your convertible tablet PC and turn
your convertible tablet PC upside down. Let the liquid drain, then let the
keyboard dry before trying to use it again. If the key board does not w ork after
it dries, you may need to replace it.
Cleaning the convertible tablet PC screen
Use a soft cloth and wat er to clean the convertible tablet PC screen. Squirt a
little water on the cloth (never directly on the screen), and wipe the screen with
the cloth.
Warning The convertible tablet PC screen is made of specially
coated glass and can be scratched or damaged by
abrasive or ammonia-based glass cleaners.
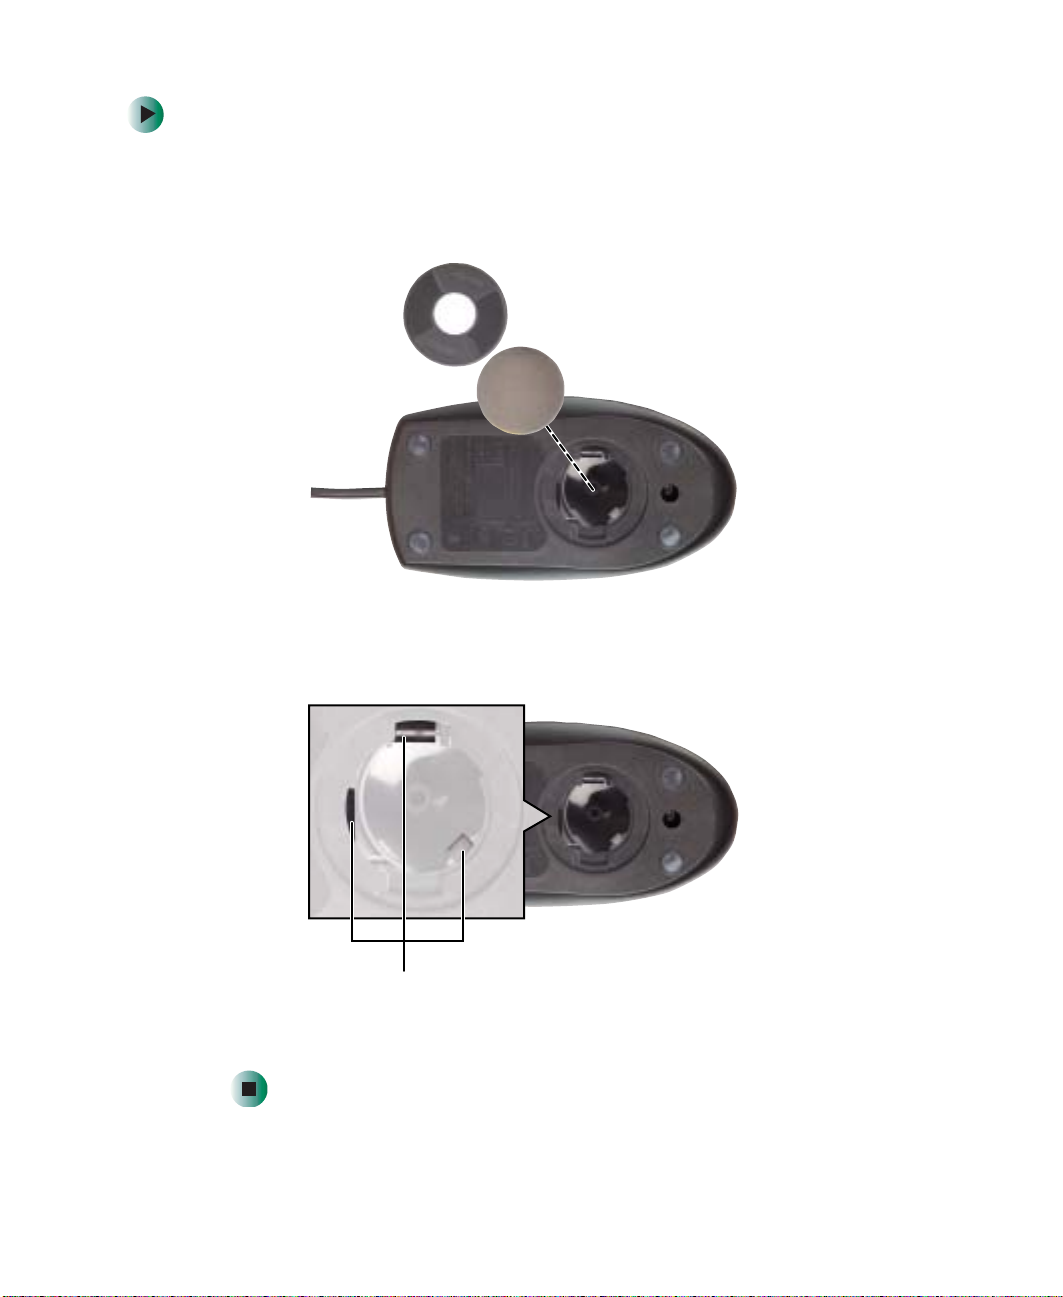
Cleaning the mouse
If you have a mouse and the mouse pointer begins moving erratically across
the computer screen or becomes difficult to control precisely, cleaning the
mouse will likely improve its accuracy.
Clean your optical mouse by wiping the bottom of the mouse w ith a damp
lint-free cloth.
www.gateway.com
245
Page 18
Chapter 13: Maintain ing Your Gateway M275
To clean your trackball mouse:
1 Turn the mouse upside down.
2 Rotate the retaining ring on the bottom of the mouse counter-clockwise,
then remove the retaining ring and mouse ball.
3 Remove any dust, lint, or dirt from the mouse ball with a soft cloth.
246
4 Clean the mouse rollers with a cotton swab dipped in isopropyl alcohol.
Mouse rollers
5 Replace the mouse ball and lock the retaining ring into place.
www.gateway.com
Page 19

Restoring
Software
Read this chapter to learn how to:
■ Reinstall device drivers
■ Update device drivers
■ Reinstall programs
■ Reinstall Windows
If you are not comfortable with the procedures covered in
this chapter, seek help from a more experienced computer
user or a computer service technician.
14
247
Page 20
Chapter 14: Restoring Softw are
Using the Restoration CDs
Use the Gateway Restoration CDs to reinstall device drivers, your operating
system, and other programs that were p reinstalled at the factory.
Important Before you try to fix a problem by reinsta lling software from
your Gateway Restoration CDs, make sure that you have
tried these steps first:
■
Use the diagnostics and troubleshooting tools found in
Help and Support. For more information about
diagnostics and troubleshooting tools, click/tap Start,
then click/tap Help and Support.
Type the keyword troubleshooting in the Search box
■
Run System Restore. For more information about
System Restore, click/tap Start, then click/tap Help and
Support.
Type the keyword System Restore in the Search box
■
See the Troubleshooting chapter of this guide.
If these steps do not resolve the problem, use the Gateway
Restoration CDs to reinstall device drivers or programs .
If reinstalling device drivers or programs does not resolve
the problem, reinstall Windows.
, then click/tap the arrow.
, then click/tap the arrow.
248
www.gateway.com
Page 21

Reinstalling devic e drivers
Reinstalling device drivers
Device drivers are progra ms that control devices su ch as the computer display,
DVD drives, and modems. Drivers translate information between computer
devices and programs.
Drivers for your original convertible tablet PC hardware are installed at
Gateway. If you install a new device, you nee d to install the drivers provided
by the device manufacturer.
You should reinstall device drivers:
■ If directed to do so while troubleshooting
■ If you see a message indicating that there is a problem with a device driver
If you need to reinstall device drivers because you are directed to do so while
troubleshooting or if a message tells you that there is a problem with a dev ice
driver, reinstall the device drivers by following the instructions below.
If you just reinstalled Windows XP, the device drivers were automatically
reinstalled.
To reinstall device drivers:
1 Insert the red Drivers and Applications CD in to the DVD or DVD/C D-RW
drive. If the program starts automatically, go to Step 5.
- OR If the program does not start automatically, go to Step 2.
Important If the drive you want to use is not in the modular bay, you
need to swap modules. For more information about
swapping modules, see “C hangin g mo dules ” on pa ge 110.
2 Click/Tap Start, then click/tap Run. The Run dialog box opens.
3 In the Open text box, type d:\runmenu.exe (where d is the drive letter of
your DVD or DVD/CD-RW drive).
4 Click/Tap OK.
www.gateway.com
249
Page 22
Chapter 14: Restoring Softw are
5 If this is the first time you have inserted the red Drivers and Applications
CD, accept the End User License Agreement (EULA) by clickin g/tapping
Yes, I accept it, then clicking/tapping Continue. The Gateway Driver and
Application Recove ry program starts and t he
Recovery
tab appears.
6 Select a s ingle device driver to reins tall.
- OR -
Drivers and Application
Click/Tap
reinstall. (Grayed out drivers are not available for Automatic Installation.
To select these drivers, click/tap
Automatic Installation, then select multiple device drivers to
Manual Installation.)
7 Click/Tap Install.
8 Follow any additio nal on-screen instructions. Depending on the device
driver you are reinstalling, you may only need to restart your convertible
tablet PC to complete the installation. However, if a setup wizard opens
when you restart your convertible tablet PC, follow the on-screen
instructions.
Help and
Support
For more information about reinstalling device drivers,
click/tap Start, then click/tap Help and Support.
Type the keyword drivers in the Search box
, then click/tap the arrow.
250
www.gateway.com
Page 23

Updating device driv ers
Updating device drivers
The Restoration CDs contain a device driver update utility that works over the
Internet. If you do not have an Internet service provider, the update utility
works by direct-dialing the device driver update service.
Important If your convertible ta blet PC came equipped with a wirel ess
device, only use the drivers approved for the country the
device will be used in. See the red Drivers and
Applications CD or the Gateway Technical Support Web
site (support.gateway.com).
If your convertible tablet PC came equipped with an
internal embedded wireless device, see “Safety,
Regulatory, and Legal Information” on page315 for
general wireless regulatory and safety guidelines.To find
out if your convertible tablet PC has an internal wireless
device, check the label (see “Identifying your model” on
page 10).
To update device drivers:
1 Insert the red Drivers and Applications CD i nto the DV D or DVD/ CD-RW
drive. If the program starts automatically, go to Step 5.
- OR If the program does not start automatically, go to Step 2.
Important If the drive you want to use is not in the modular bay, you
need to swap modules. For more information about
swapping modules, see “C hangin g mo dules ” on pa ge 110.
2 Click/Tap Start, then click/tap Run. The Run dialog box opens.
3 In the Open text box, type d:\runmenu.exe (where d is the drive letter of
the DVD or DVD/CD-RW drive).
4 Click/Tap OK.
www.gateway.com
251
Page 24
Chapter 14: Restoring Softw are
5 If this is the first time you have inserted the red Drivers and Applications
CD, accept the End User License Agreement (EULA) by clickin g/tapping
Yes, I accept it, then clicking/tapping Continue. The Gateway Driver and
Application Recove ry program starts and t he
Recovery
tab appears.
6 Click/Tap the Web Updates tab.
7 Click/Tap Check Now. The Connect window opens.
8 Install available updated dev ice drivers by following the on-screen
instructions. Depending on the device driver you are updating, you may
only need to restart your convertible tablet PC to complete the installation.
However, if a setup w izard opens when you restart your convertible
tablet PC, follow the on-screen instructions.
Drivers and Application
Help and
Support
For more information about updating device drivers,
click/tap Start, then click/tap Help and Support.
Type the keyword updating drivers in the Search box
, then click/tap the arrow.
Reinstalling programs
If you have problems running a program or if you have reinstalled your
operating system, you can reinstall programs from the red Drivers and
Applications CD and other program CDs. If you are reinstalling programs from
other program CDs, follow the installation instructions on each CD. If you want
to reinstall a program, uninstall the old version first.
To reinstall programs from the Drivers and Applications CD:
1 If you just reinstalled Windows, go to Step 4. Otherwise, go to the next
step.
2 Click/Tap Start, Control Panel, then click/tap Addor Remove Programs.
3 In the Currently Installed Programs list, click/tap th e program you want to
uninstall, then click/tap
instructions.
Change/Remove and follow the on-screen
252
www.gateway.com
Page 25

Reinstalling prog rams
4 Insert the red Drivers and Applications CD in to the DVD or DVD/C D-RW
drive. If the program starts automatically, go to Step 8.
- OR If the program does not start automatically, go to Step 5.
Important If the drive you want to use is not in the modular bay, you
need to swap modules. For more information about
swapping modules, see “C hangin g mo dules ” on pa ge 110.
5 Click/Tap Start, then click/tap Run. The Run dialog box opens.
6 In the Open text box, type d:\runmenu.exe (where d is the drive letter of
your DVD or DVD/CD-RW drive).
7 Click/Tap OK.
8 If this is the first time you have inserted the red Drivers and Applications
CD, accept the End User License Agreement (EULA) by clickin g/tapping
Yes, I accept it, then clicking/tapping Continue. The Gateway Driver and
Application Recove ry program starts and t he
Recovery
tab appears.
Drivers and Application
9 Select a single program to reinstall.
- OR Click/Tap
(Grayed out programs are not available for Automatic Installation. T o select
these programs, click/tap
Automatic Installation, then select multiple programs to reinstall.
Manual Installation.)
10 Click/Tap Install.
11 Follow any additional on-screen instructions. Depending on the programs
you are reinstalling, you may only need to restart your convertible
tablet PC to complete the installation. However, if a setup wizard opens
when you restart your convertible tablet PC, follow the on-screen
instructions.
www.gateway.com
253
Page 26
Chapter 14: Restoring Softw are
Help and
Support
For more information abo ut reinstalling programs, click/t ap
Start, then click/tap Help and Support.
Type th e keyword installing p rograms in the Search box
, then click/tap the arrow.
To reinstall other programs from a CD:
1 If you just reinstalled Windows, go to Step 4. Otherwise, go to the next
step.
2 Click/Tap Start, Control Panel, then click/tap Addor Remove Programs.
3 In the Currently Installed Programs list, click/tap th e program you want to
uninstall, then click/tap
instructions.
Change/Remove and follow the on-screen
4 Insert the program CD into the DVD or DVD/CD-RW drive.
Important If the drive you want to use is not in the modular bay, you
need to swap modules. For more information about
swapping modules, see “C hangin g mo dules ” on pa ge 110.
5 Complete the program reinstallation by following the instructions
included with the program CD.
Reinstalling Windows
If your convertible tablet PC is not working correctly, try the following op tions
to correct the problem:
■ Troubleshooting. For more information, see “Troubleshooting” on
page 285.
■ Running System Restore.
■ Reinstalling device drivers. For more information, see “Reinstalling device
drivers” on page 249.
254
www.gateway.com
Page 27

Reinstallin g Windows
If the options above do not correct the problem, you can use the Restoration
CDs to reinstall Windows and other software.
The Re storatio n CDs step you through reinstalling Windows XP. If you are
reinstalling Windows XP, the Restoration CDs automatically reinstall the
hardware device drivers and some programs as well. You can install any
remaining programs by using the program CDs that came with your convertible
tablet PC. To reinstall your programs, follow the instructions in “Reinstalling
programs” on page 252.
Important If you are prompted for your Windows product key when
you reinsta ll Window s, you can f ind the key on the
Microsoft Certificate of Authenticity label located on the
bottom of your convertible tablet PC case. For more
information, see “Microsoft Certificate of Authenticity” on
page 11.
To reinstall Windows XP and the device drivers:
Caution Back up your personal files before you use this option.
All files on your convertible tablet PC will be deleted!
1 Insert the red Drivers and Applications CD in to the DVD or DVD/C D-RW
drive.
Important If the drive you want to use is not in the modular bay, you
need to swap modules. For more information about
swapping modules, see “C hangin g mo dules ” on pa ge 110.
2 Restart your convertible tablet PC.
3 Select 2. Boot from CD-ROM.
4 Select a l anguage option .
5 Select 1. Delete all files (Automated Fdisk/Format).
6 Select 1. Continue deleting all files and restart.
7 When prompted, pr ess any key to continue.
www.gateway.com
255
Page 28

Chapter 14: Restoring Softw are
8 Select 2. Boot from CD-ROM.
9 Select a l anguage option .
10 Select 2. Automated installation of Windows (XP).
11 When prompted, remove the red Drivers and Applications CD and insert
the blue Operating System CD into the DVD or DVD/CD-RW drive, then
press any key to continue.
12 When prompted, accept the License Agreement by pressing Y.
13 Wa it while the setup program copies files to your hard drive. When y our
convertible tablet PC restarts, do NOT press any key to boot from CD.
14 When prompted, insert the red Drivers and Applications CD, then click/tap
Continue. The Gateway Application Loader automatically installs your
drivers and programs. Your convertible tablet PC restarts several times
during this process. Do not press any keys or buttons during this process
unless prompted to do so.
15 When the Gateway Application Loader has finished, go to the Windows
desktop by clicking/tapping
16 Install a ddi tion al pr ogra ms b y foll owi ng the ins truc tion s in “Reinstalling
programs” on page 252.
OK.
17 Install other software, such as Microsoft Works Suite and gaming software,
by following the instructions in “To reinstall other programs from a CD: ”
on page 254.
256
www.gateway.com
Page 29

Upgrading Y our
Gateway M275
This chapter provides information about adding hardware
devices to your convertible tablet PC. Read this chapter to
learn how to:
■ Add and remove PC Cards
■ Add and replace memory
■ Replace the har d drive
15
257
Page 30

Chapter 15: Upgrading Your Gateway M275
Adding and removing a PC Card
Your convertible tablet PC has a PC Card slot (also known as a PCMCIA card
slot). This slot accepts one Type II card.
Y ou do not need to restart your convertible tablet PC when changing most cards
because your convertible tablet PC supports hot-swapping. Hot-swapping means
that you can insert a PC Card while your convertible tablet PC is running. If
your PC Card does not work after hot-swapping, see the PC Card manufacturer’s
documentation for further information.
To insert a PC Card:
■ Push the card firmly into the PC Card slot label-side up until the outer edge
of the card is flush with the side of your convertible tablet PC.
258
www.gateway.com
Page 31

Adding and removing a PC Ca rd
To remove a PC Card:
1 Click/Tap the remove h ardware icon in the taskbar , the PC Card name,
then click/tap
-ORTurn off your convertible tablet PC.
Important If the remove hardware icon do es not appear on the
Stop.
taskbar, click/ta p the show h idden ico ns button.
2 Press the PC Card eject button once to release the eject button.
3 Press the PC Card eject button again to ejec t the PC Card.
www.gateway.com
259
Page 32

Chapter 15: Upgrading Your Gateway M275
Preventing static electricity
discharge
The components inside your convertible tablet PC are extremely sensitive to
static electricity, also known as electrostatic disc harge (ESD).
Warning ESD can permanently damage electrostatic
discharge- sensitiv e componen ts in your c onvertibl e
tablet PC. Prevent ESD damage by following ESD
guidelines every time you install memory or replace the
hard drive.
Warning To avoid exposure to dangerous electrical voltages and
moving parts, turn off your convertible tablet PC and
unplug the power cord and modem and network cables
before opening the case.
Before installing memory or replacing the hard drive, follow these guidelines:
■ Turn off your convertible tablet PC.
260
■ We ar a grounding wrist strap (available at most electronics stores) and
attach it to a bare metal part of your workbench or other grounded
connection.
Warning To prevent risk of electric shock, do not insert any object
into the vent holes of your convertible tablet PC.
■ Touch a bare metal surface on your workbench or other grounded object.
■ Unplug the power cord and the modem and network cables.
■ Remove the main battery (and secondary battery, if installed). For more
information, see “Changing batteries” on page 171.
■ Disconnect all peripheral devices and remove any PC Card s.
www.gateway.com
Page 33

Adding or replacing me mory
Before working with computer components, follow these guidelines:
■ Avoid static-causing surfaces such as carpeted floors, plastic, and packing
foam.
■ Remove components from their antistatic bags only when you are ready
to use them. Do not lay components on the outside of antistatic bags
because only the inside of the bags provide electrostatic protection.
■ Always hold components by their edges. Avoid touching the edge
connectors. Never slide components over any surface.
Adding or replacing memory
Your convertible tablet PC uses memory modules called SO-DIMMs (Small
Outline Dual Inline Memory Modules). The modules are available in various
capacities and any module can be placed in the memory bay. Use only memory
modules designed for the Gateway M275 for upgrading your memory.
SO-DIMMs are located in two places inside your convertible tablet PC. Both
SO-DIMMs can be upgraded. For instructions on upgrading the SO-DIMM
located on the bottom of your convertible tablet PC, see “Adding or replacing
memory in the memory bay” on page 262. For instructions on upgrading the
SO-DIMM located under the keyboard of your convertible tablet PC, see
“Replacing memory under t he keyboard” on page 265.
www.gateway.com
261
Page 34

Chapter 15: Upgrading Your Gateway M275
Adding or replacing memory in the memory
bay
Important Use only memory modules designed for the
Gateway M275.
To add or replace memor y modules:
1 Follow the instructions under “Preventing static electric ity discharge” on
page 260.
2 Turn off your convertible ta blet PC, disconnect the AC adapter and modem
and network cables.
3 Disconnect your convertible tablet PC from the optional port replicator
(see “Disconnecting from the port replicator” on page 283).
4 Turn your convertible tablet PC over so the bottom is facing up.
262
Memory
bay
www.gateway.com
Page 35

Adding or replacing me mory
5 Remove the main and optional secondary batteries. For more information,
see “Changing batteries” on page 171.
6 Loosen the two memory bay cover screws, then remove the memory bay
cover.
Screws
7 If you are removing a module, gently press outward on the clip at e ach
end of the memory module until the module tilts upward.
www.gateway.com
263
Page 36

Chapter 15: Upgrading Your Gateway M275
8 Pull the memory module out of the slot.
9 Hold the new or replacement module at a 30-degree angle and press it into
the empty memory slot. This module is keyed so it can only be inserted
in one direction. If the module does not fit, make sure that the notch in
the module lines up with the tab in the memory bay.
Important Use only memory modules designed for the
Gateway M275.
10 Gently push the module down until it clicks in place.
11 Replace the memory bay cover and tighten the cover screws.
12 Insert the batteries, then turn your convertible tablet PC over.
13 Reattach the optiona l port replicator.
14 Connect the power adapter and modem and network cables, then turn on
your convertible tablet PC.
264
www.gateway.com
Page 37

Adding or replacing me mory
Replacing memory under the keyboard
Important Use only memory modules designed for the
Gateway M275 for upgrading your memory.
Installing replacement memory under the keyboard is a process consisting of
three procedures that must be done in sequence:
1 Open the keyboard compartment.
2 Replac e the memor y.
3 Reattach the keyboard.
Opening the keyboard compartment
To open the keyboard compartment:
1 Follow the instructions under “Preventing stat ic electricity discharge” on
page 260.
2 Turn off your convertible tablet PC, disconnect the AC ad apter and modem
and network cables.
3 Turn your convertible tablet PC over so the bottom is facing up.
4 Remove the main and optional secondary batteries. For more information,
see “Changing batteries” on page 171.
www.gateway.com
265
Page 38

Chapter 15: Upgrading Your Gateway M275
5 Remove the two keyboard screws.
Screw
6 Turn your convertible tablet PC over so the top is facing up.
7 Open the LCD panel to the normal viewing position.
Screw
266
www.gateway.com
Page 39

Adding or replacing me mory
8 Insert the small flat-blade screwdriver under the bottom of the keyboard
bezel between the F11 and F12 keys and gently pr y it up.
Important Inserting a piece of cloth between the screwdriver and
keyboard will help prevent damage to your convertible
tablet PC.
9 Remove the bezel from your convertible tablet PC by pulling the bezel
toward you and at the same time lifting its front to clear the keyboard.
You will hear small snapping sounds as the bezel comes away from your
convertible tablet PC. Be careful not to break off the tabs found on the
bottom of the bezel.
www.gateway.com
267
Page 40

Chapter 15: Upgrading Your Gateway M275
10 With a small Phillips screwdriver, remove the four keyboard screws and
put them in a safe place.
Screws
268
www.gateway.com
Page 41

Adding or replacing me mory
11 Lift the back edge of the keyboard, then slowly rotate it toward you so it
lies keys-down on top of your convertible tablet PC. Be careful not to
damage the LCD panel.
www.gateway.com
269
Page 42

Chapter 15: Upgrading Your Gateway M275
Replacing the memory
To replace the memor y:
1 Gently press outward on the clip at each end of the memory module until
the module tilts upward.
270
2 Pull the memory module out of the slot.
www.gateway.com
Page 43

3 Hold the new or replacement module at a 30-degree angle and press it into
the empty memory slot. This module is keyed so it can only be inserted
in one direction. If the module does not fit, make sure that the notch in
the module lines up with the tab in the memory bay.
Important Use only memory modules designed for the
Gateway M275.
4 Gently push the module down until it clicks in place.
Reattaching the keyboard
To reattach the key board:
1 Rotate the keyboard toward the LCD panel until the keyboard is
almost face-up.
2 Insert the tabs on the front of the keyboard under the palm rest.
Adding or replacing me mory
Tabs
www.gateway.com
271
Page 44

Chapter 15: Upgrading Your Gateway M275
3 Gently press the keyboard down until it is flat all the way across. The
keyboard should easily fall into place. Be careful not to damage the
LCD panel.
4 Replace the four keyboard screws.
5 Slide the tabs on the bottom side of the bezel under your convertible tablet
PC frame.
Screws
272
6 Press down on the bezel in several places to make sure it is correctly
mounted. The bezel is correctly mounted when you can run you finger
along the bezel and find no loose spots. The bezel should be flat all the
way across.
www.gateway.com
Page 45

Replacing the hard dr ive kit
Warning If the bezel is not correct ly replaced, your convert ible tablet
PC could be damaged w hen you tr y to close th e LCD
panel.
7 Turn your convertible tablet PC over so the bottom is facing up.
8 Replace the two keyboard screws.
9 Insert the batteries, then turn your convertible tablet PC over.
10 Connect the power adapter and modem and network cables, then turn on
your convertible tablet PC.
Replacing the hard drive kit
If you would like more hard drive capacity, you can replace your original drive
with a higher-capacity drive.
www.gateway.com
Hard
drive
273
Page 46

Chapter 15: Upgrading Your Gateway M275
To replace the hard drive kit:
1 Follow the instructions under “Preventing static electric ity discharge” on
page 260.
2 Turn off your convertible tablet PC, disconnect the AC adapter and modem
and network cables.
3 Disconnect your convertible tablet PC from the optional port replicator
(see “Disconnecting from the port replicator” on page 283).
4 Turn your convertible tablet PC over so the bottom is facing up.
5 Remove the main and optional secondary batteries. For more information,
see “Changing batteries” on page 171.
6 Remove the two hard drive kit screws.
274
Screws
Tips & Tricks Use a magnetic screwdriver or turn your convertible
tablet PC over to remove the screws.
www.gateway.com
Page 47

Replacing the hard dr ive kit
7 Slide the old hard drive kit out of your convertible tablet PC.
8 If your new hard drive already includes the hard drive kit bracket, go to
Step 13.
-ORIf you need to move the ha rd drive kit bracket from your old hard drive
kit to your new hard drive, go to Step 9.
9 Remove the two screws that secure the hard drive to the hard drive kit
bracket.
Screw
Screw
www.gateway.com
275
Page 48

Chapter 15: Upgrading Your Gateway M275
10 Remove the bracket from the old drive.
11 Insert the new drive into the bracket so the screw holes line up.
12 Replace the two screws that secure the bracket to the drive.
13 Place the new hard drive kit into the bay and slide it into the connector.
14 Replace the screws that secure the hard drive kit to your convertible
tablet PC.
15 Insert the batteries, then turn your convertible tablet PC over.
16 Reattach the optiona l port replicator.
17 Connect the power adapter and modem and network cables, then turn on
your convertible tablet PC.
276
www.gateway.com
Page 49

Using the
Gateway M275
Port Replicator
The optional port replicator gives you a convenient way to
attach external device s such as a monitor, a full-size
keyboard, or an AC adapter.
Although devices can be attached directly to the ports on
your convertible tablet PC, the port replicator lets you
make all of those connections in one step. The port
replicator also gives you access to additional ports not
found on your convertible tablet PC.
Read this chapter to le arn:
■ Where ports and jacks are located
■ How to connect and disconnect the port replicator
■ How to secure the port replicator with a locking cable
16
277
Page 50

Chapter 16: Using the Gateway M275 Port Replicator
Front
Kensington
lock ring
Docking
port
Docking
release
latch
Component Icon Description
Kensington™ lock ring Secure your convertible tablet PC and port replicator to
an object by connecti ng a Kensington cabl e lock through
this ring and into the Kensington lock slot on your
convertible tabletPC. For more information, see
“Securing your port replicator” on page 284.
Docking port Connect your convertible tablet PC to this port.
Warning! Power is passed through this port. This
docking connection is certified to UL 1950 for use only
with convertible tablet PCs designed for your Gateway
port replicator.
Docking release latch Press the release latch to attach the convertible
tablet PC. Lift the release latch to release your
convertible tablet PC.
278
www.gateway.com
Page 51

Left side
USB port
Component Icon Description
Left side
USB port Plug USB (Universal Serial Bus) devices (such as a
diskette drive, flash drive, Iomega™ Zi p™ dri ve, pri nte r,
scanner, camera, keyboard, or mouse) into this port.
www.gateway.com
279
Page 52

Chapter 16: Using the Gateway M275 Port Replicator
Back
Microphon e jack
Headphone jack
Line in jack
S/PDIF digital
audio jack
Parallel
port
Serial
port
Monitor
port
S-Video
out jack
Ethernet
jack
USB
ports
Power conn ector
PS/2 mouse port
PS/2 keyboard port
Component Icon Description
S/PDIF digital audio jack Plug an optical (T osli nk) AC-3 digital a udio cable into th is
jack.
S-Video out jack Plug a standard S-V ideo c able into this ja ck and the j ack
on an S-Video dev ice ( such as a telev ision or VCR). For
more information, see “Viewing the display on a
television” on page 162.
USB ports Plug USB (Universal Serial Bus) devices (such as a USB
Iomega™ Zip ™ drive, printer, scanner, camera,
keyboard, or mouse) into these ports.
Power connector Plug the AC adapter cable into this connector.
Microphone jack Plug a microphone into this jack.
Headphone jack Plug amplified speakers or headphones into this jack.
The built-in speakers on your convertible tablet PC are
turned off when speakers or headphones are plugged
into this jack.
This jack is turn ed off when headphones are plugged into
your convertible tablet PC’s headphone jack.
280
www.gateway.com
Page 53

Component Icon Description
Line in jack Connect an external audio input source (such as a
stereo) to this jack so tha t you can rec ord sound on your
convertible tabletPC or play sound through your
convertible tabletPC speakers.
Parallel port Plug a parallel device (such as a printer) into this port.
Serial port Plug a serial device (such as a digital camera) into this
port.
Monitor port Plug an analog VGA monito r into this port.
Ethernet jack Plug a 10/100 Ethernet network cable into this jack. For
more information, see “Connecting to a wired Ethernet
network” on page 48 and “Networking Your
Gateway M275” on page 207.
PS/2 keyboard port Plug a Personal System/2 (PS/2) keyboard in to this port.
Attaching a PS/2 keyb oard to you r port repl icator may
deactivate the built-in keyboard.
Back
PS/2 mouse port Plug a Personal System/2 (PS/2) mouse into this port.
Attaching a PS/2 mouse to your port replicator may
deactivate the touchpad.
www.gateway.com
281
Page 54

Chapter 16: Using the Gateway M275 Port Replicator
Connecting to the port replicator
You can attach your convertible tablet PC to the port replicator while your
convertible tablet PC is off, on, or in Standby mode.
Attaching to the port replicator
To attach your convertible tablet PC to the port replicator:
1 Connect external devices to the ports on the port replicator.
2 Make sure the docking release latch is in the raised position.
3 Align the connector holes on the bottom of your convertible tablet PC with
the docking posts on the port replicator.
4 Press down on the docking release latch until your convertible tablet PC
moves into place.
282
Important Your convertible tablet PC may detect additional devices
and add drivers after being attached to the port replicator.
This process must be completed for components to work
correctly. Follow any on-screen instructions, if necessary.
www.gateway.com
Page 55

Connecting to the por t replicator
Disconnecting from the port replicator
Y ou can sep arate your convertible tablet PC from the port replicator while your
convertible tablet PC is off or on (not in Standby or Hibernate mode).
To separate your conv ertible tablet PC from the port replicator:
1 If your convertible tablet PC is off, go to Step 2.
-ORClick/Tap
menu item appears in the Start menu only while your convertible tablet PC
is docked.
Start, then click/tap Undock Computer. The Undock Computer
2 Pull up on the docking release latch. Your convertible tablet PC will move
out and away from the port replicator.
3 Lift your convertible tablet PC off of the port replicator.
www.gateway.com
283
Page 56

Chapter 16: Using the Gateway M275 Port Replicator
Securing your port replicator
You can secure your convertible tablet PC and port replicator to an object by
using the security ring located on the left side of the port replicator and the
Kensington lock slot located on the left side of your convertible tabletPC.
To secure your convertible tablet PC and port replicator:
1 Open the security ring on the port replicator.
2 Attach your convertible tablet PC to the port replicator.
3 Secure one end of the Kensington cable to a solid object, then run the other
end of the cable through the security ring and lock it into the slot provided
on the left side of your convertible tablet PC.
284
www.gateway.com
Page 57

Troubleshooting
This chapter provides some solutions to common
convertible tablet PC problems. Read this chapter to learn
how to:
■ Troubleshoot typical hardware and software problems
■ Get telephone support
■ Use automated troubleshooting systems
■ Get tutoring and training
If the suggestions in this chapter do not correct the
problem, s ee “Getting Help” on page 51 for more
information about how to get help.
17
285
Page 58

Chapter 17: Troublesho oting
Safety guidelines
While troubleshooting your convertible tablet PC, follow these safety
guidelines:
■ Never remove the memory bay cover, keyboard, or hard drive kit if your
convertible tablet PC is turned on, the batteries are installed, or while the
modem cable, network cable, or A C power ada pter are conn ected to your
convertible tablet PC.
■ Make sure that you are correctly grounded before accessing internal
components. For more information about preventing damage from static
electricity, see “Preventing static electricity discharge” on page 260.
■ After you complete any maint enance tasks wher e you remove the me mory
bay cover, keyboard, or hard drive kit, make sure that you replace the cover ,
keyboard, or hard drive kit, reinstall any screws, then replace the batteries
before you start your convertible tablet PC.
Warning Do not try to troubleshoot your problem if power cords or
plugs are damaged, if your convertible tablet PC was
dropped, or if the case was d amaged. Instead, unpl ug your
convertible tablet PC and contact a qualified computer
technician.
286
www.gateway.com
Page 59

First steps
If you have problems with your convertible tablet PC, try these things first:
■ Make sure that the AC power adapter is connected to your convertible
tablet PC and an AC outlet and that the AC outlet is supplying power.
■ If you use a power strip or surge protector, make sure that it is turned on.
■ If a peripheral devic e (su c h as a keyb oard o r m ous e) does no t work , ma ke
sure that all con nections are se cure.
■ Make sure that your hard drive is not full.
■ If an error message appears o n the screen, wr ite dow n the exact messa ge.
The message may help Gateway Technical Support in diagnosing and
fixing the problem.
■ If you added or removed peripheral devices, review the installation
procedures you performed and make sure that you followed each
instruction.
■ If an error occurs in a program, see the program’s printed documentation
or the online help.
First steps
Help and
Support
For more information about troubleshooting, click/tap
Start, then click/tap Help and Support.
Type the keyword troubleshooting in the Search box
, then click/tap the arrow.
Software support tools
Your convertible tablet PC may include the following support tool to help you
diagnose and fix problems:
■ PC Doctor is a comprehensive hardware diagnostic and system information
tool that can test your convertible tablet PC and determine its
configuration. PC Doctor provides 85 professional diagnostic tests directly
from your convertible tablet PC.
This support tool is available by clicking/tapping
clicking/tapping
Gateway Utilities.
www.gateway.com
Start, All Programs, then
287
Page 60

Chapter 17: Troublesho oting
Troubleshooting
Audio
See “Sound” on page 308.
Battery
See “Power” on page 305.
Device installation
Y ou have computer problems after adding a new device
Sometimes a new device, suc h as a PC Card, can cause a system resource (IRQ)
conflict. Check IRQ usage to determine if there is an IRQ conflict.
To check IRQ usage:
288
1 Click/Tap Start, then click/tap Control Panel. The Control Panel
window opens. If your Control Panel is in Category View, click/tap
Performance and Maintenance.
2 Click/Double-click/Tap/Double-tap System, click/tap the Hardware
tab, then click/tap
opens.
Device Manager. The Device Manager window
3 Click/Tap View, then click/tap Resources by type.
Double-click/Double-tap
hardware assignments are displayed.
Help and
Support
For more information about IRQs, click/tap Start, then
click/tap Help and Support.
Type the keyword IRQs in the Search box
www.gateway.com
Interrupt request (IRQ). All IRQs and their
, then click/tap the arrow.
Page 61

To free IRQ res ources for the new device:
1 In the Device Manager window, check the device list for a resource
conflict. A resource conflict appears as a black exclamation point in
a yellow circle.
2 Remove the device you are trying to install, then determine which
one of the existing devices or ports you can disable.
3 Right-click/Button-tap the device or port you want to disable, then
click/tap
Disable. The device or port is disabled.
Diskette drive (external)
The diskette drive is not recognized
■ Shut down and restart your convertible tablet PC.
■ The USB cable may not be inserted completely into the USB port. Press
the cable into the port, then try to access the diskette again.
Troubleshooting
Y ou see an “Access Denied” or “Write protect ” error message
■ Move the write-protection tab in the upper-right corner of the diskette
down (unpr otected).
■ The diskette may be full. Delete unnecessary files on the diskette and try
again.
■ Not all diskettes are IBM-compatible. Make sure that the diskette you are
using is IBM-compatible.
■ Try a different diskette. Occasionally diskettes are flawed and cannot be
read by the diskette drive.
Y ou see a “Disk is full” error message
■ Delete unnecessary files on the diskette.
■ Try a different diskette. Occasionally diskettes are flawed and cannot be
read by the diskette drive.
■ Run Error checking on the diskette. For more information, see “Checking
the hard drive for errors” on page 238. If errors are detected and corrected,
try using the diskette again.
www.gateway.com
289
Page 62

Chapter 17: Troublesho oting
Y ou see a “Non-system disk”, “NTLDR is missing”, or “Disk error”
error message
■ Eject the diskette from the diskette drive, then press ENTER.
■ Make sure that the diskette you are using is IBM-compatible.
The diskette drive status indicator is li t continuously
Remove the diskette from the drive. If the indicator stays on, try restarting your
convertible tablet PC.
Display
The screen is too dark
Adjust the brightness using the system keys. For more information, see “System
key combinations” on page 30.
The screen resolution is not correct
Change the screen resolution from the Display Properties dialog box. For more
information, see “Adjusting the screen resolution” on page 195.
Help and
Support
For more information about changing the screen
resolution, click/tap Start, then click/tap Help and
Support.
Type the keyword screen resolution in the Search box
The text on the display is dim or difficult to read
■ Adjust the brightness and contrast using the system keys. For more
information, see “System key combinations” on page 30.
■ Change the display settings. For more information, see “Adjustin g the
screen and desktop settings” on page 193.
■ Move your convertible tablet PC away from sources of electrical
interference, such as televisions, unshielded speakers, microwaves,
fluorescent lights, and metal beams or shelves.
290
www.gateway.com
, then click/tap the arrow.
Page 63

The display has pixels that are always dark or too bright
This condition is normal and inherent in the TFT technology used in
active-matrix LCD screens. Gateway’s inspection standards keep these to a
minimum. If you feel these pixels are unacceptably numerous or dense on your
display, contact Gateway Technical Support to identify whether a repair or
replacement is justified based on the number of pixels affected.
DVD or DVD/CD-RW drives
Y our convertible tablet PC does not recognize a disc
■ The disc may not be seated correctly in the tray. When you place a disc
on the tray, make sure that you press the disc firmly onto the spindle so
the retainers hold the disc in place.
■ The modular drive may not be inserted completely into the modular bay.
Press the module into the bay, then try to access the disc again.
■ Make sure that the disc label is facing up, then try again.
■ Try a different disc. Occasionally discs are flawed and cann ot be read by
the drive.
■ Some music CDs have copy protection software. You may not be able to
play these CDs on your convertible tablet PC.
Troubleshooting
■ Your convertible tablet PC may be experiencing some temporary memory
problems. Shut down an d restart your convertible t ablet PC.
■ Clean the disc. For more information, see “Cleaning CDs or DVDs” on
page 293.
An audio CD does not produce sound
■ Make sure that the CD label is facing up, then try again.
■ Some music CDs have copy protection software. You may not be able to
play these CDs on your convertible tablet PC.
■ Make sure that the volume control on your conv ertible tablet PC is turned
up. For more information, see “System key combinations” on page 30.
■ Make sure that the Windows volume control is turned up. For more
information, see “Adj usting the volume” o n page 10 2.
■ Make sure that Mute controls are turned off. For more information about
the mute setting, see “System key combinations” on page 30 or “Adjusting
the volume” on page 102.
www.gateway.com
291
Page 64

Chapter 17: Troublesho oting
■ Make sure that headphones are not plugged into the headphone jack. For
the location of the headphone jack, see “Left Side ” on p age 3 an d “Back”
on page 280.
■ If you are using powered speakers, make sure that they are plugged in and
turned on.
■ Clean the CD. For more information, see “Cleaning CDs or DVDs” on
page 293.
■ Your convertible tablet PC may be experiencing some temporary memory
problems. Shut down and restart your convertible tablet PC.
■ Reinstall the audio device drivers. For more information, see “Reinstalling
device drivers” on page 249.
A DVD movie will not play
■ Make sure that the label or side you want to play is facing up, then try
again.
■ Shut down and restart your convertible tablet PC.
■ Clean the DVD. For more information, see “Clea ning CDs or DVD s” on
page 293.
■ DVD discs and drives contain regio nal code s that help control DVD title
exports and help reduce illegal disc distribution. T o be a ble to play a DVD,
the disc’s regional code and your DVD drive’s regional code m ust match.
The regional code on your DVD drive is determined by your convertible
tablet PC’s delivery address. The regional code for the United States and
Canada is 1. The regional code for Mexico is 4. Your DVD drive’s regional
code must match the regional code of the disc. The regional code for the
disc is on the disc, disc documentation, or packagin g.
If the DVD movie does not play, the disc’s regional code and your DV D
drive’s regional code may not match.
■ Make sure that the InterVideo program has been installed on your
convertible tablet PC. See “Playing a DVD” on page 124 for more
information.
A DVD does not produce sound on a TV
■ Audio is not transmitted through the S-Video out jack. Use the built-in
speakers, a set of headphones or external powe red speakers, or connect
your convertible tablet PC to a stereo system to hear sound while playing
a DVD.
292
www.gateway.com
Page 65

Cleaning CDs or DVDs
Wipe from the center to the edge, not around in a circle, using a product made
especially for the purpose.
File management
A file was accidentally deleted
If a file was deleted at a DOS p rompt or in Windows while holding down the
HIFT key, the file cannot be restored.
S
Troubleshooting
To restore deleted files:
1 Double-click/Double-tap the Recycle Bin icon.
2 Right-click/Button-tap the file you want to restore, then click/tap
Restore. The file is restored to the place where it was originally
deleted from.
If the Recycle Bin was emptied before you tried to restore a file, the
file cannot be restored.
Help and
Support
For more information about rest oring deleted files, click/tap
Start, then click/tap Help and Support.
Type the keyword System Re store in the Search box
, then click/tap the arrow.
www.gateway.com
293
Page 66

Chapter 17: Troublesho oting
Hard drive
Y ou see an “Insufficient disk space” erro r message
■ Delete unnecessary files from the hard drive using Disk Cleanup. For more
information, see “Using Disk Cleanup” on page 237.
■ Empty the Recycle Bin by right-clicking/button-tapping the Recycle Bin
icon, th en clicki ng/tappi ng
Caution All delete d files w ill be lo st when you empt y the Re cycle
■ Save your files to a diskette or another drive. If the hard drive is full, copy
any files not regularly used to diskettes or other backup media, then delete
them from the hard drive.
Empty Recycle Bin.
Bin.
Help and
Support
For more information about file management, click/tap
Start, then click/tap Help and Support.
Type the keyword file management in the Search box
, then click/tap the arrow.
Y ou see a “Data error” message
This may be the result of a defective area on the hard drive. To fix hard drive
problems, run the Error checking program. For more information, see
“Checking the hard drive for errors” on page 238.
The hard drive cannot be a ccessed, or you see a “General fail ure
reading drive C” error message
■ If a diskette is in the diskette drive, eject it and restart your convertible
tablet PC.
■ Make sure that the hard drive is installed correctly. Remove it, firmly
reinsert it, then restart your convertible tablet PC. For more information,
see “Replacing the hard drive kit” on page 273.
■ If your convertible tablet PC has been subjected to static electricity or
physical shock, you may need to reinstall the operating system.
294
www.gateway.com
Page 67

Y ou see a “Non-system disk”, “NTLDR is missing”, or “disk” error
message
■ Eject the diskette from the diskette drive, then press ENTER.
Interface/Ports
The buttons on the convertible tablet PC’ s LCD panel do not do what
they are supposed to
■ The button functions have been changed. Reset button functions in the
Buttons tab of the T ablet and Pen Setting s dialog box. For more information,
see “Programming the buttons” on page 201.
The convertible tablet PC does not recognize the PC Card
■ The card is incorrectly inserted. Eject the card and re-insert it with the label
side up. For more information, see “Adding and removing a PC Card” on
page 258.
The convertible tablet PC does not recognize a USB or 1394 peripheral
device
■ The peripheral device is not connected to the convertible tablet PC
correctly. Check the connection cable, and be sure it is inserted in the
correct port on the convertible tablet PC and the peripheral devi ce.
Troubleshooting
■ The correct driver is not built into Windows XP. Use the device’s
installation CD or check the manufacturer’s Web site for the correct driver.
Internet
Y ou cannot connect to the Internet
■ Make sure that the modem cable is plugged into the modem jack and not
the Ethernet network jack. See “Right Sid e” on page 5 to make sure that
the connections have been made correctly.
■ Make sure that your convertible tablet PC is connected to the telephone
line and the telephone line has a dial tone.
■ If you have the call waiting feature on your telephone line, make sure that
it is disabled.
■ Make sure that you are not using a digital, rollover, or PBX line. These lines
do not work with your modem.
www.gateway.com
295
Page 68

Chapter 17: Troublesho oting
■ Make sure that your account with your Internet service provider (ISP) is
set up correctly. Contact your ISP technical support for help.
■ Make sure that you do not have a problem with your modem. For more
information, see “Modem (dia l-up)” on page 298
Help and
Support
For more information about troubleshooting Internet
connections, click/tap Start, then click/tap Help and
Support.
Type the keyword troublesh ooting conne ctions in the
Search box , then click/tap the
arrow.
Y ou see an “Unable to locate host” message and are unable to browse
the Internet
This problem can occur when you have typed a URL (Web address) incorrectly,
you have lost your Internet connection, or your ISP is having technical
difficulties.
Double-check the URL or try a different URL. If the error message still appears,
disconnect from the ISP connectio n and close your browser, then reconnect
and open the browser . If you still get the error , your ISP may be having technical
difficulties.
Connecting to a Web site takes too long
Many factors can affect Int ernet performance:
■ The condition of the telephone lines in your residence or at your local
telephone service
■ The condition of the Internet computers to which you connect and
the number of users accessing those computers
■ The complexity o f graphics and multimed ia on Web pages
■ Having multiple W eb browsers open, performi ng multiple downloads, and
having multiple programs open on your convertible tablet PC
People are sending you e-mail messages, but you have not received
any mail
■ Click/Tap the receive button in your e-mail program.
■ Make sure that your account with your Internet service provider (ISP) is
set up correctly. Contact your ISP for technical support.
296
www.gateway.com
Page 69

Keyboard
The built-in keyboard does not work
■ Attaching a PS/2 keyboard to your port replicator while your convertible
tablet PC is running may deactivate the built-in keyboard.
The external keyboard does not work
■ Make sure that the keyboard ca ble is plugged in correctly.
■ Remove all extension cables and switchboxes.
■ Clean the keyboard by using an aerosol can of air with a narrow, straw-like
extension to remove dust and lint trapped under the keys.
■ Try a keyboard that you know works to make sure that the keyboard port
works.
■ If you spilled liquid in the keyboard, turn off your convertible tablet PC
and unplug the keyboard. Clean the keyboard and turn it upside down to
drain it. Let the keyboard dry before using it again. If the keyboard does
not work after it dries, you may need to replace it.
A keyboard character keeps repea ting or you see a “Keyboard stuck”
or “Key failure” error message
■ Make sure that nothing is resting on the keyboard.
Troubleshooting
■ Make sure that a key is not stuck. Press each key to loosen a key that might
be stuck, then restart your convertible tablet PC.
Memory
Y ou see a “ Memory error” message
■ Make sure that the memo ry modules are inserted correctly in the memory
bay slots. For more information, see “Adding or replacing memor y” on
page 261.
■ Use PC Doctor or a t hird-party d iagnost ic program to help determine if a
memory module is failing. For more information, see “Adding or replacing
memory” on page 261.
Y ou see a “Not enough memory” error message
■ Close all programs, then restart your convertible tablet PC.
www.gateway.com
297
Page 70

Chapter 17: Troublesho oting
Help and
Support
For more information about troubleshooting memory
errors, click/tap Start, then click/tap Help and Support.
Type the keyword memory error in the Search box
, then click/tap the arrow.
Memory card reader
Drive letter for the memory card slot does not appear in the My
Computer window
■ Reboot your convertible tablet PC.
Modem (dial-up)
Y our modem does not dial or does not connect
■ Make sure that the modem cable is plugged into the modem jack and not
the Ethernet network jack. See “Right Sid e” on page 5 to make sure that
the connections have been made correctly.
■ Make sure that your convertible tablet PC is connected to the telephone
line and the telephone line has a dial tone.
■ Make sure that the modem cable is less than 6 feet (1.8 meters) long.
298
■ Remove any line splitters or surge protectors from your telephon e line,
then check for a dial tone by plugging a working telephone into the
telephone wall jack.
■ If you have additional telephone services such as call waiting, call
messaging, or voice mail, make sure that all messages are cleared and call
waiting is disabled before using the modem. Contact your telephone
service to get the correct code to temporarily disable the service. Also make
sure that the modem dialing properties are set appropriately.
To check the dialing properties:
1 Click/Tap Start, then click/tap Control Panel. The Control Panel
window opens. If your Control Panel is in Category View, click/tap
Printers and Other Hardware.
2 Click/Double-click/Tap/Double-tap the Phone and Modem Options
icon, then click/tap the
www.gateway.com
Dialing Rules tab.
Page 71

Troubleshooting
3 Click/Tap the location from which you are dialing, then click/tap
Edit.
4 Make sure that all settings are corre ct.
Help and
Support
■ Disconnect any answering machine, fax machine, or printer that is on the
For more information about dialing properties, click/tap
Start, then click/tap Help and Support.
Type the keyword dialing in the Search box
, then click/tap the arrow.
same line as the modem. Do not connect these devices to the same
telephone line as the modem.
■ Make sure that you are not using a digital, rollover, or PBX line. These lines
do not work with your modem.
■ Check for line noise (scratchy, crackling, or popping sounds). Line noise
is a common problem that can cause the modem to conn ect at a slower
rate, abort downloads, or even disconnect. The faster the modem, the less
line noise it can tolerate and still work correctly.
Listen to the line using your telephone. Dial a single number (such as 1).
When the dial tone stops, listen for line noise. Wiggle the modem cable
to see if that makes a difference. Make sure that the connectors are free
from corrosion and all screws in the wall or telephone wall jack are secure.
You can also call your telephone service and have the telephone line
checked for noise or low line levels.
■ Try another telephone line (either a different telephone number in your
house or a telephone line at a di fferent location). If you can connect on
this line, call your telephone service.
■ Try connecting with the modem at a lower connection speed. If reducing
the connect speed lets you connect, call your telephone ser vice. The
telephone line may be too noisy.
Y ou cannot connect to the Internet
■ The ISP may be having techni cal difficulties. Contac t your ISP for technical
support.
■ See if the modem works with a different communications program. The
problem may be with just one program .
www.gateway.com
299
Page 72

Chapter 17: Troublesho oting
Y our 56K modem does not connect at 56K
Current FCC regulations restrict actual data transfer rates over public telephone
lines to 53K. Other factors, such as line noise, telephone service provider
equipment, or ISP limitations, may lower the speed even further.
If your convertible tablet PC has a v.90 modem, the speed at which you can
upload (send) data is limited to 33.6K. If your convertible tablet PC has a v.92
modem, the speed at which you can upload data is limited to 48K. Your ISP
may not support 48K uploads.
You can check modem connection speeds and dial-up network (DUN)
connections by accessing the gateway.your.way dial-up server. The ser ver also
contains drivers, patche s, and updates for current Gateway hardware and
software.
The server provides a secure connection and is a stand-alone server. You cannot
use it to access the Internet. The server cannot be accessed Mondays from
8:00 a.m. to 12:00 p.m. CT.
To acces s the gateway.your.way dial-up server:
1 Insert the red Drivers and Applications CD in to the DVD or
DVD/CD-RW drive.
2 Click/Tap Help, then click/tap Support Web Site.
3 To check your modem connection speed, click/tap the Direct Dial
option. After your modem connects, move the mouse pointer over
Dial-Up Networking icon (located next to the clock on your
the
taskbar). Your modem connection speed appears.
Y our fax communications program only sends and receives faxes at
14,400 bps when you have a 56K modem
Current fax technology only supports a maximum send and receive rate of
14,400 bps.
The modem is not recognized by your convertible tablet PC
■ Make sure that the line connected to the modem is working and plugged
into the appropriate port on your conv ertible tablet PC. See “Right Side”
on page 5 to make sure that the connections have been made correctly.
300
www.gateway.com
Page 73

Troubleshooting
■ If the modem shares the telephone line with another device, make sure
that the telephone line is not in use (for example, someone is on the
telephone, or another modem is in use).
■ Use the modem cable that came with your convertible tablet PC. Some
telephone cables do not meet required cable standards and may cau se
problems with the modem connection.
■ Shut down and restart your convertible tablet PC.
■ Run Windows modem diagnostics.
To run modem diagnostics:
1 Close all open prog rams.
2 Click/Tap Start, then click/tap Control Panel. The Control Panel
window opens. If your Control Panel is in Category View, click/tap
Printers and Other Hardware.
3 Click/Double-click/Tap/Double-tap the Phone and Modem Options
icon, then click/tap the
Modems tab.
4 Click/Tap your modem, then click/tap Properties. The Modem
Properties dialog box opens.
5 Click/Tap the Diagnostic tab, then click/tap Query Modem. If
information about the modem appears, the modem passed
diagnostics. If no modem information is available, a white screen
appears with no data, or if you get an error such as port already open
or the modem has failed to respond, the modem did not pass
diagnostics.
Help and
Support
For more information about modem troubleshooting,
click/tap Start, then click/tap Help and Support.
Type the keyword modem troubleshooting in the
Search box , then click/tap the
arrow.
www.gateway.com
301
Page 74

Chapter 17: Troublesho oting
The modem is noisy when it dials and connects
When your modem tries to connect to another modem, it begins handshaking.
Handshaking is a digital “getting acquainted” conversation between the two
modems that establishes connection speeds and communication protocols. You
may hear unusual handshaking sounds when the modems first connect. If the
handshaking sounds are too loud, you can turn down the modem volume.
To turn down the modem volume:
1 Click/Tap Start, then click/tap Control Panel. The Control Panel
window opens. If your Control Panel is in Category View, click/tap
Printers and Other Hardware.
2 Click/Double-click/Tap/Double-tap the Phone and Modem Options
icon, then click/tap the
3 Click/Tap the modem you want to adjust, then click/tap Properties.
4 Click/Tap the Modem tab, then adjust the Speaker volume control.
5 Click/Tap OK twice to close the Phone and Modem Op tions dialog box.
Modems tab.
Mouse
The external mouse does not work
■ Make sure that the mouse cable is plugged in correctly.
■ Shut down and restart your convertible tablet PC.
■ Remove all extension cables and switch boxes.
■ Try a m ouse you kno w is wo rking to ma ke sure t hat the mou se po rt works.
The external mouse works erratically
■ Clean the mouse. For more information, see “Cleaning the mouse” on
page 245.
■ Some mouse pad patterns “confuse” optical mice. Try the mouse on a
different surface.
302
www.gateway.com
Page 75

Networks
Y ou cannot connect to your company network
Every network is unique. Contact your company computer department or
network administrator for help.
Troubleshooting
Help and
Support
For more information about network troubleshooting,
click/tap Start, then click/tap Help and Support.
Type the keyword network troubleshooting in the
Search box , then click/tap the
arrow.
Operating system
The program I am working in has stopped responding but the cursor
moves and other programs work
■ The program has crashed. Press the Windows Security button on the
convertible tablet PC’s LCD panel to open the Task Manager and close the
non-responsive program.
-ORPress C
non-responsive program.
The convertible tablet PC keeps showing the wrong date and time
even after resetting
■ The CMOS battery on the system board may need to be replaced. Contact
Gateway technical support.
TRL+ALT+DEL to open the Task Manager and close the
The convertible tablet PC seems to be operating more slowly than
usual
■ The hard drive is full or nearly full. Run the Disk Cleanup utility to clear
out unnecessary and temporary files, and remove unneeded programs and
files. For more information, see “Using Disk Cleanup” on page 237.
■ The hard drive needs defragmenting. Run Disk Defragmenter to
consolidate files and folders on the hard drive. For more information, see
“Defragmenting the hard drive” on pa ge 240.
www.gateway.com
303
Page 76

Chapter 17: Troublesho oting
■ The convertible tablet PC is in Portrait or Secondary Landscape orientation.
Though changing the orientation should not slow the convertible
tablet PC considerably, tr y changing back to Primary Landscape
orientation.
Passwords
Y our convertible tablet PC does not accept your password
Make sure that CAPS LOCK and PAD LOCK are turned off, then retype the
password.
Y ou forgot your startup password
The password feature (which is set in the BIOS Setup utility) is very secure, with
no easy way to recover a forgotten password. Y ou must return your convertible
tablet PC for repair. Call Gateway Technical Support for instructions.
PC Cards
Y ou installed a PC Card and now your convertible tablet PC is having
problems
■ The card is incorrectly inserted. Eject the card and re-insert it with the label
side up. For more information, see “Adding and removing a PC Card” on
page 258.
■ Make sure that you have correctly installed required software for the
PC Card. For more information, see your PC Card’s documentation.
■ Make sure that the PC Card you installed is not causing a system resource
conflict. For more information on resource conflicts, see “Device
installation” on page 288.
Pen
The convertible tablet PC does not respond to the pen
■ You are not using the correc t pen. Use only Penabled digitizer pens by
W acom such as your convertible tablet PC’ s pen. The convertible ta blet PC
does not respond to some other tablet pens or plastic pens.
304
www.gateway.com
Page 77

The pen tip does not line up with the pointer when I tap the screen
■ The pen and display need recalibrating in both Landscape and Portrait
mode. Recalibrate through the
Pen Settings tab of the T ablet and Pen Setting s
dialog box. For more information, see “Adjusting tablet and pen settings”
on page 200.
Power
Y our convertible tablet PC is not working on AC power
■ Make sure that your AC power adapter is connected correctly to your
convertible tablet PC. For more information, see “Connecting the
AC adapter” on page 19.
■ If your convertible tablet PC is plugged into a surge protector, make sure
that the surge protector is connected securely to an electrical outlet, turned
on, and working correctly. To t est the ou tlet, plug a wo rking devi ce, such
as a lamp, into the outlet and turn it on.
■ Make sure that the AC power adapter cables are free from cuts or damage.
Replace any damag ed cables.
Y our convertible tablet PC is not working on battery power
■ Make sure that the battery is installed correctly. For more information, see
“Replacing the main battery” on p age 172.
Troubleshooting
■ Make sure that the optional secondary battery is installed correctly. For
more information, see “Install ing a second ary batter y” on pag e 174.
■ Make sure that the batteries are fully recharged. For more information, see
“Recharging the battery” on page 169.
■ Make sure that the battery is calibrated correctly. For more information,
see “Recalibrating the battery” on page 170.
Y our convertible tablet PC will not turn off, even after sliding and
holding the power switch for five seconds
If your convertible tablet PC has “frozen,” and sliding and holding the power
switch for five seconds does not turn it off, insert a straightened paper clip into
the reset hole on the bottom of your convertible tablet PC. For the location of
the reset hole, see “Bottom” on page 7.
www.gateway.com
305
Page 78

Chapter 17: Troublesho oting
The battery seems to run do wn very quickly
■ Peripheral devices and programs tha t make heavy use of the hard drive
drain the battery more quickly. Use AC power whenever possible, and
readjust the
For more information, see “Changing the power scheme” on page 179.
■ The battery is weakening or defective. All batteries run down in time, but
if a new battery appears to be defective, contact Gateway about replacing it.
The convertible tablet PC will not turn on
■ The Power switch has not been fully engaged. Slide and hold the Power
switch for at least a half- second, but no more than th ree seconds.
■ The battery is fully discharged but AC power is not connected. Connect
the AC adapter to power the convertible tablet PC and charge the battery.
The convertible tablet PC turns on and the hard drive status indicator
flashes, but nothing appea rs on the display
■ Display brightness is set too low. For more information, see “Adjusting
brightness” on page 192.
The convertible tablet PC will not enter Hibernate mode
■ Hibernate mode is not activated. For more information, see “Activating and
using Hibernate mode” on page 182.
Power Properties to Max Battery when AC power is unavailable.
The convertible tablet PC will not come out of Standby or Hibernate
mode when running on battery power.
■ The battery fully discharged and AC power is not connected. Connect the
AC power adapter to power the convertible tablet PC and charge the
battery.
The display goes black while the convertible tablet PC is still turned
on
■ Convertible tablet PC has gone into Standby after sitting idle (power status
indicator is blinking blue). Slide and hold the Power switch for about a
second to resume operations.
■ Convertible tablet PC has gone into low-battery Hibernate (power status
indicator is blinking blue). Slide and hold the Power switch for about a
second to resume ope rations, and cha rge the battery.
306
www.gateway.com
Page 79

Printer
The printer will not turn on
■ Make sure that the printer is online. Many printers have an online/offline
button that you may need to press.
■ Make sure that the power cable is plugged into an AC power source.
The printer is on but will not print
■ Check the cable between the printer and your convertible tablet PC. Make
sure that it is connected to the correct port.
■ Make sure that the printer is online. Many printers have an online/offline
button that you may need to press so the printer can start printing. Press
the button to put the printer online.
■ Check the port and cable for bent or broken pins.
■ If the printer you want to print to is not the default printer, make sure
that you have selected it in the printer setup.
To set a default printer:
Troubleshooting
1 Click/Tap Start, then click/tap Control Panel. The Control Panel
window opens. If your Control Panel is in Category View, click/tap
Printers and Other Hardware.
2 Click/Double-click/Tap/Double-tap the Printers and Faxes icon. The
Printers and Faxes window opens.
3 Right-click/Button-tap the name of the printer you want to be the
default printer, then click/tap
■ Reinstall the printer driver. See the guide that came with your printer for
instructions on installing the printer driver.
Y ou see a “Printer queue is full” error message
■ Make sure that the printer is not set to work offline.
www.gateway.com
Set as De fault P rinter.
307
Page 80

Chapter 17: Troublesho oting
To make sure that the printer is not set to work offline:
1 Click/Tap Start, then click/tap Control Panel. The Control Panel
window opens. If your Control Panel is in Category View, click/tap
Printers and Other Hardware.
2 Click/Double-click/Tap/Double-tap the Printers and Faxes icon. The
Printers and Faxes window opens.
3 Right-click/Button-tap the name of the printer you want to use. If
the menu shows a check mark next to
Use Printer Offline to clear the check mark.
Use Printer Offline, click/ta p
Help and
Support
■ Wa it until files have been printed before sending additional files to the
printer.
■ If you print large files or many files at one time, you may want to add
additional memory to the printer. See the printer documentation for
instructions for adding additional memory.
For more information about printer troubleshooting,
click/tap Start, then click/tap Help and Support.
Type the k ey w ord printer troubleshooter in the Search
box , then click/tap the arrow.
Y ou see a “Printer is out of paper” error message
After adding paper, make sure that the printer is online. Most printers have an
online/offline button that you need to press after adding paper.
Sound
Y ou are not getting sound from the built-in speaker s
■ Make sure that headphones are not plugged into the headphone jack. For
the location of the headphone jack, see “Left Side ” on p age 3 an d “Back”
on page 280.
■ Make sure that the volume control on your conv ertible tablet PC is turned
up. For more information, see “System key combina tions” on page 30.
308
■ Make sure that the Windows volume control is turned up. For more
information, see “Adj usting the volume” o n page 10 2.
www.gateway.com
Page 81

Troubleshooting
■ Make sure that Mute controls are turned off. For more information about
the mute setting, see “System key combinations” on page 30 or “Adjusting
the volume” on page 102.
Help and
Support
For more information abo ut troubleshoo ting sound issues,
click/tap Start, then click/tap Help and Support.
Type the keyword sound troubleshooter in the Search
box , then click/tap the arrow.
Touchpad
The touchpad does not work.
Attaching a PS/2 mouse to your port replicator may deactivate the touchpad.
Video
The external monitor is not working
■ Make sure that you have pressed FN+LCD/CRT to activate the external
monitor option.
■ Make sure that the monitor is turned on and that the video cable is
connected correctly.
TV out is not working
■ Make sure that you have activated TV out. For more information, see
“Viewing the display on a television” on page 162.
■ Make sure that the television is turned on and that the S-Video cable is
connected correctly.
■ Televisions in different countries use different standards. If you are
traveling, you may need to change the TV Out mode. For more
information, see “Viewing the display on a television” on pag e 162.
www.gateway.com
309
Page 82

Chapter 17: Troublesho oting
T elephone support
Before calling Gateway T echnical Suppo rt
If you have a technical problem with your convertible tablet PC, follow these
recommendations before contacting Gateway Technical Support:
■ Make sure that your convertible tablet PC is connected correctly to a
grounded AC outlet that is supplying power. If you use a surge protector,
make sure that it is turned on.
■ If a peripheral device, such as a keyboard or mouse, does not appear to
work, make sure that all ca bles are plugged in securely.
■ If you have recently installed hardware or software, make sure that you
have installed it according to the instructions provided with it. If you did
not purchase the hardware or software from Gateway, see the
manufacturer’s documentation and technical support resources.
■ If you have “how to” questions about using a program, see:
■ Online Help
310
■ Printed documentation
■ The Microsoft Windows documentation
■ The software publisher’s Web site
■ See the troubleshooting section of this chapter.
Warning To avoid bodily injury, do not attempt to troubleshoot your
convertible tablet PC problem if:
■
Power cords or plugs are damaged
■
Liquid has been spilled into your convertible tablet PC
■
Your convertible tablet PC was dropped
■
The case was damaged
Instead, unplug your convertible tablet PC and contact a
qualified computer technician.
■ Have your custo m e r ID, se r ial numb e r, and order number avai l able, along
with a detailed description of your problem, including the exact text of
any error messages, and the steps you have taken.
■ Make sure that your convertible tablet PC is nearby at the time of your
call. The technician may have you follow troubleshooting steps.
www.gateway.com
Page 83

T elephone numbers
Gateway offers a wide range of customer service, technical support, and
information services.
Automated troubleshooting system
Service description How to reach
Telephone suppor t
Use an automated menu system and your telepho ne
keypad to find answers to common problems.
800-846-2118 (US)
877-709-2945 (Canada)
T elephone numbers
You can access the following services through your telephone to get answers
to your questions:
Resource Service description How to reach
Fax on demand
support
Gateway’s
fee-based
software tutorial
service
Gateway
Technical Support
Order a catalog of documents on common
problems, then order docu ments by docum ent
numbers. The documents will be faxed to you.
Get tutorial assistance for software issues
billed by the minute.
Talk to a Gateway Technical Support
representative about a non-tutorial technical
support question. (See “Before calling
Gateway Technical Support” on page 310
before calling.)
TDD Technical Support (for hearing impaired)
is available:
Weekdays 6:00 a.m. - 8:00 p.m. Central Time
Weekends 6:00 a.m. - 5:00 p.m. Cen tral Time
800-846-4526 (US)
877-709-2951 (Canada)
800-229-1 103 (charged to
your credit card)
900-555-4695 (charged to
your telephone bill)
800-846-2301 (US)
800-846-3609 (Canada
and Puerto Rico)
605-232-2191
(all other countries)
800-846-1778 (TDD)
America Online Get support for your America Online ISP
account
CompuServe Get support for your CompuServe ISP accou nt 800-848-8 990 (US)
Sales,
accounting, and
warranty
Get information about available systems,
pricing, orders, billing statements, warranty
service, or other non-technical issues.
www.gateway.com
800-827-6364 (US)
888-265-4357 (Canada)
800-846-2000 (US)
888-888-2037 (Canada)
311
Page 84

Chapter 17: Troublesho oting
T utoring and training
Gateway’s Technical Support professionals cannot provide hardware and
software training or tutorial services. Instead, Gateway recommends the
following tutoring and training resources.
Self-help
If you have how-to questions about using your Gateway-supplied hardware or
software, see the following resources:
■ The printed or online documentation that came with your hardware or
software. In many cases, additional product information and online
documentation for Gateway-supplied hard ware can be found in our Web
site’s Documentation Library
■ This user’s guide
■ The software publisher’s Web site
Help and
Support
For more how-to information about WindowsXP, click/tap
Start, then click/tap Help and Support.
Type the keyword practice in the Search box
, then click/tap the arrow.
Tutoring
For help on using hardware or software that came with your Gateway
convertible tablet PC, contact Gateway’s fee-based tutorial hotline:
■ 800-229-1103 (rate charged per minute; charged to a major credit card)
■ 900-555-4695 (rate charged per minute; charged to your telephone bill)
312
www.gateway.com
Page 85

Tutoring and training
Training
Gateway provides the following in-person and computerized training:
Resource Service description For more information
In-Store Trai ning at
Gateway stores
Gateway Learning
Libraries
Online Training
from
Learn@Gateway
Our friendly and knowledgeable software
trainers ca n teach yo u how to use the
Internet and the most popular software
programs, including M icr os oft W o rd, Ex ce l,
and PowerPoint.
A variety of courses and tutorials are
available on CD. Select from several
easy-to-use learning libraries.
More than 450 online courses are available
from Learn@Gateway. All you have to do is
go online and log in. You select the subject
matter, and the learning format (self-paced
tutorials or virtual classrooms), all from the
comfort of your convertible tablet PC.
www.gateway.com/store
www.gateway.com/training
www.learnatgateway.com/
www.gateway.com
313
Page 86

Chapter 17: Troublesho oting
314
www.gateway.com
Page 87

Safety,
Regulatory , and
Legal Information
Important safety
information
Y our Gateway system is designed and tested to meet the latest standards
for safety of information technology equipment. However, to ensure safe
use of this product, it is important that the safety instructions marked on
the product and in the documentation are followed.
Warning Always fol low these i nstruct ions to hel p
guard against personal injury and damage
to your Gateway system.
A
315
Page 88

Appendix A: Safety, Reg ulatory, and Legal I nformation
Setting up your system
■
Read and follow all instructions mar ked on the p roduct and in t he documentation before you
operate your system. Retain all safety and operating instructions for future us e.
■
Do not use this product near water or a heat source such as a radiator .
■
Set up the system on a stable work surface.
■
The product should be operated only from the type of power source indicated on the rating label.
■
If your computer has a voltage selector switch, make sure that the switch is in the proper position
for your area. The voltage selector switch is set at the factory to the correct voltage.
■
Openings in the computer case are provided for ventilation. Do not block or cov er these
openings. Make sure you provide adequate space, at least 6 inches (15 cm), around the system for
ventilation when you set up your work area. Never insert object s of any kind i nto the comp uter
ventilation openings.
■
Some products are equipped with a three-wire power cord to make sure that the product is
properly grounded when in use. The plug on this cord will fit only into a grounding-type outlet.
This is a safety feature. If you are unable to insert the plug into an outlet, contact an electr ician
to install the appropriate outlet.
■
If you use an extension cord with this system, make sure that the total ampere rating on the
products plugged into the extension cord does not exceed the extension cord ampere ratin g.
■
If your system is fitted with a TV Tuner, cable, or satellite receiver card, make su re that the
antenna or cable system is electrically grounded to provide some protection against voltage
surges and buildup of static charges.
Care during use
■
Do not walk on the power cord or allow anything to rest on it.
■
Do not spill anything on the system. The best way to avoid spill s is to avoid eating and drinking
near your system.
■
Some products have a replaceable CMOS battery on the system board. There is a danger of
explosion if the CMOS battery is replaced incorrectly . Replace the battery with the same or
equivalent type recommended by the manufacturer . Dispose of batteries according to the
manufacture r’ s ins truct ions.
■
When the computer is turned off, a small amount of electrical current still flows through the
computer . T o avoid electrical shock, always unplug all power cables and modem cables from the
wall outlets before cleaning the system.
■
Unplug the system from the wall outlet and refer servicing to qualified personnel if:
■
The power cord or p lug is da maged.
■
Liquid has been spilled into the system.
■
The system does not operate properly when the operating instructions are followed.
■
The system was dropped or the cabinet is damaged.
■
The system performance changes.
316
www.gateway.com
Page 89

Replacement parts and accessories
Use only replacement parts and accessories recommended by Gateway.
Important Do not use Gateway products in areas classified as
hazardous locations. Such areas include patient care
areas of medical and dental facilities, oxygen-laden
environmen ts, or indu strial fa cilities.
Warning To reduce the risk of fire, use only No. 26 AWG or larger
telecommunications line cord.
Important safety infor mation
www.gateway.com
317
Page 90

Appendix A: Safety, Reg ulatory, and Legal I nformation
Regulatory compliance
statements
Wireless Guidance
Low power, Radio transmitting type devices (radio frequency (RF) wireless communication
devices), may be present (embedded) in your notebook system. These devices may operate in the
2.4 GHz (i.e. 802.11B/G LAN & Bluetooth), 5.2 GHz (i.e. 802.11A LAN), and traditional cellular or
PCS cellular bands (i.e. Cellular data modem). The foll owing section is a general overview of
considerations while operating a wireless device.
Additional limitations, cautio ns, and concerns for specific count ries are listed in the specifi c
country sections (or country group sections). The wireless devices in your system are only qualified
for use in the countries identified by the Radio Approval Marks on the system rating label. If the
country you will be using the wireless device in, is not listed , please contact your local Radio
Approval agency for requirements. Wireless devices are closely regulated and use may not be
allowed.
The power output of the wireless device or devices that may be embedded in your notebook is well
below the RF exposure limits as known at this time. Because the wireless devices (which may be
embedded into your notebook) emit less energy than is allowed in radio frequency safety standards
and recommendations, Gateway believes these devices are safe for use. Regardless of the power
levels, care should be taken to minimize hu man contact during normal operatio n.
The wireless devices installed in this system are intended to be used indoors. In some areas, use of
these devices outdoors is prohibited.
Some circumstances require restrictions on wireless devices. Examples of common restrictions are
listed below:
318
Warning Radio frequency wireless communication can interfere
with equipment on commercial aircraft. Current aviation
regulations require wi rel es s devic es to be turne d off while
traveling in an airplane. 802.11B (also known as wireless
Ethernet or Wifi) and Blu etooth communicatio n devices are
examples of devices th at p rovide wirele ss co mmunic ation.
Warning In environments where the risk of interference to other
devices or services is harmf ul or perceived as harmful, the
option to use a wireless device may be restricted or
eliminated. Airports, Hospitals, and Oxygen or flammable
gas laden atmospheres are limited examples where use
of wireless devices m ay be restric ted or eliminat ed. When
in environments where you are uncertain of the sanction
to use wireless devices, ask the applicable authority for
authorization prior to us e or turning on the wireless devic e.
www.gateway.com
Page 91

Regulatory compli ance statements
Warning Every country has different restrictions on the use of
wireless devices. If your system is equipped with a
wireless device, when traveling between countries with
your system, check with the local Radio Approval
authorities prior to any move or trip for any restrictions on
the use of a wireless device in the destination country.
Warning If your system came equipped with an internal embedded
wireless device, d o not opera te the wi reless de vice unl ess
all covers and shields are in place and the system is fully
assembled.
Warning Wireless devices are not user serviceable. Do not modify
them in any way . Modi fication to a wirele ss device will void
the authorization to use it. Please contact Gateway for
service.
Warning Only use drivers approved for the country in which the
device will be used. See the Gateway Sys tem Res toration
Kit, or contact Gateway Technical Support for additional
information.
Warning In order to comply with FC C requirements transmitters
must not be operated (or co-located) in conjunction with
any other transmitter or ant enna installed in the convertible
tablet PC.
www.gateway.com
319
Page 92

Appendix A: Safety, Reg ulatory, and Legal I nformation
United States of America
Federal Communications Commission (FCC)
Intentional emitter per FCC Part 15
Low power, Radio transmitter type devices (radio frequency (RF) wireless communication devices),
operating in the 2.4 GHz band and/or 5.15 – 5.35 GHz band, may be present (embedded) in your
notebook system. This section is only applicable if these devices are present. Refer to the system
label to verify the presence of wireless devices.
Wireless devices that may be in your system are only qualified for use in the United States of
America if an FCC ID number is on the system label.
This equipment complies with FCC radio frequency electromagnetic signal (RF) exposure limits set
forth for an uncontrolled environment of a portable transmittin g device.
The wireless devices installed in this system are intended to be used indoors. In some areas, use of
these devices outdoors is prohibited.
Operation of this device is subject to the following two conditions: (1) This device may not cause
harmful interference, and (2) th is device must accept any interference received, including
interference that may cause undesired o peration of t he device.
Warning Wireless devices are not user serviceable. Do not modify
them in any way . Modi fication to a wirele ss device will void
the authorization to use it. Contact Gateway for service.
Warning The transmitting devi ce emb edded i n this sy stem may not
be used with any antenna other than provide with the
system.
Unintentional emitter per FCC Part 15
This device has been tested and found to comply with the limits for a Class B digital device,
pursuant to Part 15 of the FCC rules. These limits are designed to provide reasonable protection
against harmful interference in a resident ial installation. This equipment generates, uses , and can
radiate radio frequency energy and, if not installed and used in accordance with the instructions,
may cause harmful interference to radio or television reception. However , there is no guarantee
that interference will not occur in a par ticular installatio n. If this equipment does cause
interference to radio and television reception, which can be determined by turning the equipment
off and on, the user is encouraged to try to correct the interference by one or more of the following
measures:
■
Reorient or relocate the receiving an tenna
■
Increase the separation between the equipment and receiver
■
Connect the equipment into an outlet on a circuit different from that to which the receiver is
connected
■
Consult the dealer or an experienced radio/TV technician for help.
320
www.gateway.com
Page 93

Regulatory compli ance statements
Compliance Accessories: The accessories associated with this equipment are: shielded video cable
when an external monitor is connected. These accessories are required to be used in order to
ensure compliance with FCC rules.
FCC declaration of conformity
Responsible party:
Gateway Companies, Inc.
610 Gateway Drive, North Sioux City, SD 57049
(605) 232-2000 Fax: (605) 232-2023
Product:
■
Gateway M275
This device complies with Part 15 of the FCC Rules. Operation of this product is subject to the
following two conditions: (1) thi s device may not cause harmful inter ference, and (2) this device
must accept any interference recei ved, including in terference that may cause undesired oper ation.
Caution Changes or modifications not expressly approved by
Gateway could voi d t he FCC comp lianc e and negate yo ur
authority to operate the product.
www.gateway.com
321
Page 94

Appendix A: Safety, Reg ulatory, and Legal I nformation
T elecommunications per FCC part 68
(applicable to products fitted with USA modems)
Y our modem complies with Par t 68 of the Federal Communications Commission (F CC) rules. On
the computer or modem card is a label that contains the FCC registration number and Ringer
Equivalence Number (REN) for this device. If requested, this information must be provided to the
telephone company.
An FCC-compliant telephone line cord with a modular plug is requ ired for use with this device.
The modem is designed to be co nnected to the telephone network or premises wiring usin g a
compatible modular jack which is Part 68-compliant. See installation instructions for details.
The Ringer Equivalence Number (REN) is used to determine the number of devices which may be
connected to the telephone line. Excessive RENs on a telephone line may result in the devices not
ringing in response to an incoming call. In most areas, the sum of RENs should not exceed five
(5.0). To be certain of the number of devices that may be connected to a line, as determined by the
total RENs, contact the local telephone company.
If this device causes harm to the telephone network, th e telephone company will notify you in
advance that temporary discontinuance of service may be required. The telephone company may
request that you disconnect the equipment until the problem is resolved.
The telephone company may make changes in its facilities, equipment, operations, or procedures
that could affect the operation of this equipment. If this happens, the telephone company will
provide advance notice in order for you to make necessary modific ations to maintain
uninterrupted service.
This equipment cannot be used on telephone company-provided coin service. Connection to party
line service is subject to state tariffs. Contact the state public utility commission or public service
commission for information.
When programming or making test calls to emergency numbers:
■
Remain on the line and briefly explain to the dispatcher the reason for the call.
■
Perform such activities in the off-pe ak hours such as early morning or late evenings.
The United States Telep hone Consumer Protection Act of 1991 makes it unlawful for any person to
use a computer or other electronic device to send any message via a telephone fax machine unless
such message clearly contains, in a margin at the top or bottom of each transmitted page or on the
first page of the transmission, the date and time it is sent, an identificatio n of the business, other
entity, or other individual sending the message, and the telephone number of the sending
machine or such business, other entity, or individual. Refer to your fax communication software
documentation for details on how to comply with the fax-branding requi rement.
322
www.gateway.com
Page 95

Regulatory compli ance statements
Canada
Industry Canada (IC)
Intentional emitter per RSS 210
Low power, Radio transmitter type devices (radio frequency (RF) wireless communication devices),
operating in the 2.4 GHz band and/or 5.15 – 5.35 GHz band, may be present (embedded) in your
notebook system. This section is only applicable if these devices are present. Refer to the system
label to verify the presence of wireless devices.
Wireless devices that may be in your system are only qualified for use in Canada if an Industry
Canada ID number is on the system label.
This equipment complies with Industry Canada radio frequency electromagnetic signal (RF)
exposure limits set forth fo r an uncont rolled envir onment of a p ortable t ransmitting device
Operation of this device is subject to the following two conditions: (1) This device may not cause
harmful interference, and (2) th is device must accept any interference received, including
interference that may cause undesired o peration of t he device.
Warning To prevent radio interference to licensed service or
co-channel Mobile Satellite systems, this device is
intended to be operated indoors and away from windows
to provide maximum shielding. Equipment (or its transmit
antenna) that is ins talled o utdoors i s subject to licens ing.
Warning Wireless devices are not user serviceable. Do not modify
them in any way . Modi fication to a wirele ss device will void
the authorization to use it. Contact Gateway for service.
Warning The transmitting devi ce emb edded i n this sy stem may not
be used with any antenna other than provide with the
system.
Warning The 802.11A radio LAN your system may have been
equipped with operates in the same frequency range as
high power radar , which has pri ority use, and may dam age
the radio LAN if both are present and being used in the
same area.
www.gateway.com
323
Page 96

Appendix A: Safety, Reg ulatory, and Legal I nformation
Unintentional emitter per ICES-003
This digital apparatus does not exceed the Class B limits for radio noise emissions from digital
apparatus as set out in the radio interferenc e regulations of Industry Canada.
Le présent appareil numérique n’émet pas de bruits radioélectriques dépassant les limites
applicables aux appareils numériques de Classe B prescrites dans le règlement sur le brouillage
radioélectrique édicté par Industrie Canada.
T elecommunications per Industry Ca nada CS-03
(for products fitted with an IC-c ompliant modem)
The Industry Canada label identifies certified equ ipment. This certific ation means that the
equipment meets certain telecommunications network protective, operatio n, and safety
requirements. The Department does not gua rantee the equi pment will operate to the users’
satisfaction.
Before installing this equipment, users should make sure that it is permissible to be connected to
the facilities of the local telecommunications company . The equipment must also be installed
using an acceptable method of connection. In some cases, the inside wiring associated with a
single-line individual service may be extended by means of a certified connector assembly. The
customer should be aware that compliance with the above conditions may not prevent
degradation of service in some situations.
Repairs to certified equipment should be made by an authorized Canadian mainten ance facility
designated by the supplier. Any repairs or alterations made by the user to this equipment, or
equipment malfunctions, may give the telecommunications company cause to request the user to
disconnect the equipment.
Users should make sure, for their own protection, that the electrical ground connections of the
power utility , telephone lines, and internal metalli c water pipe system, if present, are connected
together . This precaution may be particula rly important in rural areas.
Warning To avoid electrical shock or equipme nt mal f unc ti on do not
attempt to make el ectrical gro und connec tions by yo urself.
Contact the appropriate inspection authority or an
electrician, as appropriate.
The Ringer Equi valence Numbe r (REN) assigned to each terminal device provides an indication of
the maximum number of terminals allowed to be connected to a telephone interface. The
termination on an interface may consist of any combination of devices subject only to the
requirement that the sum of the Ringer Equivalence Numbers of all the devices does not exceed 5.
324
www.gateway.com
Page 97

Regulatory compli ance statements
Mexico
Intentional emitter
Low power, Radio transmitter type devices (radio frequency (RF) wireless communication devices),
operating in the 2.4 GHz band, may be present (embedded) in your notebook system. This section
is only applicable if these devices are present. Refer to the system label to verify the presence of
wireless devices.
Wireless devices that may be in your system are only qualified for use in Mexico if a COFETEL ID is
on the system label.
This equipment complies with radio frequency electromagnetic signal (RF) exposure limits for an
uncontrolled environment of a portable transmitting device.
Unintentional emitter
At this time there are no mandatory requirements for Unintentional Emitt ers. However , this device
does comply with multiple requirements for other countries and regions as listed on the system
label and in the user’s manual.
Laser safety statement
All Gateway systems equipped with CD and DVD drives comply with the appropriate safety
standards, including IEC 825. The laser devices in these components are classified as “Class 1 Laser
Products” under a US Depart ment of Health and Human Services (DHHS) Radiation Performanc e
Standard. Should the unit ever need servicing, contact an authorized service location.
Warning Use of controls or adjustments or performance of
procedures other than those spec ifi ed in thi s ma nual may
result in hazardous radiation exposure. To prevent
exposure to laser beam s, do n ot try to op en the e nclos ure
of a CD or DVD drive.
California Proposition 65 Warning
Warning This product contains chemicals, inc lud ing lead, known to
the State of California to ca use cancer and/or bi rth defects
or reproductive harm.
www.gateway.com
325
Page 98

Appendix A: Safety, Reg ulatory, and Legal I nformation
Notices
Copyright © 2003 Gateway, Inc.
All Rights Reserved
14303 Gateway Place
Poway, CA92064 USA
All Rights Reserved
This publication is protected by copyright and all rights are reserved. No part of it may be reproduced or
transmitted by any means or in any form, without prior consent in writing from Gateway.
The information in this manual has been carefully checked and is believed to be accurate. However, changes are
made periodically. These changes are incorporated in newer publication editions. Gateway may improve and/or
change products described in this publication at any time. Due to continuing system improvements, Gateway is
not responsible for inaccurate information which may appear in this manual. For the latest product updates,
consult the Gateway Web site at www.gateway.com
special, exemplary, incidental, or consequential damages resulting from any defect or omission in this manual,
even if advised of the possibility of such damages.
In the interest of continued product development, Gateway reserves the right to make improvements in this
manual and the products it describes at any time, without notices or obligation.
Trademark Acknowledgments
1-800-GATEW A Y , ActiveCPR, ALR, AnyKey, black-and-white spot design, CrystalScan, Destination, DestiVu, EZ
Pad, EZ Point, Field Mouse, Gateway 2000, Gateway Country, gateway .net, Gateway stylized logo, Perfect
Scholar, Solo, TelePath, Vivitron, stylized “G” design, and “You’ve got a friend in the business” slogan are
registered trademarks and black-and-white spotted box logo, GATEWA Y, Gateway Astro, Gateway@Work,
Gateway Connected touch pad, Gateway Connected music player, Gateway Cyber:)Ware, Gateway
Education:)Ware, Gateway Flex Case, Gateway Gaming:)Ware, Gateway GoBack, Gateway Gold, Gateway
Learning:)Ware, Gateway Magazine, Gateway Micro Server, Gateway Money:)Ware, Gateway Music:)Ware,
Gateway Networking Solutions, Gateway Online Network (O.N.) solution, Gateway Photo:)Ware, Gateway
Professional PCs, Gateway Profile, Gateway Solo, green stylized GATEWA Y, green stylized Gateway logo,
Gateway T eacher:)Ware, Gateway V ideo:)Ware, HelpSpot, InforManager , Just click it!, Learn@Gateway , Kids
BackPack, SERVE-TO-ORDER, Server Watchdog, the Spotted G Gateway Logo and the Spotted G Logo,
SpotShop, Spotshop.com, and Your:)W are are trademarks of Gateway , Inc. Intel, Intel Inside logo, and Pentium
are registered trademarks and MMX is a trademark of Intel Corporation. Microsoft, MS, MS-DOS, and Windows
are trademarks or registered trademarks of Microsoft Corporation. All other product names mentioned herein are
used for identification purposes only, and may be the trademarks or registered trademarks of their respective
companies.
. In no event will Gateway be liable for direct, indirect,
Macrovision statement
If your computer has a DVD drive and an analog TV Out port, the following paragraph applies:
This product incorporates copyright protection technology that is protected by method claims of certain U.S.
patents and other intellectual property rights owned by Macrovision Corporation and other rights owners. Use of
this copyright protection technology must be authorized by Macrovision Corporation, and is intended for home
and other limited viewing uses only unless otherwise authorized by Macrovision Corporation. Reverse
engineering or disassembly is prohibited.
326
www.gateway.com
Page 99

Index
A
AC adapter
connecting
connector 6, 280
damaged 19
defective 20
international adapters 176
troubleshooting 306
AC-3 digital audio jack 280
access point networ k 216
accessories
purchasing
safety precautions 317
accounts
America Online
ISP 81
user 205
acoustic handset coupler 186
ad hoc networking 218, 219
adding
icons to desktop
user accounts 205
See also installing
address
e-mail
Web 84
airplane power adapter 13
alarms 178, 180
America Online 82
application key 28, 29
arrow keys 28, 29
AU file 107
audio
adjusting volume
digital jack 280
headphone jack 4, 280
microphone jack 3, 8, 280
muting 31, 102
playing 105, 107, 108, 114
recording 105
19
13
81
61
86
31
streaming 209
troubleshooting 308
volume down button 31
volume up button 31
audio CD
adding track s to librar y
copying 134
creating 130
editing track information 120
playing with MusicMatch 116
See CD
audio file
streaming
automobile power adapter 13
AVI file 107
209
121
B
background 197
backing up files 152, 242
battery 13
alarm options 178, 180
alternate power sources 176
bay 7, 172
changing 172
charge indicator 20, 26, 168
charge status 168
charging 19, 169
conserving power 176
icons 168
installing 172
installing secondary 174
latch 7
managing power 176
monitoring charge 168
recalibrating 170
recharging 19, 169
release latch 7
safety guidelines 17
secondary 2, 174
storing 230
327
Page 100

bays
battery
CD drive 2, 110
diskette drive 110
DVD drive 2, 110
DVD/CD-RW drive 2, 110
DVD-RW/CD-RW drive 2, 110
hard drive 7, 273
memory 7, 261
memory card reader 110
module 2, 110
second har d drive 2, 110
secondary batte ry 174
BIOS Setup utility 170, 188
break system key 30
brightness
adjusting
brightness system keys 28, 30, 31
broadband Internet connection 49, 80,
7, 172
192
208
browser
81, 83
Web
browsing for files and folders 70
buttons
programming
security 303
setting functions 295
button-tapping 41
201
C
cable lock
convertible tablet PC
port replicator 284
using while traveling 188
cable modem 49, 80, 212, 216
calibrating 42, 305
camera
See digital camera
See digital video camera
Caps Lock indicator
capturing video 158
cards
adding memory card
3, 5, 278
27
155
adding PC Card 258
inserting memory card 155
inserting PC Card 258
installing memory card 155
installing PC Card 258
memory card slots 3, 154
PC Card eject button 259
PC Card slot 3
reinstalling PC Card 258
removing memory card 155
removing PC Card 258
replacing memory card 155
replacing PC Card 258
troubleshooting memory card 298
troubleshooting PC Card 304
care and maintenance 190, 230
carrying case 13
CD
adding tracks to your library
cleaning 293
copying 134, 142
creating audio 130, 148
creating data 125, 138
creating label 152
creating music 130, 148
editing track information 120
inserting 113
playing audio with MusicMatch 116
playing mu sic 114
troubleshooting 291
CD Copier 134
CD drive
See DVD drive
CD-RW
See CD
CD-RW drive
See DVD/CD-RW drive
cellular telephone
memory cards
Certificate of Authenticity 11
changing bay mo dules 110
cleaning
audio CD
154
293
121
328
 Loading...