

Page 1

Creating CDs using Nero Ex press
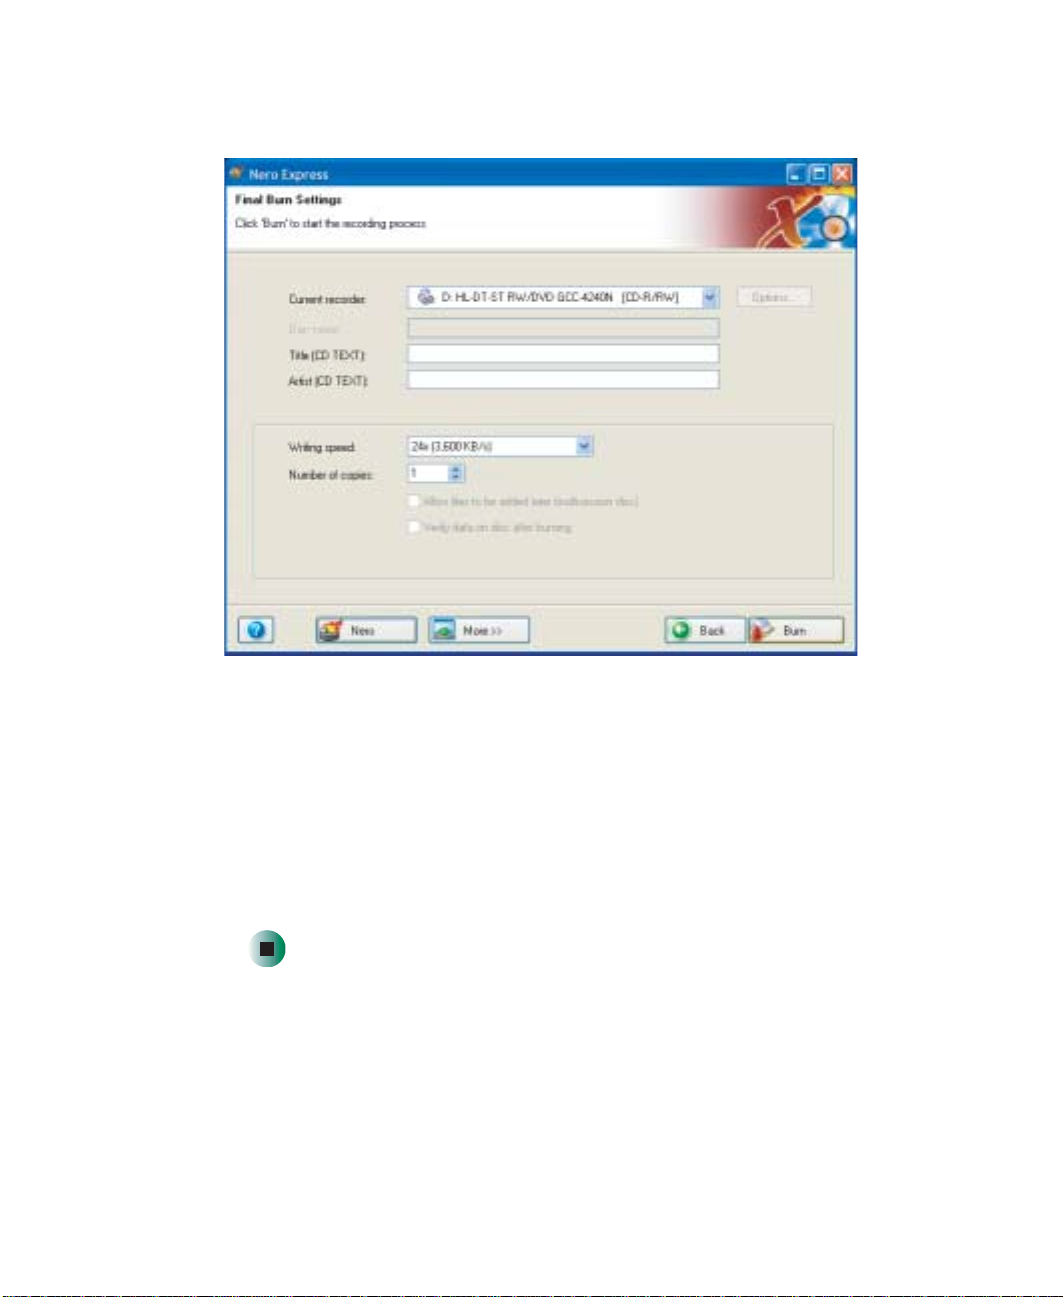
9 Click/Tap Next. The Final Burn Settings screen opens.
10 Click/Tap the arrow to open the Current recorder list, then click/tap your
recordable drive.
11 Click/Tap Burn. The Burning Process screen opens and Nero Express burns
the files to the CD.
12 When a message tells you that the recording is complete, click/tap OK.
13 Click/Tap Next to return the main Nero Express screen.
14 Click/Tap Exit.
www.gateway.com
141
Page 2
Chapter 7: Using Multim edia
Copying a CD
To copy a music CD or data CD:
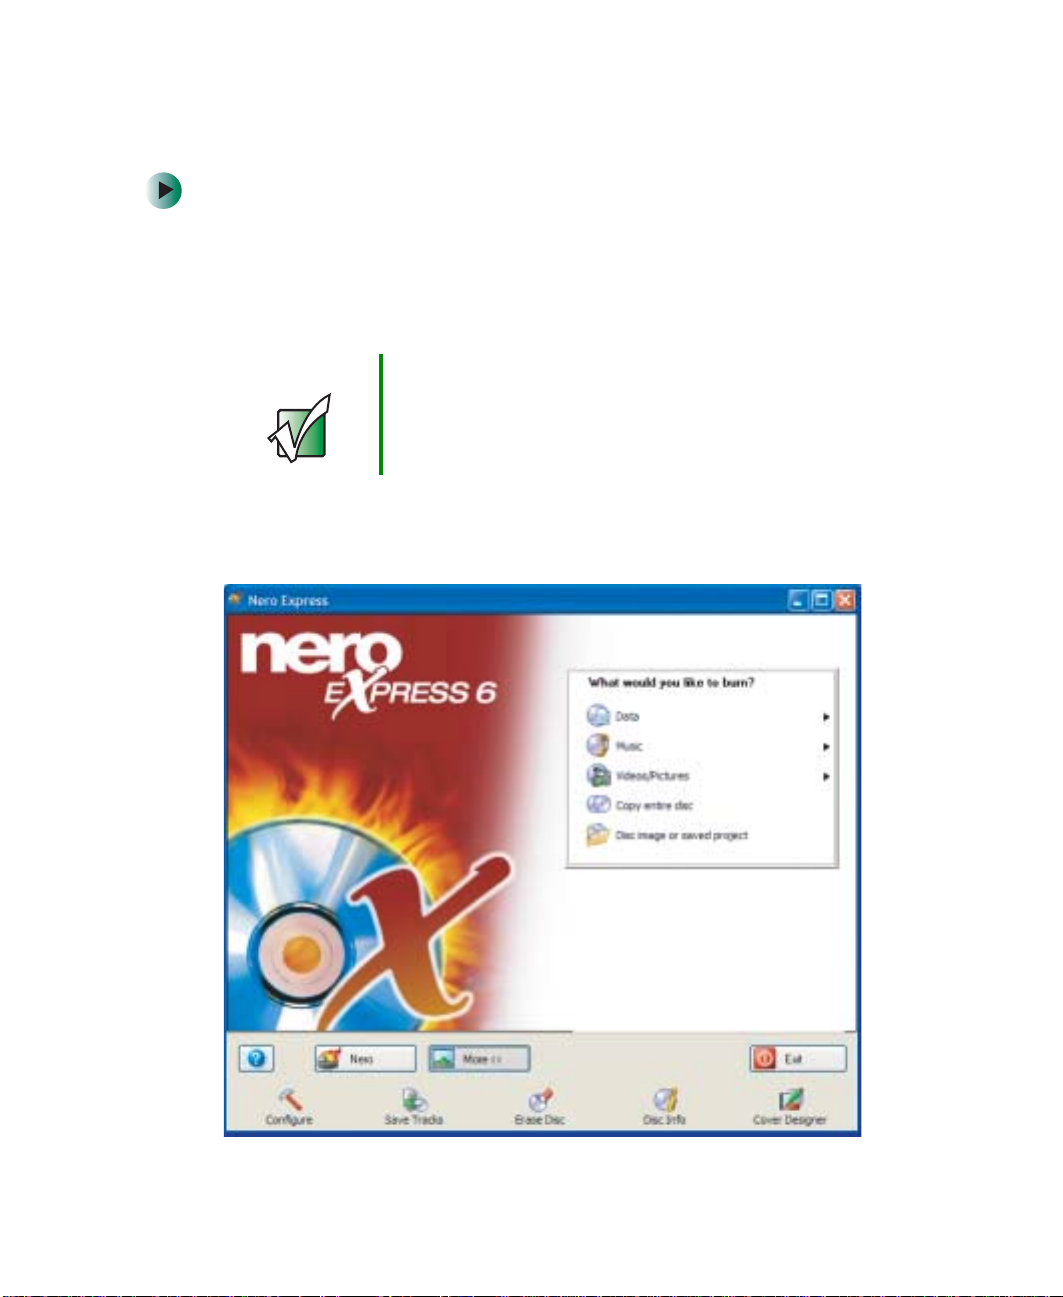
1 Click/Tap Start, All Programs, Burn a CD or Data DVD, Nero Programs, then
click/tap
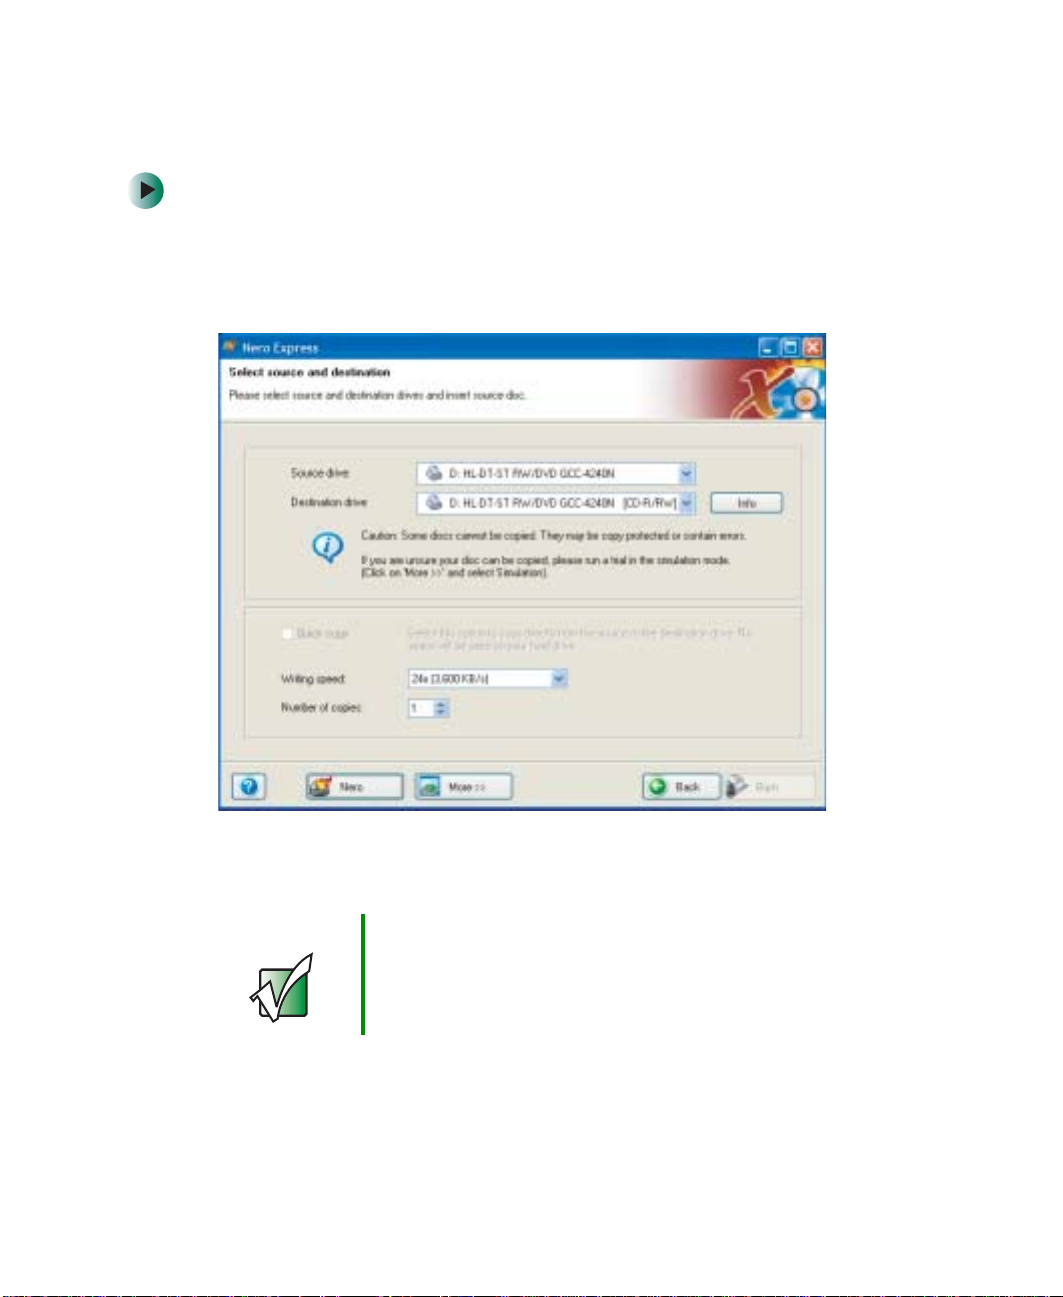
2 Click/Tap Copy entire disc. The Select source and destination screen opens.
Nero Express. Nero Express opens.
142
3 Insert the music CD or data CD you want to copy into your recordable
drive.
Important If the drive you want to use is not in the modular bay, you
need to swap modules. For more information about
swapping modules, see “C hangin g mo dules ” on pa ge 1 10.
4 Click/Tap the arrow to open the Source drive list, then click/tap the drive
that contains your source disc.
www.gateway.com
Page 3
Creating CDs using Nero Ex press
5 Click/Tap the arrow to open the Destination drive list, then click/tap your
recordable drive.
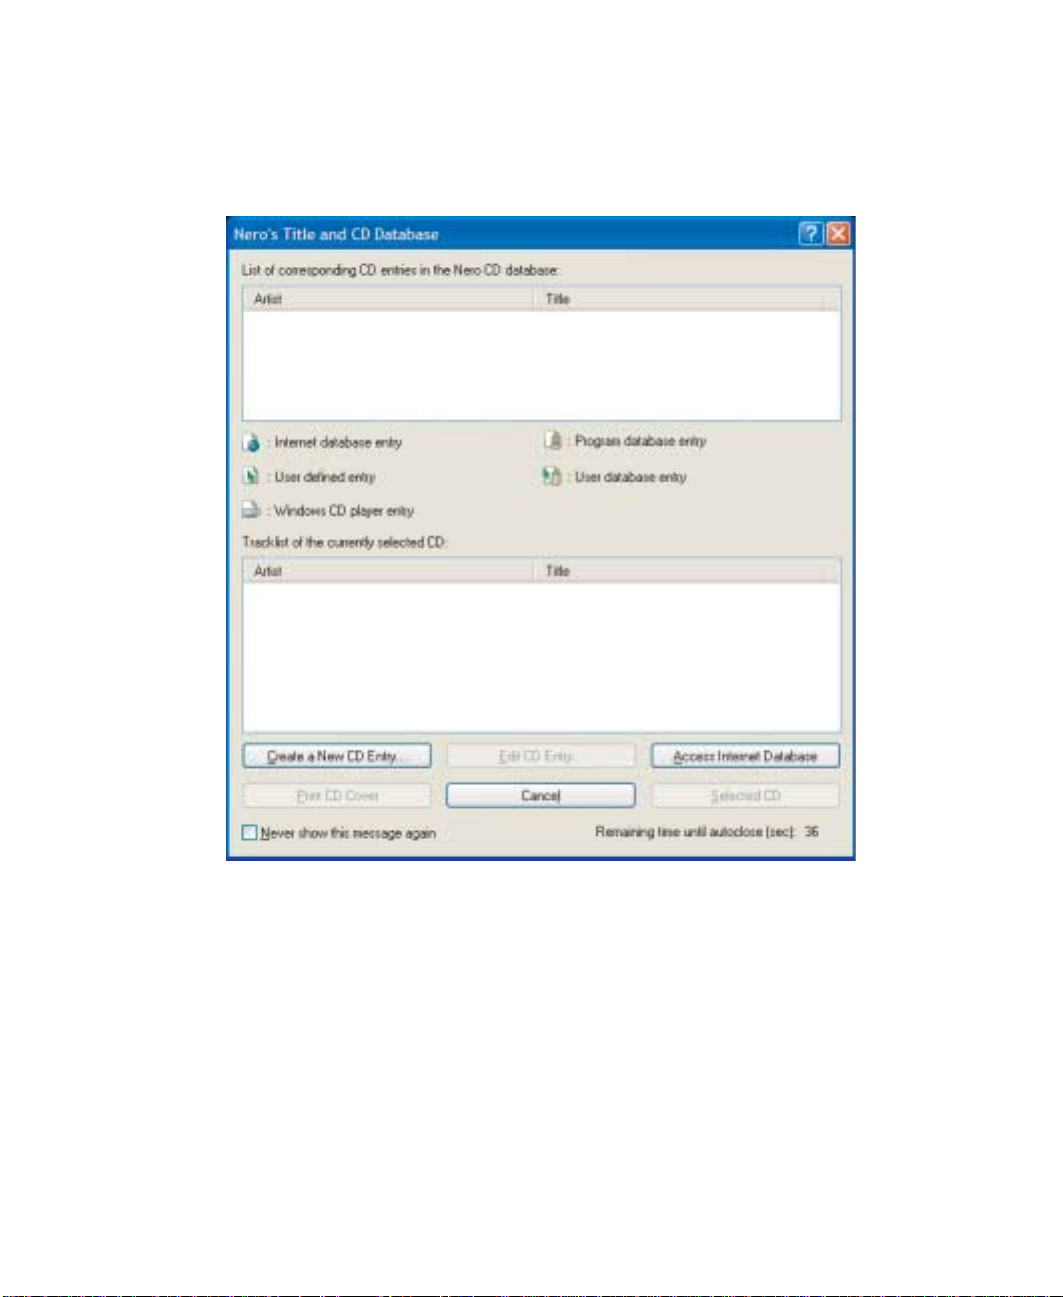
6 Click/Tap Burn. The Nero’s Title and CD Database dialog box opens.
www.gateway.com
143
Page 4
Chapter 7: Using Multim edia
7 Wa it until the dialog box closes.
- OR Click/Tap
The Burning Process screen opens. Nero Express copies the tracks or files to
your hard drive.
Cancel.
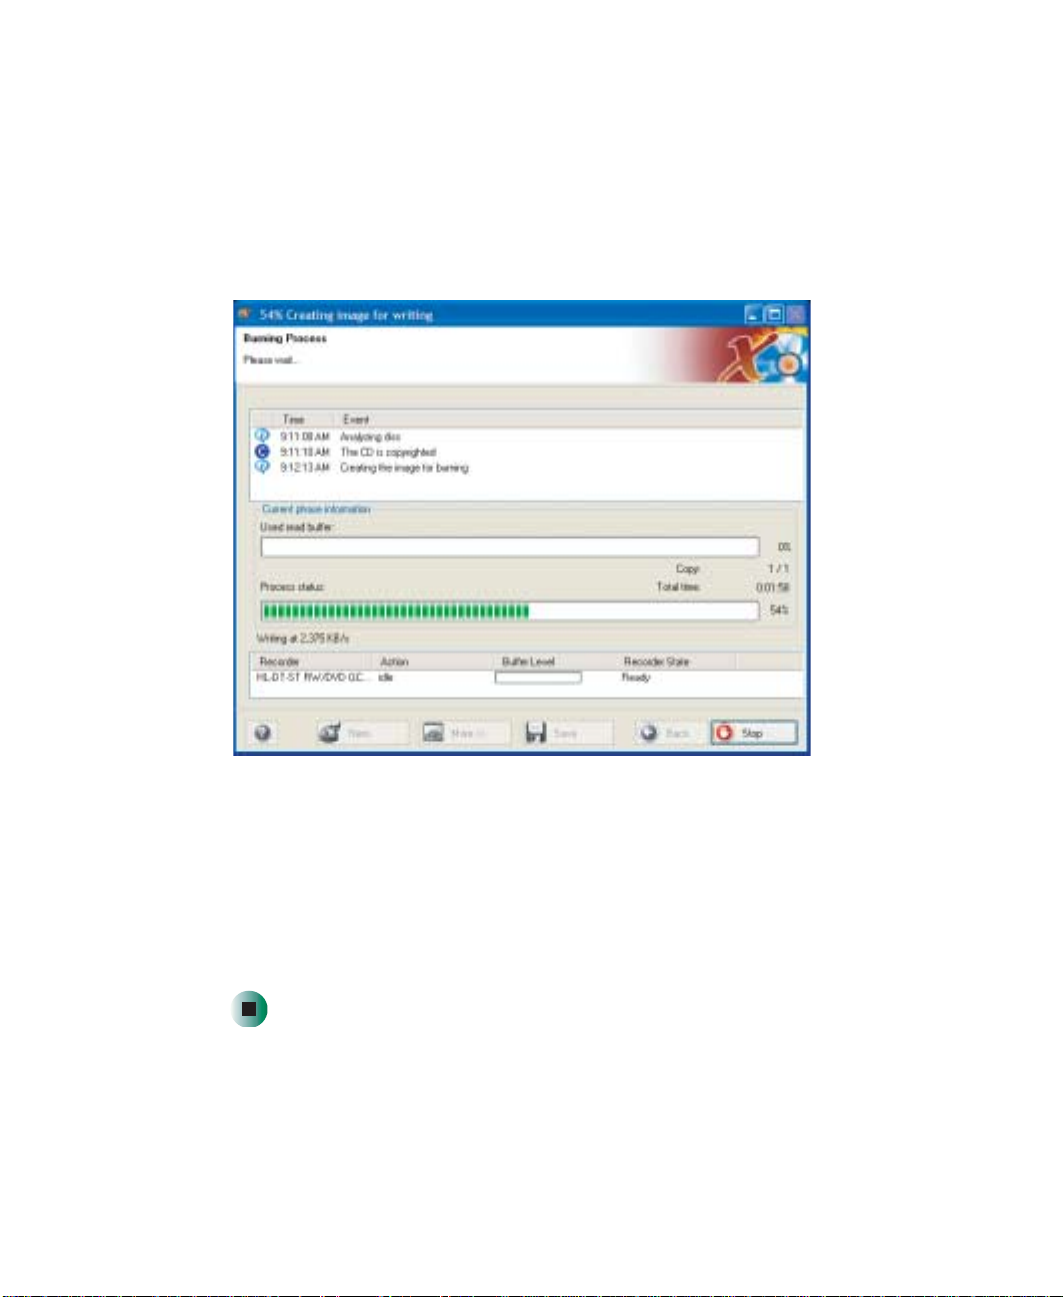
8 A message prompts you to insert a CD. Remove the source CD, insert a
blank, writable CD, then wait for the message box to close. Nero Express
copies the files from your hard drive to the writable CD.
9 When a message tells you that the recording is complete, click/tap OK.
10 Click/Tap Next to return to the main Nero Express screen.
11 Click/Tap Exit.
144
www.gateway.com
Page 5
Copying music tracks
To copy music CD tracks to your hard drive:
1 Click/Tap Start, All Programs, Burn a CD or Data DVD, Nero Programs, then
click/tap
2 Insert the music CD that has the tracks you want to copy into your CD
drive.
Important If the drive you want to use is not in the modular bay, you
3 If an Audio CD dialog box opens, click/tap T ake no actio n, then click/tap OK.
4 Click/Tap More. The Nero Toolbar opens.
Nero Express. Nero Express opens.
need to swap modules. For more information about
swapping modules, see “C hangin g mo dules ” on pa ge 1 10.
Creating CDs using Nero Ex press
www.gateway.com
145
Page 6

Chapter 7: Using Multim edia
5 Click/T a p the Save T racks icon. The Nero’ s T itle and CD Database di alog bo x
opens.
146
6 Wa it until the dialog box closes.
- OR Click/Tap
Cancel.
www.gateway.com
Page 7
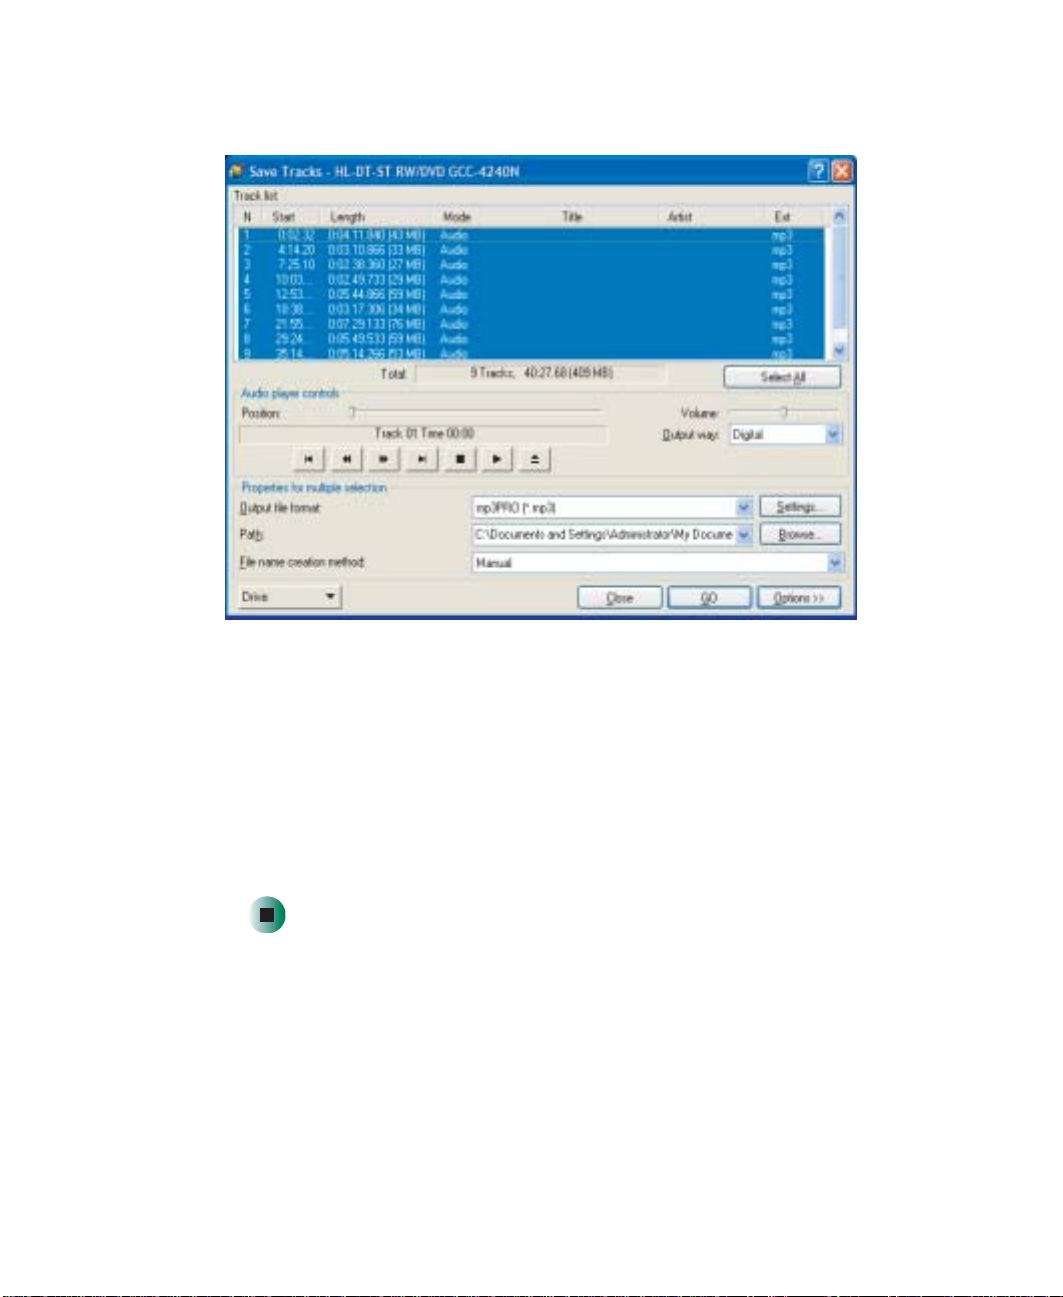
Creating CDs using Nero Ex press
7 If a message box opens, click/tap OK. The Save Tracks dialog box open s.
8 Click/T ap the arrow button to open the Output file format list, then click/tap
the format you want for the saved tracks.
9 To record all the tracks, click/tap GO. The recording process begins.
- OR T o record selected tracks, hold down the C
want, then click/tap
GO. The recording process begins.
TRL key, click/tap the tracks you
10 After the recording is complete, click/tap Close.
www.gateway.com
147
Page 8

Chapter 7: Using Multim edia
Creating a musi c CD
To create a music CD:
1 Click/Tap Start, All Programs, Burn a CD or Data DVD, Nero Programs, then
click/tap
2 Insert a blank, writable CD into your recordable d rive.
Important If the drive you want to use is not in the modular bay, you
3 If a dialog box opens, cl ick/tap Take no action, then click/tap OK.
4 Move your pointer over Music, then click/tap one of the following options:
■ Audio CD to create a music CD that will play on all CD players. Nero
■ Audio and Data CD to create a CD that contains tracks and data files.
Nero Express. Nero Express opens.
Express converts MP3 and WMA files to Audio CD format.
You can play the music files in a CD player and you can view all files
on your convertible tablet PC.
need to swap modules. For more information about
swapping modules, see “C hangin g mo dules ” on pa ge 1 10.
148
■ MP3 Disc to create a CD using MP3 fi les. You can play the CD o n yo ur
convertible tabletPC or a player that supports MP3 files.
■ WMA disc to create a CD using WMA files. You can play the CD on
your convertible tablet PC or a player that supports WMA files.
www.gateway.com
Page 9
The screen you use to add files opens.
Creating CDs using Nero Ex press
www.gateway.com
149
Page 10

Chapter 7: Using Multim edia
5 Click/Tap Add. The Select Files and Folders dialog box opens.
150
6 Browse to the folder that contains the files you want to add. You can
click/tap the arrow to open the
or you can click/tap folders in the
to select multiple files.
Location list, then click/tap a drive or folder,
Name list. Press and hold the CTRL key
7 Click/Tap Add. You can continue to select files and click/tap Add.
8 After you select all your files, click/tap Finished.
www.gateway.com
Page 11
Creating CDs using Nero Ex press
9 Click/Tap Next. The Final Burn Settings screen opens.
10 Click/Tap the arrow to open the Current recorder list, then click/tap your
recordable drive.
11 Click/Tap Burn. The Burning Process screen opens and Nero Express burns
the files to the CD.
12 When a message tells you that the recording is complete, click/tap OK.
13 Click/Tap Next to return the main Nero Express screen.
14 Click/Tap Exit.
www.gateway.com
151
Page 12

Chapter 7: Using Multim edia
Advanced features
In addition to Nero Express, you can use:
■ Nero BackItUp to create a backup of files on your hard drive, then use
BackItUp to restore the files you backed up in case of a hard drive failure,
virus, or other problem.
■ Nero CD-DVD Speed to test your DVD and DVD/CD-RW drives for transfer
rates, load and eject times, seek and access times, and more.
■ Nero Cover Designe r to create labels for y our CDs and DVDs , covers for
your CD and DVD cases, booklets to include with your CDs and DVDs,
and more.
■ Nero DriveSpeed to control DVD or D VD/CD-RW drive read speed and
spin down time.
■ Nero InfoTool to find out about your drive capabilities and your
convertible tablet PC configuration.
To use these programs, click/tap
Programs
For more information, see the online help in the programs and the online user’s
guides. To access the user’s guides, click/tap
Data DVD
, then click/tap the program you want.
, User’s Guides, then click/tap the guide you want.
Start, All Programs, Burn a CD or Data DVD, Nero
Start, All Programs, Burn a CD or
Using the optional diskette drive
A diskette drive uses 3.5-inch diskettes (sometimes called floppy disks). Diskettes
are useful for storing files or transferring files to another computer.
Warning Do not expose diskettes to water or magnetic fields.
Exposure could damage the data on the diskette.
152
www.gateway.com
Page 13

Using the optional dis kette drive
Tips & Tricks If you need to use a diskette drive , Gateway recom mends
purchasing a USB diskette drive. To order a USB diskette
drive, visit the Accessory Store at
accessories.gateway.com
.
Diskette activity indicator
Diskette eject button
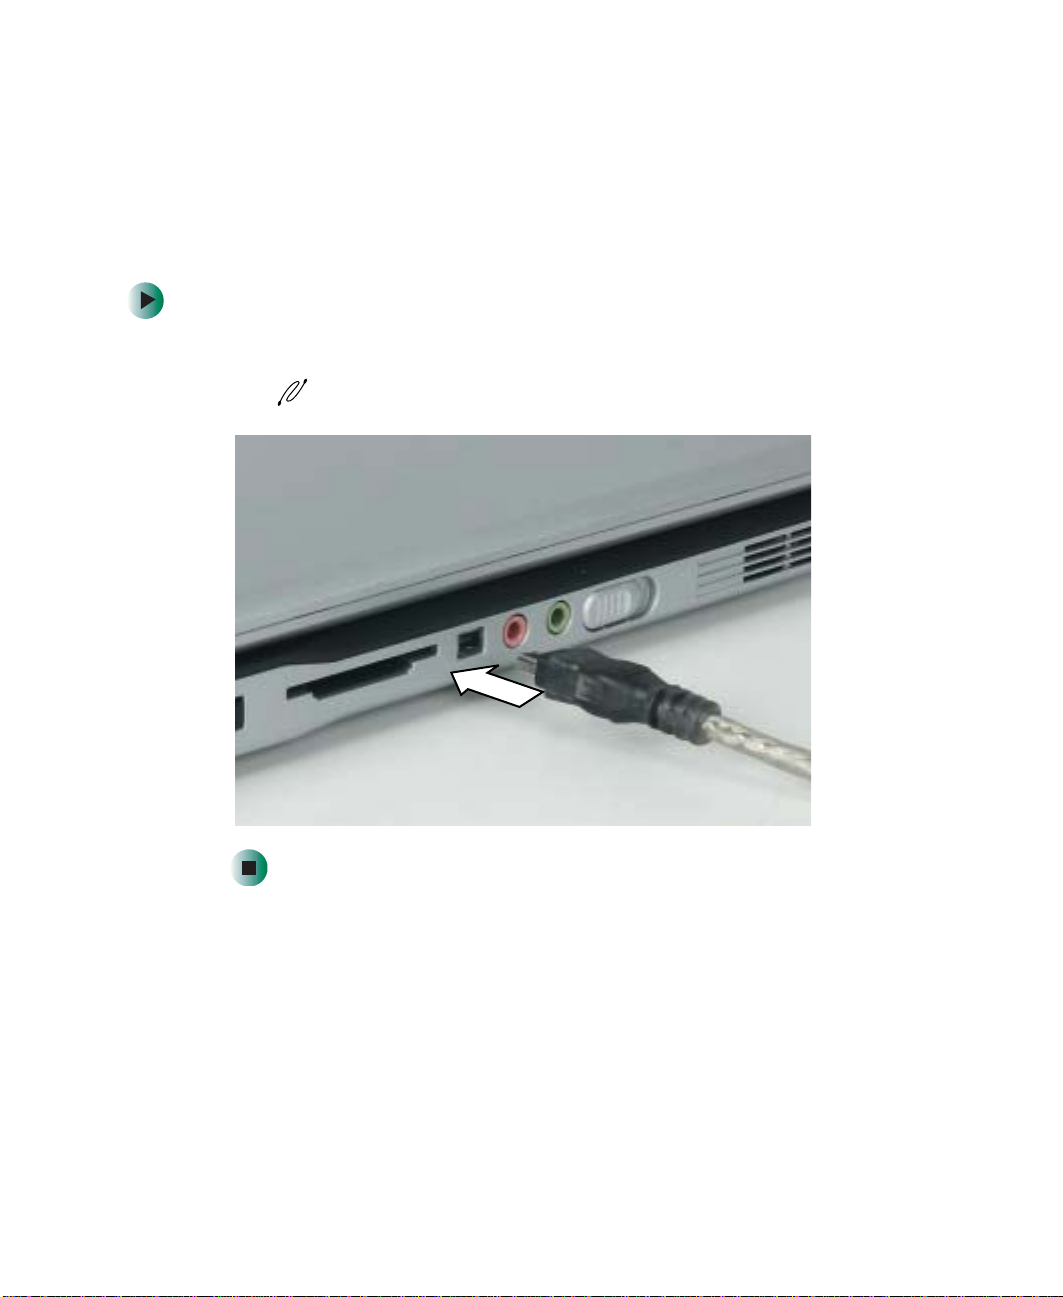
To use a disk ette:
1 Plug the diskette drive into a USB port on your convertible tablet PC or
port replicator. For the location of your USB ports, see “Back” on page 6,
“Left side” on page 279, and “Back” on page 280.
2 Insert the diskette into the diskette drive with the label facing up.
3 To access a file on the diskette, click/tap Start, then click/tap My Computer.
Double-click/Double-tap the drive letter (for example, the A: drive), th en
double-click/double-tap the file name.
4 To remove the diskette, make sure that the diskette activity indicator is
off, then press the diskette eject button.
www.gateway.com
153
Page 14

Chapter 7: Using Multim edia
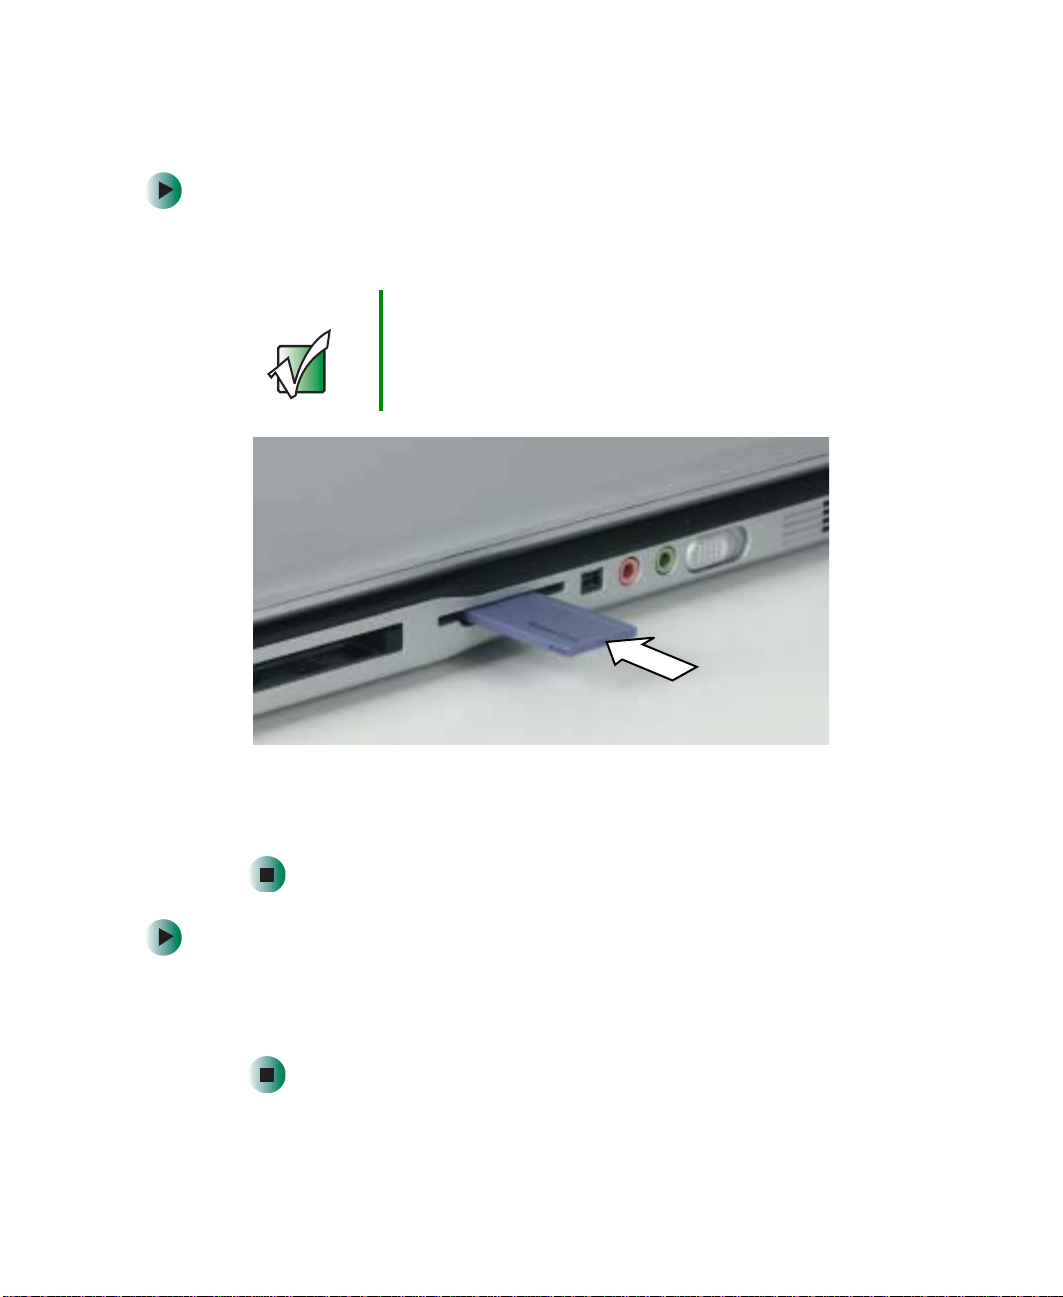
Using the memory card reader
You can use memory cards to transfer pictures from a digital camera to your
convertible tablet PC. You can also use the memory card reader to transfer data
between your convertible tablet PC and a device that uses memory cards, such
as a PDA, MP3 player, or cellular telephone.
Memory card types
The memory card reader supports the following card types:
■ Memory Stick
■ MultiMediaCard™
■ Secure Digital™
■ SmartMedia™ (3.3V only)
®
154
www.gateway.com
Page 15
Using a memory card
To insert a memor y card:
1 Insert the memory card into the memory card slot with the label facing
up and the arrow on the label pointing towards your convertible tablet PC.
Important Insert the SmartMedia card with the label facing down.
Your convertible tablet PC only accepts 3.3V SmartMedia
cards.
Using the memory card read er
2 To access a file on the memory card, cl ick/tap Start, then click/tap My
Computer
drive), then double-click/double-tap the file name.
To remove a memor y card:
■ Make sure that the memory card reader status indicator (see “LCD panel
status indicators” on page 25) is off, then pull the memory card out of your
convertible tablet PC.
. Double-click/Double-tap the drive letter (for example, the E:
www.gateway.com
155
Page 16

Chapter 7: Using Multim edia
Important Do not use the remove hardware icon in the taskbar
to remove the memory card.
Connecting a digital camera
You can connect most digital cameras to your convertible tablet PC’s USB port
to transfer pictures.
To connect a digital camera:
1 Connect one end of the USB cable to your digital camera, and connect
the other end of the cable to the USB port on the right side of your
convertible tablet PC.
156
www.gateway.com
Page 17
Connecting a digital camera
2 Use the program that came with your digital camera to transfer the pictures
to your convertible tablet PC.
-ORUse the Scanner and Camera Wizard to transfer the pictures to your
convertible tablet PC.
-ORIf your digital camera appe ars as a drive on your co nvertible tablet PC in
the My Computer window, see “Working with files and folders” on page 64
for information about moving files to your hard drive.
Help and
Support
Tips & Tricks See Do More With Gateway for more information about
For more information about using the Scanner and
Camera Wizard, click/tap Start, then click/tap Help and
Support.
Type the keyword digital picture in the Search box
, then click/tap the arrow.
using your convertible tablet PC to edit, store, and print
digital photos. Click/Tap Start, then click/tap Do More
With Gateway. If you are in the Business Solutions vi e w,
click/tap Consumer Solutions. Click/Tap Digital Photos.
www.gateway.com
157
Page 18
Chapter 7: Using Multim edia
Connecting a digital video camera
Your convertible tablet PC has an IEEE 1394 (also known as Firewire or i.Link)
port that can be used to connect to a digital video camera. To find the location
of the IEEE 1394 port, see “Left Side” on page 3.
To connect a digital video camera:
■ Connect one end of the IEEE 1394 cable to your external source, such as
a video camera, and connect the other end of the cable to the IEEE 1394
port on the side of your convertible tablet PC.
158
www.gateway.com
Page 19
Editing videos
Pinnacle Expression is a video capture program that lets you capture and edit
full-motion video, single images, and audio through the IEEE 1394 port. You
can also use Pin nacle E xpr ession to cre ate video DVDs. For more information
about using the Pinnacle Expression, see its online help.
To edit a video:
1 Click/Tap Start, All Programs, Pinnacle Expression, then click/tap
Pinnacle Expression. The program starts.
2 Use Pinnacle Expression to edit your video.
Important If Pinnacle Expression is not on your Start menu, install it
from the Pinnacle Expression CD. Insert the CD into your
DVD drive and follow the instructions in the setup wizard.
For more information on using Pinnacle Expression, see
its online help and the onlin e guide located on the prog ram
CD.
Editing videos
Tips & Tricks See Do More With Gateway for more information about
using your convertible tablet PC to edit videos. Click/Tap
Start, then click/tap Do More With Gateway. If you are
in the Business Solutions view, click/tap Consumer
Solutions. Click/Tap Digital Video.
www.gateway.com
159
Page 20

Chapter 7: Using Multim edia
Viewing the display on a projector
or monitor
You can use your notebook for giving presentations by connecting an external
monitor or projector to your monitor (VGA) port. Your notebook supports
simultaneous LCD and CRT display. Simultaneous display allows you to control
the presentation from your notebook and at the same time face your audience.
To use a pr ojector or external monitor:
1 Turn off your convertible tablet PC.
2 Plug the projector or monitor cable into the VGA port on your convertible
tablet PC or port replicator. For the location of the VGA p ort, see “Back”
on page 6 and “Back” on page 280.
3 Turn on your convertible tablet PC.
4 Plug the projector’s or monito r’s power cord into an AC power source and
turn it on. Windows XP recognizes the new hardware and sea rches for its
driver. You may need to install the driver from the disc supplied by the
projector’s or monitor’s manufacturer or download the driver from the
manufacturer’s Web site.
160
5 After the driver is installed, right-click/button-tap any empty space on the
desktop, then click/tap
Properties. The Display Properties dialog box opens.
www.gateway.com
Page 21

Viewing the display o n a projector or monit or
6 Click/Tap the Settings tab.
7 Right-click/Button-tap the s econd mo nitor icon (labeled 2), then click/tap
Attached.
8 Click/Tap Apply.
9 Adjust properties such as Screen Re solution or Color Quality if necessary.
10 Click/Tap OK.
Important Press FN+F3 to s witch between vi ewing the display o n the
LCD panel and viewing the display on the projector or
monitor.
Important If an external monitor or projector is connected, your
convertible tablet PC turns off the LC D panel, but do es not
enter Standby mode, when the LCD panel is closed.
www.gateway.com
161
Page 22

Chapter 7: Using Multim edia
Viewing the display on a television
The S-Video out jack on your optional port replicator lets you view your
convertible tablet PC display on a television scre en using a standard S-Video
cable.
Important T o turn on ex ternal v ideo by defa ult, conn ect the te levisio n
(or other external video device) before starting your
convertible tablet PC.
Important Audio is not transmitted through th e S-Vi deo out jack. U se
the built-in speakers, a set of headphones or external
powered speakers, or connect your convertible tablet PC
to a stereo system using the S/PDIF jack to hear sound
while playing a DVD. DVD playback to a VCR will be
scrambled by copyright protection software.
To view your c onvertible tablet PC display on a television:
162
1 With your convertible tablet PC off, connect one end of a standard S-Video
cable to the S-Video out jack on your port replicator. For the location of
the S-Video out jack, see “Back” on page 280.
2 Connect the other end of the cable to the Video in jack on your television
or VCR.
3 Turn on the television or VCR.
4 Start your convertible tablet PC.
5 Click/Tap Start, then click/tap Control Panel. The Control Panel window
opens. If your Control Panel is in Category View, click/tap
Themes
.
Appearance and
6 Click/Double-click/Tap/Double-tap the Display icon. The Display Properties
dialog box opens.
www.gateway.com
Page 23

Viewing the displ ay on a television
7 Click/Tap the Settings tab.
8 Click/Tap Advanced. The Multiple Monitors a nd Intel Prop erties dialog box
opens.
9 Click/Tap the Intel Extreme Graphics tab.
10 Click/Tap the Graphics Properties button. The Intel Graphics Controller
Properties dialog box opens.
www.gateway.com
163
Page 24

Chapter 7: Using Multim edia
11 Click/Tap the Television button.
Important If the Television button is grayed out, your convertible
tablet PC has not detected the television. Make sure that
the television is turned on and connected correctly.
12 Click/T ap the arrow button to open the Colors list, then click/tap True Color.
13 Click/Tap the arrow button to open the Screen Area list, then click/tap
640by480.
14 Click/Tap the arrow button to open the Video Standard list, then click/tap
NTSC-M.
Important If you are traveling i nternationally , you may need to change
the video standard . For ex ample , man y tele visio ns in Asia
use PAL instead of NT SC.
164
www.gateway.com
Page 25

Viewing the displ ay on a television
15 Click/Tap Apply. Your LCD panel will bla nk out and what was on your LCD
panel now appears on your television.
Important Your television may be able to run at a higher resolution.
If the icons and screen area appear too large on your
televisio n, try a d ifferent S creen Area value.
16 Click/Tap OK.
Changing from one display to another
After you have set up the second display on your convertible tablet PC to be
a television, you can quickly switch between viewing the display on the LCD
panel and viewing it on the television.
To... Press
Change the display from the LCD panel to the television CTRL+ALT+F2
Change the display from the television to the LCD panel CTRL+ALT+F3
www.gateway.com
165
Page 26

Chapter 7: Using Multim edia
166
www.gateway.com
Page 27

Managing Power
While your convertible tablet PC is running on battery
power, you should manage power consumption to get the
most use out of the battery. Read this chapter to learn how
to:
■ Check and recharge the battery
■ Recalibrate the battery
■ Change batt eries
■ Extend the life of the battery by conserving battery
power and using alternate power sources
■ Change power-saving settings
8
167
Page 28

Chapter 8: Managing Powe r
Monitoring the battery charge
Closely monitor the battery charge. When the battery charge gets low, change
the battery or connect to AC power immediately to prevent losing any unsaved
work.
Monitor the battery charge by:
■ Double-clicking/Double-tapping the power cord icon or battery icon
in the taskbar. The Powe r Meter dialog box opens.
Important If the power cord or battery icon does not appear on the
taskbar, click/tap the show hidden icons button. If the
icon still does not appear, make sure that Always show
icon on the taskbar is checked on the Power Options
Properties Advanced tab. See “Changing advanced
settings” on page181 for more information.
■ Pressing FN+STATUS to view the power status box, which opens in the
upper-left corner of the screen. The power status box shows the current
power source, the battery charge level, and the power management mode.
■ Looking at the batter y charge indicator:
■ LED blue - battery is fully charged.
■ LED purple - battery is charging.
■ LED blinking red - battery charge is very low.
■ LED solid red - battery is malfunctioning.
Important This LED only lights up when your convertible tablet PC
is connected to AC power or the bat tery charge is very low .
For the location of the battery charge indicator, see “LCD
panel status indicators” on page 25.
■ Wa iting for a Low Battery warning message to appear.
If your battery charge indicator displays what looks like an inaccurate charge,
you may need to recalibrate the battery. For more information, see
“Recalibrating the battery” on page 170.
168
www.gateway.com
Page 29

Recharging the battery
Recharging the battery
Both the main and the optional secondary batteries recharge while they are
installed and your convertible tablet PC is connected to AC power. While the
batteries are recharging, the battery charge indicator turns purple and the
battery icon in the taskbar has a lightning bolt .
Important If the power cord or battery icon does not appear on the
taskbar, click/tap the show hidden icons button. If the
icon still does not appear, make sure that Always show
icon on the taskbar is checked on the Power Options
Properties Advanced tab. See “Changing advanced
settings” on page181 for more information.
www.gateway.com
169
Page 30

Chapter 8: Managing Powe r
Recalibrating the battery
If your convertible tablet PC unexpectedly goes into Standby mode while you
are using it but the battery charge is not low, you may need to recalibrate your
battery. You should also recalibrate the battery periodically to maintain the
accuracy of the battery gauge.
To recalibrate the batter y:
1 Connect the AC adapter, then turn on your convertible tablet PC.
2 As soon as it starts and you see a startup screen, press F2. The BIOS Setup
utility opens.
3 Open the Advanced menu.
4 Highlight Battery Auto Learning, then select Enabled by pressing the
spacebar.
5 Open the Exit menu, then highligh t Exit Saving Changes and press ENTER.
6 Select Yes, then press ENTER.
170
The battery recalibration process begins and a screen opens showing you
the progress. The entire process will take several hours.
Important Do not interrupt the battery recalibration process. If
recalibration is interrup ted, you must star t the process over
again.
When the recalibration has finished, the message “Press [Esc] key to exit”
appears.
7 Press ESC. The battery charge indicator now displays an accurate battery
charge. If the battery charge in dicator does not show an accurate ch arge,
contact Gateway Technical Support.
www.gateway.com
Page 31

Changing batteries
If your convertible tablet PC is plugged into an AC outlet or if it has a charged
secondary battery installed, you can change the main battery while the
convertible tablet PC is turned on. If your convertible tablet PC has only one
battery and it is not plugged into an AC outlet, you must turn the convertible
tablet PC off while changing the batteries.
Warning Danger of explosion if battery is incorrectly replaced.
Replace only with a Gateway M275 battery (M275DAZ or
equivalent). Discard used batteries according to the
manufacturer’s instructions.
The battery used in this device may present a fire or
chemical burn hazard if mishandled. Do not disassemble,
heat above 212°F (100°C), or incinerate. Dis pos e o f us ed
battery promptly. Keep away from children.
Battery latch Battery
Battery lock
Changing batteries
www.gateway.com
171
Page 32

Chapter 8: Managing Powe r
Replacing the main battery
To replace the main batter y:
1 If your convertible tablet PC is on and is connected to AC power or has a
charged secondar y battery installed , go to Step 2.
-ORIf your convertible tablet PC is on and is not plugged into an AC outlet
and does not have a charged secondar y battery installed, save y our work
and turn off the convertible tablet PC.
2 Close the LCD panel.
3 Disconnect your convertible tablet PC from the optional port replicator
(see “Disconnecting from the port replicator” on page 283).
4 Turn your convertible tablet PC over so the bo ttom is facing up.
5 Slide the battery lock to the unlocked position, then slide the battery
release latch.
172
www.gateway.com
Page 33

Changing batteries
6 Lift the battery out of the bay.
7 Place a recharged bat tery int o the bay a nd press do wn until it s naps into
place.
8 Slide the battery lock to the locked position.
9 Turn your convertible tablet PC over and reattach the optional port
replicator.
10 Open the LCD panel and slide the power switch.
www.gateway.com
173
Page 34

Chapter 8: Managing Powe r
Installing a secondary battery
Your convertible tablet PC’s modular bay accepts a secondary battery. The
secondary batte ry charges when th e convertible tablet PC is connected to
AC power.
Warning Danger of explosion if battery is incorrectly replaced.
Replace only with a Gateway M275 battery (M275DAZ or
equivalent). Discard used batteries according to the
manufacturer’s instructions.
The battery used in this device may present a fire or
chemical burn hazard if mishandled. Do not disassemble,
heat above 212°F (100°C), or incinerate. Dis pos e o f us ed
battery promptly. Keep away from children.
To install a secondar y battery:
1 If you are removing a drive, make sure that the drive is empty.
2 Tu rn off your convertible tablet PC (do not place it in Standby or Hibernate
mode).
174
3 Close the LCD panel.
4 Disconnect your convertible tablet PC from the optional port replicator
(see “Disconnecting from the port replicator” on page 283).
5 Turn your convertible tablet PC over so the bo ttom is facing up.
www.gateway.com
Page 35

Changing batteries
6 Remove the module bay screw.
Screw
7 Slide and hold the module bay latch. The module may move out slightly.
8 Slide the module out.
9 Firmly push the secondary battery straight into the bay until the latch
clicks into place.
10 Replace the modu le bay screw.
www.gateway.com
175
Page 36

Chapter 8: Managing Powe r
Extending battery life
Conserving battery power
While using the battery to power your convertible tablet PC, conserve power by:
■ Dimming the display as low as is comfortable.
■ Removing PC Cards when you do not need them. Man y PC Cards use a
small amount of power while inserted, even if they are not being used.
■ Modifying the power management settings for maximum power savings.
For more information, see “Changing power settings” on page 178.
■ Closing the LCD panel to turn o ff the display while yo u are not using y our
convertible tablet PC. The display stays off until you open the panel again.
■ Using Hibernate mode fo r maximum power saving s while your conve rtible
tablet PC is not in use. For more information, see “Activating and using
Hibernate mode” on page 182.
■ Using the DVD or DVD/CD-RW drive only when necessary. These drives
use a large amount of power.
■ Recharging the battery often, taking an extra battery, and fully recharging
the batteries before traveling. For more information, see “Recharging the
battery” on page 169 and “Changing batteries” on page 171.
Using alternate power sources
To extend battery life, use alternate power sources whenever possible.
■ If traveling internationally, take electrical adapters. Save the battery for
times when you cannot use a power adapter. If you plan on taking your
AC power adapter, also take a sing le-plug surge protect or.
■ If you will have access to an automobile cigarette lighter, use a power
inverter or automobile/airplane adapter. Save the battery for times when
you cannot use a power adapter.
■ T o f ind AC power outlets in airports, look for them next to support pi llars,
in large areas such as boarding gates, and under banks of telephones.
176
www.gateway.com
Page 37

Extending battery life
Changing power modes
Y ou c an use the following p ower modes to lengthen the life of your convertible
tablet PC’s battery:
■ Standby - while your convertible tablet PC is in Standby, it switches to a
low power state where devices, such as the display and driv es, turn off.
■ Hibernate - (also called save to disk) writes all current memory (RAM)
information to the hard drive, then turns your convertible tablet PC
completely off. The next time you turn on your convertible tablet PC, it
reads the memory information from the hard drive and ope ns the
programs and documents that were open when you activated Hibern ate
mode. For more information on using Hibernate mode, see “Activating and
using Hibernate mode” on page 182.
Using power saving modes
Always save your work before using Standby mode. In Standby mode, your
convertible tablet PC reduc es or turns off the power to most devices except
memory. However, the information in memory is not saved to the hard drive.
If power is interrupted, the information is lost.
When in Hibernate mode, your convertible tablet PC saves all memory
information to the hard drive, then turns the power completely off.
If your
...and you want to... ...then
convertible
tablet PC is...
On Enter Standby mode Press FN+STANDBY.
-ORClose the L CD panel.
On Enter Hibernate mode
(must be activated)
In Standby or
Hibernate m ode
Exit Standby or
Hibernate mode
Click/Tap Start, then click/tap Turn Off Computer.
Press and hold
Slide the p ower switc h.
SHIFT, then click/tap Hibernate.
www.gateway.com
177
Page 38

Chapter 8: Managing Powe r
Changing power settings
You ca n change the function of th e power switch, Standby sys tem key, and
power-saving timers by changing power settings on your convertible tablet PC.
Y ou can cus tomize powe r settings fro m the Windows Control Panel b y selecting
power schemes, setting power alarms, adjusting advanced power settings, and
activating Hibern ate mode.
Power schemes (groups of power settings) let you change power saving options
such as when the display or hard drive is automatically turned off. You can
select one of the defined power schemes or create a custom power scheme.
Important The processor installed in your convertibl e tablet PC may
use Intel
power. A SpeedStep-equipped processor can change its
operating speed according to the power source. Your
convertible tablet PC’s default settings operate the
processor at full speed while connected to AC power and
at reduced speed (which uses less power) while using
battery power. Power schemes also set the speed of an
Intel
®
SpeedStep™ technology to conserve battery
®
SpeedStep™-equipped processor.
Alarms can alert you when the battery charge is low.
Advanced power settings let you assign different power saving modes to the power
switch and Standby system key. You can also select which power saving mode
is activated when you close the LCD panel.
178
www.gateway.com
Page 39

Changing the power scheme
To change the power s cheme:
1 Click/Tap Start, then click/tap Control Panel. The Control Panel window
opens. If your Control Panel is in Category View , cl ick/tap
Maintenance
2 Click/Double-click/Tap/Double-tap the Power Options ic on. The Power
Options Properties dialog box opens.
.
Changing power se ttings
Performance and
3 Click/Tap the arrow button to open the Power Schemes list, then click/tap
the power scheme you want.
- OR Set the timers, then click/tap
Save As and type a name for the scheme.
4 Click/Tap OK.
www.gateway.com
179
Page 40

Chapter 8: Managing Powe r
Help and
Support
For more information about changing the power scheme,
click/tap Start, then click/tap Help and Support.
Type the keyword power scheme in the Search box
Changing alarm options
To change the alarm options:
1 Click/Tap Start, then click/tap Control Panel. The Control Panel window
opens. If your Control Panel is in Category View , cl ick/tap
Maintenance
2 Click/Double-click/Tap/Double-tap the Power Options ic on. The Power
Options Properties dialog box opens.
3 Click/Tap the Alarms tab.
.
, then click/tap the arrow.
Performance and
180
4 Adjust the alarm settings.
5 Click/Tap OK.
www.gateway.com
Page 41

Changing power se ttings
Help and
Support
For more information about changing the alarm options,
click/tap Start, then click/tap Help and Support.
Type the keyword alarm options in the Search box
, then click/tap the arrow.
Changing adva nced settings
To change advanc ed power management settings:
1 Click/Tap Start, then click/tap Control Panel. The Control Panel window
opens. If your Control Panel is in Category View , cl ick/tap
Maintenance
2 Click/Double-click/Tap/Double-tap the Power Options ic on. The Power
Options Properties dialog box opens.
3 Click/Tap the Advanced tab.
.
Performance and
4 Click/Tap the arrow button to open a Power buttons list, then click/tap the
power setting mode you want to use.
www.gateway.com
181
Page 42

Chapter 8: Managing Powe r
5 Click/Tap OK.
Help and
Support
For more information about changing the power
management settings, click/tap Start, then click/tap Help
and Support.
Type the keyword power management in the Search
box , then click/tap the arrow.
Activating and using Hibernate mode
To activate Hibernate mode:
1 Click/Tap Start, then click/tap Control Panel. The Control Panel window
opens. If your Control Panel is in Category View , cl ick/tap
Maintenance
2 Click/Double-click/Tap/Double-tap the Power Options ic on. The Power
Options Properties dialog box opens.
3 Click/Tap the Hibernate tab.
.
Performance and
182
www.gateway.com
Page 43

Changing power se ttings
4 Click/Tap the Enable hibernation check box, then click/tap Apply. Hibernate
mode is now an option you can select on the Advanced tab in the Power
Options Properties dialog box and in the Turn Off Computer or
Shut Down Windows dialog box.
To use Hibernate mode:
■ As an automatic power savings mode:
Open the Power Options Properties dialog box, then click/tap the
Schemes
tab. Click/Tap the arrow button to open a System hibernates list,
Power
then click/tap the time you want to use.
- OR Open the Power Options Properties dialog box, then click/tap the
tab. Hibernate is now an option in the
■ As a manually-selected power savings mode, click/tap Start, then click/tap
Turn Off Computer. Press and hold SHIFT, then click/tap Hibernate.
Help and
Support
For more information about using Hibernate mode,
click/tap Start, then click/tap Help and Support.
Type the keyword hibernate in the Search box
Power buttons lists.
, then click/tap the arrow.
Advanced
www.gateway.com
183
Page 44

Chapter 8: Managing Powe r
184
www.gateway.com
Page 45

T raveling With
Your
Gateway M275
These tips can make traveling with your convertible
tablet PC more convenient and trouble-free. Read this
chapter to learn about:
■ Using the modem
■ Using your radio frequency wireless connections
■ Transferring files
■ Protecting your convertible tablet PC from loss and
theft
■ Managing your convertible tablet PC’s power
efficiently
Tips & Tricks Y ou can d ownload an electron ic copy of this
guide from
support.gateway.com/support/manlib/
.
9
185
Page 46

Chapter 9: Traveling W ith Your Gateway M275
Packing your convertible tablet PC
■ Remove all periphera l devices and cables . Remember to pack those you will
need while traveling, and do not forget to pack at least one convertible
tablet PC pen.
■ Protect the pen by keeping it in your convertible tablet PC’s pen holder
during travel. For more information, see “Right Si de” on page 5.
■ Pack the Gateway convertible tablet PC securely into a briefcase or
hand-carried luggage, and keep it separate from toiletries, liquids, and food.
Do not pack it in checked luggage.
■ Keep your convertible tablet PC stable during travel. Secure it to preven t
it from sliding around in overhead bins and car trunks.
T raveling by air
■ Prepare for airport security by charging the battery in case Security asks
you to start your convertible tablet PC.
186
■ Have your convertible table t PC hand-inspected or sent through the X-ray
scanner, but never carry it through the metal detector.
■ Turn off your convertible tablet PC for takeoff and landing.
■ Do not check your convertible tablet PC as baggage.
■ Turn off wireless RF devices such as your wireless Ethernet emitter while
the aircraft is moving. For more information, see “Turning your wireless
Ethernet emitter on or off” on page 220.
www.gateway.com
Page 47

Modem
■ Take a telephone cord to connect the modem to telephone jacks. If you
are traveling internationally, take telephone jack adapters or an acoustic
handset coupler.
■ Take a telephone line protector.
■ Take a telephone line tester to check for unsafe lines, esp ecially if yo u are
traveling internationally.
■ Take remote access information with you so you can connect to your ISP
while outside of your usual calling area. A list of country dialing codes may
be especially useful if you are traveling internationally.
Radio frequency wireless
connections
■ Every country has different restrictions on the use of wireless devices. If
your convertible tablet PC is equipped with a wireless device, check with
the local radio approval authorities prior to your trip for any restrictions
on the use of a wireless device in the destination country.
Modem
■ If your convertible tablet PC came equipped with an internal embedded
wireless device, see “Safety, Regulatory, and Legal Information” on
page 315 for general wireless regulatory guidelines.
■ Wireless communication can interfere with equipment on commercial
aircraft. Current aviation regulations require wireless devices to be turned
off while traveling in an airplane. IEEE 802.11a, IEEE 802.11b, and
IEEE 802.11g communication devices are examples of devices which use
wireless to communicate. For instructions on how to turn off your wireless
device, see “Turning your wireless Ethernet emitter on or off” on p age 220.
www.gateway.com
187
Page 48

Chapter 9: Traveling W ith Your Gateway M275
Files
■ Copy your working files from your desktop computer to your convertible
tablet PC before you travel.
■ If you need to access your desktop computer files from your convertible
tablet PC while traveling, set up your desktop computer for remote access.
Contact your network administrator for more information about remote
access.
■ Take extra recordable media for transferring files between computers and
backing up files.
Security
■ Get a locking cable for your convertible tablet PC so you can attach a cable
lock and leave you r convertible tab let PC in your hotel room while you
are away.
■ Always keep your convertible tablet PC with you while waiting in airports,
train stations, or bus terminals. Be ready to claim your convertible
tablet PC as soon as it passes through the x-ray machine in security
checkpoints.
188
■ Write down your convertible tablet PC mode l number and serial number
(see “Identi fying your model ” on pa ge 10) in case of theft or loss, and keep
the information in a safe place. Also, ta pe your business card or an address
label to your convertible tablet PC and accessories.
■ Whoever sits next to you or behind you can see your convertible tablet PC
display. Avoid working with confidential files until you can be sure of
privacy.
■ Use a startup password to rest rict access to your conver tible tablet PC.
Important Use a password t hat you can remember, but that is diffi cult
for someone else to guess. The password feature is very
secure, with no easy way to recov er a forgotten pass word.
If you forget your password, you must return your
convertible tabletPC to Gateway for se rvice. Call Gatewa y
Te chnical Supp ort for inst ructions.
www.gateway.com
Page 49

To create a s tartup password:
Power
1 Restart your convertible tablet PC. As soon as you see a startup
screen, press F2. The BIOS Setup utility opens.
2 Open the Security menu, then highlight Set Supervisor Password,
then press E
supervisor password in order to set the user (sta rtup) password.
NTER and follow the instructions. You must set the
3 Highlight Set User Password, then press ENTER and follow the
instructions. This is the password you need to enter at startup.
4 Highlight Password on boot, then select Enabled by pressing the
spacebar.
5 Open the Exit menu, highligh t Exit Saving Changes, then press ENTER.
When you start your convertible tablet PC, you are prompted to
enter the user password you set in Step 3.
Power
■ Take your AC power adapter to recharge the battery. If you are traveling
internationally, take power plug adapters.
■ Take a portable surge protector to protect your convertible tablet PC from
power surges.
■ To get the best performance from your convertible tablet PC, avoid using
the battery whenever possible, monitor the battery charge, and use the
most efficient power management settings.
■ For information on conserving battery power , see “Conserving battery
power” on page 176.
■ For information on using alternate power sources, see “Using alternate
power sources” on pa ge 176.
■ For information on monitoring the battery charge, see “Monitoring
the battery charge” on page 168.
www.gateway.com
189
Page 50

Chapter 9: Traveling W ith Your Gateway M275
Additional tips
■ If you plan to use s everal USB peripheral devices, take a portable USB hub
to provide additional USB port s.
■ Take a network cable if you need to connect to a network. Some hotels
provide Internet connectivity only through their networks.
■ If your convertible tablet PC has been exposed to cold temperatures, allow
it to warm to room temperature before turning it on.
■ Carry proof of ownership or a merchandise passport when traveling
internationally.
■ Consult your insurance company and credit card company to learn ab out
emergency travel assistance if your convertible tablet PC is lost or damaged.
■ Take y ou r System Restoration CDs in case you need to install an additional
driver or software.
190
www.gateway.com
Page 51

Customizing
Your
Gateway M275
This chapter provides information about customizing your
convertible tablet PC by changing settings in Windows.
Read this chapter to learn how to:
■ Change screen and display settings
■ Change the background and scre en saver
■ Adjust the touchpad settings
■ Add, change, and switch user accounts
10
191
Page 52

Chapter 10: Customizin g Your Gateway M275
Using the display
Changing display orientation
Y ou can change the display orientation from the default, landscape (horizontal),
to portrait (vertical) or secondary landscape (180 degrees from the default)
Screen Rotation button. For more information, see “LCD panel buttons” on
page 32.
To change display orientation:
■ Press Screen Rotation button to step through display orientations.
To change orientation properties:
■ Double-click/Double-tap the Tablet and Pen Settings icon in the taskbar,
then click/tap the
Display tab.
Adjusting brightness
To adjust screen brightness:
■ Use the increase brightness and decrease brightness buttons on the
keyboard. For more information, see “System key comb inations” on
page 30.
To use brightness boost:
■ Use the brightness boost.... For more information, see “LCD panel buttons”
on page 32.
192
www.gateway.com
Page 53

Adjusting the scre en and desktop settin gs
Adjusting the screen and desktop
settings
Adjusting the color depth and screen area are two of the most basic display
settings you may need to change. Y ou can also adjust settings such as the screen
background and screen saver.
Adjusting the color depth
Color depth is the number of colors your screen displays. Various image types
require various color depths for optimum appearance. For example, simple color
drawings may appear adequately in 256 colors while color photographs need
millions of colors to be displayed with optimum quality.
Windows lets you choose from several color depth settings. We recommend that
you use the 32-bit True Color setting at all times.
If the color in your images seems “false” or “jumpy,” especially after you have
played a game or run a video-intensive program, check th e color depth setting
and return it to 32-bit True Color, if necessary.
To change the color depth:
1 Click/Tap Start, then click/tap Control Panel. The Control Panel window
opens. If your Control Panel is in Category View, click/tap
Themes
.
Appearance and
2 Click/Double-click/Tap/Double-tap the Display icon. The Display Properties
dialog box opens.
www.gateway.com
193
Page 54

Chapter 10: Customizin g Your Gateway M275
3 Click/Tap the Settings tab.
4 Click/T ap t he arrow button to open the Color quality list, then click/tap the
color depth you want.
194
5 To save your changes, click/tap OK, then click/tap Yes.
Help and
Support
For more information about adjusting display settings,
click/tap Start, then click/tap Help and Support.
Type the keyword changing display settings in the
Search box , then click/tap the
arrow.
www.gateway.com
Page 55

Adjusting the scre en and desktop settin gs
Adjusting the screen resolution
You can increase the screen resolution to fit more icons on your desktop, or
you can decrease the resolution to make reading the display easier. The higher
the resolution, the smaller individual components of the screen (such as icons
and menu bars) appear.
To adjust the screen resolution:
1 Click/Tap Start, then click/tap Control Panel. The Control Panel window
opens. If your Control Panel is in Category View, click/tap
Appearance and Themes.
2 Click/Double-click/Tap/Double-tap the Display icon. The Display Properties
dialog box opens.
3 Click/Tap the Settings tab.
4 Drag the Screen resolution slider to the size you prefer.
5 To save your changes, click/tap OK, then click/tap Yes.
www.gateway.com
195
Page 56

Chapter 10: Customizin g Your Gateway M275
Help and
Support
For more information about adjusting screen resolution,
click/tap Start, then click/tap Help and Support.
Type the keyword changing screen resolution in the
Search box , then click/tap the
arrow.
Changing the colors on your Windows
desktop
You can chan ge the col ors of Windows deskt op ite ms, suc h as the bac kgro und
color and dialog box title bars.
To change desktop colors:
1 Click/Tap Start, then click/tap Control Panel. The Control Panel window
opens. If your Control Panel is in Category View, click/tap
Themes
.
2 Click/Double-click/Tap/Double-tap the Display icon. The Display Properties
dialog box opens.
3 Click/Tap the Appearance tab.
Appearance and
196
www.gateway.com
Page 57

Adjusting the scre en and desktop settin gs
4 Click/T ap the arrow button to open the Color scheme list, click/tap the color
scheme you want, then click/tap
desktop.
- OR If you want to create a new color scheme as part of a desktop theme:
OK. The new colors appear on your
a Click/Tap Advanced. The Advanced Appearance dialog box opens.
b Click/Tap the arrow button to open the Item list, then click/tap the
item you want to change.
c Change the color or font settings for the item.
d Click/Tap OK, then click/tap the Themes tab.
e Click/Tap Save As, type a name for the new theme, then click/tap OK
twice. The new colors appear on your desktop.
Changing the desktop background
You can change the Windows desktop background picture. Windows provides
several backgrounds, or you can use pic tures tha t you have created o r retrieved
from other sources.
To change the desk top background:
1 Click/Tap Start, then click/tap Control Panel. The Control Panel window
opens. If your Control Panel is in Category View, click/tap
Themes
.
Appearance and
2 Click/Double-click/Tap/Double-tap the Display icon. The Display Properties
dialog box opens.
www.gateway.com
197
Page 58

Chapter 10: Customizin g Your Gateway M275
3 Click/Tap the Desktop tab.
4 Click/Tap a background picture in the Background list.
198
- OR Click/Tap
Browse to select a background picture from an other location.
5 If you want the picture you chose to cover the entire screen, click/tap the
arrow button to open the
Position list, then click/tap Stretch or Tile.
6 If the picture you chose does not cover the entire screen and you did not
choose to stretch or tile the image in Step 5, you can change the solid color
behind the picture by clicking/tapping the arrow but ton to open the
list, then clicking/tapping a color.
Color
7 Click/Tap OK.
Help and
Support
For more information about changing the background,
click/tap Start, then click/tap Help and Support.
Type the k eyword changing desktop background in the
Search box , then click/tap the
arrow.
www.gateway.com
Page 59

Adjusting the scre en and desktop settin gs
Selecting a screen saver
You can use a screen saver to keep others from viewing your display while you
are away from your convertible tablet PC. Windows supplies a variety of screen
savers that you can choose from, and many more are available from the Internet
and as commercial products.
To select a s creen saver:
1 Click/Tap Start, then click/tap Control Panel. The Control Panel window
opens. If your Control Panel is in Category View, click/tap
Appearance and Themes.
2 Click/Double-click/Tap/Double-tap the Display icon. The Display Properties
dialog box opens.
3 Click/Tap the Screen Saver tab.
4 Click/Tap the arrow button to open the Screen Saver list, then click/tap
the screen saver you want. Windows previews the screen saver.
5 If you want to customize the screen saver, click/tap Settings, then make
your changes
the screen saver you selected.
. If the Settings bu tton is not availa ble, you cannot customize
www.gateway.com
199
Page 60

Chapter 10: Customizin g Your Gateway M275
6 If you want to display the Welcome (Login) screen whenever you exit the
screen saver, click/tap the
7 If you want to change the time before the screen saver is activated, click/tap
the up or down arrows next to the
8 Click/Tap OK.
On resume, display Welcome screen check box.
Wait box.
Help and
Support
For more information about selecting a screen saver,
click/tap Start, then click/tap Help and Support.
Type the keyword screen savers in the Search box
, then click/tap the arrow.
Adjusting tablet and pen settings
Windows XP tablet PC Edition includes a control panel for adjusting pen,
display, and button preferences such as:
■ Right-handed vs. left-handed use
■ Pen calibration in portrait and landscape modes
■ Button functions
■ Pen actions such as double-tapping
To change tablet and pen settings:
1 Double-click/Double-tap the T a blet and Pen Settin gs ic on in the taskbar .
The Tablet and Pen Properties dialog box opens.
2 Click/Tap the Pen Options tab.
200
3 Change the pen options settings, then click/tap OK.
www.gateway.com
Page 61

Programming the buttons
Programming the buttons
Most of the LCD panel buttons on your convertible tablet PC’s can be
reprogrammed with new functions. For more information, see “LCD panel
buttons” on page 32.
To reprogram button functions:
1 Double-click/Double-tap the T a blet and Pen Settin gs ic on in the taskbar .
The Tablet and Pen Properties dialog box opens.
2 Click/Tap the Tablet Buttons tab.
3 Change the button settings, then click/tap OK.
www.gateway.com
201
Page 62

Chapter 10: Customizin g Your Gateway M275
Adjusting the T ablet PC Input
Panel Settings
To adjust writing pad, writing tools, and speech settings:
1 Click/Tap (the Keyboard icon).
2 Click/Tap Tools, then click/tap Options.
202
3 Click/Tap a tab, then change the input panel settings.
www.gateway.com
Page 63
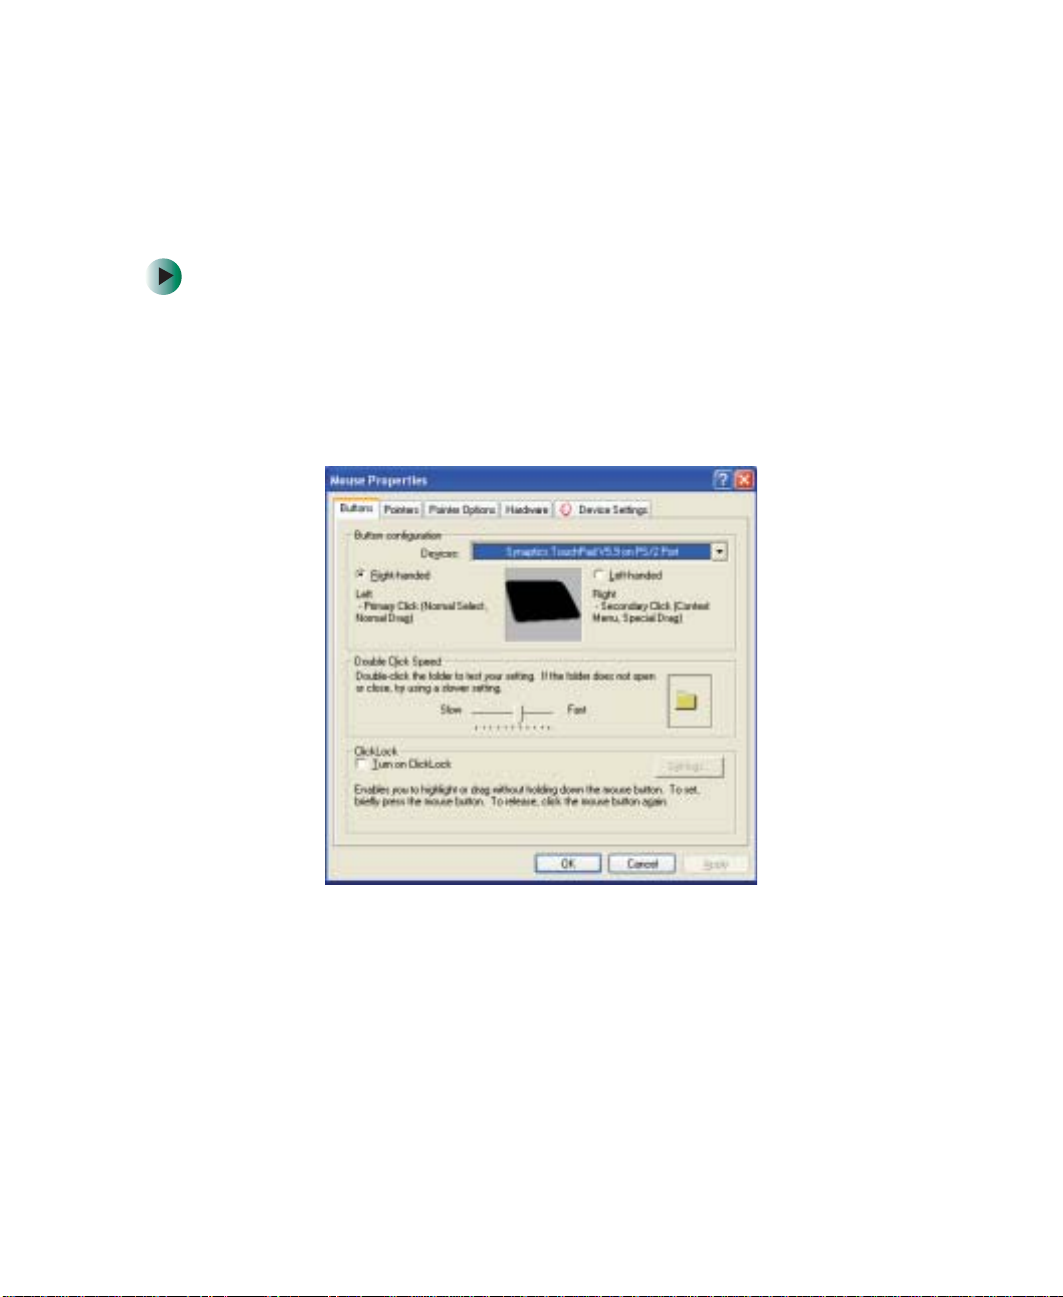
Changing the touchpad settings
Changing the touchpad settings
You can adjust the double-click speed, pointer speed, left-hand or right-hand
configuration, an d other touchpad setti ngs.
To change your touchpad settings:
1 Click/Tap Start, then click/tap Control Panel. The Control Panel window
opens. If your Control Panel is in Category View , click/tap
Hardware
.
2 Click/Double-click/Tap/Double-tap the Mouse icon. The Mouse Properties
dialog box opens.
Printers and Other
www.gateway.com
203
Page 64
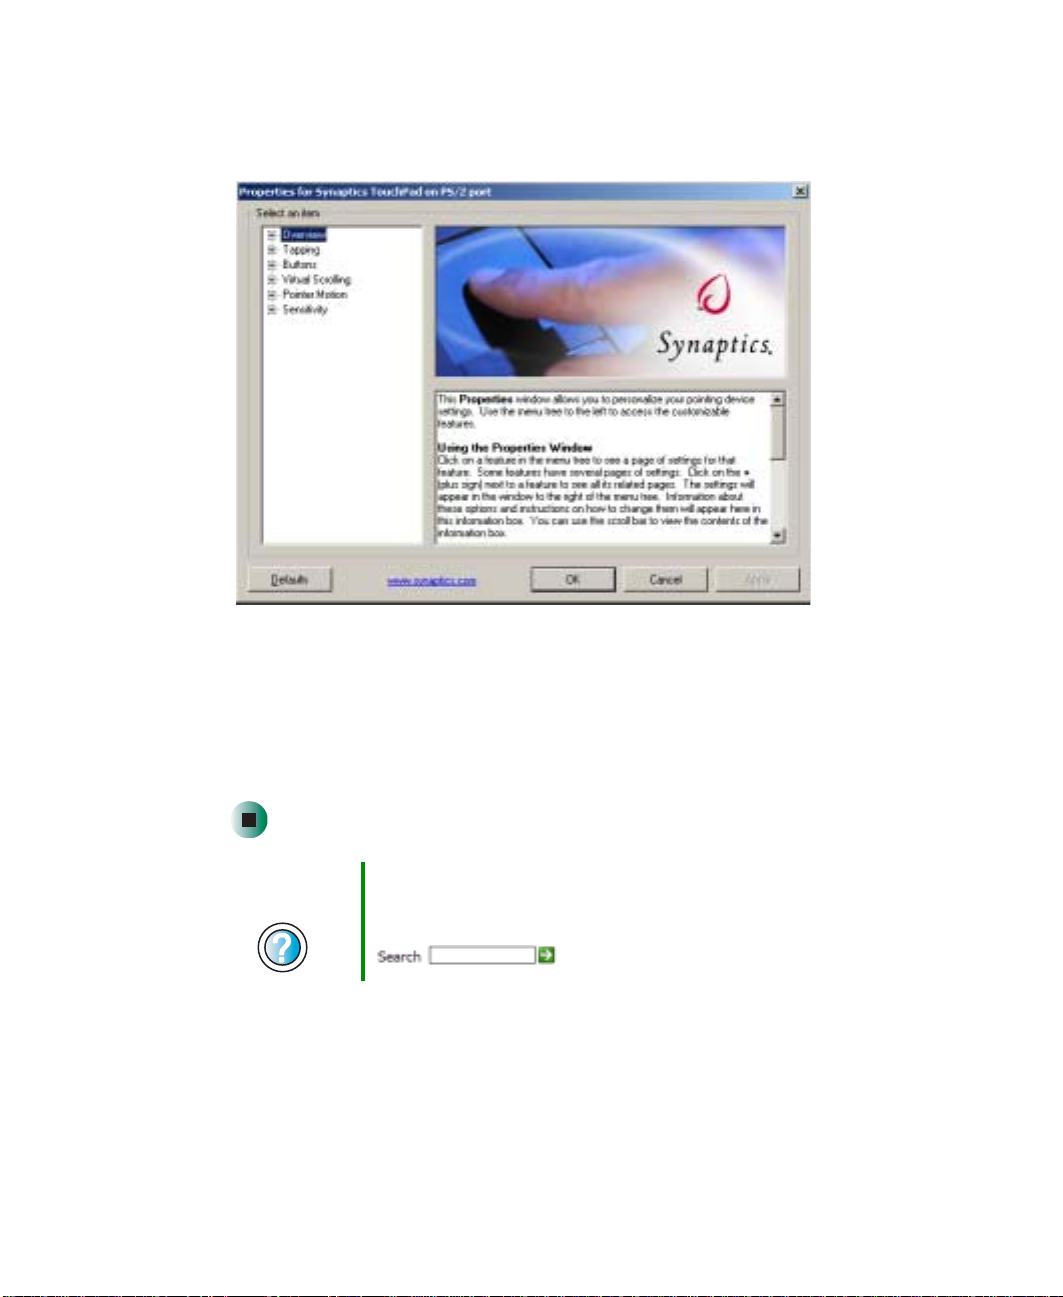
Chapter 10: Customizin g Your Gateway M275
3 Click/Tap the Device Settings tab, then click/tap Settings to change your
touchpad settings.
204
4 To modify a touchpad setting, click/tap the + in front of a setting, then
modify the setting.
5 To assign a function to the rocker switch, click the + in front o f Buttons,
click the up or down button, then click the action you want.
6 Click/Tap OK to save changes .
Help and
Support
For more information about changing mouse settings,
click/tap Start, then click/tap Help and Support.
Type the keyword mouse settings in the Search box
, then click/tap the arrow.
www.gateway.com
Page 65

Adding and modifying u ser accounts
Adding and modifying user
accounts
You ca n create and customize a user account for each person who us es your
convertible tablet PC. You can also switch (change) user accounts without
turning off your convertible tablet PC.
User account tips
■ If you want to create an account for someone, but you do not want that
user to have full access to your convertible tablet PC, be sure to make that
account limited. Remember that limited accounts may not be able to install
some older programs.
■ If a program or peripheral device is installed in one account, it may not
be available in other accounts. If this happens, install the program or
device in the accounts that need it.
■ Files created in one account are not accessible from other accounts unless
the files are stored in the Shared Documents folder. The Shared Documents
folder is accessible from all accounts on that c omputer and from other
computers on the network.
To add, delete, or modify user ac counts:
1 Click/Tap Start, then click/tap Control Panel.
2 Click/Double-click/Tap/Double-tap the User Accounts ico n. The User
Accounts window opens.
3 Follow the on-screen instructions to add, delete, or modify a user account.
Help and
Support
For more information about user acc ounts, click/ta p Start,
then click/tap Help and Support.
Type the keyword user accounts in the Search box
, then click/tap the arrow.
www.gateway.com
205
Page 66

Chapter 10: Customizin g Your Gateway M275
To switch user accounts:
1 Click/Tap Start, then click/tap Log Off. The Log Off Windows dialog box
opens.
2 Click/Tap Switch User. The Windows Welcome screen opens.
3 Click/T ap the user account that you want to use. When you switch between
user accounts, any programs that were running for the previous user
continue to run.
206
www.gateway.com
Page 67

Networking Y our
Gateway M275
Connecting your home , small office , or home off ice
computers lets you share drives, printers, and a single
Internet connection among the connected computers.
Read this chapter to le arn about:
■ Benefits of using a net work in your home, small office,
or home office
■ Types of network connections
■ Purchasing ad ditional network eq uipment
■ Installing and configuring your convertible tablet PC
for Ethernet networking
■ Turning the wireless Ethernet emitter on and off
11
207
Page 68

Chapter 11: Networking Y our Gateway M275
Benefits of networking
A network lets you:
■ Share a single Internet connection
■ Share computer drives
■ Share peripheral device s
■ Stream audio and video files
■ Play multi-player games
Sharing a single Internet connection
Each computer that is connected to the networ k can share the sa me broadband
connection or modem and tel ephone l ine and acc ess the Internet at the same
time. This saves on the cost of installing another telephone line for your second
computer and paying for a second Internet service provider (ISP) account.
Help and
Support
For more information abo ut sharing an Internet con nection,
click/tap Start, then click/tap Help and Support.
Type the keyword internet sharing in the Search box
, then click/tap the arrow.
Sharing drives
With a network, you can copy files from computer to computer by copying
and pasting or dragging and droppin g. You will no longer waste y our time
transferring files by using recordable media. In addition, you can map a drive
on a networked computer to another computer, and access the files as if they
were located on the hard drive of the computer you are using.
Help and
Support
For more information about sharing network drives,
click/tap Start, then click/tap Help and Support.
Type the keyword sharing network drives in the Search
box , then click/tap the arrow.
208
www.gateway.com
Page 69

Benefits of networking
Sharing peripheral devices
Each computer that is connected to the network can share the same peripheral
devices, such as a printer . Select print from the computer you are currently using
and your file is automatically printed on your printer no matter where it is
located on your network.
Help and
Support
For more information about sharing network devices,
click/tap Start, then click/tap Help and Support.
Type the keyword sharing in the Search box
, then click/tap the arrow.
Streaming audio and video files
With a network, you can store audio files (such as the popular .MP3 files) and
video files on any networked computer, then play them on any of the other
computers or devices connected to your network. This process is called
streaming.
Help and
Support
For more information about stream ing files, click/tap Start,
then click/tap Help and Support.
Type the keyword streaming in the Search box
, then click/tap the arrow.
Playing multi-player games
With a home network, you can play multi-player games. Load a game like
Microsoft Midtown Madness 2 on your computers, and in minutes, you and your
friends can race in comp eting cars through the stre ets of San Francisco.
Help and
Support
For more information about playing multi-player games,
click/tap Start, then click/tap Help and Support.
Type the keyword games or network games in the
Search box , then click/tap the
arrow.
www.gateway.com
209
Page 70

Chapter 11: Networking Y our Gateway M275
Selecting a network connection
The biggest decision you need to make when creating your network is what
type of connection you will use. Gateway supports both wired and wireless
Ethernet networks. Use the following criteria as a guide when selecting a
network connection.
Wired Ethernet network
Create a wired Ethernet network if:
■ You are building a new home or your exis ti ng ho me alre ady ha s Et hern et
cable installed in each room that has a device you want to connect
■ You are creating a network in an office or business where network speed
is more important than moving about with your computer
■ Your computer has an Ethernet jack for connecting to the network
Wireless Ethe rnet network
Create a wireless Ethernet (IEEE 802.11a, IEEE 802.11b, or IEEE 802.11g)
network if:
■ You are looking for an alternative to installing cable for connectivity
■ The ability to move about with your computer is as important as network
speed
■ Your computer has wireless Ethernet for networking
Help and
Support
210
For more information abou t selecting network conn ections,
click/tap Start, then click/tap Help and Support.
Type the keyword networks or network types in the
Search box , then click/tap the
arrow.
www.gateway.com
 Loading...