

Page 1

11Mbps MiniUSB Wireless Adapter
Date of Issue: January. 25, 2002
Page 2

Technical Support
The firmware version of the MiniUSB Wireless Adapter is displayed on the utility
Users could download the most recent software version from the supplier’s web site or refer to
the selling contact for the latest software information. If you have difficulty resolving the problem
while installing or using the 11Mbps MiniUSB Wireless Adapter, please contact the supplier for
support.
About
About This Manual
11Mbps MiniUSB Wireless Adapter User Manual is first published on January, 2002. The
manual includes procedures for the setup of the 11Mbps MiniUSB Wireless Adapter under
Windows XP, Windows 2000, Windows 98 or Windows ME. Take a moment to read through
this manual and familiarize yourself with wireless technology.
wind ow.
Page 3

FCC Information
This device complies with Part 15 of the FCC Rules. Operation is subject to the following two
conditions: (1) this device may not cause harmful interference, and (2) this device must accept any
interference received; including interference that may cause undesired operation.
Federal Communications Commission (FCC) Statement
This Equipment has been tested and found to comply with the limits for a Class B digital device,
pursuant to Part 15 of the FCC rules. These limits are designed to provide reasonable protection against
harmful interference in a residential installation. This equipment generates, uses and can radiate radio
frequency energy and, if not installed and used in accordance with the instructions, may cause harmful
interference to radio communications. However, there is no guarantee that interference will not occur in
a particular installation. If this equipment does cause harmful interference to radio or television reception,
which can be determined by turning the equipment off and on, the user is encouraged to try to correct
the interference by one or more of the following measures:
- Reorient or relocate the receiving antenna.
- Increase the separation between the equipment and receiver.
- Connect the equipment into an outlet on a circuit different from that to which the receiver is connected.
- Consult the dealer or an experienced radio/TV technician for help.
FCC RF Radiation Exposure Statement:
1. This Transmitter must not be co-located or operating in conjunction with any other antenna or
transmitter.
2. This equipment complies with FCC RF radiation exposure limits set forth for an uncontrolled
environment. This equipment should be installed and operated with a minimum distance of 20
centimeters between the radiator and your body.
Page 4

Limited Warranty
This Warranty constitutes the sole and exclusive remedy of any buyer or reseller’s equipment and the
sole and exclusive liability of the supplier in connection with the products and is in lieu of all other
warranties, express, implied or statutory, including, but not limited to, any implied warranty of
merchantability of fitness for a particular use and all other obligations or liabilities of the supplier.
In no even will the supplier or any other party or person be liable to your or anyone else for any
damages, including lost profits, lost savings or other incidental or consequential damages, or inability to
use the software provided on the software media even if the supplier or the other party person has been
advised of the possibility of such damages.
The following are special terms applicable to your hardware warranty as well as services you may use
during part of the warranty period. Your formal Warranty Statement, including the warranty
applicable to our Wireless LAN products, appears in the Quick Installation Guide, which accompanies
your products.
Duration of Hardware Warranty:
Replacement, Repair or Refund Procedure for Hardware:
If your unit need s a repair or replacement, return it to your dealer/distributor in its original packaging.
One Year
When returning a defective product for Warranty, always include the following documents:
The Warranty Repair Card
n
A copy of the invoice/proof of purchase, and
n
The RMA Report Form (To receive a Return Materials Authorization form (RMA), please contact
n
the party from whom you purchased the product).
Upon proof-of-purchase we shall, at its option, repair or replace the defective item at no cost to the
buyer.
This warranty is contingent upon proper use in the application for which the products are intended and
does not cover products which have been modified without the reseller ’s approval or which have been
subjected to unusual physical or electrical demands or damaged in any way.
Page 5

Please complete the information below and include it along with your products.
Name:
Title:
Company:
Telephone:
Fax:
Email:
City/State/Zipcode:
Country:
Product Name:
Serial Number:
MAC Address:
Invoice Date:
Product Description:
If you have any further questions, please contact your local authorized reseller for support.
Page 6

Table of Contents
FCC Information
Limited Warranty
................................ ........................................................... 2
................................ .......................................................... 3
Chapter 1 About MiniUSB Wireless Adapter...........................................1
1-1 Features and Benefits................................ ............................................ 1
1-2 Applications................................ .......................................................... 2
1-3 Product Kit........................................................................................... 3
Chapter 2 Getting Started...........................................................................4
2-1 Before Installation ................................................................................. 4
Chapter 3 Install Driver for Windows ........................................................5
3-1 Set up MiniUSB Wireless Adapter for Windows XP...............................5
3-2 Set up MiniUSB Wireless Adapter for Windows 2000.......................... 11
3-3 Set up MiniUSB Wireless Adapter for Windows 98/ ME ...................... 14
Chapter 4 Configure the MiniUSB Adapter...........................................18
4-1 Install the WLAN Utility...................................................................... 18
4-2 Use the WLAN Utility.......................................................................... 20
Limited Warranty
................................ ........................................................ 30
Page 7

About MiniUSB Wireless Adapter
1
The 11Mbps IEEE 802.11b MiniUSB Wireless Adapter is a standard USB adapter that fits into any
standard USB slot in a notebook computer. Its 11Mbps data rate gives equivalent Ethernet speed to
access corporate network or the Internet in a wireless environment. In addition, a detachable antenna
version is specifically designed for system integrator application. When installed, 11Mbp s MiniUSB
Wireless Adapter is able to communicate with any 802.11 and 802.11b compliant products.
1-1 Features and Benefits
1. Fully IEEE 802.11b compatible.
2. Direct Sequence Spread Spectrum (DSSS) technology provides robust, interference-resistant
and secure wireless connection.
3. Supports 1, 2, 5.5 and 11 Mbps data rate.
4. Working range up to 800 ft. in an open environment.
5. Seamless connectivity to wired Ethernet and PC network LAN’s augments existing networks
quickly and easily.
6. Greater flexibility to locate or move networked PCs.
7. Wireless connection without the cost of cabling.
8. Easy to install and user friendly, just Plug and Play.
9. Low power consumption.
10. Supports a variety of operating systems (Win98/ME/2000/XP)
11. 64-bit and 128-bits WEP encryption capable.
12. Provides Window-based Diagnostic Tools, most notably, Site Survey, Link Quality Test and
Access Point Browser.
-1-
Page 8

1-2 Applications
11Mbps MiniUSB Wireless Adapter offers a fast, reliable, cost -effective solution for wireless client
access to the network in applications like these:
1. Remote access to corporate network information
E-mail, file transfer and terminal emulation.
2. Difficult-to-wire environments
Historical or old buildings, asbestos installations, and open area where wiring is difficult to
deploy .
3. Frequently changing environments
Retailers, manufacturers and those who frequently rearrange the workplace and change
location.
4. Temporary LANs for special projects or peak time
C1- Trade shows, exhibitions and construction sites where a temporary network will be
practical.
C2- Retailers, airline and shipping companies need additional workstations during peak period.
C3- Auditors requiring workgroups at customer sites.
5. Access to database for mobile workers
Doctors, nurses, retailers, accessing their database while being mobile in the hospital, retail
store or office campus.
6. SOHO (Small Office and Home Office) users
SOHO users need easy and quick installation of a small computer network.
7. High security connection
The secure wireless network can be installed quickly and provide flexibility. (Please refer to
page 22 for encryption configuration.)
-2-
Page 9

1-3 Product Kit
11Mbps MiniUSB Wireless Adapter comes with the following items. Please go through each item
below. If any of listed items appears to be damaged or missing, please contact your local dealer.
11Mbps MiniUSB Wireless Adapter
11Mbps MiniUSB Wireless Adapter ………………….…………………….….….. x 1
l
MiniUSB Cable …………………………………………………………………….. x1
l
11Mbps PC Card Software and Documentation CD…………………… ……..…... x 1
l
11Mbps MiniUSB Wireless Adapter Quick Start Guide……..…………………..… x 1
l
-3-
Page 10

Getting Started
2
This chapter describes the instructions that guide you through the proper installation of your 11Mbps
MiniUSB Wireless Adapter for the Windows XP/2000/ME/98 operating systems.
The complete installation of the 11Mbps MiniUSB Wireless Adapter consists of the following steps:
STEP 1
STEP 2
STEP 34
2-1 Before Installation
In addition to the items shipped with the client adapter, you will also need the following in order to
install the adapter:
1. Because the MiniUSB Wireless Adapter is built into your notebook/laptop, you may directly
: Install the corresponding driver and utility.
: Set basic settings.
: Finish Installation.
proceed to the driver installation for your MiniUSB Wireless Adapter.
2. A computer equipped with a Type II or Type III USB slot, and a USB card and socket services
compliant with revision 2.10 of the USB specification (or higher).
3. Windows XP/2000/98/ME (with a Windows installation CD-ROM, diskettes for use during
installation)
4. Minimum 500 Kbytes free disk space for installing driver and utility program.
-4-
Page 11

Install Driver for Windows
3
This section describes the installation of the 11Mbps MiniUSB Wireless Adapter driver for the
Windows 98/ME /2000 and Windows XP operating systems. The installation procedures for
Windows XP refer to
see
3-2 Set up
MiniUSB Wireless Adapter for Windows 98/ME.
MiniUSB Wireless Adapter for Windows 200 0;
Note:
in case you might need certain system files.
3-1 Set up MiniUSB Wireless Adapter for Windows XP
for Win dows 98/ME refer to
Before you start the installation, you are advised to keep the Windows CD-ROM
3-1 Set up MiniUSB Wireless Adapter for Windows XP
Step 1:
the Windows will auto-detect the MiniUSB Wireless Adapter and a “
Wizard
driver.
After inserting the 11Mbps MiniUSB Wireless Adapter into the USB slot on your notebook,
” window will show up. Select “
Install from a list or specific (Advanced)
; for Windows 2000 please
3-3 Set up
Found New Hardware
” to install the
-5-
Page 12

-6-
Page 13

Step 2:
media (floppy, CD-ROM … )
Insert the Product CD-ROM into the CD-ROM drive. Check the “
” check box and click on
to install the driver.
Next
Search removable
Step 3:
files into the system. Click on
The windows will find “
MiniUSB Wireless Adapte r
to continue.
Next
” and start copying corresponding
-7-
Page 14

Step 4:
Click
to complete the installation.
Finish
Step 5:
click the
Adapter/ MiniUSB Wireless Adapter
well.
Right click “
Device Manager
My Computer
button to see if any error icon appears next to the
” from
. If no, your 11Mbps MiniUSB Wireless Adapter is working
, select
Start
Check if there is any error
icon next to the IEEE 802.11
MiniUSB Wireless Adapter
Properties
, go to the
Hardware
tab and
Network
-8-
Page 15

Step 5:
Network Connection # ” message.
Click on the message and the “
and allow use to choose to connect a wireless infrastructure network (Access Point), shown as the
below figure. You may click the
LAN CF Card, shown as below.
After installing the MiniUSB Wireless Adapter, the Windows XP will display a “Wireless
Automatic Wireless Network Configuration
Advanced
button to make advanced configuration for the Wireless
will then appear automatically
-9-
Page 16

For more information on using the automatic wireless network configuration please refer to Windows
XP
Help
file.
If you desire to use our WLAN
Utility, you need to disable the
Windows XP Automatic Wireless
Network Configuration first by
un-checking this check box.
However, the WLAN Utility, which comes with the MiniUSB Wireless Adapter , provides you more
tools to configure the MiniUSB Wireless Adapter and monitor the wireless connection. For more
information on installing and using the WLAN utility, please refer to the following sections “
of the W LAN Utility
” on page 18 and “
Usage of the WLAN Utility
” on page 20.
Installation
To use the WLAN utility under Windows XP, you need to disable the
Note:
Automatic Wireless Network Configuration
Right click the
n
Go to the
n
Uncheck the “
n
Network Connections
Wireless Networks
Use Windows to configure my wireless network settings
first . Steps are described as follows:
icon. Select
Properties
.
tab.
”
check box and click the OK button (see the above picture).
-10-
Page 17

3-2 Set up MiniUSB Wireless Adapter for Windows 2000
Step 1:
Windows will auto-detect the 11Mbps MiniUSB Wireless Adapter.
Step 2
After inserting the 11Mbps MiniUSB Wireless Adapter into the USB slot on your computer,
: A “
Found New Hardware Wizard
” window shows up. Click
to proceed.
Next
-11-
Page 18

Step 3:
Select “
Search for a suitable driver for my device (recommended)
”.
Step 4:
driver is placed. Click on
Insert the Product CD-ROM into the CD-ROM drive. Specify the location where the
to install the driver.
Next
-12-
Page 19

Step 5:
The windows will find “
USB Device
”. Click on
to continue.
Next
Step 6:
Click
to complete the installation.
Finish
-13-
Page 20
Step 7:
any error icon appears. If no, your MiniUSB Wireless Adapter is working we ll.
Open
Control Panel/System/Device Manager
Check if there is any error
icon next to the MiniUSB
, and check
Wireless Adapter
Network Adapters
to see if
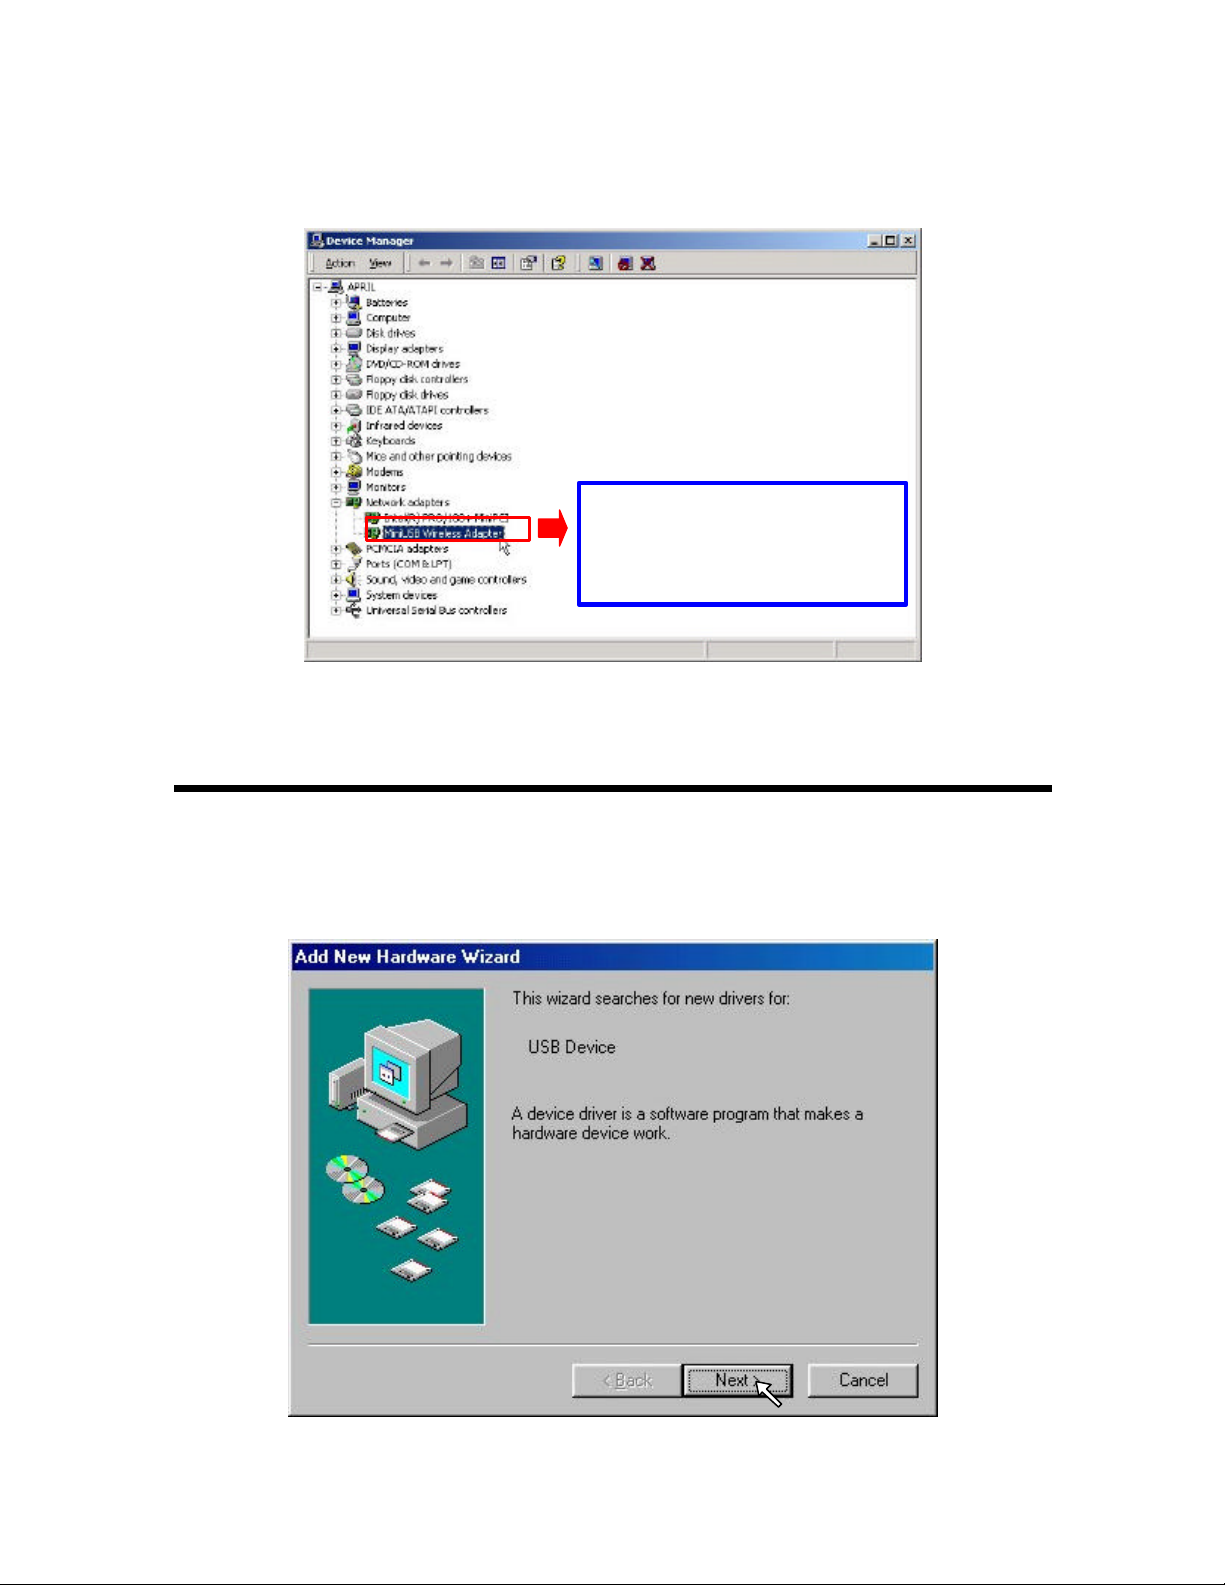
3-3 Set up MiniUSB Wireless Adapter for Windows 98/ ME
Step 1:
Windows will auto-detect new hardware and will display an “
Click
After inserting the 11Mbps MiniUSB Wireless Adapter into the USB slot on your computer,
” window.
to continue.
Next
Add New Hardware Wizard
-14-
Page 21

Step 2:
proceed.
Select “
Search for the best driver for your device (Recommended)
” and click
Next
to
Step 3:
check box and click on
Insert the Product CD-ROM into the CD-ROM drive. Select the “
to install the driver.
Next
CD-ROM drive
”
-15-
Page 22

Step 4:
Step 5:
click OK]
Usually these files can be found at C:Windows or C:Windows\ system.
The Windows will find “
Once the
window appears, enter the path corresponding to the appropriate dri ves and click OK.
[Please insert the disk labeled “Windows 98/ME CD -ROM”, and then
MiniUSB Wireless Adapter
”. Click
to continue.
Next
Step 6:
Click
to complete the software installation.
Finish
-16-
Page 23

Step 7:
Step 8:
any error icon appears next to the IEEE 802.11 MiniUSB Wireless Adapter . If no, your 11Mbps
MiniUSB Wireless Adapter is working well.
Restart the computer.
Open
Control Panel/System/Device Manager
, and check
Network Adapters
to see if
Check if there is any
error icon next to the
MiniUSB Wireless Adapter
-17-
Page 24

Configure the MiniUSB Adapter
4
This chapter gives you assistance with detailed configuration for the 11Mbps MiniUSB Wireless
Adapter under Windows XP/2000/98/ME.
4-1 Install the WLAN Utility
To install the WLAN Utility, follow these steps:
Step 1:
Step 2:
Step 3:
Insert the Product CD-ROM or floppy disk again.
Go to the
The InstallShield Wizard will show up and guide you through the rest of the setup process.
Run the Setup Utility
folder and run
utility
setup.exe
.
Choose Destination
Location and click
to continue.
Next
-18-
Page 25

Select a program folder
and click
Next
.
You may add a shortcut
in the st artup folder as
desired.
Upon completion, go to
System Tray
configuration window. When you minimize the window, the system tray icon will be loaded in the
System Tray again.
The color behind the system tray icon indicates the link status:
Blue indicates a good or excellent link.
Yellow indicates a usable but weak link.
in the bottom right corner of your task bar. Clicking on the icon will open the
Program Files
and run the WLAN Utility and its icon will appear in the
Red indicates no or very poor link quality. When you minimize the window, the system tray
icon will be loaded in the
System Tray
again .
-19-
Page 26

4-2 Use the WLAN Utility
The WLAN Utility enables you to make configuration changes and perform user-level diagnostics on
your 11Mbps MiniUSB Wireless Adapter in the Windows XP/2000/98/ME operating system
environments. The WLAN Utility consists of window with 5 items for you to monitor and configure
the 11Mbps MiniUSB Wireless Adapter:
and
Configuration:
The
Wireless Adapter such as
WEP, RTS/CTS, Fragment Threshold
the current status of the MiniUSB Wireless Adapter such as
Rate, Throughput, Link Quality
.
About
Configuration
item allows you to modify the configuration parameters for the 11Mbps MiniUSB
Profile, Network Type, Ad-Hoc Channel, Transmit Rate, ESSID
and
Configuration, Loop Back, AP Browser, Site Survey
, and
Power Save
Signal Strength
.
,
mode. Furthermore, you may monitor
State, Current Channel, Current Tx
-20-
Page 27

You may right click
tray icon to choose
Profile
The
Profile
To create the profile, go to the
If one of the profiles is no longer used, you may remove it by clicking the
changing parameters, save the profile and click the
field allows you to set values for all parameters by selecting a previously defined profile.
Profile
field, type a profile name and set the corresponding parameters.
Delete
button to take effect. You can have
Apply
button. After
multiple profiles and modify the profile at any time.
Alternatively, you may choose the profile by right clicking the system tray icon on the task bar, making
the configuration more friendly and efficient.
the WLAN system
the pre-set profiles
Network Type
There are 3 network types for the 11Mbps MiniUSB Wireless Adapter to operate. If you need to
access company network or Internet via an Access Point, select “
group of wireless stations for file and printer sharing, select “
Access Point). If
the
same channel
Ad -Hoc (without access point)
. For
802.11 AdHoc,
the
is selected, you need to set wireless stations with
same ESS ID
AdHoc
are required to the wireless stations.
Infrastructure
” or “
802.11 AdHoc
”. To set up a
” (without
-21-
Page 28

ESSID
The ESS ID is the unique ID used by Access Points and stations to identify a wireless LAN. Wireless
clients associating to any Access Point must have the same ESSID. The default setting is
ANY
, which
allows your MiniUSB Wireless Adapter to automatically associate to any Access Point (Infrastructure
mode) in the vicinity of your wireless adapter. Alternatively, you may check the
ESS ID
check box
to specify the ESS ID. It will then attempt to associate with Access Points or stations with the same
ESS ID. The ESS ID can be set up to
32 characters
and is case sensitive.
Check here before entering t he ESS ID
If there two Access Points with the same ESSID, you may check the BSS ID check box and enter the
MAC address of the Access Point you desire to connect to.
Check here before entering the BSS ID
Transmit Rate
The 11Mbps MiniUSB Wireless Adapter provides various data rate options for you to select . Data
rates options include
Fully Automatic, 2 Mb, Auto 1 or 2 Mb, 5.5 Mb
networking scenarios, you will see that the factory-set default “
Fully Auto matic
, and
11 Mb
. In most
” will prove the most
efficient. This setting will allow your 11Mbps MiniUSB Wireless Adapter to operate at the maximum
data rate. When the communications quality drops below a certain level, the PC Card will
automatically switch to a lower data rate. Transmission at lower data speeds are usually more reliable.
However, when the communications quality improves again, the 11Mbps MiniUSB Wireless Adapter
will gradually increase the data rate again, until it has reached the highest available transmit rate.
-22-
Page 29

WEP
To prevent unauthorized wireless stations from accessing data transmitted over the network, the
WLAN Utility offers highly secure data encryption, known as WEP, making your data transmission
over air more secure. To activate the WEP Encryption, check the
WEP Enabled
check box. An
Encryption window will then appear. The instructions are as follows:
Pull down the
Ø
Specify the encryption keys. There are two methods to set the WEP keys, as described below:
Ø
Encryption (WEP)
Create Encryption Keys by Using a Passphrase
To create encryption keys by using a passphrase, click the
box and type a character string in the
to generate 4 keys automatically. Select either the
string in the
. Then click the
OK
Create Key with Passphrase
Apply
menu and select either
Passphrase
field. Select one key from the 4 WEP keys and click
button on the
Configuration
64bit
or
128bit
encryption method.
Create Key with Passphrase
field. As you type, the utility uses an algorithm
64bit
or
encryption first, and type a
128bit
tab to make the sett ing take effect.
check
Create Encryption Keys Using a Passphrase (128bit)
-23-
Page 30

Create Encryption Keys Manually
You can also create encryption keys manually by clicking the
Create Keys Manually
check
box.
For 64bit encryption you may choose:
n Alphanumeric
: 5 char acters
(case sensitive) ranging from “a-z”, “A-Z” and “0-9” (e.g.
MyKey)
n Hexadecimal
:
10 hexadecimal digits
in the range of “A -F”, “a-f” and “0-9” (e.g.
11AA22BB33)
For 128bit encryption you may choose:
n Alphanumeric
: 13 characters
(case sensitive) ranging from “a-z”, “A-Z” and “0-9” (e.g.
MyKey12345678)
n Hexadecimal
: 26
hexadecimal digits
in the range of “A -F”, “a-f” and “0-9” (e.g.
00112233445566778899AABBCC).
After entering the WEP keys in the key field, select one key as active key, click the OK button and
then click the
Apply
button on the
Configuration
tab to make the setting take effect.
Create Encryption Keys Manually – Hexadecimal (64bit)
The WEP key must be set up exactly the same on the Wireless LAN stations as
Note:
they are on the wireless Access Points. If you set “MyKey” for the Wireless LAN
CF Card, the same WEP Key “MyKey” must be assigned to the Access Point or other
stations.
-24-
Page 31

Advance
The WLAN Utility also offers the advanced configuration for user to set the 11Mbps MiniUSB
Wireless Adapter under certain network environment. These advanced options include Power
Management, RTS/CTS and Fragmentation Threshold. To enable the advanced configuration, go to
the
Configuration
tab and click the
Advance
button.
Power Management
The Power Save option is designed to conserve battery life of you computer. When Power Save is
enabled, your 11Mbps Wireless LAN CF Card will go into sleep mode to minimize power
consumption.
When power saving mode is enabled, the Access Points you use need to support
Note:
power saving as well so that the communication can be established.
RTS Threshold
RTS Threshold is a mechanism implemented to prevent the “Hidden Node” problem. “Hidden
Node” is a situation in which two stations are within range of the same Access Point, but are not within
range of each other. The following figure illustrates an example of the “Hidden Node” problem.
Both stations (STA) are within range of the Access Point, however, they cannot hear each other.
Therefore, they are hidden nodes for each other. When a station starts data transmission with the
Access Point, it might not notice that the other station is already using the wireless medium. When
these two stations send data at the same time, they might collide when arriving simultane ously at the
Access Point. The collision will most certainly result in a loss of messages for both stations.
-25-
Page 32

Thus, the RTS Threshold mechanism provide s a solution to prevent data collisions. When you enable
RTS Threshold on a suspect “hidden station”, this station and its Access Point will use a Request to
Send/Clear to Send protocol (RTS/CTS). The station will send an RTS to the Access Point,
informing that it is going to transmit the data. Upon receipt, the Access Point will respond with a CTS
message to all station within its range to notify all other stations to defer transmission. It will also
confirm the requestor station that the Access Point has reserved it for the time -frame of the requested
transmission.
If the “Hidden Node” problem is an issue, please specify the packet size.
activated if the data size exceeds the value you set.
ranging from 0 to 1500. The default value is
It is highly recommended that you set the value
Disable
.
The RTS mechanism will be
Enabling RTS Threshold would cause redundant network overhead that could
Note:
negatively affect the throughput performance instead of providing a remedy.
Frag. Threshold
Fragmentation mechanism is used for improving the efficiency when high traffic flows along in the
wireless network. If your 11Mbps MiniUSB Wireless Adapter often transmit large files in wireless
network, you can enable the Fragmentation Threshold by clicking the
Enable
button and the
mechanism will split the packet. T he value can be set from 256 to 1500. The default value is
Disable
.
IRQ NO./IO Address
To avoid device conflict, you may modify the IRQ No. and IO Address for your device (Only available
under Windows NT).
-26-
Page 33

Status:
The Status field on the
Configuration
menu provides the following information.
When operating in Infrastructure mode, this field shows the MAC address of the Access Point
State:
with which the MiniUSB Wireless Adapter is communicating. When operating in Ad -Hoc mode, it
shows the virtual MAC address used by computers participating in the Ad-Hoc network.
Current Channel:
Current Tx Rate:
Throughput:
Shows the channel on which the connection is made.
Shows the highest transmit rate of the current association.
Shows the short term transmit and receive throughput in bytes/second, and is continuously
updated.
Link Quality:
Based on the quality of the received signal of the Access Point beacon. There are 5
states of link quality:
100%~80%:
Excellent link.
80%~60%: Good link quality.
60%~40%: Fair link quality.
Under 40%: Poor or no connection.
Signal Strength:
Based on the received signal strength measurement of the baseband processor of the
Beacon signal. Same as link quality, there are 5 states of signal strength:
100%~80%:
Excellent signal strength.
80%~60%: Good signal strength.
60%~40%: Fair signal strength.
Under 40%: Poor or no signal strength.
You can click the
Rescan
button to force the radio to rescan all available channels. If your link
quality or signal strength is poor, rescanning can be used to push the radio off a weak Access Point and
search for a better link with another Access Point.
-27-
Page 34

Loop Back:
The
Loop Back
tool helps you examine data transmission quality between your 11Mbps MiniUSB
Wireless Adapter and any workstation on the network. By entering IP address of 2 remote station,
setting ping interval and packet size, you may know whether communication has been made
successfully or not. Additionally, you may run the loopback test (proprietary) by clicking the
button to verify the communication quality
back
Refresh
button is used for setting the counters back to 0.
between your wireless station and Access Point .
Loop
The
AP Browser
By clicking the
:
Rescan
button, the AP Browser can display Access Points around the working
environment . Besides showing the ESSID of each Access Point, it also displays BSSID, Channel,
Signal, Quality and Supported Rates. To join any of the displayed Access Points, highlight the
Access Point you desire to connect and then click the
Points with the same ESSID), or
Join ESS
button to join the group.
Join BSS
(when there are more than 2 Access
-28-
Page 35

Site Survey:
When the
Site Survey
screen is displayed, the channel quality of all 14 radio channels will be
displayed. These channel quality measurements are shown on each gauge for the 14 radio channels.
The blue bar indicated the channel quality is clear and good. The
higher
the blue bar is, the
better
quality you have (i.e., less interference). The yellow bar indicates the channel quality is fair and the
red bar indicates the channe l is busy or having severe interference.
About:
The
item shows the versions of the Wireless LAN Utility, driver, firmware of the 11Mbps
About
MiniUSB Wireless Adapter. Also, the MAC address and frequency domain are displayed.
-29-
Page 36

Limited Warranty
This Warranty constitutes the sole and exclusive remedy of any buyer or reseller ’s equipment and the
sole and exclusive liability of the supplier in connection with the products and is in lieu of all other
warranties, express, implied or statutory, including, but not limited to, any implied warranty of
merchantability of fitness for a particular use and all other obligations or liabilities of the supplier.
In no even will the supplier or any other party or person be liable to your or anyone else for any
damages, in cluding lost profits, lost savings or other incidental or consequential damages, or inability to
use the software provided on the software media even if the supplier or the other party person has been
advised of the possibility of such damages.
The following are special terms applicable to your hardware warranty as well as services you may use
during part of the warranty period. Your formal Warranty Statement, including the warranty
applicable to our Wireless LAN products, appears in the Quick Installation Guide which accompanies
your products.
Duration of Hardware Warranty:
One Year
Replacement, Repair or Refund Procedure for Hardware:
If your unit needs a repair or replacement, return it to your dealer/distributor in its original packaging.
When returning a defective product for Warranty, always include the following documents:
The Warranty Repair Card
n
A copy of the invoice/proof of purchase, and
n
The RMA Report Form (To receive a Return Materials Authorization form (RMA), please
n
contact the party from whom you purchased the product).
Upon proof-of-purchase we shall, at its option, repair or replace the defective item at no cost to the
buyer.
This warranty is contingent upon proper use in the application for which the products are intended and
does not cover products which have been modified without the reseller’s approval or which have been
subjected to unusual physical or electrical demands or damaged in any way.
CAUTION:
In order to comply with the FCC and Ind ustry Canada RF Exposure requirements, it is
recommended, when using Notebook Computer with built-in USB Module wireless LAN, a
separation distance of at least 2.5cm must be maintained between the antenna of this
device and all persons.
-30-
Page 37

Please complete the information below and include it along with your products.
Name:
Title:
Company:
Telephone:
Fax:
Email:
City/State/Zipcode:
Country:
Product Name:
Serial Number:
MAC Address:
Invoice Date:
Product Description:
If you have any further questions, please contact your local authorized reseller for support.
-31-
 Loading...