

Page 1

toc_US.fm Page 2 Tuesday, February 7, 2006 7:50 PM
TomTo
m GO
Quick
Start
Guide
Page 2

toc_US.fm Page 3 Tuesday, February 7, 2006 7:50 PM
TomTom GO Quick Start Guide
Contents
What’s in the box 4
Before You Start... 6
Getting started 7
Making Your First Trip 8
Driving View 10
Menus 11
Using your TomTom GO 12
Points of Interest 14
Hands-Free Calling 16
Music and Photos 18
Docking your TomTom GO 21
TomTom Traffic 22
TomTom PLUS 23
Using TomTom HOME 24
How Does Navigation Work? 26
TomTom Limited Warranty 27
Contents
Contenido de la caja 28
Antes de comenzar... 30
Inicio 31
Realización del primer viaje 32
Vista de conducción 34
Menús 35
Uso del TomTom GO 36
Puntos de interés 38
Llamadas manos libres 40
Música y fotos 42
Conexión del TomTom GO 45
TomTom Traffic 46
TomTom PLUS 47
Uso de TomTom HOME 48
¿Cómo funciona la navegación? 50
TomTom Garantía Limitada 51
Contents
Contenu de la boîte 52
Avant de commencer... 54
Point de départ 55
Votre premier voyage 56
Mode conduite 58
Menus 59
Utilisation de votre TomTom GO 60
Points d'intérêt 62
Appels mains libres 64
Musique et photos 66
Accrochage de votre TomTom GO 69
TomTom Traffic 70
TomTom PLUS 71
Utilisation de TomTom HOME 72
Comment fonctionne la navigation ? 74
TomTom Garantie Limitée 75
Addendum 76
TomTom Limited Warranty for purchases made
outside of the U.S. and Canada.
Find your way the easy way
79
3
Page 3

QSG_EN.book Page 4 Tuesday, February 7, 2006 7:27 PM
EN
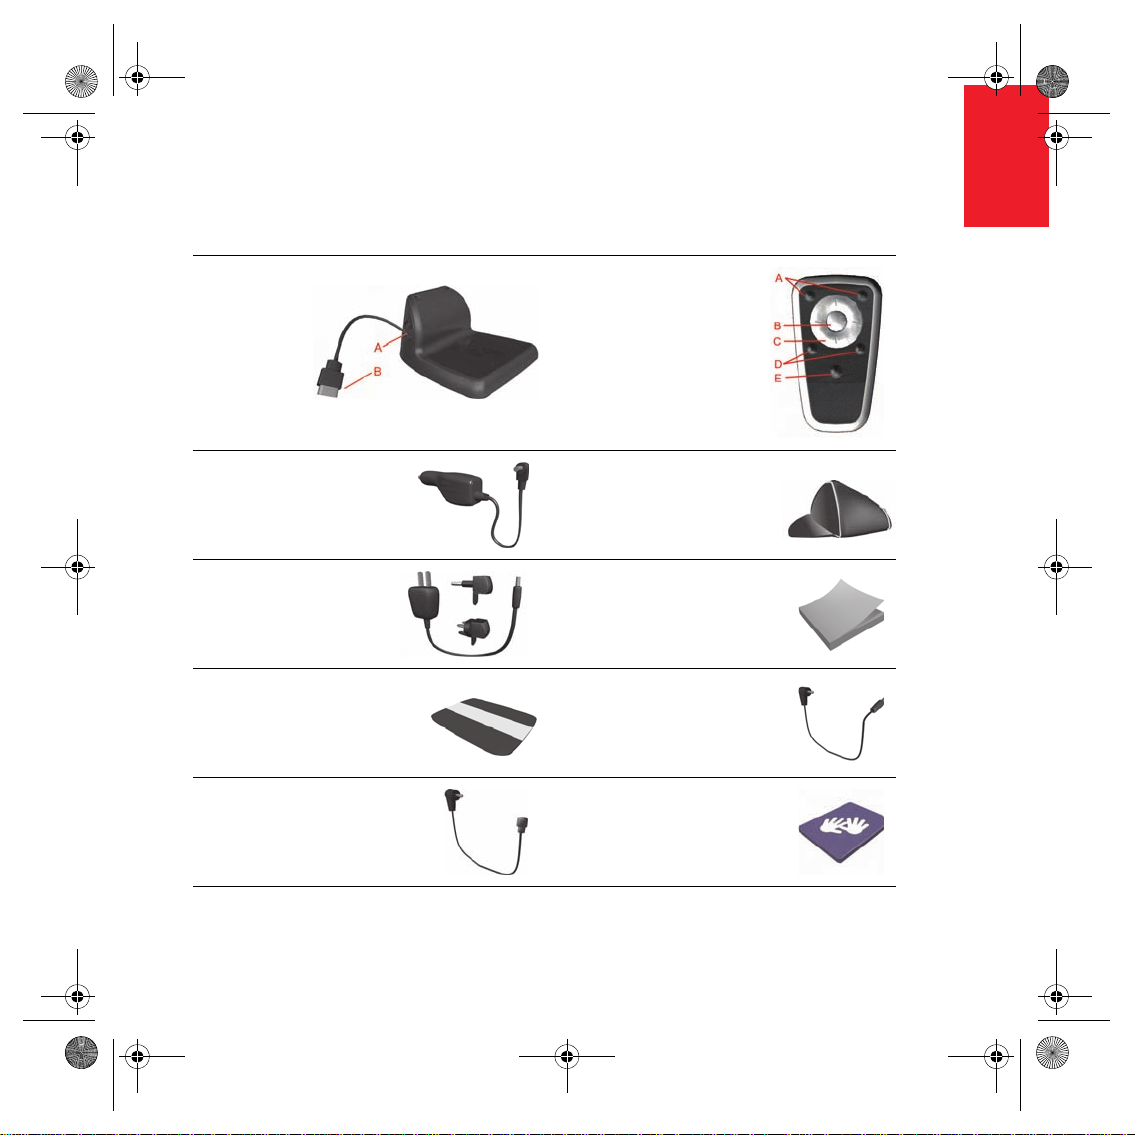
What’s in the box
What’s
in the
box
a Your TomTom GO
A Release button
B Microphone
C Charging light
D On/off button
E Light sensor
F Reset button
G Speaker
H Memory card slot*
b Windshield dock
A Audio out connector
B External microphone
connector
C External antenna
connector
D Power connector
E TomTom connector
4
Page 4
QSG_EN.book Page 5 Tuesday, February 7, 2006 7:27 PM
EN
What’s in the box
c Home Dock
d Remote control
+
A Volume up/down
B OK button
C Arrow buttons
D Left and right buttons
A Home charger connector
E Keyboard button
B USB connector
e Car charger f Carry case
g Home charger h Documentation pack
i Product code card
j Audio cable
+
k External microphone l Memory card (SD card)*
*
TomTom GO 510/710 only
+
TomTom GO 910 only
5
Page 5

QSG_EN.book Page 6 Tuesday, February 7, 2006 7:27 PM
EN
Before You Start...
Before
You
Everyone Loves TomTom GO
Start...
So never leave your GO in your car when
you’re not using it - it’s an easy target for
thieves.
Always take your GO, the windshield mount,
and the car charger with you; don’t leave any
TomTom products visible to others.
Always store your GO in the carry case to
protect the screen.
Back Up Your TomTom GO
Take Care of Your TomTom GO
It is important to take care of your GO and to
clean it correctly.
• Use a soft cloth to wipe the screen of your
GO; do not use any liquid cleaners.
• If your GO gets wet, dry it with a soft cloth.
• Do not open the casing of your GO under
any circumstances. Doing so may be
dangerous and will invalidate your
warranty.
It ’s alwa ys a goo d i dea t o m ake a ba ckup of the
contents of your TomTom GO. You can make
a backup using TomTom HOME.
For more information about TomTom HOME,
see Using TomTom HOME on page 24.
• Do not use the memory card (SD card) with
any device other than a TomTom device.
Other devices may damage the memory
card.
• Do not expose your GO to high or low
temperatures, which can cause permanent
damage. For example, don’t leave it in the
car on hot summer days or during cold
winter nights.
6
Page 6

QSG_EN.book Page 7 Tuesday, February 7, 2006 7:27 PM
Getting
started
Switching On
Follow the instructions on the Installation
Poster to dock your TomTom GO in your car.
The first time you switch on your
TomTom GO, it may take up to 20 seconds to
start. To switch off your TomTom GO, press
and hold the On/Off button for 2 seconds.
Setting Up
You have to answer a few questions to set up
your TomTom GO. Answer the questions by
tapping the screen. You will use the
touchscreen for everything you do with your
GO.
Once you have answered the questions, your
GO will display the Driving View. The Driving
View is shown in black and white until your GO
locates your current position.
Locating Your Current Position
Your TomTom GO must be outdoors to locate
your current position. The first time you start
your GO, it can take up to 5 minutes to find
your current position. If it takes longer than 5
minutes, make sure that you are in an open
place without tall buildings or trees around
you.
Getting started
Once your GO has located your current
position, the Driving View is shown in full color
and shows your position on the map.
Finding Your Position Faster
To find your position faster, use the home
dock in combination with TomTom HOME on
your computer. When connected to the
Internet, TomTom HOME automatically
downloads information which helps your GO
locate your position faster.
For more information about GPS, see How
Does Navigation Work? on page 26.
Note: Your TomTom GO does not transmit your
position. You can, however, send your position to
TomTom Buddies. For more information, visit
www.tomtom.com/plus
Note: Some vehicles have a heat reflective shield
embedded in the windshield that may prevent
TomTom GO from locating your current position.
If this is a problem in your vehicle, use the
TomTom External Antenna Kit (available as an
accessory).
EN
In the future, your position will be found much
more quickly, normally within a few seconds.
7
Page 7

QSG_EN.book Page 8 Tuesday, February 7, 2006 7:27 PM
EN
Making Your First Trip
Making
Your
Planning a route with your TomTom GO is
First
Trip
very simple. To plan your first route, follow the
steps below.
1. Tap the screen to bring up the main menu.
2. Tap Navigate to...
3. Tap Address.
When you enter an address, you can
choose from four options:
• City center - tap this button to set your
destination as the center of a city or
town.
• Street and house number - tap this
button to set an exact address as your
destination.
• Zip code - tap this button to enter a zip
code as your destination (UK and the
Netherlands only).
• Crossing or intersection - tap this
button to set your destination as the
point where two streets meet.
For your first trip, we will enter an exact
address.
4. Tap Street and house number.
8
Page 8

QSG_EN.book Page 9 Tuesday, February 7, 2006 7:27 PM
5. Start by typing the name of the town where
you want to go.
As you type, the names of the towns that
match what you have typed are shown.
When your destination is shown in the list,
tap the name of the town to set the
destination.
6. Start to type the name of the street.
As with the name of the town, the names of
the streets that match what you have typed
are shown.
7. Now enter the house number of your
destination and then tap Done.
The route is then calculated by your
TomTom GO.
8. When the route has been calculated, tap
Done.
Your TomTom GO will immediately start
guiding you to your destination with spoken
instructions and visual instructions on the
screen.
EN
Making Your First Trip
Note: Before you can plan a route in this way,
your TomTom GO must first locate your current
position.
9
Page 9
QSG_EN.book Page 10 Tuesday, February 7, 2006 7:27 PM
EN
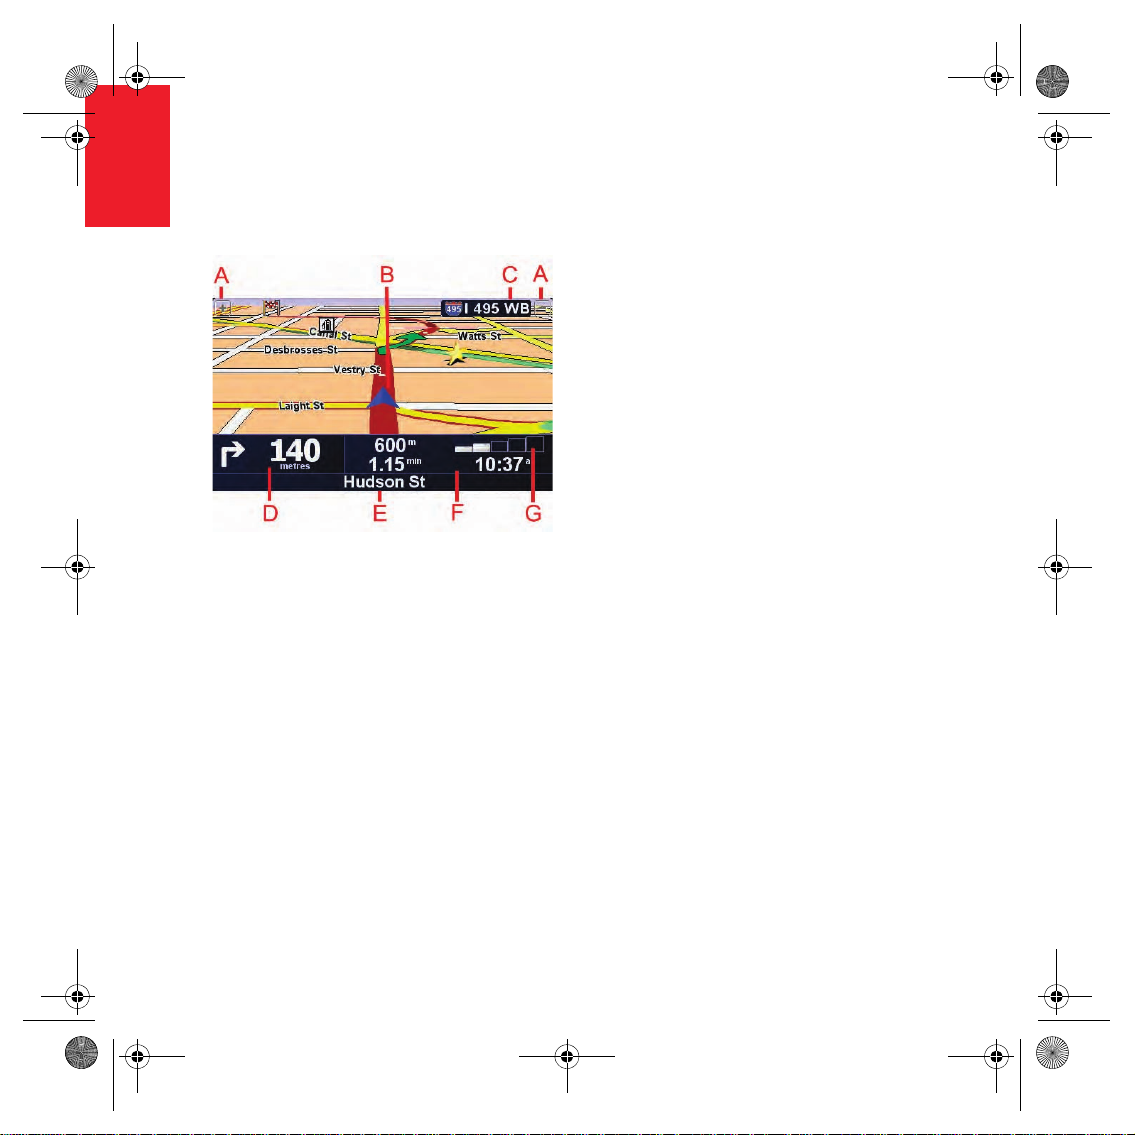
Driving View
Driving
View
A Buttons to zoom in and zoom out on your
position.
B Your current position.
C The name of the next major road, if
applicable.
D The next instruction.
This area shows you what to do and when
you will have to do it.
Tap this area to repeat the last spoken
instruction and to change the volume.
E The name of the next street to turn onto.
F Information about your trip.
Normally this area shows the remaining
travel time, remaining distance, and arrival
time. To set which information is displayed,
tap Status bar preferences in the
Preferences menu.
G Indicator of the strength of the GPS signal.
For more information about GPS, see How
Does Navigation Work? on page 26.
10
Page 10

QSG_EN.book Page 11 Tuesday, February 7, 2006 7:27 PM
EN
Menus
Main Menu
Tap the screen at any time your TomTom GO
displays the Driving View to open the Main
Menu.
• Navigate to...
Tap this button to start planning a route.
• Find alternative...
Tap this button if you want to avoid part of
your route, travel via a specific location or
calculate an alternative route.
• TomTom Traffic
Tap this button to enable or disable traffic
information. For more information, see
TomTom Traffic on page 22.
• Mobile phone
This button opens the mobile phone menu.
You can, for example, make calls, and write
or read messages. For more information,
see Hands-Free Calling on page 16.
• Change preferences
This button opens the Preferences menu.
You can change many things about the
way your TomTom GO looks and operates.
For more information, see Changing What
You See on page 13.
Menus
Hidden buttons and features
When you first start using your
TomTom GO, not all of the buttons will be
displayed in the menu.
Many buttons and some more advanced
features are hidden because you will not
need these features very often.
To show all buttons and features, tap
Show ALL menu options in the
Preferences menu.
To hide these buttons again, tap Show
fewer menu options in the Preferences
menu.
11
Page 11

QSG_EN.book Page 12 Tuesday, February 7, 2006 7:27 PM
EN
Using your TomTom GO
Using
your
Using the Map
TomTo
mGO
Every time you use your TomTom GO to plan
a route, you are using the map. However, you
can use the map in many other ways.
To open the map, tap Browse map in the Main
Menu.
Place your finger on the screen and drag it
across the screen to move the map.
A The scale bar
B Your current position
C GPS button.
Tap this button to center the map on your
current position.
D The Options button
Use the Options button to set what is
shown on the map.
E The cursor
F The Find button
Tap this button to find specific addresses
and Points of Interest on the map.
G The Cursor button
Tap this button to navigate to the cursor
position, make a Favorite of the cursor
position, or find a Point of Interest near the
cursor position.
H The zoom bar.
Change the scale of the map by moving the
zoom bar up or down.
12
Page 12

QSG_EN.book Page 13 Tuesday, February 7, 2006 7:27 PM
EN
Using your TomTom GO
Changing What You See
In the Main Menu tapChange preferences.
You can change many things about the way
the screen looks, for example:
Tap this button to reduce
the brightness and use
darker colors on the
map.
Use Night
colors
Tap this button to view
the map from above
while you are navigating.
To switch back to the 3D
Turn off 3D
display
Enable/
disable POIs
Tap the arrow to open the next page of
buttons.
view, tap it again.
Tap this button to set
which categories of
Points of Interest (POIs)
should be shown on the
map.
Choosing a Voice
You can change the voice
by tapping Change voice
in the Preferences menu.
Change
Voice
Your TomTom GO has two different kinds of
voices:
• Computer voices
This type of voice is generated by your
TomTom GO. It gives you spoken
instructions while you are driving and can
also read street names, messages and
traffic warnings aloud.
Note: Computer voices are only available on the
GO 910 and are not available in all languages.
•Human voices
This type of voice is recorded by an actor.
It gives you spoken instructions but cannot
read anything else aloud.
Once you have selected a computer voice, tap
Speech preferences in the Preferences menu
to choose the messages that the computer
voice reads aloud to you.
13
Page 13

QSG_EN.book Page 14 Tuesday, February 7, 2006 7:27 PM
EN
Points of Interest
Points
of
Points of Interest or POIs are interesting places
Interest
on the map. Here are some examples:
• Restaurants
•Hotels
•Museums
• Parking garages
•Gas stations
Showing POIs on the Map
1. Tap Enable/disable POIs in the Preferences
menu.
2. Select the POI categories to display on the
map.
3. Tap Done.
The POIs you selected are shown on the map
as symbols.
Calling a POI
Your TomTom GO knows the phone numbers
for many POIs. You can, for example, call a
restaurant to book a table or a movie theater to
book tickets.
For information about using your
TomTom GO for hands-free calling, see
Hands-Free Calling on page 16.
14
Page 14
QSG_EN.book Page 15 Tuesday, February 7, 2006 7:27 PM
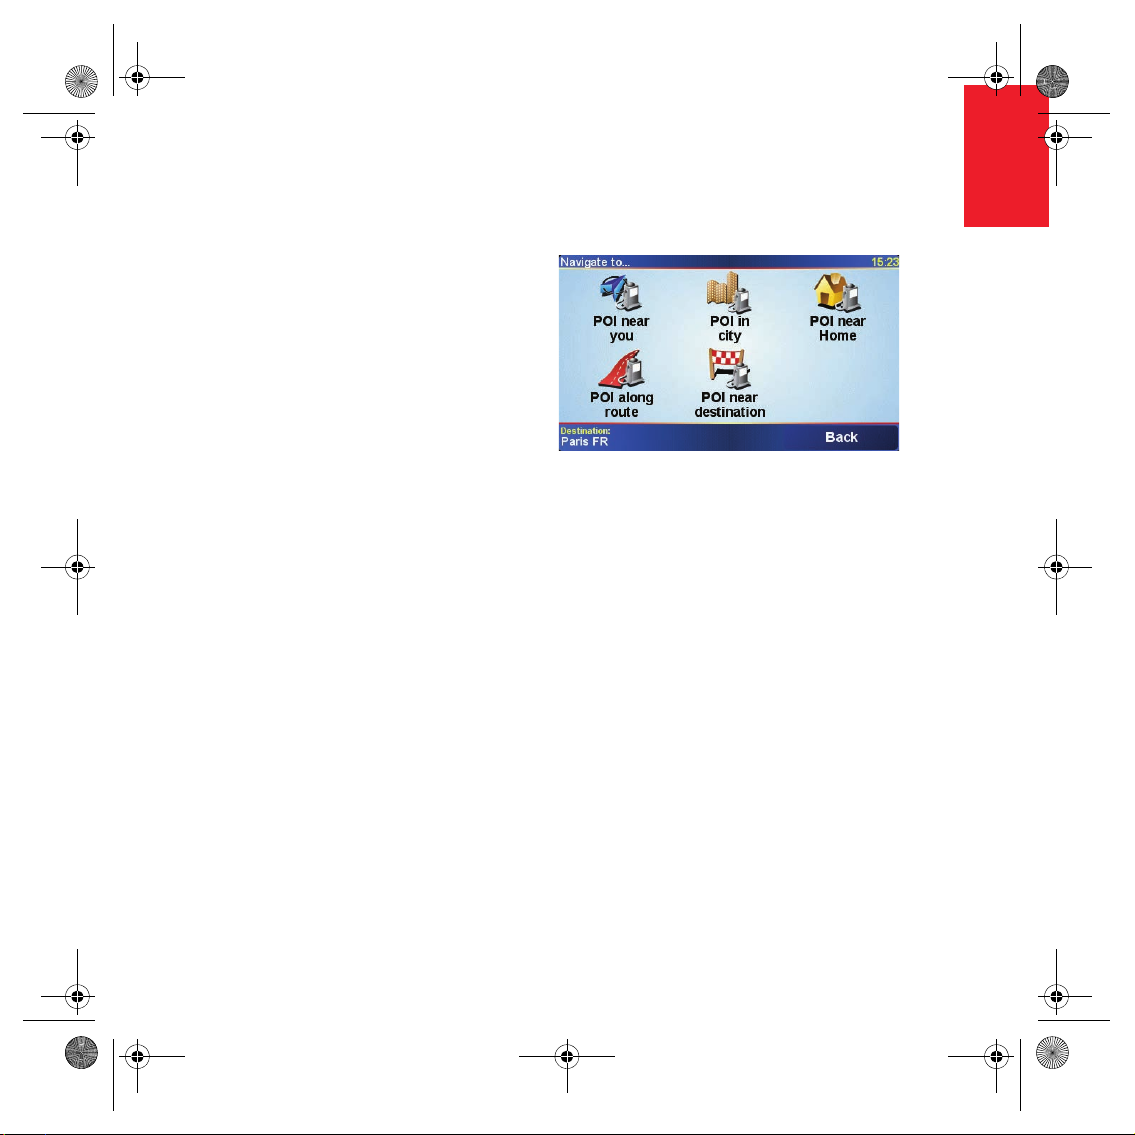
Navigating to a POI
You can use a POI as your destination. For
example, if you are traveling to a city you
aren’t familiar with, you could navigate to a
parking garage there.
1. Tap Navigate to... in the Main Menu.
2. Tap Point of Interest.
3. Tap POI in city.
4. Type the name of the town where you want
to go. Select the town when it is shown in
the list.
5. Tap Parking garage.
6. Select a parking garage. The distance listed
next to each POI is the distance from the
city center.
The route to the POI is then calculated by your
TomTom GO.
EN
Points of Interest
15
Page 15

QSG_EN.book Page 16 Tuesday, February 7, 2006 7:27 PM
EN
Hands-Free Calling
Tips
• Make sure that you switch on Bluetooth
on your phone.
• Make sure that your phone is set to
"discoverable" or "visible to all".
• You may have to enter the password
‘0000’ on your phone in order to
connect to your TomTom GO.
• Make your TomTom GO a trusted
device on your phone. Otherwise you
will have to enter ‘0000’ every time.
HandsFree
If you have a cell phone with Bluetooth®, you
Calling
can use your TomTom GO to make phone
calls and send and receive messages while
you are driving.
Note: not all phones are supported. For more
information, visit www.tomtom.com/phones
Connecting to Your Phone
First you must establish a connection between
your cell phone and your TomTom GO. You
only have to do this once. Your TomTom GO
remembers your phone.
Tap cell phone in the Main Menu, then follow
the instructions on the screen.
Setting up TomTom PLUS
After you have established a connection with
your phone, you can set up a connection for
TomTom PLUS services.
For information about TomTom PLUS, see
TomTom PLUS on page 23.
See your phone’s user guide for
information about Bluetooth settings.
16
Page 16

QSG_EN.book Page 17 Tuesday, February 7, 2006 7:27 PM
Making a Call
Once you have established a connection with
your phone, you can start making calls.
1. Tap Cell phone in the Main Menu.
2. Tap Call.
Note: Make sure that your phone is
currently selected. The current phone is
shown at the bottom of the screen.
3. Tap Number to enter a number to call.
Receiving a Call
If someone calls you while you are driving,
accept or reject the call by tapping the screen.
Auto-Answer
You can tell your TomTom GO to answer
every call automatically after a certain time.
Tap Phone preferences in the mobile phone
menu, then tap Auto-answer preferences.
Select when your TomTom GO will
automatically answer your calls.
EN
Hands-Free Calling
Sharing your TomTom GO
You can establish connections with up to 5
mobile phones. To add more phones, do the
following
1. Tap Cell phone in the Main Menu.
2. Tap Connect to your phone.
3. Tap Find other phone... and follow the
instructions on the screen.
To switch between phones, tap Connect to
your phone and then select your phone from
the list.
17
 Loading...