

Page 1

Contents
1 Checking Out Your Gateway Solo 1450. . . . . . . . . . . . . . . . . . . . . . . . . . 1
Front . . . . . . . . . . . . . . . . . . . . . . . . . . . . . . . . . . . . . . . . . . . . . . . . . . . . . . . . . . . . . 2
Left side . . . . . . . . . . . . . . . . . . . . . . . . . . . . . . . . . . . . . . . . . . . . . . . . . . . . . . . . . . . 3
Right side . . . . . . . . . . . . . . . . . . . . . . . . . . . . . . . . . . . . . . . . . . . . . . . . . . . . . . . . . . 4
Back . . . . . . . . . . . . . . . . . . . . . . . . . . . . . . . . . . . . . . . . . . . . . . . . . . . . . . . . . . . . . . 5
Bottom . . . . . . . . . . . . . . . . . . . . . . . . . . . . . . . . . . . . . . . . . . . . . . . . . . . . . . . . . . . . 6
Keyboard area . . . . . . . . . . . . . . . . . . . . . . . . . . . . . . . . . . . . . . . . . . . . . . . . . . . . . . 7
Identifying your model . . . . . . . . . . . . . . . . . . . . . . . . . . . . . . . . . . . . . . . . . . . . . . . . 9
Accessories . . . . . . . . . . . . . . . . . . . . . . . . . . . . . . . . . . . . . . . . . . . . . . . . . . . . . . . 10
2Getting Started. . . . . . . . . . . . . . . . . . . . . . . . . . . . . . . . . . . . . . . . . . . . . . . . . . 11
Connecting the AC adapter . . . . . . . . . . . . . . . . . . . . . . . . . . . . . . . . . . . . . . . . . . . 12
Protecting from power source problems . . . . . . . . . . . . . . . . . . . . . . . . . . . . . . 14
Starting your notebook . . . . . . . . . . . . . . . . . . . . . . . . . . . . . . . . . . . . . . . . . . . . . . 15
Waking up your notebook . . . . . . . . . . . . . . . . . . . . . . . . . . . . . . . . . . . . . . . . . 15
Turning off your notebook . . . . . . . . . . . . . . . . . . . . . . . . . . . . . . . . . . . . . . . . . . . . 16
Status indicators . . . . . . . . . . . . . . . . . . . . . . . . . . . . . . . . . . . . . . . . . . . . . . . . . . . 17
Using the keyboard . . . . . . . . . . . . . . . . . . . . . . . . . . . . . . . . . . . . . . . . . . . . . . . . . 18
Key types . . . . . . . . . . . . . . . . . . . . . . . . . . . . . . . . . . . . . . . . . . . . . . . . . . . . . 19
System key combinations . . . . . . . . . . . . . . . . . . . . . . . . . . . . . . . . . . . . . . . . . 20
Multi-function buttons . . . . . . . . . . . . . . . . . . . . . . . . . . . . . . . . . . . . . . . . . . . . . . . 22
Using the EZ Pad touchpad . . . . . . . . . . . . . . . . . . . . . . . . . . . . . . . . . . . . . . . . . . 23
Using the touchpad . . . . . . . . . . . . . . . . . . . . . . . . . . . . . . . . . . . . . . . . . . . . . . 24
Connecting the modem . . . . . . . . . . . . . . . . . . . . . . . . . . . . . . . . . . . . . . . . . . . . . . 26
Connecting to an Ethernet network . . . . . . . . . . . . . . . . . . . . . . . . . . . . . . . . . . . . 27
Broadband Internet connections . . . . . . . . . . . . . . . . . . . . . . . . . . . . . . . . . . . . 27
Installing a printer, scanner, or other peripheral device . . . . . . . . . . . . . . . . . . . . . 28
3Getting Help . . . . . . . . . . . . . . . . . . . . . . . . . . . . . . . . . . . . . . . . . . . . . . . . . . . . 29
HelpSpot . . . . . . . . . . . . . . . . . . . . . . . . . . . . . . . . . . . . . . . . . . . . . . . . . . . . . . . . . 30
HelpSpot Videos . . . . . . . . . . . . . . . . . . . . . . . . . . . . . . . . . . . . . . . . . . . . . . . . 32
Online help . . . . . . . . . . . . . . . . . . . . . . . . . . . . . . . . . . . . . . . . . . . . . . . . . . . . . . . 33
Gateway Web site . . . . . . . . . . . . . . . . . . . . . . . . . . . . . . . . . . . . . . . . . . . . . . . . . . 34
4 Windows Basics . . . . . . . . . . . . . . . . . . . . . . . . . . . . . . . . . . . . . . . . . . . . . . . . 35
About the Windows environment . . . . . . . . . . . . . . . . . . . . . . . . . . . . . . . . . . . . . . 36
Using the desktop . . . . . . . . . . . . . . . . . . . . . . . . . . . . . . . . . . . . . . . . . . . . . . . . . . 37
Using the Start menu . . . . . . . . . . . . . . . . . . . . . . . . . . . . . . . . . . . . . . . . . . . . 38
Identifying Window items . . . . . . . . . . . . . . . . . . . . . . . . . . . . . . . . . . . . . . . . . . . . . 39
i
Page 2

Working with files and folders . . . . . . . . . . . . . . . . . . . . . . . . . . . . . . . . . . . . . . . . .41
Viewing drives . . . . . . . . . . . . . . . . . . . . . . . . . . . . . . . . . . . . . . . . . . . . . . . . . .41
Creating folders . . . . . . . . . . . . . . . . . . . . . . . . . . . . . . . . . . . . . . . . . . . . . . . . .42
Copying and moving files and folders . . . . . . . . . . . . . . . . . . . . . . . . . . . . . . . .43
Deleting files and folders . . . . . . . . . . . . . . . . . . . . . . . . . . . . . . . . . . . . . . . . . .45
Browsing for files and folders . . . . . . . . . . . . . . . . . . . . . . . . . . . . . . . . . . . . . .47
Searching for files . . . . . . . . . . . . . . . . . . . . . . . . . . . . . . . . . . . . . . . . . . . . . . . . . . .48
Using the Search utility . . . . . . . . . . . . . . . . . . . . . . . . . . . . . . . . . . . . . . . . . . .49
Working with documents . . . . . . . . . . . . . . . . . . . . . . . . . . . . . . . . . . . . . . . . . . . . .51
Creating a new document . . . . . . . . . . . . . . . . . . . . . . . . . . . . . . . . . . . . . . . . .51
Saving a document . . . . . . . . . . . . . . . . . . . . . . . . . . . . . . . . . . . . . . . . . . . . . .52
Opening a document . . . . . . . . . . . . . . . . . . . . . . . . . . . . . . . . . . . . . . . . . . . . .53
Printing a document . . . . . . . . . . . . . . . . . . . . . . . . . . . . . . . . . . . . . . . . . . . . . .54
Shortcuts . . . . . . . . . . . . . . . . . . . . . . . . . . . . . . . . . . . . . . . . . . . . . . . . . . . . . . . . . .55
5 Using the Internet . . . . . . . . . . . . . . . . . . . . . . . . . . . . . . . . . . . . . . . . . . . . . . .57
Learning about the Internet . . . . . . . . . . . . . . . . . . . . . . . . . . . . . . . . . . . . . . . . . . .58
Setting up an Internet account . . . . . . . . . . . . . . . . . . . . . . . . . . . . . . . . . . . . . . . . .59
Accessing your Internet account . . . . . . . . . . . . . . . . . . . . . . . . . . . . . . . . . . . .60
Using the World Wide Web . . . . . . . . . . . . . . . . . . . . . . . . . . . . . . . . . . . . . . . . . . .61
Connecting to a Web site . . . . . . . . . . . . . . . . . . . . . . . . . . . . . . . . . . . . . . . . . .62
Downloading files . . . . . . . . . . . . . . . . . . . . . . . . . . . . . . . . . . . . . . . . . . . . . . . .63
Using e-mail . . . . . . . . . . . . . . . . . . . . . . . . . . . . . . . . . . . . . . . . . . . . . . . . . . . . . . .64
Sending e-mail . . . . . . . . . . . . . . . . . . . . . . . . . . . . . . . . . . . . . . . . . . . . . . . . . .65
Checking your e-mail . . . . . . . . . . . . . . . . . . . . . . . . . . . . . . . . . . . . . . . . . . . . .65
6 Using Multimedia. . . . . . . . . . . . . . . . . . . . . . . . . . . . . . . . . . . . . . . . . . . . . . . .67
Using diskettes . . . . . . . . . . . . . . . . . . . . . . . . . . . . . . . . . . . . . . . . . . . . . . . . . . . . .68
Using a CD, CD-RW, or DVD drive . . . . . . . . . . . . . . . . . . . . . . . . . . . . . . . . . . . . .69
Inserting a CD, CD-RW, or DVD . . . . . . . . . . . . . . . . . . . . . . . . . . . . . . . . . . . .69
Creating CDs using your CD-RW or DVD/CD-RW drive . . . . . . . . . . . . . . . . . . . . .70
Creating data CDs . . . . . . . . . . . . . . . . . . . . . . . . . . . . . . . . . . . . . . . . . . . . . . .70
Creating music CDs . . . . . . . . . . . . . . . . . . . . . . . . . . . . . . . . . . . . . . . . . . . . . .73
Adjusting the volume . . . . . . . . . . . . . . . . . . . . . . . . . . . . . . . . . . . . . . . . . . . . . . . .77
Listening to CDs . . . . . . . . . . . . . . . . . . . . . . . . . . . . . . . . . . . . . . . . . . . . . . . . . . . .80
Recording and playing audio . . . . . . . . . . . . . . . . . . . . . . . . . . . . . . . . . . . . . . . . . .81
Playing audio and video files with the Windows Media Player . . . . . . . . . . . . .83
Playing a DVD . . . . . . . . . . . . . . . . . . . . . . . . . . . . . . . . . . . . . . . . . . . . . . . . . .84
Using MusicMatch . . . . . . . . . . . . . . . . . . . . . . . . . . . . . . . . . . . . . . . . . . . . . . . . . .85
Playing CDs . . . . . . . . . . . . . . . . . . . . . . . . . . . . . . . . . . . . . . . . . . . . . . . . . . . .85
Creating music files . . . . . . . . . . . . . . . . . . . . . . . . . . . . . . . . . . . . . . . . . . . . . .86
Editing track information . . . . . . . . . . . . . . . . . . . . . . . . . . . . . . . . . . . . . . . . . . .88
Building a music library . . . . . . . . . . . . . . . . . . . . . . . . . . . . . . . . . . . . . . . . . . .89
ii
Page 3

Listening to Internet radio . . . . . . . . . . . . . . . . . . . . . . . . . . . . . . . . . . . . . . . . . 91
Using advanced features . . . . . . . . . . . . . . . . . . . . . . . . . . . . . . . . . . . . . . . . . 92
7 Sending and Receiving Faxes . . . . . . . . . . . . . . . . . . . . . . . . . . . . . . . . . . 93
Setting up your cover page . . . . . . . . . . . . . . . . . . . . . . . . . . . . . . . . . . . . . . . . . . . 94
Sending a fax . . . . . . . . . . . . . . . . . . . . . . . . . . . . . . . . . . . . . . . . . . . . . . . . . . . . . 96
Faxing from programs . . . . . . . . . . . . . . . . . . . . . . . . . . . . . . . . . . . . . . . . . . . . . . . 98
Receiving and viewing a fax . . . . . . . . . . . . . . . . . . . . . . . . . . . . . . . . . . . . . . . . . . 98
8 Managing Power . . . . . . . . . . . . . . . . . . . . . . . . . . . . . . . . . . . . . . . . . . . . . . . . 99
Monitoring the battery charge . . . . . . . . . . . . . . . . . . . . . . . . . . . . . . . . . . . . . . . . 100
Recharging the battery . . . . . . . . . . . . . . . . . . . . . . . . . . . . . . . . . . . . . . . . . . . . . 101
Recalibrating the battery . . . . . . . . . . . . . . . . . . . . . . . . . . . . . . . . . . . . . . . . . . . . 102
Changing batteries . . . . . . . . . . . . . . . . . . . . . . . . . . . . . . . . . . . . . . . . . . . . . . . . 103
Extending battery life . . . . . . . . . . . . . . . . . . . . . . . . . . . . . . . . . . . . . . . . . . . . . . . 105
Conserving battery power . . . . . . . . . . . . . . . . . . . . . . . . . . . . . . . . . . . . . . . . 105
Using alternate power sources . . . . . . . . . . . . . . . . . . . . . . . . . . . . . . . . . . . . 105
Changing power modes . . . . . . . . . . . . . . . . . . . . . . . . . . . . . . . . . . . . . . . . . 106
Changing power settings . . . . . . . . . . . . . . . . . . . . . . . . . . . . . . . . . . . . . . . . . . . . 107
Changing the power scheme . . . . . . . . . . . . . . . . . . . . . . . . . . . . . . . . . . . . . 108
Changing alarm options . . . . . . . . . . . . . . . . . . . . . . . . . . . . . . . . . . . . . . . . . 109
Changing advanced settings . . . . . . . . . . . . . . . . . . . . . . . . . . . . . . . . . . . . . 110
Activating and Using Hibernate Mode . . . . . . . . . . . . . . . . . . . . . . . . . . . . . . 111
Changing SpeedStep settings . . . . . . . . . . . . . . . . . . . . . . . . . . . . . . . . . . . . 112
9Travel tips . . . . . . . . . . . . . . . . . . . . . . . . . . . . . . . . . . . . . . . . . . . . . . . . . . . . . 113
Modem . . . . . . . . . . . . . . . . . . . . . . . . . . . . . . . . . . . . . . . . . . . . . . . . . . . . . . . . . . 114
Radio frequency wireless connections . . . . . . . . . . . . . . . . . . . . . . . . . . . . . . . . . 114
Files . . . . . . . . . . . . . . . . . . . . . . . . . . . . . . . . . . . . . . . . . . . . . . . . . . . . . . . . . . . . 115
Security . . . . . . . . . . . . . . . . . . . . . . . . . . . . . . . . . . . . . . . . . . . . . . . . . . . . . . . . . 115
Power . . . . . . . . . . . . . . . . . . . . . . . . . . . . . . . . . . . . . . . . . . . . . . . . . . . . . . . . . . . 116
10 Customizing Your Notebook . . . . . . . . . . . . . . . . . . . . . . . . . . . . . . . . . . . 117
Adjusting the screen and desktop settings . . . . . . . . . . . . . . . . . . . . . . . . . . . . . . 118
Adjusting the color depth . . . . . . . . . . . . . . . . . . . . . . . . . . . . . . . . . . . . . . . . 118
Adjusting the screen resolution . . . . . . . . . . . . . . . . . . . . . . . . . . . . . . . . . . . 120
Applying a color scheme . . . . . . . . . . . . . . . . . . . . . . . . . . . . . . . . . . . . . . . . 121
Changing the desktop background . . . . . . . . . . . . . . . . . . . . . . . . . . . . . . . . . 122
Selecting a screen saver . . . . . . . . . . . . . . . . . . . . . . . . . . . . . . . . . . . . . . . . 123
Changing the touchpad settings . . . . . . . . . . . . . . . . . . . . . . . . . . . . . . . . . . . . . . 125
Programming the multi-function buttons . . . . . . . . . . . . . . . . . . . . . . . . . . . . . . . . 126
Adding and modifying user accounts . . . . . . . . . . . . . . . . . . . . . . . . . . . . . . . . . . 127
iii
Page 4

11 Upgrading Your Notebook. . . . . . . . . . . . . . . . . . . . . . . . . . . . . . . . . . . . . .129
Adding PC Cards . . . . . . . . . . . . . . . . . . . . . . . . . . . . . . . . . . . . . . . . . . . . . . . . . .130
Preventing static electricity discharge . . . . . . . . . . . . . . . . . . . . . . . . . . . . . . . . . .132
Installing memory . . . . . . . . . . . . . . . . . . . . . . . . . . . . . . . . . . . . . . . . . . . . . . . . . .133
Replacing the hard drive . . . . . . . . . . . . . . . . . . . . . . . . . . . . . . . . . . . . . . . . . . . .137
12 Networking Your Notebook. . . . . . . . . . . . . . . . . . . . . . . . . . . . . . . . . . . . .139
The benefits of using a network . . . . . . . . . . . . . . . . . . . . . . . . . . . . . . . . . . . . . . .140
Sharing a single Internet connection . . . . . . . . . . . . . . . . . . . . . . . . . . . . . . . .140
Sharing drives . . . . . . . . . . . . . . . . . . . . . . . . . . . . . . . . . . . . . . . . . . . . . . . . .140
Sharing peripheral devices . . . . . . . . . . . . . . . . . . . . . . . . . . . . . . . . . . . . . . . .140
Streaming audio and video files . . . . . . . . . . . . . . . . . . . . . . . . . . . . . . . . . . .141
Playing multi-player games . . . . . . . . . . . . . . . . . . . . . . . . . . . . . . . . . . . . . . .141
Example network . . . . . . . . . . . . . . . . . . . . . . . . . . . . . . . . . . . . . . . . . . . . . . . . . .142
Selecting a network connection . . . . . . . . . . . . . . . . . . . . . . . . . . . . . . . . . . . . . . .143
Wired connections . . . . . . . . . . . . . . . . . . . . . . . . . . . . . . . . . . . . . . . . . . . . . .143
Wireless Connections . . . . . . . . . . . . . . . . . . . . . . . . . . . . . . . . . . . . . . . . . . . .144
Assessing your connection needs . . . . . . . . . . . . . . . . . . . . . . . . . . . . . . . . . .145
Comparing data transfer speed . . . . . . . . . . . . . . . . . . . . . . . . . . . . . . . . . . . .146
Using a wireless network . . . . . . . . . . . . . . . . . . . . . . . . . . . . . . . . . . . . . . . . . . . .148
Using wireless Ethernet . . . . . . . . . . . . . . . . . . . . . . . . . . . . . . . . . . . . . . . . . .149
Purchasing additional network equipment . . . . . . . . . . . . . . . . . . . . . . . . . . . . . . .174
HPNA . . . . . . . . . . . . . . . . . . . . . . . . . . . . . . . . . . . . . . . . . . . . . . . . . . . . . . . .174
Ethernet . . . . . . . . . . . . . . . . . . . . . . . . . . . . . . . . . . . . . . . . . . . . . . . . . . . . . .175
Wireless Ethernet . . . . . . . . . . . . . . . . . . . . . . . . . . . . . . . . . . . . . . . . . . . . . . .176
For more information . . . . . . . . . . . . . . . . . . . . . . . . . . . . . . . . . . . . . . . . . . . . . . .176
13 Moving From Your Old Computer . . . . . . . . . . . . . . . . . . . . . . . . . . . . . .177
Transferring software and hardware from your old computer . . . . . . . . . . . . . . . .177
Using the Windows XP Files and Settings Transfer Wizard . . . . . . . . . . . . . .177
Transferring files . . . . . . . . . . . . . . . . . . . . . . . . . . . . . . . . . . . . . . . . . . . . . . . .178
Transferring Internet settings . . . . . . . . . . . . . . . . . . . . . . . . . . . . . . . . . . . . . .179
Reinstalling your old printer or scanner . . . . . . . . . . . . . . . . . . . . . . . . . . . . . .180
Reinstalling your old programs . . . . . . . . . . . . . . . . . . . . . . . . . . . . . . . . . . . .181
14 Maintaining Your Notebook. . . . . . . . . . . . . . . . . . . . . . . . . . . . . . . . . . . . .183
Caring for your computer . . . . . . . . . . . . . . . . . . . . . . . . . . . . . . . . . . . . . . . . . . . .183
Creating an emergency startup diskette . . . . . . . . . . . . . . . . . . . . . . . . . . . . . . . .185
Protecting your computer from viruses . . . . . . . . . . . . . . . . . . . . . . . . . . . . . . . . .187
Managing hard drive space . . . . . . . . . . . . . . . . . . . . . . . . . . . . . . . . . . . . . . . . . .189
Checking hard drive space . . . . . . . . . . . . . . . . . . . . . . . . . . . . . . . . . . . . . . .189
Using Disk Cleanup . . . . . . . . . . . . . . . . . . . . . . . . . . . . . . . . . . . . . . . . . . . . .190
iv
Page 5

Checking the hard drive for errors . . . . . . . . . . . . . . . . . . . . . . . . . . . . . . . . . 191
Defragmenting the hard drive . . . . . . . . . . . . . . . . . . . . . . . . . . . . . . . . . . . . . 193
Backing up files . . . . . . . . . . . . . . . . . . . . . . . . . . . . . . . . . . . . . . . . . . . . . . . . 195
Using the Scheduled Task Wizard . . . . . . . . . . . . . . . . . . . . . . . . . . . . . . . . . 196
Cleaning your computer . . . . . . . . . . . . . . . . . . . . . . . . . . . . . . . . . . . . . . . . . . . . 197
Cleaning the exterior . . . . . . . . . . . . . . . . . . . . . . . . . . . . . . . . . . . . . . . . . . . . 197
Cleaning the keyboard . . . . . . . . . . . . . . . . . . . . . . . . . . . . . . . . . . . . . . . . . . 198
Cleaning the screen . . . . . . . . . . . . . . . . . . . . . . . . . . . . . . . . . . . . . . . . . . . . 198
Cleaning the mouse . . . . . . . . . . . . . . . . . . . . . . . . . . . . . . . . . . . . . . . . . . . . 198
15 Restoring Software . . . . . . . . . . . . . . . . . . . . . . . . . . . . . . . . . . . . . . . . . . . . 201
Using the Restoration CDs . . . . . . . . . . . . . . . . . . . . . . . . . . . . . . . . . . . . . . . . . . 201
Reinstalling device drivers . . . . . . . . . . . . . . . . . . . . . . . . . . . . . . . . . . . . . . . . . . . 202
Updating device drivers . . . . . . . . . . . . . . . . . . . . . . . . . . . . . . . . . . . . . . . . . . . . . 204
Reinstalling programs . . . . . . . . . . . . . . . . . . . . . . . . . . . . . . . . . . . . . . . . . . . . . . 206
Reinstalling Windows . . . . . . . . . . . . . . . . . . . . . . . . . . . . . . . . . . . . . . . . . . . . . . 208
16 Troubleshooting . . . . . . . . . . . . . . . . . . . . . . . . . . . . . . . . . . . . . . . . . . . . . . . 211
Safety guidelines . . . . . . . . . . . . . . . . . . . . . . . . . . . . . . . . . . . . . . . . . . . . . . . . . . 212
First steps . . . . . . . . . . . . . . . . . . . . . . . . . . . . . . . . . . . . . . . . . . . . . . . . . . . . . . . 213
Software support tools . . . . . . . . . . . . . . . . . . . . . . . . . . . . . . . . . . . . . . . . . . . . . . 214
Troubleshooting . . . . . . . . . . . . . . . . . . . . . . . . . . . . . . . . . . . . . . . . . . . . . . . . . . . 215
CD, CD-RW, DVD, or DVD/CD-RW drives . . . . . . . . . . . . . . . . . . . . . . . . . . 215
Device installation . . . . . . . . . . . . . . . . . . . . . . . . . . . . . . . . . . . . . . . . . . . . . . 217
Diskette drive . . . . . . . . . . . . . . . . . . . . . . . . . . . . . . . . . . . . . . . . . . . . . . . . . 217
File management . . . . . . . . . . . . . . . . . . . . . . . . . . . . . . . . . . . . . . . . . . . . . . 218
Hard drive . . . . . . . . . . . . . . . . . . . . . . . . . . . . . . . . . . . . . . . . . . . . . . . . . . . . 219
Internet . . . . . . . . . . . . . . . . . . . . . . . . . . . . . . . . . . . . . . . . . . . . . . . . . . . . . . 219
Keyboard . . . . . . . . . . . . . . . . . . . . . . . . . . . . . . . . . . . . . . . . . . . . . . . . . . . . . 221
LCD panel . . . . . . . . . . . . . . . . . . . . . . . . . . . . . . . . . . . . . . . . . . . . . . . . . . . . 221
Memory . . . . . . . . . . . . . . . . . . . . . . . . . . . . . . . . . . . . . . . . . . . . . . . . . . . . . . 222
Modem . . . . . . . . . . . . . . . . . . . . . . . . . . . . . . . . . . . . . . . . . . . . . . . . . . . . . . 222
Mouse . . . . . . . . . . . . . . . . . . . . . . . . . . . . . . . . . . . . . . . . . . . . . . . . . . . . . . . 226
Networks . . . . . . . . . . . . . . . . . . . . . . . . . . . . . . . . . . . . . . . . . . . . . . . . . . . . . 226
Passwords . . . . . . . . . . . . . . . . . . . . . . . . . . . . . . . . . . . . . . . . . . . . . . . . . . . . 226
PC Cards . . . . . . . . . . . . . . . . . . . . . . . . . . . . . . . . . . . . . . . . . . . . . . . . . . . . . 226
Power . . . . . . . . . . . . . . . . . . . . . . . . . . . . . . . . . . . . . . . . . . . . . . . . . . . . . . . 227
Printer . . . . . . . . . . . . . . . . . . . . . . . . . . . . . . . . . . . . . . . . . . . . . . . . . . . . . . . 227
Sound . . . . . . . . . . . . . . . . . . . . . . . . . . . . . . . . . . . . . . . . . . . . . . . . . . . . . . . 229
Video . . . . . . . . . . . . . . . . . . . . . . . . . . . . . . . . . . . . . . . . . . . . . . . . . . . . . . . . 229
Telephone support . . . . . . . . . . . . . . . . . . . . . . . . . . . . . . . . . . . . . . . . . . . . . . . . . 230
Before calling Gateway Technical Support . . . . . . . . . . . . . . . . . . . . . . . . . . 230
Telephone numbers . . . . . . . . . . . . . . . . . . . . . . . . . . . . . . . . . . . . . . . . . . . . 231
v
Page 6

Tutoring and training . . . . . . . . . . . . . . . . . . . . . . . . . . . . . . . . . . . . . . . . . . . . . . . .232
Self-help . . . . . . . . . . . . . . . . . . . . . . . . . . . . . . . . . . . . . . . . . . . . . . . . . . . . . .232
Tutoring . . . . . . . . . . . . . . . . . . . . . . . . . . . . . . . . . . . . . . . . . . . . . . . . . . . . . .232
Training . . . . . . . . . . . . . . . . . . . . . . . . . . . . . . . . . . . . . . . . . . . . . . . . . . . . . . .232
A Safety, Regulatory, and Legal Information . . . . . . . . . . . . . . . . . . . . . .235
Index. . . . . . . . . . . . . . . . . . . . . . . . . . . . . . . . . . . . . . . . . . . . . . . . . . . . . . . . . . . . . . 253
vi
Page 7
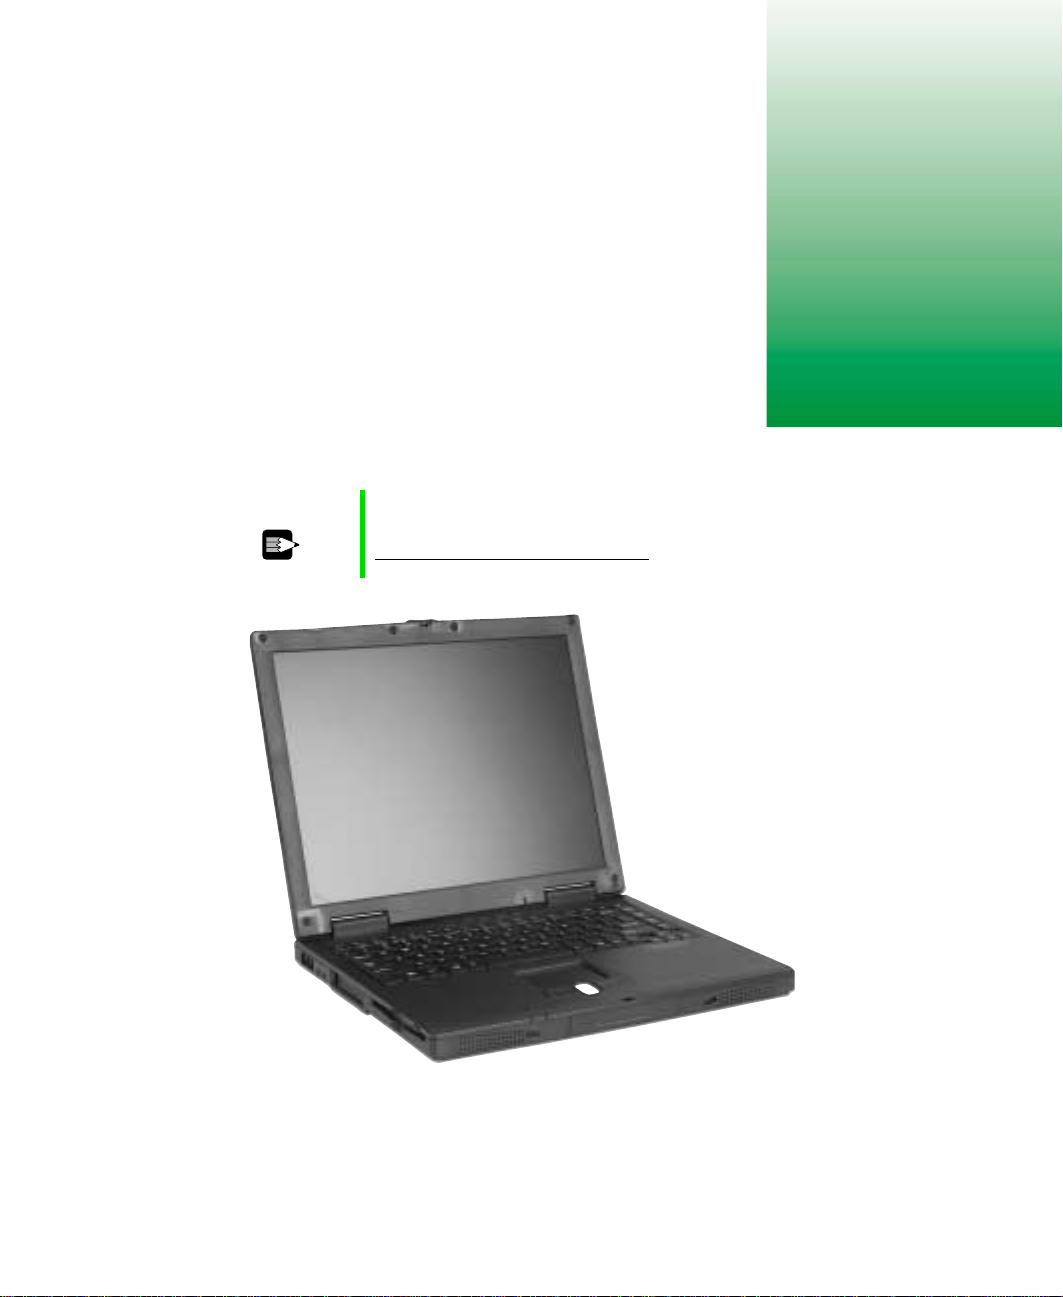
Checking Out
Your Gateway
Solo 1450
Tips & Tricks T o acce ss the contents of this guide while you a re trav eling,
download an electronic copy from
www.gateway.com/support/manlib/.
1
www.gateway.com
1
Page 8
Chapter 1: Checking Out Yo ur Gateway Solo 1450
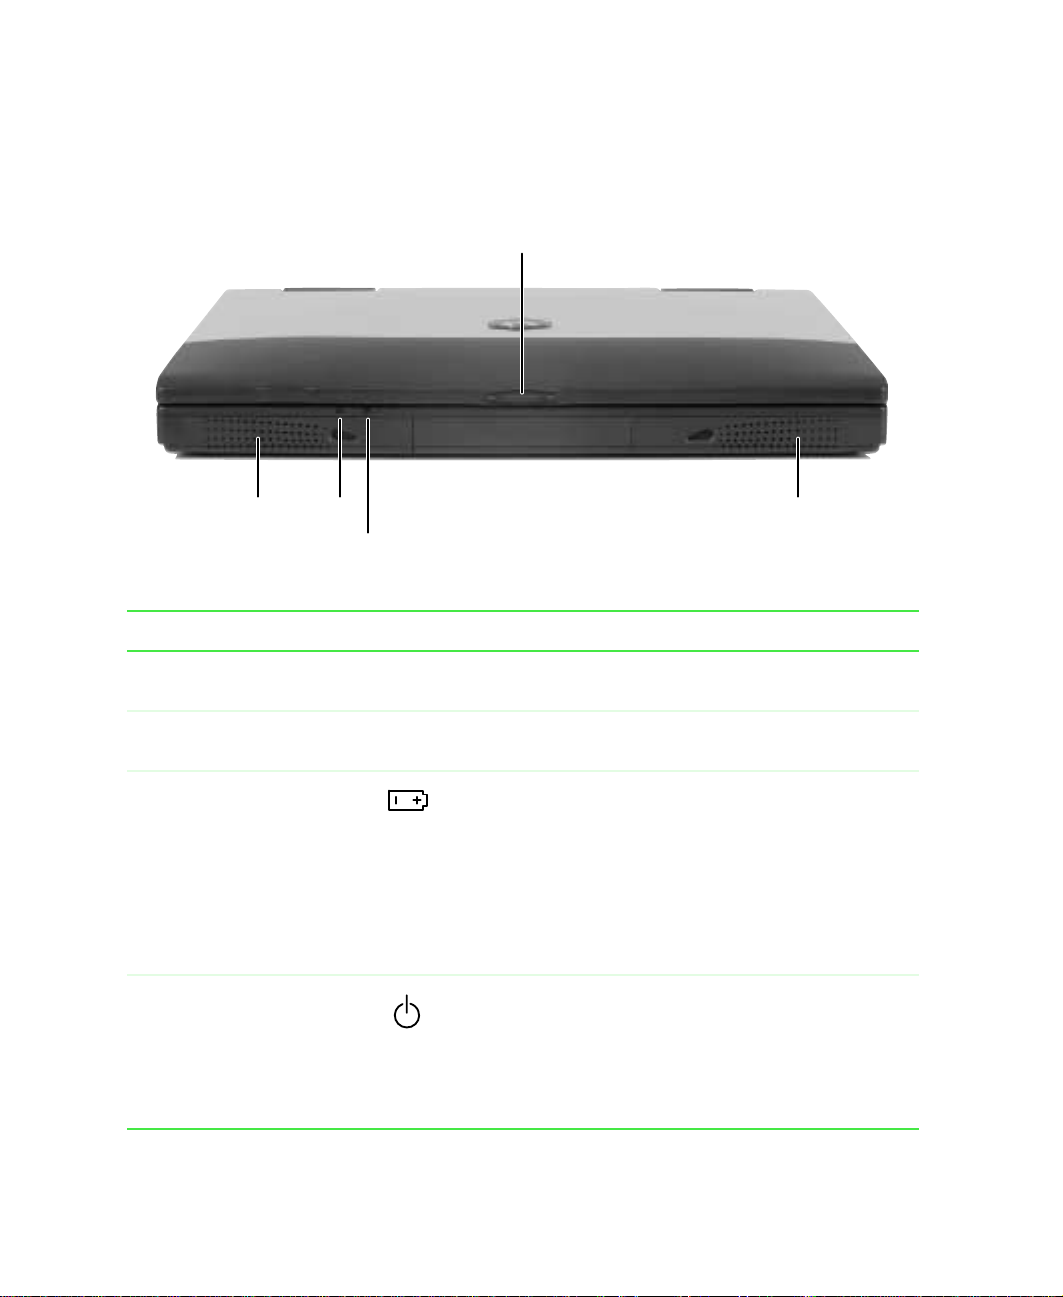
Front
LCD panel
release
latch
Speaker
Battery
charge
indicator
Speaker
Power
indicator
Component Icon Description
LCD panel release latch Open the LCD panel by sliding the release latch to the
right.
Speakers Provide audio output. Speakers are disabled while
headphones are connected.
Battery charge indicator The LED shows the battery activity and status.
■
LED green – b atter y is fully charged.
■
LED orange – batter y is cha rging.
■
LED red – battery is low.
■
LED blinking and red – battery is very low.
NOTE: This LED only lights up when the notebook is
plugged in.
Pow er indicator Lights up when the note book is turned on an d shows the
notebook power status.
■
LED on – power is on.
■
LED flashing – notebook is in Standby mode.
■
LED off – power is off or notebook is in Hibernate
mode.
2
www.gateway.com
Page 9
Left side
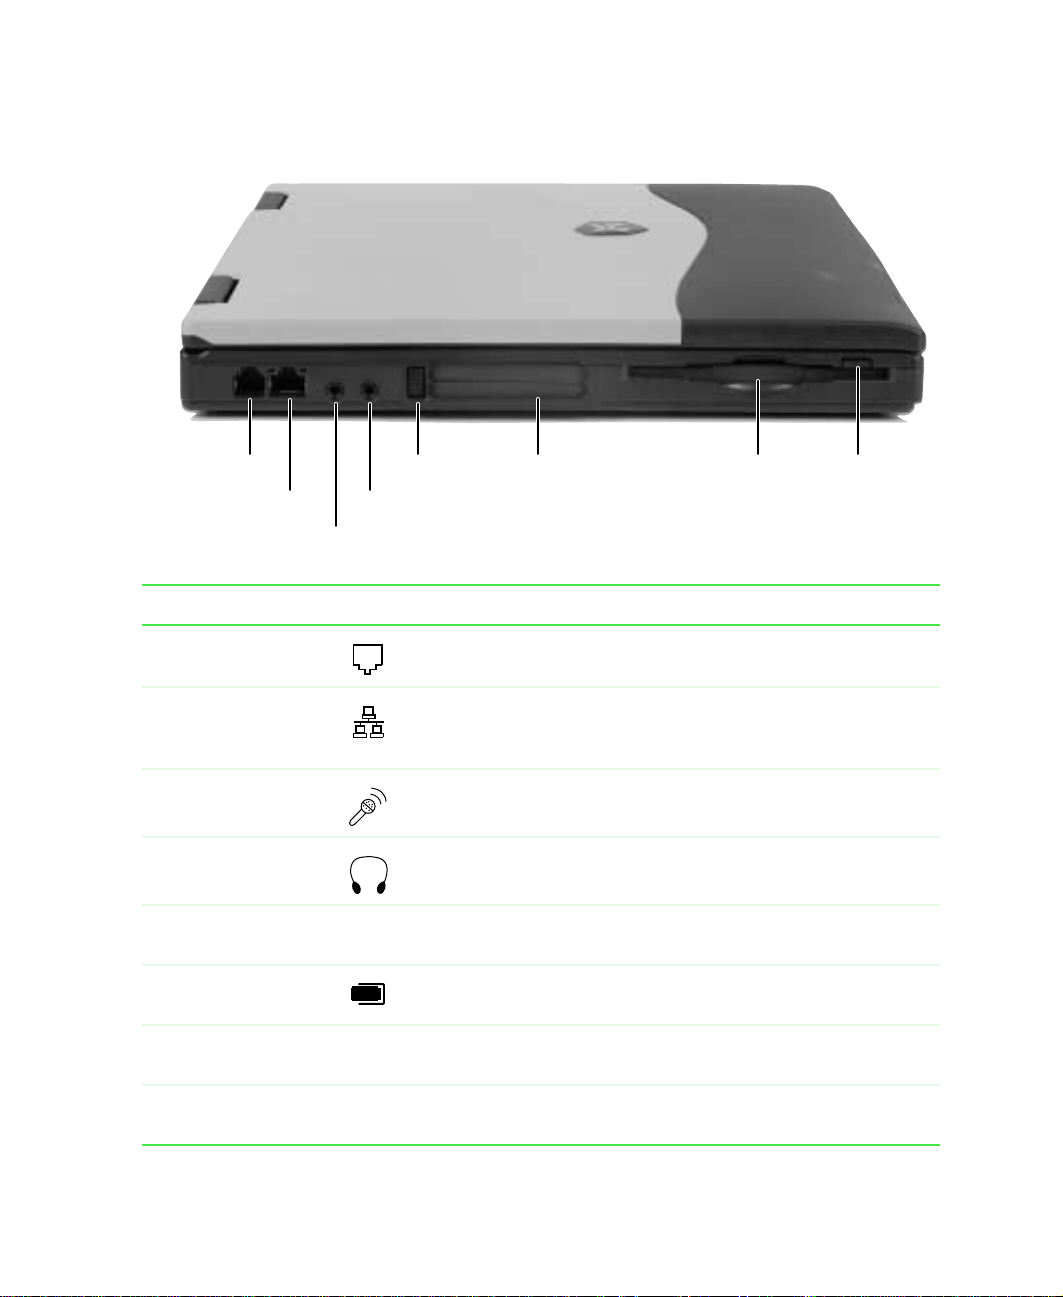
Left side
drive
Diskette drive
eject button
Modem jack
Ethernet jack
Microphone jack
PC Card
eject button
Headphone jack
PC Card
slot
Diskette
Component Icon Description
Modem jack Plug a modem cable into this jack. For more information, see
“Connecting the modem” on page 26.
Ethernet jack Plug a 10/100 Ethernet network cable into this jack. For more
information, see “Conn ecting to an Ethernet network” on page 27
and “Networking Your Notebook” on page 139.
Microphone jack Plug a microphone into this jack.
Headphone jack Plug amplified speakers or headphones into this jack.
PC Card eject bu tton Press this eject but ton to remo v e the PC Card from the PC Card
slot. For more information, see “Adding PC Cards” on page 130.
PC Card slot Insert one Type II or Type III PC Card into this slot. For more
information, see “Adding PC Cards” on page 130.
Diskette dr ive Inser t a standa rd 3.5-inch diskette in to this dr ive. For more
information, see “Using diskettes” on page 68.
Diskette drive eject
button
Press the ej ect button t o remove a diskett e from the drive. For
more information, see “Using diskettes” on page 68.
www.gateway.com
3
Page 10
Chapter 1: Checking Out Yo ur Gateway Solo 1450
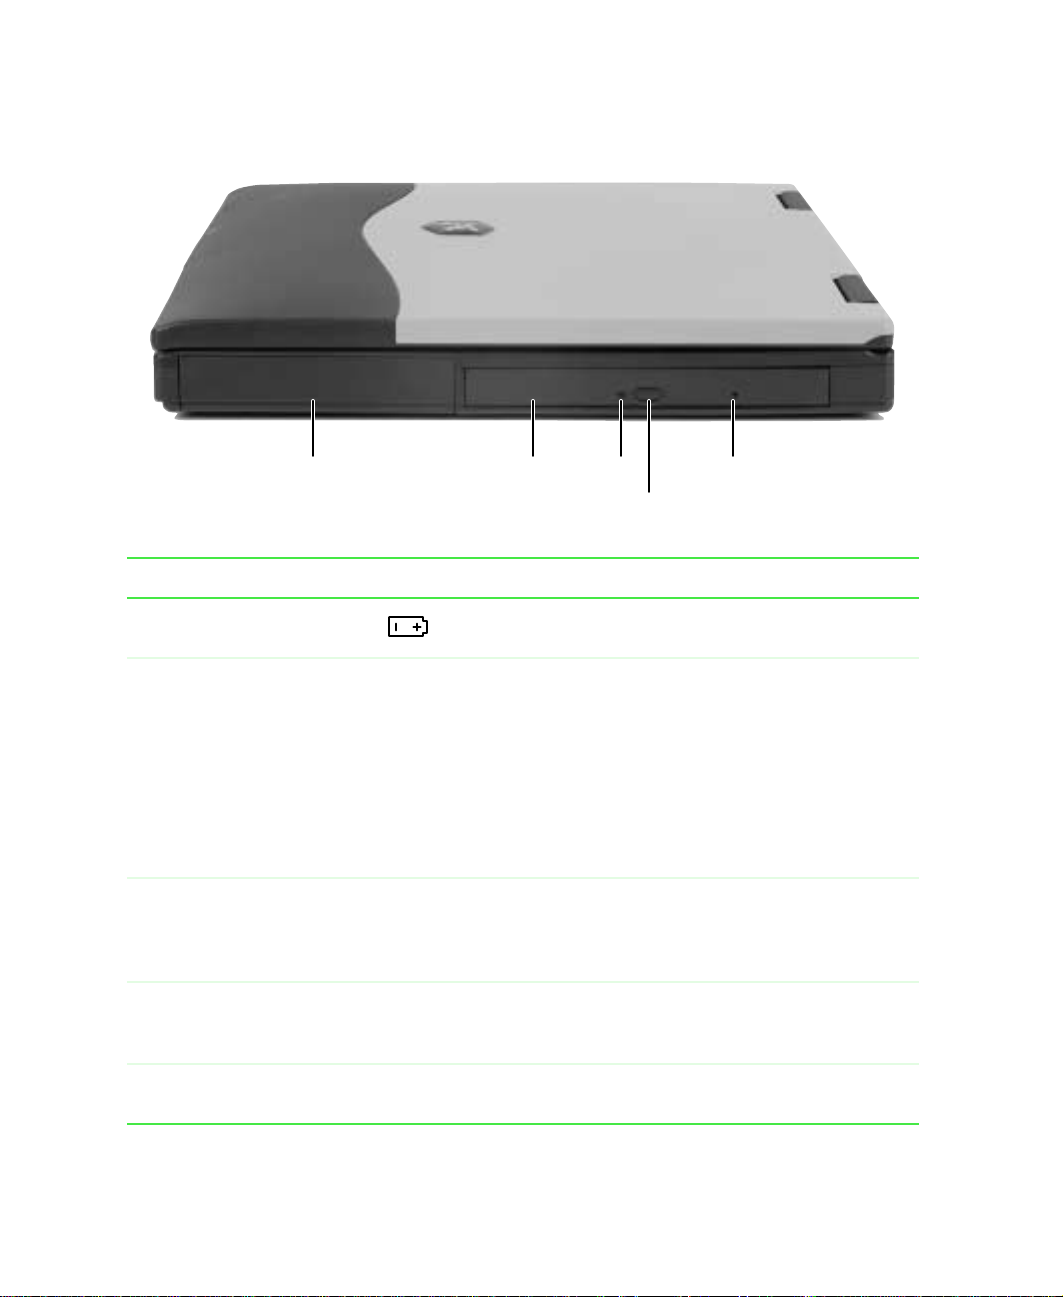
Right side
Battery bay Manual eject hole
CD, CD-RW, DVD,
or DVD/CD-RW
drive
Drive
indicator
Drive eject button
Component Icon Description
Battery bay Insert the battery into this bay. For more inf ormation, s ee
“Changing batteries” on page 103.
CD, CD-RW, DVD, or
combination DVD/CD-RW
drive
Drive indicator Lights up when the computer is accessing the CD,
Drive eject button Press the eject button to open the disc tray. For more
Insert CDs, CD-RWs, or DVDs into this drive. For more
information, see “ U s ing a CD, CD-RW, or DVD drive” on
page 69.
T o det ermine the type of driv e in your noteb ook, exa mine
the drive tray’s plastic cover. A CD Compact Disc logo
indicates a CD dri ve, a CD-R/RW logo indicate s a
recordable/rewritable CD drive, a DVD logo indicates a
DVD drive, and a DVD/CD-R/RW logo indicates a
combination DVD and recordable/rewritable CD drive.
CD-RW, DVD, or combination DVD/CD-RW drive. For
more information, see “Using a CD, CD-RW, or DVD
drive” on page 69.
information, see “ U s ing a CD, CD-RW, or DVD drive” on
page 69.
Manual eject hole Insert a straightened paperclip into this h ole to open the
drive if the drive eject button fails to open it.
4
www.gateway.com
Page 11
Back
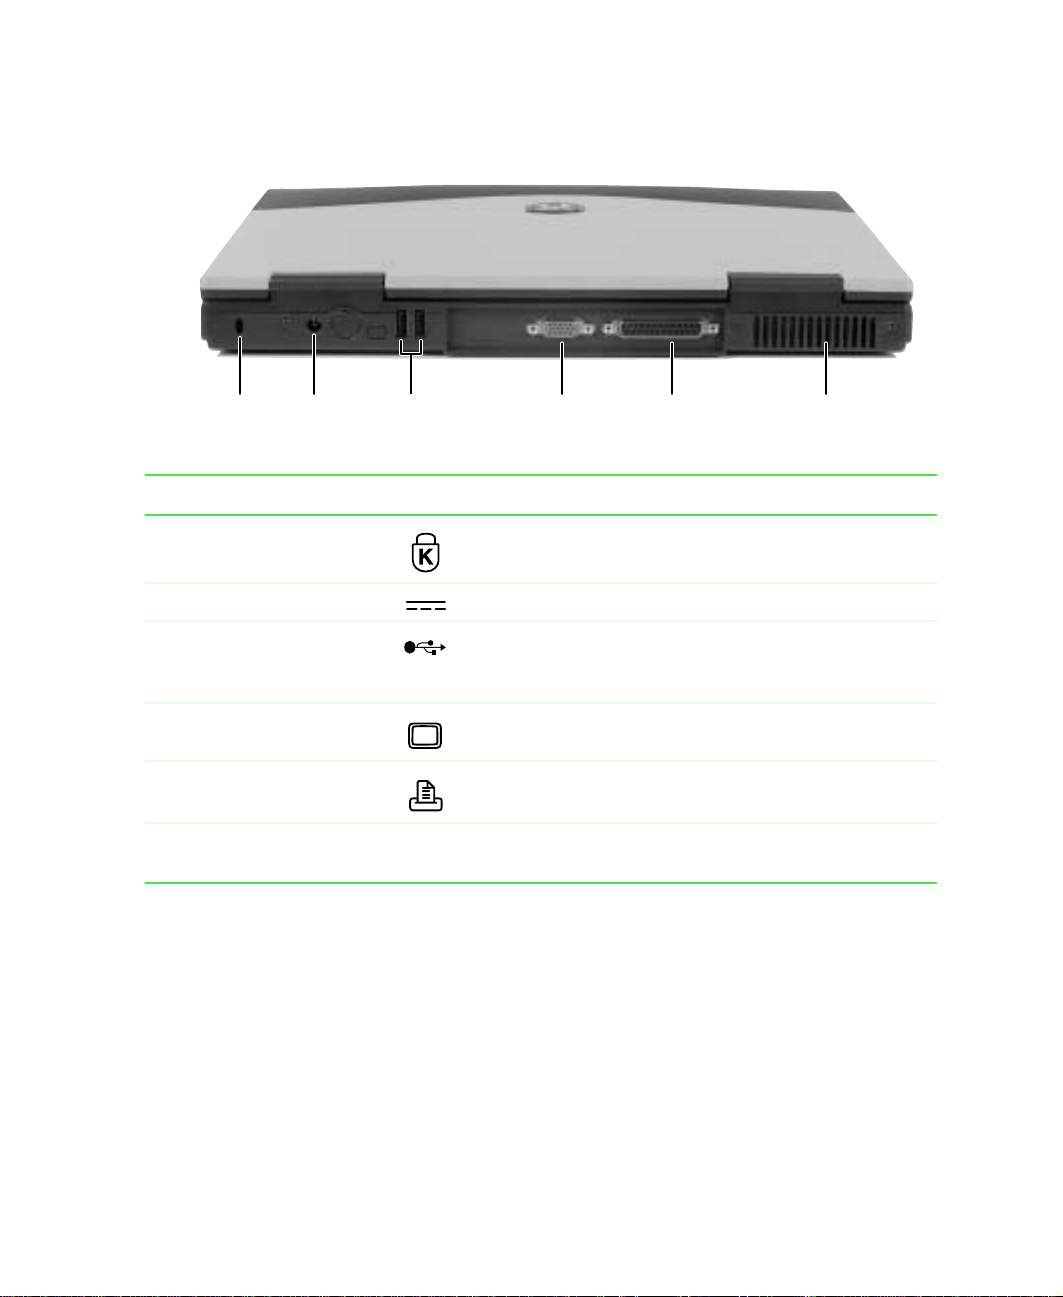
Back
Kensington
lock slot
Power
connector
USB
ports
Monitor
port
Parallel
port
Ventilation
fan
Component Icon Description
Kensington™ lock slot Secure your computer to an object by connecting a
Kensington cable lock to this slot.
Power connector Plug the AC adapter cable into this connector.
USB ports Plug USB (Univers al Serial Bus) devices (s uch as a USB
Iomega™ Zip™ drive, printer, scanner, or camera) into
these ports.
Monitor port Plug an analog VGA monitor into this port.
Parallel port Plug a parallel device (such as a printer) into this port.
Ventilation fan Helps cool internal components. Do not block or insert
objects in to these slo ts.
www.gateway.com
5
Page 12
Chapter 1: Checking Out Yo ur Gateway Solo 1450
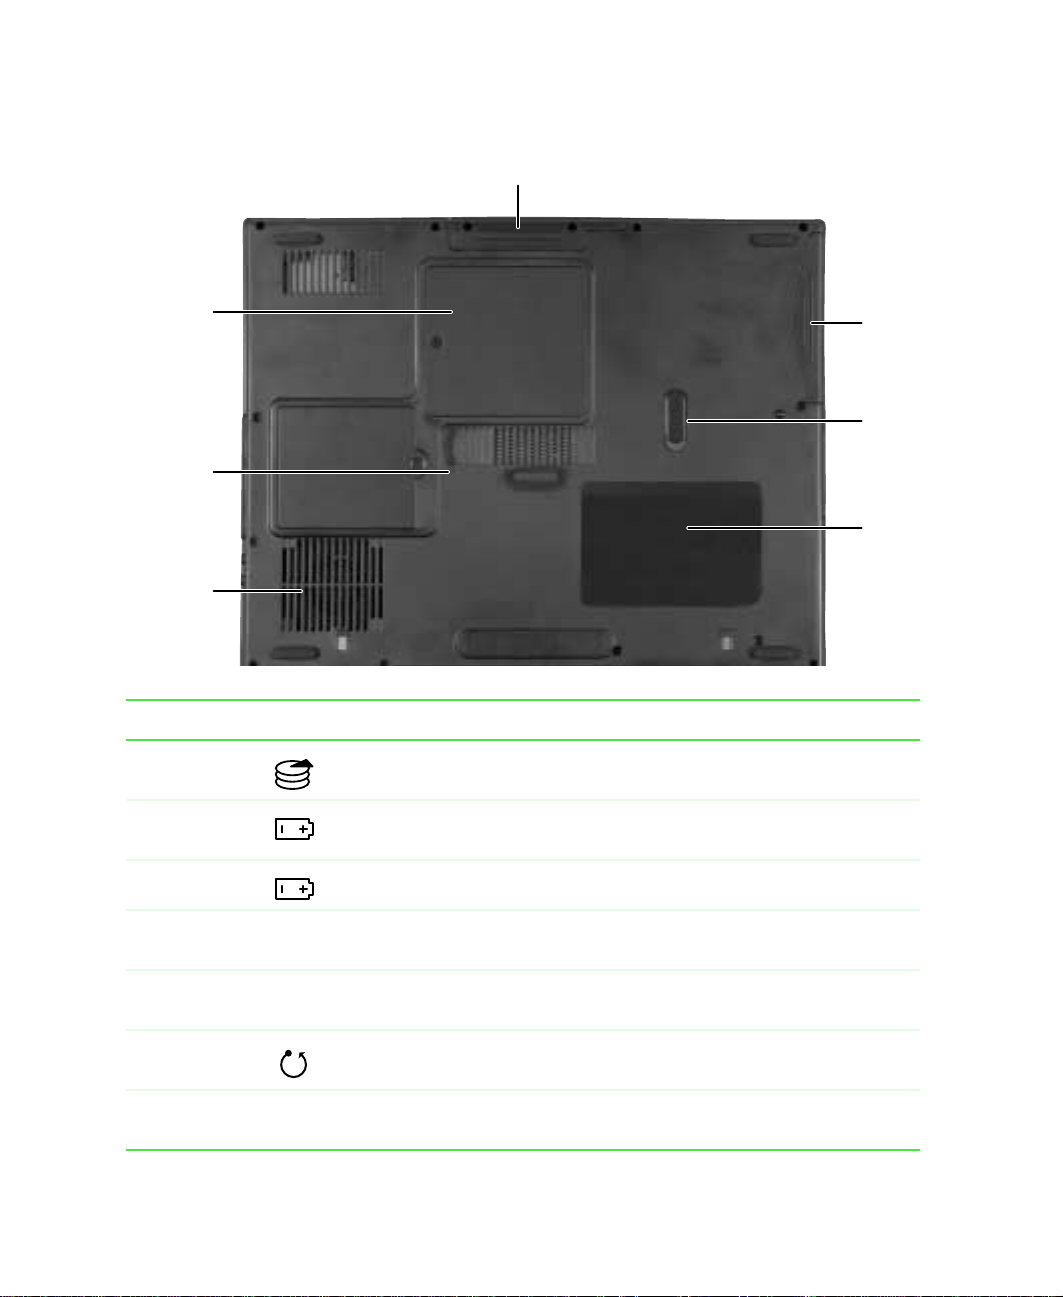
Bottom
Memory
bay
Reset
hole
Ventilation
fan
Hard drive
Battery
bay
Battery
latch
System
label
Component Icon Description
Hard drive Install the hard drive here. For more information, see “Replacing the
hard drive” on page 137.
Battery bay Insert the battery into this bay. For more information, see “Changing
batteries” on page 103.
Battery latch Slide to release the battery.
System labe l Includes th e produc t model numbe r and ser ial number. For more
information, see “Identifying your model” on page 9.
Ventilation
fan
Reset hole Insert a straightened paper clip into this hole to manually restart the
Memory bay Install as m any as two mem ory m odules in to this bay. For more
6
Helps cool internal components. Do not block or insert objects into these
slots.
system.
information, see “Installing memory” on page 133.
www.gateway.com
Page 13

Ke yboard area
Keyboard
Touchpad
Keyboard area
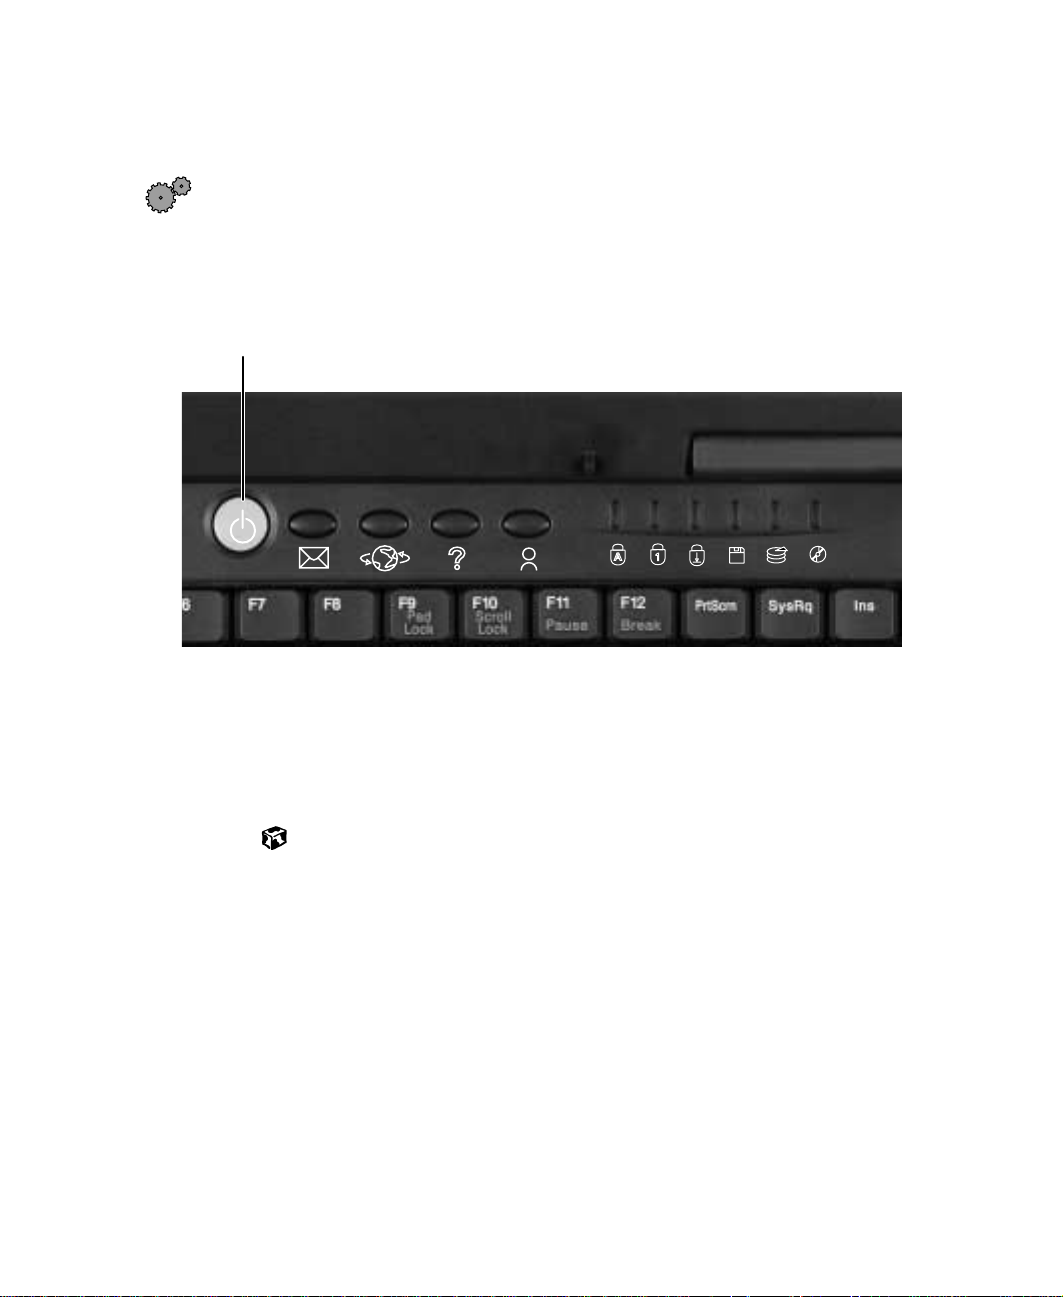
Multi-function buttons
Power button
Status
indicators
Component Icon Description
Power button Press to turn the power on or off. For more information on
configuring the power button mode, see “Changing power
settings” on page 107.
Multi-function buttons Four multi-function buttons can be assigned to open
applications. By default, these buttons are set to open your
e-mail application, your Web browser, online help, and
another program that you assign. For more information, see
“Multi-function buttons” on page 22.
Status indicators Inf orm y ou wh en a d rive is in use o r whe n a b utt on has been
pressed that affects how the keybo ard is used . For more
information, see “Status indicators” on page 17.
Touchpad Provides all the functionality of a mouse. For more
information, see “Using the EZ Pad touchpad” on page 23.
www.gateway.com
7
Page 14

Chapter 1: Checking Out Yo ur Gateway Solo 1450
Component Icon Description
Keyboard A full-sized 86-key keyboard. For more information, see
“Using the keyboard” on page 18.
8
www.gateway.com
Page 15

Identifying y our model
The labels on the bottom of your computer contain information that
identifies your notebook model and its features. Gateway Tec hnical Support
will need this information if you call for assistance.
Important The label shown below is for informational purposes only.
Label information var ies by model.
Insert Solo 1450 Label
The following label indicates your computer contains a wireless
communications dev ice.
Identifying your mo del
Insert Wireless Label
The Microsoft Certificate of Authenticity label includes the product key code
for your operating system.
Insert Microsoft XP Label
www.gateway.com
9
Page 16

Chapter 1: Checking Out Yo ur Gateway Solo 1450
Accessories
Gateway offers accessories that can help you make the most of using your
notebook.
Batteries and automobile/airplane power adapt ers
If you run your notebook on battery power for extended periods, you may
want to buy an additional battery so that you can swap batteries when
necessary. See “Changing batteries” on page 103 for more information about
using a second battery on your notebook.
With an automobile/airplane power adapter, you can save battery power by
plugging your notebook into an automobile cigarette lighter or an airplane
in-flight power receptacle.
Carrying cases
Gateway has large-capacity carrying cases if you need additional space for
accessories or supplies.
Peripheral de vices
Y o u can attach devices s uch as a keyboa rd, mouse, printer, or monitor to your
notebook.
10
Memory
Large programs, such as multimedia games or graphics programs, use a lot of
memory. If your programs are running more slowly than you think they
should, try adding more memory.
Printers
You can attach many types of printers to your notebook. The most common
types are inkjet and laser printers, which print in color or black and white.
See “Installing a printer, scanner, or other peripheral device” on page 28 for
more information about attaching a printer to your notebook.
Inkjet printers and cartridges are relatively inexpensive, but usually they are
slower than laser printers. Using an inkjet color printer, you ca n print pictures,
banners, and greeting cards, as well as documents.
Laser printers and cartridges are more expensive, but usually they print much
faster than inkjet printers. Laser printers are better than inkjet printers when
you are printing large documents.
www.gateway.com
Page 17

Getting Started
This chapter provides basic information about your Gateway notebook. Read
this chapter to find out:
■ How to con nect th e AC adapter
■ How to start and turn off your notebook
■ How to use the key board
■ How to use the EZ Pad touchpad
■ How to con nect th e modem
■ How to connect to an Ethernet network
■ How to install peripheral devi ces
2
www.gateway.com
11
Page 18
Chapter 2: Getting Started
Connecting the A C adapter
Y ou can run y our notebook using an AC adapter or the notebook battery . The
battery was shipped to you partially charged. You should use the AC adapter
right away to fully charge the battery. Allow 24 hours for the battery to fully
charge.
Important If the battery is not fully charged before you use your
notebook on battery pow er f or the first tim e, the battery lif e
may be much shorter than you expect. If the battery life
seems short even after being charged for 24 hours, the
battery may need to be recalibrated. For information on
recalibrating the b attery , se e “Recal ibrating the battery” on
page 102.
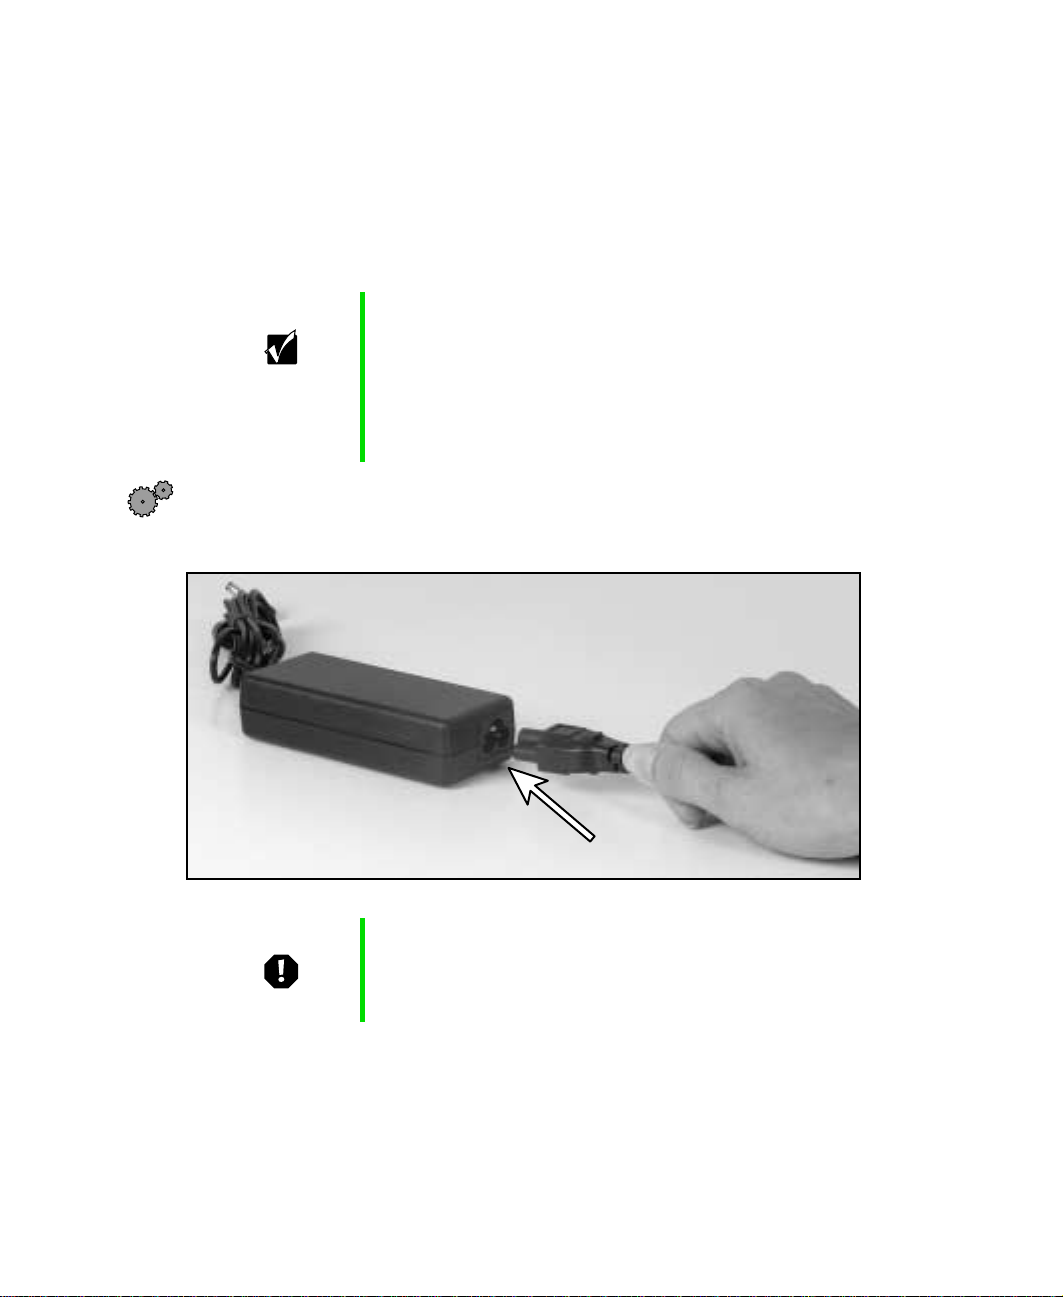
To connect the AC adapter:
1 Connect the power cord to the AC adapter.
12
Warning Replace the power cord if it becomes damaged. The
replacement cord must be of the same type and voltage
rating as the original cord or the notebook may be
damaged.
www.gateway.com
Page 19
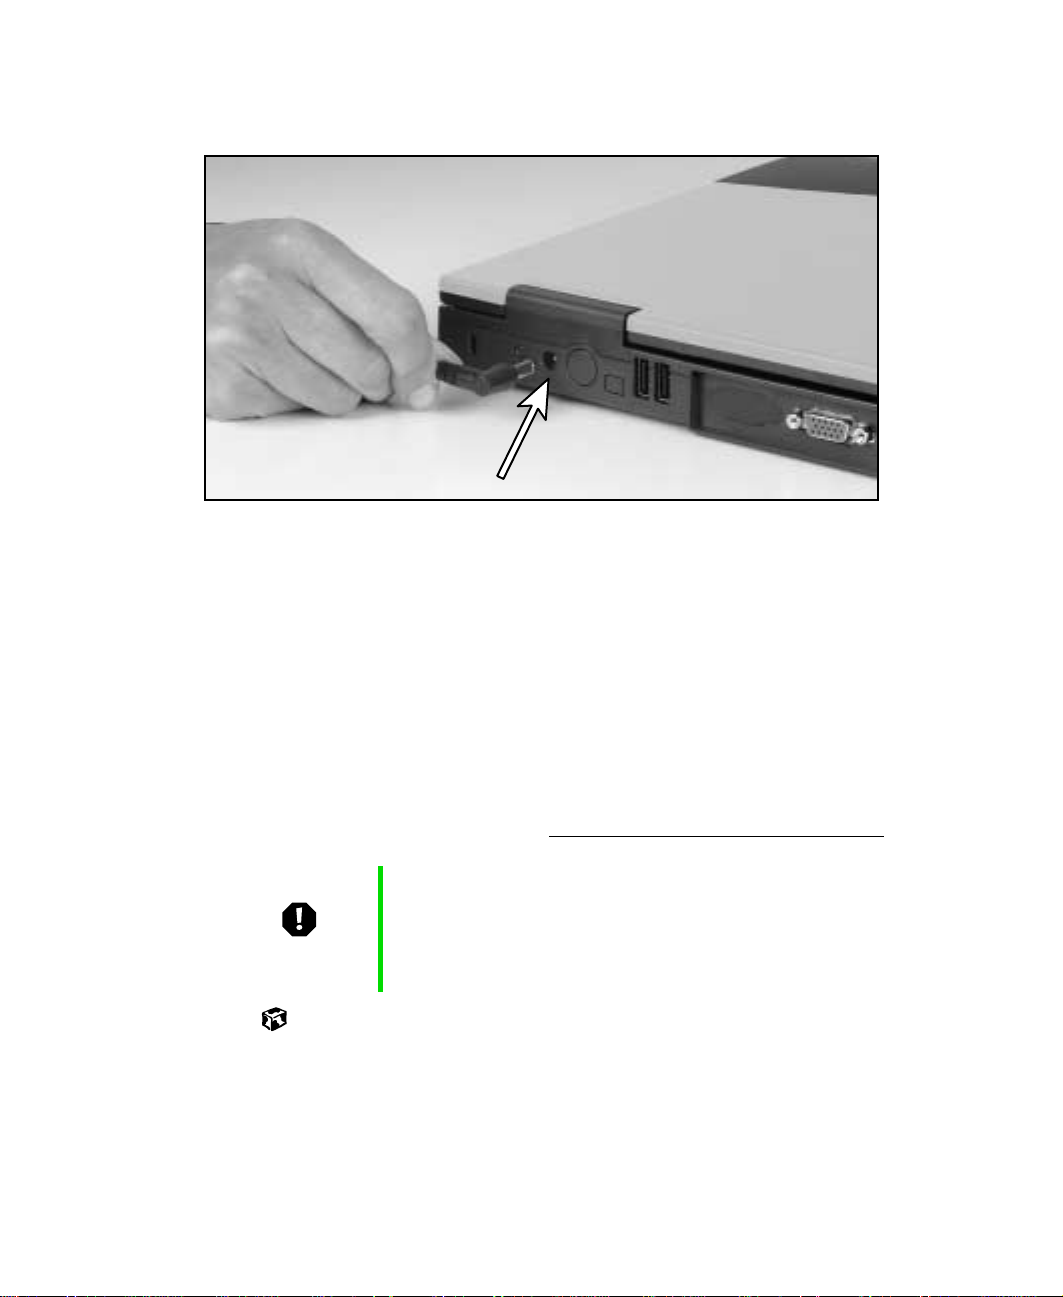
Connecting the AC adapter
2 Connect the AC adapter to your notebook’s power connector.
3 Plug the power cord into a wall outlet.
The battery charging indicator turns on (see “Front” on page 2 for the
location of the indicator). If the battery charging indicator does not turn
on, disconnect the adapter from your n otebook and repeat Step 2.
4 When you finish using your notebook for the first time, turn the
notebook off and leave the notebook connected to AC power for at least
24 hours. The battery charge meters may not show a charge for several
hours. For more information about battery meters on your model, see
“Monitoring the battery charge” on page 100.
5 If the battery meters do not show a full charge after 24 hours, contact
Gateway Technical Support at www.gateway.com/support/contact.
Warning Do not attempt to disassemble the AC adapter. The
AC adapter has no user-replaceable or user-serviceable
parts inside. The A C adapter has dangerous vo ltages that
can cause serious injury or dea th. Contact G ate wa y about
returning defective AC adapters.
www.gateway.com
13
Page 20

Chapter 2: Getting Started
Protecting from power source problems
During a power surge, the voltage level of electricity coming into your
computer can increase to far above normal levels and cause data loss or system
damage. Protect your computer and peripheral devices by connecting them
to a surge protector, which absorbs voltage surges and prevents them from
reaching your computer.
Warning High voltages can enter your computer through both the
power cord and the modem connection. Protect your
computer by using a surge protector. If you have a
telephone modem, use a surge protector that has a
modem jack. If you have a cable modem, use a surge
protector that has an antenna/cable TV jack. During an
electrical storm, unplug both the surge protector and the
modem.
14
www.gateway.com
Page 21
Starting your notebook
To start the notebook:
1 Open your notebook by sliding the latch on the front of your notebook
to the right and lifting the LCD panel.
2 Press the power button located above the keyboard.
Pow er b u tt o n
Starting your notebook
The power button is preset to On/Off mode. However, you can also set
it to function in Standby/Resume mode. For instructions on changing
the power button mode, see “Changing power settings” on page 107.
3 If you are starting your notebook for the first time, follow the on-screen
instructions to set up your notebook.
W aking up your notebook
When you have not used your notebook for several minutes, it may enter a
power-saving mode called Standby. While in Standby, the power indicator
flashes.
If your notebook is in Standby mode, “wake” it up by pressing the power
button. For more information on changing power-saving settings, see
“Changing power settings” on page 107.
www.gateway.com
15
Page 22

Chapter 2: Getting Started
Turning off y our notebook
To turn off your notebook:
1 Click Start, then click T urn Off Computer . The Turn Off Computer dialog box
opens.
2 Click Tu rn Off. Windows shuts down and turns off your notebook.
Important If for some reason you cannot use the Turn Off Computer
option in Windows to t urn off your noteboo k, press and
hold the power b utton f or about fiv e seconds, then release
it.
16
www.gateway.com
Page 23
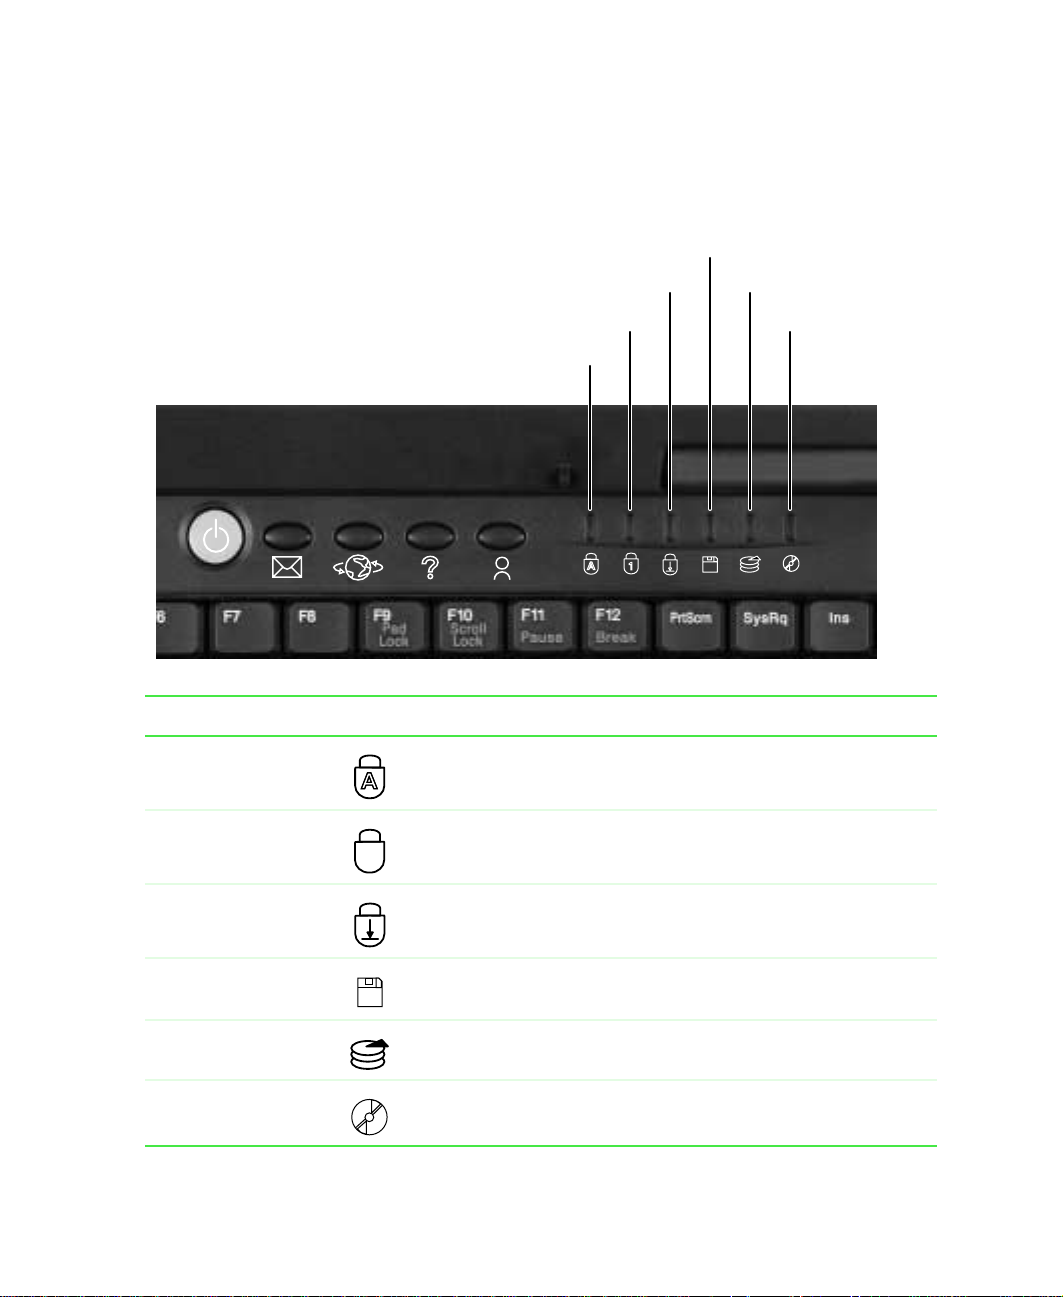
Status indicators
Status indicators inform you when a drive is being used or when a button
has been pressed that affects how the keyboard is used.
Pad lo ck
Caps lock
Scroll lock
Status indicators
Diskette drive
Hard drive
Disc drive
Indicator Icon Description
Caps Lock Caps Lo ck is tur ned on.
Pad Lock Pad Lock is turned on.
1
Scroll Lock Scroll Lock is turned on.
Diskette drive The standard 1.44 MB diskette drive is in use.
Hard drive The hard drive is in use.
Disc dr ive The CD, CD-RW, DVD, or combination DVD/CD-RW drive is in
use.
www.gateway.com
17
Page 24
Chapter 2: Getting Started
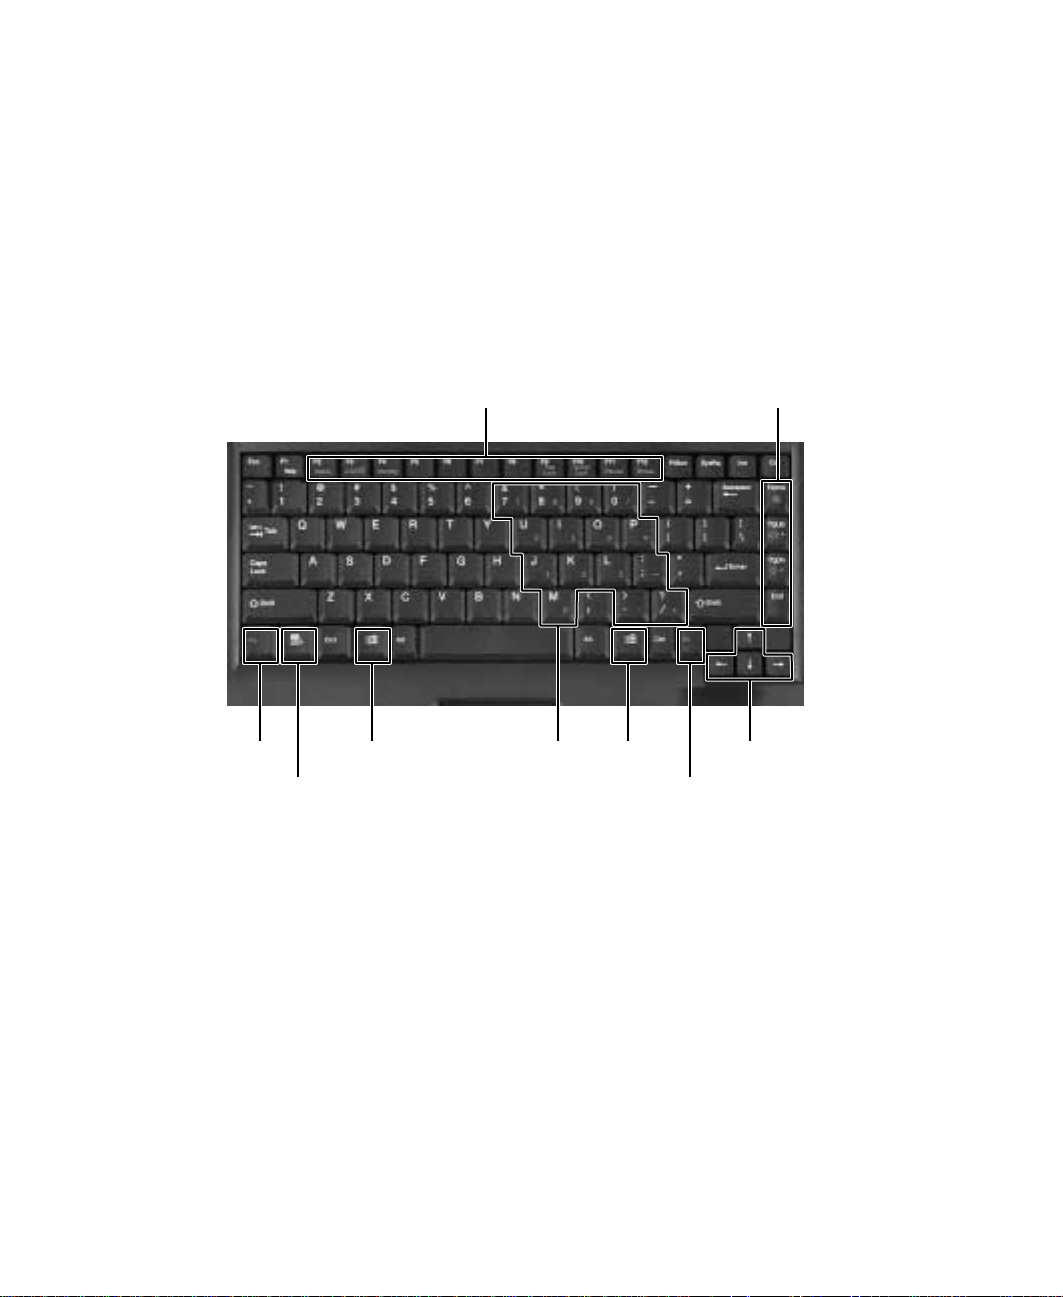
Using the keyboar d
Your notebook features a full-size keyboard that functions the same as a
desktop computer keyboard. Many of the keys have been assign ed alternate
functions, including shortcut keys for Windows, function keys for specific
system operations, and the Pad Lock keys for the numeric keypad.
Y ou can attach an external keyboard to the notebook using a USB or PS/2 port.
You do not need to shut down the notebook to connect a keyboard.
Fn key
Application
key
Function/System keys
key
Numeric
keypad
Navigation/Volume keys
Windows
key
Arrow keysWindows
Fn key
18
www.gateway.com
Page 25
Using the keyboard
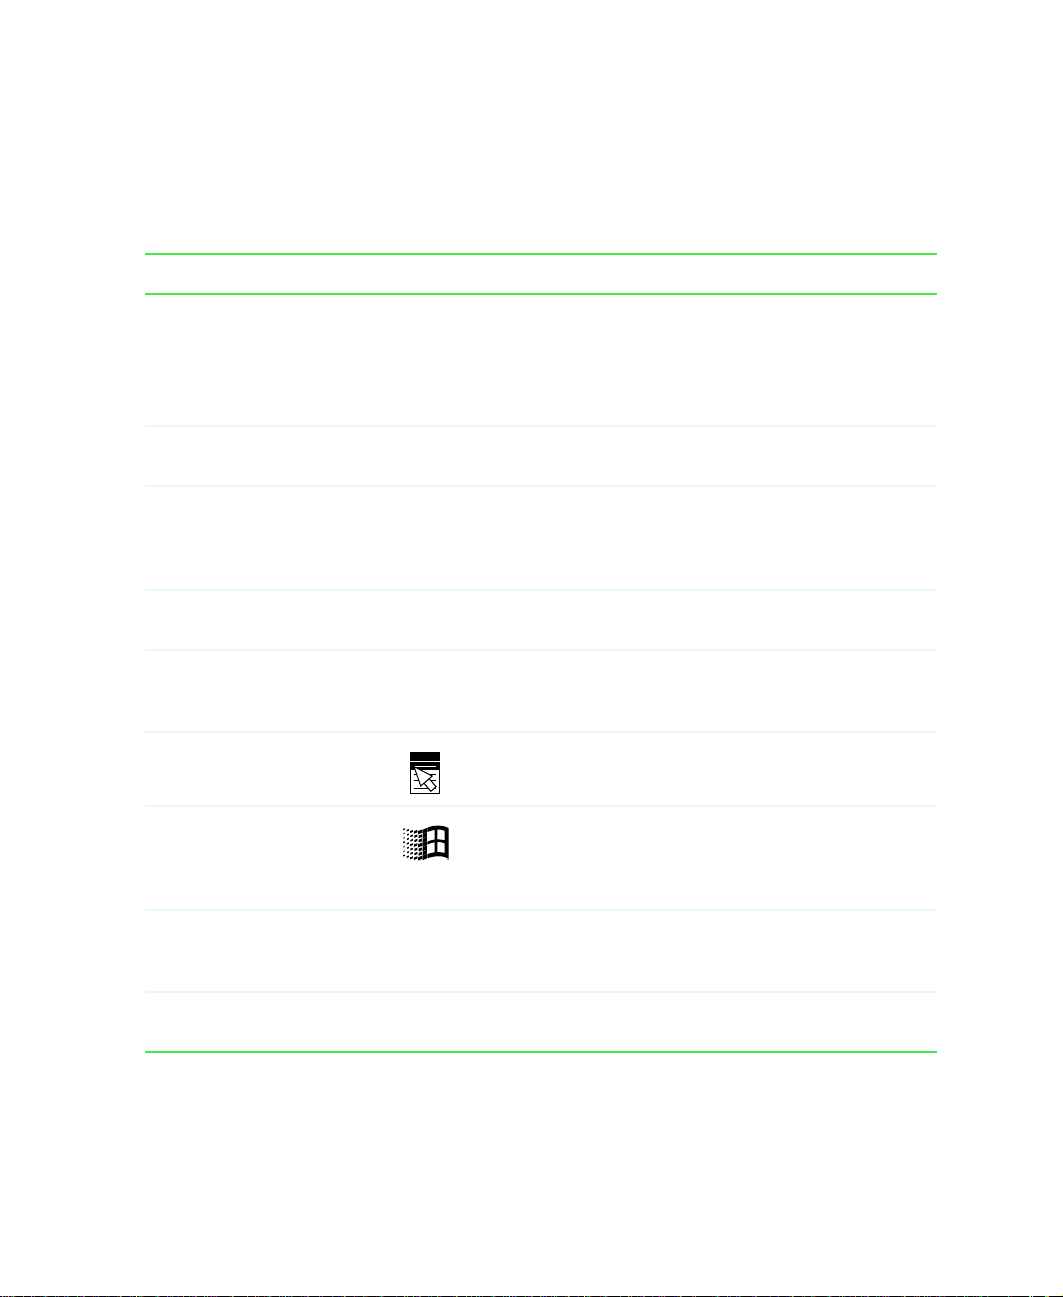
Key types
Many different key types are located on t he keyboard. Some keys perform
specific actions when pressed by itself and another action when pressed in
combination with another key.
Key type Icon Description
Function keys Press these keys labeled F1 to F12 to perform actions
in programs. For example, pressing F1 may open help.
Each program uses different function keys for different
purposes. Refer to the program documentation to find
out more about the function key actions.
System keys Press these colored k ey s in combin ation wit h the F
to perform specific actions.
Navigation keys Press these ke y s to move the cursor t o th e be ginning of
a line, to the e nd of a li n e, up th e pa ge, dow n the pa ge,
to the beginning of a document, or to the end of a
document.
V olume keys Press these colored keys in c ombinati on with the F
to increase or decrease the volume, or mute the sound.
N key Press the FN key in combination with a colored system
F
key (such as
a specific action.
Application key Press for quick access to shortcut menus and help
assistants in Windows.
Windows key Press to open the Windows Start menu. This key can
also be used in combination with other keys to open
utilities like F (Search utility), R (Run utility), and
E (Explorer utility).
Numeric keypad Use these keys to type numbers when the numeric
keypad is turned on. Press
numeric keypad.
Arrow keys Press these keys to move the cursor up, down, right, or
left.
STATUS, STANDBY, or PAUSE) to perform
FN+PAD LOCK to turn on the
N key
N key
www.gateway.com
19
Page 26
Chapter 2: Getting Started
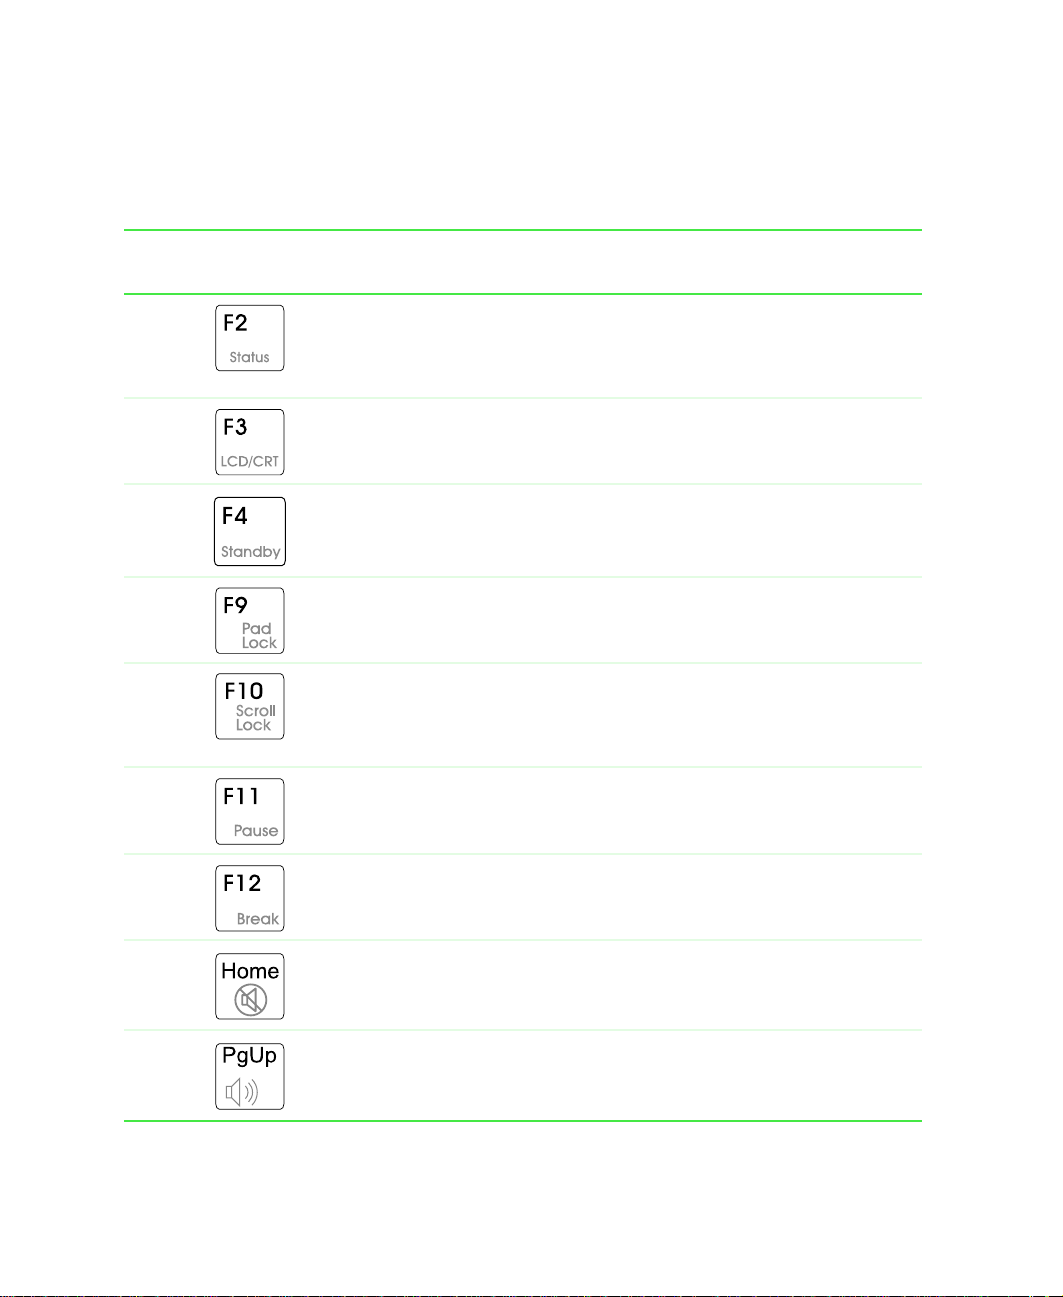
System key combinations
When you press an FN key and a system key at the same time, the notebook
performs the action identified by the colored t ext or icon on the key.
Press and hold F
N while
pressing this system key...
Too...
Display the power statu s box in th e upper left corner of your screen.
The box shows the battery charge level, the BIOS version, and
whether the AC adapter is being us ed. Pres s the key combinati on
again to close this box.
T oggle the notebook screen betw een the LCD , an e xternal monitor ,
or both displays at the same tim e . A monitor m ust be pl ugged in to
the monitor port on the notebook.
Enter Standby mode. Press the power button to leave Standby
mode.
Turn on Pad Lock so you can use the numeric keypad. Press this
key combination again to turn off Pad Lock. The Pad Lock status
indicator appears while this function is turned on.
Pause the text scrolling in a DOS screen. The Scroll Lock status
indicator appears when this function is turned on. Press the key
combination again to continue scrolling. (This function is only
available in some programs.)
Pause e xe cution of a DOS prog ram. (This fu nction is only a vail able
in some programs.)
20
Stop the cur rently r unning D OS program. (This func tion is on ly
available in some programs.)
Mute the sound. Press the key combination again to restore the
sound.
Increase volume.
www.gateway.com
Page 27

Using the keyboard
Press and hold FN while
pressing this system key...
Too...
Decrease volume.
www.gateway.com
21
Page 28

Chapter 2: Getting Started
Multi-function buttons
User-defined
shortcut
Help
Internet
E-mail
Button Icon Press to...
E-mail Open your e-mail program.
Intern et Open your Web browser.
Help Open online help.
User-defined shortcut Open the program you assign to this key.
The multi-function buttons can be assigned different functions than those
listed. For more information, see “Programming the multi-function buttons”
on page 126.
22
www.gateway.com
Page 29
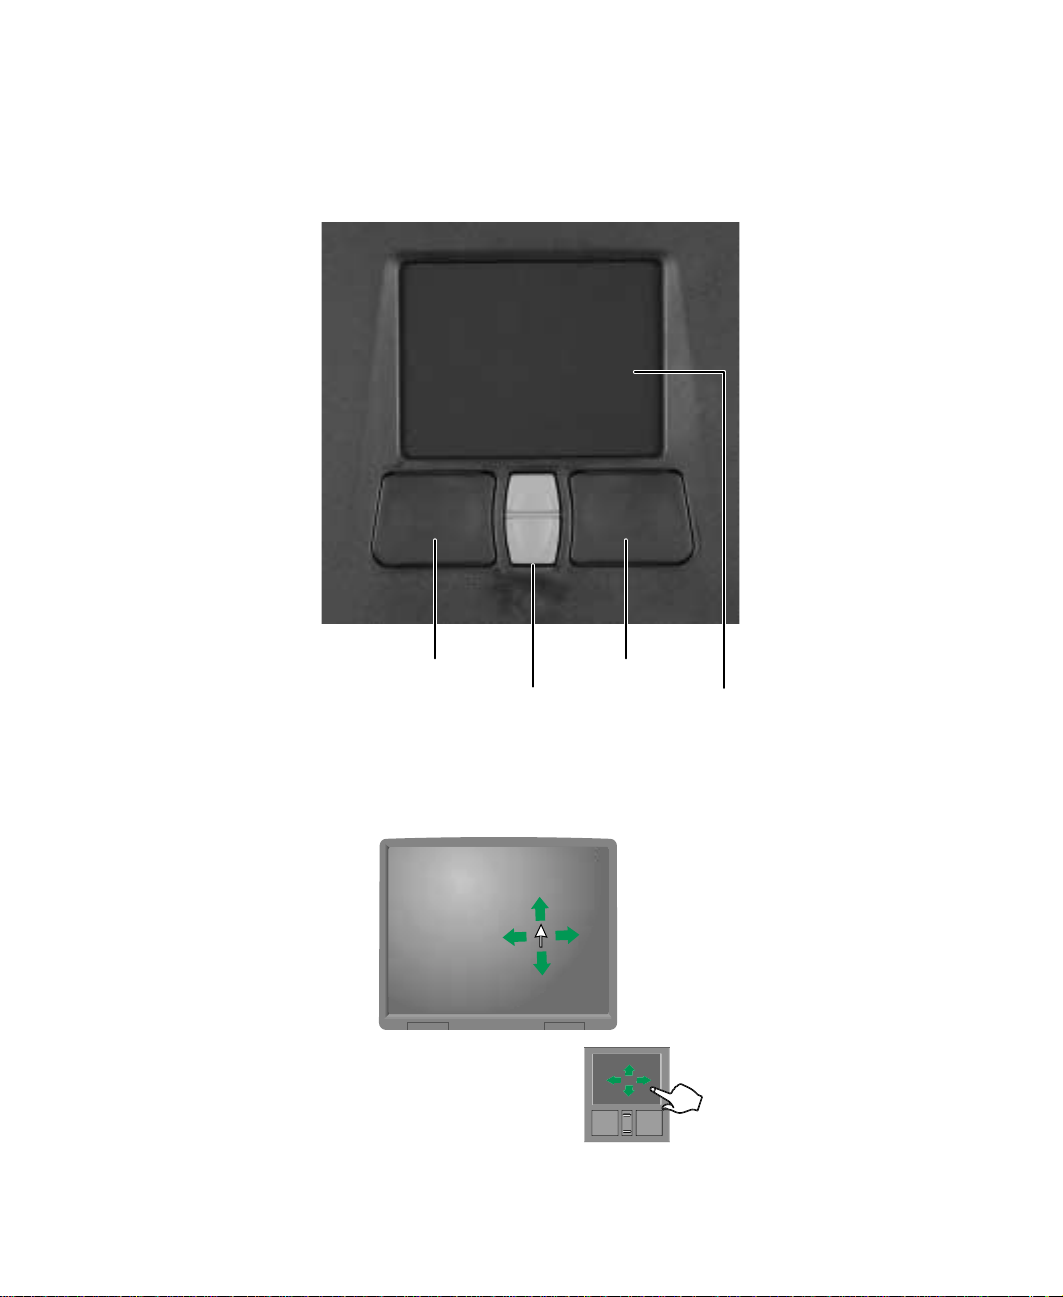
Using the EZ P ad touchpad
The EZ Pad™ consists of a touchpad, two buttons, and a rocker switch.
Using the EZ Pad touchpad
Left
touchpad
button
When you move your finger on the touchpad, the pointer (arrow) on the screen
moves in the sam e directi on.
Rocker
switch
www.gateway.com
Right
touchpad
button
Touchpad
23
Page 30
Chapter 2: Getting Started
You can use the EZ-Pad left and right buttons below the touchpad to select
objects.
You can assign a function to the rocker switch between the touchpad buttons.
This function can be to scroll up or down, maximize or minimize the active
window, or open and close the Start menu. For more information about
programming the rocker switch, see “Changing the touchpad settings” on
page 125.
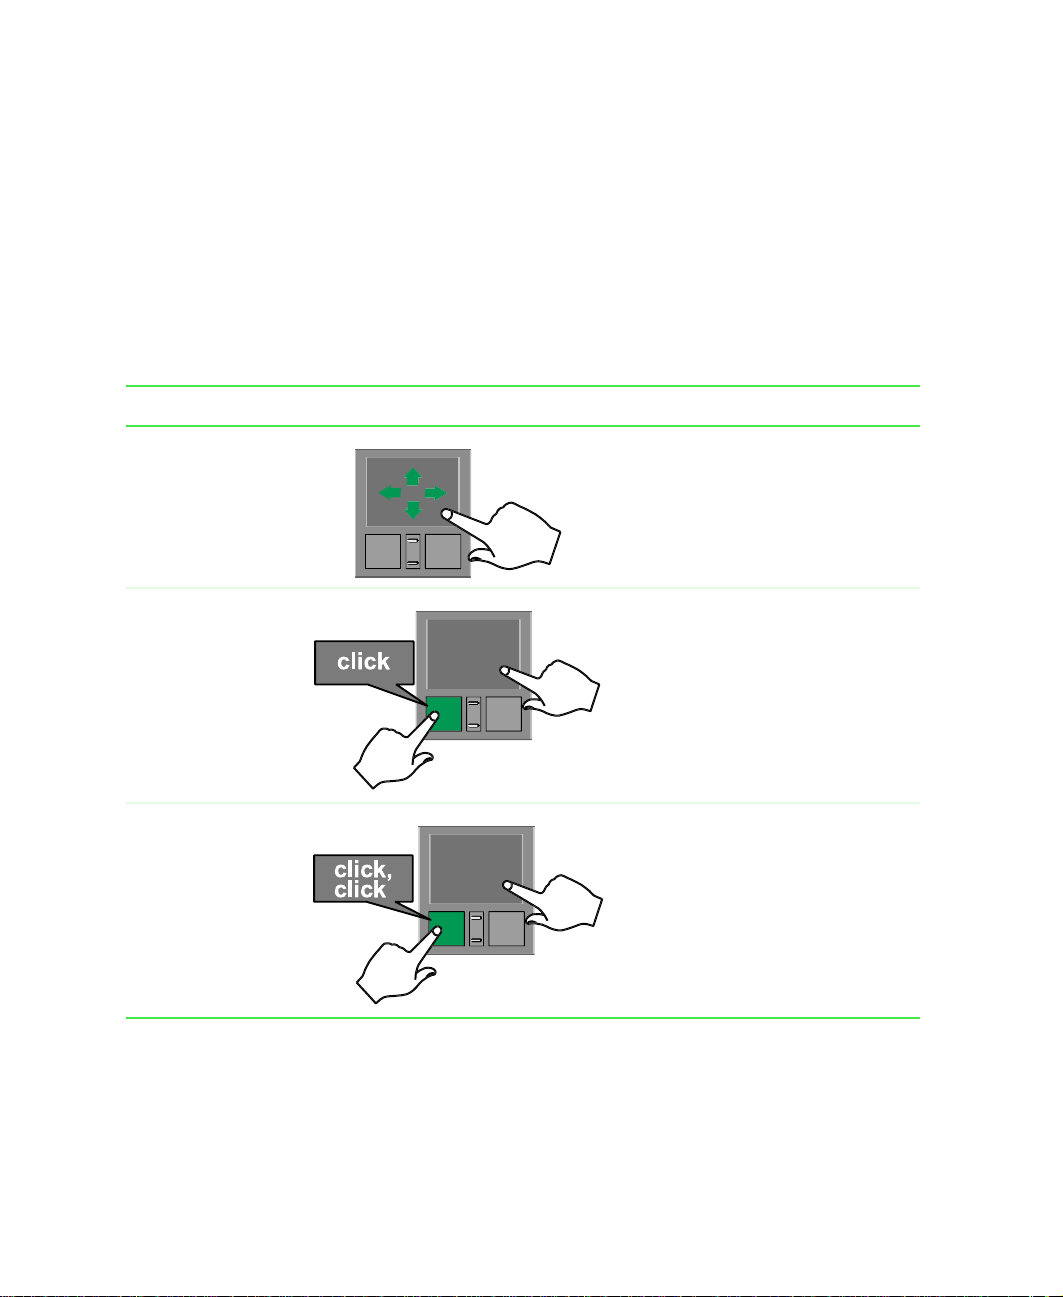
Using the touchpad
To... Do this...
Move th e po inte r
on the screen.
Select an obj ect
on the screen.
Star t a program
or open a file or
folder.
Move your finger around on the
touchpad. If you run out of sp ac e
and need to move the pointer
farther, lift your f inger, move it to
the middle of the touchpad, then
continue moving your finger.
Position the poin ter over the
object. Press the le ft button below
the touchpad once. This action is
called clicking.
Position the poin ter over the
object. Press the le ft button below
the touchpad twice in rapid
succession. This action is called
double-clicking.
24
www.gateway.com
Page 31

To... Do this...
Using the EZ Pad touchpad
Access a
shortcut menu or
find more
information
about an object
on the screen.
Move an object
on the screen.
Position the poin ter over the
object. Quickly press and release
the right button once. This action
is called right-clicking.
Position the poin ter over the
object. Press the left button and
hold it down, then use the
touchpad to move (drag) the
object to the appropriate part of
the screen. Release th e button to
drop the ob ject where you want it.
www.gateway.com
25
Page 32

Chapter 2: Getting Started
Connecting the modem
Your notebook has a built-in 56K modem.
Caution To reduce the risk of fire, use only No. 26 AWG or larger
telecommunications line cord.
To connect the modem:
1 Insert one end of the mo d e m c ab l e i n t o th e m o de m ja c k on the left
side of the notebook.
26
2 Insert the other en d of the modem cable into a telephone wall jack. The
modem will not work with digital or PBX telephone lines.
3 Start your notebook, then start your communications software.
www.gateway.com
Page 33

Connecting to an Ethernet ne twork
Connecting to an Ethernet netw ork
Your notebook has a network jack that you can use to connect it to a 10/100
Ethernet network.
To connect to a network:
1 Insert one en d of the network cable into the network jack on the
left side of the notebook.
2 Insert the other end of the network cable into a network wall jack. Ask
your network administrator to help you select the correct network jack.
Your notebook is now physically connected to the network. Your network
administrator can help you log onto your network.
Broadband Internet connections
You can use your notebook’s Ethernet jack for more than just networking.
Many broadband Interne t connections, such as cable modems and DSL
modems, connect to your notebook’s Ethernet jack. For more information,
see “Using the Internet” on page 57 and “Networking Your Notebook” on
page 139.
www.gateway.com
27
Page 34

Chapter 2: Getting Started
Installing a printer , scanner , or other
peripheral device
Your c omputer has one or more of the following p orts: Universal Serial Bus
(USB) and parallel. These ports are used for connecting peripheral devices such
as printers, scanners, and digital cameras to your computer. For more
information about port locations, see “Checking Out Your Gateway Solo
1450” on page 1.
USB ports supp ort plug-and-play and hot swapping, which means that your
computer will usually recognize such a device whenever you plug it into the
appropriate port. When you use a USB device for the first time, your computer
will prompt you to install any software the device needs. After doing this,
you can disconnect and reconnect the device at any time.
Parallel port devices are not plug-and-play. Refer to the device documentation
for detailed information and installation instructions.
28
www.gateway.com
Page 35

Getting Help
This chapter tells you about additional information resources ava ilable to help
you use your computer. It includes the following topics:
■ HelpSpot
■
Online help
■ Gateway Web site
™
3
www.gateway.com
29
Page 36

Chapter 3: Getting Help
HelpSpot
Y our computer may include HelpSpot, an easily accessible collection of help
information, troubleshooters, instructional videos, and automated support.
Use HelpSpot to answer questions about Windows and to help you quickly
discover and use the many features of your Gateway computer . HelpSp ot also
has an area called Contact Gateway that helps you find the right resource at
Gateway to answer your questions or help solve your problems.
To start HelpSpot:
■ Click Start, then click Help and Support. HelpSpot opens.
30
If this is the first time you have started HelpSpot on your computer, you
may experience a brief wait while HelpSpot builds the help database, then
HelpSpot will display an introductory video.
www.gateway.com
Page 37

You can find help information by clicking a link, performing a search, or
browsing the index. To learn about using your Gateway computer, your
mouse, and other tasks, click the
Using your computer link on the HelpSpot
main page.
HelpSpot
www.gateway.com
31
Page 38

Chapter 3: Getting Help
HelpSpot Videos
HelpSpot contains several short videos to help introduce you to new concepts
or show you how to perform various tasks.
To play a HelpSpot video:
■ T o watch a video in HelpSpot, click Video Tutorials on the HelpSpot home
page, then click a video title. The video plays.
32
www.gateway.com
Page 39

Online help
Many programs provide information online so you can research a topic or
learn how to perform a task while you are using the program. Most online
help information can be accessed by selecting a topic from a
by clicking a
You can search for information by viewing the help contents, checking the
index, searching for a topic or keyword, or browsing through the online help.
Help button.
Online help
Help menu or
www.gateway.com
33
Page 40

Chapter 3: Getting Help
Gatewa y Web site
Gateway provides a variety of information on its Web site to help you use
your computer.
34
Visit the Gateway Web site at www.gateway.com
■ Technical documentation and product manuals
■ Technical tips and support, including online chat services
■ Hardware drivers
■ Order status
■ Frequently asked questions (FAQs)
For more information about connecting to the Internet, see “Learning about
the Internet” on page 58.
www.gateway.com
for:
Page 41

Windows
Basics
Read this chapter to get basic information on how to:
■ Use the Windows desktop
■ Manage files and folders
■ Wo r k w i t h d ocum e n t s
■ Use shortcuts
Help and
Support
4
For more information about Windows, click Start, then
click Help and Support.
www.gateway.com
35
Page 42

Chapter 4: Windows Bas ics
About the Windows en viro nment
After your computer starts, the first screen you see is the Windows desktop.
The desktop is like the top of a real desk. Think of the desktop as your
personalized work space where you open programs and perform other tasks.
Y our deskto p may be different from the example shown below , depending on
how your computer is set up.
36
www.gateway.com
Page 43

Using the desktop
The desktop contains the taskbar, the Start button, and the Recycle Bin icon.
Desktop elements Descriptio n
The taskbar is the bar at the bottom of the screen
containing the Start butto n on the left a nd a cloc k
on the right. Other buttons on the taskbar
represent programs that are running.
Click a program’s button on the taskbar to open
the program’s window.
The Star t button provides access t o programs,
files, help for Windows and other programs, and
computer tools and utilities.
Click the Start button, then op en a file or prog ram
by cli cki ng ( selecting) an item on t he menu t hat
opens.
Using the desktop
The Recycle Bin is where files, folders, and
programs that you discarded are stored. You
must empty the Recycle Bin to permanently
delete them from y ou r comp uter. For instructions
on how to use the Rec ycle Bin, see “Deletin g files
and folders” on page 45.
www.gateway.com
37
Page 44

Chapter 4: Windows Bas ics
Using the Start menu
You can sta rt progr ams, ope n files, c ustomiz e your sys tem, get h elp, se arch
for files and folders, and more using the Start menu.
To use the Start menu:
1 Click the Start button on the lower left of the Windows desktop. The Start
menu opens showing you the first level of menu items.
2 To see all programs and files in the Start menu, click All Programs.
When you move the mouse pointer over any menu item that has an
arrow next to it, another menu, or submenu, opens and reveals related
files, programs, or commands.
3 Click a file or program to open it.
38
www.gateway.com
Page 45

Identifying Window items
When you double-click the icon for a drive, folder, file, or program, a window
opens on the desktop. This example shows the Local Disk (C:) window, which
opens after double-clicking the
window.
Local Disk (C:) icon in the My Computer
Identifying Window ite ms
Title bar
Menu bar
Close
Maximize
Minimize
www.gateway.com
39
Page 46

Chapter 4: Windows Bas ics
Every program window looks a little different because each has its own menus,
icons, and controls. Most windows include these items:
Window item Description
The title bar is the horizontal bar at the top
of a window th at shows the window tit le.
Clicking the minimize button reduces the
active window to a button on the taskbar.
Clicking the program button in the taskbar
opens the window again.
Clicking the maximize button expands the
active wind ow to fit the ent ire screen. Cli cking
the maximize button again restores the
window to its former size.
Clicking the close button closes the active
window or program.
Clicking an item on the menu bar starts an
action such as Print or Save.
40
www.gateway.com
Page 47

Working with files and folders
W orking with files and f olders
You c an organize your files and programs to suit your preferences much like
you would store information in a file cabinet. You can store these files in
folders and copy, move, and delete the information just as you would
reorganize and throw away information in a file cabinet.
Viewing drives
Drives are like file cabinets because they hold files and folders. A computer
almost always has more than one drive. Each drive has a letter, usually Local
Disk (C:) for the hard drive and 3½ Floppy (A:) for the diskette drive. Y ou may
also have more drives such as a CD, CD-RW, DVD, or combination
DVD/CD-RW drive.
To view the drives on your computer:
■ Click Start, then click My Computer on the Start menu.
Drives
www.gateway.com
41
Page 48

Chapter 4: Windows Bas ics
To see the files and folders on a drive:
■ Double-click the drive icon. If you do not see the contents of a drive after
you double-click its icon, click
Creating folders
Folders are much like the folders in a file cabinet. They can contain files and
other folders.
Files are much like paper documents—letters, spreadsheets, and pictures—that
you keep on your computer. In fact, all information on a computer is stored
in files.
Folders
Files
Show the contents of this drive.
To create a folder:
1 Click Start, then click My Computer on the Start menu.
2 Double-click the drive or folder, for example the Local Disk (C:), where you
42
want to put the new folder.
The drive or folder window opens. If you do not see the contents of the
drive or folder, click
Show the contents of this drive.
www.gateway.com
Page 49

Working with files and folders
3 Click File, New, then click Folder. The new folder is created.
4 Type a name for the folder, then press ENTER. The new folder n ame
appears by the folder ico n.
Copying and moving files and f olders
The skills you need to copy and move files are called copying, cutting, and
pasting.
When you copy and paste a file or folder, you place a copy of the file o r folde r
on the Windows clipboard, which temporarily stores it. Then, when you decide
what folder you want the copy to go in (the destination folder), you paste it
there.
When you cut and paste a file or folder, you remove the file or folder from
its original location and place the file or folder on the Windows clipboard.
When you decide where you want the file or folder to go, you paste it there.
Important The clipboard stores whatever you cut or copy until you
cut or copy again. Then the clipboard contains the new
information only. Therefore, you can paste copies of a file
or folder into more than one pla ce, but as soon as y ou copy
or cut a different file or folder, the original file or folder is
deleted from the clipboard.
To copy a file or folder to another folder:
1 Right-click (press the right mouse button) the file or folder that you want
to copy. A pop-up menu opens on th e desktop.
2 Click Copy on the pop-up menu.
3 Open the destination folder.
4 With the pointer inside the destination folder, right-click.
5 Click Paste. A copy of the file or folder appears in the new location.
www.gateway.com
43
Page 50

Chapter 4: Windows Bas ics
To move a file or folder to another folder:
1 Right-click (press the right mouse button) the file or folder that you want
to move. A pop-up menu opens on the desktop.
2 Click Cut on the pop- up menu.
3 Open the destination folder.
4 With the pointer inside the destination folder, right-click.
5 Click Paste. The file or folder you moved appears in its new location and
is removed from its old location.
44
www.gateway.com
Page 51

Deleting files and f olders
When you throw away paper files and folders, you take them from the file
cabinet and put them in a trash can. Eventually the trash can is emptied.
In Windows, you throw away files and folders by first moving them to
Windows trash can, called the Recycle Bin, where they remain until you decide
to empty the bin.
You can recover any file in the R ecycle Bin as long as the bin has not been
emptied.
To delete files or folders:
1 In My Computer or Windows Explorer, click the files or folders that you
want to delete. For instructions on how to select multiple files and folders,
see “Shortcuts” on page 55.
2 Click File, then click Delete. Windows moves the files and folders to the
Recycle Bin.
Working with files and folders
To recover files or folders from the Recycle Bin:
1 Double-click the Recycle Bin icon. The Recycle Bin window opens and lists
the files and folders you have thrown away since you last emptied it.
2 Click the files or folders that you want to restore. For instructions on how
to select multiple files and folders, see “Shortcuts” on page 55.
3 Click File, then click Restore. Windows returns the deleted files or folders
to their original locations.
www.gateway.com
45
Page 52

Chapter 4: Windows Bas ics
To empty the Recycle Bin:
Caution Emptying the Recycle Bin permanently erases any files or
1 Double-click the Recycle Bin icon on the desktop. The Recycle Bin window
opens.
2 Click File, then click Empty Recycle Bin. Windows asks you if you are sure
that you want to empty the bin.
3 Click Yes. Windows permanently deletes all files in the Recycle Bin.
folders in the bin. These files cannot be restored.
46
www.gateway.com
Page 53

Bro wsing for fil es and folder s
A file or folder that you need is rarely right on top of your Windows desktop.
It is usually on a drive inside a folder that may be inside yet another folder,
and so on.
Windows drives, folders, and files are organized in the same way as a real file
cabinet in that they may have many levels (usually many more levels than
a file cabinet, in fact). So you usually will have to search through levels of
folders to find the file or folder that you need. This is called browsing.
To browse for a file:
1 Click Start, then click My Computer.
2 Double-click the drive or folder that you think contains the file or folder
that you want to find. If you do not see the contents of a folder, click
Show the contents of this folder.
Working with files and folders
3 Continue double-clicking folders and their subfolders until you find the
file or folder you want.
www.gateway.com
47
Page 54

Chapter 4: Windows Bas ics
Searc hing for files
If you are looking for a particular file or folder or a set of files or folders that
have characteristics in common, but you do not remember where they are
stored on your hard drive, you can use the Search utility to search by:
■ Name or part of a name
■ Creation date
■ Modification date
■ File type
■ Text contained in the file
■ Time period in which it was created or modified
You can also combine s earch criteria to refine searches.
Files and folders found using these utilities can be opened, copied, cut,
renamed, or deleted directly from the list in the results window.
48
www.gateway.com
Page 55
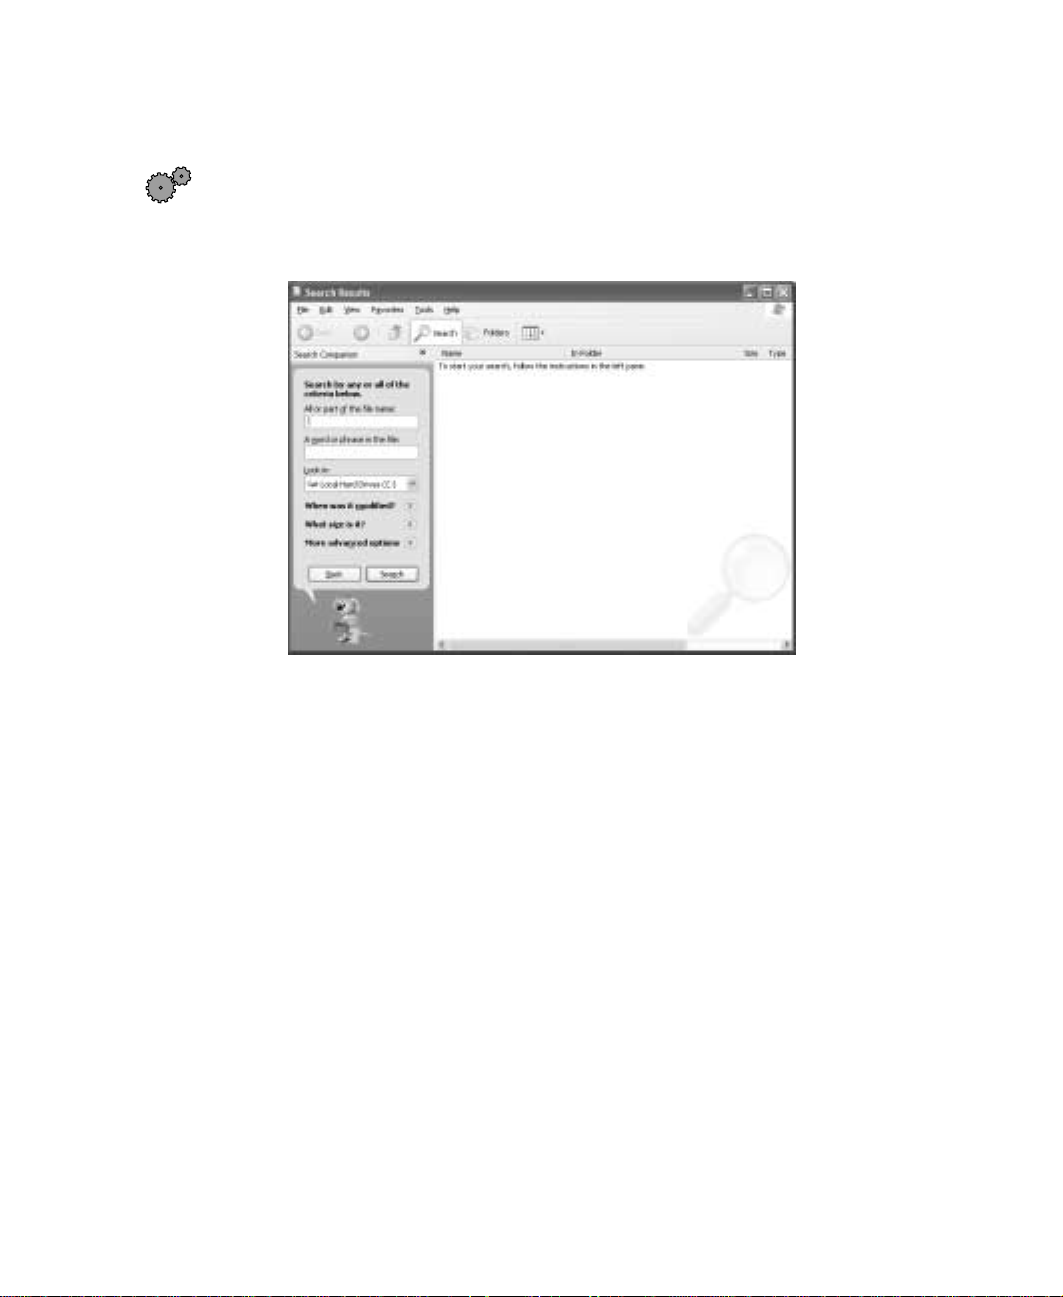
Using the Searc h utility
To find files and folders using the Search utility:
1 Click Start, then click Search. The Search Results window opens. Click All
files and folders
.
Searching for files
2 If you want to search by file or folder name, type in all or part of the
file or folder name in the name box in the left pane of the window.
■ If you type all of the name, Search will list all files and folders of
that name.
■ If you type part of the name, Search will list all of the file and folder
names containing the letters you typed.
www.gateway.com
49
Page 56

Chapter 4: Windows Bas ics
3 Click Search. When the search is completed, Windows lists the files and
folders whose names contain the text that you searched for.
4 Open a file, folder, or program by double-clicking the name in the list.
Using advanced search options
Search can find files meeting more criteria than file name. You can select
options to narrow your search by selecting the search options that you want.
You can search by the:
■ Date the file was created or modified.
■ Size of the file.
■ Type of file, such as a program or a text document.
50
www.gateway.com
Page 57

W orking with documents
Computer documents include word processing files, spreadsheet files, or other
similar files. The basic methods of creating, saving, opening, and printing a
document apply to most of these types of files.
Working with documents
The following examples show how to create, save, open, and print a document
using Microsoft
Microsoft Excel, Microsoft WordPad, and Microsoft Publisher.
For more information about using a program, click
®
Word. Similar procedures apply to other programs such as
Creating a ne w document
Help and
Support
To create a new document:
1 Click Start, All Programs, then click Microsoft Word. Microsoft Word starts
and a blank document opens.
2 Click File, then click New. The New Document pane opens.
For more information about creating a document in
Windows XP, c lick Start, then click Help and Support.
Help on its menu bar.
New
Document
pane
www.gateway.com
51
Page 58

Chapter 4: Windows Bas ics
3 Click General Templates. The Templates dialog box opens.
4 Click a tab for the type of document you want to create, click a document
template style, then click
OK. The document template opens.
5 Begin composing your document. Use the me nu s and toolbar buttons at
the top of the window to format the document.
Saving a document
After you create a document, you need to save it if you want to use it later.
Help and
Support
To save a document in Microsoft Word:
1 Click File, then click Save. The Save As dialog box opens.
2 In the Save in list, click the folder where you want to save the file.
52
For more information about saving a document in
Windows XP, c lick Start, then click Help and Support.
www.gateway.com
Page 59

3 Type the new file name.
File
folder
File
name
4 Click Save.
Working with documents
Opening a document
T o view, revise, or print an existing document, first you need to open it. Open
the document in the program that it was created in.
Help and
Support
To open a document in Microsoft Word:
1 Click Start, All Programs, then click Microsoft Word. Microsoft Word starts
and a blank document opens.
2 Click File, then click Open.
For more information about opening a document in
Windows XP, c lick Start, then click Help and Support.
www.gateway.com
53
Page 60

Chapter 4: Windows Bas ics
3 Find the folder you wan t to open in the Look in list.
Look in
list
4 Double-click the document file name. The document opens.
Printing a document
To print a document, you must have a printer connected to your computer
or have access to a network printer. For more information about installing or
using you r printe r, refer to the printer documen tation.
Help and
Support
To print a document in Microsoft Word:
1 Make sure that the printer is turned on and loaded with paper.
2 Star t Microsoft Word and open a document.
54
For more information about printing a document in
Windows XP, c lick Start, then click Help and Support.
www.gateway.com
Page 61

3 Click File, then click Print. The Print dialog box open s.
4 Set the print options, then click OK. The document prints.
Shortcuts
The following table shows a fe w shortc uts tha t yo u ca n use in Windows and
almost all programs that run in W indows. For more information on W indows
shortcuts, see your Windows or program documentation.
To... Do this...
Copy a file, folder, text, or graphic Click the item, then press CTRL + C.
Cut a file, folder, text, or graphic Click the item, then press CTRL + X.
Paste a file, folder , text, or graphic Click inside the folde r or window where y ou want to paste
the object, then press
CTRL + V.
Shortcuts
Select multiple items in a list or in a
window
Select multiple adj ac ent it em s in a lis t
or window
Permanently delete a file or folder Click the file or folder, then press SHIFT + DELETE. The
Rename a file or folder Click the fil e or fol der, press
Close the active window o r program Pre ss
Switch to a different file, folder, or
running program
Click the first item, press and hold down the CTRL key,
then click each of the remaining items.
Click the first item in the list, press and hold down the
SHIFT key, then click th e last it em in the li st.
file is permanently deleted. The file or fold er is not stored
in the Recycle Bin.
F2, type the new name , then
ENTER.
press
ALT + F4.
Press ALT +TAB.
www.gateway.com
55
Page 62

Chapter 4: Windows Bas ics
56
www.gateway.com
Page 63

Using the
Internet
This chapter provides information about the Internet and the World Wide
W eb, and tells you how to set up the America Online
you can send and receive e-mail and access other Internet resources.
5
®
Internet service so that
www.gateway.com
57
Page 64

Chapter 5: Using the Inter net
Learning about the Internet
The Internet is a worldwide network of computers linked together to provide
information to people everywhere. The two most popular services on the
Internet are e-mail and the World Wide Web. You can access this network by
connecting your computer to a telephone, DSL (Digital Subscriber Line), or
cable line and signing up with an Internet Service Provider (ISP).
Cable and DSL modems, a faster connection known as broad band, use your
TV cable or special telephone lines to connect to your ISP and access the
Internet. Cable and DSL modems connect to your computer through an
Ethernet jack.
Important For the location of your Ethernet jack, see “Left side” on
page 3.
Internet Ser vers
store infor mation so other
computers can access it
from the Internet.
Yo u r com p u ter
connects to the
Internet through
an ISP.
58
ISP Servers
let you connect to
the Internet and
access your e-mail
messages.
www.gateway.com
Page 65

Setting up an Internet acc ount
If you want to access the Internet you need:
■ A modem – a device that connects your computer to other computers
or servers using a telephone, DSL, or cable line.
■ An Internet Service Provider – a company that provides access to the
Internet through an ISP server. When you connect to an ISP, the ISP server
lets you access the Internet and yo ur e-mail messages.
■ A Web browser – a program that displays information from the World
Wide Web .
■ An e-mail program – a program that lets you create, send, and receive
e-mail messages over the Internet.
Setting up an Internet account
Before you can view the information on the World Wide Web, you need to
set up an Internet account with an Internet Service Provider (ISP). If you have
chosen America Online as an ISP, follow these instructions to set up and
connect to your account. To establish a different ISP service, or to transfer an
existing account to this computer, contact the ISP directly.
If you set up an account with America Online, an Internet e-mail address is
created for you. After completing the setup you are ready to access the
Internet.
Help and
Support
For more information on setting up and accessing an
Internet account, clic k Start, then click Help and Supp ort.
To set up an Internet account with America Online:
1 Click Start, All Programs, then click America Online.
2 Follow the on-screen instructions. After setting up your account, you can
connect to the Internet and access your e-mail services.
www.gateway.com
59
Page 66

Chapter 5: Using the Inter net
Accessing your Internet account
To connect to your America Online Internet account:
1 Click Start, All Programs, then click America Online.
2 Complete the member name and password information, then click
Connect. The computer dials the Internet account telephone number.
If you are using a service other than America Online, check with your ISP for
the correct procedure for conn ecting.
After connecting, the W eb browser window opens. For information about the
Web and the Web browser, see “Using the World Wide Web” on page 61.
To disconnect from your America Online Internet account:
■ Click X in the top right corner of the America Online window. Your
computer disconnects from the Internet.
Important Make sure that your computer disconnects correctly from
your Internet account. If you do not have an “unlimited
hours” ISP account, you may have to pay for the time that
you are connected, even if you are not at the computer.
60
If you are using a service other than America Online, check with your ISP for
the correct procedure for disconnecting.
www.gateway.com
Page 67

Using the W orld Wide W eb
The World Wide Web is a multimedia window to the Internet that gives you
access to millions of information sources.
Information on the Web comes to you on We b p a g e s , which a re electronic
documents that you view using a Web page display program called a browser.
You can use any of the commercially available Web browsers, like Microsoft
Internet Explorer, which comes installed on your new computer.
Web pages can contain text, animations, music, and other multimedia
features.
A group of related Web p ages is called a Web s it e. You can access Web sites to
shop, track investments, read the news, download programs, and much more.
You can explore a Web site or visit other Web sites by clicking areas on a Web
page called links or hyperlinks. A link may be colored or underlined text, a
picture, or an animated image. You can identify a link by moving the mouse
pointer over it. If the pointer changes to a hand, the item is a link.
Using the World Wide Web
To learn more about using the Web browser features, click
bar.
Web
page
Link
Linked W eb pa ge
Help in the menu
www.gateway.com
61
Page 68

Chapter 5: Using the Inter net
Connecting to a Web site
After you set up an account with an Internet Service Provider (ISP) such as
America Online, you can access the many information sources on the World
Wide Web .
Help and
Support
For more information on connecting to a Web site in
Windows XP, c lick Start, then click Help and Support.
To connect to a Web site:
1 Connect to your Internet account. After the computer connects, a default
opening page or welcome screen opens.
2 To go to a different Web site, type the address (called a URL for “Universal
Resource Locator”) in the browser address bar (for example
www.gateway.com
- OR On the current Web page, click a link to a Web site.
The Web browser locates the server computer on the Internet, downloads
(transfers) data to your computer, and displays the page on the site that
you requested.
), then click GO on the browser address bar.
62
Sometimes Web pages display slowly. The speed that a Web page displays on
your screen depends on the complexity of the Web page and other Internet
conditions. Additionally, the speed of your connection will determine how
fast Web pages display.
www.gateway.com
Page 69

Downloading files
Downloading is the process of transferring files from a computer on the
Internet to your computer.
To protect your computer against viruses, make sure that you scan the files
you download. For more information, see “Protecting your computer from
viruses” on page 187.
Using the World Wide Web
Help and
Support
For more inf ormation on downloadi ng files in Windo ws XP,
click Start, then click Help and Support.
To download files or programs from a Web site:
1 Connect to your Internet account.
2 In the address bar, type the address of the Web site that contains the file
or program you want to download, then click
bar.
- OR Click a link on a Web page to navigate to the Web site containing the
file that you want to download.
GO on the browser address
3 Create or locate the folder where you want to store the file on your
computer.
4 Click the link on the Web page for the file that you want to download.
5 Follow the on-screen instructions for saving the file in the folder that
you want.
A copy of the file is downloaded to your comp uter. The time that it takes
to transfer the file to your computer depends on file size and Internet
conditions.
6 Open the folder that you created.
7 Install or view the downloaded file by double-clicking it. If applicable,
follow the instructions provided on the Web site to run or install the
program.
www.gateway.com
63
Page 70

Chapter 5: Using the Inter net
Using e-mail
E-mail (electronic mail) lets you send messages to anyone who has an Internet
connection and e-mail address. E-mail is usually a free service of your Internet
account.
The Internet never closes, so you can send e-mail messages at any time. Your
e-mail messages arrive at most e-mail addresses in minutes.
An e-mail address consists of a user name, the @ symbol, and the Internet
domain name of the Internet Service Provider (ISP) or company that “hosts”
that user. Your e-mail address is assigned when you sign up for an account
with an ISP. For example, a person with an account with America Online
might have an e-mail address that is similar to this one:
jdoe@aol.com
User name I nter net domain n ame
64
Help and
Support
For more information on using e-m ail i n Wind ow s XP, click
Start, then click Help and Support.
www.gateway.com
Page 71

Sending e-mail
To send e-mail using America Online:
1 Connect to your America Online account.
2 Click Write.
3 Type the e-mail address of the recipient you want to send e-mail to in
the
Send To box.
4 Type the subject of your e-mail in the Subject box.
5 Type the e-mail message.
6 When finished, click Send Now. Your e-mail is sent over the Internet to
the e-mail address you specified.
Checking y our e-mail
Using e-mail
To check your e-mail using America Online:
1 Connect to your America Online account.
2 Click Read.
3 Double-click the message you want to read.
For more information about managing and organizing your e-mail messag es,
see the online help in your e-mail program.
www.gateway.com
65
Page 72

Chapter 5: Using the Inter net
66
www.gateway.com
Page 73

Using
Multimedia
This chapter provides information on using the multimedia capabilities of
your notebook. Read this chapter to learn how to:
■ Use the diskette drive
■ Use a CD, CD-RW, DVD, or combination DVD/CD-RW drive
■ Create CDs
■ Adjust the volume
■ Play CDs and DVDs
■ Record and play audio files
■ Use Windows Media Player
■ Use MusicMatch
6
www.gateway.com
67
Page 74

Chapter 6: Using Multim edia
Using diskettes
The diskette drive uses 3.5-inch diskettes (sometimes called floppy disks).
Diskettes are useful for storing files or transferring files to another computer.
Warning Do not expose diskettes to water or magnetic fields.
Exposure could damage the data on the diskette.
To use a diskette:
1 Insert the diskette into the diskette drive with the label facing up.
2 To access a file on the diskette, click Start, My Computer, double-click the
3 To remove the diskette, make sure the diskette drive status indicator is
68
Diskette
slot
drive letter (for example, the A: drive), then double-click the file name.
off (see “Status indicators” on page 17), then press the diskette eject
button.
www.gateway.com
Eject
button
Page 75

Using a CD, CD-RW, or DVD drive
Using a CD , CD-RW, or D VD drive
You can use your computer to enjoy a wide variety of multimedia features,
such as making recordings, listening to audio CDs, and watching DVD movies.
Activity indicator Manual eject hole
Eject button
Inserting a CD, CD-R W , or D VD
To ins ert a CD, CD-RW, or DVD:
1 Press the eject button on the CD, CD-RW, DVD, or combination
DVD/CD-RW drive. After the tray opens slightly, pull the disc tray
completely open.
2 Place the disc in the tray with the label facing up, then press down
carefully on the disc until it snaps into place.
Important When you place a singl e-s ide d dis c in the tray, make sure
that the label side is f ac ing up. If the disc has two playab le
sides, place the disc so that the n ame of th e side y ou w ant
to play is facing up.
3 Push the tray in until it is closed.
www.gateway.com
69
Page 76

Chapter 6: Using Multim edia
Creating CDs using your CD-R W or
DVD/CD-RW drive
Creating data CDs
Use Roxio Easy CD Creator to create data CDs. Data CDs are ideal for backing
up important files such as tax records, letters, MP3s, or photos.
To create a data CD:
1 Insert a blank CD-R or CD-RW disc into your CD-RW drive.
2 If a CD Drive dialog box opens, click Create a CD using Roxio Easy CD
Creator
- OR -
, then click OK. The Project Selector window opens.
If a dialog box does no t open, click
Creator
, then click Project Selector. The Project Selector window opens.
make a data CD dataCD project
Start, All Programs, Roxio Easy CD
70
www.gateway.com
Page 77

Creating CDs using your CD-RW or DVD/CD-RW drive
3 Move your pointer over make a data CD, then click dataCD projec t. The
Easy CD Creator window opens.
Select Source Files
Source Pane Add
4 Click the arrow button to open the Select Source Files list, then click the
folder where your files are located.
www.gateway.com
71
Page 78

Chapter 6: Using Multim edia
5 Click the file you want to record (hold down the CTRL or SHIFT key when
you click to select multiple files) in the Source pane, then click
Add.
72
record
6 After you have added all of your files, click record. The Record CD Setup
window opens.
Start Recording
7 Click Start Recording.
www.gateway.com
Page 79

Creating music CDs
Use Roxio Easy CD Creator to create music CDs from other music CDs or MP3
files.
To create music CDs:
1 Insert a blank CD-R or CD-RW disc into your CD-RW drive.
Tips & Tricks Most car stereos read CD-R discs, but do not read CD-RW
discs.
2 If a CD Drive dialog box opens, click Create a CD using Roxio Easy CD
Creator
- OR -
, then click OK. The Project Selector window opens.
Creating CDs using your CD-RW or DVD/CD-RW drive
If a dialog box does no t open, click
Creator
make a music CD musicCD project
, then click Project Selector. The Project Selector window opens.
Start, All Programs, Roxio Easy CD
www.gateway.com
73
Page 80

Chapter 6: Using Multim edia
3 Move your pointer over make a music CD, then click musicCD project. The
Easy CD Creator window opens.
Select Sour ce Files
74
Source pane
Source pane
Add
4 Click the arrow button to open the Select Source Files list, then click the
folder where your files are located.
www.gateway.com
Page 81

Creating CDs using your CD-RW or DVD/CD-RW drive
5 Click the file you want to record (hold down the CTRL or SHIFT key when
you click to select multiple files) in the Source pane, then click
Tips & Tricks You can add any comb ination of music tracks or MP3 fi le s
to a music CD project. You can add up to 99 tracks and
files, or up to 650 MB (74-minute CD) or 700 MB
(80-minute CD) of tracks and files to a music CD project.
Add.
www.gateway.com
record
75
Page 82

Chapter 6: Using Multim edia
6 After you have added all of your tracks and files, click record. The Record
CD Setup window opens.
7 Click Start Recording.
Start Recording
76
www.gateway.com
Page 83

Adjusting the volume
Y ou c an use the volume controls to a djust the overall volume and the vo lume
of specific sound devices in your computer.
Adjusting the volume
Help and
Support
For more information about adjusting the volume in
Windows XP, c lick Start, then click Help and Support.
To adjust the overall volume level using hardware controls:
■ On the keyboard, press the volume system key combination FN+ or
F
N+ to change the volume, or press the mute system key combination
F
N+ to turn of f all sou nd.
To adjust the overall volume level from Windows:
1 Click Start, then click Contro l Pane l. The Control Panel window opens. If
your Control Panel is in Category View, click
Devices
.
Sounds, Speech, and Audio
2 Click/Double-click the Ad just the sy stem volume or Sounds and Audio
Devices
. The Sounds and Audio Devices Properties dialog box opens.
www.gateway.com
77
Page 84

Chapter 6: Using Multim edia
3 Click the Volume tab.
4 Drag the Device Volume slider to change the volume or click to select the
Mute check box, then click OK.
To adjust specific volume levels:
1 Click Start, then click Contro l Pane l. The Control Panel window opens. If
your Control Panel is in Category View, click
Devices
.
2 Click/Double-click the Ad just the sy stem volume or Sounds and Audio
Devices
78
. The Sounds and Audio Devices Properties dialog box opens.
Sounds, Speech, and Audio
www.gateway.com
Page 85

3 Click the Volume tab.
4 Click Advanced in the Device volume area.
Adjusting the volume
If the device you want to adjust does not appear in the window, click
Options, Properties, the check box next to the audio device you want to
appear, then click
OK.
5 Drag the volume level and balance sliders for the device you want to
adjust, then close the window. For more information about the volume
controls, click
Help in the window.
6 Click X in the top-right corner of the window to close it.
www.gateway.com
79
Page 86

Chapter 6: Using Multim edia
Listening to CDs
Use the Windows Media Player to listen to CDs. For more information about
the using the Windows Media Player, click
to listen to CDs. See “Using MusicMatch” on page 85 for more information.
To play a CD:
1 Insert a CD into the CD, CD-RW, DVD, or combination DVD/CD-RW
drive.
2 If a mes sage asks you to chose a CD p layer, click Windows Media Player.
The Windows Media Play er opens.
3 When the med ia player opens, click (play).
Help. Y ou ca n also use Mus icMatch
80
Play
Stop
Previous Mute
Volume
Next
www.gateway.com
Page 87

Recording and pla ying audio
Use the instructions below to make an audio recording by speaking into the
microphone.
Recording and playin g audio
Help and
Support
For more inf ormation about rec ording and pl ay ing audio in
Windows XP, c lick Start, then click Help and Support.
To make an audio recording:
1 Plug a microphone into the Microphone jack on your computer. See “Left
side” on page 3 for the location of the Microphone jack.
2 Click Start, All Programs, Accessories, Entertainment, then click Sound
Recorder
. The Sound Recorder opens.
Rewind Fast
Forward
Play Stop Record
3 Cli ck (record ), then sp eak into the micro phone.
4 When you finish recording, click (stop).
5 Click File, then click Save As. The Save As dialog box opens.
6 Name the rec ording, specify the location where you want to save the
recording, then click
Save. The recording is saved.
www.gateway.com
81
Page 88

Chapter 6: Using Multim edia
To play an audio recording in Sound Recorder:
1 Open the S ound Recorder.
2 Click File, then click Open. The Open dialog box opens.
3 Click the file you want to play, then click Open.
4 Play the file by clicking (play), then stop playing the file by
clicking (stop).
82
www.gateway.com
Page 89

Recording and playin g audio
Playing audio and video files with the
Windows Media Player
The Windows Media Player can play several types of audio and video files,
including WAV, MIDI, MP3, AU, AVI, and MPEG formats. For more
information about using the Windows Media Player, click
To play a file using the Windows Media Player:
1 Click Start, All Programs, then click Windows Media Player.
The Windows Media Play er opens.
Video file
information
Video
screen
Help.
Play
Stop
2 Click File, then click Open. The Open dialog box opens.
3 Click the file you want to play, then click Open.
4 Play the file by clicking (play), then stop playing the file by
clicking (stop).
www.gateway.com
83
Page 90

Chapter 6: Using Multim edia
Playing a D VD
A Digital Versatile Di sc (DVD) is similar to a standard CD but has greater data
capacity. Because of this increased capacity, full-length movies, several albums
of music, or several gigabytes of data can fit on a single disc. If your computer
has a DVD drive or combination DVD/CD-R W drive, you c an play DVDs with
the DVD Player program. For m ore information about playing DVDs, click
Help in the DVD player program .
To play a DVD:
1 Make sure that the speakers are turned on or headphones are plugged in
and that the volume is turned up.
2 Turn off your screen saver and standby timers.
3 Click Start, All Programs, DVD Player, then click DVD Player. The D VD Player
video screen and control panel open.
4 Insert a DVD into the D VD drive, then click (play). The DVD plays.
5 To specifically control the DVD or adjust the volume, use the controls
in the DVD player. For more information on using the DVD player, see
its online help.
84
www.gateway.com
Page 91

Using MusicMatch
Using MusicMatch™, yo u can:
■ Play music CDs
■ Create MP3 music files from your music CDs
■ Use your music files to build a music library
■ Enter music track information
■ Listen to Internet Radio
For more information on using MusicMatch, see its online Help.
Playing CDs
You can use the MusicM atch program to play mu sic CDs.
To play a music CD:
1 In sert the m usic CD i nto the CD , CD-RW, DVD, or combi nation
DVD/CD-RW drive on your computer. The first time you insert a CD, the
Audio CD dialog box opens.
Using MusicMatch
www.gateway.com
85
Page 92

Chapter 6: Using Multim edia
2 Click Pla y Audio CD usin g MUSICMA TCH Jukebo x, click Alwa ys do the selected
action
, then click OK. MusicMatch opens, the CD begins playing, and the
names of the music tracks appear in the playlist area.
The next time you insert an audio CD, MusicMatch plays the CD
automatically.
Creating music files
Using MusicMatch, you can copy the tracks from a music CD to your
computer’s hard drive as MP3 files. MP3 (MPEG Layer 3) is a standard for
digitally compressing high-fidelity music into compact files without
noticeably sacrificing quality. MP3 files end in the file extension .mp3.
To create (rip) MP3 files:
1 Open Mus icMatch by clicki ng Start, All Programs, MusicMatch, then
clicking
2 Insert a CD into the CD, CD-RW, DVD, or combination DVD/CD-RW
drive, then click (record). The Recorder window opens.
3 By default all tracks in the track list are selected. Clear the checkbox of
any audio track you do not want to record (rip).
86
MusicMatch Jukebox.
www.gateway.com
Page 93

4 Click (REC), then follow the on-screen instructions.
Using MusicMatch
www.gateway.com
87
Page 94

Chapter 6: Using Multim edia
Editing track in formation
After you add a CD track as an MP3 file to your music library, you can edit
the track’s information.
To edit track information:
1 In MusicMatch, click My Library. The library window opens.
2 In the library window, right-click the file, then click Edit Track Tag(s). The
E di t Tr a c k Ta g dialog box open s.
88
3 Enter information such as track title, lead artist, album, and genre.
4 Click OK. The new track information appears in the MusicMatch playlist,
music library, and recorder.
www.gateway.com
Page 95

Building a m usic library
Use MusicMatch to build a music library. You can organize your music tracks
by categories, find a track quickly by using the sort features, and add
information to a music file.
You can add music tracks to your music library by:
■ Creating MP3 files – When you create MP3 files from the tracks on your
music CD, MusicMatch automatically adds these files to your music
library.
■ Dragging and Dro pping – Drag a nd drop files from Windows Explorer
or your desktop to the music library.
■ Downloading files from the Internet – When you are connected to the
Internet, MP3 files that you download are automatically added to your
music library.
Using MusicMatch
www.gateway.com
89
Page 96

Chapter 6: Using Multim edia
Changing the music library display settings
To change the music library display settings:
1 In MusicMatch, click Options, then click Settings. The Settings window
opens.
2 Click the Music Library tab.
90
3 Click the categories that you want to display in the columns, then
click
OK.
www.gateway.com
Page 97

Listening to Internet radio
Use the Radio feature in MusicMatch to listen to Internet Radio stations.
To listen to an Internet radio station:
1 Connect to the Internet, then open MusicMatch.
2 Click Radio Stations. The Radio window opens.
Using MusicMatch
www.gateway.com
91
Page 98

Chapter 6: Using Multim edia
3 To select one of the MusicMatch Internet radio stations , click one of the
Popular Stations. You can also choose another Internet radio station by
clicking
Station Selector.
Broadcast Stations, then clicking the appropriate category in the
4 Select a radio station, then click Play. MusicMatch connects to the station
and plays the audio.
Using advanced features
Y ou can a lso use MusicMatch to create your own music CDs and to download
MP3 files to your portable MP3 player. For more information, see the
MusicMatch online Help.
92
www.gateway.com
Page 99

Sending and
Receiving
Faxes
PhoneTools lets you send and receive faxes using the modem.
Help and
Support
Before you send your first fax, you need to set up you r user information. Your
fax cover sheets and fax headers will contain this information, which is
required by law.
7
For more information about using the fax functions in
Windows XP, c lick Start, then click Help and Support.
www.gateway.com
93
Page 100

Chapter 7: Sending and Rec eiving Faxes
Setting up y our cover page
To set up your fax cover page:
1 If PhoneTools is not open, click Start, All Programs, PhoneTools, then click
PhoneTools.
94
2 Click Setup, then click General Setup. The General Setup dialog box opens.
3 Click the Customize tab, then type your personal information in the User
boxes.
4 Click the Fax tab, then enter your name and fax number in the Fax
identifier
enter up to 20 characters in the text box. We suggest using eight
characters for your identifier name, followed by 12 characters for your
telephone number.
Important Some fax machines cannot use special characters such
text box. This identifier information is required by law. You c a n
as hyphens . W e sugges t using spa ces instead o f h yphens
in telephone and fax numbers.
5 Click OK.
www.gateway.com
 Loading...