

Page 1

I
KPC-1900 Series User’s Manual
KPC-1900 Seri es
19” Touch Panel PC
wi th I n tel® Skylake S- Series Pr ocessors
User’s Guide
Page 2

Content
2
KPC-1900 Series User’s Manual
Content
Content......................................................................................................................................2
Fig ures ......................................................................................................................................3
Tab l es ........................................................................................................................................4
Safety Instructions...................................................................................................................5
Before You Begin ....................................................................................................5
When Working Inside a Computer .......................................................................6
Preventing Electrostatic Discharge ......................................................................6
Pre fa ce ......................................................................................................................................9
How to Use This Guide ..........................................................................................9
Unpacking ................................................................................................................9
Regulatory Compliance Statem ents ....................................................................9
Maintaining Your Computer.................................................................................10
Chapter 1 Introduction ..........................................................................................................13
Overview ................................................................................................................13
Product Specifications .........................................................................................14
System tour............................................................................................................16
Mechanical Dimensions ...............................................................................................18
Chapter 2 Getting Started ....................................................................................................19
Setting up your PC ...............................................................................................19
VESA Mounting .....................................................................................................24
Panel Mounting .....................................................................................................25
Chapter 3 AMI BIOS Setup ..................................................................................................27
Overview ................................................................................................................27
Main Menu .............................................................................................................28
Ad vanced Menu ....................................................................................................29
Security Menu .......................................................................................................44
Boot Menu..............................................................................................................45
Save & Exit Menu .................................................................................................46
Chapter 4 Driver Installation ................................................................................................47
Page 3

Figures
3
KPC-1900 Series User’s Manual
Figures
Figure 1 I/Os...........................................................................................................16
Figure 2 Mechanical Dimensions........................................................................18
Figure 3 DP / DVI-D ..............................................................................................19
Figure 4 Connect USB mouse & keyboard .......................................................20
Figure 5 RJ45 connector ......................................................................................21
Figure 6 COM port.................................................................................................22
Figure 7 Turning on the s ystem ..........................................................................23
Figure 8 VESA Mounting Hole Locations ..........................................................24
Figure 9 Panel Mount Cut-out hole and maximum panel thickness..............25
Figure 10 Panel Mounting ....................................................................................26
Page 4

Tables
4
KPC-1900 Series User’s Manual
Tables
Table 1 KPC-1900 Series product specifications .............................................15
Table 2 KPC-1900 Series BIOS Main Menu .....................................................28
Table 3 Advanced Menu .......................................................................................29
Table 4 Advanced Menu – Display Configuration.............................................30
Table 5 Advanced Menu – Super IO Configuration..........................................31
Table 6 Advanced Menu – Super IO Configuration – Serial Port 1
Co n figu ra tion ..................................................................................................31
Table 7 Advanced Menu – Super IO Configuration – Serial Port 2
Co n figu ra tion ..................................................................................................32
Table 8 Advanced Menu – Super IO Configuration – Serial Port 3
Co n figu ra tion ..................................................................................................33
Table 9 Advanced Menu – Super IO Configuration – Serial Port 4
Co n figu ra tion ..................................................................................................34
Table 10 Advanced Menu – Super IO Configuration – Serial Port 5
Co n figu ra tion ..................................................................................................35
Table 11 Advanced Menu – Super IO Configuration – Serial Port 6
Co n figu ra tion ..................................................................................................36
Table 12 Advanced Menu – CPU Chipset Configuration ................................37
Table 13 Advanced Menu – SATA Configuration..............................................38
Table 14 Advanced Menu – USB Configuration ...............................................39
Table 15 Advanced Menu – AMT Configuration ...............................................40
Table 16 Advanced Menu – DIO Configuration ................................................41
Table 17 Advanced Menu – Network Stack.......................................................41
Table 18 Advanced Menu – H/W Monitor ..........................................................42
Table 19 Power Menu ...........................................................................................43
Table 20 Security Menu ........................................................................................44
Table 21 Boot Menu ..............................................................................................45
Table 22 Save & Exit Menu..................................................................................46
Page 5

Safety Instructions
5
KPC-1900 Series User’s Manual
Safety Instructions
Before You Begin
Before handling the product, read the instructions and safety guidelines on the
following pages to prevent damage to the product and to ensure your own personal
safety. Refer to the “Advisories” section in the Preface for advisory conventions used
in this user’s guide, including the distinction between Warnings, Cautions, Important
Notes, and Notes.
Always use caution when handling/operating a computer. Only qualified,
experienced, authorized electronics service personnel should access the
interior of a computer. The power supplies produce high voltages and
energy hazards, which can cause bodily harm.
Use extreme caution when installing or removing components. Refer to the
installation instructions in this user’s guide for precautions and procedures.
If you have any questions, please contact our Post-Sales Technical
Support.
Access can only be gained by service persons or by users who have been
instructed about the reasons for the restrictions applied to the location and
about any precautions that shall be taken; and access is through the use of
a tool or lock and key, or other means of security, and is controlled by
authority responsible for the location.
WARNING
High voltages are present inside the chassis when the unit’s power cord is
plugged into an electrical outlet. Turn off system power, turn off the power
supply, and then disconnect the power cord from its source before
removing the chassis cover. Turning off the system power switch does not
remove power to components.
Page 6

Safety Instructions
6
KPC-1900 Series User’s Manual
When Working Inside a Computer
Before taking covers off a computer, perform the following steps:
1. Turn off the computer and any peripherals.
2. Disconnect the computer and peripherals from their power sources or
subsystems to prevent electric shock or system board damage. This does not
apply when hot swapping parts.
3. Follow the guidelines provided in “Preventing Electrostatic Discharge” on the
following page.
4. Disconnect any telephone or telecommunications lines from the computer.
In addition, take note of these safety guidelines when appropriate:
To help avoid possible damage to system boards, wait five seconds after
turning off the computer before removing a component, removing a system
board, or disconnecting a peripheral device from the computer.
When you disconnect a cable, pull on its connector or on its strain-relief loop,
not on the cable itself. Some cables have a connector with locking tabs. If you
are disconnecting this type of cable, press in on the locking tabs before
disconnecting the cable. As you pull connectors apart, keep them evenly
aligned to avoid bending any connector pins. Also, before connecting a cable,
make sure both connectors are correctly oriented and aligned.
CAUTION
Do not attempt to service the system yourself except as explained in this
user’s guide. Follow installation and troubleshooting instructions closely.
Preventing Electrostatic Discharge
Static electricity can harm system boards. Perform service at an ESD workstation
and follow proper ESD procedure to reduce the risk of damage to components. We
strongly encourage you to follow proper ESD procedure, which can include wrist
straps and smocks, when servicing equipment.
You can also take the following steps to prevent damage from electrostatic
Page 7

Safety Instructions
7
KPC-1900 Series User’s Manual
discharge (ESD):
When unpacking a static-sensitive component from its shipping carton, do not
remove the component’s antistatic packing material until you are ready to install
the component in a computer. Just before unwrapping the antistatic packaging,
be sure you are at an ESD workstation or grounded. This will discharge any
static electricity that may have built up in your body.
Page 8

Safety Instructions
8
KPC-1900 Series User’s Manual
When transporting a sensitive component, first place it in an antistatic container
or packaging.
Handle all sensitive components at an ESD workstation. If possible, use
antistatic floor pads and workbench pads.
Handle components and boards with care. Don’t touch the components or
contacts on a board. Hold a board by its edges or by its metal mounting bracket.
Do not handle or store system boards near strong electrostatic, electromagnetic,
magnetic, or radioactive fields.
Page 9

Preface
9
KPC-1900 Series User’s Manual
Preface
How to Use This Guide
This guide is designed to be used as step-by-step instructions for installation, and as
a reference for operation, troubleshooting, and upgrades.
Unpacking
When unpacking, follow these steps:
1. After opening the box, save it and the packing material for possible future
shipment.
2. Remove all items from the box. If any items listed on the purchase order
are missing, notify our customer service immediately.
3. Inspect the product for damage. If there is damage, notify our customer
service immediately. Refer to “Warranty Policy” for the return procedure.
Regulatory Compliance Statements
This section provides the FCC compliance statement for Class A devices.
FCC Compliance Statement for Class A Devices
The product(s) described in this user’s guide has been tested and found to comply
with the limits for a Class A digital device, pursuant to Part 15 of the FCC Rules.
These limits are designed to provide reasonable protection against harmful
interference when the equipment is operated in a commercial environment. This
equipment generates, uses, and can radiate radio frequency energy and, if not
installed and used in accordance with the user’s guide, may cause harmful
interference to radio communications. Operation of this equipment in a residential
area (domestic environment) is likely to cause harmful interference, in which case
the user will be required to correct the interference (take adequate measures) at
their own expense.
Changes or modifications not expressly approved by us could void the user's
authority to operate the equipment.
Page 10

Preface
10
KPC-1900 Series User’s Manual
NOTE
The assembler of a personal computer system may be required to test
the system and/or make necessary modifications if a system is found to
cause harmful interference or to be noncompliant with the appropriate
standards for its intended use.
Maintaining Your Computer
Environmental Factors
Temperature
The ambient temperature within an enclosure may be greater than room
ambient temperature. Installation in an enclosure should be such that the
amount of air flow required for safe operation is not compromised.
Consideration should be given to the maximum rated ambient temperature.
Overheating can cause a variety of problems, including premature aging and
failure of chips or mechanical failure of devices.
If the system has been exposed to abnormally cold temperatures, allow a
two-hour warm-up period to bring it up to normal operating temperature before
turning it on. Failure to do so may cause damage to internal components,
particularly the hard disk drive.
Humidity
High-humidity can cause moisture to enter and accumulate in the system. This
moisture can cause corrosion of internal components and degrade such
properties as electrical resistance and thermal conductivity. Extreme moisture
buildup inside the system can result in electrical shorts, which can cause
serious damage to the system.
Buildings in which climate is controlled usually maintain an acceptable level of
humidity for system equipment. However, if a system is located in an unusually
humid location, a dehumidifier can be used to maintain the humidity within an
acceptable range. Refer to the “Specifications” section of this user’s guide for
the operating and storage humidity specifications.
Altitude
Operating a system at a high altitude (low pressure) reduces the efficiency of
the cooling fans to cool the system. This can cause electrical problems related
Page 11

Preface
11
KPC-1900 Series User’s Manual
to arcing and corona effects. This condition can also cause sealed components
with internal pressure, such as electrolytic capacitors, to fail or perform at
reduced efficiency.
Po we r Prote ction
The greatest threats to a system’s supply of power are power loss, power spikes,
and power surges caused by electrical storms, which interrupt system operation
and/or damage system components. To protect your system, always properly
ground power cables and one of the following devices.
Surg e P rotect or
Surge protectors are available in a variety of types and usually provide a level
of protection proportional with the cost of the device. Surge protectors prevent
voltage spikes from entering a system through the AC power cord. Surge
protectors, however, do not offer protection against brownouts, which occur
when the voltage drops more than 20 percent below the normal AC line voltage
level.
Line Con dit i one r
Line conditioners go beyond the over voltage protection of surge protectors.
Line conditioners keep a system’s AC power source voltage at a fairly constant
level and, therefore, can handle brownouts. Because of this added protection,
line conditioners cost more than surge protectors. However, line conditioners
cannot protect against a complete loss of power.
Uninterruptible Power Supply
Uninterruptible power supply (UPS) systems offer the most complete protection
against variations on power because they use battery power to keep the server
running when AC power is lost. The battery is charged by the AC power while it
is available, so when AC power is lost, the battery can provide power to the
system for a limited amount of time, depending on the UPS system.
UPS systems range in price from a few hundred dollars to several thousand
dollars, with the more expensive unit s allowing you to run larger systems for a
longer period of time when AC power is lost. UPS systems that provide only 5
minutes of battery power let you conduct an orderly shutdown of the system,
but are not intended to provide continued operation. Surge protectors should be
used with all UPS systems, and the UPS system should be Underwriters
Page 12

Preface
12
KPC-1900 Series User’s Manual
Laboratories (UL) safety approved.
Page 13

Chapter 1
13
KPC-1900 Series User’s Manual
Chapter 1
Introduction
Overview
Powered by 6th Generation Intel® Skylake S-Series Processors, KPC-1900 Series
Panel PC has greatly improved graphics performance, power efficiency and wireless
connectivity. In addition to 1x DVI-D, 2x DP, 4x USB3.0, 2x USB2.0, 6x COM, and 2x
LAN for display output, peripheral applications and wired networking, it has a variety
of expansion slots /sockets for wireless, storage or other function expansion,
including PCIex8 add-on card, mPCIe / mSATA, SATA slots / sockets.
Checklist
KPC-1900 Series
Power Adapter
Power Cord
Driver CD
Quick installation Guide
Optional VESA Mounting Kit
Optional wireless LAN
Features
LGA1151 Socket 6th Gen. Intel® Skylake S-Series Processors (35W TDP)
Intel® Q170 / H110 Express Chipset
2x DDR4 SO-DIMM Socket
1x 2.5" HDD / SSD for Storage
19" 5-wire resistive LCD touch display
1x D VI-D, 2x DP for display output
2x L AN, 4x USB3.0, 2x USB2.0, 6x COM for wired network and peripherals
1x mSATA/mPCIe + 1x mPCIe or 2x mPCIe, 2x PCIex8 for storage & expansion
TPM & iAMT support
IP65 aluminum front bezel
Page 14

Chapter 1
14
KPC-1900 Series User’s Manual
Product Specifications
CPU Support Intel® Skylake-S Processors (FCLGA1151 Socket, up to 35W)
Chipset Intel® Q170 (KPC-1900)
Intel® H110 (KPC-1901)
Memo ry 2x DDR4 S O-DIMM
LCD Di splay
S i ze : 19 i n ch
Aspect Ratio: 5:4
Backlight: LED
Resolution: 1280 x 1024 SXGA
Brightness: 250cd/m2 (typical)
Contrast Ratio: 1000:1 (typical)
Color: 16.7M
Vie win g An gle (L / R/H/L): 85°/85°/ 80 °/80 °
Touch: 5-wire resistive touch sensor
External Di splay 1x DVI-D (on rear)
2x DP (on rear)
Multiple Display Triple
Audi o Chi p se t RealtekALC662
Audi o I nt e rfa ces 1xLine‐in(onrea r)
1xLine‐out(onrear)
1xMic‐in(onrear)
Ethernet 2xLAN(RJ‐45onrear,1xInte l®I219‐LM,1xIntel®I210‐AT)
USB 4x USB3.0 (Type A on rear)
2x USB2.0 (Type A on rear)
Se ria l P o rts 3x RS-232/422/485 (DB9 on rear)
3x RS-232 (DB 9 on rea r)
Storage & Expansion 1x 2.5" SATA HDD / SSD
1x mSATA / mPCIe (full size, Q170 models, KPC-1900)
1x mPCIe (half size, Q170 models, KPC-1900)
2x mPCIe (1x full size, 1x half size, H110 models, KPC-1901)
2x PCIex8 add-on card slot
1x SIM Ca rd Ca ge (opti onal)
Power Supply Connector: Phoenix Connector (on rear) or Lockable DC Jack (on rear)
Input Voltage: DC 12V (default), DC 24V or other options (by request)
Power Adapter: AC to DC, 100V ~ 240V
Firmware BIOS: AMI uEFI BIOS w/ 128Mb SPI Flash
Page 15

Chapter 1
15
KPC-1900 Series User’s Manual
Watchdog: Programmable WDT to generate system reset event
H/W Monitor: Input & Core Voltages, CPU & System Temperatures
Rea l Tome Clock: Ch i pset integrated RTC
TPM: Yes (Infineon SLB 9660 TPM 1.2)
iAMT: depending on processor
System Control &
Monitoring
1x Power Switch (on rear)
Coo ling 1x CPU Smart Fan
1x System Smart Fan
Co n stru cti on M e tal Ch a ssis + Al um in um Front Bezel
Dimensions 448 x 373 x 72.5 mm / 17.64" x 14.69" x 2.85" (W x H x D)
Weight 7650 g / 16.87 lb
Enviro nm ent al
Characteristics
Operation Temp.: 0°C ~ 50°C / 32°F ~ 122°F
Storage Temp.: -20°C ~ 70°C / -4°F ~ 158°F
Hu mi di ty: 0 % ~ 95%
Certification CE, FCC Cl ass A, IP65 (front bezel)
Table 1 KPC-1900 Series product specifications
Page 16
Chapter 1
16
KPC-1900 Series User’s Manual
System tour
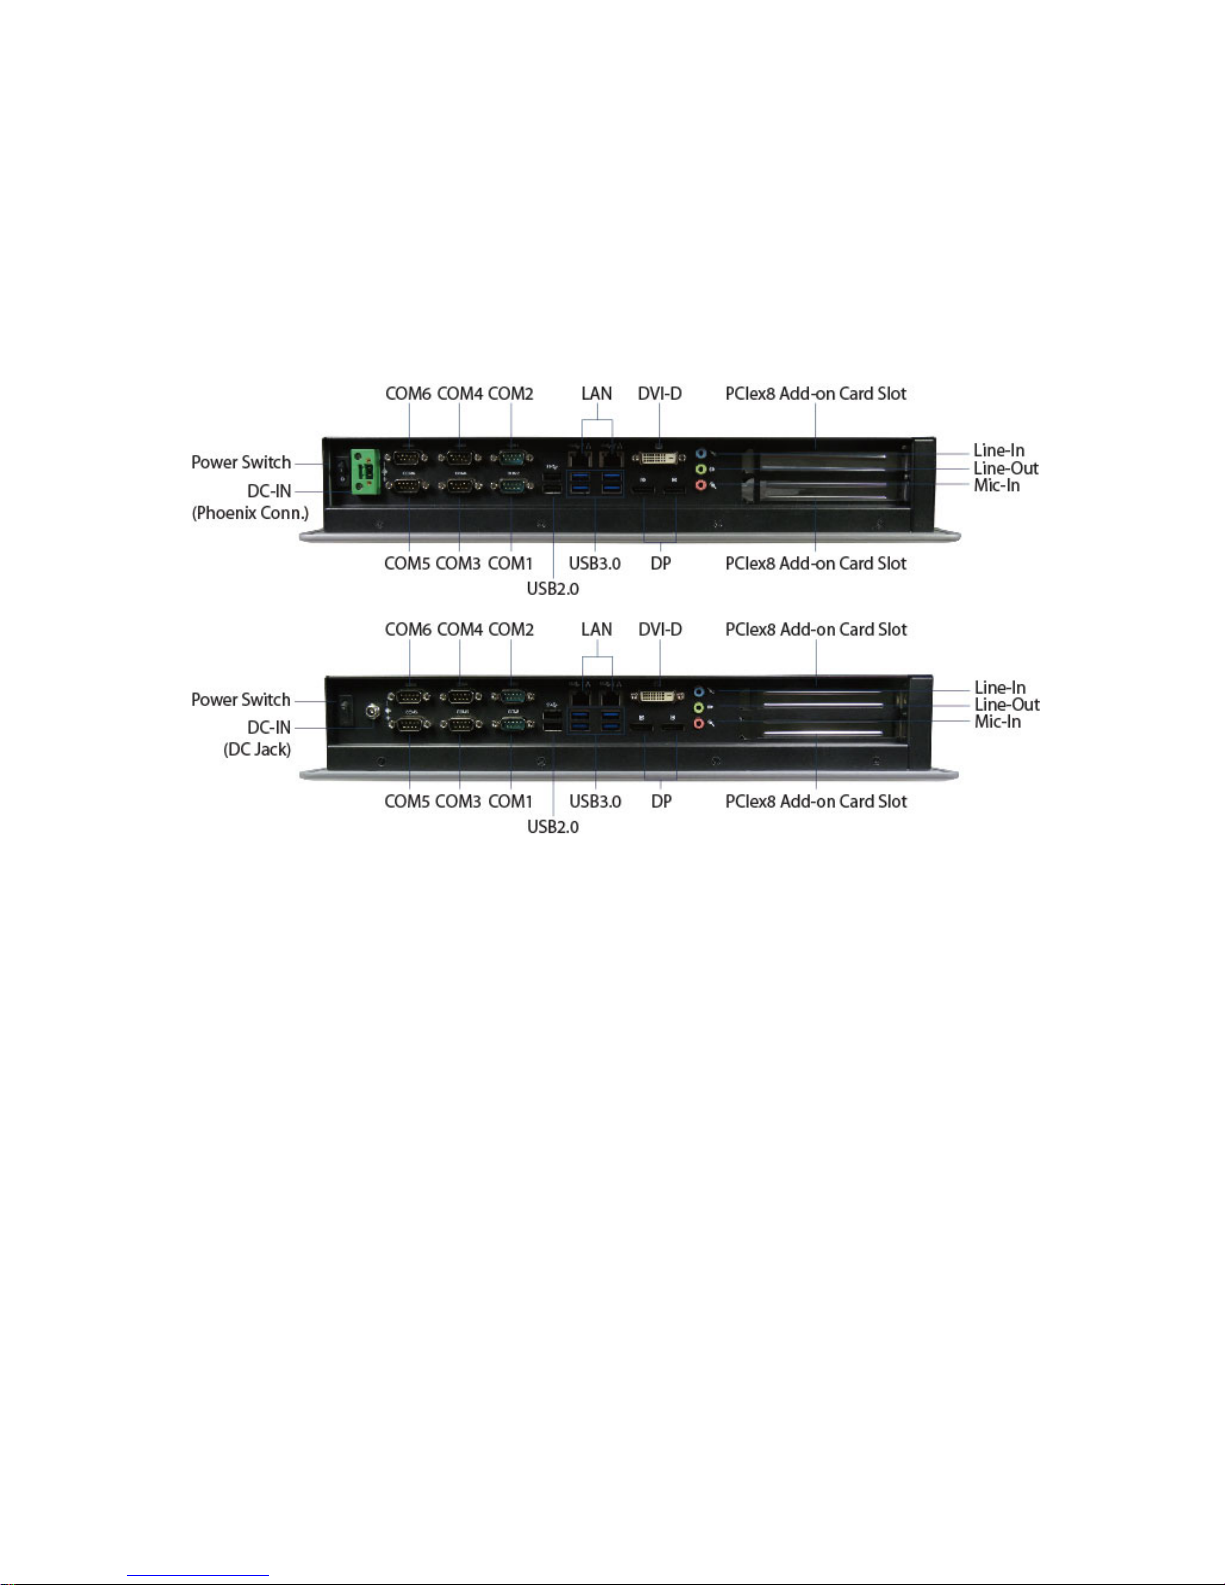
Refer to the diagrams below to identify the components of the system.
I/Os
Figure 1 I/Os
USB
The USB (Universal Serial Bus) port is compatible with USB devices such as
keyboards, mouse devices, cameras, and hard disk drives. USB allows many
devices to run simultaneously on a single computer, with some peripheral
acting as additional plug-in sites or hubs.
Power Switch
The power switch allows powering ON and OFF the system.
Ethernet
The eight-pin RJ-45 LAN port supports a standard Ethernet cable for
connection to a local network.
Power Input
The supplied power adapter converts AC power to DC for use with this phoenix
connector or DC jack. Power supplied through this connector supplies power to
Page 17

Chapter 1
17
KPC-1900 Series User’s Manual
the PC. To prevent damage to the PC, always use the supplied power adapter.
DP
DP is a display interface used to connect a video source to a display device such
as a computer monitor or a television set.
DVI-D
DVI-D is an acronym which means Digital Video Interface Digital. Essentially it is a
cable that connects two devices producing an output image on a screen.
COM
D-Sub 9 pin connector for RS-232/422/485 and RS-232 connection
Line-Out (G reen)
The stereo headphone jack is used to connect the system’s audio out signal to
amplified speakers or headphones.
MIC -IN (Pink)
The microphone jack is designed to connect the microphone used for video
conferencing, voice narrations, or simple audio recordings.
Line-IN (Blue)
The Line-in jack is designed to take input from a higher-powered sound source.
Page 18
Chapter 1
18
KPC-1900 Series User’s Manual
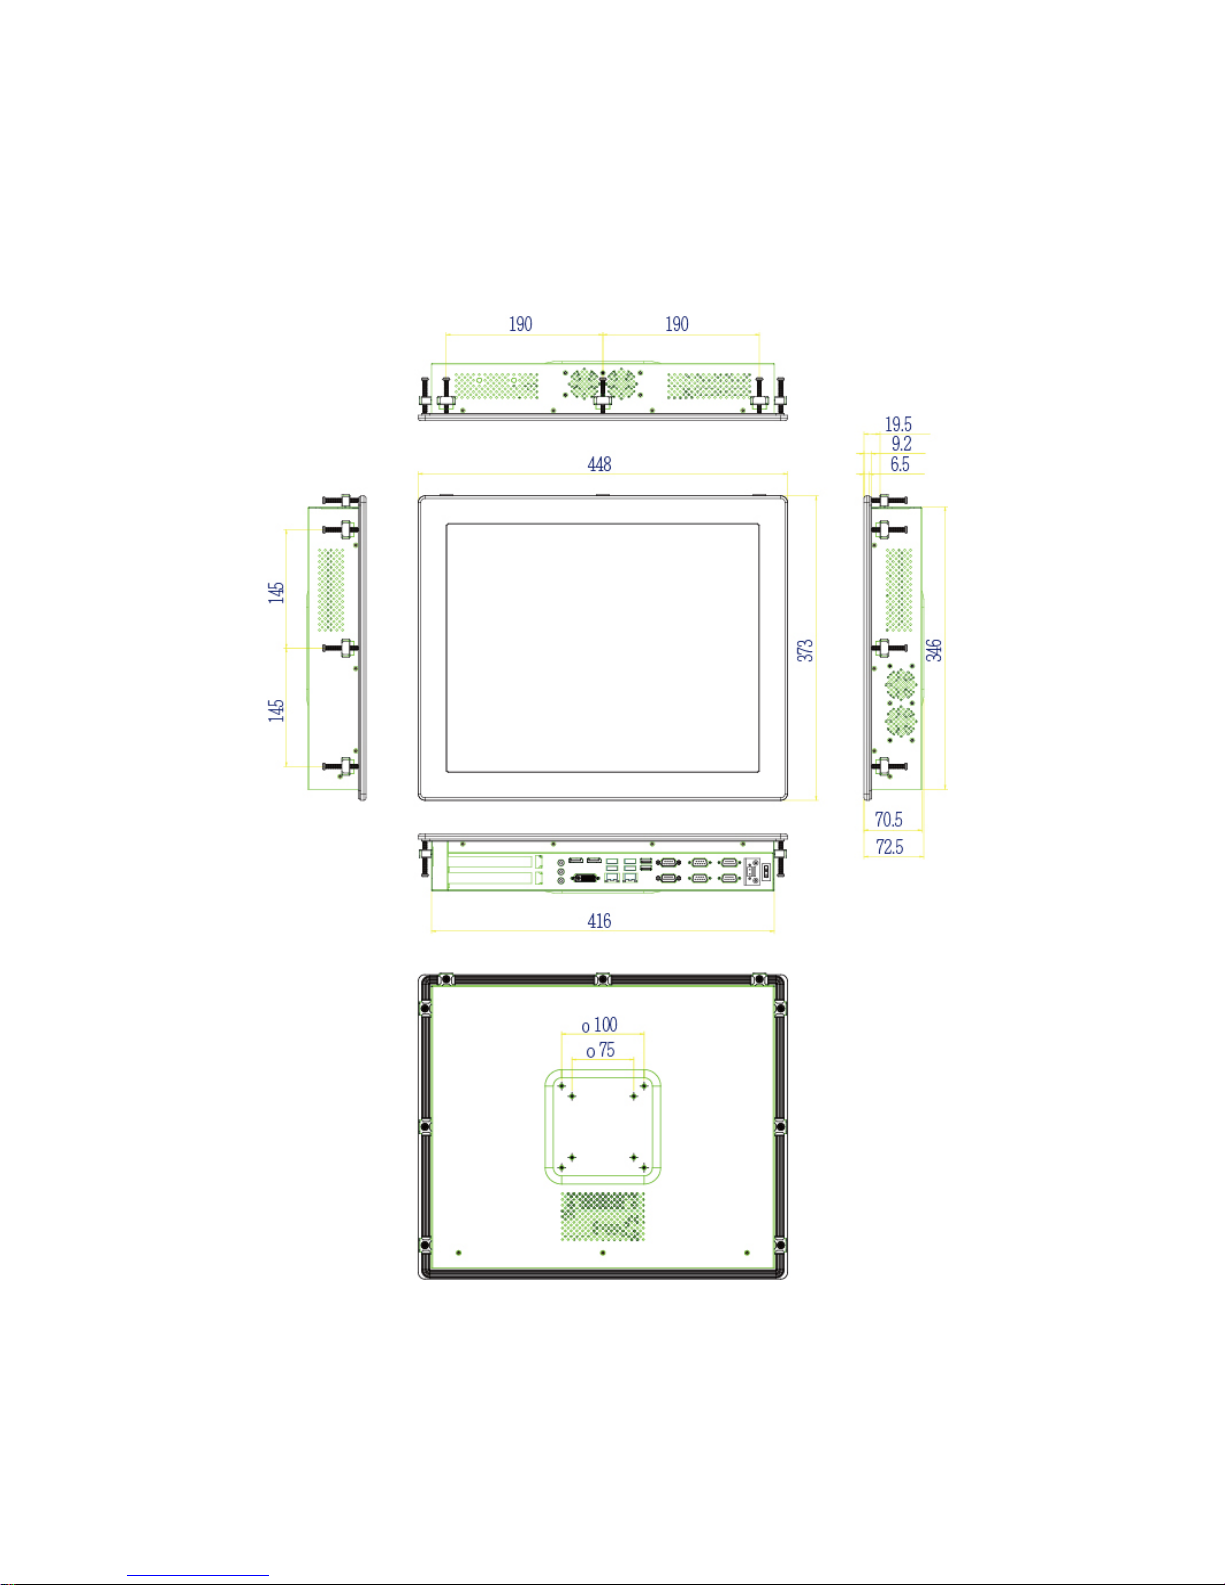
Mechanical Dimensions
448 x 373 x 72.5 mm (W x H x D)
Figure 2 Mechanical Dimensions
Page 19
Chapter 2
19
KPC-1900 Series User’s Manual
Chapter 2
Getting Started
Setting up your PC
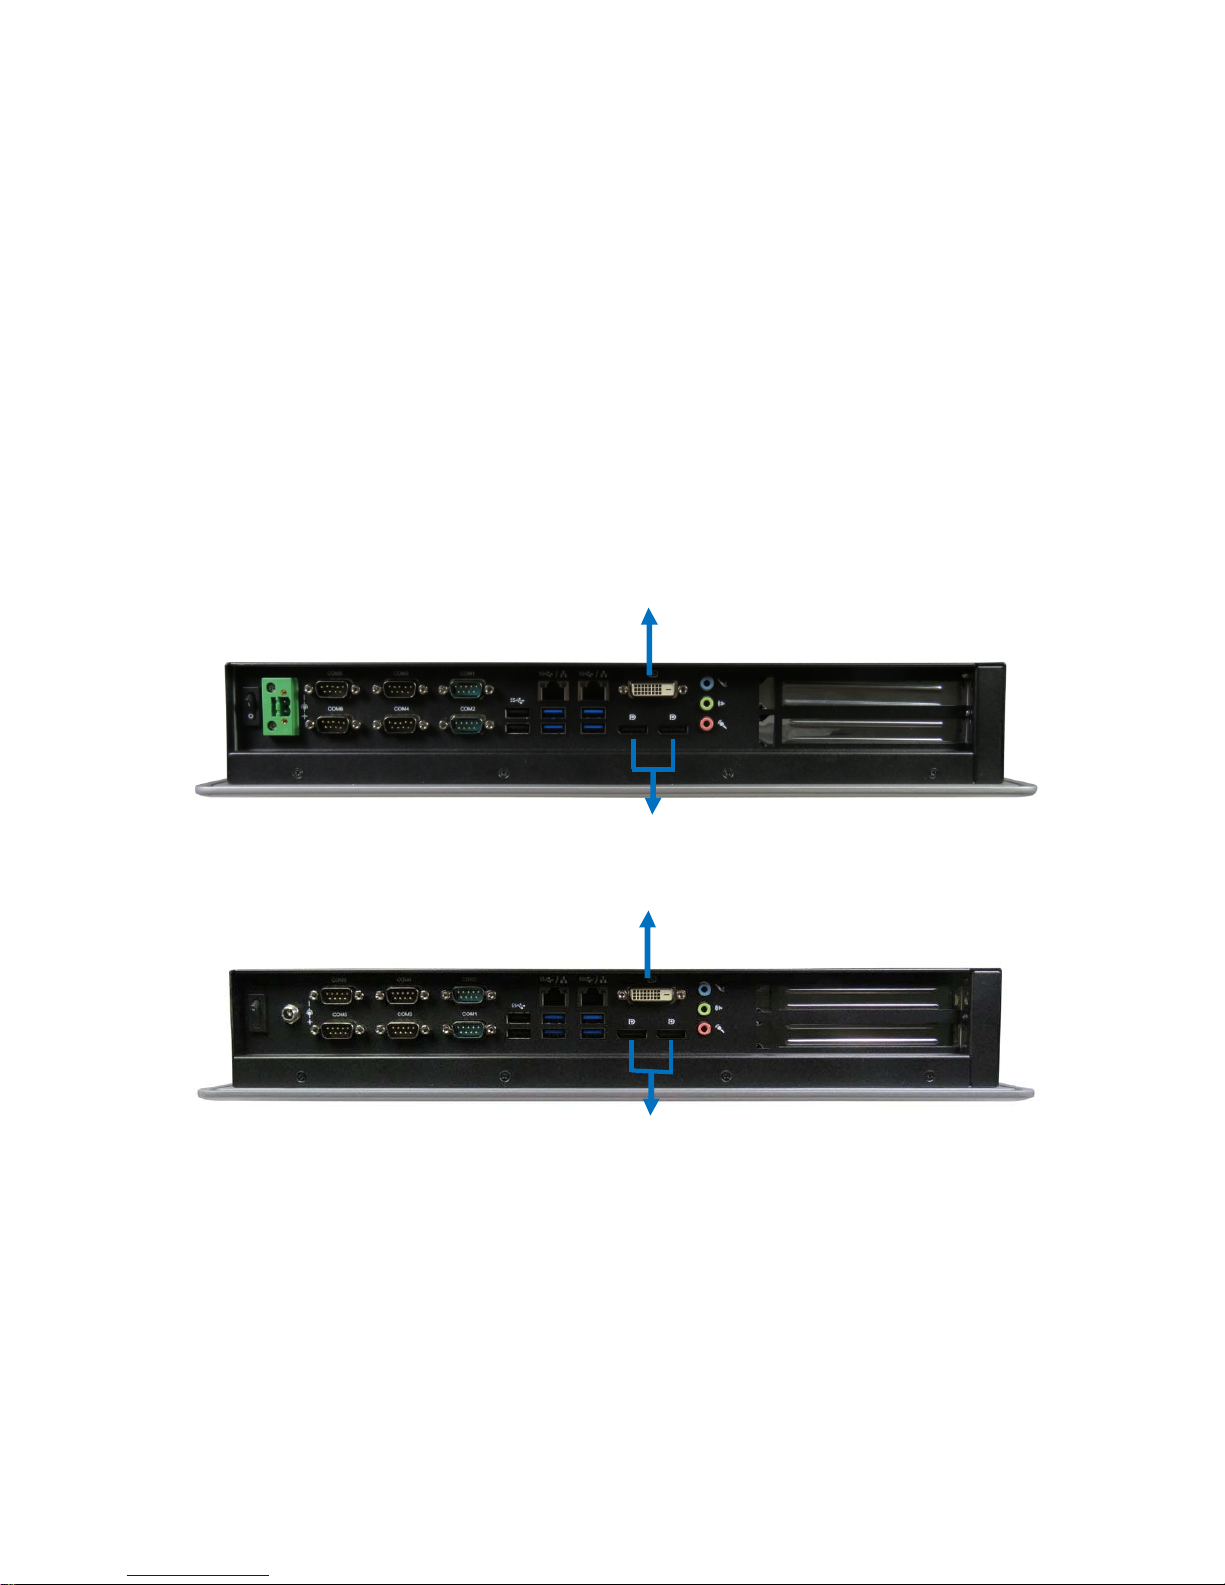
Connecting the monitor
Connect the DP / DVI-D cable f rom your display to the DP / DVI-D port.
Figure 3 DP / DVI-D
DVI-D
DP
DVI-D
DP
Page 20
Chapter 2
20
KPC-1900 Series User’s Manual
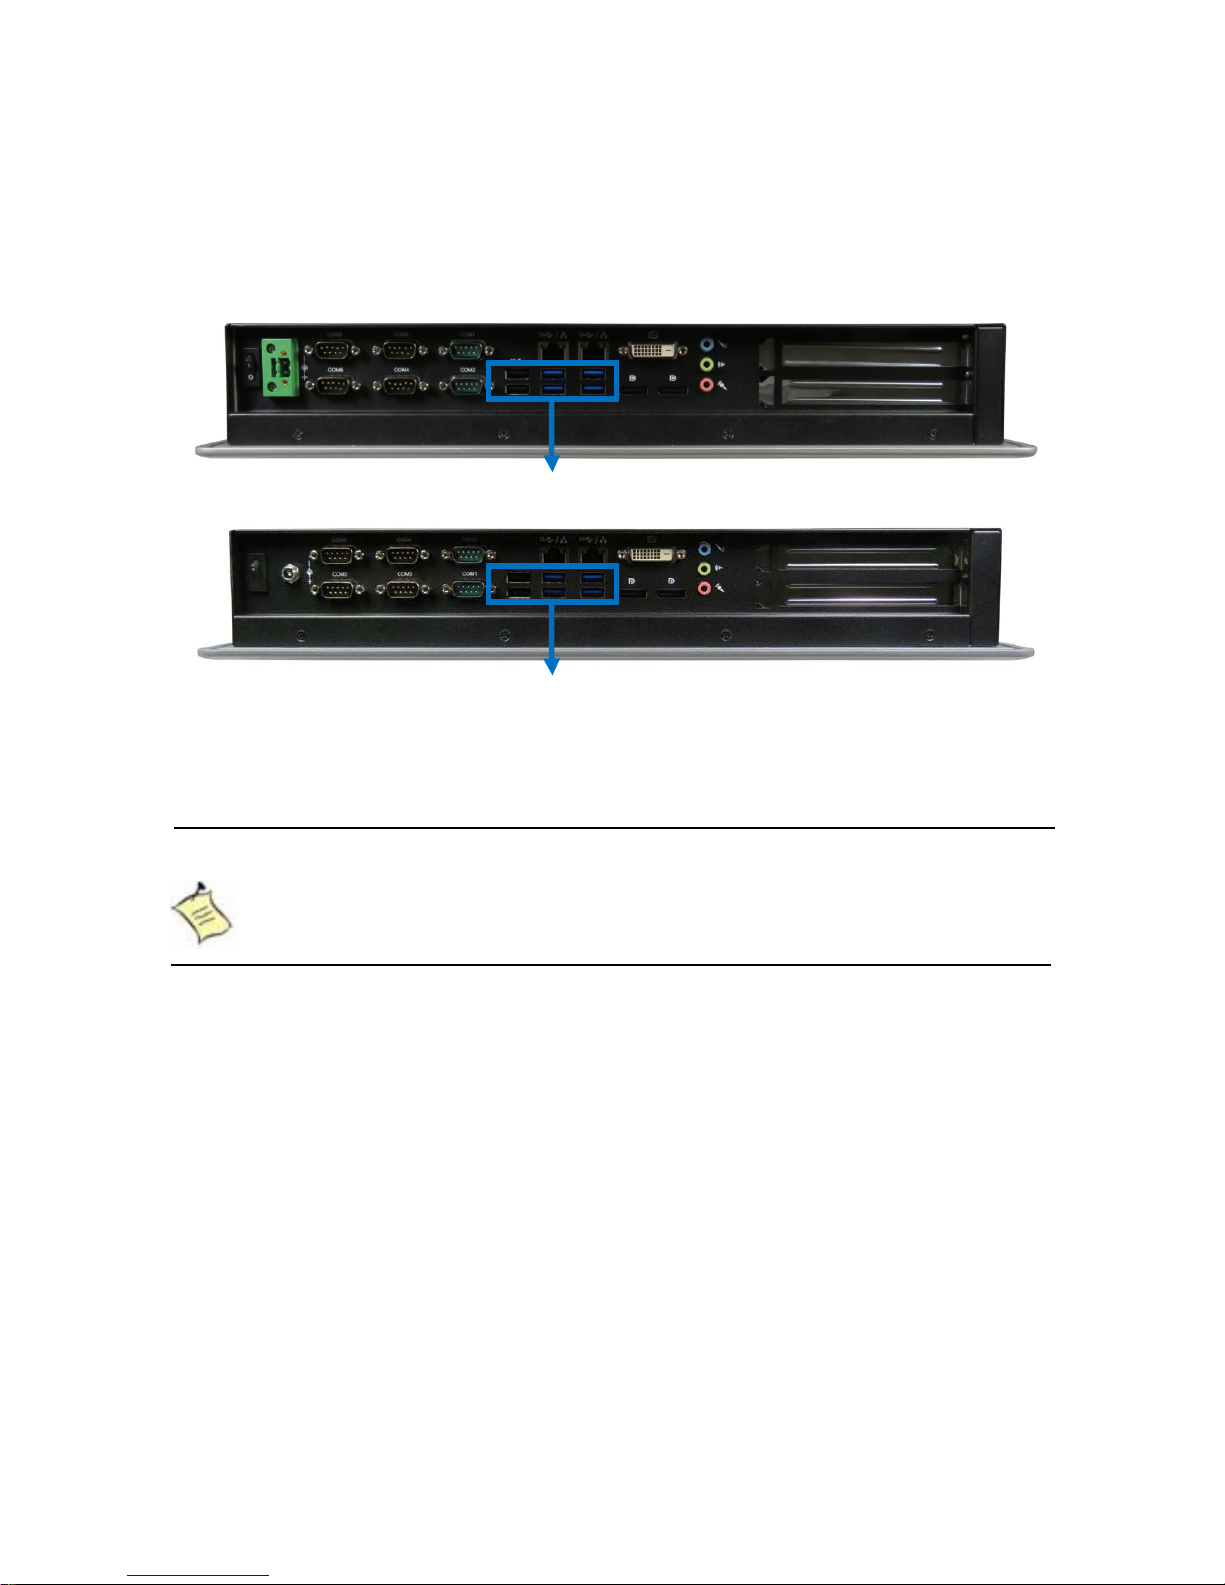
Connecting USB mouse & keyboard
Your KPC-1900 Series does not come with a keyboard and mouse, but you can
use any USB keyboard or mouse with your computer.
Figure 4 Connect USB mouse & keyboard
NOTE
Using a third-party USB mouse or keyboard may require software drivers.
Check the manufacturer’s website for the latest software drivers.
USB
USB
Page 21
Chapter 2
21
KPC-1900 Series User’s Manual
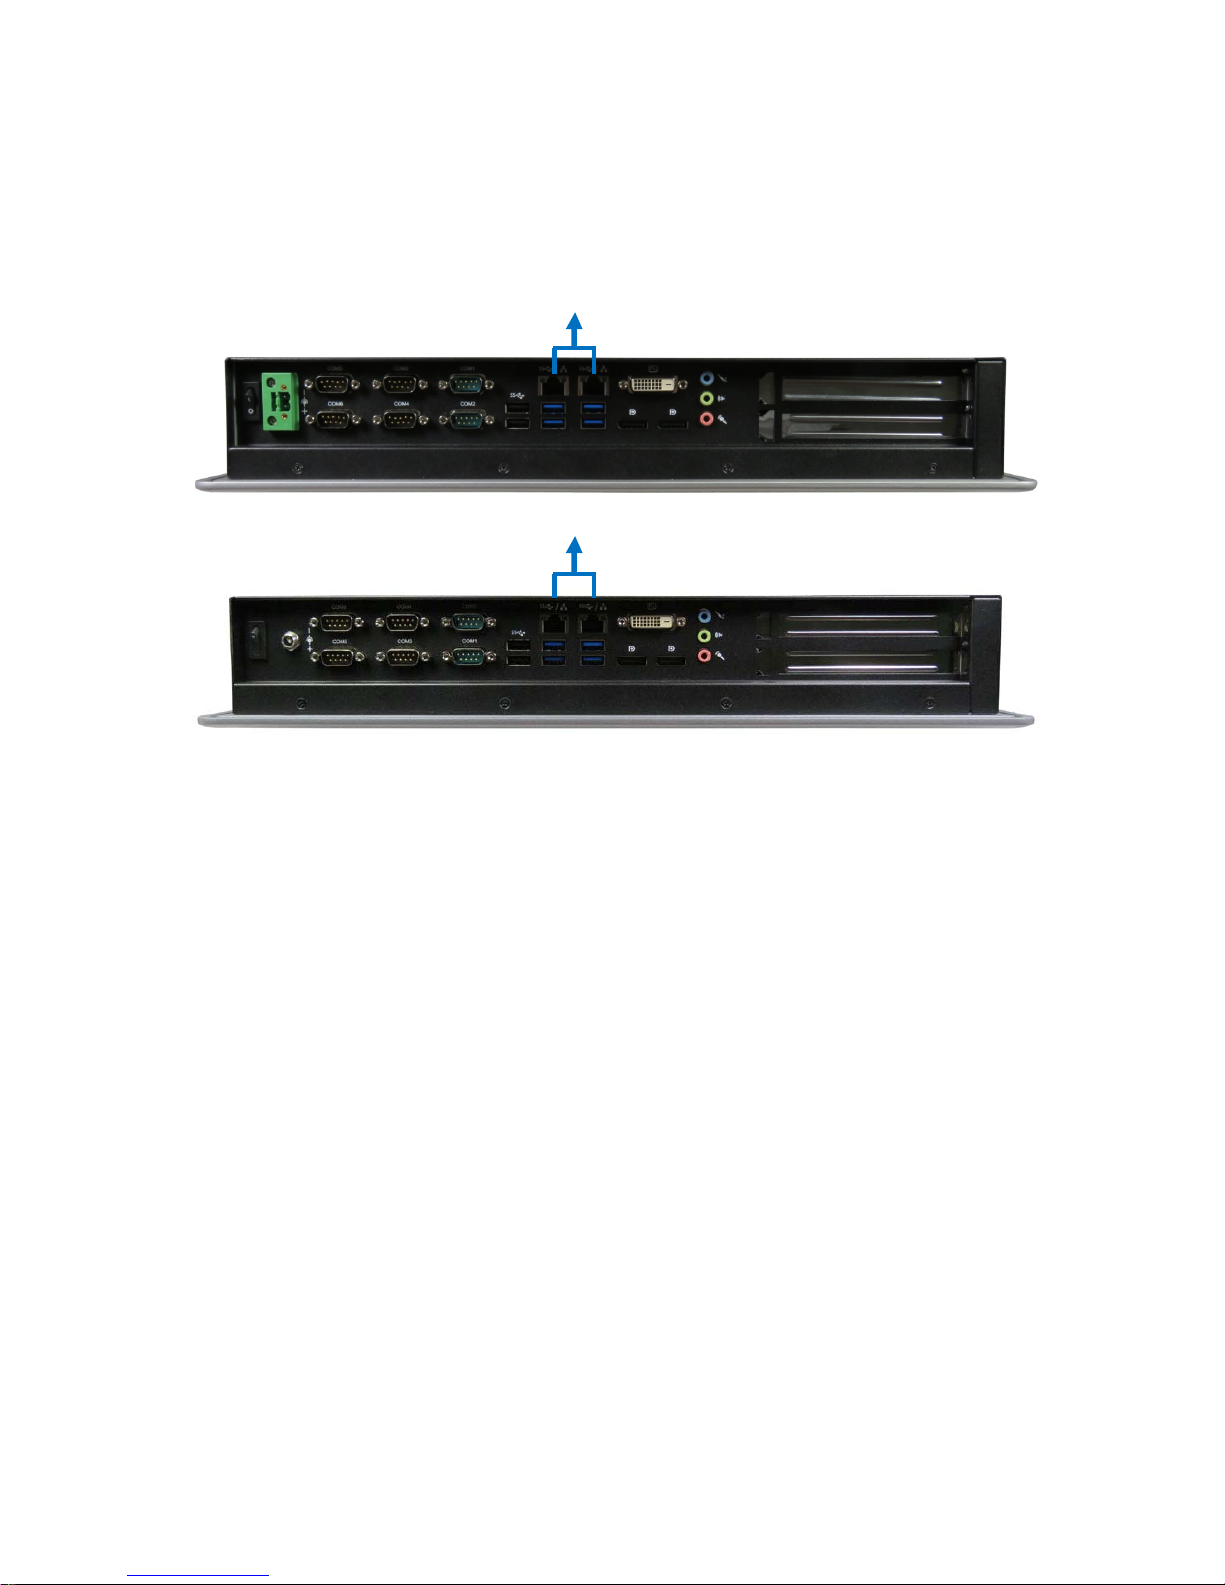
Connecting to a net work device
Connect one end of a network cable to the LAN port on the system rear panel
and the other end to a hub or switch.
Figure 5 RJ45 connector
LAN
LAN
Page 22
Chapter 2
22
KPC-1900 Series User’s Manual
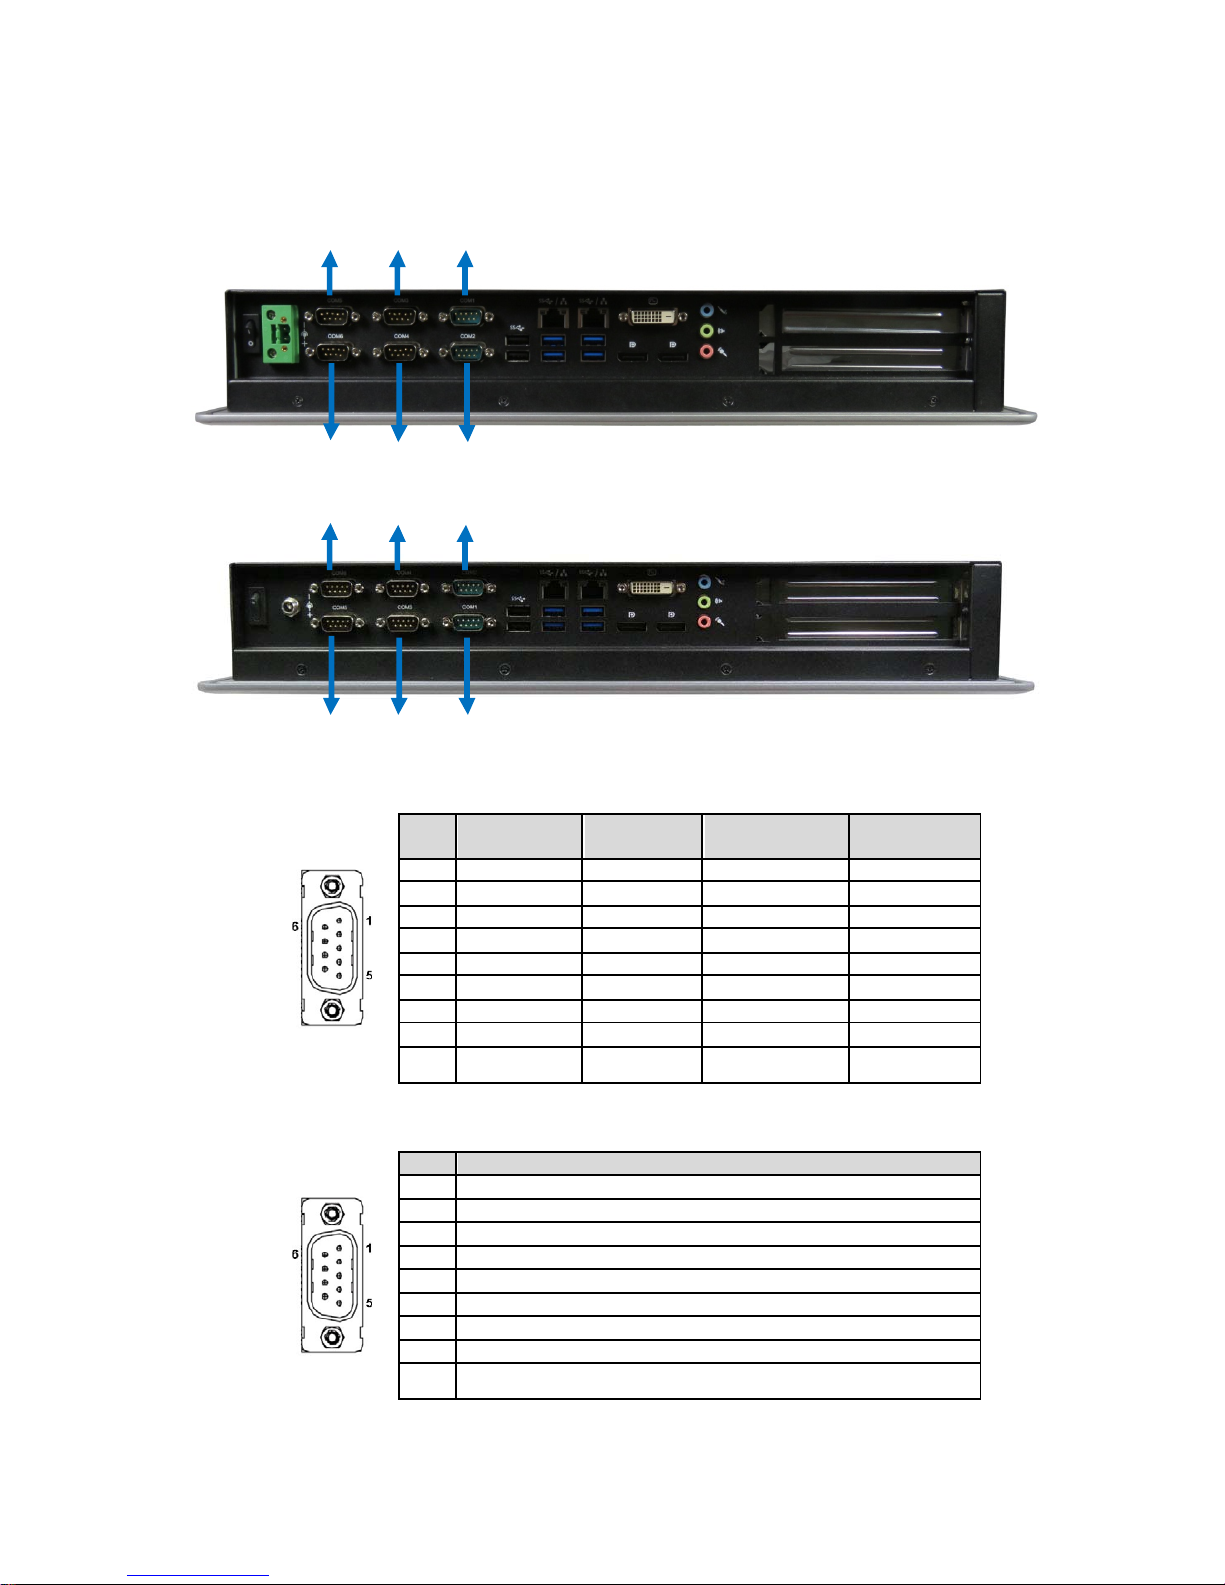
COM ports
COM ports with the pin definitions.
COM1~COM3 RS-232 / 422 / 485 Port DB-9
Pin RS-232 RS-422
Half Duplex
RS-485
Full Dupl ex
RS-485
1 DCD TX- DATA- TX2 RX D RX+ N/A RX+
3 TXD TX+ DATA+ TX+
4 DTR RX- N/A RX5 GND GND GND GND
6 DSR N/A N/A N/A
7 RTS N/A N/A N/A
8 CTS N/A N/A N/A
9 RI
N/A N/A N/A
COM4~COM6 RS-232 / 422 / 485 Port DB-9
Pin RS-232
1 DCD
2 RX D
3 TXD
4 DTR
5 GND
6 DSR
7 RTS
8 CTS
9
RI
Fi gure 6 COM po rt
COM2 COM4
COM6
COM1 COM3
COM5
COM2
COM4
COM6
COM1 COM3
COM5
Page 23
Chapter 2
23
KPC-1900 Series User’s Manual
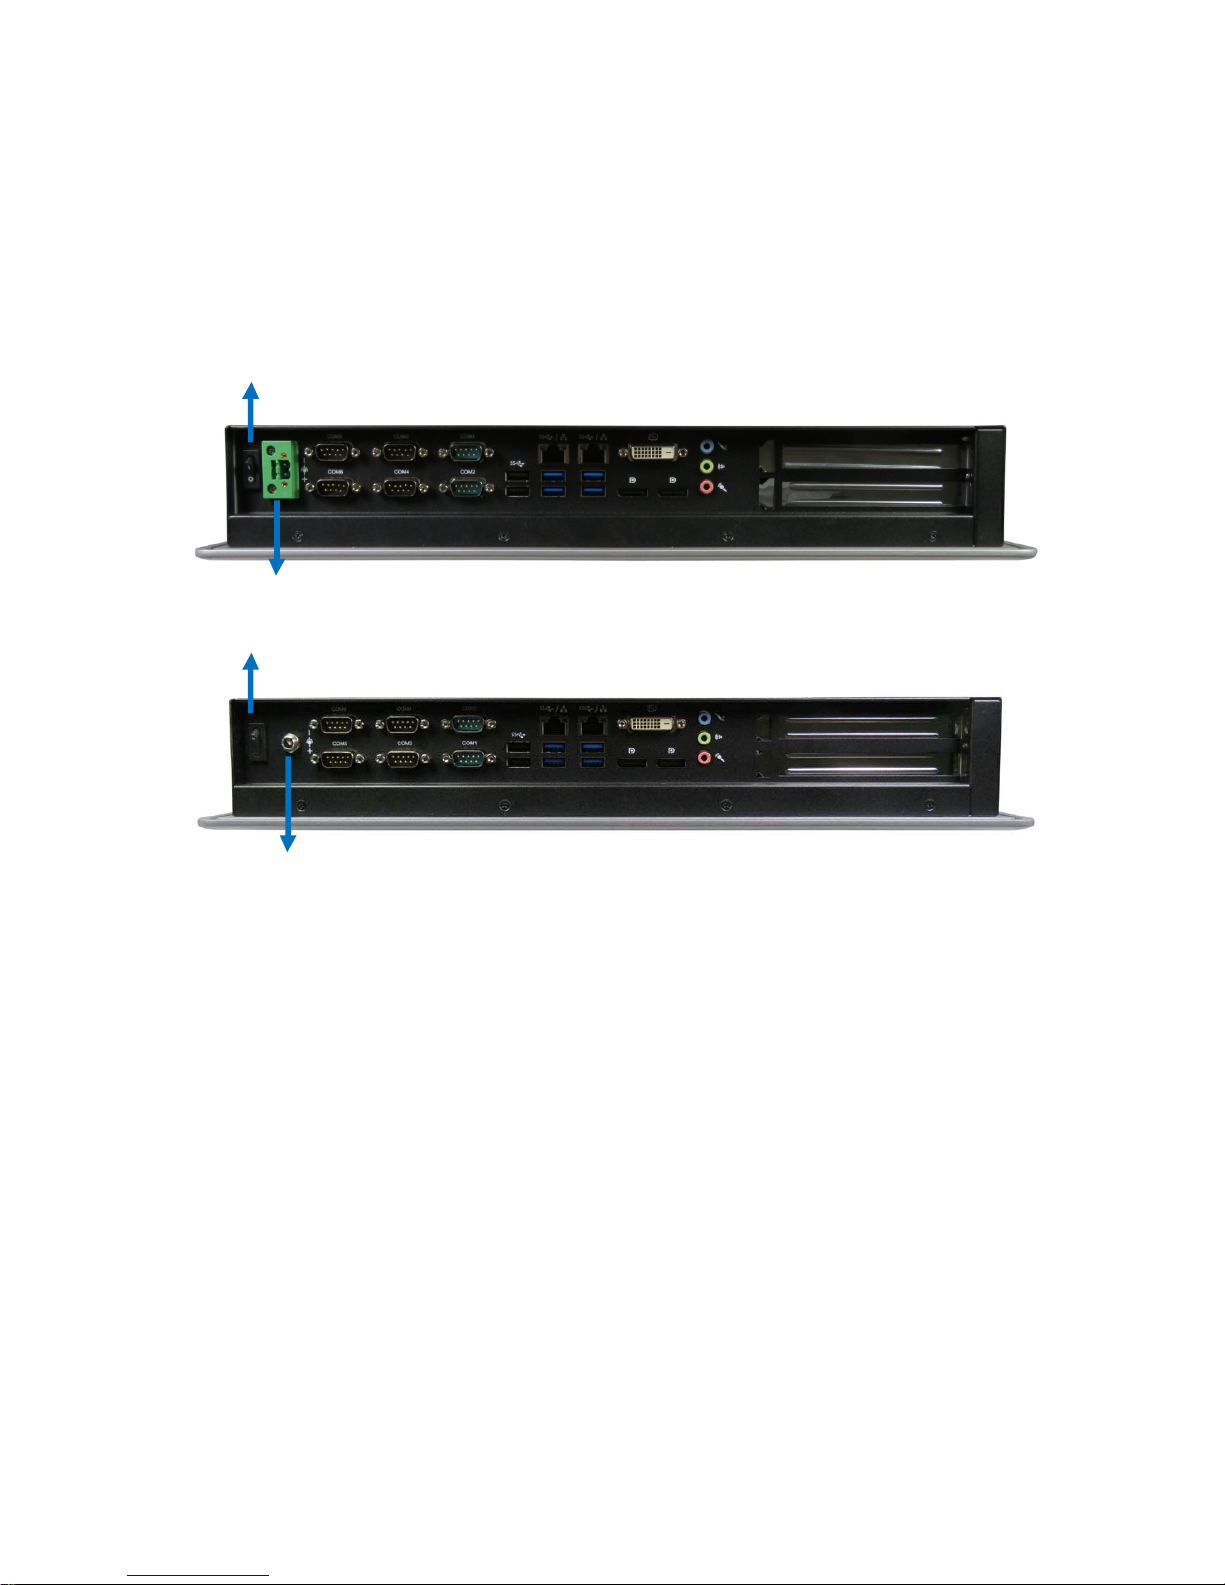
Turning on the system
1. Connect the power adapter cable to the Phoenix Connector or DC jack (DC IN) on
the I/O panel of the system.
2. Connect the AC power cable to the power adapter.
3. Connect the other end of the AC power cable to a corresponding AC power outlet.
4. Press the power switch on the I/O panel to turn on the system.
Figure 7 Turning on the system
Power Switch
DC In (Phoenix Connector)
Power Switch
DC In (DC Jack)
Page 24
Chapter 2
24
KPC-1900 Series User’s Manual
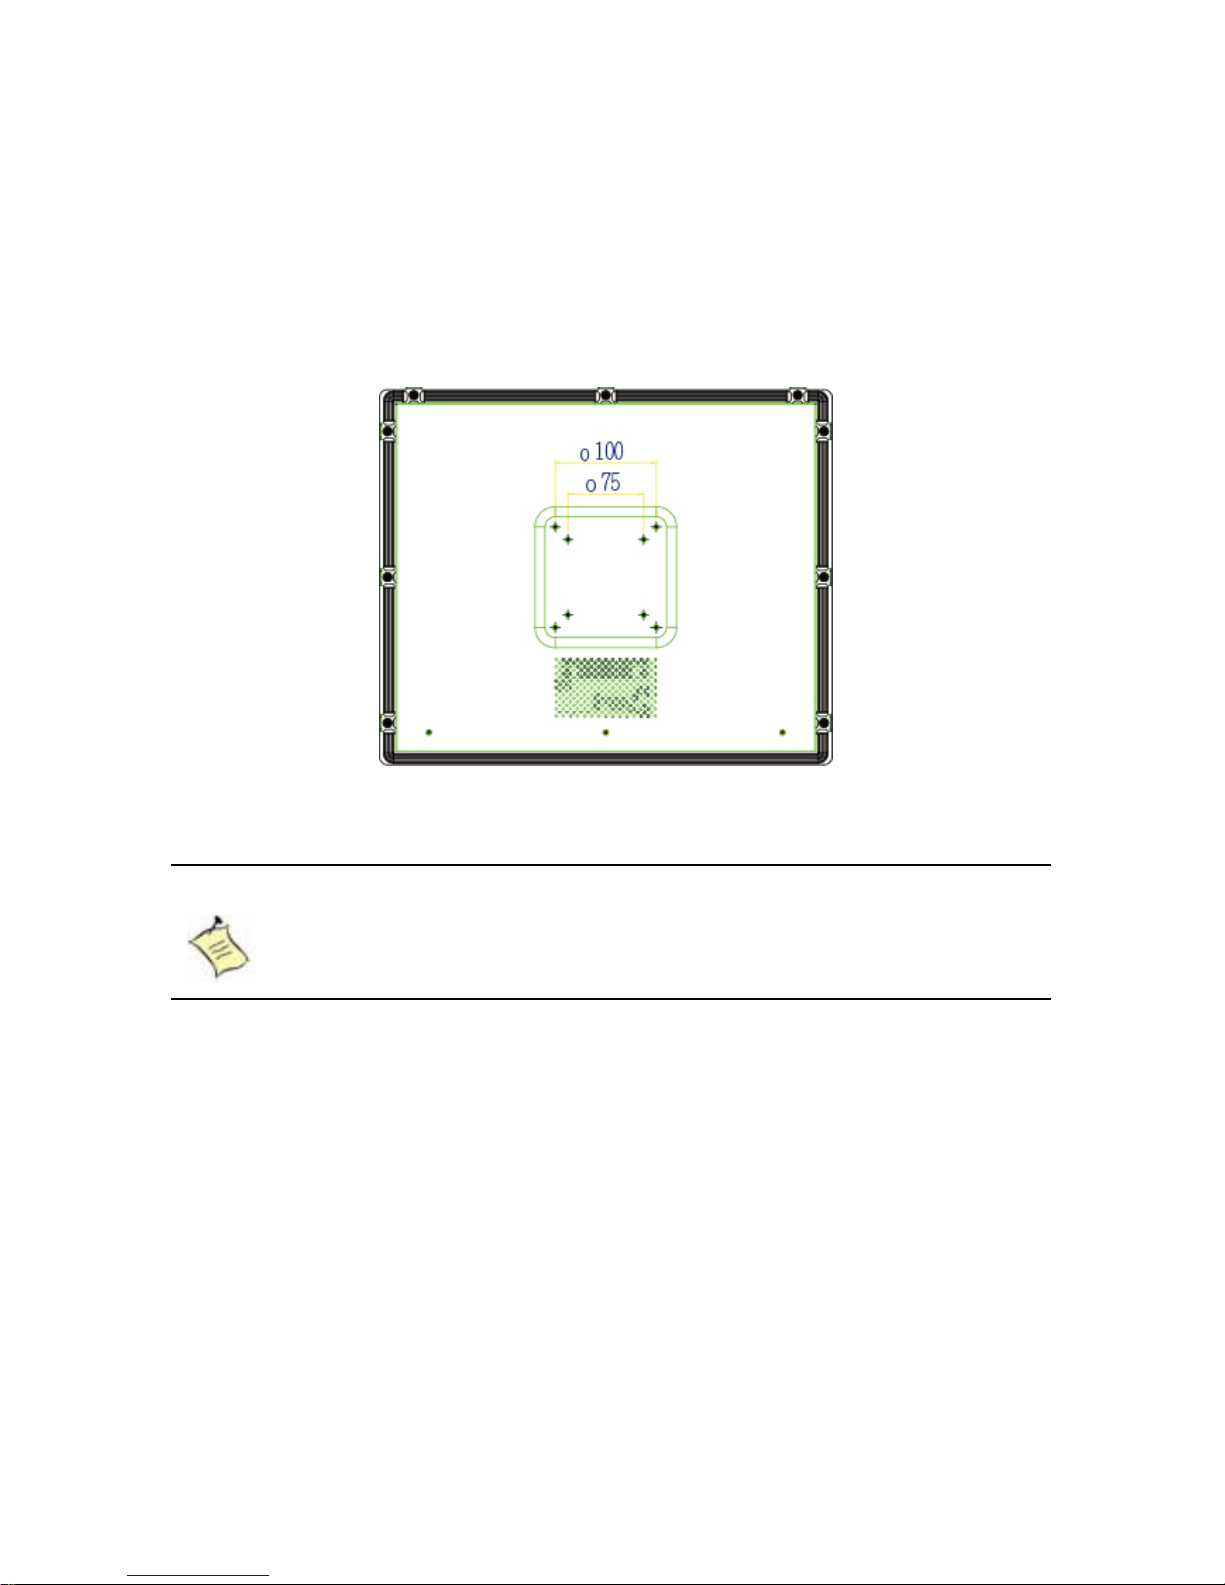
VESA Mounting
The product comes with VESA FDMI 75/100 standard mounting holes as shown
below. Use 4 screws with the appropriate length for your mounting bracket.
Figure 8 VESA Mounting Hole Locations
NOTE
To fasten the metal shelf, your monitor must comply with VESA75 or
VESA100 standard. The VESA mounting kit is optional.
Page 25
Chapter 2
25
KPC-1900 Series User’s Manual
Panel Mounting
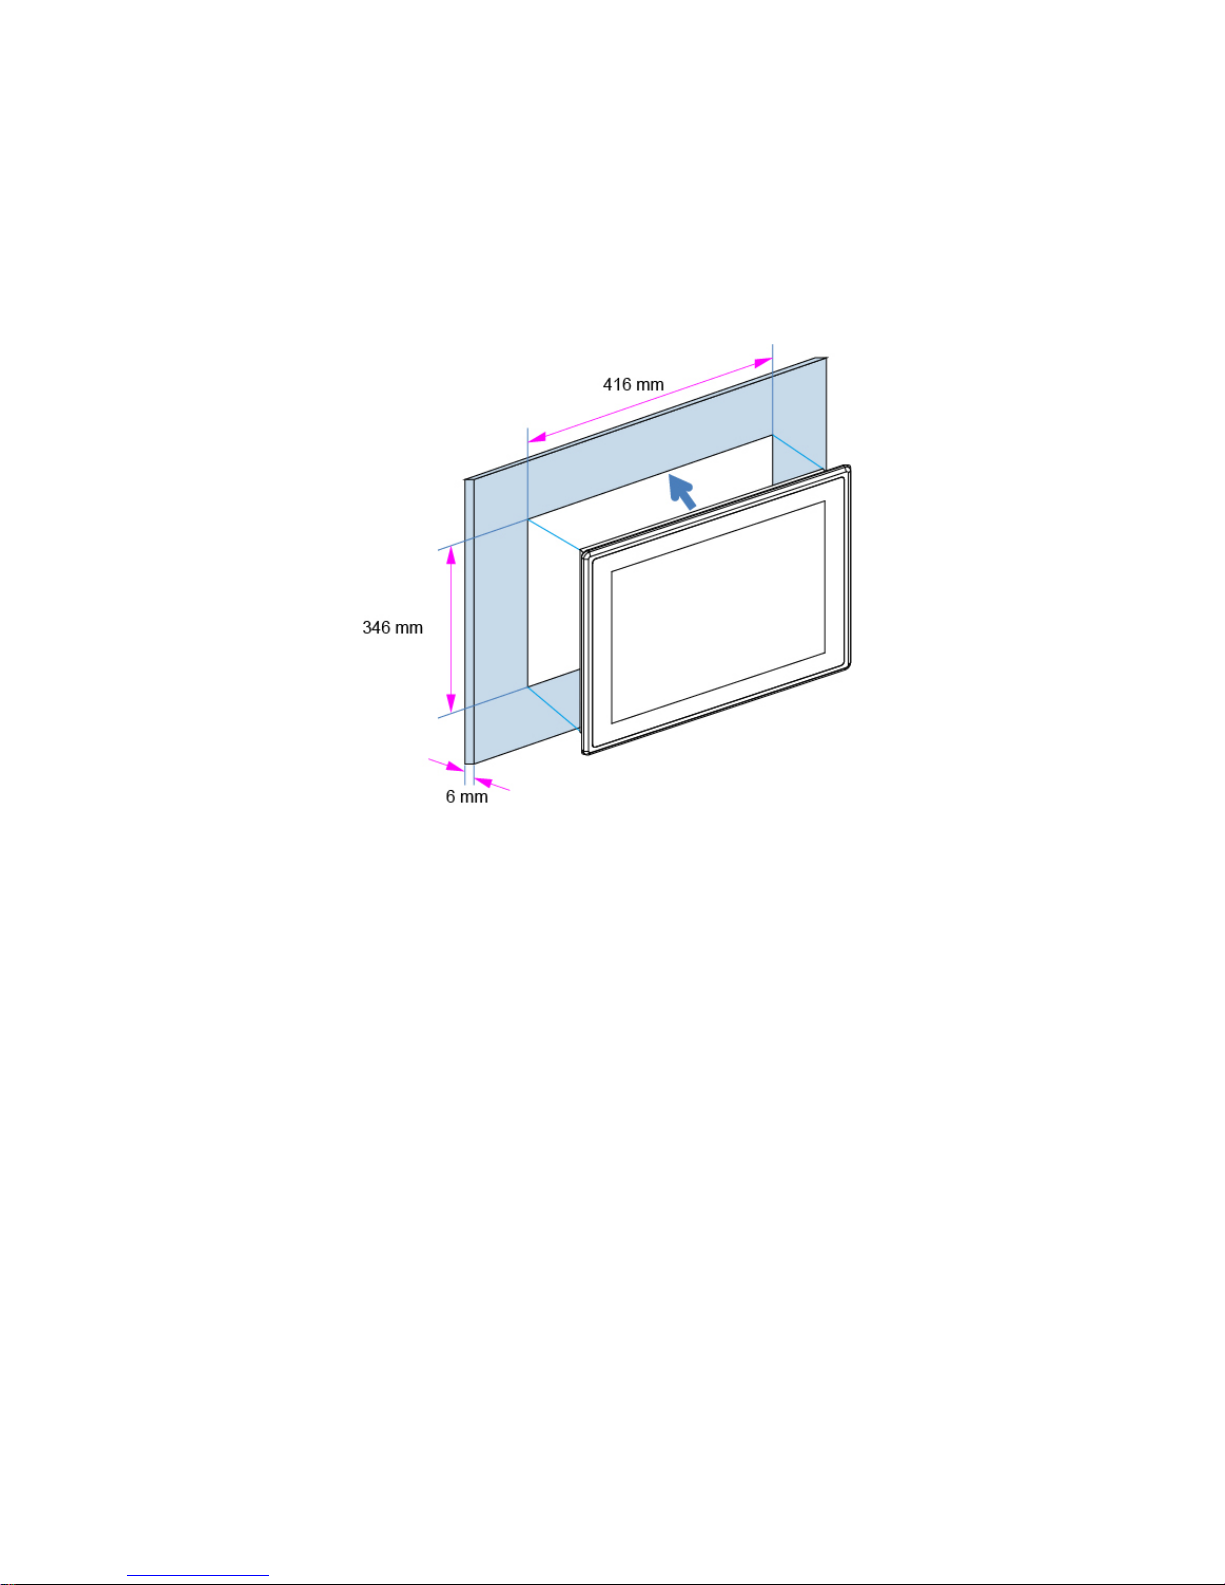
The Panel PC can be panel mounted and comes with brack ets and screws f or this purpose. The required cutout
f or panel m ounting and maximum panel thickness is shown below.
Figure 9 Panel Mount Cut-out hole and maximum panel thickness
Page 26
Chapter 2
26
KPC-1900 Series User’s Manual
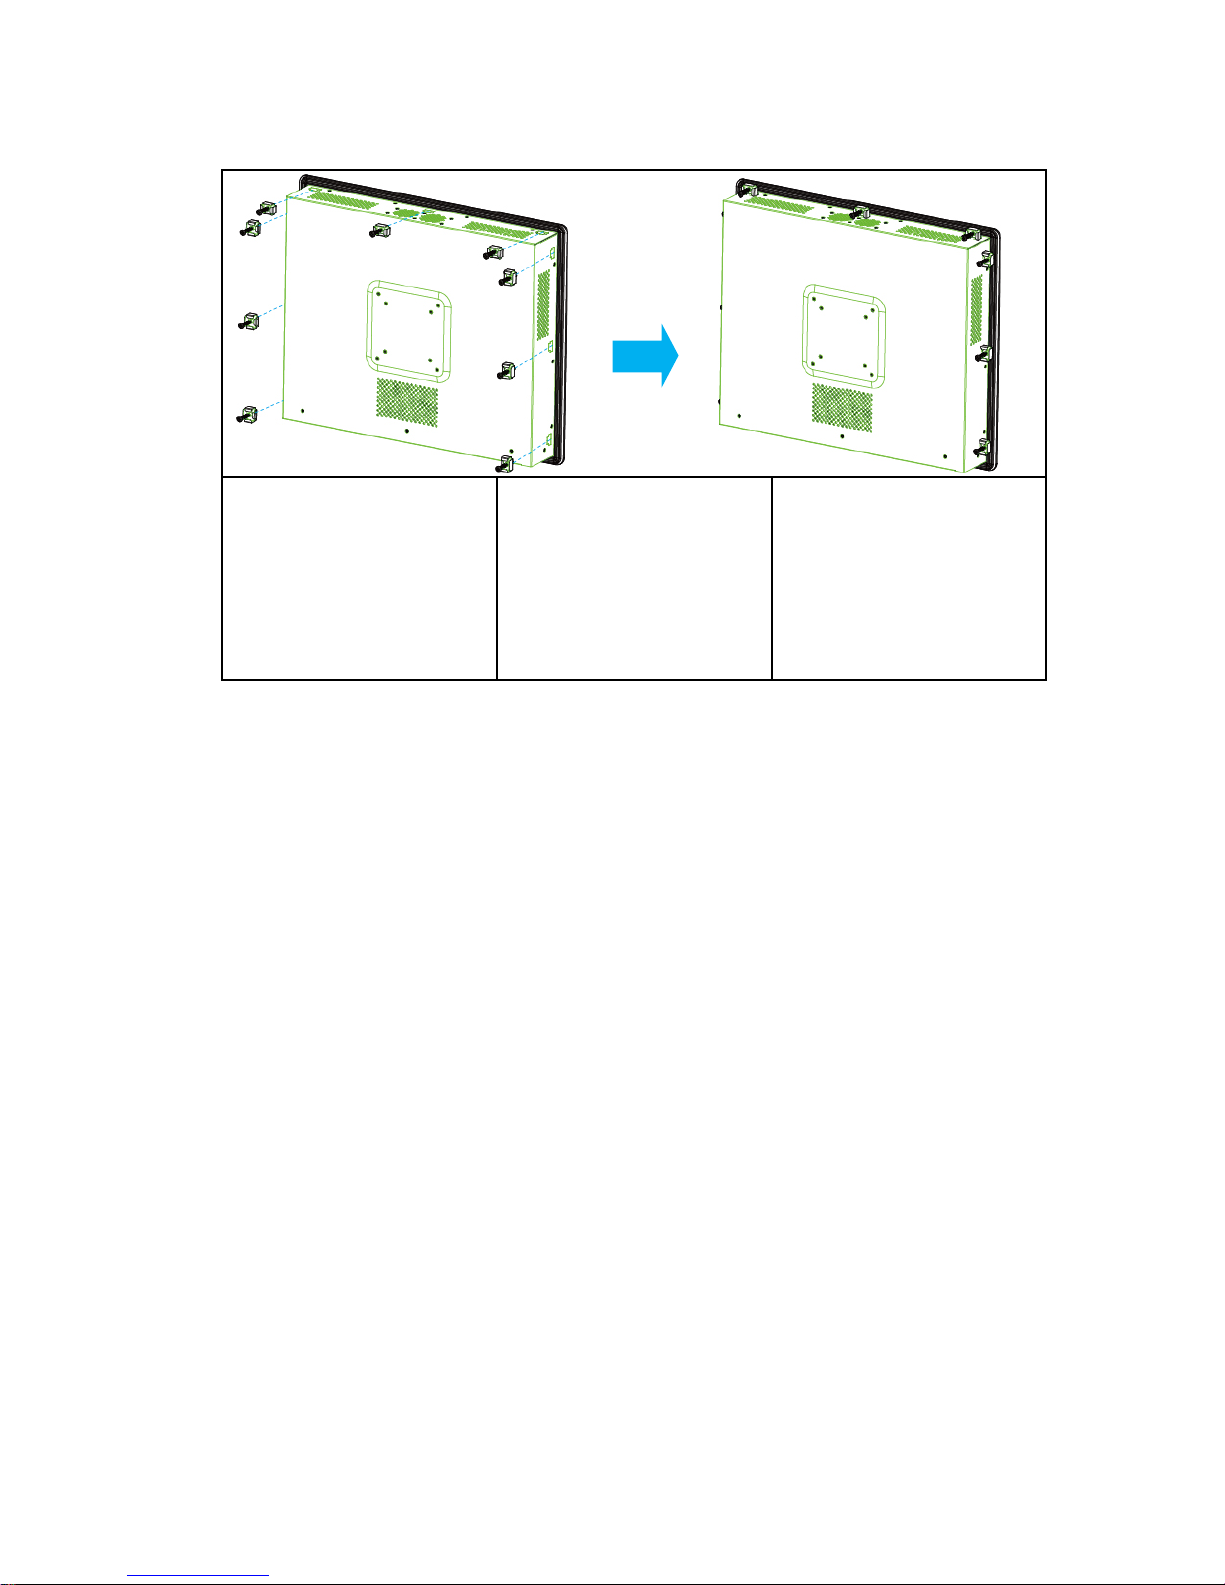
Below are the demonstrations of how to do panel mounting.
Step 1
Remove 9 Bracket
Opening Covers from the
chassis with Phillips
Screwdriver (3 on top
edge, 3 on bottom edge)
Step 2
Insert a Panel Mount
Bracket into each
Bracket Opening
Step 3
Secure brackets to Panel
by tightening the screws
Fi gure 10 Panel Mo unti n g
Page 27

Chapter 3
27 KPC-1900 Series User’s Manual
Chapter 3
AMI BIOS Setup
Overview
This chapter provides a description of the AMI BIOS. The BIOS setup menus
and available selections may vary from those of your product. For specific
information on the BIOS for your product, please contact us.
NOTE: The BIOS menus and selections for your product may vary from
those in this chapter. For the BIOS manual specific to your product,
please contact us.
AMI's ROM BIOS provides a built-in Setup program, which allows the user to
modify the basic system configuration and hardware parameters. The modified
data will be stored in a battery-backed CMOS, so that data will be retained
even when the power is turned off. In general, the information saved in the
CMOS RAM will not need to be changed unless there is a configuration
change in the system, such as a hard drive replacement or when a device is
added.
It is poss ible for the CMOS battery to fail, which will cause data loss in the
CMOS only. If this happens you will need to reconfigure your BIOS settings.
Page 28

Chapter 3
28 KPC-1900 Series User’s Manual
Main Menu
The BIOS Setup is accessed by pressing the DEL key after the Power-On
Self-Test (POST) memory test begins and before the operating system boot
begins. Once you enter the BIOS Setup Utility, the Main Menu will appear on
the screen. The Main Menu provides System Overview information and allows
you to set the System Time and Date. Use the “<” and “>” cursor keys to
navigate between menu screens.
Table 2 KPC-1900 Series BIOS Main Menu
BIOS SETUP UTILITY
Main Advanced Power Security Boot Save & Exit
Produc t In for m ati o n
: Select Scr ee n
↑↓: Selec t It em
Enter: Sel ect
+/-: Chang e O pt.
F1: Ge ner al H elp
F2: Previous Values
F3: Optimize d Def aults
F4: Save & Reset
ESC: E xit
Produc t Na me KPC-1900
BIOS Version R0.01 (x64)
BIOS Buil d D ate 11/ 29/ 20 16
ME FW V ersion 11.0.0. 1178
CPU Infor mati on
Intel® Cor e i7- 6 70 0TE CPU @ 2. 40GH z
Mic r ocode R e visio n 39
Processor C or es 4
Memory Information
Total Si ze 819 2 MB
Fr eq uenc y 213 3 MHz
Sys tem date [Fri 11/25/201 6]
Sys te m ti me [14: 17:17 ]
Access Level Administrator
Versi on 2.1 7.125 4. C op yri g ht ( C ) 20 16, Amer i can M eg atren ds, I nc.
Page 29

Chapter 3
29 KPC-1900 Series User’s Manual
Advanced Menu
Table 3 Advanced Menu
BIOS SETUP UTILITY
Main Ad van ced Power Security Boot Save & Exit
Onb oar d LAN 1 C ontr ol ler [Ena bl e d]
: Select Scr ee n
↑↓: Selec t It em
Enter: Sel ect
+/-: Chang e O pt.
F1: Ge ner al H elp
F2: Previous Values
F3: Optimize d Def aults
F4: Save & Reset
ESC: E xit
Onb oar d LAN 2 Contr ol ler [Ena bl e d]
Audio Con troll er [Ena ble d]
> Di splay C onfig urati on
> Sup er IO C o nfig ur ati o n
> CPU Chipset Configuration
> SATA Co nfig urati o n
> USB Config urati on
> AMT C onfi g urati o n
> DIO Config uratio n
> Networ k Stac k
> H/W Moni t or
Versi on 2.1 7.125 4. C op yri g ht ( C ) 20 16, Amer i can M eg atren ds, I nc.
Onboar d LA N 1 Cont r olle r
Options : D is able d , Enabled
Onboar d LA N 2 Cont r olle r
Options : D is able d , Enabled
Audio Cont roll e r
Options : D is able d , Enabled
Page 30

Chapter 3
30 KPC-1900 Series User’s Manual
Table 4 Advanced Menu – Display Configuration
BIOS SETUP UTILITY
Main Ad van ced Power Security Boot Save & Exit
Di splay C onfi g ur ati on
: Select Scr ee n
↑↓: Selec t It em
Enter: Sel ect
+/-: Chang e O pt.
F1: Ge ner al H elp
F2: Previous Values
F3: Optimize d Def aults
F4: Save & Reset
ESC: E xit
Primar y Di splay [Aut o]
UM A Frame Buf fer Size [25 6M B]
DVMT Pre-Allocated [64M]
DVMT Total Gfx Mem [256M]
Active LVDS [Enabled]
LVDS Panel Type [1280x1024 24Bit 2CH]
LVDS Backlig ht Control - PWM 127
Versi on 2.1 7.125 4. C op yri g ht ( C ) 20 16, Amer i can M eg atren ds, I nc.
Pri mary Display
Options: Auto, IGF X, PE G, PCIE
UMA Frame Buffer Size
Options: 128MB, 256MB, 512MB
D V M T Pre-Allocated
Options: 32M, 64M, 96M, 128M, 160M, 192M, 224M, 256M, 288 M, 320M,
352M, 384M, 416M, 448M, 480M, 512M, 1024M
DVMT Total Gfx Mem
Options: 128M, 256M, MAX
Ac t ive LVDS
Options : D is able d , Enabled
L VDS Panel Type
Options: 640x480 18Bit 1CH,
800x480 18Bit 1CH,
800x600 18Bit 1CH,
1024x768 18Bit 1CH,
1440x900 18Bit 2CH,
1600x900 18Bit 2CH,
1024x600 18Bit 1CH,
1366x768 18Bit 1CH,
1024x768 24Bit 1CH,
1280x1024 24Bit 2CH,
1366x768 24Bit 1CH,
1366x768 24Bit 2CH,
1440x900 24Bit 2CH,
1600x1200 24Bit 2CH,
1920x1080 24Bit 2CH,
1920x1200 24Bit 2CH
Page 31
Chapter 3
31 KPC-1900 Series User’s Manual
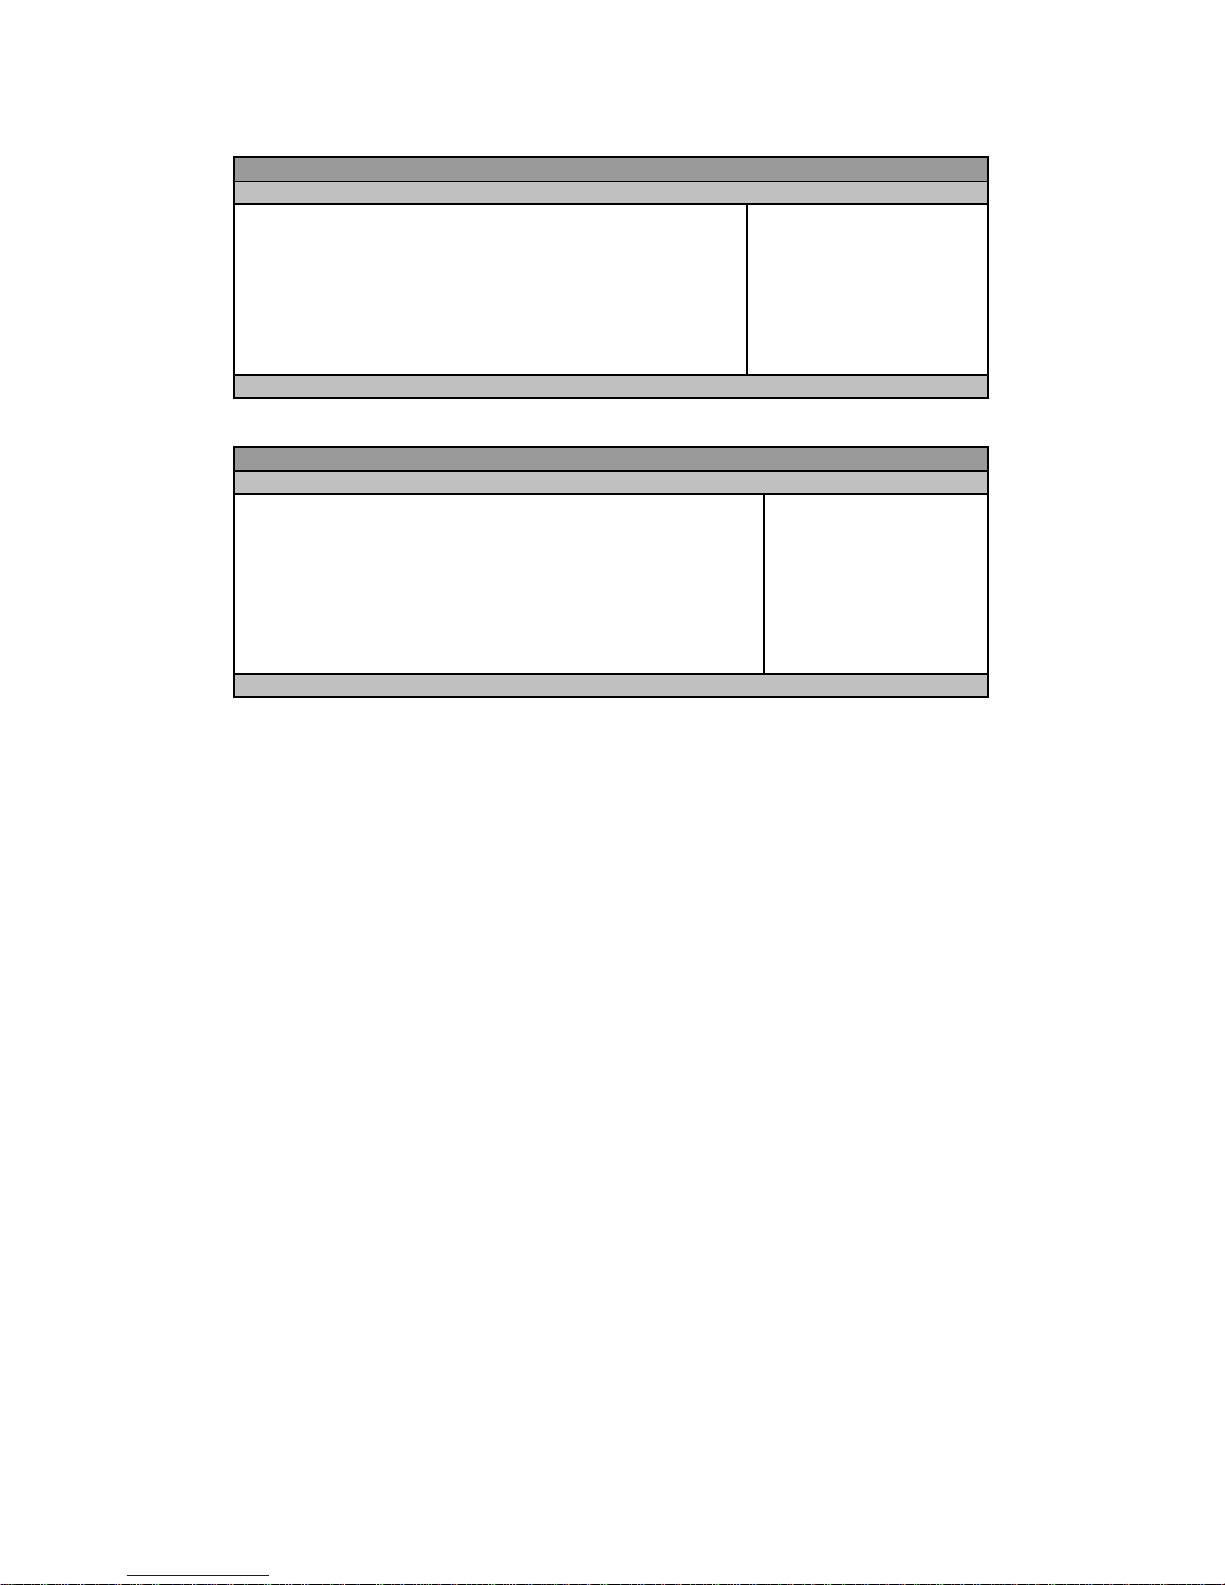
Table 5 Advanced Menu – Super IO Configuration
BIOS SETUP UTILITY
Main Ad van ced Power Security Boot Save & Exit
Super IO Chip Parameters.
> Serial Por t 1 Co nfig ur ati o n
> Serial Por t 2 Co nfig ur ati o n
> Serial Por t 3 Co nfig ur ati o n
> Serial Por t 4 Co nfig ur ati o n
> Serial Por t 5 Co nfig ur ati o n
> Serial Por t 6 Co nfig ur ati o n
: Select Scr ee n
↑↓: Selec t It em
Enter: Sel ect
+/-: Chang e O pt.
F1: Ge ner al H elp
F2: Previous Values
F3: Optimize d Def aults
F4: Save & Reset
ESC: E xit
Versi on 2.1 7.125 4. C op yri g ht ( C ) 20 16, Amer i can M eg atren ds, I nc.
Table 6 Advanced Menu – Super IO Configuration – Serial Port 1 Configuration
BIOS SETUP UTILITY
Main Ad van ced Power Security Boot Save & Exit
Serial Port 1 Co nfi g urati o n : Select Scr ee n
↑↓: Selec t It em
Enter: Sel ect
+/-: Chang e O pt.
F1: Ge ner al H elp
F2: Previous Values
F3: Optimize d Def aults
F4: Save & Reset
ESC: E xit
Serial Por t [Ena bl e d]
Device Setti ngs IO=3F8h ; IRQ=4 ;
Chang e Setti ng s [Aut o]
Serial Port 1 T ype [R S23 2]
Versi on 2.1 7.125 4. C op yri g ht ( C ) 20 16, Amer i can M eg atren ds, I nc.
Serial Port
Options : D is able d , Enabled
Change Settings
Options: Auto,
IO=3F8h; IRQ=4;
IO=3F8h; IRQ=3, 4, 5, 6, 7, 9, 10, 11, 12;
IO=2F8h; IRQ=3, 4, 5, 6, 7, 9, 10, 11, 12;
IO=3E8h; IRQ=3, 4, 5, 6, 7, 9, 10, 11, 12;
IO=2E8h; IRQ=3, 4, 5, 6, 7, 9, 10, 11, 12;
Serial Port 1 Type
Options: RS232, RS422, RS485
RS485 Duplex M od e
Options: Half Duplex, Full Duplex
RS485 Auto Flow C on t rol
Options : D is able d , Enabled
Page 32

Chapter 3
32 KPC-1900 Series User’s Manual
Table 7 Advanced Menu – Super IO Configuration – Serial Port 2 Configuration
BIOS SETUP UTILITY
Main Ad van ced Power Security Boot Save & Exit
Serial Port 2 Co nfi g urati o n : Select Scr ee n
↑↓: Selec t It em
Enter: Sel ect
+/-: Chang e O pt.
F1: Ge ner al H elp
F2: Previous Values
F3: Optimize d Def aults
F4: Save & Reset
ESC: E xit
Serial Por t [Ena bl e d]
Device Setti ngs IO=2F8h ; IRQ=3 ;
Chang e Setti ng s [Aut o]
Serial Port 2 T ype [R S23 2]
Versi on 2.1 7.125 4. C op yri g ht ( C ) 20 16, Amer i can M eg atren ds, I nc.
Serial Port
Options : D is able d , Enabled
Change Settings
Options: Auto,
IO=2F8h; IRQ=3;
IO=3F8h; IRQ=3, 4, 5, 6, 7, 9, 10, 11, 12;
IO=2F8h; IRQ=3, 4, 5, 6, 7, 9, 10, 11, 12;
IO=3E8h; IRQ=3, 4, 5, 6, 7, 9, 10, 11, 12;
IO=2E8h; IRQ=3, 4, 5, 6, 7, 9, 10, 11, 12
Serial Port 2 Type
Options: RS232, RS422, RS485
RS485 Duplex M od e
Options: Half Duplex, Full Duplex
RS485 Auto Flow C on t rol
Options : D is able d , Enabled
Page 33

Chapter 3
33 KPC-1900 Series User’s Manual
Table 8 Advanced Menu – Super IO Configuration – Serial Port 3 Configuration
BIOS SETUP UTILITY
Main Ad van ced Power Security Boot Save & Exit
Serial Port 3 Co nfi g urati o n : Select Scr ee n
↑↓: Selec t It em
Enter: Sel ect
+/-: Chang e O pt.
F1: Ge ner al H elp
F2: Previous Values
F3: Optimize d Def aults
F4: Save & Reset
ESC: E xit
Serial Por t [Ena bl e d]
Device Setti ngs IO=3E8 h ; IRQ= 5;
Chang e Setti ng s [Aut o]
Serial Port 3 T ype [R S23 2]
Versi on 2.1 7.125 4. C op yri g ht ( C ) 20 16, Amer i can M eg atren ds, I nc.
Serial Port
Options : D is able d , Enabled
Change Settings
Options: Auto,
IO=3E8h; IRQ=7;
IO=3E8h; IRQ=3, 4, 5, 6, 7, 9, 10, 11, 12;
IO=2E8h; IRQ=3, 4, 5, 6, 7, 9, 10, 11, 12;
IO=2F0h; IRQ=3, 4, 5, 6, 7, 9, 10, 11, 12;
IO=2E0h; IRQ=3, 4, 5, 6, 7, 9, 10, 11, 12
Serial Port 3 Type
Options: RS232, RS422, RS485
RS485 Duplex M od e
Options: Half Duplex, Full Duplex
RS485 Auto Flow C on t rol
Options : D is able d , Enabled
Page 34

Chapter 3
34 KPC-1900 Series User’s Manual
Table 9 Advanced Menu – Super IO Configuration – Serial Port 4 Configuration
BIOS SETUP UTILITY
Main Ad van ced Power Security Boot Save & Exit
Serial Port 4 Co nfi g urati o n : Select Scr ee n
↑↓: Selec t It em
Enter: Sel ect
+/-: Chang e O pt.
F1: Ge ner al H elp
F2: Previous Values
F3: Optimize d Def aults
F4: Save & Reset
ESC: E xit
Serial Por t [Ena bl e d]
Device Setti ngs IO=2E8 h ; IRQ= 5;
Chang e Setti ng s [Aut o]
Versi on 2.1 7.125 4. C op yri g ht ( C ) 20 16, Amer i can M eg atren ds, I nc.
Serial Port
Options : D is able d , Enabled
Change Settings
Options: Auto,
IO=2E8h; IRQ=7;
IO=3E8h; IRQ=3, 4, 5, 6, 7, 9, 10, 11, 12;
IO=2E8h; IRQ=3, 4, 5, 6, 7, 9, 10, 11, 12;
IO=2F0h; IRQ=3, 4, 5, 6, 7, 9, 10, 11, 12;
IO=2E0h; IRQ=3, 4, 5, 6, 7, 9, 10, 11, 12
Page 35

Chapter 3
35 KPC-1900 Series User’s Manual
Table 10 Advanced Menu – Super IO Configuration – Serial Port 5 Configuration
BIOS SETUP UTILITY
Main Ad van ced Power Security Boot Save & Exit
Serial Port 5 Co nfi g urati o n : Select Scr ee n
↑↓: Selec t It em
Enter: Sel ect
+/-: Chang e O pt.
F1: Ge ner al H elp
F2: Previous Values
F3: Optimize d Def aults
F4: Save & Reset
ESC: E xit
Serial Por t [Ena bl e d]
Device Setti ngs IO=2F0h ; IRQ=5 ;
Chang e Setti ng s [Aut o]
Versi on 2.1 7.125 4. C op yri g ht ( C ) 20 16, Amer i can M eg atren ds, I nc.
Serial Port
Options : D is able d , Enabled
Change Settings
Options: Auto,
IO=2F0h; IRQ=7;
IO=3E8h; IRQ=3, 4, 5, 6, 7, 9, 10, 11, 12;
IO=2E8h; IRQ=3, 4, 5, 6, 7, 9, 10, 11, 12;
IO=2F0h; IRQ=3, 4, 5, 6, 7, 9, 10, 11, 12;
IO=2E0h; IRQ=3, 4, 5, 6, 7, 9, 10, 11, 12
Page 36

Chapter 3
36 KPC-1900 Series User’s Manual
Table 11 Advanced Menu – Super IO Configuration – Serial Port 6 Configuration
BIOS SETUP UTILITY
Main Ad van ced Power Security Boot Save & Exit
Serial Port 6 Co nfi g urati o n : Select Scr ee n
↑↓: Selec t It em
Enter: Sel ect
+/-: Chang e O pt.
F1: Ge ner al H elp
F2: Previous Values
F3: Optimize d Def aults
F4: Save & Reset
ESC: E xit
Serial Por t [Ena bl e d]
Device Setti ngs IO=2E0 h ; IRQ= 5;
Chang e Setti ng s [Aut o]
Versi on 2.1 7.125 4. C op yri g ht ( C ) 20 16, Amer i can M eg atren ds, I nc.
Serial Port
Options : D is able d , Enabled
Change Settings
Options: Auto,
IO=2E0h; IRQ=7;
IO=3E8h; IRQ=3, 4, 5, 6, 7, 9, 10, 11, 12;
IO=2E8h; IRQ=3, 4, 5, 6, 7, 9, 10, 11, 12;
IO=2F0h; IRQ=3, 4, 5, 6, 7, 9, 10, 11, 12;
IO=2E0h; IRQ=3, 4, 5, 6, 7, 9, 10, 11, 12
Page 37

Chapter 3
37 KPC-1900 Series User’s Manual
Table 12 Advanced Menu – CPU Chipset Configuration
BIOS SETUP UTILITY
Main Ad van ced Power Security Boot Save & Exit
CPU Chipset Configuration
: Select Scr ee n
↑↓: Selec t It em
Enter: Sel ect
+/-: Chang e O pt.
F1: Ge ner al H elp
F2: Previous Values
F3: Optimize d Def aults
F4: Save & Reset
ESC: E xit
EIST [Enabl e d]
Tur bo Mo de [Ena ble d]
Hyp er - thr ea di ng [Ena ble d]
VT- d [Ena ble d]
Active Processor Cor es [All]
Limit CPUID Maxi mum [Disabled]
Exec ut e Dis a bl e Bi t [Ena ble d]
Intel Vi r tual izati on T ech nolog y [Dis abl ed ]
Intel T XT( LT ) Su ppor t [Di sabled ]
Versi on 2.1 7.125 4. C op yri g ht ( C ) 20 16, Amer i can M eg atren ds, I nc.
EIS T
Options : D is able d , Enabled
Turbo Mode
Options : D is able d , Enabled
Hyper-threading
Options : D is able d , Enabled
VT-d
Options : D is able d , Enabled
A ct ive Processor C ores
Options: All, 1, 2, 3
Limit CPUID Maximum
Options : D is able d , Enabled
Execute Disable B it
Options : D is able d , Enabled
Intel Virtualization Technology
Options : D is able d , Enabled
Intel TXT(LT) Support
Options : D is able d , Enabled
Page 38

Chapter 3
38 KPC-1900 Series User’s Manual
Tabl e 1 3 Advanced Me nu – S ATA Config u ratio n
BIOS SETUP UTILITY
Main Ad van ced Power Security Boot Save & Exit
SATA Co nfig urati o n
: Select Scr ee n
↑↓: Selec t It em
Enter: Sel ect
+/-: Chang e O pt.
F1: Ge ner al H elp
F2: Previous Values
F3: Optimize d Def aults
F4: Save & Reset
ESC: E xit
SATA Controller(s) [Enabled]
SATA M o de Selec tion [AHC I]
Seri al ATA Port 1 Empt y
Port 1 [Ena ble d]
Seri al ATA Port 2 Empt y
Port 2 [Ena ble d]
Seri al ATA Port 3 Empt y
Port 3 [Ena ble d]
Seri al ATA Port 4 Empt y
Port 4 [Ena ble d]
mSAT A P ort 1 Empt y
Port 1 [Ena ble d]
mSAT A P ort 2 Empt y
Port 2 [Ena ble d]
Versi on 2.1 7.125 4. C op yri g ht ( C ) 20 16, Amer i can M eg atren ds, I nc.
SAT A Controller(s)
Options: Enabled, Disabled
SATA Mode Selection
Options: AHCI, R AID
Serial STS Port 1/2/3/4
Po rt 1/2/3/4
Options : D is able d , Enabled
mSATA Po rt 1/2
Po rt 1/2
Options : D is able d , Enabled
Page 39

Chapter 3
39 KPC-1900 Series User’s Manual
Table 14 Advanced Menu – USB Configuration
BIOS SETUP UTILITY
Main Ad van ced Power Security Boot Save & Exit
USB Con fig urati on : Select Scree n
↑↓: Selec t It em
Enter: Sel ect
+/-: Chang e O pt.
F1: Ge ner al H elp
F2: Previous Values
F3: Optimize d Def aults
F4: Save & Reset
ESC: E xit
USB Devices:
1 Ke ybo ard, 1 Mo use, 1 Point
Leg ac y USB Su pp ort [Ena ble d]
xHCI hand-off [Disabled]
USB Mass S tor ag e Driv er S upp ort [Ena bl e d]
Versi on 2.1 7.125 4. C op yri g ht ( C ) 20 16, Amer i can M eg atren ds, I nc.
Legacy USB Support
Options: Enabled, Disabled
XHCI h and-off
Options: Enabled, Disabled
U S B M ass S t orage D river Support
Options : D is able d , Enabled
Page 40

Chapter 3
40 KPC-1900 Series User’s Manual
Table 15 Advanced Menu – AMT Configuration
BIOS SETUP UTILITY
Main Ad van ced Power Security Boot Save & Exit
AMT C onfi g urati o n : Select Screen
↑↓: Selec t It em
Enter: Sel ect
+/-: Chang e O pt.
F1: Ge ner al H elp
F2: Previous Values
F3: Optimize d Def aults
F4: Save & Reset
ESC: E xit
Intel AMT [Ena ble d]
Un- C onfi g ur e M E [Dis abled ]
Versi on 2.1 7.125 4. C op yri g ht ( C ) 20 16, Amer i can M eg atren ds, I nc.
Inte l AMT
Options : D is able d , Enabled
Un-Configure ME
Options : D is able d , Enabled
Page 41
Chapter 3
41 KPC-1900 Series User’s Manual
Table 16 Advanced Menu – DIO Configuration
BIOS SETUP UTILITY
Main Ad van ced Power Security Boot Save & Exit
DIO Confi g ur ati on : Select Scree n
↑↓: Selec t It em
Enter: Sel ect
+/-: Chang e O pt.
F1: Ge ner al H elp
F2: Previous Values
F3: Optimize d Def aults
F4: Save & Reset
ESC: E xit
Us er Config uratio n [Dis abled ]
DIO_0 Val u e 1
DIO_1 Val u e 1
DIO_2 Val u e 1
DIO_3 Val u e 1
DIO_4 Val u e 1
DIO_5 Val u e 1
DIO_6 Val u e 1
DIO_7 Val u e 1
Versi on 2.1 7.125 4. C op yri g ht ( C ) 20 16, Amer i can M eg atren ds, I nc.
User Configuration
Options: Enabled, Disabled
DIO_0/1/2/3/4/5/6/7
Options: Output Low, Output High, Input
Table 17 Advanced Menu – Network Stack
BIOS SETUP UTILITY
Main Ad van ced Power Security Boot Save & Exit
Networ k St ac k [Dis abl ed ] : Select Scr ee n
↑↓: Selec t It em
Enter: Sel ect
+/-: Chang e O pt.
F1: Ge ner al H elp
F2: Previous Values
F3: Optimize d Def aults
F4: Save & Reset
ESC: E xit
Versi on 2.1 7.125 4. C op yri g ht ( C ) 20 16, Amer i can M eg atren ds, I nc.
N et wo rk S t ack
Options : D is able d , Enabled
Ipv4 PXE Support
Options : D is able d , Enabled
Ipv6 PXE Support
Options : D is able d , Enabled
Page 42

Chapter 3
42 KPC-1900 Series User’s Manual
Table 18 Advanced Menu – H/W Monitor
BIOS SETUP UTILITY
Main Ad van ced Power Security Boot Save & Exit
PC Heal th St atus
: Select Scr ee n
↑↓: Selec t It em
Enter: Sel ect
+/-: Chang e O pt.
F1: Ge ner al H elp
F2: Previous Values
F3: Optimize d Def aults
F4: Save & Reset
ESC: E xit
CPU War ni ng Te mperat ur e [Dis abl ed ]
CPU T em per at ure : + 56 C
Sys te m Temperat ure : + 47 C
CPU F an S peed : 13 23 R PM
SYS F an Spe ed : N/A
+VCORE : +0.957 V
+12V : + 11. 956 V
+5V : +5.106 V
+VMEN : +1.221 V
+3.3VSB : +3.2 96 V
+3.3V : +3.3 60 V
+VRTC : +3.216 V
+1.05V : + 1.080 V
Versi on 2.1 7.125 4. C op yri g ht ( C ) 20 16, Amer i can M eg atren ds, I nc.
CPU Warning Tem perature
Options: Disabled, 80 C, 85 C, 90 C, 95 C
Page 43

Chapter 3
43 KPC-1900 Series User’s Manual
Table 19 Power Menu
BIOS SETUP UTILITY
Main Ad vanced Po wer Security Boot Save & Exit
Po wer C o nfig uration
: Select Scr ee n
↑↓: Selec t It em
Enter: Sel ect
+/-: Chang e O pt.
F1: Ge ner al H elp
F2: Previous Values
F3: Optimize d Def aults
F4: Save & Reset
ESC: E xit
ACPI Sl e ep St ate [S3 ( S uspend to R AM ) ]
Res tor e AC Po w er Loss [Po wer O ff]
Po wer S aving M od e [Di sabl ed ]
Resume Event Control
Resume fr o m S3 By PS /2 Keyboard [Di sabled]
Resume fro m S3 By PS/2 Mo use [Di sabled]
Resume By LAN Device [Disabled]
Resume By PCI-E Device [Disabled]
Resume By Ring Device [Disabled]
Resume By RTC Alarm [Disabled]
>Watch dog T imer C onfig ur ati on
Versi on 2.1 7.125 4. C op yri g ht ( C ) 20 16, Amer i can M eg atren ds, I nc.
A CPI S leep S t at e
Options: Suspend Disabled, S3 (Suspend to RAM)
R est ore AC Power Loss
Options: Power Off, Power On, Las t State
Power Saving Mode
Options : D is able d , EUP En abled
Resume from S3 By PS/2 K ey board
Options : D is able d , Enabled
R esume from S3 By PS/ 2 M ou se
Options : D is able d , Enabled
R esume By LA N Device
Options : D is able d , Enabled
Resume By PCI-E Device
Options : D is able d , Enabled
R esume By Ri ng D evice
Options : D is able d , Enabled
R esume By RT C Alarm
Options : D is able d , Enabled
Watchdog Timer Configuration
■ W DT Fu nction [Disabled]
Options : D is able d , Enabled
Page 44

Chapter 3
44 KPC-1900 Series User’s Manual
Security Menu
Table 20 Security Menu
BIOS SETUP UTILITY
Main Advanced Power S ecurit y Boot Save & Exit
Pass word D escription
If ON LY t he Admini strat or ’ s p assw or d is s et, th en this onl y limits acc ess t o
Setu p and is o nly as ked f or whe n ent eri ng Set up
If ON LY t he U ser’ s p ass word i s set , t he n t his i s a po wer on p assw or d an d
must be entered to boot or ent er Setup. In Setup the User will have
Administrator rights
The p ass word l ength m ust be in the f ol lowi ng r ang e:
Mini mum L eng th 3
M axi mu m l e ng t h 2 0
Administrator Password
User Password
: Select Scr ee n
↑↓: Selec t It em
Enter: Sel ect
+/-: Chang e O pt.
F1: Ge ner al H elp
F2: Previous Values
F3: Optimize d Def aults
F4: Save & Reset
ESC: E xit
Versi on 2.1 7.125 4. C op yri g ht ( C ) 20 16, Amer i can M eg atren ds, I nc.
Page 45

Chapter 3
45 KPC-1900 Series User’s Manual
Boot Menu
Table 21 Boot Menu
BIOS SETUP UTILITY
Main Advanced Power Security Boot Save & Exit
Boot C on fi g ur ati on : Select Scr ee n
↑↓: Selec t It em
Enter: Sel ect
+/-: Chang e O pt.
F1: Ge ner al H elp
F2: Previous Values
F3: Optimize d Def aults
F4: Save & Reset
ESC: E xit
Ful l Screen LOGO D ispl a y [Di sabl ed]
Setu p Pr om pt T imeout 1
Boot up N umLoc k St ate [On]
CSM Support [Dis abl ed ]
Boot Op tion Filt er [UEFI only]
Boot Option Pri or ities
Versi on 2.1 7.125 4. C op yri g ht ( C ) 20 16, Amer i can M eg atren ds, I nc.
Full Screen LOGO Di spl ay
Options : D is able d , Enabled
Boot up NumLock Sta te
Options: On, Off
CSM Support
Options: Enabled, Disabled
Boot Option F ilter
Options: UEFI and Legacy, Legacy only, UEFI only
Page 46

Chapter 3
46 KPC-1900 Series User’s Manual
Save & Exit Menu
Table 22 Save & Exit Menu
BIOS SETUP UTILITY
Main Advanced Power Security Boot Save & Exit
Save Changes and Reset
Di scar d Chang es and R es et
Save Options
Save Changes
Di scar d Chang es
Res tor e D e fa ults
: Select Scr ee n
↑↓: Selec t It em
Enter: Sel ect
+/-: Chang e O pt.
F1: Ge ner al H elp
F2: Previous Values
F3: Optimize d Def aults
F4: Save & Reset
ESC: E xit
Versi on 2.1 7.125 4. C op yri g ht ( C ) 20 16, Amer i can M eg atren ds, I nc.
Save Ch ang es and Exi t
Exit system setup after saving the changes. Once you are finished making
your selections, choose this option from the Exit menu to ensure the values
you selected are saved to the CMOS RAM. The CMOS RAM is sustained by
an onboard backup battery and stays on even when the PC is turned off. When
you select this option, a confirmation window appears. Select [Yes] to save
changes and exit.
D iscard C hanges and E xit
Exit system setup without saving any changes. Select this option only if you do
not want to save the changes that you made to the Setup program. If you
made changes to fields other than system date, system time, and password,
the BIOS asks for a confirmation before exiting.
D iscard C hanges
Discards changes done so far to any of the setup values. This option allows
you to discard the selections you made and restore the previously saved
values. After selecting this option, a confirmation appears. Select [Yes] to
discard any changes and load the previously saved values.
Load Optimal Defaults
Load Optimal Default values for all the setup values. This option allows you to
load optimal default values for each of the parameters on the Setup menus,
which will provide the best performance settings for your system. The F9 key
can be used for this operation.
Load Fai ls a f e Def a ults
Load Optimal Default values for all the setup values. This option allows you to
load failsafe default values for each of the parameters on the Setup menus,
which will provide the most stable performance settings. The F8 key can be
used for this operation.
Page 47

Chapter 4
47 KPC-1900 Series User’s Manual
Chapter 4
Drive r Installation
If your KPC-1900 Series does not come with an operating system pre-installed,
you will need to install an operating system and the necessary drivers to
operate it. After you have finished assembling your system and connected the
appropriate power source, power it up using the power supply and install the
desired operating system.
You can download the drivers for the KPC-1900 Series from our website and
install as instructed there. For other operating systems, please contact us.
 Loading...