

Page 1
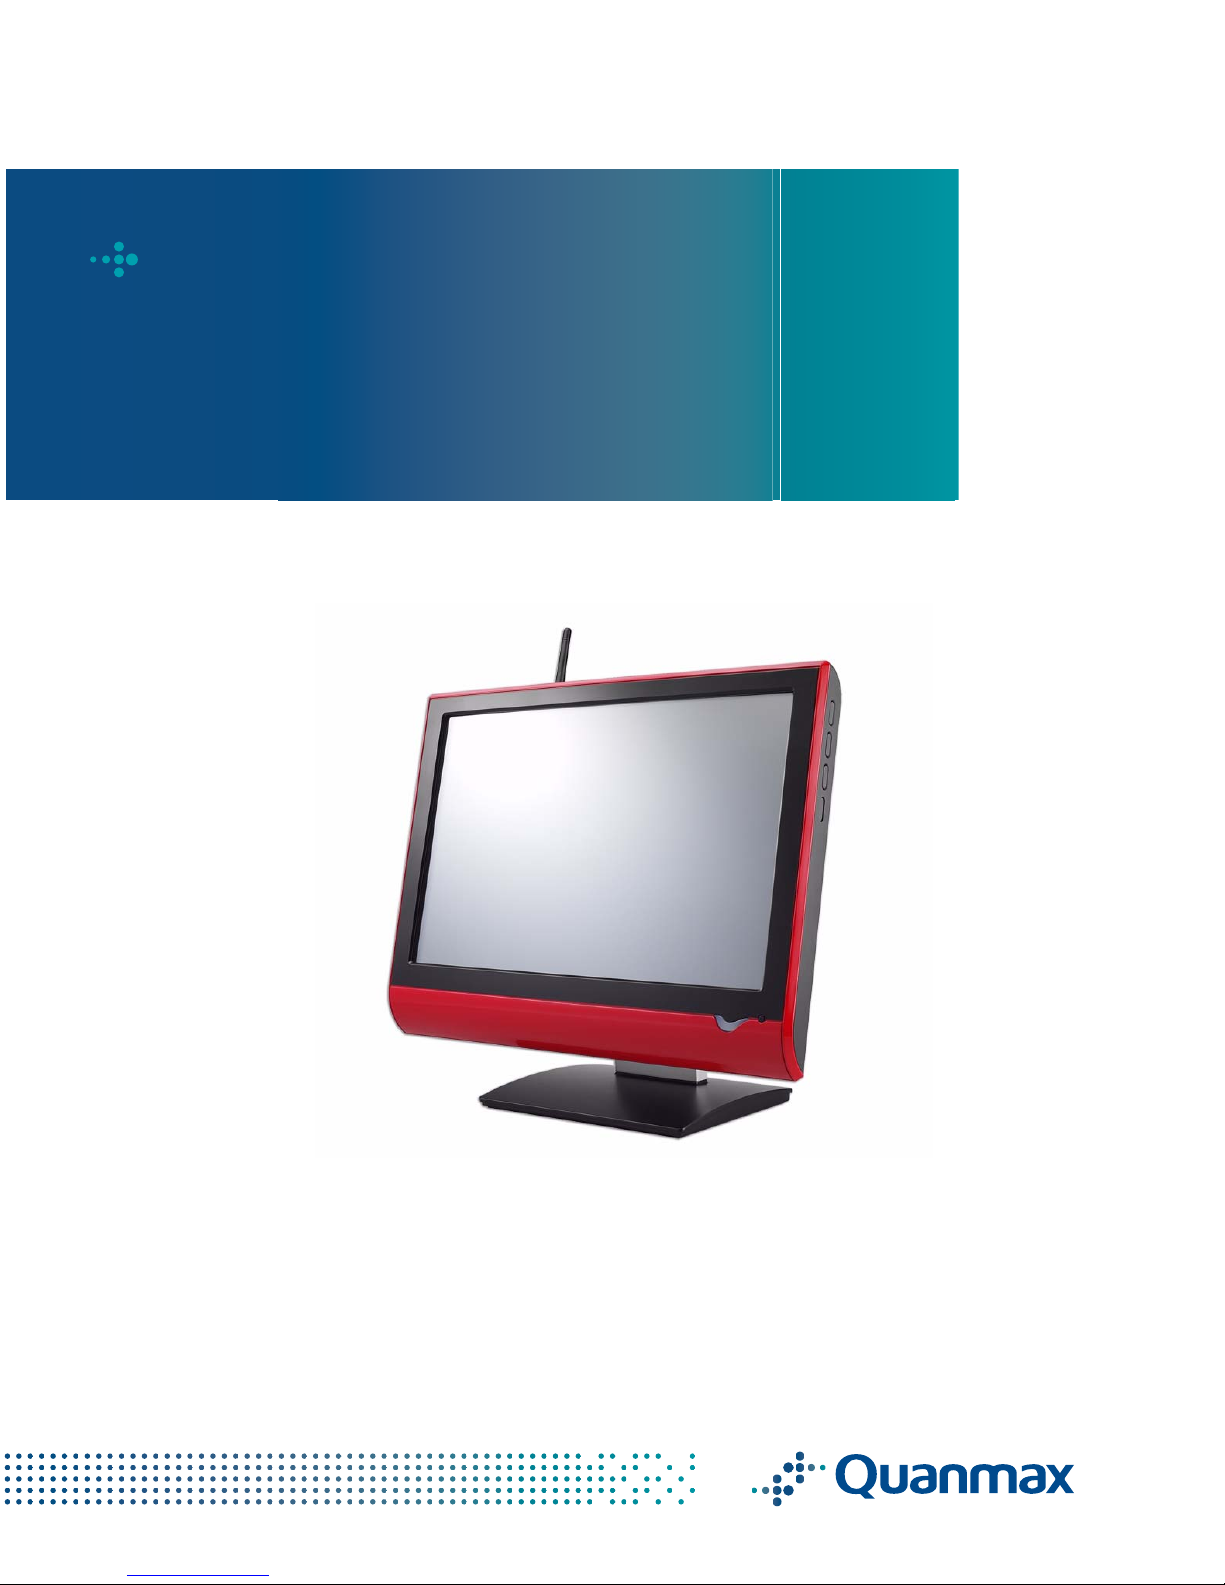
KPC-1710RT
Industrial Panel PC
User’s Guide
Rev. 2.00
May 1, 2008
Page 2
Customer Service
Contact Info: Quanmax Inc.
4F, No. 415, Ti-Ding Blvd. Sec. 2
NeiHu District, Taipei 114
Taiwan
Tel: +886-2-2799-2789
Fax: +886-2-2799-7399
Visit our site at: www.quanmax.com
© 2008 Quanmax Inc. All rights reserved.
The information in this user’s guide is provided for reference only. Quanmax does not assume any
liability arising out of the application or use of the information or products described herein. This user’s
guide may contain or reference information and products protected by copyrights or patents and does
not convey any license under the patent rights of Quanmax, nor the rights of others.
Quanmax is a registered trademark of Quanmax. All trademarks, registered trademarks, and trade
names used in this user’s guide are the property of their respective owners. All rights reserved. This
user’s guide contains information proprietary to Quanmax. Customers may reprint and use this user’s
guide in other publications. Customers may alter this user’s guide and publish it only after they remove
the Quanmax name, cover, and logo.
Quanmax reserves the right to make changes without notice in product or component design as
warranted by evolution in user needs or progress in engineering or manufacturing technology.
Changes which affect the operation of the unit will be documented in the next revision of this user’s
guide.
Revision Date Edited by Changes
1.00 11/01/2007 JC Initial Release
1.10 25/02/2008 JC Correct Packing Checklist
2.00 05/01/2008 JC Conv ert to Quanmax
Page 3

X Contents
Safety Instructions
Before You Begin. . . . . . . . . . . . . . . . . . . . . . . . . . . . . . . . . . . . . . . . . . . . . . . . . . . . . . . . . . . . ix
When Working Inside a Computer. . . . . . . . . . . . . . . . . . . . . . . . . . . . . . . . . . . . . . . . . . . . . . . x
Preventing Electrostatic Discharge . . . . . . . . . . . . . . . . . . . . . . . . . . . . . . . . . . . . . . . . . . . . . . xi
Preface
How to Use This Guide . . . . . . . . . . . . . . . . . . . . . . . . . . . . . . . . . . . . . . . . . . . . . . . . . . . . . . xv
Advisory Conventions . . . . . . . . . . . . . . . . . . . . . . . . . . . . . . . . . . . . . . . . . . . . . . . . . . . . . . . xvi
Unpacking . . . . . . . . . . . . . . . . . . . . . . . . . . . . . . . . . . . . . . . . . . . . . . . . . . . . . . . . . . . . . . . . xvii
Regulatory Compliance Statements . . . . . . . . . . . . . . . . . . . . . . . . . . . . . . . . . . . . . . . . . . . xviii
Warranty Policy. . . . . . . . . . . . . . . . . . . . . . . . . . . . . . . . . . . . . . . . . . . . . . . . . . . . . . . . . . . . xix
Limited Warranty . . . . . . . . . . . . . . . . . . . . . . . . . . . . . . . . . . . . . . . . . . . . . . . . . . . . . . . xix
Return Procedure. . . . . . . . . . . . . . . . . . . . . . . . . . . . . . . . . . . . . . . . . . . . . . . . . . . . . . . xix
Limitation of Liability. . . . . . . . . . . . . . . . . . . . . . . . . . . . . . . . . . . . . . . . . . . . . . . . . . . . . xix
Maintaining Your Computer. . . . . . . . . . . . . . . . . . . . . . . . . . . . . . . . . . . . . . . . . . . . . . . . . . . xx
Environmental Factors. . . . . . . . . . . . . . . . . . . . . . . . . . . . . . . . . . . . . . . . . . . . . . . . . . . .xx
Power Protection . . . . . . . . . . . . . . . . . . . . . . . . . . . . . . . . . . . . . . . . . . . . . . . . . . . . . . . xxi
Chapter 1
Product Introduction
Overview . . . . . . . . . . . . . . . . . . . . . . . . . . . . . . . . . . . . . . . . . . . . . . . . . . . . . . . . . . . . . . . . . 1-3
Checklist. . . . . . . . . . . . . . . . . . . . . . . . . . . . . . . . . . . . . . . . . . . . . . . . . . . . . . . . . . . . . . 1-4
Features. . . . . . . . . . . . . . . . . . . . . . . . . . . . . . . . . . . . . . . . . . . . . . . . . . . . . . . . . . . . . . 1-5
Product Specifications. . . . . . . . . . . . . . . . . . . . . . . . . . . . . . . . . . . . . . . . . . . . . . . . . . . . . . . 1-6
Mechanical Layout . . . . . . . . . . . . . . . . . . . . . . . . . . . . . . . . . . . . . . . . . . . . . . . . . . . . . . . . . 1-7
Front and Side Panel . . . . . . . . . . . . . . . . . . . . . . . . . . . . . . . . . . . . . . . . . . . . . . . . . . . . 1-7
I/O Panel . . . . . . . . . . . . . . . . . . . . . . . . . . . . . . . . . . . . . . . . . . . . . . . . . . . . . . . . . . . . . 1-7
Mechanical Dimensions . . . . . . . . . . . . . . . . . . . . . . . . . . . . . . . . . . . . . . . . . . . . . . . . . . 1-8
Chapter 2
Assembly
VESA Mounting. . . . . . . . . . . . . . . . . . . . . . . . . . . . . . . . . . . . . . . . . . . . . . . . . . . . . . . . . . . . 2-3
Desktop Mounting . . . . . . . . . . . . . . . . . . . . . . . . . . . . . . . . . . . . . . . . . . . . . . . . . . . . . . . . . . 2-4
Wi-FI Antenna Installation (optional). . . . . . . . . . . . . . . . . . . . . . . . . . . . . . . . . . . . . . . . . . . . 2-5
Chapter 3
Getting Started
Power Connection. . . . . . . . . . . . . . . . . . . . . . . . . . . . . . . . . . . . . . . . . . . . . . . . . . . . . . . . . . 3-3
Operating System and Drivers . . . . . . . . . . . . . . . . . . . . . . . . . . . . . . . . . . . . . . . . . . . . . . . . 3-4
Chipset Driver Installation . . . . . . . . . . . . . . . . . . . . . . . . . . . . . . . . . . . . . . . . . . . . . . . . 3-4
Graphics Driver Installation . . . . . . . . . . . . . . . . . . . . . . . . . . . . . . . . . . . . . . . . . . . . . . . 3-4
Audio Driver Installation. . . . . . . . . . . . . . . . . . . . . . . . . . . . . . . . . . . . . . . . . . . . . . . . . . 3-4
LAN Driver Installation . . . . . . . . . . . . . . . . . . . . . . . . . . . . . . . . . . . . . . . . . . . . . . . . . . . 3-5
Touch-Screen Driver Installation . . . . . . . . . . . . . . . . . . . . . . . . . . . . . . . . . . . . . . . . . . . 3-7
Wi-Fi Driver and Utility Installation (optional). . . . . . . . . . . . . . . . . . . . . . . . . . . . . . . . . . 3-9
iKPC-1710RT User’s Guide
Page 4

Chapter 4
Maintenance
Maintenance and Prevention . . . . . . . . . . . . . . . . . . . . . . . . . . . . . . . . . . . . . . . . . . . . . . . . . 4-3
Chapter 5
Interfaces
External Connectors . . . . . . . . . . . . . . . . . . . . . . . . . . . . . . . . . . . . . . . . . . . . . . . . . . . . . . . . 5-3
ii KPC-1710RT User’s Guide
Page 5

X Tables
Table 1-1. KPC-1710RT Specifications. . . . . . . . . . . . . . . . . . . . . . . . . . . . . . . . . . . . . . . . . . 1-6
Table 5-1. PS/2 Mouse Connector pin definition. . . . . . . . . . . . . . . . . . . . . . . . . . . . . . . . . . . 5-3
Table 5-2. PS/2 Keyboard Connector pin definition . . . . . . . . . . . . . . . . . . . . . . . . . . . . . . . . 5-3
Table 5-3. COM1 RS-232 Serial Port Connector pin definition. . . . . . . . . . . . . . . . . . . . . . . . 5-3
Table 5-4. Parallel Port Connector pin definition. . . . . . . . . . . . . . . . . . . . . . . . . . . . . . . . . . . 5-4
Table 5-5. VGA Display Connector pin definition . . . . . . . . . . . . . . . . . . . . . . . . . . . . . . . . . . 5-4
Table 5-6. Fast Ethernet + 2 USB 2.0 Connector pin definition . . . . . . . . . . . . . . . . . . . . . . . 5-4
Table 5-7. Audio Jack Connector pin definition. . . . . . . . . . . . . . . . . . . . . . . . . . . . . . . . . . . . 5-5
Table 5-8. COM2 RS232/422/485 Serial Port Connector pin definition . . . . . . . . . . . . . . . . . 5-5
iiiKPC-1710RT User’s Guide
Page 6

iv KPC-1710RT User’s Guide
Page 7

X Figures
Figure 1-1. KPC-1710RT Mechanical Layout - Front and Side. . . . . . . . . . . . . . . . . . . . . . . . 1-7
Figure 1-2. KPC-1710RT Mechanical Layout - I/O Panel . . . . . . . . . . . . . . . . . . . . . . . . . . . . 1-7
Figure 1-3. KPC-1710RT Mechanical Dimensions . . . . . . . . . . . . . . . . . . . . . . . . . . . . . . . . . 1-8
Figure 2-1. VESA 100 mounting hole locations on the KPC-1710RT . . . . . . . . . . . . . . . . . . . 2-3
Figure 2-2. Attach the base to the desktop mounting bracket. . . . . . . . . . . . . . . . . . . . . . . . . 2-4
Figure 2-3. Attach the base to the desktop mounting bracket. . . . . . . . . . . . . . . . . . . . . . . . . 2-4
Figure 2-4. Installing the antenna for the optional Wi-Fi card on the KPC-1710RT . . . . . . . . 2-5
Figure 3-1. AC inlet location . . . . . . . . . . . . . . . . . . . . . . . . . . . . . . . . . . . . . . . . . . . . . . . . . . 3-3
vKPC-1710RT User’s Guide
Page 8

vi KPC-1710RT User’s Guide
Page 9

X Safety Instructions
Contents
Before You Begin. . . . . . . . . . . . . . . . . . . . . . . . . . . . . . . . . . . . . . ix
When Working Inside a Computer. . . . . . . . . . . . . . . . . . . . . . . . . x
Preventing Electrostatic Discharge . . . . . . . . . . . . . . . . . . . . . . . . xi
Page 10

This page intentionally left blank.
viii KPC-1710RT User’s Guide
Page 11

X Before You Begin
Before handling the KPC-1710RT, read the instructions and safety guidelines on the following pages to
prevent damage to the product and to ensure your own personal safety. Refer to the “Advisories” section in
the Preface for advisory conventions used in this user’s guide, including the distinction between Warnings,
Cautions, Important Notes, and Notes.
Always use caution when handling/operating a computer. Only qualified, experienced,
authorized electronics service personnel should access the interior of a comp uter. The power
supplies produce high voltages and energy hazards, which can cause bodily harm.
Use extreme caution when installing or removing components. Refer to the installation
instructions in this user’s guide for precautions and procedures. If you have any questions,
please contact Quanmax Post-Sales Technical Support.
WARNING
High voltages are present inside the chassis when the unit’s
power cord is plugged into an electrical outlet. Turn off
system power, turn of f the power supply, and then disconnect
the power cord from its source before removing the chassis
cover. Turning off the system power switch does not remove
power to components.
Before You Begin -ixKPC-1710RT User’s Guide
Page 12

X When Working Inside a Computer
Before taking covers off a computer, perform the following steps:
1) Turn off the computer and any peripherals.
2) Disconnect the computer and peripherals from their power sources or subsystems to prevent
electric shock or system board damage. This does not apply when hot swapping parts.
3) Follow the guidelines provided in “Preventing Electrostatic Discharge” on the following page.
4) Disconnect any telephone or telecommunications lines from the computer.
In addition, take note of these safety guidelines when appropriate:
To help avoid possible damage to system boards, wait five seconds after turning off the
computer before removing a component, removing a system board, or disconnecting a
peripheral device from the computer.
When you disconnect a cable, pull on its connector or on its strain-relief loop, not on the cable
itself. Some cables have a connector with locking tabs. If you are disconnecting this type of
cable, press in on the locking tabs before disconnecting the cable. As you pull connectors
apart, keep them evenly aligned to avoid bending any connector pins. Also, before connecting
a cable, make sure both connectors are correctly oriented and aligned.
CAUTION
Do not attempt to service the system yourself except as
explained in this user’s guide. Follow installation and
troubleshooting instructions closely.
x KPC-1710RT User’s Guide
Page 13

X Preventing Electrostatic Discharge
Static electricity can harm system boards. Perform service at an ESD workstation and follow proper ESD
procedure to reduce the risk of damage to components. Quanmax strongly encourages you to follow proper
ESD procedure, which can include wrist straps and smocks, when servicing equipment.
You can also take the following steps to prevent damage from electrostatic discharge (ESD):
When unpacking a static-sensitive component from its shipping carton, do not remove the
component’s antistatic packing material until you are ready to install the component in a
computer. Just before unwrapping the antistatic packaging, be sure you are at an ESD
workstation or grounded. This willl discharge any static electricity that may have built up in your
body.
When transporting a sensitive component, first plac e it in an antistatic container or packaging.
Handle all sensitive components at an ESD workstation. If possible, use antistatic floor pads and
workbench pads.
Handle components and boards with care. Don’t touch the components or contacts on a board.
Hold a board by its edges or by its metal mounting bracket.
Do not handle or store system boards near strong electrostatic, electromagnetic, magnetic, or
radioactive fields.
Preventing Electrostatic Discharge -xiKPC-1710RT User’s Guide
Page 14

This page intentionally left blank.
xii KPC-1710RT User’s Guide
Page 15

X Preface
Contents
How to Use This Guide . . . . . . . . . . . . . . . . . . . . . . . . . . . . . . . . . xv
Unpacking . . . . . . . . . . . . . . . . . . . . . . . . . . . . . . . . . . . . . . . . . . xvi
Regulatory Compliance Statements. . . . . . . . . . . . . . . . . . . . . . . xvii
Warranty Policy . . . . . . . . . . . . . . . . . . . . . . . . . . . . . . . . . . . . . xviii
Limited Warranty. . . . . . . . . . . . . . . . . . . . . . . . . . . . . . . . . .xviii
Return Procedure . . . . . . . . . . . . . . . . . . . . . . . . . . . . . . . . .xviii
Limitation of Liability. . . . . . . . . . . . . . . . . . . . . . . . . . . . . . xviii
Maintaining Your Computer . . . . . . . . . . . . . . . . . . . . . . . . . . . . . xix
Cleaning Components . . . . . . . . . . . . . . . . . . . . . . . . . . . . . .xix
Environmental Factors . . . . . . . . . . . . . . . . . . . . . . . . . . . . . .xix
Power Protection . . . . . . . . . . . . . . . . . . . . . . . . . . . . . . . . . . xx
Page 16

This page intentionally left blank.
xiv KPC-1710RT User’s Guide
Page 17

X How to Use This Guide
This guide is designed to be used as step-by-step instructions for installation, and as a reference for
operation, troubleshooting, and upgrades.
Note: Driver downloads and additional information are available under
Downloads on our web site: www.quanmax.com.
The following is a summary of the chapter contents:
Chapter 1, Product Introduction, presents the product specifications and system architecture
for the
KPC-1710RT.
Chapter 2, Assembly/Disassembly, describes how to access the system’s internal
components and locations of connectors so that you can easily configure your system.
Chapter 3, Getting Started, describes how to connect power to your system and installation of
the required drivers and operating system.
Chapter 4, Maintenance and Prevention, describes how to maintain your system and prevent
damage and may include instructions for fan removal, cleaning the air filter and battery
replacement.
Chapter 5, Interface Definitions, provides information on the external connectors
backplane/motherboard interfaces of the KPC-1710 RT.
How to Use This Guide -xvKPC-1710RT User’s Guide
Page 18

X Unpacking
When unpacking, follow these steps:
1) After opening the box, save it and the packing material for possible future shipment.
2) Remove all items from the box. If any items listed on the purchase order are missing, notify
Quanmax customer service immediately.
3) Inspect the product for damage. If there is damage, notify Quanmax customer service immediately .
Refer to
“Warranty Policy” for the return procedure.
xvi KPC-1710RT User’s Guide
Page 19

X Regulatory Compliance Statements
This section provides the FCC compliance statement for Class A devices.
X FCC Compliance Statement for Class A Devices
The product(s) described in this user’s guide has been tested and found to comply with the limits for a Class
A digital device, pursuant to Part 15 of the FCC Rules. These limits are designed to provide reasonable
protection against harmful interference when the equipment is operated in a commercial environment. This
equipment generates, uses, and can radiate radio frequency energy and, if not installed and used in
accordance with the user’s guide, may cause harmful interference to radio communications. Operation of this
equipment in a residential area (domestic environment) is likely to cause harmful interference, in which case
the user will be required to correct the interference (take adequate measures) at their own expense.
Changes or modifications not expressly approved by Quanmax could void the user's authority to operate the
equipment.
Note: The assembler of a personal computer system may be required to
test the system and/or make necessary modifications if a system is found
to cause harmful interference or to be noncompliant with the appropriate
standards for its intended use.
Regulatory Compliance Statements -xviiKPC-1710RT User’s Guide
Page 20

X Warranty Policy
X Limited Warranty
Quanmax Inc.’s detailed Limited Warranty policy can be found under Support at www.quanmax.com.
Please consult your distributor for warranty verification.
The limited warranty is void if the product has been subjected to alteration, neglect, misuse, or abuse; if any
repairs have been attempted by anyone other than Quanmax or its authorized agent; or if the failure is
caused by accident, acts of God, or other causes beyond the control of Quanmax or the manufacture r.
Neglect, misuse, and abuse shall include any installation, operation, or maintenance of the product other
than in accordance with the user’s guide.
No agent, dealer, distributor , service company, or other party is authorized to change, modify, or extend the
terms of this Limited Warranty in any manner whatsoever. Quanmax reserves the right to make changes or
improvements in any product without incurring any obligation to similarly alter products previously
purchased.
X Return Procedure
For any Limited Warranty return, please contact Support at www.quanmax.com and login to obtain a
Return Material Authorization (RMA) Number. If you do not have an account, send an email to
[email protected] to apply for one.
All product(s) returned to Quanmax for service or credit must be accompanied by a Return Material
Authorization (RMA) Number. Freight on all returned items must be prepaid by the customer who is
responsible for any loss or damage caused by common carrier in transit. Returns for Warranty must
include a Failure Report for each unit, by serial number(s), as well as a copy of the original invoice showing
the date of purchase.
To reduce risk of damage, returns of product must be in a Quanmax shipping container. If the original
container has been lost or damaged, new shipping containers may be obtained from Quanmax Customer
Service at a nominal cost.
Quanmax owns all parts removed from repaired products. Quanmax uses new and reconditioned parts
made by various manufacturers in performing warranty repairs and building replacement products. If
Quanmax repairs or replaces a product, its warranty term is not extended.
Shipments not in compliance with this Limited Warranty Return Policy will not be accepted by Quanmax.
X Limitation of Liability
In no event shall Quanmax be liable for any defect in hardware, software, loss, or inadequacy of data of any
kind, or for any direct, indirect, incidental, or consequential damages in connection with or arising out of the
performance or use of any product furnished hereunder. Quanmax’s liability shall in no event exceed the
purchase price of the product purchased hereunder. The foregoing limitation of liability shall be equally
applicable to any service provided by Quanmax or its authorized agent.
xviii KPC-1710RT User’s Guide
Page 21

X Maintaining Your Computer
X Environmental Factors
X Temperature
The ambient temperature within an enclosure may be greater than room ambient temperature. Installation in
an enclosure should be such that the amount of air flow required for safe operation is not compromised.
Consideration should be given to the maximum rated ambient temperature. Overheating can cause a variety
of problems, including premature aging and failure of chips or mechanical failure of devices.
If the system has been exposed to abnormally cold temperatures, allow a two-hour warm-up period to bring it
up to normal operating temperature before turning it on. Failure to do so may cause damage to internal
components, particularly the hard disk drive.
X Humidity
High-humidity can cause moisture to enter and accumulate in the system. This moisture can cause corrosion
of internal components and degrade such properties as electrical resistance and thermal conductivity .
Extreme moisture buildup inside the system can result in electrical shorts, which can cause serious damage
to the system.
Buildings in which climate is controlled usually maintain an acceptable level of humidity for system
equipment. However, if a system is located in an unusually humid location, a dehumidifier can be used to
maintain the humidity within an acceptable range. Refer to the “Specifications” section of this user’s guide for
the operating and storage humidity specifications.
X Altitude
Operating a system at a high altitude (low pressure) reduces the efficiency of the cooling fans to cool the
system. This can cause electrical problems related to arcing and corona effects. This condition can also
cause sealed components with internal pressure, such as electrolytic capacitors, to fail or perform at reduced
efficiency.
Maintaining Your Computer -xixKPC-1710RT User’s Guide
Page 22

X Power Protection
The greatest threats to a system’s supply of power are power loss, power spikes, and power surges caused
by electrical storms, which interrupt system operation and/or damage system components. To protect your
system, always properly ground power cables and one of the following devices.
X Surge Protector
Surge protectors are available in a variety of types and usually provide a level of protection proportional
with the cost of the device. Surge protectors prevent voltage spikes from entering a system through the AC
power cord. Surge protectors, however, do not offer protection against brownouts, which occur when the
voltage drops more than 20 percent below the normal AC line voltage level.
X Line Conditioner
Line conditioners go beyond the overvoltage protection of surge protectors. Line conditioners keep a
system’s AC power source voltage at a fairly const ant level and, therefore, can handle brownouts. Because
of this added protection, line conditioners cost more than surge protectors. However, line conditioners
cannot protect against a complete loss of power.
X Uninterruptible Power Supply
Uninterruptible power supply (UPS) systems offer the most complete protection against variations on
power because they use battery power to keep the server running when AC power is lost. The battery is
charged by the AC power while it is available, so when AC power is lost, the battery can provide power to
the system for a limited amount of time, depending on the UPS system.
UPS systems range in price from a few hundred dollars to several thousand dollars, with the more
expensive unit s allowing you to run larger systems for a longer period of time when AC power is lost. UPS
systems that provide only 5 minutes of battery power let you conduct an orderly shutdown of the system,
but are not intended to provide continued operation. Surge protectors should be used with all UPS
systems, and the UPS system should be Underwriters Laboratories (UL) safety approved.
xx KPC-1710RT User’s Guide
Page 23

Chapter 1
X Product Introduction
Contents
Overview . . . . . . . . . . . . . . . . . . . . . . . . . . . . . . . . . . . . . . . . . . . 1-3
Checklist. . . . . . . . . . . . . . . . . . . . . . . . . . . . . . . . . . . . . . . . 1-4
Features . . . . . . . . . . . . . . . . . . . . . . . . . . . . . . . . . . . . . . . . 1-5
Product Specifications . . . . . . . . . . . . . . . . . . . . . . . . . . . . . . . . . 1-6
Mechanical Layout. . . . . . . . . . . . . . . . . . . . . . . . . . . . . . . . . . . . 1-7
Front and Side Panel . . . . . . . . . . . . . . . . . . . . . . . . . . . . . . 1-7
I/O Panel. . . . . . . . . . . . . . . . . . . . . . . . . . . . . . . . . . . . . . . . 1-7
Mechanical Dimensions . . . . . . . . . . . . . . . . . . . . . . . . . . . . 1-8
Page 24

This page intentionally left blank.
1-2 KPC-1710RT User’s Guide
Page 25

X Overview
The KPC-1710RT Panel PC offers a 17” widescreen touch-panel monitor and powerful computing
performance based on Intel technology at extremely low power consumption for a wide range of industrial
applications. The bezel and chassis are designed for an attractive consumer-style appearance while the
16:10 screen aspect ratio follows the trend toward HD video content.
The KPC-1710RT features fanless operation, providing for a quiet, reliable and low-maintenance system.
Combined with its widescreen format and attractive exterior, this panel PC is ideal for interactive applications
in retail and educational environments, as an information kiosk, POS, gaming, digital signage, and thin client.
Overview 1-3KPC-1710RT User’s Guide
Page 26

X Checklist
1. Take out the KPC-1710RT series unit from the carton box, check if the unit is properly secure in the
plastic bag.
2. Check the contents of the carton box:
Panel PC
AC power adapter (incl. wall socket cord)
Driver CD
Desktop stand (arm + base)
Screw bag
Wi-Fi antenna (optional)
If any of these items is damaged or missing, please contact Quanmax. Save all packing materials for future
replacement and maintenance.
1-4 KPC-1710RT User’s Guide
Page 27

X Features
X Display
The KPC-1710RT has a 17” TFT LCD display with WXGA resolution and 500 cd/m2 brightness and resistive
5-wire touch screen panel.
X Motherboard
The KPC-1710RT implements a Mini-ITX motherboard with Intel® Celeron® M 600MHz µFC-BGA (512kB
L2 cache), Intel® 852GM GMCH and Intel® I/O Controller Hub 4 ICH4 chipset, 512MB DDR266
(expandable up to 2 GB), dual Fast Ethernet via two IntelÆ 82551ER Fast Ethernet Controllers, LPC-based
Winbond W83627HF Super I/O controller, and Realtek ALC655 AC'97 audio CODEC.
X Input/Output
The KPC-1710RT has the following I/O interfaces:
2x Fast Ethernet (RJ45 on panel)
5x Serial Port (COM2 supports RS-232/422/485)
4x USB 2.0 (on panel)
Mic-in, Line-in, Line-out (on panel)
PS/2 Keyboard, Mouse (on panel)
Parallel Port (on panel)
Reset Button
X Storage
The KPC-1710RT has a 40GB 2.5” Hard Disk and a CompactFlash Ty pe II.
X Expansion
The KPC-1710RT has a Mini PCI slot.
X Power Supply
The KPC-1710RT is powered by an external 100V-240V AC power adapter (12VDC out).
Overview 1-5KPC-1710RT User’s Guide
Page 28
X Product Specifications
Features KPC-1710RT
Display 17” TFT WXGA
Resolution 1440x900
Brightness 500 cd/m²
Touch Screen Resistive 5-wire
Dimensions 422 x 317 x 83.6 mm (WxHxD)
Weight 7kg
Processor ULV Intel® Celeron® M 600MHz uFC-BGA, 512kB L2 cache
Chipset Intel® 852GM GMCH, ICH4
RAM 512MB DIMM DDR (max. 2GB)
Internal Storage
I/O
Mic-in, Line-in, Line-out, 2x Speakers
Expansion Mini PCI slot
Wireless LAN Marvell 802.11b/g WLAN Mini PCI card (optional)
Power Supply AC Adapter 100-240V (12V DC out)
Power Consumption 80W
Cooling Fanless
Temperature
Operating: 0°C to 40°C, 10%-90%, non-condensing
Storage: -20°C to 85°C, 5%-95%, non-condensing
Shock Operating: 10 g / 11ms; Storage: 20 g / 11ms (half-sine)
Vibration
Operating: 5-500Hz, 0.5 g (rms) / 3-axes
Storage: 5-500Hz, 2.0 g (rms) / 3-axes
OS Windows 2000, XP, Linux, XP Embedded
Certifications CE, FCC Class A
RoHS compliant yes
2.5"HDD 40GB
CompactFlash Type-II socket
2x Fast Ethernet
5x Serial Port RS-232
4x USB 2.0
Parallel Port
VGA out
PS/2 Keyboard, Mouse
Reset Button
1-6 KPC-1710RT User’s Guide
Table 1-1. KPC-1710RT Specifications
Page 29
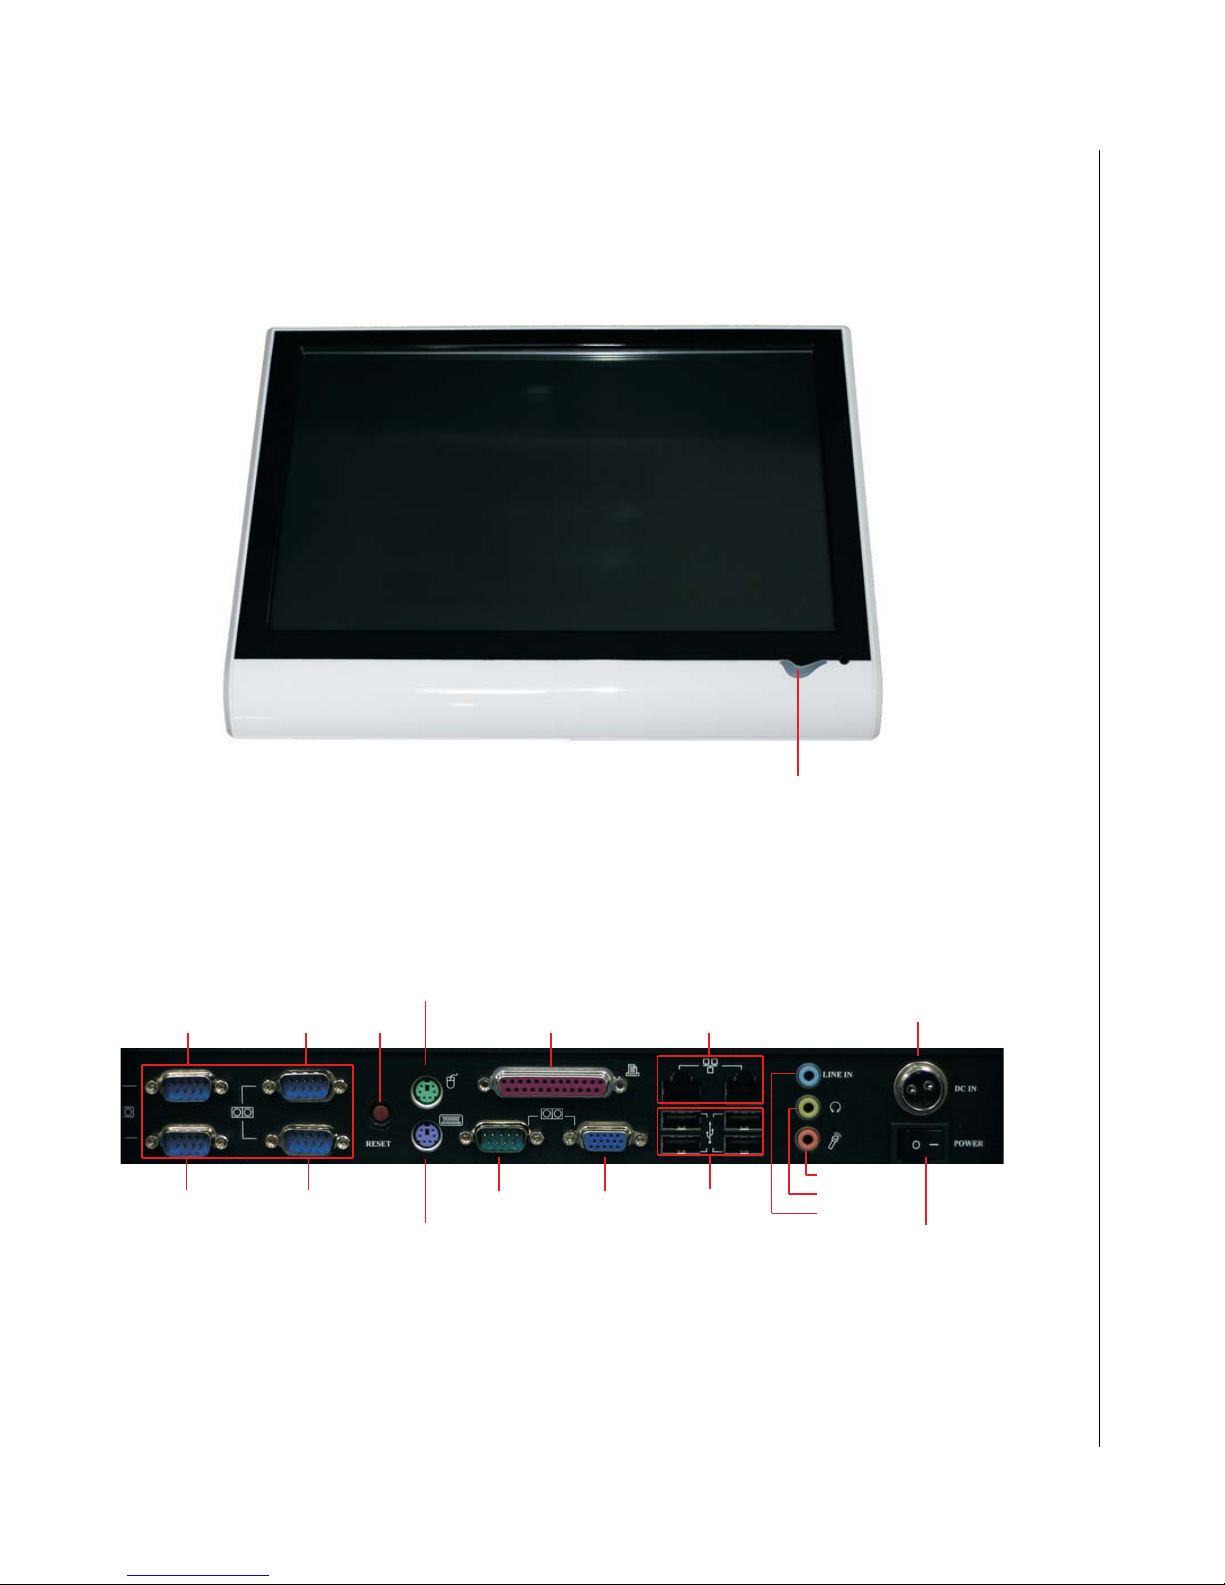
X Mechanical Layout
X Front and Side Panel
X I/O Panel
COM 3 COM 5
COM 2 COM 4
ATX Power Switch
(blue ON, red OFF)
Figure 1-1. KPC-1710RT Mechanical Layout - Front and Side
PS/2 Mouse
Reset
PS/2 Keyboard
Figure 1-2. KPC-1710RT Mechanical Layout - I/O Panel
Parallel Port
COM 1
VGA
LAN Port
USB Port
DC Power In
Mic-in
Speaker-out
Line-in
Master On/O
Mechanical Layout 1-7KPC-1710RT User’s Guide
Page 30
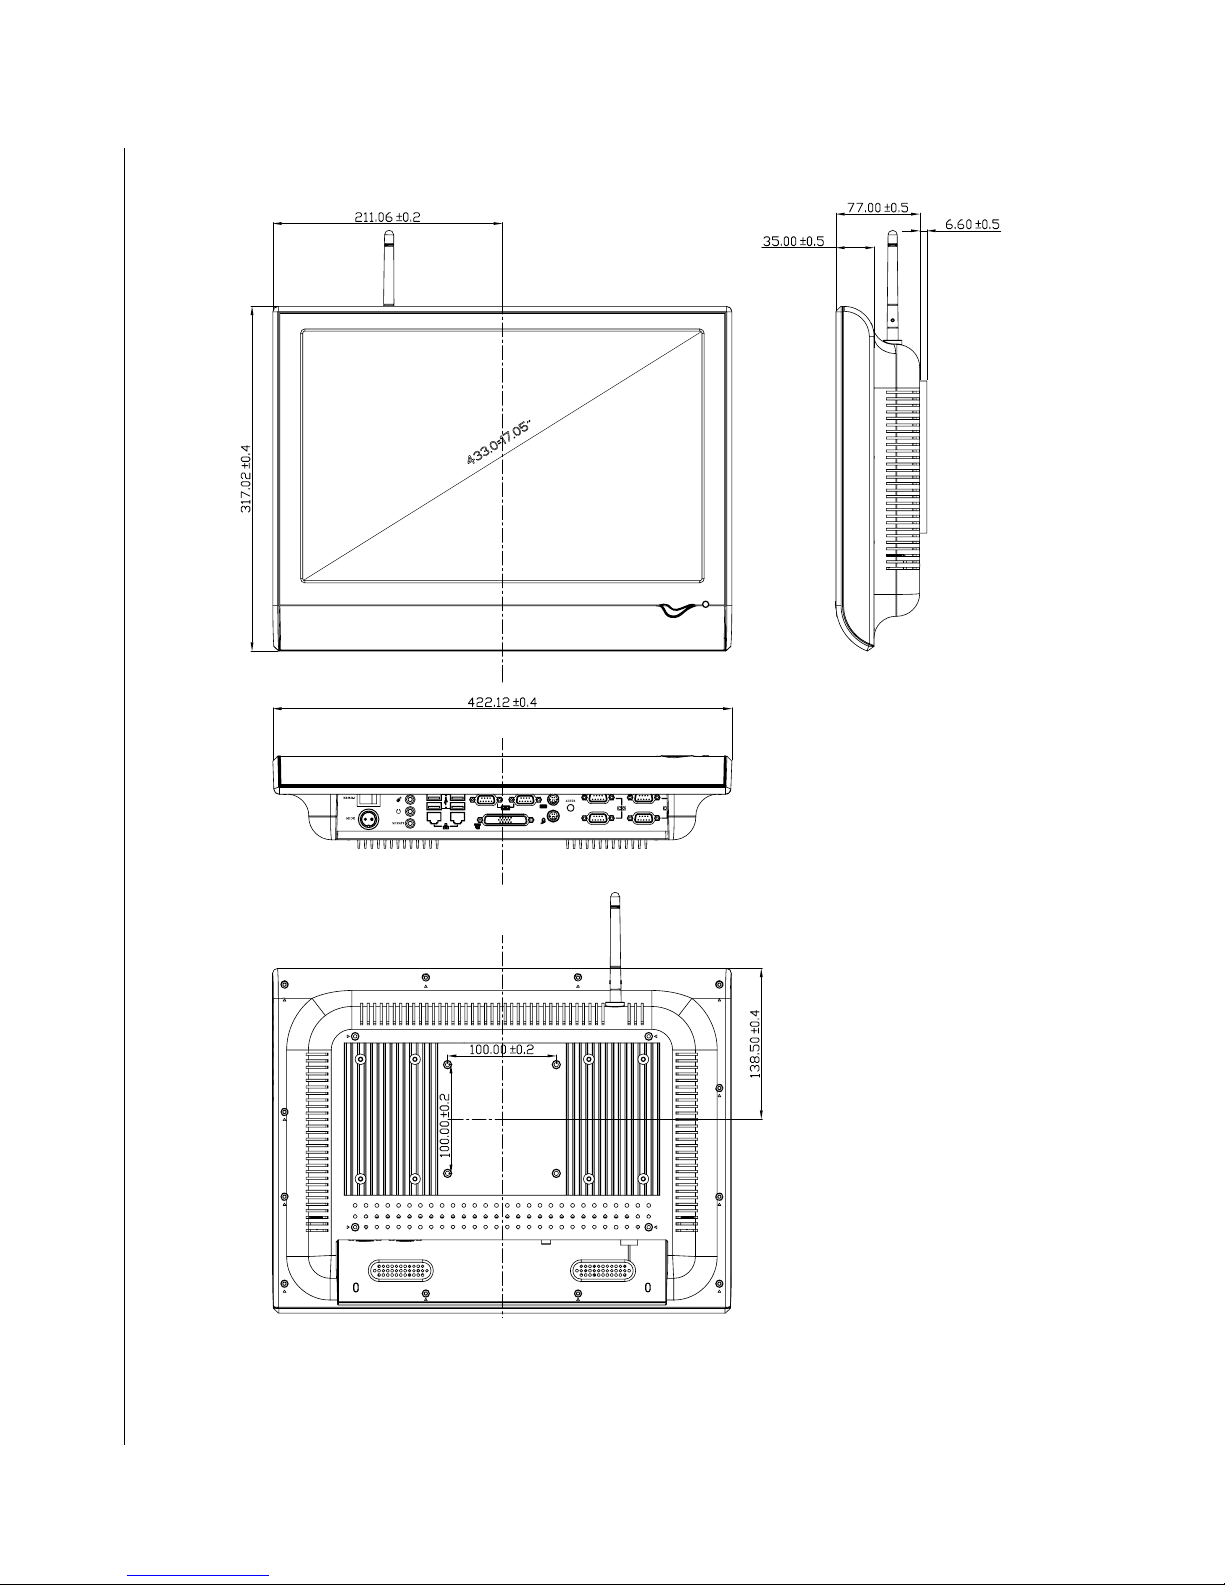
X Mechanical Dimensions
1-8 KPC-1710RT User’s Guide
Figure 1-3. KPC-1710RT Mechanical Dimensions
Page 31

Chapter 2
X Assembly
Contents
VESA Mounting . . . . . . . . . . . . . . . . . . . . . . . . . . . . . . . . . . . . . . 2-3
Desktop Mounting . . . . . . . . . . . . . . . . . . . . . . . . . . . . . . . . . . . . 2-4
Wi-FI Antenna Installation (optional) . . . . . . . . . . . . . . . . . . . . . . 2-5
Page 32

This page intentionally left blank.
2-2 KPC-1710RT User’s Guide
Page 33
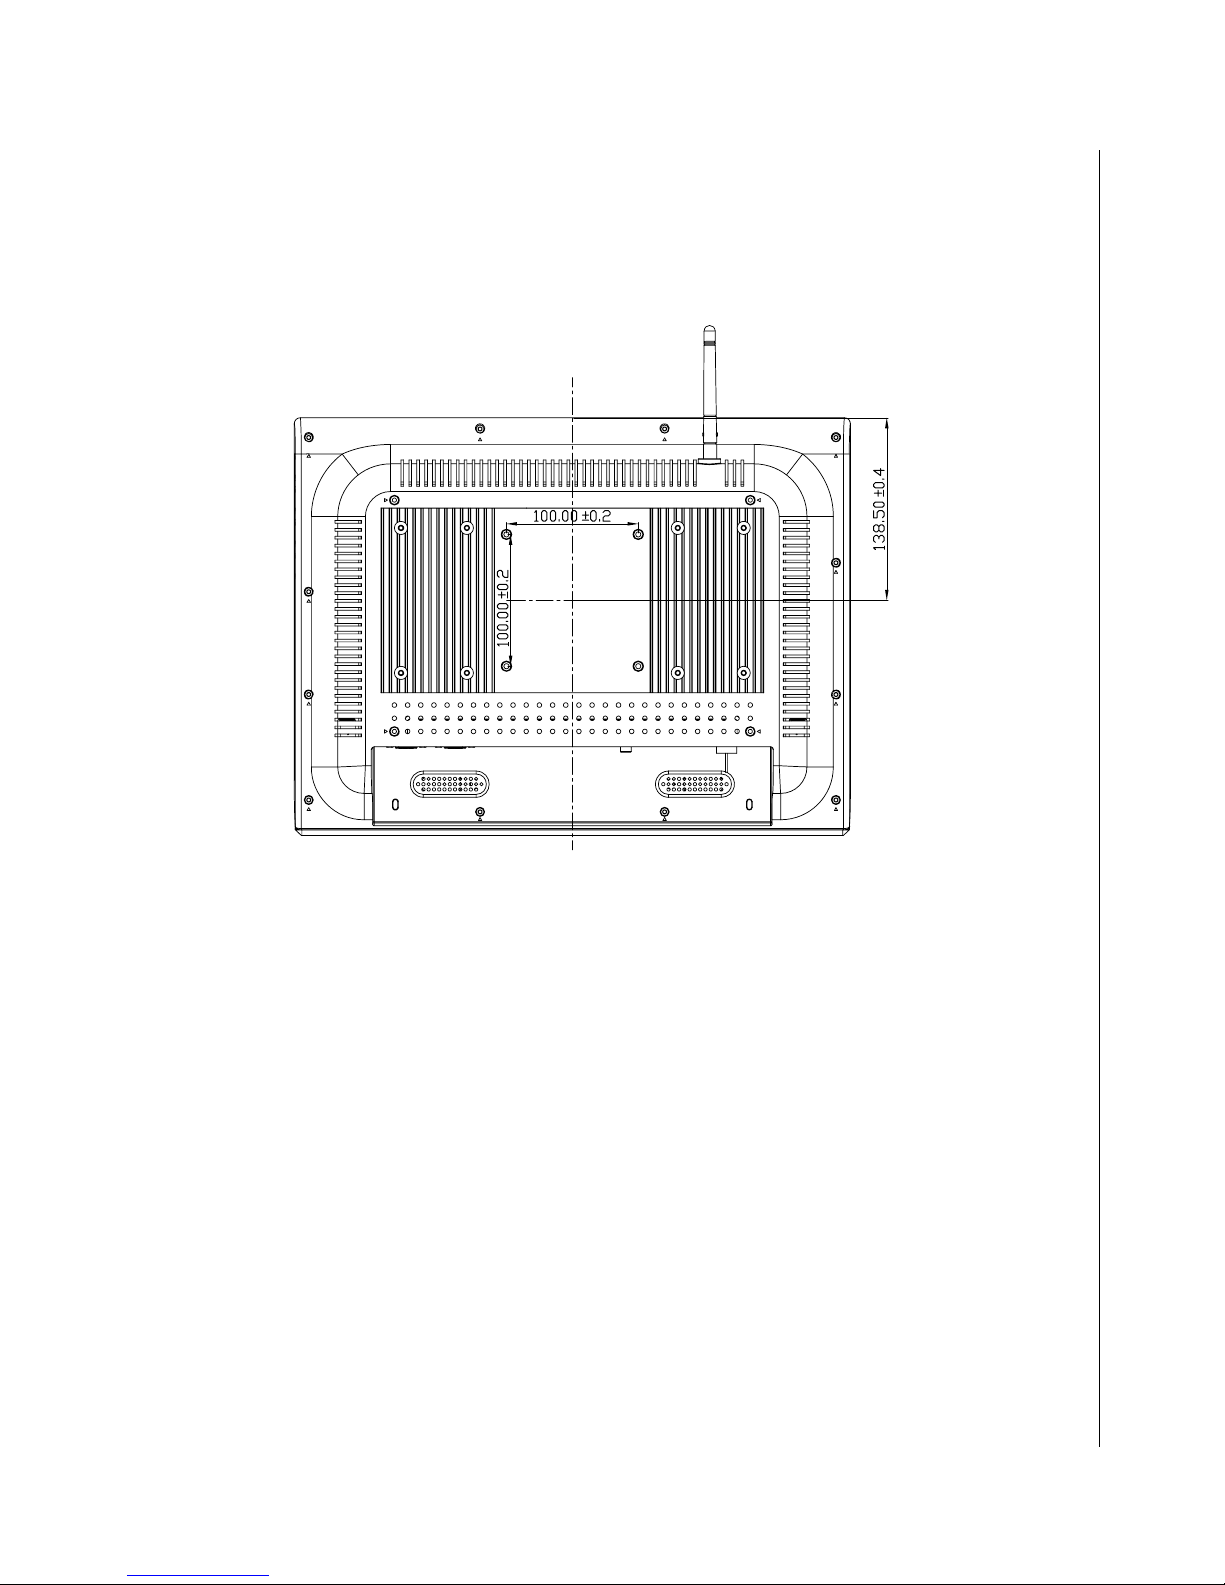
X VESA Mounting
The KPC-1710RT comes with VESA FDMI 100 standard mounting holes as shown below. Use M4x0.7 metric
machine screws with the appropriate length for your mounting bracket. The available internal clearance for
the mounting screws is 8mm.
Figure 2-1. VESA 100 mounting hole locations on the KPC-1710RT
VESA Mounting 2-3KPC-1710RT User’s Guide
Page 34
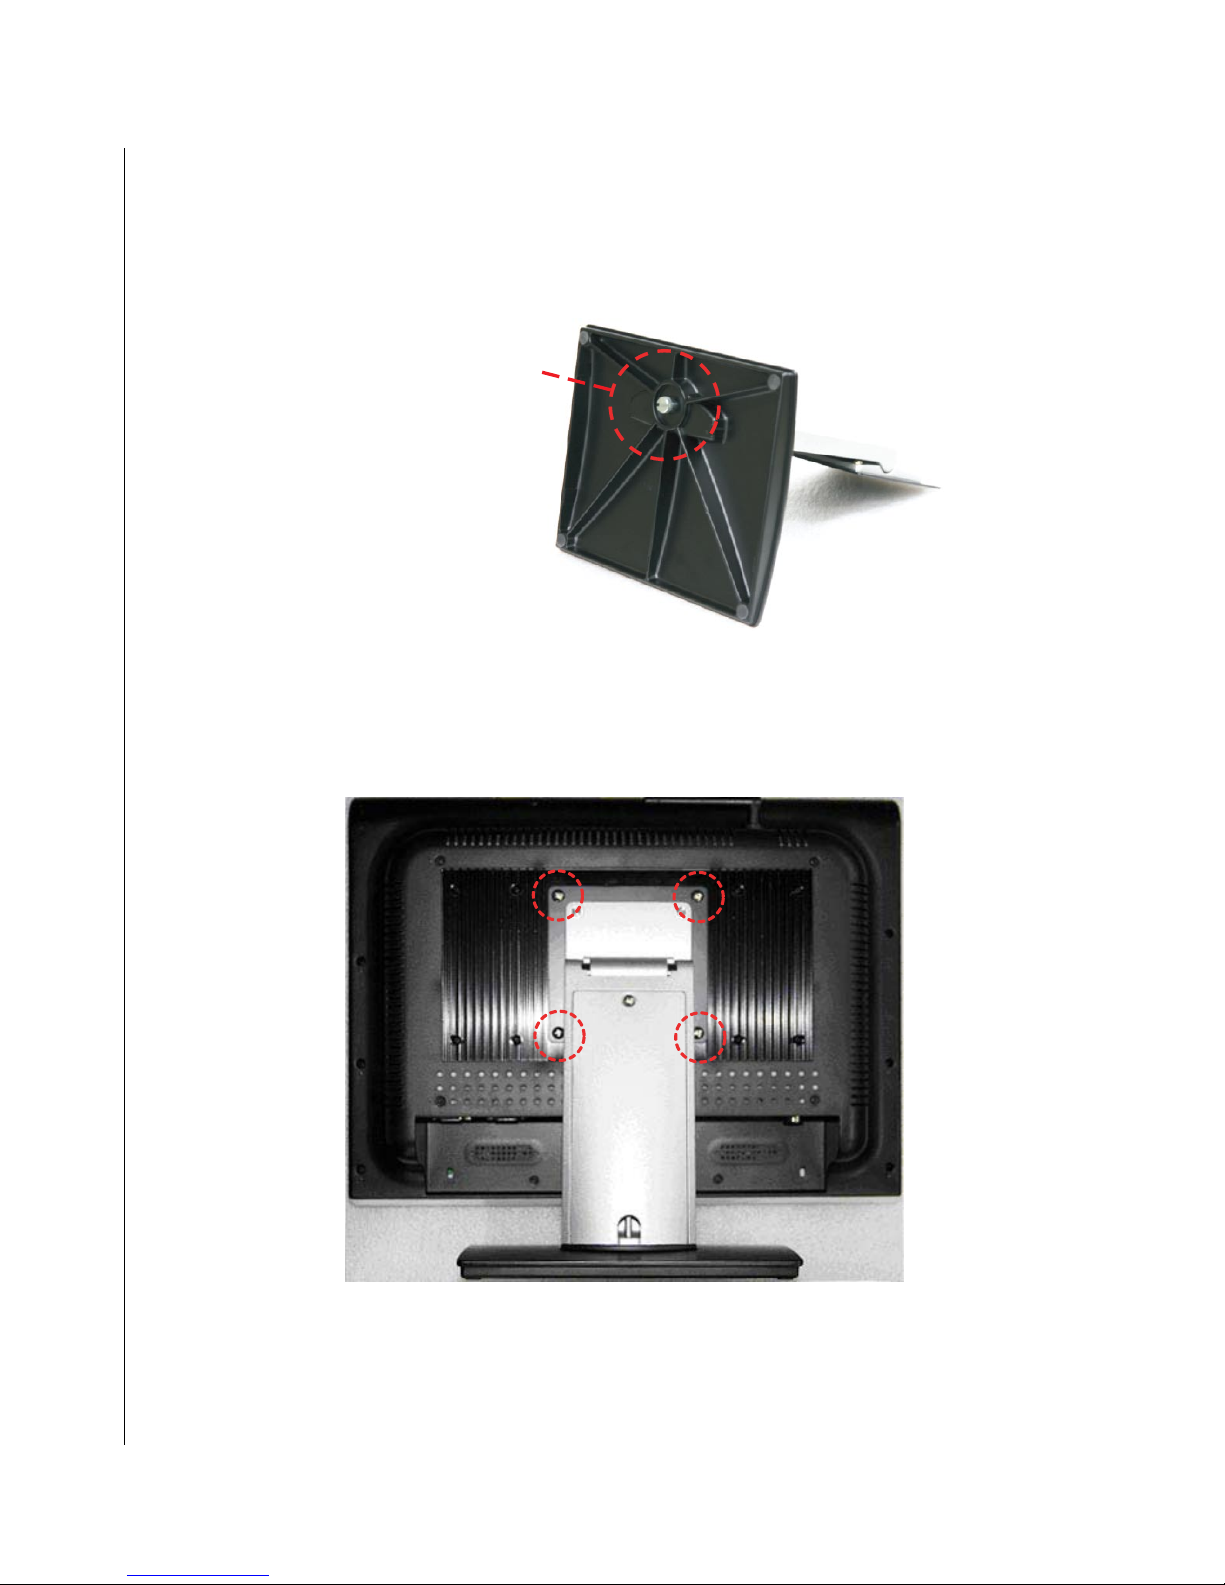
X Desktop Mounting
The KPC-1710RT comes with a desktop mounting bracket. Attach the base to the bracket spine using the
single large screw provided and a flathead screwdriver as shown
Secure Base to
Desktop Bracket
Figure 2-2. Attach the base to the desktop mounting bracket.
Secure the bracket to the VESA mounting holes on back of of the KPC-1710RT using the 4 M4x0.7 screws
provided and a Phillips screwdriver as shown.
Figure 2-3. Attach the base to the desktop mounting bracket.
2-4 KPC-1710RT User’s Guide
Page 35
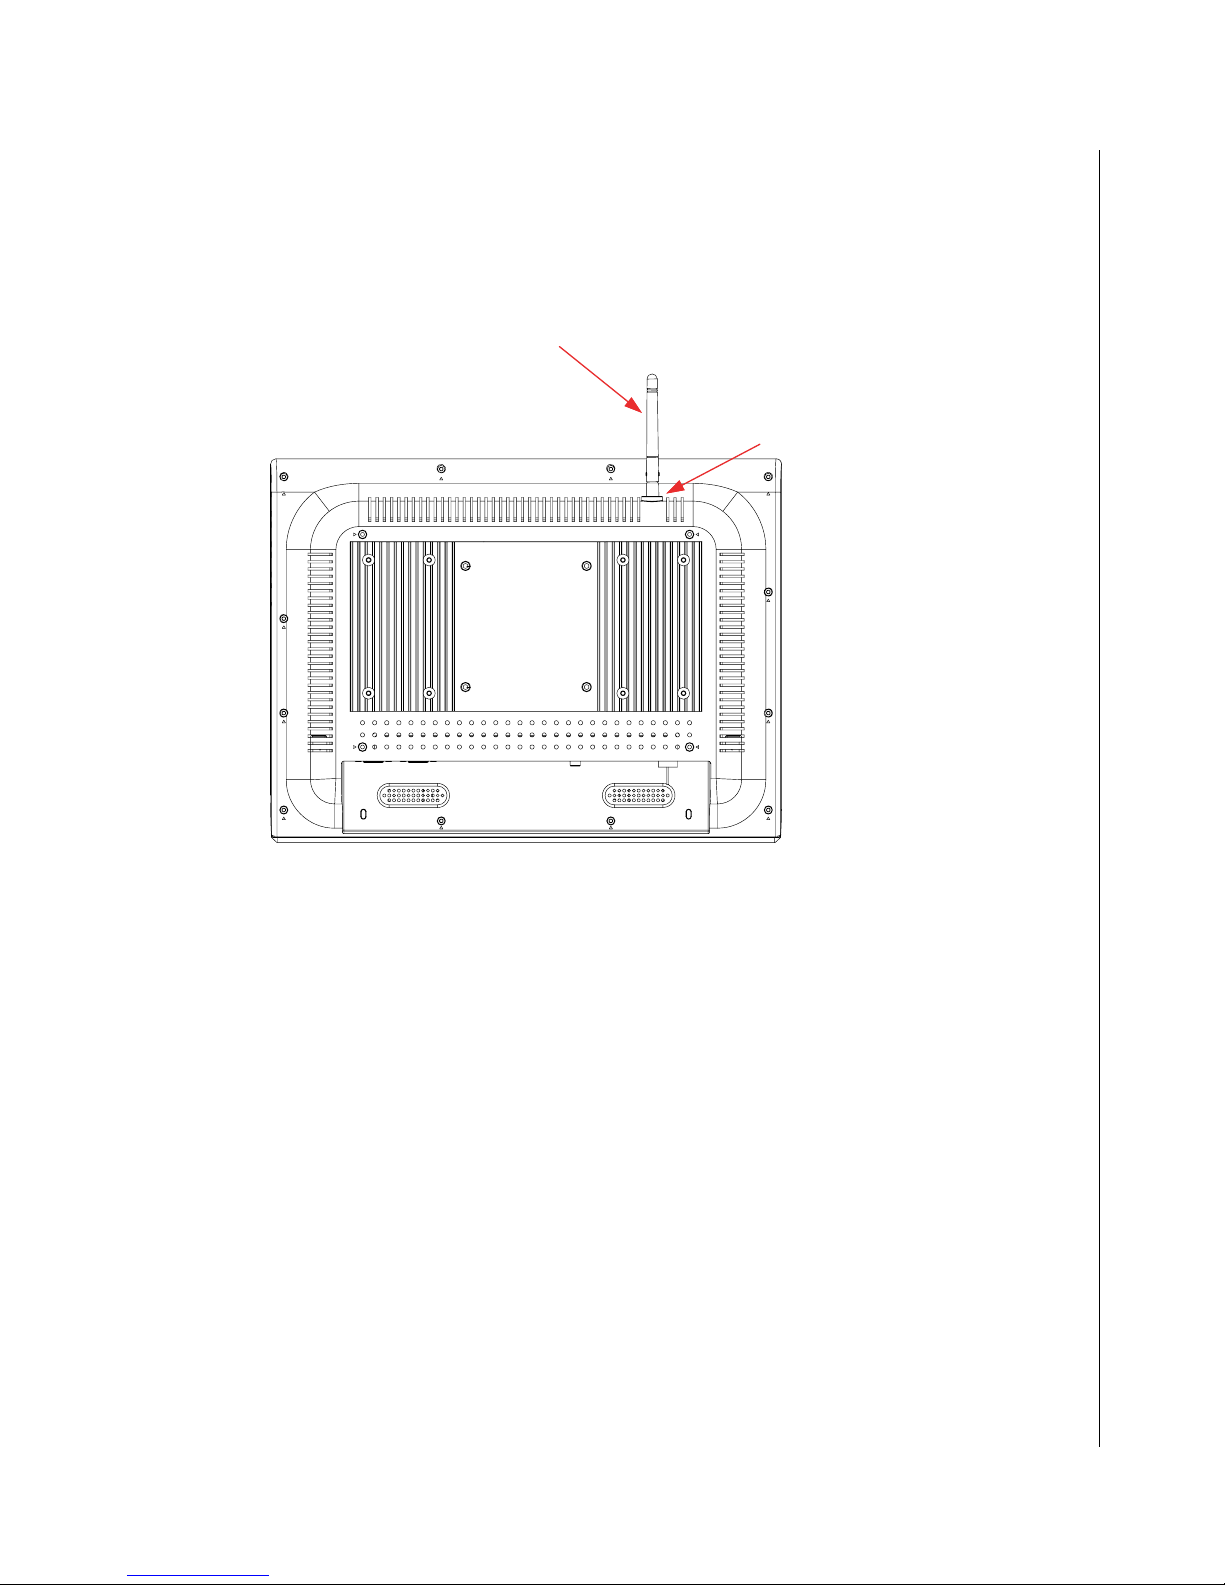
X Wi-FI Antenna Installation (optional)
To install the antenna for the optional Wi-Fi card on the KPC-1710 RT, remove the cap covering the antenna
mount as indicated below and screw the supplied antenna into the mount.
Wi-Fi Antenna
Antenna Mount
Figure 2-4. Installing the antenna for the optional Wi-Fi card on the KPC-1710RT
Wi-FI Antenna Installation (optional) 2-5KPC-1710RT User’s Guide
Page 36

This page intentionally left blank.
2-6 KPC-1710RT User’s Guide
Page 37

Chapter 3
X Getting Started
Contents
Power Connection . . . . . . . . . . . . . . . . . . . . . . . . . . . . . . . . . . . . 3-3
Operating System and Drivers. . . . . . . . . . . . . . . . . . . . . . . . . . . 3-4
Chipset Driver Installation. . . . . . . . . . . . . . . . . . . . . . . . . . . 3-4
Graphics Driver Installation. . . . . . . . . . . . . . . . . . . . . . . . . . 3-4
Audio Driver Installation . . . . . . . . . . . . . . . . . . . . . . . . . . . . 3-4
LAN Driver Installation . . . . . . . . . . . . . . . . . . . . . . . . . . . . . 3-5
Touch-Screen Driver Installation. . . . . . . . . . . . . . . . . . . . . . 3-7
Wi-Fi Driver Installation. . . . . . . . . . . . . . . . . . . . . . . . . . . . . 3-7
Page 38

This page intentionally left blank.
3-2 KPC-1710RT User’s Guide
Page 39
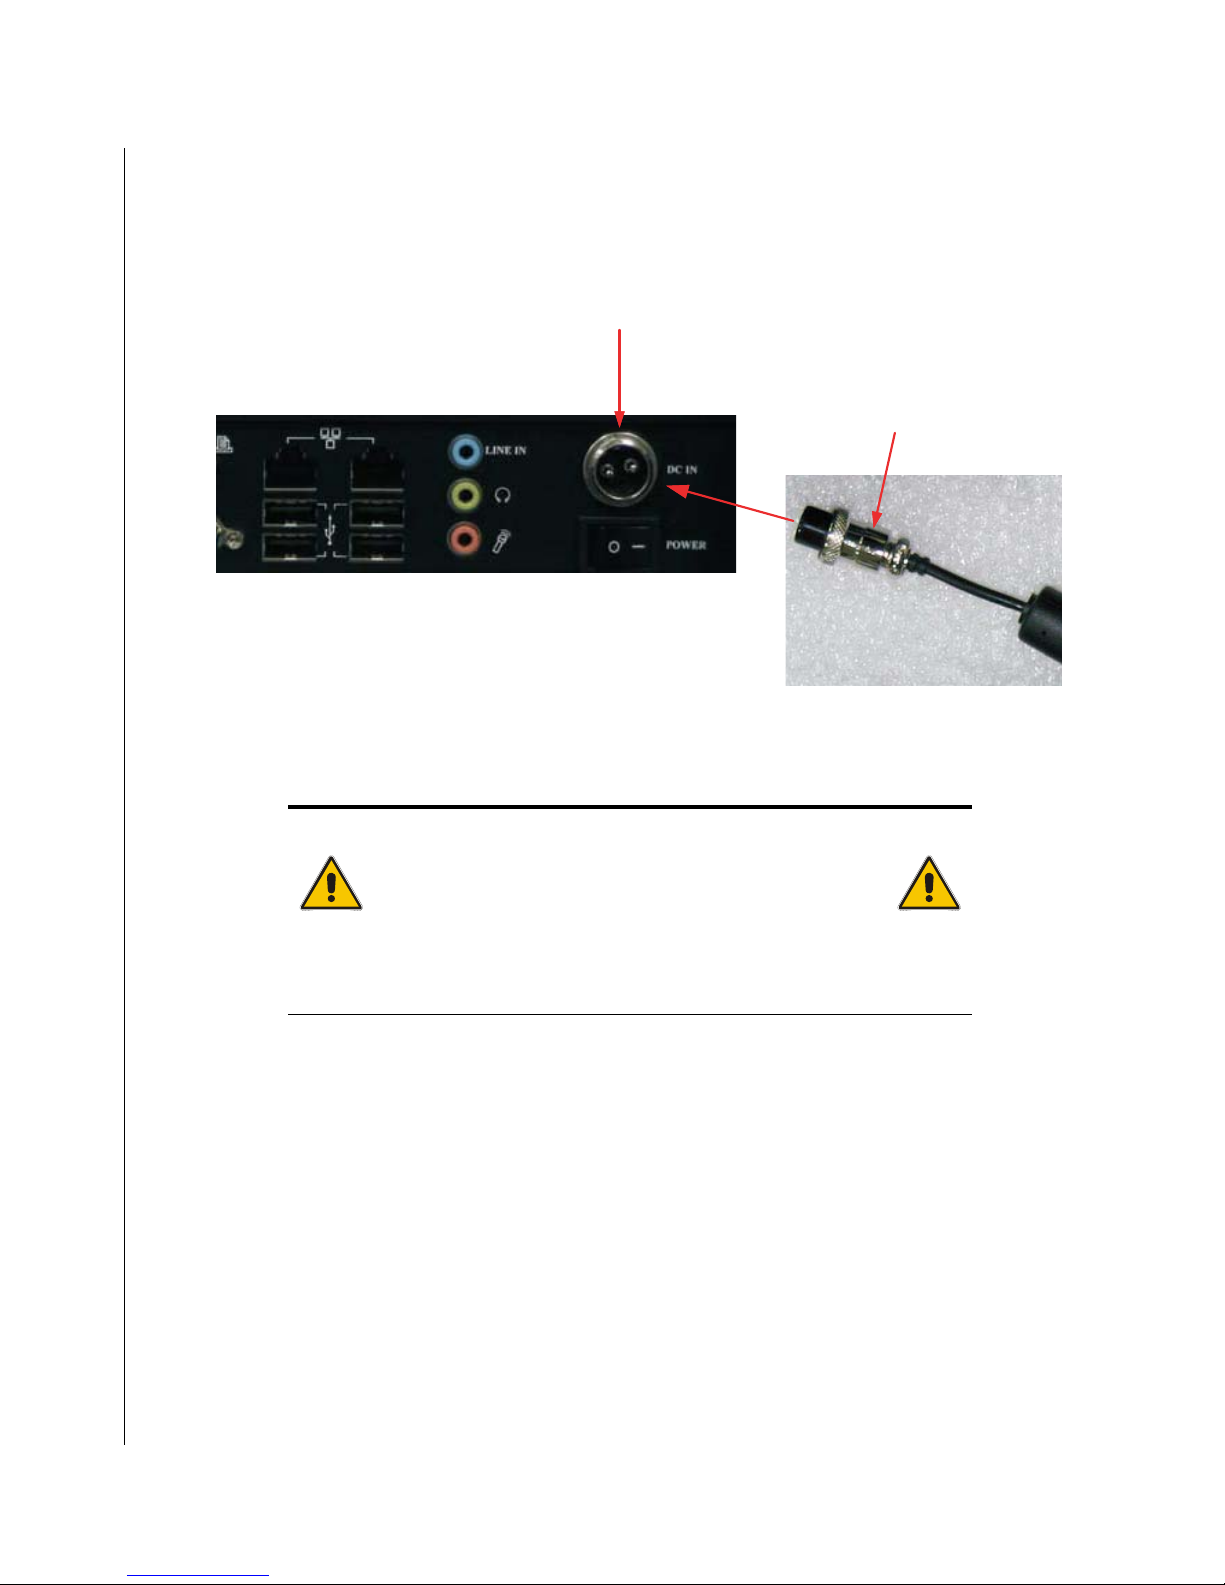
X Power Connection
Connect the supplied the AC adapter to the system by inserting the DC connector of the adapter into DC
power inlet on the I/O panel of the system as shown. Secure the connector by tightening the knurled screw
on the DC connector
DC power inlet
DC connector
Figure 3-1. AC inlet location
Connect the the AC power cord of the AC adapter to a corresponding AC outlet.
CAUTION
Use the power cord suitable for the power supply in your
country.
Do not remove or alter the grounding prong on the power cord.
In situations where a two-slot receptacle is present, have it
replaced with a properly grounded three-prong grounding type
receptacle.
3-3 KPC-1710RT User’s Guide
Page 40

X Operating System and Drivers
The KPC-1710RT Series of Panel PC does not come with operating system and drivers pre-installed. After
you have finished assembling your system and connected the appropriate power source, power it up using
the ATX Power Switch and install the required operating system.
The following sections describe driver installation procedures for Windows operating systems. Download
the drivers for the KPC-1710RT from the Quanmax website at www.quanmax.com and install them in the
order they are listed below. For other operating systems, please contact Quanmax.
X Chipset Driver Installation
To install the Intel® 855G chipset drviers, extract the contents of ICH_Driver_KPC-1710.zip and run the
file “infinst_autol.exe” in ICH Driver. When asked to reboot the system, click “yes”.
X Graphics Driver Installation
After installing the chipset driver, extract the contents of Graphics_KPC-1710.zip and install the graphics
driver by running the file “win2k_xp141950.exe” located in the folder Intel Graphics_V14.19.50. After
installation is complete, reboot the system.
X Audio Driver Installation
To install the install the audio drive, extract the contents of Audio_Driver_KPC-1710.zip and ru n the file
“WDM_A390.exe”. Follow the instructions given.
3-4 KPC-1710RT User’s Guide
Page 41
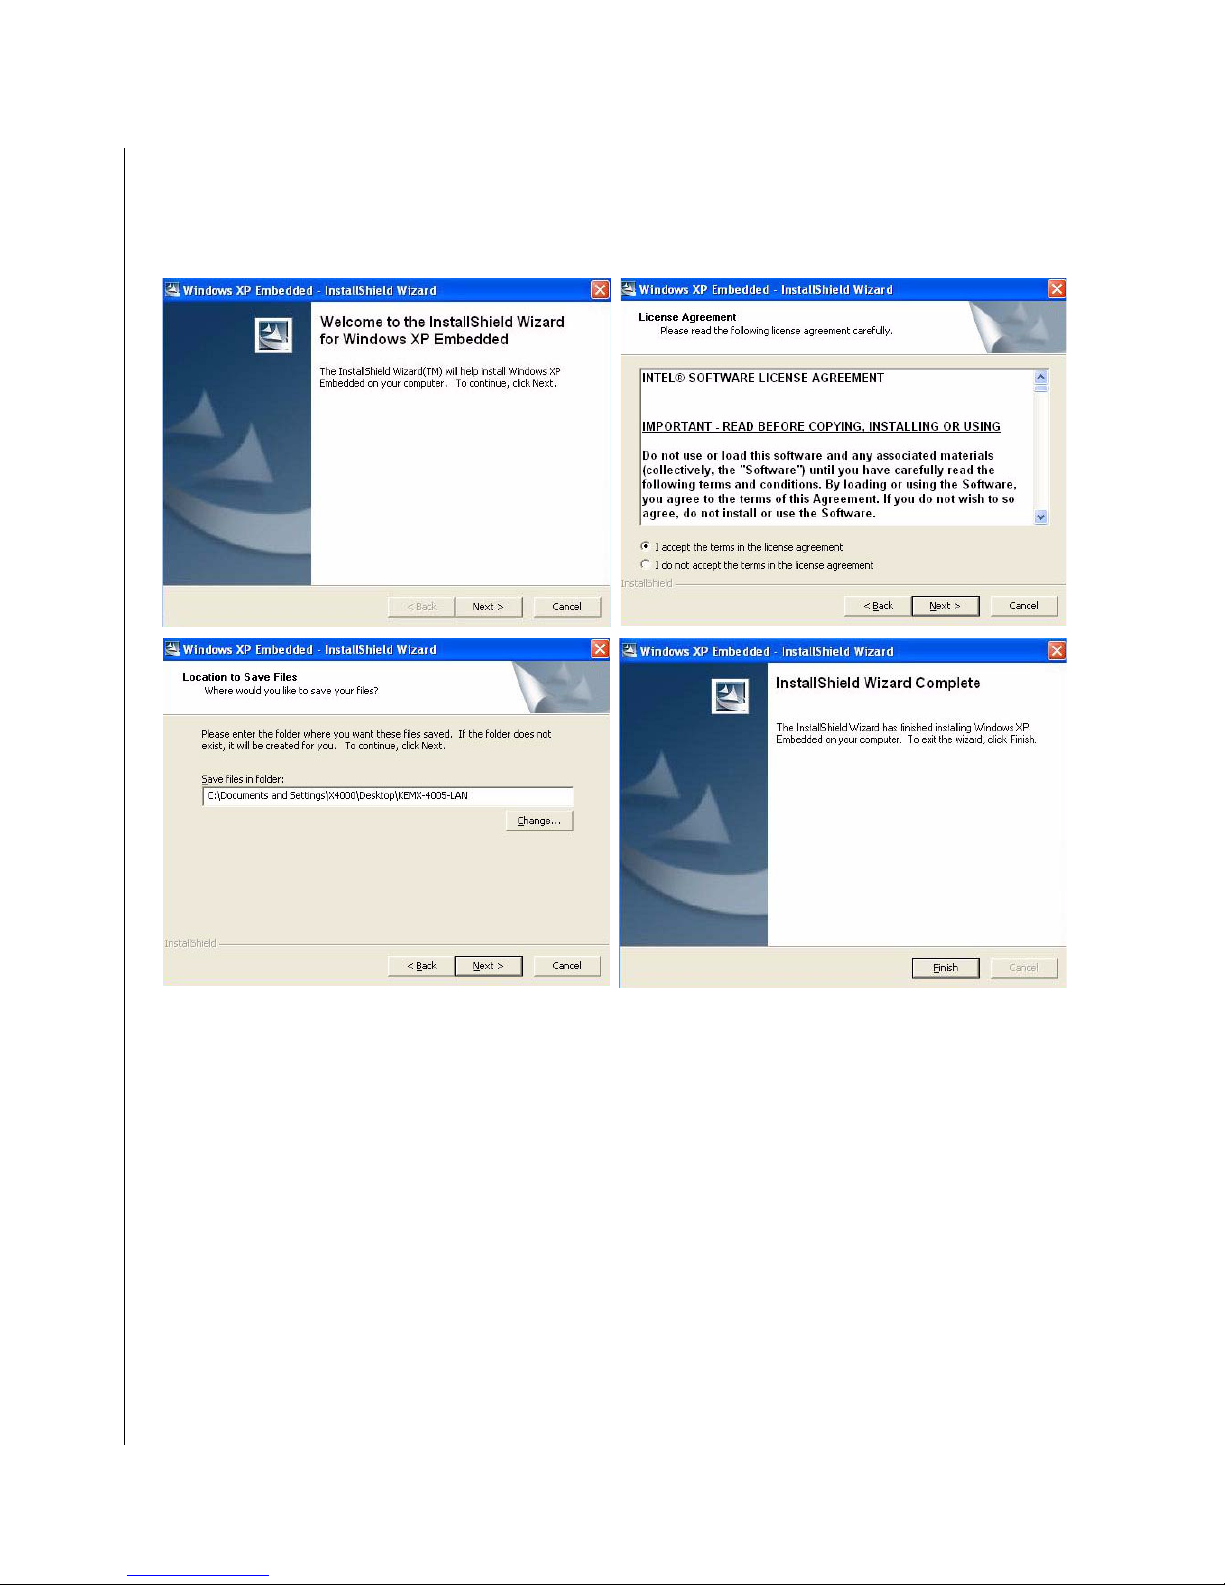
X LAN Driver Installation
To install the LAN Driver, extract the contents of LAN_KPC-1710.zip, run the file “e100exp.exe”, accept
the license agreement, and save the files to the desired folder.
3-5 KPC-1710RT User’s Guide
Page 42
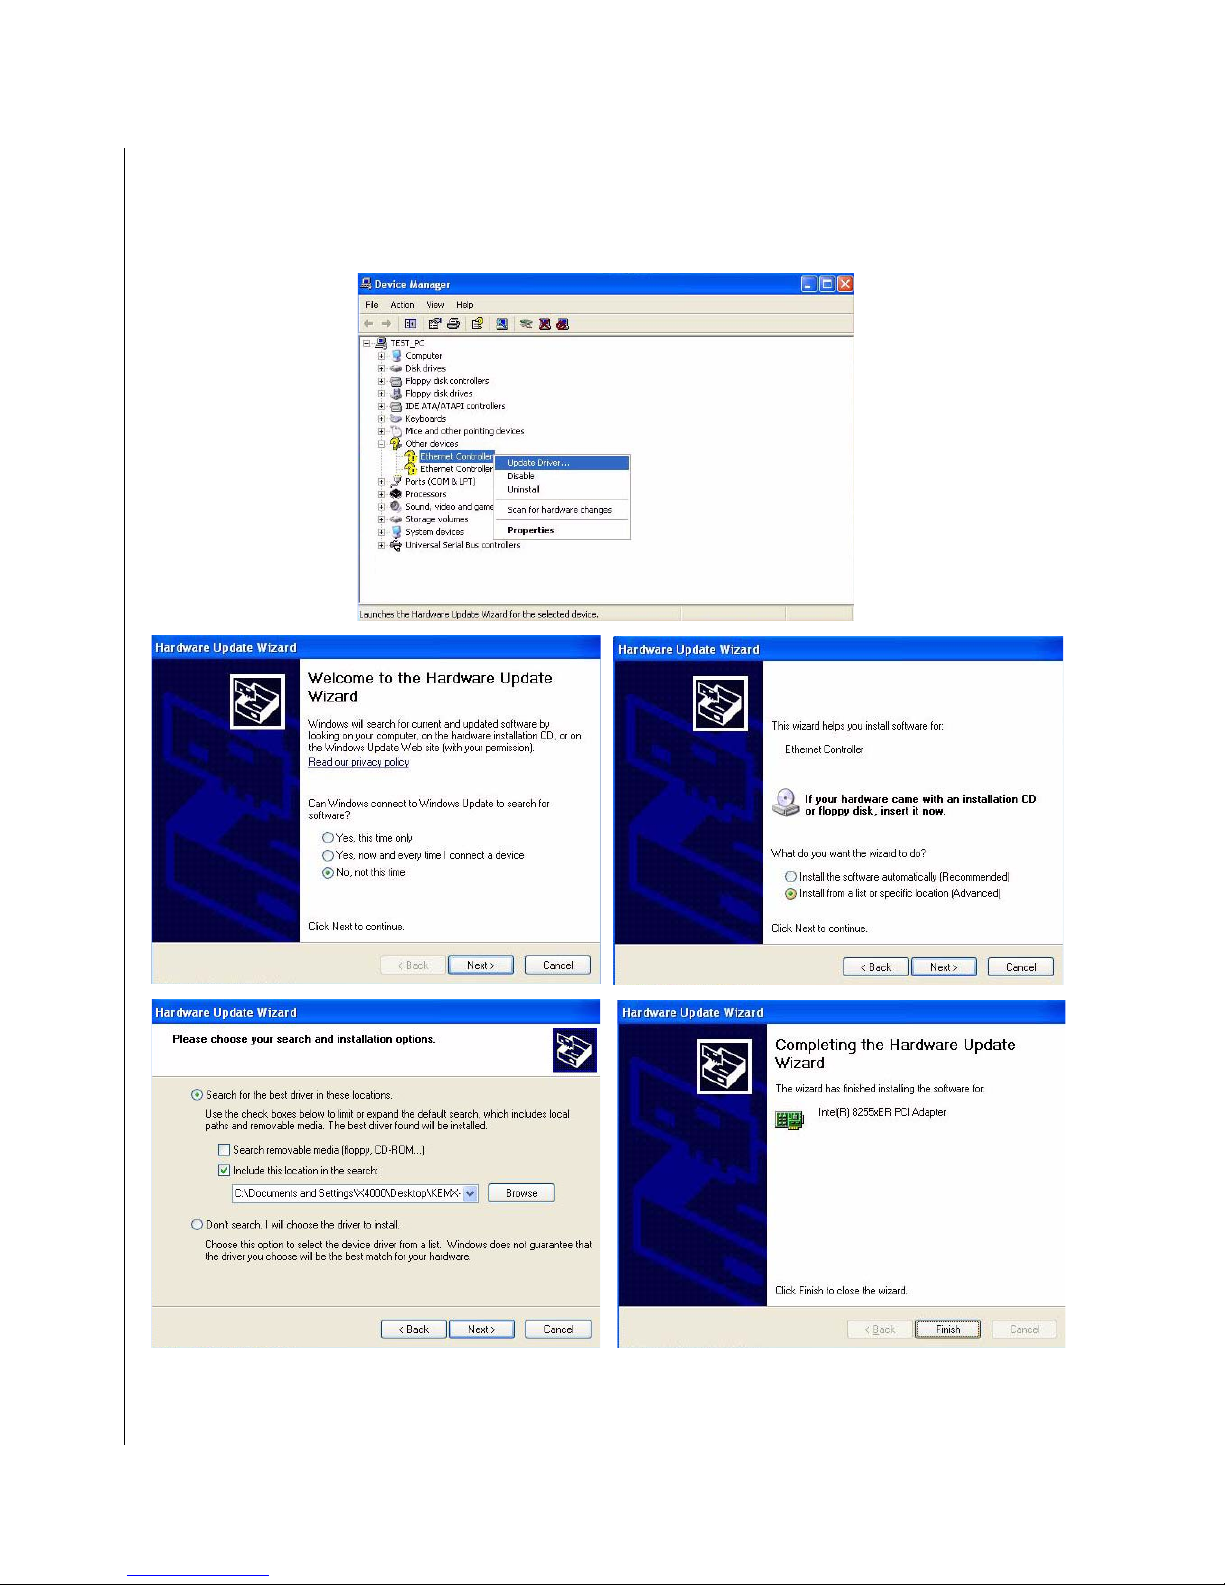
Open the Device Manager and R-click on Ethernet Controller and select Update Driver. When asked
whether or not to connect to Windows Update, select No. Select Install from a list or specific location and
include the folder you saved the installation files to above. Click Finish and repeat the procedure for the
other Ethernet Controller.
3-6 KPC-1710RT User’s Guide
Page 43
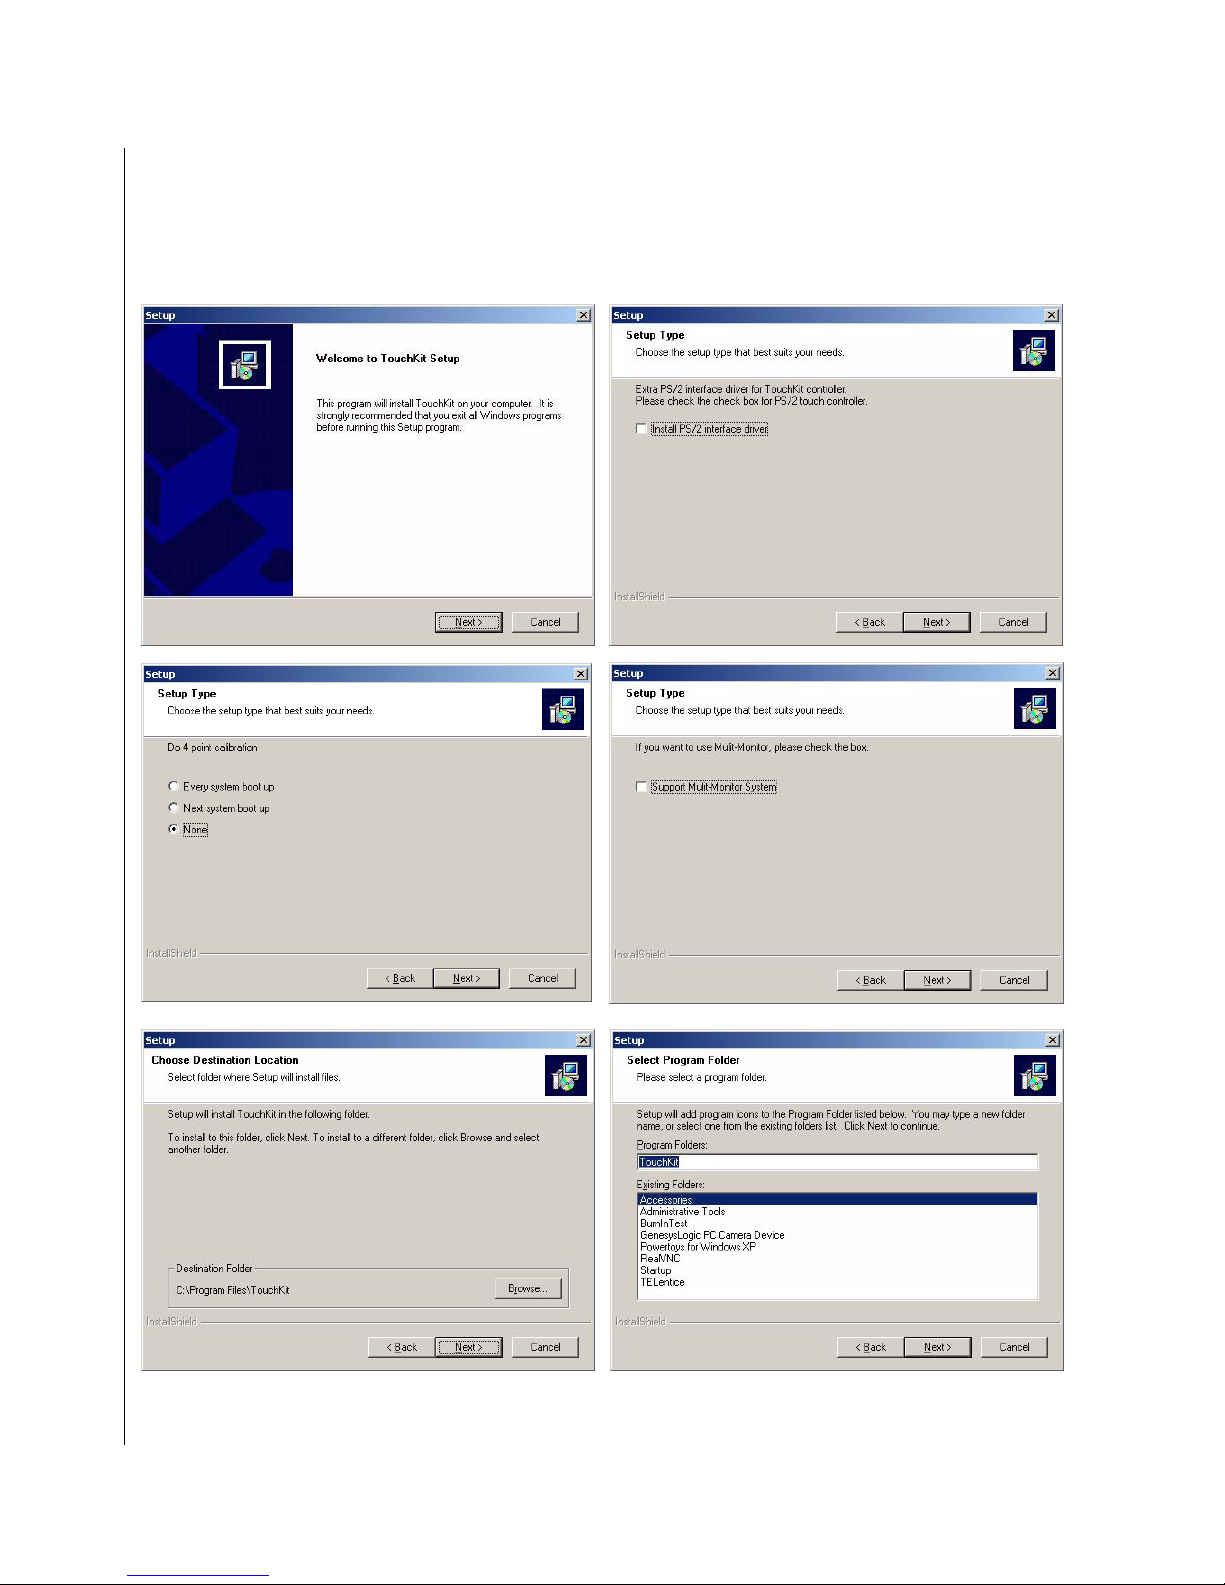
X T ouch-Screen Driver Installation
To install the Touch-Screen driver, extract the contents of Touchscreen_KPC-1710.zip and run Setup.exe
from the folder Win2000_XP_4.3.7.3321. Click through the menus, leaving “Install PS/2 interface driver”
unchecked, and choose “None” for the calibration check.
3-7 KPC-1710RT User’s Guide
Page 44
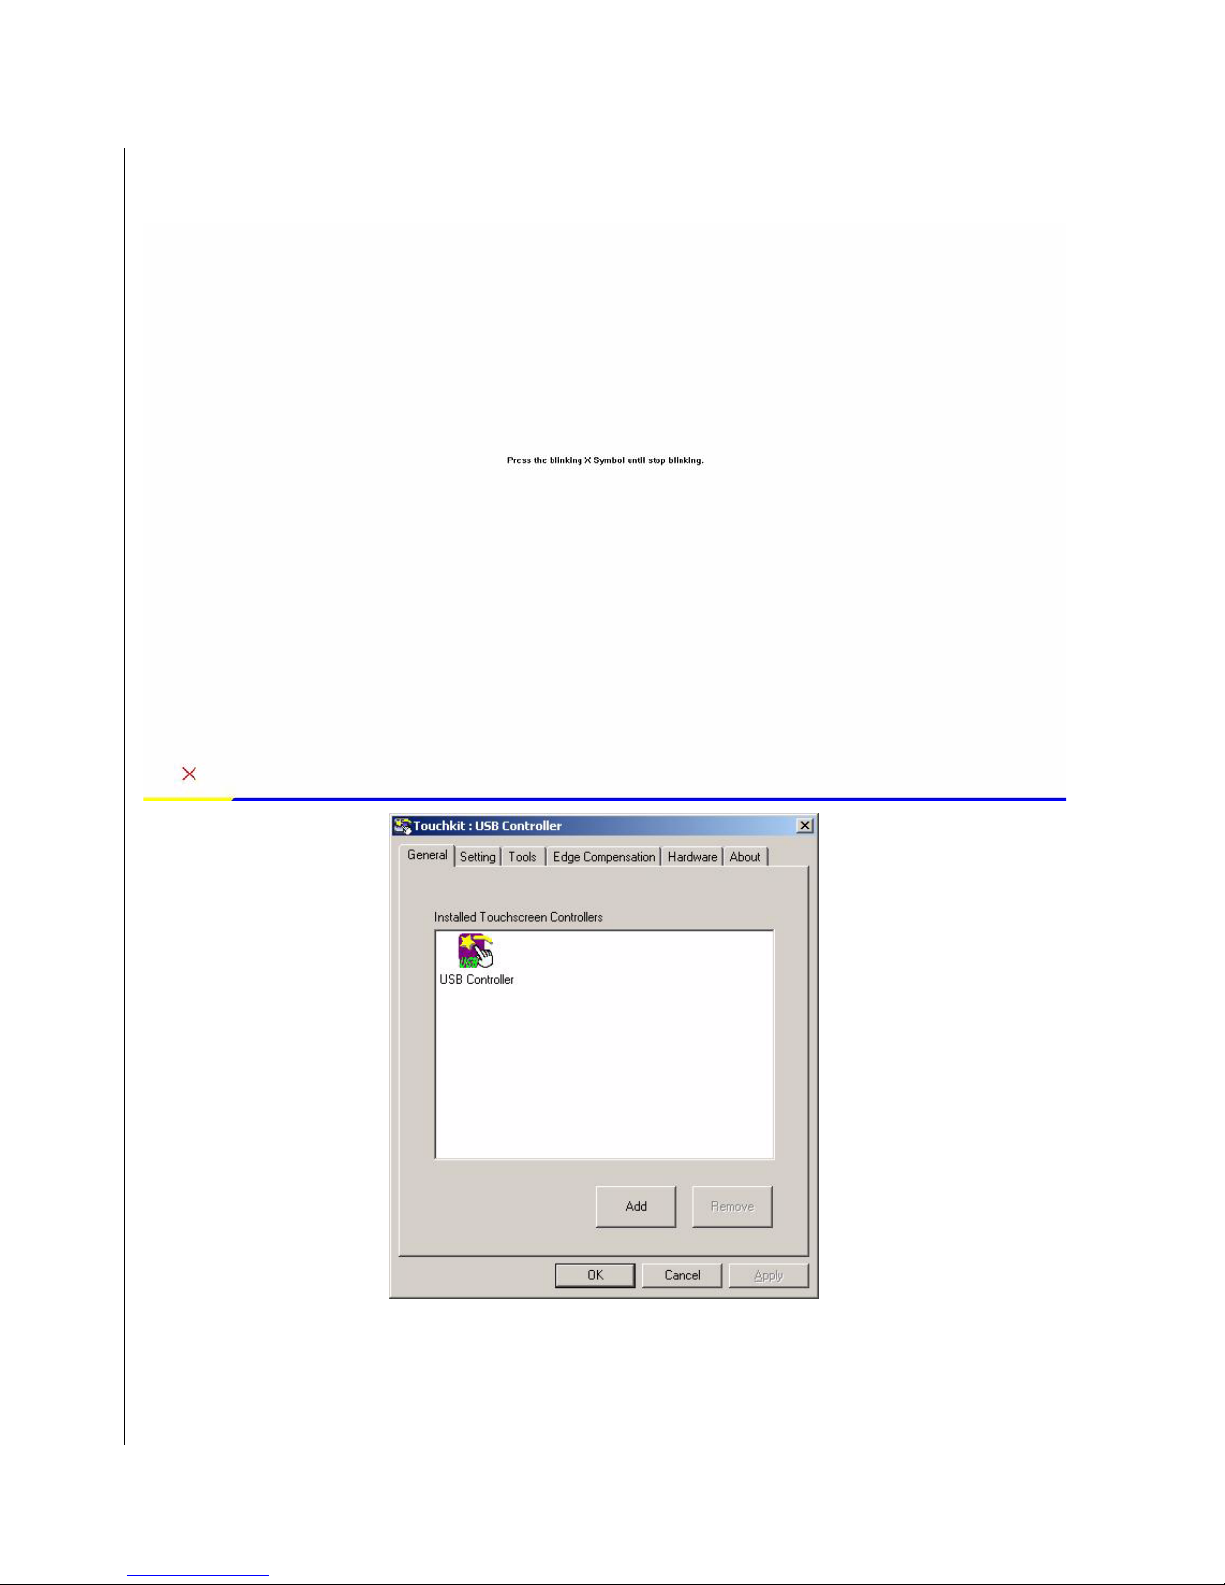
Click “Yes” when asked to perform the 4 point calibration, then touch and hold down on each flashing X
until it stops flashing and a beep is heard.
Click “OK” to exit the Touchkit USB Controller. To access the Touch-Screen Utility Help Documentation,
to go
Start > Programs > Touchkit > Document.
3-8 KPC-1710RT User’s Guide
Page 45
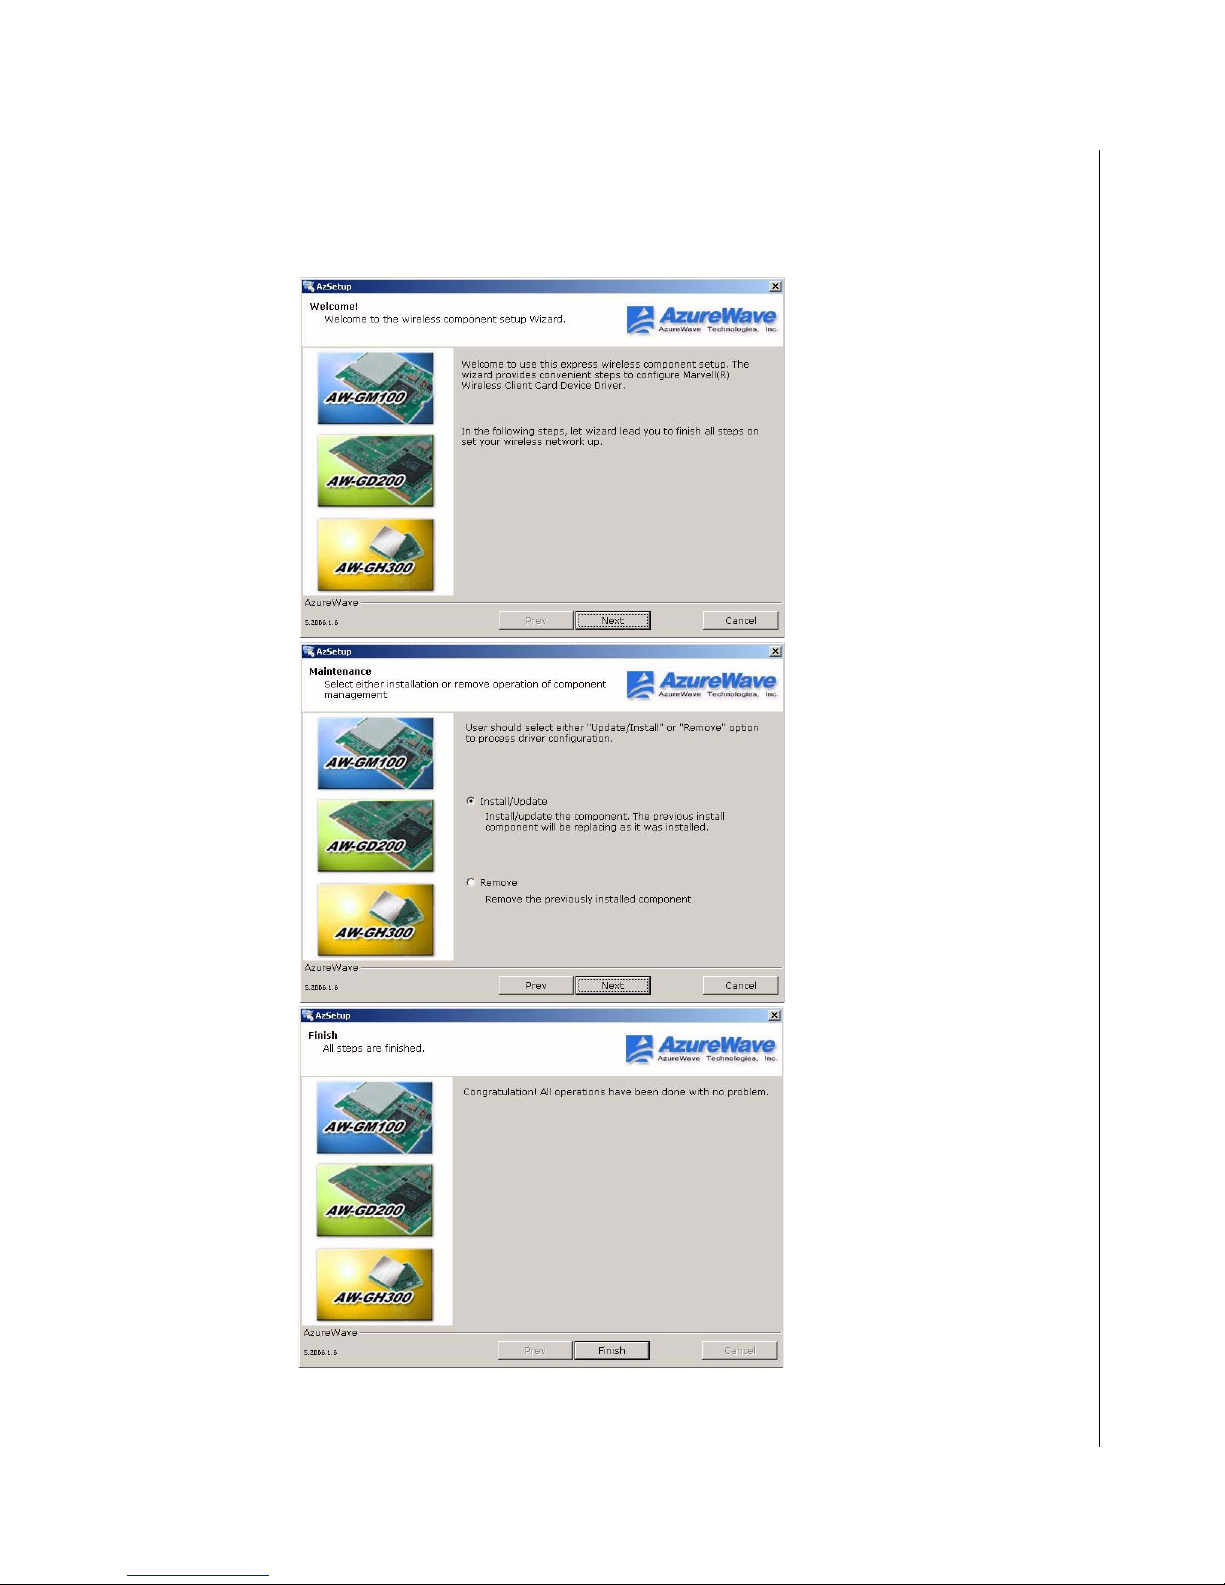
X Wi-Fi Driver and Utility Installation (optional)
To install the optional Wi-Fi card driver, extract the contents of Wi-Fi_KPC-1710.zip and run Setup.exe from
the folder GM100(3.2.3.2-Logo)-az(6.01.11). Click through the menus as shown.
Operating System and Drivers 3-9KPC-1710RT User’s Guide
Page 46
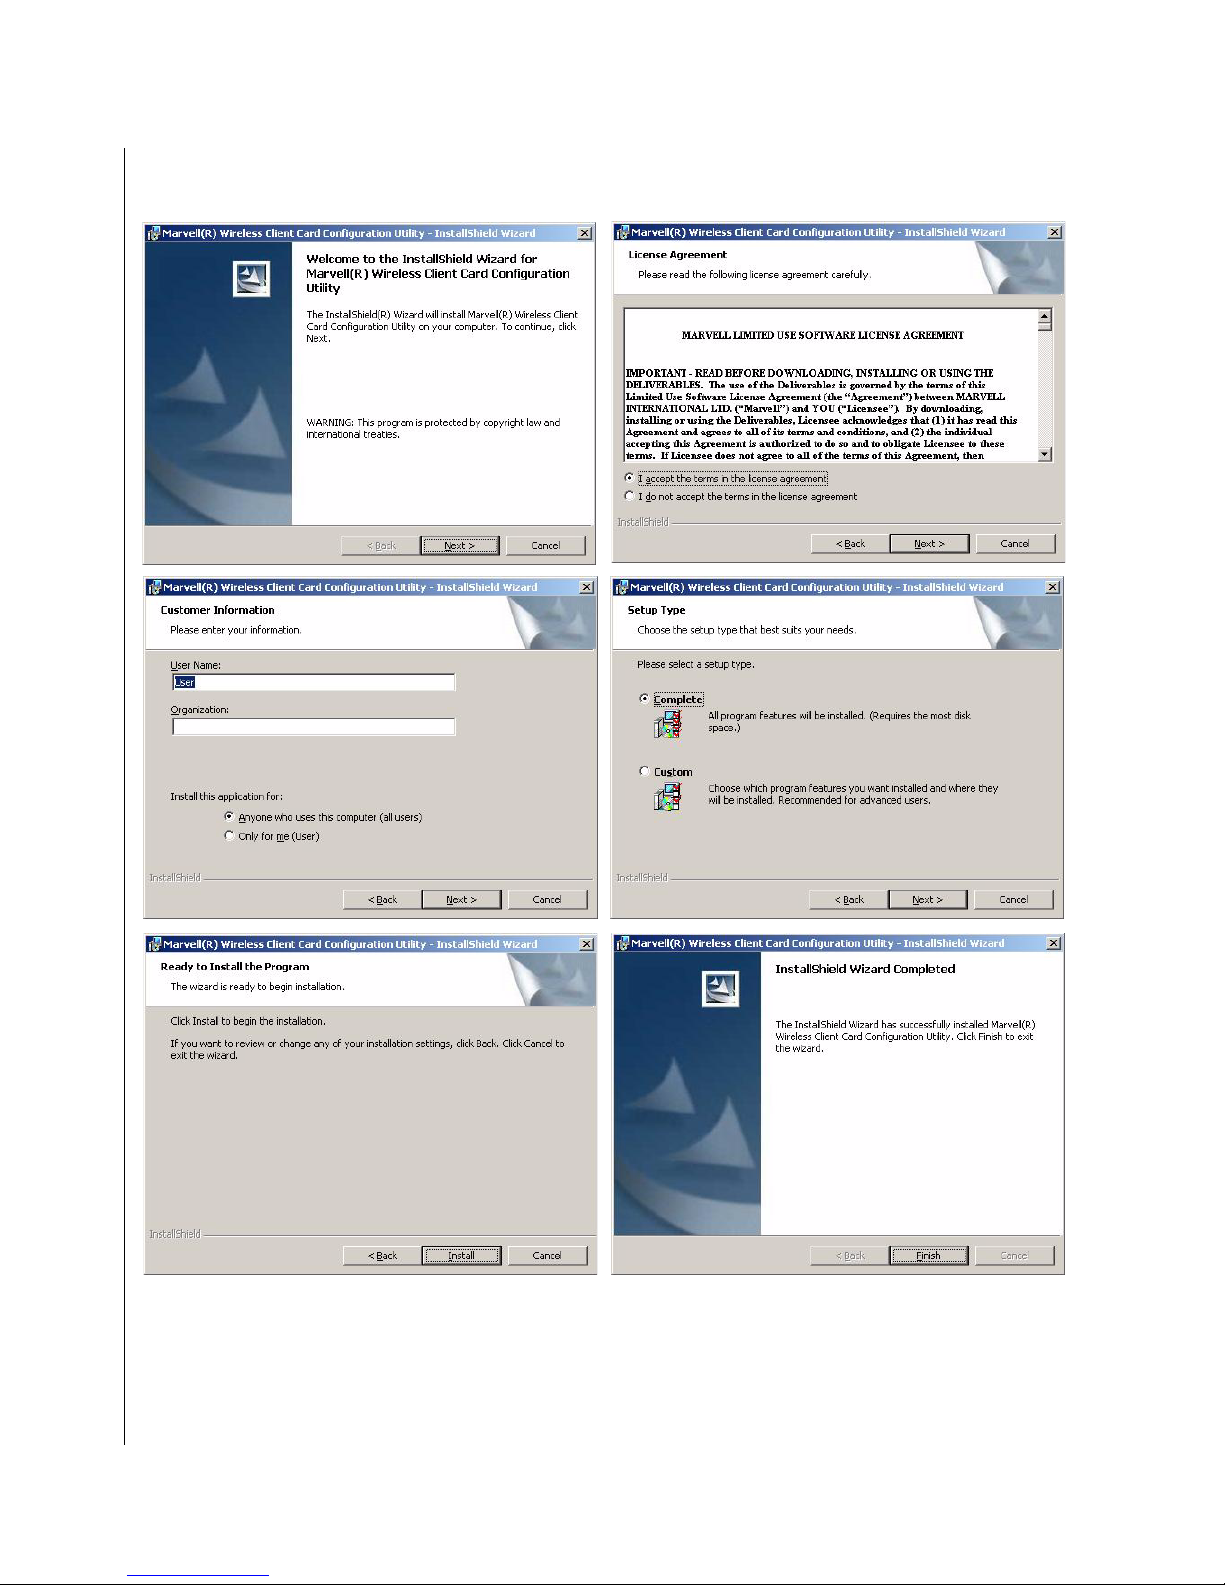
The Wirless Client Card Configuration Utility installation will begin immediately . Click through the menus as
shown.
To configure Wi-Fi card, open the Marvell Libertas Client Configuration Manager from the Desktop,
System Tray, or Start Menu.
3-10 KPC-1710RT User’s Guide
Page 47

Chapter 4
X Maintenance
Contents
Maintenance and Prevention. . . . . . . . . . . . . . . . . . . . . . . . . . . . 4-3
Page 48

This page intentionally left blank.
4-2 KPC-1710RT User’s Guide
Page 49

X Maintenance and Prevention
Your KPC-1710RT system requires minimal maintenance and care to keep it operating correctly.
Occasionally wipe the system with a soft dry cloth.
You should only remove persistent dirt by use of a soft, slightly damp cloth (use only a mild
detergent).
Make sure the ventilation holes are clear of debris.
Maintenance and Prevention 4-3KPC-1710RT User’s Guide
Page 50

This page intentionally left blank.
4-4 KPC-1710RT User’s Guide
Page 51

Chapter 5
X Interfaces
Contents
External Connectors . . . . . . . . . . . . . . . . . . . . . . . . . . . . . . . . . . 5-3
Page 52

This page intentionally left blank.
5-2 KPC-1710RT User’s Guide
Page 53
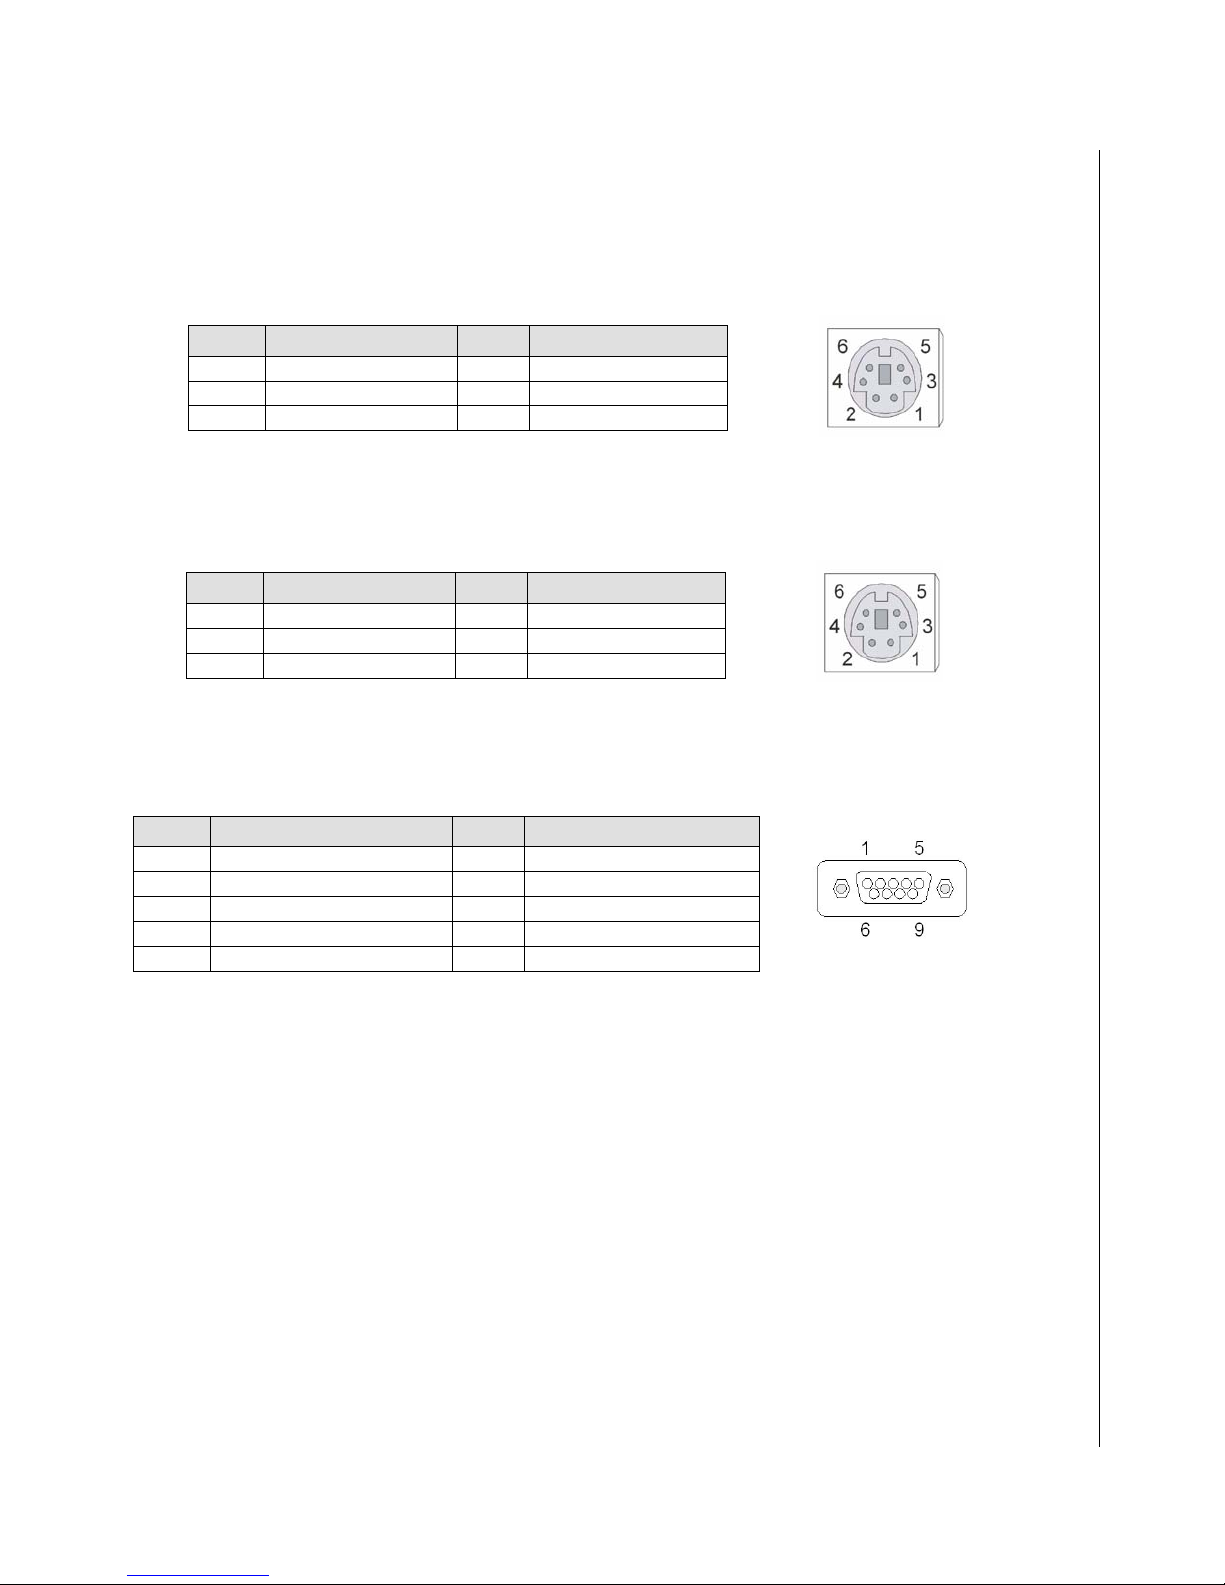
X External Connectors
Please refer to Figure 1-2. KPC-1710RT Mechanical Layout - I/O Panel for connector locations.
X PS/2 Mouse Connector (6-pin green Mini DIN):
PIN SIGNAL PIN SIGNAL
1 Mouse data 2 NC
3 Ground 4 +5V
5 Mouse clock 6 NC
Table 5-1. PS/2 Mouse Connector pin definition
X PS/2 Keyboard Connector (6-pin purple Mini DIN):
PIN SIGNAL PIN SIGNAL
1 Keyboard data 2 NC
3 Ground 4 +5V
5 Keyboard clock 6 NC
Table 5-2. PS/2 Keyboard Connector pin definition
X COM1, COM3-5 RS-232 Serial Port Connector (D-Sub 9-pin male):
PIN SIGNAL PIN SIGNAL
1 DCD (Data Carrier Detect) 6 DSR (Data Set Ready)
2 RXD (Receive Data) 7 RTS (Request to Send)
3 TXD (Transmit Data) 8 CTS (Clear to Send)
4 DTR (Data Terminal Ready) 9 RI (Ring Indicator)
5 Ground
Table 5-3. COM1 RS-232 Serial Port Connector pin definition
External Connectors 5-3KPC-1710RT User’s Guide
Page 54
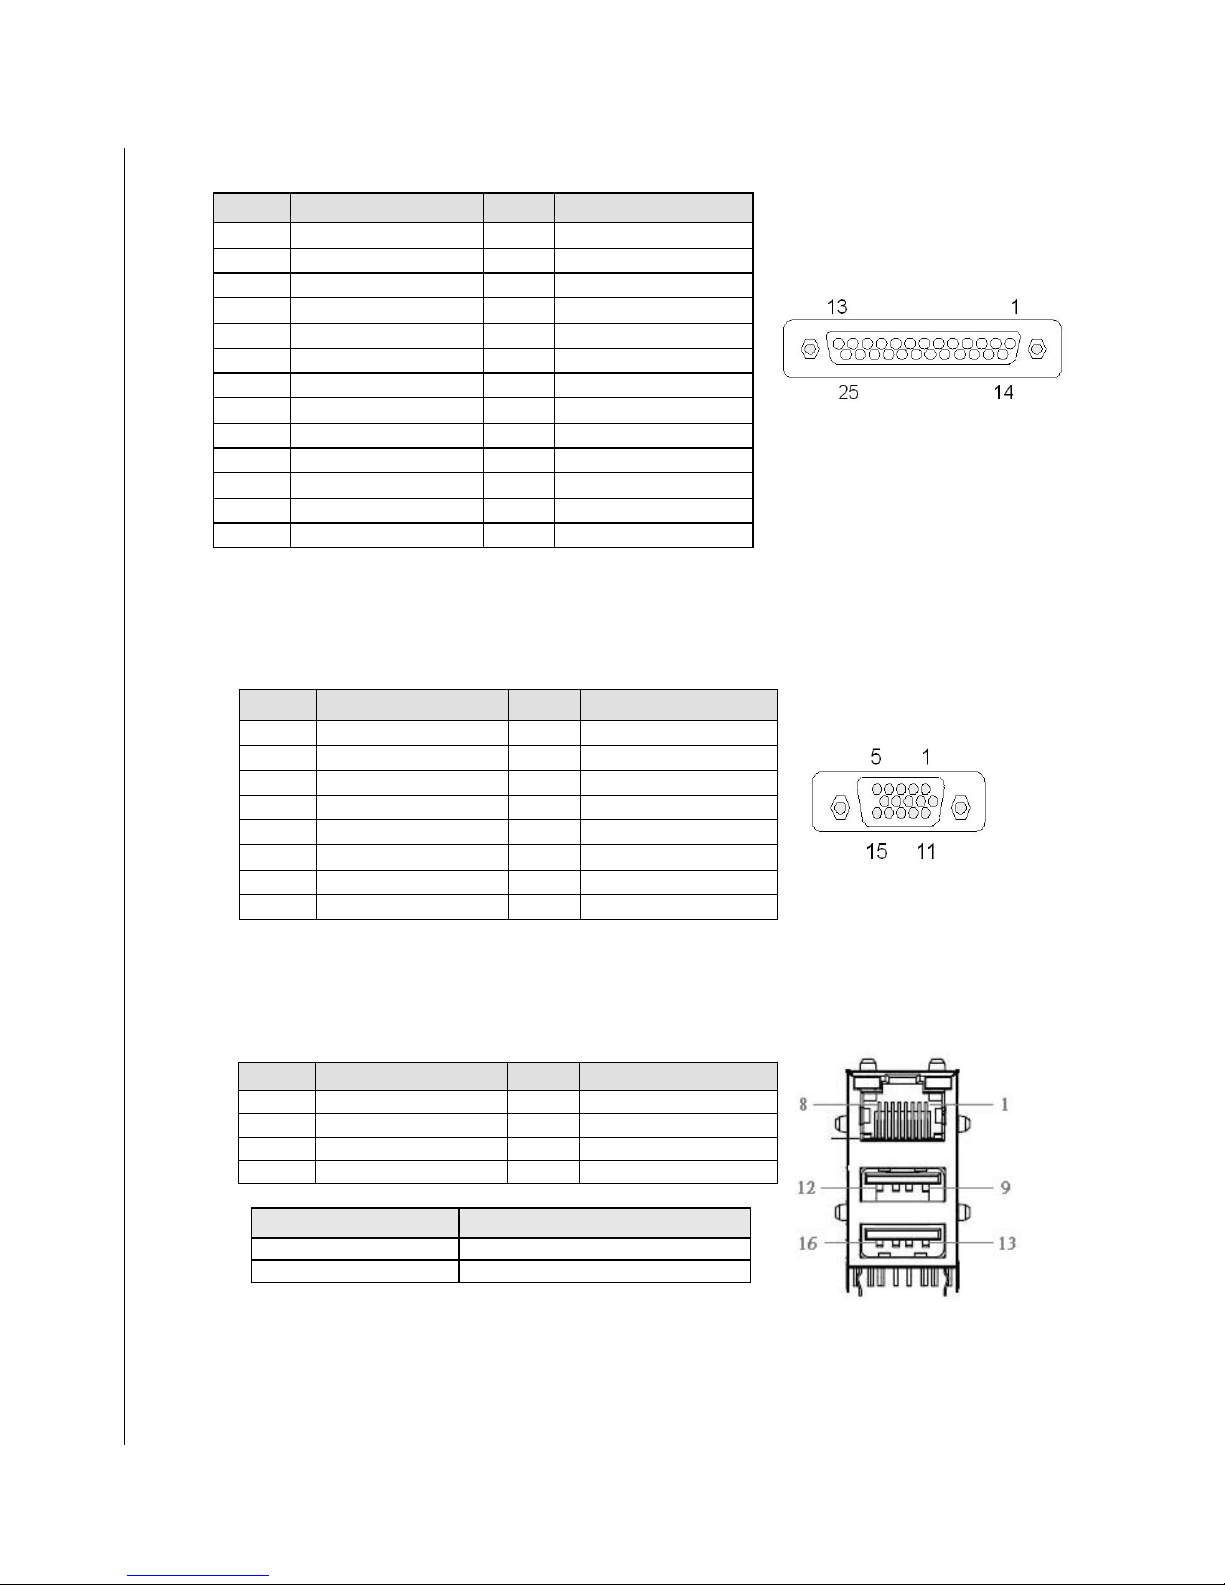
X Parallel Port Connector (D-Sub 25-pin female):
L
PIN SIGNAL PIN SIGNA
1 Line Printer Strobe 14 Auto Feed
2 PD 0, Parallel Data 0 15 Error
3 PD 1, Parallel Data 1 16 Initialize
4 PD 2, Parallel Data 2 17 Select
5 PD 3, Parallel Data 3 18 Ground
6 PD 4, Parallel Data 4 19 Ground
7 PD 5, Parallel Data 5 20 Ground
8 PD 6, Parallel Data 6 21 Ground
9 PD 7, Parallel Data 7 22 Ground
10 ACK, Acknowledge 23 Ground
11 Busy 24 Ground
12 Paper Empty 25 Ground
13 Select
Table 5-4. Parallel Port Connector pin definition
X VGA Display Connector (D-Sub 15-pin female):
PIN SIGNAL PIN SIGNAL
1 Red 2 Green
3 Blue 4 NC
5 Ground 6 Ground
7 Ground 8 Ground
9 VCC 10 Ground
11 NC 12 DDCData
13 HSync 14 VSync
15 DDCClk
X Fast Ethernet + 2 USB 2.0 Connector (RJ-45 + USB type "A"):
PIN SIGNAL PIN SIGNAL
1 Transmit output (+) 5 NC
2 Transmit output (-) 6 Receive input (-)
3 Receive input (+) 7 NC
4 NC 8 NC
LAN LED Function
Yellow LINK / ACTIVE
OFF / Green / Orange Speed 10 / Speed 100 / Speed 1000
5-4 KPC-1710RT User’s Guide
Table 5-5. VGA Display Connector pin definition
Table 5-6. Fast Ethernet + 2 USB 2.0 Connector pin definition
Page 55
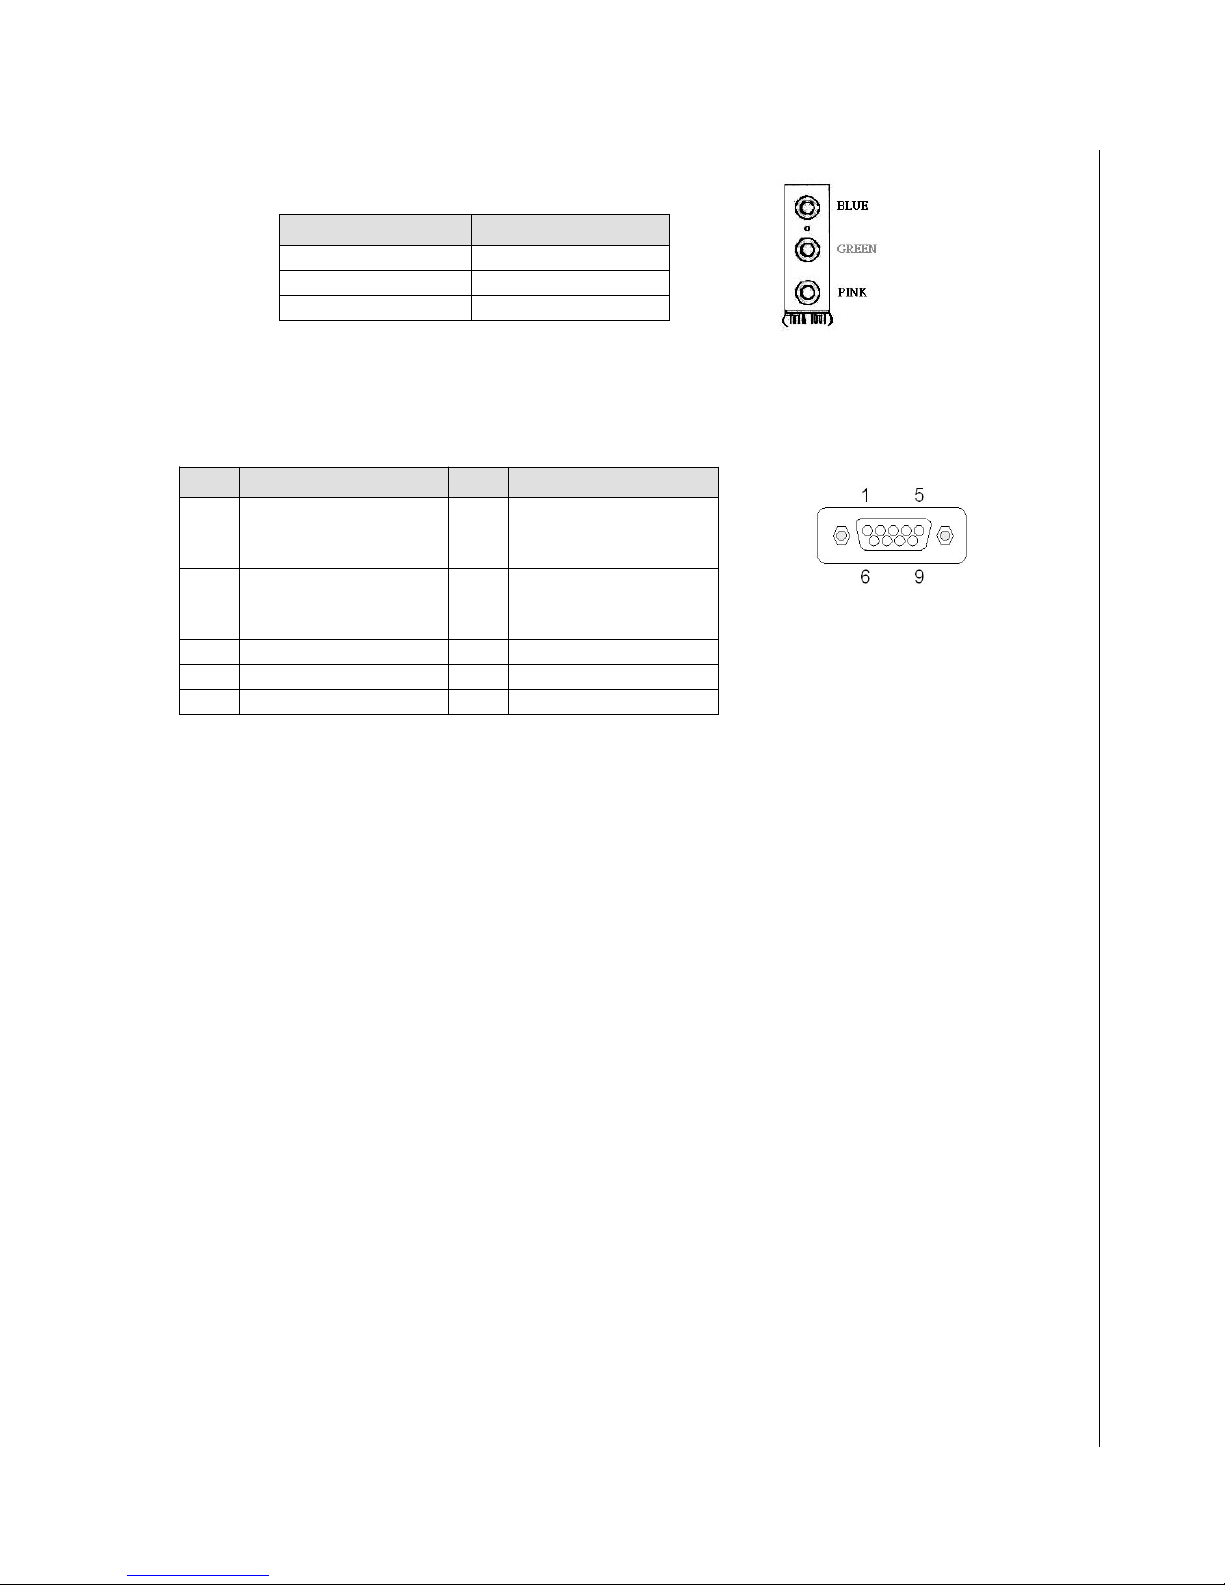
X Audio Jack Connector (DM1: audio jack connector):
COLOR SIGNAL
Pink MIC_In
Blue Line-out
Green Line_In
Table 5-7. Audio Jack Connector pin definition
X COM2: RS-232/422/485 Serial Port Connector (D-Sub 9-pin male):
PIN SIGNAL PIN SIGNAL
RS-232
:DCD
RS-422
RS-485
RS-232
RS-422
RS-485
:TX+
:RTX+
:TXD
:TX-
:RTX-
GND
RTS
RI
1
3
5
7
9
2
4
6
8
10
RS-232
RS-422
RS-485
RS-232
RS-422
RS-485
DSR
:RXD
:RX+
:N/A
:DTR
:RX-
:N/A
CTS
NC
Table 5-8. COM2 RS232/422/485 Serial Port Connector pin definition
External Connectors 5-5KPC-1710RT User’s Guide
 Loading...