

Page 1

Patch Management
User Guide
Version 1.4
April 6, 2021
Page 2

Copyright 2018-2021 by Qualys, Inc. All Rights Reserved.
Qualys and the Qualys logo are registered trademarks of Qualys, Inc. All other trademarks
are the property of their respective owners.
Qualys, Inc.
919 E Hillsdale Blvd
4th Floor
Foster City, CA 94404
1 (650) 801 6100
Page 3

Table of Contents
About this Guide .............................................................................................. 5
About Qualys ........................................................................................................................... 5
Qualys Support ........................................................................................................................ 5
Patch Management Overview....................................................................... 6
Get Started ............................................................................................................................... 6
Manage PM Licenses................................................................................................................ 7
Fallback to free version........................................................................................................... 8
View Your Assets ..................................................................................................................... 8
View Your Jobs ......................................................................................................................... 9
View Your Assessment Profiles and Licenses Information .............................................. 10
Install Cloud Agents for PM.......................................................................... 12
What are the steps? .............................................................................................................. 12
Download Installer ................................................................................................................ 13
Activate your agents for PM ................................................................................................. 15
Enable PM in a CA configuration profile ............................................................................. 15
User Roles and Permissions ........................................................................ 16
How to find PM Roles and view their permissions............................................................. 18
How are tags used to grant access to assets?..................................................................... 20
User Roles Comparison......................................................................................................... 21
Create Assessment Profiles......................................................................... 23
Review Missing and Installed Patches ..................................................... 24
Download Patch from the Vendor Site................................................................................ 26
Jobs to Deploy Patches on Assets ............................................................ 28
Schedule Job Settings ............................................................................................................ 35
Reboot Settings ...................................................................................................................... 37
Enable/Disable Jobs ............................................................................................................... 40
Use QQL to Automate Patch Selection for Jobs................................... 43
Example 1 Installing patches released on Patch Tuesday automatically....................... 43
Example 2 Installing critical patches for Chrome and Internet Explorer ....................... 44
Example 3 QQL for security patches ................................................................................... 44
Clone a Job..................................................................................................... 46
Cloning a Job .......................................................................................................................... 47
3
Page 4

Change Job Ownership ............................................................................... 49
Uninstall Patches from Assets ................................................................... 50
Review Job Results ....................................................................................... 56
Asset, Deployment, and Patch Statuses .................................................. 57
Asset Statuses List................................................................................................................. 57
Deployment Job Statuses List............................................................................................... 58
Patch Specific Failure Reason Codes List............................................................................ 58
Exporting Patch Data.................................................................................... 61
How to Export Patch Data?................................................................................................... 62
URLs to be Whitelisted For Patch Download ......................................... 63
4
Page 5

About this Guide
About Qualys
About this Guide
Welcome to Qualys Patch Management! We’ll help you get acquainted with the Qualys
solutions for patching your systems using the Qualys Cloud Security Platform.
About Qualys
Qualys, Inc. (NASDAQ: QLYS) is a pioneer and leading provider of cloud-based security and
compliance solutions. The Qualys Cloud Platform and its integrated apps help businesses
simplify security operations and lower the cost of compliance by delivering critical
security intelligence on demand and automating the full spectrum of auditing,
compliance and protection for IT systems and web applications.
Founded in 1999, Qualys has established strategic partnerships with leading managed
service providers and consulting organizations including Accenture, BT, Cognizant
Technology Solutions, Deutsche Telekom, Fujitsu, HCL, HP Enterprise, IBM, Infosys, NTT,
Optiv, SecureWorks, Tata Communications, Verizon and Wipro. The company is also
founding member of the Cloud Security Alliance (CSA). For more information, please visit
www.qualys.com
Qualys Support
Qualys is committed to providing you with the most thorough support. Through online
documentation, telephone help, and direct email support, Qualys ensures that your
questions will be answered in the fastest time possible. We support you 7 days a week,
24 hours a day. Access online support information at www.qualys.com/support/.
5
Page 6

Patch Management Overview
Get Started
Patch Management Overview
Qualys Patch Management saves you time and effort by automating patch management
on Windows assets, for both Microsoft and Non-Microsoft patches, using a single patch
management application. It provides instant visibility on patches available for your assets
and tells you whether these patches are already installed. You can automatically deploy
new patches as and when they are available.
The Cloud Agent downloads the required patches from external sources. However, patches
that require authentication cannot be downloaded by the agent. You can manually
download and install such patches on the assets. Qualys Patch Management will then
identify these patches as installed.
We do not support scanning assets running Windows evaluation versions. These assets
are scanned for missing/installed patches once they are upgraded to the full version of
Windows.
Note: Qualys Patch Management 1.4 has several search and token changes due to which
your existing dashboard widgets might stop working or show errors. To fix the widgets, see
the “Rebuild Widgets” topic in the online help.
Get Started
Follow the steps to get started with Patch Management.
Qualys Subscription and Modules required
You would require “Patch Management” (PM) module enabled for your account.
System support
Patch Management only supports installing patches on Windows at present.
Agent installation and configuration
Install Cloud Agents (using the CA app)
Enable PM in a CA configuration Profile (using the CA app)
Manage PM Licenses
Deploy patches
Create a custom assessment profile (Optional)
Review missing and installed patches
Jobs to Deploy Patches on Assets
Review patch deployment results (success / failure)
6
Page 7
Patch Management Overview
Manage PM Licenses
Uninstall patches
Create a custom assessment profile (Optional)
Review missing and installed patches
Uninstall Patches from Assets
Review patch uninstall results (success / failure)
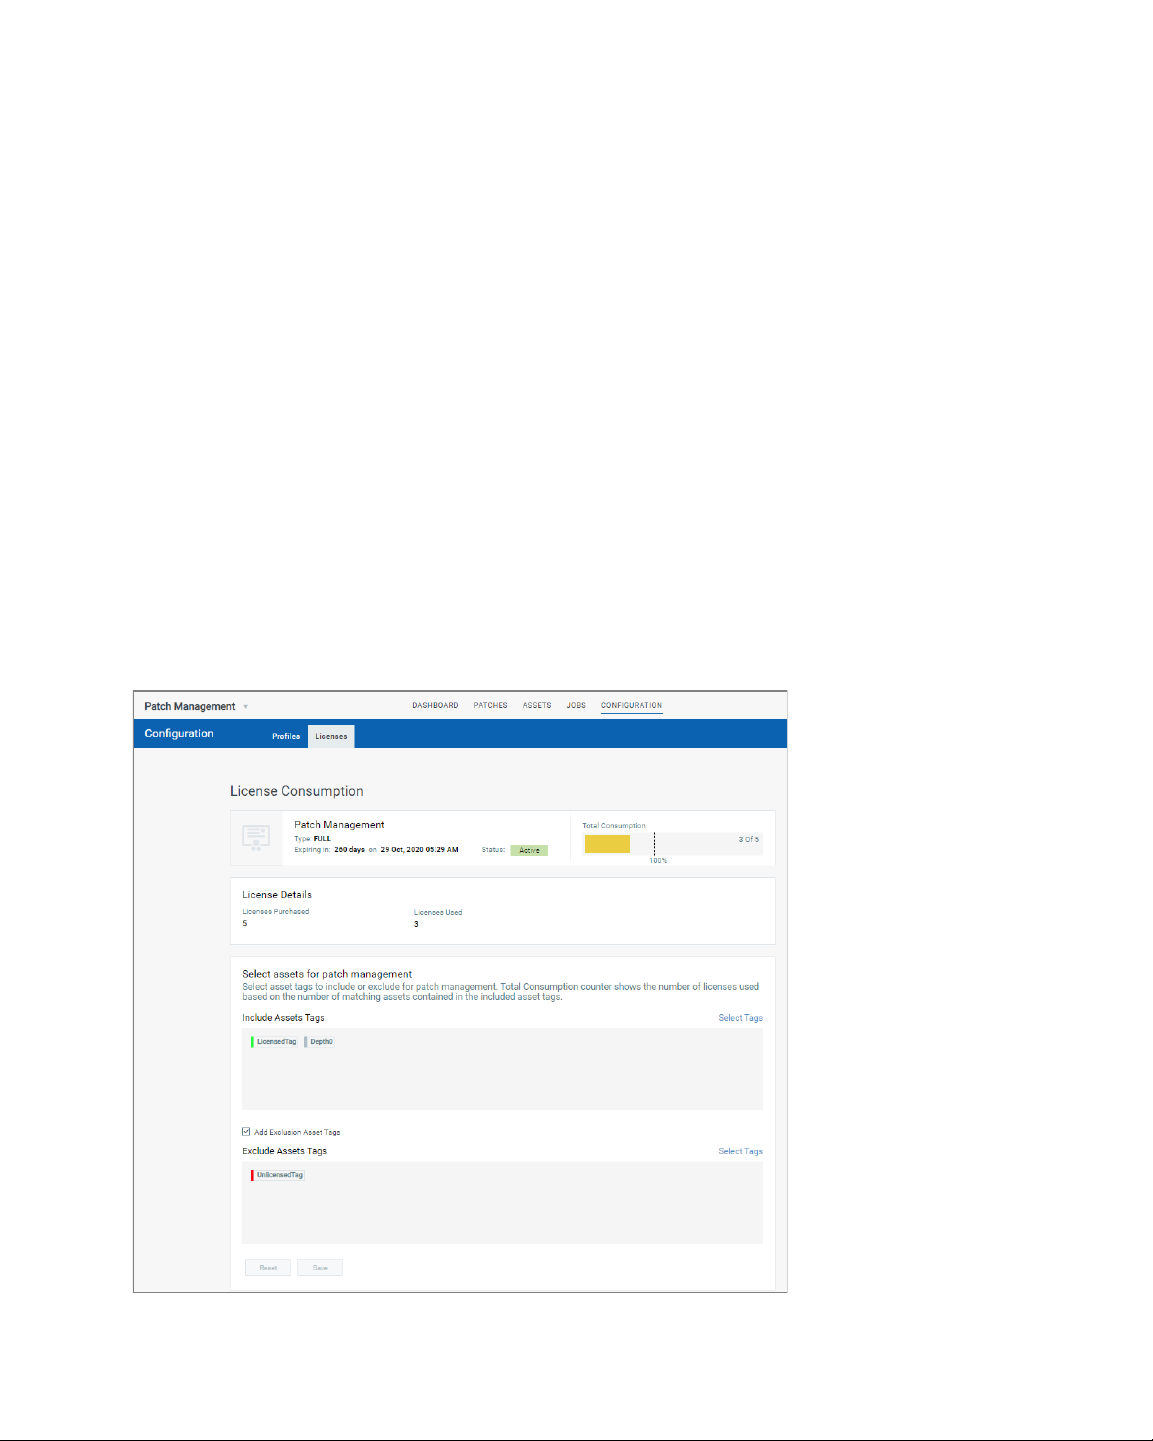
Manage PM Licenses
The Licenses tab, enabled only for paid subscribers, shows the number of licenses
consumed by Patch Management (PM). You can include asset tags to allow
installing/uninstalling patches on the assets contained in those asset tags. The Total
Consumption counter may exceed 100% if the number of assets activated for PM are more
than the number of PM licenses you have. Assets in the excluded asset tags are not
considered for patch management and you cannot deploy patches on those assets.
Note: In case the Total Consumption counter exceeds 100%, licenses will be consumed
based on the asset activation time stamp in ascending order.
Only admin / super users can manage licenses. Sub-users can only view the license
information.
7
Page 8

Patch Management Overview
Fallback to free version
Fallback to free version
Patch Management will revert to the Free version once your Trial or Full subscription
expires. Existing scan intervals of less than 24 hours will get converted to intervals of 24
hours. Your existing jobs will be disabled and you can re-enable them once you renew
your subscription.
The free version allows you to create assessment profiles with a minimum scan interval of
24 hours and see a list of missing and installed patches on the assets in your environment.
It doesn’t allow creating deployment/uninstall jobs.
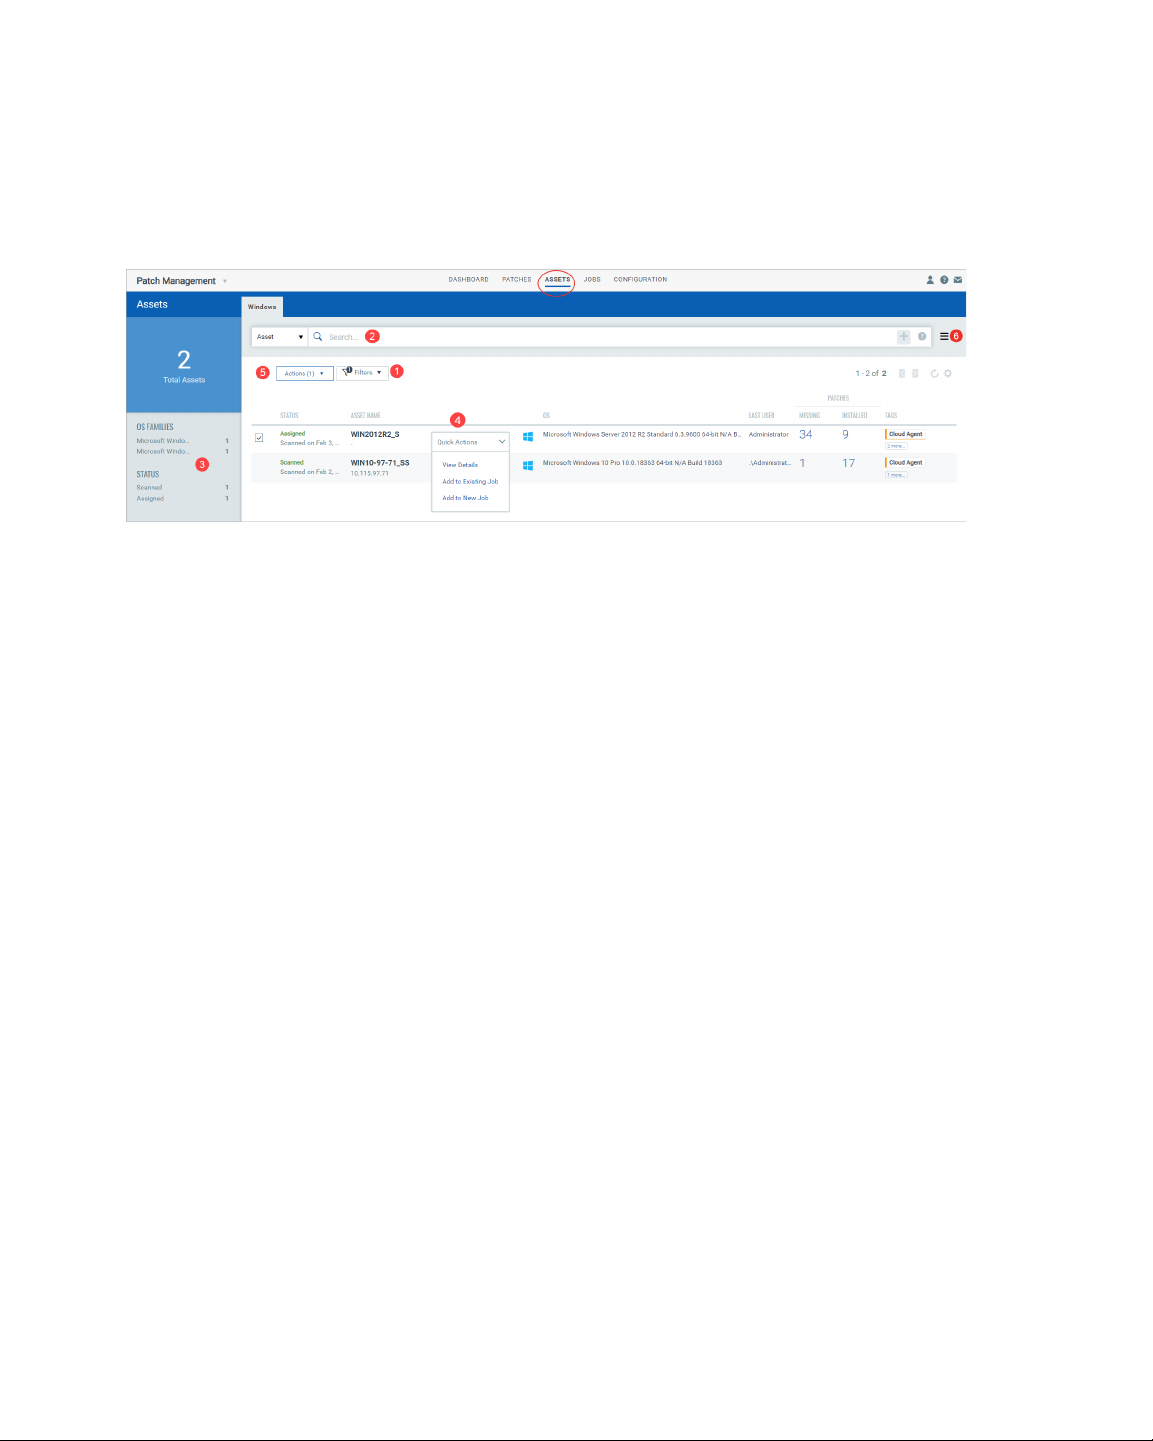
View Your Assets
The Assets tab displays all the assets in your account for which you activated Patch
Management from the Cloud Agent module. We display missing and installed patches for
all the successfully scanned assets, but you can patch only assets that have Patch
Management license. You can use the asset search token "licensed:true" to list licensed
assets.
Note that you will see only those assets in the Asset tab that are in your asset tag scope.
Go to the Administration utility and view what asset tags are added to your user. Only the
assets that have these asset tags are shown to you in the Asset tab. See "How are tags used
to grant access to assets?" section in the User Roles and Permissions.
For each asset, we show the date and time when the asset is scanned, asset name and its
operating system, total number of missing and installed patches, who logged into the
asset, and assets tags applied to the assets.
From the Assets tab, you can:
1) filter assets by patch status: Missing, Installed and only Latest Missing Patches. Missing
when selected displays the assets that have missing patches. Installed when selected
displays the assets that have installed patches. The third option "Only Latest Missing
Patches" when selected will include in the missing patches count for assets only the most
recent iterations of the patches for OS and applications.
2) enter QQL (Qualys Query Language ) queries in the search box to search for assets. Use
asset and patch tokens in the queries individually or in combination to search for assets.
To use the queries in combination click the plus icon in the search box. The Patch tokens
let you search for assets by patch information such as patch title, ID and so on. For
example, you can search what assets have patches missing with a certain patch ID. If you
have selected a filter (Missing/Installed), then the search will include those assets that
matches the selected filter. If the filter "Missing" is selected, then only the assets with
missing patches will be searched.
3) use the filters to search assets by OS Families and scanning status. When you click a
filter from the list, search box will show the filter query and the Assets page shows only
those assets that meet the filter conditions.
4) select an asset and use the Quick Action menu to view details of assets including
system information, network information, data and findings reported by other Qualys
modules and applications, and add the assets to a new job or an existing job.
8
Page 9
Patch Management Overview
View Your Jobs
5) select one or more assets and use the Bulk Actions menu to add them to an existing job
or a new job.
6) use the Search Actions menu to view the recent searches, save search queries added in
the search box and manage saved searches.
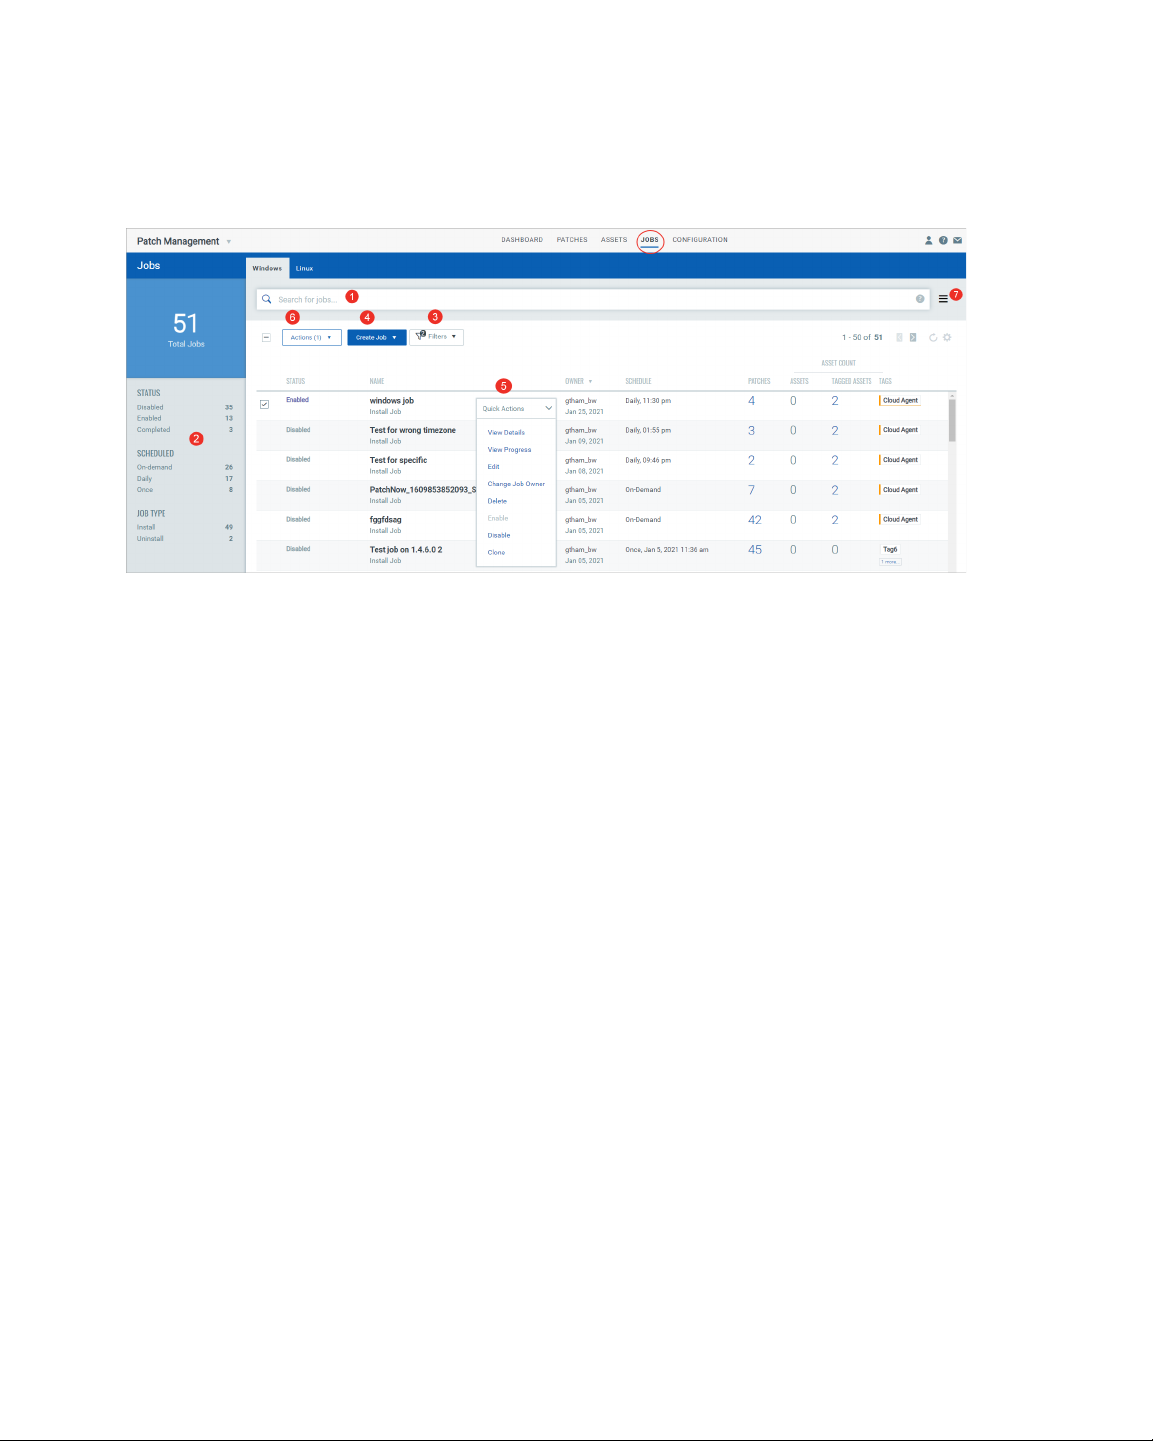
View Your Jobs
The Jobs tab lists the patch jobs. On the Jobs page, we show you the job's status (Enabled,
Disabled and Completed), name, owner, schedule. In addition to these details, we also
show the total number of patches, assets and asset tags added to job. When you click the
total number of patches and assets links, we will show you the list of patches and assets.
Tagged assets show out of the total assets that have the selected asset tags how many are
included in the job. While adding tags, you can used AND and OR operators. Only the
assets that satisfy the condition will be added to the job.
Currently, we show all the jobs that are created in your subscription, but you can view or
edit only those jobs that you have created or you are the Co-Author. The Co-Author of a
job has permission to edit the job if the Co-Author has edit permission.
From the Jobs tab, you can 1) enter QQL (Qualys Query Language ) queries in the search
box to search for jobs, 2) use the filters to search jobs by status (Enabled, Disabled, and
Completed), schedule (On-demand, Daily, Once) and job type (Install, Uninstall), 3) select
filters to view the jobs that you have created or you are the Co-Author, 4) create
deployment or Uninstall jobs, 5) select a job and use the Quick Actions menu to view the
job details and progress, edit the job, change the owner of the job, delete a job, clone a job,
and enable or disable a job, 6) select multiple jobs and use the Bulk Actions menu to
change the ownership of jobs, delete and enable jobs. Note that you must be either Owner
9
Page 10
View Your Assessment Profiles and Licenses Information
Patch Management Overview
or Co-Author of the job to perform the actions available from Quick Actions and Actions
menu, and 7) use the Search Actions menu to view the recent searches, save search
queries added in the search box and manage saved searches.
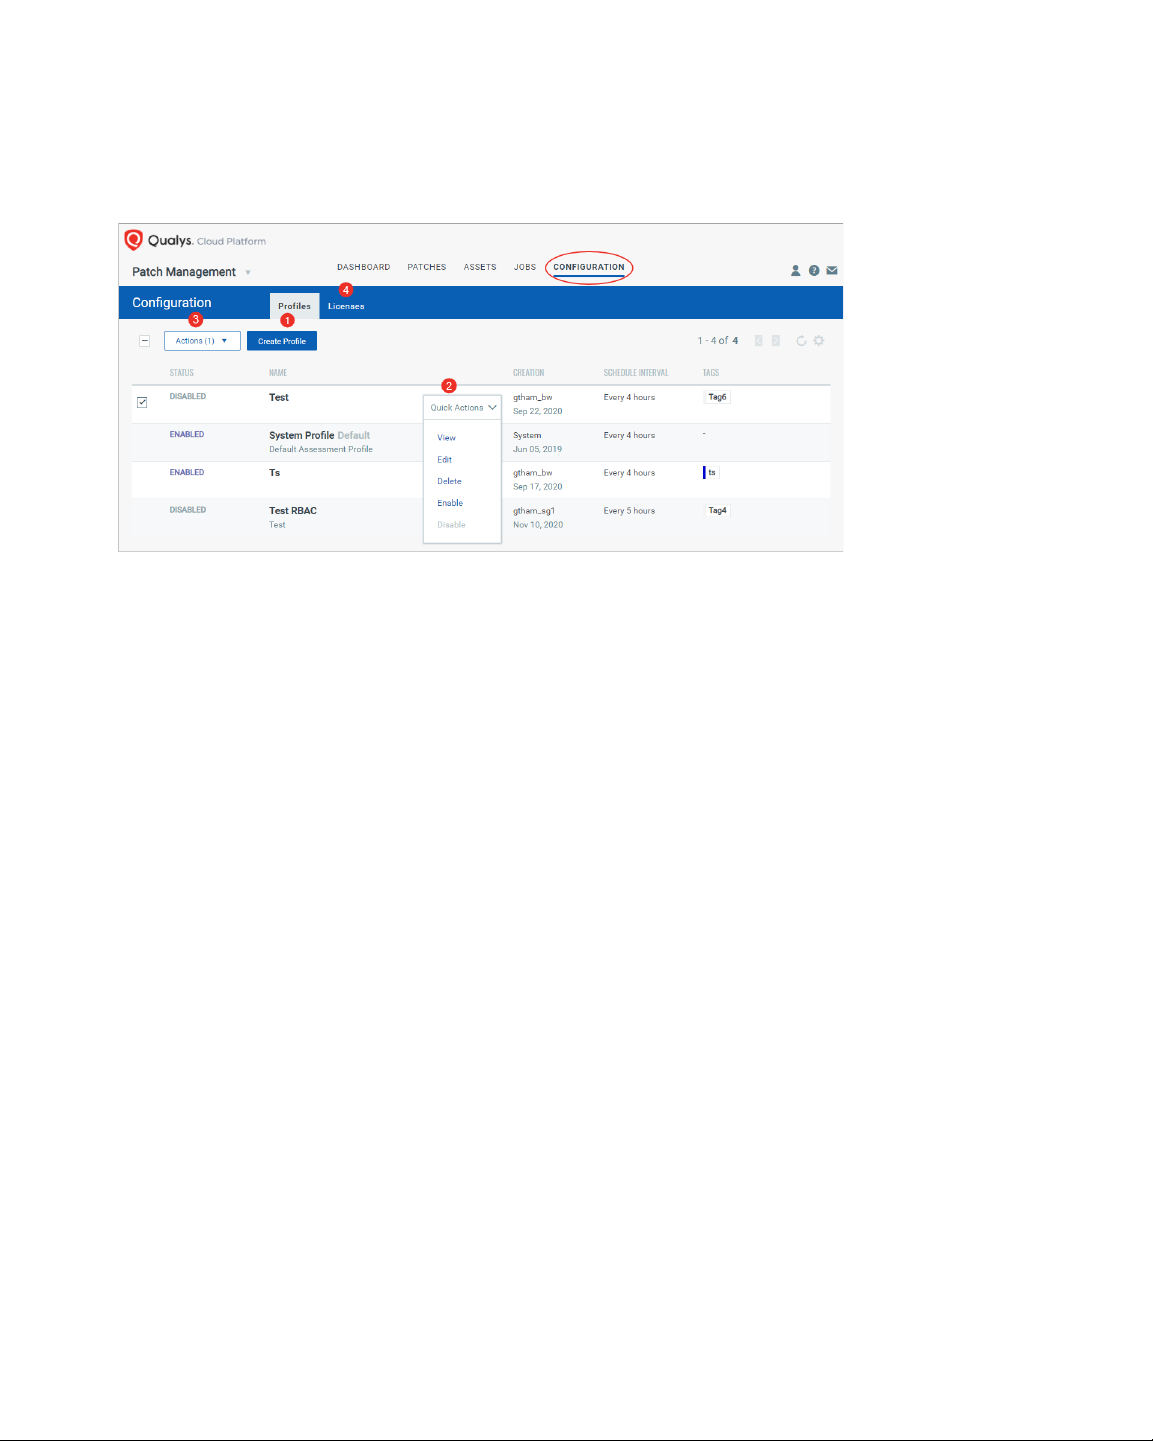
View Your Assessment Profiles and Licenses Information
The Configuration tab has two tabs: Profiles and License tab. The Profiles tab lists the
default assessment and custom assessment profiles and the Licenses tab show licenses
information. The Profiles tab displays a default assessment profile. Cloud Agents scan for
patches (missing and installed) at a specific interval using the configuration defined in the
default Assessment Profile. When no custom assessment profile is defined, then the
default assessment profile is applied to all agents, which scans the assets at an interval of
24 hours for free subscription and 4 hours for trial/paid subscription. The profile tab
Shows the assessment profile's status (enabled/disabled), name, date and time of
creation, schedule (the scan interval). Asset tags show what asset tags are added to the
assessment profiles.
From the profile tab, you can: 1) Create custom assessment profiles, 2) select a assessment
profile and use the Quick Actions menu to view, edit delete, enable and disable profiles.
Delete, Enable and Disable actions are not available for Default assessment profiles, 3)
select more than one assessment profiles and use the Actions menu to delete enable and
10
Page 11
View Your Assessment Profiles and Licenses Information
Patch Management Overview
disable assessment profiles, and 4) click the Licenses tab to manage PM licenses for your
assets . The Licenses tab, enabled only for paid subscribers, shows the number of licenses
consumed by Patch Management (PM).
11
Page 12
Install Cloud Agents for PM
Agent installations are managed in Cloud Agent (CA).
Let's get started!
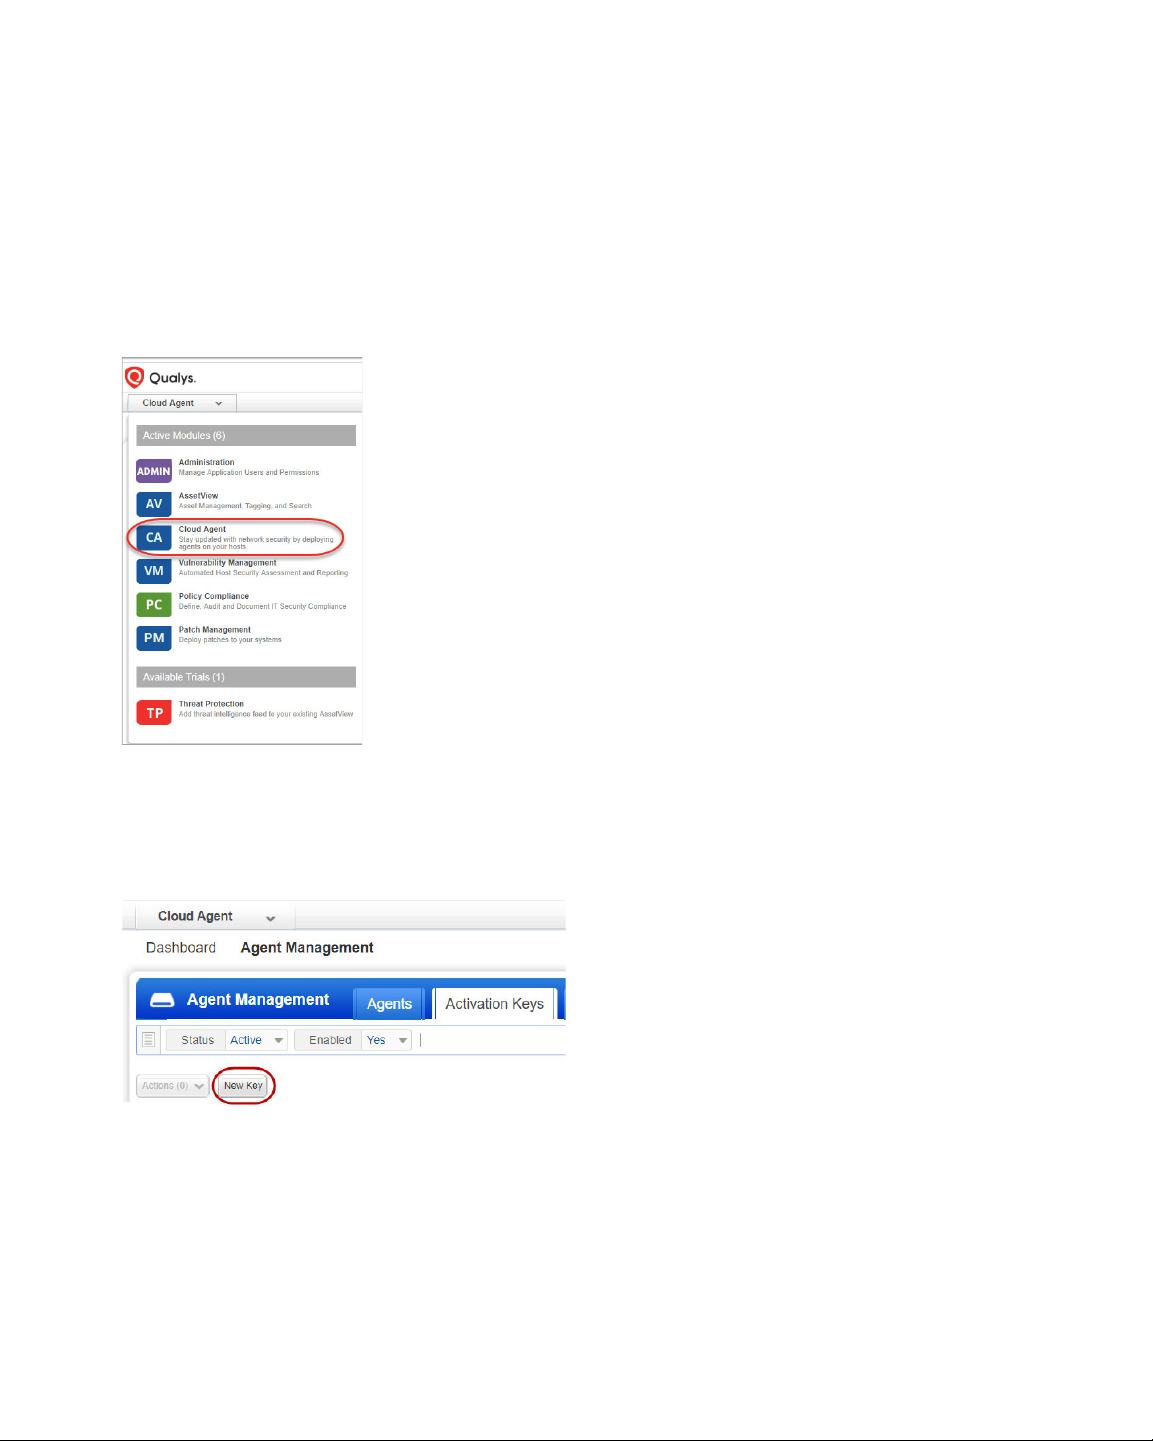
Choose CA (Cloud Agent) from the app picker.
As a first time user, you’ll land directly into the Getting Started page.
Install Cloud Agents for PM
What are the steps?
What are the steps?
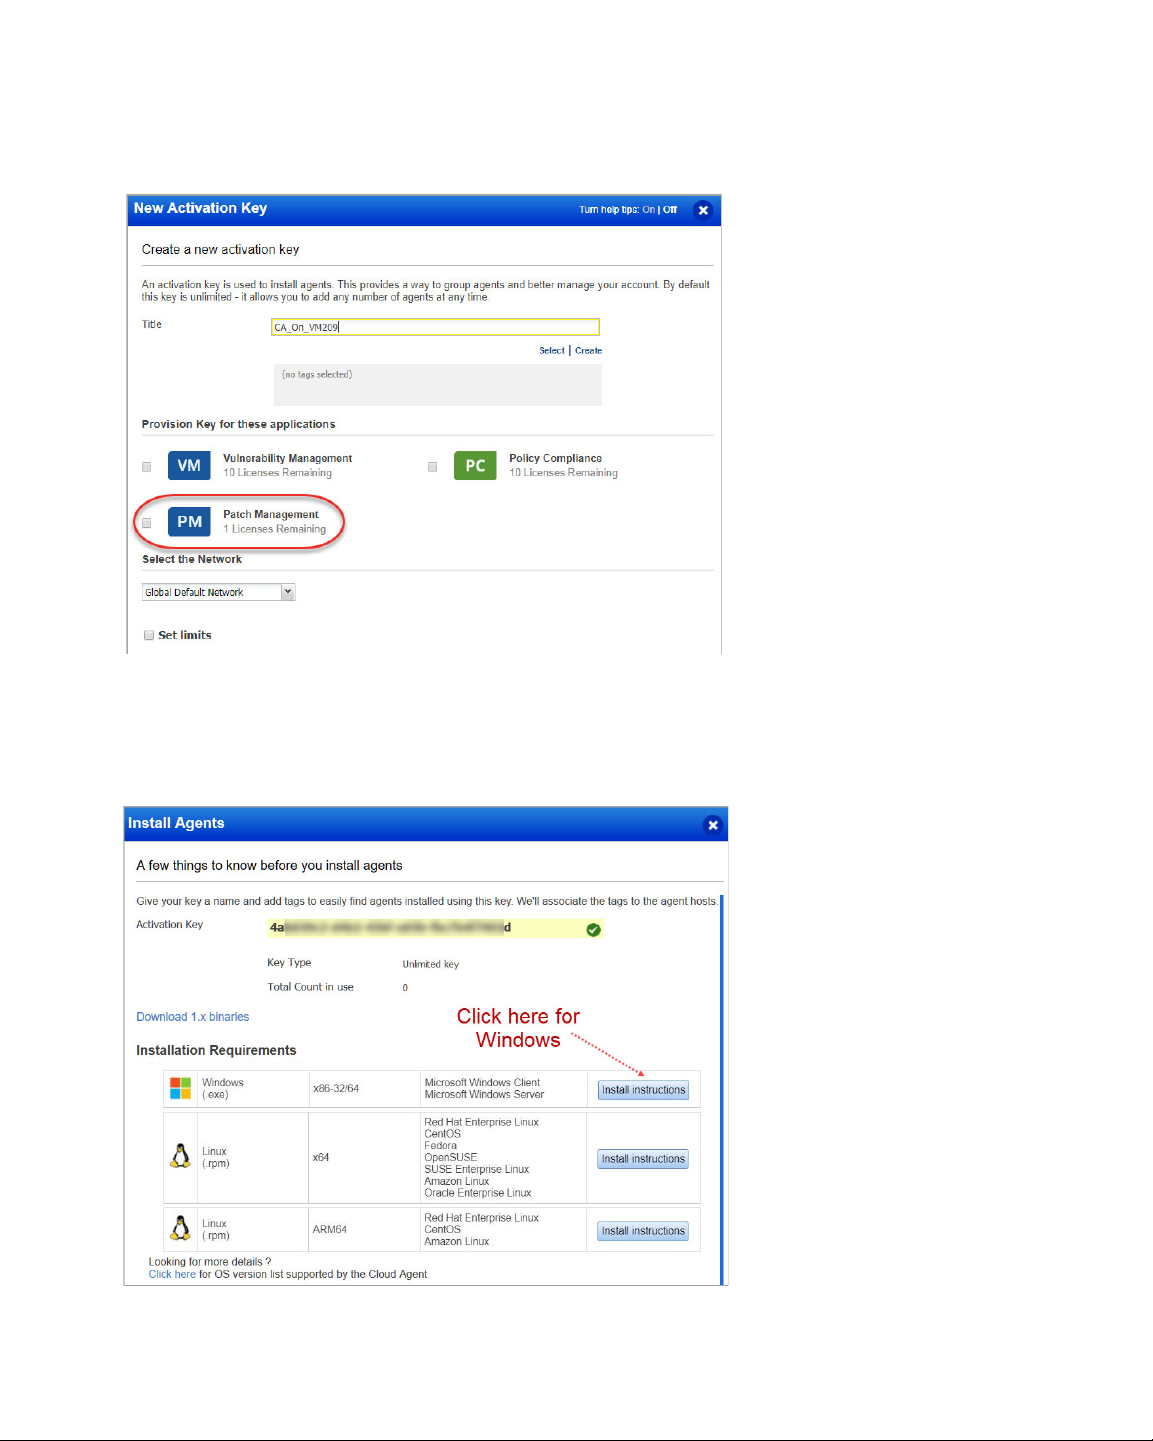
Create an activation key. Go to Activation Keys, click the New Key button. Give it a title,
provision for the PM application and click Generate.
12
Page 13
Install Cloud Agents for PM
Download Installer
As you can see you can provision the same key for any of the other applications in your
account.
Download Installer
Click Install instructions next to Windows (.exe). Patch Management only supports
installing patches on Windows at present.
13
Page 14
Install Cloud Agents for PM
Download Installer
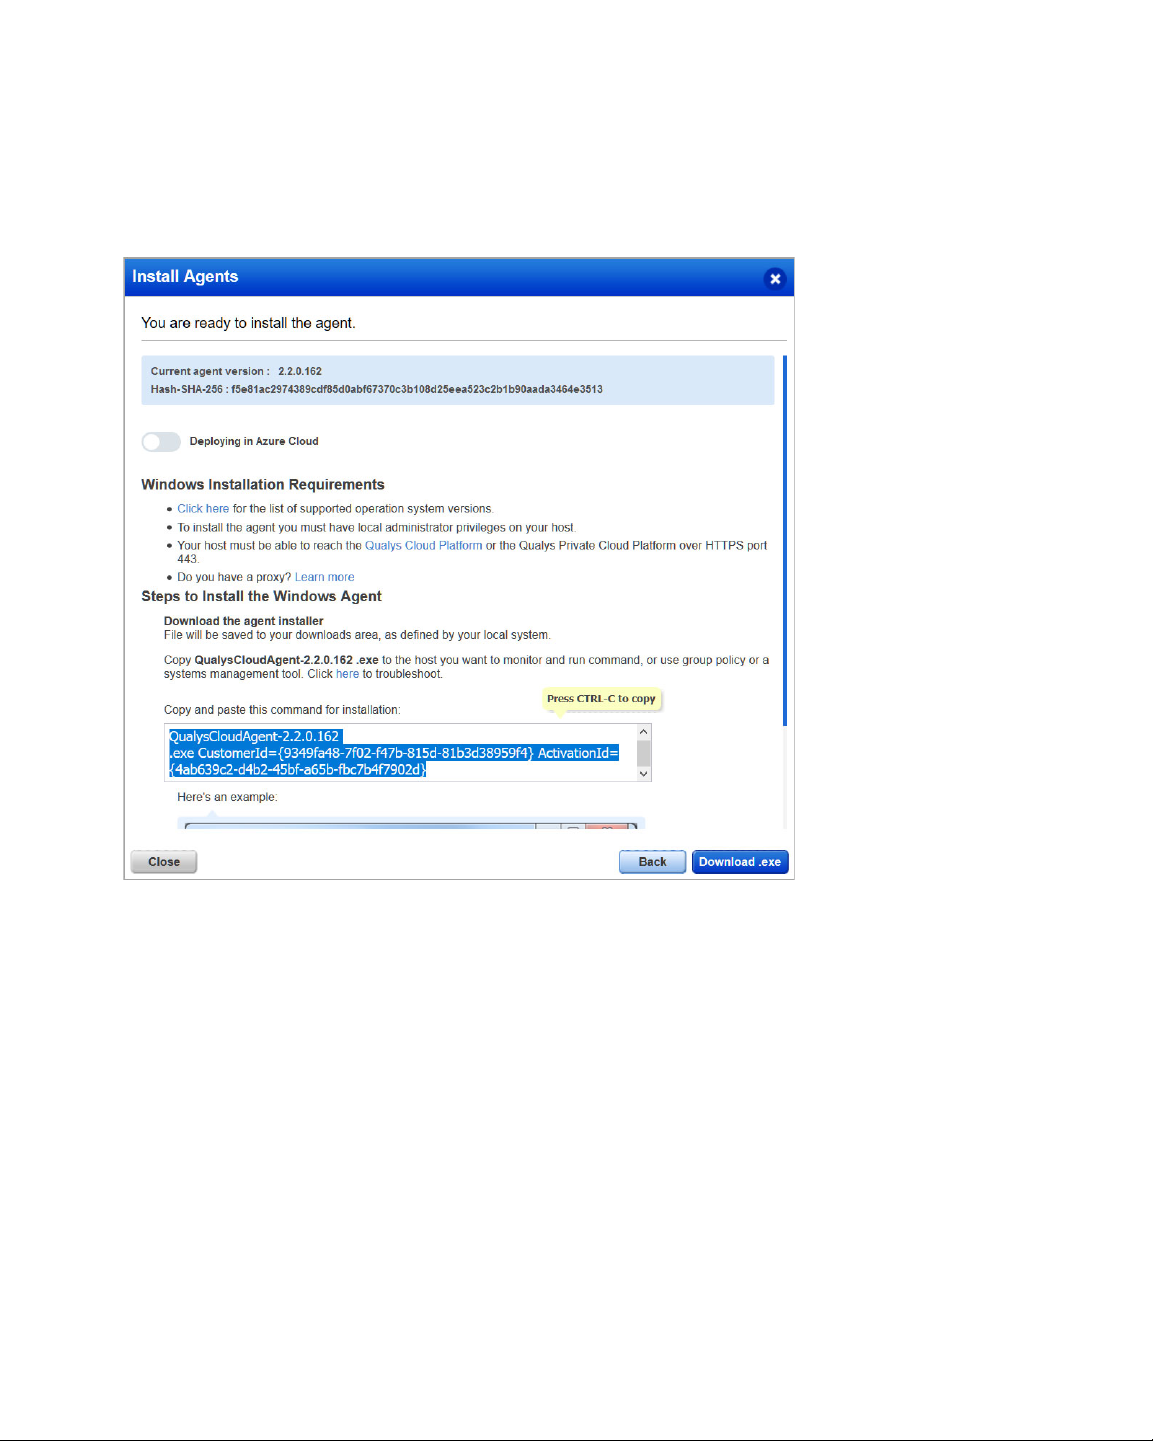
Review the installation requirements and click Download.
You'll run the installer on each system from an elevated command prompt, or use a
systems management tool or Windows group policy. Your agents should start connecting
to our cloud platform.
Your host must be able to reach your Qualys Cloud Platform (or the Qualys Private Cloud
Platform) over HTTPS port 443. On the Qualys Cloud Platform, go to Help > About to see
the URL your host needs to access. For more information about connectivity
requirements/proxy settings refer to the platform specific Cloud Agent Installation Guides
available on https://www.qualys.com/documentation/.
Click here for a list of URLs that you must whitelist for the Cloud Agent to successfully
download patches on your host.
14
Page 15
Activate your agents for PM
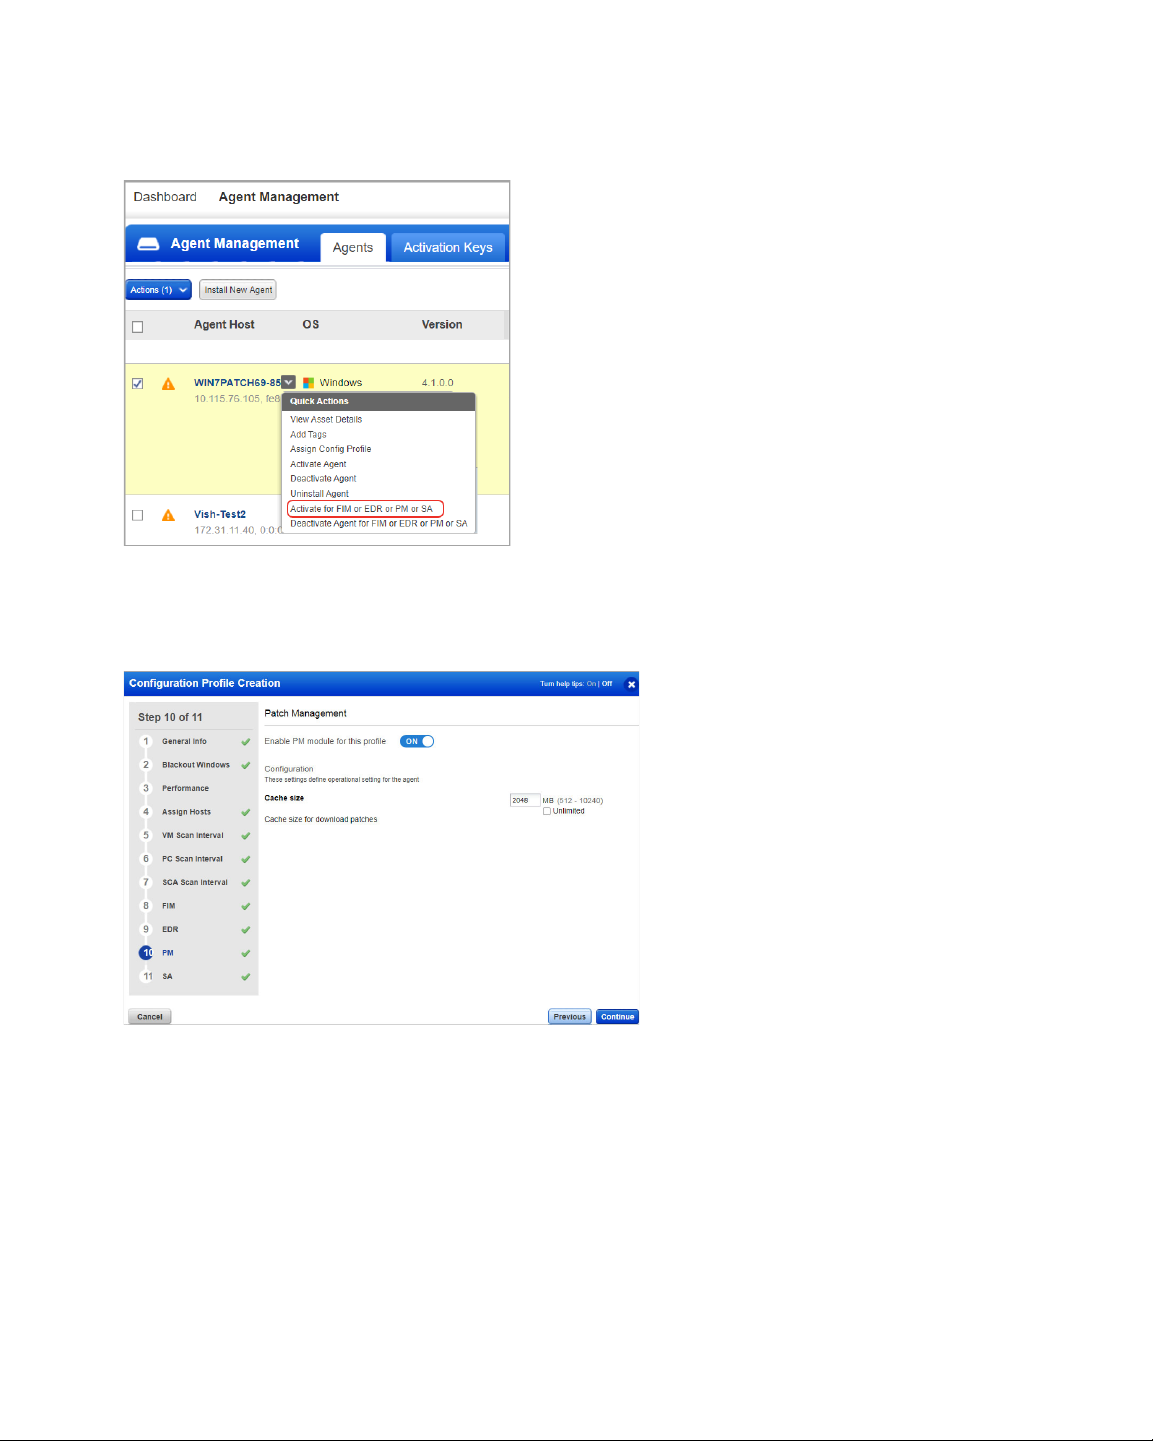
Go to the Agents tab, and from the
Quick Actions menu of an agent,
click "Activate for FIM or EDR or
PM or SA". (Bulk activation is
supported using the Actions
menu).
Enable PM in a CA configuration profile
Install Cloud Agents for PM
Activate your agents for PM
You can create a new profile or edit an existing one. The PM module is enabled by default.
The Cache size setting determines how much space the agent should allocate to store
downloaded patches on the asset. By default, 2048 MB are allocated. If you are planning
on using the opportunistic download, where an agent downloads patches before
deployment, it is recommended to increase the cache size, or to allow for Unlimited Cache
size. Note that the agent will clear the cached files after deployment.
You're ready!
Select PM from the application picker and then create a deployment job to start installing
patches on your assets.
15
Page 16

User Roles and Permissions
User Roles and Permissions
Role Based Access Control gives you flexibility to control access to Patch Management
features based on the roles of the individual users.
Each user is assigned a pre-defined user role which determines what actions the user can
take.
We have 5 OOTB (Out-of-the-box) roles for PM users. Each role, except Patch Security, is an
incremental role to the previous one.
1) Patch Reader: This is the default role designed to most (sub-)users, present in the
system today, with minimum permissions possible. This role is granted to allow users
viewing/ read-only capabilities in the Dashboards developed to provide an insight into the
Patching operations. This role has only view permissions on assigned jobs, assessment
profiles, and dashboards.
2) Patch Dashboard Author: This is a special role that would be needed only for larger
organizations that delegate development of dashboards to a dedicated team especially,
one that does NOT operate/ manage the patching jobs. This role includes all the Patch
Reader permissions.
3) Patch User: This role is designed for the operators of the Patching job, who interact and
manage patching activities on a regular basis. In most cases, these users will also build
dashboards for reporting information to their respective department/ team. This role
includes all the Patch Dashboard Author permissions.
4) Patch Security: This role is mutually exclusive to all the earlier set of roles. It is meant
for the Security Expert in organizations where IT operations and Security operations
(SecOps) are owned by distinct team. These users have very limited capabilities that allow
them to pass on a list of selective patches to the IT operations team to operationalize their
patching on the endpoints across the organization. All the job advisories created by Patch
Security user are “Partially Configured Job” and only after assigning these jobs to a Patch
User/ Patch Manager, the owners can choose the right tags/ assets, schedule and other
options. Only the Patch Manager role has “Change Owner” permission enabling it to take/
assign ownership of a “Partially Configured Job” to other users, with Patch Manager or
Patch User roles. These users can neither own nor edit/co-edit any job.
5) Patch Manager: A Patch Manager has all the permissions except create job advisory
permission.
Note: For Patch Management, we refer to the Global Dashboard Permissions to determine
what operations the user can perform on Unified Dashboard. The Global Dashboard
Permissions will only allow the Patch Manager, Patch User, and Patch Dashboard Author to
create, edit and delete their own dashboards. For permissions to edit, delete other users'
dashboard and print/download dashboard, contact SuperUser or Administrator.
Our earlier RBAC model, was more restrictive enforcing a clear compartmentalization of
users from each other and basic roles only. With the new RBAC model, we have added
more roles, depicting the real-life hierarchies and responsibilities. With the upgrade of the
16
Page 17
User Roles and Permissions
RBAC model, all existing sub-users will take the Patch User role and all the existing superusers will have all the permission defined in RBAC. All other roles will need to be explicitly
managed by the superuser.
Also note, that these roles are exclusive to the Patch Management module only. The roles
defined in other modules have NO correlation with that defined in Patch Management.
Note: We recommend users to NOT create custom roles for the Patch Management users
by assigning or unassigning permissions available through the default roles. Such
customization of roles or change of permissions may lead to user roles not working as per
the design.
Job Sharing with other users
A job can be shared with other users by making them co-authors of the job, allowing them
to edit/operate the job equivalent to the creator, provided they have the same (or higher)
role and same (or larger) asset scope assigned to them for administration.
See Jobs to Deploy Patches on Assets/Uninstall Patches from Assets. From Assets to assign
co-authors to a job.
Note that co-authors of a job do not have permission to add/remove assets to/from the job
but they can add/remove asset tags to/from the job. Though co-authors of a job can add
an asset tag to the job, only the assets that are in the owner's asset scope will be picked up
when the job is run. Remember that execution of a job is restricted by the tag scope of the
job owner.
Partially Configured Job
Patching Job has 3 critical components:
a) Patch(es): One or more patches to be applied as a part of the job.
b) Asset(s)/ Tags: One or more assets on which the patches are to be applied. A logical
collection of assets is referred to as Tags.
17
Page 18
How to find PM Roles and view their permissions
User Roles and Permissions
c) Schedule: The Patching job needs to be executed at a scheduled date and time. In case
of a recurring Patching job, each job run is scheduled for a selected time, at a frequency
across selected dates/ days of a month.
All these 3 components are important for the completeness of a job. If any of them is
pending in a job definition, we have a Partially Configured Job.
The “Patch Security” role is restricted to defining only the first component i.e. patch list of
a job. This ensures that the security advisors leave the operational aspects at the
discretion of the Patch Users. Other users who are permitted to create/edit a job can also
create Partially Configured Jobs. A job can be executed only when it is Fully Configured.
Apart from the above 3 mandatory components, a Fully Configured Job could also have
some other options.
How to find PM Roles and view their permissions
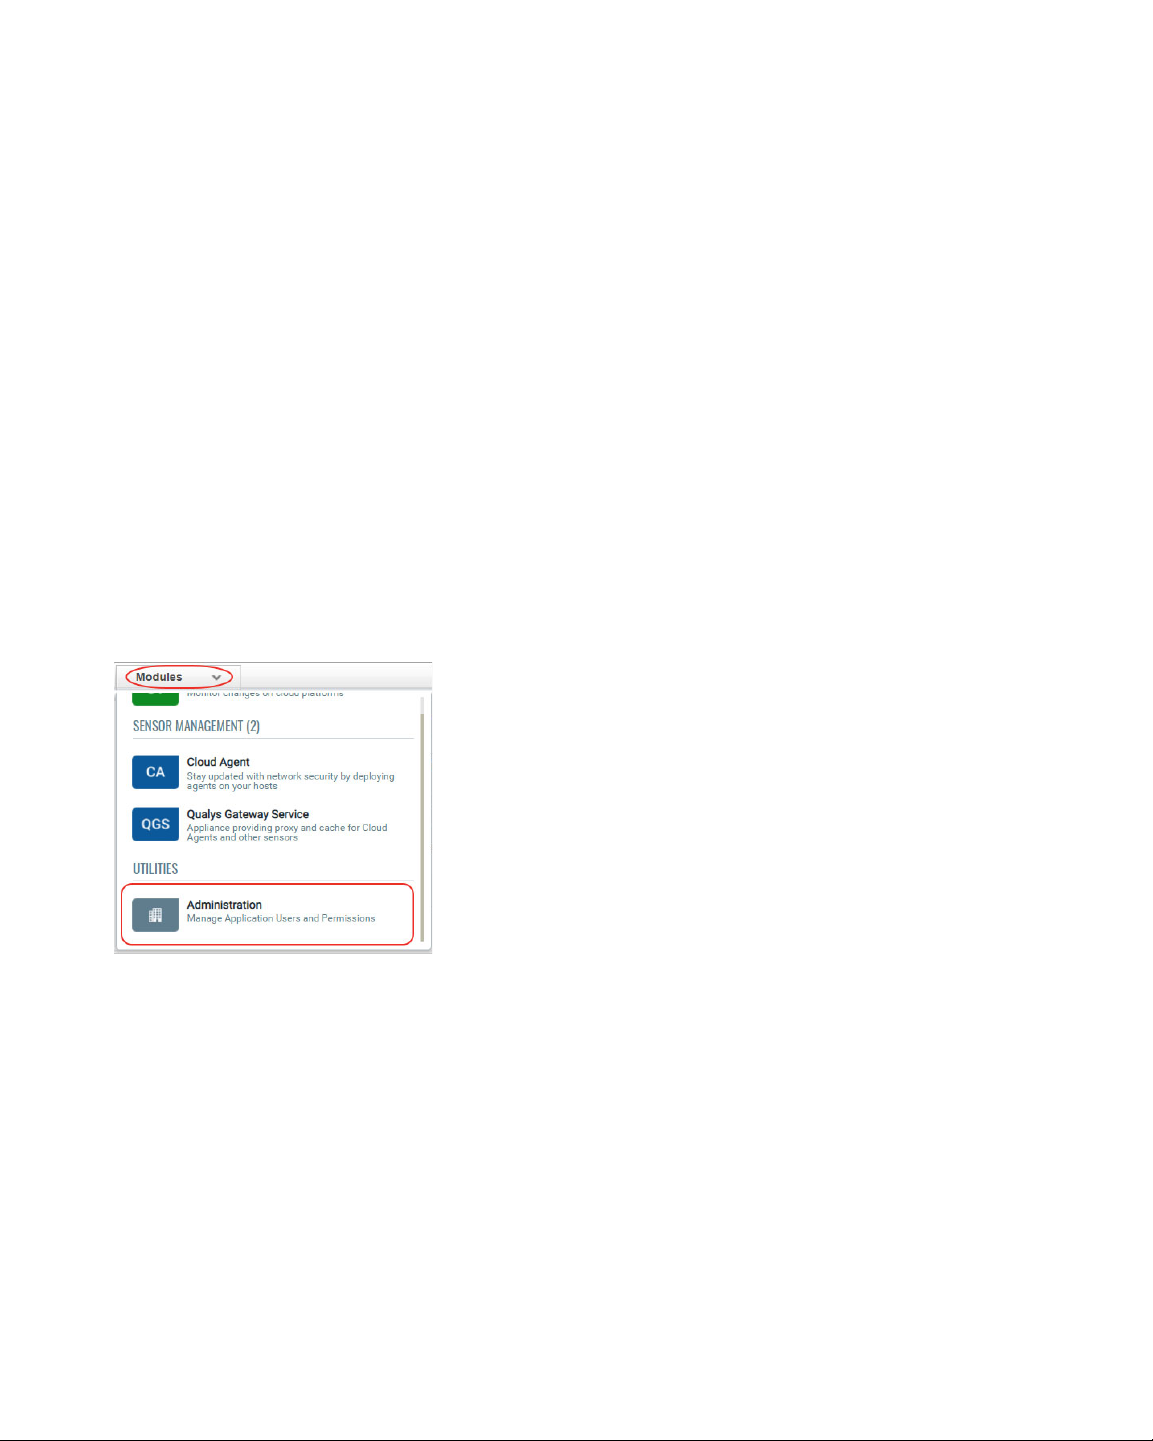
You can assign roles from our Administration utility module. Within the Administration
utility, you'll find roles and their related permissions in the Role Management section. See
Qualys Administration utility Online Help.
1) From the application module picker, click Administration.
18
Page 19
How to find PM Roles and view their permissions
User Roles and Permissions
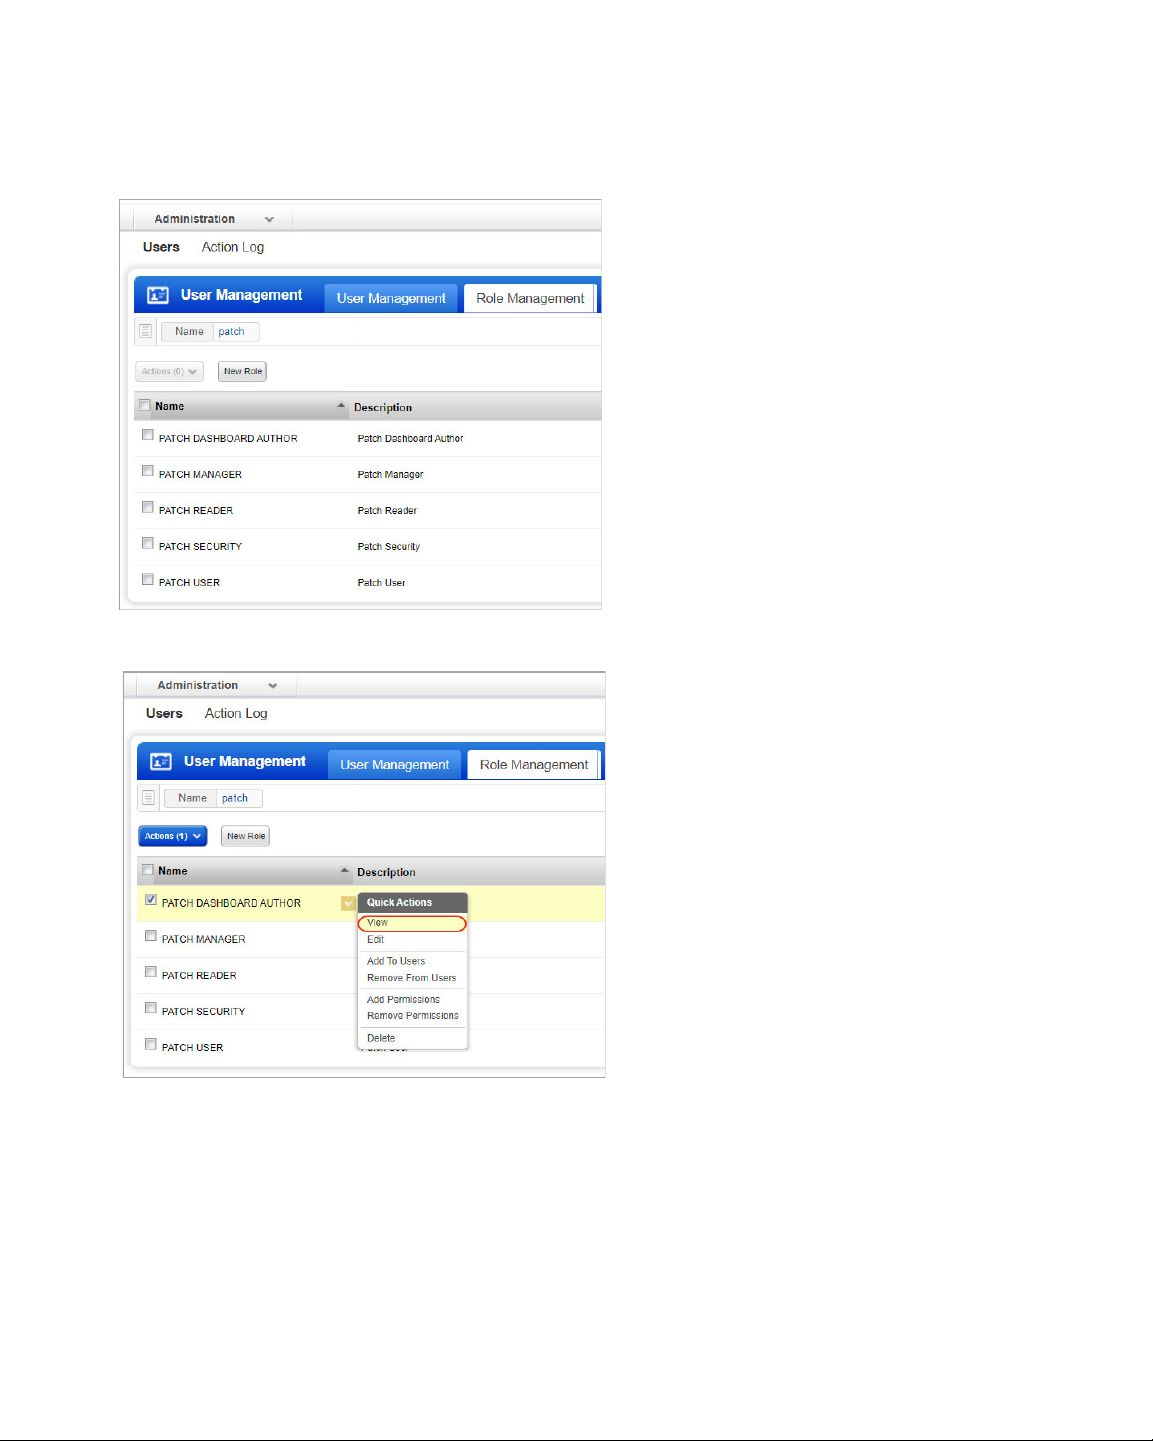
2) Go to the Role Management tab and enter "patch" in the search box to view all the
patch management roles.
3) Select a role from the list and from the Quick Actions menu, click View.
19
Page 20
How are tags used to grant access to assets?
User Roles and Permissions
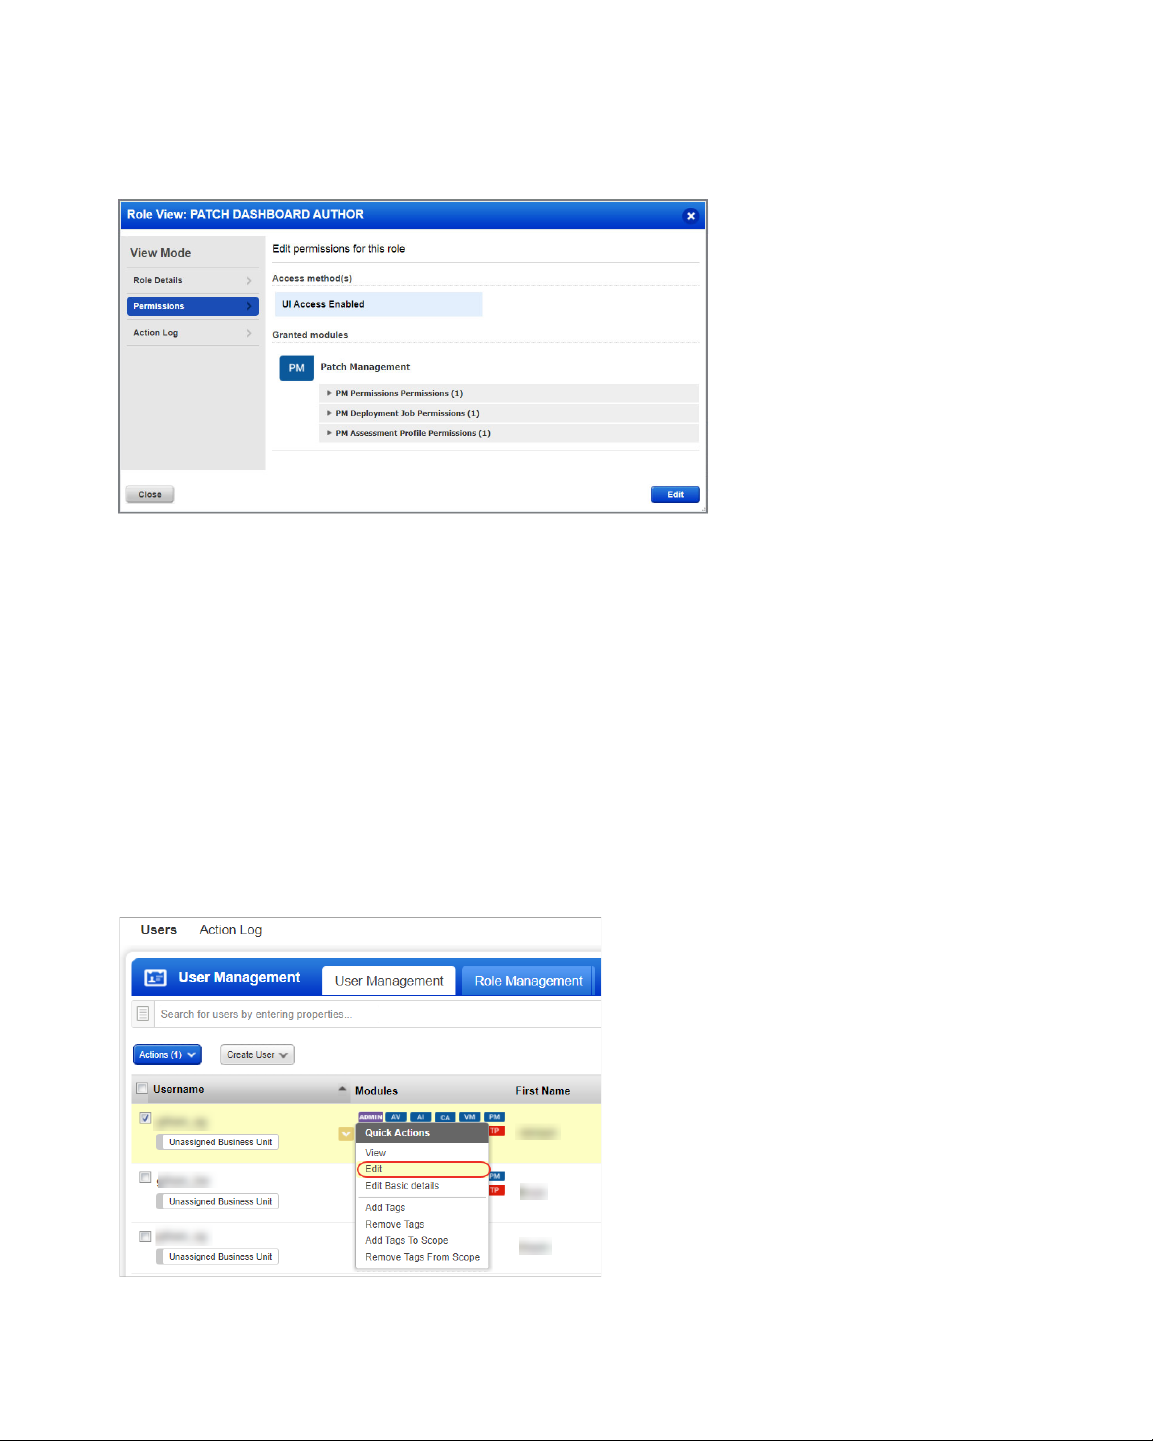
4) On the Roles View screen, go to the Permissions tab to view the permission for the
selected role.
How are tags used to grant access to assets?
An asset tag is a tag assigned to one or more assets. Tag scopes define what assets the user
can view when creating a job or when user go to Assets tab in patch management.
Assigning a tag to an asset enables you to grant users access to that asset by assigning the
same tag to the users scope. Want to define tags? It's easy - just go to the Asset
Management (AM) application.
To assign asset tags to the user,
1) Go to the Administration module and then from the User Management tab search a or
select the user.
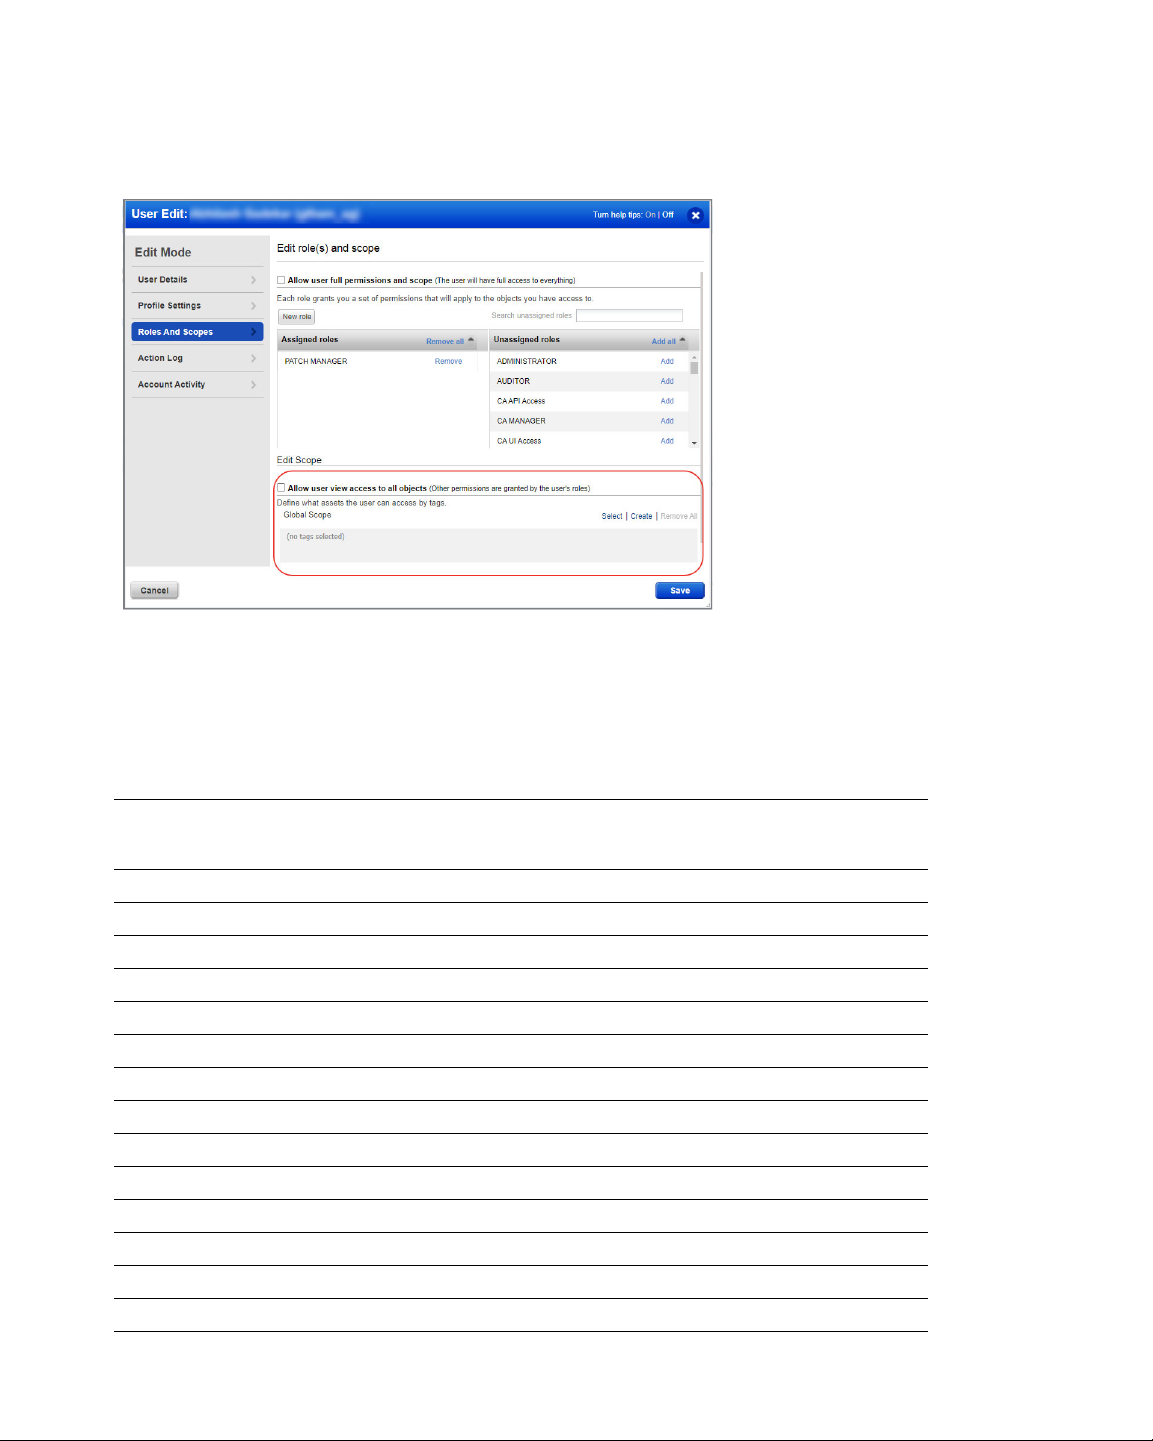
2) From the Quick Actions menu, click Edit.
3) On the User Edit screen, go to the Roles and Scopes tab.
20
Page 21
User Roles and Permissions
User Roles Comparison
4) In the Edit Scope section, select one or more asset tags that you want to assign to the
user. Then click Save.
User Roles Comparison
The following table provides a comparison of privileges granted to user roles for Patch
Management.Note that Assigned Jobs of a user are the jobs that the user has created or
permission to edit as a co-author.
Privileges Patch
Manage License Permissions
Manage License Y
Assessment Profile Permissions
Create Profile Y
Edit Profile Y
Delete Profile Y
View Profile Y Y Y Y Y
Deployment Job Permissions
Change Job Owner(ship) Y
View Any Job Y
Edit Any Job Y
Enable/disable any Job Y
Delete Any Job Y
Create job Y Y
Manager
Patch
User
Patch
Dashboard
Author
Patch
Reader
Patch
Security
21
Page 22

User Roles and Permissions
User Roles Comparison
Edit Assigned Job Y Y
Enable/disable Assigned Job only Y Y
Add Remove Patches To Job only Y Y
Delete Assigned Job Y Y
View Assigned Job Y Y Y Y Y
Global Dashboard Permissions
Create, Edit, Delete your own
YY Y
dashboards
Edit Dashboard
Delete Dashboard
Print/Download Dashboard
Advisory Permissions
Create Job Advisory Y
22
Page 23

Create Assessment Profiles
Create Assessment Profiles
You can create custom assessment profiles. This is an optional step.
By default your cloud agents scan for patches (missing and installed) at a specific interval,
as defined in the default Assessment Profile.
What is the default assessment profile?
At first, a default assessment profile is applied to all agents, which scans the assets at an
interval of 24 hours for free subscription and 4 hours for trial/paid subscription.
Add a custom assessment profile if you want to override the default interval
Simply go to Configuration > Create Profile, provide a profile name, select asset tags to
apply this custom profile to, and then select the scan interval (minimum 24 hours for free
subscription and 4 hours for trial/paid subscription). Multiple assessment profiles can be
created with different intervals.
Note: Only admin users can create/modify/delete the assessment profiles. Non-admin
users can only view assessment profiles. Admin users are those which have either "Allow
user full permissions and scope" or "Allow user view access to all objects" permission set
in their user profile in the Qualys Administration app.
Scan interval of less than 24 hours will be automatically changed to an interval of 24
hours, when a Paid or Trial subscription expires and the app gets converted into a free
version.
Good to Know - Asset tags once applied to one custom profile, cannot be applied to
another custom profile. When you select an asset tag, corresponding child tags get
automatically selected.
23
Page 24

Review Missing and Installed Patches
Review Missing and Installed Patches
The patch list under Patch Management patch catalog are the ones missing on the host
which were detected using the Patch Management scan. On the Patches tab, we list two
types of patches 1) Qualys Patchable and 2) AcquireFromVendor.
Qualys Patchable
Qualys Patchable are the patches that can be installed using Patch Management. Most of
the patches listed on the Patches tab are Qualys Patchable.
AcquireFromVendor
We have certain patches which are listed under Patches tab but cannot be installed using
Patch Management. These patch are marked as "AcquireFromVendor" which means you
need to manually download the patch from vendor website and install them on the host.
See Download Patch from the Vendor Site.
Patches which are not marked as "AcquireFromVendor" are defined as "Qualys Patchable"
which mean they can be added to a patch job.
Default or custom assessment profile scans the assets for missing and installed patches at
regular intervals. This information is then displayed in the patches tab in the form of
missing or installed patches.
Note that patches are linked to QIDs using CVE IDs. The QID for a patch is not shown if the
QID is not linked to a CVE ID. CVE ID is the common point of linking and required to link
the patch with the QID.
24
Page 25

Review Missing and Installed Patches
Alternatively, you can go to the Assets tab to view missing and installed patches on
particular assets.
Refer to the online help for information on using search tokens.
25
Page 26

Review Missing and Installed Patches
Download Patch from the Vendor Site
Download Patch from the Vendor Site
The Patches tab show a key icon for patches that can not be downloaded via the Qualys
Cloud Security Agent. This "key" shaped icon indicates that the patch must be acquired
from the vendor.
If you try to add such a patch to a patch job, then the system will show a message
informing you that these patches will be not be added to said job as they are no longer
supported for download via the Cloud Agent.
For such patches, the patch details page displays the Download Method as
"AcquireFromVendor" and known patch URL in the Patch Information section. Use the URL
to download the patch.
Download Methods for patch are:
- Automatic - Patch downloadable usingthe Cloud Agent (Qualys Patchable: Yes)
- AcquireFromVendor - Patch must be acquired from the vendor and installed manually
(Qualys Patchable: No)
- Unavailable - Patch download information is not available (Qualys Patchable: No)
26
Page 27

Review Missing and Installed Patches
Download Patch from the Vendor Site
27
Page 28

Jobs to Deploy Patches on Assets
Jobs to Deploy Patches on Assets
You can create a deployment job to install missing patches on assets. You have three
options to create the deployment job 1) from the Jobs tab, 2) from the Assets tab, and 3)
from the Patches tab.
The difference between the two options is when you create a job from the Jobs tab, you
select the assets while creating the job, where as when creating job from Assets tab, you
select the assets first and then create deployment job to deploy patches on those assets.
The assets are pre-populated for the job when creating deployment job from the Assets
tab.
Simply go to Jobs > Create Job, and click Deployment Job.
Optionally, you can go to the Assets tab, select the assets on which you want to apply the
patches and then go to Actions > Add to New Job.
28
Page 29

Jobs to Deploy Patches on Assets
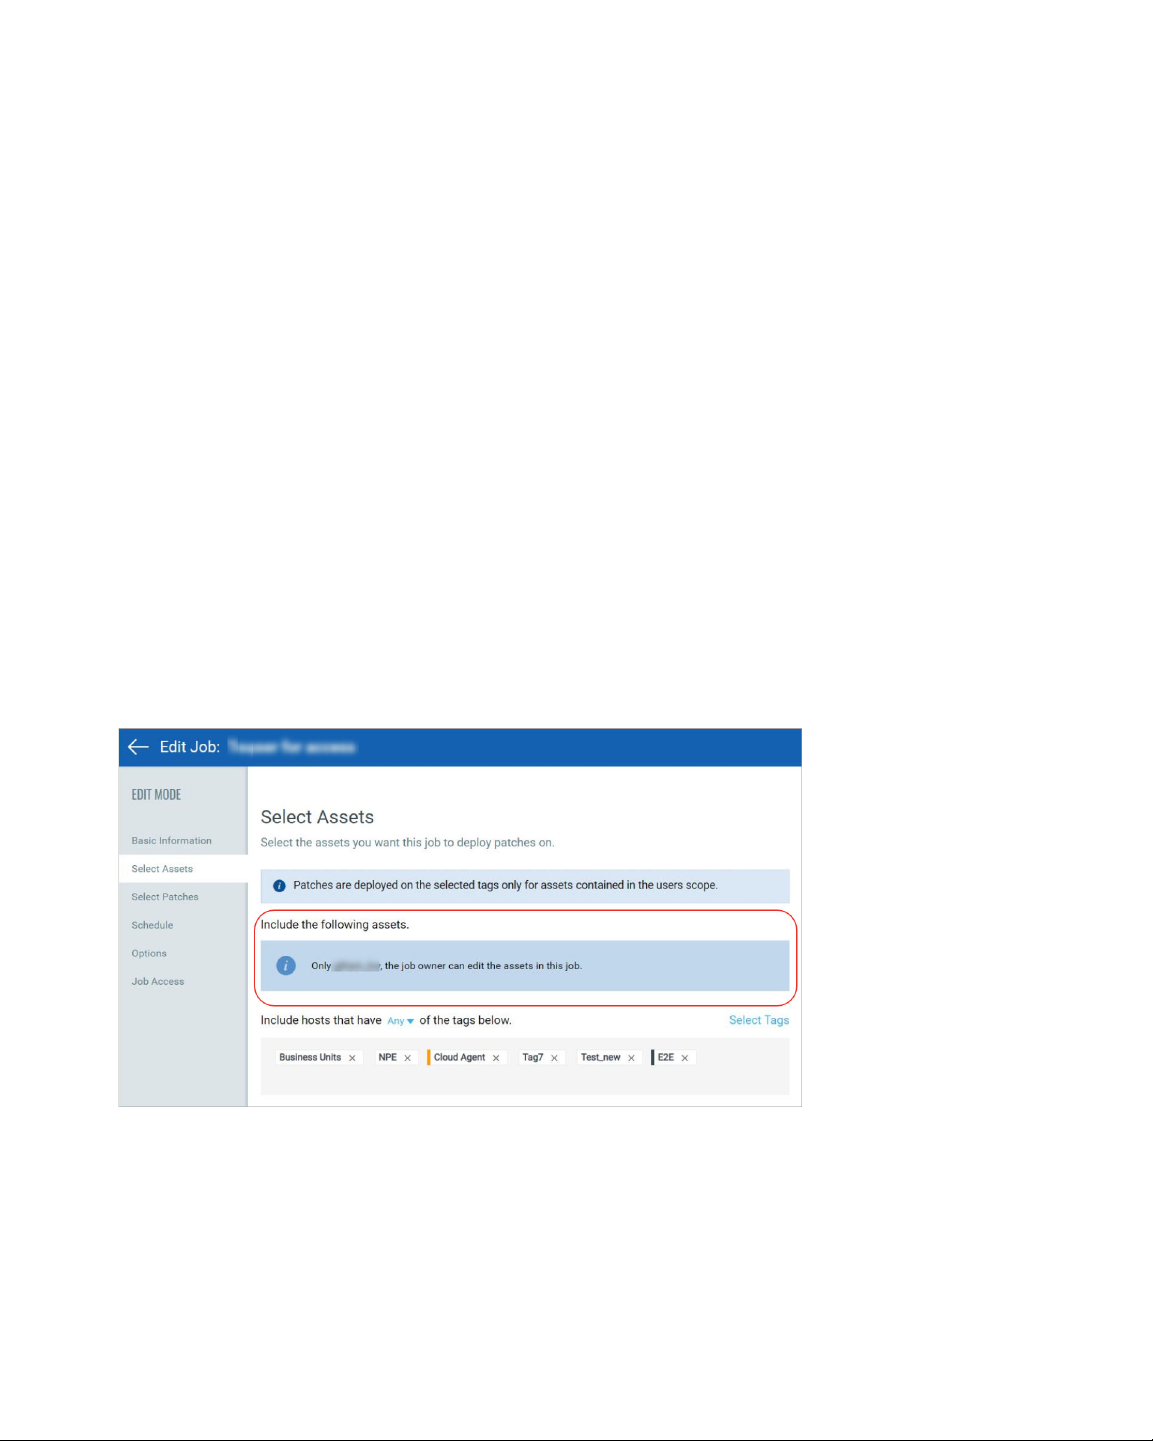
Provide a job title, and then select assets or asset tags to apply the patches to.
Want to add assets later? Go to the Assets tab, and select one or more assets, then from
the Quick Actions Menu of a single asset or from the Actions menu (bulk actions) click
Add to Existing Job or click Add to New Job. You cannot add assets later to On-Demand
or run-once (non recurring) jobs once they are enabled.
Note: Patches are deployed on the selected tags only for assets contained in the user's
scope. When you select an asset tag, corresponding child tags get automatically selected.
Select "Any" to include assets that have any of the selected tags. Select “All” to include
only those assets in the patch deployment job that have ALL the selected tags.
Select “Add Exclusion Asset Tags” to exclude the assets from the deployment job that have
All/ANY of the selected asset tags.
Select patches to apply to the assets. Use the patch selector link to select patches. On the
Patch Selector page you can use the Within Scope option to view patches within the scope
of the selected assets or view all available patches. Select the desired patches and click
Add to Job and then click Close. On the Select Patches pane of the deployment job wizard,
click Available Patches if you want to add more patches to the job.
29
Page 30

Jobs to Deploy Patches on Assets
You can use the Qualys Query Language (QQL) to create a criteria to automate the patches
that are installed for a job. The query can be used for run-once and recurring jobs. You
cannot use a combination of a QQL and Patch list to select patches that are added to a job.
You must create a job that is executed based on the query or select the patches from the
Patch List.
Want to add patches later? Go to the Patches tab, and select one or more patches, then
from the Quick Actions Menu of a single patch or from the Actions menu (bulk actions)
click Add to Existing Job or click Add to New Job. You cannot add patches later to On-
Demand or run-once (non recurring) jobs once they are enabled.
Note that when you modify a patch job using the Add to Existing Job option from the
Patches tab, you can add patches, but cannot add target assets or asset tags. To apply
patches to an asset that is not added to the job, you can 1) edit an existing job from the
Jobs tab, 2)select the asset from the Assets tab and use the Add to Existing Job option or 3)
create a new patch job for that asset.
Note: You can add maximum 2000 patches to a single job. Create another job to add
patches above 2000.
Choose when to install the patches, whether On-Demand or Schedule. The On-Demand
option allows you to install the patches immediately once the job is created and enabled.
The Schedule option allows you to install the patches at a set time. You can choose to
make a scheduled job recur daily, weekly, or monthly. See Schedule Job Settings.
In case of scheduled jobs, you can enable opportunistic patch download from Options >
Additional Job Settings to allow the Cloud Agent to download the required patches before
a scheduled job run begins. This will help the Cloud Agent to deploy patches in less
amount of time instead of waiting to download the patches only after a job run starts. The
“Enable opportunistic patch download” is recommended to be enabled only for Jobs
Scheduled beyond 3 hours of current time. Jobs scheduled less than 3 hours ahead are
ideal for being an On-Demand job instead.
Note that Jobs are marked "Completed" once the patch window duration set for the job is
elapsed. We show Completed status only for On-Demand and run-once jobs. The
scheduled recurring jobs are never marked Completed.
30
Page 31

Jobs to Deploy Patches on Assets
In case of scheduled jobs, you can enable opportunistic patch download from Options >
Additional Job Settings to allow the Cloud Agent to download the required patches before
a scheduled job run begins. This will help the Cloud Agent to deploy patches in less
amount of time instead of waiting to download the patches only after a job run starts.
Note: Monthly jobs which are scheduled to run on the 31st of the month will be scheduled
every two months (where 31st date is available). Recurring jobs (Daily, Weekly, Monthly)
should be enabled three hours prior to the scheduled time otherwise next eligible
schedule will be considered.
31
Page 32

Jobs to Deploy Patches on Assets
You can configure how to notify the users about the patch deployment. You can configure
pre-deployment messages, deferring the patch deployment certain number of times.
You can also provide progress and completion messages. Finally, you can prompt the user
or choose suppress reboot when asset reboot is required post patch installation. See
Reboot Settings.
These are the reboot options:
Suppress Reboot - This option allows you to patch systems in advance and defer reboot till
the maintenance window.
Reboot Request - Many patches require reboot in order to take effect. When enabled, it
will show a message to users indicating that a reboot is required. If no user is logged in,
the reboot will start immediately after patch deployment.
You can configure this option to give the user the option to either reboot the machine
immediately after the patch is deployed or defer the reboot "x" number of times so that the
user can save the work and complete other tasks. Reboot will defer until 1) the user clicks
OK when reboot message is shown or 2) maximum number of deferments are reached.
Reboot Countdown - Show countdown message to users after deferment limit, if set in the
Reboot Request option, is reached. When reboot countdown is enabled, this gives the end
user an indication of how long it will take before the system is rebooted.
32
Page 33

Jobs to Deploy Patches on Assets
We highly recommend that when you create the job, fill out both the message and
description fields for these options as this has proven to have better performance in the
agent/platform acknowledging the requests. Keep the messages very brief and the
descriptions as detailed as possible.
Finally, choose Co-Authors for this job. Besides the owner, the selected Co-Authors can
edit this job.
Next, review the configuration.
33
Page 34

Jobs to Deploy Patches on Assets
Job can either be created in ENABLED state by using the Save & Enable option or in
DISABLED state by using the Save button.
You must enable the disabled job in order to run it. To enable a disabled job, simply go to
the Jobs tab, then from the Quick Actions menu of a job, click Enable. The Save & Enable
option should be chosen only when you are confident that job is correctly configured,
because this job will begin executing as soon as you “Save” the job. This option is available
only when creating a Job the first time, not during editing the job.
Tip: You can use the Disable option to temporarily disable a scheduled job. You can then
re-enable the job later at your convenience. On-Demand or run-once (non recurring) jobs
cannot be edited or disabled once they are enabled. See Enable/Disable Jobs.
Want to uninstall patches? See Uninstall Patches from Assets.
Note that the Patch Manager super user can change the job status (enable/disable), delete
and edit the job.
34
Page 35

Jobs to Deploy Patches on Assets
Schedule Job Settings
Schedule Job Settings
You can schedule a (deployment and uninstall) job to run immediately (when enabled) or
in the future - once or on a recurring basis. The Patch Management module allows
creation of Run-Once and Recurring jobs. Run-Once jobs are the default type of jobs for
Patching.
Run-Once Jobs
By default 2 types of schedules are available for a Run-Once job.
1) On Demand - The On-Demand option allows you to install the patches immediately
once the job is created and enabled.
2) Scheduled - The Scheduled option allows you to install the patches later at a set time
and are generally used for planned one-time activities. Such jobs will begin executing, as
soon as they are enabled on the server side. However, the patch installation on the assets
will happen only at the scheduled time or later. For Run-Once jobs, patches
installation/upgrade on assets begins only after scheduled time of the job and manifest
reaching the agent. Run-Once jobs have NO end time except if a patching window is
defined. That means the job will be active as long as the patches installation is not
attempted on all the assets added to the patch job.
Note: Run-Once jobs when saved/created in the Enabled state, CANNOT be Disabled,
Edited. They can however be Deleted.
35
Page 36

Jobs to Deploy Patches on Assets
Schedule Job Settings
Recurring jobs
Scheduled recurring jobs can be created by selecting the “Recurring Job" check box next to
the Start Date. The start date and time when the job will repeat can be fine tuned for
subsequent runs. Recurring jobs can be scheduled to run Daily, Weekly or Monthly.
1) Daily - Select this option to schedule the job to run once every day of week, whether a
working day or weekend (since security is a 24x7 business priority).
2) Weekly - Select this option to schedule the job to run one or more day(s) of the week.
3) Monthly - Select this option to schedule the job to run on a specific date or day of a
specific week.
Note: Recurring jobs do not have end-date and it will run perpetually until you disable the
job i.e. revoke its execution. You can Disable a job i.e. Revoke its execution any time.
Similarly, you can Re-Enable a job again as needed. Recurring jobs can be Enabled &
Disabled any number of times.
Time Zone
1) When creating jobs you should be mindful of the time zone. By default, the schedule
time is interpreted as the local time (zone) of the endpoint/asset. This option is best suited
for larger organizations, spread across geographies with time zones of the assets
associated with a job are varying i.e. across multiple time zones. This would effectively
stagger the job execution as per the local time zone of the agent.
If an organization is NOT spread across geographies OR consolidated in one time zone
only, the default Agent time zonewill be as good as the Server time zone schedule. This is
like enforcing a schedule relative to the time zone of the server.
2) The second option is to schedule a job at a specific time zone, irrespective of the agent
and server time zones. With assets spread across multiple time zones and complications
like DST, etc, you can explicitly define a very specific time zone. The specific time zone
option is an offset from GMT which does not change during DST or other adjustments,
allowing you to run the job on all assets at a specific time.
Tip: You should select the time zone and consistently use the same settings across all jobs
to reduce conflicts across multiple jobs.
Patching Window
A Patching Window is generally defined to enforce time-bound execution. Set the patching
window to avoid 1) interference/impact of patching during some important event and 2)
perpetual running of the job resulting in job getting finished in a set duration. Setting a
patch window will restrict the agent to start the job within the specified patch window
(e.g., start time + 6 hrs). The job gets timed out if it does not start within this window. The
default Patching window is perpetual i.e. Patch Window (Duration/End time) is set to
None. Setting no patch window allows the Cloud Agent to take the time it needs to
complete the job.
Note that the job may timeout if the asset is Offline or the Cloud Agent does not have
sufficient time to download the patch after the asset comes Online. We show Completed
status only for Run-Once jobs (On-Demand and non-recurring Scheduled job). An On-
36
Page 37

Jobs to Deploy Patches on Assets
Demand job is marked “Completed” when it is Enabled. A Run-Once job (non-recurring
Scheduled job) is marked Completed after the start time of the job on the asset on the last
time zone. The scheduled recurring jobs are never marked Completed.
The Patch Window can be set between 30 minutes to 168 hours or 10080 minutes, which is
1 week. More than a week is contradictory to the very concept of a Patching window. Any
job failing to start within a week, should be marked as failed and retried later, if needed. If
you think you would like it to be more than 168 hours, we would suggest you turn off the
“Patch Window” option itself, by changing it to “None”.
Note: If Patching window is not defined, the job can run perpetually till it successfully
completes or fails with an explicit error.
Reboot Settings
Reboot Settings
You may have patches in your job that require system to reboot after they are installed or
unistalled. You can configure a job to either suppress a reboot for an indefinite period of
time or defer it by a Y time duration for an X number of times where X and Y is
configurable. You can configure these options in the Options tab in the Create/Edit Job
wizard. The “Reboot messages” section in the Options tab allows you to 1) suppress a
reboot or 2) defer a reboot and show countdown after the deferment limit is reached.
Suppress Reboot
Suppress reboot option allows you to patch systems in advance and defer reboot till the
maintenance window. To enable this option, go to the Create and Edit wizard job, navigate
to the “Options” tab and enable “Suppress Reboot” in the “Reboot messages” section. You
37
Page 38

Jobs to Deploy Patches on Assets
Reboot Settings
can suppress reboot indefinitely, as maybe required for the Server class Windows
machines. Although this option is recommended for Server class assets only, it can be
used for non-server assets too.
Microsoft claims that a system is in a “Volatile” state, after upgrades are carried out and
before the necessary reboots.
Volatile systems may display undesirable and unpredictable behavior or side effects. That
is why we recommend to keep the time interval between patching your assets and
rebooting them as minimum as possible. Exercise personal judgement before activating
this option.
A patch that is marked as “Reboot required” is NOT completely applied till the Reboot
actually happens, after the job is run. A “Suppress Reboot” should be used with caution as
it blocks all subsequent jobs till the reboot happens which allows the job to be marked as
complete. Such a job will also be reported as "Pending Reboot", tillthe manual reboot is
applied.
Note: For patches dependent on other “Reboot required” patches, in some cases are as
good as NOT applied, if the reboot is suppressed.
Reboot Request
Reboot is an option on the level of a job, not per patch. If no user is logged in, the reboot
will start immediately after completing patch deployment. Need for a reboot is
determined on a job level, based on patches in the job. A user can override auto reboot of a
job by manually rebooting the system before the scheduled reboot time. In case of
multiple patches requiring reboot, deployment of all patches needs to be completed/
attempted before the reboot can be applied. Some patches initially indicate “Reboot
required” but may actually NOT require it, based on the context/state of the system. In
such cases, the reboot prompts are suppressed automatically, for being Not Applicable.
Defer Reboot
You can configure the Reboot Request option to defer a reboot for a duration between 1
minute and 1440 minutes/24 hours. You can defer a reboot between 1 – 9 times, for a
period of 1 – 1440 minutes each time.
Ideal reboot configurations recommended are as follows:
- Defer reboot by 1 – 15 minutes for 1 – 5 times for Urgent rollout of Critical Patches.
- Defer reboot by 1 hour for 9 – 12 times. Allows you to defer for maximum of 1 working
day. 1 hour interval allows a more granular control but too frequent interruption to user.
2- 4 hours deferments 3 – 6 times can also help achieve the same. Best choice depends on
the organizational context.
- Defer reboot by 8 hours for 3 times. Allows you to defer reboot for maximum of 1 working
day at 8 hours interval.
- Defer reboot by 24 hours for 2 – 7 times. Allows you to defer till end of the working week/
calendar week.
38
Page 39

Jobs to Deploy Patches on Assets
Reboot Settings
Deferring beyond a week is NOT recommended. For any reason, if you need to defer reboot
beyond a week then we recommend using Suppress Reboot option.
Reboot Countdown
The “Reboot Countdown” is recommended to be enabled whenever reboot is NOT
suppressed.
If deferment limit is set in the Reboot Request, then setting this option shows countdown
message to users after deferment limit is reached. It ensures an explicit indication of
remaining time before a reboot, so that end user is not surprised by a sudden reboot.
Reboot countdown can be configured to show the countdown message before minimum 1
minute and maximum 24 hours/1440 minutes. We recommend you to set the reboot
countdown of 15 minutes for your assets.
39
Page 40

Jobs to Deploy Patches on Assets
Enable/Disable Jobs
Enable/Disable Jobs
Use the Enable option to “Submit a Job for Execution” and the Disable option to
"Temporary Withdraw a Job from Execution”. A patching job is not enabled (submitted for
execution) immediately when you define a job to safeguard against any configuration
errors. You should review the configuration and ensure that job is correctly configured
before enabling it. You can right-click on the job name in the job list page to enable the
job.
A job can also be enabled by choosing the "Save & Enable” option on the job Confirmation
page. This option should be chosen only when you are confident about the options chosen,
because this job will begin executing as soon as you “Save” the job. This option is available
only when creating the Job the first time, not during later edits to the job.
Run-Once/Scheduled Jobs
For the Run-Once jobs i.e. “On-Demand” and “Scheduled”, you can submit them for
Execution only once, since they are going to run only once.
In summary, Run-Once jobs can only be enabled once. They cannot be disabled. Run-Once
jobs can also be edited only before you enable them. Once you Enable them, the job
configuration can not be modified.
The only difference between the “On-Demand” and “Scheduled” job is that the first option
initiates execution of the job right away, while the second option waits till the scheduled
time or past it.
Run-Once jobs ideally do not expire. They are guaranteed to run once, even if you enable
them past their schedule time. The only exception where such jobs expire is if you "Set
Duration" within "Patch Window" to anything other than “None”.
Remember that patch window cannot be greater than 7 days i.e. 168 hours. If you think
you would like it to be more than 168 hours, we would suggest you turn off the "Patch
Window" option itself, by changing it to 'None'.
Recurring Jobs
Recurring Jobs on the other hand can be enabled and disabled multiple times. They can
also be edited in both enabled as well as disabled state, but the changes will reflect in the
next run only. The next run is a loaded term as it depends on multiple parameters of a job
configuration. Some of these parameters are explained below:
- The scheduled time of the job (minus 3 hours) should be a point in time later in the day.
- If the job is scheduled for the Agent time zone, which is the default value, then it is
possible that for some endpoints the run may have executed and for some it is pending.
Those pending for execution more than 3 hours later from the time of saving
configuration (and re-enabling the job, if disabled) will reflect change of behavior in the
current run while the ones where it has already been executed or pending for execution
less than 3 hours later will reflect in the next run.
40
Page 41

Jobs to Deploy Patches on Assets
Enable/Disable Jobs
Depending on the schedule of the job i.e. daily, weekly, etc, next run could be few days or
weeks later. Technically, it could be few hours later too but we would recommend you to
configure schedule cycles for the job a day apart, at the least.
41
Page 42

Jobs to Deploy Patches on Assets
Enable/Disable Jobs
42
Page 43

Example 1 Installing patches released on Patch Tuesday automatically
Use QQL to Automate Patch Selection for Jobs
Use QQL to Automate Patch Selection for Jobs
You can use Qualys Query Language (QQL) to provide the criteria that associates selective
patches to a deployment job. QQL ensures that all the latest patches that qualify based on
the criteria are automatically associated to a job without a manual intervention. This
saves time and ensures that the critical patch updates are installed regularly.
Although, you can use QQL for a run-once job, QQL is optimally utilized for recurring jobs.
QQL is available only for the deployment jobs and not for the uninstall jobs. Since
uninstall patch jobs are executed for selective patches and rarely used, the QQL option is
not provided for the uninstall job. See “Jobs to Deploy Patches on Assets” on page 28.
Example 1 Installing patches released on Patch Tuesday
automatically
Generally, an admin has to keep an eye on the patches that are released on every Patch
Tuesday by Microsoft and manually select these patches that must be deployed on assets.
You can create a job based on QQL and schedule a recurring job on every 2nd Thursday of
a month.
To automate the patch installation, create a deployment job with the following
parameters:
To automate the patch installation, create a deployment job with the following
parameters:
Create the following job schedule:
43
Page 44

Example 2 Installing critical patches for Chrome and Internet Explorer
Use QQL to Automate Patch Selection for Jobs
Example 2 Installing critical patches for Chrome and Internet
Explorer
To ensure that the browsers receive the critical updates, you can create a weekly recurring
job to ensure critical patches are deployed.
To automate patch installation for Google Chrome and Microsoft Internet Explorer, create
a job with following parameters:
Create the following job schedule:
Example 3 QQL for security patches
To ensure that none of the important security patches are missed, you can setup a job
with the following parameters.
44
Page 45

Create the following job schedule:
Use QQL to Automate Patch Selection for Jobs
Example 3 QQL for security patches
45
Page 46

Clone a Job
Clone a Job
Cloning a patch job lets you quickly copy an existing job and create a new one from it with
minimal edits. Creating a job in less time means you can promptly patch your mission
critical assets to mitigate the vulnerabilities, which reduces the risk of attack.
Cloning a job is very simple. From the Jobs tab, select any job with configurations that you
want to have for the new patch job and then use the Clone option to create an exact copy
of the job. When you clone a job, we will copy the assets, patches, schedule and options
information as it is to the new job. To uniquely identify the job, the cloned job name has a
prefix 'Copy of ' and suffix <epochtime> in the job title. The cloned job needs to be saved
explicitly.
You can modify the job name, assets, tags, patch, options and users who can edit the job
as a part of the job definition while cloning a job.
Only one job can be cloned at a time, but a job can be cloned any number of times. A
cloned job can be cloned again too. Cloned jobs have no interrelation between them or
with the source job.
When cloning a Run-Once job, schedule will NOT be copied, if the schedule time is in the
past. You will be prompted to provide a new schedule, before saving the copy. For a RunOnce job with schedule in the future, the schedule need not be revised, but you can edit it,
if needed. For a Recurring job, the cloned job will also have the same schedule and
recurrence. You are expected to change the schedule as needed, before enabling the
cloned job.
Partially Configured Job when cloned will create a Partially Configured Job. No default
value changes are made as part of Cloning, except the Job state. A cloned job is always in
the Disabled state, just like during job creation – to protect the user against accidental
runs.
Note that if a Partially Configured Job has an owner, then the user who will be cloning the
job will become the owner of the cloned job, but if no owner is established for the Partially
Configured Job, then the cloned job will have no owner.
Execution of a cloned job is restricted by the tag scope of the new owner.
Permissions required to clone a job
To clone a job, you must have a create job permission and you must satisfy one of these
conditions: either you should have permission to view any job or view assigned job and
you should be either co-author or owner of the job.
Good to Know
- The user creating the job will be the owner of the job.
- Any user can clone the job of another user.
- Execution of the new job is restricted by the tag scope of the owner.
46
Page 47

Clone a Job
Cloning a Job
Cloning a Job
1) Go to the Jobs tab, and select a job.
2) From the Actions menu, select the Clone option. The configurations specified in the
selected job are copied to the new cloned job and we will directly take you to the
Confirmation step.
Note: In case the schedule of the cloned job is run once, then we check the date and time
of the job. If the date and time of job is set to an older date and time then we will take you
to the Schedule screen where you can change the start date and time. An error message is
shown if you try to proceed without specifying a valid date and time for the job.
47
Page 48

Clone a Job
Cloning a Job
3) Review the configurations of the job. As per your need, you can edit the job to change
the title of the job, add or remove assets and patches, change the job schedule and other
configurations.
4) Click Save to create the Job. Job can either be created in ENABLED state by using the
Save & Enable option or in DISABLED state by using the Save button.
48
Page 49
Change Job Ownership
Change Job Ownership
Our earlier RBAC model, was more restrictive enforcing a clear compartmentalization of
users from each other and basic roles only. With the new RBAC model, we have added
more roles, depicting the real-life hierarchies and responsibilities.
A job can now be shared with other users by making them Co-Authors of the job. Coauthors should have the same (or higher) role and same (or larger) asset scope assigned to
them for administration so that they can edit/ operate the job equivalent to the creator
(owner).
If you want to temporarily allow additional users to edit/ manage a job, you can make
them Co-Author(s) of the job. This can be done by adding the users to the job under the Job
Access options while creating a job.
If you want to permanently transfer ownership of a job to another user, you could achieve
that by changing the ownership of the job.
To change the owner of the job, you must have “Change Owner” permission i.e. “Patch
Manager” role. You can change ownership of jobs, in bulk or on individual jobs. From the
Jobs tab, select a one or more job(s) and then from the Quick Actions menu, choose
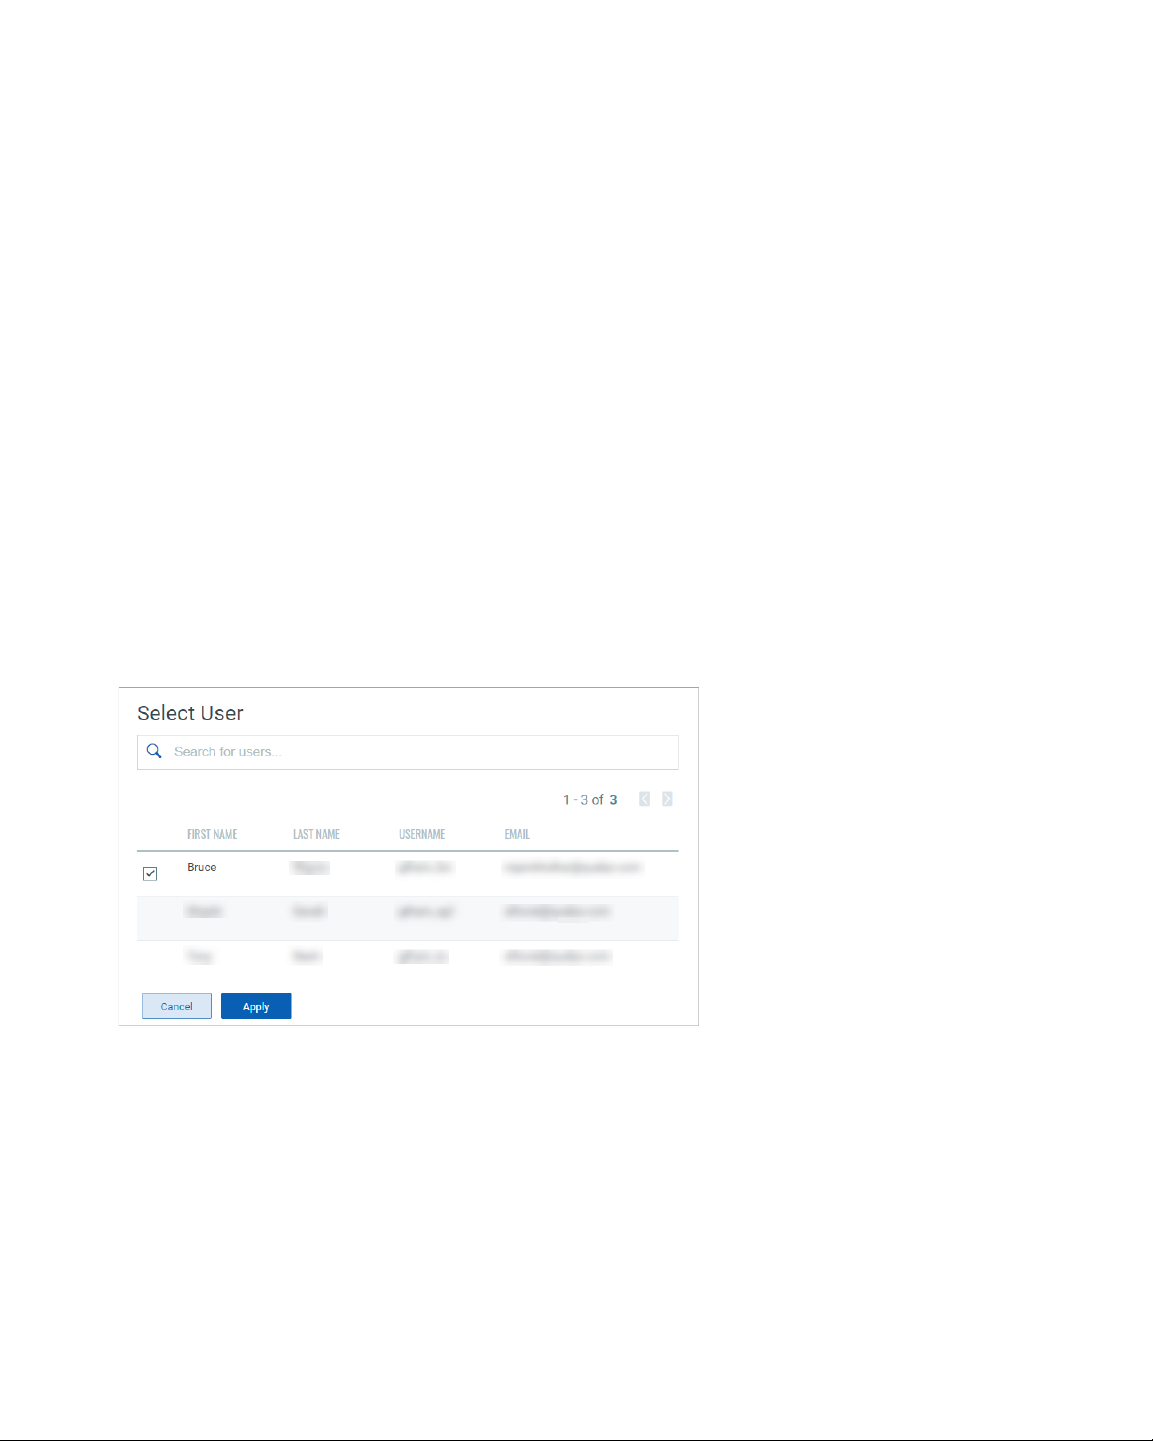
"Change Job Owner" option. Select the username of the new Job owner and click Apply. A
message confirms that the job ownership is transferred to the selected user.
If the new owner has the same (or higher) role but a different asset scope assigned to
them, the jobs could execute differently. The endpoints targeted by the job will be limited
to the assets that are common between the asset scope of original owner and the new
owner. A Patch Manager would need to revise the asset scope of the new user to ensure
execution of the job as before the ownership change.
If the new owner has a role lower than Patch Manager OR Patch User, the jobs may not
execute at all. If a job, especially a partially configured one, created as an advisory, it has
No Owner. Ownership for such a job needs to be established by explicitly assigning an
owner to such “Partially Configured Jobs”.
49
Page 50

Uninstall Patches from Assets
Uninstall Patches from Assets
You can create a patch uninstall job to uninstall patches from assets.
Simply go to Jobs > Create Job, and click Uninstall Job.
Provide a job title, and then select assets or asset tags to uninstall the patches from.
Note: Patches are uninstalled on the selected tags only for assets contained in the user's
scope. When you select an asset tag, corresponding child tags get automatically selected.
Select "Any" to include assets that have any of the selected tags. Select "All" to include only
those assets in the patch uninstallation job that have ALL the selected tags.
Select "Add Exclusion Asset Tags" to exclude the assets from the uninstallation job that
have All/ANY of the selected asset tags.
50
Page 51

Uninstall Patches from Assets
Select patches to uninstall from the assets. Use the patch selector link to select patches.
On the Patch Selector page you can use the Within Scope option to view patches within
the scope of theselected assets or view all available patches. Select the desired patches
and click Add to Job and then click Close. On the Select Patches pane of the Uninstall Job
wizard, click Available Patches if you want to add more patches to the job.
Want to add patches later? Go to the Patches tab, and select one or more patches, then
from the Quick Actions Menu of a single patch or from the Actions menu (bulk actions)
click Add to Existing Job or click Add to New Job. You cannot add patches later to
OnDemand or run-once (non recurring) jobs once they are enabled.
Note that when you modify a patch job using the Add to Existing Job option from the
Patches tab, you can add patches, but cannot add target assets or asset tags. To apply
patches to an asset that is not added to the job, you can 1) edit an existing job from the
Jobs tab, 2)select the asset from the Assets tab and use the Add to Existing Job option or 3)
create a new patch job for that asset.
51
Page 52

Uninstall Patches from Assets
Note: You can add maximum 2000 patches to a single job. Create another job to add
patches above 2000.
Choose when to uninstall the patches, whether On-Demand or Schedule. The On-Demand
option allows you to uninstall the patches immediately once the job is created and
enabled. The Schedule option allows you to uninstall the patches at a set time. You can
choose to make a scheduled job recur daily, weekly, or monthly. See Schedule Job Settings.
Note: Monthly jobs which are scheduled to run on the 31st of the month will be scheduled
every two months (where 31st date is available). Recurring jobs (Daily, Weekly, Monthly)
should be enabled three hours prior to the scheduled time otherwise next eligible
schedule will be considered.
52
Page 53

Uninstall Patches from Assets
You can configure how to notify the users about the patch uninstallation. You can
configure pre-uninstallation messages, deferring the patch uninstallation certain number
of times. You can also provide progress and completion messages.
Finally, you can prompt the user or choose suppress reboot when asset reboot is required
post patch installation. See Reboot Settings.
These are the reboot options:
Suppress Reboot - This option allows you to patch systems in advance and defer reboot till
the maintenance window.
Reboot Request - Many patches require reboot in order to take effect. When enabled, it
will show a message to users indicating that a reboot is required. If no user is logged in,
the reboot will start immediately after patch deployment.
You can configure this option to give the user the option to either reboot the machine
immediately after the patch is deployed or defer the reboot "x" number of times so that the
user can save the work and complete other tasks. Reboot will defer until 1) the user clicks
OK when reboot message is shown or 2) maximum number of deferments are reached.
Reboot Countdown - Show countdown message to users after deferment limit, if set in the
Reboot Request option, is reached. When reboot countdown is enabled, this gives the end
user an indication of how long it will take before the system is rebooted.
53
Page 54

Uninstall Patches from Assets
We highly recommend that when you create the job, the user creating the job fill out both
the message and description fields for these options as this has proven to have better
performance in the agent/platform acknowledging the requests. Keep the messages very
brief and the descriptions as detailed as possible.
Finally, choose Co-Authors for this job. Besides the owner, the selected Co-Authors can
edit this job.
54
Page 55

Uninstall Patches from Assets
Next, review the configuration.
Job can either be created in ENABLED state by using the Save & Enable option or in
DISABLED state by using the Save button.
You must enable the disabled job in order to run it. To enable a disabled job, simply go to
the Jobs tab, then from the Quick Actions menu of a job, click Enable. The Save & Enable
option should be chosen only when you are confident that job is correctly configured,
because this job will begin executing as soon as you “Save” the job. This option is available
only when creating a Job the first time, not during editing the job.
Tip: You can use the Disable option to temporarily disable a scheduled job. You can then
re-enable the job later at your convenience. On-Demand or run-once (non recurring) jobs
cannot be edited or disabled once they are enabled. See Enable/Disable Jobs
Note that the Patch Manager super user can change the job status (enable/disable), delete
and edit the job.
55
Page 56

Review Job Results
Review Job Results
Once the deployment / uninstall job is created it runs immediately (OnDemand) or on a
specified schedule. You can view the results of a job run, whether all patches got
successfully installed / uninstalled or there are failures.
To view the job results, go to Jobs, then from the Quick Actions Menu of a job, click View
Progress. You can see the assets on which the patch deployment / uninstall job was run,
and the results in the Progress column.
On this screen, we also show you the assets that are not licensed in Patch Management.
We skip patch installation for these assets.
Job activities corresponding to the reboot messages and notifications displayed on the
asset, are logged at the following location:
%USERPROFILE%\AppData\Local\Qualys\QualysAgent\QAgentUiLog.txt
56
Page 57

Asset, Deployment, and Patch Statuses
Asset Statuses List
Asset, Deployment, and Patch Statuses
Asset Statuses List
We run certain patch related operations on your assets in background. You can go to the
Assets tab to view the current status of the operation for an asset. Here is the list of
statuses and their description that we show for the various activities.
Status Description
Assigning This status means job manifest is successfully downloaded on
the asset.
Assigned This status means job manifest is successfully parsed on the
asset.
Assigning - Failed This status is shown for jobs when any one of the following
event occurs:
- Job Manifest downloading is failed.
- Job Manifest parsing is failed.
Configuring This status means Configuration Manifest is successfully
downloaded on the asset.
Configuring Failed
Configured This status means configuration manifest is parsed successfully.
Deactivated This status means the patch agent is deactivated on the asset.
Disabled This status means the patch scan is disabled on the asset.
Enabled This status means the patch agent is enabled on the asset.
Failed This status is shown for assets when any one of the following
Preparing This status is shown for assets when any one of the following
Preparing - Failed This status is shown for assets when any one of the following
Ready This status means agent has completed the prerequisite steps
Scanned This status means that agent has completed patch scan activity
This status means Configuration Manifest download is failed for
the asset.
event occurs:
- Agent failed to complete the prerequisites steps on the asset.
- Agent failed to complete the patch scan activity on the asset.
event occurs:
- Prerequisite Manifest is downloaded successfully.
- Prerequisite Manifest is parsed successfully.
- Patch components downloading are in progress.
- Patch definitions downloading are in progress.
event occurs:
- Prerequisite Manifest downloading is failed.
- Prerequisite Manifest parsing is failed.
on the asset and is ready for patch management activities.
on the asset.
57
Page 58

Asset, Deployment, and Patch Statuses
Deployment Job Statuses List
Deployment Job Statuses List
Here is the list of statuses and their descriptions that you may see for your deployment
jobs on the Job Results tab.
Status Description
Canceled - Blackout This status means the patch deployment job is canceled on the asset
due to blackout window.
Completed This status means the patch deployment job is completed on the asset.
Downloaded This status means patch file is successfully downloaded on the asset.
Downloading - Failed This status means patch failed to download on the asset.
Not Licensed This status means job manifest can not be sent as the asset does not
have Patch Management license.
Job Started This status means the agent has started the job.
Job Resumed This means the asset is restarted and agent has resumed the job.
Job Failed This means the agent encounters an error while executing the job.
Patching This status means the patch job is running on the asset.
Pending This status means the patch job is pending for execution on the asset.
Pending Reboot This status means reboot activity is pending for the asset.
Rebooted This status means asset is restated after patch installation.
Timed Out This status means job is timed out.
Patch Specific Failure Reason Codes List
Here is the list of patch specific failure reason codes shown for patch jobs in the Jobs
Results tab.
Code Status Description
3 LanguageDownloadNot
Ava il ab le
4 FileDownloadFailed This means the vendor patch file failed to download. As a
5 UnspecifiedAgentError This means an unspecified error occurred during the
7 FileValidationFailed This means the vendor patch file is either not signed, or the
8 Cancelled This means the patch installation was aborted on
9 InstallerFailed This means the installer failed to deploy the patch.
This means patch is not available for the selected
language.
result, installation will not happen.
execution of the agent that caused patch deployment
failure, e.g. out of memory.
file signature fails the validation requested by the content
provider.
command.
58
Page 59

Asset, Deployment, and Patch Statuses
Patch Specific Failure Reason Codes List
10 DeployerProcessCrashedThis means the patch deployment engine (STDeploy.exe)
crashed / terminated unexpectedly.
11 FileSignatureFailed This means the vendor patch file failed the signature
validation.
12 FileHashValidationFailedThis means vendor patch file failed the hash validation.
13 PatchURLMissing This means the vendor patch has no URL.
59
Page 60

Asset, Deployment, and Patch Statuses
Patch Specific Failure Reason Codes List
60
Page 61

Exporting Patch Data
Exporting Patch Data
You can export detailed patch data from the Patches and Assets tabs. You can download
job progress details from the Job Progress option on the Jobs tab. You must have an active
Patch License to be able to export the data.
You can also view the list of reports generated and their statuses. Exporting the patch data
allows to import the data to a preferred analytic tool, such as Tableau. For example, you
can analyze the data and calculate compliance ratio to make sound decisions or you can
use the patch data to identify patches that were missed based on the severity of the
critical assets.
You can now overlay the Patch data with other business data to set a new context for
analysis. Exporting allows you to integrate data from different systems and view it on a
single pane of glass.
Note the following important points:
- At a given time, you can access only 5 latest reports per user.
- The generated report files are retained for 7 days. After that the report data is deleted.
- You can use filters or search functionality to select the data that you want to export.
- You can download the reports in the CSV format in a Gzip file. The reports are available
to download in the universal CSV format separated by commas and enclosed in double
quotes. Due to repetitive text items in the CSV file, we have provided a compressed version
in a Gzip file for a quick and efficient access.
- We recommend that you use 7zip or any other zipping tool to unzip the report file.
- Currently, we support only the fixed columns shown on the UI that are exported in the
report.
- The report file size is limited to 1 GB after the data is compressed.
- Any references to data or time in the report should be considered in the UTC
time stamps.
61
Page 62

Exporting Patch Data
How to Export Patch Data?
How to Export Patch Data?
To export patch data, go to the Patches or Assets tab and click Download:
The Report Download Request Status page lists all the reports that are ready to download
or are being generated. Once the reports are generated, click to download the report and
then simply unzip the file to view the data.
You can also export the data from the Job Progress tab. To download the individual job
details. go to Jobs > Quick Actions > View Progress > Download.
62
Page 63

URLs to be Whitelisted For Patch Download
URLs to be Whitelisted For Patch Download
This section provides a list of URLs that you must whitelist for the Cloud Agent to
successfully download patches on your assets.
These URLs must be allowed access through firewalls or other content blocking methods
to properly retrieve patches from the patch vendors. The Qualys Cloud Agent must get
access to these URLs to successfully download patches. If you are using a Qualys Gateway
Service (QGS) proxy, ensure that it has access to the URLs as well so that it can download
and cache the patches.
NOTE: To obtain the IP Address for vendor sites you can ping the vendor site or contact the
vendor to obtain this information. We are unable to provide a list of IP addresses due to
the varied dynamic IP addresses being used by the vendors.
It may be easier to create an exception for an entire domain rather than entering all
specific URLs. You can usually do so by entering the exception in this format:
*.domain.com
List of URLs to be whitelisted
ftp://ftp.attglobal.net
http://34e34375d0b7c22eafcf-c0a4be9b34fe09958cbea1670de70e9b.r87.cf1.rackcdn.com
http://airdownload.adobe.com
http://appldnld.apple.com
http://appldnld.apple.com.edgesuite.net
http://ardownload.adobe.com
http://au.v4.download.windowsupdate.com
http://b1.download.windowsupdate.com
http://cache-download.real.com
http://cache.lumension.com
http://ccmdl.adobe.com
http://cdn01.foxitsoftware.com
http://cdn02.foxitsoftware.com
http://cdn03.foxitsoftware.com
http://cdn06.foxitsoftware.com
http://cdn09.foxitsoftware.com
http://cdn1.evernote.com
http://citrixreceiver491000.html
63
Page 64

http://citrixreceiver492000.html
http://citrixreceiver493000.html
http://content.ivanti.com
http://dl.delivery.mp.microsoft.com
http://dl.google.com
http://dl3.xmind.net
http://download-origin.cdn.mozilla.net
http://download.adobe.com
http://download.autodesk.com
http://download.betanews.com
http://download.ccleaner.com
http://download.cdburnerxp.se
http://download.gimp.org
URLs to be Whitelisted For Patch Download
http://download.macromedia.com
http://download.microsoft.com
http://download.notepad-plus-plus.org
http://download.oldfoss.com
http://download.pdfforge.org
http://download.piriform.com
http://download.royalapplications.com
http://download.teamviewer.com
http://download.techsmith.com
http://download.videolan.org
http://download.virtualbox.org
http://download.windowsupdate.com
http://download.winzip.com
http://download2.operacdn.com
http://download3.operacdn.com
http://download3.vmware.com
http://download3.xnview.com
http://download4.operacdn.com
64
Page 65

http://downloadarchive.documentfoundation.org
http://downloads.hpe.com
http://downloads.pdf-xchange.com
http://downloads.sourceforge.net
http://dwnld.windvdpro.com
http://files2.zimbra.com
http://fpdownload.macromedia.com
http://ftp.adobe.com
http://ftp.gimp.org
http://ftp.opera.com
http://ftp.osuosl.org
http://get.geo.opera.com
http://gigenet.dl.osdn.jp
URLs to be Whitelisted For Patch Download
http://install.nitropdf.com
http://jaist.dl.sourceforge.net
http://javadl.oracle.com
http://javadl.sun.com
http://jsimlo.sk
http://knowledge.autodesk.com
http://osdn.dl.osdn.jp
http://pspad.poradna.net
http://pumath.dl.osdn.jp
http://releases.mozilla.org
http://silverlight.dlservice.microsoft.com
http://sourceforge.net
http://support.citrix.com
http://support1.uvnc.com
http://updates-http.cdn-apple.com
http://www.7-zip.org
http://www.aimp.ru
http://www.coreftp.com
65
Page 66

http://www.download.windowsupdate.com
http://www.fosshub.com
http://www.getpaint.net
http://www.goodsync.com
http://www.jam-software.com
http://www.rarlab.com
http://www.tightvnc.com
http://www.uvnc.com
http://www.wireshark.org
http://zoom.us
https://2.na.dl.wireshark.org
https://aimp.su
https://airdownload.adobe.com
URLs to be Whitelisted For Patch Download
https://allwaysync.com
https://app.ringcentral.com
https://archive.apache.org
https://archive.mozilla.org
https://ardownload2.adobe.com
https://assets.cdngetgo.com
https://astuteinternet.dl.sourceforge.net
https://atlassian.jfrog.io
https://ayera.dl.sourceforge.net
https://az764295.vo.msecnd.net
https://binaries.webex.com
https://builds.cdn.getgo.com
https://cdn.azul.com
https://cdn.gomlab.com
https://cdn01.foxitsoftware.com
https://cdn1.evernote.com
https://cfhcable.dl.sourceforge.net
https://clientupdates.dropboxstatic.com
66
Page 67

https://content.ivanti.com
https://corretto.aws
https://cran.r-project.org
https://d11yldzmag5yn.cloudfront.net
https://d3pxv6yz143wms.cloudfront.net
https://data-cdn.mbamupdates.com
https://desktopassets.prezi.com
https://dl.bandicam.com/bandicut
https://dl.google.com
https://dl.teamviewer.com
https://dl.tvcdn.de
https://dl1.cdn.filezilla-project.org
https://dl3.cdn.filezilla-project.org
URLs to be Whitelisted For Patch Download
https://dl3.xmind.net
https://download-installer.cdn.mozilla.net
https://download.adobe.com
https://download.ccleaner.com
https://download.cdburnerxp.se
https://download.filezilla-project.org
https://download.gimp.org
https://download.microsoft.com
https://download.oracle.com
https://download.qsrinternational.com
https://download.royalapplications.com
https://download.skype.com
https://download.splunk.com
https://download.sublimetext.com
https://download.teamviewer.com
https://download.techsmith.com
https://download.tortoisegit.org
https://download.videolan.org
67
Page 68

https://download.virtualbox.org
https://download.visualstudio.microsoft.com
https://download.winzip.com
https://download.xnview.com
https://download1.operacdn.com
https://download3.xnview.com
https://downloadplugins.citrix.com
https://downloads.hpe.com
https://downloads.jam-software.de
https://downloads.pdf-xchange.com
https://downloads.plex.tv
https://downloads.ringcentral.com
https://downloads.slack-edge.com
URLs to be Whitelisted For Patch Download
https://downloads.sourceforge.net
https://downloads.tableau.com
https://downloadus2.teamviewer.com
https://downloadus4.teamviewer.com
https://e3.boxcdn.net
https://endpoint920510.azureedge.net
https://files.zimbra.com
https://fpdownload.adobe.com
https://fpdownload.macromedia.com
https://ftp.opera.com
https://gensho.ftp.acc.umu.se
https://gigenet.dl.sourceforge.net
https://github.com
https://iweb.dl.sourceforge.net
https://jabraxpressonlineprdstor.blob.core.windows.net
https://knowledge.autodesk.com
https://launch.getgo.com
https://managedway.dl.sourceforge.net
68
Page 69

https://master.dl.sourceforge.net
https://media.inkscape.org
https://meetings.webex.com
https://mirror.clarkson.edu
https://mirrors.gigenet.com
https://mirrors.xtom.com
https://msedge.sf.dl.delivery.mp.microsoft.com
https://neevia.com
https://netactuate.dl.sourceforge.net
https://nmap.org
https://nodejs.org
https://notepad-plus-plus.org
https://osdn.mirror.constant.com
URLs to be Whitelisted For Patch Download
https://osdn.net
https://packages.vmware.com
https://phoenixnap.dl.sourceforge.net
https://pilotfiber.dl.sourceforge.net
https://product-downloads.atlassian.com
https://razaoinfo.dl.sourceforge.net
https://s3.amazonaws.com/files.zimbra.com
https://secure-appldnld.apple.com
https://secure.logmein.com
https://secure.mozy.com
https://slack-ssb-updates.global.ssl.fastly.net
https://sourceforge.net
https://statics.teams.cdn.office.net
https://storage.googleapis.com
https://support.citrix.com
https://swdl.bluejeans.com
https://the.earth.li
https://versaweb.dl.sourceforge.net
69
Page 70

https://web.mit.edu
https://www.7-zip.org
https://www.citrix.com
https://www.crowdstrike.com
https://www.fosshub.com
https://www.goodsync.com
https://www.irfanview.info
https://www.jam-software.com
https://www.mercurial-scm.org
https://www.morphisec.com
https://www.oracle.com
https://www.poly.com
https://www.rarlab.com
URLs to be Whitelisted For Patch Download
https://www.realvnc.com
https://www.scootersoftware.com
https://www.tightvnc.com
https://www.tracker-software.com
https://www.uvnc.com
https://www.wireshark.org
70
 Loading...