

Page 1
4.5 Ton Electric Horizontal Log Splitter - Owner’s Manual
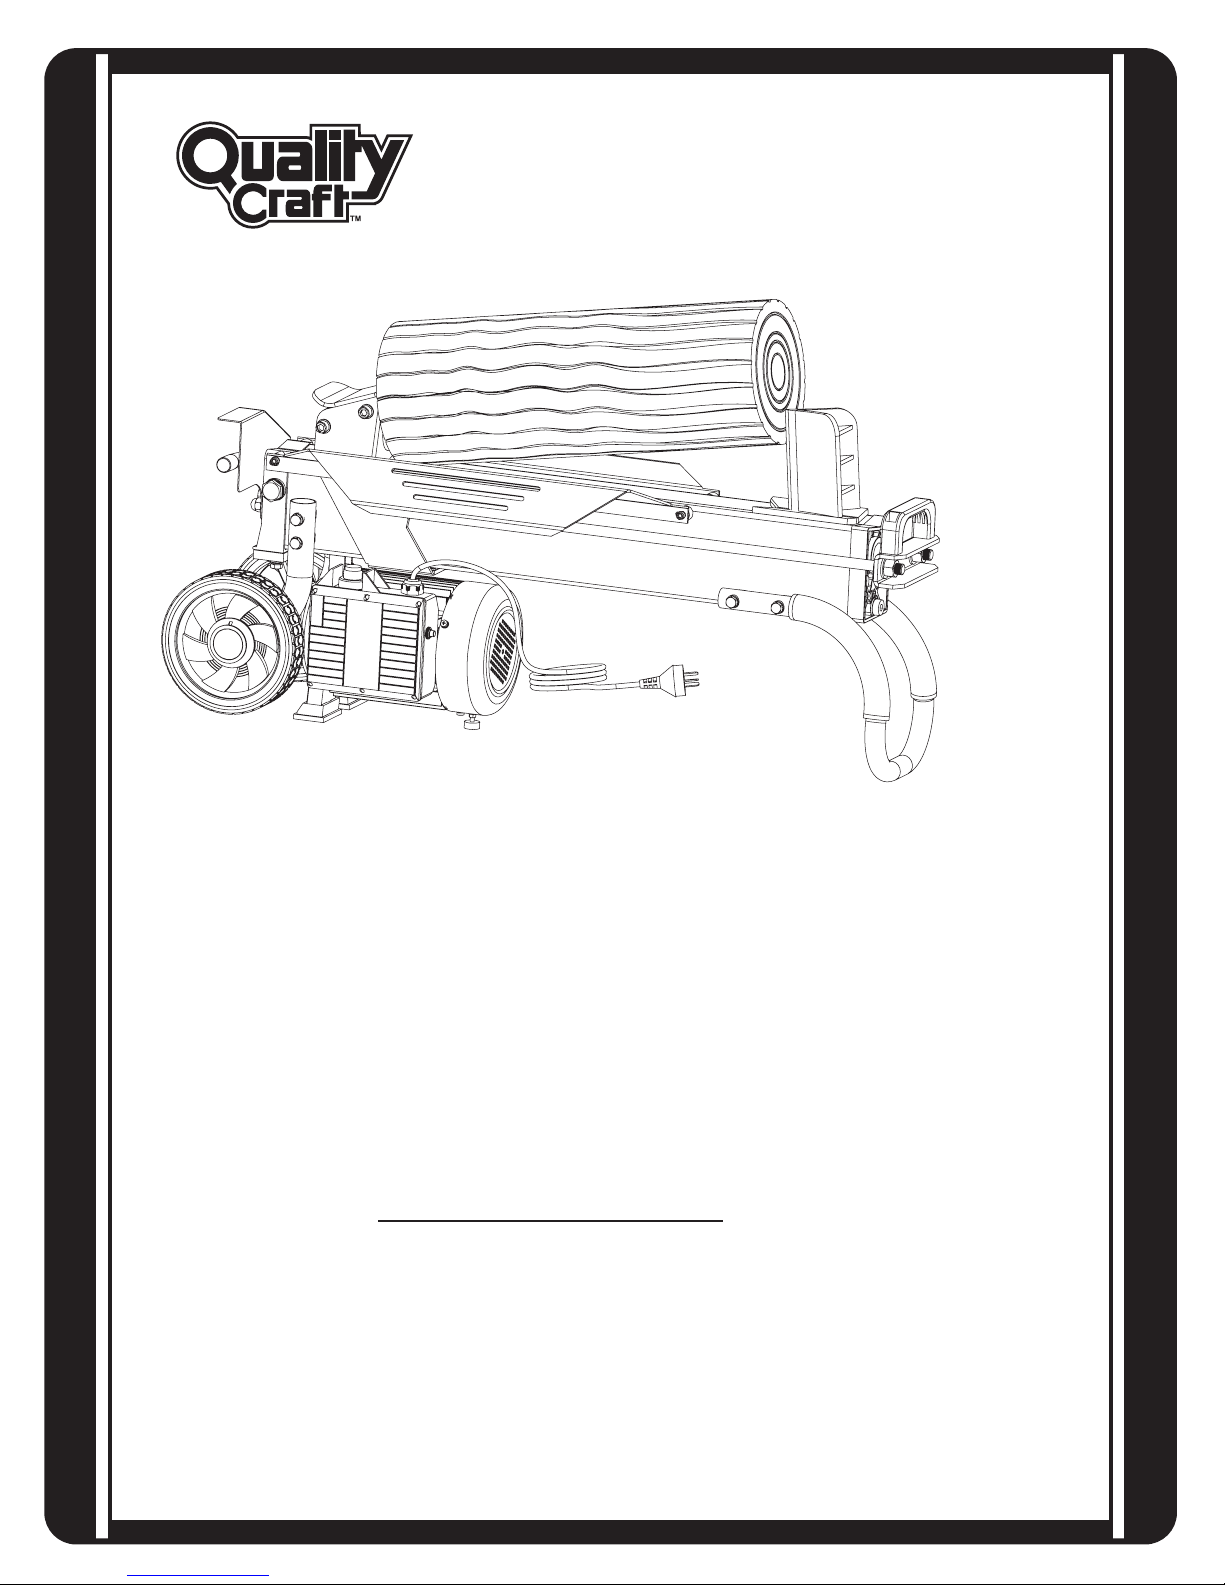
4.5 Ton Electric Horizontal Log Splitter
FOR YOUR SAFETY, READ AND UNDERSTAND
THE ENTIRE MANUAL BEFORE OPERATING
THIS MACHINE
MODEL NUMBER: LS5T-H
SERIAL NUMBER:
BOTH MODEL NUMBER AND SERIAL NUMBER MAY BE FOUND ON
THE MAIN LABEL. YOU SHOULD RECORD BOTH OF THEM IN A SAFE
PLACE FOR FUTURE USE.
SAvE THIS MANUAL FOR FUTURE REFERENCE
Page 2

TA B L E O F C O N T E N T S / S A F E T Y W A R N I N G S & C A U T I O N S
TABLE OF CONTENTS
Safety Warnings & Cautions 2-4
Application Conditions 4
Specifications 4
Electrical Requirements 4
Set up & Preparation for Operation 5
Wiring Diagram 6
Plumbing Diagram 6
Log Splitter Operation 6-7
Freeing a Jammed Log 7
Replacing Hydraulic Oil 8
Sharpening Wedge 8
Trouble Shooting / Warranty 9
Parts Schematic 10
Parts List 11
UNDERSTAND YOUR LOG SPLITTER
Read and understand the owner’s manual and labels affixed to the log splitter. Learn its
application and limitations as well as the specific potential hazards particular to it.
DRUGS, ALCOHOL AND MEDICATION
Do not operate the log splitter while under the influence of drugs, alcohol, or any medication
that could affect your ability to use it properly.
AvOID DANGEROUS CONDITIONS
Put the log splitter on a 59-76 cm (23 in-30 in) high, stable, flat, and level work bench where
there is plenty of room for handling. Bolt the log splitter to the work surface if it tends to
slip, walk, or slide.
Keep your work area clean and well lighted. A cluttered area invites injuries.
Do not use the log splitter in wet or damp areas or expose it to rain.
Do not use it in areas where fumes from paint, solvents or flammable liquids pose a potential
hazard.
INSPECT YOUR LOGSPLITTER
Check your log splitter before turning it on. Keep guards in place and in working order. Form
a habit of checking to see that keys and adjusting wrenches are removed from tool area
before turning it on. Replace damaged, missing or failed parts before using it.
DRESS PROPERLY
Do not wear loose clothing, gloves, neckties or jewelry (rings, wrist watches). They can get
caught in moving parts. Protective, electrically non-conductive gloves and non-skid footwear are recommended when working. Wear protective hair covering to contain long hair,
preventing it from getting caught in machinery.
SYMBOL AFFIXED TO MACHINE
PROTECT YOUR EYES AND FACE
Any log splitter may throw foreign objects into the eyes. This can cause permanent eye
damage. Always wear safety goggles. Everyday eyeglasses have only impact resistant
lenses. They are not safety glasses.
Do not put the log splitter on the ground for operation. This is an awkward operating
position that the operator has to bring his face close to the machine, and thus risks being
struck by wood chips or debris.
2
Page 3

S A F E T Y W A R N I N G S & C A U T I O N S
EXTENSION CORDS
Improper use of extension cords may cause inefficient operation of the log splitter which
can result in overheating. Be sure extension cord is approved for this application. See
specifications.
Avoid use of free and inadequately insulated connections. Connections must be made with
protected material suitable for outdoor use.
AvOID ELECTRICAL SHOCK
Check that the electric circuit is adequately protected and that it corresponds with the
power, voltage and frequency of the motor. Check that there is a ground connection and a
regulation differential switch upstream.
Prevent body contact with grounded surfaces: pipes, radiators, ranges, and refrigerator
enclosures.
Never open the pushbutton box on the motor. Should this be necessary, contact a qualified
electrician.
Make sure your fingers do not touch the plug’s metal prongs when plugging or unplugging
the log splitter.
KEEP vISITORS AND CHILDREN AWAY
The log splitter must always be operated by one person only. Other people should keep
a safe distance from the work area, especially when the log splitter is in operation. Never
have another person help you with freeing a jammed log.
INSPECT LOG
Make sure there are no nails or foreign objects in logs to be split. The ends of the logs
must be cut square. Branches must be cut off flush with the trunk.
SYMBOL AFFIXED TO MACHINE
DO NOT OvERREACH
Floor must not be slippery. Keep proper footing and balance at all times.
Never stand on log splitter. Serious injury could occur if the tool is tipped or if the cutting
tool is unintentionally contacted. Do not store items above or near the log splitter where
anyone might use the log splitter to stand on in order to reach the items.
AvOID INJURY FROM UNEXPECTED ACCIDENT
Always pay full attention to the movement of the log pusher. Do not attempt to load the
log on until the log pusher has stopped. Keep hands out of the way of all moving parts.
PROTECT YOUR HANDS
Keep your hands away from splits and cracks which open in the log, as they may close
suddenly and can cause severe injury. Do not remove jammed logs with your hands.
DO NOT FORCE THE TOOL
Never try to split logs larger than those indicated in the specifications table. This could be
dangerous and may damage the machine. Do not use log splitter for purposes in which it
was not intended.
NEvER LEAvE TOOL RUNNING UNATTENDED
Don’t leave tool until it has come to a complete stop and unplugged.
DISCONNECT POWER
Unplug when not in use, before making adjustments, changing parts, cleaning, or working
on the log splitter. Consult technical manual before servicing.
3
Page 4

APPLICATION CONDITIONS / SPECIFICATIONS / ELECTRICAL REQUIREMENTS
PROTECT THE ENvIRONMENT
Take used oil to an authorized collection point or follow the stipulations in the country
where the log splitter is used. Do not discharge into drains, soil or water.
SYMBOL AFFIXED TO MACHINE
MAINTAIN YOUR LOG SPLITTER WITH CARE
Keep the log splitter clean for best and safest performance.
MAKE THE WORKSHOP CHILDPROOF
Lock the shop. Disconnect master switches. Store the log splitter away from children
and others not qualified to use it.
APPLICATION CONDTIONS
This log splitter is a home use model. It is designed for operating under ambient temperatures between 5˚ C - 40˚ C (41˚ F and 104˚ F) and
for installation at altitudes no more than 1,000 metres (3,281 feet) above M.S.L. The surrounding humidity should be less than 50% at 40˚ C
(104˚ F). It can be stored or transported under ambient temperatures between 10.5˚ C - 55˚ C (13˚ F and 131˚ F).
SPECIFICATIONS
* The diameter of the log is indicative – a small log can be difficult to split when it has knobs or a particularly tough fiber. On the other hand, it
may not be difficult to split logs with regular fibers even if its diameter exceeds the max figure indicated above.
ELECTRICAL REQUIREMENTS
Connect the main leads to a standard 110 volt electrical supply which has protection devices of under-voltage, over-voltage, over-current as
well as a residual current device (RCD) with a maximum residual current rated at 0.03A.
4
Page 5
S E T U P & P R E P A R AT I O N F O R O P E R A T I O N
1 2
3
4
5
6
7
8
9
10
15
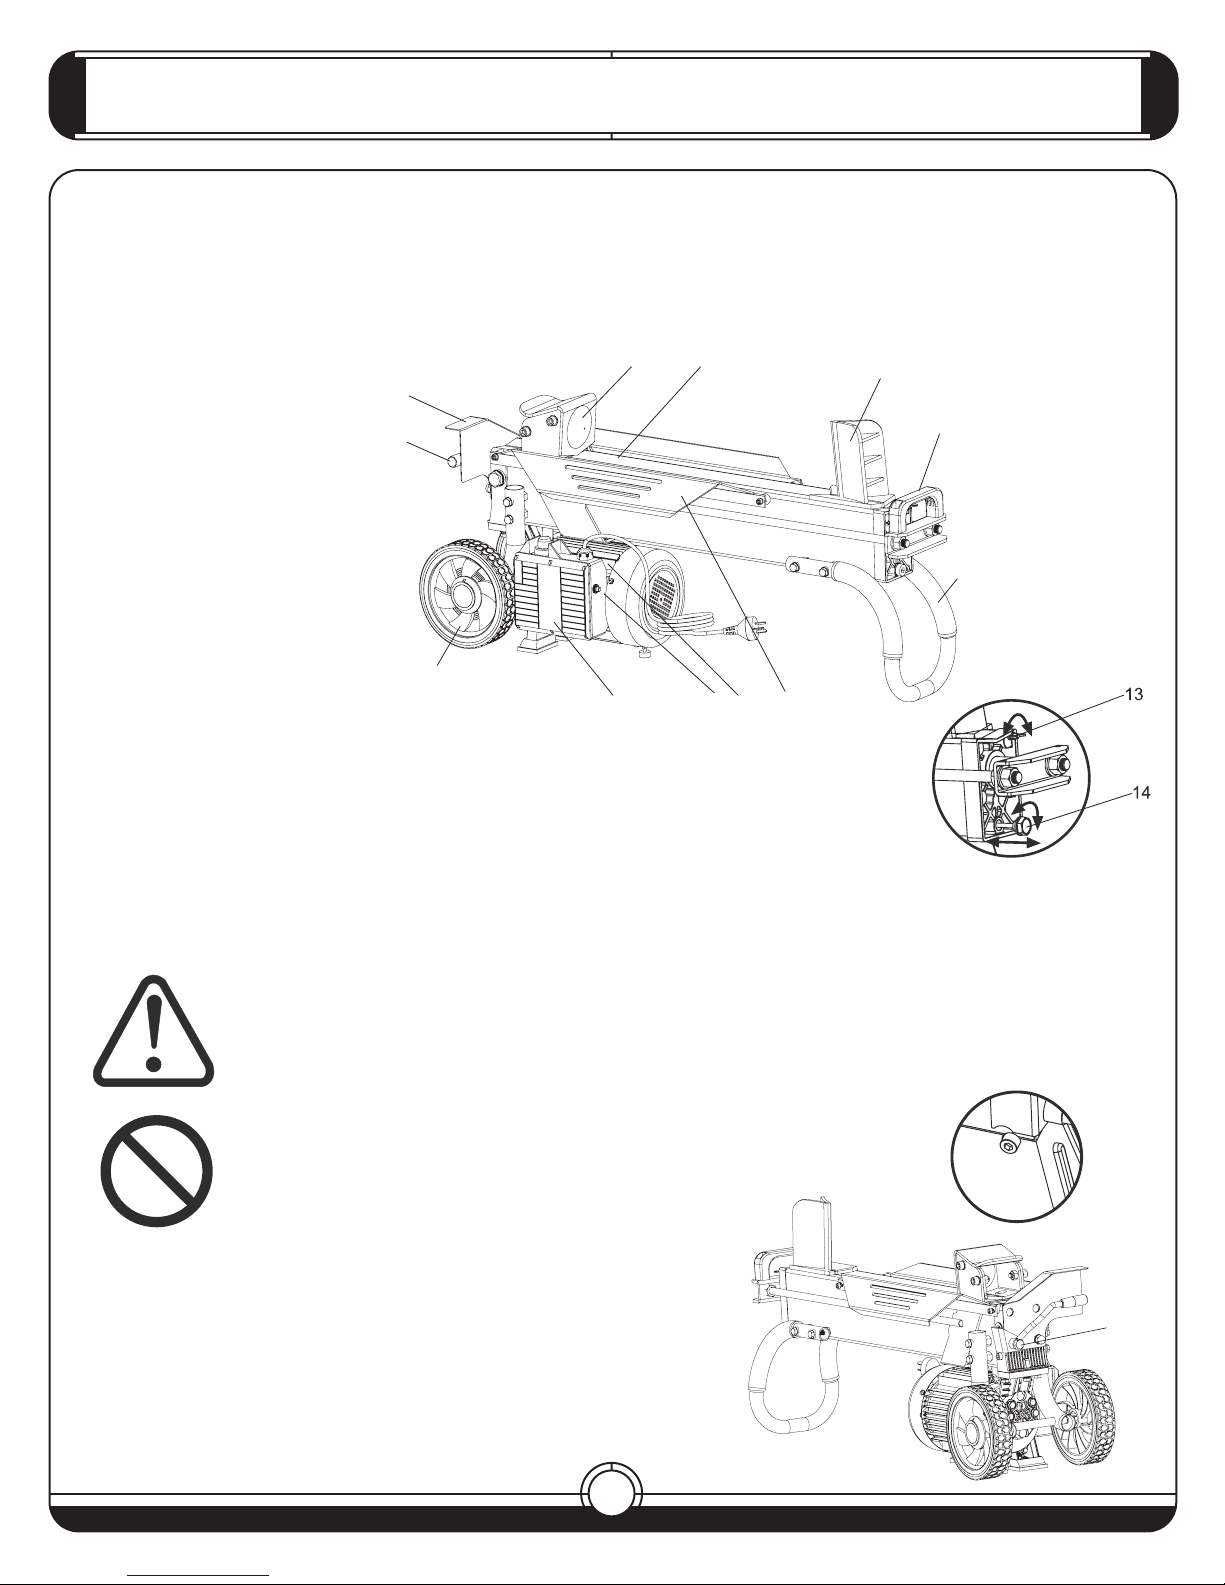
SET UP & PREPARATION FOR OPERATION
1. Bolt the Support Leg to the Log Splitter, lift the log splitter by the handles at both ends and place it on a 60.9 cm 76.2 cm (2 ft - 2.5 ft)
high, stable, flat and level work surface.
2. Familiarize yourself with the controls and features of this log splitter in the illustrations.
1. Log Pusher
2. Work Table
3. Wedge
4. Lift Handle
5. Support Leg
6. Log Retaining Plates
7. Switch
8. Motor
9. Pushbutton Box
10. Wheels for Minor Moving ONLY.
11. Hydraulic Control Lever
12. Control Lever Guard
13. Bleed Screw
14. Oil Drain Bolt w/ Dipstick
15. Max Pressure Limiting Screw
Before operating the log splitter, the Bleed Screw should be loosened by a few rotations until air can go in and out of the oil
tank smoothly. Air flow through the Bleed Screw hole should be detectable while the log splitter is under operation.
Before moving the log splitter, make sure the Bleed Screw is tightened to avoid oil leaking from this point.
FAILURE TO LOOSEN THE BLEED SCREW WILL KEEP THE SEALED AIR IN HYDRAULIC SYSTEM BEING
COMPRESSED AFTER BEING DECOMPRESSED. SUCH CONTINUOUS AIR COMPRESSION AND
DECOMPRESSION WILL BLOW OUT THE SEALS OF THE HYDRAULIC SYSTEM AND CAUSE PERMANT
DAMAGE TO THE LOG SPLITTER.
DO NOT ADJUST THE MAX PRESSURE LIMITING SCREW!
Max pressure was set by the manufacturer and the max pressure
limiting screw is sealed with glue to ensure the log splitter works
under pressure no more than 4 tons. This setting was done by a
qualified mechanic with professional instruments.
UNAUTHORIZED RESETTING WILL VOID THE WARRANTY AND CAUSE
THE HYDRAULIC PUMP TO FAIL, RESULTING IN SERIOUS INJURY AS WELL
AS DAMAGE TO THE MACHINE
5
Page 6

WIRING & PLUMBING DIAGRAMS / LOG SPLITTER OPERATION
WIRING DIAGRAM PLUMBING DIAGRAM
LOG SPLITTER OPERATION
This log splitter is equipped with “ZHB” control system that requires it to be operated by both hands of the user. The left hand controls the
hydraulic control lever while the right hand controls the push button switch. The log splitter will not operate if either hand is removed from the
controls. Only after both hands release the controls, does the log pusher start to return backward to the starting position.
Trigger type lock-out device is adopted to avoid accidental Hydraulic Control Lever pushdown. To operate the Hydraulic Control Lever, draw
the Trigger backward with the index finger before pushing the Hydraulic Control Lever forward.
Never force the log splitter for more than 5 seconds by keeping pressure on it to split excessively hard wood.
Excessive force will void the warranty.
6
Page 7
LOG SPLITTER OPERATION / FREEING A JAMMED LOG
After this time interval, the oil under pressure will be overheated and the machine could be damaged. For splitting an extremely hard log,
rotate it by 90˚ to see whether it can be split in a different direction. In any case, if you are not able to split the log, this means that its hardness
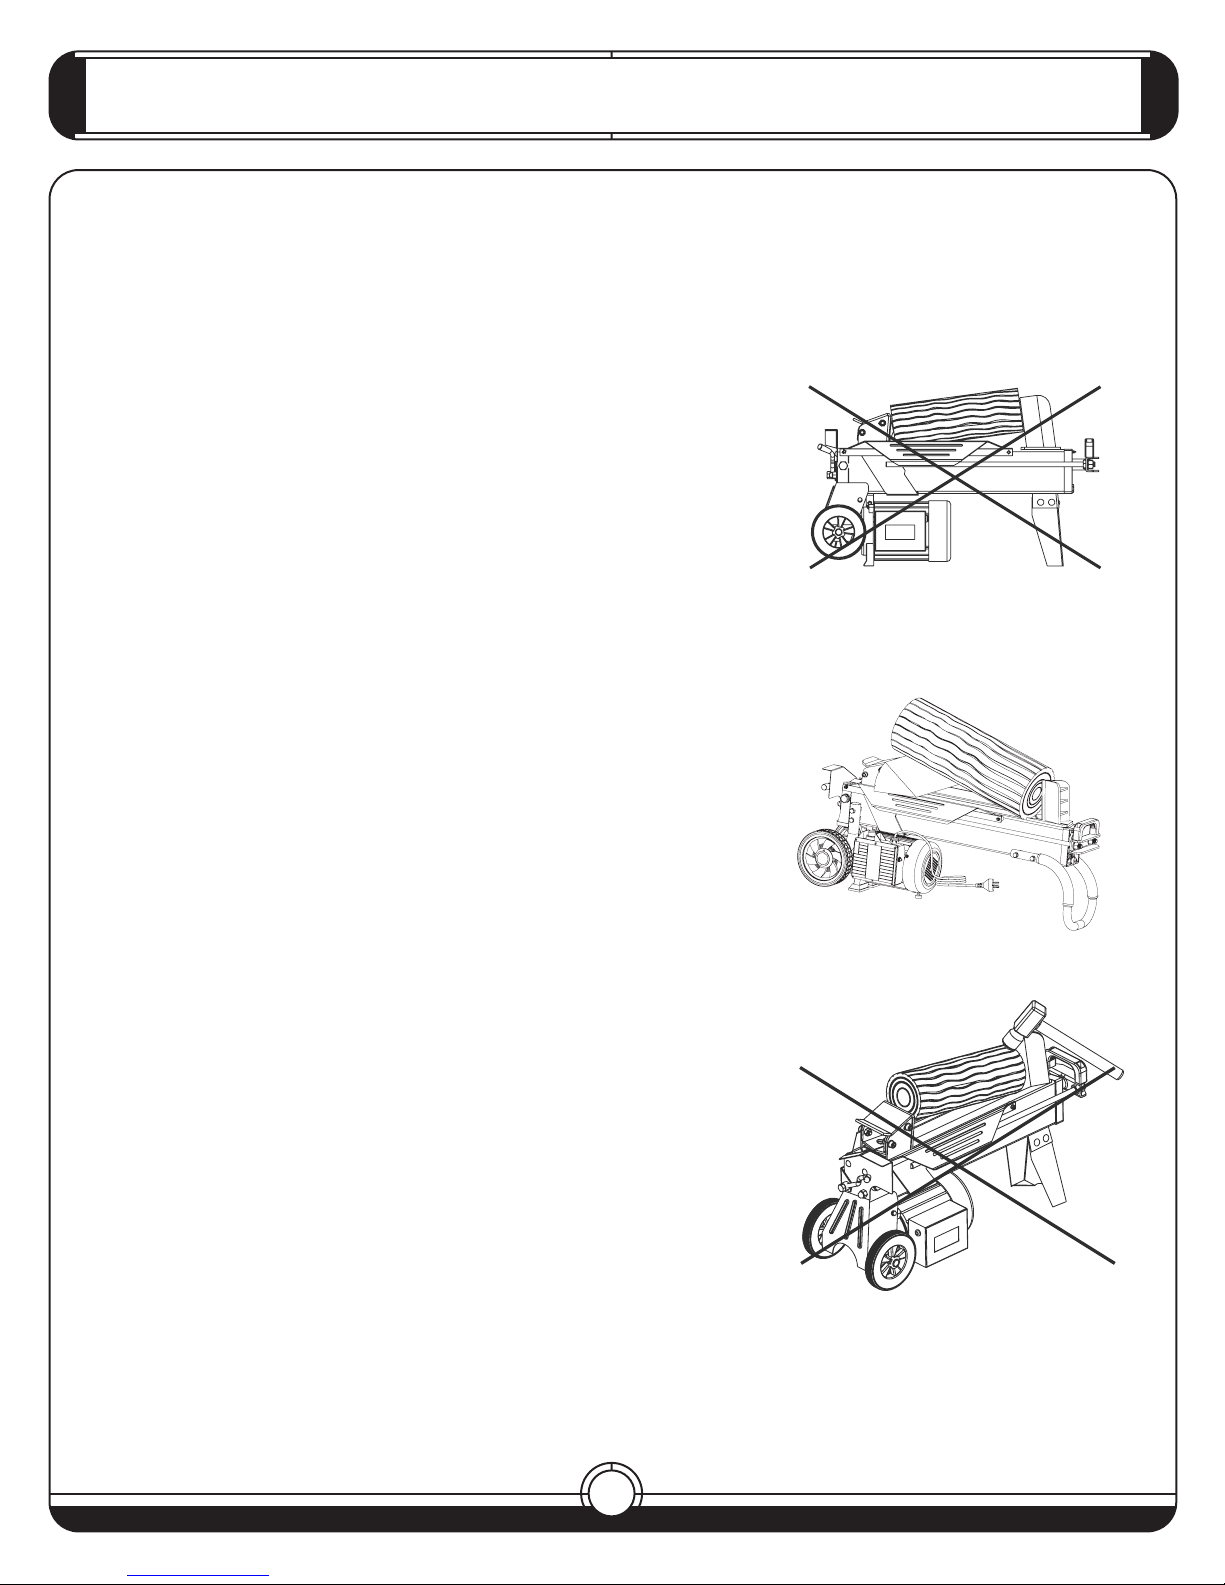
exceeds the capacity of the machine and thus the log should be discarded to protect the log splitter.
Always set logs firmly on the log retaining plates and work table. Make sure logs will not twist, rock or slip while being split. Do
not force the blade by splitting the log on the upper part. This will break the blade or damage the machine.
Split log in the direction of its growing grain. Do not place log across the log
splitter for splitting. It may be dangerous and may seriously damage the
machine. Do not attempt to split 2 pieces of logs at the same time. One of them
may fly up and hit you.
FREEING A JAMMED LOG
- Release both controls.
- After the log pusher moves back and completely stops at its starting
position, insert a wooden wedge under the jammed log.
- Start the log splitter to push the wooden wedge completely under the jammed one.
- Repeat above procedure with sharper sloped wooden wedge until the log is
completely freed.
Do not try to force the jammed log off. Forcing will damage the machine or may
launch the log and cause accident.
7
Page 8

REPLACING HYDRAULIC OIL / SHARPENING WEDGE
REPLACING HYDRAULIC OIL
Replace the Hydraulic oil in the log splitter after every 150 hours of use. Take following steps to replace it.
- Make sure all moving parts stop and the log splitter is unplugged.
- Unscrew Oil Drain Bolt with Dipstick to remove it.
- Turn the log splitter on the Support Leg side over a 1gal. capacity container to drain the
hydraulic oil off.
- Turn the log splitter on the motor side.
- Refill fresh hydraulic oil at the volume as per the hydraulic oil capacity of the particular model
indicated in the specifications table. (see pg. 4)
- Clean the surface of Dipstick on the Oil Drain Bolt and put it back into the oil tank while
keeping the log splitter vertical.
- Make sure the level of the refilled oil is just between 2 grooves on the Dipstick.
- Clean the Oil Drain Bolt before reinstalling. Make sure they are tightened to avoid leakage
before placing the log splitter back to its horizontal postition.
Periodically check oil level to ensure it is between the 2 grooves on the Dipstick.
If oil is below lower level, oil refilling is required.
The following hydraulic oils or equivalent are recommend for the log splitter’s
hydraulic transmission system:
- SHELL Tellus 22
- MOBIL DTE 11
- ARAL Vitam GF 22
- BP Energol HLP-HM 22
SHARPENING WEDGE
After using the log splitter for some time, sharpen the wedge of the log splitter using a fine toothed file and smooth any burrs or crushed areas
along the cutting edge.
8
Page 9

PROBLEM PROBABLE CAUSE SUGGESTED ACTION
Fails to split logs
The log pusher
moves jerkily,
making unfamiliar
noise or excessive
vibration.
Oil leaks around
cylinder ram or
from other points.
Log is improperly positioned.
The sizes or hardness of the log exceeds
the capacity of the machine
Reduce the log size before splitting it on
the log splitter.
Refer to “ Sharpening Wedge “ section to
sharpen the cutting edge.
Wedge cutting edge is blunt.
Locate leak(s) and contact the dealer.Oil leaks.
Contact the dealer.Unauthorized adjustment was made on
Max. Pressure Limiting Screw. Lower
max pressure rating was set.
Lack of hydraulic oil and excessive air
in the hydraulic system.
Air sealed in hydraulic system while
operating.
Loosen Bleed Screw by 3 ~ 4 rotations
before operating the log splitter.
Bleed Screw is not tightened before
moving the log splitter.
Tighten the Bleed Screw up before
moving the log splitter.
Oil Drain Bolt with Dipstick is not tight. Tighten the Oil Drain Bolt with Dipstick.
Hydraulic Control Valve Assembly and /
or seal(s) are worn.
Contact the dealer.
Check oil level for possible oil refilling.
Contact the dealer.
Refer to “Log Splitter Operation” section
for correct log loading.
TRO U BLE S HO OTIN G / WARR A NT Y
WARRANTY
Your electric log splitter is guaranteed for one year. If the tool should stop working within one year from the date of purchase you
should return it to the retailer where you purchased it for a free replacement.
This guarantee is for do-it-yourself / home owner use only and is not valid if the tool is used for commercial or rental use.
The guarantee may not be honoured if in the opinion of Quality Craft, the tool has been misused, dropped, taken apart and or has
been the subject of unusual wear and tear, and/or if repairs have been made or attempted by those other than specified by Quality
Craft. Disassembling the tool will also void the warranty.
IMPORTANT. If you have any problems with your Quality Craft product please vist our website at www.qualitycraft.ca or call customer service at 1-800-459-4409 before returning unit to the store. Save packaging until you are satisfied with your purchase.
Imported by
Quality Craft Ltd.
Laval, Quebec, Canada H7S 2G7
1-800-459-4409 (EST)
www.qualitycraft.com
Made in China
9
Page 10

PARTS SCHEMATIC
10
Page 11

PARTS SCHEMATIC LIST
No. DESCRIPTION Qty
1 Lever Mount Nut 1
2 Nut Cap M10 3
3 Lever 1
4 Lever Knob 1
5 Guard Plate 1
6 Nut 2
7 Copper Gasket 4
8 Screw M8 1
9 O-Ring 5.5x2 1
10 Snap Washer – Shaft 1
11 Valve Retract Spring 1
12 O-Ring , 6.7x1.8 1
13 Valve Core Rod 1
14 Sliding Pressure Sensor Sleeve 1
15 Sliding Pressure Sensor Sleeve Spring 1
16 Aluminum Cover (Rear) 1
17 O-Ring 55x3.1 1
18 Piston 1
19 Piston Ring 1
20 O-Ring 32x3.5 1
21 Spring 1
22 Stud 4
23 Hydraulic Cylinder 1
24 Aluminum Cover (Front) 1
25 Piston Rod Seal 1
26 O-Ring 7x1.9 1
27 Wing Bolt 1
28 Flat Washer Groupware M14 1
29 Dipstick 1
30 Piston Rod 1
31 Lift Handle 1
32 Screw M6x16 2
33 Frame Tube 1
34 Lead Plank 2
35 Spring Washer M6 4
36 Screw M6x10 4
37 Nut M14 2
38 Flat Washer 2
39 Nut 2
40 Spring Gasket 2
41 Nut Plug 1
42 Flat Washer Groupware M18 1
43 Valve Sleeve 1
44 O-Ring 12.5x1.8 5
45 Adjusting Screw 1
46 Steel Ball 1
47 Pressure Limited Valve Spring 1
48 Adjusting Screw 1
49 Log Pusher Connection Weldment 1
50 Plastic Insert 1 1
51 Plastic Insert 2 1
52 Gasket 5
53 Log Pusher 1
54 Nut M10 4
55 Screw M10x25 4
56 Wheel Cover 2
57 Block Turn 2
58 Wheel 2
59 Bolt 4
60 Washer 8
61 Shelf 1
62 Bolt 6
63 Spring Washer 9
64 Washer 9
65 Gear Pump Cover 1
66 O-Ring 10.6x2.65 2
67 Gear Housing Plate 1
68 C-Clip 2
69 Gear Shaft 1
70 Steel Ball 1
71 Gear 2
72 Pin 1
73 Washer 6
74 Bolt 3
75 Motor Cover 1
76 Seal 1
77 Nut 1
78 Screw 1
79 Motor 1
80 Fan 1
81 Block Turn 1
82 Shroud 1
83 Spring Washer 5
84 Screw 2
85 Bolt 7
86 Leg 1
87 Leg Cover 2
88 Cable & Plug 1
89 Nut 4
90 Cord Stop 1
91 Bolt 1
92 Circuit Breaker 1
93 Screw 8
94 Switch Box Cover 1
95 Airproof Underlay 1
96 Connection Terminal 1
97 Capacitor 1
98 Switch 1
99 Switch Box 1
100 Waterproof Underlay 1
101 Left Motor Support Shoe 1
102 Right Motor Support Shoe 1
103 Pin 2
104 Sping 2
105 Sliding Sleeve 4
11
Page 12

FENDEUSE DE BÛCHES, 4,5 t – Manuel du propriétaire
FENDEUSE DE BÛCHES, 4,5 t
POUR VOTRE SÉCURITÉ VEUILLEZ LIRE ET
BIEN COMPRENDRE TOUT LE CONTENU DU
PRÉSENT MANUEL AVANT D’UTILISER CETTE
MACHINE.
NO DE MODÈLE : LS5T-H
NO DE SÉRIE :
VOUS TROUVEREZ LE NUMÉRO DE MODÈLE ET LE NUMÉRO DE
SÉRIE SUR L’ÉTIqUETTE PRINCIPALE. VOUS DEVRIEZ CONSERVER L’UN ET L’AUTRE DE CES NUMÉROS EN LIEU SûR, POUR RÉfÉRENCE fUTURE.
Page 13

TABLE DES MATIÈRES / AVERTISSEMENTS ET MISES EN GARDE LIÉS À LA SÉCURITÉ
TABLE DES MATIÈRES
Avertissements et mises en garde liés à la sécurité 2-4
Conditions d’utilisation 4
Fiche technique 4
Exigences liées à l’électricité 5
Installation et préparatifs en vue de l’utilisation 5-6
Schéma de câblage 6
Schéma des canalisations 6
Fonctionnement de la fendeuse de bûches 7
Comment dégager une bûche coincée 8
Remplacement de l’huile hydraulique 8-9
Affûtage du coin à refendre 9
Diagnostics d’anomalies 9
Garantie 10
Schéma des pièces 11
Liste des pièces 12
COMPRENDRE LE fONCTIONNEMENT DE VOTRE fENDEUSE
Prenez soin de lire et de bien comprendre le Manuel du propriétaire et les messages des
étiquettes qui sont apposées sur la machine. Apprenez les conditions d’utilisation, les
restrictions et les risques potentiels propres à cette machine.
DROGUES, ALCOOL ET MÉDICAMENTS
N’utilisez pas la fendeuse de bûches si vous êtes sous l’effet d’une drogue, de l’alcool ou
de tout médicament qui pourrait influer sur votre aptitude à utiliser l’outil correctement.
ÉVITEZ TOUTE CONDITION D’UTILISATION DANGERE
Installez votre fendeuse sur un établi stable, plat et de niveau, d’une hauteur d’environ 60 à
75 cm (de 23 à 30 po), où il y a beaucoup d’espace libre pour la manutention, en un endroit
propice à la vigilance de l’opérateur. Si la fendeuse a tendance à glisser, à « sautiller » ou à
se déporter, boulonnez-la en place sur la surface de travail.
Maintenez votre aire de travail propre et correctement éclairée : encombrée, elle sera
propice aux accidents avec blessures !
N’utilisez pas la fendeuse dans un endroit mouillé ou humide, ni ne l’exposez à la pluie. Ne
l’utilisez pas non plus là où sont produites des émanations potentiellement dangereuses
provenant de peintures, de solvants ou de liquides inflammables.
USE
INSPECTEZ L’ÉTAT DE VOTRE fENDEUSE
Vérifiez votre fendeuse avant de la mettre sous tension. Conservez les protections en
place et en bon état opérationnel. Prenez l’habitude de vous assurer systématiquement
que clavettes et clés de réglage ont été enlevées de l’outil avant la mise en marche. Remplacez toute pièce endommagée, défectueuse ou manquante avant d’utiliser l’outil.
SYMBOLE APPOSÉ SUR LA
MACHINE
PORTEZ DES VÊTEMENTS APPROPRIÉS
Évitez de porter des vêtements lâches, gants, cravates ou bijoux (bagues, montres); ceuxci pourraient se prendre dans les pièces mobiles de l’outil ! Il est recommandé de porter des
gants de protection non conducteurs et des chaussures à semelle antidérapante lorsque
vous travaillez. Si vos cheveux sont longs, couvrez-les de façon bien protégée afin d’éviter
qu’ils se prennent dans les mécanismes de l’outil.
2
Page 14

AVERTISSEMENTS ET MISES EN GARDE LIÉS À LA SÉCURITÉ
PROTÉGEZ VOS YEUX ET VOTRE VISAGE
Toute fendeuse de bûches est susceptible de projeter des débris pouvant causer des blessures permanentes aux yeux ! Portez toujours des lunettes à coques. Seuls les verres de
lunettes ordinaires peuvent résister à l’impact : ce ne sont pas des lunettes de sécurité !
Ne placez pas la fendeuse au sol pour l’utiliser. C’est là une position d’utilisation incommode, qui oblige l’opérateur à approcher son visage de la machine et à accroître ainsi les
risques d’être heurté par des copeaux de bois ou des débris.
CÂBLES DE RALLONGE
L’utilisation inadéquate d’un câble de rallonge est susceptible de rendre le fonctionnement
de la fendeuse de bûches inefficace et de provoquer la surchauffe de l’outil. Assurez-vous
que le câble de rallonge choisi est homologué pour ce type d’utilisation. Voir la fiche technique de l’outil.
Évitez d’utiliser des connexions lâches ou mal isolées. Les connexions doivent être réalisées avec un matériel protégé, convenant aux utilisations à l’extérieur.
ÉVITEZ LES DÉCHARGES ÉLECTRIqUES !
Assurez-vous que le circuit électrique est adéquatement protégé et qu’il correspond aux
valeurs de puissance, de tension et de fréquence de courant du moteur. Assurez-vous que
le circuit comporte une connexion de mise à la terre (MÀT) ainsi qu’un commutateur de
différentiel de régulation, en amont.
Évitez tout contact corporel avec les surfaces mises à la terre : tuyaux, radiateurs, cuisinières et bâtis de réfrigérateur.
Ne tentez jamais d’ouvrir le boîtier du bouton-poussoir sur le moteur. Si une telle intervention est nécessaire, confiez-la à un électricien qualifié.
Lorsque vous branchez ou débranchez la fendeuse, veillez à ne pas toucher aux broches
métalliques de la fiche.
SYMBOLE APPOSÉ SUR LA
MACHINE
TENEZ SPECTATEURS ET ENfANTS À DISTANCE !
La fendeuse de bûches doit toujours être utilisée par une seule personne. Toute autre
personne doit se tenir à une distance sécuritaire de l’aire de travail, tout particulièrement
lorsque l’outil est utilisé. Ne demandez jamais à une autre personne de vous aider à
dégager une bûche qui est coincée.
INSPECTEZ VOS BûCHES.
Assurez-vous que la bûche que vous voulez fendre ne contient ni clous ni autres objets
étrangers. Aussi, les extrémités de la bûche doivent être coupées d’équerre. Les branches doivent être coupées à ras le tronc.
ÉVITEZ DE VOUS ÉTIRER POUR TRAVAILLER
Le plancher ne doit pas être glissant. Conservez une prise de pied et un équilibre appropriés en tous temps. Ne vous tenez jamais debout sur la fendeuse. De graves blessures
peuvent être causées si la machine est inclinée, ou si l’on fait contact avec les outils de
coupe. Évitez de ranger des objets au-dessus ou à proximité de la fendeuse et d’inciter
ainsi une personne à monter sur la machine pour atteindre l’objet rangé.
ÉVITEZ LES BLESSURES ACCIDENTELLES !
Prêtez toujours bien attention au mouvement de l’organe de poussée de la bûche.
Ne tentez pas de charger une bûche tant que l’organe de poussée ne s’est pas arrêté.
Gardez les mains à l’écart de toute pièce mobile.
PROTÉGEZ-VOUS LES MAINS !
Gardez les mains à l’écart des fentes et fissures qui s’ouvrent dans la bûche. Celles-ci
peuvent se refermer subitement et vous écraser ou sectionner la main ! Ne dégagez
jamais une bûche coincée avec les mains !
3
Page 15

AVERTISSEMENTS ET MISES EN GARDE LIÉS À LA SÉCURITÉ / CONDITIONS D’UTILISATION
NE fORCEZ PAS L’ACTION DE L’OUTIL.
Celui-ci travaillera mieux et de façon plus sécuritaire à sa cadence nominale. Ne tentez
jamais de fendre une bûche dont les dimensions dépassent celles indiquées au tableau de
la fiche technique : ceci pourrait être dangereux et aussi endommager la machine.
N’utilisez pas la fendeuse de bûches dans un but pour lequel elle n’a pas été conçue.
NE LAISSEZ JAMAIS L’OUTIL EN MARCHE SANS SURVEILLANCE !
Ne quittez pas l’outil tant qu’il ne s’est pas mis à l’arrêt complètement, et assurez-vous
qu’il est débranché.
DÉBRANCHEZ L’ALIMENTATION
Débranchez l’appareil lorsqu’il ne sert pas et avant d’y apporter tout réglage, de remplacer
une pièce, de le nettoyer ou d’y travailler; consultez sa notice technique avant toute intervention de service.
PROTÉGEZ L’ENVIRONNEMENT !
Apportez toute huile usée à un centre de collecte autorisé, ou suivez les dispositions
prévues à cet effet dans le pays où la fendeuse de bûches est utilisée.
Ne vidangez pas l’huile dans les canalisations d’égout, dans la terre ni dans un plan d’eau !
EffECTUEZ SOIGNEUSEMENT L’ENTRETIEN DE
VOTRE fENDEUSE DE BûCHES.
Maintenez la fendeuse en bon état de propreté pour en tirer un rendement supérieur et
sécuritaire !
SYMBOLE APPOSÉ SUR LA
MACHINE
fAITES DE VOTRE ATELIER UN ENDROIT À L’ÉPREUVE
DES ENfANTS !
Gardez votre atelier sous verrou. Mettez hors circuit les commutateurs principaux. Rangez
la fendeuse de bûches hors de portée des enfants et de toute autre personne non qualifiée
pour l’utiliser.
CONDITIONS D’UTILISATION
Cette fendeuse de bûches est d’un modèle conçu pour usage résidentiel. Elle est conçue pour fonctionner à des températures ambiantes
comprises entre 5˚ C et 40˚ C (41˚ F et 104˚ F) et à des altitudes ne dépassant pas les 1000 m (3281 pi) au-dessus du niveau moyen de la
mer. L’humidité ambiante devrait être inférieure à 50 % à une température de 40˚ C (104˚ F). Cet outil peut être rangé ou transporté à des
températures ambiantes comprises entre -25˚ C et +55˚ C (-13˚ F et 131˚ F).
fICHE
TECHNIqUE
4
Page 16

EXIGENCES LIÉES À L’ÉLECTRICITÉ / INSTALLATION ET PRÉPARATIFS EN VUE DE L’UTILISATION
1 2
3
4
5
6
7
8
9
10
* Le diamètre indiqué pour la bûche est un ordre de grandeur seulement : une petite bûche peut être difficile à fendre si elle comporte des
nœuds, ou si sa fibre de bois est particulièrement coriace. Par contre, une bûche dont le diamètre dépasse quelque peu la valeur maximale
indiquée ci-dessus pourrait se fendre facilement si sa fibre de bois n’est que moyennement résistante.
EXIGENCES LIÉES À L’ÉLECTRICITÉ
Branchez le cordon d’alimentation principal à une prise de courant standard de 110 V, dotée des dispositifs de protection nécessaires respectivement contre les baisses de tension, les hausses de tension, les surintensités et les courants résiduels, ce dernier dispositif ayant une valeur
nominale maximum de courant résiduel de 0,03 A.
INSTALLATION ET PRÉPARATIfS EN VUE DE L’UTILISATION
1. Boulonnez le pied de support à la fendeuse de bûches; soulevez ensuite la fendeuse par ses poignées de chaque extrémité, et placez-la sur
une surface de travail plane, de niveau et stable, de 60 à 75 cm (de 2 pi à 2,5 pi) de hauteur.
2. Familiarisez-vous avec les commandes et les caractéristiques techniques de la fendeuse, qui sont montrées dans les illustrations
de ce Manuel
1. Organe de poussée de la bûche
2. Table de travail
3. Coin à refendre
4. Poignée de levage
5. Pied de support
6. Plaques de retenue de la bûche
7. Interrupteur de marche/arrêt
8. Moteur
9. Boîtier du bouton-poussoir
10. Roues, pour déplacements mineurs SEULEMENT
11. Levier de commande hydraulique
12. Protecteur du levier de commande
13. Vis de purge
14. Boulon de vidange d’huile, avec jauge manuelle de niveau
15. Vis de limite de pression maximale
Avant de faire fonctionner la fendeuse de bûches, desserrez la vis de purge de quelques tours, jusqu’à ce que l’air puisse pénétrer dans
le réservoir d’huile et en ressortir librement et en douceur.
On doit pouvoir détecter l’écoulement de l’air par l’orifice de la vis de purge pendant que la fendeuse fonctionne.
Avant de déplacer la fendeuse, assurez-vous d’abord que la vis de purge est bien vissée, afin que l’huile ne fuie pas par cet orifice.
SI VOUS OMETTEZ DE DESSERRER LA VIS DE PURGE, L’AIR PIÉGÉ DANS LE CIRCUIT HYDRAULIQUE SERA
CONSTAMMENT COMPRIMÉ ET DÉCOMPRIMÉ. UNE TELLE COMPRESSION/DÉCOMPRESSION CONTINUE
EXPULSERA ÉVENTUELLEMENT LES JOINTS D’ÉTANCHÉITÉ DU CIRCUIT ET ENDOMMAGERA LA FENDEUSE
DE FAÇON PERMANENTE !
NE TENTEZ PAS DE MODIFIER LE RÉGLAGE DE LA VIS DE LIMITE DE PRESSION MAXIMALE !
5
Page 17

IN S TALL ATION ET PRÉPARATIFS EN V UE DE L’UTILIS ATION
15
SC H ÉMAS DE CÂBLAGE E T DES CA N ALISA-
La valeur de pression maximale a été réglée par le fabricant, et la vis de limite de pression maximale a été scellée avec de la
colle comme assurance que la machine ne sera pas utilisée à une pression dépassant les 4 tonnes. Ce réglage a été réalisé par
des mécaniciens qualifiés, équipés d’instruments de qualité professionnelle.
SI VOUS MODIFIEZ CE RÉGLAGE, IL Y RISQUES QUE LA POMPE HYDRAULIQUE NE PUISSE
FOURNIR UNE PRESSION DE FENDAGE SUFFISANTE ET QUE DE GRAVES BLESSURES
CORPORELLES ET D’IMPORTANTS DOMMAGES À L’ÉQUIPEMENT EN RÉSULTENT !
SCHÉMA DE CÂBLAGE SCHÉMA DES CANALISATIONS
6
Page 18

F O N C T I O N N E M E N T D E L A F E N D E U S E D E B Û C H E S
fONCTIONNEMENT DE LA fENDEUSE DE BûCHES
Cette fendeuse de bûches est dotée d’un système de contrôle ZHB; l’utilisateur doit commander ce système des deux mains : la gauche pour
le levier de commande hydraulique, et la droite pour manipuler le commutateur à bouton-poussoir. La fendeuse s’arrête instantanément en
l’absence de l’une ou l’autre main de l’utilisateur. Ce n’est que lorsque les deux mains ont déclenché les commandes que l’organe de poussée commence à retourner en arrière, vers sa position de départ.
On a prévu un dispositif de verrouillage hors service du type à gâchette afin d’éviter que le levier de commande hydraulique ne soit enfoncé
accidentellement. Pour pouvoir utiliser le levier de commande hydraulique, tirez la gâchette vers l’arrière avec l’index avant de pousser le levier
de commande hydraulique en avant
Ne forcez jamais la fendeuse plus que 5 secondes d’affilée en maintenant la pression exercée sur une
bûche excessivement dure. Toute application d’une force excessive annulera la garantie.
Après cet intervalle, l’huile sous pression commence à surchauffer, et la machine risque d’être endommagée. Si vous devez fendre une bûche
de grande dureté, faites-la tourner sur 90o pour vérifier si elle ne pourrait pas être fendue dans une nouvelle position. Dans tous les cas, si
vous n’êtes pas capable de la fendre, c’est que la dureté de son bois dépasse simplement la capacité de la machine; par conséquent, une
telle bûche devrait être éliminée de votre corde à fendre afin de protéger votre fendeuse.
Placez toujours la bûche fermement sur les plaques de retenue et sur la
table de travail. Assurez-vous que la bûche ne risque pas de se tordre ou
de glisser hors position, ou d’osciller pendant la manœuvre de fendage.
Ne forcez pas la lame en tentant de fendre la bûche sur la partie supérieure de la lame : vous risqueriez de briser celle-ci ou d’endommager
autrement la machine !
Fendez la bûche dans la direction du grain de croissance. Ne placez pas
la bûche à fendre transversalement par rapport à la machine : cela est
dangereux et risque d’endommager sérieusement la fendeuse !
Ne tentez pas de fendre deux bûches simultanément : l’une d’elles risquerait d’être expulsée subitement et de vous heurter !
7
Page 19

COMMENT DÉGAGER UNE BÛCHE COINCÉE / REMPLACEMENT DE L’HUILE HYDRAULIQUE
COMMENT DÉGAGER UNE BûCHE COINCÉE
- Déclenchez les deux commandes.
- Après que l’organe de poussée de la bûche s’est retiré en arrière, puis
complètement arrêté à sa position de départ, insérez un morceau de bois en
coin sous la bûche coincée.
- Faites démarrer la fendeuse pour qu’elle pousse ce coin de bois complètement
sous la bûche.
- Répétez cette marche à suivre avec un coin à angle plus marqué jusqu’à ce
que la bûche se libère.
Ne tentez pas de libérer la bûche coincée en frappant dessus avec un marteau ou
autre. Ceci risquerait d’endommager la machine ou d’expulser trop brutalement la
bûche et de causer ainsi un accident !
REMPLACEMENT DE L’HUILE HYDRAULIqUE
Remplacez l’huile hydraulique de la fendeuse de bûches toutes les 150 heures d’utilisation.
Faites-le selon la marche à suivre ci-après :
- Assurez-vous que toutes les pièces mobiles se sont arrêtées et que la machine est bien
débranchée.
- Dévissez le boulon de vidange d’huile avec jauge manuelle de niveau, et enlevez-le.
- Retournez la fendeuse de bûches sur le côté pied de support, au-dessus d’un contenant
d’une capacité d’environ 4 L (1 gal US) pour y vidanger l’huile.
- Retournez de nouveau la fendeuse, maintenant sur le côté moteur.
- Faites maintenant le plein d’huile hydraulique neuve, selon le volume indiqué pour la capaci
té du réservoir d’huile hydraulique du modèle particulier, au tableau de fiche technique vu
précédemment. (voir pg. 4)
- Essuyez la surface de la jauge manuelle de niveau du boulon de vidange d’huile, puis réin
sérez-la dans le réservoir d’huile, tout en maintenant la machine à la verticale.
- Assurez-vous que le niveau de l’huile neuve arrive juste entre les deux rainures autour de
la jauge.
- Nettoyez le boulon de vidange d’huile avant de le visser de nouveau en place. Assurez-vous
qu’il est bien serré afin d’éviter que la fendeuse fuie une fois remise à l’horizontale.
Vérifiez périodiquement le niveau d’huile pour vous assurer qu’il arrive bien entre les deux rainures sur la jauge manuelle.
S’il arrive plus bas, c’est qu’il faut faire un appoint d’huile.
8
Page 20

AFFÛTAGE DU COIN À REFENDRE / DIAGNOSTICS D’ANOMALIES
Il est recommandé d’employer les huiles hydrauliques suivantes, ou l’équivalent, dans le circuit de transmission hydraulique de
la fendeuse de bûches :
- SHELL Tellus 22
- MOBIL DTE 11
- ARAL Vitam GF 22
- BP Energol HLP-HM 22
AffûTAGE DU COIN À REfENDRE
Au bout d’un certain temps d’utilisation de la fendeuse de bûches, il faut affûter son coin à refendre au moyen d’une lime fine, et adoucir toute
ébarbure ou zone écrasée le long du tranchant de l’outil.
DIAGNOSTICS D’ANOMALIES
9
Page 21

G A R A N T I E
GARANTIE
Votre fendeuse de bûches à moteur électrique est garantie pour une période d’un (1) an. S’il arrivait que l’outil cesse de fonctionner
dans la première année à compter de la date de son achat, vous devriez le retourner chez le détaillant de qui vous l’avez acheté afin
d’en demander le remplacement gratuit.
La présente garantie est valide pour les usages de bricoleurs / résidentiels seulement; elle n’est pas valide lorsque l’outil est employé
à des fins commerciales ou locatives.
La présente garantie est susceptible de ne pas être honorée si, de l’avis de Quality Craft, l’outil en cause a fait l’objet de mésusage,
a été échappé ou démonté, et/ou a été soumis à une détérioration anormale et/ou à une intervention de réparation de la part d’une
personne autre que désignée par Quality Craft. Le démontage de l’outil invaliderait aussi la garantie.
IMPORTANT – Si vous éprouvez un problème quelconque avec votre produit Quality Craft, veuillez visiter notre site Web, à l’adresse
www.qualitycraft.ca, ou téléphoner à notre service à la clientèle, en faisant le 1-800-459-4409, avant de retourner l’unité au magasin.
Conservez l’emballage du produit jusqu’à ce que vous jugiez être satisfait(e) de celui-ci.
Importé par
Quality Craft Ltd.
Laval, Québec, Canada H7S 2G7
1-800-459-4409 (H.N.E.)
www.qualitycraft.com
Fabriqué en Chine
10
Page 22

SCHÉMA DES PIÈCES
11
Page 23

LISTE DE PIÈCES
No DESCRIPTION Qté
1 Écrou de montage du levier 1
2 Capuchon d’écrou M10 3
3 Levier 1
4 Bouton de levier 1
5 Plaque de protection 1
6 Écrou 2
7 Joint d’étanchéité en cuivre 4
8 Vis M8 1
9 Joint torique, 5,5x2 1
10 Rondelle élastique - arbre 1
11 Ressort de rappel de soupape 1
12 Joint torique, 6,7x1,8 1 1
13 Tige centrale, soupape 1
14 Manchon coulissant, capteur de pression 1
15 Ressort, manchon coulissant, capteur de pression 1
16 Couvercle en aluminium (arr.) 1
17 Joint torique, 55x3,1 1
18 Piston 1
19 Segment de piston 1
20 Joint torique, 32x3,5 1
21 Ressort 1
22 Goujon 4
23 Cylindre hydraulique 1
24 Couvercle en aluminium (av.) 1
25 Joint d’étanchéité, tige de piston 1
26 Joint torique, 7x1,9 1
27 Boulon à ailettes 1
28 Rondelle plate, Groupware M14 1
29 Jauge de niveau 1
30 Tige de piston 1
31 Poignée de levage 1
32 Vis M6x16 2
33 Profilé de bâti 1
34 Longrine 2
35 Rondelle élastique M6 4
36 Vis M6x10 4
37 Écrou M14 2
38 Rondelle plate 2
39 Écrou 2
40 Joint statique, ressort 2
41 Pastille d’écrou 1
42 Rondelle plate, Groupware M18 1
43 Manchon de soupape 1
44 Joint torique, 12,5x1,8 5
45 Vis de réglage 1
46 Bille d’acier 1
47 Ressort, soupape de limite de pression 1
48 Vis de réglage 1
49 Raccord soudé, organe de poussée de bûche 1
50 Pièce d’insertion en plastique 1 1
51 Pièce d’insertion en plastique 2 1
52 Joint statique 5
53 Organe de poussée de bûche 1
54 Écrou M10 4
55 Vis M10x25 4
56 Carter de roue 2
57 Tour de bloc 2
58 Roue 2
59 Boulon 4
60 Rondelle 8
61 Bauquière 1
62 Boulon 6
63 Rondelle élastique 9
64 Rondelle 9
65 Carter, pompe à engrenages 1
66 Joint torique, 10,6x2,65 2
67 Plaque, carter d’engrenages 1
68 Circlip 2
69 Pignon d’engrenage 1
70 Bille d’acier 1
71 Pignon 2
72 Goupille 1
73 Rondelle 6
74 Boulon 3
75 Carter de moteur 1
76 Pièce d’étanchéité 1
77 Écrou 1
78 Vis 1
79 Moteur 1
80 Ventilateur 1
81 Tour de bloc 1
82 Hauban 1
83 Rondelle élastique 5
84 Vis 2
85 Boulon 1
86 Pied 7
87 Carter de pied 2
88 Câble et fiche 1
89 Écrou 4
90 Butée d’arrêt de câble 1
91 Boulon 1
92 Coupe-circuit 1
93 Vis 8
94 Couvercle du boîtier de commutateur 1
95 Sous-couche étanche à l’air 1
96 Borne de connexion 1
97 Condensateur 1
98 Commutateur 1
99 Boîtier de commutateur 1
100 Sous-couche étanche à l’eau 1
101 Socle gauche, moteur 1
102 Socle droit, moteur 1
103 Goupille 2
104 Ressort 2
105 Manchon coulissant 4
12
Page 24

)&/%*%03"%&."%&3"%&50/&-"%"4o.BOVBMEFMQSPQJFUBSJP
Hendidora de troncos horizontal
eléctrica de 4,5 Toneladas
POR SU SEGURIDAD, LEA Y COMPRENDA LA
TOTALIDAD DEL CONTENIDO DE ESTE
MANUAL ANTES DE OPERAR LA MÁQUINA
NÚMERO DE MODELO: LS5T-H
NÚMERO DE SERIE:
TANTO EL NÚMERO DE MODELO COMO EL NÚMERO DE SERIE PUEDEN ENCONTRARSE EN LA ETIQUETA PRINCIPAL. LE ACONSEjAMOS REGISTRAR AMbOS EN UN LUGAR SEGURO PARA SU USO EN
EL fUTURO.
GUARDE ESTE MANUAL PARA fUTURAS CONSULTAS
Page 25

TABLA DE CONTENIDOS / ADVERTENCIAS DE SEGURIDAD Y PRECAUCIONES
TAbLA DE CONTENIDOS
Advertencias de seguridad y precauciones 2-4
Condiciones de aplicación 4
Especificaciones 4
Requerimientos eléctricos 4
Configuración y preparación para la operación 5
Diagrama de cableado 6
Diagrama de plomería 6
Funcionamiento de la hendidora de troncos 6-7
Freeing a Jammed Log 7
Reemplazo del aceite hidráulico 8
Afilación de la cuña 8
COMPRENDA SU HENDIDORA DE TRONCOS
Lea y comprenda el manual del usuario y las etiquetas adheridas a la hendidora de
troncos. Aprenda acerca de su aplicación y limitaciones, así como también los peligros
potenciales específicos de su uso.
DROGAS, ALCOHOL Y MEDICAMENTOS
No opere la hendidora de troncos mientras se encuentre bajo la influencia de drogas, alcohol o cualquier medicamento que pudiera afectar su habilidad para utilizarla
apropiadamente.
AVOID DANGEROUS CONDITIONS
Coloque la hendidora de troncos en un banco de trabajo estable, plano y equilibrado de
60 - 75cm de altura en el que haya suficiente espacio para manipulaciones y para ayudar
al operador a que permanezca alerta. Asegure la hendidora de troncos a la superficie de
trabajo con pernos si tiende a resbalar, moverse o deslizarse.
Mantenga su área de trabajo limpia y bien iluminada. Un área poco despejada es una invitación a las lesiones.
No utilice la hendidora de troncos en áreas mojadas o húmedas ni la exponga a la lluvia.
No la utilice en áreas en donde los vapores de pinturas, solventes o líquidos inflamables
constituyan un riesgo potencial.
INSPECCIONE SU HENDIDORA DE TRONCOS
Revise su hendidora de troncos antes de encenderla. Mantenga las guardas en su lugar y
en buen estado. Acostúmbrese a revisar si las llaves y las llaves de ajuste fueron retiradas
del área de herramientas antes de encenderla. Reemplace las piezas dañadas, faltantes o
que hubieran fallado antes de usarla.
VISTA APROPIADAMENTE
No utilice vestimenta suelta, guantes, corbatas o artículos de joyería (anillos, relojes de
pulsera). Pueden quedar atrapados entre las piezas móviles. Se recomienda el uso de
guantes protectores que no sean conductores de la electricidad y calzado antideslizante
al trabajar. Utilice una prenda protectora para el cabello para contener el cabello largo,
evitando que quede atrapado en la maquinaria.
SÍMbOLO ADHERIDO A
LA MÁQUINA
PROTEjA SUS OjOS Y SU ROSTRO
Cualquier hendidora de troncos puede arrojar objetos extraños a sus ojos. Esto puede
causar un daño ocular permanente. Utilice siempre antiparras de seguridad. Los anteojos
normales solo tienen lentes resistentes al impacto. No son antiparras de seguridad.
No coloque la hendidora de troncos sobre el suelo para utilizarla. Esta es una posición de
funcionamiento incómoda, en la que el operador debe acercar su rostro a la máquina, arriesgándose de esa forma a ser golpeado por virutas o fragmentos de madera.
2
Page 26

A D V E R T E N C I A S D E S E G U R I D A D Y P R E C A U C I O N E S
CAbLES DE EXTENSIÓN
El uso incorrecto de cables de extensión puede causar un funcionamiento ineficiente de la
hendidora de troncos, lo que puede resultar en un sobrecalentamiento. Asegúrese de que
el cable de extensión está aprobado para esta aplicación. Consulte las especificaciones.
Evite el uso de conexiones libres e inadecuadamente aisladas. Las conexiones deben realizarse con material protegido adecuado para su uso al aire libre.
EVITE DESCARGAS ELÉCTRICAS
Verifique que el circuito eléctrico se encuentre adecuadamente protegido y que coincide
con la potencia, voltaje y frecuencia del motor. Verifique que haya una conexión a tierra y un
interruptor diferencial de regulación aguas arriba.
Evite el contacto de la carcasa con superficies con conexión a tierra: tuberías, radiadores,
cocinas y carcasas de refrigeradores.
Nunca abra la caja del botón pulsador en el motor. En caso de que sea necesario, comuníquese con electricista calificado.
Asegúrese de que sus dedos no toquen las clavijas de metal del enchufe al enchufar o
desenchufar la hendidora de troncos.
MANTENGA ALEjADOS A LOS VISITANTES Y A
LOS NIÑO
La hendidora de troncos debe ser operada siempre por una sola persona. Otras personas
deberían mantenerse a una distancia segura del área de trabajo, especialmente cuando
la hendidora de troncos está funcionando. Nunca permita que otra persona lo ayude a
liberar un tronco trabado.
INSPECCIONE SU TRONCO
Asegúrese de que no haya clavos u objetos extraños en los troncos que va a partir. Los
extremos de los troncos deben cortarse para que tengan una forma cuadrada. Las ramas
deben cortarse del tronco.
SÍMbOLO ADHERIDO A
LA MÁQUINA
NO SE EXTRALIMITE
El suelo no debe estar resbaladizo.
Tenga siempre los pies apoyados y mantenga el equilibrio en todo momento.
Nunca se pare sobre la hendidora de troncos. Puede sufrir lesiones serias si la herramienta está inclinada o si entra en contacto accidental con la herramienta de corte. No
almacene ningún objeto sobre o cerca de la hendidora de troncos para evitar que alguien
se suba a la herramienta para intentar alcanzarlo.
EVITE LESIONES A CAUSA DE ACCIDENTES
INESPERADOS
Siempre preste atención al movimiento de la hendidora de troncos. No intente cargar el
tronco hasta que la hendidora se haya detenido. Mantenga sus manos alejadas de las
piezas móviles.
PROTEjA SUS MANOS
Mantenga sus manos alejadas de las divisiones y grietas que se abren en la madera;
Pueden cerrarse repentinamente y aplastar o amputar una de sus extremidades.
No retire los troncos trabados con sus manos.
NO fUERCE LA HERRAMIENTA
La herramienta funcionará mejor y de manera más segura a su velocidad normal. Nunca
intente partir troncos más grandes que aquellos indicados en la tabla de especificaciones.
Esto podría ser peligroso y puede dañar la máquina.
No utilice la hendidora de troncos para un propósito para el cual no fue creada.
NUNCA DEjE LA HERRAMIENTA fUNCIONANDO SOLA
No se separe de la herramienta hasta que se detenga completamente y hasta haberla
desenchufado.
3
Page 27

CONDICIONES DE APLICACIÓN / ESPECIFICACIONES / REQUERIMIENTOS ELÉCTRICOS
DESCONECTE LA ALIMENTACIÓN
Desenchúfela cuando no se utiliza, antes de realizar ajustes, cambiar piezas, limpiar,
o trabajar con la hendidora de troncos; Consulte el manual técnico antes de
realizar mantenimiento.
LA MÁQUINA
PROTEjA EL MEDIO AMbIENTE
SÍMbOLO ADHERIDO A
Lleve el aceite usado a un punto de recolección autorizado o siga las estipulaciones
del país en el que se utiliza la hendidora de troncos. No la descargue en drenajes, en
el suelo o en el agua.
REALICE UN CUIDADOSO MANTENIMIENTO DE SU
HENDIDORA DE TRONCOS
Mantenga la hendidora de troncos limpia para un mejor y más seguro desempeño.
PROTEjA A LOS NIÑOS DE LSO PELIGROS DE
SU TALLER
Cierre el taller. Desconecte los interruptores maestros. Guarde la hendidora de troncos
lejos del alcance de los niños y de personas que no estén calificadas para utilizarla.
CONDICIONES DE APLICACIÓN
Esta hendidora de troncos es un modelo de uso hogareño. Está diseñada para funcionar a una temperatura ambiente entre 41oF y 104oF
y para instalarlas en alturas no mayores a 3.281 pies sobre el nivel del mar. La humedad circundante debería ser inferior al 50% a 104oF.
Puede guardarse o transportarse a temperaturas entre -13oF y 131oF.
ESPECIfICACIONES
* El diámetro del tronco es una indicación – un tronco pequeño puede ser difícil de partir cuando tiene protuberancias o una fibra particularmente resistente. Por otro lado, puede no ser difícil partir troncos con fibras normales, incluso si el diámetro excede la cifra máxima
indicada arriba.
REQUERIMIENTOS ELÉCTRICOS
Conecte el cable principal a un suministró eléctrico estándar de 110 voltios con dispositivos de protección contra baja tensión, sobretensión y
sobrecorriente, como así también un dispositivo de corriente residual (RCD) con una corriente residual máxima de 0,03A.
4
Page 28

CON F IGUR A CI ÓN Y PR EPA RACI Ó N PARA LA O P ER ACIÓ N
1 2
3
4
5
6
7
8
9
10
15
CONfIGURACIÓN Y PREPARACIÓN PARA LA OPERACIÓN
1. Asegure la pata de soporte a la hendidora de troncos con un perno, levante la hendidora de troncos tomándola por las manijas en ambos
extremos y colóquela en una superficie de trabajo estable, plana y equilibrada de 2’-2,5’ de altura.
2. Familiarícese con los controles y funciones de esta hendidora de troncos en las ilustraciones.
1. Empujador de troncos
2. Superficie de trabajo
3. Cuña
4. Manija
5. Pata de soporte
6. Placas de retención de troncos
7. Interruptor
8. Motor
9. Caja del botón pulsador
10. Ruedas SÓLO para movimientos menores
11. Palanca de control hidráulico
12. Guarda de la palanca de control
13. Tornillo de drenaje
14. Perno de drenaje de aceite c/ varilla medidora
15. Tornillo limitante de presión máx
Antes de operar la hendidora de troncos, es necesario aflojar el tornillo de drenaje hasta que el aire pueda entrar y salir del
tanque fluidamente. El flujo de aire a través del tornillo de drenaje debe ser detectable cuando la hendidora de troncos esté
funcionando. Antes de mover la hendidora de troncos, asegúrese de que el tornillo de drenaje esté ajustado para evitar el derrame de aceite a partir de este punto.
NO AFLOJAR EL TORNILLO DE DRENAJE MANTENDRÁ EL AIRE SELLADO EN EL SISTEMA HIDRÁULICO
COMPRIMIDO DESPUÉS DE HABERSE DESCOMPRIMIDO. DICHA COMPRESIÓN Y DESCOMPRESIÓN
CONTINUAS DEL AIRE VOLARÁN LOS SELLOS DEL SISTEMA HIDRÁULICO Y DAÑARÁN LA HENDIDORA DE
TRONCOS DE MANERA PERMANENTE.
¡NO AJUSTE EL TORNILLO LIMITANTE DE PRESIÓN MÁXIMA!
La presión máxima fue establecida por el fabricante y el tornillo limitante
de la presión máxima está sellado con pegamento para asegurarse de
que la hendidora funciones bajo una presión que no sea superior a las
4 toneladas. La presión fue establecida por un mecánico, utilizando
instrumentos profesionales. Un reajuste no autorizado dejará sin efecto
la garantía y causará una falla en la bomba hidráulica
ESTO PUEDE RESULTAR EN LESIONES SERIAS Y EN DAÑOS A LA MÁQUINA.
5
Page 29

DIAGRAMA DE CABLEADO / DIAGRAMA DE PLOMERÍA
DIAGRAMA DE CAbLEADO
DIAGRAMA DE PLOMERÍA
OPERACIÓN DE LA HENDIDORA
DE TRONCOS
Esta hendidora de troncos está equipada con el sistema de control “ZHB”, lo que requiere que el usuario la opere con ambas manos. La
mano izquierda controla la palanca de control hidráulico mientras que la derecha controla el interruptor del botón pulsador. Esta hendidora de
troncos se detendrá si no es controlada por ambas manos. El empujador de troncos comienza a retornar hacia la posición inicial sólo cuando
ambas manos sueltan los controles.
Se adopta un dispositivo de traba de tipo gatillo para evitar pulsar accidentalmente la palanca del control hidráulico. Para operar la palanca de
control hidráulico, Apriete el gatillo con el índice antes de en pujar la palanca de control hidráulico hacia adelante.
Nunca fuerce la hendidora de troncos por más de 5 segundos manteniendo la presión para partir madera
excesivamente dura. El uso de fuerza excesiva dejará sin efecto la garantía
6
Page 30

FUNCIONAMIENTO DE LA HENDIDORA DE TRONCOS / LIBERACIÓN DE UN TRONCO TRABADO
Después de este intervalo, el aceite bajo presión se sobrecalentará y la máquina podría dañarse. Para un tronco tan extremadamente duro,
gírelo 90o para ver si puede partirlo en una orientación diferente. En cualquier caso, si no puede partirlo, esto significa que su dureza excede
la capacidad de la máquina y, por lo tanto, dicho tronco debe ser descartado para proteger la hendidora de troncos.
Coloque siempre los troncos firmemente apoyados en las placas de retención y en la superficie de trabajo. Asegúrese de que
los troncos no se torcerán, moverán o resbalarán mientras se los parte. No fuerce el filo partiendo el tronco en la parte superior.
Esto romperá el filo o dañará la máquina.
Rompa el tronco en el sentido de su crecimiento. No coloque troncos en
posición perpendicular a la hendidora de troncos para partirlos. Podría ser
peligroso y puede dañar seriamente la máquina.
No intente partir 2 troncos a la vez. Uno de ellos puede salir despedido y gol
pearlo.
-
LIbERACIÓN DE UN TRONCO TRAbADO
- Suelte ambos controles.
- Una vez que el empujador de troncos vuelva a su posición inicial y se detenga
completamente, inserte una cuña debajo del tronco trabado.
- Arranque la hendidora de troncos para empujar la cuña hasta que quede comple
tamente debajo del tronco.
- Repita el procedimiento que aparece arriba con cuñas con pendientes más mar
cadas hasta que el tronco quede libre.
No intente forzar el tronco trabado para sacarlo. Forzarlo puede dañar la máquina o
causar que tronco salga despedido, ocasionando un accidente.
7
Page 31

REEMPLAZO DEL ACEITE HIDRÁULICO / AFILACIÓN DE LA CUÑA
REEMPLAZO DEL ACEITE HIDRÁULICO
Reemplace el aceite hidráulico en la hendidora de troncos tras 150 horas de uso.
Para reemplazarlo, siga estos pasos.
- Asegúrese de que todas las piezas móviles se hayan detenido y que la hendidora de troncos
esté desenchufada.
- Desatornille el perno de drenaje de aceite con varilla medidora para retirarlo.
- Incline la hendidora de troncos del lado de la pata de soporte sobre un contendor de 1gal.
De capacidad para drenar el aceite hidráulico.
- Gire la hendidora de troncos sobre el lado del motor.
- Vuelva a llenar con el volumen de aceite hidráulico nuevo que corresponde a la capacidad de
su modelo particular, como se indica en la tabla de especificaciones de arriba.
- Limpie la superficie de la varilla medidora en el perno de drenaje de aceite y vuelva a colo
carla en el tanque de aceite mientras mantiene la hendidora de troncos en posición vertical.
- Asegúrese de que el nivel de aceite de repuesto se encuentre entre 2 estrías de la
varilla medidora.
- Limpie el perno de drenaje de aceite antes de reinstalarlo. Asegúrese de que se
encuentren ajustados para evitar pérdidas antes de colocar la hendidora de troncos en
posición horizontal.
Verifique periódicamente el nivel de aceite para asegurarse de que se encuentre
entre 2 estrías de la varilla medidora. Al llegar al nivel de aceite más bajo,
es necesario volver a llenar con aceite.
Se recomienda el uso de los siguientes aceites hidráulicos o equivalentes en el sistema de transmisión hidráulica de la hendidora de troncos:
- SHELL Tellus 22
- MOBIL DTE 11
- ARAL Vitam GF 22
- BP Energol HLP-HM 22
AfILACIÓN DE LA CUÑA
Tras utilizar hendidoras de troncos por algún tiempo, afile la cuña de la hendidora de troncos utilizando una lima de dientes finos y alise cualquier rebaba o área aplastada a lo largo del filo de corte.
8
Page 32

RES O LUCI Ó N DE P R OB LEMA S / E S QU EMA D E PIEZ A S
GARANTÍA
La garantía de su cortadora de troncos eléctrica es de un año. Si la herramienta dejara de funcionar dentro del primer año desde la
fecha de compra, debe devolverla a la tienda donde la compró para que se la reemplacen de forma gratuita.
La presente garantía sólo cubre uso de la herramienta para actividades domésticas o de bricolaje, y no es válida si la cortadora se
destina para uso comercial o para alquiler.
La garantía puede no respetarse si, a criterio de Quality Craft, la herramienta ha sido mal utilizada, se ha caído, ha sido desmontada
o presenta un nivel de desgaste anormal, y/o si alguna persona que no sea la designada por Quality Craft la ha reparado o intentado
reparar. La garantía también perderá validez si se ha desarmado la herramienta.
IMPORTANTE: Si tiene algún problema con su producto Quality Craft, antes de devolver el artículo a la tienda, ingrese a nuestro sitio
Web en www.qualitycraft.ca o llame a nuestro servicio de atención al cliente al 1-800-268-4669. Guarde el envoltorio hasta que esté
satisfecho con su compra.
Importado por
Quality Craft Ltd.
Laval, Quebec, Canadá H7S 2G7
1-800-459-4409 (hora del Este)
www.qualitycraft.com
Hecho en China
9
Page 33

ESQUEMA DE PIEZAS
10
Page 34

LISTA DE PIEZAS
Nro. serie Descripción Cantidad
1 Tuerca del soporte de la palanca 1
2 Tuerca ciega M10 3
3 Palanca 1
4 Perilla de la palanca 1
5 Placa protectora 1
6 Tuerca 2
7 Junta de cobre 4
8 Tornillo M8 1
9 Junta tórica 5,5x2 1
10 Arandela de retención – Eje 1
11 Muelle de retracción de la válvula 1
12 Junta tórica , 6,7x1,8 1
13 Varilla de la válvula 1
14
Manguito deslizable del sensor de presión
15
Resorte del manguito deslizable del sensor de presión
16 Tapa de aluminio (posterior) 1
17 Junta tórica 55x3,1 1
18 Pistón 1
19 Aro del pistón 1
20 Junta tórica 32x3,5 1
21 Resorte 1
22 Perno 4
23 Cilindro hidráulico 1
24 Tapa de aluminio (anterior) 1
25 Sello de la biela del pistón 1
26 Junta tórica 7x1,9 1
27 Perno mariposa 1
28 Grupo de arandelas planas M14 1
29 Varilla medidora 1
30 Piston Rod 1
31 Manija 1
32 Tornillo M6x16 2
33 Tubo del armazón 1
34 Plancha de plomo 2
35 Arandela de resorte M6 4
36 Tornillo M6x10 4
37 Tuerca M14 2
38 Arandela plana 2
39 Tuerca 2
40 Junta de resorte 2
41 Tapón obturador 1
42 Grupo de arandelas planas M18 1
43 Manguito de la válvula 1
44 Junta tórica 12,5x1,8 5
45 Tornillo de ajuste 1
46 Bola de acero 1
47 Resorte de la válvula limitado por presión 1
48 Tornillo de ajuste 1
49
Soldadura de conexión del empujador de troncos
50 Accesorio de plástico 1 1
51 Accesorio de plástico 2 1
52 Junta 5
1
1
1
53 Empujador de troncos 1
54 Tuerca M10 4
55 Tornillo M10x25 4
56 Tapa de la rueda 2
57 Giro del bloque 2
58 Rueda 2
59 Perno 4
60 Arandela 8
61 Anaquel 1
62 Perno 6
63 Arandela de resorte 9
64 Arandela 9
65 Tapa de la bomba de engranajes 1
66 Junta tórica 10,6x2,65 2
67 Placa del cárter de engranajes 1
68 Sujetador en C 2
69 Eje de engranajes 1
70 Bola de acero 1
71 Engranaje 2
72 Pasador 1
73 Arandela 6
74 Perno 3
75 Tapa del motor 1
76 Sello 1
77 Tuerca 1
78 Tornillo 1
79 Motor 1
80 Ventilador 1
81 Giro del bloque 1
82 Cubierta 1
83 Arandela de resorte 5
84 Tornillo 2
85 Perno 7
86 Pata 1
87 Tapa de la pata 2
88 Cable y enchufe 1
89 Tuerca 4
90 Tope del cable 1
91 Perno 1
92 Disyuntor 1
93 Tornillo 8
94 Tapa de la caja del interruptor 1
95 Capa base hermética 1
96 Terminal de conexión 1
97 Capacitor 1
98 Interruptor 1
99 Caja del interruptor 1
100 Capa base impermeable 1
101 Zapata de soporte izquierda del motor 1
102 Zapata de soporte derecha del motor 1
103 Pasador 2
104 Resorte 2
105 Manguito deslizable 4
11
 Loading...