

Page 1

AQG-PC 4645
Petrol Chain Saw
Artikel-Nr.: 4501662
Ident-Nr.: 11011
Komponenten / Ersatzteile
Position Artikel-Nr. Beschreibung
Position Artikel-Nr. Beschreibung
1 450166001001 oil tank
3 450166001003 safty trigger lever
4 450166001004 rear handle cover
5 450166001005 trigger
6 450166001006 trigger spring ›0.9
7 450166001007 pin
10 450166001010 special screw ST4.8x15
13 450166001013 vacuum hose spring ›6
14 450166001014 fuel pipe
16 450166001016 oil filter
18 450166001018 oil cap
19 450166001019 oil cap gasket
21 450166001021 screw ST4.8x16
22 450166001022 right rubber gasket for handle
23 450166001023 bottom rubber gasket for handl e
24 450166001024 handle
Page 2

Komponenten / Ersatzteile
Position Artikel-Nr. Beschreibung
Position Artikel-Nr. Beschreibung
28 450166001028 heat insulation plate
29 450166001029 flange inlet
30 450166001030 carburetor
31 450166001031 carburetor gasket
37 450166001037 air filter washer ›1.5x›22
38 450166001038 air filter
40 450166001040 air filter knob für Luftfilterabdeckung
41 450166001041 knob gasket
42 450166001042 air filter top cover
43 450166001043 cover
47 450166001047 tension spring for clutch ›5.3 x150
48 450166001048 clutch gasket
49 450166001049 clutch drum
50 450166001050 sproket wheel
51 450166001051 needle bearing K121514.5
52 450166001052 worm wheel
54 450166001054 oil pump cover für Ölpumpe
55 450166001055 oil seal ›15x›28x5
56 450166001056 bearing 6202
59 450166001059 throttle rod
64 450166001064 seal mat
65 450166001065 spark plug L8RTF
66 450166001066 retaining ring
68 450166001068 intake tube seal gasket
69 450166001069 cylinder seal gasket
70 450166001070 snap ring for piston pin ›11
71 450166001071 piston pin ›11x34.3
72 450166001072 piston ring ›43.5
73 450166001073 piston ›43.5
84 450166001084 circlip ›35
85 450166001085 oil seal ›15x›35x5
86 450166001086 Oil seal plate
88 450166001088 hex nut M8x1
89 450166001089 spring washer ›8
90 450166001090 flywheel
93 450166001093 engine oil cap
94 450166001094 seal ring
97 450166001097 ignitor
98 450166001098 ignitor cap
107 450166001107 muffler
108 450166001108 muffler cover
109 450166001109 muffler gasket
111 450166001111 cyliner
116 450166001116 toothed plate
122 450166001122 oil fiter
123 450166001123 oil-inlet pipe
125 450166001125 oil pump
126 450166001126 oil-outlet pipe
127 450166001127 tower spring
129 450166001129 chain catcher
173 450166001173 file ›4.5
174 450166001174 allen key T4
175 450166001175 allen key T3
176 450166001176 plug wrench
177 450166001177 screwdriver
180 450166001180 bar cover
800 450166001800 mix bottle
901 450166001901 starter assy.
902 450166001902 brake assy.
903 450166001903 retainer with fly weights set
Page 3

Important - Please read these instructions fully before starting assembly
These instructions contain important information that will help you get the best from
your chainsaw, ensuring it is assembled correctly and safely.
If you need help or have damaged or missing parts, call the Customer Helpline
on 0151 649 1500.
Qualcast
46 cc Petrol Chainsaw
Original Operating Instructions
Feb 2011
UK/Ireland 0151 649 1500
Republic of Ireland 1890 946 244
Web www.einhell.co.uk
After Sales Support
Operation and Maintenance Manual
Page 4

Contents
2
Customer Helpline 0151 649 1500
Components List .......................................................................................................................................... 4-5
Safety Information ...........................................................................................................................................6
Warnings Symbols ......................................................................................................................................6
Explanation of the Symbols and Warning signs on the machine labels .............................................. 7-8
General Safety .............................................................................................................................................9
Personal Safety ............................................................................................................................................9
Operating and Maintenance Safety .........................................................................................................10
Handling Safety ........................................................................................................................................11
Proper Use .......................................................................................................................................... 12-13
Kickback Safety .........................................................................................................................................13
Pinching Safety ..........................................................................................................................................14
Preparing to Operate the Chainsaw .........................................................................................................15
Step 1 - Assemble the Chainsaw ..............................................................................................................15
Step 2 - Check the Chain Brake ......................................................................................................... 15-16
Step 3 - Fuel and Lubrication ............................................................................................................. 17-18
Step 4 - Filling the Fuel Tank ....................................................................................................................19
Step 5 - Filling the Chain Lubrication Oil Tank ........................................................................................20
Operating the Chainsaw ................................................................................................................................21
Step 1 - Starting the Engine ............................................................................................................... 21-26
Step 2 - Restarting the Chainsaw When Warmed Up .............................................................................27
How to Use the Chainsaw .............................................................................................................................28
Introduction ................................................................................................................................................28
Felling ................................................................................................................................................... 29-30
Limbing ......................................................................................................................................................31
Bucking ......................................................................................................................................................32
Page 5

Contents
3
Customer Helpline 0151 649 1500
Storing the Chainsaw ....................................................................................................................................33
Step 1 - Storing the Chainsaw for Short Periods ....................................................................................33
Step 2 - Storing the Chainsaw for Extended Periods ...................................................................... 33-35
Step 3 - Preparing the Chainsaw for Use Following Storage ................................................................35
Maintenance ...................................................................................................................................................36
Maintenance Schedule .............................................................................................................................36
Step 1 - Operational Chain Brake Test ....................................................................................................37
Step 2 - Clean / Replace the Air Filter ............................................................................................... 38-39
Step 3 - Change / Replace the Fuel Filter ......................................................................................... 40-42
Step 4 - Clean / Replace the Spark Plug ........................................................................................... 42-46
Step 5 - Carburettor Settings ...................................................................................................................47
Step 6 - Lubricating the Sprocket Tips .............................................................................................. 47-48
Step 7 - Reversing the Guide Bar .............................................................................................................49
Step 8 - Adjusting the Automatic Chain Lubricator ................................................................................49
Step 9 - Check the Saw Chain Tension ....................................................................................................50
Step 10 - Sharpening the Saw Chain .......................................................................................................51
Troubleshooting .............................................................................................................................................52
General Troubleshooting ..................................................................................................................... 51-53
Useful Information .........................................................................................................................................53
Technical Data ...............................................................................................................................................54
Technical Data Table .................................................................................................................................54
Disposal ..........................................................................................................................................................54
Disposal Instructions ................................................................................................................................54
Guarantee ......................................................................................................................................................55
Declaration of Conformity .............................................................................................................................56
Page 6
4
Customer Helpline 0151 649 1500
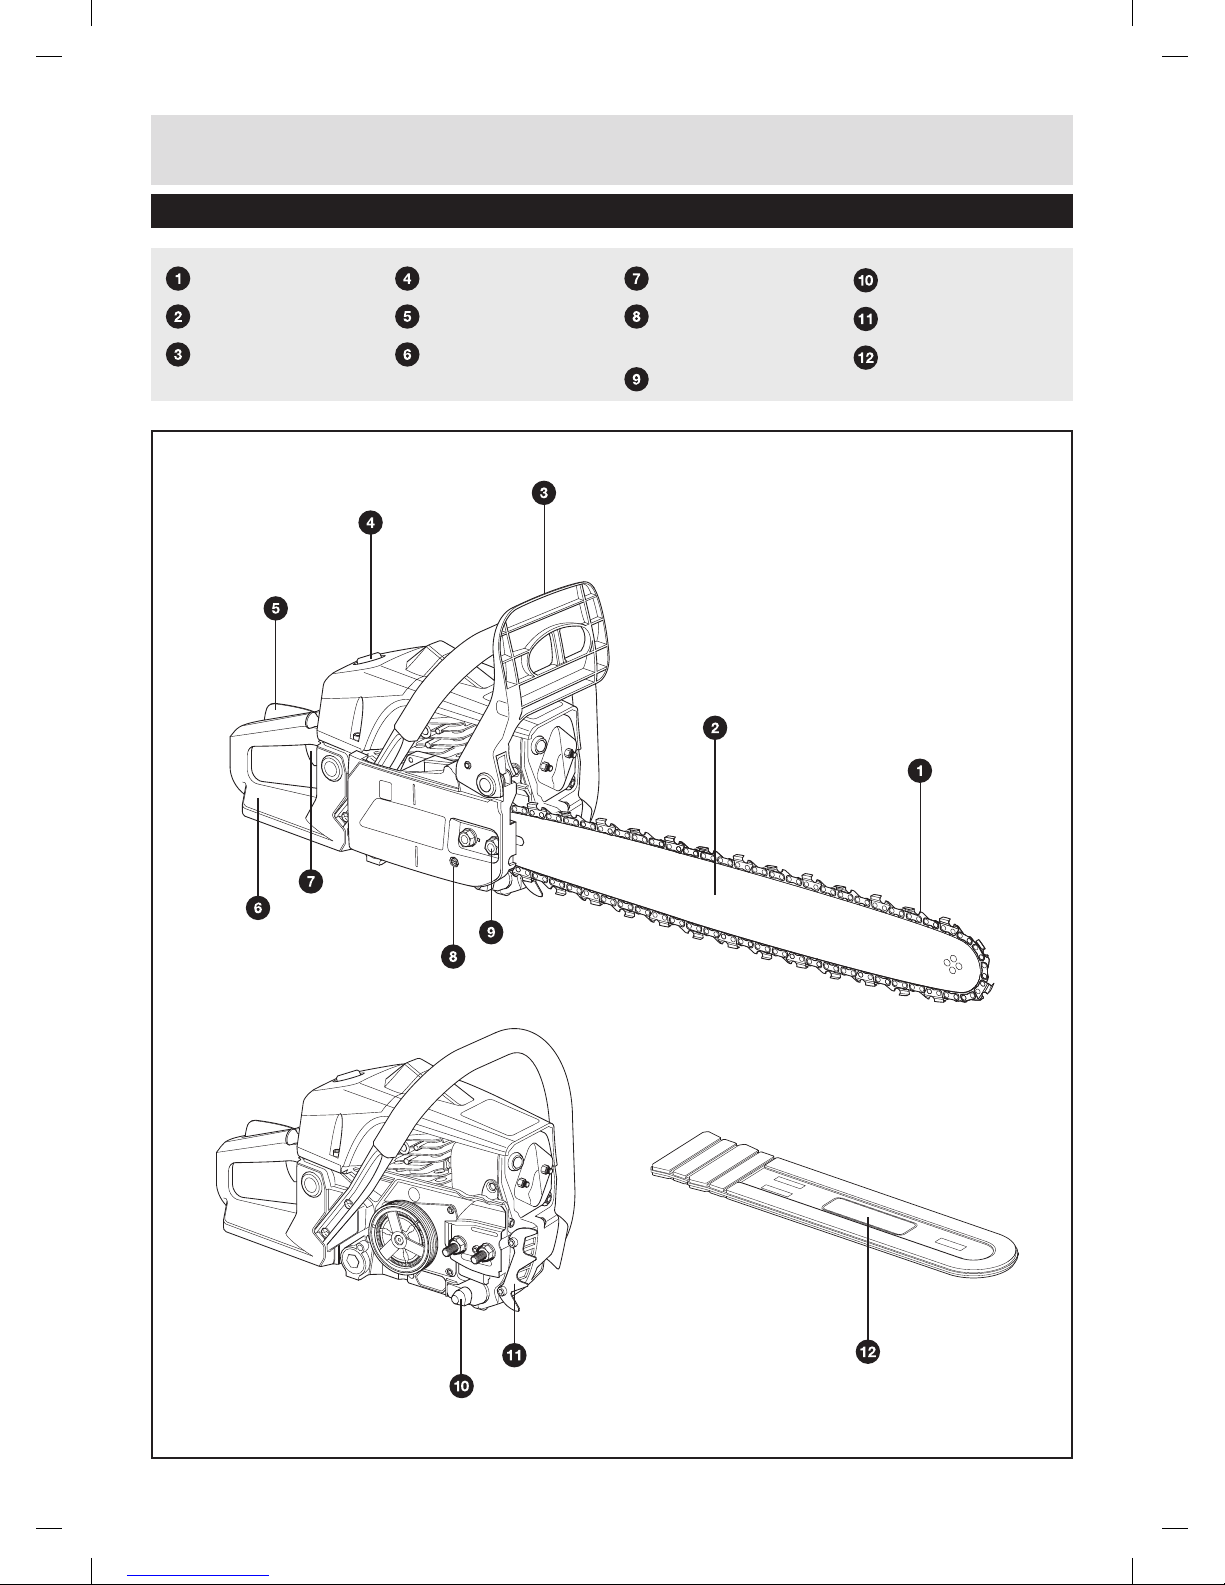
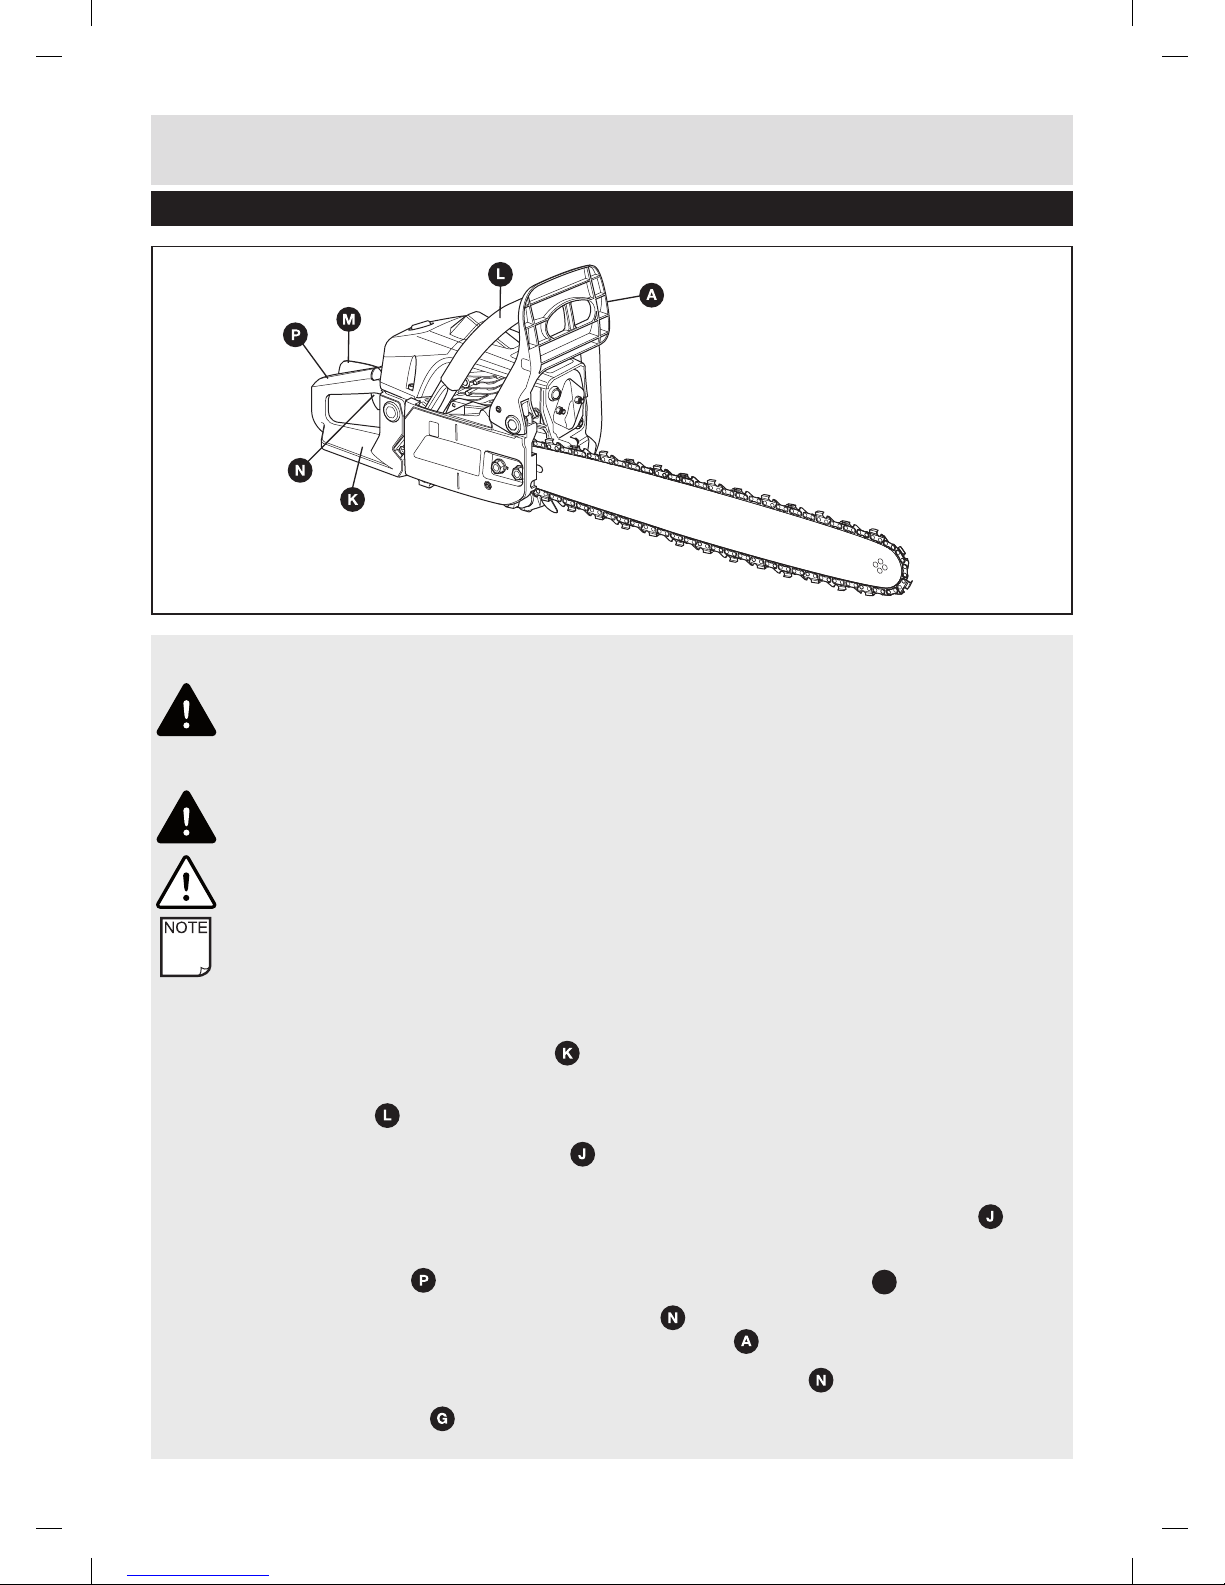
Saw chain
Chain bar
Chain brake lever/
front hand guard
Air filter cover
Safety lock
Rear handle/
bootstrap
Throttle lever
Chain
tensioning screw
Bar fastening nut
Chain catch
Stop claw
Chain guard
Components List
Page 7
5
Customer Helpline 0151 649 1500
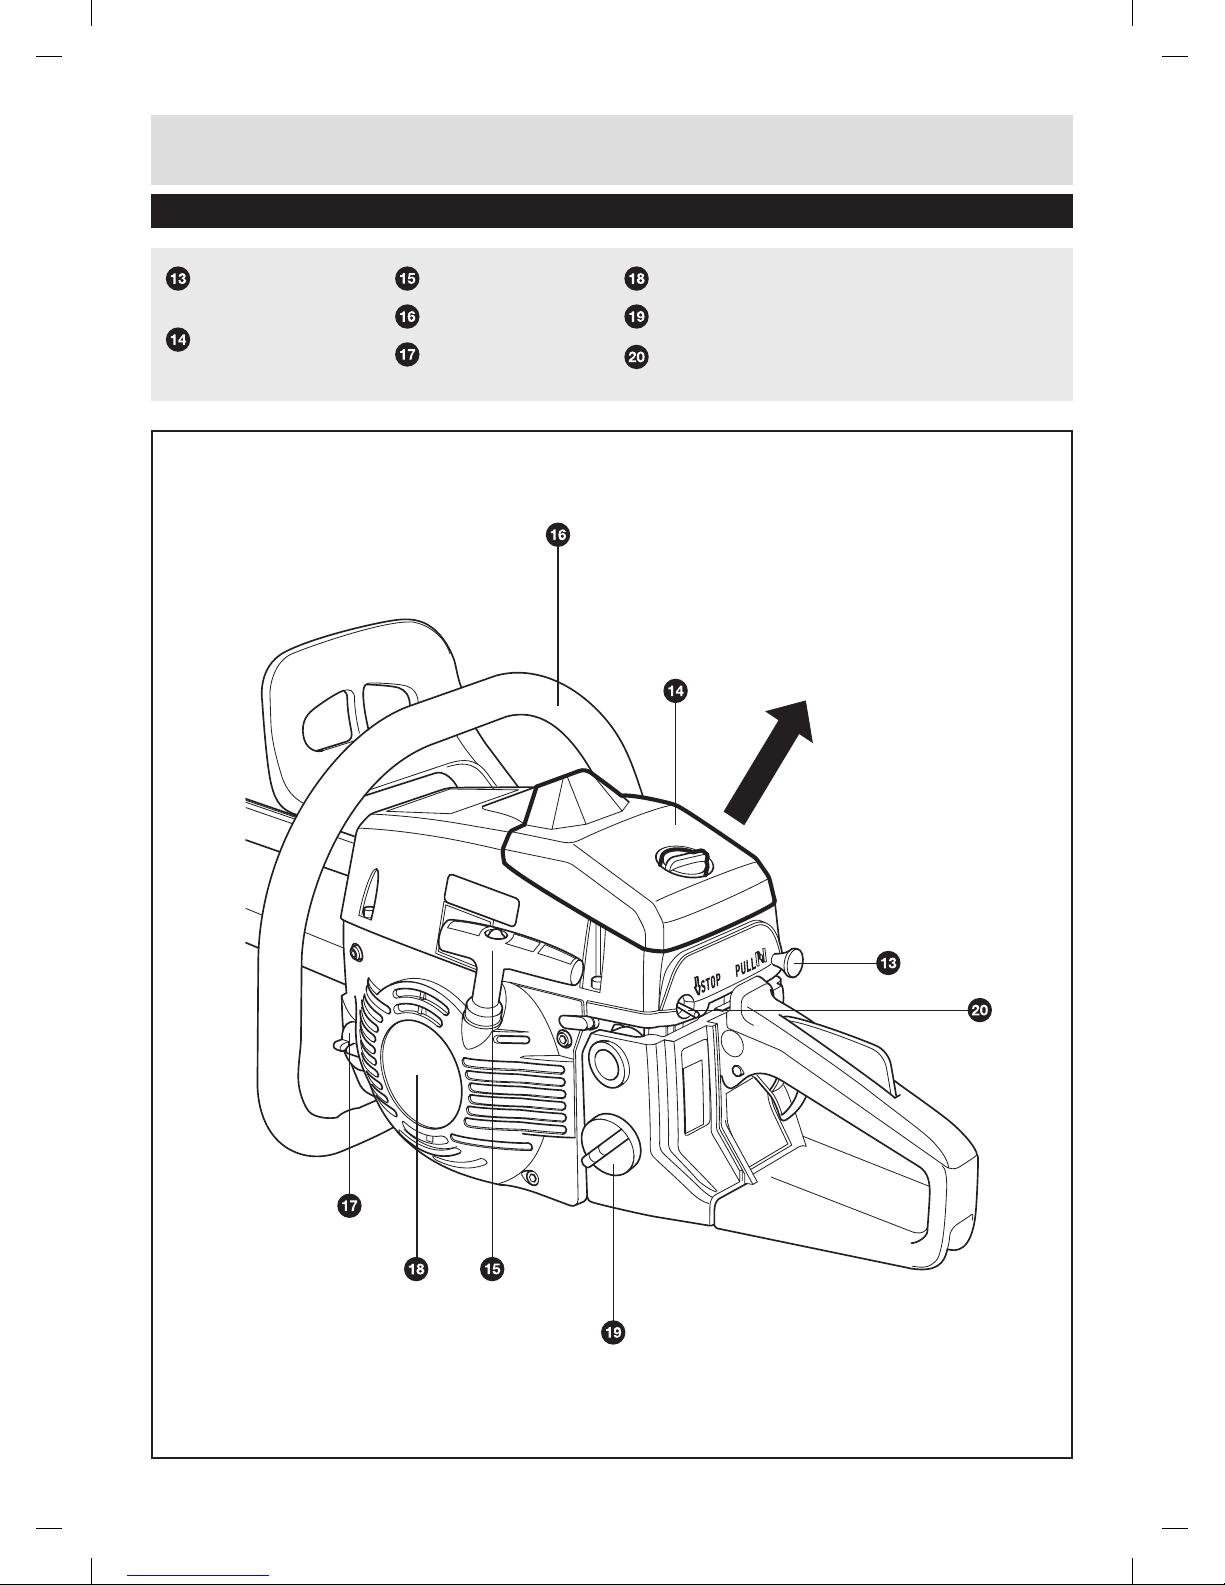
Choke/
(carburettor setting)
Spark plug
(under the air
filter cover)
Starter handle
Front handle
Oil tank cap
Fan housing
Fuel tank cap
Stop switch
Components List
Page 8
Safety Information
6
Important - Please read these instructions fully before operating or maintaining
Customer Helpline 0151 649 1500
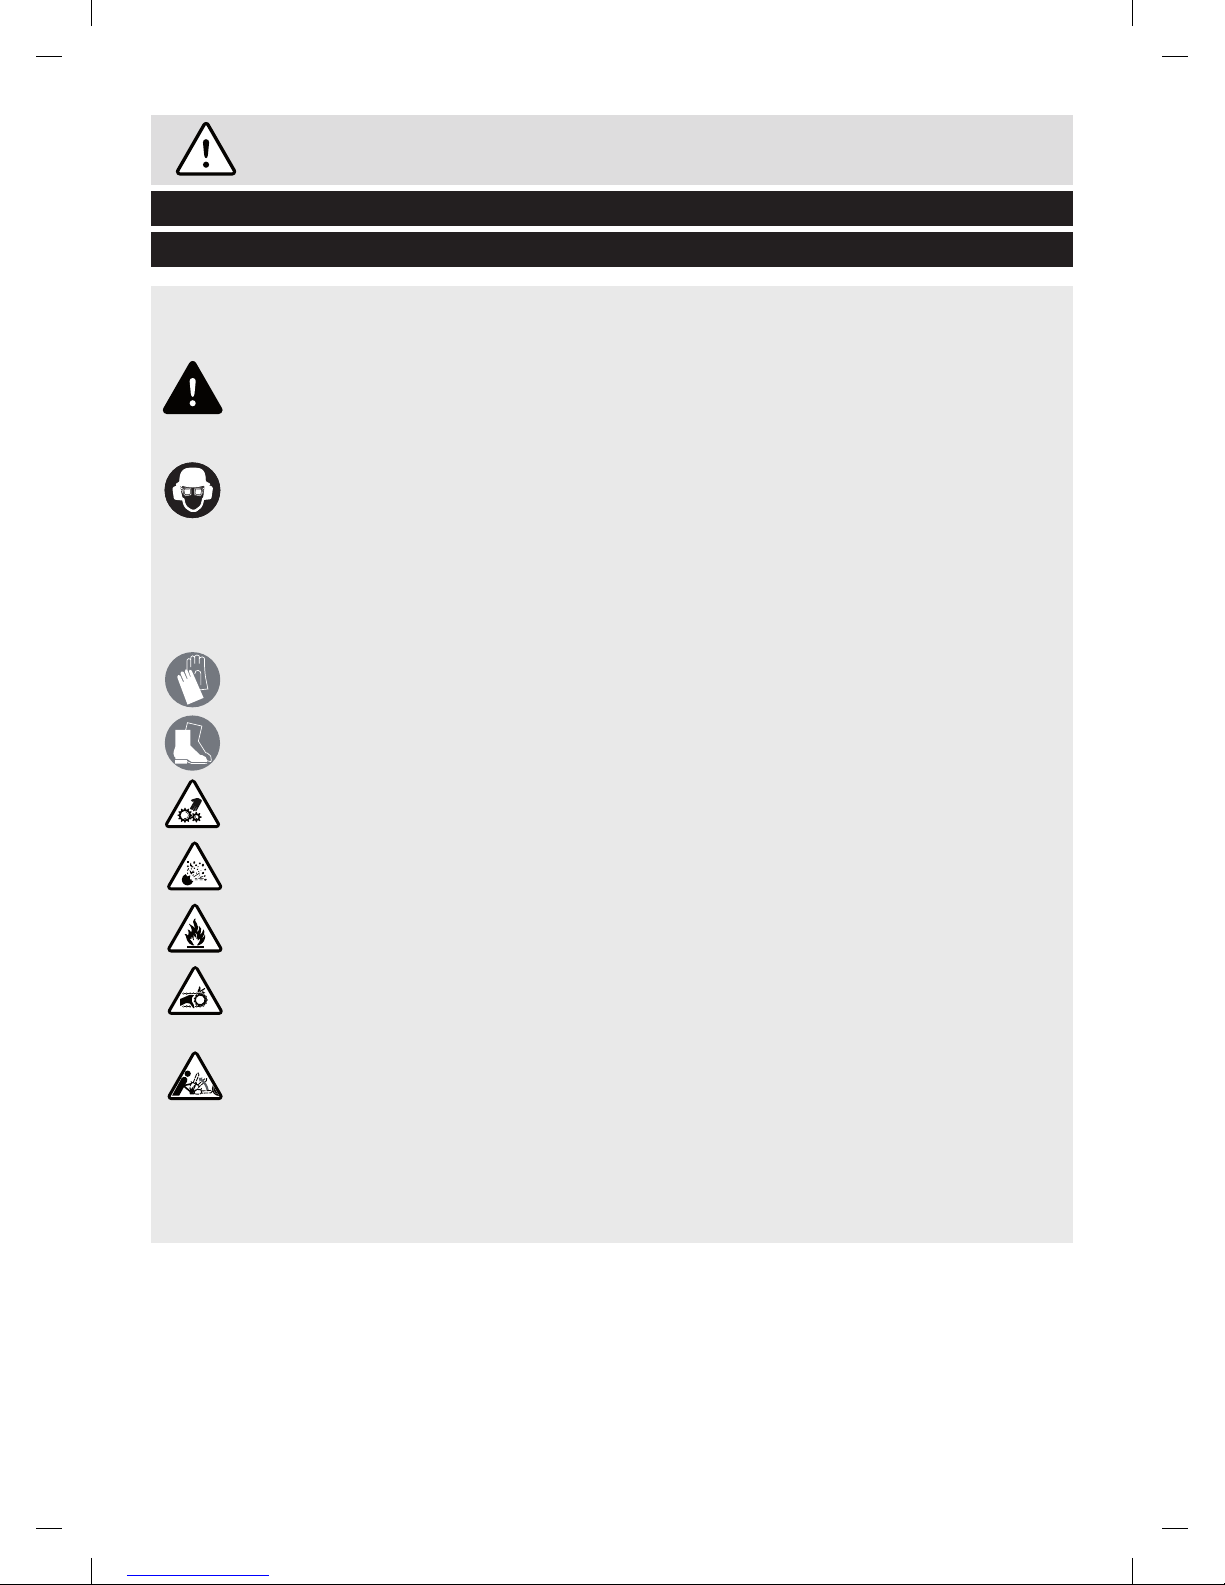
The following warning symbols appear throughout this assembly manual and indicate the appropriate
safety measures you should take when assembly and operating the chainsaw.
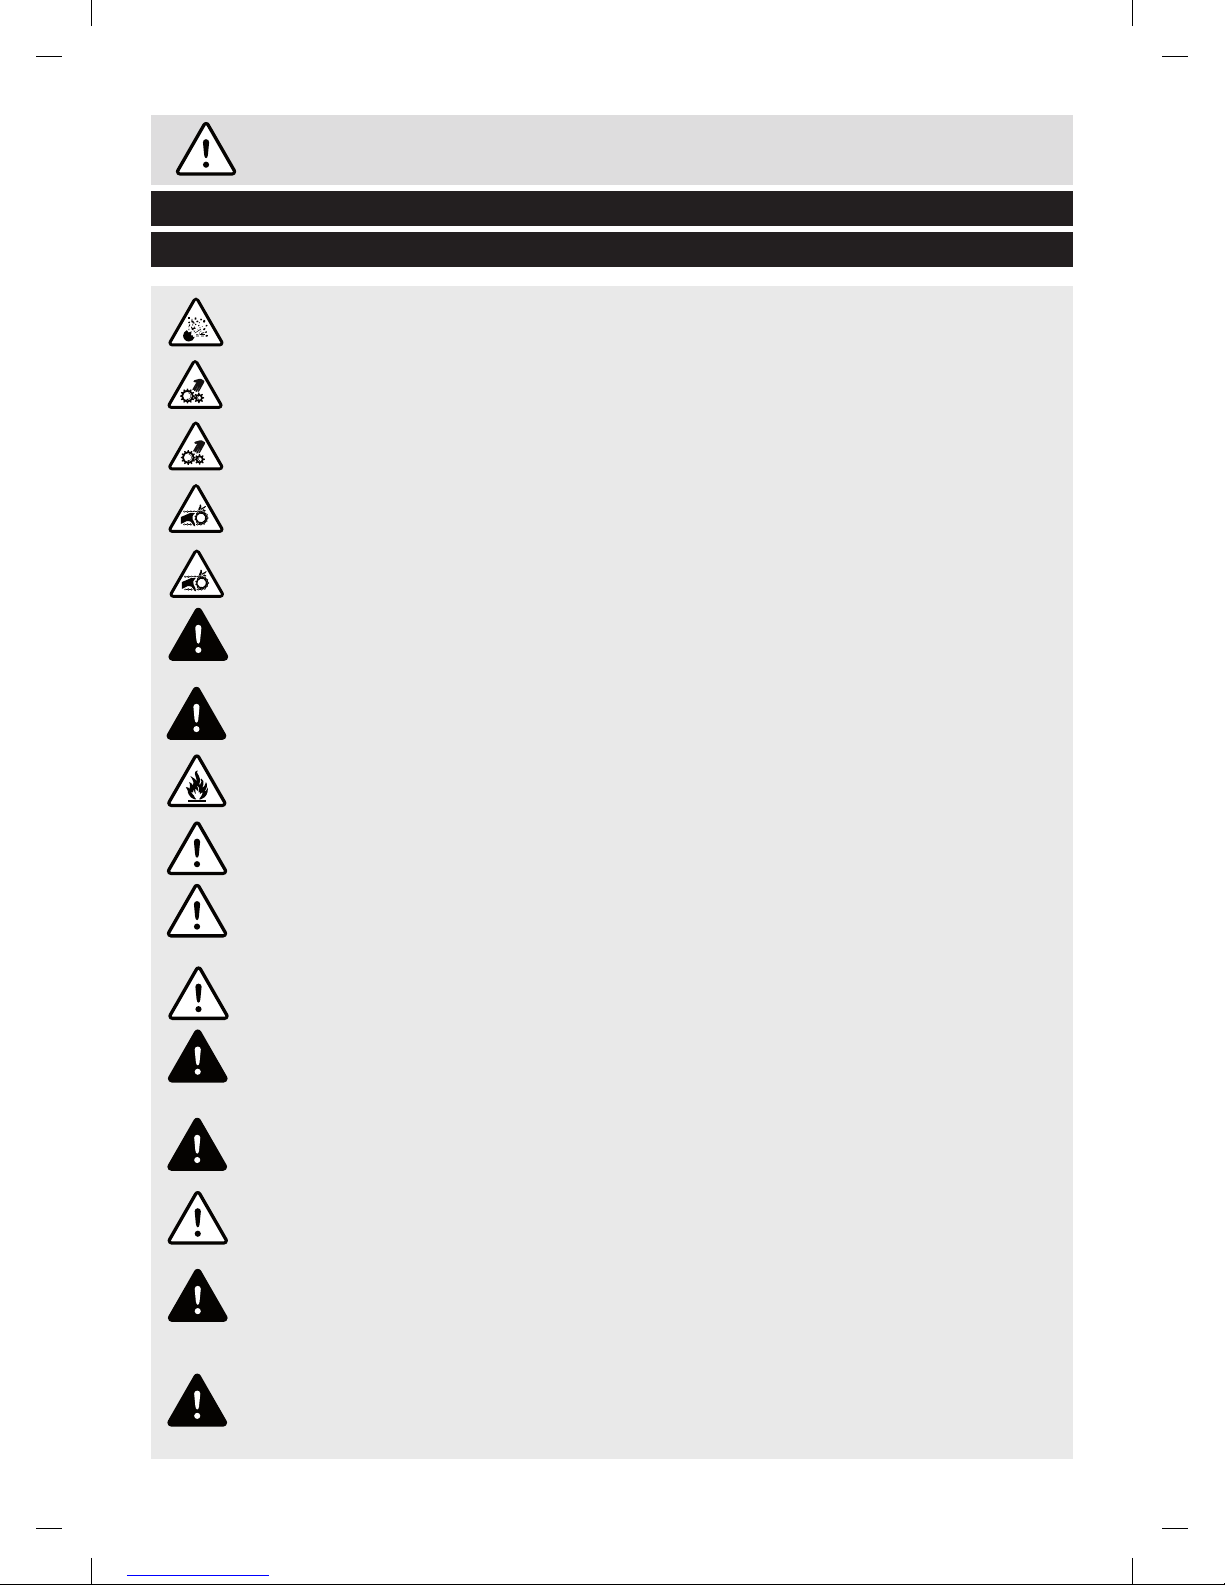
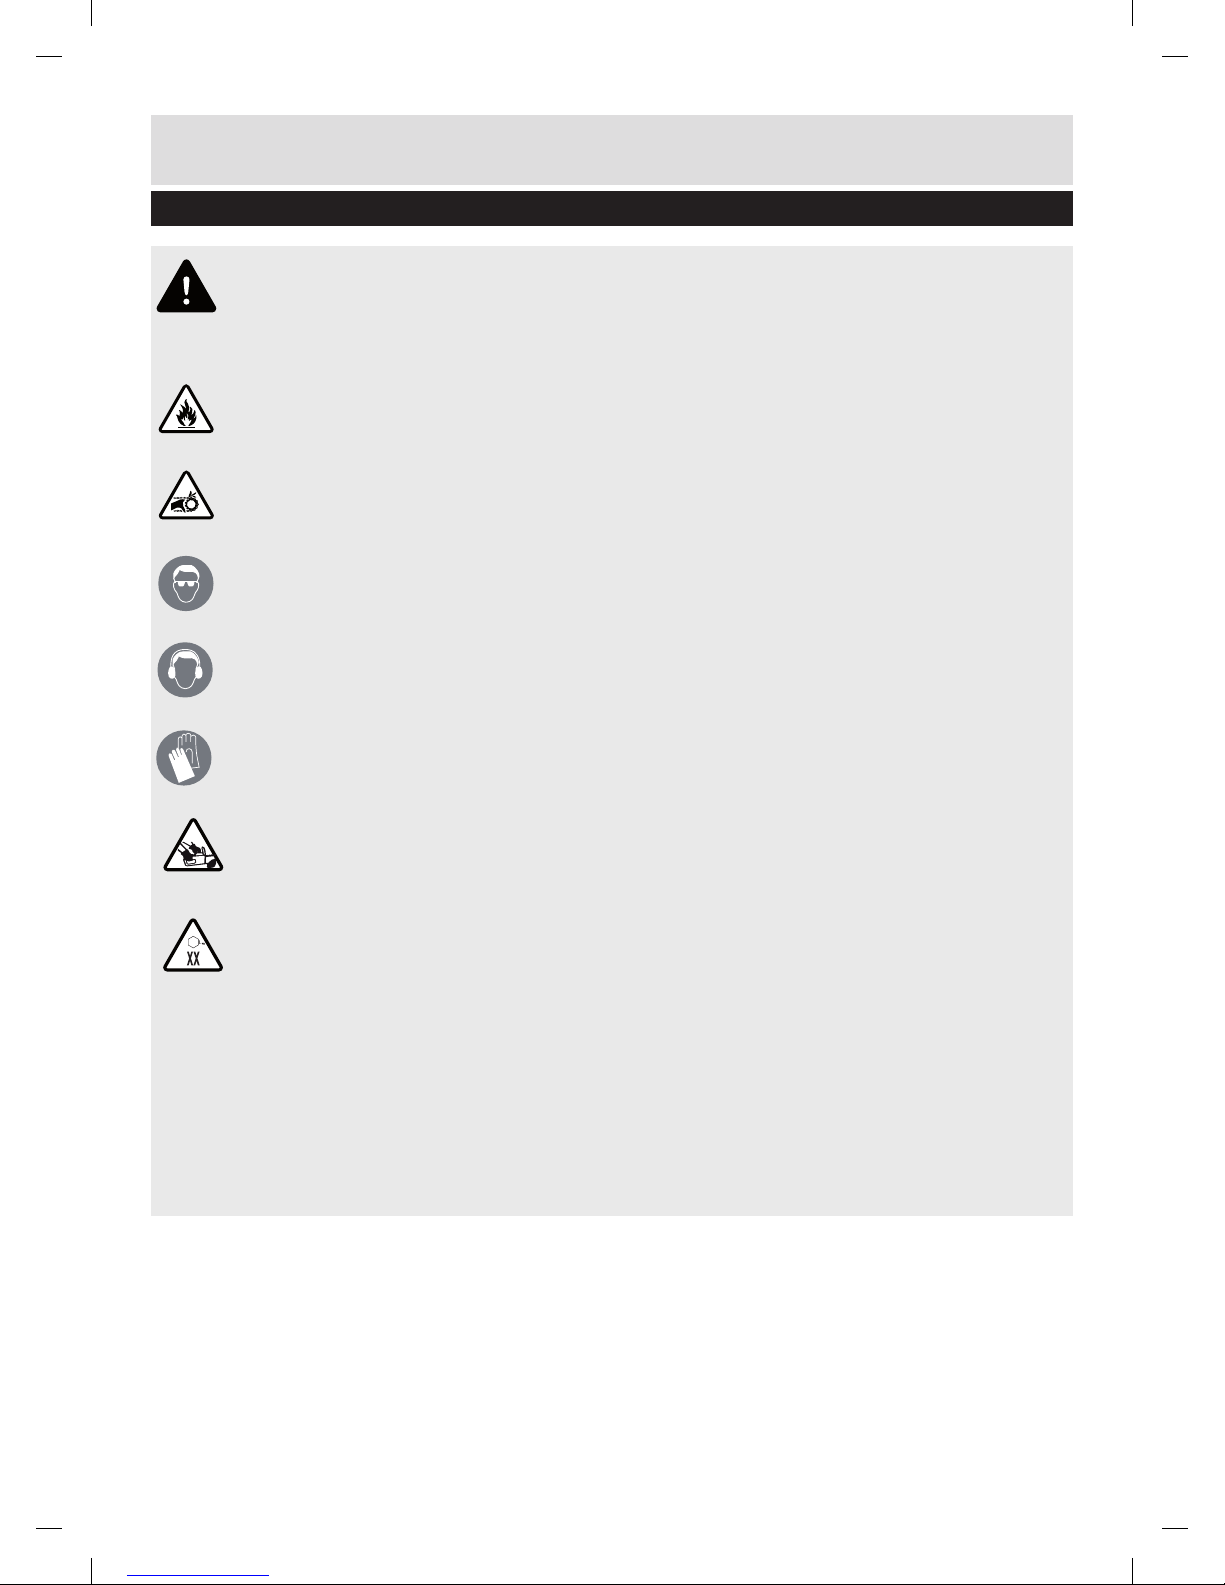
This symbol indicates there is a danger of serious personal injury or death if you do not observe
the warning.
This symbol indicates that there is: -
1. Danger of permanently damaging your hearing if you do not wear ear defenders
2. Danger of permanently damaging your sight if you do not wear suitable goggles or glasses
3. Danger of suffering serious head injuries if you do not wear a suitable helmet
This symbol indicates that there is a danger of damaging your hands if you do not wear thick, hard
wearing gloves.
This symbol indicates that there is a danger of damaging your feet if you do not wear protective shoes
or boots.
This symbol indicates there is a danger of serious personal injury if you attempt to make adjustments
to the chainsaw while it is running.
This symbol indicates there is a risk of explosion if you do not observe the warning.
This symbol indicates there is a risk of igniting flammable liquids if you do not observe the warning.
This symbol indicates there is a danger of serious personal injury if you attempt to grasp or come into
contact with a moving saw chain.
This symbol indicates there is a danger of kickback if you fail to observe this warning.
Warnings Symbols
Page 9

Safety Information
Important - Please read these instructions fully before operating or maintaining
7Customer Helpline 0151 649 1500
Explanation of the Symbols and Warning signs on the machine
Explanation of the symbols on the warning label on the machine.
Read the user manual before using the machine.
On all jobs performed with the saw you must always wear safety goggles to guard your eyes from flying
materials/objects and ear defenders to protect your hearing. Wear a safety helmet if there is a risk of
objects falling on you from above.
Important! Wear gloves to protect your hands.
Wear safety shoes to protect your feet.
Warning! Danger!
Make sure that the chain brake is released. Pull back the handle/chain brake before operating.
Noise emission complies with Directive 2000/14/EC!
Explanation of the symbols for the handling label on the machine.
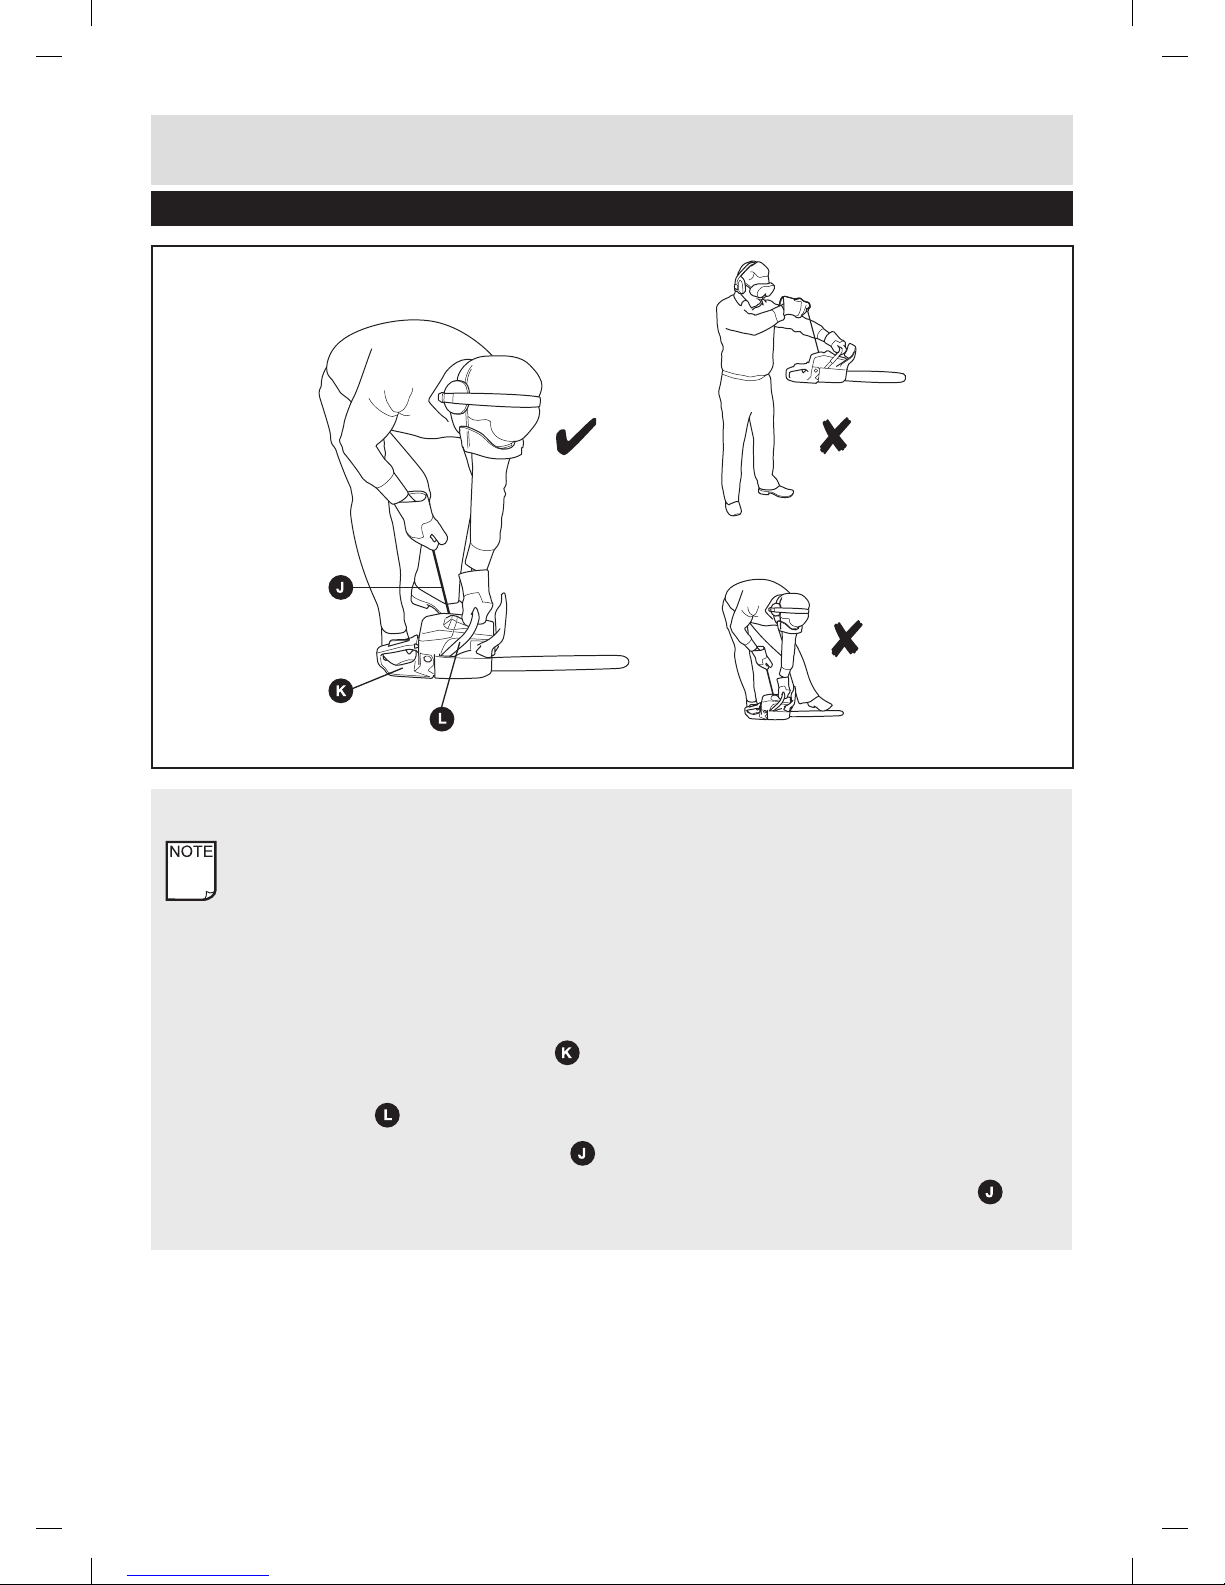
A safety sign is fitted to the chain saw’s fan filter cover. This label, along with the safety instructions
on these pages, should be carefully read before attempting to operate this unit.
IMPORTANT! Picture 1/2/3 Warns about a dangerous method of working that must not be used.
Picture 4 Recommends operation for safe sawing.
1. Avoid contact with the tip of the rail (chain return point). RECOMMENDED.
2. Warning! Beware of recoil.
3. Do not hold the saw in one hand.
IMPORTANT! Hold the saw firmly with both hands. Place your right hand on the rear handle
and your left hand on the front handle.
Page 10

Safety Information
8
Important - Please read these instructions fully before operating or maintaining
Customer Helpline 0151 649 1500
Explanation of the symbols for the brake function label on the machine.
Push the handle back to disengage the brake.
Push the handle forward to engage the brake, and stop the chain.
NOTE! The chainsaw is designed for occasional use by home owners, garden owners and campers
and is for general work such as stump grubbing, cutting firewood, etc. It is not designed for lengthy
use. If it is used for a lengthy period, the vibrations it causes in the hands of the user may result in
circulation problems (white finger syndrome).
Explanation of the Symbols and Warning signs on the machine continued
Page 11
Safety Information
Important - Please read these instructions fully before operating or maintaining
9Customer Helpline 0151 649 1500
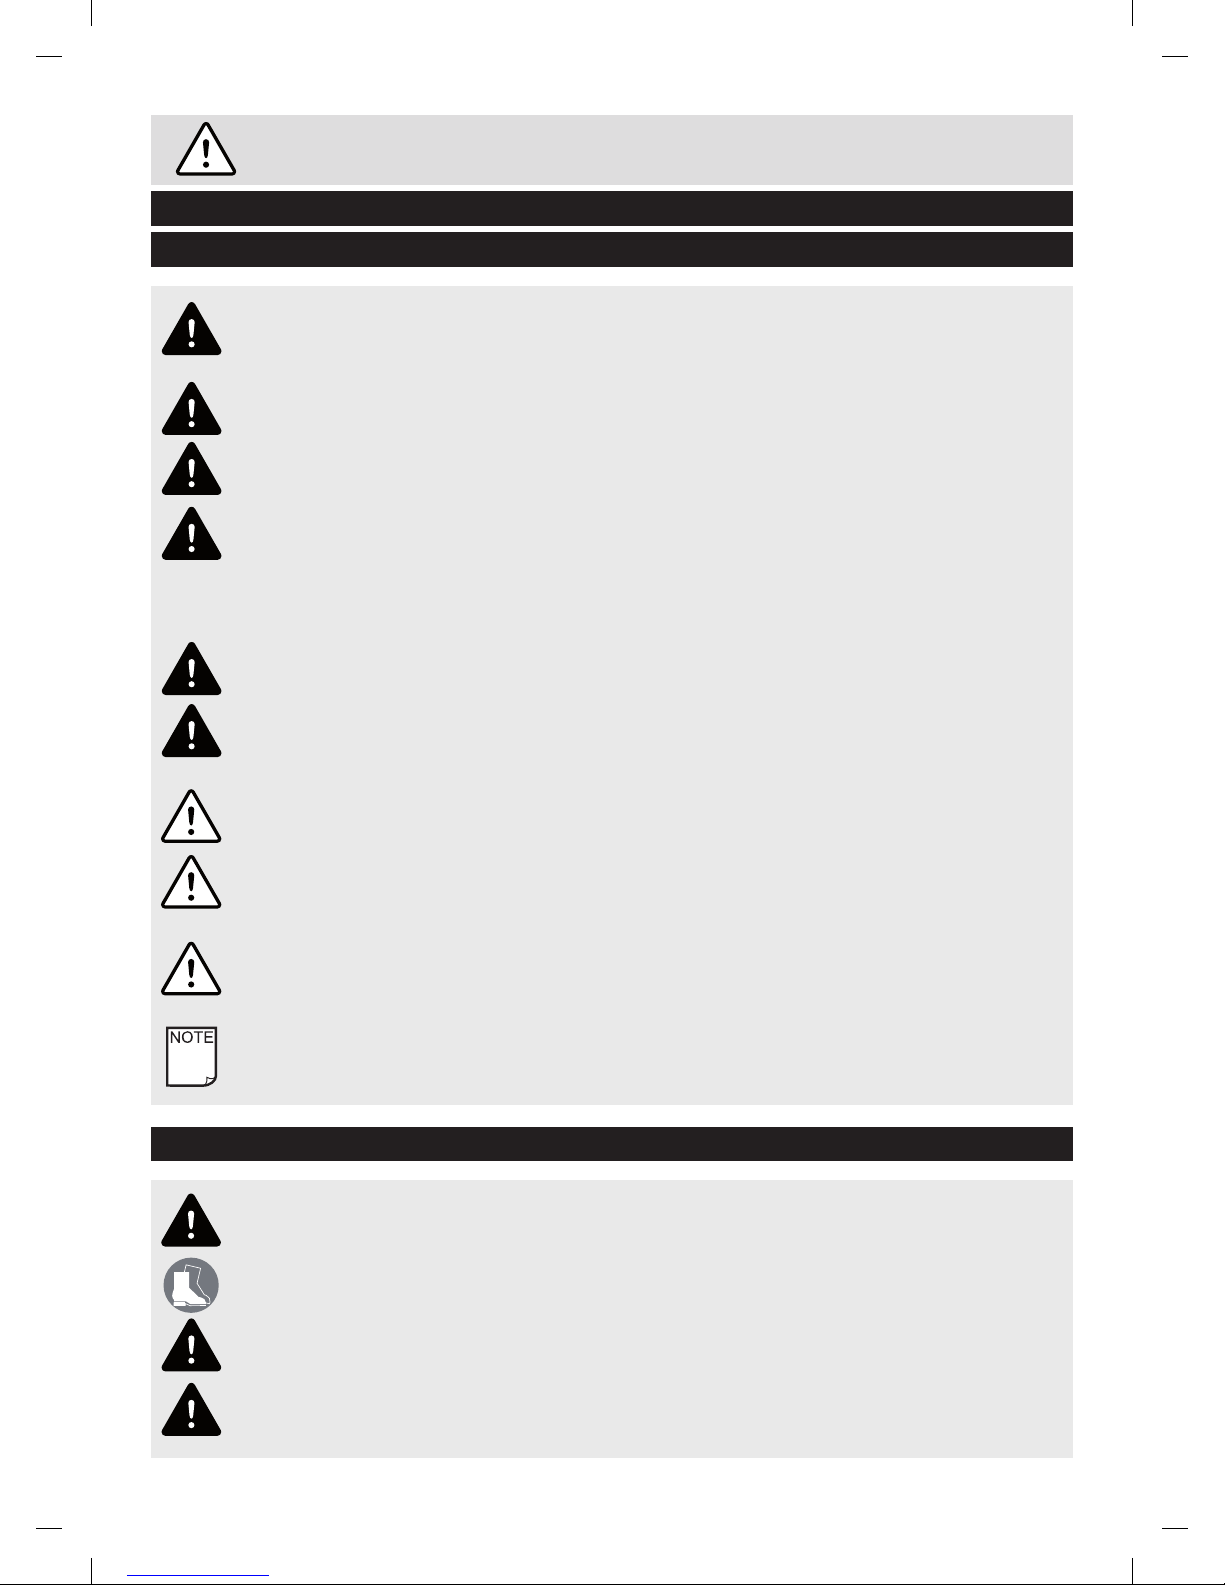
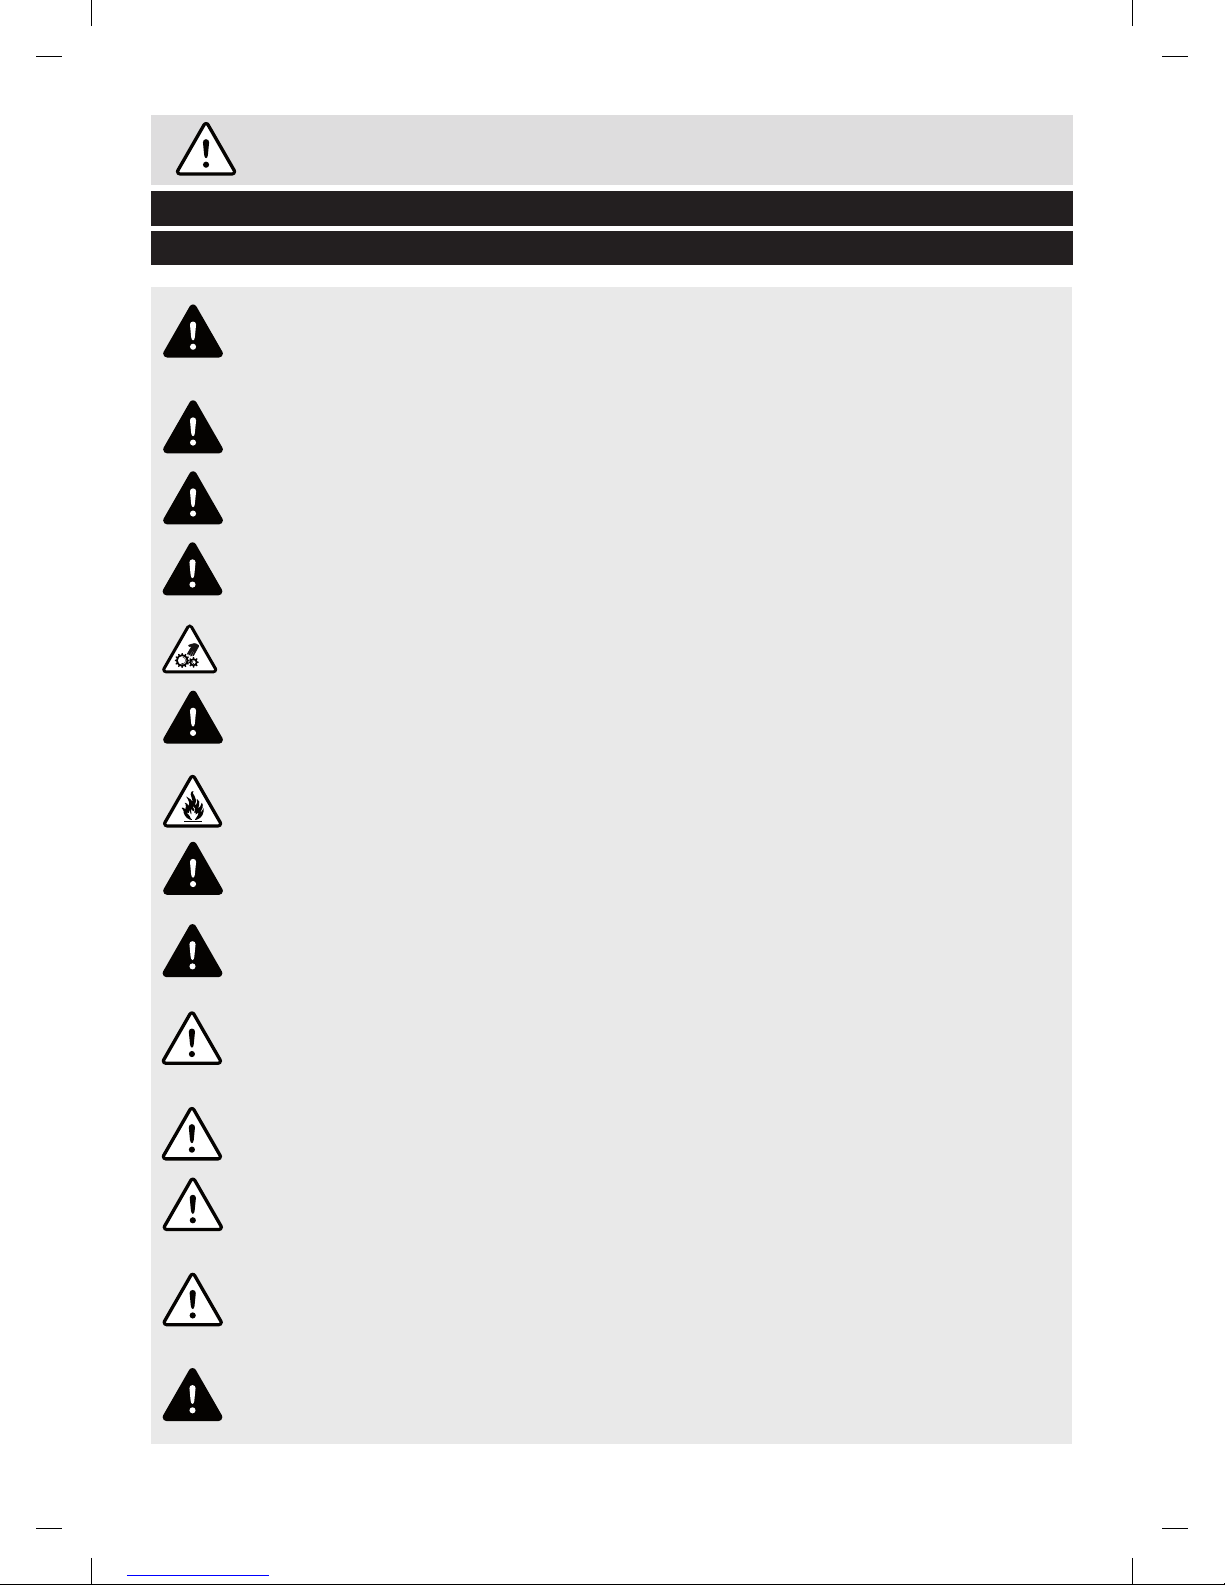
WARNING! Only operate the chainsaw if you are wearing the correct Personal Protective
Equipment (PPE) as described in the following warnings.
WARNING! Always wear a suitable helmet and footwear if you are operating the chainsaw where
there is a risk of falling objects i.e. under a tree canopy.
WARNING! Never wear loose fitting clothing while operating the chainsaw.
WARNING! Never operate the chainsaw for extended periods of time. You may become tired or
lose concentration. This may create unnecessary risks to yourself and others. Take periodic breaks
whenever possible.
WARNING! Read and follow the operating instructions and safety information before using for the first
time. Keep this operating and maintenance manual in a safe place for reference at a later date.
WARNING! Always ensure anyone intending to operate this chainsaw is fully conversant with the
contents of this manual prior to maintaining or operating the chainsaw.
WARNING! Only perform operations described in this manual. Failure to observe this warning may
lead to serious injury, death, or damage to the chainsaw.
WARNING! This chainsaw must only be used for light domestic applications such as sawing wood
in your own garden. It is not a commercial, trade or industrial product and must not be used for
extended periods of time. Extended use may lead to circulatory problems. Always seek guidance
and appropriate training before attempting to fell trees or perform sawing operations on large trees
or tree stumps.
WARNING! This chainsaw is only designed to saw wood. Under no circumstances should you
attempt to saw plastic, masonry or metallic materials.
WARNING! Always take the time to fully inspect the chainsaw for signs of damage each and every
time it is used. If any signs of damage are observed, do not use the chainsaw until it has been fully
inspected by a suitably qualified service technician.
CAUTION! The saw chain will stretch after as few as five cuts following the initial tensioning. Refer to
the operation and maintenance manual for instructions on re-adjusting the saw chain tension.
CAUTION! Only operating and maintenance procedures specifically detailed in this manual or the
maintenance manual should be carried out. All other procedures must be carried out by a suitable
qualified service technician.
IMPORTANT! Before assembling the chainsaw, check all the parts indicated in the manual are in
the box. Inspect all the parts for signs of damage. Do not assemble the chainsaw if you observe any
damaged components.
NOTE! This chainsaw complies with the Noise Emission Directive 2000/14/EC.
General Safety
Personal Safety
Page 12
Safety Information
10
Important - Please read these instructions fully before operating or maintaining
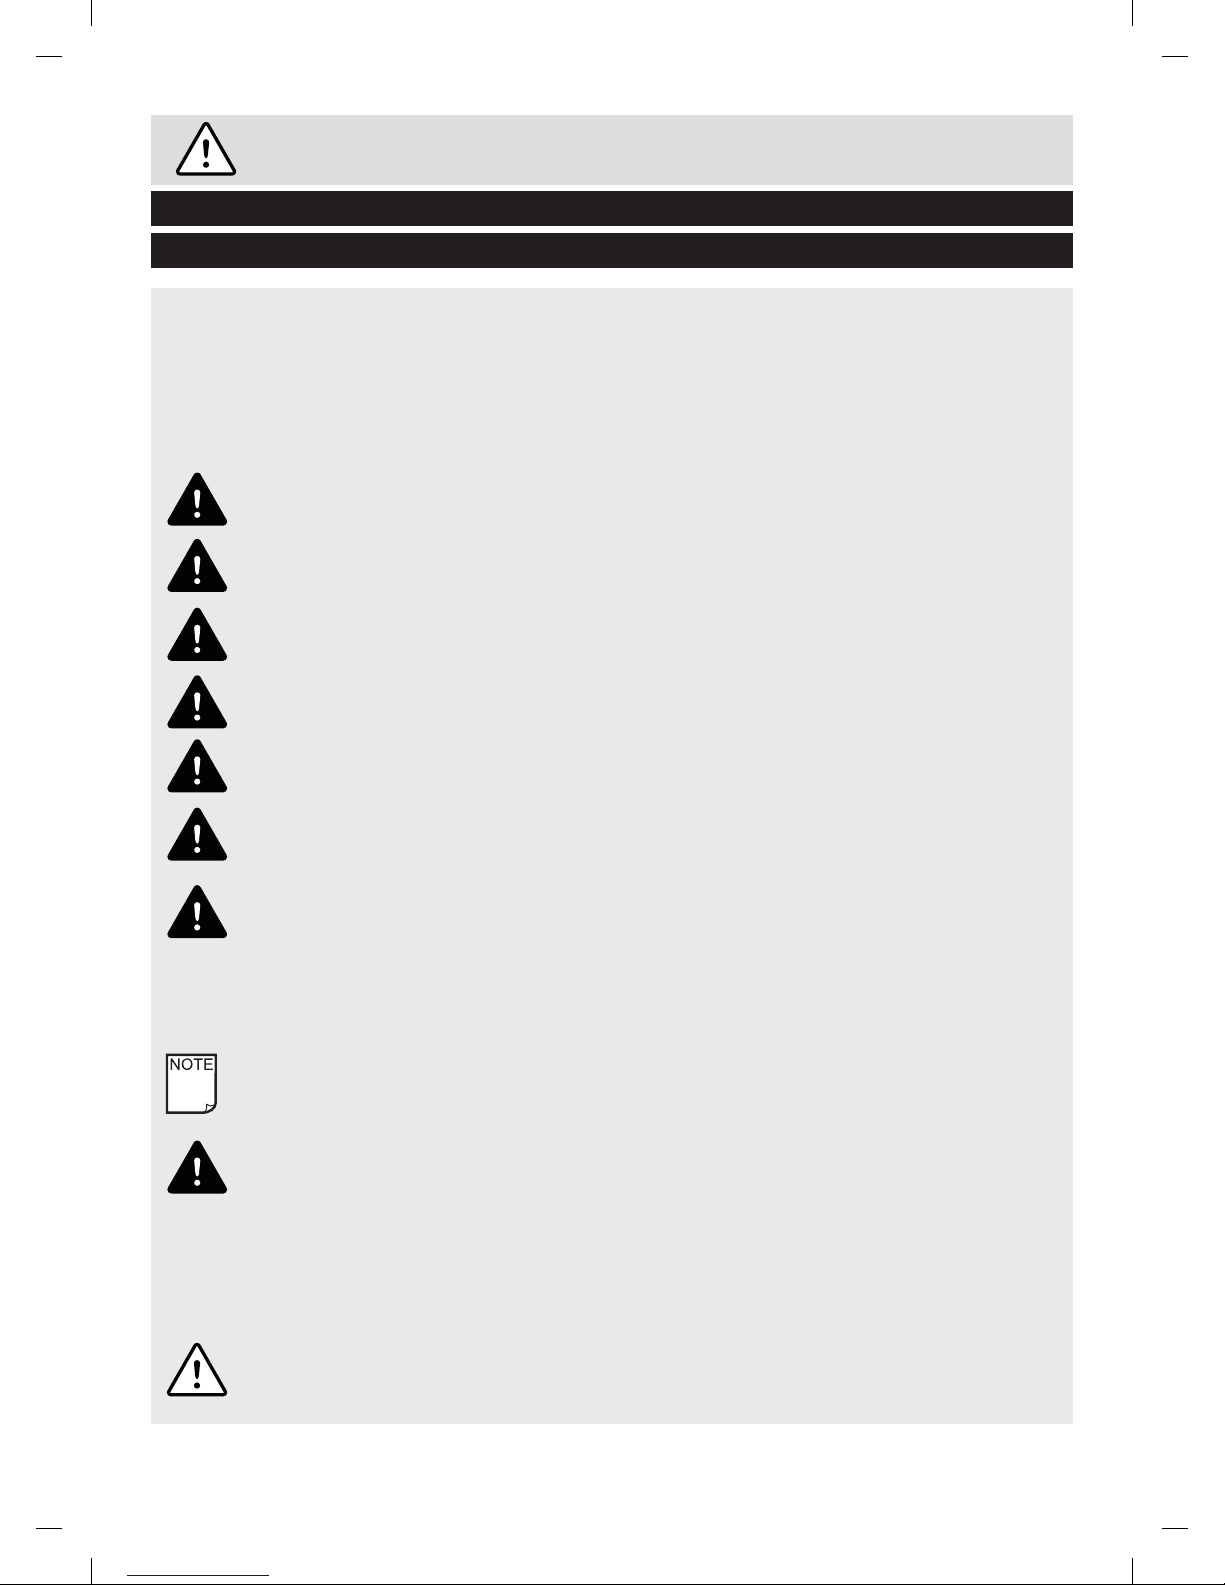
WARNING! Under no circumstances should the chainsaw be filled or refilled with the fuel mixture or
oil while the engine is running. Failure to observe this notice may present a risk of explosion.
WARNING! Under no circumstances should you attempt to lubricate any part of the chainsaw while
the engine is running.
WARNING! Always turn the engine off before setting the chainsaw down. Failure to observe this
warning may allow the chainsaw to be accidentally operated leading to serous personal injury.
WARNING! Never attempt to clear trapped debris from the saw chain while the engine is running.
WARNING! Under no circumstances should you attempt to grasp the saw chain while it is moving.
Failure to observe this warning may lead to serious personal injury.
WARNING! To stop the chainsaw in an emergency, apply rapid pressure to the chain brake.
WARNING! If the chain brake fails the operational chain brake test, DO NOT use the chainsaw until it
has been serviced and inspected by a suitably qualified technician.
WARNING! Always store excess fuel/oil mixtures drained from the fuel tank in a suitable sealed
container designed for the storage of flammable liquids.
CAUTION! Only use the large end of the supplied multitool to remove the spark plug. Using any other
tool may damage the spark plug and/or the chainsaw engine.
CAUTION! Although the guide bar is pre-lubricated at the factory, it is essential that you regularly
lubricate the guide bar in accordance with maintenance schedule. Failure to observe this caution will
inhibit the performance of the chainsaw and may void your warranty.
CAUTION! It is essential that the correct saw chain tension is maintained. This will ensure that the saw
chain, drive sprocket, guide bar and engine do not wear prematurely.
WARNING! Always ensure the chainsaw is operated in a safe area free from objects or surfaces
which may lead to tripping, slipping or loss of secure footing. Always ensure you have a planned
retreat path from a tree which is to be felled.
WARNING! Periodically inspect the work area for possible hazards while using the chainsaw.
CAUTION! Always operate the chainsaw in well ventilated areas.
WARNING! DO NOT allow other persons to be near when starting or cutting with the chain saw.
Keep bystanders and animals out of the work area.
WARNING! The engine will create toxic exhaust fumes as soon as the engine is started.
Never work in enclosed rooms or in rooms with poor ventilation.
Operating and Maintenance Safety
Customer Helpline 0151 649 1500
Page 13
Safety Information
Important - Please read these instructions fully before operating or maintaining
11Customer Helpline 0151 649 1500
WARNING! Always hold the chainsaw with two hands while operating. This chainsaw is not
designed for single-handed operation. Failure to observe this warning may lead to loss of control
and may present a serious threat of personal injury or death to yourself and others.
WARNING! Never attempt to operate or maintain the chainsaw while tired or in a situation where
you may be easily distracted.
WARNING! Do not operate the chainsaw if you have a medical condition which may affect your
ability to operate it safely. If unsure, seek medical advice.
WARNING! Never attempt to operate or maintain the chainsaw under the influence of drugs and/or
alcohol. Your ability to operate chainsaw safely may be reduced, leading to serious injury, death or
damage to the chainsaw.
WARNING! Never expose any part of the body to saw chain while the engine is running. Failure to
observe this warning my lead to serious injury or death.
WARNING! Always ensure the chain brake works correctly before operating the chainsaw by
performing the chain brake mechanical test. Never use the chainsaw if the chain brake is damaged,
fails to operate correctly or is not assembled correctly.
WARNING! Never start the chainsaw in close proximity to stored fuel. Failure to observe this
warning may lead to inadvertent ignition of stored or spilled fuel leading to personal injury.
WARNING! Never attempt to operate the chainsaw at heights or in a tree unless you have
undertaken specific training and are suitable qualified to do so. Failure to observe this warning may
lead to serious personal injury to yourself and others.
WARNING! Always ensure the handles and controls of the chainsaw are dry and free from grease,
mixed fuel, oil or any other lubricant. Failure to observe this warning may lead to loss of control and
serious personal injury or death.
CAUTION! Never use the chainsaw to saw/cut small bushes, shrubs or saplings. The branches of
these may get caught in the cutting blades of the saw chain and whipped towards you or pull you
off balance.
CAUTION! Always be alert when sawing branches under tension. Once sawn/cut, the tension will
be released. You may become unbalanced or struck by loose objects.
CAUTION! When the chainsaw is not in use, always carry it by the handle with the saw chain and
guide bar facing rearwards. Whenever possible, cover the saw chain with the protective cover
provided.
CAUTION! During operation, the chainsaw will exhaust hot gases. Keep all exposed parts of the
body away from the exhaust.
WARNING! If your fingers become white or you feel an awkward feeling (prickle) in your fingers,
stop working immediately!
Handling Safety
Page 14
Safety Information
12
Important - Please read these instructions fully before operating or maintaining
The chain is designed exclusively for sawing wood. You may only fell trees if you have received
the appropriate training. The manufacturer cannot be held liable for damage caused by improper
or incorrect usage.
Residual hazards
Even when the equipment is used properly, a certain residual hazard cannot be ruled out. The
following potential dangers may arise in connection with the equipment’s design and construction:
Contact with the unguarded saw chain (injuries through cutting).
Reaching into the saw chain while it is running (injuries through cutting).
Unforeseen, sudden movement of the cutter rail (injuries through cutting).
Catapulting of parts of the saw chain.
Catapulting of parts of the material being cut.
Damage to hearing if the compulsory hearing protection is not used Inhalation of particles
from the material being cut, emissions from the combustion engine.
Skin contact with petrol.
The machine is to be used only for its prescribed purpose. Any other use is deemed to be a case
of misuse. The user / operator and not the manufacturer will be liable for any damage or injuries
of any kind caused as a result of this.
Please note that our equipment has not been designed for use in commercial, trade or industrial
applications. Our warranty will be voided if the machine is used in commercial, trade or industrial
businesses or for equivalent purposes.
The following information is primarily for the end user or occasional user. The chainsaw is designed
for occasional use by home owners, garden owners and campers and is for general work such
as stumpgrubbing, cutting firewood, etc. It is not designed for lengthy use. If it is used for a lengthy
period, the vibrations it causes in the hands of the user may result in circulation problems (white
finger syndrome).The hand-arm vibration syndrome (vibration white finger) is a vascular disease
that involves seizure-like spasms of the fingers and toes. The affected areas are no longer sufficiently
supplied with blood and therefore appear extremely pale. The frequent use of vibrating equipment
may trigger nerve damage in people with an impaired circulation (for example smokers, diabetics).
Should you observe any unusual impairments, interrupt your work immediately and consult a doctor.
Proper Use
Customer Helpline 0151 649 1500
Page 15
Safety Information
Important - Please read these instructions fully before operating or maintaining
13
Safety Information
Follow these instructions in order to reduce the dangers:
Keep your body and in particular your hands warm when working in the cold.
Take regular breaks and move your hands to stimulate the blood circulation during the breaks.
Ensure that the equipment makes the least possible vibration through regular maintenance and
solid parts on the equipment.
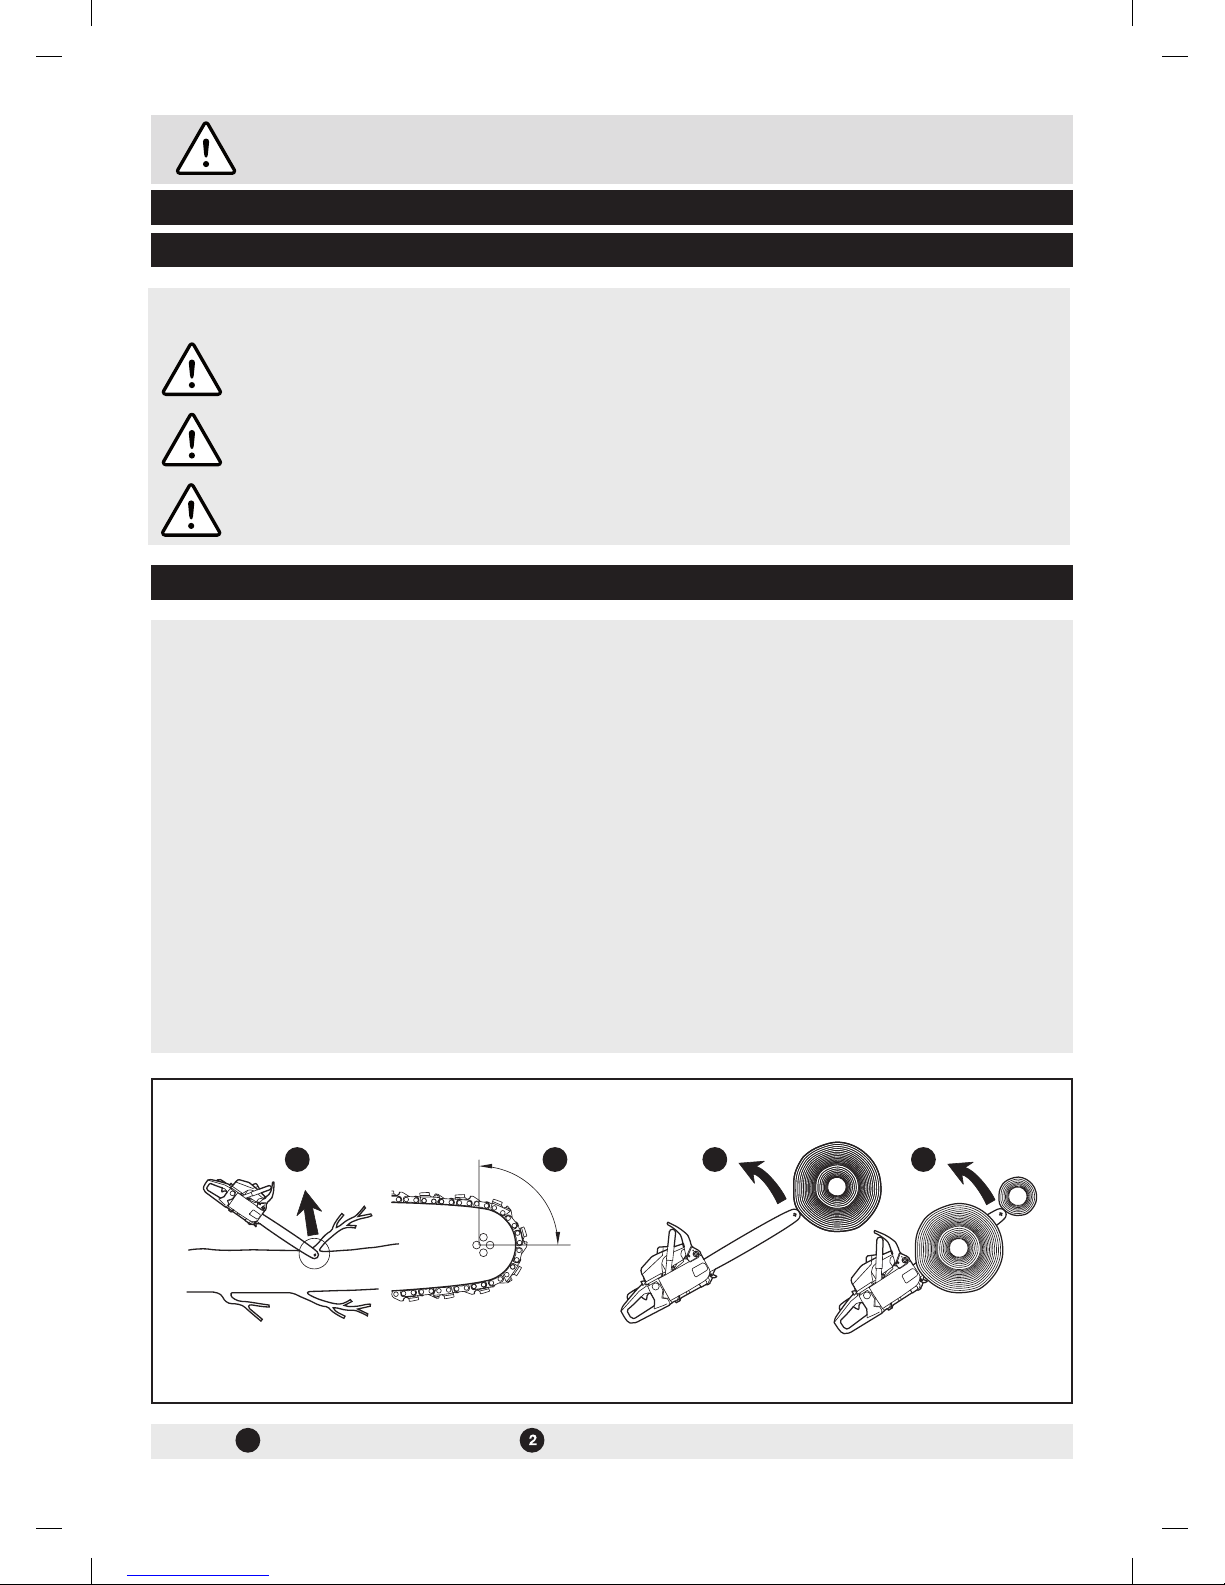
Kickback is the term used to describe the reaction of the chainsaw when the nose or tip of the guide
bar comes into contact with an object. This form of contact causes a lightening fast reverse reaction
causing the nose or tip of the chainsaw to ‘kickback’ towards the operator. This presents a risk of
serious personal injury or even death. Although the chainsaw is fitted with the various safety features,
it is imperative that you stay alert at all times to prevent kickback occurring. You can do this by
observing the following simple rules:
• Ensurethechainsawisheldrmlywithbothhands.Therighthandshouldgriptherearhandleand
the left hand the front handle. Gripping the handles firmly will help you control the chainsaw more
effectively in the event of kickback.
• Ensurethetipornoseofthechainsawnevercomesintocontactwithanyobjectwhileoperating.
• Alwaysusethechainsawatfullthrottletomaintaintheoptimumcuttingspeed.
• Undernocircumstancesshouldyouoverreachwhileoperatingthechainsaw.
The following figure demonstrates the reaction zone of the chainsaw tip and situations which may
cause kickback.
Kickback Safety
Proper Use (continued)
1
Direction of reaction
Reaction zone
1 2 1 1
Customer Helpline 0151 649 1500
Page 16
Safety Information
14
Important - Please read these instructions fully before operating or maintaining
Customer Helpline 0151 649 1500
Safety Information
Important - Please read these instructions fully before operating or maintaining
Pinching is the term used to describe the reaction of the chainsaw when the BOTTOM or TOP of
the guide bar is pinched in the object being cut or sawn. This form of contact causes the chainsaw
to move rapidly towards or away from you. If the BOTTOM of the guide is pinched, the chainsaw will
be pulled away from you. If the TOP of the guide is pinched, the chainsaw will be pushed towards
you. This presents a risk of serious personal injury or even death. Although the chainsaw is fitted
with the various safety features, it is imperative that you stay alert at all times to prevent pinching
occurring.
To prevent pinching, always place the object to be cut against the claw stop at the rear of the guide
bar as shown in the figure below.
Pinching Safety
The following figure demonstrates the types of sawing action which may lead to pinching.
Push Reaction
Pull reaction
4
3
Page 17
15
Customer Helpline 0151 649 1500
Step 1 - Assembly of the Chain Saw
Step 2 - Check the Chain Brake
Preparing to Operate the Chainsaw
2a and 2b
Disengaged Engaged
Please refer to the Assembly Instructions booklet for details of how to assemble the chainsaw.
Please refer to the Assembly Instructions booklet for details of how to adjust the tension of the
Chain bar and Chain on the chain saw Main Body Assembly.
Please refer to the Assembly Instructions booklet for details of how to fit the Chain bar and
Chain to the chain saw Main Body Assembly.
Page 18

16
Customer Helpline 0151 649 1500
WARNING! The chain brake must not be tested with the chainsaw running unless strictly instructed
to do so in this manual. Failure to observe this warning may lead to serious personal injury.
WARNING! The chain brake can only reduce the possibility of serious personal injury if it is fitted in
accordance with the instructions detailed in the Assembly Manual. If the chain brake is tampered with
or the chainsaw is not used in accordance with these operating instructions i.e. careless operation,
the risk of serious injury may still exist.
CAUTION! If it proves difficult to move the chain brake lever into the required position, stop using
the chainsaw immediately. It should be inspected by a suitably qualified service technician.
The chainsaw is fitted with a chain brake which is designed to reduce the possibility of serious
personal injury due to kickback. The chain brake is engaged when pressure is applied to the chain
brake lever i.e. when the operator’s hand strikes the chain brake lever during kickback.
Once the chain brake is engaged, the saw chain stops moving immediately.
WARNING! NEVER use a chainsaw which is damaged, incorrectly set or incompletely and loosely
assembled. Failure to observe this warning may lead to serious personal injury.
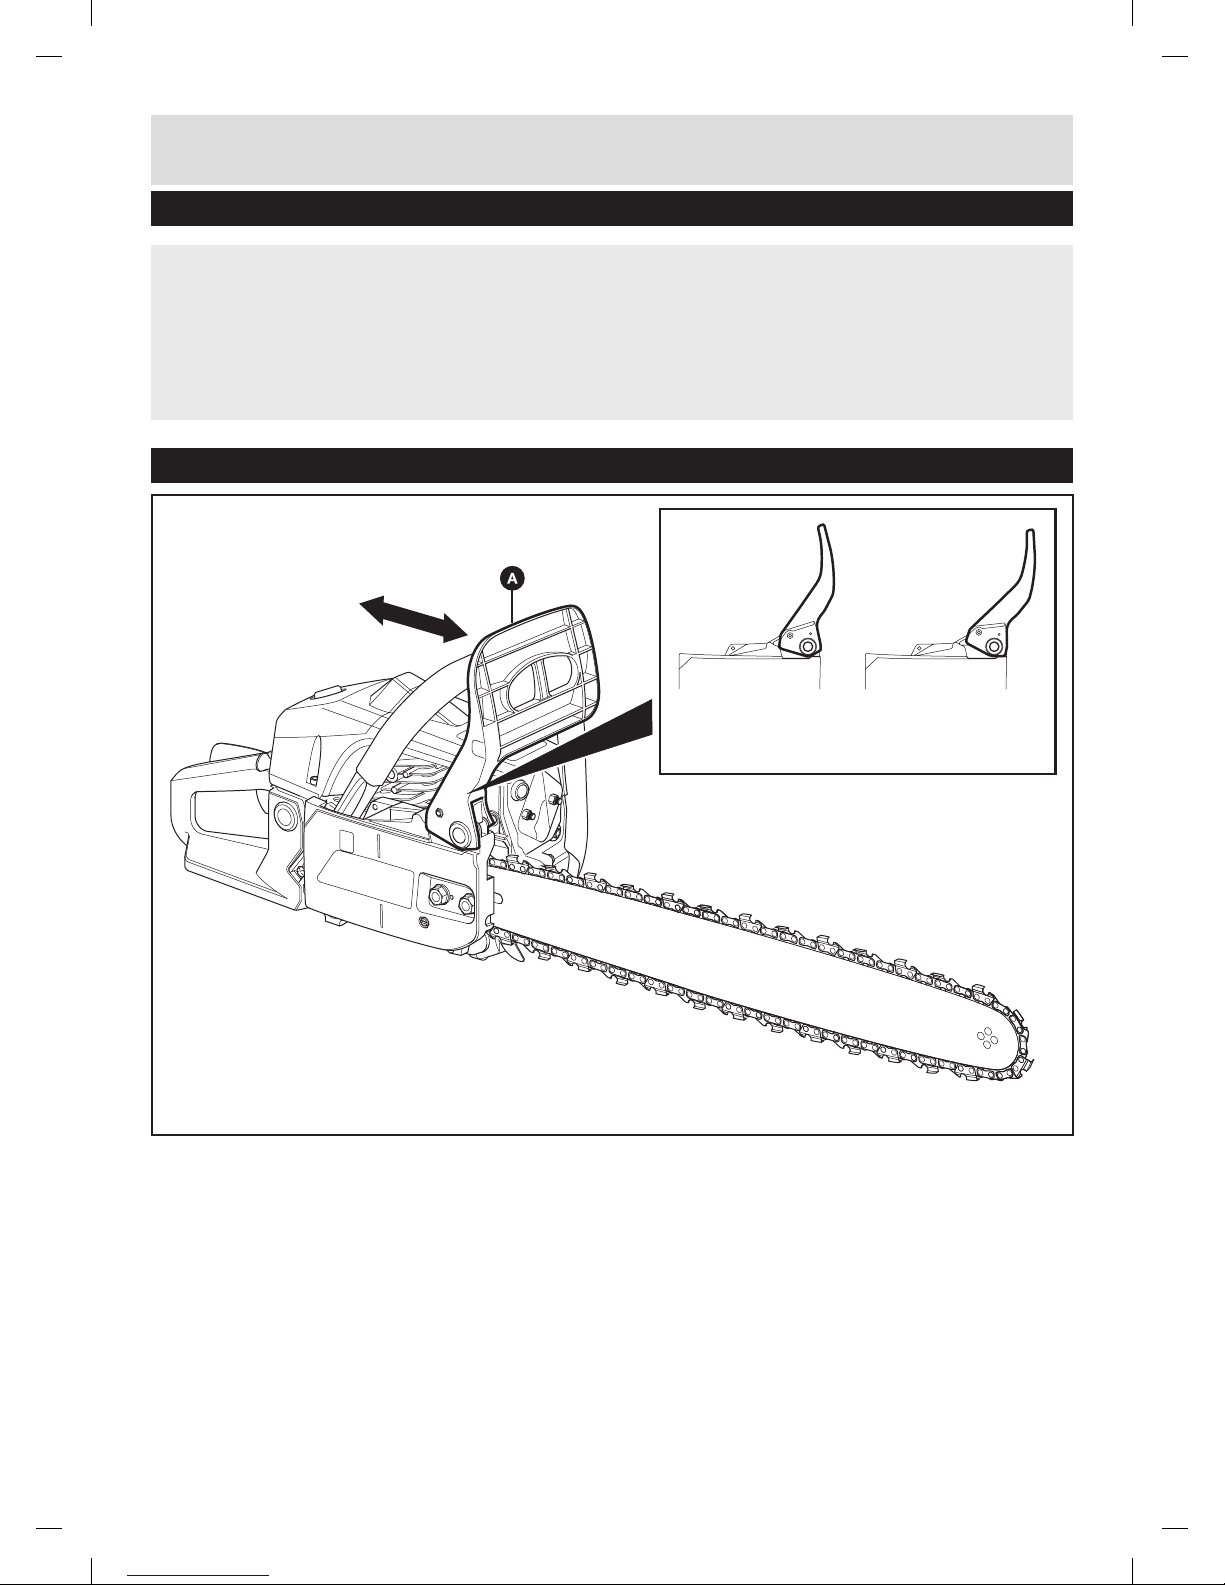
Step 2 - Check the Chain Brake (continued)
Preparing to Operate the Chainsaw
2a. Check the Chain Brake Disengages
Pull the chain brake lever
A
fully backwards until it ‘clicks’ into position. If the chain brake is
disengaged it should be possible to move the saw chain using a gloved hand.
If it is not possible to move the saw chain, the chain brake may be damaged. Do not use the chainsaw
until it has been inspected by a suitably qualified technician.
2b. Check the Chain Brake Engages
Push the chain brake lever
A
fully forwards until it ‘clicks’ into position. If the chain brake is engaged it
should NOT be possible to move the saw chain using a gloved hand.
If it is possible to move the saw chain, the chain brake may be damaged. Do not use the chainsaw
until it has been inspected by a suitably qualified technician.
Page 19

17
Customer Helpline 0151 649 1500
Preparing to Operate the Chainsaw
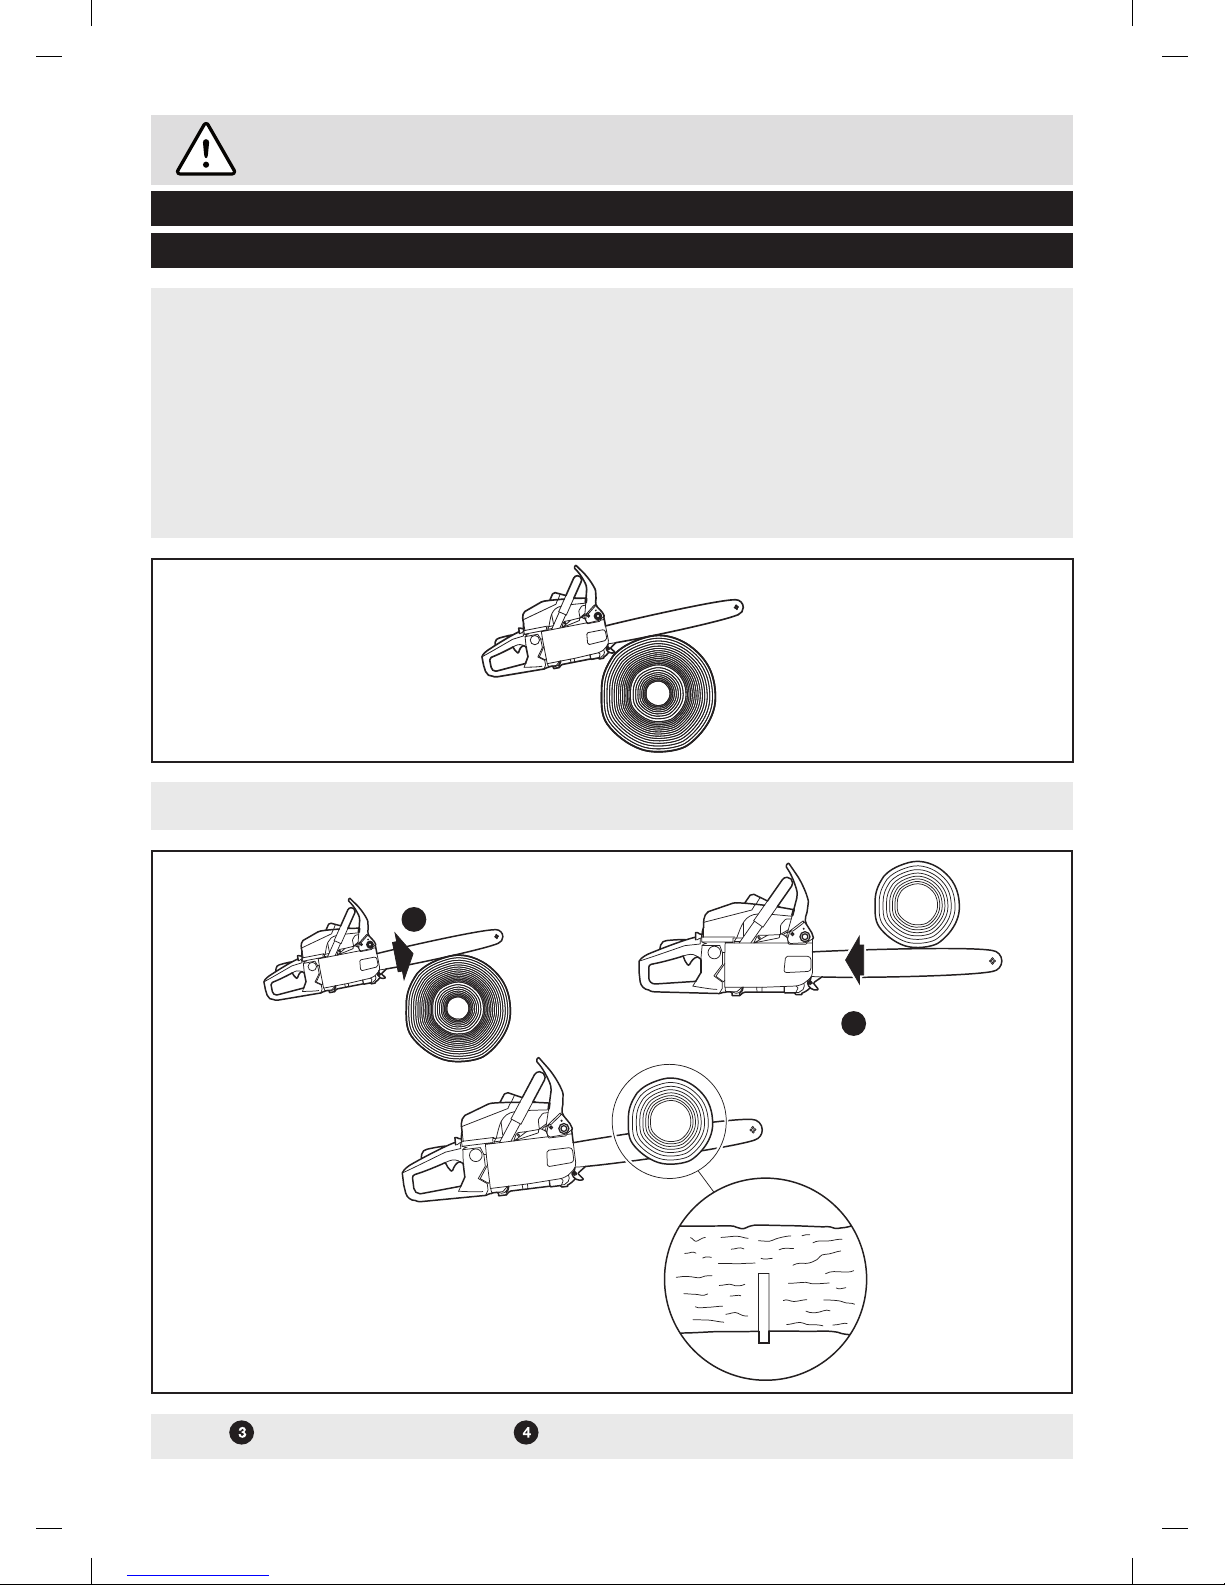
Step 3 - Fuel and Lubrication
3a
3b
2-cycle engine oil
Regular unleaded fuel
x 30 seconds
Page 20

18
Customer Helpline 0151 649 1500
It essential for the smooth operation of the chainsaw to use the correct type of fuel and oil.
The chainsaw utilises a 2-stroke engine which runs on a mixture of regular unleaded fuel and
2-cycle engine oil mixed at a ratio of 40:1.
The chainsaw will operate with any brand or grade of regular unleaded fuel which is designed for
automotive use.
2a. Filling the Mixing Container with Fuel and Oil
WARNING! Before attempting to mix fuel and oil, always ensure all sources of ignition are removed
i.e. naked flames.
WARNING! The chainsaw should NOT be used with petrol only. This will cause permanent damage
to the engine and will void your warranty.
CAUTION! Only use premium grade oil for 2-cycle air cooled engines designed to be mixed to a ratio
of 40:1. Under no circumstances should oils designed for 100:1 mixes be used. Failure to observe this
caution may prevent the engine from being suitable lubricated.
CAUTION! Using 2-cycle oils designed for mixing ratio other than 40:1 will void your warranty.
CAUTION! Do not use a fuel/oil mixture which has been stored for more than 90 days.
NOTE! It is recommended that a full container of fuel and oil is mixed every time to ensure the correct
mixing ratio is achieved.
Fill the supplied mixing container
with approximately 500 ml of regular unleaded fuel. This level
is indicated on the side of the container.
Add 2-cycle oil to the mixing container
to fill up to the 40:1 oil indication . This requires 12.5 ml
of oil.
2b. Mixing Fuel and Oil
Ensuring the top of the mixing container
is fitted and fully tightened, shake vigorously for
30 seconds.
Step 3 - Fuel and Lubrication (continued)
Preparing to Operate the Chainsaw
Page 21

19
Customer Helpline 0151 649 1500
Step 4 - Filling the Fuel Tank
Preparing to Operate the Chainsaw
4a. Fill the Fuel Tank
WARNING! Before attempting to fill the fuel tank, always ensure all sources of ignition are removed i.e.
naked flames.
Remove the fuel tank cap
by unscrewing anti-clockwise.
Remove the top of the mixing container
(shown in step 2) and position a suitable funnel (not
supplied) into the fuel tank. Pour the fuel and oil mixture into the fuel tank.
Refit the fuel tank cap
and tighten by turning clockwise. Only tighten using your hands - DO NOT
use tools.
4a
Page 22

20
Customer Helpline 0151 649 1500
Step 5 - Filling the Chain Lubrication Oil Tank
Preparing to Operate the Chainsaw
5a. Fill the Oil Tank
WARNING! Before attempting to fill the oil tank, always ensure all sources of ignition are removed
i.e. naked flames.
Remove the oil tank cap
by unscrewing anti-clockwise.
Fill the oil tank with the suitable oil designed for lubricating saw chains.
Refit the oil tank cap
and tighten by turning clockwise. Only tighten using your hands -
DO NOT use tools.
NOTE! Please refer to the Maintenance Section - Step 6 for details of how to lubricate the chain /
chain bar.
5a
Page 23

21
Customer Helpline 0151 649 1500
Step 1 - Starting the Engine
Operating the Chainsaw
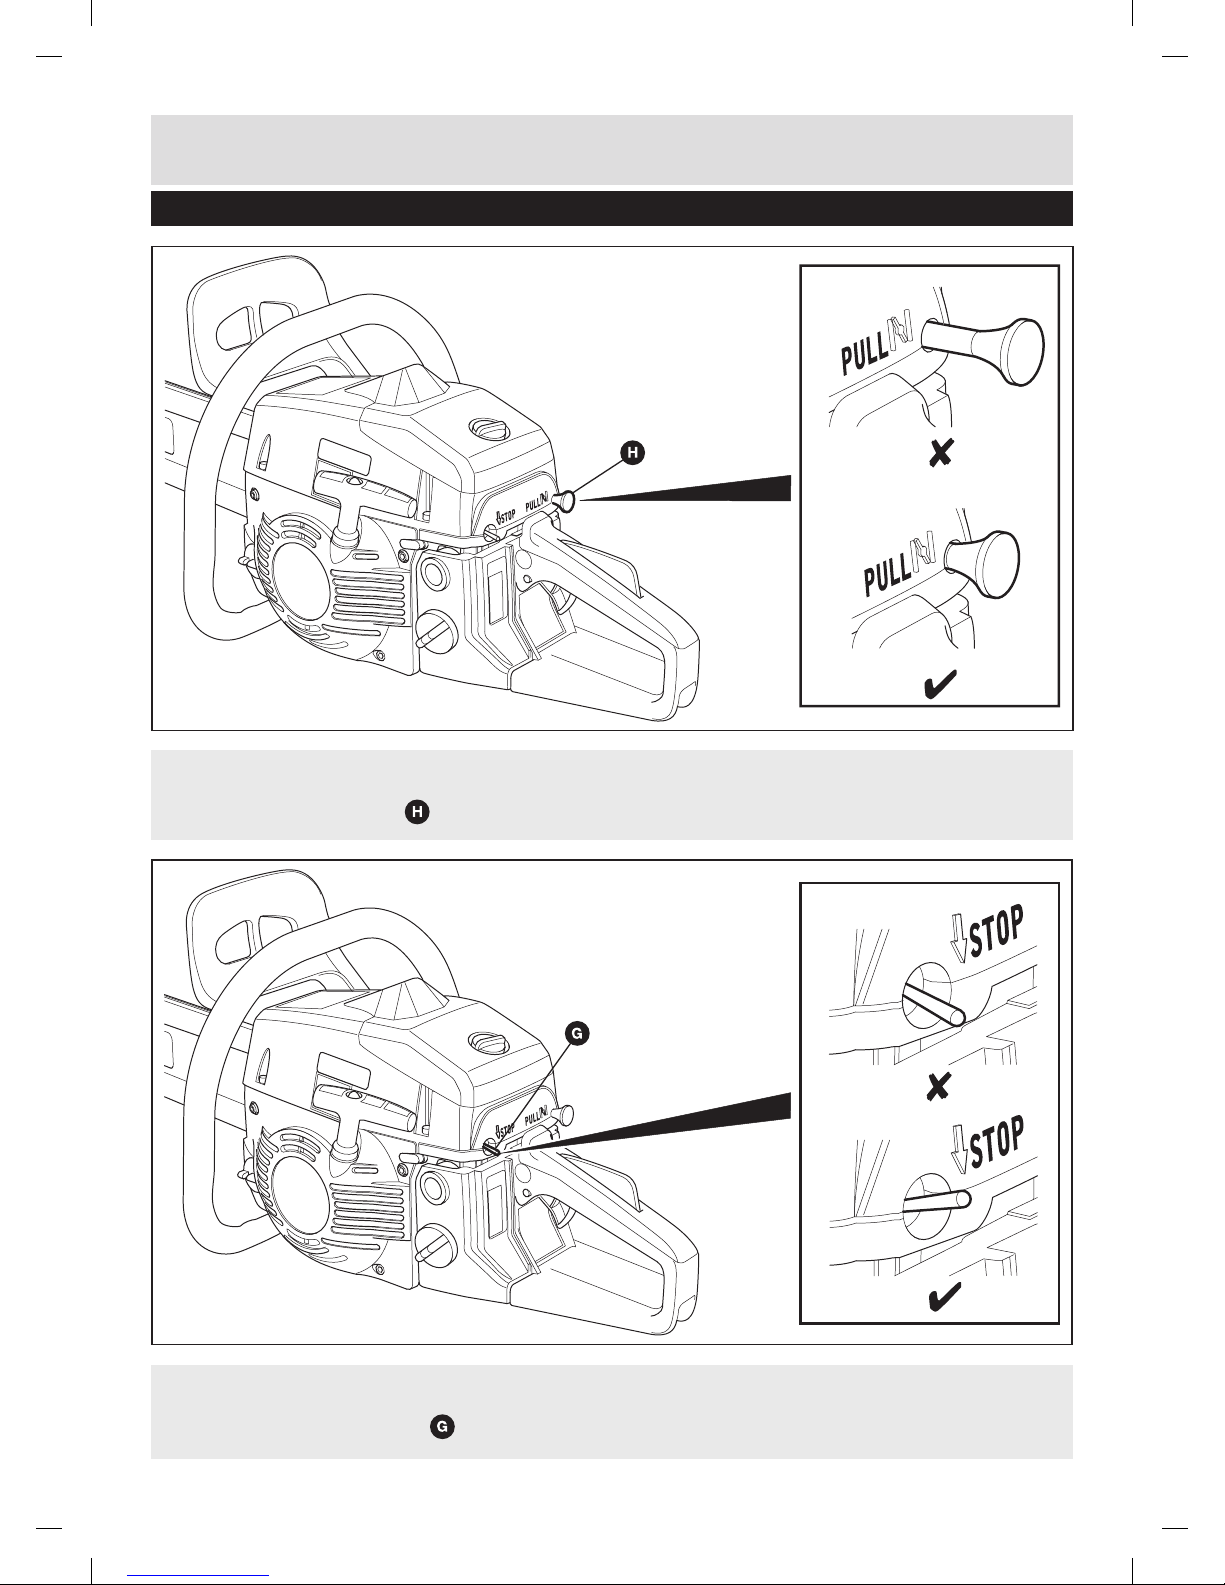
1a . Set the Ignition Switch to STOP
Move the ignition switch
to the lower STOP (OFF, “0”) position.
1a
1b. Ensure the Choke is Fully Out
Pull the choke lever
fully out until it clicks into position.
1b
Page 24

22
Customer Helpline 0151 649 1500
Step 1 - Starting the Engine (continued)
Operating the Chainsaw
1c
1c. Priming the Chainsaw
WARNING! Before attempting to start and operate the chainsaw, ensure the saw chain is not in
contact with the ground or any other object. Failure to observe this warning may lead to kickback or
objects being propelled towards you and others in the area.
WARNING! Never attempt to start or operate the chainsaw if you suspect there is spilt fuel or
any other flammable gases/liquids in the area. Failure to observe this notice may present a risk of
explosion.
WARNING! Always be aware of the proximity of any part of your body to the saw chain while the
operating the chainsaw. Ensure the saw chain is kept away from legs, feet and body at all times.
Failure to observe this warning may lead to serious personal injury or death.
WARNING! Always wear fully enclosed safety goggles when operating the chainsaw to protect your
eyes from flying dust and debris. Failure to observe this warning may lead to irreparable damage to
your eyes.
WARNING! Always wear suitable ear plugs or ear defenders when operating the chainsaw to protect
your hearing. Prolonged exposure to the loud noise produced by the chainsaw may lead to hearing
loss or impairment.
WARNING! Always wear suitable gloves when operating chainsaw to protect your hands from flying
debris and/or sharp objects. It is particularly important to wear protective gloves when assembling or
maintaining the saw chain.
Ensure the chain brake is disengaged.
Page 25

23
Customer Helpline 0151 649 1500
Step 1 - Starting the Engine (continued)
Operating the Chainsaw
Place the chainsaw on a firm level surface clear of debris or any objects which may come into contact
with the saw chain while it is moving.
Place your right foot on the trigger plate
to keep the chainsaw stable while starting. Your left foot
should be positioned so that it is clear of the chainsaw but still allows you to stand firmly.
Grasp the handle
firmly with your left hand.
Using your right hand pull the starter cord
slowly towards you until you feel resistance.
Ensuring that all parts of your body are away from the saw chain, rapidly pull the starter cord
slowly
and release in a controlled manner four times.
The chainsaw is now primed.
IMPORTANT! Always pull the starter cable slowly until you feel the initial resistance before you
then pull it quickly to start the engine. Do not allow the starter cable to whip back of it’s own accord.
Page 26
24
Customer Helpline 0151 649 1500
Step 1 - Starting the Engine (continued)
Operating the Chainsaw
1d. Ensure the Choke is Fully In
Push the choke lever
fully in.
1d
1e
1e. Set the Ignition Switch to ON
Move the ignition switch
to the upper ON (“1”) position.
Page 27
25
Customer Helpline 0151 649 1500
Step 1 - Starting the Engine (continued)
Operating the Chainsaw
1f
1f. Start the Chainsaw
WARNING! To stop the chainsaw in an emergency, apply rapid pressure to the chain brake.
Place the chainsaw on a firm level surface clear of debris or any objects which may come into contact
with the saw chain while it is moving.
Place your right foot on the trigger plate
to keep the chainsaw stable while starting. Your left foot
should be positioned so that it is clear of the chainsaw but still allows you to stand firmly.
Grasp the handle
firmly with your left hand.
Using your right hand pull the starter cord
slowly towards you until you feel resistance.
Ensuring that all parts of your body are away from the saw chain, rapidly pull the starter cord
slowly
and release in a controlled manner. Up to six pulls may be required to start the chainsaw. Allow the
engine to idle for approximately 10 seconds.
NOTE! If the chainsaw fails to start repeat steps 1a to 1f. If the chainsaw still fails to start, consult the
troubleshooting guide at the rear of this manual.
Page 28

26
Customer Helpline 0151 649 1500
Step 1 - Starting the Engine (continued)
Operating the Chainsaw
1g. Accelerate the Engine
WARNING! To stop the chainsaw in an emergency, rapidly strike the chain brake.
Before attempting to saw anything with the chainsaw, the engine must be accelerated to operating
speed. This is done using the throttle lever
. Once the chainsaw engine is running and has warmed
up, it is ready to use.
While fully depressing the safety lever
press the throttle lever
. The chainsaw engine will
rapidly accelerate.
Keep the throttle lever
depressed while sawing or cutting.
NOTE! It will not be possible to accelerate the chainsaw engine with the throttle lever unless the safety
lever is fully depressed. This is a safety feature.
1h. Stopping the Chainsaw
To stop the chainsaw, release the throttle lever
and move the ignition switch to the lower STOP
(OFF, “0”) position as shown in step 1a.
Only use the chainsaw as described in the following sections.
1g
Page 29
27
Customer Helpline 0151 649 1500
Step 2 - Restarting the Chainsaw When Warmed Up
Operating the Chainsaw
2a
2a. Restarting the Chainsaw When Warmed Up
NOTE! Once the chainsaw is warmed up there is no need to ‘prime the chainsaw’ as described in
step 1c.
Place the chainsaw on a firm level surface clear of debris or any objects which may come into contact
with the saw chain while it is moving.
Ensure the ignition switch is set to the upper ON (“1”) position.
Place your right foot on the trigger plate
to keep the chainsaw stable while starting. Your left foot
should be positioned so that it is clear of the chainsaw but still allows you to stand firmly.
Grasp the handle
firmly with your left hand.
Using your right hand pull the starter cord
slowly towards you until you feel resistance.
Ensuring that all parts of your body are away from the saw chain, rapidly pull the starter cord
slowly
and release in a controlled manner. Up to six pulls may be required to start the chainsaw.
Page 30
28
Customer Helpline 0151 649 1500
Introduction
How to Use the Chainsaw
WARNING! Before attempting to use the chainsaw, it is imperative that you undertake professional
training by an accredited body. This will provide full instruction on the type of sawing and cutting
operations that can be performed complete with relevant safety training.
Cutting and sawing with a chainsaw can be very dangerous if undertaken without proper training.
WARNING! Never attempt to start or operate the chainsaw if you suspect there is spilt fuel or
any other flammable gases/liquids in the area. Failure to observe this notice may present a risk of
explosion.
WARNING! Always be aware of the proximity of any part of your body to the saw chain while the
operating the chainsaw. Ensure the saw chain is kept away from legs, feet and body at all times.
Failure to observe this warning may lead to serious personal injury or death.
WARNING! Always wear fully enclosed safety goggles when operating the chainsaw to protect your
eyes from flying dust and debris. Failure to observe this warning may lead to irreparable damage to
your eyes.
WARNING! Always wear suitable ear plugs or ear defenders when operating the chainsaw to protect
your hearing. Prolonged exposure to the loud noise produced by the chainsaw may lead to hearing
loss or impairment.
WARNING! Always wear suitable gloves when operating chainsaw to protect your hands from flying
debris and/or sharp objects. It is particularly important to wear protective gloves when assembly or
maintaining the saw chain.
IMPORTANT! Hold the saw firmly with both hands. Place your right hand on the rear handle
and your left hand on the front handle.
Noise emission complies with Directive 2000/14/EC!
This chainsaw can be used to perform the following types of cutting and sawing operations:
• Felling-Usedtocutdownlargetrees.
• Limbing-Usedtoremovebranchesandlargerlimbsfromatreetrunk.
• Bucking-Usedtocutlargelogsortrunksintosmallerlengths.
The following steps provide a brief overview of each type of cutting operation. Always undertake
full professional training before using the chainsaw to perform any of these types of cuts.
Page 31
29
Customer Helpline 0151 649 1500
Felling
How to Use the Chainsaw
Felling is the type of cut used to cut down trees. Whereas it may be possible to cut down small trees
(6-7 inches in diameter) with a single straight through cut, larger trees require a felling cut.
If this type of cut is made it is performed in two stages. The first stage is the notching cut which
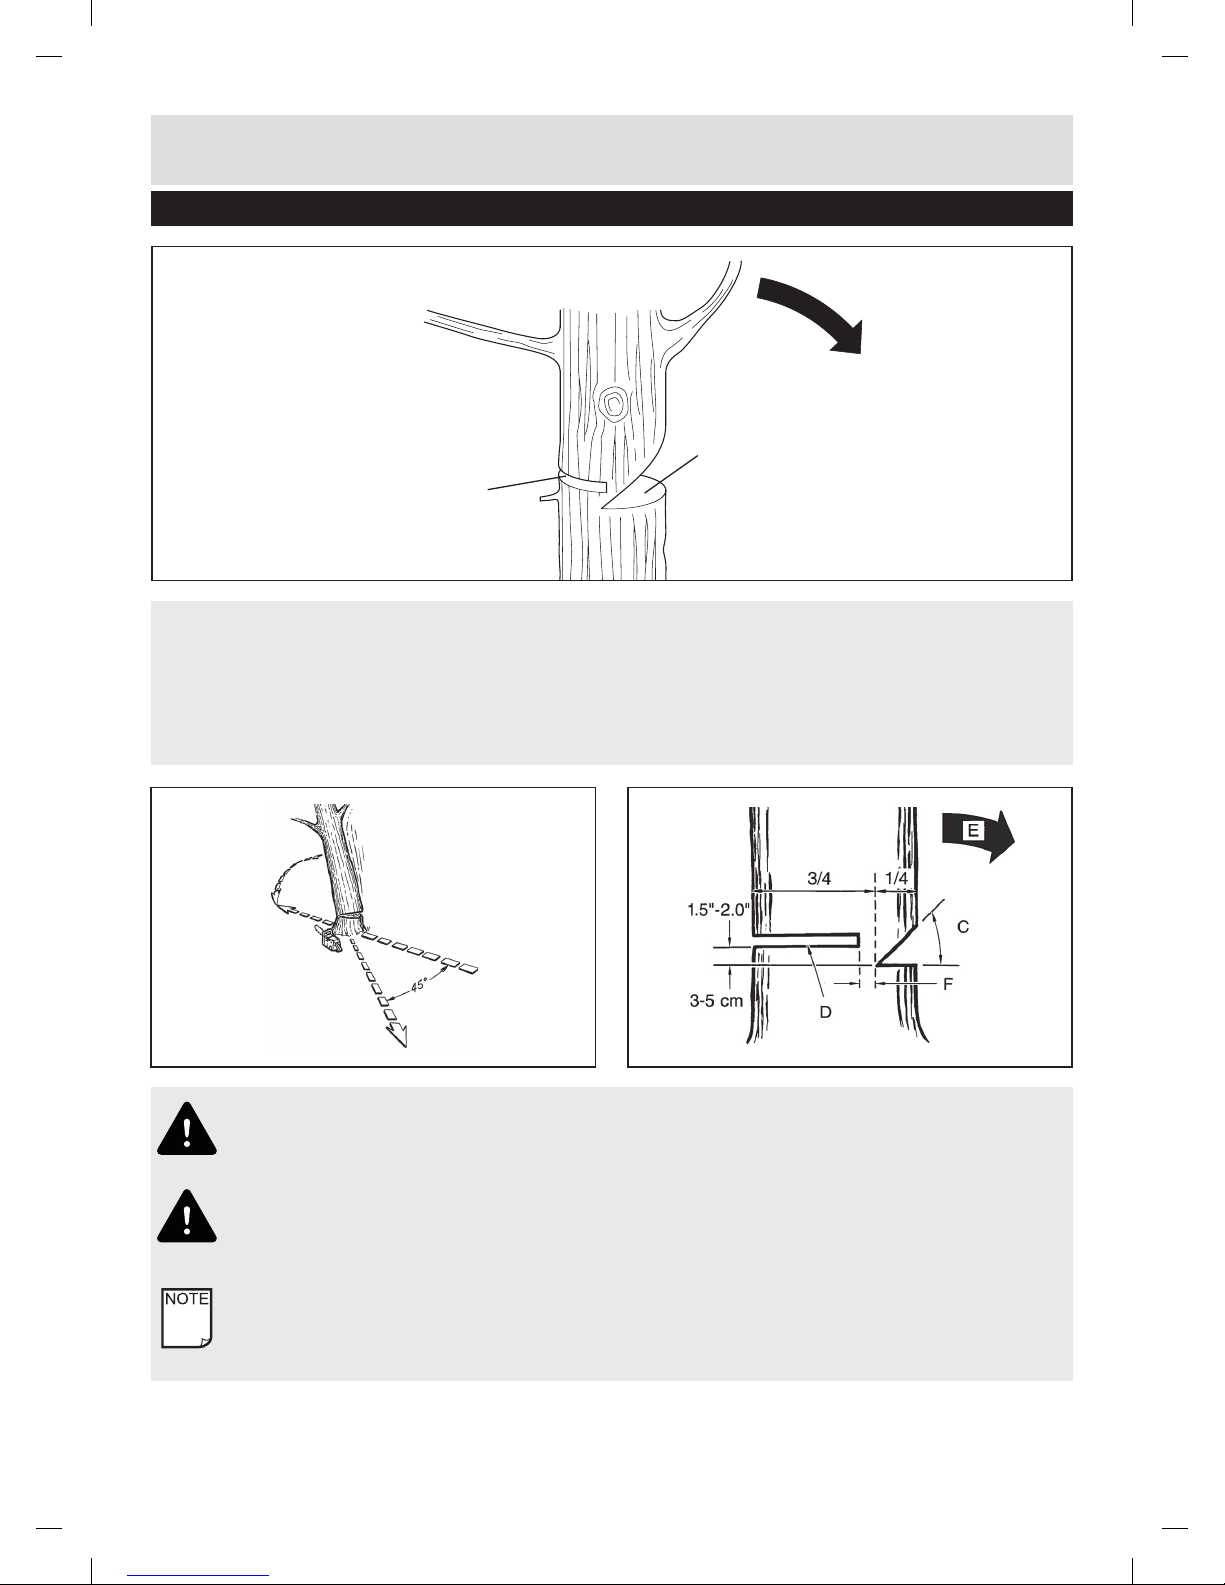
determines the direction the tree will fall. The second stage is the felling cut which weakens the tree
trunk and causes it to fall.
Felling Cut
Notching Cut
Direction of Fall
B
A
WARNING! A repeat path (A) should be planned and cleared as necessary before cuts are
started. The retreat path should extend back and diagonally to the rear of the expected line
of fall, as illustrated above.
WARNING! If felling a tree on sloping ground, the chain saw operator should keep on the
uphill side of the terrain, as the tree is likely to roll or slide downhill after it is felled.
NOTE! Direction of fall (B) is controlled by the notching cut. Before any cuts are made, consider the
location of larger branches and natural lean of the tree to determine the way the tree will fall (Fig. 20).
Page 32

30
Customer Helpline 0151 649 1500
Felling (continued)
How to Use the Chainsaw
NOTE! The chainsaw is designed for occasional use by home owners, garden owners and campers
and is for general work such as stump grubbing, cutting firewood, etc. It is not designed for lengthy
use. If it is used for a lengthy period, the vibrations it causes in the hands of the user may result in
circulation problems (white finger syndrome).
WARNING! Felling of trees is prohibited without the necessary training.
WARNING! Ensure that you frequently check the operation of the chainsaw Brake.
NOTE! Spiked bumper.
WARNING! Do not cut down a tree during high or changing winds or if there is a danger
to property. Consult a tree professional. Do not cut down a tree if there is danger of
striking utility wires; notify the utility company before making any cuts.
WARNING! Never walk in front of a tree that has been notched. Make the felling cut (D) from
the other side of the tree and 1.5-2.0 inches (3-5cm) above the edge of the notch (C). Never
saw completely through the trunk. Always leave a hinge. The hinge guides the tree. If the trunk
is completely cut through, control over the felling direction is lost.
Insert a wedge or felling lever in the cut well before the tree becomes unstable and starts to move.
This will prevent the guidebar from binding in the felling cut if you have misjudged the falling direction.
Make sure no bystanders have entered the range of the falling tree before you push it over.
WARNING! Before making the final cut, always recheck the area for bystanders,
animals or obstacles.
Page 33

31
Customer Helpline 0151 649 1500
How to Use the Chainsaw
Limbing
This type of cut is used to remove small branches from a felled or fallen tree. Cuts can be made
horizontally or vertically to the bottom of a branch. Usually limbing cuts are performed when a tree
trunk has been cut into small manageable lengths using a bucking cut. Branches under tension
should be cut from the bottom up to avoid binding the chainsaw.
Page 34

32
Customer Helpline 0151 649 1500
Bucking
How to Use the Chainsaw
A bucking cut is used to cut a fallen or felled tree into small manageable lengths or logs. Usually the
tree trunk will be supported at one end, both ends or along its entire length. Often this type of cut is
performed using a sawhorse which provides all the required support to keep the trunk stable.
Saw Horse
WARNING! This chainsaw must only be used for light domestic applications such as sawing wood
in your own garden. It is not a commercial, trade or industrial product and must not be used for
extended periods of time. Extended use may lead to circulatory problems. Always seek guidance
and appropriate training before attempting to fell trees or perform sawing operations on large trees
or tree stumps.
WARNING! Never cut tree limbs while standing on tree trunk.
Page 35

33
Customer Helpline 0151 649 1500
Step 1 - Storing the Chainsaw for Short Periods
Storing the Chainsaw
The chainsaw can be stored for short periods of time (less than 30 days) without performing any
storage maintenance. If the chainsaw is to be stored for longer than 30 days, carry out the storage
maintenance instructions as described in the following section.
Before placing the chainsaw into storage, always carry out the following:
• Allowthechainsawenginetofullycool.
• Ensurethesawchainandguidebarareclean,freefromdebrisandfullylubricated.
• Coverthesawchainwiththesuppliedprotectivecover.
• Storethechainsawonatandlevelsurfacewiththechainsawupright.
• Storeinasafeplacewhichisnotaccessiblebychildrenorpeoplewhoarenotfamiliar
with its operation.
Store the unit in a dry place away from possible sources of ignition such as a furnace,
gas hot water heater, gas dryer, etc.
If the chainsaw is to be placed into storage for more than 30 days, storage maintenance must be
performed on the chainsaw. If the following steps are not carried out, when you next operate the
chainsaw it may not start correctly and may need to be serviced.
2a. Access the Fuel Tank
Remove the fuel tank cap
by unscrewing anti-clockwise.
2a
Step 2 - Storing the Chainsaw for Extended Periods
Page 36

34
Customer Helpline 0151 649 1500
Step 2 - Storing the Chainsaw for Extended Periods (continued)
Storing the Chainsaw
2b
2b. Drain the Fuel Tank
WARNING! Always store excess fuel/oil mixtures drained from the fuel tank in a suitable sealed
container designed for the storage of flammable liquids.
WARNING! Before attempting to mix fuel and oil, always ensure all sources of ignition are removed
i.e. naked flames.
Carefully lift and rotate the chainsaw so that the access hole to the fuel tank is facing downwards
over a suitable funnel and container (not supplied).
Allow the excess fuel to drain into the funnel and container.
Page 37

35
Customer Helpline 0151 649 1500
Step 2 - Storing the Chainsaw for Extended Periods (continued)
Storing the Chainsaw
2c. Start the Chainsaw
Start the chainsaw as described on page 23 and allow it to run until it stops. This will ensure any fuel
in the carburettor is used.
2d. Oil the Combustion Chamber
Allow the engine to cool (approx. 5 minutes).
Remove the spark plug as described on page 42.
Carefully pour one teaspoon of clean unused 2-cycle oil into the combustion chamber.
Pull the starter cord several times to ensure the 2-cycle oil covers all the internal components.
Replace the spark plug as described page 42.
Before the chainsaw can be used following extended storage, the following procedures
must be performed.
Store the unit in a dry place away from possible sources of ignition such as a furnace,
gas hot water heater, gas dryer, etc.
3a. Remove the Spark Plug
Remove the spark plug as described page 37.
3b. Clear the Combustion Chamber
Pull the starter cord several times to ensure the 2-cycle oil is expelled from the combustion chamber.
3c. Check the Spark Plug Electrode Gap
Carefully clean the spark plug as described page 37 and ensure the electrode gap (approx. 0.6mm
is correct).
3d. Refit the Spark Plug
Refit the spark plug as described page 42.
3e. Prepare the Chainsaw for Use
Prepare the chainsaw for use as described on page 15 to 20.
Step 3 - Preparing the Chainsaw for Use Following Storage
Page 38

36
Customer Helpline 0151 649 1500
Maintenance Schedule
Maintenance
Performing routine maintenance correctly on your chainsaw will ensure you get years of trouble
free use.
Please keep this manual safe for future reference.
It is recommended that the following maintenance schedule is adhered to. This will ensure the
chainsaw operates correctly and is safe to use.
Some maintenance procedures must be performed by suitably qualified service technicians.
These are indicated by the grey rows in the table.
Before
each use
After 10
hours
After 50
hours
After 100
hours
After 300
hours
Check the chain brake
Check the air filter
Clean / replace the air filter
(1)
Clean / replace the fuel filter
Visual inspection
Clean / replace the spark plug
(2)
Lubricatetheguidebar
Reversing the guide bar
Check and adjust the carburettor
throttle valve
Clean the cylinder head
Set the valve clearance
(1) Change the filter element if necessary.
(2) Gap 0.6mm. Replace as necessary.
Page 39
37
Customer Helpline 0151 649 1500
Step 1 - Operational Chain Brake Test
Maintenance
1a. Check the Chain Brake
WARNING! The chain brake can only reduce the possibility of serious personal injury if it is fitted in
accordance with the instructions detailed in the Assembly Manual. If the chain brake is tampered with
or the chainsaw is not used in accordance with these operating instructions i.e. careless operation, the
risk of serious injury may still exist.
WARNING! If the chain brake fails the operational chain brake test, DO NOT use the chainsaw until it
has been serviced and inspected by a suitably qualified technician.
CAUTION! If it proves difficult to move the chain brake lever into the required position, stop using the
chainsaw immediately. It should be inspected by a suitably qualified service technician.
NOTE! It is recommended that the operational chain brake test is performed following any
maintenance procedures.
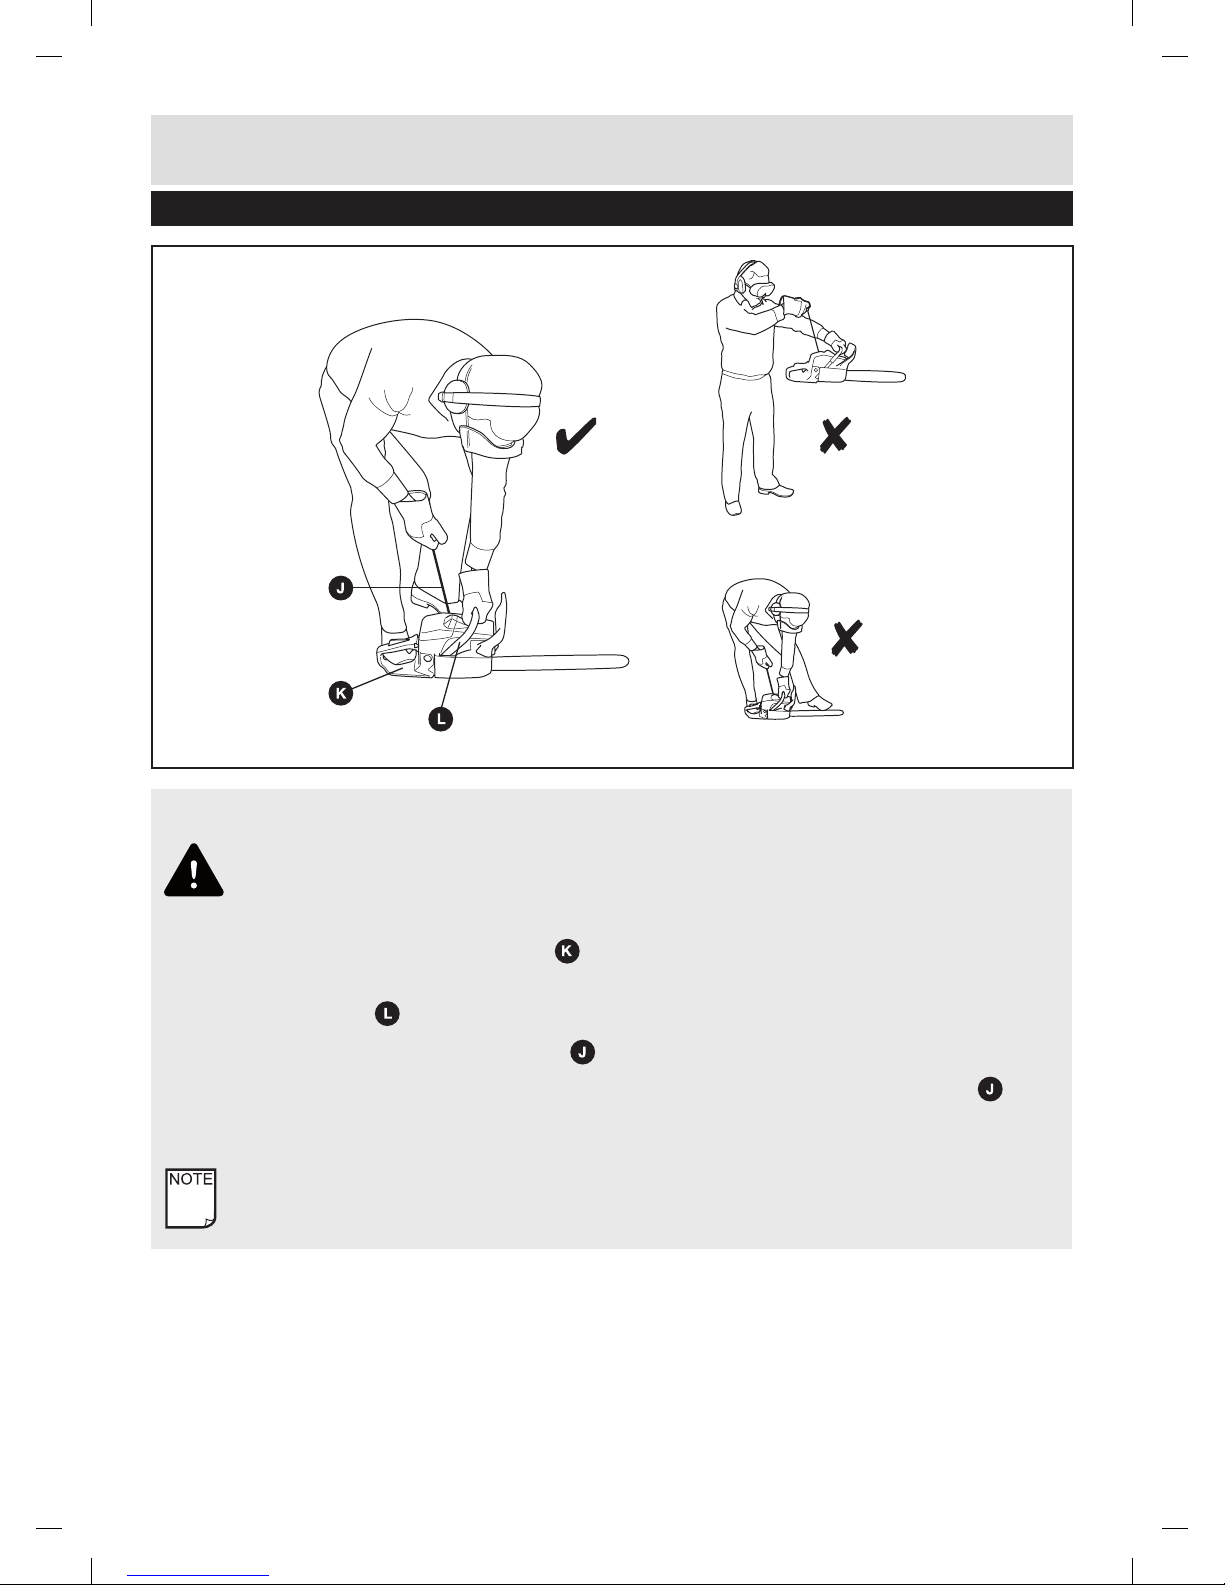
Place the chainsaw on a firm level surface clear of debris or any objects which may come into contact
with the saw chain while it is moving.
Place your right foot on the trigger plate
to keep the chainsaw stable while starting. Your left foot
should be positioned so that it is clear of the chainsaw but still allows you to stand firmly.
Grasp the handle
firmly with your left hand.
Using your right hand pull the starter cord
(as shown in step 1f on page 20) slowly towards you
until you feel resistance.
Ensuring that all parts of your body are away from the saw chain, rapidly pull the starter cord
slowly
and release in a controlled manner. Up to six pulls may be required to start the chainsaw.
Grasp the rear handle
with your right hand while depressing the safety lever M.
Apply a small amount of pressure to the throttle lever
. While the chainsaw engine accelerates,
apply pressure slowly and deliberately to the chain brake lever
.
The saw chain should STOP IMMEDIATELY. Release the throttle lever
.
Move the ignition switch
to the lower ‘STOP’ (lower) position.
1a
Page 40

38
Customer Helpline 0151 649 1500
Step 2 - Clean / Replace the Air Filter
Maintenance
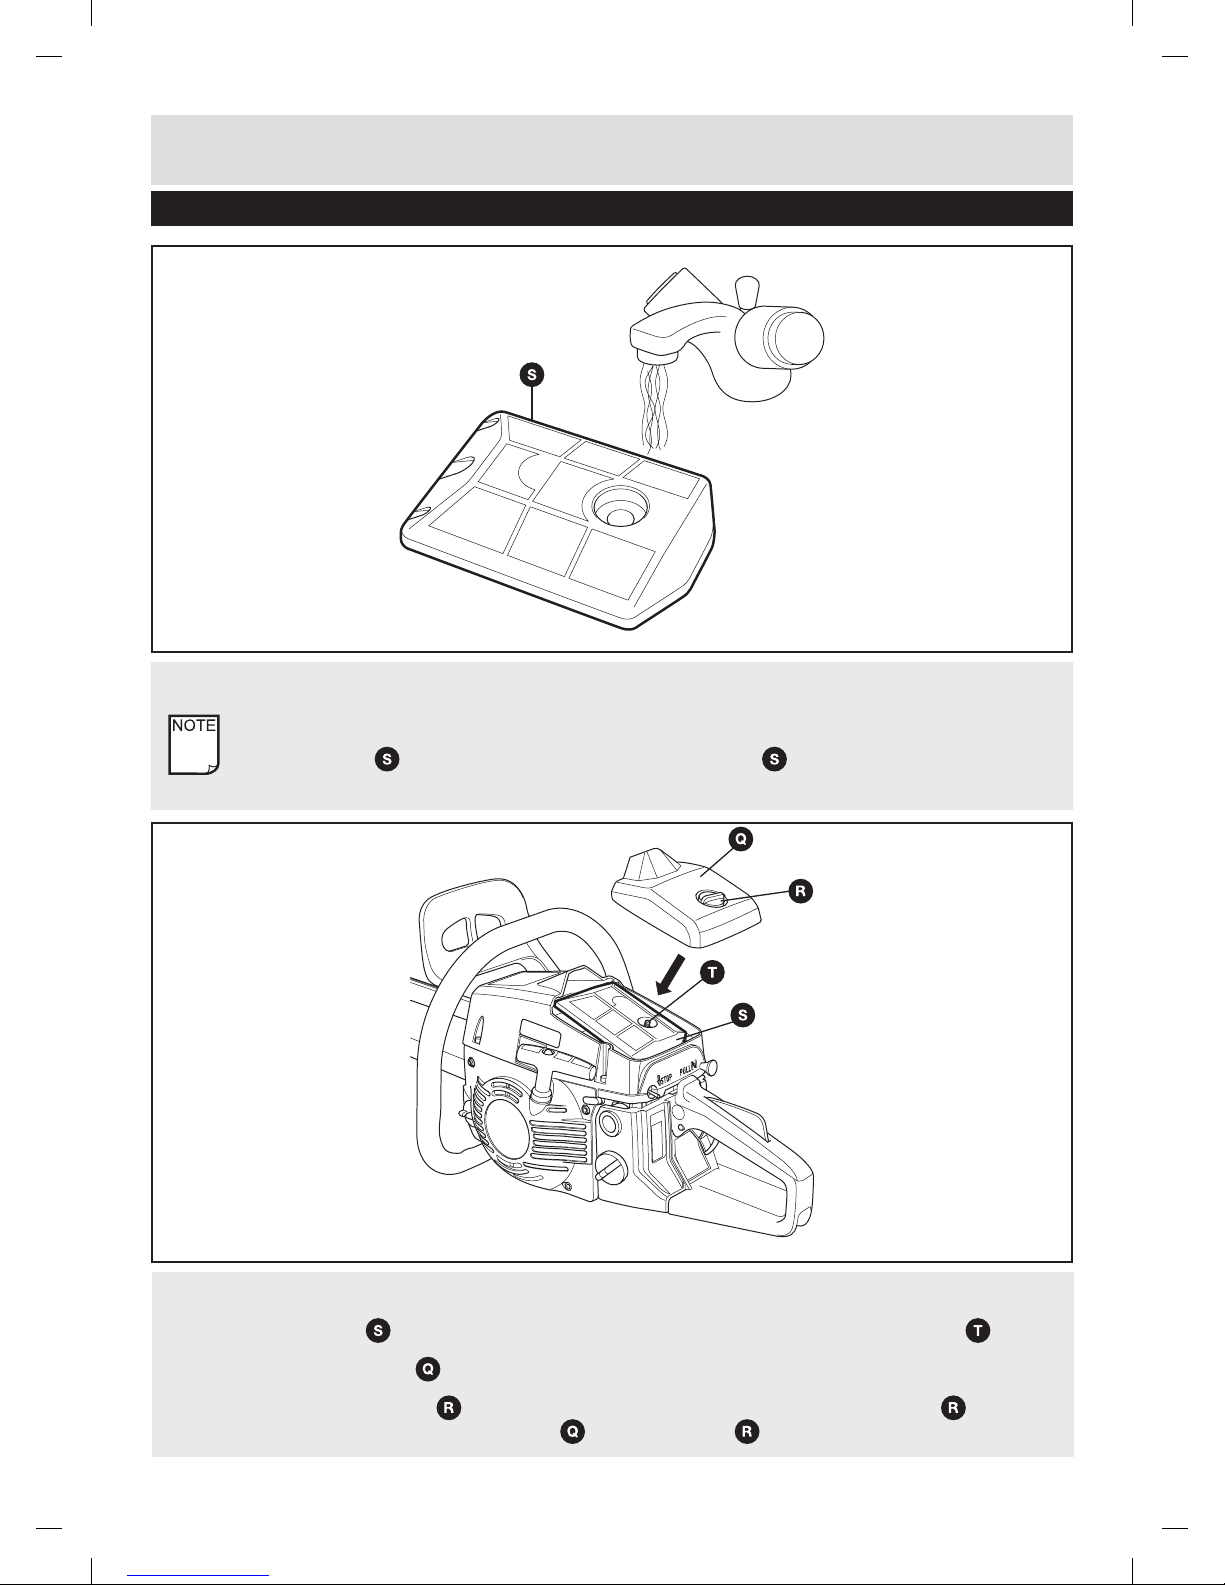
2a. Remove the Air Filter Cover
Unscrew the retaining cap
anti-clockwise.
NOTE! It is not possible to remove the retaining cap from the air filter cover. This is a captive
component.
Carefully lift and remove the air filter cover
.
2a
2b
2b. Remove the Air Filter
Carefully lift the air filter
off the locating pin .
Page 41
39
Customer Helpline 0151 649 1500
Step 2 - Clean / Replace the Air Filter (continued)
Maintenance
2c
2c. Clean the Air Filter
NOTE! If the air filter is being replaced, there is no need to perform this step.
Clean the air filter
using clean, warm soapy water. The air filter must be thoroughly rinsed and
air dried before refitting it to the chainsaw.
2d
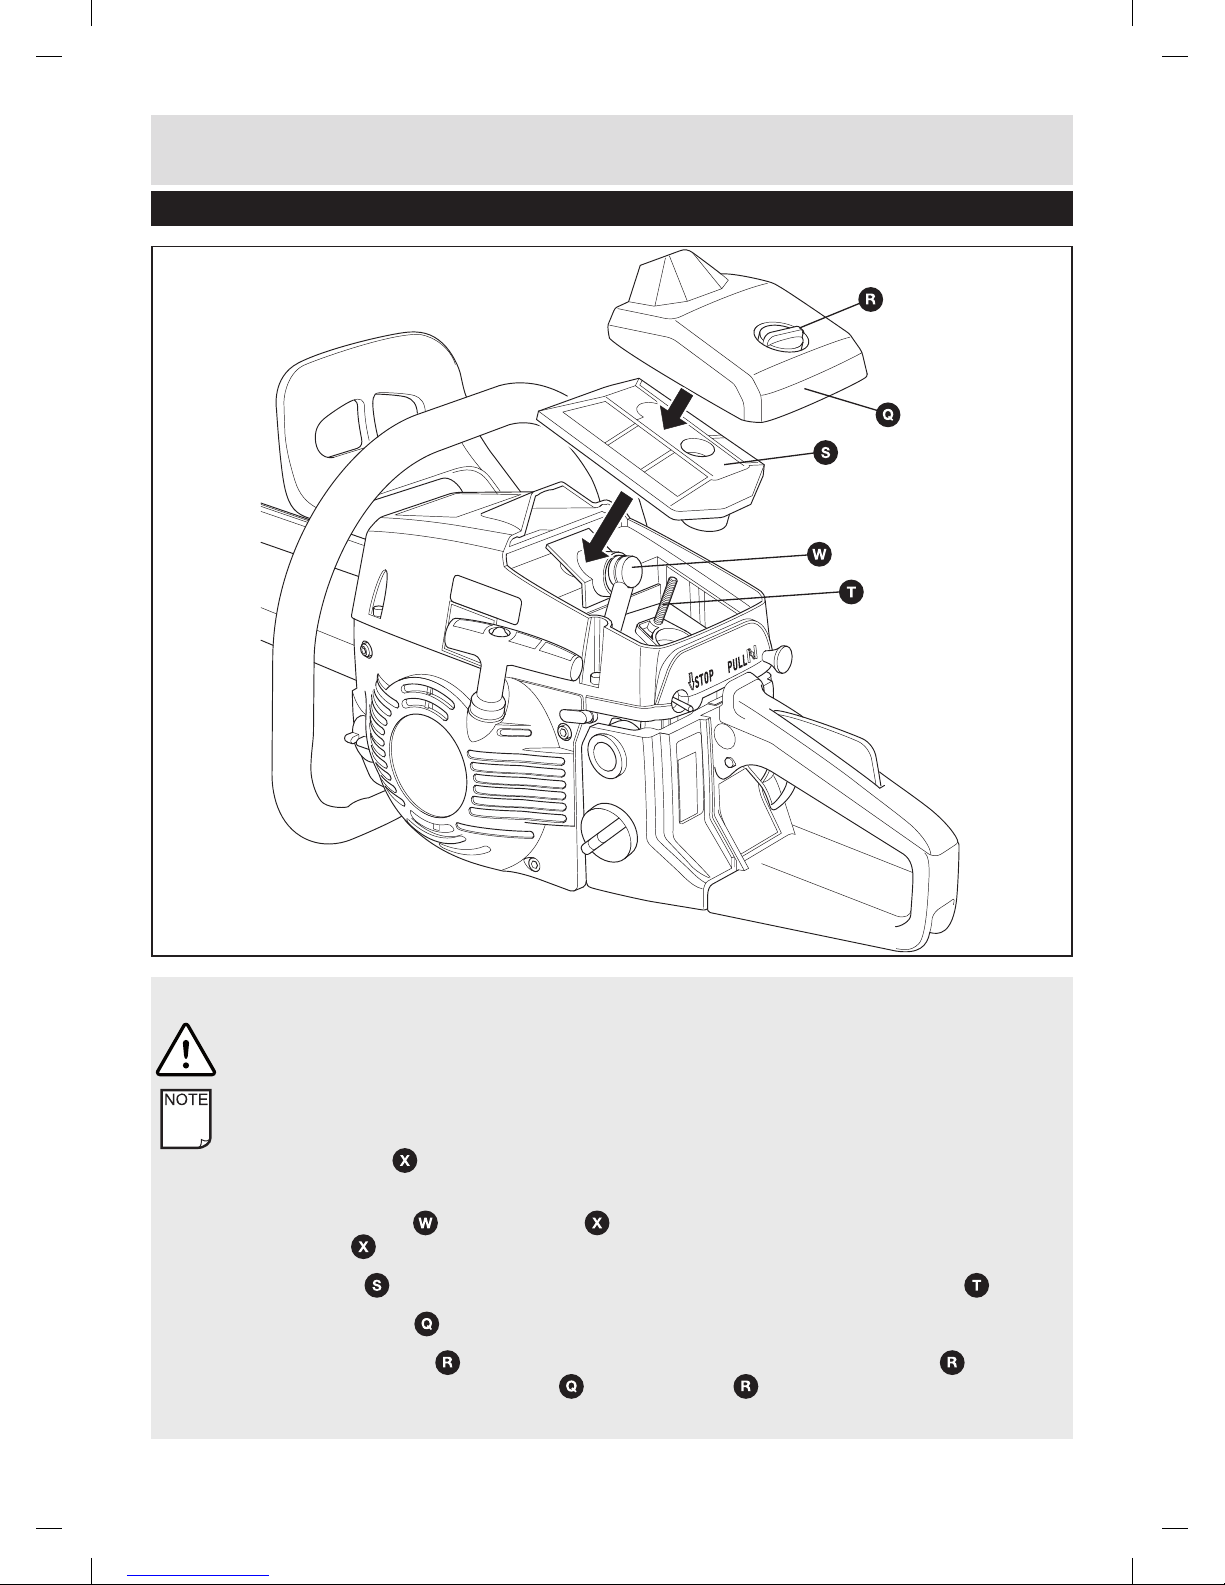
2d. Refit the Air Filter
Refit the air filter
to the chainsaw ensuring it is correctly positioned over the locating pin .
Refit the air filter cover
to the chainsaw ensuring it is correctly seated on all sides.
Tighten the retaining cap
by turning clockwise. Do not over tighten the retaining cap as this
may cause damage to the air filter cover
and retaining cap .
Page 42

40
Customer Helpline 0151 649 1500
Step 3 - Change / Replace the Fuel Filter
Maintenance
3a
3a. Access the Fuel Tank
Remove the fuel tank cap
by unscrewing anti-clockwise.
Drain the fuel tank as described in step 2b on page 29.
3b
3b. Remove the Fuel Filter
Using a piece of wire, for example a paper clip, form a long hook.
Use the hook to move the fuel filter
towards the front of fuel tank.
Using your fingers, carefully withdraw the fuel filter
from the fuel tank.
Page 43

41
Customer Helpline 0151 649 1500
Step 3 - Change / Replace the Fuel Filter (continued)
Maintenance
3c
3c. Separate the Fuel Filter
Carefully pull the fuel filter
off the fuel pipe using a twisting action.
3d. Clean the Fuel Filter
NOTE! If the fuel filter is being replaced, there is no need to perform this step.
Clean the fuel filter
using clean, warm soapy water. The fuel filter must be thoroughly rinsed and
air dried before refitting it to the chainsaw.
3d
Page 44

42
Customer Helpline 0151 649 1500
Step 3 - Change / Replace the Fuel Filter (continued)
Maintenance
3e
3e. Refit the Fuel Filter
Carefully fit the cleaned or replacement fuel filter
to the fuel pipe .
Position the fuel filter
in the lower corner of the fuel tank. You may need to use a
screwdriver to position the fuel filter
correctly.
Refill the fuel tank with a new mixture and replace the fuel cap as described in Step 3a on page 14.
4a
4a. Set the Ignition Switch to STOP
Move the ignition switch
to the lower STOP (OFF, “0”) position.
Step 4 - Clean / Replace the Spark Plug
Page 45

43
Customer Helpline 0151 649 1500
Step 4 - Clean / Replace the Spark Plug (continued)
Maintenance
4b. Remove the Air Filter Cover
Unscrew the retaining cap
anti-clockwise.
NOTE! It is not possible to remove the retaining cap from the air filter cover. This is a captive
component.
Carefully lift and remove the air filter cover
.
4b
Page 46

44
Customer Helpline 0151 649 1500
4c
Step 4 - Clean / Replace the Spark Plug (continued)
Maintenance
4c. Remove the Air Filter
Carefully lift the air filter
off the locating pin .
4d. Disconnect the Ignition Cable
Remove the ignition cable
from the spark plug by pulling backwards using a twisting action.
4d
Page 47

45
Customer Helpline 0151 649 1500
4e
Step 4 - Clean / Replace the Spark Plug (continued)
Maintenance
4e. Remove the Spark Plug
CAUTION! Only use the large end of the supplied multitool to remove the spark plug. Using any other
tool may damage the spark plug and/or the chainsaw engine.
Remove the spark plug
from the chainsaw engine using the large end of the supplied multitool.
Page 48
46
Customer Helpline 0151 649 1500
Step 4 - Clean / Replace the Spark Plug (continued)
Maintenance
4f. Refit the Spark Plug
CAUTION! Only use the large end of the supplied multitool to remove the spark plug. Using any other
tool may damage the spark plug and/or the chainsaw engine.
NOTE! If the spark plug is not being replaced, clean the existing spark plug with a copper wire brush
and check the electrode gap using suitable feeler gauges. The gap must be 0.6 mm.
Refit the spark plug
to the chainsaw engine using the large end of the supplied multitool. Do Not
overtighten the spark plug.
Refit the ignition cable
to the spark plug
.
Ensure the ignition cable is fully seated on the end of
the spark plug
.
Refit the air filter
to the chainsaw ensuring it is correctly positioned over the locating pin .
Refit the air filter cover
to the chainsaw ensuring it is correctly seated on all sides.
Tighten the retaining cap
by turning clockwise. Do not over tighten the retaining cap as this
may cause damage to the air filter cover
and retaining cap .
4f
Page 49

47
Customer Helpline 0151 649 1500
Step 5 - Carburettor Settings
Step 6 - Lubricating the Sprocket Tips
Maintenance
The carburettor is factory set to the ideal setting for the chainsaw to operate efficiently. If the
carburettor requires adjustment after extensive use, contact a suitably qualified service technician to
inspect the chainsaw and make the necessary adjustments.
6a
6a - Set the Ignition Switch to STOP
Move the ignition switch
to the ‘STOP’ (lower) position.
Page 50

48
Customer Helpline 0151 649 1500
Step 6 - Lubricating the Sprocket Tips (continued)
Maintenance
6b
6b. Lubricating the Sprocket Tips
WARNING! Always wear suitable gloves when operating chainsaw to protect your hands from flying debris and/
or sharp objects. It is particularly important to wear protective gloves when assembling or maintaining the saw
chain.
CAUTION! Although the guide bar is pre-lubricated at the factory, it is essential that you regularly lubricate the
guide bar in accordance with maintenance schedule. Failure to observe this caution will inhibit the performance
of the chainsaw and may void your warranty.
NOTE! To lubricate the guide bar you will need a suitable grease gun with a long thin needle nose
(not supplied). This is not supplied with the chainsaw and must be sourced from a suitable supplier.
NOTE! The guide bar sprocket tips can be lubricated without disassembling the chainsaw.
Using a wire brush, remove any debris from both the saw chain
and guide bar .
Insert the nose of the grease gun
into the upper lubricating hole of the guide bar . Pump grease into the
lubricating hole until excess grease appears on the edge of the sprocket tip.
Using a gloved hand, slowly rotate the saw chain until the next sprocket tip is exposed.
Repeat the greasing procedure described above. Keep rotating and greasing the sprocket tips until they
are all
fully greased.
Page 51

49
Customer Helpline 0151 649 1500
Step 7 - Reversing the Guide Bar
Step 8 - Adjusting the Automatic Chain Lubricator
Maintenance
7a. Remove the Guide Bar
The guide bar must be completely removed from the chainsaw. To do this, reverse the procedures
described in the assembly manual.
7b
7b. Clean the Guide Bar
NOTE! To clean the guide bar, you will need a bar scraper. This is not supplied with the chainsaw and
must be sourced from a suitable supplier.
Using a bar scraper
, remove any trapped debris from the grooves at the top and bottom of the
guide bar
.
If necessary remove any burrs or sharp edges using a flat file.
7c. Reverse the Guide Bar
Refit the guide bar
to the chainsaw as described in the assembly manual. Take care to ensure that
the guide bar is inverted before reassembling.
The automatic chain lubricator is factory set to the ideal setting for the chainsaw to operate efficiently.
If the automatic chain lubricator requires adjustment after extensive use, contact a suitably qualified
service technician to inspect the chainsaw and make the necessary adjustments.
Page 52

50
Customer Helpline 0151 649 1500
Step 9 - Check the Saw Chain Tension
Maintenance
9a
9a. Check the Saw Chain Tension
CAUTION! It is essential that the correct saw chain tension is maintained. This will ensure that the saw
chain
, drive sprocket, guide bar and engine do not wear prematurely.
WARNING! Always wear suitable gloves when operating chainsaw to protect your hands from flying
debris and/or sharp objects. It is particularly important to wear protective gloves when assembling or
maintaining the saw chain.
Using a screwdriver, turn the tension adjustment screw
clockwise or anti-clockwise to adjust the
saw chain
tension.
Turn the tension adjustment screw
anticlockwise to decrease the tension.
Turn the tension adjustment screw
clockwise to increase the tension.
The saw chain must fit snugly all the way around the guide bar
as shown.
Using a gloved hand, ensure the saw chain
is free to move. If the saw chain does not move,
decrease the tension.
Page 53

51
Customer Helpline 0151 649 1500
Step 10 - Sharpening the Saw Chain
Maintenance
If the cutting performance of the chainsaw deteriorates, the saw chain may need sharpening or
replacing. Please contact the customer helpline for support.
Check the Ignition
Switch is in the
‘ON’ position.
If No, then set the
Ignition Switch to
the ‘ON’ position.
Continue with the
starting procedure.
Continue with the
starting procedure.
Pull the Starter
Cord a minimum of
6 times.
If yes, check there is
sufficient fuel in the
fuel tank.
If No, then fill the
fuel tank with
sufficient fuel.
Ensure the correct
mixture.
If the chainsaw still fails to start and if after trying all of the above, please call the
helpline for further assistance.
General Troubleshooting
Page 54

52
Customer Helpline 0151 649 1500
Troubleshooting
The following table provides solutions to common problems encountered with the chainsaw.
Fault Possible Cause Solution
Chainsaw will not start or starts but
will not run.
The chainsaw has not been
started correctly.
Start the chainsaw as
described on page 21.
The carburettor setting
is incorrect.
Please contact the
Customer Helpline on
0151 649 1500
The spark plug is fouled. Inspect the spark plug
electrode gap using suitable
feeler gauges as described
on page 42. Alternatively
clean the spark plug using
a wire brush (not supplied).
The fuel filter clogged. Clean or replace the
fuel filter as describe on
page 40.
The chain brake is engaged. Disengage the chain brake
as described on page 15.
The chainsaw starts but the power
levels are low.
The air filter is dirty. Clean or replace the air filter
as describe on page 38.
The carburettor setting
is incorrect.
Please contact the
Customer Helpline on
0151 649 1500.
The chainsaw engine hesitates. The carburettor setting
is incorrect.
Please contact the
Customer Helpline on
0151 649 1500.
The chainsaw power levels are low
when sawing or cutting.
The spark plug is fouled. Inspect the spark plug
electrode gap using suitable
feeler gauges as described
on page 42. Alternatively
clean the spark plug using
a copper wire brush
(not supplied).
The chainsaw runs inconsistently The carburettor setting is
incorrect.
Please contact the
Customer Helpline on
0151 649 1500
The chainsaw produces excessive
smoke while running.
The fuel and oil mixture
is incorrect.
Ensure the fuel mixture is
correct as described on
page 17.
General Troubleshooting (continued)
Page 55

53
Customer Helpline 0151 649 1500
General Troubleshooting (continued)
Useful Information
Useful Information
Fault Possible Cause Solution
The chainsaw fails to
cut or saw correctly.
The saw chain is blunt. Please contact the
Customer Helpline on
0151 649 1500
The saw chain is loose. Adjust the saw chain
tension as described
on page 50.
The chainsaw engine
stops abruptly.
The fuel tank is empty. Fill up the fuel tank as
described on page 19.
The fuel filter is located
incorrectly in the fuel tank.
Ensure the fuel filter is
positioned correctly in
the fuel tank as described
on page 40.
The saw chain and guide bar
become excessively hot and
discoloured during use.
There is insufficient
lubrication due to an empty
oil tank.
Refill the oil tank as
described on page 20.
The oil lubrication openings
are blocked.
Clean the guide bar as
described on page 49.
Type of Machine AQP-PC 4645
Article Number of Machine 45.016.62
Identification Number of Machine 11011
Troubleshooting
NOTE! The chainsaw is designed for occasional use by home owners, garden owners and campers
and is for general work such as stump grubbing, cutting firewood, etc. It is not designed for lengthy
use. If it is used for a lengthy period, the vibrations it causes in the hands of the user may result in
circulation problems (white finger syndrome).
Page 56

54
Customer Helpline 0151 649 1500
Technical Data Table
Technical Data
Property Value
Engine displacement 46 cm
3
Maximum engine capacity 2 kW
Bar length 43 cm
Cutter rail length (18”) 45 cm
Chain pitch (0.325”) 8.255 mm
Chain thickness (0.0584”) 1.47 mm
Idling speed 3500 rpm
Maximum speed with cutting equipment 10,000 rpm
Tank capacity 550 ml
Oil tank capacity 260 ml
Anti-vibration function Yes
Chain wheel teeth 7 x 8.255 mm
Chain brake Yes
Clutch Yes
Automatic chain lubrication Yes
Low-kickbackchain Yes
Net weight without chain and chain bar 5.5 kg
Net weight (dry) 7 kg
Fuel consumption (specific) 560 g / kWh
LpAsoundpressurelevel 99 dB(A)
LWAsoundpowerlevel 114 dB(A)
Vibration a
hv
(front handle) max. 7.07 m/s
2
Uncertainty (k) (front handle) 1.5 m/s
2
Vibration ahv (rear handle) max. 6.67 m/s
2
Uncertainty (k) (rear handle) 1.5 m/s
2
Chain type CarltonK2L-BL-72EB
Bar type BE18-72-5810P
Spark plug L8RTF/NASPLD
Disposal Instructions
Disposal
The chainsaw and its accessories are made of various recyclable materials. Dispose of the
chainsaw in accordance with your local recycling regulations.
Page 57

55
Customer Helpline 0151 649 1500
Guarantee
Dear Customer,
In the unlikely event that your device develops a fault, please contact our Customer service
department on the telephone number shown below.
1. These guarantee terms cover additional guarantee rights and do not affect your statutory warranty
rights. Claims must be accompanied by Proof of purchase. This must be in the form of a Sales
receipt or Bank statement and must show that the product has been purchased within 2 years
prior to the claim from the retailer that it was originally sold to.
2. Our guarantee covers problems caused by material or manufacturing defects, and will result in the
repair of these defects or replacement of the device with a like for like or similar article. Please note
that our devices have not been designed for use in commercial, trade or industrial applications or
for other equivalent activities.
3. The following are also excluded from our guarantee:
• Faultsduetoaccidents,customermisuse,orunauthorisedrepairs.
• ConsumablePartssuchasBlades/Chains/Trimmerlines/Spools/VacuumBags/SparkPlugs
or Filters.
• Failureduetolackofroutinemaintenance.
• Failureasaresultofnotusingtheequipmentinaccordancewiththemanualandsafety
instructions.
• Theadjustmentorlubricationcables,drivebelts,orrecoilstarters.
4. The guarantee is valid for a period of 2 years starting from the purchase date of the device.
Guarantee claims should be submitted before the end of the guarantee period within two weeks
of the defect being noticed. No guarantee claims will be accepted after the end of the guarantee
period. The original guarantee period remains applicable to the device even if repairs are carried
out or parts are replaced. In such cases, the work performed or parts fitted will not result in
an extension of the guarantee period, and no new guarantee will become active for the work
performed or parts fitted. This also applies when an on-site Service is used.
5. Please keep sales receipt in a safe place. If the defect is covered by our guarantee your device
will either be repaired under the terms of guarantee or we will send you a replacement device.
Thisdevicemaybere-conditionedorLikeforlikereplacement.
UK/Ireland 0151 649 1500
Republic of Ireland 1890 946 244
Web www.einhell.co.uk
Home Retail Group
489-499 Avebury Boulevard,
Saxon Gate West,
Central Milton Keynes
MK9 2NW
After Sales Support
Page 58

56
Customer Helpline 0151 649 1500
Declaration of Conformity
 Loading...